
1
Panopto for Mac recording software (student use)
1. Log in to your course in Pilot, navigate to the module in Content that has Panopto, then select
the Panopto link.
2. Click into the assignment sub-folder created by your instructor.

2
3. Click the large green CREATE button. Select “Record a new session” from the dropdown menu.
4. If you’ve not recorded in Panopto in a previous class, you will probably need to install the
Panopto recorder software. Choose to download the software for your system (Windows or
Mac); run the software installation and leave all of the default settings as they are.
5. After it’s installed, go back to where you downloaded the Panopto recorder in the browser
window and press the green button the open Panopto (some browsers will display this as
“Launch Panopto” and others will say “Open”).
NOTE – The Panopto for Windows and Panopto for Mac recording software cannot be opened
and logged into directly from your computer, so you must launch it through Pilot for each
recording. For more information on this, please visit this link explaining Panopto application log-
in instructions.

3
1. Setting up the Panopto Recorder
A. VIDEO - Select your computer or laptop’s web camera to record yourself.
B. AUDIO - Select your computer or laptop’s microphone or headset to record your voice.
(NOTE – The Slider adjusts volume. The meter will respond to your voice if the
microphone is working properly. Slide the slider up or down so that it fills the green
meters when you speak. If the response is regularly jumping out of the green/yellow
region and into the red, it is too loud; drop the audio level slider down to lower the
recording volume.)
C. CHECK Capture PowerPoint or Keynote- Enable either the PowerPoint or Keynote
checkbox to record your presentation slides. The slides and their titles from your
presentation deck will be used to automatically create chapter markers. Transitions and
animations will not be recorded with this feature.
D. Secondary Sources- Enable to record your computer/projector screen. This should be
checked in case you have PowerPoint transitions, animations, videos, or
software/website demonstrations.
4
NOTE – If you have a video in your presentation, you cannot record the audio using the
Panopto for Mac recording software, unfortunately.
2. Get presentation materials ready
A. Close any unnecessary programs or tabs except for Panopto and your PowerPoint or
Keynote slides.
3. CLICK RECORD
A. Minimize screen and begin your presentation (go into PowerPoint presentation mode
after you’ve begun recording)
4. When finished, click the STOP Button
A. Click UPLOAD in the pop-up window and re-name your video.
5. Monitor upload status
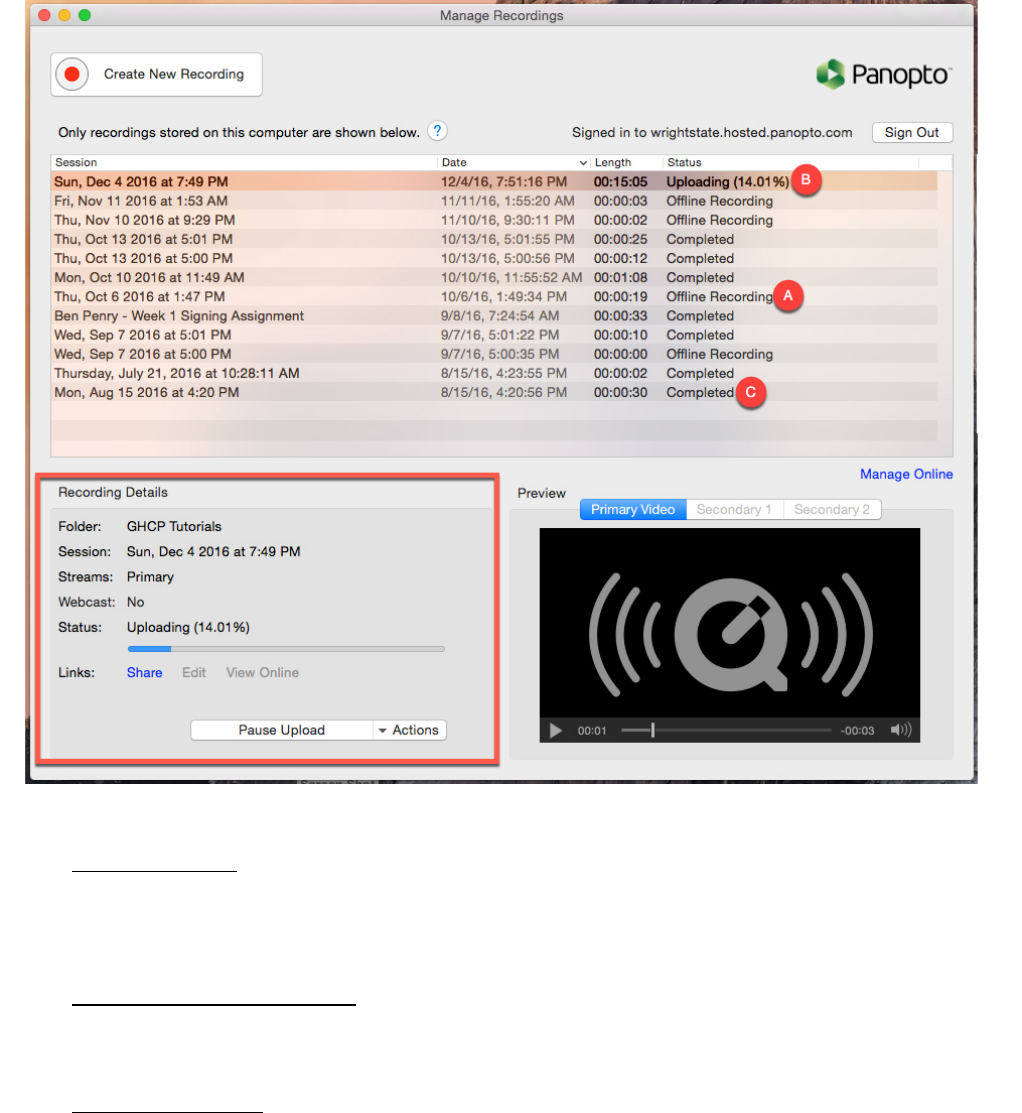
5
Manage Recordings
A. Offline Recordings – Any recordings you have made on this computer but that have not been
uploaded to the Panopto server. You can choose to record offline or there may have been a
disruption in your connection that could cause the recording to remain offline. You can
manually upload a session by selecting the session and clicking the “Choose Folder and Upload”
button that will appear in the bottom left “Recording Details” section.
B. Currently Uploading Recordings – This is where you will see the Upload Progress of any
recording you just completed. By default, Panopto uploads the video to the server while you
are recording, but if you are recording from home, upload speeds will be very slow . Note – DO
NOT SHUT DOWN COMPUTER UNTIL YOUR VIDEO HAS UPLOADED COMPLETELY. .
C. Uploaded Recordings – These are past recordings you have uploaded from this computer.
Under the Status/Link heading, your most recently recorded/uploaded video will display a
Processing percentage that occurs on Panopto’s servers. The video will not be viewable until
the video until it is 100% processed.

6
COMMON ISSUES
+ VIDEO FAILS TO UPLOAD +
If your video does not successfully upload, it will appear in either category A (Offline Recordings)
or category B (Currently Uploading Recordings) in the Manage Recordings section (page 5). The
most common reason for this is because home internet upload speeds are very slow (as
opposed to the download speed). Try taking your laptop to campus, a library, or an
institution/facility with faster upload speeds. Press the “Choose Folder and Upload” button that
will appear in the bottom left “Recording Details” section when the session is selected. If you do
not have a laptop, try uploading when home internet traffic is slowest (avoid evenings during
the week).
