
OWNER'S
MANUAL
CORE HEALTH & FITNESS
8-TRx/8-TR Treadmills

Page 1
TABLE OF CONTENTS
IMPORTANT SAFETY INSTRUCTIONS ................................................................................................................2
IMPORTANT LABEL LOCATIONS ........................................................................................................................4
PRODUCT SPECIFICATIONS ........................................................................................................................6
PART IDENTIFICATION ........................................................................................................................7
OPERATION - OPENHUB
LCD CONSOLES ........................................................................................................................8
OPERATION - OPENHUB
TOUCHSCREEN CONSOLES ......................................................................................................................13
SCREEN VIEWS ................................................................. 16
WORKOUT SELECTION KEYS AND PROGRAM DEFINITIONS .................. 18
PROGRAM UPLOAD ................................................................. 19
MENU MAP - TREADMILL ................................................................. 21
MAINTENANCE MODE ......................................................................................................................22
CALIBRATION - OPENHUB LCD ................................................................. 24
CALIBRATION - OPENHUB TOUCHSCREEN ............................................. 25
MAINTENANCE ......................................................................................................................27
TOOLS ................................................................. 27
MAINTENANCE SCHEDULE ................................................................. 28
SUPPORT & SERVICE ......................................................................................................................30

Page 2
Before using this product, it is essential to read the ENTIRE Owner’s Manual and ALL
installation instructions. The Owner’s Manual describes equipment setup and instructs
members on how to use correctly and safely.
Read all warnings posted on the machine.
Health related injuries may result from incorrect or excessive use of exercise equipment.
Core Health & Fitness strongly recommends you to encourage your members to discuss their
health program or fitness regimen with a health care professional, especially if you or they
have not exercised for several years, are over 35, or have known health conditions.
WARNING!
IMPORTANT SAFETY INSTRUCTIONS
DANGER - to reduce the risk of electrical
shock:
1. Always unplug the machine from the electrical
outlet before cleaning or servicing.
2. This machine is not intended to be serviced by
the end user, refer servicing to qualified personnel
only.
3. This machine is designed for aerobic exercise in
a gymnasium or heath club environment (FOR
COMMERCIAL USE). It is wired for either 110
VAC 20A OR 230 VAC 15A nominal power input.
It is factory-equipped with a specific electric
cord and plug to permit connection to the proper
electric circuit. Make sure that the treadmill is
con nected to a dedicated power line having an
outlet with the same configuration as that of the
plug:
• 20A for 110V models
• 15A for the 230V models
4. If the power supply cord is damaged, it must be
replaced by the manufacturer, its service agent,
or similarly qualified persons in order to avoid
hazard.
5. Do not operate machine in damp or wet locations.
WARNING - to reduce the risk of injury to
person:
24 in (0.6 m)
78.8 in (2.0 m)
Fig. 1
Required Clearance
1. Assemble and operate the machine on a solid
level surface. Position the machine with a
minimum of 23.6 inches (0.6 meters) of clearance
on each side to allow for ease of mounting and
dismounting. Allow for 78.8 inches (2.0 meters) of
clearance behind the machine. Leave a minimum
of 19.7 inches (0.5 meters) between two adjacent
units. These dimensions are the recommended
minimum distances.
The actual area for access and passage shall be
the responsibility of the facility and should take
into account this training envelope, Americans
with Disabilities Act Accessibility Guidelines
(ADAAG) requirements and any required local
codes or regulations (www.access-board.gov/
ada).

Page 3
2. Do not exceed the maximum allowable weight
limit of:
• 8-TRx - 500 lbs. / 227 kg.
• 8-TR - 500 lbs. / 227 kg.
3. Familiarize yourself with the location of the
STOP buttons on the console. If you experience
difficulties during the workout, pushing the STOP
button will bring the machine to a stop.
4. Lock your treadmill when not in use. Use the
Lockout EN option in MAINTENANCE MODE
to enable or disable treadmill lockout. When
the treadmill is locked, the display shows the
message “TREADMILL LOCKED, PRESS 0 TO
ENTER ID”. The user must press “0”, enter the
3-digit ID number (default=999), then press
ENTER to unlock the treadmill. The treadmill will
then operate as normal (NOTE: The treadmill will
lock back up if it is idle for 30 seconds).
5. Use care when getting on or off the treadmill.
Always use the handrails. Do not step off of the
treadmill while it is moving. Press the STOP
button and wait for the treadmill to come to a
complete stop before dismounting.
6. Inspect the treadmill for incorrect, worn, or loose
components and then correct, replace, or tighten
prior to use.
7. Obtain a medical exam before beginning any
exercise program. If at any time during exercise
you feel faint, dizzy, or experience pain, stop and
consult your physician.
8. Keep children away.
9. Do not wear loose or dangling clothing while
using the treadmill.
10. Do not operate the machine if the motor shroud
is removed or if the power cord is damaged in
any manner. Keep all air openings free from dirt
or any material that would block the flow of air to
the motor.
11. Keep the top side of the moving surface clean
and dry.
12. The safety and integrity of this machine can only
be maintained when the equipment is regularly
examined for damage and wear and repaired.
It is the sole responsibility of the owner of this
equipment to ensure that regular maintenance
is performed. Worn or damaged parts must be
replaced immediately or the equipment removed
from service until the repair is made.
13. WARNING: Heart rate monitoring systems
may be inaccurate. Over-exercising may result
in serious injury or death. If you feel faint stop
exercising immediately.
14. Noise emission under load is higher than without
load.
SAVE THESE INSTRUCTIONS

Page 4
This page shows examples of the warning labels and communication stickers placed on the equipment as part of the manufacturing process. It is critical that own-
ers maintain the integrity and placement of these stickers. If you find any stickers missing or damaged the replacement numbers are shown on the support site.
See Support and Service to order replacements. For console warnings, refer to console documentation for part replacement. NOTE: STICKERS AND LABELS
ARE NOT SHOWN TO SCALE
Serial Label
050-2159
Console Warning
050-5742
Fig. 2
Pictured with 19” OpenHub Embedded Console
IMPORTANT LABEL LOCATIONS
P/N: 050-5456 Rev C
CERTIFICATIONS
PHASE
MAX USER
WEIGHT
WATTS
VOLT
AMPS
CYCLES
DATE
DESIGNED IN THE USA
MADE IN CHINA
Patents: www.corehealthandfitness.com/patents
PRODUCT NAME:
1-888-678-2476
Vancouver, WA 98662 USA
4400 NE 77th Avenue, Suite 300
Core Health & Fitness, LLC
mm/yyyy
SINGLE
50/60 Hz
1980
110V/18A
9-9201-MUNBP0
TR9201Lyywwxxxx
500 lbs
(227 kg)
8-TRx
Treadmill
212740

Page 5
050-2159
LABEL, CAUTION, PINCH POINTS, TR
050-5742
LOGO, STAR TRAC, EMBOSSED

Page 6
Fig. 3
Pictured with 19” OpenHub Embedded Console
SKU: 9-9291 110V
9-9294 220V CE/UL/FCC/CSA
Desc: 8-TRx Treadmill
Unit Weight Width Length Height Belt Width
Max User
Weight
471 lbs
214 kg
32 in
81 cm
81 in
209 cm
60 in
150 cm
22 in
55 cm
0-500 lbs
0-226 kg
SKU: 9-9191 110V
9-9192 220V, UL/FCC
9-9194 220V, CE
Desc: 8-TR Treadmill
Unit Weight Width Length Height Belt Width
Max User
Weight
576 lbs
261 kg
36 in
91 cm
85 in
216 cm
63 in
160 cm
22 in
55 cm
0-500 lbs
0-226 kg
PRODUCT SPECIFICATIONS
Page 7
L
E
C
M
H
I
B
A
F
G
D
K J
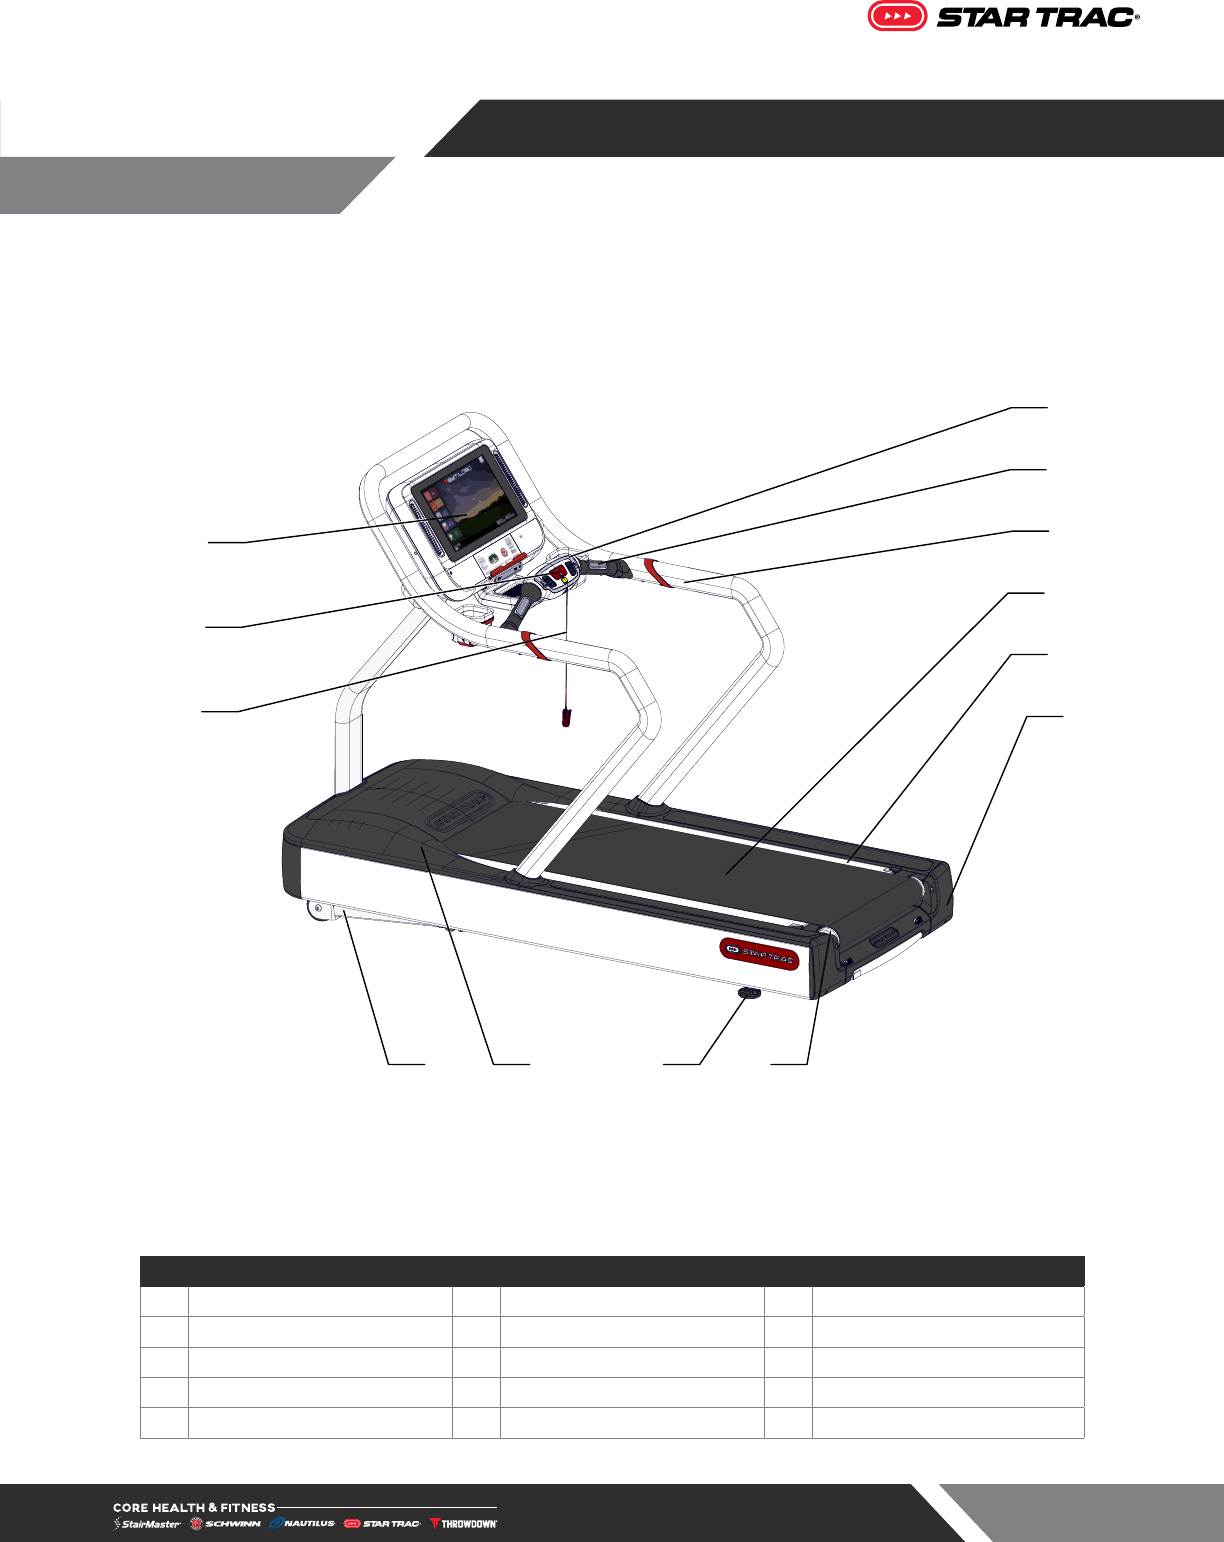
Fig. 4
8-TRx Features pictured with 19” OpenHub Embedded Console
PART IDENTIFICATION
# Part # Part # Part
A Console F Safety Stop (Cord) K Foot
B Front Handlebar G Moving Surface L Elevation Frame
C Heart Rate Grips H Deck M Motor Shroud
D Safety Stop (Button) I Rear Roller Shroud
E Handrail J Rear Roller

Page 8
SAFETY FIRST
Stop Lanyard Clip
Stop Button
Reset Button
Fig. 5
Your treadmill is equipped with an easy to
reach HOT BAR® that provides you with
an additional PAUSE/STOP button and a
Stop Switch.
The Stop Lanyard Clip attached to the
HOT BAR® is provided for your protection
to stop the machine.
Always attach the Stop Lanyard Clip
to your clothing before each workout.
Attach it to your clothes near the waistline.
If the cord is pulled the Stop Switch will
be activated and the treadmill will stop
operating.
If the Stop Switch has been activated,
press the smaller yellow RESET button
to reset the treadmill and resume normal
operation.
During use, press the red STOP button to PAUSE your workout. Press the STOP button a second time while in
Pause mode to stop and cancel the workout program.
Important: Facility owners, managers, personal trainers and personnel. Remind users of the importance of
using the Stop Lanyard Clip. It is the facility’s responsibility to train and instruct the proper use of this treadmill,
including the safety features.
Note: A clipping feature is provided in the display housing to store the Stop Lanyard Clip when the treadmill is
not in use.
SAVE THESE INSTRUCTIONS
OPERATION - OPENHUB
LCD CONSOLES

Page 9
DISPLAY MEASUREMENTS
SPEED Displays the current speed in MPH/KPH
INCLINE Displays the current incline as percent grade
KCAL Displays accumulated calories burned
WATTS/METS Alternates display of current user Watts and METS
WORKOUT PROFILE Displays profile of past and upcoming speed levels relative to one another
SEGMENT TIMER Below the Workout Profile area is a segment timer that counts down the time remaining
in the current segment.
TOP DISPLAY WINDOW
The top display window includes several measures:
TIME Current total workout time
HEART RATE Current HR in beats per minute, if available
PACE Current pace in minutes/mile or km
LAPS
COMPLETED Total no of laps completed
VERTICAL
DISTANCE Total distance climbed in feet or meters distance

Page 10
CONSOLE KEY FUNCTIONS
QUICK START Key
Enables manual operation using a default weight, SPEED and a default time limit.
NOTE: Default time and weight are adjustable through Maintenance Mode.
Fan Button Cycles the fan between three settings: High, Low and Off
Numeric Keypad
Use to enter specific values for program parameters during program setup.
During a program, these keys may be used to change level.
Up/Down Buttons
Cycle between options during setup mode, adjust incline & speed up and down
during workout mode
BLUETOOTH DEVICE PAIRING
Bluetooth Device Pairing with Bluetooth Button: Pushing the button puts the console into
discover mode. The console will be available for pairing for up to 60 seconds to pair with a
compatible App. The button will flash while searching for pairing, and the display will show the
unique console code. Once a device is paired with the console, the light will stop flashing and
remain on to indicate the connection. Visit our website for a list of compatible Apps.
Pairing with Apple Watch: OpenHub consoles marked with this icon have the
capability to connect using Near Field Communication (NFC) with Apple Watch (must be
running WatchOS 4.2 or later and have option Detect Gym Equipment set to On in Watch settings for
Workout App.)
Pairing with Samsung Galaxy Watch: OpenHub consoles marked with the Samsung
icon also have the capability to connect with Samsung Galaxy Watch (must be running
software 4.8 or later and have NFC set to On)
1
.
To connect: Hold the watch near the icon on the console (this is where the NFC reader is located). When
the display and watch detect each other, the Bluetooth button on the display will flash and then turn solid blue,
and watch will ask user to confirm connection with the display. Once connection is confirmed by user, it will
finalize and data will begin to pass between console and watch. It is possible to make this connection either
before the workout begins (recommended), or at any time during an active workout. At the end of workout, the
connection will be terminated.
Note: when Apple Watch is connected to display, the Calories display window will show both Active and Total
Calories per Apple Watch calculations.
1 See support.corehandf.com/Software for version numbers and update instructions

Page 11
WORKOUT SELECTION KEYS AND PROGRAM DEFINITIONS
Manual
Similar to Quick Start, but allows user to enter a time goal and weight for more
accurate calorie measurement
5k Loop Similar to Quick Start, but is a pre-set distance
Fitness Tests
Provides access to sub-menu to select from one of 7 different fitness test
programs:
1. Fitness Test
The Fitness Test is a modified version of the Balke and Ware protocol for maximal VO2 treadmill
testing. The original Balke-Ware protocol is a 20 minute test with a maximum elevation of 20%, the test
has been modified to last 12 minutes with a maximum incline of 12%. This protocol is appropriate for
all users but mostly used for older, deconditioned, or patient groups. During the Fitness Test, treadmill
speed remains at a constant 3.4 mph. Treadmill incline is set at 0% during the first minute, increases
to 2% during the second minute, and increases by 1% per minute for the remainder of the test. During
the test you MAY NOT adjust the treadmill speed or incline, and you MAY NOT pause the program.
If your heart rate exceeds 150 BPM for more than one minute, the test will terminate automatically.
Your heart rate results are compared with charted data for your corresponding age and gender. Test
results include your calculated VO2 max. VO2 max is a physiological measurement of a body’s ability
to absorb oxygen and has specific correlation to your fitness level. See “Calculation for VO2 Max” for
more information
2. Firefighter Test
The Firefighter test found in the Star Trac 8 Series Treadmill is based on the Gerkin Protocol developed
by Dr. Richard Gerkin of the Phoenix (Arizona) Fire Department. It is a sub-maximal graded treadmill
evaluation used by many Fire Departments across the United States to assess the condition of the
firefighters. The program operates as follows:
Warm-Up During warm-up, the treadmill runs at 3.0 mph (4.8 kph), 0% incline for 3 min-
utes.
Stage 1 At 3 minutes, treadmill speed increases gradually to 4.5 mph (7.2 kph). The
test begins at 4.5 mph (7.2 kph). During the test, heart rate is continuously
monitored.
Stage 2 After one minute, treadmill incline increases to 2%.
Stage 3 After one minute, treadmill speed increases to 5.0 mph (8.0 kph).
Stages 4
through 11 After every odd minute, treadmill incline increases an additional 2%. After
every even minute, treadmill speed increases by 0.5 mph (0.8 kph). Once the

Page 12
user’s heart rate exceeds the target HR (85% of maximum), the individual
continues the evaluation for an additional 15 seconds. During this 15 second
period, the evaluation remains at the stage where the target HR is exceeded,
with speed or grade unchanged. If the HR does not return to or below the
target HR, the evaluation ends and the final evaluation stage is recorded. If
the HR returns to or below the target HR, the program continues at the point
where it would have been had the program not stabilized for 15 seconds.
Test
Completion: The test is completed when user heart rate exceeds target for more than
15 seconds or the user completes all 11 stages, whichever occurs first. The
treadmill will enter a Cooldown cycle for 3 minutes at 3.0 mph (4.8 kph), 0%
incline.
NOTE: You must wear the heart rate strap during the Firefighter Test to monitor your heart rate.
3. USMC 3 Mile Run - Object is to complete as quickly as possible
4. US Army 2 Mile Run - Object is to complete as quickly as possible (HR strap required)
5. US Navy 1.5 Mile Run - Object is to complete as quickly as possible
6. USAF 1.5 Mile Run - Object is to complete as quickly as possible
7. 2.4KM Fitness Test - Object is to complete as quickly as possible
Random Hill Climbing, interval-style workout 250 different terrain configurations to add variety
Alpine Pass Climbing, interval-style workout with a progressive high level of intensity
Training Tools Two HR Control training programs (HR strap required)
Dynamic The Dynamic HR Control program is designed to gradually elevate your heart
rate to the upper end of your selected training range, then gradually decrease
your heart rate to the lower end of your selected training range using speed
and incline. During the workout, this cycle will repeat several times, creating
an interval training effect that is customized to the user’s desired heart rate
training range.
NOTE: During program setup, there must be at least an 18 BPM difference
between the lower heart rate limit and upper heart rate limit to ensure an inter-
val workout.
Constant This heart rate feature is designed to maintain your heart rate at a constant
level by varying the treadmill incline during your workout. Note that your heart
rate may vary above and below your target heart rate during this program.

Page 13
Fig. 6
Treadmill Hotbar
CONSOLE & HOTBAR (WHERE APPLICABLE) FUNCTIONS
F QUICK START Key
Enables manual operation using a default weight, SPEED and a default time limit.
NOTE: Default time and weight are adjustable through Maintenance Mode.
G STOP Button
Press the STOP button to enter pause mode. Workout will be suspended and a
countdown timer will begin counting down from 2 minutes. To re-start workout
press the Key. To end the workout push the STOP button again
C Flag Button
Displays language options, appears only on home screen
mi
km
D Unit Button
Unit toggle, appears only on home screen
I Speed Adjustment
Allows user to increase/decrease speed
OPERATION - OPENHUB
TOUCHSCREEN CONSOLES

Page 14
H Incline Adjustment
Allows user to increase/decrease incline (Treadmill/Treadclimber Only)
Level Adjustment
Allows user to increase/decrease program level (8G and 10G Only)
ST20
H.I.I.T.
Build A
Workout
Existing
Workouts
Quick
Start
RunTV
A Main Menu
Workout controls, varies by unit. See the Menu Map for complete details.

Page 15
BLUETOOTH DEVICE PAIRING
Pushing the button opens the bluetooth menu. After selecting the device type, the console will show all
available local devices. The display will show the unique console code. Once a device is paired with the
console, the light will stop flashing and remain on to indicate the connection. Visit openhubconnect.com for a
list of compatible apps and demonstration video.
ST20
H.I.I.T.
Build A
Workout
Existing
Workouts
Quick
Start
FLOW
Fig. 7
Pairing with Apple Watch : OpenHub consoles marked with this icon have the
capability to connect using Near Field Communication (NFC) with Apple Watch (must be
running WatchOS 4.2 or later and have option Detect Gym Equipment set to On in Watch settings for
Workout App.)
Pairing with Samsung Galaxy Watch: OpenHub consoles marked with the Samsung
icon also have the capability to connect with Samsung Galaxy Watch (must be running
software 4.8 or later and have NFC set to On)
1
.
To connect: Hold the watch near the icon on the console (this is where the NFC reader is located). When
the display and watch detect each other, the Bluetooth button on the display will flash and then turn solid blue,
and watch will ask user to confirm connection with the display. Once connection is confirmed by user, it will
finalize and data will begin to pass between console and watch. It is possible to make this connection either
before the workout begins (recommended), or at any time during an active workout. At the end of workout, the
connection will be terminated.
Note: when Apple Watch is connected to display, the Calories display window will show both Active and Total
Calories per Apple Watch calculations.
1 See support.corehandf.com/Software for version numbers and update instructions

Page 16
MPH
3.015.0
%
156 84%
HR
327
KCAL
3.65mi
Total Distance
37:45
Total Time
20:00
Pace (Min/Mi)
MPH
3.0
%
15.0
MILES
0.15
Fig. 8
Screen Elements
During most workouts, users can select from multiple screen view options by tapping the icons at the
bottom of screen. Screens vary by unit, all screens are shown in the Service Manual.
• Simple Key workout stats in a large and easily readable format
• Progress Workout stats plus graphical representation of segments
• Quick Workout stats plus customizable buttons to select incline/speed with single button
press
• Entertainment View video from connected TV feed, or HDMI streaming from personal device
• Apps View (networked product only) Select from a preset list of on-board Apps, including:
YouTube, Facebook, Instagram, Twitter, Reddit,
Pinterest, BBC, NPR (list subject to change at any time)
Fig. 9
Apps View
SCREEN VIEWS

Page 17
Other controls vary by unit:
A Fan Button Cycles the fan between three settings: High, Low and Off
C Bluetooth Button is grayed out if no device is connected to the console.
D
Adjustment
Buttons
Allows user to increase/decrease speed, level or incline depending on unit.
E Exit/Back
This button has the same function as pressing stop button on hot bar, puts
display into the pause screen.
F Wallpaper Select to set the screen background.
Display Measurements
Measurements are displayed at top of screen during workout, tapping any of the measurement boxes allows
user to select alternative measures to display and may include the following measurements:
Calories
Active/Total calories burned
Note: When connected to Apple Watch only
MPH
3.015.0
%
156 84%
HR
327
KCAL
3.65mi
Total Distance
37:45
Total Time
20:00
Pace (Min/Mi)
MPH
3.0
%
15.0
MILES
0.15
KCAL
KCAL / HR
METS
Watts
Total Dist
Dist Climb
Total Time
Time
Remaining
Pace
(Min/Mi)
HR
Avg HR
Heart Rate Zones
% indicates % of theoretical max heart
rate (calculated as 220 – Age). Color
changes to indicate current training zone.
Low Intensity:
Heart Healthy:
Endurance Training:
Athletic Conditioning:
30-59%
60-69%
70-79%
80%+
Fig. 10
Display Measurement Dropdown (Treadmill)
Time
Current total workout time
Pace
Current pace
Incline
Current degree incline
Cal/Hour
Current rate of calorie burn
METS
Current user METS
Speed
Current speed
Vehicle
Distance
Height traveled/climbed
Calories
Accumulated calories burned
Watts
Current user Watts
Heart Rate
Current HR in beats per minute,
if available

Page 18
WORKOUT SELECTION KEYS AND PROGRAM DEFINITIONS
On the main screen are several choices:
Quick Start Program will request user information to create more accurate calorie burn and heart rate zone
calculations, then begin a fixed time (default length can be adjusted in maintenance mode) manual workout
Existing Workouts
5K Time Trial
Manual
Random Hill
Alpine Pass
Evaluate Fitness (Fitness Test, Firefighter Test, Military Tests – see Service Manual for details)
Build a Workout
Custom Interval Training
Heart Rate Training
Time Goal
Distance Goal
Calorie Goal
TWENTY
Interval-based training has been clinically proven to
provide amazing benefits including: lower blood
pressure, less glucose sensitivity, reduction in
body fat, and of course, better aerobic fitness &
muscular power.
The Star Trac TWENTY curriculum was created
specifically to allow exercisers of all fitness levels to
reap the benefits of interval training, in a time
efficient manner, with a varied approach to keep it
fun and engaging!
All workouts total 20 minutes, and migrate through
periods of work and recovery to deliver maximum
fitness benefits with up to 90% less training
volume and up to 67% less time commitment than
traditional interval based programs.
PROGRAM & BENEFITS
OUTSTANDING FITNESS
IN TWENTY MINUTES
START
Fig. 11
StarTrac Twenty
Star Trac 20 A set of 5 different 20 minute High Intensity Interval Training (HIIT) program options, allowing
users of all fitness levels to create a workout that allows them to experience the benefit of adding HIIT to their
workout routine
RunTV A set of first person videos, allows users to choose from a variety of running paths to visually
enhance their workout

Page 19
PROGRAM UPLOAD
Prior to starting a workout, a BlueTooth connected device can be used to upload a program to display on the
console from a compatible app. The upload may contain user info such as age and weight.
1. In an App interface, select the
option to Upload Program
to Display and then select
the program from the app to
upload. Console will switch to
shown page when responding
to the app.
NOTE: if done while a workout
is in progress, the display
will not respond to the app
command.
ST20
H.I.I.T.
Build A
Workout
Existing
Workouts
Quick
Start
RunTV
mi
km
Fig. 12
2. The app will upload to the
console. Pressing the cancel
during this time will return to the
home screen and remove any
uploaded information from the
console.
ST20
H.I.I.T.
Build A
Workout
Existing
Workouts
Quick
Start
RunTV
mi
km
Fig. 13

Page 20
3. Once the program has loaded,
press the green start button to
progress to the setup screen.
NOTE: Console will return to
home screen after 30 seconds
or if cancel is pressed.
4. If program fails to load, an
error screen is displayed for
5 seconds before retuning to
the home screen. Any error
reporting is handled by the
app, please check the app for
additional details.
ST20
H.I.I.T.
Build A
Workout
Existing
Workouts
Quick
Start
RunTV
mi
km
Fig. 14
5. Information from the app may
be adjusted on the setup
screen, or press the GO button
to begin the program.
Fig. 15

Page 21
MENU MAP - TREADMILL
Quick
Start
Build A
Workout
Existing
Workouts
RunTV
ST20
H.I.I.T.
Build A Workout
Time
Goal
Distance
Goal
Calorie
Goal
Improve
Cardio
Custom
Interval
Fitness
Test
Firefighter
Test
Military
Test
Evaluate Fitness
Existing Workouts
Manual Random Hill Alpine Pass 5K time trial
Evaluate Fitness
HR Training
Dynamic HR
Control
Constant HR
Control
Military Test
Navy
Test
Army
Test
Air Force
Test
Marines
Test
Fig. 16
Treadmill Menu Map

Page 22
Maintenance Mode allows access to service and diagnostic information, as well as provides the ability to adjust
certain program default parameters. To enter Maintenance Mode:
1. Press and hold the , and keys together.
2. A beep will sound and “MAINTENANCE MODE” will display momentarily in the Information Window.
3. Release all keys. “SERIAL NO #####” will display in the Information Window.
The following keys are available in MAINTENANCE MODE:
Incline Keys
Increase and Decrease LEVEL Keys: Adjust the value of the
displayed parameter up and down, respectively, in increments of 1 unit.
These keys do not save the new value.
Numeric Keypad
Numeric Keypad: Allows you to enter specific values for numeric
parameters. These keys do not save the new value.
OK Key
Updates (saves) the values of all parameters in non-volatile memory,
and exits Maintenance Mode.
NOTE: To exit Maintenance Mode without saving any values or settings, press the QUICK START key.
A complete list of the items that you may display and change in Maintenance Mode:
Item
Lowest
Value
Highest
Value Default Notes
Vx.xx Sum
N/A N/A
V958
6C92FBD4
Update software
N/A N/A Update console software via USB
contrast
0 100 100 Display contrast setting
backlight
10 200 200 Display backlight setting
WD
N/A N/A on/off
pd time
N/A N/A on/off Person Detect
Burn in mode
N/A (Manufacture Only)
Elev Calibration
Elevation calibration function
motor calibration
Motor calibration function
cal values
Resets Console to default factory settings
error list
List of last errors
error stats
N/A N/A Count of errors
serial # port tests
N/A N/A Access to Serial Port Test function
heartrate test
N/A N/A Access to Heart Rate System Test function
keypad test
N/A N/A Access to Keypad Test function
LCD OPENHUB CONSOLE
MAINTENANCE MODE

Page 23
Item
Lowest
Value
Highest
Value Default Notes
display test
N/A N/A Access to LCD Test function
program stats
N/A N/A Access to program usage counts
last belt
0 65,535 0 Number of miles since belt was last replaced
last deck
0 65,535 0 Number of miles since deck was last replaced
model
N/A N/A 1 or 2 Choose Model 1 for 8-TR, Model 2 for 8-TRx
deccel time
8 60 25
accel time
8 60 30
max speed
5.0/5.0
15.0/24.0
(12.5/20.0
for 8-TR)
12.5/20 Max speed (MPH/KPH)
min speed
0.5/0.8 2.0/3.2 0.5/0.8 Min speed (MPH/KPH)
lockout ID
1 999 999 Treadmill lockout ID
Lockout EN
- - OFF Enable or disable treadmill lockout
Csafe
- - OFF Turns CSAFE function ON or OFF
Elevation
- - ON Enable/Disable Elevation function
Ant +
- - OFF Turns ANT PLUS function ON or OFF
Auto fan
- - ON Turns AUTO FAN function ON or OFF
Pause time
30 120 45 Pause duration, in seconds, during a program
Mets
- - OFF Enable/Disable METS display
Lang
- - English
Language is English (ENGL), German (GERM), Spanish
(SPAN), Dutch (DUCT), Portuguess (PORT), French (FREN),
Italian (ITAL), Swedish(SWED), Katakana (KATA) or Russian
(RUS).
Weight
50 500/226 155/70
Default user weight used in calorie calculations if not entered
by user (lbs/kg)
Max time
5 99 99 Max workout time allowed
units
- - English English = pounds, feet; Metric = kilograms, meters
distance
0 65,535 0 Total distance (miles) since last reset
Op hours
0 65,535 0 Total operating hours since last reset
serial #
- -
MAINTENANCE MODE - TOUCHSCREEN
To enter maintenance mode on a 15”-19” EC touchscreen display, in sequence press the top left corner, then top right, then
top left again. To enter maintenance mode on 15” touchscreen display, simultaneously press the Vol UP, Channel UP and
the number 3 on the media center keypad. To enter maintenance mode on the 10” touchscreen display, in sequence press
the top left corner, then top right corner, then the Logo.
The maintenance menus for the touchscreen displays contain many of the same options as for the LCD displays, as well as
a few extra options related directly to touchscreens, such as touchscreen calibration and an option to upload background
images. Refer to the touchscreen manual for more information.

Page 24
Fig. 17
Accessing the Service Menu
Speed Calibration Procedure
1. On the numeric keypad, press and hold the , and keys together. The Service Menu will
display.
2. A beep will sound and “MAINTENANCE MODE” will display momentarily in the Information Window.
3. Release all keys. “SERIAL NO #####” will display in the Information Window.
4. Use the incline keys to navigate.
5. Navigate to Motor Calibration
6. Tap the key to begin elevation calibration.
WARNING: Do not stand on moving surface during calibration.
Elevation Calibration Procedure
1. On the numeric keypad, press and hold the , and keys together. The Service Menu will
display.
2. A beep will sound and “MAINTENANCE MODE” will display momentarily in the Information Window.
3. Release all keys. “SERIAL NO #####” will display in the Information Window.
4. Use the incline keys to navigate.
5. Navigate to Elev Calibration
6. Tap the key to begin elevation calibration.
WARNING: Do not stand on moving surface during calibration.
CALIBRATION - OPENHUB LCD
Page 25
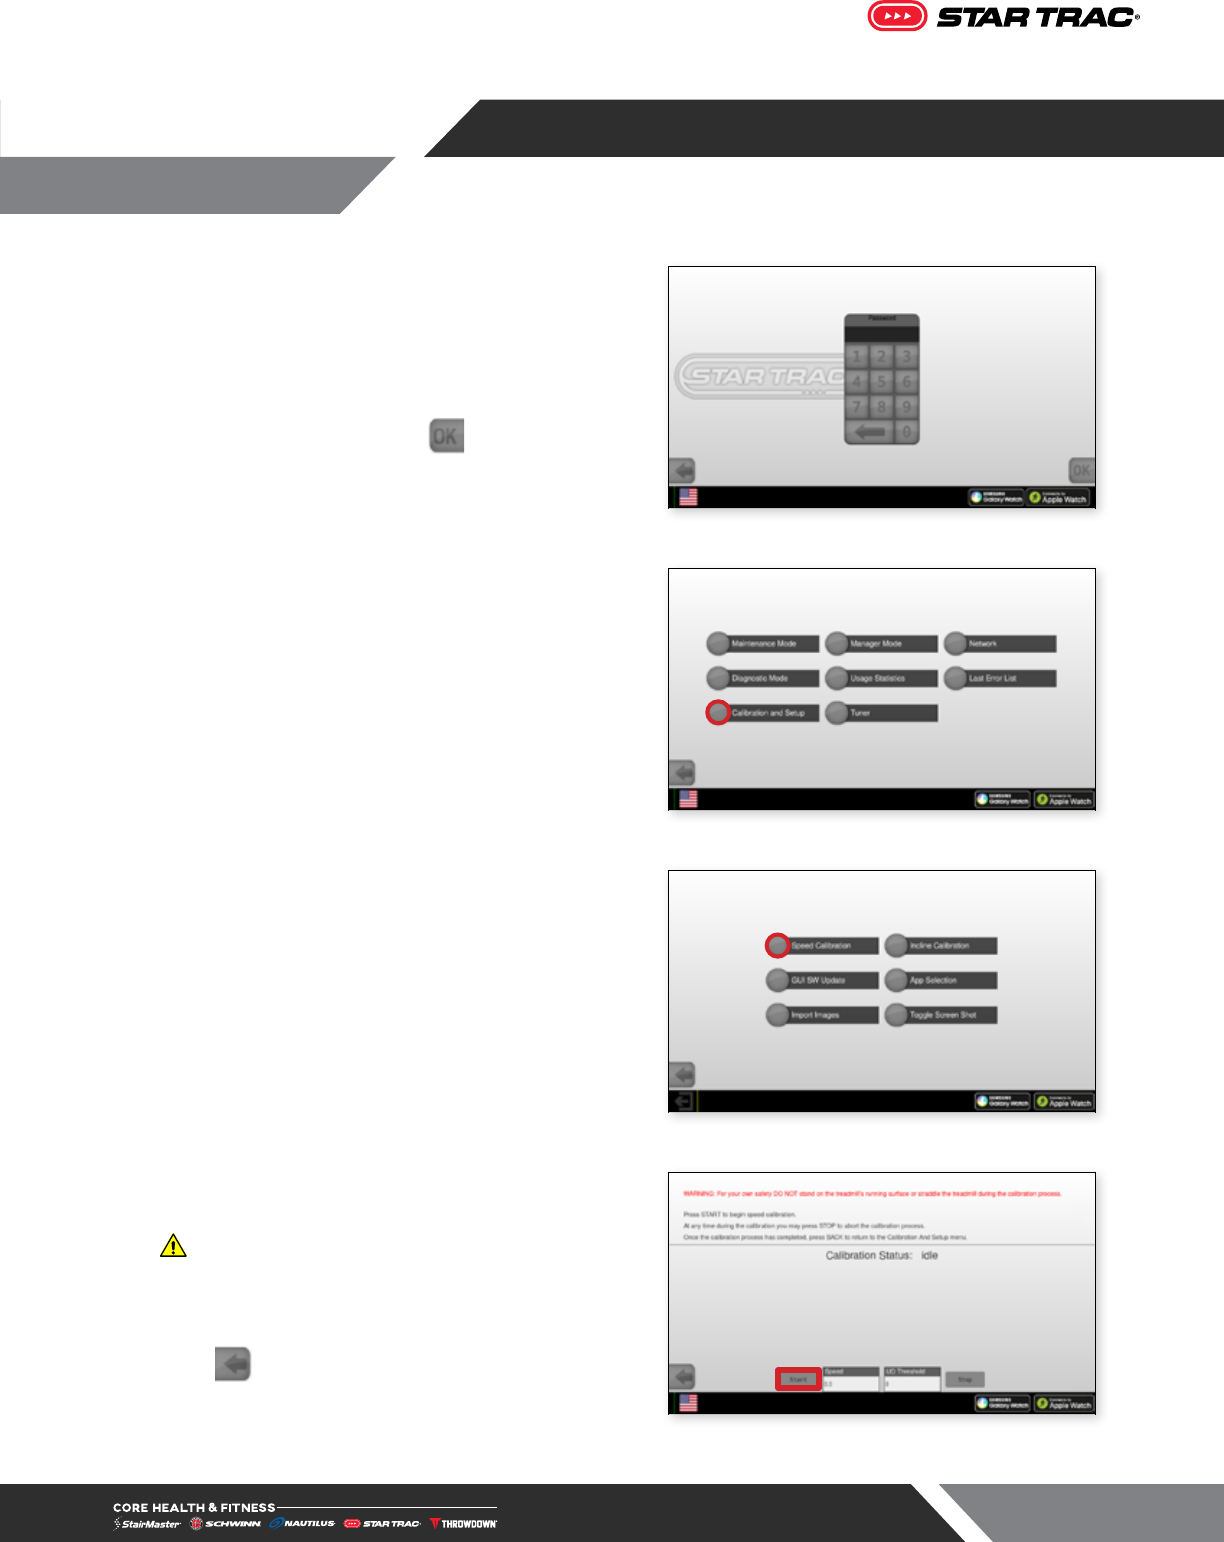
CALIBRATION - OPENHUB TOUCHSCREEN
Speed Calibration Procedure
1. On the top of the touchscreen, tap the upper left
corner, then upper right, then upper left again.
Password Screen will display.
2. Enter password 214 then tap . Service Menu will
display.
Fig. 18
3. Tap Calibration and Setup
Fig. 19
4. Tap Speed Calibration on the Calibration and Setup
screen.
Fig. 20
5. Press START to begin the calibration.
WARNING: Do not stand on moving surface
during calibration.
6. After the Speed Calibration is completed, press EXIT;
The Calibration And Setup screen appears.
7. Press to exit and go back to the Home Screen.
8. The Speed Calibration has been completed.
Fig. 21

Page 26
Incline Calibration Procedure
1. On the top of the touchscreen, tap the upper left
corner, then upper right, then upper left again.
Password Screen will display.
2. Enter password 214 then tap . Service Menu will
display.
Fig. 22
3. Tap Calibration and Setup
Fig. 23
4. Tap Speed Calibration on the Calibration and Setup
screen.
Fig. 24
5. Press START to begin the calibration.
WARNING: Do not stand on moving surface
during calibration.
6. After the Incline Calibration is completed, press EXIT;
The Calibration And Setup screen appears.
7. Press to exit and go back to the Home Screen.
8. The Incline Calibration has been completed.
Fig. 25

Page 27
TOOLS
Working on this product will require basic and/or sometimes specialty tools based on the type of service that
will be performed at any time. To assist, we recommend having the tools listed available when performing
maintenance.
Tool
Multi-meter
Screwdriver Set, Phillips
Socket Set, SAE
Screwdriver Set, Flat
Socket Set, Metric
Tape Measure
Socket driver
Ball-Peen Hammer
Open end wrenches, SAE
Rubber Mallet
Open end wrenches, Metric
USB - Flash Drive
Hex Bit Socket Set, SAE
Motorcycle straps, adjustable
Hex Bit Socket Set, Metric
Loctite 680
Adjustable Wrench
1’ Jumper wire w/ alligator clips
Snap Ring Pliers
zip ties – various sizes
Torque Wrench
MAINTENANCE
IMPORTANT NOTE: Do not use power tools on fasteners, it will damage the plastic shrouds.
SCAN TO WATCH A BRIEF
MAINTENANCE VIDEO
ON STARTRAC TREADMILLS

Page 28
The safety and integrity of this machine can only be maintained when the equipment is regularly examined for
damage and wear and repaired. It is the sole responsibility of the owner of this equipment to ensure that regular
maintenance is performed. Worn or damaged parts must be replaced immediately or the equipment removed
from service until the repair is made.
Some types of PM need to be performed more often than others. The frequency of PM depends a great deal on
the use and environment of the unit. Basic scheduling is shown below, but timeline and PM schedules should
be adapted to the environment and usage that the unit receives. Refer to the OpenHub Manual for further
maintenance information on the console.
Maintenance Schedule Daily Weekly Monthly
Every 6
Months Yearly
Cleaning
Wipe down all surfaces X
Wipe Moving Surface
1
with dry cloth
2
X
Clean Console
3
X
Elevate unit and vacuum underneath X
Unplug unit and vacuum underneath motor shroud X
General Maintenance
Check tracking to assure moving surface stays centered X
Check Condition of Power Cord
4
X
Inspect and Clean underside of moving surface
5
X
Check drive belt tension X
Check moving surface tension, adjusting if needed X
Check all settings and Keypad Performance X
Calibrate Elevation & Speed X
1 Earlier documentation may refer to the moving surface as the ‘running belt’.
2 To ensure the longevity of the moving surface, clean under the moving surface with a soft, dry cloth. To clean, slide the cloth between the moving
surface and deck from one side of the frame to the other (you may need a ruler or similar tool to slide the towel under the belt), then, holding the edges
of the cloth, pull the cloth from the headroller down to the tailroller.
3 Wipe console with a soft, non-abrasive cloth to remove all sweat after each use. Use a soft, non-abrasive cloth and mild spray cleanser to clean the
console. Never use abrasive cleaning liquids, cleaning liquids with an oil base, ammonia, or alcohol.
4 Ensure the power cord is not under the treadmill and is positioned away from the elevation screws. This will prevent the power cord from being pinched
or from binding up the elevation screws.
5 Inspect the inside surface of the moving surface and the top surface of the running deck for unusual wear. Check the belt for a “glazed” condition (a
smooth almost melted appearance). If the moving surface appears glazed, replace the moving surface and flip or replace the running deck.
NOTE: Never install a new moving surface on a used deck.
MAINTENANCE SCHEDULE

Page 29
Maintenance Schedule Daily Weekly Monthly
Every 6
Months Yearly
Check Moving Surface and Deck Condition and replace
if wear found
X
Unplug unit and check all power connections
including speed sensor
X
Preventive Maintenance Cautions
• While maintaining equipment you will want to avoid spraying any liquids directly onto any surface of the
unit. Always spray cleaning solutions onto a clean towel first then wipe the unit.
• Do not use glass cleaners or any other household cleaners on the console. The console should be
cleaned with a damp cloth and dried on a daily basis. Cleaning solutions can be made of a 5:1 dilution
ratio, where 5 parts water are mixed with 1 part of Simple Green®, Fantastik®, or 409®. Do not spray
water, or cleaner directly onto console USB Port. Do not use liquid cleaner under the moving surface.
• WARNING: Do not clean the moving surface by activating the treadmill.
INSPECTION
Inspect the frame for any rust, bubbling, or paint chips during the daily cleaning. The salt in perspiration can
damage the unpainted surfaces. Repair the damaged area with a touch-up paint kit purchased from Core
Health & Fitness (call Customer Service for order information).
NOTE: To prevent potential damage to the IEC connector when moving the machine, we recommend that you
elevate the treadmill to 5%+ grade before moving.

Page 30
SUPPORT & SERVICE
For Technical Support, Service, Parts Orders or any Customer Service needs, please contact us direct by phone,
email, or through our 24 hour support site:
To help us support you, please provide the following information when requesting assistance with your equipment:
Facility Name & Address
Product Serial Number
Description of Issue
Our goal is to provide fast, reliable support to all your product support requests. We strive to answer all support
requests under an average hold time of 3 minutes, all support emails within 1 business day and all field service
requests within 48 hours.
PREVENTATIVE MAINTENANCE
Protect your product & assure it always runs like new with a Core Advantage Preventative Maintenance or Extended
Warranty Package. Contact your service manager for more information: [email protected]
To request access visit:
SUPPORT.COREHANDF.COM
• General Inquiries
• Warranty Registration
• Preventative Maintenance
• Service Requests
• Parts Orders
• Automated partner payment
• Product technical library
• Transparency on service performance
• Real time communication
OFFERS 24-HOUR SELF SERVICE ACCESS TO:
Core Connect is your portal to all things service! Whether you need to
order parts or register your warranty, Core Connect is the most effective
way to get what you need fast and keep your facility operating smoothly.
CORE CONNECT
GLOBAL SUPPORT CENTER
4400 NE 77th Avenue, Suite 300 Vancouver, WA 98662
Tel: (360) 326-4090 • (888) 678-2476 • [email protected]
Warranty information: https://corehandf.com/warranty

© 2020 CORE HEALTH & FITNESS LLC PART NUMBER 620-8806, REV A
All rights reserved. Star Trac, the Star Trac logo and StairMaster are registered trademarks of Core Health & Fitness, LLC. Schwinn and Nautilus are registered
trademarks of Nautilus Inc. used under license to Core Health & Fitness LLC. Throwdown is a registered trademark of Throwdown Industries, LLC.
