
(2001-) SUZUKI INTRUDER VOLUSIA 800 &
(2005-) SUZUKI BOULEVARD C50 &
(2005-) SUZUKI BOULEVARD M50 (DRIVE SHAFT)
LEFT REAR AXLE BRACKET INSTALLED
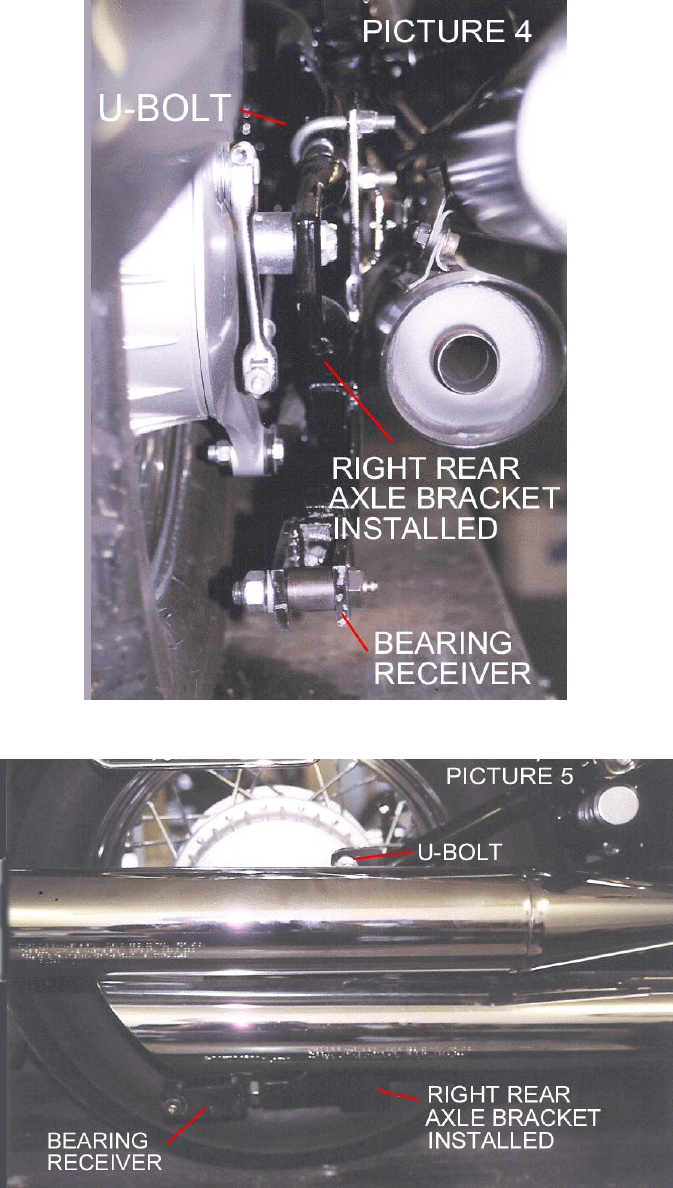
(2001-) SUZUKI INTRUDER VOLUSIA 800 &
(2005-) SUZUKI BOULEVARD C50 &
(2005-) SUZUKI BOULEVARD M50 (DRIVE SHAFT)
RIGHT REAR AXLE BRACKET INSTALLED

(2001-) SUZUKI INTRUDER VOLUSIA 800 &
(2005-) SUZUKI BOULEVARD C50 &
(2005-) SUZUKI BOULEVARD M50 (DRIVE SHAFT)
BELLY BRACKET INSTALLED
(RIGHT SIDE PICTURED)

(2001-) SUZUKI INTRUDER VOLUSIA 800 &
(2005-) SUZUKI BOULEVARD C50 &
(2005-) SUZUKI BOULEVARD M50 (DRIVE SHAFT)
BELLY BRACKET INSTALLED
(LEFT SIDE PICTURED)

(2001-) SUZUKI INTRUDER VOLUSIA 800 &
(2005-) SUZUKI BOULEVARD C50 &
(2005-) SUZUKI BOULEVARD M50 (DRIVE SHAFT)
DESCRIPTION OF PARTS
One 3 3/4” shim, one 5 1/2” shim, and one 10” shim – not shown in picture above.
You may or may not have to use one or two of the shims. See note below.
After installing the mounting hardware and attaching the Voyager frame to the belly bracket you may
need shims to make the motorcycle stand straight up and down.
The shim(s) may be used on either the left or the right side depending on which way the motorcycle is
leaning. If the motorcycle is leaning to the left put the shims on the left side. If the motorcycle is leaning
to the right put the shim on the right side. The shim(s) will go on one side of the belly bracket.
Place the shim(s) in-between
belly bracket and motorcycle frame.
Revised 8-11-10
SECTION 1
INSTALLATION OF THE
(2001-) SUZUKI INTRUDER VOLUSIA 800 &
(2005-) SUZUKI BOULEVARD C50 &
(2005-) SUZUKI BOULEVARD M50 (DRIVE SHAFT)
MOUNTING HARDWARE
Place motorcycle on a clean flat surface. Make sure to tie down motorcycle so it does not
tip over during installation of Voyager hardware. Installation is easier if motorcycle is in
an upright position.
Disconnect negative cable from battery before beginning installation.
NOTE: The Voyager Convertible Kit was designed for a stock motorcycle from the
manufacturer. Any after market products that are on a stock motorcycle may cause the
installation process to not be done properly and may or may not need to be removed to be
able to install the Voyager Convertible Kit completely. Be aware that your motorcycle and
the same make & model as someone else’s motorcycle may not have mufflers, body panels,
frames, fenders and any other manufacturer parts that are attached to the motorcycle in
the exact same place as yours. We at Motorcycle Tour Conversion, Inc. take that into
consideration when we manufacture our parts to fit your motorcycle. Once in awhile you
may need to modify your motorcycle slightly so that the Motorcycle Tour Conversion, Inc.
hardware or suspension fits your motorcycle. Please call Motorcycle Tour Conversion, Inc.
if you have any questions about installation with after market products or any modification
of motorcycle and/or Motorcycle Tour Conversion, Inc. hardware.
A) Belly Bracket
1) On the left side of the motorcycle place (1) U-bolt 5/16” x 1 3/8” x 2 1/2” over the
frame behind the weld of side stand of the motorcycle. (Shown in picture 1) This will
set the belly bracket in place.
2) Place the remaining (2) U-bolts 5/16” x 1 3/8” x 2 1/2”on the left side.
3) Then place (3) U-bolts 5/16” x 1 3/8” x 2 1/2” over the frame of the right side of the
motorcycle. (Shown in picture 3)
4) Attach the belly bracket to the U-bolts with 5/16” flat washers and 5/16”-18 nylock
nuts.
SECTION 1
INSTALLATION OF THE
(2001-) SUZUKI INTRUDER VOLUSIA 800 &
(2005-) SUZUKI BOULEVARD C50 &
(2005-) SUZUKI BOULEVARD M50 (DRIVE SHAFT)
MOUNTING HARDWARE
B) Left Rear Axle Bracket
1) You will have to remove and leave off the left side swing arm of motorcycle. Swing
arm of motorcycle could be plastic or metal. Swing arm is fake and only there for
looks.
2) Remove axle nut and push axle bolt out 5/16”of an inch.
3) Slide left rear axle bracket over axle bolt, then place spacer (note: two spacers
provided in kit – use whichever fits our bike) behind left rear axle bracket and install
with the bolt removed from the plastic/metal swing arm cover.
(Shown in picture 6)
4) Push the axle bolt back in and install axle nut supplied with kit.
NOTE: You will have to drill new hole for cotter pin in axle bolt.
C) Right Rear Axle Bracket
1) Install right rear axle bracket over lower swing arm and attach with (1) U-bolt 3/8” x
1 1/4” x 2 1/4”, (4) 3/8” flat washers, (4) 3/8”-16 nylock nuts over upper swing arm.
(Shown in picture 4)

MOTORCYCLE TOUR CONVERSION, INC.
1530 TITANIUM DR
OTTAWA, IL. 61350
TOLL FREE: 877-434-7901
FAX: 815-434-8980
(2001-) SUZUKI INTRUDER VOLUSIA 800 &
(2005-) SUZUKI BOULEVARD C50 &
(2005-) SUZUKI BOULEVARD M50 (DRIVE SHAFT)
INSTALLATION MANUAL
US PATENT # 6,739,420
WARRANTY WILL BE VOID IF INSTALLATION
IS NOT DONE PROPERLY
READ THIS MANUAL FULLY BEFORE
BEGINNING INSTALLATION OR DRIVING YOUR
MOTORCYCLE WITH THE VOYAGER KIT ATTACHED
