
TTUHSC Finance Systems Management August 2023 Page 1|26
This document will provide instructions for submitting a General Travel expense report
for an individual’s post-trip reimbursement when a Travel Pre-Approval report was not
completed prior to the trip.
Note: Travel expense reports for post-trip reimbursement without a Pre-Approval import
should be the exception and not the regular process for travel reimbursement. Travel
Pre-Approval reports should be submitted before the trip occurs when circumstances
allow.
If a Pre-Approval report was completed prior to the trip, refer to the Chrome River –
Travel Reports w/Pre-Approval Import training document in the Training Center. No
Business Travel Account (BTA) or Travel Advance reconciliation instructions are
included in this document as these resources require a Pre-Approval report.
Travel Expense Report
After Trip with No Pre-Approval Import
To create a Travel Expense Report for post-trip reimbursement with no pre-approval
import:
• Confirm traveler dashboard.
• Create new expense report.
• Verify report type in expense report header = General Travel.
• Verify basic trip information in expense report header.
• Add travel expense line items to report.

TTUHSC Finance Systems Management August 2023 Page 2|26
Document Index:
Travel Expense Report – After Trip with No Pre-Approval Import
• Confirm Traveler Dashboard
• Create New Expense Report
• Add Trip Report Information on Trip Report Header
• Add Travel Expense Line Items to Report
• Meals, Lodging, and Mileage (Special Expense Entry)
- Meals-Itemized
- Lodging
- Mileage/Google Maps
• Report Submission
Travel Expense Report – Submitted Report Routing and Options
• Submitted Report Routing
• Submitted Report Options
Contacts

TTUHSC Finance Systems Management August 2023 Page 3|26
Confirm Traveler Dashboard (click link to return to index)
If you are an employee submitting your own travel expense report, signing into Chrome
River via SSO will automatically place you on your own dashboard for report
submissions.
If you are a delegate for another traveler and need to submit a pre-approval report on
their behalf, click your account name in the top right corner. This will populate a drop-
down menu that will list other employee accounts that have granted you delegate rights.
Click the correct traveler to switch to their dashboard.
Create New Expense Report (click link to return to index)
Click the Create button in the top right corner of the Expenses bar.
The Create button will populate a report header in the right-side panel.
Add Trip Information on Travel Report Header (click link to return to index)
Input the specified data to the travel report header:
• Report Name: Traveler Last Name, First Initial - Trip Start Date, Destination City,
State
• Report Type: PCard transaction reconciliations are also completed via Chrome
River expense reports. Ensure that the report type displayed is General Travel.
• Chart: This field verifies the Chart of Account (COA) that will be used for the trip
and automatically populates H for TTUHSC funds.
Do not choose options E, S, or T unless TTUHSC El Paso, TTU Systems, or
Texas Tech University funding is needed. Only one chart per report is allowed.
Select
Correct Traveler
Click Create

TTUHSC Finance Systems Management August 2023 Page 4|26
• Start Date/End Date: Verify when the traveler will depart from and return to their
headquarters.
• Vacation Taken (checkbox): If vacation will be taken during the trip, click on this
checkbox to view a “Vacation Details” field that will allow the entry of dates and
further information.
• Business Purpose: Input the detailed reason for the trip that affirms the travel is
related to TTUHSC business. Do not utilize acronyms.
Continue to provide the following information:
• Type: Select Expense Report (After Trip).
• Did You Receive an Advance for this Trip: Select No.
If an advance was received, refer to the Chrome River – Travel Reports w/Pre-
Approval Import training document in the Training Center.
• Traveler Type (H)/Trip Purpose (H): Choose the appropriate selection from the
options provided.
• Approver: Search and select the traveler’s direct supervisor. If submission is for
a non-employee, search and select the Department Head or Fund Manager.
Add
Trip Information to
Report Header

TTUHSC Finance Systems Management August 2023 Page 5|26
• Origination/Destination: Search and select the traveler’s originating and
destination locations. If the individual is traveling to multiple locations for
business, input the furthest destination traveled.
• Fiscal Year: Select the appropriate Fiscal Year that the travel will occur. If travel
dates take place across two fiscal year periods, use the trip end date to
determine correct FY.
After entering all information, click the Save button in the top right corner. The report
progress will be saved and can now be viewed in the Expense Report Drafts Folder.
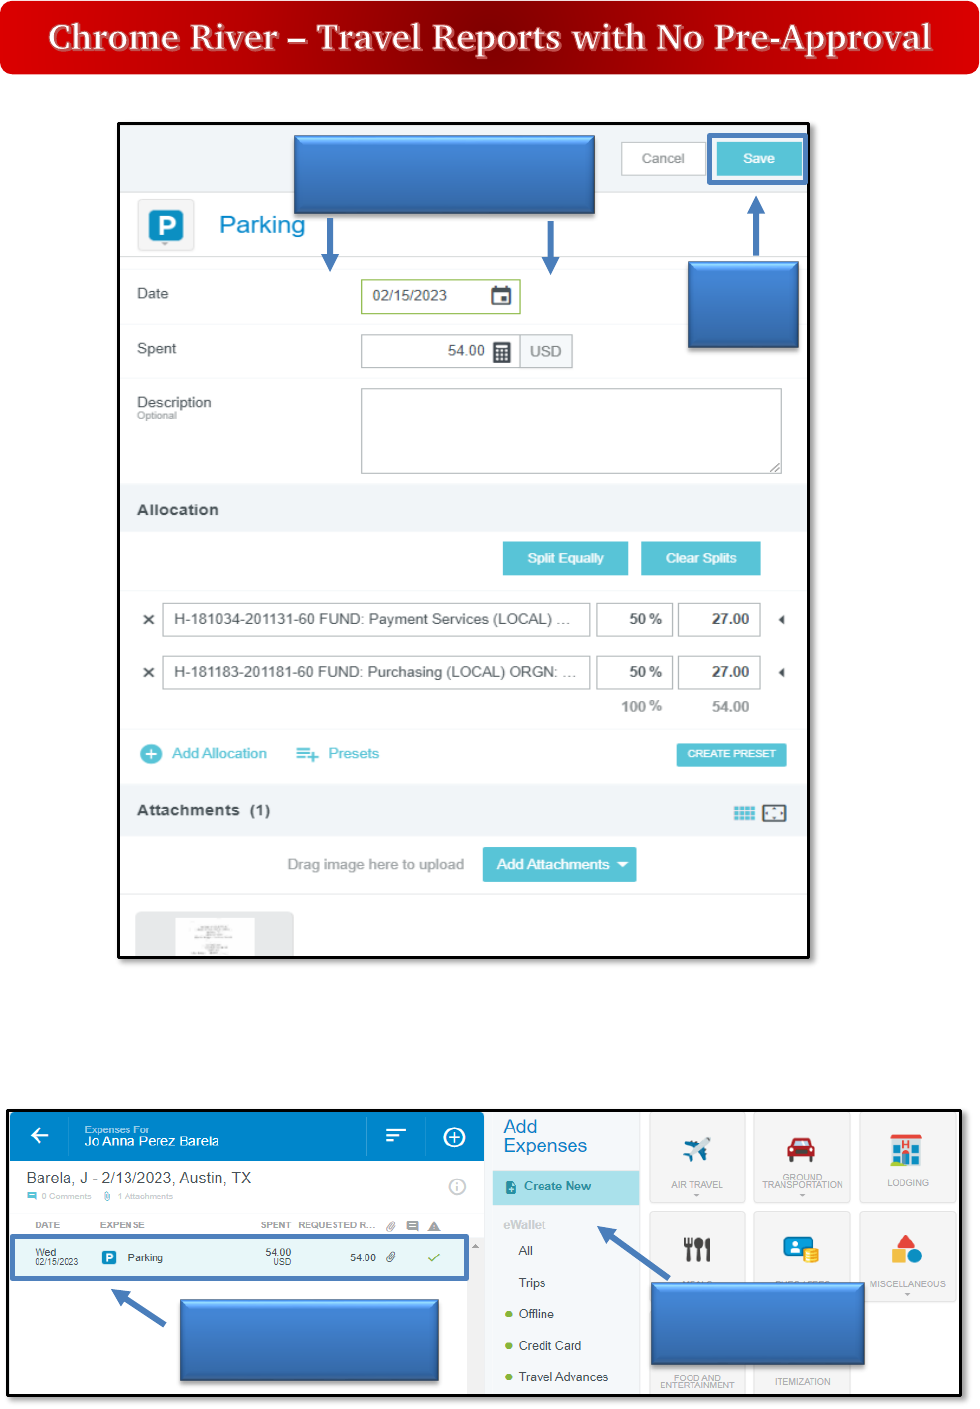
Add Travel Expense Line Items to Report (click link to return to index)
After saving your expense report header, the system will display the empty expense
report in the left-hand panel and the traveler’s eWallet in the right-hand panel.
The eWallet selection will default to All. Click Create New button.
Provide
Trip Information

TTUHSC Finance Systems Management August 2023 Page 6|26
Create New will display all Travel expenses that can be selected to add a
reimbursement line item to the report. A tile with a small down arrow is referred to as an
Expense Drawer and can be clicked to view more specific subcategories.
• Air Travel: Airfare, Air Wi-Fi, Baggage Fee, Seat Upgrade Fee, Ticket Exchange
Fee, Travel Agency Fee, Personal Plane Mileage
• Ground Transportation: Car Rental, Car Rental Fuel, Mileage/Google Map*,
Parking, Public Transportation, Taxi/Car Service, Tolls
• Lodging*
• Meals: Daily Allowance Wizard*, Meals-Itemized*
• Dues/Fees: Currency Exchange Fee, Visa/Passport Fee, Registration Fees,
Training/Education
Click
Create New
eWallet will
default to All
Click tile with an
Expense Drawer (arrow)
to view subcategories
Select
Travel Expense

TTUHSC Finance Systems Management August 2023 Page 7|26
• Miscellaneous: Travel Advance Return (not applicable to this report type),
Miscellaneous/Other
• Food and Entertainment
* Special Expense Type with unique entry. See following section for more information.
To add an expense to your report, click the appropriate expense tile from the list
above. Most tiles generate a standard expense form that require entry of basic
information related to the expense type being claimed.
Expense forms will vary slightly by expense type, but all forms will require the following:
1) Date: Date of Purchase or Transaction Date for expense being claimed.
2) Spent: Amount being requested for reimbursement.
3) Description: Open field to provide any additional information related to the claim, if
necessary.
4) Allocation: The FOP combination that will be utilized to fund the reimbursement
request. All valid FOP combinations for the Chart of Accounts (H) selected will be
available to search and select. Multiple allocations can be added to a single expense
by clicking Add Allocation.
If multiple FOPs are added, the split can be determined by percentage or specific
amounts. The total must equal the Spent amount requested for reimbursement.
5) Attachments: Itemized receipts are required for all reimbursement claims.
Supporting documentation can be uploaded directly from your computer to the
expense form or the Receipt Gallery can be utilized.
When the requirements of the expense form have been completed, click Save in the
top right corner of the form.
Click
Add Allocation
(if needed)
Search/Select
Allocation
TTUHSC Finance Systems Management August 2023 Page 8|26
After saving, the reimbursement request for the expense type chosen will be added to
the Travel Expense Report in the left-hand panel, and the right-hand panel will display
the Add Expenses option.
Click
Save
Enter
Required Information
Reimbursement
Request added
Add Expenses
Option
TTUHSC Finance Systems Management August 2023 Page 9|26
Repeat the process of selecting the appropriate expense tile, fulfilling the requirements
of the expense forms, and saving to the report.
Meals, Lodging, and Mileage (Special Expense Entry) (click link to return to index)
The Meals-Itemized, Lodging, and Mileage/Google Maps expense tiles include forms
with special requirements and capabilities. Please adhere to the following instructions
for each to ensure they are correctly added to the report.
Meals-Itemized (click link to return to index)
Itemized meal expense claims require additional action to ensure the GSA Per Diem
rates and locations are applied to the report, regardless of the type of funds being used.
Before entering itemized meal claims, the user MUST calculate and apply the GSA
Per Diem location and rates to the report.
To calculate and apply the GSA Per Diem location and rate information, under the
Create New option, select the Daily Allowance Wizard tile, which is located in the
Meals tile.
Selecting this tile will display the Daily Allowance Wizard tool in the dashboard. Input
the trip Start/End dates and the Location (traveler’s business destination) in the left-
hand panel.
GSA Per Diem rates are determined by County. Ensure the appropriate location is
chosen. After entering the information, click the Add To Preview button.
Select
Daily Allowance
Wizard
Click Meals to
open drop down

TTUHSC Finance Systems Management August 2023 Page 10|26
This will pull GSA Per Diem rates for the dates and location entered and display them in
the right-hand panel.
Do not select any deductible checkboxes. This will reduce the Per Diem rate applied
to the report, which is not required for reimbursement of actual meal costs supported by
itemized receipts.
Verify the information is correct and then click the Apply button.
Add Dates
Click Add To Preview
Add Location
Click Apply
Verify
Information

TTUHSC Finance Systems Management August 2023 Page 11|26
Applying the Daily Allowance Wizard information will not display as a report line item.
This information works in the background of all meal claims to ensure compliance and
reveal meal claims that exceed the standard rate.
After application, the system will display the Add Expenses column and Create New
option.
Select the Meals-Itemized expense tile under the Meals tile to claim daily meal
expenses.
Meal expense forms are designed to reflect a traveler’s entire meal reimbursement
request for a single day of travel. Enter the appropriate date and the reimbursement
amount for Breakfast, Lunch, and Dinner. The Spent field (reimbursement amount) will
automatically display the sum of amounts entered.
The form displays verification of the daily allowance information applied to the report.
Any overages verified by the system or meal tips included in the reimbursement
amount require the use of a local, unrestricted FOP. Adjust allocations
appropriately, when necessary.
Upload supporting documentation (itemized meal receipts) to Attachments and then
click the Save button in the top right corner of the expense form to add the meal line
item to the report.
Click Meals to
open drop down
Select
Meals - Itemized

TTUHSC Finance Systems Management August 2023 Page 12|26
Repeat the process of clicking Create New and selecting the Meals-Itemized expense
tile to add more daily meal claims to the report.
Lodging (click link to return to index)
Lodging folios typically include charges for several different expense types. To ensure
accurate entry of lodging charges, the Lodging expense entry requires itemization of the
total lodging amount being requested for reimbursement.
Lodging claims also require additional action to ensure the GSA Per Diem rates and
locations are applied to the report, regardless of the type of funds being used.
To add a Lodging claim to the expense report, select the Create New option and
choose the Lodging expense tile.
Click
Save
Enter
Date
Enter
Amounts
Upload
Attachments

TTUHSC Finance Systems Management August 2023 Page 13|26
Enter the following information requested by the Lodging expense header.
• Date: Date of Payment to Lodging Establishment
• Check In/Check Out Dates
• Spent: Total reimbursable amount of Lodging expenses (excluding meal
charges*). If any charges were incurred on the hotel folio that are not
reimbursable, such as State occupancy taxes for lodging in Texas, do not include
them in the total amount.
*If meal amounts are listed on your hotel folio, do not include them in the lodging
spent amount. Meals must be supported by itemized receipts and claimed on the
Meals-Itemized expense form.
For this example, the folio includes no meals or non-reimbursable expenses and
the total amount being claimed for reimbursement is $272.50.
Select
Create New
Click
Lodging

TTUHSC Finance Systems Management August 2023 Page 14|26
• Allowable Total: Select Calculate link to the right of the locked amount field.
This will generate a pop-up box to ensures that the appropriate GSA Per Diem
rates and location are applied to the lodging claim. This action is required
regardless of the fund type being used for reimbursement.
Enter Start Date (Check in), End Date (Check out), Location (ensure appropriate
county is selected), and input a single room only. Reimbursements for more than a
single room are prohibited for an individual traveler.
Click Save to apply GSA information and go back to Lodging header expense form.
Provide the following information in the Lodging header expense form:
• Description: Optional field to provide any additional information related to the
hotel stay or circumstances that would be beneficial to Travel Admin during their
review of the reimbursement request.
• Merchant Name: Name of the Lodging establishment.
• Allocation: Funding source for reimbursement (will be copied over to all itemized
line items).
• Attachments: Upload itemized hotel folio from device or Receipt Gallery (will be
copied over to all itemized line items).
After entering Lodging Header information, click Itemize to begin identifying the hotel
expenses and amounts.
Enter
Dates
Enter
Location
Input
Single Room Only
Click
Save

TTUHSC Finance Systems Management August 2023 Page 15|26
The system will display a variety of hotel expense types to choose. The total amount
being claimed for reimbursement appears in black in the upper right-hand corner of the
screen. The amount remaining to be itemized appears in red.
Lodging Itemization Option 1: If your Lodging folio reflects charges for the same
expense types that are the same amount each day, the Recurring tile can be chosen.
This tile allows you to enter the amounts charged each day, and after selecting Save,
will automatically create the line items on your behalf.
If the Lodging folio has charges that are not the same each day, and/or State/Restricted
funds are being used for reimbursement, skip to Lodging Itemization Option 2.
Click
Itemize
Amount to
Itemize
Variety of Lodging
Itemize Expense
Types

TTUHSC Finance Systems Management August 2023 Page 16|26
After Recurring is saved and line items are created on the report, click Done.
Lodging Itemization Option 2: If the Lodging Folio has daily charges that differ in
amount, the Recurring tile cannot be used. Expenses must be entered manually, as
they were charged each day. Manual entry is also the preferred method for lodging
Enter
Amounts
Enter
Dates
Click
Save
Click
Done

TTUHSC Finance Systems Management August 2023 Page 17|26
expenses being reimbursed by State or Restricted fund types to ensure any determined
overages are appropriately allocated.
To complete itemization without Recurring capabilities, begin by selecting the Nightly
Rate expense tile to claim the first day’s nightly rate charge. Enter the Date (date of
charge as shown on folio), Spent (charged amount as shown on folio), and Description
(if applicable).
The system will display the Lodging Per Diem Rate and Amount Over Per Diem Rate
for the date indicated on the form. If a State or Restricted funds are being used, a local
FOP must be provided to reimburse any amount over the per diem rate. Do not lump
together multiple days of nightly rate charges to ensure per diem rates and
overages are accurately recorded.
After completing form, click Save in the top right corner to add the itemized line to the
report.
The system will display the Lodging expense tiles for selection and an updated
remaining amount for itemization. Select Taxes/Fees to record the first night of
taxes/fees charged.
Click
Save
Enter
Date
Enter
Amount
Enter
Description (Optional)

TTUHSC Finance Systems Management August 2023 Page 18|26
On the Taxes/Fees expense form, enter the Date (date of taxes/fees charged, as shown
on folio), Spent (total amount of taxes/fees charged on date specified, as shown on
folio*), and Description (if applicable).
If a local or unrestricted FOP is being used for reimbursement, disregard the Restricted
Fund Allocation checkbox and click Save.
*Taxes and Fees charged on a single day should be combined on a single line item, but
do not lump multiple days of taxes and fees on a single Taxes/Fees expense form.
Select
Taxes / Fees
Enter
Date
Enter
Amount
Click
Save
Enter
Description
(Optional)

TTUHSC Finance Systems Management August 2023 Page 19|26
If a State or Restricted fund is being used for reimbursement, click the Restricted Fund
Allocation Checkbox to view a calculator that will determine the maximum amount of
Taxes/Fees that can be claimed on restricted funds.
To complete calculations, verify the actual nightly rate charged on the same date as the
Taxes/Fees being claimed on the expense form. From this information, the system will
calculate the tax percentage and max amount of taxes allowed on restricted funds
based on the per diem rate.
After completing calculations and adjusting allocations (if necessary), click Save.
In the example below, a local FOP would be required for $2.43 of taxes/fees incurred on
2/13/23.
Repeat the process of selecting correct Lodging expense type and inputting amounts for
each day. Remaining Amount must reflect 0.00 in order to submit report. This
verifies that the entire amount claimed for reimbursement in the Lodging Header is
accounted for in the itemized lodging line items.
Click
Restricted Fund
Allocation Checkbox
Click
Save
Local FOP required
for Taxes/Fees

TTUHSC Finance Systems Management August 2023 Page 20|26
Mileage/Google Maps (click link to return to index)
Chrome River provides mileage calculation abilities that allow a user to obtain distance
verification and documentation without leaving the Mileage/Google Maps expense form
(Individual Trips), or manually enter a claim that is supported by an Odometer Log
(Monthly Mileage Accruals).
To add a personal auto-mileage claim to the expense report, select the Create New
option and choose the Mileage/Google Maps expense tile located in Ground
Transportation.
Remaining Amount
equals 0.00
Select
Create New
Click Ground
Transportation
Select
Mileage/Google Maps

TTUHSC Finance Systems Management August 2023 Page 21|26
Mileage Expense Entry for Individual Trip:
• Date: Mileage accrual date.
• Spent: Locked field, determined by number of miles claimed.
• Description: Leave empty, the mileage calculation capabilities will auto fill this
information when completed.
• Mileage Type: Select Individual Trip.
• Rate: Locked field, verifies mileage reimbursement rate for date entered on
expense form.
• Miles: Select the Calculate Mileage link to the right of this field to determine
miles traveled.
The Calculate Mileage tool will appear in the right panel. Search and select the
origination/destination.
If traveler accrued mileage to multiple locations, select the Add Destination button in
the left to enter another location. If traveler returned to starting location on the same
day, select the Return to Start button.
Select Save Trip in top right corner when finished. System will enter automatically enter
location information in Description Field and the number of miles in the mileage field.
Enter
Date
Select
Individual Trip
Click
Calculate
Mileage link

TTUHSC Finance Systems Management August 2023 Page 22|26
The system will automatically enter location information in the Description Field and the
number of miles in the mileage field.
• Deduction: If there are no mileage limitations, leave at None.
If the traveler is being limited to a certain number of miles, click the None button and
select Distance to enter the number of miles that should be deducted from the
traveler’s reimbursement.
If traveler is being limited to a certain amount, click the None button and select Amount
to enter the amount that should be deducted from the traveler’s reimbursement.
Selections and deductions indicated will automatically update the traveler’s
reimbursement amount in the locked Spent field.
Search/Select
Origination &
Destination
Click
Save Trip
Click to
Add Destination

TTUHSC Finance Systems Management August 2023 Page 23|26
• Allocation: Verify FOP(s) being used for reimbursement.
• Attachments: Upload additional supporting documentation, if applicable.
Note: Odometer Reading Logs will not be accepted for Individual Trip Mileage claims.
Odometer reading documentation is for monthly mileage accruals only.
Click Save in the top right corner of the expense form. Google Maps picture with
verification of travel locations will automatically be saved to Attachments.
Mileage Expense Entry for Monthly Mileage Accrual:
• Date: First date of mileage accrual.
• Spent: Locked field, determined by number of miles claimed.
• Description: Enter the verbiage - “Month/Year - See attached Odometer Log.”
• Mileage Type: Select Monthly Mileage.
• Rate: Locked field that verifies mileage reimbursement rate for date entered on
expense form.
• Miles: Enter total number of miles being claimed. Do not use the Calculate
Mileage tool for monthly mileage accruals.
• Allocation: Verify FOP(s) being used for reimbursement.
• Attachments: Upload Odometer Log.
Select
Deduction, if needed

TTUHSC Finance Systems Management August 2023 Page 24|26
Click Save in the top right corner of expense form.
Report Submission (click link to return to index)
Click Submit in the bottom of the left-hand panel when all claims for reimbursement
have been added to the expense report.
Submission confirmation and report summary will display in right-hand panel. Click
Submit again to verify report submission.
Travel Expense Report
Submitted Report Routing and Options
Submitted Report Routing (click link to return to index)
Submitted Travel Expense Reports for post-trip reimbursement claims will be
electronically routed as follows:
1) Traveler Approval: Only applicable if report was created/submitted by a delegate.
If traveler submits their own expense report, no electronic approval from traveler
is required.
2) Budget Check: Automated verification of available funds. If any line items have
insufficient funding, the system will return the expense report to the traveler’s
dashboard.
3) Supervisor Approval: Individual chosen on Report Header.
4) Fund Manager Notification: Fund Manager(s) receive automated email
notification summarizing use of funds on the expense report. No action needed.
5) Travel Office Approval: Expense report is reviewed for accuracy and compliance
with State and institutional requirements.
Click Submit

TTUHSC Finance Systems Management August 2023 Page 25|26
6) Final Budget Check: Automated verification of available funds to ensure sufficient
funding for invoice creation to issue individual reimbursement.
7) Export to Banner for Invoice Creation: Reimbursement to traveler will process the
following business day.
Submitted Report Options (click link to return to index)
Submitted reports can be viewed in the Submitted folder of the Expense bar. Click the
Submitted folder (3
rd
option) to view all Expense Reports that have been submitted in
the current dashboard.
Once the Submitted Folder has been opened, click the appropriate report for review.
A summary of the report will open in the right-hand panel with the following options:
• Open: Open the report and review the expense report line items.
• PDF: Generate a PDF version of the expense report.
• Tracking: View the status of the expense report line items.
• Recall: Use this tool to return any expense report that has not been fully
approved to the Drafts folder for corrections.
Do not contact the Travel Office for status verification or to request an estimated
approval date. These inquiries divert Travel Office personnel focus and attention from
report reviews and cause further delay.
Status can be verified with the tracking tool and approval dates cannot be accurately
pre-determined. All reports are reviewed in the order they are received. If additional
information or documentation is needed, the delegate and/or traveler will be notified at
the time of review.
Click
Submitted Folder
Select Report

TTUHSC Finance Systems Management August 2023 Page 26|26
Note: The buttons will disappear if your browser window is too narrow to display them. If
the buttons do not appear, click the ellipsis to display the options or widen the browser
window.
Contacts (click link to return to index)
For questions related to the appropriate use of the system or system issues, email
For all other travel related inquiries, email [email protected].
Select from
Options
