
Using Automatic Subtitles with Microsoft 365
PowerPoint
These directions may be used in live presentations. (If you are presenting via MS Teams
or Zoom, you may use the automatic live transcription/captions available in both
applications.) The accuracy of auto-captions may not meet accommodation needs.
However, they may be useful as a best practice and Universal Design for Learning
principle.
Check out Microsoft’s support guide for system requirements. If you are using a
Windows PC, you will need Windows 10 or 11 and Microsoft 365. Mac’s will need
Microsoft 365 with PowerPoint. Chrome, Firefox, and Edge browsers are supported.
Refer to MS support for specific details on compatible versions of Microsoft 365 and web
browsers. You will also need a microphone.
Contents
Using Automatic Subtitles with Microsoft 365 PowerPoint ........................................... 1
Contents ........................................................................................................... 1
Enabling Subtitles............................................................................................... 2
Cautions & Recommendations.............................................................................. 4
Upd ated: 3 / 16/202 3 Page 1 | 4
0
0
Pow
erpoim On
li
ne
Home
Create
EJ
Create
new
My Cont€,nt
EB
Apps
Outl
ook:
Blank presentation
JP
Fr
om
B
eg
i
nn
i
ng
~
Fr
om
Curren
t S
li
de
~
Pr
~
Al
ways U
se
Subtit l
es
v
Spoken l anguage
>
Subtitle l anguage
>
C
Bottom (Overlaid)
C
Top
(Overl
ai
d)
lbll
Below Slide
Cl
Above Slide
4}
Au
dio
Settings
. ~
COLOR.ADO
MESA
UNIVERSITY
DISTANCE EDUCATION
~
Always
Use
Su
b
ti
tl
es
v
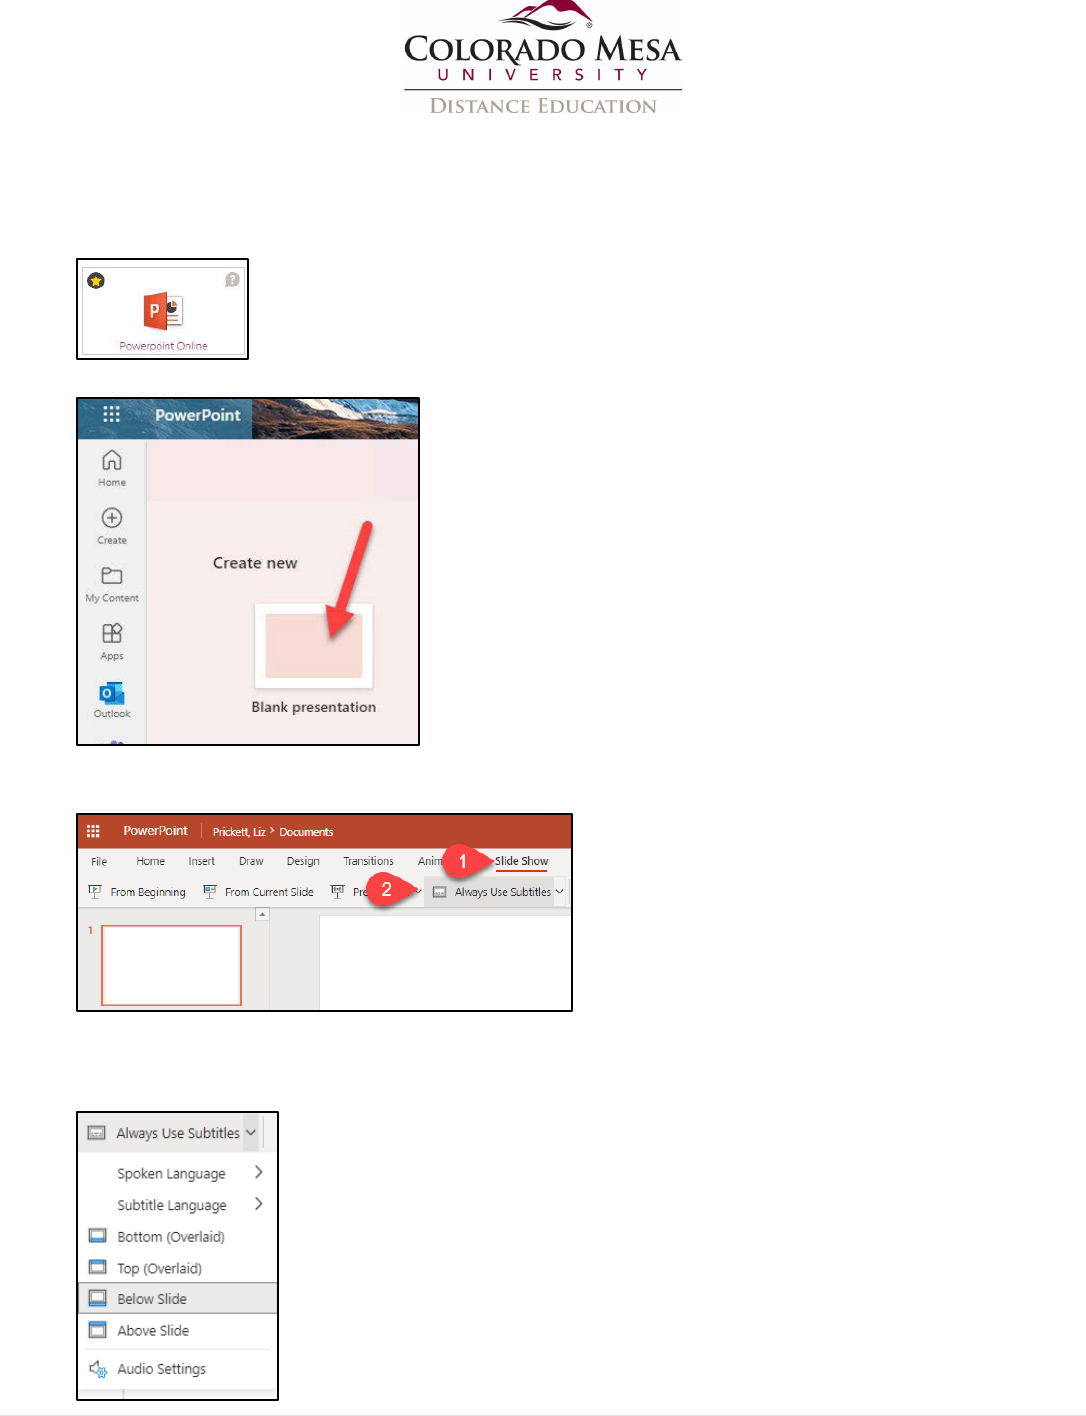
Enabling Subtitles
1. Go to MAVZone.
2. In Applications, select PowerPoint Online.
3. In PowerPoint Online, select an existing presentation or Blank presentation.
4. In PowerPoint, click the Slide Show tab. Then, in the Slide Show ribbon,
double check that Always Use Subtitles is showing.
5. Use the Always Use Subtitles dropdown menu to select your Spoken
Language, Subtitle Language, subtitle placement (Below Slide), and adjust
Audio Settings as needed.
2 | Pag e

. ~
COLOR.ADO
MESA
... omesa365-
my
.sharepoint.com wants to
.!,
Use yo ur microph one
-
...._
Allow Block
UNIVERSITY
DISTANCE
EDUCATION
X
Once
you
begin
speaking.
The
automatic
6. Click Present.
7. You’ll notice a quick popup message at the bottom of the screen announcing
Starting Subtitles.
If not already enabled, you’ll need to allow the application to use your microphone.
8. Once you begin speaking, the automatic captions will appear at the bottom of the
screen.
9. Check out the presentation features:
a. Toggle mic on/off for PPT
b. Advance slides forward/backward
c. Show all slides
d. Annotation features (Pen, Highlighter, Erase, Erase All Ink on Slide, color
selector)
e. Toggle subtitles/auto-captions on/off
f. Turn on PowerPoint Live
g. End presentation
3 | Pag e

. ~
COLOR.ADO
MESA
UNIVERSITY
DISTANCE EDUCATION
Cautions & Recommendations
Auto-captions vary in accuracy based on recording technology, speaker, etc. If you have
a student who needs an accommodation, you should consult with EAS.
PPT’s auto-captions/subtitles will only pick up speech from the presenter running PPT if
using a headset, which is best for audio quality and speech recognition. They will most
likely only pick up the main speaker even if you are using another mic, too. Therefore, if
you have questions/comments from others, you will need to repeat them in order for
them to be recognized by speech recognition.
If you notice the auto-captions are inaccurate, try speaking more slowly or enunciating
more clearly. You may also try repositioning your mic or reducing background noise.
4 | Pag e
