
© 2016
JVC KENWOOD Corporati
on
2016
Smart Music Control Application
User Guide
Smart Music Control
Application
JVC KENWOOD Corporation

© 2016
JVC KENWOOD Corporati
on
CONTENTS
CONTENTS 2
GETTING STARTED 1
Installing Smart Music Control App
Preparing the Music Player
MEDIA PLAYER 1
Media Player Screen
Category Selection Screens
Current List Screen
Mood Blender Screen
Making a Playlist
Equalizer Screen
Mood Playlist
Song Background Analysis
HOME LAUNCHER 4
Accessing the Home Launcher
The Home Launcher Screen
NAVI SHORTCUT 6
Changing the default Navigation App
Phone Caller Applet 6
Adding Contacts and Navigation
Various Calling Methods
Deleting Contacts
App Launcher 7
Adding Apps and Navigation
Changing App Launcher Layout
Returning to JVC Smart Music Control
Media Player Shortcut 7
JSMC Remote Control Mode 8
Entering into Remote Control Mode
Source Control Main Screen 8
Status Indicator
Source Name Screen
Source Info Bar
Media Information Panel
Play Time Bar
Car Receiver Settings 10
Entering Car Receiver Settings
EQ Settings
Fader/Balance Settings
HPF/LPF Settings
Color Settings
OPERATION FEATURES 13
Gesture Control
Gesture Commands in Operation
VOICE COMMAND 14
Floating Home and Media Button 14
Operation and Movement
Disabling the Feature
Audio Switching 15
SMS READER 15
Enable SMS Reader
Enable SMS Blacklist

© 2016
JVC KENWOOD Corporati
on
OTHER PREFERENCE SETTING 16
Preference Setting

JVC Smart Music Control User Guide| 1
©
2016
JVCKENWOOD Corporation
GETTING STARTED
JVC Smart Music Control App requires the following for
proper operation:
Android OS 4.0 and above
Bluetooth support.
The system requirement information as mentioned
above is not a guarantee that the application will work
on all Bluetooth® compatible devices.
Installing Smart Music Control App
JVC Smart Music Control is a free application, available in
the Google Play Store. This app enhances the user
experience of compatible JVC car receivers. Search for
“JVC Smart Music” in Google Play Store to locate and
download the Smart Music Control App into your device.
Alternatively, you can scan the QR code using your
android device below to directly access the Smart Music
Control App in the Google Play Store.
Preparing the Music Player
Copy music files into the internal storage or the SD card
of your device.
Note
If music files are stored in the SD card, do not remove or
dismount the SD card while playing songs.
Supported audio files*
• MP3 (.mp3)
• AAC-LC/TLP (.m4a, .aac)
• PCM/WAVE (.wav)
• Ogg Vorbis (.ogg)
• AMR-NB (.3gp)
• AMR-WB (.3gp)
*Depends on your smartphone
MEDIA PLAYER
Media Player Mode playback songs saved in the device.
Media Player Screen
1. Tap once on the Media Player screen to play the
song.
Media Player Screen
2. You can control the song playback as follows:
• To pause or resume playback, tap once on the
screen.
• To skip to the previous song, swipe left.
• To skip to the next song, swipe right.
• To repeat all songs or one song, curve right.
• To play songs at random, curve left.
(Refer to page 13 for Gesture Controls)
Category Selection Screens
Songs in your device are automatically sorted into
different categories for easy song selection. This list of
screens displays the songs in their respective categories.
1. Go to “Menu > Content List” or Swipe up to open
the Category Selection screen.
JVC Smart Music Control User Guide
Album Art
Media Info
(Song
title, Artist Name,
Album Name)
Play
T
ime
Progress bar

JVC Smart Music Control User Guide| 2
©
2016
JVCKENWOOD Corporation
List Screen
The available categories are: Songs, Albums, Artists,
Playlist and Mood.
2. Swipe Left/Right to change categories, and tap on an
item to select it. The item hierarchies are listed
below:
*1 To play a song in Playlists, create playlist and add your
favorite songs. -> See PLAYLIST (page 3)
*2 To play a song in Moods, Mood Analysis must be
performed in advance. -> See MOOD PLAYLIST (page 4).
To return to the Media Player Screen, tap the currently
playing song or tap the return key on your device.
Current List Screen
Based on the category used to select the currently
playing song, the lineup of all the songs in that chosen
category is displayed in the Current List Screen.
1. Swipe down the Media Player screen to open
Current List screen.
Current List Screen
2. Tap a song to play.
To return to the Media Player screen, tap return key on
your device.
Mood Blender Screen
The Mood Blender Screen is a special display screen that
displays an active visualization during song playback, and
the pre-analyzed songs can be selected by using the
Mood Selector.
1. Perform a 2-finger swipe left/right on the Media
Player Screen to open the Mood Blender screen.
Mood Blender Screen
>Moods*2 > Mood in detail > Song
>Songs
>Album > Song
> Artist >Albums > Song
> Playlists*1 > Song
Current
ly
play
ing
song
Touch to change to
Media Player screen
Current
ly
play
ing
song
Mood Matrix Area
Mood Selector
Move it to adjust the
current mood
Flick left or right to go
to a different category
screen.

JVC Smart Music Control User Guide| 3
©
2016
JVCKENWOOD Corporation
2. Tap and drag the Mood selector circle to your
preferred mood in mood matrix area to adjust the
current mood.
Note
To use the Mood Blender function, you first need to
analyze all songs using the Song Background analysis
function. (Page 4)
To return to the Media Player screen, perform a 2-finger
swipe left/right on the Mood Blender screen.
Making a Playlist
Playlists enables a custom selection of songs for
continuous playback based on the individual preference.
1. In the Category Selection Screen, swipe to the
Playlist category.
2. Select “Add New Playlist”
3. Enter a new name for this playlist and select OK.
Adding Songs to a Playlist
Songs can be added to the playlist in “Current List
Screen” and “Category Selection Screen > Songs”.
1. While in any of the 2 screens, long press on a song
item.
2. An “Add to Playlist” dialog screen will pop up. Select
the appropriate playlist to add the selected song to.
Equalizer Screen
Select Preset Equalizer
1. Tap the Menu on your device.
2. Tap [ Equalizer] in menu list.
3. Select Preset Equalizer Flat/Dynamic/Natural/Vocal
Boost/Bass Boost.
Equalizer Screen
Note
Equalizer settings only apply to Media Player on your
device. When the App is connected to a JVC Car Receiver
and enters Remote Control Mode (See below), this
Equalizer function will be disabled, and only the Car
receiver’s EQ settings will be available.
Edit User Equalizer
1. Tap User 1/ User 2/ User 3.
2. Tap Edit.
3. Change the level of each band.
4. Tap Save.
User Equalizer Screen
To return to the Media Player Screen, tap the return key
on your device.
Bass Boost setting
1. Tap Bass Boost to ON.
2. Move the slide bar to adjust the Bass Boost level.
Spacing Effect setting
1. Tap Spacing Effect.
2. Choose your preferred effect from the pop up list.
Edit User Equalizer
Preset
Equalizer
Bass Boost setting
Spacing Effect
setting
Change the level of
each band
Tap here to save
changes

JVC Smart Music Control User Guide| 4
©
2016
JVCKENWOOD Corporation
Mood Playlist
JVC Smart Music Control analyzes the mood of songs
using its Mood Analyzer Function. Once analysis is
complete, songs are classified into the following 13
moods. The songs classified are added in [ Moods]
automatically and you can enjoy songs by selecting the
individual mood.
Note
The song cannot be analyzed if its time is shorter than 20
seconds.
Song Background Analysis
Analyze all songs
1. Tap the Menu button on your device.
2. Tap [ Preference].
3. Check [Manual Song Mood Analysis].
All songs are analyzed while songs are playing. After
analysis is completed, the songs will be classified and
added in [ Moods] automatically.
The current progress of Song Mood Analysis can be
found in the Android Notification Panel in the Android
Home Screen.
Note
If the remaining battery capacity of your device falls
below 20%, the background analysis will be stopped, in
order to conserve battery.
To cancel song analysis while analyzing all songs
1. Exit the application by pressing HOME on the device.
2. Pull down the Android Notification Panel.
3. Tap to display the song analysis status.
4. Tap [ Analyzing …(song name)].
5. Tap the Menu button on your device.
6. Tap [ Cancel analysis] and then [OK].
Play a song from Mood Category Screen
1. In the Category Selection Screen, swipe left/right to
moods category.
2. Tap Mood > Mood in detail > Song.
HOME LAUNCHER
JVC Smart Music Control’s Launcher interface has been
designed for easy one-touch operation while driving a
vehicle. You can now use JVC Smart Music Control as a
preferred operation interface while driving.
The Home Launcher is the main screen where you can
access the main features of JVC Smart Music Control.
Accessing the Home Launcher
The Home Launcher can be accessed at any time by
tapping on the HOME icon in the top left corner of the
app.
The Home Launcher Screen
The Home Launcher screen enables you to select the
following touch-friendly features of this app:
HOME Icon
JVC Smart Music Control User Guide| 5
©
2016
JVCKENWOOD Corporation
1. Navi – Launch the Navigation App of your choice.
2. Phone – Enters the Phone calling feature of this app.
3. App – Enters the App Launcher. Allows you to launch
3
rd
party apps from within JVC Smart Music Control.
4. Media – Launches/Returns you to the media player.
5. Source
*1
– Launches the Source Control (Remote
Control Mode), letting you control and view selected
JVC Car Receivers display information wirelessly.
Note
*1
Source Control is only available when JVC Smart Music
Control is connected to the Car Receiver. It replaces the
“Media” Button when a connection is established.
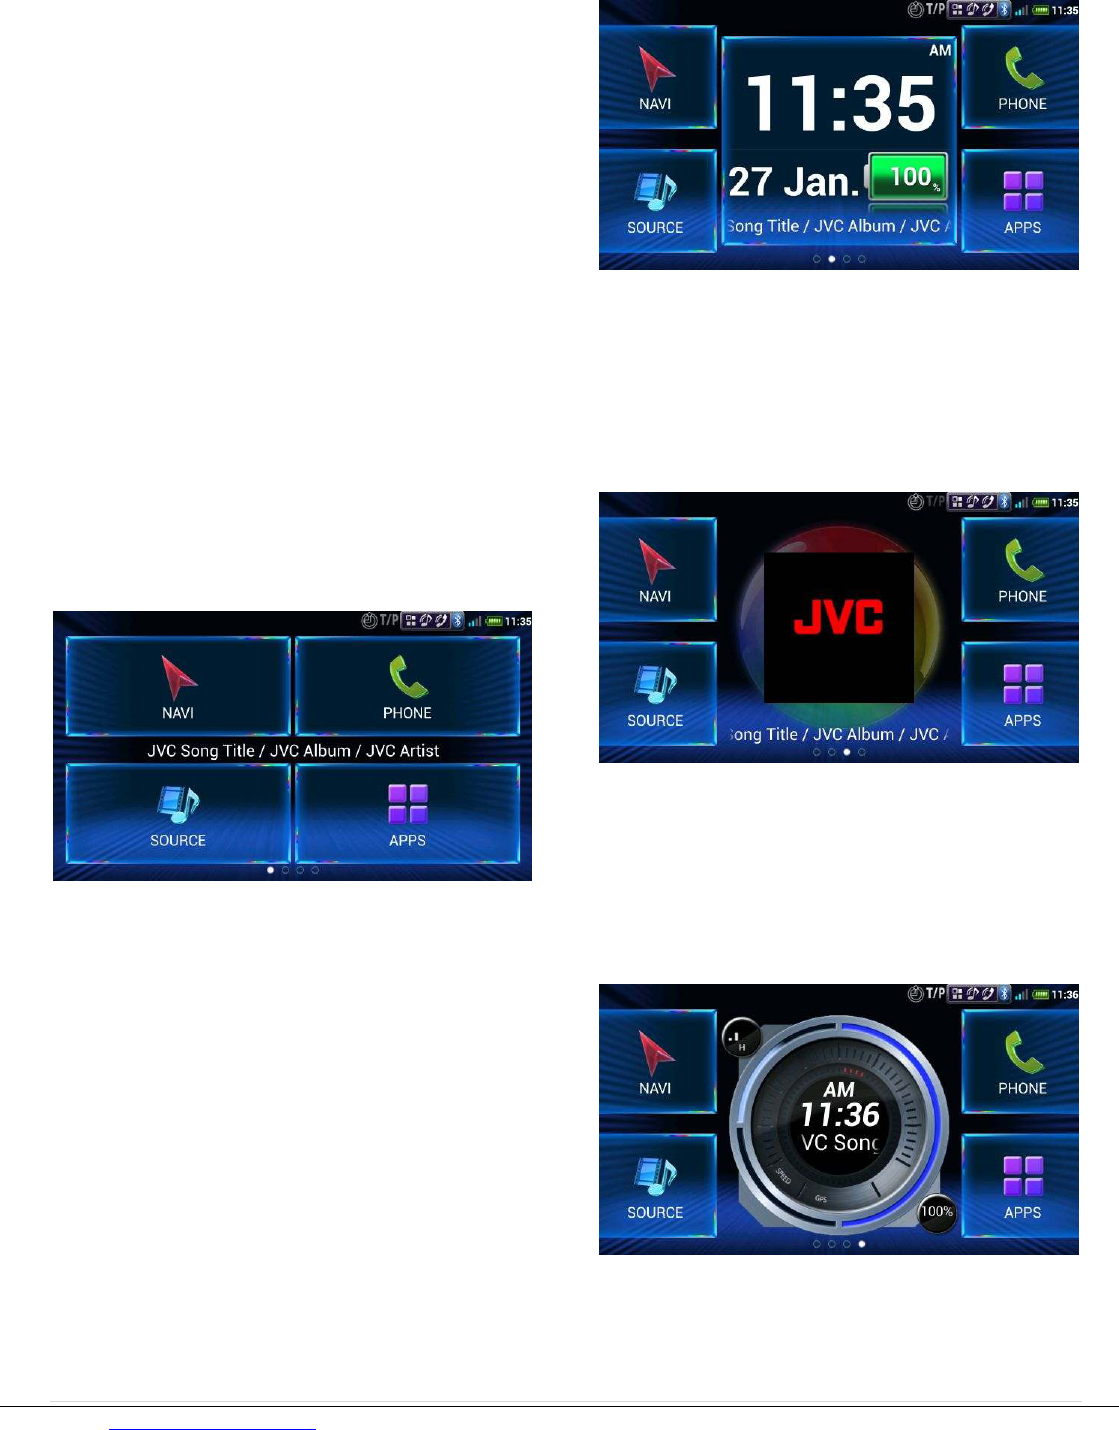
The Home Launcher screen has 4 different layouts, each
displaying different types of information.
Swipe left or right on the screen to switch between
layouts.
Layout A
The First layout has a “ticker tape”-style information bar
in the middle of the screen, which scrolls various types
of information at different scenarios:
1. When App is not connected to any car receiver –
“Title/Album/Artist”
2. When App is connected, and Car Receiver is in
the following source:
a. USB or CD – “(USB/CD) Title/Album/Artist”
b. Tuner – “(Tuner) Station Name”
c. AUX/BT/Others – “(AUX/BT/Others)”
Layout B
The second Layout adds a digital clock, date and a
battery indicator to its display, on top of the information
bar as seen in layout A.
Layout C
The third Layout adds the display of current song’s
album artwork
*1
, on top of the information bar as seen
in layout A.
Layout D
The final Layout adds the display of GPS speed
*2
,
Wifi/Mobile signal strength
*3
, battery bar and a digital
clock, on top of the information bar as seen in layout A.

JVC Smart Music Control User Guide| 6
©
2016
JVCKENWOOD Corporation
Note
*1
Album artwork will only be shown if the artwork is
available in the source media.
*2
GPS Speed will only be shown if GPS chip is present in
the device, and it is enabled in Android Settings. GPS
speed indicator in the UI is set to a min-max range of 0-
240Km/h.
*3
Wifi and Mobile Signal Strength will only be shown if it
is present in the device, and it is enabled in Android
Settings.
NAVI SHORTCUT
The first feature accessible from the Home Launcher is
the Navi Shortcut.
You can now access your favourite navigation app from
the Home Launcher. Simply tap on the NAVI button, and
the navigation app will launch.
Changing the default Navigation App
You can change the default Navigation app in the
Preferences menu.
1. Tap the MENU button on your device.
2. Tap [ Preference].
3. Tap [Launcher Settings].
4. Tap [Set Default Navi App].
5. Select your preferred Navigation App and save.
PHONE CALLER APPLET
The Phone Caller Applet feature is a touch-friendly
interface that allows you to make mobile or VOIP calls to
selected contacts through large and accessible icons.
Adding Contacts and Navigation
To add a contact to the applet, tap on the “+” icon in an
empty box. A selection screen will allow you to scroll
through your contacts. Select a contact and tap “ADD”.
The Phone Caller Applet is able to save up to 32 (8 pages
of 4 contacts each) of your favourite contacts for quick
access. Simply swipe left and right to navigate between
the pages.
Various Calling Methods
Once the contact is saved in a box, tap on the contact to
bring up the contact’s detail screen:
This screen shows the available calling methods that you
can make to the contact. To add more calling methods
or to edit contacts, tap on the settings icon in the
top right corner of the dialog box.

JVC Smart Music Control User Guide| 7
©
2016
JVCKENWOOD Corporation
Here you can edit contact names, numbers, and also add
VoIP calling by ticking the appropriate checkbox and
entering the contact’s details for that VoIP program.
Once done, press SAVE to save all edited information.
To make a call via mobile/VoIP to the contact, simply tap
in the appropriate call icon in the contact details screen.
Deleting Contacts
To delete a contact from a box, tap the MENU button on
your device, and select “EDIT” to enter the edit mode.
An “X” will appear at the right side of every box. Tap on
the “X” to delete that contact.
Tap the BACK button on your device to exit the edit
mode.
APP LAUNCHER
The App Launcher feature allows you to access any 3
rd
party app using a touch-friendly interface that supports
multiple layout patterns.
Adding Apps and Navigation
To add an App to the launcher, tap on the “+” icon in an
empty box. A selection screen will allow you to scroll
through your apps. Select a contact and tap “ADD”.
The App launcher is able to save up to 24 of your
favourite apps for quick access. Simply swipe left and
right to navigate between the pages.
Changing App Launcher Layout
The App Launcher has included a total of 9 different
layout designs, with varying sizes of app boxes, for you
to choose.
Tap on the settings icon in the top right corner of
the screen, and select between the 9 possible layouts.
Returning to JVC Smart Music Control
In order for easy access to JVC Smart Music Control
interface while operating 3
rd
party apps, a feature called
the Floating Home and Media Button has been
implemented. The Floating Home and Media Button will
always remain on top of any 3
rd
party app that is
launched from within JVC Smart Music Control.
For more information on the Floating Home and Media
Button, please refer to the section in this Guide, entitled
“Floating Home and Media Button”.
MEDIA PLAYER SHORTCUT
The Media Player Shortcut will bring you back to the
Media Player screen.

JVC Smart Music Control User Guide| 8
©
2016
JVCKENWOOD Corporation
For more information on Media Player operation, please
refer to the section in this Guide, entitled “Media
Player”.
JSMC REMOTE CONTROL MODE
JVC Smart Music Control is able to connect to a JVC
Receiver, and functions like sending remote control
commands, receiving data and other useful information
from the receiver can be performed.
Entering into Remote Control Mode
In order to access the Remote Control Mode function,
the android device must first be paired with a
compatible BT-enabled JVC Car Receiver present within
10m of the Android device. (Visit the JVC website [Link
Here]for device compatibility.)
1. Perform a Bluetooth pairing between the Android
device and the JVC Car Receiver.
2. Once pairing is successful, launch JVC Smart Music
Control App on the Android device.
3. Go to “Menu > Connect” to initiate a connection
between the app and the receiver.
4. Select the JVC receiver that was paired earlier in the
dialog box that pops up.
5. Wait for further instructions to appear on the app
screen.
6. The app is now connected to the receiver, and the app
enters Remote Control Mode.
SOURCE CONTROL MAIN SCREEN
The Source Control is the main operating interface in
Remote Control Mode.
In this interface, you will be able to retrieve and view
detailed information from the current source being
played in the car receiver, as well as performing basic
remote control functions from your device to the car
receiver.
The Source Control interface will launch automatically
every time JVC Smart Music Control establishes a
connection with a JVC car receiver. The Source Control
interface is also available in the Home Launcher Screen,
when connected to a car receiver.
The following sections provide a detailed description of
items displayed while using Smart Music Control App in
Remote Control Mode.
Source Control Screen
Status Indicator
The status area shows the connectivity status for various
Bluetooth functions, and status of traffic program, radio
timer in car receiver.
Functions
On
Off
Bluetooth
Bluetooth Hands
-
free
connection
Bluetooth Audio
connection (A2DP*)
JVC
Applink connection
T/P (Traffic Program)
Radio Timer
* Advanced Audio Distribution Profile (A2DP)
Source Name Screen
The source name panel shows the currently selected
source in the connected JVC car receiver.
Status Indicator
Source Name Panel
Media Info
rmation
Screen
Play Time Panel
Source Info Bar

JVC Smart Music Control User Guide| 9
©
2016
JVCKENWOOD Corporation
The following table is the list of the source.
Icon
Source
USB
SD
iPod Mode
iPod Head Mode
iPod App Mode
CD
Tuner
HD Radio *1
Bluetooth Audio
Aux-In
Android
Unknown *2
*1 Available for HD Radio Ready car receiver models
only
*2 Smart Music Control App does not support Satellite
Radio, EXT IN and BT Pandora.
Source Info Bar
The source info bar shows the playback status.
Repeat Indicator
Icon
Repeat
Type
Repeat Off
Repeat Once
Repeat Folder/ Group
Repeat All
Random Indicator
Icon
Random
Ty
pe
Random Off
Random Folder/Group
Random All
Play/Pause Indicator
Play/Pause indicator shows the current
playback status.
Mute Indicator
Mute indicator shows the volume
status of the receiver (Mute On/Off).
Mute indicator is available for sources which do not
support play/pause operations, except Bluetooth Audio
source.
Stereo/Mono Indicator
Stereo/Mono icon is available only in Tuner source. If
Stereo/Mono icon does not appear, the current station
does not have available Stereo/Mono information.
HD Radio Indicator
HD Radio indicator shows availability of HD radio in the
current frequency. “HD” flashes when the car receiver is
searching for a HD channel. “HD” lights up when the car
receiver finds a HD channel. “HD” goes off when the car
receiver is unable to find any HD channel in the current
frequency.
EQ Indicator
The EQ icon shows the selected EQ setting of the current
source in the car receiver. Refer to the JVC car receiver
user manual for more details on supported EQ.
Media Information Panel
The media information panel displays some information
of a song or a radio station. For example, when the car
receiver plays MP3 song with ID3 tag, the song title,
artist name and album name are displayed.
When playing a song
When listening to the radio

JVC Smart Music Control User Guide| 10
©
2016
JVCKENWOOD Corporation
Play Time Bar
Play Time Bar is only available for sources that support
play time indication, which include sources like CD-DA
and Music Files in USB mass storage.
CAR RECEIVER SETTINGS
JVC Smart Music Control allows you to adjust certain car
receiver settings
*1
directly from your device. This is done
in Remote Control Mode, through the Source Control
interface.
Entering Car Receiver Settings
In Source Control interface, tap the MENU button on
your device, and select “Receiver Settings”.
You will be presented with the receiver setting
parameters that are available for your Car receiver
model.
Note
*1
EQ and Fader/Balance settings are only available for
certain Y2014 and 2015 Car Receiver models. HPF/LPF
and Color settings are only available for certain Y2015
Car Receiver models.
EQ Settings
In EQ Settings, tap on any Preset EQ button to change
the Car Receiver’s EQ immediately.
For User EQ, first select a User EQ, and then tap on the
EDIT button to edit the User EQ Setting.
You will be presented with the User EQ Edit Screen. Tap
on the respective zones to edit that range.
Press SAVE to send changes to the Receiver.
Tap here to edit
User EQ.

JVC Smart Music Control User Guide| 11
©
2016
JVCKENWOOD Corporation
Fader/Balance Settings
In Fader/Balance Settings, tap on any of the arrows to
move the crosshair to the approximate position as
indicated in the simulated cabin graphics. You can also
tap directly on the simulated cabin graphics to position
the crosshair. Press SAVE to save the settings to the car
receiver.
HPF/LPF Settings
In HPF/LPF settings, tap on the respective arrows to
adjust High Pass Filter and Low Pass Filter. Press SAVE to
save the settings to the car receiver.
Color Settings
In Color Settings, there are 2 submenu options: Preset
Color and User Color. Both submenu options will change
the respective color in JVC receiver in all zones.
(Individual zone color changes are only available on the
receiver itself.)
Tap the Preset Color tab to enter preset color settings.
Swipe right or left on the screen to select more preset
color options.
Tap directly on the color square to send and save the
color to the JVC receiver simultaneously. Press BACK on
the device to exit this screen.
2 tabs are available in this screen.
Under the Palette tab:
Tap on the User Color tab to enter User Color setting. In
this screen, a color palette is available for the user to
choose from all available colors.
Drag the slide bar to select the base color, and tap on
the color sheet to select the color shade of the base
color. The JVC receiver will automatically display the
selected color as the user taps on the screen, but the
color will not be saved on the receiver until the user
selects the SAVE button on the right.

JVC Smart Music Control User Guide| 12
©
2016
JVCKENWOOD Corporation
Under the Previous tab:
The last 8 previously saved user colors (when saved
using JSMC) are available in this screen, and tagged by
date and time automatically. Tap on the color square to
retrieve a previously saved color.

JVC Smart Music Control User Guide| 13
©
2016
JVCKENWOOD Corporation
OPERATION FEATURES
Gesture Control
Gesture control operation is designed for quick
operation control without looking at the smart phone.
Refer to JVC Smart Music Control App internal help
(“menu->preference->help”) for more details.
All gesture control patterns in JVC Smart Music Control
App are showed in the figure below.
Note
For freeform gestures, these gestures can be initiated
from any direction as long as the final drawn shape is
similar to the gestures in the chart.
Note
To enable proximity sensor, turn on the proximity sensor
in the preference setting.
Gesture Commands in Operation
The same gesture controls performed in different
sources will trigger different operations. The mapping of
each gesture control to each source is listed in the table
below.
Gesture
Remote Control
Mode*
Media
Player Mode
Direction Gesture
Finger Click Play/Pause/ Mute Play/Pause
Long Click Voice command Voice command
Swipe Right
Next Song/Right
Auto Scan
Next Track
Swipe Left
Previous Song/Left
Auto Scan
Previous Track
Swipe Up
Folder Up/Group
Up/Up Preset
Load Content
List UI
Swipe Down
Folder Down/Group
Down/Down Preset
Load Current
Playlist UI

JVC Smart Music Control User Guide| 14
©
2016
JVCKENWOOD Corporation
Freeform Gesture
Curve Right
Random Toggle/HD
UI*2
Random Toggle
Curve Left
Repeat Toggle/HD
UI*2
Repeat Toggle
Curve Up Source Change None
Curve Down EQ Toggle
Toggle Preset
EQ
Multi Point Gesture
2 Finger Swipe Up Volume UP None
2 Finger Swipe
Down
Volume Down None
2 Finger Swipe
Left
Load Mood
Selection
Load Mood
Selection*1
2 Finger Swipe
Right
Load Mood
Selection
Load Mood
Selection*1
Other Sensor
Proximity sensor Voice Command
Voice
Command
Note
*1 In Bluetooth Audio source, control functions depend
on phone.
*2 HD AM/FM supports display of TEXT information of
current streamed music.
VOICE COMMAND
JVC Smart Music Control App accepts voice command to
control playback and music search. Besides the playback
control, voice command can also control other actions
while in Car Receiver mode (e.g. change source, tune
preset).
Before you start voice command, choose your preferred
voice recognition engine language in “Voice music
search language” located in the preference setting.
To trigger voice command, perform a 2 finger tap or the
proximity sensor gesture. Wait for “ready tone” before
speaking your command.
Voice Command
Car
Receiver
Mode
Media
Player
Mode
Playback Control Command
Next
◎ ○
Previous ◎ ○
Repeat off
◎ ○
Repeat all
◎ ○
Repeat track
◎ ○
Repeat group
◎ X
Random off
◎ ○
Random all
◎ ○
Random group
◎ ○
Music Search Command
Search song
○*BT Only ○
Search artist ○*BT Only ○
Search album
○*BT Only ○
Car Receiver Mode Command
CD
○
X
SD ○ X
USB
○
X
Bluetooth
○
X
Auxiliary
○
X
iPod
○
X
iPhone
○
X
FM
○
X
Am
○
X
HD Radio X X
Android X X
Preset 1
○*Tuner Only
X
Preset 2
○*Tuner Only
X
Preset 3 ○*Tuner Only X
Preset 4
○*Tuner Only
X
Preset 5
○*Tuner Only
X
Preset 6
○*Tuner Only
X
X Not Support, ○ Full Support, ◎ Partial Support
Note
The Voice recognition engine requires internet access to
process voice data.
FLOATING HOME AND MEDIA
BUTTON
The Floating Home and Media Button is a feature that
allows quick access back into JVC Smart Music Control,
whenever another 3
rd
party app is running in the
foreground. This feature consists of a movable button in
the top layer of the screen, that always stays on top of
any 3
rd
party application.
The Floating Home and Media Button
Tapping on the Home button (on the left) will bring the
user back to the JSMC Home Launcher. Tapping on the
Media button (on the right) will bring the user back to
the JSMC Source Control Main Screen.

JVC Smart Music Control User Guide| 15
©
2016
JVCKENWOOD Corporation
The Floating Home and Media Button will appear in the
top left corner of the screen, whenever user goes to
another 3
rd
party program, either through the App
Launcher interface, or by the default Android buttons.
Once user is back in JVC Smart Music Control, the
Floating Home and Media Button will automatically
disappear.
Operation and Movement
1. Simply tap on the Floating Home Button to return to
JVC Smart Music Control’s Home Launcher.
2. Simply tap on the Floating Media Button to return to
JVC Smart Music Control’s Source Control Main
Screen.
3. If you want to move the button, simply drag the
button to another desired location.
Disabling the Feature
Either buttons can be independently disabled. Should
you wish to disable this feature, or individual buttons,
you can do so in the Preferences Setting.
1. Tap the MENU button on your device.
2. Tap [ Preference].
3. Tap [Application Settings].
4. Uncheck [Floating Home Icon] to remove the Home
button.
5. Uncheck [Floating Media Icon] to remove the Media
button.
AUDIO SWITCHING
Audio Switching is a special feature that allows 3
rd
party
apps to signal the supported car receiver
*1
to
temporarily allow audio segments
*2
to be played on the
car speakers, for the user to hear.
This feature works as follows:
1. JVC Smart Music Control is firstly in Remote
Control mode, and user launches a 3
rd
party app.
2. An audio segment
*2
is played from the 3
rd
party
app. JVC Smart Music Control sees the incoming
audio segment.
3. JVC Smart Music Control sends an interrupt
command to Car receiver.
4. Car Receiver will switch audio to allow the audio
segment to be played over BT Audio
*3
, and after
the audio segment ends, car receiver will
automatically switch back to the previous source
and continue playback.
This feature is useful for listening to important audio
segments like Navigation audio prompts, or any
notification prompts that make use of the Android
interrupt command set.
Note
*1
Audio Switching feature is only available for certain
Y2014 and newer Car Receiver models.
*2
Applies to audio interrupts that uses Android SHORT
and LONG DUCK audio interrupts only.
*3
A special interrupt text will be displayed on the Car
Receiver to inform the user of the Audio Switching.
SMS READER
The SMS reader function in JVC Smart Music Control App
reads out incoming SMS messages. It makes use of the
Android Text-to-Speech engine to read out the SMS
message.
Enable SMS Reader
1. Tap the Menu button on your device.
2. Tap [ Preference].
3. Tap [SMS Reader].
Option list appears.
4. Choose your reference option.
Note
In order to read out SMS messages, the Android Text-to-
Speech engine first requires a download of voice data
information in your preferred language.
Enable SMS Blacklist
4. Tap the Menu button on your device.
5. Tap [ Preference].
6. Check [Enable SMS Blacklist].
7. Tap [SMS Read Blacklist].
SMS blacklist screen appears.

JVC Smart Music Control User Guide| 16
©
2016
JVCKENWOOD Corporation
SMS Blacklist screen
8. Add contact into blacklist.
OTHER PREFERENCE SETTING
Preference Setting
Menu Screen
Other preference settings can be accessed by pressing
the MENU key on the device. Descriptions for various
options are provided in the preferences setting screen
itself.
Software MENU Key
Some devices do not have a hardware MENU key, and
do not make use of the virtual buttons. In this case, the
MENU operation is performed means of a software
MENU button located on the right side of the HOME
button (top left corner).
1. Long press on the HOME button, and wait till the
MENU button slides down beside the HOME button.
2. Slide your finger to the right, on to the MENU button.
3. Release finger, and Preferences menu will appear at
the bottom of the screen.
Preference setting
Blacklisted contact
Software MENU
Button
