
NI LINUX REAL-TIME SECURITY USER GUIDE
OVERVIEW AND TUTORIAL
Summary
NI Linux Real-Time is a publicly available Linux operating system that is used across various National Instruments real-
time systems.
This document is a guide for engineers working with products based on NI Linux Real-Time. It is intended to help you
understand and implement best practices for administrating and securing a NI Linux Real-Time system using primarily
standard Linux components. Individual sections provide step-by-step instructions and additional resources for further
reading.
Preliminary knowledge of Linux systems is not necessary since basic Linux architecture and commands are explained
where they are relevant within the sections.
Current state
Released
Version number
1.0.4-en
Date of last change
27.04.2017
Operating System
NI Linux Real-Time x64 4.1.15-rt17-4.0.0f0
Firmware
4.0.0f0 (installed with NI RIO 2016)
Disclaimer
This document discusses software of National Instruments as well as software of third-party providers. Where we do
discuss software of third-party providers, this is identified in the text. Linux is a registered trademark of Linus Tor-
valds.
Furthermore, this document contains links to other websites ("external links"). As the content of these websites is
not under control of National Instruments, we cannot assume any liability for such external content. The provider of
information of the linked websites is liable for the content and accuracy of the information provided. At the time
when the links were placed, no infringements of the law were recognizable. Upon notification of such infringement,
we will remove the link immediately.
The document does not replace any technical advice and does not present legal advice. For the entire document and
all its contents the current Sample Code License applies, available at http://ni.com/samplecodelicense.
This document is subject to change without notice.

Content
Summary ........................................................................................................................................................................ 1
Disclaimer ....................................................................................................................................................................... 1
General Information on the NI Linux Real-Time Operating System ............................................................................... 3
The Linux Foundation and the Real-Time Linux (RTL) Collaborative Project ............................................................. 3
The NI Linux Real-Time Distribution .......................................................................................................................... 3
Standard Components of the NI Linux Real-Time Distribution .................................................................................. 4
The PREEMPT_RT Patchset in NI Linux Real-Time ..................................................................................................... 4
Introduction to Linux Real-Time..................................................................................................................................... 6
Overview .................................................................................................................................................................... 6
The Linux Console ...................................................................................................................................................... 6
The Graphical User Interface Xfce4 ........................................................................................................................... 6
Accessing the System ................................................................................................................................................. 7
NI Linux Real-Time Directories and Partitions ......................................................................................................... 11
Basic NI Linux Real-Time Commands and Workflows .............................................................................................. 14
Security Aspects of NI Linux Real-Time ........................................................................................................................ 21
Considerations on Operating System Security ......................................................................................................... 21
Security Aspects of Software and Files .................................................................................................................... 21
Access Control .......................................................................................................................................................... 24
Hardening Interfaces ............................................................................................................................................... 40
Additional Information ................................................................................................................................................. 45
Deepen Your Linux Knowledge ................................................................................................................................ 45
Deepen Your Linux Security Knowledge .................................................................................................................. 45

3
General Information on the NI Linux Real-Time Operating System
The Linux Foundation and the Real-Time Linux (RTL) Collaborative Project
The Linux Foundation is a nonprofit organization consisting of leading Linux and open source companies with the
shared goal to accelerate the growth of Linux. Leading developers like Linux inventor Linus Torvalds participate in the
organization. Collaborative projects within The Linux Foundation protect and standardize Linux components.
National Instruments joined the Linux Foundation as a Silver Member and as a Gold level contributor to the Real-
Time Linux (RTL) Collaborative Project, working closely with other big industry companies like Google, Intel and IBM.
Members of the collaborative project are dedicated to supporting and developing a real-time kernel that combines
Linux standard components with the real-time patchset PREEMPT_RT, which has been used successfully for several
years in varied industrial applications.
Linux is widely considered to be the leading option for embedded system design due to its free, open sourced, and
community grown and supported nature. The results of the collaborative project connect hard real-time with the
proven Linux kernel. With the support of Linux Foundation members like National Instruments Linux continues to
grow as a stable, tested and secure operating system.
Link and source:
The Linux Foundation Announces Project to Advance Real-Time Linux (27.04.2017):
https://www.linuxfoundation.org/news-media/announcements/2015/10/linux-foundation-announces-project-ad-
vance-real-time-linux
The NI Linux Real-Time Distribution
Linux is a free open source operating system that is typically bundled into a software collection known as a distribu-
tion. Each distribution contains the Linux kernel, libraries, system-utilities, drivers and user software. Distributions
are created for designated use cases. For example, there are well-known distributions such as openSUSE and Ubuntu
for personal computers. Embedded systems have different requirements than personal computers. For example,
they require a small memory footprint and real-time capability, and they do not need a sophisticated user interface
or office software such as GIMP or LibreOffice.
NI Linux Real-Time is a standard distribution for embedded systems that can be used on various hardware platforms.
It includes standard components like the Linux kernel with the PREEMPT_RT patch, the GRUB bootloader program
and the OPKG package manager. Additionally, it includes NI-specific hardware drivers and system services for com-
munication with the LabVIEW development environment. Many other standard packages such as the GNU Compiler
Collection for text-based programming languages can be installed on demand via the OPKG package manager, but
they are not installed on the system by default to save space and reduce security patch requirements. You should
install packages you really need.
Links and sources:
Linux kernel (27.04.2017):
https://www.kernel.org/
Main page of the PREEMPT_RT patchset (27.04.2017):
https://rt.wiki.kernel.org/index.php/Main_Page

4
Standard Components of the NI Linux Real -Time Distribution
For maximum usability and security, National Instruments uses proven, standard components. The components used
by NI are disclosed on Github, where you can find the complete NI Linux Real-Time Distribution (27.04.2017):
https://github.com/ni). Table 1 lists the core components.
Table 1: Core Components of NI Linux Real-Time 2016
Component depending
on chip architecture
X86_64
ARMv7
System created with
Yocto / Open Embedded
Yocto / Open Embedded
Kernel version
4.1.15-rt17
4.1.15-rt17
Bootloader
GRUB2
u-boot
Init system
SysV
SysV
glibc
2.21
2.21
File system
EXT4
UBIFS
Device manager
udev
udev
Package manager
OPKG
OPKG
Desktop environment
Xfce4
(not available)
NI Linux Real-Time is optimized for use with National Instruments hardware. It can also be ported to other hardware,
although this is not officially supported by NI because of the large number of possible hardware configurations.
Links and sources:
GRUB, the bootloader used in NI Linux Real-Time (as example of a standard component, 27.04.2017):
https://www.gnu.org/software/grub/
The NI Linux Real-Time Operating System for free download and documentation on Github (27.04.2017):
https://github.com/ni
Feature Updates and Changelog for NI Linux Real-Time (27.04.2017):
https://decibel.ni.com/content/docs/DOC-39438
NI Linux Real-Time FAQ (27.04.2017):
https://decibel.ni.com/content/docs/DOC-35053
The PREEMPT_RT Patchset in NI Linux Real-Time
NI Linux Real-Time by default contains the kernel patchset PREEMPT_RT. The patchset provides a hard real-time
kernel that has been successfully integrated in diverse industrial devices over the last decade.
A patched Linux system runs two different schedulers for processing code. Time-critical code is processed by the real-
time scheduler provided by PREEMPT_RT. Non-critical code is still managed by the Completely Fair Scheduler (CFS)
introduced in Linux 2.6. This arrangement optimizes performance because the CFS can plan tasks with lower priority
more efficiently than PREEMPT_RT can.
Links and sources:
Under the Hood of NI Linux Real-Time (27.04.2017):
http://www.ni.com/white-paper/14626/en/
Inside the Completely Fair Scheduler (27.04.2017):
http://www.ibm.com/developerworks/library/l-completely-fair-scheduler/
Overview of PREEMPT_RT (27.04.2017):
http://lwn.net/Articles/146861/


6
Introduction to Linux Real-Time
Overview
While industry uses the term "Linux distributions", the Linux developer community often uses the term "Linux fla-
vors" because the Linux distributions strongly resemble each other. Distributions rely on the same kernel, and stand-
ard components are either the same or work very similarly. For example, many distributions use GRUB as bootloader,
and the three most widely used package managers (OPKG, APT and RPM) have similar commands and capabilities
even though their packages are not compatible.
You must configure NI Linux Real-Time to meet the requirements of a security-critical system. Such configuration
often involves modifying access rights, changing default configuration settings, and installing additional software. All
these procedures require knowledge of the Linux operating system and how to use the Linux command line. This
guide identifies the commands used for altering key system settings.
Since this guide cannot cover every detail, consider the resources listed in Additional Information on page 45 to
expand your Linux knowledge or to research solutions to a specific problem you are trying to solve.
The Linux Console
Every component installed on NI Linux Real-
Time can be controlled via the Linux command
line. The command line interpreter looks very
similar to the Windows command prompt (see
Figure 1). In Linux, these command line inter-
preters are called shells. You use a shell either
directly on the device (most devices have con-
nectors for monitor, mouse and keyboard) or re-
motely over the network using Secure Shell (for
example, with PuTTY).
The commands in NI Linux Real-Time are similar
to commands in other Linux distributions. If you
only have experience with the Windows com-
mand line, you will find some similarities, too.
For example, both operating systems share commands like cd, whoami or exit. The Linux command ls corre-
sponds to the Windows command dir and uses similar parameters.
The Graphical User Interface Xfce4
x86-based Linux Real-Time operating systems come preinstalled with the graphical user interface Xfce4. Xfce4 is a
lightweight desktop environment, which makes it particularly suitable for embedded systems.
Figure 1: The command ls means list and lists the content of a folder.

7
Figure 2 shows a screen shot of the Xfce4 desktop.
It was taken with the utility xfce-4-screenshooter
using the following commands:
opkg update
opkg install xfce4-screenshooter
For more information on opkg and installing soft-
ware, see section Using the Package Manager
OPKG – How to Install Additional Software on page
18.
Xfce4 is disabled by default, but you can enable it in NI MAX by following these steps:
(1) Start NI MAX
(2) Choose your NI Linux Real-
Time System from the Re-
mote Systems
(3) Step into System Set-
tings (first tab), there
scroll to the middle.
(4) Check Enable Embedded
UI
(5) Press Save. The device will
restart itself.
(6) Connect monitor, mouse
and keyboard to your em-
bedded device.
Accessing the System
Accessing the System via Network: Secure Shell and PuTTY
Secure Shell (SSH) refers to programs that establish an authenticated, encrypted network connection to another
device. The most popular software for this is PuTTY, a free implementation of SSH, originally developed by Simon
Tatham. An example of the User Interface can be found in Figure 4. To connect your Windows personal computer via
PuTTY with your NI Linux Real-Time Operating System, complete the steps in the next two subsections.
1
2
4
3
5
Figure 3: How to enable the graphical user interface Xfce4
Figure 2: A screen shot of the desktop environment Xfce4
8
Links and sources:
PuTTY, a free SSH and Telnet client (en):
http://www.chiark.greenend.org.uk/~sgtatham/putty/
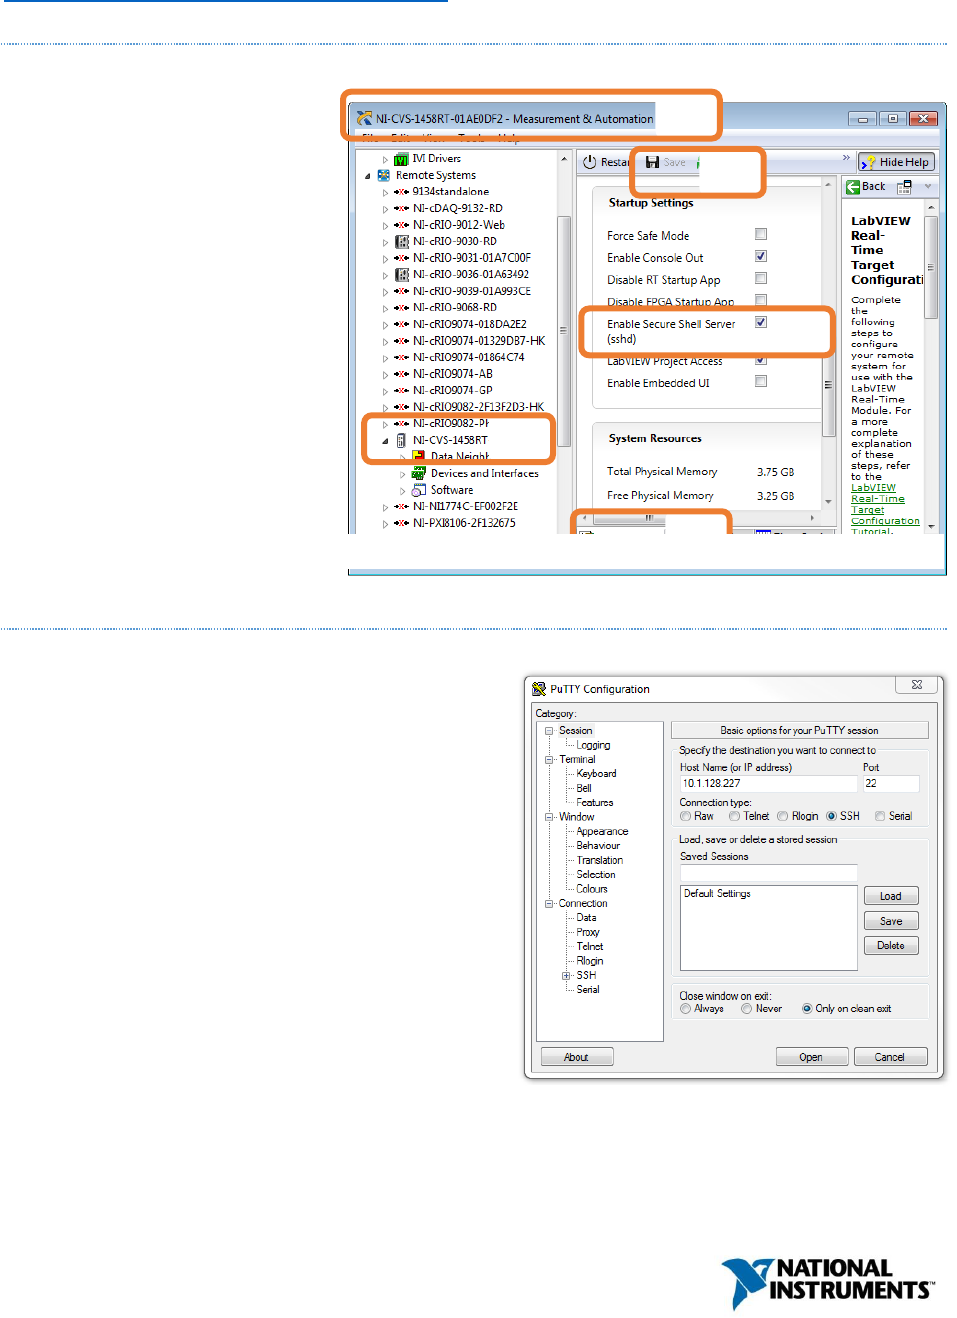
Activate Secure Shell Server (sshd) on Your NI Linux Real-Time System
(1) Start NI MAX
(2) Choose your NI Linux Real-Time
System from the Remote Systems
(3) Step into System Settings
(first tab), there scroll to the mid-
dle.
(4) Check Enable Secure Shell
Server (sshd)
(5) Press Save. The device will restart
itself.
Configure PuTTY
After the installation of PuTTY, follow these steps:
Open PuTTY. Enter Host Name (or IP ad-
dress) of your device and choose port (TCP port 22 is
used the default port for SSH)
Press Open.
1
2
4
3
5
Figure 4: How to enable Secure Shell
Figure 5: PuTTY configuration interface

9
Now a command line window opens (see Figure 6)
If your system has no admin configuration yet, log in
with the following credentials:
login as: admin
password: (void)
You should set an admin password as soon as possible.
You learn how to do this in section Setting up a Secure
Administrator Password on page 32.
After login, you can operate and configure the system
via command line.
Accessing to NI Linux Real-Time via FTP
By default, no FTP server is installed with NI Linux Real-Time. While it is possible to install a FTP server, National
Instruments does not recommend it because the FTP protocol is insecure. Use WebDAV and SSH instead.
Accessing to NI Linux Real-Time via WebDAV
You can use WebDAV to access the files on a NI Linux Real-Time system from your personal computer. The steps for
a Windows 7 system are described below.
WebDAV expects a login with user name and password. If you want to login with your admin account, you need to
set an admin password on the target system. See section Setting up a Secure Administrator Password on page 32
for step-by-step instructions.
To use WebDAV on your Windows PC, you map a network drive. Follow these steps on a Windows 7 PC.
Tip: If you use PuTTY, you can easily search through the internet for commands and then copy
them into the command line window. To do that, in your browser you select the command. Copy
it, i.e., using CTRL+C. Back in PuTTY you simply right-click, and the command will be written and
executed without any other action. This way, multiple lines (and thus whole scripts) can be trans-
ferred at once, too. This procedure also works with examples in this document.
Figure 6: Command line window PuTTY

10
(1) Right-click to Computer -> Map network drive...
(2) Select a drive letter and choose http://HOSTNAME/files/ as the folder. Instead of HOSTNAME you can
use the IP address, too.
(3) Enable Connect using different credentials to use your admin credentials instead of your Windows credentials.
(4) Now you will see the directory structure of your Linux Device as network drive below Computer.
Please note: The WebDAV access is established via the user webserv even if you log in as user admin. This is for
security reasons described in section User Account webserv on page 36. For now, keep the following in mind:
- Using WebDAV, you will not have write access for many folders
Figure 7: How to map a network drive using WebDAV
Figure 8: Directory structure of NI Linux Real-Time as network drive mounted in Windows
7

11
- lvuser, means, any LabVIEW program running on the device, will not necessarily have write access to the
files and folders you create via WebDAV
See section Discretionary Access Control: Users, Groups and Standard Folder Permissions on page 26 for more in-
formation and for best practices how to successfully work with user rights.
NI Linux Real-Time Directories and Partitions
Introduction to Linux Directories
The directory structure of NI Linux Real-Time follows Linux Foundation standards.
Notes for Windows users:
(1) Directory separator: Linux uses "/" instead of "\"
(2) Directory and file names: Linux is case-sensitive. If you search for a directory "/Home" but only have a direc-
tory named "/home", Linux will not find the directory!
(3) Unix principle "everything is a file": Devices are accessed via the file system, which means that a device
driver is described in the /dev folder by a driver file. By reading from and writing to the file, a program can
communicate with the device driver. The same applies to kernel data, where the directories used for these
purposes are /proc and /sys.
(4) Drives: Like Windows, Linux uses disk partitions for different “drives.” Linux displays and accesses these as
directories instead of separate disk drives.
The file system starts at the root-directory, which corresponds to "My Computer" in Windows. Figure 1 on page 6
shows the root directory structure displayed in PuTTY. The root directory contains the first folder level of all con-
nected partitions. You find all default partitions of NI Linux Real-Time explained in section NI Linux Real-Time Parti-
tion Structure on page 12.
Example: User directory of a user admin in Windows and Linux
Windows
My Computer ->
C: \Users\admin
Command Line
dir c:\Users\admin
Linux
root ->
/home/admin
Command line
ls /home/admin

12
NI Linux Real-Time Directories
Directory
Description
/bin
Essential user commands (executable binaries)
/boot
Essential files for boot
/c
No standard Linux folder. /c is implemented to ease the transition from older NI real-time systems,
because the directory structure of these real-time systems was similar to Microsoft Windows.
Symbolic link to /home/lvuser/natinst/bin
/C
Symbolic link to /c
/dev
"Device files". Interfaces to all devices, including tasks and processes. No real files.
/dev is located in volatile memory, see section NI Linux Real-Time Partition Structure on page 12.
/etc
Configuration files
/home
User folder. Typically a user will have its own subfolder in /home
/lib
Libraries. Typically references to binaries in /bin and /sbin
/lib64
Symbolic link to /lib
/lost+found
This folder is not described in the Linux standard, but it is supported by various Linux distributions.
It serves to display files that lost their folder information
/media
Subfolder for removable media, managed by the system. I.e., if an USB flash drive is connected to a
Linux device, it will be mapped as subfolder of /media
/mnt
Subfolder for removable media, for manual insertion by the system administrator
/opt
Additional software
/proc
Contains process information. No real files, but interfaces to system functions
/README_File_Paths.txt
File provided by NI containing basic file system information
/README_File_Transfer.txt
File provided by NI containing basic file system information
/run
Temporary system file. Contents are created newly with each system start. /run is located in vola-
tile memory, see section NI Linux Real-Time Partition Structure on page 12
/sbin
Essential system commands (executable binaries)
/sys
Contains kernel information. No real files, just interfaces to kernel functions.
/tmp
Symbolic link to /var/tmp
/usr
Multi-user applications and libraries
/var
Variable files. Includes temporary files, system log files and file buffers. /var/volatile is lo-
cated in volatile memory, see section NI Linux Real-Time Partition Structure on page 12
NI Linux Real-Time Partition Structure
Read /proc/partitions to see the system partition structure. With the commands df and lsblk, you can
fetch further information on all partitions (you can get a list of all available parameters with df --help and lsblk
–help, respectively).
The following partitions are set on the installed SSD:
File system = SSD Partition
Directory
lsblk label
Description
/dev/sda1
nigrub
GRUB (bootloader)
/dev/sda2
/boot
nibootfs
Kernel for Safe Mode & Run Node
/dev/sda3
/etc/natinst/share
niconfig
Configuration files including network settings like
for IP adresses, firewall and VPN.
/dev/sda4 =
/dev/root
/
nirootfs
Root filesystem where software and user files are
located.
The following file systems are created in RAM
File System on RAM
Directory
devtmpfs
/dev
tmpfs
/run
tmpfs
/var/volatile
Links and sources:
Wikipedia: Everything is a file (27.04.2017):
https://en.wikipedia.org/wiki/Everything_is_a_file

13
Wikipedia: Volatile memory tmpfs (27.04.2017):
https://en.wikipedia.org/wiki/Tmpfs
Official documentation of Linux directory structure (27.04.2017):
https://wiki.linuxfoundation.org/en/FHS
Working with File Paths on Real-Time Targets (27.04.2017):
http://www.ni.com/tutorial/14669/en/
Symbolic Links, see Section 3.11.2 (27.04.2017):
http://www.tldp.org/LDP/gs/node5.html
Resetting the File System to Factory Settings
NI Linux Real-Time provides two modes of operation:
- Run Mode
This is the mode for normal use. The user lvuser has
access to the root file system, but cannot perform any
accidental changes to protected system files.
- Safe Mode
The system boots with a read-only kernel. If the system
is not able to boot successfully in two recurring cases,
including startup of a LabVIEW application, it boots it-
self in Safe Mode.
Safe Mode is also used to configure or install NI soft-
ware from MAX, and for resetting the system to factory
settings (See Figure 9).
Additionally, GNU GRUB can be configured so that the
user can choose a mode at startup, which might be use-
ful if you are implementing more in-depth changes to
your system. To enable this feature, run the command
fw_setenv bootdelay 5 (here 5 is the number
of seconds for which the system will prompt to choose
your mode before beginning the boot process).
What to do if Safe Mode does not work
If you are using the admin account to modify or delete files within the /boot directory, you might damage the
operating system in a way it cannot recover itself any more (or does not even start up). If this happens to you, please
contact the technical support of National Instruments. In most cases, we can provide you an operating system image
to recover without having to return the device for repair.
Figure 9: Using
Right-click -> Format Disk
you can
reset the system, including or excluding the files on the configu-
ration partition.

14
Basic NI Linux Real-Time Commands and Workflows
Basic Linux Commands
The following tables provide useful commands for interacting with your NI Linux Real-Time system. When the
description says “display”, the output of the command is displayed on the output device. The output device is your
monitor (if you are directly working on the device) or your PuTTY window (if you are working remotely with PuTTY).
Links and sources:
Machtelt Garrels: Introduction to Linux. A Hands on Guide (27.04.2017):
http://tille.garrels.be/training/tldp/ch02s02.html
Moving Around the System
Command
Function
cd [directory-name]
Go to [directorypath]
Attention: Linux is case sensitive!
cd /home/lvuser
Go to /home/lvuser
cd ..
From current directory go to the containing directory (one up)
cd
Go to the current user’s home directory
clear
Clears the command line screen
ls
List all files in the current working directory (like dir in Windows command line)
ls -la
Again, list all files.
-l means “write a list, including additional information”
-a means “show all files, including hidden files and containing directory
-la means the same as -l -a (typically this is possible for all parameters without additional
options)
su [another-user]
Switch to another user account
exit
leave this session (or user)
logout
leave this session (or user)
shutdown -r now
Shutdown the system and -restart it now
pwd
Display the pathname for the current directory
whoami
Display the current user
Create, View and Remove
Command
Function
cat [filename]
Display the content of a file
cat [filename] | more
View the contents of a file one page or line at a time. Use Space to navigate one page at a
time. Use Enter to navigate one line at a time. This command set uses piping (for more
information see section Piping on page 17)
echo "[my-text]”
Display [my-text]
file [filename]
Shows the file type of [filename]
less [filename]
View the contents of a file one page at a time
vi [filename]
You can use the Linux text editor vi to open, create, read, change, write and save a text
file. An improved version of vi is vim (the name says it: “vi improved”)
It can be installed using the commands
opkg update
opkg install vim
For more on installing software see section Using the Package Manager OPKG – How to
Install Additional Software on page 18.
For an extensive reference to vi and vim have a look at the following Linux-tutorial:
http://www.yolinux.com/TUTORIALS/LinuxTutorialAdvanced_vi.html (27.04.2017)
Do NOT confuse the vi editor with the .vi ending of LabVIEW program files
mkdir [directory-name]
Create a new directory
mv [source] [destination]
Rename or move file(s) or directories
rm [filename]
Remove (delete) one or multiple files. Also works on directories
rmdir [directory-name]
Remove (delete) an empty directory

15
Search
Command
Function
ls
List all files in the current working directory (like dir in Windows command line)
grep [search-phrase] [file]
grep searches through a [file] and outputs all lines that contain [search-phrase]
grep -r [search-phrase] [folder]
grep searches -recursively through a [folder] and all it sub-folders. It outputs all lines that
contain [search-phrase]
which -a [command]
Find the directory in which [command] lies. The -a parameter says: List all occurrences.
Getting Help
Command
Function
[command] --help
Usable for most commands. Displays condensed help information, including typical pa-
rameters
man [command]
man is a program often found on desktop Linux operating system. It displays help file con-
tent for Linux commands. On NI Linux Real-Time it is not installed by default to keep foot-
print low. Nevertheless, the contents of man are quite helpful for working with Linux
commands. You can find the content of man on https://www.kernel.org/doc/man-pages/
(27.04.2017) or if you install man and all its pages to your system via opkg. An example
implementation for how to bring man-pages to your NI Linux Real-Time operating system
is presented in section A Shell Scripting Example: Install man-pages on page 19
Basic Shell / Putty Shortkeys
Shortcut
Function
CTRL+C
End a running program and return to the prompt
CTRL+D
Log out of the current shell session, equal to the commands exit and logout
CTRL+L
Clear this terminal, equal to the command clear
CTRL+Q
Reactivate PuTTY from suspension (CTRL+S)
CTRL+S
Suspend PuTTY (This is emotionally devastating if you start working in the VI Editor and are used to CTRL+S for saving, be-
cause it actually freezes PuTTY. To save your file in VI Editor, use “:w”, to reactivate PuTTY use CTRL+Q)
Linux Streams, Redirecting and Piping
Streams
Input and output in Linux is distributed through streams, which are one-way ‘pipes’ through which data flows.
There are three standard-IO-streams (all three of them containing text):
- STDIN (0): The input stream (keyboard by default)
- STDOUT (1): The output stream (console by default). The stream contains all “non-error” information a com-
mand can output.
- STDERR (2): The error stream (console by default). The stream contains all error information a command
can output.
Input
Output

16
Stream sources and destinations can be changed using two methods as we will see in the next examples. Redirecting
means that the stream is brought to or taken from a different location. Piping means that a stream is directly brought
to another command instead of showing it at a monitor.
Redirecting
You can redirect an output stream’s contents to a non-default location (e.g., a file) and redirect an input stream to
read from a non-default source. Redirection is indicated using the characters < and >. Table 2 shows some examples.
Table 2: Redirecting output
Command
Function
echo “[my-text]” > [filename]
Streaming to a new file: The output of echo “[my-text]”, which is [my-text], is redi-
rected from display to a new or existing file. If the file does not exist on the system, it
will be created. If the file already exists, it will be overwritten. This command will only
stream STDOUT, so error information will be printed to the screen as usual.
ls > [filename]
Streaming to a new file: The output of ls is redirected to a new or existing file. If the
file does not exist on the system, it will be created. If the file already exists, it will be
overwritten. This command will only stream STDOUT, so error information will be
printed to the screen as usual.
cat [filename1] > [filename2]
Streaming to a new file: The cat command outputs the content of a file. If the
output is redirected from STDOUT to [filename2], then [filename2] will contain the
content of [filename1]. You create a copy (without file information).
ls >> [filename]
Streaming to a file and append: The output of ls is redirected to a new or existing
file. If the file does not exist on the system, it will be created. If the file already exists,
the output will be appended. This command will only stream STDOUT, so error
information will be printed to the screen as usual.
STDIN (0)
STDIN (0)
STDERR (2)
STDOUT
(1)
Figure 10: Examples for STDIN (0), STOUT (1) and STDERR (2). ls -l is a known parameter, so results are written to STDOUT. ls -f is an
unknown parameter, so results are written to STDERR.

17
Command
Function
ls 2> [filename]
Stream any error information to a file: The output of ls is redirected to a new or
existing file. If the file does not exist on the system, it will be created. If the file
already exists, it will be overwritten. This command will only stream STDERR, so it can
be used for an error log, for example. STDOUT information will be printed on the
screen as usual.
This command will only stream STDOUT, so error information will be printed to the
screen as usual.
ls > [filename] 2>&1
Stream any information to a file: The output of ls, both of STDOUT and STDERR
bundled and then forwarded to a new or existing file. If the file does not exist on the
system, it will be created. If the file already exists, it will be overwritten. Your monitor
/ shell will not output anything.
In principle, it is also possible to change the source of STDIN, but this is less common. Here are two examples.
Table 3: Redirecting input
Command
Function
cat < [filename]
Takes the content of a file and prints it on the screen. Same as cat [filename]
grep [search-phrase] < [file]
Searches through a [file] and outputs all lines that contain [search-phrase]. Same as
grep [search-phrase] [file]
Piping
You can connect an output stream to an input stream using piping. Piping is often used to take the output of one
command and give as input to another command instead of showing it on the console. Piping is indicated by the |
character. Table 4 provides several examples.
Table 4: Piping Examples
Command
Function
cat [filename] | more
View the contents of a file one page or line at a time. Use Space to navigate one page
at a time. Use Enter to navigate one line at a time.
ls -lR | more
ls -lR lists the whole file system recursively, which is quite a mass of files. To look
through it, you use | more to show the contents one page or line at a time. Use Space
to navigate one page at a time. Use Enter to navigate one line at a time.
grep -R UNIX / | cut -d: -f2 | more
First grep searches recursively through / and outputs each line of each file containing
UNIX, resulting in lines like:
/home/lvuser/natinst/bin/README_File_Paths.txt:UNIX-style
operating systems.
The result is forwarded to the cut command. A list of some nice examples on cut can
be found at (27.04.2017): http://www.thegeekstuff.com/2013/06/cut-command-ex-
amples. Here we use two parameters. -d: says “cut it at each semicolon as a delim-
iter” and -f2 means “take the second field between the delimiters”. This way we get
something like that:
UNIX-style operating systems.
We already know the last part: more now helps us to search through our list of men-
tions one page or line at a time.
Links and sources:
More examples and further explanations (27.04.2017):
http://ryanstutorials.net/linuxtutorial/piping.php
https://www.ibm.com/developerworks/library/l-lpic1-v3-103-4/l-lpic1-v3-103-4-pdf.pdf

18
Using the Package Manager OPKG – How to Install Additional Software
Linux package managers are like the app stores of modern smart phones. A server stores a variety of packages ready
for download and installation. Each package contains all the executables, startup scripts, and configuration files for
a software application. The package manager on the embedded device connects to the server address(es) specified
in a configuration file. The package manager can download and install packages provided by the server as well as
upgrade or remove installed packages.
There are three major package managers (OPKG, APT and RPM). All resemble each other in how they are used and
which commands are possible, but they are not compatible with each other. They are not designed to coexist on the
same system.
APT and RPM are most common on user and server systems. If you are already a Linux user, you are likely to be
familiar with one of them. OPKG is a lightweight package manager especially made for embedded systems. NI Linux
Real-Time uses OPKG. A useful feature of OPKG is that it can install and upgrade packages for the root file system
(e.g., additional kernel modules and drivers), which can be useful on embedded systems.
Package support differs between the different package managers. If OPKG does not provide a particular package that
APT or RPM provides, the most likely reason is that the software application has not been tested for embedded
systems. While you can try to install such software using generic installation scripts from the software manufacturer,
you risk incompatibilities and you do not get the benefits of the package manager (e.g., installing all the required
dependencies, upgrading, and cleanly removing the software).
Table 5 lists the most typical commands for OPKG. The examples install GNU GCC, the Gnu Compiler Collection for C,
C++ and other languages if you need to compile your own scripts or to install software that is not provided through
OPKG. You need to be logged in with the admin account for these commands.
Table 5: Common OPKG commands
Command
Function
opkg update
Always before using OPKG, command it to update its list of available
packages by retrieving an up-to-date list from the server.
opkg list > /home/lvuser/opkg.list.txt
List all available packages and write them to a text file you can later
search through
opkg install packagegroup-core-buildessential
Download and install a package. Example installs GCC with support li-
braries
opkg upgrade packagegroup-core-buildessential
Upgrade a package
opkg remove packagegroup-core-buildessential
Remove a package
Links and sources:
NI Linux Real-Time FAQ (27.04.2017):
https://decibel.ni.com/content/docs/DOC-35053
NI software and drivers are installed, updated and uninstalled from the host system via MAX.
This is to keep the workflow for developers clean, who also program the embedded system via
host software such as Eclipse or LabVIEW. To handle this process properly, the embedded system
uses a second, separate package manager that does not interact with OPKG.

19
OPKG Package Manager (27.04.2017):
https://wiki.openwrt.org/doc/techref/opkg
GCC, the GNU Compiler Collection (27.04.2017):
https://gcc.gnu.org/
Basic Shell Scripting
Shell scripts are text files. They contain one or more shell commands to automate a task. They are similar to batch
files in Windows. Shell scripts typically use the extension .sh, like the following helloworld.sh:
The first line tells the script which shell to use. Unlike Windows, which only has one command interpreter (cmd.exe),
Linux can use several shells. Bash is one of the most commonly used Linux shells; you will see this line often in .sh
files.
Typically, shell scripts can be used for installations, rearranging files (including security backups), and so on. If you do
a task often, you should consider automating it with a shell script.
Shell scripts support all the commands possible from the command line, and they also support structures, conditional
branching, loops, and variables. In contrast, piping can only run the supplied commands sequentially.
A Shell Scripting Example: Install man-pages
The following example shows how to write a shell script to install and update man pages.
#!/bin/bash
echo "Hello, World"

20
#!/bin/bash
echo "The script starts now. It is intended to install the man pages on your computer."
echo "Beware: You should add man pages to each new opkg package you install separately."
echo "Typically, for a program [name] the man page will be called [name]-doc."
echo "updating opkg"
opkg update
echo "Now we will install man. This will not install any pages, though."
opkg install man
echo "Installing tar and xz for reading man pages"
echo "Both are used for uncompressing compressed files like zip."
opkg install tar
opkg install xz
echo "Download man page standard set from 19-Jul-2016"
# define variable MANFOLDERVERSION
MANFOLDERVERSION="man-pages-4.07.tar.xz"
# wget is used to download content to the current folder.
# It utilizes the variable MANFOLDERVERSION
wget https://www.kernel.org/pub/linux/docs/man-pages/$MANFOLDERVERSION
echo "Save man page standard set to location /usr/shared/man"
tar --xz -xvf $MANFOLDERVERSION # verbosely extract the file with name $MANFOLDERVERSION
mv $MANFOLDERVERSION man
cp -R man /usr/share # copy recursively: folder man into folder /usr/share
echo "Installing further documentation for installed packages."
echo "Actually, use this script to install man pages anytime!"
# IFS is a bash variable, long: "internal field separator".
# It's content (which is plain text) defines what characters ...
# ... are used to separate between fields in strings
IFS='' # set delimiter to none ... "\n" does not work properly with the opkg output
# The next line uses pipelining to create and fill a variable DOCFILELIST
# First command fetches all installed packages resulting in a list of ...
# ... "zip - 3.0-r2.182" and aliases
# Second command cuts everything after the first space
# Third command adds a "-doc"
# Result: for program "zip" a man page "zip-doc" is searched, which is a typical man page name
DOCFILELIST=($(opkg list-installed | cut -d' ' -f 1 | sed 's/$/-doc/' ))
# echo $DOCFILELIST
unset IFS # reset delimiter to default
# next we cut DOCFILELIST into an array of string values
DOCFILEARRAY=($(echo $DOCFILELIST | tr " " "\n"))
echo ${DOCFILEARRAY[@]}
echo "Now we will use DOCFILEARRAY to install all doc files that can be found."
echo "Attention: Not every package also has a package-doc file. If not, this script will send
an error message. Ignore that Error Message."
echo "This will take some minutes."
for i in "${DOCFILEARRAY[@]}"
do
opkg install $i
done
echo "Installation of man pages completed."

21
Security Aspects of NI Linux Real-Time
Considerations on Operating System Security
NI Linux Real-Time offers you many options to achieve your goals due to its flexibility and modularity. You can recom-
pile the kernel with additional modules, install software via OPKG, add your own C or LabVIEW routines, and change
configuration files. An attacker can do all that, too. Given an infinite amount of time, knowledgeable attackers can
break into even the most secure systems. Securing (also called “hardening”) your system means making attacks so
complex, costly, or discoverable that they are impractical within the system’s lifetime.
Estimation of a system’s security needs is an important exercise to appropriately scope the security solution. Security
needs are best determined early in the design phase and re-assessed periodically during the system’s lifecycle. The
following questions help to define the security risk and associated security measures of the system:
- How valuable is the system? For example, what intellectual property is lost if an intruder downloads files
on this system? What is the economic cost of system downtime or of damage to a control system?
- How exposed is the system? For example, what are the ways it can be accessed from remote networks,
from the local network, and physically? What important data can flow through those access points?
- What security measures reduce this exposure to a reasonable level? For example, what physical and per-
sonnel security measures can we use? What technical features or configuration options are needed? How
much do each security measure cost, and is that cost on par with its security value to the system?
Like any feature, technical security measures require knowledge building, development time, and maintenance. They
need system resources. They almost always reduce usability. However, their necessity is entirely dependent on the
specific purpose and context in which the system will be used. National Instruments controllers are designed for the
broadest possible range of uses with a configuration optimized for rapid development. Consider this the starting
point for adding technical security measures that address the security risks you have identified.
The following sections list various technical security measures, but the list is not exhaustive. Where possible, this
document provides examples or references to examples. It is important to remember that these security measures
need to be considered in view of the security risks you have identified. Not all of them are appropriate for your
system, and you may need other security measures not mentioned here.
For complex security situations, it is often helpful to engage the consulting services of companies that specialize in
embedded operating system security (e.g., Tresys Technology). You can also contact National Instruments sales for
referrals to specialized partners that offer professional support.
Security Aspects of Software and Files
Keep Software Up-To-Date
Over time, new releases of Linux and NI software add new security features, remove outdated or insecure features,
and incorporate fixes to security issues found in older releases. These fixes to security issues are usually made in the
most recent release only. By keeping firmware (i.e. Linux Version) and software (i.e. LabVIEW Version) up to date you
can improve the security of your systems. Conversely, continuing to use older firmware and software increases your
system’s exposure to the security issues become known about those older versions. Even if it is impractical for you
to update your system firmware and software often, you should reassess the security risk of the system considering
the security fixes present in newer firmware and software.

22
Minimize the Amount of Installed Software
As you develop your applications, you might incorporate RIO standard installations, add NI networking libraries, or
install a Linux compiler. Each software component you install on your system influences the security risk of that
system. While a compiler may not seem like it increases the system’s exposure, its presence can significantly help an
attacker that has gained a small foothold on the system.
To help minimize the amount of installed software, consider the following questions:
- Check NI MAX and look at the installed NI Software. Did you use a standard installation like RIO 16.0? Then
you might have a look at the install list and do some research: Which of the installed packages do you need,
which can be uninstalled? This is especially important for software that is doing networking.
- Use opkg list-installed and revise the list. Is every part necessary?
- netstat -ln and top show currently running processes. Do you see any processes your system might
not need?
Beware of the effort. Removing or disabling components without understanding how they are used can break your
application. Perform extended testing for functionality after removing or disabling a component.
File Integrity Monitoring
While preventing a successful attack is vital, so is detecting when your other security measures have failed. Software
for file integrity checking can detect the presence of new or altered software that do not belong on the system, which
is often a sign of a successful attack. A file integrity monitor compares current file content (especially executables
and configuration files) to expected values configured by an administrator. For any file that does not match (e.g., an
extra file or an altered file), the file integrity monitor triggers reactions such as e-mail to the administrator (a typical
approach for desktop PCs and server computers) or entering a failure state (a possible approach for security-critical
embedded systems).
The Typical Approach of File Integrity Monitoring
Planning and configuration phase:
- The administrator creates an integrity monitoring plan, which contains:
o Files to be monitored. See subsection Choosing System Components to Check for a discussion of pos-
sible files and folders.
o Time and/or situation to be checked. A typical time is at system restart. Regular checks in the back-
ground are also common.
o Action to be triggered for a mismatch. Typical for embedded systems is either to try and repair attacked
files (from a dedicated repair image) or to shut it down into a defined error state.
- The integrity monitoring plan can then be implemented accordingly.
o Write the plan into a tool-specific configuration file stored in a secure location on the system.
o On a correctly configured system, run a full system check to establish the baseline of expected values
for each monitored file, which is then stored in a secure location in the system.
o Enable the file integrity monitoring service.

23
Software Tools for Integrity Monitoring
There are various Linux utilities available for file integrity monitoring, but they are not necessarily designed with
embedded systems in mind. One utility with a small memory and processor footprint is "integrit", which is released
under GNU GPL license. Other options include Tripwire and NNT Change Tracker.
It is also quite possible to create your own file integrity checker in LabVIEW. For this, follow the typical approach,
stated above. Some notes on functionality:
- Choose a database:
o A possible database for this application is PostgresSQL, which is often used for Linux systems.
o Tutorial for and discussion on using PostgreSQL on NI Linux Real Time systems (27.04.2017):
https://decibel.ni.com/content/docs/DOC-30308
- Know MD5ChecksumFile:
o For file checksum calculation LabVIEW contains the "MD5ChecksumFile VI".
o See the LabVIEW Help for more information on this function.
Links and sources:
Integrit utility (27.04.2017):
http://integrit.sourceforge.net/texinfo/integrit.html
tripwire utility (27.04.2017):
https://github.com/Tripwire/tripwire-open-source
http://www.tripwire.com/it-security-software/scm/file-integrity-monitoring/
NNT Change Tracker (27.04.2017):
https://www.newnettechnologies.com/change-tracker-gen-7.html
Choosing System Components to Check
File integrity checking plans will differ from system to system, and there will be a need to test your plan rigorously to
avoid both wrong alarms and not identified attacks. Nevertheless, there are common guidelines which folders are
useful to check and which are not.
Folders which contents are typically checked:
Folder
Contents
/bin
Essential user commands (executable binaries)
/boot
Essential files for bootup
/etc
Configuration files
/home
User folder. Typically a user will have its own subfolder in /home
/lib
Libraries. Typically references to binaries in /bin and /sbin
/opt
Additional software
/sbin
Essential system commands (executable binaries)
/usr
Multi-user applications and libraries
Caution: Even for these folders there must be rigorous tests regarding which files to skip.

24
Folders which contents are typically skipped:
Category
Folders
Reason
folders in volatile memory tmpls and
devtemps
/dev
/run
/var/volatile
Is newly created at each reboot
Is newly created at each reboot
Is newly created at each reboot
Files that are frequently changed by
the operating system
/run
/var
Is newly created at each reboot
Variable files. No system files, but used by system.
Folders that do not contain actual files
/dev
/proc
/sys
Dynamically created interfaces to devices
Dynamically created system information
Dynamically created system information
Files that are frequently changed by
the user
/var/log
/home/lvuser/*
Dynamically created log files (system and user)
Dynamically by LabVIEW created files (user)
Access Control
Access control is about giving users, groups and processes the access privileges they need, while preventing access
where it should not be allowed. Access control also involves a password policy.
In discussions about access control, you will commonly find the terms subject and object. A subject is doing some-
thing on an object. For every object, there must exist a definition of which subjects are allowed what actions.
Objects are files (recall that everything in Linux is treated as a file, including devices, folders, and network sockets).
Subjects are more complex and differ by the type of access control model being used.
- The User Perspective: Discretionary Access Control (DAC):
Subjects: users, groups (of users)
Objects: files, processes (inherited by the file rights of their executables)
With DAC, access control is handled on the user’s discretion. This is what you know from your everyday computer
life. A typical Linux or Windows user decides for his own files: Who has access to them? What will anybody be
allowed to do? A user can grant or withdraw permissions at any time.
By default, DAC is an essential part of NI Linux Real-Time. You will typically work with the users lvuser and
admin, you can create users and groups, and you will handle rights on files on a user or group basis. In the next
sections, we will discuss in-depth, how you handle users. We also add information on password security there.
- The Process Perspective: Mandatory Access Control (MAC):
Subjects: processes
Objects: files, processes
With MAC, access control is handled by the system and cannot be adjusted by users. MAC access control rules
(called policies) are implemented by the developers or integrators of a specific Linux system.
The idea behind MAC is simple: Allow each process to access only what it needs to accomplish its tasks. For
example, the cat command is meant to display the contents of files. A MAC policy would give cat the privilege
to read files but not allow cat to delete files or to open a TCP port.

25
MAC closes a security gap that exists in DAC by design. Consider the following scenario: With DAC, when you use
cat to read a file, the cat command has all the privileges of your user account. If an attacker alters the cat
utility to also send the file contents to an internet server and your account has the privilege to open an internet
connection and send files, DAC will not stop the altered cat utility from doing so. A properly defined MAC policy
would prevent the altered cat utility’s internet access while allowing it to display the contents of the files. MAC
supplements DAC.
A well-known implementation of MAC is Security Enhanced Linux (SELinux). Together with the internet security
company Tresys Technology, National Instruments created a policy for SELinux to be used with NI Linux Real-
Time. This document contains a short overview of SELinux and links to online resources for configuring SELinux,
but an in-depth discussion of the NI SELinux policy and possible adaptions are outside the scope of this docu-
ment. If you want to explore an SELinux implementation, we recommend contacting a third-party provider like
Tresys Technology for assistance.
- The Role Perspective: Role-based Access Control (RBAC):
Subjects: users or projects with a certain role
Objects: files, processes (inherited by the file rights of their executables)
RBAC means that a user’s access rights are defined by the user’s current role. Users can be assigned to one or
more roles, but only one is active at a time. If you have administrator rights on one of your newer Windows
computers, you have experienced a form of RBAC. When you start an installer, you may be prompted to confirm
that you temporarily want to use your administrator role to install the software. Additionally, you have the pos-
sibility (via right-click) to use your administrator role to run a program by selecting “run as admin”. Your user
account can operate in either a “standard user role” or an “administrator role”.
RBAC can be approximated using DAC groups, but with DAC groups the user is always acting as all the roles
assigned to the account. One problem with this approach is that any member of the group can change the group
permissions. This is one reason why MAC is preferred for implementing RBAC.
RBAC is best implemented using MAC, such as SELinux. For example, an RBAC role can define restricted privileges
for a maintainer role so that you don’t have to give full root or admin privileges to maintenance personnel.
The maintainer role can be allowed to update software and run diagnostic utilities but not be able to perform
any other privileged functions. Further details are outside the scope of this document.
Links and sources:
Discussion on DAC, MAC and RBAC on Stackexchange.com (27.04.2017):
http://security.stackexchange.com/questions/63518/mac-vs-dac-vs-rbac
Blog article on DAC, MAC and RBAC on Techotopia.com (27.04.2017)
http://www.techotopia.com/index.php/Mandatory,_Discretionary,_Role_and_Rule_Based_Access_Control
Blog article on DAC, MAC and RBAC by jimmyxu101 (27.04.2017)
https://sites.google.com/site/jimmyxu101/concepts/accesscontrol

26
Discretionary Access Control: Users, Groups and Standard Folder Permissions
Default Linux User Management
Users
Linux is a multi-user operating system. This means that
multiple users can interact with the system at the same
time. In fact, it is common practice in Linux to start differ-
ent processes with their own, reduced user rights. This
means that in Linux each process (or group of similarly act-
ing processes) has its own user. For example, if you log in
as admin via WebDAV, WebDAV itself is started with web-
serv user rights only (see Figure 12).
But why are there so many users on a typical Linux sys-
tem? If processes would be directly started by the system
(root or admin), then the processes would have full ac-
cess rights; if there was a wrong programming in these
processes, they could easily be abused by attackers.
Examples for users, processes, and directory access permissions:
Linux
webserv
WebDAV
su
webserv
run
files
read
write
Figure 10: The Linux operating system logs in as user webserv and,
being this user for now, starts the process WebDAV. After that, Web-
DAV works only with the user rights of user webserv and not with
the much more privileged admin account. This is a typical example
how in a Linux system processes are started with the minimal user
rights they need, to ensure better security in case of a hacker attack.
User
write access to its
own home
directory
Typically read
access to the most
other directories
Associated
processes
Caller (of
associated
processes)
lvuser
write access to
/home/lvuser
read access to /
LabVIEW Runtime
NI processes
xfce4
admin calls
processes with
lvuser rights
webserv
write access to
/home/webserv and
/home/lvuser (via
group ni)
read access to /
WebDAV
other
communication
processes
admin calls
processes with
webserv rights
Figure 11: User rights concept in Linux. lvuser: typical processes and access rights. webserv: typical processes and access rights.
(The illustrations above are simplified. Users with higher privileges like lvuser, webserv and admin will have write or execute rights outside
their home folder. Using the parameterized command "ls -lR / > [FilePath]" you get a complete list of all files and their user rights on
the system (written into a text file). You will find a complete list of all users and groups in the section Description of Default Users and Groups on
page 32.

27
Groups
Like users, groups in Linux should have a specific purpose. Examples:
Users may be grouped together in a "group". They then share the file rights of this group. Examples:
The file rights of a group can differ from the file rights of a user. Typically, the user of a file has the same or more
rights on the file than a group. Example:
Figure 12: You can use the
su command the same way as the operating system, that is, to perform specific commands or start specific pro-
cesses with restricted user rights. To do that in console, you (being logged in as
admin) type su lvuser
and press enter. You now behave as
lvuser
in every way. The command whoami tells you the current user. Log out from the su session with the command exit.
adm has access to several log files in /var/logs
ni has access to National Instruments files and processes
niwscerts has one very specific function: to manage SSL certification
tty grants read/write access to different terminal devices in /dev
lvuser belongs by default to four groups: tty, plugdev, niwscerts and ni.
webserv belongs by default to five groups: adm, tty, plugdev, niwscerts and ni.
Let's have an exemplary look at tty and adm:
webserv and lvuser both belong to group tty, because they both might need access to terminal de-
vices. webserv belongs to adm, and lvuser does not, because lvuser does not need access to logfiles.
The folder /home/webserv belongs to user webserv and to group ni. User webserv has read, write
and execute rights. Group ni has read and execute rights, but no write access.
As user lvuser is part of the group ni, it gets read and execute rights, but no write access.

28
File Permissions
If you set access permissions to a file, you can set three different access rights: "user", "group" and "others". In this
context, "others" means "all users and groups". Access permissions follow this scheme:
Notice the “s” group access to the right of webserv folder. This flag is called SGID (Set Group ID upon execution).
When a user executes commands in folder webserv (like creating files or sub-folders via mkdir), the user does so
with the group rights of the folder webserv (ni in this example). This ensures that created files have ni as a group.
This is useful for shared folders where multiple users interact. Note that there are other extended permissions SUID
and Sticky Bit not addressed in this document.
Use caution with these extended permissions because they can have unintended consequences.
Links and sources:
SUID and Sticky Bit (27.04.2017):
http://thegeekdiary.com/what-is-suid-sgid-and-sticky-bit/
Best Practices on User and Group Permissions
Each file is assigned to exactly one user and exactly one group. If several users must have access rights to a file,
then the file and the users need to share a group.
For example, consider the following situation: You want to fetch data files via WebDAV (user webserv) and then
process these files via LabVIEW (user lvuser). The requirement here is to have write access for both webserv and
lvuser. The problem is, there only can be one user assigned as the files’ owner.
You have three options to give these users access:
(1) You can give all users write access to the file. This is not advisable since it contradicts the goal of assigning the
minimum permissions to users and groups. And you surely do not want other processes accidentally change your
files!
(2) Both webserv and lvuser are part of the group ni. Since they are also the only users of ni, you can complete
the following steps to grant write access to group ni:
group of the file file name
user of the file
access rights of all other users "o "
access rights of the group "g"
access rights of the user "u"
d = directory, l = link, - = file
ls -l ("list in long form"): file information including access permissions
chmod ("change mode") changes access permissions for files and folders.
Examples of parameters you can use:
chmod ugo+rwx [file]
change mode of user, group and other; add
rights to read, write, execute
chmod o-x [folder] -R
change mode of other; remove right to exe-
cute -Recursively, i.e., including subfolders and
included files
chmod u+w [file]
change mode of user; add right to write

29
a. change the group of the data files to ni
b. add write access for the data files for group ni
(3) In some cases, you might want to add modularity here by creating a new group. You can complete the following
steps to create a new group and grant write access to that group. This is especially appropriate if you want to
keep groups very specific.
a. create a new group file-workers
b. change the group of the data files to file-workers
c. add write access to group file-workers
Useful System Commands
Linux User Management with Pluggable Authentication Modules (PAM) and NIAuth
For enhanced user management and security, NI Linux Real-Time manages users with the PAM Plugin, which was
originally created by well-known Linux distributor Red Hat. PAM integrates NIAuth, a cross-system NI Interface for
user management. A system administrator can create new users both via Linux standard user management and via
PAM. PAM is the recommended method.
Find out user and group of a file
groups lvuser
shows all groups the user lvuser is a member of
lid -g ni
shows the users of group ni. The lid (“List ID”)
command is not preinstalled on NI Linux Real-Time
systems. You can install it using:
opkg update
opkg install libuser
Find files belonging to a user or group
find / -user [username]
starting at root directory "/", finds all files and folders
that belong to a certain user
find / -user [username] >
[Filepath]
writes a list of all files belonging to a user into a text file
find / -group [groupname]
starting at root directory "/", finds all files and folders
that belong to a certain group
ls -lR / > [FilePath]
starting at "/", working recursively through all folders,
lists all files on the system with user right information
and writes this information to a text file
Change owner of a file
chown lvuser:ni
/home/lvuser/MyFile
changes owner: user lvuser and group ni now own
MyFile
chown -R :ni
/home/lvuser/MyFolder
changes owner recursively: do not change user, but
group ni now owns MyFolder
and all contained files
and directories
Add a group
groupadd file-workers
creates a new group file-workers
groupdel file-workers
deletes the group file-workers
usermod -a -G file-workers
lvuser
modifies user lvuser to have additional group
file-workers
Linux standard functions for users: useradd, usermod, userdel
Linux standard functions for groups: groupadd, groupmod, groupdel

30
Example: Steps to create a user
(1) Open your web browser and enter http://IPADDRESS for the URL, where IPADDRESS is the IP address
of your device
(2) The System Configurator opens. Log in via the button you will find in the upper right corner. Log in as admin
(3) Select the third tab "Security Configuration"
a. To add a user, select the "+" icon at the bottom left
b. Choose a user name
c. Choose a user password via the "Change Password" Button
d. Do not forget to save your changes with the "Save" Button
For creating new users, use PAM since it integrates seamlessly into the system. For changes to existing users and
groups outside PAM, you can still use the traditional Linux standard functions. See section Useful System Commands
on page 29 for an overview of these functions. See section Best Practices on User and Group on page 28 for an
example where you would rather use the standard functions.
Please keep in mind that NI users like lvuser and webserv are deliberately hidden in the PAM administrator
interface to reduce the risk of wrong settings. Use caution when changing either of these users!
Users and groups that are managed by Linux default are stored in following standard files: /etc/passwd,
/etc/shadow, /etc/group
Figure 13: Login form for System Configurator
2A
2B

31
Users and groups that are managed by PAM are saved in binary form using the NIAuth Plugins: /etc/na-
tinst/share/niauth/registry.bin
Best Practices on Password Security
Password Complexity
With advances in computer technologies, password guidelines are constantly changing. An up-to-date set of guide-
lines as well as an extensive discussion on the topic can be found at Wikipedia (27.04.2017):
https://en.wikipedia.org/wiki/Password_strength#Guidelines_for_strong_passwords
Users of a system include both the set of users managed by standard Linux commands and the
set of users managed by PAM. You can get the total with the command getent
, which is not
installed by default. You can install it via:
opkg update
opkg install libc6-utils
The commands are:
getent passwd
getent group
3
3a
3c
B
3d
3b
B
Figure 14: Create a user via web using System Configurator

32
Change the Default Administrator Password
As a fundamental security requirement, set a password for user admin.
For a step-to-step tutorial see above section Password on page 31. Follow the description, starting at 3b.
Links and sources:
More on managing Linux users (27.04.2017):
http://www.tldp.org/LDP/sag/html/managing-users.html
More on Linux access rights (27.04.2017):
http://www.tldp.org/LDP/intro-linux/html/sect_03_04.html
Starting with PAM (27.04.2017):
http://www.tuxradar.com/content/how-pam-works
Red Hat reference documentation of PAM (27.04.2017):
https://access.redhat.com/documentation/en-US/Red_Hat_Enterprise_Linux/6/html/Manag-
ing_Smart_Cards/Pluggable_Authentication_Modules.html
Description of Default Users and Groups
Linux systems commonly use dedicated users (and groups) for many processes. This section describes the default
users and groups in NI Linux Real-Time.
System administrators and device programmers mostly work with the three users admin, lvuser and webserv.
This document provides more detail about these three users in section In-Depth Discussion of Essential NI User
Accounts admin, lvuser and webserv on page 36. Most of the other users have very specific permissions and
purposes. They are either used by internal processes of the operating system or they are kept for compatibility rea-
sons. If you want to reduce the number of users or groups, be aware of the risk of breaking some or all your system.
Do rigorous documentation and be prepared to reset your system in worst case.
NI Linux Real-Time Default Users
User
Groups
IDs user
& group
Description
Home folder & shell
admin
administrators
everyone
0
0
System administrator account, gains root privileges by
PAM. See section User Account admin on page 36.
/home/admin
/bin/bash
root
administrators
0
0
The root account typically gains full access to everything
including system files and because of that corresponds to
the typical idea of an admin. Often an admin has root
privileges, like in NI Linux Real-Time.
/home/admin
/bin/sh
daemon
daemon
1
1
In several distributions, daemons are added to user and
group deamon, as they should not have admin rights
(when they are started by root or admin). deamon is
not used by default, but for compatibility reasons it is
part of this distribution. Today it is typically recom-
mended to create a dedicated user and group for each
process.
/usr/sbin
/bin/sh
bin
bin
2
2
For historic reasons part of most Linux distributions, not
in use.
/bin
/bin/sh
sys
sys
3
3
Part of the distribution for compatibility reasons. Used
for configuration and maintenance of hardware and soft-
ware.
/dev
/bin/sh

33
User
Groups
IDs user
& group
Description
Home folder & shell
sync
nogroup
4
65534
Part of the distribution for compatibility reasons. Not
used in default state.
/bin
/bin/sync
games
games
5
60
Part of the distribution for compatibility reasons.
/usr/games
/bin/sh
man
man
6
12
Used by system command man. Part of the distribution
for compatibility reasons. Not used in default state.
/var/cache/man
/bin/sh
lp
lp
7
7
lp has access to printers on /dev. Part of the distribu-
tion for compatibility reasons. Not used in default state.
/var/spool/lpd
/bin/sh
mail
mail
8
8
mail has access to mailboxes in /var/mail and is typ-
ically used for mail services in other distributions. Part of
the distribution for compatibility reasons. Not used in de-
fault state.
/var/mail
/bin/sh
news
news
9
9
Default user for news. Part of the distribution for com-
patibility reasons. Not used in default state.
/var/spool/news
/bin/sh
uucp
uucp
10
10
To be used by the Unix to Unix Copy Protocol. Part of the
distribution for compatibility reasons. Not used in default
state.
/var/spool/uucp
/bin/sh
proxy
proxy
13
13
Similar to daemon. For web cache files. Part of the distri-
bution for compatibility reasons. Not used in default
state.
/bin
/bin/sh
www-data
www-data
33
33
In some Linux distributions world wide web data files are
assigned to this user, as well as web services, to access
these data files. Part of the distribution for compatibility
reasons. In NI Linux Real-Time typically user webserv
replaces www-data functionality.
/var/www
/bin/sh
backup
backup
34
34
Used in some Linux distributions. The idea behind is to
run backup software locally with limited user rights. Part
of the distribution for compatibility reasons. Not used in
default state.
/var/backups
/bin/sh
list
list
38
38
Linux standard user as mailing list manager. Part of the
distribution for compatibility reasons. Not used in default
state.
/var/list
/bin/sh
irc
irc
39
39
Part of the distribution for compatibility reasons.
Server for internet relay chat, in short IRC.
/var/run/ircd
/bin/sh
gnats
gnats
41
41
Part of the distribution for compatibility reasons. Not
used in default state.
/var/lib/gnats
/bin/sh
nobody
nogroup
65534
65534
Thought for daemons with no file access. These then are
run as nobody.nogroup. In NI Linux Real-Time no-
body accesses folder /proc/1530, which ensures
availability of system processes.
/nonexistent
/bin/sh
messagebus
messagebus
999
998
Used for inter process communication. Specifications of
D-Bus can be found here (27.04.2017):
https://freedesktop.org/wiki/Software/dbus/
/var/lib/dbus
/bin/false
sshd
sshd
498
497
System service, implements OpenSSH by OpenBSD. Used
in Linux by default. Specifications can be found here
(27.04.2017):
http://www.openssh.com/
/var/run/sshd
/bin/false
avahi
avahi
998
997
avahi is a standard linux service. It is a implementation
of mDNS/DNS-SD and is used for devices to be able to
find each other in a network without DHCP Server. Speci-
fications can be found here (27.04.2017):
http://avahi.org/doxygen/html/
/var/run/avahi-daemon
/bin/false
lvuser
tty, plugdev,
niwscerts, ni
500
500
Standard user on a NI Linux Real-Time System. lvuser
rights are needed for LabVIEW, most NI system services
and the graphical user interface Xfce4. See section User
Account lvuser on page 36.
/home/lvuser
/bin/sh
openvpn
openvpn
499
499
In Linux distributions commonly used virtual private net-
work daemon. Specifications can be found here
(27.04.2017):
https://openvpn.net/index.php/access-server/docs.html
/home/openvpn
/bin/sh
webserv
adm, tty,
plugdev, niws-
certs, ni
501
500
User for web services like WebDAV. See section User Ac-
count webserv on page 36.
/home/webserv
/bin/sh

34
User
Groups
IDs user
& group
Description
Home folder & shell
polkitd
polkitd
398
394
Authorization manager for D-Bus. Specifications can be
found here: https://www.freedesktop.org/soft-
ware/polkit/docs/latest/polkit.8.html
/etc/polkit-1
/bin/sh
NI Linux Real-Time Default Groups
Many of the groups listed below are not used. These are part of this distribution mainly for compatibility purposes
and can still be used as originally suggested. While it is possible to delete these groups, this is not recommended.
Group
ID
Assigned
users
Used?
Description
administrators
0
admin
x
PAM group: administrators. Current permissions can be found by opening the Web
Security Configuration in your web browser (using the IP address of the system)
everyone
10003
admin
x
PAM group: not used. It is intended to be a user group with common permissions.
Current permissions can be found by opening the Web Security Configuration in your
web browser (using the IP address of the system)
powerusers
10001
x
PAM group: not used. It is intended to be a user group with advanced permissions.
Current permissions are void and can be changed in the Web Security Configuration
in your web browser (using the IP address of the system)
users
10002
x
PAM group: not used. It is intended to be a user group with common permissions
like everyone. Current permissions can be found by opening the Web Security
Configuration in your web browser (using the IP address of the system)
root
0
root
x
Group of the root account.
daemon
1
daemon
In several distributions, daemons are added to user and group deamon, as they
should not have admin rights (when they are started by root or admin). deamon
is not used by default, but for compatibility reasons it is part of this distribution.
Today it is typically recommended to create a dedicated user and group for each
process.
bin
2
bin
For historic reasons part of most Linux distributions, not in use.
sys
3
sys
x
Part of the distribution for compatibility reasons. Used for configuration and
maintenance of hardware and software.
adm
4
webserv
x
Has access to diverse files in /var/volatile/log.
tty
5
lvuser
webserv
x
Allows read and write access to some (terminal-)devices in /dev.
disk
6
x
Accesses file systems like /dev/sda (the SSD of the device) and /dev/ram (RAM
memory). This can be relevant for some software, but is commonly considered to be
a security hazard. In NI Linux Real-Time, the group exists for compatibility reasons,
but does not have any assigned users.
lp
7
lp
lp has access to printers on /dev. Part of the distribution for compatibility reasons.
Not used in default state.
mail
8
mail
mail has access to mailboxes in /var/mail and is typically used for mail services
in other distributions. Part of the distribution for compatibility reasons. Not used in
default state.
news
9
news
Default group for news. Part of the distribution for compatibility reasons. Not used
in default state.
uucp
10
uucp
To be used by the Unix to Unix Copy Protocol. Part of the distribution for
compatibility reasons. Not used in default state.
man
12
man
Used by system command man. Part of the distribution for compatibility reasons.
Not used in default state.
proxy
13
proxy
Like daemon. For web cache files. Part of the distribution for compatibility reasons.
Not used in default state.
kmem
15
In some distributions users within this group have read access to the content of the
system memory.
input
19
x
Access to input devices like mouse and keyboard in /dev/input.
dialout
20
x
Used for modems, ISDN and PPP output devices. Linked to kernel within the udev
device rules /udev/rules.d/
fax
21
x
Old group for fax devices, part of the distribution for compatibility reasons. Is
registered as TCP service in /etc/services
voice
22
Used in some distributions if a modem is used as an answering machine
cdrom
24
Owns all CD/DVD devices in /dev. Part of the distribution for compatibility reasons.
floppy
25
Owns floppy disks in /dev

35
Group
ID
Assigned
users
Used?
Description
tape
26
Owns tape drives in /dev
audio
29
Owns audio devices in /dev
dip
30
Used for programs that operate, but not configure, modems or similar devices.
Stands for "Dial-up IP".
www-data
33
www-data
In some Linux distributions world wide web data files are part of this group, as well
as web services, to access these data files. Part of the distribution for compatibility
reasons. In NI Linux Real-Time typically user webserv replaces www-data
functionality.
backup
34
backup
Used in some Linux distributions. The idea behind is to run backup software locally
with limited user rights. Part of the distribution for compatibility reasons. Not used
in default state.
operator
37
Historic user group, thought as only group for remote logins.
list
38
list
Linux standard user as mailing list manager. Part of the distribution for compatibility
reasons. Not used in default state.
irc
39
irc
x
Part of the distribution for compatibility reasons.
Server for internet relay chat, in short IRC.
src
40
In some distributions used for groups that should be able to access source code.
gnats
41
gnats
x
GNATS is a tool for bug tracking.
shadow
42
Programs with read access to /etc/shadow are managed in this group via sgid.
utmp
43
Used by Linux to manage login/logout procedures. Programs with access to these
functions should be added to this group using sgid.
video
44
x
Owns video devices like framebuffers (to monitors) or web cams in /dev. In NI Linux
Real-Time used for /dev/fb* and /dev/dri
sasl
45
x
Used for authentication via PAM.
plugdev
46
webserv
lvuser
x
Used to manage plug&play memory devices like usb (dev/bus/usb/*) without
root privileges. For optical devices see group cdrom.
staff
50
Prepared user group with similar concept like group everybody. A member of group
staff should get execute privileges for functions in /usr/local/bin as well as
/usr/local/sbin without gaining root privileges.
games
60
games
Owns /usr/games
shutdown
70
Use this group to enable users to run command /sbin/shutdown
users
100
Another prepared user group.
nogroup
65534
sync
nobody
x
Thought for daemons with no file access. These then are run as nobody.nogroup.
netdev
999
Prepared user group with configure privileges for network interfaces.
messagebus
998
messagebus
x
Used for inter process communication. Specifications of D-Bus can be found here
(27.04.2017):
https://freedesktop.org/wiki/Software/dbus/
sshd
497
sshd
x
System service, implements OpenSSH by OpenBSD. Used in Linux by default. Speci-
fications can be found here (27.04.2017):
http://www.openssh.com/
avahi
997
avahi
x
avahi is a standard Linux service. It is a implementation of mDNS/DNS-SD and is
used for devices to be able to find each other in a network without DHCP Server.
Specifications can be found here (27.04.2017):
http://avahi.org/doxygen/html/
ni
500
lvuser
webserv
x
Group used by National Instruments users. Ensures that NI system services are run,
without allowing root access.
openvpn
499
openvpn
x
In Linux distributions commonly used virtual private network daemon. Specifica-
tions can be found here (27.04.2017):
https://openvpn.net/index.php/access-server/docs.html
niwscerts
498
lvuser
webserv
x
Manages the SSL certification store
polkitd
394
polkitd
x
Authorization manager for D-Bus. Specifications can be found here (27.04.2017):
https://www.freedesktop.org/software/polkit/docs/latest/polkit.8.html
crontab
396
x
Manages cron jobs. Owner of /var/spool/cron

36
In-Depth Discussion of Essential NI User Accounts admin, lvuser and webserv
This section describes the NI user accounts that are the most common to configure: admin, lvuser and web-
serv. See section Description of Default Users and Groups on page 32 for a full list of default users and groups..
User Account admin
admin is used to manage and configure the system. Via PAM plugin admin gains root access rights. This account is
used to separate between system (admin) and user space (lvuser und webserv). You will use the admin ac-
count for the following activities:
- Perform NI MAX functions such as configure, restart, reset to default, and install new software
- Login via WebDAV
- Login via SSH
- Perform system functions such as chmod, mkdir ("make directory"), rm ("remove") in all folders
- Use the NI System Configuration API
- Connect from your PC to the controller via NI Vision Builder for Automation or via Eclipse
The admin account is delivered without a password and should be protected with a strong password as soon as
possible. See section Setting up a Secure Administrator Password on page 32 for instructions.
User Account lvuser
lvuser is the main user-space account on all NI Linux Real-Time systems. Its password is hidden for security pur-
poses. You access lvuser in one of two ways:
- Using Linux console via the su command ("su lvuser")
- Using LabVIEW development environment
lvuser is used by the following applications:
- Most NI system services on the Linux system
- LabVIEW, including any work from a developer's computer
- Xfce4 (to enable LabVIEW to display results. GUI is also started by lvuser)
User Account webserv
webserv is used for various web services on NI Linux Real-Time systems. Its password is hidden for security pur-
poses. You access webserv in one of two ways:
- Using Linux console via the su command ("su webserv")
- Using WebDAV. Even though you login as admin, the WebDAV application uses webserv user permissions
webserv has write access to the following directories and creates files as files of user webserv and group ni.
- /home/webserv
A LabVIEW development system can always login as lvuser
. Because of this, it is important to
disconnect ports to the development system once development has been completed.
Read section Ethernet Port: Firewall iptables on page 40 for more information.

37
- /home/lvuser
- /tmp
lvuser, being part of group ni, gains read access for any webserv files, but typically it does not gain write access.
If you do need write access for lvuser, you should change file permissions using the one of the following com-
mands:
See section
File Permissions on page 28 for a discussion of this topic and typically used commands.
Best Practice: Only Necessary Write and Execute Permissions for Users
The administration of folder rights in a security-oriented system is strongly coupled with the administration of user
and group accounts. It is best practice to give users the minimum access rights they need.
NI Linux Real-Time is constructed in a way that user space (lvuser and webserv) cannot access system space
(user admin, folder /bin, /boot, /dev, /proc, /run, /sbin, /sys) in an unauthorized way.
Each file in the system has its specific access rights settings. You get a complete reference of all
user rights using the comand ls -lR > [PathToTextfile].
chmod g+wx [file]
For a file, add write and execute rights to its group
chmod g+wx [folder] -R
For a folder and its contents, add write and execute rights to its group

38
Introduction to Mandatory Access Control with SELinux
About SELinux
SELinux is an implementation of Mandatory Access Control, which is explained in section Access Control on page 24.
It controls access for processes, while standard Linux Access Control (an implementation of Discretionary Access
Control) controls access for users and groups. Access control via SELinux is handled by the system, not the user.
SELinux is part of the Linux kernel, so an attacker must exploit the kernel itself to compromise it.
SELinux intercepts any process calls within the system (which includes all functions a user will start knowingly or
unknowingly). The call is validated by SELinux using a policy, which is a set of rules. If a rule for this kind of behavior
exists, then permission is granted. In every other case permission is denied and the denial is logged.
SELinux access is checked only after DAC checks succeed. This means that if a user does not have the necessary DAC
permissions to access a specific file, no SELinux checks are done. If the access is allowed via DAC, then SELinux cheks
are done but only if the SELinux mode is not “disabled”. When the SELinux mode is “permissive”, SELinux logs warn-
ings for policy violations but does not prevent such access from occurring. When the SELinux mode is “enforcing”,
SELinux prevents access for all policy violations.
Benefits and Drawbacks of SELinux
Recall the example from section Access Control on page 24: An attacker accesses the cat executable and replaces
it with a version that also opens a network socket and streams data to the intruder. Without SELinux, cat runs with
your accounts privileges, so it can do everything you can do, including opening and writing to the network socket.
With an SELinux policy, you can create rules that only allow cat to read files and not open them for write access.
This would effectively prevent cat from writing to a network socket since sockets are treated as files (like everything
else in Linux). You can further restrict the read access to specific directories or files, which is useful to prevent low-
level read access to devices. The same is true for any other commands or software: unless there is a rule permitting

39
an action on a specific object, the action will be denied. With SELinux, you get a very granular additional layer of
security that can be tailored specifically for how you intend your system to operate.
SELinux enables strong separation between applications. Even untrustworthy applications can be run with less risk
by strongly restricting their access rights, and the impact of exploited processes is reduced to the allowed actions for
that process. If the policy implementation has been done properly, SELinux enables a system to defend itself exploits
from outside and inside the system.
SELinux provides a way to realize very tight access control. SELinux policy development requires a considerable
amount of knowledge and effort. Make sure to allocate sufficient resources for this and start the work early in de-
velopment. Once implemented, any changes to the system need to be reflected in a policy update, an effort that
needs to be factored into your maintenance plans.
How Much Help Will I Need?
National Instruments provides a reference policy that covers the behavior of some of the NI-specific services and
options on our real-time targets. This reference policy is insufficient for most production uses. You should take fur-
ther actions to customize the security policy for your system. Doing so requires detailed knowledge of the low-level
behavior of your application, Linux operating systems, and NI’s runtime libraries and configuration software. For
customers who are not already skilled in SELinux policy work, we recommend engaging a third party to develop a
policy for your application (e.g. Tresys Technology, upon whose SELinux reference policy the NI reference policy is
based).
Tresys Technology SELinux page (27.04.2017):
http://www.tresys.com/solutions/security-enhanced-linux
National Instruments provides the libraries and tools needed to install SELinux and the reference policy to your target
system using the package manager. However, National Instruments does not provide support for installing, config-
uring, or using SELinux beyond given documentation. If you encounter problems with the SELinux implementation
on your target, National Instruments recommends seeking external help.
Installing and Configuring SELinux on Your NI Linux Real -Time System
National Instruments provides tutorials for installing SELinux on your NI Linux Real-Time system and customizing
the NI reference policy.
SELinux reference policy and tutorials for NI Linux Real-Time (27.04.2017):
https://github.com/ni/ni-refpolicy
Learning SELinux
Learning SELinux can be a challenge to learn. A good introduction for new users can be found on the SELinux for Red
Hat Enterprise Linux page.
Documentation on SELinux for Red Hat Enterprise Linux (27.04.2017):
https://access.redhat.com/documentation/en-US/Red_Hat_Enterprise_Linux/6/html/Security-Enhanced_Linux/in-
dex.html
Official information on the SELinux project (27.04.2017):
http://www.selinuxproject.org

40
Hardening Interfaces
Ethernet Port: Firewall iptables
NI Linux Real-Time includes the Linux standard firewall iptables, which is part of the netfilter.org project.
IPtables official documentation (27.04.2017):
https://www.netfilter.org/documentation/index.html
iptables is software for packet filtering. iptables operates at Open Systems Interconnection (OSI) model layer
3 (network layer). iptables is also able to filter higher layers. For example, it is possible to filter specific transport-
layer TCP or UDP ports (layer 4) and at outgoing packages at the application layer (layer 7) using the process ID of the
application.
Any system connected to a network can be exposed to attacks that originate from the local network or a remote
network: packet sniffing, packet injection, packet alteration and substitution, denial of service, brute force attacks,
and many more. General purpose desktop systems can be protected only so far before the security measures impact
usability. Special purpose embedded systems, on the other hand, can go much further in their security measures.
Security measures for communication can be very restrictive, allowing only the communications known by the system
developers. It is advisable to configure their firewall interfaces following two guiding principles:
- Ignore ("DROP") all undefined requests
The communication needs of an embedded system are known, so all other ports should remain closed by
default. In the context of iptables, DROP means that a system does not respond to the sender of a for-
bidden connection (thus informing the attacker that the system exists). Subsection iptables Basics:
Chains on page 40 explains the exact implementation of this requirement.
- The embedded system is the only one that initiates connections
Implement communications in a way that they are only initiated by the system and cannot be triggered by
external participants. This design pattern works across firewalls that use network address translation to hide
system network addresses from remote networks.
You will find an example implementation for both requirements in subsection
Commented Example: Security-Oriented Script with policy DROP and One Open TCP Port on page 44.
iptables Basics: Chains and Their Policy
iptables configures rules that are used by netfilter to decide which packets to ACCEPT and which to DROP.
Firewall rules are by default distributed to three groups called Chains.
- Chain INPUT controls the behavior of the firewall for incoming connections.
- Chain FORWARD controls the behavior of the firewall for connections within the Linux System.
- Chain OUTPUT controls the behavior of the firewall for outgoing connections.

41
They are called Chains because the firewall rules
are appended like the rings of a chain. iptables
works through a Chain‘s rules in order, and if no
defined rule for a packet exists, the general pol-
icy of this chain is applied. One of two general
policies is assigned to each of the three
Chains. In practice, you set the policy first, and
then create the rules that are the exceptions to the
policy).
- policy ACCEPT specifies that the Chain
accepts connections by default and that defined
rules prohibit connections. This means that pol-
icy ACCEPT corresponds to a non-configured firewall. It is the default policy for all three chains, so all
network connections are accepted.
- policy DROP specifies that the Chain rejects connections by default and that defined rules allow con-
nections. No response is given to the source of a connection when a packet is dropped.
Other iptables Commands
iptables -L
# Shows the current iptables configuration
iptables -P INPUT DROP
iptables -P FORWARD DROP
iptables -P OUTPUT ACCEPT
# | | |__chosen policy (DROP or ACCEPT)
# | |
# | |_chosen Chain (by default INPUT, FORWARD and OUPUT exist)
# |
# |__-P means "policy"
#
iptables -F
# |__-F means "forget all rules in all existing Chains"
#
iptables -X
# |__-X means "delete all not-standard chains"
#
iptables-save > /etc/natinst/share/iptables.conf
# |___ „save the current iptables settings.“
# Important: Only then your configuration will still be existing after reboot.
Figure 15: All three Chains and their policy (factory settings). Each
line below each
Chain (with header
target prot opt source
destination) shows a rule in the configured system. Use the com-
mand iptables -L to list the current iptables configuration.
It is strongly advised to use policy DROP for all Chains.

42
Structure of a Typical iptables Rule
Best Practices: Programming with LabVIEW
(1) Only use communication protocols that use a small range of ports (e.g., TCP with STM library) instead of com-
munication protocols with a large range of ports (e.g., network streams or network variables). This limits the
number of ports you need to open in iptables.
(2) Today’s industrial cameras often use the Gigabit-Ethernet Vision protocol. This protocol assigns open TCP ports
dynamically, without any limitations in range, which in fact rules out any firewall security on the dedicated Ether-
net port. Here it is best practice to use this port exclusively for the camera and to secure physical access to the
port. When performance is important, you can connect only one camera per port. For example, iptables
settings see
(3) Commented Example: Security-Oriented Script with policy DROP and One Open TCP Port on page 44.
(4) If you configure and activate the firewall using a SSH connection, make sure to allow SSH before anything else
so that you do not lock yourself out. iptables immediately applies updated rules, which in case of policy
DROP means that it cuts any existing connections to the system. If you accidentally lock yourself out of SSH, you
can undo the settings by directly connecting a mouse and a keyboard and editing iptables. For example
iptables settings, again, see
(5) Commented Example: Security-Oriented Script with policy DROP and One Open TCP Port on page 44.
(6) With the lvuser account, the LabVIEW development system has full access to LabVIEW code on the system.
This access is not meant to be secured by a password, and the password of lvuser is hidden. At the same time
the development system uses various fixed and dynamic ports for communication to the embedded system (for
convenience). From a security perspective, it is best practice to deactivate the firewall during development and
activate it after development is completed. Make sure that the firewall rules prevent access to the Linux system
via NI MAX and LabVIEW.
# The following two rules allow SSH communication, i.e. using PuTTY
iptables -A INPUT -i eth0 -p tcp --dport 22 -j ACCEPT
# | | | | | |__jump to ACCEPT = ignore all further rules
# | | | | |
# | | | | |__destiny port
# | | | |
# | | | |__protocol tcp
# | | |
# | | |__use ethernet port eth0
# | |
# | |_Chain INPUT
# |
# |__-A append to Chain
#
iptables -A OUTPUT -o eth0 -p tcp --sport 22 -j ACCEPT
# | | | | | |__jump to ACCEPT = ignore all further rules
# | | | | |
# | | | | |__source port
# | | | |
# | | | |__protocol tcp
# | | |
# | | |__use ethernet port eth0
# | |
# | |_Chain INPUT
# |
# |__-A append to Chain
#

43
Example Scripts
Commented Example: Basic Settings "All Ports Open"
Basic settings of the firewall are "unconfigured" or "all ports open"
You go back into basic settings using following script:
# -------------------------------------------------------------------------- #
# RESET iptables to standard config #
# -------------------------------------------------------------------------- #
# RESET DEFAULT POLICIES
iptables -P INPUT ACCEPT
iptables -P FORWARD ACCEPT
iptables -P OUTPUT ACCEPT
# FLUSH ALL RULES, ERASE NON-DEFAULT CHAINS
iptables -F
iptables -X

44
Commented Example: Security-Oriented Script with policy DROP and One Open TCP Port
Proposal for an iptables script:
# --------------------------------------------------------------------------------------- #
# Standard settings for basic security ... PuTTY will work after that #
# --------------------------------------------------------------------------------------- #
# FLUSH ALL RULES, ERASE NON-DEFAULT CHAINS
iptables -F
iptables -X
# Adds SSH - PuTTY Contact. Do that first to stay in contact.
# If you DROP all connections first, you will shut yourself out
iptables -A INPUT -i eth0 -p tcp --dport 22 -m state --state NEW,ESTABLISHED -j ACCEPT
iptables -A OUTPUT -o eth0 -p tcp --sport 22 -m state --state ESTABLISHED -j ACCEPT
# For security purposes change policies "-P" (means default reactions)
# for all Chains to "DROP" (means "do not react")
iptables -P INPUT DROP
iptables -P FORWARD DROP
iptables -P OUTPUT DROP
# --------------------------------------------------------------------------------------- #
# GigE communication on ethernet port 1 – applies to you if you use GigE-cameras
# Sadly GigE uses dynamic ports. To ensure security, turn off Firewall for the used
# HW Port. Wire Camera and Vision System directly and make sure an offender cannot
# open that hardwired connection
# Reference:
# http://www.ni.com/product-documentation/5846/en/#toc3
# --------------------------------------------------------------------------------------- #
iptables -A INPUT -i eth1 -j ACCEPT
iptables -A OUTPUT -o eth1 -j ACCEPT
iptables -A FORWARD -o eth1 -j ACCEPT
# --------------------------------------------------------------------------------------- #
# Here you open Ethernet TCP Port 55555 in both directions, but the outgoing connection
# has to be the one that starts the connection.
# You can communicate on this port, for example, using the TCP STM Library
# --------------------------------------------------------------------------------------- #
iptables -A INPUT -i eth0 -p tcp --dport 55555 -m state --state ESTABLISHED -j ACCEPT
iptables -A OUTPUT -o eth0 -p tcp --sport 55555 -m state --state NEW,ESTABLISHED -j ACCEPT
# --------------------------------------------------------------------------------------- #
# Save iptables configuration so that it survives a restart
# --------------------------------------------------------------------------------------- #
iptables-save > /etc/natinst/share/iptables.conf

45
Additional Information
Deepen Your Linux Knowledge
To acquire general Linux knowledge and to reference typical functions, you can visit several projects that maintain
free and well-written reference documentation. In general, documentation that is applicable to all Linux distributions
applies to NI Linux Real-Time.
Linux Guide of the Wikibooks project (27.04.2017):
https://en.wikibooks.org/wiki/Linux_Guide
The Linux Documentation Project containing several works of reference (27.04.2017):
http://www.tldp.org/guides.html
Deepen Your Linux Security Knowledge
Embedded developers working on security-critical projects can learn from the best practices of Linux network ad-
ministrators. Many of the best practices they discuss are directly helpful for the embedded industry. Not all software
tools used on server or desktop systems are appropriate for embedded systems since they might consume too much
memory or depend on components that can interfere with real-time performance.
The Debian Administrator’s Handbook (27.04.2017):
https://debian-handbook.info/browse/stable/
Gentoo Linux Security Handbook (27.04.2017):
https://wiki.gentoo.org/wiki/Security_Handbook/Full
NI Community Group maintained by NI engineers for all questions related to NI Linux Real-Time (27.04.2017):
https://decibel.ni.com/content/groups/ni-linux-real-time
