Connectors and APIs


Table of Contents
Preface and Legal Notices ................................................................................................................. ix
1 Introduction ..................................................................................................................................... 1
2 MySQL Connector/C++ Developer Guide ......................................................................................... 3
2.1 Introduction to Connector/C++ .............................................................................................. 3
2.2 Obtaining Connector/C++ ...................................................................................................... 6
2.3 Installing Connector/C++ from a Binary Distribution ................................................................ 6
2.4 Installing Connector/C++ from Source ................................................................................... 9
2.4.1 Source Installation System Prerequisites ..................................................................... 9
2.4.2 Obtaining and Unpacking a Connector/C++ Source Distribution .................................. 10
2.4.3 Installing Connector/C++ from Source ....................................................................... 11
2.4.4 Connector/C++ Source-Configuration Options ........................................................... 15
2.5 Building Connector/C++ Applications ................................................................................... 21
2.5.1 Building Connector/C++ Applications: General Considerations .................................... 21
2.5.2 Building Connector/C++ Applications: Platform-Specific Considerations ....................... 29
2.5.3 Authentication Support ............................................................................................. 34
2.5.4 OpenTelemetry Tracing Support ............................................................................... 38
2.6 Connector/C++ Known Issues ............................................................................................. 39
2.7 Connector/C++ Support ...................................................................................................... 40
3 MySQL Connector/J Developer Guide ............................................................................................ 41
3.1 Overview of MySQL Connector/J ......................................................................................... 42
3.2 Compatibility with MySQL and Java Versions ....................................................................... 43
3.3 Connector/J Installation ....................................................................................................... 43
3.3.1 Installing Connector/J from a Binary Distribution ........................................................ 43
3.3.2 Installing Connector/J Using Maven .......................................................................... 45
3.3.3 Installing from Source .............................................................................................. 45
3.3.4 Upgrading from an Older Version ............................................................................. 48
3.3.5 Testing Connector/J ................................................................................................. 53
3.4 Connector/J Examples ........................................................................................................ 54
3.5 Connector/J Reference ....................................................................................................... 55
3.5.1 Driver/Datasource Class Name ................................................................................. 55
3.5.2 Connection URL Syntax ........................................................................................... 55
3.5.3 Configuration Properties ........................................................................................... 59
3.5.4 JDBC API Implementation Notes ............................................................................ 106
3.5.5 Java, JDBC, and MySQL Types ............................................................................. 109
3.5.6 Handling of Date-Time Values ................................................................................ 112
3.5.7 Using Character Sets and Unicode ......................................................................... 118
3.5.8 Using Query Attributes ........................................................................................... 120
3.5.9 Connecting Securely Using SSL ............................................................................. 122
3.5.10 Connecting Using Unix Domain Sockets ................................................................ 128
3.5.11 Connecting Using Named Pipes ........................................................................... 128
3.5.12 Connecting Using Various Authentication Methods ................................................. 129
3.5.13 Using Source/Replica Replication with ReplicationConnection ................................. 135
3.5.14 Support for DNS SRV Records ............................................................................. 135
3.5.15 Client Session State Tracker ................................................................................ 137
3.5.16 Mapping MySQL Error Numbers to JDBC SQLState Codes .................................... 138
3.6 JDBC Concepts ................................................................................................................ 293
3.6.1 Connecting to MySQL Using the JDBC DriverManager Interface ........................... 293
3.6.2 Using JDBC Statement Objects to Execute SQL ................................................... 295
3.6.3 Using JDBC CallableStatements to Execute Stored Procedures ......................... 296
3.6.4 Retrieving AUTO_INCREMENT Column Values through JDBC .................................... 298
3.7 Connection Pooling with Connector/J ................................................................................. 301
iii

Connectors and APIs
3.8 Multi-Host Connections ..................................................................................................... 305
3.8.1 Configuring Server Failover for Connections Using JDBC ......................................... 305
3.8.2 Configuring Server Failover for Connections Using X DevAPI ................................... 308
3.8.3 Configuring Load Balancing with Connector/J .......................................................... 308
3.8.4 Configuring Source/Replica Replication with Connector/J ......................................... 311
3.8.5 Advanced Load-balancing and Failover Configuration .............................................. 314
3.9 Using the X DevAPI with Connector/J: Special Topics ........................................................ 316
3.9.1 Connection Compression Using X DevAPI .............................................................. 316
3.9.2 Schema Validation ................................................................................................. 317
3.10 Using the Connector/J Interceptor Classes ....................................................................... 319
3.11 Using Logging Frameworks with SLF4J ........................................................................... 320
3.12 Using Connector/J with Tomcat ....................................................................................... 321
3.13 Using Connector/J with Spring ......................................................................................... 323
3.13.1 Using JdbcTemplate .......................................................................................... 324
3.13.2 Transactional JDBC Access .................................................................................. 326
3.13.3 Connection Pooling with Spring ............................................................................ 327
3.14 Troubleshooting Connector/J Applications ........................................................................ 328
3.15 Known Issues and Limitations ......................................................................................... 334
3.16 Connector/J Support ....................................................................................................... 335
3.16.1 Connector/J Community Support ........................................................................... 335
3.16.2 How to Report Connector/J Bugs or Problems ....................................................... 335
4 MySQL Connector/NET Developer Guide ..................................................................................... 337
4.1 Introduction to MySQL Connector/NET .............................................................................. 338
4.2 Connector/NET Versions ................................................................................................... 339
4.3 Connector/NET Installation ................................................................................................ 341
4.3.1 Installing Connector/NET on Windows ..................................................................... 341
4.3.2 Installing Connector/NET on Unix with Mono ........................................................... 344
4.3.3 Installing Connector/NET from Source ..................................................................... 345
4.4 Connector/NET Connections ............................................................................................. 346
4.4.1 Creating a Connector/NET Connection String .......................................................... 346
4.4.2 Managing a Connection Pool in Connector/NET ...................................................... 349
4.4.3 Handling Connection Errors .................................................................................... 350
4.4.4 Connector/NET Authentication ................................................................................ 351
4.4.5 Connector/NET Connection Options Reference ....................................................... 356
4.5 Connector/NET Programming ............................................................................................ 373
4.5.1 Using GetSchema on a Connection ........................................................................ 373
4.5.2 Using MySqlCommand ........................................................................................... 375
4.5.3 Using Connector/NET with Table Caching ............................................................... 378
4.5.4 Preparing Statements in Connector/NET ................................................................. 378
4.5.5 Creating and Calling Stored Procedures .................................................................. 379
4.5.6 Handling BLOB Data With Connector/NET .............................................................. 383
4.5.7 Working with Partial Trust / Medium Trust ............................................................... 386
4.5.8 Writing a Custom Authentication Plugin ................................................................... 390
4.5.9 Using the Connector/NET Interceptor Classes ......................................................... 393
4.5.10 Handling Date and Time Information in Connector/NET .......................................... 395
4.5.11 Using the MySqlBulkLoader Class ........................................................................ 396
4.5.12 Connector/NET Tracing ........................................................................................ 398
4.5.13 Using Connector/NET with Crystal Reports ............................................................ 403
4.5.14 Asynchronous Methods ........................................................................................ 407
4.5.15 Binary and Nonbinary Issues ................................................................................ 414
4.5.16 Character Set Considerations for Connector/NET .................................................. 414
4.6 Connector/NET Tutorials ................................................................................................... 415
4.6.1 Tutorial: An Introduction to Connector/NET Programming ......................................... 415
4.6.2 ASP.NET Provider Model and Tutorials ................................................................... 424
iv

Connectors and APIs
4.6.3 Tutorial: Using an Entity Framework Entity as a Windows Forms Data Source ........... 441
4.6.4 Tutorial: Data Binding in ASP.NET Using LINQ on Entities ....................................... 449
4.6.5 Tutorial: Generating MySQL DDL from an Entity Framework Model ........................... 452
4.6.6 Tutorial: Basic CRUD Operations with Connector/NET ............................................. 453
4.6.7 Tutorial: Configuring SSL with Connector/NET ......................................................... 456
4.6.8 Tutorial: Using MySqlScript ..................................................................................... 459
4.7 Connector/NET for Entity Framework ................................................................................. 463
4.7.1 Entity Framework 6 Support ................................................................................... 463
4.7.2 Entity Framework Core Support .............................................................................. 469
4.8 Connector/NET API Reference .......................................................................................... 478
4.8.1 MySql.Data.Common.DnsClient .............................................................................. 478
4.8.2 MySql.Data.MySqlClient Namespace ...................................................................... 478
4.8.3 MySql.Data.MySqlClient.Authentication Namespace ................................................. 481
4.8.4 MySql.Data.MySqlClient.Interceptors Namespace .................................................... 482
4.8.5 MySql.Data.MySqlClient.Replication Namespace ..................................................... 482
4.8.6 MySql.Data.Types Namespace ............................................................................... 482
4.8.7 MySql.Data.EntityFramework Namespace ............................................................... 483
4.8.8 Microsoft.EntityFrameworkCore Namespace ............................................................ 484
4.8.9 MySql.EntityFrameworkCore Namespace ................................................................ 484
4.8.10 MySql.Web Namespace ....................................................................................... 487
4.9 Connector/NET Support .................................................................................................... 488
4.9.1 Connector/NET Community Support ........................................................................ 488
4.9.2 How to Report Connector/NET Problems or Bugs .................................................... 488
5 MySQL Connector/ODBC Developer Guide .................................................................................. 491
5.1 Introduction to MySQL Connector/ODBC ........................................................................... 492
5.2 Connector/ODBC Versions ................................................................................................ 493
5.3 General Information About ODBC and Connector/ODBC .................................................... 493
5.3.1 Connector/ODBC Architecture ................................................................................ 493
5.3.2 ODBC Driver Managers ......................................................................................... 495
5.4 Connector/ODBC Installation ............................................................................................. 496
5.4.1 Installing Connector/ODBC on Windows .................................................................. 497
5.4.2 Installing Connector/ODBC on Unix-like Systems ..................................................... 499
5.4.3 Installing Connector/ODBC on macOS .................................................................... 502
5.4.4 Building Connector/ODBC from a Source Distribution on Windows ............................ 503
5.4.5 Building Connector/ODBC from a Source Distribution on Unix .................................. 504
5.4.6 Building Connector/ODBC from a Source Distribution on macOS .............................. 507
5.4.7 Installing Connector/ODBC from the Development Source Tree ................................ 507
5.5 Configuring Connector/ODBC ............................................................................................ 507
5.5.1 Overview of Connector/ODBC Data Source Names ................................................. 507
5.5.2 Connector/ODBC Connection Parameters ............................................................... 508
5.5.3 Configuring a Connector/ODBC DSN on Windows ................................................... 518
5.5.4 Configuring a Connector/ODBC DSN on macOS ..................................................... 523
5.5.5 Configuring a Connector/ODBC DSN on Unix .......................................................... 526
5.5.6 Connecting Without a Predefined DSN .................................................................... 526
5.5.7 ODBC Connection Pooling ..................................................................................... 527
5.5.8 OpenTelemetry Tracing Support ............................................................................. 527
5.5.9 Authentication Options ........................................................................................... 528
5.5.10 Getting an ODBC Trace File ................................................................................. 529
5.6 Connector/ODBC Examples .............................................................................................. 531
5.6.1 Basic Connector/ODBC Application Steps ............................................................... 531
5.6.2 Step-by-step Guide to Connecting to a MySQL Database through Connector/ODBC ... 532
5.6.3 Connector/ODBC and Third-Party ODBC Tools ....................................................... 533
5.6.4 Using Connector/ODBC with Microsoft Access ........................................................ 534
5.6.5 Using Connector/ODBC with Microsoft Word or Excel .............................................. 545
v

Connectors and APIs
5.6.6 Using Connector/ODBC with Crystal Reports .......................................................... 547
5.6.7 Connector/ODBC Programming .............................................................................. 553
5.7 Connector/ODBC Reference .............................................................................................. 560
5.7.1 Connector/ODBC API Reference ............................................................................ 560
5.7.2 Connector/ODBC Data Types ................................................................................. 564
5.7.3 Connector/ODBC Error Codes ................................................................................ 565
5.8 Connector/ODBC Notes and Tips ...................................................................................... 566
5.8.1 Connector/ODBC General Functionality ................................................................... 566
5.8.2 Connector/ODBC Application-Specific Tips .............................................................. 568
5.8.3 Connector/ODBC and the Application Both Use OpenSSL ....................................... 573
5.8.4 Connector/ODBC Errors and Resolutions (FAQ) ...................................................... 573
5.9 Connector/ODBC Support ................................................................................................. 578
5.9.1 Connector/ODBC Community Support ..................................................................... 578
5.9.2 How to Report Connector/ODBC Problems or Bugs ................................................. 579
5.9.3 Connector/ODBC Version History ........................................................................... 579
6 MySQL Connector/Python Developer Guide ................................................................................. 583
6.1 Introduction to MySQL Connector/Python ........................................................................... 584
6.2 Guidelines for Python Developers ...................................................................................... 584
6.3 Connector/Python Versions ............................................................................................... 586
6.4 Connector/Python Installation ............................................................................................ 588
6.4.1 Obtaining Connector/Python ................................................................................... 588
6.4.2 Installing Connector/Python from a Binary Distribution .............................................. 588
6.4.3 Installing Connector/Python from a Source Distribution ............................................ 589
6.4.4 Verifying Your Connector/Python Installation ........................................................... 591
6.5 Connector/Python Coding Examples .................................................................................. 591
6.5.1 Connecting to MySQL Using Connector/Python ....................................................... 592
6.5.2 Creating Tables Using Connector/Python ................................................................ 594
6.5.3 Inserting Data Using Connector/Python ................................................................... 596
6.5.4 Querying Data Using Connector/Python .................................................................. 597
6.6 Connector/Python Tutorials ............................................................................................... 598
6.6.1 Tutorial: Raise Employee's Salary Using a Buffered Cursor ...................................... 598
6.7 Connector/Python Connection Establishment ..................................................................... 599
6.7.1 Connector/Python Connection Arguments ............................................................... 599
6.7.2 Connector/Python Option-File Support .................................................................... 607
6.8 Connector/Python Other Topics ......................................................................................... 609
6.8.1 Connector/Python Logging ...................................................................................... 609
6.8.2 Telemetry Support ................................................................................................. 609
6.8.3 Asynchronous Connectivity ..................................................................................... 612
6.8.4 Connector/Python Connection Pooling .................................................................... 621
6.8.5 Connector/Python Django Back End ....................................................................... 622
6.9 Connector/Python API Reference ...................................................................................... 623
6.9.1 mysql.connector Module ......................................................................................... 624
6.9.2 connection.MySQLConnection Class ....................................................................... 625
6.9.3 pooling.MySQLConnectionPool Class ...................................................................... 637
6.9.4 pooling.PooledMySQLConnection Class .................................................................. 639
6.9.5 cursor.MySQLCursor Class .................................................................................... 640
6.9.6 Subclasses cursor.MySQLCursor ............................................................................ 649
6.9.7 constants.ClientFlag Class ...................................................................................... 653
6.9.8 constants.FieldType Class ...................................................................................... 653
6.9.9 constants.SQLMode Class ...................................................................................... 653
6.9.10 constants.CharacterSet Class ............................................................................... 654
6.9.11 constants.RefreshOption Class ............................................................................. 654
6.9.12 Errors and Exceptions .......................................................................................... 654
7 MySQL and PHP ......................................................................................................................... 661
vi


viii

Preface and Legal Notices
This manual describes the Connectors and APIs that can be used with MySQL.
Legal Notices
Copyright © 1997, 2024, Oracle and/or its affiliates.
License Restrictions
This software and related documentation are provided under a license agreement containing restrictions
on use and disclosure and are protected by intellectual property laws. Except as expressly permitted
in your license agreement or allowed by law, you may not use, copy, reproduce, translate, broadcast,
modify, license, transmit, distribute, exhibit, perform, publish, or display any part, in any form, or by any
means. Reverse engineering, disassembly, or decompilation of this software, unless required by law for
interoperability, is prohibited.
Warranty Disclaimer
The information contained herein is subject to change without notice and is not warranted to be error-free.
If you find any errors, please report them to us in writing.
Restricted Rights Notice
If this is software, software documentation, data (as defined in the Federal Acquisition Regulation), or
related documentation that is delivered to the U.S. Government or anyone licensing it on behalf of the U.S.
Government, then the following notice is applicable:
U.S. GOVERNMENT END USERS: Oracle programs (including any operating system, integrated
software, any programs embedded, installed, or activated on delivered hardware, and modifications
of such programs) and Oracle computer documentation or other Oracle data delivered to or accessed
by U.S. Government end users are "commercial computer software," "commercial computer software
documentation," or "limited rights data" pursuant to the applicable Federal Acquisition Regulation and
agency-specific supplemental regulations. As such, the use, reproduction, duplication, release, display,
disclosure, modification, preparation of derivative works, and/or adaptation of i) Oracle programs (including
any operating system, integrated software, any programs embedded, installed, or activated on delivered
hardware, and modifications of such programs), ii) Oracle computer documentation and/or iii) other Oracle
data, is subject to the rights and limitations specified in the license contained in the applicable contract.
The terms governing the U.S. Government's use of Oracle cloud services are defined by the applicable
contract for such services. No other rights are granted to the U.S. Government.
Hazardous Applications Notice
This software or hardware is developed for general use in a variety of information management
applications. It is not developed or intended for use in any inherently dangerous applications, including
applications that may create a risk of personal injury. If you use this software or hardware in dangerous
applications, then you shall be responsible to take all appropriate fail-safe, backup, redundancy, and other
measures to ensure its safe use. Oracle Corporation and its affiliates disclaim any liability for any damages
caused by use of this software or hardware in dangerous applications.
Trademark Notice
Oracle, Java, MySQL, and NetSuite are registered trademarks of Oracle and/or its affiliates. Other names
may be trademarks of their respective owners.
ix

Documentation Accessibility
Intel and Intel Inside are trademarks or registered trademarks of Intel Corporation. All SPARC trademarks
are used under license and are trademarks or registered trademarks of SPARC International, Inc. AMD,
Epyc, and the AMD logo are trademarks or registered trademarks of Advanced Micro Devices. UNIX is a
registered trademark of The Open Group.
Third-Party Content, Products, and Services Disclaimer
This software or hardware and documentation may provide access to or information about content,
products, and services from third parties. Oracle Corporation and its affiliates are not responsible for and
expressly disclaim all warranties of any kind with respect to third-party content, products, and services
unless otherwise set forth in an applicable agreement between you and Oracle. Oracle Corporation and its
affiliates will not be responsible for any loss, costs, or damages incurred due to your access to or use of
third-party content, products, or services, except as set forth in an applicable agreement between you and
Oracle.
Use of This Documentation
This documentation is NOT distributed under a GPL license. Use of this documentation is subject to the
following terms:
You may create a printed copy of this documentation solely for your own personal use. Conversion to other
formats is allowed as long as the actual content is not altered or edited in any way. You shall not publish
or distribute this documentation in any form or on any media, except if you distribute the documentation in
a manner similar to how Oracle disseminates it (that is, electronically for download on a Web site with the
software) or on a CD-ROM or similar medium, provided however that the documentation is disseminated
together with the software on the same medium. Any other use, such as any dissemination of printed
copies or use of this documentation, in whole or in part, in another publication, requires the prior written
consent from an authorized representative of Oracle. Oracle and/or its affiliates reserve any and all rights
to this documentation not expressly granted above.
Documentation Accessibility
For information about Oracle's commitment to accessibility, visit the Oracle Accessibility Program website
at
http://www.oracle.com/pls/topic/lookup?ctx=acc&id=docacc.
Access to Oracle Support for Accessibility
Oracle customers that have purchased support have access to electronic support through My Oracle
Support. For information, visit
http://www.oracle.com/pls/topic/lookup?ctx=acc&id=info or visit http://www.oracle.com/pls/topic/
lookup?ctx=acc&id=trs if you are hearing impaired.
x

Chapter 1 Introduction
MySQL Connectors provide connectivity to the MySQL server for client programs. APIs provide low-level
access to MySQL resources using either the classic MySQL protocol or X Protocol. Both Connectors and
the APIs enable you to connect and execute MySQL statements from another language or environment,
including ODBC, Java (JDBC), C++, Python, Node.js, PHP, Perl, Ruby, and C.
MySQL Connectors
Oracle develops a number of connectors:
• Connector/C++ enables C++ applications to connect to MySQL.
• Connector/J provides driver support for connecting to MySQL from Java applications using the standard
Java Database Connectivity (JDBC) API.
• Connector/NET enables developers to create .NET applications that connect to MySQL. Connector/NET
implements a fully functional ADO.NET interface and provides support for use with ADO.NET aware
tools. Applications that use Connector/NET can be written in any supported .NET language.
• Connector/ODBC provides driver support for connecting to MySQL using the Open Database
Connectivity (ODBC) API. Support is available for ODBC connectivity from Windows, Unix, and macOS
platforms.
• Connector/Python provides driver support for connecting to MySQL from Python applications using an
API that is compliant with the Python DB API version 2.0. No additional Python modules or MySQL client
libraries are required.
• Connector/Node.js provides an asynchronous API for connecting to MySQL from Node.js
applications using X Protocol. Connector/Node.js supports managing database sessions and schemas,
working with MySQL Document Store collections and using raw SQL statements.
The MySQL C API
For direct access to using MySQL natively within a C application, the C API provides low-level access to
the MySQL client/server protocol through the libmysqlclient client library. This is the primary method
used to connect to an instance of the MySQL server, and is used both by MySQL command-line clients
and many of the MySQL Connectors and third-party APIs detailed here.
libmysqlclient is included in MySQL distributions distributions.
See also MySQL C API Implementations.
To access MySQL from a C application, or to build an interface to MySQL for a language not supported by
the Connectors or APIs in this chapter, the C API is where to start. A number of programmer's utilities are
available to help with the process; see Program Development Utilities.
Third-Party MySQL APIs
The remaining APIs described in this chapter provide an interface to MySQL from specific application
languages. These third-party solutions are not developed or supported by Oracle. Basic information on
their usage and abilities is provided here for reference purposes only.
All the third-party language APIs are developed using one of two methods, using libmysqlclient or by
implementing a native driver. The two solutions offer different benefits:
1

Third-Party MySQL APIs
• Using libmysqlclient offers complete compatibility with MySQL because it uses the same libraries
as the MySQL client applications. However, the feature set is limited to the implementation and
interfaces exposed through libmysqlclient and the performance may be lower as data is copied
between the native language, and the MySQL API components.
• Native drivers are an implementation of the MySQL network protocol entirely within the host language
or environment. Native drivers are fast, as there is less copying of data between components, and they
can offer advanced functionality not available through the standard MySQL API. Native drivers are also
easier for end users to build and deploy because no copy of the MySQL client libraries is needed to build
the native driver components.
MySQL APIs and Interfaces lists many of the libraries and interfaces available for MySQL.
2

Chapter 2 MySQL Connector/C++ Developer Guide
Table of Contents
2.1 Introduction to Connector/C++ ...................................................................................................... 3
2.2 Obtaining Connector/C++ .............................................................................................................. 6
2.3 Installing Connector/C++ from a Binary Distribution ........................................................................ 6
2.4 Installing Connector/C++ from Source ........................................................................................... 9
2.4.1 Source Installation System Prerequisites ............................................................................ 9
2.4.2 Obtaining and Unpacking a Connector/C++ Source Distribution .......................................... 10
2.4.3 Installing Connector/C++ from Source ............................................................................... 11
2.4.4 Connector/C++ Source-Configuration Options ................................................................... 15
2.5 Building Connector/C++ Applications ........................................................................................... 21
2.5.1 Building Connector/C++ Applications: General Considerations ............................................ 21
2.5.2 Building Connector/C++ Applications: Platform-Specific Considerations .............................. 29
2.5.3 Authentication Support ..................................................................................................... 34
2.5.4 OpenTelemetry Tracing Support ....................................................................................... 38
2.6 Connector/C++ Known Issues ..................................................................................................... 39
2.7 Connector/C++ Support .............................................................................................................. 40
MySQL Connector/C++ is the C++ interface for communicating with MySQL servers.
For notes detailing the changes in each release of Connector/C++, see MySQL Connector/C++ Release
Notes.
For legal information, see the Legal Notices.
For help with using MySQL, please visit the MySQL Forums, where you can discuss your issues with other
MySQL users.
Licensing information. This product may include third-party software, used under license. If you
are using a Commercial release of MySQL Connector/C++, see this document for licensing information,
including licensing information relating to third-party software that may be included in this Commercial
release. If you are using a Community release of MySQL Connector/C++, see this document for licensing
information, including licensing information relating to third-party software that may be included in this
Community release.
2.1 Introduction to Connector/C++
MySQL Connector/C++ is a MySQL database connector for C++ applications that connect to MySQL
servers. Connector/C++ can be used to access MySQL servers that implement a document store, or in a
traditional way using SQL statements. The preferred development environment for Connector/C++ is to
enable development of C++ applications using X DevAPI, or plain C applications using X DevAPI for C, but
Connector/C++ also enables development of C++ applications that use the legacy JDBC-based API from
Connector/C++ 1.1.
Connector/C++ applications that use X DevAPI or X DevAPI for C require a MySQL server that has X
Plugin enabled. Connector/C++ applications that use the legacy JDBC-based API neither require nor
support X Plugin.
For more detailed requirements about required MySQL versions for Connector/C++ applications, see
Platform Support and Prerequisites.
3

Connector/C++ Benefits
For notes detailing the changes in each release of Connector/C++, see MySQL Connector/C++ Release
Notes.
• Connector/C++ Benefits
• X DevAPI and X DevAPI for C
• Legacy JDBC API and JDBC Compatibility
• Platform Support and Prerequisites
Connector/C++ Benefits
MySQL Connector/C++ offers the following benefits for C++ users compared to the MySQL C API provided
by the MySQL client library:
• Convenience of pure C++.
• Support for these application programming interfaces:
• X DevAPI
• X DevAPI for C
• Legacy JDBC 4.0-based API
• Support for the object-oriented programming paradigm.
• Reduced development time.
• Licensed under the GPL with the FLOSS License Exception.
• Available under a commercial license upon request.
X DevAPI and X DevAPI for C
Connector/C++ implements X DevAPI, which enables connecting to MySQL servers that implement a
document store with X Plugin. X DevAPI also enables applications to execute SQL statements.
Connector/C++ also implements a similar interface called X DevAPI for C for use by applications written in
plain C.
For general information about X DevAPI, see X DevAPI User Guide. For reference information specific
to the Connector/C++ implementation of X DevAPI and X DevAPI for C, see MySQL Connector/C++ X
DevAPI Reference in the X DevAPI section of MySQL Documentation.
Legacy JDBC API and JDBC Compatibility
Connector/C++ implements the JDBC 4.0 API, if built to include the legacy JDBC connector:
• Connector/C++ binary distributions include the JDBC connector.
• If you build Connector/C++ from source, the JDBC connector is not built by default, but can be included
by enabling the WITH_JDBC CMake option. See Section 2.4, “Installing Connector/C++ from Source”.
The Connector/C++ JDBC API is compatible with the JDBC 4.0 API. Connector/C++ does not implement
the entire JDBC 4.0 API, but does feature these classes: Connection, DatabaseMetaData, Driver,
PreparedStatement, ResultSet, ResultSetMetaData, Savepoint, Statement.
4

Platform Support and Prerequisites
The JDBC 4.0 API defines approximately 450 methods for the classes just mentioned. Connector/C++
implements approximately 80% of these.
Note
The legacy JDBC connector in Connector/C++ 9.0 is based on the connector
provided by Connector/C++ 1.1. For more information about using the JDBC API in
Connector/C++ 9.0, see MySQL Connector/C++ 1.1 Developer Guide.
Platform Support and Prerequisites
To see which platforms are supported, visit the Connector/C++ downloads page.
On Windows platforms, Commercial and Community Connector/C++ distributions require the Visual
C++ Redistributable for Visual Studio. The Redistributable is available at the Visual Studio Download
Center; install it before installing Connector/C++. The acceptable Redistributable versions depend on your
Connector/C++ version:
• Connector/C++ 8.0.19 and higher: VC++ Redistributable 2017 or higher.
• Connector/C++ 8.0.14 to 8.0.18: VC++ Redistributable 2015 or higher.
The following requirements apply to building and running Connector/C++ applications, and to building
Connector/C++ itself if you build it from source:
• To run Connector/C++ applications, the MySQL server requirements depend on the API the application
uses:
• Connector/C++ applications that use X DevAPI or X DevAPI for C require a server from MySQL 8.0.11
or later with X Plugin enabled (default).
• Applications that use the JDBC API support MySQL 8.0 or higher. X Plugin is neither required nor
supported.
• To build Connector/C++ applications:
• The MySQL version does not apply.
• On Windows, Microsoft Visual Studio is required. The acceptable MSVC versions depend on your
Connector/C++ version and the type of linking you use:
• Connector/C++ 8.0.20 and higher: Same as Connector/C++ 8.0.19, with the addition that binary
distributions are also compatible with MSVC 2017 using the static X DevAPI connector library. This
means that binary distributions are fully compatible with MSVC 2019, and fully compatible with
MSVC 2017 with the exception of the static legacy (JDBC) connector library.
• Connector/C++ 8.0.19: Connector/C++ binary distributions are compatible with projects built using
MSVC 2019 (using either dynamic or static connector libraries) or MSVC 2017 (using dynamic
connector libraries).
• Connector/C++ 8.0.14 to 8.0.18: MSVC 2017 or 2015.
• Connector/C++ prior to 8.0.14: MSVC 2015.
• To build Connector/C++ from source:
• The MySQL C API client library may be required:
5

Obtaining Connector/C++
• For Connector/C++ built without the JDBC connector (which is the default), the client library is not
needed.
• To build Connector/C++ with the JDBC connector, configure Connector/C++ with the WITH_JDBC
CMake option enabled. In this case, the JDBC connector requires a client library from MySQL 8.0 or
later.
• On Windows, Microsoft Visual Studio is required. The acceptable MSVC versions depend on your
Connector/C++ version:
• Connector/C++ 8.0.19 and higher: MSVC 2019 or 2017.
• Connector/C++ 8.0.14 to 8.0.18: MSVC 2017 or 2015.
• Connector/C++ prior to 8.0.14: MSVC 2015.
2.2 Obtaining Connector/C++
Connector/C++ binary and source distributions are available, in platform-specific packaging formats. To
obtain a distribution, visit the Connector/C++ downloads page. It is also possible to clone the Connector/C+
+ Git source repository.
• Connector/C++ binary distributions are available for Microsoft Windows, and for Unix and Unix-like
platforms. See Section 2.3, “Installing Connector/C++ from a Binary Distribution”.
• Connector/C++ source distributions are available as compressed tar files or Zip archives and can be
used on any supported platform. See Section 2.4, “Installing Connector/C++ from Source”.
• The Connector/C++ source code repository uses Git and is available at GitHub. See Section 2.4,
“Installing Connector/C++ from Source”.
2.3 Installing Connector/C++ from a Binary Distribution
To obtain a Connector/C++ binary distribution, visit the Connector/C++ downloads page.
For some platforms, Connector/C++ binary distributions are available in platform-specific packaging
formats. Binary distributions are also available in more generic format, in the form of compressed tar files
or Zip archives.
Note
Generic Linux packages do not contain Connector/C++ static libraries. If you intend
to link your application to a static library, consider installing a package that is
specific to the platform on which you build your final application.
For descriptions here that refer to documentation files, those files have names such as
CONTRIBUTING.md, README.md, README.txt, README, LICENSE.txt, LICENSE, INFO_BIN, and
INFO_SRC. (Prior to Connector/C++ 8.0.14, the information file is BUILDINFO.txt rather than INFO_BIN
and INFO_SRC.)
• Installation on Windows
• Installation on Linux
• Installation on macOS
6

Installation on Windows
• Installation on Solaris
• Installation Using a tar or Zip Package
Installation on Windows
Important
On Windows platforms, Commercial and Community Connector/C++ distributions
require the Visual C++ Redistributable for Visual Studio. The Redistributable
is available at the Visual Studio Download Center; install it before installing
Connector/C++. For information about which VC++ Redistributable versions are
acceptable, see Platform Support and Prerequisites.
These methods of installing binary distributions are available on Windows:
• Windows MSI Installer. As of Connector/C++ 8.0.12, an MSI Installer is available for Windows. To
use the MSI Installer (.msi file), launch it and follow the prompts in the screens it presents. The MSI
Installer can install components for these connectors:
• The connector for X DevAPI (including X DevAPI for C).
• The connector for the legacy JDBC API.
For each connector, there are two components:
• The DLL component includes the connector DLLs and libraries to satisfy runtime dependencies. The
DLL component is required to run Connector/C++ application binaries that use the connector.
• The Developer component includes header files, static libraries, and import libraries for DLLs. The
Developer component is required to build from source Connector/C++ applications that use the
connector.
The MSI Installer requires administrative privileges. It begins by presenting a welcome screen that
enables you to continue the installation or cancel it. If you continue the installation, the MSI Installer
overview screen enables you to select the type of installation to perform:
• The Complete installation installs the DLL and Developer components for both connectors.
• The Typical installation installs the DLL component for both connectors.
• The Custom installation enables you to specify the installation location and select which components
to install. The DLL and Developer components for the X DevAPI connector are preselected, but you
can override the selection. The Developer component for a connector cannot be selected without also
selecting the connector DLL component.
The MSI Installer performs these actions:
• It checks whether the required Visual C++ Redistributable for Visual Studio is present. If not, the
installer asks you to install it and exits with an error. For information about which VC++ Redistributable
versions are acceptable, see Platform Support and Prerequisites.
• It installs documentation files.
To install Connector/C++ from the command line in batch mode, use a command similar to:
msiexec.exe /i packages\mysql-connector-cpp-commercial-8.X.X-winx64.msi /qn /lvx*
7

Installation on Linux
msi_install.log ALLUSERS=1 INSTALLDIR=C:\tmp\c-cpp-unpacked INSTALLLEVEL=4
To uninstall Connector/C++ from the command line in batch mode, use a command similar to:
msiexec.exe /x packages\mysql-connector-cpp-commercial-8.X.X-winx64.msi /qn /lvx*
msi_uninstall.log
• Zip archive package without installer. To install from a Zip archive package (.zip file), see
Installation Using a tar or Zip Package.
In addition to the standard Zip archive packages, packages are available that were built in debug mode.
However, applications should use the same build mode as Connector/C++. If you install Connector/C++
packages built in debug mode, build applications in debug mode. If you install Connector/C++ packages
built in release mode, build applications in release mode.
Installation on Linux
These methods of installing binary distributions are available on Linux:
• RPM package. RPM packages are available for Linux (as of Connector/C++ 8.0.12). The packages
are distinguished by their base names (the full names include the Connector/C++ version and suffixes):
• mysql-connector-c++: This package provides the shared connector library implementing X
DevAPI and X DevAPI for C.
• mysql-connector-c++-jdbc: This package provides the shared legacy connector library
implementing the JDBC API.
• mysql-connector-c++-devel: This package installs development files required for building
applications that use Connector/C++ libraries provided by the other packages, and static connector
libraries. This package depends on the shared libraries provided by the other packages. It cannot be
installed by itself without the other two packages.
• Debian package. Debian packages are available for Linux (as of Connector/C++ 8.0.14). The
packages are distinguished by their base names (the full names include the Connector/C++ version and
suffixes):
• libmysqlcppconn8-1: This package provides the shared connector library implementing X DevAPI
and X DevAPI for C.
• libmysqlcppconn7: This package provides the shared legacy connector library implementing the
JDBC API.
• libmysqlcppconn-dev: This package installs development files required for building applications
that use Connector/C++ libraries provided by the other packages, and static connector libraries. This
package depends on the shared libraries provided by the other packages. It cannot be installed by
itself without the other two packages.
• Compressed tar file. To install from a compressed tar file (.tar.gz file), see Installation Using a
tar or Zip Package.
Installation on macOS
These methods of installing binary distributions are available on macOS:
• DMG package. DMG (disk image) packages for macOS are available as of Connector/C++ 8.0.12. A
DMG package provides shared and static connector libraries implementing X DevAPI and X DevAPI for
8

Installation on Solaris
C, and the legacy connector library implementing the JDBC API. The package also includes OpenSSL
libraries, public header files, and documentation files.
• Compressed tar file. To install from a compressed tar file (.tar.gz file), see Installation Using a
tar or Zip Package.
Installation on Solaris
These methods of installing binary distributions are available on Solaris:
• Compressed tar file. To install from a compressed tar file (.tar.gz file), see Installation Using a
tar or Zip Package.
Installation Using a tar or Zip Package
Connector/C++ binary distributions are available for several platforms, packaged in the form of
compressed tar files or Zip archives, denoted here as PACKAGE.tar.gz or PACKAGE.zip.
Note
Generic Linux packages do not contain Connector/C++ static libraries.
To unpack a compressed tar file, use this command in the intended installation directory:
tar zxvf PACKAGE.tar.gz
To install from a Zip archive package (.zip file), use WinZip or another tool that can read .zip files to
unpack the file into the location of your choosing.
2.4 Installing Connector/C++ from Source
This chapter describes how to install Connector/C++ using a source distribution or a copy of the Git source
repository.
2.4.1 Source Installation System Prerequisites
To install Connector/C++ from source, the following system requirements must be satisfied:
• Build Tools
• MySQL Client Library
• Boost C++ Libraries
• SSL Support
Build Tools
You must have the cross-platform build tool CMake (3.0 or higher).
You must have a C++ compiler that supports C++17 (as of Connector/C++ 8.0.33).
MySQL Client Library
To build Connector/C++ from source, the MySQL C API client library may be required:
• Building the JDBC connector requires a client library from MySQL 8.0 or later. This occurs when
Connector/C++ is configured with the WITH_JDBC CMake option enabled to include the JDBC connector.
9

Obtaining and Unpacking a Connector/C++ Source Distribution
• For Connector/C++ built without the JDBC connector, the client library is not needed.
Typically, the MySQL client library is installed when MySQL is installed. However, check your operating
system documentation for other installation options.
To specify where to find the client library, set the MYSQL_DIR CMake option appropriately at configuration
time as necessary (see Section 2.4.4, “Connector/C++ Source-Configuration Options”).
Boost C++ Libraries
To compile Connector/C++ the Boost C++ libraries are needed only if you build the legacy JDBC API
or if the version of the C++ standard library on your system does not implement the UTF8 converter
(codecvt_utf8).
If the Boost C++ libraries are needed, Boost 1.59.0 or newer must be installed. To obtain Boost and its
installation instructions, visit the official Boost site.
After Boost is installed, use the WITH_BOOST CMake option to indicate where the Boost files are located
(see Section 2.4.4, “Connector/C++ Source-Configuration Options”):
cmake [other_options] -DWITH_BOOST=/usr/local/boost_1_59_0
Adjust the path as necessary to match your installation.
SSL Support
Use the WITH_SSL CMake option to specify which SSL library to use when compiling Connector/C++.
OpenSSL 1.0.x or higher is required. Your other options are:
• As of Connector/C++ 8.0.18, it is possible to compile against OpenSSL 1.1.
• As of Connector/C++ 8.0.30, it is possible to compile against OpenSSL 3.0.
For more information about WITH_SSL and SSL libraries, see Section 2.4.4, “Connector/C++ Source-
Configuration Options”.
2.4.2 Obtaining and Unpacking a Connector/C++ Source Distribution
To obtain a Connector/C++ source distribution, visit the Connector/C++ downloads page. Alternatively,
clone the Connector/C++ Git source repository.
A Connector/C++ source distribution is packaged as a compressed tar file or Zip archive, denoted here as
PACKAGE.tar.gz or PACKAGE.zip. A source distribution in tar file or Zip archive format can be used on
any supported platform.
The distribution when unpacked includes an INFO_SRC file that provides information about the product
version and the source repository from which the distribution was produced. The distribution also includes
other documentation files such as those listed in Section 2.3, “Installing Connector/C++ from a Binary
Distribution”.
To unpack a compressed tar file, use this command in the intended installation directory:
tar zxvf PACKAGE.tar.gz
After unpacking the distribution, build it using the appropriate instructions for your platform later in this
chapter.
10

Installing Connector/C++ from Source
To install from a Zip archive package (.zip file), use WinZip or another tool that can read .zip files
to unpack the file into the location of your choosing. After unpacking the distribution, build it using the
appropriate instructions for your platform later in this chapter.
To clone the Connector/C++ code from the source code repository located on GitHub at https://github.com/
mysql/mysql-connector-cpp, use this command:
git clone https://github.com/mysql/mysql-connector-cpp.git
That command should create a mysql-connector-cpp directory containing a copy of the entire
Connector/C++ source tree.
The git clone command sets the sources to the master branch, which is the branch that contains the
latest sources. Released code is in the 8.0 branche (the 8.0 branch contains the same sources as the
master branch). If necessary, use git checkout in the source directory to select the desired branch.
For example, to build Connector/C++ 8.0:
cd mysql-connector-cpp
git checkout 8.0
After cloning the repository, build it using the appropriate instructions for your platform later in this chapter.
After the initial checkout operation to get the source tree, run git pull periodically to update your source
to the latest version.
2.4.3 Installing Connector/C++ from Source
To install Connector/C++ from source, verify that your system satisfies the requirements outlined in
Section 2.4.1, “Source Installation System Prerequisites”.
• Configuring Connector/C++
• Specifying External Dependencies
• Building Connector/C++
• Installing Connector/C++
• Verifying Connector/C++ Functionality
Configuring Connector/C++
Use CMake to configure and build Connector/C++. Only out-of-source-builds are supported, so create a
directory to use for the build and change location into it. Then configure the build using this command,
where concpp_source is the directory containing the Connector/C++ source code:
cmake concpp_source
It may be necessary to specify other options on the configuration command. Some examples:
• By default, these installation locations are used:
• /usr/local/mysql/connector-c++-8.0 (Unix and Unix-like systems)
• User_home/MySQL/"MySQL Connector C++ 8.0" (Windows)
To specify the installation location explicitly, use the CMAKE_INSTALL_PREFIX option:
11

Installing Connector/C++ from Source
-DCMAKE_INSTALL_PREFIX=path_name
• On Windows, you can use the -G and -A options to select a particular generator:
• -G "Visual Studio 16" -A x64 (64-bit builds)
• -G "Visual Studio 16" -A Win32 (32-bit builds)
Consult the CMake manual or check cmake --help to find out which generators are supported by your
CMake version. (However, it may be that your version of CMake supports more generators than can
actually be used to build Connector/C++.)
• If the Boost C++ libraries are needed, use the WITH_BOOST option to specify their location:
-DWITH_BOOST=path_name
• By default, the build creates dynamic (shared) libraries. To build static libraries, enable the
BUILD_STATIC option:
-DBUILD_STATIC=ON
• By default, the legacy JDBC connector is not built. To include the JDBC connector in the build, enable
the WITH_JDBC option:
-DWITH_JDBC=ON
Note
If you configure and build the test programs later, use the same CMake options to
configure them as the ones you use to configure Connector/C++ (-G, WITH_BOOST,
BUILD_STATIC, and so forth). Exceptions: Path name arguments will differ, and
you need not specify CMAKE_INSTALL_PREFIX.
For information about CMake configuration options, see Section 2.4.4, “Connector/C++ Source-
Configuration Options”.
Specifying External Dependencies
Use CMake options to configure and build Connector/C++ with external sources that you can substitute
for the required third-party dependencies currently bundled with the connector. If the dependency is an
external library, then the library is linked dynamically to the connector. In contrast, bundled third-party
libraries used by connector are linked statically to it.
Note
Using an external third-party library that cannot be linked to the connector
dynamically causes the build to fail, even when the static library is available.
The supported options are:
• WITH_BOOST
• WITH_LZ4
• WITH_MYSQL
• WITH_PROTOBUF
12

Installing Connector/C++ from Source
• WITH_SSL
• WITH_ZLIB
• WITH_ZSTD
For example, to use an external installation of Protobuf, instead of building it from bundled sources,
specify the WITH_PROTOBUF option and provide the path name to the location where CMake can find the
alternative dependency.
Note
If an external dependency cannot be found (or is unusable), then the build fails. No
attempt is made to locate the bundled source.
cmake [other_options] -DWITH_PROTOBUF=path_name_to_protobuf_install
To configure the standard system-wide location for an external dependency, use the literal value system
rather than providing a path name. For example:
-DWITH_SSL=system
For information about CMake configuration options, see Section 2.4.4, “Connector/C++ Source-
Configuration Options”.
External dependencies make it possible to use shared third-party libraries that are linked dynamically to
the connector. This can be an advantage because, for example, you cannot use the connector static library
with an application that also links to a Protobuf library.
When running an application that is linked to the connector dynamic library, the third-party libraries on
which the connector depends should be correctly found if they are placed in the file system next to the
connector library. The application should also work when the libraries are installed at the standard system-
wide locations. This assumes that the external third-party dependency version is expected by Connector/C
++.
Except for Windows, it should be possible to run an application linked to the connector dynamic library
when the connector library and the third-party libraries are placed in a nonstandard location, provided that
these locations were stored as runtime paths when building the application (gcc -rpath option).
For Windows, an application that is linked to the connector shared library can be run only if the connector
library and the libraries are stored either:
• In the Windows system folder
• In the same folder as the application
• In a folder listed in the PATH environment variable
If the application is linked to the connector static library, it remains true that the required libraries must be
found in one of the preceding locations.
Building Connector/C++
After configuring the Connector/C++ distribution, build it using this command:
cmake --build . --config build_type
The --config option is optional. It specifies the build configuration to use, such as Release or Debug. If
you omit --config, the default is Debug.
13

Installing Connector/C++ from Source
Important
If you specify the --config option on the preceding command, specify the same
--config option for later steps, such as the steps that install Connector/C++ or
that build test programs.
If the build is successful, it creates the connector libraries in the build directory. (For Windows, look for
the libraries in a subdirectory with the same name as the build_type value specified for the --config
option.)
• If you build dynamic libraries, they have these names:
• libmysqlcppconn8.so.1 (Unix)
• libmysqlcppconn8.3.dylib (macOS)
• mysqlcppconn8-1-vs14.dll (Windows)
• If you build static libraries, they have these names:
• libmysqlcppconn8-static.a (Unix, macOS)
• mysqlcppconn8-static.lib (Windows)
If you enabled the WITH_JDBC option to include the legacy JDBC connector in the build, the following
additional library files are created.
• If you build legacy dynamic libraries, they have these names:
• libmysqlcppconn.so.7 (Unix)
• libmysqlcppconn.7.dylib (macOS)
• mysqlcppconn-7-vs14.dll (Windows)
• If you build legacy static libraries, they have these names:
• libmysqlcppconn-static.a (Unix, macOS)
• mysqlcppconn-static.lib (Windows)
Installing Connector/C++
To install Connector/C++, use this command:
cmake --build . --target install --config build_type
Verifying Connector/C++ Functionality
To verify connector functionality, build and run one or more of the test programs included in the testapp
directory of the source distribution. Create a directory to use and change location into it. Then issue the
following commands:
cmake [other_options] -DWITH_CONCPP=concpp_install concpp_source/testapp
cmake --build . --config=build_type
WITH_CONCPP is an option used only to configure the test application. other_options consists of the
options that you used to configure Connector/C++ itself (-G, WITH_BOOST, BUILD_STATIC, and so forth).
concpp_source is the directory containing the Connector/C++ source code, and concpp_install is
the directory where Connector/C++ is installed:
14

Connector/C++ Source-Configuration Options
The preceding commands should create the devapi_test and xapi_test programs in the run
directory of the build location. If you enable WITH_JDBC when configuring the test programs, the build also
creates the jdbc_test program.
Before running test programs, ensure that a MySQL server instance is running with X Plugin enabled. The
easiest way to arrange this is to use the mysql-test-run.pl script from the MySQL distribution. For
MySQL 8.0, X Plugin is enabled by default, so invoke this command in the mysql-test directory of that
distribution:
perl mysql-test-run.pl --start-and-exit
The command should start a test server instance with X Plugin enabled and listening on port 13009 instead
of its standard port (33060).
Now you can run one of the test programs. They accept a connection-string argument, so if the server was
started as just described, you can run them like this:
run/devapi_test mysqlx://[email protected]:13009
run/xapi_test mysqlx://[email protected]:13009
The connection string assumes availability of a root user account without any password and the programs
assume that there is a test schema available (assumptions that hold for a server started using mysql-
test-run.pl).
To test jdbc_test, you need a MySQL server, but X Plugin is not required. Also, the connection options
must be in the form specified by the JDBC API. Pass the user name as the second argument. For
example:
run/jdbc_test tcp://127.0.0.1:13009 root
2.4.4 Connector/C++ Source-Configuration Options
Connector/C++ recognizes the CMake options described in this section.
Table 2.1 Connector/C++ Source-Configuration Option Reference
Formats Description Default
BUILD_STATIC Whether to build a static librarty OFF
BUNDLE_DEPENDENCIES Whether to bundle external
dependency libraries with the
connector
OFF
CMAKE_BUILD_TYPE Type of build to produce Debug
CMAKE_INSTALL_DOCDIR Documentation installation
directory
CMAKE_INSTALL_INCLUDEDIR Header file installation directory
CMAKE_INSTALL_LIBDIR Library installation directory
CMAKE_INSTALL_PREFIX Installation base directory /usr/local
MAINTAINER_MODE For internal use only OFF
MYSQLCLIENT_STATIC_BINDINGWhether to link to the shared
MySQL client library
ON
MYSQLCLIENT_STATIC_LINKINGWhether to statically link to the
MySQL client library
OFF
15

Connector/C++ Source-Configuration Options
Formats Description Default
MYSQL_CONFIG_EXECUTABLE Path to the mysql_config program ${MYSQL_DIR}/bin/
mysql_config
MYSQL_DIR MySQL Server installation
directory
STATIC_MSVCRT Use the static runtime library
WITH_BOOST The Boost source directory system
WITH_DOC Whether to generate Doxygen
documentation
OFF
WITH_JDBC Whether to build legacy JDBC
library
OFF
WITH_LZ4 The LZ4 source directory
WITH_MYSQL The MySQL Server source
directory
system
WITH_PROTOBUF The Protobuf source directory
WITH_SSL The SSL source directory system
WITH_ZLIB The ZLIB source directory
WITH_ZSTD The ZSTD source directory
• -DBUILD_STATIC=bool
By default, dynamic (shared) libraries are built. If this option is enabled, static libraries are built instead.
• -DBUNDLE_DEPENDENCIES=bool
This is an internal option used for creating Connector/C++ distribution packages.
• -DCMAKE_BUILD_TYPE=type
The type of build to produce:
• Debug: Disable optimizations and generate debugging information. This is the default.
• Release: Enable optimizations.
• RelWithDebInfo: Enable optimizations and generate debugging information.
• -DCMAKE_INSTALL_DOCDIR=dir_name
The documentation installation directory, relative to CMAKE_INSTALL_PREFIX. If not specified, the
default is to install in CMAKE_INSTALL_PREFIX.
This option requires that WITH_DOC be enabled.
This option was added in Connector/C++ 8.0.14.
• -DCMAKE_INSTALL_INCLUDEDIR=dir_name
The header file installation directory, relative to CMAKE_INSTALL_PREFIX. If not specified, the default is
include.
This option was added in Connector/C++ 8.0.14.
16

Connector/C++ Source-Configuration Options
• -DCMAKE_INSTALL_LIBDIR=dir_name
The library installation directory, relative to CMAKE_INSTALL_PREFIX. If not specified, the default is
lib64 or lib.
This option was added in Connector/C++ 8.0.14.
• -DCMAKE_INSTALL_PREFIX=dir_name
The installation base directory (where to install Connector/C++).
• -DMAINTAINER_MODE=bool
This is an internal option used for creating Connector/C++ distribution packages. It was added in
Connector/C++ 8.0.12.
• -DMYSQLCLIENT_STATIC_BINDING=bool
Whether to link to the shared MySQL client library. This option is used only if
MYSQLCLIENT_STATIC_LINKING is disabled to enable dynamic linking of the MySQL client library.
In that case, if MYSQLCLIENT_STATIC_BINDING is enabled (the default), Connector/C++ is linked to
the shared MySQL client library. Otherwise, the shared MySQL client library is loaded and mapped at
runtime.
This option applies only if you are building the legacy JDBC connector (that is, only if WITH_JDBC is
enabled). It was added in Connector/C++ 8.0.16.
• -DMYSQLCLIENT_STATIC_LINKING=bool
Whether to link statically to the MySQL client library. The default depends on the legacy JDBC connector
that you are building:
• From Connector/C++ 8.0.33, the default is OFF (use dynamic linking to the client library). Enabling this
option disables dynamic linking to the client library.
• For Connector/C++ 8.0.16 to 8.0.32, the default is ON (use static linking to the client library). Disabling
this option enables dynamic linking to the client library. CMake verifies that the current compiler and
standard libraries can build without errors at configuration time.
This option applies only if you are building the legacy JDBC connector (that is, only if WITH_JDBC is
enabled). It was added in Connector/C++ 8.0.16.
• -DMYSQL_CONFIG_EXECUTABLE=file_name
The path to the mysql_config program.
On non-Windows systems, CMake checks to see whether MYSQL_CONFIG_EXECUTABLE is set. If not,
CMake tries to locate mysql_config in the default locations.
This option applies only if you are building the legacy JDBC connector (that is, only if WITH_JDBC is
enabled).
• -DMYSQL_DIR=dir_name
The directory where MySQL is installed.
This option applies only if you are building the legacy JDBC connector (that is, only if WITH_JDBC is
enabled).
17

Connector/C++ Source-Configuration Options
• -DSTATIC_MSVCRT=bool
(Windows only) Use the static runtime library (the /MT* compiler option). This option might be necessary
if code that uses Connector/C++ also uses the static runtime library.
• -DWITH_BOOST={system|path_name}
This option specifies which BOOST header file to use when compiling Connector/C++ with an external
dependency. The option value to use:
• system: Use the system BOOST header file.
• path_name is the path name to the file to use.
For consistency with CMake conventions, BOOST_DIR or BOOST_ROOT_DIR can be used instead
of WITH_BOOST to indicate the base location of the dependency. As an alternative that implies the
WITH_BOOST option (without specifying it), use BOOST_INCLUDE_DIR to provide the header file location
instead of deriving it from the BOOST_ROOT_DIR value.
This option applies only if you are building the legacy JDBC connector (that is, only if WITH_JDBC is
enabled).
• -DWITH_DOC=bool
Whether to enable generating the Doxygen documentation. As of Connector/C++ 8.0.16, enabling this
option also causes the Doxygen documentation to be built by the all target.
• -DWITH_JDBC=bool
Whether to build the legacy JDBC connector. This option is disabled by default. If it is enabled,
Connector/C++ 8.0 applications can use the legacy JDBC API, just like Connector/C++ 1.1 applications.
• -DWITH_LZ4={system|path_name}
This option specifies which LZ4 installation to use when compiling Connector/C++ with an external
dependency. The option value to use:
• system: Use the system LZ4 location.
• path_name is the path name to the installation location to use.
For consistency with CMake conventions, LZ4_DIR or LZ4_ROOT_DIR can be used instead of
WITH_LZ4 to indicate the base location of the dependency.
To imply the WITH_LZ4 option but with more fine-grained specification of installation directories, use
LZ4_INCLUDE_DIR or LZ4_LIB_DIR to indicate the header file (or library) location instead of deriving
it from the LZ4_ROOT_DIR value. To specify a list of external libraries to link to, use LZ4_LIBRARY
instead of the WITH_LZ4 option.
If you specify both LZ4_LIBRARY and LZ4_LIB_DIR, then LZ4_LIB_DIR is used as an additional
prefix when finding the library file and LZ4_LIBRARY should be relative to that prefix. On Windows,
LZ4_LIBRARY should point at the import library of the DLL.
• -DWITH_MYSQL={system|path_name}
The location where the MySQL sources are installed. The client library is linked statically when you
specify this option unless you also request MYSQLCLIENT_STATIC_LINKING=OFF. The option value to
use:
18

Connector/C++ Source-Configuration Options
• system: Use the system MYSQL location.
• path_name is the path name to the installation location to use.
This option applies only if you are building the legacy JDBC connector (that is, only if WITH_JDBC is
enabled).
For consistency with CMake conventions, MYSQL_DIR or MYSQL_ROOT_DIR can be used instead of
WITH_MYSQL to indicate the base location of the dependency.
To imply the WITH_MYSQL option but with more fine-grained specification of installation directories,
use MYSQL_INCLUDE_DIR or MYSQL_LIB_DIR to indicate the header file (or library) location instead
of deriving it from the MYSQL_ROOT_DIR value. To specify a list of external libraries to link to, use
MYSQL_LIBRARY instead of the WITH_MYSQL option.
If you specify both MYSQL_LIBRARY and MYSQL_LIB_DIR, then MYSQL_LIB_DIR is used as an
additional prefix when finding the library file and MYSQL_LIBRARY should be relative to that prefix. On
Windows, MYSQL_LIBRARY should point at the import library of the DLL.
• -DWITH_PROTOBUF={system|path_name}
This option specifies which Protobuf installation to use when compiling Connector/C++ with an external
dependency. Although the library in Connector/C++ binary packages still links in Protobuf statically,
using this option makes it possible to build from external sources a variant that links in Protobuf
dynamically.
The option value to use:
• system: Use the system Protobuf location.
• path_name is the path name to the installation location to use.
For consistency with CMake conventions, PROTOBUF_DIR or PROTOBUF_ROOT_DIR can be used
instead of WITH_PROTOBUF to indicate the base location of the dependency.
To imply the WITH_PROTOBUF option but with more fine-grained specification of installation directories,
use PROTOBUF_INCLUDE_DIR or PROTOBUF_LIB_DIR to indicate the header file (or library) location
instead of deriving it from the PROTOBUF_ROOT_DIR value. To specify a list of external libraries to link
to, use PROTOBUF_LIBRARY instead of the WITH_PROTOBUF option.
If you specify both PROTOBUF_LIBRARY and PROTOBUF_LIB_DIR, then PROTOBUF_LIB_DIR is used
as an additional prefix when finding the library file and PROTOBUF_LIBRARY should be relative to that
prefix. On Windows, PROTOBUF_LIBRARY should point at the import library of the DLL.
Similarly, specifying PROTOBUF_BIN_DIR makes it possible to locate the binaries required to use the
dependency and find the compiler.
• -DWITH_SSL={system|path_name}
This option specifies which SSL library to use when compiling Connector/C++. The option value to use:
• system: Use the system OpenSSL library.
• path_name is the path name to the SSL installation to use. It should be the path to the installed
OpenSSL library, and must point to a directory containing a lib subdirectory with OpenSSL libraries
that are already built. Specifying a path name for the OpenSSL installation can be preferable to using
19

Connector/C++ Source-Configuration Options
system because it can prevent CMake from detecting and using an older or incorrect OpenSSL
version installed on the system.
For consistency with CMake conventions, SSL_DIR or SSL_ROOT_DIR (OPENSSL_ROOT_DIR) can be
used instead of WITH_SSL to indicate the base location of the dependency.
To imply the WITH_SSL option but with more fine-grained specification of installation directories,
use OPENSSL_INCLUDE_DIR or OPENSSL_LIB_DIR to indicate the header file (or library) location
instead of deriving it from the SSL_ROOT_DIR value. To specify a list of external libraries to link to, use
SSL_LIBRARY instead of the WITH_SSL option.
If you specify both SSL_LIBRARY and OPENSSL_LIB_DIR, then OPENSSL_LIB_DIR is used as an
additional prefix when finding the library file and SSL_LIBRARY should be relative to that prefix. On
Windows, SSL_LIBRARY should point at the import library of the DLL.
• -DWITH_ZLIB={system|path_name}
This option specifies which ZLIB installation to use when compiling Connector/C++ with an external
dependency. The option value to use:
• system: Use the system ZLIB location.
• path_name is the path name to the installation location to use.
For consistency with CMake conventions, ZLIB_DIR or ZLIB_ROOT_DIR can be used instead of
WITH_ZLIB to indicate the base location of the dependency.
To imply the WITH_ZLIB option but with more fine-grained specification of installation directories,
use ZLIB_INCLUDE_DIR or ZLIB_LIB_DIR to indicate the header file (or library) location instead
of deriving it from the ZLIB_ROOT_DIR value. To specify a list of external libraries to link to, use
ZLIB_LIBRARY instead of the WITH_ZLIB option.
If you specify both ZLIB_LIBRARY and ZLIB_LIB_DIR, then ZLIB_LIB_DIR is used as an additional
prefix when finding the library file and ZLIB_LIBRARY should be relative to that prefix. On Windows,
ZLIB_LIBRARY should point at the import library of the DLL,
• -DWITH_ZSTD={system|path_name}
This option specifies which ZSTD installation to use when compiling Connector/C++ with an external
dependency. The option value to use:
• system: Use the system ZSTD location.
• path_name is the path name to the installation location to use.
For consistency with CMake conventions, ZSTD_DIR or ZSTD_ROOT_DIR can be used instead of
WITH_ZSTD to indicate the base location of the dependency.
To imply the WITH_ZSTD option but with more fine-grained specification of installation directories,
use ZSTD_INCLUDE_DIR or ZSTD_LIB_DIR to indicate the header file (or library) location instead
of deriving it from the ZSTD_ROOT_DIR value. To specify a list of external libraries to link to, use
ZSTD_LIBRARY instead of the WITH_ZSTD option.
If you specify both ZSTD_LIBRARY and ZSTD_LIB_DIR, then ZSTD_LIB_DIR is used as an additional
prefix when finding the library file and ZSTD_LIBRARY should be relative to that prefix. On Windows,
ZSTD_LIBRARY should point at the import library of the DLL.
20

Building Connector/C++ Applications
2.5 Building Connector/C++ Applications
This chapter provides guidance on building Connector/C++ applications:
• General considerations for building Connector/C++ applications successfully. See Section 2.5.1,
“Building Connector/C++ Applications: General Considerations”.
• Information about building Connector/C++ applications that applies to specific platforms such as
Windows, macOS, generic Linux, and Solaris. See Section 2.5.2, “Building Connector/C++ Applications:
Platform-Specific Considerations”.
For discussion of the programming interfaces available to Connector/C++ applications, see Section 2.1,
“Introduction to Connector/C++”.
2.5.1 Building Connector/C++ Applications: General Considerations
This section discusses general considerations to keep in mind when building Connector/C++ applications.
For information that applies to particular platforms, see the section that applies to your platform in
Section 2.5.2, “Building Connector/C++ Applications: Platform-Specific Considerations”.
Commands shown here are as given from the command line (for example, as invoked from a Makefile).
The commands apply to any platform that supports make and command-line build tools such as g++, cc,
or clang, but may need adjustment for your build environment.
• Build Tools and Configuration Settings
• C++17 Support
• Connector/C++ Header Files
• Connector/C++ Version Macros
• Boost Header Files
• Link Libraries
• Runtime Libraries
• Using the Connector/C++ Dynamic Library
• Using the Connector/C++ Static Library
Build Tools and Configuration Settings
It is important that the tools you use to build your Connector/C++ applications are compatible with the tools
used to build Connector/C++ itself. Ideally, build your applications with the same tools that were used to
build the Connector/C++ binaries.
To avoid issues, ensure that these factors are the same for your applications and Connector/C++ itself:
• Compiler version.
• Runtime library.
• Runtime linker configuration settings.
To avoid potential crashes, the build configuration of Connector/C++ should match the build configuration
of the application using it. For example, do not use a release build of Connector/C++ with a debug build of
the client application.
21

Building Connector/C++ Applications: General Considerations
To use a different compiler version, release configuration, or runtime library, first build Connector/C++ from
source using your desired settings (see Section 2.4, “Installing Connector/C++ from Source”), then build
your applications using those same settings.
Connector/C++ binary distributions include an INFO_BIN file that describes the environment and
configuration options used to build the distribution. If you installed Connector/C++ from a binary distribution
and experience build-related issues on a platform, it may help to check the settings that were used to
build the distribution on that platform. Binary distributions also include an INFO_SRC file that provides
information about the product version and the source repository from which the distribution was produced.
(Prior to Connector/C++ 8.0.14, look for BUILDINFO.txt rather than INFO_BIN and INFO_SRC.)
C++17 Support
X DevAPI uses C++17 language features (as of Connector/C++ 8.0.33). To compile Connector/C++
applications that use X DevAPI, enable C++17 support in the compiler using the -std=c++17 option. This
option is not needed for applications that use X DevAPI for C (which is a plain C API) or the legacy JDBC
API (which is based on plain C++), unless the application code uses C++17.
Connector/C++ Header Files
The API an application uses determines which Connector/C++ header files it should include. The following
include directives work under the assumption that the include path contains $MYSQL_CPPCONN_DIR/
include, where $MYSQL_CPPCONN_DIR is the Connector/C++ installation location. Pass an -I
$MYSQL_CPPCONN_DIR/include option on the compiler invocation command to ensure this.
• For applications that use X DevAPI:
#include <mysqlx/xdevapi.h>
• For applications that use X DevAPI for C:
#include <mysqlx/xapi.h>
• For applications that use the legacy JDBC API, the header files are version dependent:
• As of Connector/C++ 8.0.16, a single #include directive suffices:
#include <mysql/jdbc.h>
• Prior to Connector/C++ 8.0.16, use this set of #include directives:
#include <jdbc/mysql_driver.h>
#include <jdbc/mysql_connection.h>
#include <jdbc/cppconn/*.h>
The notation <jdbc/cppconn/*.h> means that you should include all header files from the jdbc/
cppconn directory that are needed by your application. The particular files needed depend on the
application.
• Legacy code that uses Connector/C++ 1.1 has #include directives of this form:
#include <mysql_driver.h>
#include <mysql_connection.h>
#include <cppconn/*.h>
To build such code with Connector/C++ 8.0 without modifying it, add $MYSQL_CPPCONN_DIR/
include/jdbc to the include path.
22

Building Connector/C++ Applications: General Considerations
To compile code that you intend to link statically against Connector/C++, define a macro that adjusts API
declarations in the header files for usage with the static library. For details, see Using the Connector/C++
Static Library.
Connector/C++ Version Macros
Starting with Connector/C++ 8.0.30, version-related macros are defined in public header files. The intent
of the macros is to provide a way to systematically and predictably maintain version numbering of the
Connector/C++ product. The following table describes the version-related macros.
Macro Name Description
MYSQL_CONCPP_VERSION_MAJOR Major number of the product version; currently 8.
MYSQL_CONCPP_VERSION_MINOR Minor number of the product version; currently 00.
MYSQL_CONCPP_VERSION_MICRO Micro number of the product version; initially 30.
MYSQL_CONCPP_VERSION_NUMBER Full Connector/C++ version number, which
combines the major, minor, and micro numbers. For
example, the combined version number 8000030
represents Connector/C++ 8.0.30.
Note
The version numbers maintained by these macros apply to the Connector/C
++ product only and are unrelated to API or ABI versions, which are handled
separately.
Connector/C++ applications that use X DevAPI, X DevAPI for C, or the legacy JDBC API can specify
the MYSQL_CONCPP_VERSION_NUMBER macro to add conditional tests that determine the inclusion or
exclusion of feature dependencies, based on which Connector/C++ version introduced the dependency.
For example, it is possible to use the MYSQL_CONCPP_VERSION_NUMBER macro in the following cases:
• When a Connector/C++ application needs a guard that checks for features introduced after the specified
version. The following example specifies version 8.0.32, which has the macro defined in public header
files. The same conditional-compilation directive also works when the macro is not defined (with
pre-8.0.30 header files), because the value is treated as 0.
#if MYSQL_CONCPP_VERSION_NUMBER > 8000032
// use some 8.0.32+ feature
#endif
• When a Connector/C++ application requires all features introduced before the specified version.
#if MYSQL_CONCPP_VERSION_NUMBER < 8000032
// this usage is OK; it compiles with 8.0.31 and all previous versions
#endif
• When a Connector/C++ application that uses X DevAPI also uses the CharacterSet::utf8mb3
enumeration constant or any of the new utf8mb4 collation members. If the application compiles with the
pre-8.0.30 connector, then it is possible to guard the use of these new API elements.
#if MYSQL_CONCPP_VERSION_NUMBER >= 8000030
if (CharacterSet::utf8mb3 == cs)
#else
if (CharacterSet::utf8 == cs)
#endif
{
// cs is the id of the utf8 character set
}
23

Building Connector/C++ Applications: General Considerations
• When a Connector/C++ application that uses X DevAPI needs to check the name of the utf8mb3
character set or any of its collations, and it must also be compiled with the pre-8.0.30 connector.
#if MYSQL_CONCPP_VERSION_NUMBER >= 8000030
if ("utf8mb3" == characterSetName(cs))
#else
if ("utf8" == characterSetName(cs))
#endif
{
// cs is the id of the utf8 character set
}
Note
Alternatively, you can compare against numeric enumeration constant value,
which should work regardless of the connector version.
• When a Connector/C++ application that uses the legacy JDBC API needs to check the name of
the utf8mb3 character set or any of its collations, and it must also be compiled with the pre-8.0.30
connector.
#if MYSQL_CONCPP_VERSION_NUMBER >= 8000030
if ("utf8mb3" == metadata->getColumnCharset(column))
#else
if ("utf8" == metadata->getColumnCharset(column))
#endif
{
// column is the column index using the utf8 character set
}
Do not use the MYSQL_CONCPP_VERSION_NUMBER macro to check against versions earlier than
Connector/C++ 8.0.30, which can produce unreliable results. For example:
#if MYSQL_CONCPP_VERSION_NUMBER > 8000028
// this does not compile the with 8.0.29 connector!
#endif
#if MYSQL_CONCPP_VERSION_NUMBER < 8000028
// this compiles with the 8.0.29 connector!
#endif
Boost Header Files
The Boost header files are needed under these circumstances:
• Prior to Connector/C++ 8.0.16, on Unix and Unix-like platforms for applications that use X DevAPI or X
DevAPI for C, if you build using gcc and the version of the C++ standard library on your system does not
implement the UTF8 converter (codecvt_utf8).
• Prior to Connector/C++ 8.0.23, to compile Connector/C++ applications that use the legacy JDBC API.
If the Boost header files are needed, Boost 1.59.0 or newer must be installed, and the location of the
headers must be added to the include path. To obtain Boost and its installation instructions, visit the official
Boost site.
Link Libraries
When running an application that uses the shared Connector/C++ library, the library and its runtime
dependencies must be found by the dynamic linker. The dynamic linker must be properly configured to find
Connector/C++ libraries and their dependencies. This includes adding -lresolv explicitly to the compile/
link command.
24

Building Connector/C++ Applications: General Considerations
Building Connector/C++ using OpenSSL makes the connector library dependent on OpenSSL dynamic
libraries. In that case:
• When linking an application to Connector/C++ dynamically, this dependency is relevant only at runtime.
• When linking an application to Connector/C++ statically, link to the OpenSSL libraries as well. On Linux,
this means adding -lssl -lcrypto explicitly to the compile/link command. On Windows, this is
handled automatically.
On Windows, link to the dynamic version of the C++ Runtime Library.
Runtime Libraries
X DevAPI for C applications need libstdc++ at runtime. Depending on your platform or build tools, a
different library may apply. For example, the library is libc++ on macOS; see Section 2.5.2.2, “macOS
Notes”.
If an application is built using dynamic link libraries, those libraries must be present not just on the build
host, but on target hosts where the application runs. The dynamic linker must be properly configured to find
those libraries and their runtime dependencies, as well as to find Connector/C++ libraries and their runtime
dependencies.
Connector/C++ libraries built by Oracle depend on the OpenSSL libraries. The latter must be installed
on the system in order to run code that links against Connector/C++ libraries. Another option is to put
the OpenSSL libraries in the same location as Connector/C++, in which case, the dynamic linker should
find them next to the connector library. See also Section 2.5.2.1, “Windows Notes”, and Section 2.5.2.2,
“macOS Notes”.
Note
The TLSv1 and TLSv1.1 connection protocols are no longer supported as of
Connector/C++ 8.0.28, making TLSv1.2 the earliest supported connection protocol.
Using the Connector/C++ Dynamic Library
The Connector/C++ dynamic library name depends on the platform. These libraries implement X DevAPI
and X DevAPI for C, where A in the library name represents the ABI version:
• libmysqlcppconn8.so.A (Unix)
• libmysqlcppconn8.A.dylib (macOS)
• mysqlcppconn8-A-vsNN.dll, with import library vsNN/mysqlcppconn8.lib (Windows)
For the legacy JDBC API, the dynamic libraries are named as follows, where B in the library name
represents the ABI version:
• libmysqlcppconn.so.B (Unix)
• libmysqlcppconn.B.dylib (macOS)
• mysqlcppconn-B-vsNN.dll, with import library vsNN/mysqlcppconn-static.lib (Windows)
On Windows, the vsNN value in library names depends on the MSVC toolchain version used to build the
libraries. (Connector/C++ libraries provided by Oracle use vs14, and they are compatible with MSVC
2019 and 2017.) This convention enables using libraries built with different versions of MSVC on the same
system. See also Section 2.5.2.1, “Windows Notes”.
25

Building Connector/C++ Applications: General Considerations
To build code that uses X DevAPI or X DevAPI for C, add -lmysqlcppconn8 to the linker options. To
build code that uses the legacy JDBC API, add -lmysqlcppconn.
You must also indicate whether to use the 64-bit or 32-bit libraries by specifying the appropriate
library directory. Use an -L linker option to specify $MYSQL_CONCPP_DIR/lib64 (64-bit libraries) or
$MYSQL_CONCPP_DIR/lib (32-bit libraries), where $MYSQL_CPPCONN_DIR is the Connector/C++
installation location. On FreeBSD, /lib64 is not used. The library name always ends with /lib.
To build a Connector/C++ application that uses X DevAPI, has sources in app.cc, and links dynamically
to the connector library, the Makefile might look like this:
MYSQL_CONCPP_DIR = Connector/C++ installation location
CPPFLAGS = -I $(MYSQL_CONCPP_DIR)/include -L $(MYSQL_CONCPP_DIR)/lib64
LDLIBS = -lmysqlcppconn8
CXXFLAGS = -std=c++17
app : app.cc
With that Makefile, the command make app generates the following compiler invocation:
g++ -std=c++17 -I .../include -L .../lib64 app.cc -lmysqlcppconn8 -o app
To build a plain C application that uses X DevAPI for C, has sources in app.c, and links dynamically to the
connector library, the Makefile might look like this:
MYSQL_CONCPP_DIR = Connector/C++ installation location
CPPFLAGS = -I $(MYSQL_CONCPP_DIR)/include -L $(MYSQL_CONCPP_DIR)/lib64
LDLIBS = -lmysqlcppconn8
app : app.c
With that Makefile, the command make app generates the following compiler invocation:
cc -I .../include -L .../lib64 app.c -lmysqlcppconn8 -o app
Note
The resulting code, even though it is compiled as plain C, depends on the C++
runtime (typically libstdc++, though this may differ depending on platform or build
tools; see Runtime Libraries).
To build a plain C++ application that uses the legacy JDBC API, has sources in app.c, and links
dynamically to the connector library, the Makefile might look like this:
MYSQL_CONCPP_DIR = Connector/C++ installation location
CPPFLAGS = -I $(MYSQL_CONCPP_DIR)/include -L $(MYSQL_CONCPP_DIR)/lib64
LDLIBS = -lmysqlcppconn
app : app.c
The library option in this case is -lmysqlcppcon, rather than -lmysqlcppcon8 as for an X DevAPI or X
DevAPI for C application.
With that Makefile, the command make app generates the following compiler invocation:
cc -I .../include -L .../lib64 app.c -lmysqlcppconn -o app
Note
When running an application that uses the Connector/C++ dynamic library, the
library and its runtime dependencies must be found by the dynamic linker. See
Runtime Libraries.
26

Building Connector/C++ Applications: General Considerations
Using the Connector/C++ Static Library
It is possible to link your application with the Connector/C++ static library. This way there is no runtime
dependency on the connector, and the resulting binary can run on systems where Connector/C++ is not
installed.
Note
Even when linking statically, the resulting code still depends on all runtime
dependencies of the Connector/C++ library. For example, if Connector/C++ is built
using OpenSSL, the code has a runtime dependency on the OpenSSL libraries.
See Runtime Libraries.
The Connector/C++ static library name depends on the platform. These libraries implement X DevAPI and
X DevAPI for C:
• libmysqlcppconn8-static.a (Unix, macOS)
• vsNN/mysqlcppconn8-static.lib (Windows)
For the legacy JDBC API, the static libraries are named as follows:
• libmysqlcppconn-static.a (Unix, macOS)
• vsNN/mysqlcppconn-static.lib (Windows)
Note
Generic Linux packages do not contain any Connector/C++ static libraries. If you
intend to link your application to a static library, consider installing a package that is
specific to the platform on which you build your final application.
On Windows, the vsNN value in library names depends on the MSVC toolchain version used to build the
libraries. (Connector/C++ libraries provided by Oracle use vs14, and they are compatible with MSVC
2019 and 2017.) This convention enables using libraries built with different versions of MSVC on the same
system. See also Section 2.5.2.1, “Windows Notes”.
To compile code that you intend to link statically against Connector/C++, define a macro that adjusts API
declarations in the header files for usage with the static library. One way to define the macro is by passing
a -D option on the compiler invocation command:
• For applications that use X DevAPI, X DevAPI for C, or (as of Connector/C++ 8.0.16) the legacy JDBC
API, define the STATIC_CONCPP macro. All that matters is that you define it; the value does not matter.
For example: -DSTATIC_CONCPP
• Prior to Connector/C++ 8.0.16, for applications that use the legacy JDBC API, define
the CPPCONN_PUBLIC_FUNC macro as an empty string. To ensure this, define the
macro as CPPCONN_PUBLIC_FUNC=, not as CPPCONN_PUBLIC_FUNC. For example: -
DCPPCONN_PUBLIC_FUNC=
To build a Connector/C++ application that uses X DevAPI, has sources in app.cc, and links statically to
the connector library, the Makefile might look like this:
MYSQL_CONCPP_DIR = Connector/C++ installation location
CPPFLAGS = -DSTATIC_CONCPP -I $(MYSQL_CONCPP_DIR)/include
LDLIBS = $(MYSQL_CONCPP_DIR)/lib64/libmysqlcppconn8-static.a -lssl -lcrypto -lpthread
CXXFLAGS = -std=c++17
app : app.cc
With that Makefile, the command make app generates the following compiler invocation:
27

Building Connector/C++ Applications: General Considerations
g++ -std=c++17 -DSTATIC_CONCPP -I .../include app.cc
.../lib64/libmysqlcppconn8-static.a -lssl -lcrypto -lpthread -o app
Note
To avoid having the linker report unresolved symbols, the compile line must include
the OpenSSL libraries and the pthread library on which Connector/C++ code
depends.
OpenSSL libraries are not needed if Connector/C++ is built without them, but
Connector/C++ distributions built by Oracle do depend on OpenSSL.
The exact list of libraries required by Connector/C++ library depends on the
platform. For example, on Solaris, the socket, rt, and nsl libraries might be
needed.
To build a plain C application that uses X DevAPI for C, has sources in app.c, and links statically to the
connector library, the Makefile might look like this:
MYSQL_CONCPP_DIR = Connector/C++ installation location
CPPFLAGS = -DSTATIC_CONCPP -I $(MYSQL_CONCPP_DIR)/include
LDLIBS = $(MYSQL_CONCPP_DIR)/lib64/libmysqlcppconn8-static.a -lssl -lcrypto -lpthread
app : app.c
With that Makefile, the command make app generates the following compiler invocation:
cc -DSTATIC_CONCPP -I .../include app.c
.../lib64/libmysqlcppconn8-static.a -lssl -lcrypto -lpthread -o app
To build a plain C application that uses the legacy JDBC API, has sources in app.c, and links statically to
the connector library, the Makefile might look like this:
MYSQL_CONCPP_DIR = Connector/C++ installation location
CPPFLAGS = -DCPPCONN_PUBLIC_FUNC= -I $(MYSQL_CONCPP_DIR)/include
LDLIBS = $(MYSQL_CONCPP_DIR)/lib64/libmysqlcppconn-static.a -lssl -lcrypto -lpthread
app : app.c
The library option in this case names libmysqlcppcon-static.a, rather than libmysqlcppcon8-
static.a as for an X DevAPI or X DevAPI for C application.
With that Makefile, the command make app generates the following compiler invocation:
cc -std=c++17 --DCPPCONN_PUBLIC_FUNC= -I .../include app.c
.../lib64/libmysqlcppconn-static.a -lssl -lcrypto -lpthread -o app
When building plain C code, it is important to take care of connector's dependency on the C++ runtime,
which is introduced by the connector library even though the code that uses it is plain C:
• One approach is to ensure that a C++ linker is used to build the final code. This approach is taken by the
Makefile shown here:
MYSQL_CONCPP_DIR = Connector/C++ installation location
CPPFLAGS = -DSTATIC_CONCPP -I $(MYSQL_CONCPP_DIR)/include
LDLIBS = $(MYSQL_CONCPP_DIR)/lib64/libmysqlcppconn8-static.a -lssl -lcrypto -lpthread
LINK.o = $(LINK.cc) # use C++ linker
app : app.o
With that Makefile, the build process has two steps: first compile the application source in app.c
using a plain C compiler to produce app.o, then link the final executable (app) using the C++ linker,
which takes care of the dependency on the C++ runtime. The commands look something like this:
cc -DSTATIC_CONCPP -I .../include -c -o app.o app.c
28

Building Connector/C++ Applications: Platform-Specific Considerations
g++ -DSTATIC_CONCPP -I .../include app.o
.../libmysqlcppconn8-static.a -lssl -lcrypto -lpthread -o app
• Another approach is to use a plain C compiler and linker, but add the libstdc++ C++ runtime library as
an explicit option to the linker. This approach is taken by the Makefile shown here:
MYSQL_CONCPP_DIR = Connector/C++ installation location
CPPFLAGS = -DSTATIC_CONCPP -I $(MYSQL_CONCPP_DIR)/include
LDLIBS = $(MYSQL_CONCPP_DIR)/lib64/libmysqlcppconn8-static.a -lssl -lcrypto -lpthread -lstdc++
app : app.c
With that Makefile, the compiler is invoked as follows:
cc -DSTATIC_CONCPP -I .../include app.c
.../libmysqlcppconn8-static.a -lssl -lcrypto -lpthread -lstdc++ -o app
Note
Even if the application that uses Connector/C++ is written in plain C, the final
executable depends on the C++ runtime which must be installed on the target
computer on which the application is to run.
2.5.2 Building Connector/C++ Applications: Platform-Specific Considerations
This section discusses platform-specific considerations to keep in mind when building Connector/C++
applications. For general considerations that apply on a platform-independent basis, see Section 2.5.1,
“Building Connector/C++ Applications: General Considerations”.
2.5.2.1 Windows Notes
This section describes aspects of building Connector/C++ applications that are specific to Microsoft
Windows. For general application-building information, see Section 2.5.1, “Building Connector/C++
Applications: General Considerations”.
On Windows, applications can be built in different build configurations, which determine the type of the C++
runtime library that is used by the final executable:
• An application can be built in 32-bit or 64-bit mode.
• An application can be built in release or debug mode.
• You can choose between the dynamic runtime library (/MD linker option) or static runtime library (/MT
linker option). Different versions of the MSVC compiler also use different versions of the runtime library.
To build Connector/C++ applications, developers using Windows must satisfy these conditions:
• An acceptable version of Microsoft Visual Studio is required.
• Applications should use the same build configuration as that used to build Connector/C++. Build
configuration includes the build mode (release mode or debug mode) and the linker option (for example,
/MD or /MDd).
• Target hosts running client applications must have an acceptable version of the Visual C++
Redistributable for Visual Studio installed.
For information about acceptable versions of Visual Studio and VC++ Redistributable, see Platform
Support and Prerequisites.
The following sections provide additional detail about several aspects of building Connector/C++
applications:
29

Building Connector/C++ Applications: Platform-Specific Considerations
• Application Build Configuration Must Match Connector/C++
• Linking Connector/C++ to Applications
• Building Connector/C++ Applications with Microsoft Visual Studio
Application Build Configuration Must Match Connector/C++
It is important to use a compatible compiler version to build applications and Connector/C++. It is also
important to build applications using the same build configuration as that used to build Connector/C++.
That is, applications should use the same build mode and linker option, to ensure that the connector and
the application use the same runtime library.
The following table shows the linker option appropriate for each combination of build mode and runtime
library. It also shows for each combination whether a Connector/C++ binary package is available from
Oracle. (If not, you must build Connector/C++ from source yourself.)
Table 2.2 Connector/C++ Linker Option Per Build Mode and Runtime Library
Build Mode Runtime Library Linker Option Binary Package
Available
Release Dynamic /MD Yes
Debug Dynamic /MDd Yes
Release Static /MT No (build from source)
Debug Static /MTd No (build from source)
Standard Connector/C++ binary packages available from Oracle are built in release mode. If you install
such a package, build applications in release mode to match. Oracle packages built in debug mode are
available as well. To build applications in debug mode, you must either install an Oracle-built Connector/C+
+ package that was built in debug mode, or build Connector/C++ from source yourself using debug mode.
Linking Connector/C++ to Applications
Connector/C++ binary distributions are available as 64-bit or 32-bit packages, which store libraries under a
directory named lib64 or lib, respectively. Package names and certain library file and directory names
also include vsNN. The vsNN value in these names depends on the MSVC toolchain version used to build
the libraries. This convention enables using libraries built with different versions of MSVC on the same
system.
Note
The vsNN value represents the major version of the MSVC toolchain used to
build the libraries. Currently it is vs14, which is the toolchain used by MSVC 2015
through 2019.
Connector/C++ binary packages include libraries built using the dynamic runtime library in either release
mode (/MD) or debug mode (/MDd). The Connector/C++ libraries are compatible with MSVC 2019 and
2017, and code that uses these libraries can be built with either MSVC 2019 or 2017 using the appropriate
linker option (that is, /MD for release mode or /MDd for debug mode). To build code with a different linker
option (/MT or /MTd), first build Connector/C++ from source with that option (see Section 2.4.3, “Installing
Connector/C++ from Source”), then build applications using the same option.
Note
One exception for compiler version compatibility is that to build applications using
the static JDBC legacy connector, MSVC 2019 is required; 2017 does not work.
30

Building Connector/C++ Applications: Platform-Specific Considerations
Connector/C++ is available as a dynamic or static library to use with your application. Which library you
choose determines the library files needed, and the location of those files within a Connector/C++ package
depends on whether the package was built in release or debug mode. Library files are located under the
library directory, which, as previously mentioned, is lib64 for 64-bit packages or lib for 32-bit packages.
Denote this directory as LIB. The following table shows the directory in which to find library files for each
type of library (including import libraries, which are used in conjunction with dynamic libraries).
Table 2.3 Connector/C++ Library File Directories
Library Type Library File Directory (Release
Build)
Library File Directory (Debug
Build)
Dynamic Library LIB LIB/debug
Import Library LIB/vs14 LIB/vs14/debug
Static Library LIB/vs14 LIB/vs14/debug
For dynamic linking, the following table indicates which dynamic and import library files to use.
Table 2.4 Connector/C++ Dynamic and Import Library Files Per Connector
Connector Dynamic Library File Import Library File
X DevAPI, X DevAPI for C mysqlcppconn8-2-vs14.dll mysqlcppconn8.lib
JDBC mysqlcppconn-7-vs14.dll mysqlcppconn.lib
For the X DevAPI or X DevAPI for C connector, use the dynamic library file named mysqlcppconn8-2-
vs14.dll, together with with the import library file named mysqlcppconn8.lib from the import library
directory. The 2 in the dynamic library name is the major ABI version number. (This helps when using
compatibility libraries with an old ABI together with new libraries having a different ABI.) The libraries
installed on your system may have a different ABI version in their file names.
For the legacy JDBC connector, use the dynamic library file named mysqlcppconn-7-vs14.dll,
together with the import library file named mysqlcppconn.lib from the import library directory.
For static linking, the following table indicates which static library file to use.
Table 2.5 Connector/C++ Static Library File Per Connector
Connector Static Library File
X DevAPI, X DevAPI for C mysqlcppconn8-static.lib
JDBC mysqlcppconn-static.lib
For the X DevAPI or X DevAPI for C connector, use the static library file named mysqlcppconn8-
static.lib from the static library directory.
For the legacy JDBC connector, use the static library file named mysqlcppconn-static.lib from the
static library directory.
When building code that uses Connector/C++ libraries, use these guidelines for setting build options in the
project configuration:
• As an additional include directory, specify $MYSQL_CPPCONN_DIR/include.
• As an additional library directory, specify the directory containing the libraries the application must link to,
as indicated in Table 2.3, “Connector/C++ Library File Directories”. For example, to specify the import or
static library directory for building in release mode, use $MYSQL_CONCPP_DIR/lib64/vs14 (for 64-bit
libraries) or $MYSQL_CONCPP_DIR/lib/vs14 (for 32-bit libraries). For building in debug mode, change
vs14 to vs14/debug.
31

Building Connector/C++ Applications: Platform-Specific Considerations
• To use a dynamic library file (.dll extension), link your application with a .lib import library:
mysqlcppconn8.lib to the linker options, or mysqlcppconn.lib for legacy code.
• To use a static library file (.lib extension), link your application with the library: mysqlcppconn8-
static.lib, or mysqlcppconn-static.lib for legacy code.
For static linking, the application must also be linked with import libraries for the required OpenSSL
libraries. If the connector was installed from a binary package provided by Oracle, these are
present in the vs14 subdirectory under the main library directory ($MYSQL_CONCPP_DIR/lib64 or
$MYSQL_CONCPP_DIR/lib), and the corresponding OpenSSL .dll libraries are present in the main
library directory.
Note
A Windows application that uses the connector dynamic library must be able to
locate it at runtime, as well as its dependencies such as OpenSSL. The common
way of arranging this is to copy all the required DLLs to the same location as the
application executable.
Building Connector/C++ Applications with Microsoft Visual Studio
To build a Connector/C++ application with Microsoft Visual Studio, follow this procedure:
1. Start a new Visual C++ project in Visual Studio.
2. Set the required include paths.
From the main menu, select Project, Properties. This can also be accessed using the hot key ALT +
F7. Under Configuration Properties, open the tree view. Select C/C++, General in the tree view.
In the Additional Include Directories text field:
• Add the include/ directory of Connector/C++. This directory should be located within the
Connector/C++ installation directory.
• If Boost is required to build the application, also add the Boost library root directory. (See
Section 2.5.1, “Building Connector/C++ Applications: General Considerations”.)
3. Set the library locations.
In the tree view, open Linker, General, Additional Library Directories.
In the Additional Library Directories text field, add the Connector/C++ import or static library directory
as specified in Table 2.3, “Connector/C++ Library File Directories”. Set appropriate paths for release
and debug builds.
Note
For building in debug mode, the Connector/C++ debug package must be
installed.
4. Set the connector library to use.
Open Linker, Input in the Property Pages dialog.
For building with the Connector/C++ dynamic library, enter the import library name:
mysqlcppconn8.lib, or mysqlcppconn.lib for legacy applications.
32

Building Connector/C++ Applications: Platform-Specific Considerations
For building with the Connector/C++ static library, enter the static library name: mysqlcppconn8-
static.lib, or mysqlcppconn-static.lib for legacy applications.
Note
Generic Linux packages do not contain Connector/C++ static libraries.
5. Define macros for static linking.
To compile code that is linked statically with the connector library, you must define a macro that adjusts
API declarations in the header files for usage with the static library. By default, the macro is undefined
to declare functions to be compatible with an application that calls a DLL.
In the Project, Properties tree view, under C++, Preprocessor, enter the appropriate macro into the
Preprocessor Definitions text field:
• For applications that use X DevAPI, X DevAPI for C, or (as of Connector/C++ 8.0.16) the legacy
JDBC API, define the STATIC_CONCPP macro. All that matters is that you define it; the value does
not matter. For example: -DSTATIC_CONCPP
• Prior to Connector/C++ 8.0.16, for applications that use the legacy JDBC API, define the
CPPCONN_PUBLIC_FUNC macro as an empty string. To ensure this, define the macro as
CPPCONN_PUBLIC_FUNC=, not as CPPCONN_PUBLIC_FUNC.
Notes
• Target hosts running the client application must have the Visual C++
Redistributable for Visual Studio installed. For information about which VC++
Redistributable versions are acceptable, see Platform Support and Prerequisites.
• If your code uses the Connector/C++ dynamic library, it must be present on the
target host where the application is run. Copy the appropriate Connector/C++
dynamic library to the same directory as the application executable (see Linking
Connector/C++ to Applications). Alternatively, extend the PATH environment
variable using SET PATH=%PATH%;C:\path\to\cpp, or copy the dynamic
library to the Windows installation directory, typically C:\windows.
• If your code uses the Connector/C++ static library, the required OpenSSL
libraries must be found on the target host where the application is run.
For Connector/C++ binary distributions, the OpenSSL .dll libraries are
present in the main library directory ($MYSQL_CONCPP_DIR/lib64 or
$MYSQL_CONCPP_DIR/lib). Copy them to the same location as the application
executable or to some directory listed in the system PATH.
2.5.2.2 macOS Notes
This section describes aspects of building Connector/C++ applications that are specific to macOS. For
general application-building information, see Section 2.5.1, “Building Connector/C++ Applications: General
Considerations”.
The binary distribution of Connector/C++ for macOS is compiled using the macOS native clang compiler.
For that reason, an application that uses Connector/C++ should be built with the same clang compiler.
The clang compiler can use two different implementations of the C++ runtime library: either the native
libc++ or the GNU libstdc++ library. It is important that an application uses the same runtime
33

Authentication Support
implementation as Connector/C++ that is, the native libc++. To ensure that, the -stdlib=libc++
option should be passed to the compiler and the linker invocations.
To build a Connector/C++ application that uses X DevAPI, has sources in app.cc, and links dynamically
to the connector library, the Makefile for building on macOS might look like this:
MYSQL_CONCPP_DIR = Connector/C++ installation location
CPPFLAGS = -I $(MYSQL_CONCPP_DIR)/include -L $(MYSQL_CONCPP_DIR)/lib64
LDLIBS = -lmysqlcppconn8
CXX = clang++ -stdlib=libc++
CXXFLAGS = -std=c++17
app : app.cc
Binary packages for macOS include OpenSSL libraries that are required by code linked with the connector.
These libraries are installed in the same location as the connector libraries and should be found there by
the dynamic linker.
2.5.2.3 Generic Linux Notes
This section describes aspects of building Connector/C++ applications that are specific to Linux. Generic
Linux packages do not contain Connector/C++ static libraries. For general application-building information,
see Section 2.5.1, “Building Connector/C++ Applications: General Considerations”.
Note
Connector/C++ 8.0.32 provides generic Linux packages for ARM architecture
(64 bit). All Connector/C++ versions provide generic Linux packages for Intel
architecture (both 32 and 64 bits).
Previously, generic Linux packages were built on the EL7 platform and on that platform GCC is configured
to use an older ABI of libstdc++. Some of the symbols exported by the library include standard library
types in their names, and consequently, are not compatible with the new CXX11 ABI, which is the default
for modern GCC on most platforms (EL7 being an exception). So, unless you build your code on EL7, and
use GCC6 or later compiler, it defaults to new CXX11 ABI and looks for Connector/C++ symbols that have
new ABI names in them.
As of Connector/C++ 8.0.30, Connector/C++ uses the new CXX11 ABI. With this change, you might
encounter following problems when using Connector/C++ installed from a generic Linux package:
• An upgrade from Connector/C++ 8.0.29 (or earlier) to 8.0.30 (or later) could produce runtime errors after
the upgrade, even if the previous version of Connector/C++ ran successfully.
• It will not work with GCC5 or earlier, because the old compiler uses the old ABI and cannot link to code
that uses new the ABI.
• It will not work on EL6, EL7, or any other platform that modifies GCC settings to use
the old ABI by default. However, in this situation a workaround is to build code under -
D_GLIBCXX_USE_CXX11_ABI=1.
For a majority of platforms, including EL8, the GCC default was changed to the new ABI.
2.5.3 Authentication Support
For connections to the server made using the legacy JDBC API (that is, not made using X DevAPI or X
DevAPI for C), Connector/C++ supports different client-side authentication plugins and authentication
methods for:
• LDAP Authentication
34

Authentication Support
• Kerberos Authentication
• OCI Authentication
• Multifactor Authentication
• WebAuthn (FIDO) Authentication
LDAP Authentication
LDAP authentication enables Connector/C++ (8.0.22 and later) application programs to connect to
MySQL servers using simple LDAP authentication, or SASL LDAP authentication using the SCRAM-
SHA-1 authentication method. LDAP authentication requires use of a server from a MySQL Enterprise
Edition distribution. For more information about the LDAP authentication plugins, see LDAP Pluggable
Authentication.
Connector/C++ binary distributions include the libraries that provide the client-side LDAP authentication
plugins, as well as any dependent libraries required by the plugins.
Note
In Connector/C++ 8.0.23, a dependency on the mysql-client-plugins
package was removed. This package now is required only on hosts where
Connector/C++ applications make connections using commercial MySQL server
accounts with LDAP authentication. In that case, additional libraries must also
be installed: cyrus-sasl-scram for installations that use RPM packages and
libsasl2-modules-gssapi-mit for installations that use Debian packages.
These SASL packages provide the support required to use the SCRAM-SHA-256
and GSSAPI/Kerberos authentication methods for LDAP.
If Connector/C++ was installed from a compressed tar file or Zip archive, the application program will
need to set the OPT_PLUGIN_DIR connection option to the appropriate directory so that the bundled plugin
library can be found. (Alternatively, copy the required plugin library to the default directory expected by the
client library.)
For example:
sql::ConnectOptionsMap connection_properties;
// To use simple LDAP authentication ...
connection_properties["userName"] = "simple_ldap_user_name";
connection_properties["password"] = "simple_ldap_password";
connection_properties[OPT_ENABLE_CLEARTEXT_PLUGIN]=true;
// To use SASL LDAP authentication using SCRAM-SHA-1 ...
connection_properties["userName"] = "sasl_ldap_user_name";
connection_properties["password"] = "sasl_ldap_scram_password";
// Needed if Connector/C++ was installed from tar file or Zip archive ...
connection_properties[OPT_PLUGIN_DIR] = "${INSTALL_DIR}/lib{64}/plugin";
auto *driver = get_driver_instance();
auto *con = driver->connect(connection_properties);
// Execute statements ...
con->close();
Kerberos Authentication
Kerberos authentication enables Connector/C++ application programs to establish connections for
accounts that use the authentication_kerberos server-side authentication plugin, provided that the
correct Kerberos tickets are available or can be obtained from Kerberos. This capability is available on
client hosts running Linux (starting with 8.0.26).
35

Authentication Support
On Windows (starting with 8.0.32), the OPT_AUTHENTICATION_KERBEROS_CLIENT_MODE connection
option can be set to either SSPI (default) or GSSAPI. The option permits choosing between SSPI and
GSSAPI at runtime for the authentication_kerberos_client authentication plugin on Windows.
Connector/C++ implements GSSAPI mode through the MIT kerberos library and this mode is compatible
with the Java SE security tools (for example, klist and kinit commands) on Windows. In this mode, the
ticket search on Windows hosts is restricted to the MIT Kerberos cache only. If the cache has no ticket, the
connection fails even if the Windows ticket is valid
Previously, Connector/C++ supported Kerberos authentication through the Windows SSPI Kerberos library
only (starting with 8.0.27). SSPI is not capable of acquiring cached credentials that were generated using
the kinit command. In SSPI mode, the Windows single sign-on ticket is used for authentication if the
client user provides no password and the authentication method considers the Windows ticket exclusively.
If the ticket is missing or invalid, the connection fails even if the Kerberos cache contains a valid ticket. For
more information, see Commands for Windows Clients in SSPI Mode.
It is possible to connect to Kerberos-authenticated accounts without giving a user name under these
conditions:
• The user has a Kerberos principal name assigned, a MySQL Kerberos account for that principal name
exists, and the user has the required tickets.
• The default authentication method must be set to the authentication_kerberos_client client-
side authentication plugin using the OPT_DEFAULT_AUTH connection option.
It is possible to connect without giving a password, provided that the user has the required tickets in the
Kerberos cache on Linux or the MIT Kerberos cache on Windows (for example, created by kinit or a
similar command).
Note
The SSPI Kerberos library is not compatible with Java SE security
tools. To use the kinit command, the client application must set the
OPT_AUTHENTICATION_KERBEROS_CLIENT_MODE connection option to GSSAPI.
If the required tickets are not present in the Kerberos cache (or the MIT Kerberos cache) and a password
was given, Connector/C++ obtains the tickets from Kerberos using that password. If the required tickets
are found in the cache, any password given is ignored and the connection might succeed even if the
password is incorrect.
On client hosts running Windows, you can override the default location of the MIT Kerberos configuration
file by setting the KRB5_CONFIG environment variable and the default MIT Kerberos credential cache
name with the KRB5CCNAME environment variable (for example, KRB5CCNAME=DIR:/mydir/).
For details about using the MIT Kerberos configuration and cache, see:
• KRB5_CONFIG: https://web.mit.edu/kerberos/krb5-devel/doc/admin/conf_files/krb5_conf.html
• KRB5CCNAME: https://web.mit.edu/kerberos/krb5-1.12/doc/basic/ccache_def.html
For more information about Kerberos authentication, see Kerberos Pluggable Authentication.
OCI Authentication
OCI authentication enables Connector/C++ application programs to make connections without passwords
for accounts that use the authentication_oci server-side authentication plugin, provided that
the correct configuration entries are available to map to one unique user in a specific Oracle Cloud
Infrastructure tenancy. This supported was added in the Connector/C++ 8.0.27 release.
36

Authentication Support
To ensure correct account mapping, the client-side Oracle Cloud Infrastructure configuration must contain
a fingerprint of the API key to use for authentication (fingerprint entry) and the location of a PEM file
with the private part of the API key (key_file entry). Both entries should be specified in the [DEFAULT]
profile of the configuration file. In Connector/C++ 8.0.33, the OPT_OCI_CLIENT_CONFIG_PROFILE
connection option permits selecting a profile in the configuration file to use for authentication. By default,
the value of OPT_OCI_CLIENT_CONFIG_PROFILE is the [DEFAULT] profile.
Unless an alternative path to the configuration file is specified with the OPT_OCI_CONFIG_FILE
connection option, the following default locations are used:
• ~/.oci/config on Linux or Posix host types
• %HOMEDRIVE%%HOMEPATH%/.oci/config on Windows host types
If the MySQL user name is not provided as a connection option, then the operating system user name is
substituted. Specifically, if the private key and correct Oracle Cloud Infrastructure configuration are present
on the client side, then a connection can be made without giving any options.
To support Oracle Cloud Infrastructure ephemeral key-based authentication, Connector/C++ 8.0.33 (and
later) obtains the location of the token file from the security_token_file entry. For example:
[DEFAULT]
fingerprint=59:8a:0b[...]
key_file=~/.oci/sessions/DEFAULT/oci_api_key.pem
tenancy=ocid1.tenancy.oc1.[...]
region=us-ashburn-1
security_token_file=~/.oci/sessions/DEFAULT/token
Connector/C++ sends to the server a JSON attribute (named "token") with the value extracted from the
security_token_file field. If the target file referenced in the profile does not exist, or if the file exceeds
a specified maximum value, then Connector/C++ terminates the action and returns an exception with the
cause.
Connector/C++ sends an empty token value in the JSON payload if:
• The security-token file is empty.
• The configuration option security_token_file is found but the value in the configuration file is
empty.
In all other cases, Connector/C++ adds the content of the security-token file intact to the JSON document.
Multifactor Authentication
Starting with Connector/C++ 8.0.28, applications can establish connections using multifactor
authentication, such that up to three passwords can be specified at connect time. The OPT_PASSWORD1,
OPT_PASSWORD2, and OPT_PASSWORD3 connection options are available for specifying the first, second,
and third multifactor authentication passwords, respectively.
OPT_PASSWORD1 is an alias for the existing OPT_PASSWORD option; if both are provided, OPT_PASSWORD
is ignored. For more information about this authentication option, see Multifactor Authentication.
WebAuthn (FIDO) Authentication
WebAuthn authentication to MySQL Server supports using devices such as web browsers, smart cards,
security keys, and biometric readers. WebAuthn authentication supports both the FIDO and FIDO2
standards. To ensure client applications using the legacy JBDC API are notified when a user is expected
37

OpenTelemetry Tracing Support
to interact with the FIDO/FIDO2 device, Connector/C++ 8.2.0 (and later) adds a callback argument
named WebAuthn_Callback to the setCallback() method in the MySQL_Driver class. The
WebAuthn_Callback class has a callback method named ActionRequested().
class WebAuthn_Callback
{
public:
WebAuthn_Callback(std::function<void(SQLString)>);
/**
* Override this message to receive WebAuthn Action Requests
*/
virtual void ActionRequested(sql::SQLString msg);
};
Set the WebAuthn_Callback callback explicitly for authentication to accounts that use WebAuthn
authentication.
Note
On Windows, the client application must run as administrator. The is a requirement
of the fido2.dll library, which is used by the authentication_webauthn
plugin.
A client application has two options for obtaining a callback from the connector:
• By passing a function or lambda to WebAuthn_Callback.
driver->setCallBack(WebAuthn_Callback([](SQLString msg) {...}));
• By implementing the virtual method ActionRequested.
class MyWindow : public WebAuthn_Callback
{
void ActionRequested(sql::SQLString msg) override;
};
MyWindow window;
driver->setCallBack(window);
Setting a new callback always removes the previous callback. To disable the active callback and restore
the default behavior, pass nullptr as a function callback. Example:
driver->setCallBack(WebAuthn_Callback(nullptr));
For more information about WebAuthn authentication, see WebAuthn Pluggable Authentication.
Note
Connector/C++ 8.0.29 added authentication_fido support, deprecated
it in 8.2.0 in favor of authentication_webauthn, and removed
authentication_fido support in 8.4.0. For backward-compatibility,
the Fido_Callback callback argument remains but it invokes WebAuthn
authentication.
2.5.4 OpenTelemetry Tracing Support
For applications that use the legacy JDBC API (that is, not X DevAPI or X DevAPI for C) on Linux systems
and use OpenTelemetry (OTel) instrumentation, the connector adds query and connection spans to
the trace generated by application code and forwards the current OpenTelemetry context to the server.
OpenTelemetry tracing was introduced in the Connector/C++ 8.1.0 release.
38

Connector/C++ Known Issues
Note
OTel context forwarding works only with MySQL Enterprise Edition, a commercial
product. To learn more about commercial products, see https://www.mysql.com/
products/.
Enabling and Disabling Tracing
By default, the connector generates spans only when an instrumented application links with the required
OpenTelemetry SDK libraries and configures the trace exporter to send trace data to some destination. If
the application code does not use instrumentation, then the legacy connector does not use it either.
Connector/C++ supports a connection property option, OPT_OPENTELEMETRY, which has these values:
• OTEL_DISABLED: The connector does not create OpenTelemetry spans or forward the OpenTelemetry
context to the server.
• OTEL_PREFERRED: Default. Use instrumentation in the connection if the required OpenTelemetry
instrumentation is available. Otherwise, permit the connection to operate without any OpenTelemetry
instrumentation.
The OPT_OPENTELEMETRY option also accepts a Boolean value in which false corresponds to
OTEL_DISABLED. false is the only accepted Boolean value for this option; setting it to true has no
meaning and emits an error.
For example, an application can specify OPT_OPENTELEMETRY in either form using the connect() syntax
that takes an option map argument:
connection_properties["OPT_OPENTELEMETRY"] = false;
connection_properties["OPT_OPENTELEMETRY"] = OTEL_DISABLED;
When you build code that links to Connector/C++ and uses OTel instrumentation, the additional spans
generated by the connector appear in the traces generated by your code. Spans generated by the
connector are sent to the same destination (trace exporter) where other spans generated by the user code
are sent as configured by user code. It is not possible to send spans generated by the connector to any
other destination.
This implementation is distinct from the implementation provided through the MySQL client library (or the
related telemetry_client client-side plugin).
2.6 Connector/C++ Known Issues
To report bugs, use the MySQL Bug System. See How to Report Bugs or Problems.
For notes detailing the changes in each release of Connector/C++, see MySQL Connector/C++ Release
Notes.
• Generally speaking, C++ library binaries are less portable than C library binaries. Issues can be caused
by name mangling, different Standard Template Library (STL) versions, and using different compilers
and linkers for linking against the libraries than were used for building the library itself.
Even a small change in the compiler version can cause problems. If you obtain error messages that
you suspect are related to binary incompatibilities, build Connector/C++ from source, using the same
compiler and linker that you use to build and link your application.
Due to variations between Linux distributions, compiler versions, linker versions, and STL versions, it
is not possible to provide binaries for every possible configuration. However, Connector/C++ binary
39

Connector/C++ Support
distributions include an INFO_BIN file that describes the environment and configuration options used
to build the binary versions of the connector libraries. Binary distributions also include an INFO_SRC file
that provides information about the product version and the source repository from which the distribution
was produced. (Prior to Connector/C++ 8.0.14, look for BUILDINFO.txt rather than INFO_BIN and
INFO_SRC.)
• To avoid potential crashes, the build configuration of Connector/C++ should match the build
configuration of the application using it. For example, do not use a release build of Connector/C++ with a
debug build of the client application.
2.7 Connector/C++ Support
For general discussion of Connector/C++, please use the C/C++ community forum.
To report bugs, use the MySQL Bug System. See How to Report Bugs or Problems.
For notes detailing the changes in each release of Connector/C++, see MySQL Connector/C++ Release
Notes.
For Licensing questions, and to purchase MySQL Products and Services, please see http://
www.mysql.com/buy-mysql/.
40

Chapter 3 MySQL Connector/J Developer Guide
Table of Contents
3.1 Overview of MySQL Connector/J ................................................................................................ 42
3.2 Compatibility with MySQL and Java Versions .............................................................................. 43
3.3 Connector/J Installation ............................................................................................................... 43
3.3.1 Installing Connector/J from a Binary Distribution ................................................................ 43
3.3.2 Installing Connector/J Using Maven .................................................................................. 45
3.3.3 Installing from Source ...................................................................................................... 45
3.3.4 Upgrading from an Older Version ..................................................................................... 48
3.3.5 Testing Connector/J ......................................................................................................... 53
3.4 Connector/J Examples ................................................................................................................ 54
3.5 Connector/J Reference ............................................................................................................... 55
3.5.1 Driver/Datasource Class Name ......................................................................................... 55
3.5.2 Connection URL Syntax ................................................................................................... 55
3.5.3 Configuration Properties ................................................................................................... 59
3.5.4 JDBC API Implementation Notes .................................................................................... 106
3.5.5 Java, JDBC, and MySQL Types ..................................................................................... 109
3.5.6 Handling of Date-Time Values ........................................................................................ 112
3.5.7 Using Character Sets and Unicode ................................................................................. 118
3.5.8 Using Query Attributes ................................................................................................... 120
3.5.9 Connecting Securely Using SSL ..................................................................................... 122
3.5.10 Connecting Using Unix Domain Sockets ....................................................................... 128
3.5.11 Connecting Using Named Pipes ................................................................................... 128
3.5.12 Connecting Using Various Authentication Methods ......................................................... 129
3.5.13 Using Source/Replica Replication with ReplicationConnection ......................................... 135
3.5.14 Support for DNS SRV Records ..................................................................................... 135
3.5.15 Client Session State Tracker ........................................................................................ 137
3.5.16 Mapping MySQL Error Numbers to JDBC SQLState Codes ............................................ 138
3.6 JDBC Concepts ........................................................................................................................ 293
3.6.1 Connecting to MySQL Using the JDBC DriverManager Interface ................................... 293
3.6.2 Using JDBC Statement Objects to Execute SQL ........................................................... 295
3.6.3 Using JDBC CallableStatements to Execute Stored Procedures ................................ 296
3.6.4 Retrieving AUTO_INCREMENT Column Values through JDBC ........................................... 298
3.7 Connection Pooling with Connector/J ......................................................................................... 301
3.8 Multi-Host Connections ............................................................................................................. 305
3.8.1 Configuring Server Failover for Connections Using JDBC ................................................. 305
3.8.2 Configuring Server Failover for Connections Using X DevAPI ........................................... 308
3.8.3 Configuring Load Balancing with Connector/J .................................................................. 308
3.8.4 Configuring Source/Replica Replication with Connector/J ................................................. 311
3.8.5 Advanced Load-balancing and Failover Configuration ...................................................... 314
3.9 Using the X DevAPI with Connector/J: Special Topics ................................................................ 316
3.9.1 Connection Compression Using X DevAPI ...................................................................... 316
3.9.2 Schema Validation ......................................................................................................... 317
3.10 Using the Connector/J Interceptor Classes ............................................................................... 319
3.11 Using Logging Frameworks with SLF4J ................................................................................... 320
3.12 Using Connector/J with Tomcat ............................................................................................... 321
3.13 Using Connector/J with Spring ................................................................................................ 323
3.13.1 Using JdbcTemplate .................................................................................................. 324
3.13.2 Transactional JDBC Access .......................................................................................... 326
3.13.3 Connection Pooling with Spring .................................................................................... 327
41

Overview of MySQL Connector/J
3.14 Troubleshooting Connector/J Applications ................................................................................ 328
3.15 Known Issues and Limitations ................................................................................................. 334
3.16 Connector/J Support ............................................................................................................... 335
3.16.1 Connector/J Community Support ................................................................................... 335
3.16.2 How to Report Connector/J Bugs or Problems ............................................................... 335
MySQL Connector/J is a JDBC driver for communicating with MySQL servers.
For notes detailing the changes in each release of Connector/J, see MySQL Connector/J Release Notes.
For legal information, see the Legal Notices.
For help with using MySQL, please visit the MySQL Forums, where you can discuss your issues with other
MySQL users.
Licensing information. This product may include third-party software, used under license. If you are
using a Commercial release of MySQL Connector/J, see this document for licensing information, including
licensing information relating to third-party software that may be included in this Commercial release. If
you are using a Community release of MySQL Connector/J, see this document for licensing information,
including licensing information relating to third-party software that may be included in this Community
release.
3.1 Overview of MySQL Connector/J
MySQL provides connectivity for client applications developed in the Java programming language with
MySQL Connector/J. Connector/J implements the Java Database Connectivity (JDBC) API, as well as a
number of value-adding extensions of it. It also supports the new X DevAPI.
MySQL Connector/J is a JDBC Type 4 driver, implementing the JDBC 4.2 specification. The Type 4
designation means that the driver is a pure Java implementation of the MySQL protocol and does not
rely on the MySQL client libraries. See Section 3.2, “Compatibility with MySQL and Java Versions” for
compatibility information.
Connector/J 8.0 provides ease of development features including auto-registration with the Driver
Manager, standardized validity checks, categorized SQLExceptions, support for large update counts,
support for local and offset date-time variants from the java.time package, support for JDBC-4.x XML
processing, support for per connection client information, and support for the NCHAR, NVARCHAR and
NCLOB data types. See Section 3.2, “Compatibility with MySQL and Java Versions” for compatibility
information.
For large-scale programs that use common design patterns of data access, consider using one of the
popular persistence frameworks such as Hibernate, Spring's JDBC templates or MyBatis SQL Maps to
reduce the amount of JDBC code for you to debug, tune, secure, and maintain.
Key Topics
• For installation instructions for Connector/J, see Section 3.3, “Connector/J Installation”.
• For help with connection strings, connection options, and setting up your connection through JDBC, see
Section 3.5, “Connector/J Reference”.
• For information on connection pooling, see Section 3.7, “Connection Pooling with Connector/J”.
• For information on multi-host connections, see Section 3.8, “Multi-Host Connections”.
• For information on using the X DevAPI with Connector/J, see Section 3.9, “Using the X DevAPI with
Connector/J: Special Topics”.
42

Compatibility with MySQL and Java Versions
3.2 Compatibility with MySQL and Java Versions
Here is some compatibility information for Connector/J 8.0:
• JDBC versions: Connector/J 8.0 implements JDBC 4.2. While Connector/J 8.0 works with libraries of
higher JDBC versions, it returns a SQLFeatureNotSupportedException for any calls of methods
supported only by JDBC 4.3 and higher.
• MySQL Server versions: Connector/J 8.0 supports MySQL 8.0 and up.
• JRE versions: Connector/J 8.0 supports JRE 8 or higher.
• JDK Required for Compilation: JDK 8.0 or higher is required for compiling Connector/J 8.0. Also, a
customized JSSE provider might be required to use some later TLS versions and cipher suites when
connecting to MySQL servers. For example, because Oracle's Java 8 releases before 8u261 were
shipped with JSSE implementations that support TLS up to version 1.2 only, you need a customized
JSSE implementation to use TLSv1.3 on those Java 8 platforms. Oracle Java 8u261 and above do
support TLSv1.3, so no customized JSSE implementation is needed.
3.3 Connector/J Installation
You can install the Connector/J package using either a binary or source distribution. While the binary
distribution provides the easiest method for installation, the source distribution lets you customize your
installation. Both types of distributions are available from the Connector/J Download page. The source
code for Connector/J is also available on GitHub at https://github.com/mysql/mysql-connector-j.
Connector/J is also available as a Maven artifact in the Central Repository. See Section 3.3.2, “Installing
Connector/J Using Maven” for details.
If you are upgrading from a previous version, read the upgrade information in Section 3.3.4, “Upgrading
from an Older Version” before continuing.
Important
Third-party Libraries: According to how you use Connector/J 8.0, you may also
need to install the following third-party libraries on your system for it to work:
• Protocol Buffers (protobuf-java) 4.26.1 is required for using X DevAPI
• Oracle Cloud Infrastructure SDK for Java (oci-java-sdk) 3.41.2 is required to
support OCI AIM authentication
• Simple Logging Facade API (slf4j-api) 2.0.13 is required for using
the logging capabilities provided by the default implementation of
org.slf4j.Logger.Slf4JLogger by Connector/J
These and other third-party libraries are required for building Connector/J from
source—see the section for more information.
3.3.1 Installing Connector/J from a Binary Distribution
Obtaining and Using the Binary Distribution Packages
Different types of binary distribution packages for Connector/J are available from the Connector/J
Download page. The following explains how to use each type of the packages to install Connector/J.
43

Installing Connector/J from a Binary Distribution
Using Platform-independent Archives: .tar.gz or .zip archives are available for installing Connector/
J on any platform. Using the appropriate graphical or command-line utility (for example, tar for the
.tar.gz archive and WinZip for the .zip archive), extract the JAR archive from the .tar.gz or .zip
archive to a suitable location.
Note
Because there are potentially long file names in the distribution, the Connector/J
archives use the GNU Tar archive format. Use GNU Tar or a compatible application
to unpack the .tar.gz variant of the distribution.
Using Packages for Software Package Management Systems on Linux Platforms: RPM and Debian
packages are available for installing Connector/J on a number of Linux distributions like Oracle Linux,
Debian, Ubuntu, SUSE, and so on. Install these packages using your system's software package
management system.
On Windows Platforms: You cannot install Connector/J on Windows platforms using the MySQL Installer
for Windows. Notice that there are also no stand-alone Windows installer files (.msi) for installing
Connector/J. Use the platform-independent archives instead for installations on Windows platforms.
Configuring the CLASSPATH
Once mysql-connector-j-version.jar has been extracted from the binary distribution package
to the right place, finish installing the driver by placing the JAR archive in your Java classpath, either by
adding its full file path to your CLASSPATH environment variable, or by directly specifying the file path with
the command line switch -cp when starting the JVM.
For example, on Linux platforms, add the Connector/J driver to your CLASSPATH using one of the following
forms, depending on your command shell:
# Bourne-compatible shell (sh, ksh, bash, zsh):
$> export CLASSPATH=/path/mysql-connector-j-ver.jar:$CLASSPATH
# C shell (csh, tcsh):
$> setenv CLASSPATH /path/mysql-connector-j-ver.jar:$CLASSPATH
You can also set the CLASSPATH environment variable in a profile file, either locally for a user within the
user's .profile, .login, or other login file, or globally by editing the global /etc/profile file.
For Windows platforms, you set the environment variable through the System Control Panel.
Important
Remember to also add the locations of the third-party libraries required for using
Connector/J to CLASSPATH.
Configuring Connector/J for Application Servers
To use MySQL Connector/J with an application server such as GlassFish or Tomcat, read your vendor's
documentation for information on how to configure third-party class libraries, as most application servers
ignore the CLASSPATH environment variable. For configuration examples for some J2EE application
servers, see Section 3.7, “Connection Pooling with Connector/J”, Section 3.8.3, “Configuring Load
Balancing with Connector/J”, and Section 3.8.5, “Advanced Load-balancing and Failover Configuration”.
However, the authoritative source for JDBC connection pool configuration information is the documentation
for your own application server.
If you are developing servlets or JSPs and your application server is J2EE-compliant, you can put
the driver's .jar file in the WEB-INF/lib subdirectory of your web application, as this is a standard
location for third-party class libraries in J2EE web applications. You can also use the MysqlDataSource
44

Installing Connector/J Using Maven
or MysqlConnectionPoolDataSource classes in the com.mysql.cj.jdbc package, if your
J2EE application server supports or requires them. The javax.sql.XADataSource interface is
implemented using the com.mysql.cj.jdbc.MysqlXADataSource class, which supports XA
distributed transactions. The various MysqlDataSource classes support the following parameters
(through standard set mutators):
• user
• password
• serverName
• databaseName
• port
3.3.2 Installing Connector/J Using Maven
You can also use Maven dependencies manager to install and configure the Connector/J library in your
project. Connector/J is published in The Maven Central Repository with the following groupId and artifactId:
• groupId: com.mysql
• artifactId: mysql-connector-j
You can link the Connector/J library to your project by adding the following dependency in your pom.xml
file:
<dependency>
<groupId>com.mysql</groupId>
<artifactId>mysql-connector-j</artifactId>
<version>x.y.z</version>
</dependency>
Notice that if you use Maven to manage your project dependencies, you do not need to explicitly refer to
the library protobuf-java as it is resolved by dependency transitivity. However, if you do not want to use
the X DevAPI features, you may also want to add a dependency exclusion to avoid linking the unneeded
sub-library. For example:
<dependency>
<groupId>com.mysql</groupId>
<artifactId>mysql-connector-j</artifactId>
<version>x.y.z</version>
<exclusions>
<exclusion>
<groupId>com.google.protobuf</groupId>
<artifactId>protobuf-java</artifactId>
</exclusion>
</exclusions>
</dependency>
3.3.3 Installing from Source
Caution
You need to install Connector/J from source only if you want to build a customized
version of Connector/J or if you are interested in helping us test our new code. To
just get MySQL Connector/J up and running on your system, install Connector/
J using a standard binary release distribution; see Section 3.3.1, “Installing
Connector/J from a Binary Distribution” for instructions.
45

Installing from Source
To install MySQL Connector/J from source, make sure that you have the following software on your
system:
Tip
It is suggested that the latest versions available for the following software be used
for compiling Connector/J; otherwise, some features might not be available.
• A Git client, if you want to check out the sources from our GitHub repository (available from http://git-
scm.com/downloads).
• Apache Ant version 1.10.6 or newer (available from http://ant.apache.org/).
• JDK 1.8.x (available from https://www.oracle.com/technetwork/java/javase/downloads/jdk8-
downloads-2133151.html).
• The following third-party libraries:
• JUnit 5.10.2 (see installation and download information in the JUnit 5 User Guide). The following JAR
files are required:
• junit-jupiter-api-5.10.2.jar (available from, for example, https://central.sonatype.com/
artifact/org.junit.jupiter/junit-jupiter-api/5.10.2/jar).
• junit-jupiter-engine-5.10.2.jar (available from, for example, https://
central.sonatype.com/artifact/org.junit.jupiter/junit-jupiter-engine/5.10.2/jar).
• junit-platform-commons-1.10.2.jar (available from, for example, https://
central.sonatype.com/artifact/org.junit.platform/junit-platform-commons/1.10.2/jar).
• junit-platform-engine-1.10.2.jar (available from, for example, https://
central.sonatype.com/artifact/org.junit.platform/junit-platform-engine/1.10.2/jar).
• junit-platform-launcher-1.10.2.jar (available from, for example, https://
central.sonatype.com/artifact/org.junit.platform/junit-platform-launcher/1.10.2/jar).
• These additional JAR files, which JUnit 5 depends on:
• apiguardian-api-1.1.2.jar (available from, for example, https://central.sonatype.com/
artifact/org.apiguardian/apiguardian-api/1.1.2/jar).
• opentest4j-1.3.0.jar (available from, for example, https://central.sonatype.com/artifact/
org.opentest4j/opentest4j/1.3.0/jar).
• Javassist 3.30.2 (javassist-3.30.2-GA.jar, available from, for example, https://
central.sonatype.com/artifact/org.javassist/javassist/3.30.2-GA/bundle).
• Protocol Buffers Java API 4.26.1 (protobuf-java-4.26.1.jar, available from, for example,
https://central.sonatype.com/artifact/com.google.protobuf/protobuf-java/4.26.1/bundle).
• C3P0 0.10.1 or newer (c3p0-0.10.1.jar, available from, for example, https://central.sonatype.com/
artifact/com.mchange/c3p0/0.10.1/jar).
• Simple Logging Facade API 2.0.13 or newer (slf4j-api-2.0.13.jar, available from, for example,
https://central.sonatype.com/artifact/org.slf4j/slf4j-api/2.0.13/jar).
• Java Hamcrest 2.2 or newer (hamcrest-2.2.jar, available from, for example, https://
central.sonatype.com/artifact/org.hamcrest/hamcrest/2.2/jar).
46

Installing from Source
• Oracle Cloud Infrastructure SDK for Java (oci-java-sdk-common-3.41.2.jar, available from, for
example, https://central.sonatype.com/artifact/com.oracle.oci.sdk/oci-java-sdk-common/3.41.2/jar).
• OpenTelemetry API (opentelemetry-api-1.38.0.jar, available from, for example, https://
central.sonatype.com/artifact/io.opentelemetry/opentelemetry-api/1.38.0).
• OpenTelemetry Context (opentelemetry-context-1.38.0.jar, available from, for example,
https://central.sonatype.com/artifact/io.opentelemetry/opentelemetry-context/1.38.0).
• Open Test Alliance for the JVM (opentest4j-1.3.0.jar, available from, for example, https://
central.sonatype.com/artifact/org.opentest4j/opentest4j/1.3.0).
To build MySQL Connector/J from source, follow these steps:
1. Make sure that you have JDK 1.8.x installed.
2. Obtain the sources for Connector/J by one of the following means:
• Download the platform independent distribution archive (in .tar.gz or .zip format) for Connector/
J, which contains the sources, from the Connector/J Download page. Extract contents of the archive
into a folder named, for example, mysql-connector-j.
• Download a source RPM package for Connector/J from Connector/J Download page and install it.
• Check out the code from the source code repository for MySQL Connector/J located on GitHub at
https://github.com/mysql/mysql-connector-j. The latest release of the Connector/J 8.0 series is on the
release/8.0 branch; use the following command to check it out:
$> git clone --branch release/8.0 https://github.com/mysql/mysql-connector-j.git
Under the current directory, the command creates a mysql-connector-j subdirectory , which
contains the code you want.
3. Place all the required third-party libraries in a the directory called lib at the root of the source tree (that
is, in mysql-connector-j/lib, if you have followed the steps above), or put them elsewhere and
supply the location to Ant later (see Step 5 below).
4. Change your current working directory to the mysql-connector-j directory created in step 2 above.
5. In the directory, create a file named build.properties to indicate to Ant the location of the
root directory for your JDK 1.8.x installation with the property com.mysql.cj.build.jdk, as
well as the location for the extra libraries, if they are not in mysql-connector-j/lib, with the
property com.mysql.cj.extra.libs. Here is a sample file with those properties set (replace the
“path_to_*” parts with the appropriate file paths):
com.mysql.cj.build.jdk=path_to_jdk_1.8
com.mysql.cj.extra.libs=path_to_folder_for_extra_libraries
Alternatively, you can set the values of those properties through the Ant -D options.
Note
Going from Connector/J 5.1 to 8.0 and beyond, a number of Ant properties for
building Connector/J have been renamed or removed; see Changes for Build
Properties for details.
6. Issue the following command to compile the driver and create a .jar file for Connector/J:
47

Upgrading from an Older Version
$> ant build
This creates a build directory in the current directory, where all the build output goes. A directory
is created under the build directory, whose name includes the version number of the release you
are building. That directory contains the sources, the compiled .class files, and a .jar file for
deployment.
For information on all the build targets, including those that create a fully packaged distribution, issue
the following command:
$> ant -projecthelp
7. Install the newly created .jar file for the JDBC driver as you would install a binary .jar file you
download from MySQL by following the instructions given in Configuring the CLASSPATH or
Configuring Connector/J for Application Servers.
3.3.4 Upgrading from an Older Version
This section has information for users who are upgrading from one version of Connector/J to another,
or to a new version of the MySQL server that supports a more recent level of JDBC. A newer version of
Connector/J might include changes to support new features, improve existing functionality, or comply with
new standards.
Depending on the platform and the way you used to install Connector/J, upgrading can be performed by
one of the following methods:
• Downloading a new platform-independent archive (.tar, .tar.gz, .zip, etc.) and overwriting with it
your original installation created by an older archive.
• Updating the version of the Connector/J dependency in your Maven .pom file.
• Using the upgrade command of your Linux distro's package management system.
• Using the MySQL Installer for Windows, which can also perform automatic updates for Connector/J
See Section 3.3, “Connector/J Installation” for details on the installation and upgrade methods. You should
also pay attention to any important changes in the new version like changes in 3rd-party dependencies,
incompatibilities, etc.
3.3.4.1 Upgrading to MySQL Connector/J 8.0 from Connector/J 5.1
Upgrading an application developed for Connector/J 5.1 to use Connector/J 8.0 and beyond might require
certain changes to your code or the environment in which it runs. Here are some changes for Connector/J
going from 5.1 to 8.0 and beyond, for which adjustments might be required:
Running on the Java 8 Platform
Connector/J 8.0 and beyond is created specifically to run on the Java 8 platform. While Java 8 is known
to be strongly compatible with earlier Java versions, incompatibilities do exist, and code designed to
work on Java 7 might need to be adjusted before being run on Java 8. Developers should refer to the
incompatibility information provided by Oracle.
Changes in Connection Properties
A complete list of Connector/J 8.0 connection properties are available in Section 3.5.3, “Configuration
Properties”. The following are connection properties that have been changed (removed, added, have their
names changed, or have their default values changed) going from Connector/J 5.1 to 8.0 and beyond.
48

Upgrading from an Older Version
Properties that have been removed (do not use them during connection):
• useDynamicCharsetInfo
• useBlobToStoreUTF8OutsideBMP , utf8OutsideBmpExcludedColumnNamePattern, and
utf8OutsideBmpIncludedColumnNamePattern: MySQL 5.6 and later supports the utf8mb4
character set, which is the character set that should be used by Connector/J applications for supporting
characters beyond the Basic Multilingual Plane (BMP) of Unicode Version 3.
• useJvmCharsetConverters: JVM character set conversion is now used in all cases
• The following date and time properties:
• dynamicCalendars
• noTzConversionForTimeType
• noTzConversionForDateType
• cacheDefaultTimezone
• useFastIntParsing
• useFastDateParsing
• useJDBCCompliantTimezoneShift
• useLegacyDatetimeCode
• useSSPSCompatibleTimezoneShift
• useTimezone
• useGmtMillisForDatetimes
• dumpMetadataOnColumnNotFound
• relaxAutoCommit
• strictFloatingPoint
• runningCTS13
• retainStatementAfterResultSetClose
• nullNamePatternMatchesAll
Properties that have been added:
• mysqlx.useAsyncProtocol (deprecated)
Property that has its name changed:
• com.mysql.jdbc.faultInjection.serverCharsetIndex changed to
com.mysql.cj.testsuite.faultInjection.serverCharsetIndex
• loadBalanceEnableJMX to ha.enableJMX
• replicationEnableJMX to ha.enableJMX
Properties that have their default values changed:
49

Upgrading from an Older Version
• nullCatalogMeansCurrent is now false by default
Changes in the Connector/J API
This section describes some of the more important changes to the Connector/J API going from version 5.1
to 8.0 and beyond. You might need to adjust your API calls accordingly:
• The name of the class that implements java.sql.Driver in MySQL Connector/J has changed
from com.mysql.jdbc.Driver to com.mysql.cj.jdbc.Driver. The old class name has been
deprecated.
• The names of these commonly-used classes and interfaces have also been changed:
• ExceptionInterceptor: from com.mysql.jdbc.ExceptionInterceptor to
com.mysql.cj.exceptions.ExceptionInterceptor
• StatementInterceptor: from com.mysql.jdbc.StatementInterceptorV2 to
com.mysql.cj.interceptors.QueryInterceptor
• ConnectionLifecycleInterceptor: from com.mysql.jdbc.ConnectionLifecycleInterceptor to
com.mysql.cj.jdbc.interceptors.ConnectionLifecycleInterceptor
• AuthenticationPlugin: from com.mysql.jdbc.AuthenticationPlugin to
com.mysql.cj.protocol.AuthenticationPlugin
• BalanceStrategy: from com.mysql.jdbc.BalanceStrategy to
com.mysql.cj.jdbc.ha.BalanceStrategy
• MysqlDataSource: from com.mysql.jdbc.jdbc2.optional.MysqlDataSource to
com.mysql.cj.jdbc.MysqlDataSource
• MysqlDataSourceFactory: from com.mysql.jdbc.jdbc2.optional.MysqlDataSourceFactory
to com.mysql.cj.jdbc.MysqlDataSourceFactory
• MysqlConnectionPoolDataSource: from
com.mysql.jdbc.jdbc2.optional.MysqlConnectionPoolDataSource to
com.mysql.cj.jdbc.MysqlConnectionPoolDataSource
• MysqlXADataSource: from com.mysql.jdbc.jdbc2.optional.MysqlXADataSource to
com.mysql.cj.jdbc.MysqlXADataSource
• MysqlXid: from com.mysql.jdbc.jdbc2.optional.MysqlXid to
com.mysql.cj.jdbc.MysqlXid
Changes for Build Properties
A number of Ant properties for building Connector/J from source have been renamed; see Table 3.1,
“Changes with the Build Properties from Connector/J 5.1 to 8.0 and Beyond”
Table 3.1 Changes with the Build Properties from Connector/J 5.1 to 8.0 and Beyond
Old name New name
com.mysql.jdbc.extra.libs com.mysql.cj.extra.libs
com.mysql.jdbc.jdk com.mysql.cj.build.jdk
debug.enable com.mysql.cj.build.addDebugInfo
com.mysql.jdbc.noCleanBetweenCompiles com.mysql.cj.build.noCleanBetweenCompiles
50

Upgrading from an Older Version
Old name New name
com.mysql.jdbc.commercialBuild com.mysql.cj.build.commercial
com.mysql.jdbc.filterLicense com.mysql.cj.build.filterLicense
com.mysql.jdbc.noCryptoBuild com.mysql.cj.build.noCrypto
com.mysql.jdbc.noSources com.mysql.cj.build.noSources
com.mysql.jdbc.noMavenSources com.mysql.cj.build.noMavenSources
major_version com.mysql.cj.build.driver.version.major
minor_version com.mysql.cj.build.driver.version.minor
subminor_version com.mysql.cj.build.driver.version.subminor
version_status com.mysql.cj.build.driver.version.status
extra.version com.mysql.cj.build.driver.version.extra
snapshot.version com.mysql.cj.build.driver.version.snapshot
version com.mysql.cj.build.driver.version
full.version com.mysql.cj.build.driver.version.full
prodDisplayName com.mysql.cj.build.driver.displayName
prodName com.mysql.cj.build.driver.name
fullProdName com.mysql.cj.build.driver.fullName
buildDir com.mysql.cj.build.dir
buildDriverDir com.mysql.cj.build.dir.driver
mavenUploadDir com.mysql.cj.build.dir.maven
distDir com.mysql.cj.dist.dir
toPackage com.mysql.cj.dist.dir.prepare
packageDest com.mysql.cj.dist.dir.package
com.mysql.jdbc.docs.sourceDir com.mysql.cj.dist.dir.prebuilt.docs
Change for Test Properties
A number of Ant properties for testing Connector/J have been renamed or removed; see Table 3.2,
“Changes with the Test Properties from Connector/J 5.1 to 8.0 and Beyond”
Table 3.2 Changes with the Test Properties from Connector/J 5.1 to 8.0 and Beyond
Old name New name
buildTestDir com.mysql.cj.testsuite.build.dir
junit.results com.mysql.cj.testsuite.junit.results
com.mysql.jdbc.testsuite.jvm com.mysql.cj.testsuite.jvm
test com.mysql.cj.testsuite.test.class
methods com.mysql.cj.testsuite.test.methods
com.mysql.jdbc.testsuite.url com.mysql.cj.testsuite.url
com.mysql.jdbc.testsuite.admin-url com.mysql.cj.testsuite.url.admin
com.mysql.jdbc.testsuite.ClusterUrl com.mysql.cj.testsuite.url.cluster
com.mysql.jdbc.testsuite.url.sha256defaultcom.mysql.cj.testsuite.url.openssl
51

Upgrading from an Older Version
Old name New name
com.mysql.jdbc.testsuite.cantGrant com.mysql.cj.testsuite.cantGrant
com.mysql.jdbc.testsuite.no-multi-
hosts-tests
com.mysql.cj.testsuite.disable.multihost.tests
com.mysql.jdbc.test.ds.host com.mysql.cj.testsuite.ds.host
com.mysql.jdbc.test.ds.port com.mysql.cj.testsuite.ds.port
com.mysql.jdbc.test.ds.db com.mysql.cj.testsuite.ds.db
com.mysql.jdbc.test.ds.user com.mysql.cj.testsuite.ds.user
com.mysql.jdbc.test.ds.password com.mysql.cj.testsuite.ds.password
com.mysql.jdbc.test.tabletype com.mysql.cj.testsuite.loadstoreperf.tabletype
com.mysql.jdbc.testsuite.loadstoreperf.useBigResultscom.mysql.cj.testsuite.loadstoreperf.useBigResults
com.mysql.jdbc.testsuite.MiniAdminTest.runShutdowncom.mysql.cj.testsuite.miniAdminTest.runShutdown
com.mysql.jdbc.testsuite.noDebugOutput com.mysql.cj.testsuite.noDebugOutput
com.mysql.jdbc.testsuite.retainArtifactscom.mysql.cj.testsuite.retainArtifacts
com.mysql.jdbc.testsuite.runLongTests com.mysql.cj.testsuite.runLongTests
com.mysql.jdbc.test.ServerController.basedircom.mysql.cj.testsuite.serverController.basedir
com.mysql.jdbc.ReplicationConnection.isSlavecom.mysql.cj.testsuite.replicationConnection.isReplica
com.mysql.jdbc.test.isLocalHostnameReplacementRemoved
com.mysql.jdbc.testsuite.driver Removed
com.mysql.jdbc.testsuite.url.default Removed. No longer needed, as multi-JVM tests
have been removed from the test suite.
Changes for Exceptions
Some exceptions have been removed from Connector/J going from version 5.1 to 8.0 and beyond.
Applications that used to catch the removed exceptions should now catch the corresponding exceptions
listed in Table 3.3 below.
Note
Some of these Connector/J 5.1 exceptions are duplicated in the
com.mysql.jdbc.exception.jdbc4 package; that is indicated by “[jdbc4.]” in their
names in Table 3.3.
Table 3.3 Changes for Exceptions from Connector/J 5.1 to 8.0 and Beyond
Removed Exception in Connector/J 5.1 Exception to Catch in Connector/J 8.0 and Beyond
com.mysql.jdbc.exceptions.jdbc4.CommunicationsException com.mysql.cj.jdbc.exceptions.CommunicationsException
com.mysql.jdbc.exceptions.[jdbc4.]MySQLDataException java.sql.SQLDataException
com.mysql.jdbc.exceptions.[jdbc4.]MySQLIntegrityConstraintViolationException java.sql.SQLIntegrityConstraintViolationException
com.mysql.jdbc.exceptions.[jdbc4.]MySQLInvalidAuthorizationSpecException java.sql.SQLInvalidAuthorizationSpecException
com.mysql.jdbc.exceptions.[jdbc4.]MySQLNonTransientConnectionException java.sql.SQLNonTransientConnectionException
com.mysql.jdbc.exceptions.[jdbc4.]MySQLNonTransientException java.sql.SQLNonTransientException
com.mysql.jdbc.exceptions.[jdbc4.]MySQLQueryInterruptedException com.mysql.cj.jdbc.exceptions.MySQLQueryInterruptedException
com.mysql.jdbc.exceptions.MySQLStatementCancelledException com.mysql.cj.jdbc.exceptions.MySQLStatementCancelledException
52

Testing Connector/J
Removed Exception in Connector/J 5.1 Exception to Catch in Connector/J 8.0 and Beyond
com.mysql.jdbc.exceptions.[jdbc4.]MySQLSyntaxErrorException java.sql.SQLSyntaxErrorException
com.mysql.jdbc.exceptions.[jdbc4.]MySQLTimeoutException java.sql.SQLTimeoutException
com.mysql.jdbc.exceptions.[jdbc4.]MySQLTransactionRollbackException java.sql.SQLTransactionRollbackException
com.mysql.jdbc.exceptions.[jdbc4.]MySQLTransientConnectionException java.sql.SQLTransientConnectionException
com.mysql.jdbc.exceptions.[jdbc4.]MySQLTransientException java.sql.SQLTransientException
com.mysql.jdbc.exceptions.[jdbc4.]MySQLIntegrityConstraintViolationException java.sql.SQLIntegrityConstraintViolationException
Other Changes
Here are other changes with Connector/J 8.0 and beyond:
• Removed ReplicationDriver. Instead of using a separate driver, you can now obtain a connection
for a replication setup just by using the jdbc:mysql:replication:// scheme.
• See Section 3.3, “Connector/J Installation” for third-party libraries required for Connector/J 8.0 to work.
• For Connector/J 8.0.22 and earlier: Connector/J always performs time offset adjustments on date-time
values, and the adjustments require one of the following to be true:
• The MySQL server is configured with a canonical time zone that is recognizable by Java (for example,
Europe/Paris, Etc/GMT-5, UTC, etc.)
• The server's time zone is overridden by setting the Connector/J connection property
serverTimezone (for example, serverTimezone=Europe/Paris).
Note
The Connector/J's behavior in this respect has changed since release 8.0.23.
See Section 3.5.6.1, “Preserving Time Instants” for details. serverTimezone
is now an alias for the connection property connectionTimeZone, which has
replaced serverTimezone.
3.3.5 Testing Connector/J
The Connector/J source code repository or packages that are shipped with source code include an
extensive test suite, containing test cases that can be executed independently. The test cases are divided
into the following categories:
• Unit tests: They are methods located in packages aligning with the classes that they test.
• Functional tests: Classes from the package testsuite.simple. Include test code for the main
features of Connector/J.
• Performance tests: Classes from the package testsuite.perf. Include test code to make
measurements for the performance of Connector/J.
• Regression tests: Classes from the package testsuite.regression. Includes code for testing bug
and regression fixes.
• X DevAPI and X Protocol tests: Classes from the package testsuite.x for testing X DevAPI and X
Protocol functionality.
The bundled Ant build file contains targets like test, which can facilitate the process of running the
Connector/J tests; see the target descriptions in the build file for details. To run the tests, in addition
53

Connector/J Examples
to fulfilling the requirements described in Section 3.3.3, “Installing from Source”, you must also set the
following properties in the build.properties file or through the Ant -D options:
• com.mysql.cj.testsuite.jvm: the JVM to be used for the tests. If the property is not set, the JVM
supplied with com.mysql.cj.build.jdk will be used.
• com.mysql.cj.testsuite.url: it specifies the JDBC URL for connection to a MySQL test server;
see Section 3.5.2, “Connection URL Syntax”.
• com.mysql.cj.testsuite.url.openssl: (for release 8.0.26 and earlier only) it specifies the JDBC
URL for connection to a MySQL test server compiled with OpenSSL; see Section 3.5.2, “Connection
URL Syntax”.
• com.mysql.cj.testsuite.mysqlx.url: it specifies the X DevAPI URL for connection to a MySQL
test server; see Section 3.5.2, “Connection URL Syntax”.
• com.mysql.cj.testsuite.mysqlx.url.openssl: (for release 8.0.26 and earlier only) it specifies
the X DevAPI URL for connection to a MySQL test server compiled with OpenSSL; see Section 3.5.2,
“Connection URL Syntax”.
After setting these parameters, run the tests with Ant in the following ways:
• Building the test target with ant test runs all test cases by default on a single server
instance. If you want to run a particular test case, put the test's fully qualified class names in the
com.mysql.cj.testsuite.test.class variable; for example:
shell > ant -Dcom.mysql.cj.testsuite.test.class=testsuite.simple.StringUtilsTest test
You can also run individual tests in a test case by specifying the names of the corresponding methods in
the com.mysql.cj.testsuite.test.methods variable, separating multiple methods by commas;
for example:
shell > ant -Dcom.mysql.cj.testsuite.test.class=testsuite.simple.StringUtilsTest \
-Dcom.mysql.cj.testsuite.test.methods=testIndexOfIgnoreCase,testGetBytes test
While the test results are partially reported by the console, complete reports in HTML and XML formats are
provided. View the HTML report by opening buildtest/junit/report/index.html. XML version of
the reports are located in the folder buildtest/junit.
Note
Going from Connector/J 5.1 to 8.0 and beyond, a number of Ant properties
for testing Connector/J have been renamed or removed; see Change for Test
Properties for details.
3.4 Connector/J Examples
Examples of using Connector/J are located throughout this document. This section provides a summary
and links to these examples.
• Example 3.4, “Connector/J: Obtaining a connection from the DriverManager”
• Example 3.5, “Connector/J: Using java.sql.Statement to execute a SELECT query”
• Example 3.6, “Connector/J: Calling Stored Procedures”
• Example 3.7, “Connector/J: Using Connection.prepareCall()”
• Example 3.8, “Connector/J: Registering output parameters”
54

Connector/J Reference
• Example 3.9, “Connector/J: Setting CallableStatement input parameters”
• Example 3.10, “Connector/J: Retrieving results and output parameter values”
• Example 3.11, “Connector/J: Retrieving AUTO_INCREMENT column values using
Statement.getGeneratedKeys()”
• Example 3.12, “Connector/J: Retrieving AUTO_INCREMENT column values using SELECT
LAST_INSERT_ID()”
• Example 3.13, “Connector/J: Retrieving AUTO_INCREMENT column values in Updatable
ResultSets”
• Example 3.14, “Connector/J: Using a connection pool with a J2EE application server”
• Example 3.15, “Connector/J: Example of transaction with retry logic”
3.5 Connector/J Reference
This section of the manual contains reference material for MySQL Connector/J.
3.5.1 Driver/Datasource Class Name
The name of the class that implements java.sql.Driver in MySQL Connector/J is
com.mysql.cj.jdbc.Driver.
3.5.2 Connection URL Syntax
This section explains the syntax of the URLs for connecting to MySQL.
This is the generic format of the connection URL:
protocol//[hosts][/database][?properties]
The URL consists of the following parts:
Important
Any reserved characters for URLs (for example, /, :, @, (, ), [, ], &, #, =, ?, and
space) that appear in any part of the connection URL must be percent encoded.
protocol
There are the possible protocols for a connection:
• jdbc:mysql: is for ordinary and basic JDBC failover connections.
• jdbc:mysql:loadbalance: is for load-balancing JDBC connections. See Section 3.8.3, “Configuring
Load Balancing with Connector/J” for details.
• jdbc:mysql:replication: is for JDBC replication connections. See Section 3.8.4, “Configuring
Source/Replica Replication with Connector/J” for details.
• mysqlx: is for X DevAPI connections.
• jdbc:mysql+srv: is for ordinary and basic failover JDBC connections that make use of DNS SRV
records.
• jdbc:mysql+srv:loadbalance: is for load-balancing JDBC connections that make use of DNS SRV
records.
55

Connection URL Syntax
• jdbc:mysql+srv:replication: is for replication JDBC connections that make use of DNS SRV
records.
• mysqlx+srv: is for X DevAPI connections that make use of DNS SRV records.
hosts
Depending on the situation, the hosts part may consist simply of a host name, or it can be a complex
structure consisting of various elements like multiple host names, port numbers, host-specific properties,
and user credentials.
• Single host:
• Single-host connections without adding host-specific properties:
• The hosts part is written in the format of host:port. This is an example of a simple single-host
connection URL:
jdbc:mysql://host1:33060/sakila
• host can be an IPv4 or an IPv6 host name string, and in the latter case it must be put inside
square brackets, for example “[1000:2000::abcd].” When host is not specified, the default value of
localhost is used.
• port is a standard port number, i.e., an integer between 1 and 65535. The default port number
for an ordinary MySQL connection is 3306, and it is 33060 for a connection using the X Protocol. If
port is not specified, the corresponding default is used.
• Single-host connections adding host-specific properties:
• In this case, the host is defined as a succession of key=value pairs. Keys are used to identify the
host, the port, as well as any host-specific properties. There are two alternate formats for specifying
keys:
• The “address-equals” form:
address=(host=host_or_ip)(port=port)(key1=value1)(key2=value2)...(keyN=valueN)
Here is a sample URL using the“address-equals” form :
jdbc:mysql://address=(host=myhost)(port=1111)(key1=value1)/db
• The “key-value” form:
(host=host,port=port,key1=value1,key2=value2,...,keyN=valueN)
Here is a sample URL using the “key-value” form :
jdbc:mysql://(host=myhost,port=1111,key1=value1)/db
• The host and the port are identified by the keys host and port. The descriptions of the format and
default values of host and port in Single host without host-specific properties [56] above also
apply here.
• Other keys that can be added include user, password, protocol, and so on. They override
the global values set in the properties part of the URL. Limit the overrides to user, password,
network timeouts, and statement and metadata cache sizes; the effects of other per-host overrides
are not defined.
56

Connection URL Syntax
• Different protocols may require different keys. For example, the mysqlx: scheme uses two special
keys, address and priority. address is a host:port pair and priority an integer. For
example:
mysqlx://(address=host:1111,priority=1,key1=value1)/db
• key is case-sensitive. Two keys differing in case only are considered conflicting, and there are no
guarantees on which one will be used.
• Multiple hosts
There are two formats for specifying multiple hosts:
• List hosts in a comma-separated list:
host1,host2,...,hostN
Each host can be specified in any of the three ways described in Single host [56] above. Here are
some examples:
jdbc:mysql://myhost1:1111,myhost2:2222/db
jdbc:mysql://address=(host=myhost1)(port=1111)(key1=value1),address=(host=myhost2)(port=2222)(key2=value2)/db
jdbc:mysql://(host=myhost1,port=1111,key1=value1),(host=myhost2,port=2222,key2=value2)/db
jdbc:mysql://myhost1:1111,(host=myhost2,port=2222,key2=value2)/db
mysqlx://(address=host1:1111,priority=1,key1=value1),(address=host2:2222,priority=2,key2=value2)/db
• List hosts in a comma-separated list, and then encloses the list by square brackets:
[host1,host2,...,hostN]
This is called the host sublist form, which allows sharing of the user credentials by all hosts in the list
as if they are a single host. Each host in the list can be specified in any of the three ways described in
Single host [56] above. Here are some examples:
jdbc:mysql://sandy:secret@[myhost1:1111,myhost2:2222]/db
jdbc:mysql://sandy:secret@[address=(host=myhost1)(port=1111)(key1=value1),address=(host=myhost2)(port=2222)(key2=value2)]/db
jdbc:mysql://sandy:secret@[myhost1:1111,address=(host=myhost2)(port=2222)(key2=value2)]/db
While it is not possible to write host sublists recursively, a host list may contain host sublists as its
member hosts.
57

Connection URL Syntax
• User credentials
User credentials can be set outside of the connection URL—for example, as arguments when getting
a connection from the java.sql.DriverManager (see Section 3.5.3, “Configuration Properties” for
details). When set with the connection URL, there are several ways to specify them:
• Prefix the a single host, a host sublist (see Multiple hosts [57]), or any host in a list of hosts with the
user credentials with an @:
user:password@host_or_host_sublist
For example:
mysqlx://sandy:secret@[(address=host1:1111,priority=1,key1=value1),(address=host2:2222,priority=2,key2=value2))]/db
• Use the keys user and password to specify credentials for each host:
(user=sandy)(password=mypass)
For example:
jdbc:mysql://[(host=myhost1,port=1111,user=sandy,password=secret),(host=myhost2,port=2222,user=finn,password=secret)]/db
jdbc:mysql://address=(host=myhost1)(port=1111)(user=sandy)(password=secret),address=(host=myhost2)(port=2222)(user=finn)(password=secret)/db
In both forms, when multiple user credentials are specified, the one to the left takes precedence—that is,
going from left to right in the connection string, the first one found that is applicable to a host is the one
that is used.
Inside a host sublist, no host can have user credentials in the @ format, but individual host can have
user credentials specified in the key format.
database
The default database or catalog to open. If the database is not specified, the connection is made with no
default database. In this case, either call the setCatalog() method on the Connection instance, or
specify table names using the database name (that is, SELECT dbname.tablename.colname FROM
dbname.tablename...) in your SQL statements. Opening a connection without specifying the database
to use is, in general, only useful when building tools that work with multiple databases, such as GUI
database managers.
Note
Always use the Connection.setCatalog() method to specify the desired
database in JDBC applications, rather than the USE database statement.
properties
A succession of global properties applying to all hosts, preceded by ? and written as key=value pairs
separated by the symbol “&.” Here are some examples:
jdbc:mysql://(host=myhost1,port=1111),(host=myhost2,port=2222)/db?key1=value1&key2=value2&key3=value3
The following are true for the key-value pairs:
• key and value are just strings. Proper type conversion and validation are performed internally in
Connector/J.
• key is case-sensitive. Two keys differing in case only are considered conflicting, and it is uncertain
which one will be used.
58

Configuration Properties
• Any host-specific values specified with key-value pairs as explained in Single host with host-specific
properties [56] and Multiple hosts [57] above override the global values set here.
See Section 3.5.3, “Configuration Properties” for details about the configuration properties.
3.5.3 Configuration Properties
Configuration properties define how Connector/J will make a connection to a MySQL server. Unless
otherwise noted, properties can be set for a DataSource object or for a Connection object.
Configuration properties can be set in one of the following ways:
• Using the set*() methods on MySQL implementations of java.sql.DataSource (which is the
preferred method when using implementations of java.sql.DataSource):
• com.mysql.cj.jdbc.MysqlDataSource
• com.mysql.cj.jdbc.MysqlConnectionPoolDataSource
• As a key-value pair in the java.util.Properties instance passed to
DriverManager.getConnection() or Driver.connect()
• As a JDBC URL parameter in the URL given to java.sql.DriverManager.getConnection(),
java.sql.Driver.connect() or the MySQL implementations of the javax.sql.DataSource
setURL() method. If you specify a configuration property in the URL without providing a value for
it, nothing will be set; for example, adding useServerPrepStmts alone to the URL does not make
Connector/J use server-side prepared statements; you need to add useServerPrepStmts=true.
Note
If the mechanism you use to configure a JDBC URL is XML-based, use the XML
character literal & to separate configuration parameters, as the ampersand
is a reserved character for XML.
The properties are listed by categories in the following tables and then in the subsections that follow. Click
on a property name in the tables to see its full description in the subsections.
Table 3.4 Authentication Properties
Name Default Value Since Version
user - all versions
password - all versions
password1 - 8.0.28
password2 - 8.0.28
password3 - 8.0.28
authenticationPlugins - 5.1.19
disabledAuthenticationPlugins- 5.1.19
defaultAuthenticationPlugin caching_sha2_password 5.1.19
ldapServerHostname - 8.0.23
ociConfigFile - 8.0.27
ociConfigProfile DEFAULT 8.0.33
authenticationWebAuthnCallbackHandler- 8.2.0
59

Configuration Properties
Table 3.5 Connection Properties
Name Default Value Since Version
connectionAttributes - 5.1.25
connectionLifecycleInterceptors- 5.1.4
useConfigs - 3.1.5
clientInfoProvider com.mysql.cj.jdbc.CommentClientInfoProvider5.1.0
createDatabaseIfNotExist false 3.1.9
databaseTerm CATALOG 8.0.17
detectCustomCollations false 5.1.29
disconnectOnExpiredPasswords true 5.1.23
interactiveClient false 3.1.0
passwordCharacterEncoding - 5.1.7
propertiesTransform - 3.1.4
rollbackOnPooledClose true 3.0.15
useAffectedRows false 5.1.7
Table 3.6 Session Properties
Name Default Value Since Version
sessionVariables - 3.1.8
characterEncoding - 1.1g
characterSetResults - 3.0.13
connectionCollation - 3.0.13
customCharsetMapping - 8.0.26
trackSessionState false 8.0.26
Table 3.7 Networking Properties
Name Default Value Since Version
socksProxyHost - 5.1.34
socksProxyPort 1080 5.1.34
socketFactory com.mysql.cj.protocol.StandardSocketFactory3.0.3
connectTimeout 0 3.0.1
socketTimeout 0 3.0.1
dnsSrv false 8.0.19
localSocketAddress - 5.0.5
maxAllowedPacket 65535 5.1.8
socksProxyRemoteDns false 8.0.29
tcpKeepAlive true 5.0.7
tcpNoDelay true 5.0.7
tcpRcvBuf 0 5.0.7
tcpSndBuf 0 5.0.7
60

Configuration Properties
Name Default Value Since Version
tcpTrafficClass 0 5.0.7
useCompression false 3.0.17
useUnbufferedInput true 3.0.11
Table 3.8 Security Properties
Name Default Value Since Version
paranoid false 3.0.1
serverRSAPublicKeyFile - 5.1.31
allowPublicKeyRetrieval false 5.1.31
sslMode PREFERRED 8.0.13
trustCertificateKeyStoreUrl - 5.1.0
trustCertificateKeyStoreType JKS 5.1.0
trustCertificateKeyStorePassword- 5.1.0
fallbackToSystemTrustStore true 8.0.22
clientCertificateKeyStoreUrl - 5.1.0
clientCertificateKeyStoreTypeJKS 5.1.0
clientCertificateKeyStorePassword- 5.1.0
fallbackToSystemKeyStore true 8.0.22
tlsCiphersuites - 5.1.35
tlsVersions - 8.0.8
fipsCompliantJsse false 8.1.0
KeyManagerFactoryProvider - 8.1.0
trustManagerFactoryProvider - 8.1.0
keyStoreProvider - 8.1.0
sslContextProvider - 8.1.0
allowLoadLocalInfile false 3.0.3
allowLoadLocalInfileInPath - 8.0.22
allowMultiQueries false 3.1.1
allowUrlInLocalInfile false 3.1.4
requireSSL false 3.1.0
useSSL true 3.0.2
verifyServerCertificate false 5.1.6
Table 3.9 Statements Properties
Name Default Value Since Version
cacheDefaultTimeZone true 8.0.20
continueBatchOnError true 3.0.3
dontTrackOpenResources false 3.1.7
queryInterceptors - 8.0.7
61

Configuration Properties
Name Default Value Since Version
queryTimeoutKillsConnection false 5.1.9
Table 3.10 Prepared Statements Properties
Name Default Value Since Version
allowNanAndInf false 3.1.5
autoClosePStmtStreams false 3.1.12
compensateOnDuplicateKeyUpdateCountsfalse 5.1.7
emulateUnsupportedPstmts true 3.1.7
generateSimpleParameterMetadatafalse 5.0.5
processEscapeCodesForPrepStmtstrue 3.1.12
useServerPrepStmts false 3.1.0
useStreamLengthsInPrepStmts true 3.0.2
Table 3.11 Result Sets Properties
Name Default Value Since Version
clobberStreamingResults false 3.0.9
emptyStringsConvertToZero true 3.1.8
holdResultsOpenOverStatementClosefalse 3.1.7
jdbcCompliantTruncation true 3.1.2
maxRows -1 all versions
netTimeoutForStreamingResults600 5.1.0
padCharsWithSpace false 5.0.6
populateInsertRowWithDefaultValuesfalse 5.0.5
scrollTolerantForwardOnly false 8.0.24
strictUpdates true 3.0.4
tinyInt1isBit true 3.0.16
transformedBitIsBoolean false 3.1.9
Table 3.12 Metadata Properties
Name Default Value Since Version
getProceduresReturnsFunctionstrue 5.1.26
noAccessToProcedureBodies false 5.0.3
nullDatabaseMeansCurrent false 3.1.8
useHostsInPrivileges true 3.0.2
useInformationSchema false 5.0.0
Table 3.13 BLOB/CLOB processing Properties
Name Default Value Since Version
blobSendChunkSize 1048576 3.1.9
62

Configuration Properties
Name Default Value Since Version
blobsAreStrings false 5.0.8
clobCharacterEncoding - 5.0.0
emulateLocators false 3.1.0
functionsNeverReturnBlobs false 5.0.8
locatorFetchBufferSize 1048576 3.2.1
Table 3.14 Datetime types processing Properties
Name Default Value Since Version
connectionTimeZone - 3.0.2
forceConnectionTimeZoneToSessionfalse 8.0.23
noDatetimeStringSync false 3.1.7
preserveInstants true 8.0.23
sendFractionalSeconds true 5.1.37
sendFractionalSecondsForTime true 8.0.23
treatMysqlDatetimeAsTimestampfalse 8.2.0
treatUtilDateAsTimestamp true 5.0.5
yearIsDateType true 3.1.9
zeroDateTimeBehavior EXCEPTION 3.1.4
Table 3.15 High Availability and Clustering Properties
Name Default Value Since Version
autoReconnect false 1.1
autoReconnectForPools false 3.1.3
failOverReadOnly true 3.0.12
maxReconnects 3 1.1
reconnectAtTxEnd false 3.0.10
retriesAllDown 120 5.1.6
initialTimeout 2 1.1
queriesBeforeRetrySource 50 3.0.2
secondsBeforeRetrySource 30 3.0.2
allowReplicaDownConnections false 6.0.2
allowSourceDownConnections false 5.1.27
ha.enableJMX false 5.1.27
loadBalanceHostRemovalGracePeriod15000 6.0.3
readFromSourceWhenNoReplicas false 6.0.2
selfDestructOnPingMaxOperations0 5.1.6
selfDestructOnPingSecondsLifetime0 5.1.6
ha.loadBalanceStrategy random 5.0.6
loadBalanceAutoCommitStatementRegex- 5.1.15
63

Configuration Properties
Name Default Value Since Version
loadBalanceAutoCommitStatementThreshold0 5.1.15
loadBalanceBlocklistTimeout 0 5.1.0
loadBalanceConnectionGroup - 5.1.13
loadBalanceExceptionChecker com.mysql.cj.jdbc.ha.StandardLoadBalanceExceptionChecker5.1.13
loadBalancePingTimeout 0 5.1.13
loadBalanceSQLExceptionSubclassFailover- 5.1.13
loadBalanceSQLStateFailover - 5.1.13
loadBalanceValidateConnectionOnSwapServerfalse 5.1.13
pinGlobalTxToPhysicalConnectionfalse 5.0.1
replicationConnectionGroup - 8.0.7
resourceId - 5.0.1
serverAffinityOrder - 8.0.8
Table 3.16 Performance Extensions Properties
Name Default Value Since Version
callableStmtCacheSize 100 3.1.2
metadataCacheSize 50 3.1.1
useLocalSessionState false 3.1.7
useLocalTransactionState false 5.1.7
prepStmtCacheSize 25 3.0.10
prepStmtCacheSqlLimit 256 3.0.10
queryInfoCacheFactory com.mysql.cj.PerConnectionLRUFactory5.1.1
serverConfigCacheFactory com.mysql.cj.util.PerVmServerConfigCacheFactory5.1.1
alwaysSendSetIsolation true 3.1.7
maintainTimeStats true 3.1.9
useCursorFetch false 5.0.0
cacheCallableStmts false 3.1.2
cachePrepStmts false 3.0.10
cacheResultSetMetadata false 3.1.1
cacheServerConfiguration false 3.1.5
defaultFetchSize 0 3.1.9
dontCheckOnDuplicateKeyUpdateInSQLfalse 5.1.32
elideSetAutoCommits false 3.1.3
enableEscapeProcessing true 6.0.1
enableQueryTimeouts true 5.0.6
largeRowSizeThreshold 2048 5.1.1
readOnlyPropagatesToServer true 5.1.35
rewriteBatchedStatements false 3.1.13
64

Configuration Properties
Name Default Value Since Version
useReadAheadInput true 3.1.5
Table 3.17 Debugging/Profiling Properties
Name Default Value Since Version
logger com.mysql.cj.log.StandardLogger 3.1.1
profilerEventHandler com.mysql.cj.log.LoggingProfilerEventHandler5.1.6
useNanosForElapsedTime false 5.0.7
maxQuerySizeToLog 2048 3.1.3
maxByteArrayAsHex 1024 8.0.31
profileSQL false 3.1.0
logSlowQueries false 3.1.2
slowQueryThresholdMillis 2000 3.1.2
slowQueryThresholdNanos 0 5.0.7
autoSlowLog true 5.1.4
explainSlowQueries false 3.1.2
gatherPerfMetrics false 3.1.2
reportMetricsIntervalMillis 30000 3.1.2
logXaCommands false 5.0.5
traceProtocol false 3.1.2
enablePacketDebug false 3.1.3
packetDebugBufferSize 20 3.1.3
useUsageAdvisor false 3.1.1
resultSetSizeThreshold 100 5.0.5
autoGenerateTestcaseScript false 3.1.9
openTelemetry PREFERRED 8.4.0
Table 3.18 Exceptions/Warnings Properties
Name Default Value Since Version
dumpQueriesOnException false 3.1.3
exceptionInterceptors - 5.1.8
ignoreNonTxTables false 3.0.9
includeInnodbStatusInDeadlockExceptionsfalse 5.0.7
includeThreadDumpInDeadlockExceptionsfalse 5.1.15
includeThreadNamesAsStatementCommentfalse 5.1.15
useOnlyServerErrorMessages true 3.0.15
Table 3.19 Tunes for integration with other products Properties
Name Default Value Since Version
overrideSupportsIntegrityEnhancementFacilityfalse 3.1.12
65

Configuration Properties
Name Default Value Since Version
ultraDevHack false 2.0.3
Table 3.20 JDBC compliance Properties
Name Default Value Since Version
useColumnNamesInFindColumn false 5.1.7
pedantic false 3.0.0
useOldAliasMetadataBehavior false 5.0.4
Table 3.21 X Protocol and X DevAPI Properties
Name Default Value Since Version
xdevapi.auth PLAIN 8.0.8
xdevapi.compression PREFERRED 8.0.20
xdevapi.compression-
algorithms
zstd_stream,lz4_message,deflate_stream8.0.22
xdevapi.compression-
extensions
- 8.0.22
xdevapi.connect-timeout 10000 8.0.13
xdevapi.connection-
attributes
- 8.0.16
xdevapi.dns-srv false 8.0.19
xdevapi.fallback-to-system-
keystore
true 8.0.22
xdevapi.fallback-to-system-
truststore
true 8.0.22
xdevapi.ssl-keystore - 8.0.22
xdevapi.ssl-keystore-
password
- 8.0.22
xdevapi.ssl-keystore-type JKS 8.0.22
xdevapi.ssl-mode REQUIRED 8.0.7
xdevapi.ssl-truststore - 6.0.6
xdevapi.ssl-truststore-
password
- 6.0.6
xdevapi.ssl-truststore-type JKS 6.0.6
xdevapi.tls-ciphersuites - 8.0.19
xdevapi.tls-versions - 8.0.19
3.5.3.1 Authentication
• user
The user to connect as. If none is specified, it is authentication plugin dependent what user name is
used. Built-in authentication plugins default to the session login user name.
66

Configuration Properties
Since Version all versions
• password
The password to use when authenticating the user.
Since Version all versions
• password1
The password to use in the first phase of a Multi-Factor Authentication workflow. It is a synonym of the
connection property 'password' and can also be set with user credentials in the connection string.
Since Version 8.0.28
• password2
The password to use in the second phase of a Multi-Factor Authentication workflow.
Since Version 8.0.28
• password3
The password to use in the third phase of a Multi-Factor Authentication workflow.
Since Version 8.0.28
• authenticationPlugins
Comma-delimited list of classes that implement the interface
'com.mysql.cj.protocol.AuthenticationPlugin'. These plugins will be loaded at connection initialization
and can be used together with their sever-side counterparts for authenticating users, unless they are
disabled in the connection property 'disabledAuthenticationPlugins'.
Since Version 5.1.19
• disabledAuthenticationPlugins
Comma-delimited list of authentication plugins client-side protocol names or classes implementing the
interface 'com.mysql.cj.protocol.AuthenticationPlugin'. The authentication plugins listed will not be used
for authenticating users and, if anyone of them is required during the authentication exchange, the
connection fails. The default authentication plugin specified in the property 'defaultAuthenticationPlugin'
cannot be disabled.
Since Version 5.1.19
• defaultAuthenticationPlugin
The default authentication plugin client-side protocol name or a fully qualified name of a class that
implements the interface 'com.mysql.cj.protocol.AuthenticationPlugin'. The specified authentication
plugin must be either one of the built-in authentication plugins or one of the plugins listed in the property
'authenticationPlugins'. Additionally, the default authentication plugin cannot be disabled with the
property 'disabledAuthenticationPlugins'. Neither an empty nor unknown plugin name or class can be set
for this property.
67

Configuration Properties
By default, Connector/J honors the server-side default authentication plugin, which is known after
receiving the initial handshake packet, and falls back to this property's default value if that plugin cannot
be used. However, when a value is explicitly provided to this property, Connector/J then overrides the
server-side default authentication plugin and always tries first the plugin specified with this property.
Default Value caching_sha2_password
Since Version 5.1.19
• ldapServerHostname
When using MySQL's LDAP pluggable authentication with GSSAPI/Kerberos authentication method,
allows setting the LDAP service principal hostname as configured in the Kerberos KDC. If this property is
not set, Connector/J takes the system property 'java.security.krb5.kdc' and extracts the hostname (short
name) from its value and uses it. If neither is set, the connection fails with an exception.
Since Version 8.0.23
• ociConfigFile
The location of the OCI configuration file as required by the OCI SDK for Java. Default value is "~/.oci/
config" for Unix-like systems and "%HOMEDRIVE%%HOMEPATH%.oci\config" for Windows.
Since Version 8.0.27
• ociConfigProfile
The profile in the OCI configuration file specified in 'ociConfigFile', from where the configuration to use in
the 'authentication_oci_client' authentication plugin is to be read.
Default Value DEFAULT
Since Version 8.0.33
• authenticationWebAuthnCallbackHandler
Fully-qualified class name of a class implementing the interface
'com.mysql.cj.callback.MysqlCallbackHandler'. This class will be used by the WebAuthn authentication
plugin to obtain the authenticator data and signature required for the FIDO authentication process. See
the documentation of com.mysql.cj.callback.WebAuthnAuthenticationCallback for more details.
Since Version 8.2.0
3.5.3.2 Connection
• connectionAttributes
A comma-delimited list of user-defined "key:value" pairs, in addition to standard MySQL-defined
"key:value" pairs, to be passed to MySQL Server for display as connection attributes in the
'PERFORMANCE_SCHEMA' tables 'session_account_connect_attrs' and 'session_connect_attrs'.
Example usage: "connectionAttributes=key1:value1,key2:value2" This functionality is available
for use with MySQL Server version 5.6 or later only. Earlier versions of MySQL Server do
not support connection attributes, causing this configuration option to be ignored. Setting
"connectionAttributes=none" will cause connection attribute processing to be bypassed for situations
where Connection creation/initialization speed is critical.
68

Configuration Properties
Since Version 5.1.25
• connectionLifecycleInterceptors
A comma-delimited list of classes that implement
'com.mysql.cj.jdbc.interceptors.ConnectionLifecycleInterceptor' that should be notified of
connection lifecycle events (creation, destruction, commit, rollback, setting the current database
and changing the autocommit mode) and potentially alter the execution of these commands.
'ConnectionLifecycleInterceptors' are stackable, more than one interceptor may be specified via the
configuration property as a comma-delimited list, with the interceptors executed in order from left to right.
Since Version 5.1.4
• useConfigs
Load the comma-delimited list of configuration properties for specifying combinations of options
for particular scenarios. These properties are loaded before parsing the URL or applying user-
specified properties. Allowed values are "3-0-Compat", "clusterBase", "coldFusion", "fullDebug",
"maxPerformance", "maxPerformance-8-0" and "solarisMaxPerformance", and they correspond to
properties files shipped within the Connector/J jar file, under "com/mysql/cj/configurations".
Since Version 3.1.5
• clientInfoProvider
The name of a class that implements the 'com.mysql.cj.jdbc.ClientInfoProvider' interface in order to
support JDBC-4.0's 'Connection.get/setClientInfo()' methods.
Default Value com.mysql.cj.jdbc.CommentClientInfoProvider
Since Version 5.1.0
• createDatabaseIfNotExist
Creates the database given in the URL if it doesn't yet exist. Assumes the configured user has
permissions to create databases.
Default Value false
Since Version 3.1.9
• databaseTerm
MySQL uses the term "schema" as a synonym of the term "database," while Connector/J historically
takes the JDBC term "catalog" as synonymous to "database". This property sets for Connector/J which
of the JDBC terms "catalog" and "schema" is used in an application to refer to a database. The property
takes one of the two values "CATALOG" or "SCHEMA" and uses it to determine (1) which Connection
methods can be used to set/get the current database (e.g. 'setCatalog()' or 'setSchema()'?), (2) which
arguments can be used within the various 'DatabaseMetaData' methods to filter results (e.g. the catalog
or 'schemaPattern' argument of 'getColumns()'?), and (3) which fields in the result sets returned by
69

Configuration Properties
'DatabaseMetaData' methods contain the database identification information (i.e., the 'TABLE_CAT' or
'TABLE_SCHEM' field in the result set returned by 'getTables()'?).
If "databaseTerm=CATALOG", 'schemaPattern' for searches are ignored and calls of schema methods
(like 'setSchema()' or get 'Schema()') become no-ops, and vice versa.
Default Value CATALOG
Since Version 8.0.17
• detectCustomCollations
Should the driver detect custom charsets/collations installed on server? If this option set to "true" the
driver gets actual charsets/collations from the server each time a connection establishes. This could slow
down connection initialization significantly.
Default Value false
Since Version 5.1.29
• disconnectOnExpiredPasswords
If 'disconnectOnExpiredPasswords' is set to "false" and password is expired then server enters sandbox
mode and sends 'ERR(08001, ER_MUST_CHANGE_PASSWORD)' for all commands that are not
needed to set a new password until a new password is set.
Default Value true
Since Version 5.1.23
• interactiveClient
Set the 'CLIENT_INTERACTIVE' flag, which tells MySQL to timeout connections based on
'interactive_timeout' instead of 'wait_timeout'.
Default Value false
Since Version 3.1.0
• passwordCharacterEncoding
Instructs the server to use the default character set for the specified Java encoding during the
authentication phase. If this property is not set, Connector/J falls back to the collation name specified in
the property 'connectionCollation' or to the Java encoding specified in the property 'characterEncoding',
in that order of priority. The default collation of the character set utf8mb4 is used if none of the properties
is set.
Since Version 5.1.7
• propertiesTransform
An implementation of 'com.mysql.cj.conf.ConnectionPropertiesTransform' that the driver will use to
modify connection string properties passed to the driver before attempting a connection.
Since Version 3.1.4
70

Configuration Properties
• rollbackOnPooledClose
Should the driver issue a 'rollback()' when the logical connection in a pool is closed?
Default Value true
Since Version 3.0.15
• useAffectedRows
Don't set the 'CLIENT_FOUND_ROWS' flag when connecting to the server. Note that this is not JDBC-
compliant and it will break most applications that rely on "found" rows vs. "affected rows" for DML
statements, but does cause correct update counts from "INSERT ... ON DUPLICATE KEY UPDATE"
statements to be returned by the server.
Default Value false
Since Version 5.1.7
3.5.3.3 Session
• sessionVariables
A comma or semicolon separated list of "name=value" pairs to be sent as "SET [SESSION] ..." to the
server when the driver connects.
Since Version 3.1.8
• characterEncoding
Instructs the server to set session system variables 'character_set_client' and 'character_set_connection'
to the default character set supported by MySQL for the specified Java character encoding and set
'collation_connection' to the default collation for this character set. If neither this property nor the property
'connectionCollation' is set:
For Connector/J 8.0.25 and earlier, the driver will try to use the server's default character set;
For Connector/J 8.0.26 and later, the driver will use "utf8mb4".
Since Version 1.1g
• characterSetResults
Instructs the server to return the data encoded with the default character set for the specified Java
encoding. If not set or set to "null", the server will send data in its original character set and the driver will
decode it according to the result metadata.
Since Version 3.0.13
• connectionCollation
Instructs the server to set session system variable 'collation_connection' to the specified collation
name and set 'character_set_client' and 'character_set_connection' to a corresponding character set.
This property overrides the value of 'characterEncoding' with the default character set this collation
belongs to, if and only if 'characterEncoding' is not configured or is configured with a character set that
is incompatible with the collation. That means 'connectionCollation' may not always correct a mismatch
of character sets. For example, if 'connectionCollation' is set to "latin1_swedish_ci", the corresponding
71

Configuration Properties
character set is "latin1" for MySQL, which maps it to the Java character set "windows-1252";
so if 'characterEncoding' is not set,"windows-1252" is the character set that will be used; but if
'characterEncoding' has been set to, e.g. "ISO-8859-1", that is compatible with "latin1_swedish_ci", so
the character encoding setting is left unchanged; and if client is actually using "windows-1252" (which is
similar but different from "ISO-8859-1"), errors would occur for some characters. If neither this property
nor the property 'characterEncoding' is set:
For Connector/J 8.0.25 and earlier, the driver will try to use the server's default character set;
For Connector/J 8.0.26 and later, the driver will use utf8mb4's default collation.
Since Version 3.0.13
• customCharsetMapping
A comma-delimited list of custom "charset:java encoding" pairs.
In case the MySQL server is configured with custom character sets and "detectCustomCollations=true",
Connector/J needs to know which Java character encoding to use for the data represented by these
character sets. Example usage: "customCharsetMapping=charset1:UTF-8,charset2:Cp1252".
Since Version 8.0.26
• trackSessionState
Receive server session state changes on query results. These changes are accessible via
'MysqlConnection.getServerSessionStateController()'.
Default Value false
Since Version 8.0.26
3.5.3.4 Networking
• socksProxyHost
Name or IP address of a SOCKS host to connect through.
Since Version 5.1.34
• socksProxyPort
Port of the SOCKS server.
Default Value 1080
Since Version 5.1.34
• socketFactory
The name of the class that the driver should use for creating socket connections to the server. This
class must implement the interface 'com.mysql.cj.protocol.SocketFactory' and have a public no-args
constructor.
Default Value com.mysql.cj.protocol.StandardSocketFactory
Since Version 3.0.3
72

Configuration Properties
• connectTimeout
Timeout for socket connect (in milliseconds), with 0 being no timeout.
Default Value 0
Since Version 3.0.1
• socketTimeout
Timeout, specified in milliseconds, on network socket operations. Value "0" means no timeout.
Default Value 0
Since Version 3.0.1
• dnsSrv
Should the driver use the given host name to lookup for DNS SRV records and use the resulting list of
hosts in a multi-host failover connection? Note that a single host name and no port must be provided
when this option is enabled.
Default Value false
Since Version 8.0.19
• localSocketAddress
Hostname or IP address given to explicitly configure the interface that the driver will bind the client side
of the TCP/IP connection to when connecting.
Since Version 5.0.5
• maxAllowedPacket
Maximum allowed packet size to send to server. If not set, the value of system variable
'max_allowed_packet' will be used to initialize this upon connecting. This value will not take effect if set
larger than the value of 'max_allowed_packet'. Also, due to an internal dependency with the property
'blobSendChunkSize', this setting has a minimum value of "8203" if 'useServerPrepStmts' is set to "true".
Default Value 65535
Since Version 5.1.8
• socksProxyRemoteDns
When using a SOCKS proxy, whether the DNS lookup for the database host should be performed locally
or through the SOCKS proxy.
Default Value false
Since Version 8.0.29
• tcpKeepAlive
If connecting using TCP/IP, should the driver set 'SO_KEEPALIVE'?
Default Value true
73

Configuration Properties
Since Version 5.0.7
• tcpNoDelay
If connecting using TCP/IP, should the driver set 'SO_TCP_NODELAY', disabling the Nagle Algorithm?
Default Value true
Since Version 5.0.7
• tcpRcvBuf
If connecting using TCP/IP, should the driver set 'SO_RCV_BUF' to the given value? The default value
of "0", means use the platform default value for this property.
Default Value 0
Since Version 5.0.7
• tcpSndBuf
If connecting using TCP/IP, should the driver set 'SO_SND_BUF' to the given value? The default value
of "0", means use the platform default value for this property.
Default Value 0
Since Version 5.0.7
• tcpTrafficClass
If connecting using TCP/IP, should the driver set traffic class or type-of-service fields? See the
documentation for 'java.net.Socket.setTrafficClass()' for more information.
Default Value 0
Since Version 5.0.7
• useCompression
Use zlib compression when communicating with the server?
Default Value false
Since Version 3.0.17
• useUnbufferedInput
Don't use 'BufferedInputStream' for reading data from the server.
Default Value true
Since Version 3.0.11
3.5.3.5 Security
• paranoid
Take measures to prevent exposure sensitive information in error messages and clear data structures
holding sensitive data when possible?
74

Configuration Properties
Default Value false
Since Version 3.0.1
• serverRSAPublicKeyFile
File path to the server RSA public key file for 'sha256_password' authentication. If not specified, the
public key will be retrieved from the server.
Since Version 5.1.31
• allowPublicKeyRetrieval
Allows special handshake round-trip to get an RSA public key directly from server.
Default Value false
Since Version 5.1.31
• sslMode
By default, network connections are SSL encrypted; this property permits secure connections
to be turned off, or a different levels of security to be chosen. The following values are allowed:
"DISABLED" - Establish unencrypted connections; "PREFERRED" - Establish encrypted connections
if the server enabled them, otherwise fall back to unencrypted connections; "REQUIRED" - Establish
secure connections if the server enabled them, fail otherwise; "VERIFY_CA" - Like "REQUIRED" but
additionally verify the server TLS certificate against the configured Certificate Authority (CA) certificates;
"VERIFY_IDENTITY" - Like "VERIFY_CA", but additionally verify that the server certificate matches the
host to which the connection is attempted.
This property replaced the deprecated legacy properties 'useSSL', 'requireSSL', and
'verifyServerCertificate', which are still accepted but translated into a value for 'sslMode'
if 'sslMode' is not explicitly set: "useSSL=false" is translated to "sslMode=DISABLED";
{"useSSL=true", "requireSSL=false", "verifyServerCertificate=false"} is translated to
"sslMode=PREFERRED"; {"useSSL=true", "requireSSL=true", "verifyServerCertificate=false"} is
translated to "sslMode=REQUIRED"; {"useSSL=true", "verifyServerCertificate=true"} is translated to
"sslMode=VERIFY_CA". There is no equivalent legacy settings for "sslMode=VERIFY_IDENTITY". Note
that, for all server versions, the default setting of 'sslMode' is "PREFERRED", and it is equivalent to the
legacy settings of "useSSL=true", "requireSSL=false", and "verifyServerCertificate=false", which are
different from their default settings for Connector/J 8.0.12 and earlier in some situations. Applications
that continue to use the legacy properties and rely on their old default settings should be reviewed.
The legacy properties are ignored if 'sslMode' is set explicitly. If none of 'sslMode' or 'useSSL' is set
explicitly, the default setting of "sslMode=PREFERRED" applies.
Default Value PREFERRED
Since Version 8.0.13
• trustCertificateKeyStoreUrl
URL for the trusted root certificates key store.
If not specified, the property 'fallbackToSystemTrustStore' determines if system-wide trust store is used.
Since Version 5.1.0
75

Configuration Properties
• trustCertificateKeyStoreType
Key store type for trusted root certificates.
Null or empty means use the default, which is "JKS". Standard key store types supported by the JVM are
"JKS" and "PKCS12", your environment may have more available depending on what security providers
are installed and available to the JVM.
Default Value JKS
Since Version 5.1.0
• trustCertificateKeyStorePassword
Password for the trusted root certificates key store.
Since Version 5.1.0
• fallbackToSystemTrustStore
Whether the absence of setting a value for 'trustCertificateKeyStoreUrl' falls back to using the system-
wide default trust store or one defined through the system properties 'javax.net.ssl.trustStore*'.
Default Value true
Since Version 8.0.22
• clientCertificateKeyStoreUrl
URL for the client certificate KeyStore.
If not specified, the property 'fallbackToSystemKeyStore' determines if system-wide key store is used.
Since Version 5.1.0
• clientCertificateKeyStoreType
Key store type for client certificates.
Null or empty means use the default, which is "JKS". Standard key store types supported by the JVM are
"JKS" and "PKCS12", your environment may have more available depending on what security providers
are installed and available to the JVM.
Default Value JKS
Since Version 5.1.0
• clientCertificateKeyStorePassword
Password for the client certificates key store.
Since Version 5.1.0
76

Configuration Properties
• fallbackToSystemKeyStore
Whether the absence of setting a value for 'clientCertificateKeyStoreUrl' falls back to using the system-
wide key store defined through the system properties 'javax.net.ssl.keyStore*'.
Default Value true
Since Version 8.0.22
• tlsCiphersuites
When establishing secure connections, overrides the cipher suites enabled for use on the underlying
SSL sockets. This may be required when using external JSSE providers or to specify cipher suites
compatible with both MySQL server and used JVM. Prior to version 8.0.28, this property was named
'enabledSSLCipherSuites', which remains as an alias.
Since Version 5.1.35
• tlsVersions
List of TLS protocols to allow when establishing secure connections. Overrides the TLS protocols
enabled in the underlying SSL sockets. This can be used to restrict connections to specific TLS versions
and, by doing that, avoid TLS negotiation fallback. Allowed and default values are "TLSv1.2" and
"TLSv1.3". Prior to version 8.0.28, this property was named 'enabledTLSProtocols', which remains as an
alias.
Since Version 8.0.8
• fipsCompliantJsse
Enables Connector/J to be compatible to JSSE operating in FIPS mode. Should be set to "true" if the
JSSE is configured to operate in FIPS mode and Connector/J receives the error "FIPS mode: only
SunJSSE TrustManagers may be used" when creating secure connections. If set to "true" then, when
establishing secure connections, the driver operates as if the 'sslMode' was set to "VERIFY_CA" or
"VERIFY_IDENTITY", i.e., all secure connections require at least server certificate validation, for which a
trust store must be configured or fall back to the system-wide trust store must be enabled.
Default Value false
Since Version 8.1.0
• KeyManagerFactoryProvider
The name of the a Java Security Provider that provides a 'javax.net.ssl.KeyManagerFactory'
implementation. If none is specified then the default one is used.
Since Version 8.1.0
• trustManagerFactoryProvider
The name of the a Java Security Provider that provides a 'javax.net.ssl.TrustManagerFactory'
implementation. If none is specified then the default one is used.
Since Version 8.1.0
• keyStoreProvider
77

Configuration Properties
The name of the a Java Security Provider that provides a 'java.security.KeyStore' implementation
that supports the key stores types specified with 'clientCertificateKeyStoreType' and
'trustCertificateKeyStoreType'. If none is specified then the default one is used.
Since Version 8.1.0
• sslContextProvider
The name of the a Java Security Provider that provides a 'javax.net.ssl.SSLContext' implementation. If
none is specified then the default one is used.
Since Version 8.1.0
• allowLoadLocalInfile
Should the driver allow use of "LOAD DATA LOCAL INFILE ..."?
Setting to "true" overrides whatever path is set in 'allowLoadLocalInfileInPath', allowing uploading files
from any location.
Default Value false
Since Version 3.0.3
• allowLoadLocalInfileInPath
Enables "LOAD DATA LOCAL INFILE ..." statements, but only allows loading files from the specified
path. Files within sub-directories are also allowed, but relative paths or symlinks that fall outside this path
are forbidden.
Since Version 8.0.22
• allowMultiQueries
Allow the use of ";" to delimit multiple queries during one statement. This option does not affect the
'addBatch()' and 'executeBatch()' methods, which rely on 'rewriteBatchStatements' instead.
Default Value false
Since Version 3.1.1
• allowUrlInLocalInfile
Should the driver allow URLs in "LOAD DATA LOCAL INFILE ..." statements?
Default Value false
Since Version 3.1.4
• requireSSL
DEPRECATED: See 'sslMode' property description for details.
For 8.0.12 and earlier: Require server support of SSL connection if "useSSL=true".
Default Value false
78

Configuration Properties
Since Version 3.1.0
• useSSL
DEPRECATED: See 'sslMode' property description for details.
For 8.0.12 and earlier: Use SSL when communicating with the server, default is "true" when connecting
to MySQL 5.5.45+, 5.6.26+ or 5.7.6+, otherwise default is "false".
For 8.0.13 and later: Default is "true".
Default Value true
Since Version 3.0.2
• verifyServerCertificate
DEPRECATED: See 'sslMode' property description for details.
For 8.0.12 and earlier: If 'useSSL' is set to "true", should the driver verify the server's certificate? When
using this feature, the key store parameters should be specified by the 'clientCertificateKeyStore*'
properties, rather than system properties. Default is "false" when connecting to MySQL 5.5.45+, 5.6.26+
or 5.7.6+ and 'useSSL' was not explicitly set to "true". Otherwise default is "true".
For 8.0.13 and later: Default is "false".
Default Value false
Since Version 5.1.6
3.5.3.6 Statements
• cacheDefaultTimeZone
Caches client's default time zone. This results in better performance when dealing with time zone
conversions in Date and Time data types, however it won't be aware of time zone changes if they
happen at runtime.
Default Value true
Since Version 8.0.20
• continueBatchOnError
Should the driver continue processing batch commands if one statement fails. The JDBC spec allows
either way.
Default Value true
Since Version 3.0.3
• dontTrackOpenResources
The JDBC specification requires the driver to automatically track and close resources,
however if your application doesn't do a good job of explicitly calling 'close()' on statements
or result sets this can cause memory leakage. Setting this property to "true" relaxes this
constraint, and can be more memory efficient for some applications. Also the automatic
closing of the statement and current result set in 'Statement.closeOnCompletion()'
79

Configuration Properties
and 'Statement.getMoreResults([Statement.CLOSE_CURRENT_RESULT |
Statement.CLOSE_ALL_RESULTS])', respectively, ceases to happen. This property automatically sets
"holdResultsOpenOverStatementClose=true".
Default Value false
Since Version 3.1.7
• queryInterceptors
A comma-delimited list of classes that implement 'com.mysql.cj.interceptors.QueryInterceptor' that
intercept query executions and are able influence the results. Query iterceptors are chainable: the results
returned by the current interceptor will be passed on to the next in the chain, from left-to-right in the order
specified in this property.
Since Version 8.0.7
• queryTimeoutKillsConnection
If the timeout given in 'Statement.setQueryTimeout()' expires, should the driver forcibly abort the
connection instead of attempting to abort the query?
Default Value false
Since Version 5.1.9
3.5.3.7 Prepared Statements
• allowNanAndInf
Should the driver allow NaN or +/- INF values in 'PreparedStatement.setDouble()'?
Default Value false
Since Version 3.1.5
• autoClosePStmtStreams
Should the driver automatically call the method 'close()' on streams/readers passed as arguments via
'set*()' methods?
Default Value false
Since Version 3.1.12
• compensateOnDuplicateKeyUpdateCounts
Should the driver compensate for the update counts of "INSERT ... ON DUPLICATE KEY UPDATE"
statements (2 = 1, 0 = 1) when using prepared statements?
Default Value false
Since Version 5.1.7
• emulateUnsupportedPstmts
Should the driver detect prepared statements that are not supported by the server, and replace them
with client-side emulated versions?
80

Configuration Properties
Default Value true
Since Version 3.1.7
• generateSimpleParameterMetadata
Should the driver generate simplified parameter metadata for prepared statements when no metadata
is available either because the server couldn't support preparing the statement, or server-side prepared
statements are disabled?
Default Value false
Since Version 5.0.5
• processEscapeCodesForPrepStmts
Should the driver process escape codes in queries that are prepared? Default escape processing
behavior in non-prepared statements must be defined with the property 'enableEscapeProcessing'.
Default Value true
Since Version 3.1.12
• useServerPrepStmts
Use server-side prepared statements if the server supports them? The server may limit the number
of prepared statements with 'max_prepared_stmt_count' or disable them altogether. In case of
not being possible to prepare new server-side prepared statements, it depends on the value of
'emulateUnsupportedPstmts' to whether return an error or fall back to client-side emulated prepared
statements.
Default Value false
Since Version 3.1.0
• useStreamLengthsInPrepStmts
Honor stream length parameter in 'PreparedStatement/ResultSet.set*Stream()' method calls?
Default Value true
Since Version 3.0.2
3.5.3.8 Result Sets
• clobberStreamingResults
This will cause a streaming result set to be automatically closed, and any outstanding data still streaming
from the server to be discarded if another query is executed before all the data has been read from the
server.
Default Value false
Since Version 3.0.9
• emptyStringsConvertToZero
Should the driver allow conversions from empty string fields to numeric values of "0"?
81

Configuration Properties
Default Value true
Since Version 3.1.8
• holdResultsOpenOverStatementClose
Should the driver close result sets on 'Statement.close()' as required by the JDBC specification?
Default Value false
Since Version 3.1.7
• jdbcCompliantTruncation
Should the driver throw 'java.sql.DataTruncation' exceptions when data is truncated as is
required by the JDBC specification? This property has no effect if the server sql-mode includes
'STRICT_TRANS_TABLES'.
Default Value true
Since Version 3.1.2
• maxRows
The maximum number of rows to return. The default "0" means return all rows.
Default Value -1
Since Version all versions
• netTimeoutForStreamingResults
What value should the driver automatically set the server setting 'net_write_timeout' to when the
streaming result sets feature is in use? Value has unit of seconds, the value "0" means the driver will not
try and adjust this value.
Default Value 600
Since Version 5.1.0
• padCharsWithSpace
If a result set column has the CHAR type and the value does not fill the amount of characters specified
in the DDL for the column, should the driver pad the remaining characters with space (for ANSI
compliance)?
Default Value false
Since Version 5.0.6
• populateInsertRowWithDefaultValues
When using result sets that are 'CONCUR_UPDATABLE', should the driver pre-populate the insert
row with default values from the DDL for the table used in the query so those values are immediately
available for 'ResultSet' accessors? This functionality requires a call to the database for metadata each
82

Configuration Properties
time a result set of this type is created. If disabled, the default values will be populated by the an internal
call to 'refreshRow()' which pulls back default values and/or values changed by triggers.
Default Value false
Since Version 5.0.5
• scrollTolerantForwardOnly
Should the driver contradict the JDBC API and tolerate and support backward and absolute cursor
movement on result sets of type 'ResultSet.TYPE_FORWARD_ONLY'?
Regardless of this setting, cursor-based and row streaming result sets cannot be navigated in the
prohibited directions.
Default Value false
Since Version 8.0.24
• strictUpdates
Should the driver do strict checking, i.e. all primary keys selected, of updatable result sets?
Default Value true
Since Version 3.0.4
• tinyInt1isBit
Since the MySQL server silently converts BIT to TINYINT(1) when creating tables, should the driver treat
the datatype TINYINT(1) as the BIT type?
Default Value true
Since Version 3.0.16
• transformedBitIsBoolean
If the driver converts TINYINT(1) to a different type, should it use BOOLEAN instead of BIT?
Default Value false
Since Version 3.1.9
3.5.3.9 Metadata
• getProceduresReturnsFunctions
Pre-JDBC4 'DatabaseMetaData' API has only the 'getProcedures()' and 'getProcedureColumns()'
methods, so they return metadata info for both stored procedures and functions. JDBC4 was extended
with the 'getFunctions()' and 'getFunctionColumns()' methods and the expected behaviours of previous
methods are not well defined. For JDBC4 and higher, default "true" value of the option means that
calls of 'DatabaseMetaData.getProcedures()' and 'DatabaseMetaData.getProcedureColumns()'
return metadata for both procedures and functions as before, keeping backward compatibility.
Setting this property to "false" decouples Connector/J from its pre-JDBC4 behaviours for
'DatabaseMetaData.getProcedures()' and 'DatabaseMetaData.getProcedureColumns()', forcing them to
return metadata for procedures only.
83

Configuration Properties
Default Value true
Since Version 5.1.26
• noAccessToProcedureBodies
When determining procedure parameter types for 'CallableStatement', and the connected user can't
access procedure bodies through "SHOW CREATE PROCEDURE" or SELECT on mysql.proc should
the driver instead create basic metadata, with all parameters reported as INOUT VARCHARs, instead of
throwing an exception?
Default Value false
Since Version 5.0.3
• nullDatabaseMeansCurrent
In 'DatabaseMetaData' methods that take a 'catalog' or 'schema' parameter, does the value "null" mean
to use the current database? See also the property 'databaseTerm'.
Default Value false
Since Version 3.1.8
• useHostsInPrivileges
Add '@hostname' to users in 'DatabaseMetaData.getColumn/TablePrivileges()'.
Default Value true
Since Version 3.0.2
• useInformationSchema
Should the driver use the INFORMATION_SCHEMA to derive information used by 'DatabaseMetaData'?
Default is "true" when connecting to MySQL 8.0.3+, otherwise default is "false".
Default Value false
Since Version 5.0.0
3.5.3.10 BLOB/CLOB processing
• blobSendChunkSize
Chunk size to use when sending BLOB/CLOBs via server-prepared statements. Note that this value
cannot exceed the value of 'maxAllowedPacket' and, if that is the case, then this value will be corrected
automatically.
Default Value 1048576
Since Version 3.1.9
• blobsAreStrings
Should the driver always treat BLOBs as Strings - specifically to work around dubious metadata returned
by the server for GROUP BY clauses?
84

Configuration Properties
Default Value false
Since Version 5.0.8
• clobCharacterEncoding
The character encoding to use for sending and retrieving TEXT, MEDIUMTEXT and LONGTEXT values
instead of the configured connection 'characterEncoding'.
Since Version 5.0.0
• emulateLocators
Should the driver emulate 'java.sql.Blob' with locators? With this feature enabled, the driver will delay
loading the actual Blob data until the one of the retrieval methods ('getInputStream()', 'getBytes()', and so
forth) on the blob data stream has been accessed. For this to work, you must use a column alias with the
value of the column to the actual name of the Blob. The feature also has the following restrictions: The
SELECT that created the result set must reference only one table, the table must have a primary key;
the SELECT must alias the original blob column name, specified as a string, to an alternate name; the
SELECT must cover all columns that make up the primary key.
Default Value false
Since Version 3.1.0
• functionsNeverReturnBlobs
Should the driver always treat data from functions returning BLOBs as Strings - specifically to work
around dubious metadata returned by the server for "GROUP BY" clauses?
Default Value false
Since Version 5.0.8
• locatorFetchBufferSize
If 'emulateLocators' is configured to "true", what size buffer should be used when fetching BLOB data for
'getBinaryInputStream()'?
Default Value 1048576
Since Version 3.2.1
3.5.3.11 Datetime types processing
• connectionTimeZone
Configures the connection time zone which is used by Connector/J if conversion between the JVM
default and a target time zone is needed when preserving instant temporal values.
Accepts a geographic time zone name or a time zone offset from Greenwich/UTC, using a syntax
'java.time.ZoneId' is able to parse, or one of the two logical values "LOCAL" and "SERVER". Default
is "LOCAL". If set to an explicit time zone then it must be one that either the JVM or both the JVM and
MySQL support. If set to "LOCAL" then the driver assumes that the connection time zone is the same as
the JVM default time zone. If set to "SERVER" then the driver attempts to detect the session time zone
from the values configured on the MySQL server session variables 'time_zone' or 'system_time_zone'.
The time zone detection and subsequent mapping to a Java time zone may fail due to several reasons,
85

Configuration Properties
mostly because of time zone abbreviations being used, in which case an explicit time zone must be set
or a different time zone must be configured on the server.
This option itself does not set MySQL server session variable 'time_zone' to the given value. To do that
the 'forceConnectionTimeZoneToSession' connection option must be set to "true".
Please note that setting a value to 'connectionTimeZone' in conjunction with
"forceConnectionTimeZoneToSession=false" and "preserveInstants=false" has no effect since, in this
case, neither this option is used to change the session time zone nor used for time zone conversions of
time-based data.
Former connection option 'serverTimezone' is still valid as an alias of this one but may be deprecated in
the future.
See also 'forceConnectionTimeZoneToSession' and 'preserveInstants' for more details.
Since Version 3.0.2
• forceConnectionTimeZoneToSession
If enabled, sets the time zone value determined by 'connectionTimeZone' connection property to the
current server session 'time_zone' variable. If the time zone value is given as a geographical time zone,
then Connector/J sets this value as-is in the server session, in which case the time zone system tables
must be populated beforehand (consult the MySQL Server documentation for further details); but, if
the value is given as an offset from Greenwich/UTC in any of the supported syntaxes, then the server
session time zone is set as a numeric offset from UTC.
With that no intermediate conversion between JVM default time zone and connection time zone is
needed to store correct milliseconds value of instant Java objects such as 'java.sql.Timestamp' or
'java.time.OffsetDateTime' when stored in TIMESTAMP columns.
Note that it also affects the result of MySQL functions such as 'NOW()', 'CURTIME()' or 'CURDATE()'.
This option has no effect if used in conjunction with "connectionTimeZone=SERVER" since, in this case,
the session is already set with the required time zone.
See also 'connectionTimeZone' and 'preserveInstants' for more details.
Default Value false
Since Version 8.0.23
• noDatetimeStringSync
Don't ensure that 'ResultSet.getTimestamp().toString().equals(ResultSet.getString())'.
Default Value false
Since Version 3.1.7
• preserveInstants
If enabled, Connector/J does its best to preserve the instant point on the time-line for Java instant-based
objects such as 'java.sql.Timestamp' or 'java.time.OffsetDateTime' instead of their original visual form.
86

Configuration Properties
Otherwise, the driver always uses the JVM default time zone for rendering the values it sends to the
server and for constructing the Java objects from the fetched data.
MySQL uses implied time zone conversion for TIMESTAMP values: they are converted from the session
time zone to UTC for storage, and back from UTC to the session time zone for retrieval. So, to store
the correct correct UTC value internally, the driver converts the value from the original time zone to the
session time zone before sending to the server. On retrieval, Connector/J converts the received value
from the session time zone to the JVM default one.
When storing, the conversion is performed only if the target 'SQLType', either the explicit one or the
default one, is TIMESTAMP. When retrieving, the conversion is performed only if the source column
has the TIMESTAMP, DATETIME or character type and the target class is an instant-based one, like
'java.sql.Timestamp' or 'java.time.OffsetDateTime'.
Note that this option has no effect if used in conjunction with "connectionTimeZone=LOCAL" since, in
this case, the source and target time zones are the same. Though, in this case, it's still possible to store
a correct instant value if set together with "forceConnectionTimeZoneToSession=true".
See also 'connectionTimeZone' and 'forceConnectionTimeZoneToSession' for more details.
Default Value true
Since Version 8.0.23
• sendFractionalSeconds
If set to "false", the fractional seconds will always be truncated before sending any data to the server.
This option applies only to prepared statements, callable statements or updatable result sets.
Default Value true
Since Version 5.1.37
• sendFractionalSecondsForTime
If set to "false", the fractional seconds of 'java.sql.Time' will be ignored as required by JDBC
specification. If set to "true", its value is rendered with fractional seconds allowing to store milliseconds
into MySQL TIME column. This option applies only to prepared statements, callable statements or
updatable result sets. It has no effect if "sendFractionalSeconds=false".
Default Value true
Since Version 8.0.23
• treatMysqlDatetimeAsTimestamp
Should the driver treat the MySQL DATETIME type as TIMESTAMP in 'ResultSet.getObject()'?
Enabling this option changes the default MySQL data type to Java type mapping for DATETIME from
'java.time.LocalDateTime' to 'java.sql.Timestamp'. Given the nature of the DATETIME type and its
inability to represent instant values, it is not advisable to enable this option unless the driver is used with
a framework or API that expects exclusively objects following the default MySQL data types to Java
types mapping, which is the case of, for example, 'javax.sql.rowset.CachedRowSet'.
Default Value false
Since Version 8.2.0
• treatUtilDateAsTimestamp
87

Configuration Properties
Should the driver treat 'java.util.Date' as a TIMESTAMP in 'PreparedStatement.setObject()'?
Default Value true
Since Version 5.0.5
• yearIsDateType
Should the JDBC driver treat the MySQL type YEAR as a 'java.sql.Date', or as a SHORT?
Default Value true
Since Version 3.1.9
• zeroDateTimeBehavior
What should happen when the driver encounters DATETIME values that are composed entirely of
zeros - used by MySQL to represent invalid dates? Valid values are "EXCEPTION", "ROUND" and
"CONVERT_TO_NULL".
Default Value EXCEPTION
Since Version 3.1.4
3.5.3.12 High Availability and Clustering
• autoReconnect
Should the driver try to re-establish stale and/or dead connections? If enabled the driver will throw an
exception for queries issued on a stale or dead connection, which belong to the current transaction,
but will attempt reconnect before the next query issued on the connection in a new transaction. The
use of this feature is not recommended, because it has side effects related to session state and data
consistency when applications don't handle SQLExceptions properly, and is only designed to be used
when you are unable to configure your application to handle SQLExceptions resulting from dead and
stale connections properly. Alternatively, as a last option, investigate setting the MySQL server variable
'wait_timeout' to a high value, rather than the default of 8 hours.
Default Value false
Since Version 1.1
• autoReconnectForPools
Use a reconnection strategy appropriate for connection pools?
Default Value false
Since Version 3.1.3
• failOverReadOnly
When failing over in 'autoReconnect' mode, should the connection be set to 'read-only'?
Default Value true
Since Version 3.0.12
• maxReconnects
88

Configuration Properties
Maximum number of reconnects to attempt if 'autoReconnect' is "true".
Default Value 3
Since Version 1.1
• reconnectAtTxEnd
If 'autoReconnect' is set to "true", should the driver attempt reconnections at the end of every
transaction?
Default Value false
Since Version 3.0.10
• retriesAllDown
When using load balancing or failover, the number of times the driver should cycle through available
hosts, attempting to connect. Between cycles, the driver will pause for 250 ms if no servers are available.
Default Value 120
Since Version 5.1.6
• initialTimeout
If 'autoReconnect' is enabled, the initial time to wait between re-connect attempts (in seconds, defaults to
"2").
Default Value 2
Since Version 1.1
• queriesBeforeRetrySource
When using multi-host failover, the number of queries to issue before falling back to the
primary host when failed over. Whichever condition is met first, 'queriesBeforeRetrySource' or
'secondsBeforeRetrySource' will cause an attempt to be made to reconnect to the primary host. Setting
both properties to "0" disables the automatic fall back to the primary host at transaction boundaries.
Default Value 50
Since Version 3.0.2
• secondsBeforeRetrySource
How long, in seconds, should the driver wait when failed over, before attempting to reconnect
to the primary host? Whichever condition is met first, 'queriesBeforeRetrySource' or
'secondsBeforeRetrySource' will cause an attempt to be made to reconnect to the source host. Setting
both properties to "0" disables the automatic fall back to the primary host at transaction boundaries.
Default Value 30
Since Version 3.0.2
89

Configuration Properties
• allowReplicaDownConnections
By default, a replication-aware connection will fail to connect when configured replica hosts are all
unavailable at initial connection. Setting this property to "true" allows to establish the initial connection.
It won't prevent failures when switching to replicas i.e. by setting the replication connection to read-only
state. The property 'readFromSourceWhenNoReplicas' should be used for this purpose.
Default Value false
Since Version 6.0.2
• allowSourceDownConnections
By default, a replication-aware connection will fail to connect when configured source hosts are all
unavailable at initial connection. Setting this property to "true" allows to establish the initial connection,
by failing over to the replica servers, in read-only state. It won't prevent subsequent failures when
switching back to the source hosts i.e. by setting the replication connection to read/write state.
Default Value false
Since Version 5.1.27
• ha.enableJMX
Enables JMX-based management of load-balanced connection groups, including live addition/removal
of hosts from load-balancing pool. Enables JMX-based management of replication connection groups,
including live replica promotion, addition of new replicas and removal of source or replica hosts from
load-balanced source and replica connection pools.
Default Value false
Since Version 5.1.27
• loadBalanceHostRemovalGracePeriod
Sets the grace period to wait for a host being removed from a load-balanced connection, to be released
when it is currently the active host.
Default Value 15000
Since Version 6.0.3
• readFromSourceWhenNoReplicas
Replication-aware connections distribute load by using the source hosts when in read/write state and by
using the replica hosts when in read-only state. If, when setting the connection to read-only state, none
of the replica hosts are available, an 'SQLException' is thrown back. Setting this property to "true" allows
to fail over to the source hosts, while setting the connection state to read-only, when no replica hosts are
available at switch instant.
Default Value false
Since Version 6.0.2
90

Configuration Properties
• selfDestructOnPingMaxOperations
If set to a non-zero value, the driver will report close the connection and report failure when
'com.mysql.cj.jdbc.JdbcConnection.ping()' or 'java.sql.Connection.isValid(int)' is called if the connection's
count of commands sent to the server exceeds this value.
Default Value 0
Since Version 5.1.6
• selfDestructOnPingSecondsLifetime
If set to a non-zero value, the driver will close the connection and report failure when
'com.mysql.cj.jdbc.JdbcConnection.ping()' or 'java.sql.Connection.isValid(int)' is called if the connection's
lifetime exceeds this value, specified in milliseconds.
Default Value 0
Since Version 5.1.6
• ha.loadBalanceStrategy
If using a load-balanced connection to connect to SQL servers in a MySQL Cluster configuration (by
using the URL prefix "jdbc:mysql:loadbalance://"), which load balancing algorithm should the driver
use: (1) "random" - the driver will pick a random host for each request. This tends to work better than
round-robin, as the randomness will somewhat account for spreading loads where requests vary in
response time, while round-robin can sometimes lead to overloaded nodes if there are variations in
response times across the workload. (2) "bestResponseTime" - the driver will route the request to the
host that had the best response time for the previous transaction. (3) "serverAffinity" - the driver initially
attempts to enforce server affinity while still respecting and benefiting from the fault tolerance aspects
of the load-balancing implementation. The server affinity ordered list is provided using the property
'serverAffinityOrder'. If none of the servers listed in the affinity list is responsive, the driver then refers to
the "random" strategy to proceed with choosing the next server.
Default Value random
Since Version 5.0.6
• loadBalanceAutoCommitStatementRegex
When load-balancing is enabled for auto-commit statements (via
'loadBalanceAutoCommitStatementThreshold'), the statement counter will only increment when the SQL
matches the regular expression. By default, every statement issued matches.
Since Version 5.1.15
• loadBalanceAutoCommitStatementThreshold
When auto-commit is enabled, the number of statements which should be executed before triggering
load-balancing to rebalance. Default value of "0" causes load-balanced connections to only rebalance
when exceptions are encountered, or auto-commit is disabled and transactions are explicitly committed
or rolled back.
Default Value 0
Since Version 5.1.15
91

Configuration Properties
• loadBalanceBlocklistTimeout
Time in milliseconds between checks of servers which are unavailable, by controlling how long a server
lives in the global blocklist.
Default Value 0
Since Version 5.1.0
• loadBalanceConnectionGroup
Logical group of load-balanced connections within a class loader, used to manage different groups
independently. If not specified, live management of load-balanced connections is disabled.
Since Version 5.1.13
• loadBalanceExceptionChecker
Fully-qualified class name of custom exception checker. The class must implement
'com.mysql.cj.jdbc.ha.LoadBalanceExceptionChecker' interface, and is used to inspect 'SQLException'
exceptions and determine whether they should trigger fail-over to another host in a load-balanced
deployment.
Default Value com.mysql.cj.jdbc.ha.StandardLoadBalanceExceptionChecker
Since Version 5.1.13
• loadBalancePingTimeout
Time in milliseconds to wait for ping responses from each of load-balanced physical connections when
using a load-balanced connection.
Default Value 0
Since Version 5.1.13
• loadBalanceSQLExceptionSubclassFailover
Comma-delimited list of classes/interfaces used by default load-balanced exception checker to
determine whether a given 'SQLException' should trigger a failover. The comparison is done using
'Class.isInstance(SQLException)' using the 'SQLException' thrown.
Since Version 5.1.13
• loadBalanceSQLStateFailover
Comma-delimited list of 'SQLState' codes used by the default load-balanced exception checker
to determine whether a given 'SQLException' should trigger a failover. The 'SQLState' of a given
'SQLException' is evaluated to determine whether it begins with any of the values specified in the
comma-delimited list.
Since Version 5.1.13
• loadBalanceValidateConnectionOnSwapServer
Should the load-balanced connection explicitly check whether the connection is live when swapping to a
new physical connection at commit/rollback?
92

Configuration Properties
Default Value false
Since Version 5.1.13
• pinGlobalTxToPhysicalConnection
When using XA connections, should the driver ensure that operations on a given XID are always routed
to the same physical connection? This allows the 'XAConnection' to support "XA START ... JOIN" after
"XA END" has been called.
Default Value false
Since Version 5.0.1
• replicationConnectionGroup
Logical group of replication connections within a class loader, used to manage different groups
independently. If not specified, live management of replication connections is disabled.
Since Version 8.0.7
• resourceId
A globally unique name that identifies the resource that this data source or connection is connected to,
used for 'XAResource.isSameRM()' when the driver can't determine this value based on hostnames
used in the URL.
Since Version 5.0.1
• serverAffinityOrder
A comma separated list containing the host/port pairs that are to be used in load-balancing
"serverAffinity" strategy. Only the sub-set of the hosts enumerated in the main hosts section in this URL
will be used and they must be identical in case and type, i.e., can't use an IP address in one place and
the corresponding host name in the other.
Since Version 8.0.8
3.5.3.13 Performance Extensions
• callableStmtCacheSize
If 'cacheCallableStmts' is enabled, how many callable statements should be cached?
Default Value 100
Since Version 3.1.2
• metadataCacheSize
The number of queries to cache 'ResultSetMetadata' for if 'cacheResultSetMetaData' is set to "true".
Default Value 50
Since Version 3.1.1
• useLocalSessionState
93

Configuration Properties
Should the driver refer to the internal values of auto-commit and transaction isolation that are set by
'Connection.setAutoCommit()' and 'Connection.setTransactionIsolation()' and transaction state as
maintained by the protocol, rather than querying the database or blindly sending commands to the
database for 'commit()' or 'rollback()' method calls?
Default Value false
Since Version 3.1.7
• useLocalTransactionState
Should the driver use the in-transaction state provided by the MySQL protocol to determine if a
'commit()' or 'rollback()' should actually be sent to the database?
Default Value false
Since Version 5.1.7
• prepStmtCacheSize
If prepared statement caching is enabled, how many prepared statements should be cached?
Default Value 25
Since Version 3.0.10
• prepStmtCacheSqlLimit
If prepared statement caching is enabled, what's the largest SQL the driver will cache the parsing for?
Default Value 256
Since Version 3.0.10
• queryInfoCacheFactory
Name of a class implementing 'com.mysql.cj.CacheAdapterFactory', which will be used to create caches
for the parsed representation of prepared statements. Prior to version 8.0.29, this property was named
'parseInfoCacheFactory', which remains as an alias.
Default Value com.mysql.cj.PerConnectionLRUFactory
Since Version 5.1.1
• serverConfigCacheFactory
Name of a class implementing 'com.mysql.cj.CacheAdapterFactory', which will be used to create caches
for MySQL server configuration values.
Default Value com.mysql.cj.util.PerVmServerConfigCacheFactory
Since Version 5.1.1
• alwaysSendSetIsolation
Should the driver always communicate with the database when 'Connection.setTransactionIsolation()'
is called? If set to "false", the driver will only communicate with the database when the requested
transaction isolation is different than the whichever is newer, the last value that was set via
94

Configuration Properties
'Connection.setTransactionIsolation()', or the value that was read from the server when the
connection was established. Note that "useLocalSessionState=true" will force the same behavior as
"alwaysSendSetIsolation=false", regardless of how 'alwaysSendSetIsolation' is set.
Default Value true
Since Version 3.1.7
• maintainTimeStats
Should the driver maintain various internal timers to enable idle time calculations as well as more
verbose error messages when the connection to the server fails? Setting this property to false removes
at least two calls to 'System.getCurrentTimeMillis()' per query.
Default Value true
Since Version 3.1.9
• useCursorFetch
Should the driver use cursor-based fetching to retrieve rows? If set to "true" and 'defaultFetchSize' is
set to a value higher than zero or 'setFetchSize()' with a value higher than zero is called on a statement,
then the cursor-based result set will be used. Please note that 'useServerPrepStmts' is automatically set
to "true" in this case because cursor functionality is available only for server-side prepared statements.
Default Value false
Since Version 5.0.0
• cacheCallableStmts
Should the driver cache the parsing stage of CallableStatements?
Default Value false
Since Version 3.1.2
• cachePrepStmts
Should the driver cache the parsing stage of PreparedStatements of client-side prepared statements, the
"check" for suitability of server-side prepared and server-side prepared statements themselves?
Default Value false
Since Version 3.0.10
• cacheResultSetMetadata
Should the driver cache 'ResultSetMetaData' for statements and prepared statements?
Default Value false
Since Version 3.1.1
95

Configuration Properties
• cacheServerConfiguration
Should the driver cache the results of "SHOW VARIABLES" and "SHOW COLLATION" on a per-URL
basis?
Default Value false
Since Version 3.1.5
• defaultFetchSize
The driver will call 'setFetchSize(n)' with this value on all newly-created statements.
Default Value 0
Since Version 3.1.9
• dontCheckOnDuplicateKeyUpdateInSQL
Stops checking if every INSERT statement contains the "ON DUPLICATE KEY UPDATE" clause. As a
side effect, obtaining the statement's generated keys information will return a list where normally it would
not. Also be aware that, in this case, the list of generated keys returned may not be accurate. The effect
of this property is canceled if set simultaneously with "rewriteBatchedStatements=true".
Default Value false
Since Version 5.1.32
• elideSetAutoCommits
Should the driver only issue 'set autocommit=n' queries when the server's state doesn't match the
requested state by 'Connection.setAutoCommit(boolean)'?
Default Value false
Since Version 3.1.3
• enableEscapeProcessing
Sets the default escape processing behavior for Statement objects. The method
'Statement.setEscapeProcessing()' can be used to specify the escape processing behavior for an
individual statement object. Default escape processing behavior in prepared statements must be defined
with the property 'processEscapeCodesForPrepStmts'.
Default Value true
Since Version 6.0.1
• enableQueryTimeouts
When enabled, query timeouts set via 'Statement.setQueryTimeout()' use a shared 'java.util.Timer'
instance for scheduling. Even if the timeout doesn't expire before the query is processed, there will
be memory used by the 'TimerTask' for the given timeout which won't be reclaimed until the time the
timeout would have expired if it hadn't been cancelled by the driver. High-load environments might want
to consider disabling this functionality.
Default Value true
Since Version 5.0.6
96

Configuration Properties
• largeRowSizeThreshold
What size result set row should the JDBC driver consider large, and thus use a more memory-efficient
way of representing the row internally?
Default Value 2048
Since Version 5.1.1
• readOnlyPropagatesToServer
Should the driver issue appropriate statements to implicitly set the transaction access mode on server
side when 'Connection.setReadOnly()' is called? Setting this property to "true" enables InnoDB read-
only potential optimizations but also requires an extra roundtrip to set the right transaction state. Even if
this property is set to "false", the driver will do its best effort to prevent the execution of database-state-
changing queries.
Default Value true
Since Version 5.1.35
• rewriteBatchedStatements
Should the driver use multi-queries, regardless of the setting of 'allowMultiQueries', as well as rewriting
of prepared statements for INSERT and REPLACE queries into multi-values clause statements when
'executeBatch()' is called?
Notice that this might allow SQL injection when using plain statements and the provided input is not
properly sanitized. Also notice that for prepared statements, if the stream length is not specified when
using 'PreparedStatement.set*Stream()', the driver would not be able to determine the optimum number
of parameters per batch and might return an error saying that the resultant packet is too large.
'Statement.getGeneratedKeys()', for statements that are rewritten only works when the entire batch
consists of INSERT or REPLACE statements.
Be aware that when using "rewriteBatchedStatements=true" with "INSERT ... ON DUPLICATE KEY
UPDATE" for rewritten statements, the server returns only one value for all affected (or found) rows in
the batch, and it is not possible to map it correctly to the initial statements; in this case the driver returns
"0" as the result for each batch statement if total count was zero, and 'Statement.SUCCESS_NO_INFO'
if total count was above zero.
Default Value false
Since Version 3.1.13
• useReadAheadInput
Use optimized non-blocking buffered input stream when reading from the server?
Default Value true
Since Version 3.1.5
3.5.3.14 Debugging/Profiling
• logger
97

Configuration Properties
The name of a class that implements 'com.mysql.cj.log.Log' that will be used to log messages to. (default
is 'com.mysql.cj.log.StandardLogger', which logs to STDERR).
Default Value com.mysql.cj.log.StandardLogger
Since Version 3.1.1
• profilerEventHandler
Name of a class that implements the interface 'com.mysql.cj.log.ProfilerEventHandler' that will be used to
handle profiling/tracing events.
Default Value com.mysql.cj.log.LoggingProfilerEventHandler
Since Version 5.1.6
• useNanosForElapsedTime
For profiling/debugging functionality that measures elapsed time, should the driver try to use
nanoseconds resolution?
Default Value false
Since Version 5.0.7
• maxQuerySizeToLog
Controls the maximum length of the part of a query that will get logged when profiling or tracing.
Default Value 2048
Since Version 3.1.3
• maxByteArrayAsHex
Maximum size for a byte array parameter in a prepared statement that is converted to a hexadecimal
literal when interpolated by 'JdbcPreparedStatement.toString()'. Any byte arrays larger than this value
are interpolated generically as "** BYTE ARRAY DATA **".
Default Value 1024
Since Version 8.0.31
• profileSQL
Trace queries and their execution/fetch times to the configured 'profilerEventHandler'.
Default Value false
Since Version 3.1.0
• logSlowQueries
Should queries that take longer than 'slowQueryThresholdMillis' or detected by the 'autoSlowLog'
monitoring be reported to the registered 'profilerEventHandler'?
Default Value false
Since Version 3.1.2
98

Configuration Properties
• slowQueryThresholdMillis
If 'logSlowQueries' is enabled, how long, in milliseconds, should a query take before it is logged as slow?
Default Value 2000
Since Version 3.1.2
• slowQueryThresholdNanos
If 'logSlowQueries' is enabled, 'useNanosForElapsedTime' is set to "true", and this property is set to a
non-zero value, the driver will use this threshold, in nanosecond units, to determine if a query was slow.
Default Value 0
Since Version 5.0.7
• autoSlowLog
Instead of using 'slowQueryThreshold*' to determine if a query is slow enough to be logged, maintain
statistics that allow the driver to determine queries that are outside the 99th percentile?
Default Value true
Since Version 5.1.4
• explainSlowQueries
If 'logSlowQueries' is enabled, should the driver automatically issue an 'EXPLAIN' on the server and
send the results to the configured logger at a WARN level?
Default Value false
Since Version 3.1.2
• gatherPerfMetrics
Should the driver gather performance metrics, and report them via the configured logger every
'reportMetricsIntervalMillis' milliseconds?
Default Value false
Since Version 3.1.2
• reportMetricsIntervalMillis
If 'gatherPerfMetrics' is enabled, how often should they be logged (in milliseconds)?
Default Value 30000
Since Version 3.1.2
• logXaCommands
Should the driver log XA commands sent by 'MysqlXaConnection' to the server, at the DEBUG level of
logging?
Default Value false
Since Version 5.0.5
99

Configuration Properties
• traceProtocol
Should the network protocol be logged at the TRACE level?
Default Value false
Since Version 3.1.2
• enablePacketDebug
When enabled, a ring-buffer of 'packetDebugBufferSize' packets will be kept, and dumped when
exceptions are thrown in key areas in the driver's code.
Default Value false
Since Version 3.1.3
• packetDebugBufferSize
The maximum number of packets to retain when 'enablePacketDebug' is "true".
Default Value 20
Since Version 3.1.3
• useUsageAdvisor
Should the driver issue usage warnings advising proper and efficient usage of JDBC and MySQL
Connector/J to the 'profilerEventHandler'?
Default Value false
Since Version 3.1.1
• resultSetSizeThreshold
If 'useUsageAdvisor' is "true", how many rows should a result set contain before the driver warns that it is
suspiciously large?
Default Value 100
Since Version 5.0.5
• autoGenerateTestcaseScript
Should the driver dump the SQL it is executing, including server-side prepared statements to STDERR?
Default Value false
Since Version 3.1.9
• openTelemetry
Should the driver generate OpenTelemetry traces and handle context propagation to the MySQL
Server? This option accepts the values "REQUIRED", "PREFERRED", and "DISABLED". If set to
"REQUIRED", an OpenTelemetry library must be available at run time, or connections to the MySQL
Server will fail. Setting it to "DISABLED" turns off generating OpenTelemetry instrumentation by
Connector/J. Setting it to "PREFERRED" enables generating OpenTelemetry instrumentation provided
that an OpenTelemetry library is available at run time, and a warning is issued otherwise. Not setting
100

Configuration Properties
a value for the property is equivalent to setting it as "PREFERRED", but no warning is issued when no
OpenTelmetry library is available at run time. Connector/J relies entirely on the OpenTelemetry exporters
configured in the calling application and does not provide any means of configuring its own exporters.
Default Value PREFERRED
Since Version 8.4.0
3.5.3.15 Exceptions/Warnings
• dumpQueriesOnException
Should the driver dump the contents of the query sent to the server in the message for SQLExceptions?
Default Value false
Since Version 3.1.3
• exceptionInterceptors
Comma-delimited list of classes that implement the interface
'com.mysql.cj.exceptions.ExceptionInterceptor'. These classes will be instantiated one per 'Connection'
instance, and all 'SQLException' exceptions thrown by the driver will be allowed to be intercepted by
these interceptors, in a chained fashion, with the first class listed as the head of the chain.
Since Version 5.1.8
• ignoreNonTxTables
Ignore non-transactional table warning for rollback?
Default Value false
Since Version 3.0.9
• includeInnodbStatusInDeadlockExceptions
Include the output of "SHOW ENGINE INNODB STATUS" in exception messages when deadlock
exceptions are detected?
Default Value false
Since Version 5.0.7
• includeThreadDumpInDeadlockExceptions
Include current Java thread dump in exception messages when deadlock exceptions are detected?
Default Value false
Since Version 5.1.15
• includeThreadNamesAsStatementComment
Include the name of the current thread as a comment visible in "SHOW PROCESSLIST", or in Innodb
deadlock dumps, useful in correlation with "includeInnodbStatusInDeadlockExceptions=true" and
"includeThreadDumpInDeadlockExceptions=true".
101

Configuration Properties
Default Value false
Since Version 5.1.15
• useOnlyServerErrorMessages
Don't prepend standard 'SQLState' error messages to error messages returned by the server.
Default Value true
Since Version 3.0.15
3.5.3.16 Tunes for integration with other products
• overrideSupportsIntegrityEnhancementFacility
Should the driver return "true" for 'DatabaseMetaData.supportsIntegrityEnhancementFacility()' even if the
database doesn't support it to workaround applications that require this method to return "true" to signal
support of foreign keys, even though the SQL specification states that this facility contains much more
than just foreign key support (one such application being OpenOffice)?
Default Value false
Since Version 3.1.12
• ultraDevHack
Create prepared statements for 'prepareCall()' when required, because UltraDev is broken and issues a
'prepareCall()' for all statements?
Default Value false
Since Version 2.0.3
3.5.3.17 JDBC compliance
• useColumnNamesInFindColumn
Prior to JDBC-4.0, the JDBC specification had a bug related to what could be given as a
column name to result set methods like 'findColumn()', or getters that took a String property.
JDBC-4.0 clarified "column name" to mean the label, as given in an "AS" clause and returned by
'ResultSetMetaData.getColumnLabel()', and if no "AS" clause is specified, the column name. Setting
this property to "true" will result in a behavior that is congruent to JDBC-3.0 and earlier versions of
the JDBC specification, but which could have unexpected results. This property is preferred over
'useOldAliasMetadataBehavior' unless in need of the specific behavior that it provides with respect to
'ResultSetMetadata'.
Default Value false
Since Version 5.1.7
• pedantic
Follow the JDBC specification to the letter.
Default Value false
Since Version 3.0.0
102

Configuration Properties
• useOldAliasMetadataBehavior
Should the driver use the legacy behavior for "AS" clauses on columns and tables, and only return
aliases ,if any, for 'ResultSetMetaData.getColumnName()' or 'ResultSetMetaData.getTableName()'
rather than the original column/table name?
Default Value false
Since Version 5.0.4
3.5.3.18 X Protocol and X DevAPI
• xdevapi.auth
Authentication mechanism to use with the X Protocol. Allowed values are "SHA256_MEMORY",
"MYSQL41", "PLAIN", and "EXTERNAL". Value is case insensitive. If the property is not set, the
mechanism is chosen depending on the connection type: "PLAIN" is used for TLS connections and
"SHA256_MEMORY" or "MYSQL41" is used for unencrypted connections.
Default Value PLAIN
Since Version 8.0.8
• xdevapi.compression
X DevAPI-specific network traffic compression. This option accepts one of the three values:
"PREFERRED", "REQUIRED", and "DISABLED". Setting this option to "PREFERRED" or "REQUIRED"
enables compression algorithm negotiation between Connector and Server, and turns on compression
of large X Protocol packets, as long as a consensus is reached between client and server regarding
the compression algorithm to use. If a consensus cannot be reached, connection fails if the option is
set to "REQUIRED" and continues without compression if the option is set to "PREFERRED". Setting
this option as "DISABLED" skips the compression negotiation phase and forbids the interchange of
compressed messages between client and server.
Default Value PREFERRED
Since Version 8.0.20
• xdevapi.compression-algorithms
A comma-delimited list of compression algorithms, each one identified by its name and
operating mode, (e.g. "lz4_message"; consult the description for the MySQL global variable
'mysqlx_compression_algorithms' for a list of supported and enabled algorithms), that defines the order
and which algorithms will be attempted when negotiating connection compression with the server.
The compression algorithm 'deflate_stream' is supported natively. Additional compression algorithms
require using third-party libraries and enabling them with the connection property 'xdevapi.compression-
extensions'.
This option is meaningful only when network traffic compression is enabled using the connection
property 'xdevapi.compression'.
As an alternative to the default algorithm names, that contain a reference to the compression operation
mode, the aliases "zstd", "lz4", and "deflate" can be used instead of "zstd_stream", "lz4_message", and
"deflate_stream".
Default Value zstd_stream,lz4_message,deflate_stream
103

Configuration Properties
Since Version 8.0.22
• xdevapi.compression-extensions
A comma-delimited list of triplets, with their elements delimited by colon, that enables the support
for additional compression algorithms. Each triplet must contain: first, an algorithm name and
operating mode (e.g. "lz4_message"; consult the description for the MySQL global variable
'mysqlx_compression_algorithms' for a list of supported and enabled algorithms); second, a fully-
qualified class name of a class implementing the interface 'java.io.InputStream' that will be used to inflate
data compressed with the named algorithm; third, a fully-qualified class name of a class implementing
the interface 'java.io.OutputStream' that will be used to deflate data using the named algorithm. Along
with this setting, the library containing implementations of the designated classes must be available in
the application's class path.
Any number of triplets defining compression algorithms and their inflater and deflater implementations
can be provided but only the ones supported and enabled on the MySQL Server can be used.
The compression algorithm 'deflate_stream' is supported natively. Additional compression algorithms
require using third-party libraries.
This option is meaningful only when network traffic compression is enabled using the connection
property 'xdevapi.compression'.
As an alternative to the default algorithm names, that contain a reference to the compression operation
mode, the aliases "zstd", "lz4", and "deflate" can be used instead of "zstd_stream", "lz4_message", and
"deflate_stream".
Since Version 8.0.22
• xdevapi.connect-timeout
X DevAPI-specific timeout, in milliseconds, for socket connect, with "0" being no timeout. If
'xdevapi.connect-timeout' is not set explicitly and 'connectTimeout' is, 'xdevapi.connect-timeout' takes up
the value of 'connectTimeout'.
Default Value 10000
Since Version 8.0.13
• xdevapi.connection-attributes
An X DevAPI-specific comma-delimited list of user-defined "key=value" pairs, in addition to standard X
Protocol-defined "key=value" pairs, to be passed to MySQL Server for display as connection attributes
in the 'PERFORMANCE_SCHEMA' tables 'session_account_connect_attrs' and 'session_connect_attrs'.
Example usage: "xdevapi.connection-attributes=key1=value1,key2=value2" or "xdevapi.connection-
attributes=[key1=value1,key2=value2]". This functionality is available for use with MySQL Server version
8.0.16 or later only. Earlier versions of X Protocol do not support connection attributes, causing this
configuration option to be ignored. For situations where Session creation/initialization speed is critical,
setting "xdevapi.connection-attributes=false" will cause connection attribute processing to be bypassed.
Since Version 8.0.16
104

Configuration Properties
• xdevapi.dns-srv
X DevAPI-specific option for instructing the driver use the given host name to lookup for DNS SRV
records and use the resulting list of hosts in a multi-host failover connection. Note that a single host
name and no port must be provided when this option is enabled.
Default Value false
Since Version 8.0.19
• xdevapi.fallback-to-system-keystore
X DevAPI-specific switch to specify whether in the absence of a set value for 'xdevapi.ssl-keystore' (or
'clientCertificateKeyStoreUrl'), Connector/J falls back to using the system-wide key store defined through
the system properties 'javax.net.ssl.keyStore*'. If not specified, the value of 'fallbackToSystemKeyStore'
is used.
Default Value true
Since Version 8.0.22
• xdevapi.fallback-to-system-truststore
X DevAPI-specific switch to specify whether in the absence of a set value for 'xdevapi.ssl-truststore' (or
'trustCertificateKeyStoreUrl'), Connector/J falls back to using the system-wide default trust store or
one defined through the system properties 'javax.net.ssl.trustStore*'. If not specified, the value of
'fallbackToSystemTrustStore' is used.
Default Value true
Since Version 8.0.22
• xdevapi.ssl-keystore
X DevAPI-specific URL for the client certificate key store. If not specified, use
'clientCertificateKeyStoreUrl' value.
Since Version 8.0.22
• xdevapi.ssl-keystore-password
X DevAPI-specific password for the client certificate key store. If not specified, use
'clientCertificateKeyStorePassword' value.
Since Version 8.0.22
• xdevapi.ssl-keystore-type
X DevAPI-specific type of the client certificate key store. If not specified, use
'clientCertificateKeyStoreType' value.
Default Value JKS
Since Version 8.0.22
105

JDBC API Implementation Notes
• xdevapi.ssl-mode
X DevAPI-specific SSL mode setting. If not specified, use 'sslMode'. Because the "PREFERRED" mode
is not applicable to X Protocol, if 'xdevapi.ssl-mode' is not set and 'sslMode' is set to "PREFERRED",
'xdevapi.ssl-mode' is set to "REQUIRED".
Default Value REQUIRED
Since Version 8.0.7
• xdevapi.ssl-truststore
X DevAPI-specific URL for the trusted CA certificates key store. If not specified, use
'trustCertificateKeyStoreUrl' value.
Since Version 6.0.6
• xdevapi.ssl-truststore-password
X DevAPI-specific password for the trusted CA certificates key store. If not specified, use
'trustCertificateKeyStorePassword' value.
Since Version 6.0.6
• xdevapi.ssl-truststore-type
X DevAPI-specific type of the trusted CA certificates key store. If not specified, use
'trustCertificateKeyStoreType' value.
Default Value JKS
Since Version 6.0.6
• xdevapi.tls-ciphersuites
X DevAPI-specific property overriding the cipher suites enabled for use on the underlying SSL sockets. If
not specified, the value of 'enabledSSLCipherSuites' is used.
Since Version 8.0.19
• xdevapi.tls-versions
X DevAPI-specific property that takes a list of TLS protocols to allow when creating secure sessions.
Overrides the TLS protocols enabled in the underlying SSL socket. If not specified, then the value of
'tlsVersions' is used instead. Allowed and default values are "TLSv1.2" and "TLSv1.3".
Since Version 8.0.19
3.5.4 JDBC API Implementation Notes
MySQL Connector/J, as a rigorous implementation of the JDBC API, passes all of the tests in the publicly
available version of Oracle's JDBC compliance test suite. The JDBC specification is flexible on how certain
functionality should be implemented. This section gives details on an interface-by-interface level about
implementation decisions that might affect how you code applications with MySQL Connector/J.
• BLOB
106

JDBC API Implementation Notes
You can emulate BLOBs with locators by adding the property emulateLocators=true to your JDBC
URL. Using this method, the driver will delay loading the actual BLOB data until you retrieve the other
data and then use retrieval methods (getInputStream(), getBytes(), and so forth) on the BLOB
data stream.
You must use a column alias with the value of the column to the actual name of the BLOB, for example:
SELECT id, 'data' as blob_data from blobtable
You must also follow these rules:
• The SELECT must reference only one table. The table must have a primary key.
• The SELECT must alias the original BLOB column name, specified as a string, to an alternate name.
• The SELECT must cover all columns that make up the primary key.
The BLOB implementation does not allow in-place modification (they are copies, as reported by the
DatabaseMetaData.locatorsUpdateCopies() method). Because of this, use the corresponding
PreparedStatement.setBlob() or ResultSet.updateBlob() (in the case of updatable result
sets) methods to save changes back to the database.
• Connection
The isClosed() method does not ping the server to determine if it is available. In accordance with the
JDBC specification, it only returns true if closed() has been called on the connection. If you need to
determine if the connection is still valid, issue a simple query, such as SELECT 1. The driver will throw
an exception if the connection is no longer valid.
• DatabaseMetaData
Foreign key information (getImportedKeys()/getExportedKeys() and getCrossReference())
is only available from InnoDB tables. The driver uses SHOW CREATE TABLE to retrieve this information,
so if any other storage engines add support for foreign keys, the driver would transparently support them
as well.
• PreparedStatement
Two variants of prepared statements are implemented by Connector/J, the client-side and the server-
side prepared statements. Client-side prepared statements are used by default because early MySQL
versions did not support the prepared statement feature or had problems with its implementation. Server-
side prepared statements and binary-encoded result sets are used when the server supports them. To
enable usage of server-side prepared statements, set useServerPrepStmts=true.
Be careful when using a server-side prepared statement with large parameters that are set using
setBinaryStream(), setAsciiStream(), setUnicodeStream(), setCharacterStream(),
setNCharacterStream(), setBlob(), setClob(), or setNCLob(). To re-execute the statement
107

JDBC API Implementation Notes
with any large parameter changed to a nonlarge parameter, call clearParameters() and set all
parameters again. The reason for this is as follows:
• During both server-side prepared statements and client-side emulation, large data is exchanged only
when PreparedStatement.execute() is called.
• Once that has been done, the stream used to read the data on the client side is closed (as per the
JDBC spec), and cannot be read from again.
• If a parameter changes from large to nonlarge, the driver must reset the server-side state of the
prepared statement to allow the parameter that is being changed to take the place of the prior large
value. This removes all of the large data that has already been sent to the server, thus requiring the
data to be re-sent, using the setBinaryStream(), setAsciiStream(), setUnicodeStream(),
setCharacterStream(), setNCharacterStream(), setBlob(), setClob(), or setNCLob()
method.
Consequently, to change the type of a parameter to a nonlarge one, you must call
clearParameters() and set all parameters of the prepared statement again before it can be re-
executed.
• ResultSet
By default, ResultSets are completely retrieved and stored in memory. In most cases this is the most
efficient way to operate and, due to the design of the MySQL network protocol, is easier to implement.
If you are working with ResultSets that have a large number of rows or large values and cannot allocate
heap space in your JVM for the memory required, you can tell the driver to stream the results back one
row at a time.
To enable this functionality, create a Statement instance in the following manner:
stmt = conn.createStatement(java.sql.ResultSet.TYPE_FORWARD_ONLY,
java.sql.ResultSet.CONCUR_READ_ONLY);
stmt.setFetchSize(Integer.MIN_VALUE);
The combination of a forward-only, read-only result set, with a fetch size of Integer.MIN_VALUE
serves as a signal to the driver to stream result sets row-by-row. After this, any result sets created with
the statement will be retrieved row-by-row.
There are some caveats with this approach. You must read all of the rows in the result set (or close it)
before you can issue any other queries on the connection, or an exception will be thrown.
The earliest the locks these statements hold can be released (whether they be MyISAM table-level locks
or row-level locks in some other storage engine such as InnoDB) is when the statement completes.
If the statement is within scope of a transaction, then locks are released when the transaction completes
(which implies that the statement needs to complete first). As with most other databases, statements
are not complete until all the results pending on the statement are read or the active result set for the
statement is closed.
Therefore, if using streaming results, process them as quickly as possible if you want to maintain
concurrent access to the tables referenced by the statement producing the result set.
Another alternative is to use cursor-based streaming to retrieve a set number of rows each time.
This can be done by setting the connection property useCursorFetch to true, and then calling
setFetchSize(int) with int being the desired number of rows to be fetched each time:
conn = DriverManager.getConnection("jdbc:mysql://localhost/?useCursorFetch=true", "user", "s3cr3t");
108

Java, JDBC, and MySQL Types
stmt = conn.createStatement();
stmt.setFetchSize(100);
rs = stmt.executeQuery("SELECT * FROM your_table_here");
• Statement
Connector/J includes support for both Statement.cancel() and Statement.setQueryTimeout().
Both require a separate connection to issue the KILL QUERY statement. In the case of
setQueryTimeout(), the implementation creates an additional thread to handle the timeout
functionality.
Note
Failures to cancel the statement for setQueryTimeout() may manifest
themselves as RuntimeException rather than failing silently, as there is
currently no way to unblock the thread that is executing the query being cancelled
due to timeout expiration and have it throw the exception instead.
MySQL does not support SQL cursors, and the JDBC driver does not emulate them, so
setCursorName() has no effect.
Connector/J also supplies two additional methods:
• setLocalInfileInputStream() sets an InputStream instance that will be used to send data to
the MySQL server for a LOAD DATA LOCAL INFILE statement rather than a FileInputStream or
URLInputStream that represents the path given as an argument to the statement.
This stream will be read to completion upon execution of a LOAD DATA LOCAL INFILE statement,
and will automatically be closed by the driver, so it needs to be reset before each call to execute*()
that would cause the MySQL server to request data to fulfill the request for LOAD DATA LOCAL
INFILE.
If this value is set to NULL, the driver will revert to using a FileInputStream or URLInputStream
as required.
• getLocalInfileInputStream() returns the InputStream instance that will be used to send data
in response to a LOAD DATA LOCAL INFILE statement.
This method returns NULL if no such stream has been set using setLocalInfileInputStream().
3.5.5 Java, JDBC, and MySQL Types
MySQL Connector/J is flexible in the way it handles conversions between MySQL data types and Java
data types.
In general, any MySQL data type can be converted to a java.lang.String, and any numeric type
can be converted to any of the Java numeric types, although round-off, overflow, or loss of precision may
occur.
Connector/J issues warnings or throws DataTruncation exceptions as is required by the
JDBC specification, unless the connection was configured not to do so by using the property
jdbcCompliantTruncation and setting it to false.
The conversions that are always guaranteed to work are listed in the following table. The first column lists
one or more MySQL data types, and the second column lists one or more Java types to which the MySQL
types can be converted.
109

Java, JDBC, and MySQL Types
Table 3.22 Possible Conversions Between MySQL and Java Data Types
These MySQL Data Types Can always be converted to these Java types
CHAR, VARCHAR, BLOB, TEXT, ENUM, and
SET
java.lang.String, java.io.InputStream,
java.io.Reader, java.sql.Blob,
java.sql.Clob
FLOAT, REAL, DOUBLE PRECISION,
NUMERIC, DECIMAL, TINYINT, SMALLINT,
MEDIUMINT, INTEGER, BIGINT
java.lang.String, java.lang.Short,
java.lang.Integer, java.lang.Long,
java.lang.Double, java.math.BigDecimal
DATE, TIME, DATETIME, TIMESTAMP java.lang.String, java.sql.Date,
java.sql.Timestamp
Note
Round-off, overflow or loss of precision may occur if you choose a Java numeric
data type that has less precision or capacity than the MySQL data type you are
converting to/from.
The ResultSet.getObject() method uses the type conversions between MySQL and
Java types, following the JDBC specification where appropriate. The values returned by
ResultSetMetaData.GetColumnTypeName()and ResultSetMetaData.GetColumnClassName()
are shown in the table below. For more information on the JDBC types, see the reference on the
java.sql.Types class.
Table 3.23 MySQL Types and Return Values for ResultSetMetaData.GetColumnTypeName()and
ResultSetMetaData.GetColumnClassName()
MySQL Type Name Return value of
GetColumnTypeName
Return value of GetColumnClassName
BIT(1) BIT java.lang.Boolean
BIT( > 1) BIT byte[]
TINYINT(1) SIGNED,
BOOLEAN
If
tinyInt1isBit=true
and
transformedBitIsBoolean=false:
BIT
If
tinyInt1isBit=true
and
transformedBitIsBoolean=true:
BOOLEAN
If
tinyInt1isBit=false:
TINYINT
If tinyInt1isBit=true and
transformedBitIsBoolean=false:
java.lang.Boolean
If tinyInt1isBit=true and
transformedBitIsBoolean=true:
java.lang.Boolean
If tinyInt1isBit=false: java.lang.Integer
TINYINT( > 1)
SIGNED
TINYINT java.lang.Integer
TINYINT( any )
UNSIGNED
TINYINT UNSIGNED java.lang.Integer
SMALLINT[(M)]
[UNSIGNED]
SMALLINT [UNSIGNED] java.lang.Integer (regardless of whether it is
UNSIGNED or not)
110

Java, JDBC, and MySQL Types
MySQL Type Name Return value of
GetColumnTypeName
Return value of GetColumnClassName
MEDIUMINT[(M)]
[UNSIGNED]
MEDIUMINT
[UNSIGNED]
java.lang.Integer (regardless of whether it is
UNSIGNED or not)
INT,INTEGER[(M)] INTEGER java.lang.Integer
INT,INTEGER[(M)]
UNSIGNED
INTEGER UNSIGNED java.lang.Long
BIGINT[(M)] BIGINT java.lang.Long
BIGINT[(M)]
UNSIGNED
BIGINT UNSIGNED java.math.BigInteger
FLOAT[(M,D)] FLOAT java.lang.Float
DOUBLE[(M,B)]
[UNSIGNED]
DOUBLE java.lang.Double (regardless of whether it is
UNSIGNED or not)
DECIMAL[(M[,D])]
[UNSIGNED]
DECIMAL java.math.BigDecimal (regardless of whether it
is UNSIGNED or not)
DATE DATE java.sql.Date
DATETIME DATETIME java.time.LocalDateTime
TIMESTAMP[(M)] TIMESTAMP java.sql.Timestamp
TIME TIME java.sql.Time
YEAR[(2|4)] YEAR If yearIsDateType configuration property is
set to false, then the returned object type is
java.sql.Short. If set to true (the default), then
the returned object is of type java.sql.Date.
CHAR(M) CHAR java.lang.String
VARCHAR(M) VARCHAR java.lang.String
BINARY(M), CHAR(M)
BINARY
BINARY byte[]
VARBINARY(M),
VARCHAR(M) BINARY
VARBINARY byte[]
BLOB BLOB byte[]
TINYBLOB TINYBLOB byte[]
MEDIUMBLOB MEDIUMBLOB byte[]
LONGBLOB LONGBLOB byte[]
TEXT TEXT java.lang.String
TINYTEXT TINYTEXT java.lang.String
MEDIUMTEXT MEDIUMTEXT java.lang.String
LONGTEXT LONGTEXT java.lang.String
JSON JSON java.lang.String
GEOMETRY GEOMETRY byte[]
VECTOR(M) (only
supported when available
with MySQL Enterprise
Server)
VECTOR byte[]
111

Handling of Date-Time Values
MySQL Type Name Return value of
GetColumnTypeName
Return value of GetColumnClassName
ENUM('value1','value2',...)CHAR java.lang.String
SET('value1','value2',...)CHAR java.lang.String
3.5.6 Handling of Date-Time Values
3.5.6.1 Preserving Time Instants
Background
A time instant is a specific moment on a time-line. A time instant is said to be preserved when it always
refers to the same point in time when its value is being stored to or retrieved from a database, no matter
what time zones the database server and the clients are operating in.
TIMESTAMP is the only MySQL data type designed to store instants. To preserve time instants, the
server applies time zone conversions in incoming or outgoing time values when needed. Incoming
values are converted by server from the connection session's time zone to Coordinated Universal Time
(UTC) for storage, and outgoing values are converted from UTC to the session time zone. Starting from
MySQL 8.0.19, you can also specify a time zone offset when storing TIMESTAMP values (see The DATE,
DATETIME, and TIMESTAMP Types for details), in which case the TIMESTAMP values are converted to
the UTC from the specified offset instead of the session time zone. But, once stored, the original offset
information is no longer preserved.
The situation is less straightforward with the DATETIME data type: it does not represent an instant and,
when no time zone offset is specified, there is no time zone conversion for DATETIME values, so they are
stored and retrieved as they are. However, with a specified time zone offset, the input value is converted
to the session time zone before it is stored; the result is that, when retrieved in a different session with a
different time zone offset as the specified one, the DATETIME value becomes different from the original
input value.
Because MySQL data types other than TIMESTAMP (and the Java wrapper classes for those other
MySQL data types) do not represent true time instants; mixing up instant-representing and non-instant-
representing date-time types when storing and retrieving values might give rise to unexpected results. For
example:
• When storing java.sql.Timestamp to, for example, a DATETIME column, you might not get back the
same instant value when retrieving it into a client that is in a different time zone than the one the client
was in when storing the value.
• When storing, for example, a java.time.LocalDateTime to a TIMESTAMP column, you might not
be storing the correct UTC-based value for it, because the time zone for the value is actually undefined.
Therefore, do not pass instant date-time types (java.util.Calendar, java.util.Date,
java.time.OffsetDateTime, java.sql.Timestamp) to non-instant date-time types (for example,
java.sql.DATE, java.time.LocalDate, java.time.LocalTime, java.time.OffsetTime) or
vice versa, when working with the server.
The rest of the section discusses how to preserve time instants when working with Connector/J.
Preserving Instants with Connector/J
The scenario: Let us assume that an application is running on a certain application server and is
connecting to a MySQL server using Connector/J. Certain events take place in a connection session, for
112

Handling of Date-Time Values
which timestamps are generated, and the event timestamps are associated with the JVM time zone of the
application server. These timestamps are to be stored onto a MySQL Server, and are also to be retrieved
from it later.
The challenge: The timestamps' instant values need to be preserved when they are saved onto or retrieved
from the server using Connector/J. Because the MySQL Server always assumes implicitly that a time
instant value references to the connection session time zone (which is set by the session time_zone
variable ) when being saved to or retrieved form the server, a time instant value is properly preserved only
in the following situations:
1. When Connector/J is running in the same time zone as the MySQL Server (i.e., the server's session
time zone is the same as the JVM's time zone), time instants are naturally preserved, and no time zone
conversion is needed. Note that in this case, time instants are really preserved only if the server and
the JVM continue to run always in the same time zone in the future.
2. When Connector/J is running in a different time zone from that of the MySQL Server (i.e., the JVM's
time zone is different from the server's session time zone), Connector/.J performs one of the following:
a. Queries the value of the session time zone from the server, and converts the event timestamps
between the session time zone and the JVM time zone.
b. Changes the server's session time zone to that of the JVM time zone, after which no time zone
conversion will be required.
c. Changes the server session time zone to a desired time zone specified by the user, and then
converts the timestamps between the JVM time zone and the user-specified time zone.
We identify the above solutions for time instant preservation as Solution 1, 2a, 2b, and 2c. To achieve
these solutions, the following connection properties have been introduced in Connector/J since release
8.0.23:
• preserveInstants={true|false}: Whether to attempt to preserve time instant values by adjusting
timestamps.
• When it is false, no conversions are attempted; a timestamp is sent to the server as-is for storage,
and its visual presentation, not the actual time instant is preserved. When it is retrieved from the server
by Connector/J, different time zones might be associated with it, as the retrieval might happen in
different JVM time zones. For example: For example:
• Time zones: UTC for JVM, UTC+1 for server session
• Original timestamp from client (in UTC): 2020-01-01 01:00:00
• Timestamp sent to server by Connector/J: 2020-01-01 01:00:00 (no conversion)
• Timestamp values stored internally on the server: 2020-01-01 00:00:00 UTC (after internal
conversion of 2020-01-01 00:00:00 UTC+1 to UTC)
• Timestamp value retrieved later into a server section (in UTC+1): 2020-01-01 01:00:00 (after
internal conversion of 2020-01-01 00:00:00 from UTC to UTC+1)
• Timestamp values constructed by Connector/J in some other JVM time zone then before (say, in
UTC+3): 2020-01-01 01:00:00
• Comment: Time instant is not preserved
113

Handling of Date-Time Values
• When it is true, Connector/J attempts to preserve the time instants by performing the
conversions in a manner defined by the connection properties connectionTimeZone and
forceConnectionTimeZoneToSession.
When storing a value, the conversion is performed only if the target data type, either the explicit one or
the default one, is TIMESTAMP. When retrieving a value, the conversion is performed only if the source
column has the TIMESTAMP, DATETIME, or a character data type and the target class is an instant-
preserving one, like java.sql.Timestamp or java.time.OffsetDateTime.
• connectionTimeZone={LOCAL|SERVER|user-defined-time-zone}: Specifies how the server's
session time zone (in reference to which the timestamps are saved onto the server) is to be determined
by Connector/J. It takes on one of the following values:
• LOCAL: Connector/J assumes that the server's session time zone either (a) is the same as the JVM
time zone for Connector/J, or (b) should be set as the same as the JVM time zone for Connector/
J. Connector/J takes the situation as (a) or (b) depending on the value of the connection property
forceConnectionTimeZoneToSession.
• SERVER: Connector/J should query the session's time zone from the server, instead of making any
assumptions about it. If the session time zone actually turns out to be different from Connector/J's JVM
time zone and preserveInstants=true, Connector/J performs time zone conversion between the
session time zone and the JVM time zone.
• user-defined-time-zone: Connector/J assumes that the server's session time zone either
(a) is the same as the user-defined time zone, or (b) should be set as the user-defined time zone.
Connector/J takes the situation as (a) or (b) depending on the value of the connection property
forceConnectionTimeZoneToSession.
Note
For Connector/J 8.0.23 and later, serverTimezone is an alias for
connectionTimeZone. For Connector/J 8.0.22 and earlier, serverTimezone
was used to override the session time zone setting on the server.
• forceConnectionTimeZoneToSession={true|false}: Controls whether the session time_zone
variable is to be set to the value specified in connectionTimeZone.
Now, here are the connection properties values to be used for achieving the Solutions defined above for
preserving time instants:
• Solution 1: Use either preserveInstants=false or connectionTimeZone=LOCAL&
forceConnectionTimeZoneToSession=false. Because it can be safely assumed that the server
session time zone is the same as Connector/J' s JVM timezone, no query of the server's session time
zone occurs, and no time zone conversion occurs. For example:
• Time zones: UTC+1 for both the JVM and the server session
• Original timestamp from client (in UTC+1): 2020-01-01 01:00:00
• Timestamp sent to server by Connector/J: 2020-01-01 01:00:00 (no conversion needed)
• Timestamp values stored internally on the server: 2020-01-01 00:00:00 UTC (after internal
conversion from UTC+1 to UTC)
• Timestamp value retrieved later into a server time session in UTC+1 that Connector/J connects to:
2020-01-01 01:00:00 (after internal conversion from UTC to UTC+1)
114

Handling of Date-Time Values
• Timestamp value constructed by Connector/J in the same JVM time zone as before (UTC+1) and
returned to an application: 2020-01-01 01:00:00
• Comment: Time instant is preserved without conversion.
Note
This setting corresponds to the default behavior of Connector/J 5.1
• Solution 2a: Use preserveInstants=true&connectionTimeZone=SERVER . Connector/J then queries
the value of the session time zone from the server, and converts the event timestamps between the
session time zone and the JVM time zone. For example:
• Time zones: UTC+2 for JVM, UTC+1 for server session
• Original timestamp from client (in UTC+2): 2020-01-01 02:00:00
• Timestamp sent to server by Connector/J: 2020-01-01 01:00:00 (after conversion from UTC+2 to
UTC+1)
• Timestamp value stored internally on the server: 2020-01-01 00:00:00 UTC (after internal
conversion from UTC+1 to UTC)
• Timestamp value retrieved later into a server session in UTC+1: 2020-01-01 01:00:00 (after
internal conversion from UTC to UTC+1)
• Timestamp values constructed by Connector/J in the same JVM time zone as before (UTC+2) and
returned to an application: 2020-01-01 02:00:00 (after conversion from UTC+1 to UTC+2)
• Timestamp values constructed by Connector/J in another JVM time zone (say, UTC+3) and returned
to an application: 2020-01-01 03:00:00 (after conversion from UTC+1 to UTC+3)
• Comment: Time instant is preserved.
Notes
• This setting corresponds to the default behavior of Connector/
J 8.0.22 and before and to the behavior of Connector/J 5.1 with
useLegacyDatetimeCode=false.
115

Handling of Date-Time Values
• Solution 2b: Use connectionTimeZone=LOCAL& forceConnectionTimeZoneToSession=true.
Connector/J then changes the server's session time zone to that of the JVM time zone, after which no
timezone conversions are required when storing or achieving the timestamps. For example:
• Time zones: UTC+1 for JVM, UTC+2 for server session originally, but now modified to UTC+1 by
Connector/J
• Original timestamp from client (in UTC+1): 2020-01-01 01:00:00
• Timestamp sent to server by Connector/J: 2020-01-01 01:00:00 (no conversion)
• Timestamp values stored internally on the server: 2020-01-01 00:00:00 (after internal conversion
from UTC+1 to UTC)
• Timestamp values retrieved later into a server session (in UTC+1, as set by Connector/J):
2020-01-01 01:00:00 (after internal conversion from UTC to UTC+1)
• Timestamp value constructed by Connector/J in the same JVM time zone as before (UTC+1):
2020-01-01 01:00:00 (no conversion needed)
• Timestamp values retrieved later into a server session (time zone modified to, say, UTC+3, by
Connector/J): 2020-01-01 03:00:00 (after internal conversion from UTC to UTC+3)
• Timestamp value constructed by Connector/J in the JVM time zone of UTC+3: 2020-01-01
03:00:00 (no conversion needed)
• Comment: Time instant is preserved without conversion by Connector/J, because the session time
zone is changed by Connector/J to its JVM's value.
Warnings
• • Altering the session time zone affects the results of MySQL functions such
as NOW(), CURTIME(), or CURDATE()—if you do not want those functions
to be affected, do not use this setting.
• If you use this setting on different clients in different time zones, the clients
are going to modify their connection session's time zones to different values;
if you want to keep the same visual date-time value representation for the
same time instant for all the clients and in all their sessions, store the values
to a DATETIME instead of a TIMESTAMP column and use non-instant Java
classes for them, for example, java.time.LocalDateTime.
• Solution 2c: Use preserveInstants=true&connectionTimeZone=user-defined-time-zone&
forceConnectionTimeZoneToSession=true. Connector/J then changes the server's session time zone
to the user-defined time zone, and converts the timestamps between the user-defined time zone and the
JVM time zone. A typical use case for this setting is when the session time zone value on the server is
known to be unrecognizable by Connector/J (e.g., CST or CEST). For example:
• Time zones: UTC+2 for JVM, CET for server session originally, but now modified to user-specified
Europe/Berlin by Connector/J
• Original timestamp from client (in UTC+2): 2020-01-01 02:00:00
• Timestamp sent to server by Connector/J: 2020-01-01 01:00:00 (after conversion between JVM
time zone (UTC+2) and user-defined time zone (Europe/Berlin=UTC+1))
116

Handling of Date-Time Values
• Timestamp values stored internally on the server: 2020-01-01 00:00:00 (after internal conversion
from UTC+1 to UTC)
• Timestamp value retrieved into a server session (time zone modified to Europe/Berlin (=UTC+1)
by Connector/J): 2020-01-01 01:00:00 (after internal conversion from UTC to UTC+1)
• Timestamp value constructed by Connector/J in the same JVM time zone as before (UTC+2) and
returned to an application: 2020-01-01 02:00:00 (after conversion between user-defined time
zone (UTC+1) and JVM time zone (UTC+2)).
• Comment: Time instant is preserved with conversion and with the session time zone being changed by
Connector/J according to a user-defined value.
As an alternative to this solution, the user might want the same conversion of the timestamps
between the JVM time zone and the user-defined time zone as described above, without
actually correcting the unrecognizable time zone value on the server. To do so, use,
preserveInstants=true&connectionTimeZone=user-defined-time-zone&
forceConnectionTimeZoneToSession=false. This achieves the same result of preserving the
time instant.
Warnings
See the warnings above for Solution 2b.
3.5.6.2 Fractional Seconds
While a java.sql.TIME instance, according to the JDBC specification, is not supposed to contain
fractional seconds by design, because java.sql.TIME is a wrapper around java.util.Date, it
is possible to store fractional seconds in a java.sql.TIME instance. However, when Connector/
J inserted a java.sql.TIME into the server as a MySQL TIME value, the fractional seconds were
always truncated. To allow the fractional seconds to be sent to the server, a connection property,
sendFractionalSecondsForTime, has been introduced in release 8.0.23: when the property is true
(which is the default value), the fractional seconds for java.sql.TIME are sent to the server; otherwise,
the fractional seconds are truncated.
Also, the connection property sendFractionalSeconds has become a global control for
the sending of fractional seconds for ALL date-time types since release 8.0.23. As a result, if
sendFractionalSeconds=false, fractional seconds are not sent irrespective of the value of
sendFractionalSecondsForTime.
3.5.6.3 Handling of YEAR Values
How a value in a MySQL YEAR column is handled is controlled by the connection property
yearIsDateType:
• If yearIsDateType is true (the default), YEAR is mapped to the Java data type java.sql.Date.
• If yearIsDateType is false, YEAR is mapped to the Java data type java.sql.Short.
Connector/J follows the same rules that govern how values are inserted by a mysql client; see
explanations in The YEAR Type for details.
Connector/J handles the retrieval of zero values from a YEAR column differently than a mysql client.
Treatments of zero values depend on whether they are strings or numbers, and on the value of
yearIsDateType:
117

Using Character Sets and Unicode
• If a string value of '0', '00', or '000' is entered into a YEAR column, when retrieved by Connector/J:
• If yearIsDateType is true, the retrieved value is equivalent to January 1, 2000 00:00:00.000.
• If yearIsDateType is false, the retrieved value is 2000
• If a numeric value of 0, 00, 000, or 0000 is entered into a YEAR column, when retrieved by Connector/
J,
• If yearIsDateType is true, the retrieved value is equivalent to January 1, 2000 00:00:00.000.
• If yearIsDateType is false, the retrieved value is 0
3.5.7 Using Character Sets and Unicode
All strings sent from the JDBC driver to the server are converted automatically from native
Java Unicode form to the connection's character encoding, including all queries sent using
Statement.execute(), Statement.executeUpdate(), and Statement.executeQuery(), as
well as all PreparedStatement and CallableStatement parameters, excluding parameters set using
the following methods:
• setBlob()
• setBytes()
• setClob()
• setNClob()
• setAsciiStream()
• setBinaryStream()
• setCharacterStream()
• setNCharacterStream()
• setUnicodeStream()
Number of Encodings Per Connection
Connector/J supports a single character encoding between the client and the server, and any number of
character encodings for data returned by the server to the client in ResultSets.
Setting the Character Encoding
For Connector/J 8.0.25 and earlier: The character encoding between the client and the server
is automatically detected upon connection (provided that the Connector/J connection properties
characterEncoding and connectionCollation are not set). The encoding on the server is specified
using the system variable character_set_server (for more information, see Server Character Set and
Collation), and the driver automatically uses the encoding. For example, to use the 4-byte UTF-8 character
set with Connector/J, configure the MySQL server with character_set_server=utf8mb4, and leave
characterEncoding and connectionCollation out of the Connector/J connection string. Connector/
J will then autodetect the UTF-8 setting. To override the automatically detected encoding on the client side,
use the characterEncoding property in the connection URL to the server.
For Connector/J 8.0.26 and later: There are two phases during the connection initialization in which the
character encoding and collation are set.
118

Using Character Sets and Unicode
• Pre-Authentication Phase: In this phase, the character encoding between the client and the server is
determined by the settings of the Connector/J connection properties, in the following order of priority:
• passwordCharacterEncoding
• connectionCollation
• characterEncoding
• Set to UTF8 (corresponds to utf8mb4 on MySQL servers), if none of the properties above is set
• Post-Authentication Phase: In this phase, the character encoding between the client and the server for
the rest of the session is determined by the settings of the Connector/J connection properties, in the
following order of priority:
• connectionCollation
• characterEncoding
• Set to UTF8 (corresponds to utf8mb4 on MySQL servers), if none of the properties above is set
This means Connector/J needs to issue a SET NAMES Statement to change the character set and
collation that were established in the pre-authentication phase only if passwordCharacterEncoding
is set, but its setting is different from that of connectionCollation, or different from that of
characterEncoding (when connectionCollation is not set), or different from utf8mb4 (when
both connectionCollation and characterEncoding are not set).
Custom Character Sets and Collations
To support the use of custom character sets and collations on the server, set the Connector/J connection
property detectCustomCollations to true, and provide the mapping between the custom character
sets and the Java character encodings by supplying the customCharsetMapping connection
property with a comma-delimited list of custom_charset:java_encoding pairs (for example:
customCharsetMapping=charset1:UTF-8,charset2:Cp1252).
MySQL to Java Encoding Name Translations
Use Java-style names when specifying character encodings. The following table lists MySQL character set
names and their corresponding Java-style names:
Table 3.24 MySQL to Java Encoding Name Translations
MySQL Character Set Name Java-Style Character Encoding Name
ascii US-ASCII
big5 Big5
gbk GBK
sjis SJIS or Cp932
cp932 Cp932 or MS932
gb2312 EUC_CN
ujis EUC_JP
euckr EUC_KR
latin1 Cp1252
119

Using Query Attributes
MySQL Character Set Name Java-Style Character Encoding Name
latin2 ISO8859_2
greek ISO8859_7
hebrew ISO8859_8
cp866 Cp866
tis620 TIS620
cp1250 Cp1250
cp1251 Cp1251
cp1257 Cp1257
macroman MacRoman
macce MacCentralEurope
utf8mb4 UTF-8
ucs2 UnicodeBig
Notes
• When UTF-8 is used for characterEncoding in the connection string, it maps
to the MySQL character set name utf8mb4.
• If the connection option connectionCollation is also set alongside
characterEncoding and is incompatible with it, characterEncoding will be
overridden with the encoding corresponding to connectionCollation.
• Because there is no Java-style character set name for utfmb3 that you can use
with the connection option charaterEncoding, the only way to use utf8mb3
as your connection character set is to use a utf8mb3 collation (for example,
utf8_general_ci) for the connection option connectionCollation, which
forces a utf8mb3 character set to be used, as explained in the last bullet.
Warning
Do not issue the query SET NAMES with Connector/J, as the driver will not detect
that the character set has been changed by the query, and will continue to use the
character set configured when the connection was first set up.
3.5.8 Using Query Attributes
Connector/J supports Query Attributes when it has been enabled on the server by installing the
query_attributes component (see Prerequisites for Using Query Attributes for details).
Attributes are set for a query by using the setAttribute() method of the JdbcStatement interface.
Here is the method's signature:
JdbcStatement.setAttribute(String name, Object value)
Here is an example of using the query attributes with a JdbcStatement:
Example 3.1 Using Query Attributes with a Plain Statement
conn = DriverManager.getConnection("jdbc:mysql://localhost/test", "myuser", "password");
120

Using Query Attributes
Statement stmt = conn.createStatement();
JdbcStatement jdbcStmt = (JdbcStatement) stmt;
jdbcStmt.executeUpdate("CREATE TABLE t11 (c1 CHAR(20), c2 CHAR(20))");
jdbcStmt.setAttribute("attr1", "cat");
jdbcStmt.setAttribute("attr2", "mat");
jdbcStmt.executeUpdate("INSERT INTO t11 (c1, c2) VALUES(\n" +
" mysql_query_attribute_string('attr1'),\n" +
" mysql_query_attribute_string('attr2')\n" +
" );");
ResultSet rs = stmt.executeQuery("SELECT * from t11");
while(rs.next()) {
String col1 = rs.getString(1);
String col2 = rs.getString(2);
System.out.println("The "+col1+" is on the "+col2);
}
While query attributes are cleared on the server after each query, they are kept on the side of Connector/J,
so they can be resent for the next query. To clear the attributes, use the clearAttributes() method of
the JdbcStatement interface:
JdbcStatement.clearAttributes()
The following example (a continuation of the code in Example 3.1, “Using Query Attributes with a Plain
Statement”) shows how the attributes are preserved for a statement until it is cleared :
Example 3.2 Preservation of Query Attributes
/* Continuing from the code in the last example, where query attributes have
already been set and used */
rs = stmt.executeQuery("SELECT c2 FROM t11 where " +
"c1 = mysql_query_attribute_string('attr1')");
if (rs.next()) {
String col1 = rs.getString(1);
System.out.println("It is on the "+col1);
}
// Prints "It is on the mat"
jdbcStmt.clearAttributes();
rs = stmt.executeQuery("SELECT c2 FROM t11 where " +
"c1 = mysql_query_attribute_string('attr1')");
if (rs.next()) {
String col1 = rs.getString(1);
System.out.println("It is on the "+col1);
}
else {
System.out.println("No results!");
}
// Prints "No results!" as attribute string attr1 is empty
Attributes can also be set for client-side and server-side prepared statements, using the setAttribute()
method:
Example 3.3 Using Query Attributes with a Prepared Statement
conn = DriverManager.getConnection("jdbc:mysql://localhost/test", "myuser", "password");
PreparedStatement ps = conn.prepareStatement(
"select ?, c2 from t11 where c1 = mysql_query_attribute_string('attr1')");
ps.setString(1, "It is on a ");
JdbcStatement jdbcPs = (JdbcStatement) ps;
jdbcPs.setAttribute("attr1", "cat");
rs = ps.executeQuery();
if (rs.next()) {
System.out.println(rs.getString(1)+" "+ rs.getString(2));
}
121

Connecting Securely Using SSL
Not all MySQL data types are supported by the setAttribute() method; only the following MySQL data
types are supported and are directly mapped to from specific Java objects or their subclasses:
Table 3.25 Data Type Mappings for Query Attributes
MySQL Data Type Java Object
MYSQL_TYPE_STRING java.lang.String
MYSQL_TYPE_TINY java.lang.Boolean, java.lang.Byte
MYSQL_TYPE_SHORT java.lang.Short
MYSQL_TYPE_LONG java.lang.Integer
MYSQL_TYPE_LONGLONG java.lang.Long, java.math.BigInteger
MYSQL_TYPE_FLOAT java.lang.Float
MYSQL_TYPE_DOUBLE java.lang.Double, java.math.BigDecimal
MYSQL_TYPE_DATE java.sql.Date, java.time.LocalDate
MYSQL_TYPE_TIME java.sql.Time, java.time.LocalTime,
java.time.OffsetTime,
java.time.Duration
MYSQL_TYPE_DATETIME java.time.LocalDateTime
MYSQL_TYPE_TIMESTAMP java.sql.Timestamp, java.time.Instant,
java.time.OffsetDateTime,
java.time.ZonedDateTime, java.util.Date,
java.util.Calendar
When there is no direct mapping from a Java object type to any MySQL data type, the attribute is set with a
string value that comes from converting the supplied object to a String using the .toString() method.
3.5.9 Connecting Securely Using SSL
Connector/J can encrypt all data communicated between the JDBC driver and the server (except for the
initial handshake) using SSL. There is a performance penalty for enabling connection encryption, the
severity of which depends on multiple factors including (but not limited to) the size of the query, the amount
of data returned, the server hardware, the SSL library used, the network bandwidth, and so on.
The system works through two Java keystore files: one file contains the certificate information for the
server (truststore in the examples below), and another contains the keys and certificate for the client
(keystore in the examples below). All Java keystore files are protected by the password supplied to the
keytool when you created the files. You need the file names and the associated passwords to create an
SSL connection.
For SSL support to work, you must have the following:
• A MySQL server that supports SSL, and compiled and configured to do so. For more information, see
Using Encrypted Connections and Configuring SSL Library Support.
• A signed client certificate, if using mutual (two-way) authentication.
By default, Connector/J establishes secure connections with the MySQL servers. Note that MySQL servers
5.7 and up, when compiled with OpenSSL, can automatically generate missing SSL files at startup and
configure the SSL connection accordingly.
For 8.0.12 and earlier: As long as the server is correctly configured to use SSL, there is no need to
configure anything on the Connector/J client to use encrypted connections (the exception is when
122

Connecting Securely Using SSL
Connector/J is connecting to very old server versions like 5.6.25 and earlier or 5.7.5 and earlier, in which
case the client must set the connection property useSSL=true in order to use encrypted connections).
The client can demand SSL to be used by setting the connection property requireSSL=true; the
connection then fails if the server is not configured to use SSL. Without requireSSL=true, the
connection just falls back to non-encrypted mode if the server is not configured to use SSL.
For 8.0.13 and later: As long as the server is correctly configured to use SSL, there is no need to configure
anything on the Connector/J client to use encrypted connections. The client can demand SSL to be
used by setting the connection property sslMode=REQUIRED, VERIFY_CA, or VERIFY_IDENTITY;
the connection then fails if the server is not configured to use SSL. With sslMode=PREFERRED, the
connection just falls back to non-encrypted mode if the server is not configured to use SSL. For X-Protocol
connections, the connection property xdevapi.ssl-mode specifies the SSL Mode setting, just like
sslMode does for MySQL-protocol connections (except that PREFERRED is not supported by X Protocol); if
not explicitly set, xdevapi.ssl-mode takes up the value of sslMode ( if xdevapi.ssl-mode is not set
and sslMode is set to PREFERRED, xdevapi.ssl-mode is set to REQUIRED).
For additional security, you can setup the client for a one-way (server or client) or two-way (server and
client) SSL authentication, allowing the client or the server to authenticate each other's identity.
TLS versions: The allowable versions of TLS protocol can be restricted using the connection properties
tlsVersions and, for X DevAPI connections and for release 8.0.19 and later, xdevapi.tls-versions
(when xdevapi.tls-versions is not specified, it takes up the value of tlsVersions). If no such
restrictions have been specified, Connector/J attempts to connect to the server with the TLSv1.2 and
TLSv1.3.
Notes
• Since Connector/J 8.0.28, the connection property enabledTLSProtocols has
been renamed to tlsVersions, and enabledSSLCipherSuites has been
renamed to tlsCiphersuites; the original names remain as aliases.
• For Connector/J 8.0.26 and later: TLSv1 and TLSv1.1 were deprecated in
Connector/J 8.0.26 and removed in release 8.0.28; the removed values are
considered invalid for use with connection options and session settings.
Connections can be made using the more-secure TLSv1.2 and TLSv1.3
protocols. Using TLSv1.3 requires that the server be compiled with OpenSSL
1.1.1 or higher and Connector/J be run with a JVM that supports TLSv1.3 (for
example, Oracle Java 8u261 and above).
• For Connector/J 8.0.18 and earlier when connecting to MySQL Community
Server 5.6 and 5.7 using the JDBC API: Due to compatibility issues with
MySQL Server compiled with yaSSL, Connector/J does not enable connections
with TLSv1.2 and higher by default. When connecting to servers that restrict
connections to use those higher TLS versions, enable them explicitly by setting
the Connector/J connection property enabledTLSProtocols (e.g., set
enabledTLSProtocols=TLSv1.2,TLSv1.3).
Cipher Suites: Since release 8.0.19, the cipher suites usable by Connector/J are pre-
restricted by a properties file that can be found at src/main/resources/com/mysql/cj/
TlsSettings.properties inside the src folder on the source tree or in the platform-independent
distribution archive (in .tar.gz or .zip format) for Connector/J. The file contains four sections, listing
in each the mandatory, approved, deprecated, and unacceptable ciphers. Only suites listed in the first
three sections can be used. The last section (unacceptable) defines patterns or masks that blocklist unsafe
cipher suites. Practically, with the allowlist already given in the first three sections, the blocklist patterns in
the forth section are redundant; but they are there as an extra safeguard against unwanted ciphers. The
allowlist and blocklist of cipher suites apply to both JDBC and X DevAPI connections.
123

Connecting Securely Using SSL
The allowable cipher suites for SSL connections can be restricted using the connection properties
tlsCiphersuites and, for X DevAPI connections and for release 8.0.19 and later, xdevapi.tls-
ciphersuites (when xdevapi.tls-ciphersuites is not specified, it takes up the value of
tlsCiphersuites). If no such restrictions have been specified, Connector/J attempts to establish SSL
connections with any allowlisted cipher suites that the server accepts.
3.5.9.1 Setting up Server Authentication
Server authentication via server certificate verification is enabled when the Connector/J connection
property sslMode is set to VERIFY_CA or VERIFY_IDENTITY. If sslMode is not set, server
authentication via server certificate verification is enabled when the legacy properties useSSL AND
verifyServerCertificate are both true.
Certificates signed by a trusted CA. When server authentication via server certificate verification is
enabled, if no additional configurations are made regarding server authentication, Java verifies the server
certificate using its default trusted CA certificates, usually from $JAVA_HOME/lib/security/cacerts.
Using self-signed certificates. It is pretty common though for MySQL server certificates to be self-
signed or signed by a self-signed CA certificate; the auto-generated certificates and keys created by the
MySQL server are based on the latter—that is, the server generates all required keys and a self-signed CA
certificate that is used to sign a server and a client certificate. The server then configures itself to use the
CA certificate and the server certificate. Although the client certificate file is placed in the same directory, it
is not used by the server.
To verify the server certificate, Connector/J needs to be able to read the certificate that signed it, that
is, the server certificate that signed itself or the self-signed CA certificate. This can be accomplished by
either importing the certificate (ca.pem or any other certificate) into the Java default truststore (although
tampering the default truststore is not recommended) or by importing it into a custom Java truststore
file and configuring the Connector/J driver accordingly. Use Java's keytool (typically located in the bin
subdirectory of your JDK or JRE installation) to import the server certificates:
$> keytool -importcert -alias MySQLCACert -file ca.pem \
-keystore truststore -storepass mypassword
Supply the proper arguments for the command options. If the truststore file does not already exist, a new
one will be created; otherwise the certificate will be added to the existing file. Interaction with keytool
looks like this:
Owner: CN=MySQL_Server_8.4.0_Auto_Generated_CA_Certificate
Issuer: CN=MySQL_Server_8.4.0_Auto_Generated_CA_Certificate
Serial number: 1
Valid from: Thu Mar 07 11:37:33 WET 2024 until: Sun Mar 05 11:37:33 WET 2034
Certificate fingerprints:
SHA1: 43:12:0F:96:1A:09:1C:D2:5B:62:7A:2A:55:6C:62:6A:84:5F:78:E4
SHA256: 7D:86:18:FF:06:A7:DF:A7:7C:D0:07:AB:96:1A:51:FD:02:4F:32:BF:1C:51:35:42:27:81:53:0A:8F:D3:56:39
Signature algorithm name: SHA256withRSA
Subject Public Key Algorithm: 2048-bit RSA key
Version: 3
Extensions:
#1: ObjectId: 2.5.29.19 Criticality=true
BasicConstraints:[
CA:true
PathLen:2147483647
]
Trust this certificate? [no]: yes
Certificate was added to keystore
The output of the command shows all details about the imported certificate. Make sure you remember the
password you have supplied. Also, be mindful that the password will have to be written as plain text in your
Connector/J configuration file or application source code.
124

Connecting Securely Using SSL
The next step is to configure Java or Connector/J to read the truststore you just created or modified. This
can be done by using one of the following three methods:
1. Using the Java command line arguments:
-Djavax.net.ssl.trustStore=path_to_truststore_file
-Djavax.net.ssl.trustStorePassword=mypassword
2. Setting the system properties directly in the client code:
System.setProperty("javax.net.ssl.trustStore","path_to_truststore_file");
System.setProperty("javax.net.ssl.trustStorePassword","mypassword");
3. Setting the Connector/J connection properties:
trustCertificateKeyStoreUrl=file:path_to_truststore_file
trustCertificateKeyStorePassword=mypassword
Notice that when used together, the connection properties override the values set by the other two
methods. Also, whatever values set with connection properties are used in that connection only, while
values set using the system-wide values are used for all connections (unless overridden by the connection
properties). Setting the connection property fallbackToSystemTrustStore to false prevents
Connector/J from falling back to the system-wide truststore setup you created using method (1) or (2) when
method (3) is not used.
With the above setup and the server authentication enabled, all connections established are going to be
SSL-encrypted, with the server being authenticated in the SSL handshake process, and the client can now
safely trust the server it is connecting to.
For X-Protocol connections, the connection properties xdevapi.ssl-truststore,
xdevapi.ssl-truststore-type, xdevapi.ssl-truststore-password, and
xdevapi.ssl-fallbackToSystemTrustStore specify the truststore settings,
just like trustCertificateKeyStoreUrl, trustCertificateKeyStoreType,
trustCertificateKeyStorePasswordamd fallbackToSystemTrustStore do for MySQL-
protocol connections; if not explicitly set, xdevapi.ssl-truststore, xdevapi.ssl-truststore-
type, xdevapi.ssl-truststore-password, and xdevapi.ssl-fallbackToSystemTrustStore
take up the values of trustCertificateKeyStoreUrl, trustCertificateKeyStoreType,
trustCertificateKeyStorePassword, and fallbackToSystemTrustStore respectively.
Service Identity Verification. Beyond server authentication via server certificate verification, when
sslMode is set to VERIFY_IDENTITY, Connector/J also performs host name identity verification by
checking whether the host name that it uses for connecting matches the Common Name value in the
server certificate.
3.5.9.2 Setting up Client Authentication
The server may want to authenticate a client and require the client to provide an SSL certificate to it,
which it verifies against its known certificate authorities or performs additional checks on the client identity
if needed (see CREATE USER SSL/TLS Options for details). In that case, Connector/J needs to have
access to the client certificate, so it can be sent to the server while establishing new database connections.
This is done using the Java keystore files.
To allow client authentication, the client connecting to the server must have its own set of keys and an SSL
certificate. The client certificate must be signed so that the server can verify it. While you can have the
client certificates signed by official certificate authorities, it is more common to use an intermediate, private,
CA certificate to sign client certificates. Such an intermediate CA certificate may be self-signed or signed
by a trusted root CA. The requirement is that the server knows a CA certificate that is capable of validating
the client certificate.
125

Connecting Securely Using SSL
Some MySQL server builds are able to generate SSL keys and certificates for communication encryption,
including a certificate and a private key (contained in the client-cert.pem and client-key.pem
files), which can be used by any client. This SSL certificate is already signed by the self-signed CA
certificate ca.pem, which the server may have already been configured to use.
If you do not want to use the client keys and certificate files generated by the server, you can also generate
new ones using the procedures described in Creating SSL and RSA Certificates and Keys. Notice that,
according to the setup of the server, you may have to reuse the already existing CA certificate the server is
configured to work with to sign the new client certificate, instead of creating a new one.
Once you have the client private key and certificate files you want to use, you need to import them into a
Java keystore so that they can be used by the Java SSL library and Connector/J. The following instructions
explain how to create the keystore file:
• Convert the client key and certificate files to a PKCS #12 archive:
$> openssl pkcs12 -export -in client-cert.pem -inkey client-key.pem \
-name "mysqlclient" -passout pass:mypassword -out client-keystore.p12
• Import the client key and certificate into a Java keystore:
$> keytool -importkeystore -srckeystore client-keystore.p12 -srcstoretype pkcs12 \
-srcstorepass mypassword -destkeystore keystore -deststoretype JKS -deststorepass mypassword
Supply the proper arguments for the command options. If the keystore file does not already exist, a new
one will be created; otherwise the certificate will be added to the existing file. Output by keytool looks
like this:
Entry for alias mysqlclient successfully imported.
Import command completed: 1 entries successfully imported, 0 entries failed or cancelled
Make sure you remember the password you have chosen. Also, be mindful that the password will have
to be written as plain text in your Connector/J configuration file or application source code.
After the step, you can delete the PKCS #12 archive (client-keystore.p12 in the example).
The next step is to configure Java or Connector/J so that it reads the keystore you just created or modified.
This can be done by using one of the following three methods:
1. Using the Java command line arguments:
-Djavax.net.ssl.keyStore=path_to_keystore_file
-Djavax.net.ssl.keyStorePassword=mypassword
2. Setting the system properties directly in the client code:
System.setProperty("javax.net.ssl.keyStore","path_to_keystore_file");
System.setProperty("javax.net.ssl.keyStorePassword","mypassword");
3. Through Connector/J connection properties:
clientCertificateKeyStoreUrl=file:path_to_truststore_file
clientCertificateKeyStorePassword=mypassword
Notice that when used together, the connection properties override the values set by the other two
methods. Also, whatever values set with connection properties are used in that connection only, while
values set using the system-wide values are used for all connections (unless overridden by the connection
properties). Setting the connection property fallbackToSystemKeyStore to false prevents
Connector/J from falling back to the system-wide keystore setup you created using method (1) or (2) when
method (3) is not used.
126

Connecting Securely Using SSL
With the above setups, all connections established are going to be SSL-encrypted with the client being
authenticated in the SSL handshake process, and the server can now safely trust the client that is
requesting a connection to it.
For X-Protocol connections, the connection properties xdevapi.ssl-keystore,
xdevapi.ssl-keystore-type, xdevapi.ssl-keystore-password, and
xdevapi.ssl-fallbackToSystemKeyStore specify the keystore settings, just
like trustCertificateKeyStoreUrl, trustCertificateKeyStoreType,
trustCertificateKeyStorePassword, and fallbackToSystemTKeyStore do for MySQL-
protocol connections; if not explicitly set, xdevapi.ssl-keystore, xdevapi.ssl-keystore-
type, xdevapi.ssl-keystore-password, and xdevapi.ssl-fallbackToSystemKeyStore
take up the values of clientCertificateKeyStoreUrl, clientCertificateKeyStoreType,
clientCertificateKeyStorePassword, and fallbackToSystemKeyStore respectively.
3.5.9.3 Setting up 2-Way Authentication
Apply the steps outlined in both Section 3.5.9.1, “Setting up Server Authentication” and Section 3.5.9.2,
“Setting up Client Authentication” to set up a mutual, two-way authentication process in which the server
and the client authenticate each other before establishing a connection.
Although the typical setup described above uses the same CA certificate in both ends for mutual
authentication, it does not have to be the case. The only requirements are that the CA certificate
configured in the server must be able to validate the client certificate and the CA certificate imported into
the client truststore must be able to validate the server certificate; the two CA certificates used on the two
ends can be distinct.
3.5.9.4 JSSE in FIPS Mode
When using a Java 8 to 12 JREs, if JSSE is configured to use FIPS mode, attempts to connect to a
MySQL Server may fail in some cases with a KeyManagementException, complaining that "FIPS
mode: only SunJSSE TrustManagers may be used." This happens because, in that case, a custom
TrustManager implemented by Connector/J that supports the different sslMode options is invoked but is
eventually rejected by the default implementation of SunJSSE.
The issue can be overcome by telling Connector/J not to use its custom TrustManager implementation,
but use your own security providers instead. This can be done by setting the following connection
properties:
• fipsCompliantJsse: Set to true to overcome the above-mentioned issue with FIPS mode.
Note
When set to true, Connector/J always performs server certificate validation (even
if sslMode is set to PREFERRED or REQUIRED), which means a truststore must
be configured with the connection proprieties described below, or the fallback
system-wide truststore must be enabled.
• KeyManagerFactoryProvider: The name of the a Java Security Provider that provides a
javax.net.ssl.KeyManagerFactory implementation.
• trustManagerFactoryProvider: The name of the a Java Security Provider that provides a
javax.net.ssl.TrustManagerFactory implementation.
• keyStoreProvider: The name of the a Java Security Provider that provides a
java.security.KeyStore implementation, supporting the key stores types specified with
clientCertificateKeyStoreType and trustCertificateKeyStoreType.
127

Connecting Using Unix Domain Sockets
3.5.9.5 Debugging an SSL Connection
JSSE provides debugging information to stdout when you set the system property -
Djavax.net.debug=all. Java then tells you what keystores and truststores are being used, as well as
what is going on during the SSL handshake and certificate exchange. That will be helpful when you are
trying to debug a failed SSL connection.
3.5.10 Connecting Using Unix Domain Sockets
Connector/J does not natively support connections to MySQL Servers with Unix domain sockets. However,
there is provision for using 3rd-party libraries that supply the function via a pluggable socket factory. Such
a custom factory should implement the com.mysql.cj.protocol.SocketFactory interface or the
legacy com.mysql.jdbc.SocketFactory interface of Connector/J. Follow these requirements when
you use such a custom socket factory for Unix sockets :
• The MySQL Server must be configured with the system variable --socket (for native protocol
connections using the JDBC API) or --mysqlx-socket (for X Protocol connections using the X
DevAPI), which must contain the file path of the Unix socket file.
• The fully-qualified class name of the custom factory should be passed to Connector/J via the connection
property socketFactory. For example, with the junixsocket library, set:
socketFactory=org.newsclub.net.mysql.AFUNIXDatabaseSocketFactory
You might also need to pass other parameters to the custom factory as connection properties.
For example, for the junixsocket library, provide the file path of the socket file with the property
junixsocket.file:
junixsocket.file=path_to_socket_file
3.5.11 Connecting Using Named Pipes
Important
Minimal permissions on named pipes are granted to clients that use them
to connect to the server. Connector/J, however, can only use named pipes
when granted full access on them. As a workaround, the MySQL Server that
Connector/J wants to connect to must be started with the system variable
named_pipe_full_access_group, which specifies a Windows local group
containing the user by which the client application JVM (and thus Connector/J) is
being executed; see the description for named_pipe_full_access_group for
more details.
Note
Support for named pipes is not available for X Protocol connections.
Connector/J also supports access to MySQL using named pipes on Windows platforms with the
NamedPipeSocketFactory as a plugin-sockets factory. If you do not use a namedPipePath property,
the default of '\\.\pipe\MySQL' is used. If you use the NamedPipeSocketFactory, the host name
and port number values in the JDBC URL are ignored. To enable this feature, set the socketFactory
property:
socketFactory=com.mysql.cj.protocol.NamedPipeSocketFactory
Set this property, as well as the path of the named pipe, with the following connection URL:
jdbc:mysql:///test?socketFactory=com.mysql.cj.protocol.NamedPipeSocketFactory&namedPipePath=\\.\pipe\MySQL80
128

Connecting Using Various Authentication Methods
To create your own socket factories, follow the sample code in
com.mysql.cj.protocol.NamedPipeSocketFactory or
com.mysql.cj.protocol.StandardSocketFactory.
An alternate approach is to use the following two properties in connection URLs for establishing named
pipe connections on Windows platforms:
• (protocol=pipe) for named pipes (default value for the property is tcp).
• (path=path_to_pipe) for path of named pipes. Default value for the path is \\.\pipe\MySQL.
The “address-equals” or “key-value” form of host specification (see Single host [56] for details) greatly
simplifies the URL for a named pipe connection on Windows. For example, to use the default named pipe
of “\\.\pipe\MySQL,” just specify:
jdbc:mysql://address=(protocol=pipe)/test
To use the custom named pipe of “\\.\pipe\MySQL80” :
jdbc:mysql://address=(protocol=pipe)(path=\\.\pipe\MySQL80)/test
With (protocol=pipe), the NamedPipeSocketFactory is automatically selected.
Named pipes only work when connecting to a MySQL server on the same physical machine where the
JDBC driver is running. In simple performance tests, named pipe access is between 30%-50% faster than
the standard TCP/IP access. However, this varies per system, and named pipes are slower than TCP/IP in
many Windows configurations.
3.5.12 Connecting Using Various Authentication Methods
3.5.12.1 Connecting Using PAM Authentication
Java applications using Connector/J can connect to MySQL servers that use the pluggable authentication
module (PAM) authentication scheme.
For PAM authentication to work, you must have the following:
• A MySQL server that supports PAM authentication. See PAM Pluggable Authentication for more
information. Connector/J implements the same cleartext authentication method as in Client-Side
Cleartext Pluggable Authentication.
• SSL capability, as explained in Section 3.5.9, “Connecting Securely Using SSL”. Because the PAM
authentication scheme sends the original password to the server, the connection to the server must be
encrypted.
PAM authentication support is enabled by default in Connector/J 8.0, so no extra configuration is needed.
To disable the PAM authentication feature, specify mysql_clear_password (the method) or
com.mysql.cj.protocol.a.authentication.MysqlClearPasswordPlugin (the class name) in
the comma-separated list of arguments for the disabledAuthenticationPlugins connection option.
See Section 3.5.3, “Configuration Properties” for details about that connection option.
3.5.12.2 Connecting Using Kerberos
Kerberos is a ticket-based server-client mutual authentication protocol that is supported by the MySQL
Server (commercial versions only) .
Support for Kerberos is implemented by Connector/J using the GSS-API, JAAS API, and JCA API;
providers for each of these APIs must be available on the Java Virtual Machine running your application
that uses Kerberos authentication. Using non-default providers can lead to unexpected results.
129

Connecting Using Various Authentication Methods
Kerberos Authentication Workflow
The main usage of Kerberos authentication in MySQL is to allow users to create
connections without having to specify a user name and password in the connection string.
For that to work, Connector/J must be configured with the connection property setting
defaultAuthenticationPlugin=authentication_kerberos_client and then the MySQL user
name may be extracted from the Kerberos principal associated to the locally cached Ticket-Granting Ticket
(TGT). Notice that a MySQL user name differs from a Kerberos principal in not containing a realm part;
therefore, Connector/J cuts all the characters in the principle after the “@” sign and uses it as the MySQL
user name.
If there is no TGT available in the local Kerberos cache, Connector/J uses the OS login user name as the
MySQL user name. A user name specified in the connection string always takes precedence over names
obtained by any other means for the MySQL user.
The MySQL user name is then sent to the MySQL server for validation. Non-existing users cause the
server to return an error. Existing users are allowed to proceed with the authentication process, and the
authentication mechanism that follows depends on how the MySQL user was created:
• For users created with the authentication plugin authentication_kerberos, MySQL server sends
the corresponding Kerberos realm back to Connector/J, which, in turn, uses it to construct the Kerberos
principal that identifies the user on the Kerberos server. One of three things may then happen:
• The newly constructed Kerberos principal matches the Kerberos principal associated to the locally
cached TGT; this TGT is then sent to the Kerberos server to obtain the desired MySQL Service Ticket,
and the authentication proceeds.
• The newly constructed Kerberos principal does not match the Kerberos principal associated to
the locally cached TGT, or there is no local Kerberos cache; this Kerberos principal, as well as the
password that may have been specified in the connection string (or an empty string if none was
specified), is sent to the Kerberos server to obtain first a valid TGT, and then the desired MySQL
Service Ticket; and the authentication proceeds.
• An error is thrown if Connector/J is unable to obtain the correct Kerberos configurations, unable to
communicate with the Kerberos server, or unable to perform either of the two steps above.
• For users defined with a plugin different from authentication_kerberos, the server requests
Connector/J to use another authentication method.
Client-side Kerberos configurations
In order to operate properly with the Kerberos server, Connector/J requires either a system-wide Kerberos
configuration, or these local system property settings for the JVM:
• -Djava.security.krb5.kdc=[the KDC host name]
• -Djava.security.krb5.realm=[the default Kerberos realm]
Debug Information
The process of configuring Connector/J to use Kerberos authentication is not always straightforward.
Enabling logging in the internal Java providers can help find potential problems. That can be done by
setting these system properties:
• -Dsun.security.krb5.debug=true
• -Dsun.security.jgss.debug=true
130

Connecting Using Various Authentication Methods
3.5.12.3 Connecting Using Multifactor Authentication
Multifactor authentication (MFA) is the use of multiple authentication factors during an authentication
process. MySQL Server supports MFA for up to three authentication factors.
Connection to MySQL Server with MFA is supported by Connector/J. When authenticating user accounts
that require multiple passwords, up to three passwords can be specified using the Connector/J connection
properties password1, password2, and password3 . This is a sample connection string that uses the
three connection properties for passwords:
jdbc:mysql://localhost/db?user=johndoe&password1=password&passsword2=password&password3=password
The following apply when using the connection properties for passwords:
• password1, password2, and password3 are passwords for authentication factors 1, 2, and 3,
respectively, as described in Getting Started with Multifactor Authentication.
• If any of the authentication factors (say, factor N) does not require a password, the corresponding
password (passwordN) is ignored, even if supplied.
• Not specifying the corresponding password for an authentication factor that requires a password is
equivalent to supplying an empty password for the factor.
• password and password1 are taken as synonyms except when both are supplied, in which case
password1 overrides password.
3.5.12.4 Connecting Using Web Authentication (WebAuthn) Authentication
Web Authentication (WebAuthn) enables user authentication for MySQL Server using devices such as
smart cards, security keys, and biometric readers. WebAuthn enables passwordless authentication, and
can be used for MySQL accounts that use multifactor authentication. It is supported by MySQL Enterprise
Edition and Connector/J since release 8.2.0—see WebAuthn Pluggable Authentication for details.
The following explains how to use WebAuthn authentication with Connector/J. It assumes there is a
MySQL server running and configured to support WebAuthn authentication, with the authentication plugin
authentication_webauthn loaded and the system variable authentication_webauthn_rp_id
properly configured. Although not always the case, FIDO authentication often works with multifactor
authentication, so additional configuration might be necessary but, typically, a default MySQL installation is
multifactor authentication ready.
Create a MySQL User
Create the MySQL user to be linked to the FIDO device. Use the mysql client with a root user:
mysql > CREATE USER 'johndoe'@'%' IDENTIFIED WITH caching_sha2_password BY 's3cr3t' AND IDENTIFIED WITH authentication_webauthn;
Query OK, 0 rows affected (0,02 sec)
Register the FIDO device by the user you just created. This is accomplished by running the mysql client
on the same system the device is installed, which might require installing the mysql client in your working
machine or moving the FIDO device to the system where the MySQL Server is running. In either case,
issue the following command (additional command options to connect to the right server might be needed):
$ mysql --user=johndoe --password1 --register-factor=2
Enter password: <type "s3cr3t">
Please insert FIDO device and follow the instruction. Depending on the device, you may have to perform gesture action multiple times.
1. Perform gesture action (Skip this step if you are prompted to enter device PIN).
Welcome to the MySQL monitor. Commands end with ; or \g.
Your MySQL connection id is 12
Server version: 8.2.0-commercial MySQL Enterprise Server - Commercial
Copyright (c) 2000, 2023, Oracle and/or its affiliates.
131

Connecting Using Various Authentication Methods
Oracle is a registered trademark of Oracle Corporation and/or its
affiliates. Other names may be trademarks of their respective
owners.
Type 'help;' or '\h' for help. Type '\c' to clear the current input statement.
mysql >
Get 3rd-party Dependencies
MySQL Connector/J is a JDBC Type 4 driver, which is a 100% pure Java implementation, However,
there is no pure Java library supporting the authentication devices that Connector/J can use. Therefore,
developers need to implement the code that handles the interaction with the authentication devices, for
which the following 3rd-party libraries are needed.
• The libfido2 native library, which must be installed in the system where the application will run.
• Some Java bindings, for example Java Native Interface (JNI) or Java Native Access (JNA). In the
following example, Java Native Access (JNA) is used to implement our minimal Java bindings over the
libfido2 library.
Implement the Native Bindings
Create a simple class (called FidoAssertion below) that implements the minimal set of bindings
between Java and the libfido2 native library (consult the libfido2 manuals if needed):
import com.sun.jna.Library;
import com.sun.jna.Native;
import com.sun.jna.Pointer;
import com.sun.jna.PointerType;
import com.sun.jna.ptr.IntByReference;
import com.sun.jna.ptr.PointerByReference;
public class FidoAssertion {
private interface LibFido2 extends Library {
public static int FIDO_OK = 0;
static class FidoAssertT extends PointerType {}
static class FidoDevInfoT extends PointerType {}
static class FidoDevT extends PointerType {}
LibFido2 INSTANCE = Native.load("fido2", LibFido2.class);
int fido_assert_allow_cred(FidoAssertT assrt, byte[] ptr, int len);
int fido_assert_authdata_len(FidoAssertT assrt, int idx);
Pointer fido_assert_authdata_ptr(FidoAssertT assrt, int idx);
void fido_assert_free(PointerByReference assrt);
FidoAssertT fido_assert_new();
int fido_assert_count(FidoAssertT assrt);
int fido_assert_set_clientdata_hash(FidoAssertT assrt, byte[] ptr, int len);
int fido_assert_set_rp(FidoAssertT assrt, String id);
int fido_assert_sig_len(FidoAssertT assrt, int idx);
Pointer fido_assert_sig_ptr(FidoAssertT assrt, int idx);
int fido_dev_close(FidoDevT dev);
void fido_dev_free(PointerByReference dev);
int fido_dev_get_assert(FidoDevT dev, FidoAssertT assrt, String pin);
void fido_dev_info_free(PointerByReference devlist, int n);
int fido_dev_info_manifest(FidoDevInfoT devlist, int ilen, IntByReference olen);
FidoDevInfoT fido_dev_info_new(int n);
String fido_dev_info_path(FidoDevInfoT di);
FidoDevInfoT fido_dev_info_ptr(FidoDevInfoT devList, int size);
FidoDevT fido_dev_new();
int fido_dev_open(FidoDevT dev, String path);
boolean fido_dev_supports_credman(FidoDevT dev);
void fido_init(int flags);
}
private LibFido2.FidoAssertT fidoAssert;
private LibFido2.FidoDevT fidoDev;
private byte[] clientDataHash;
private String relyingPartyId;
132

Connecting Using Various Authentication Methods
private byte[] credentialId;
private boolean supportsCredMan = false;
public FidoAssertion() {
LibFido2.INSTANCE.fido_init(0);
initializeFidoDevice();
}
private void initializeFidoDevice() {
LibFido2.FidoDevInfoT fidoDevInfo = LibFido2.INSTANCE.fido_dev_info_new(1);
IntByReference olen = new IntByReference();
int r = LibFido2.INSTANCE.fido_dev_info_manifest(fidoDevInfo, 1, olen);
if (r != LibFido2.FIDO_OK) {
throw new RuntimeException("Failed locating FIDO devices.");
}
LibFido2.FidoDevInfoT dev = LibFido2.INSTANCE.fido_dev_info_ptr(fidoDevInfo, 0);
String path = LibFido2.INSTANCE.fido_dev_info_path(dev);
LibFido2.INSTANCE.fido_dev_info_free(new PointerByReference(fidoDevInfo.getPointer()), 1);
this.fidoDev = LibFido2.INSTANCE.fido_dev_new();
r = LibFido2.INSTANCE.fido_dev_open(this.fidoDev, path);
if (r != LibFido2.FIDO_OK) {
throw new RuntimeException("Failed opening the FIDO device.");
}
this.supportsCredMan = LibFido2.INSTANCE.fido_dev_supports_credman(this.fidoDev);
}
boolean supportsCredentialManagement() {
return this.supportsCredMan;
}
void setClienDataHash(byte[] clientDataHash) {
this.clientDataHash = clientDataHash;
}
void setRelyingPartyId(String relyingPartyId) {
this.relyingPartyId = relyingPartyId;
}
void setCredentialId(byte[] credentialId) {
this.credentialId = credentialId;
}
void computeAssertions() {
int r;
this.fidoAssert = LibFido2.INSTANCE.fido_assert_new();
// Set the Relying Party Id.
r = LibFido2.INSTANCE.fido_assert_set_rp(this.fidoAssert, this.relyingPartyId);
if (r != LibFido2.FIDO_OK) {
throw new RuntimeException("Failed setting the relying party id.");
}
// Set the Client Data Hash.
r = LibFido2.INSTANCE.fido_assert_set_clientdata_hash(this.fidoAssert, this.clientDataHash, this.clientDataHash.length);
if (r != LibFido2.FIDO_OK) {
throw new RuntimeException("Failed setting the client data hash.");
}
// Set the Credential Id. Not applicable when resident keys are used.
if (this.credentialId.length > 0) {
r = LibFido2.INSTANCE.fido_assert_allow_cred(this.fidoAssert, this.credentialId, this.credentialId.length);
if (r != LibFido2.FIDO_OK) {
throw new RuntimeException("Failed setting the credential id.");
}
}
// Obtain the assertion(s) from the FIDO device.
r = LibFido2.INSTANCE.fido_dev_get_assert(this.fidoDev, this.fidoAssert, null);
if (r != LibFido2.FIDO_OK) {
throw new RuntimeException("Failed obtaining the assertion(s) from the FIDO device.");
}
}
public int getAssertCount() {
int assertCount = LibFido2.INSTANCE.fido_assert_count(this.fidoAssert);
return assertCount;
}
public byte[] getAuthenticatorData(int idx) {
int authDataLen = LibFido2.INSTANCE.fido_assert_authdata_len(this.fidoAssert, idx);
133

Connecting Using Various Authentication Methods
Pointer authData = LibFido2.INSTANCE.fido_assert_authdata_ptr(this.fidoAssert, idx);
byte[] authenticatorData = authData.getByteArray(0, authDataLen);
return authenticatorData;
}
public byte[] getSignature(int idx) {
int sigLen = LibFido2.INSTANCE.fido_assert_sig_len(this.fidoAssert, idx);
Pointer sigData = LibFido2.INSTANCE.fido_assert_sig_ptr(this.fidoAssert, idx);
byte[] signature = sigData.getByteArray(0, sigLen);
return signature;
}
public void freeResources() {
LibFido2.INSTANCE.fido_dev_close(this.fidoDev);
LibFido2.INSTANCE.fido_dev_free(new PointerByReference(this.fidoDev.getPointer()));
LibFido2.INSTANCE.fido_assert_free(new PointerByReference(this.fidoAssert.getPointer()));
}
}
Compile the class with a Java 8 compiler (or above).
$ javac -classpath *:. FidoAssertion.java
Implement the Authentication Callback
MySQL Connector/J uses a pluggable callback class that exchanges data between the authentication
process and the interaction with the authentication device. This class must be an instance of the interface
com.mysql.cj.callback.MysqlCallbackHandler, which defines one single method: void
handle(MysqlCallback cb);. The MysqlCallback argument this method takes is an instance of
com.mysql.cj.callback.WebAuthnAuthenticationCallback and it contains all the data required
by the FIDO assertion code implemented earlier. Likewise, it also takes the output from the FIDO device
(authenticator data and signatures) to the running authentication process.
Here is one possible implementation of the WebAuthnAuthenticationCallback.
import com.mysql.cj.callback.MysqlCallback;
import com.mysql.cj.callback.MysqlCallbackHandler;
import com.mysql.cj.callback.WebAuthnAuthenticationCallback;
public class AuthenticationWebAuthnCallbackHandler implements MysqlCallbackHandler {
@Override
public void handle(MysqlCallback cb) {
if (!WebAuthnAuthenticationCallback.class.isAssignableFrom(cb.getClass())) {
return;
}
WebAuthnAuthenticationCallback webAuthnAuthCallback = (WebAuthnAuthenticationCallback) cb;
FidoAssertion libFido2Assertion = new FidoAssertion();
webAuthnAuthCallback.setSupportsCredentialManagement(libFido2Assertion.supportsCredentialManagement());
libFido2Assertion.setClienDataHash(webAuthnAuthCallback.getClientDataHash());
libFido2Assertion.setRelyingPartyId(webAuthnAuthCallback.getRelyingPartyId());
libFido2Assertion.setCredentialId(webAuthnAuthCallback.getCredentialId());
System.out.println("Please perform the gesture action on your FIDO device.");
libFido2Assertion.computeAssertions();
for (int i = 0; i < libFido2Assertion.getAssertCount(); i++) {
webAuthnAuthCallback.addAuthenticatorData(libFido2Assertion.getAuthenticatorData(i));
webAuthnAuthCallback.addSignature(libFido2Assertion.getSignature(i));
}
libFido2Assertion.freeResources();
}
}
Notice how this implementation is responsible for asking the user to perform the gesture action. In a real
use case, this would eventually trigger an event that would, for example, open a pop-up message to the
user.
Compile this code:
$ javac -classpath *:. AuthenticationWebAuthnCallbackHandler.java
134

Using Source/Replica Replication with ReplicationConnection
The name of this class must be supplied to Connector/J through the connection property
authenticationWebAuthnCallbackHandler.
Implement the Application
Implement the client application. The following implementation is just a proof of concept that creates a
MySQL connection to the MySQL server with the user created earlier and checks if the connection was
established successfully. Notice that FIDO authentication requires some sort of human interactions, so
this is not a solution to apply for a typical three-tier architecture, where there is usually a single database
user configured in the application server and connections to the database are established from a remote
machine.
Here is a simple client application code:
import java.sql.Connection;
import java.sql.DriverManager;
import java.sql.ResultSet;
import java.util.Properties;
import com.mysql.cj.conf.PropertyKey;
public class AuthenticationWebAuthnApp {
private static final String HOST = "localhost";
private static final String PORT = "3306";
private static final String USER = "johndoe";
private static final String PASS = "s3cr3t";
public static void main(String[] args) throws Exception {
Properties props = new Properties();
props.setProperty(PropertyKey.authenticationWebAuthnCallbackHandler.getKeyName(), AuthenticationWebAuthnCallbackHandler.class.getName());
String url = "jdbc:mysql://" + USER + ":" + PASS + "@" + HOST + ":" + PORT + "/";
try (Connection conn = DriverManager.getConnection(url, props)) {
ResultSet rs = conn.createStatement().executeQuery("SELECT CURRENT_USER()");
rs.next();
System.out.println(rs.getString(1) + " AUTHENTICATED SUCCESSFULLY!");
}
}
}
Compile the code:
$ javac -classpath *:. AuthenticationWebAuthnApp.java
Run the code:
$ /usr/lib/jvm/jdk-17/bin/java -classpath *:. AuthenticationWebAuthnApp
Please perform the gesture action on your FIDO device.
johndoe@% AUTHENTICATED SUCCESSFULLY!
3.5.13 Using Source/Replica Replication with ReplicationConnection
See Section 3.8.4, “Configuring Source/Replica Replication with Connector/J” for details on the topic.
3.5.14 Support for DNS SRV Records
Connector/J supports the use of DNS SRV records for connections. For information about DNS SRV
support in MySQL, see Connecting to the Server Using DNS SRV Records.
When multiple MySQL instances provide the same service for your applications, DNS SRV records can
be used to provide failover, load balancing, and replication services. They eliminate the need for clients
to identify each possible host in the connection string, or for connections to be handled by an additional
software component. Here is a summary for Connector/J's support for DNS SRV records:
• These new schemas in the connection URLs enable DNS SRV record support:
135

Support for DNS SRV Records
• jdbc:mysql+srv: For ordinary and basic failover JDBC connections that make use of DNS SRV
records.
• jdbc:mysql+srv:loadbalance: For load-balancing JDBC connections that make use of DNS
SRV records.
• jdbc:mysql+srv:replication: For replication JDBC connections that make use of DNS SRV
records.
• mysqlx+srv: For X DevAPI connections that make use of DNS SRV records.
• Besides using the new schemas in the connection URLs, DNS SRV record support can be enabled or
disabled using the two new connection properties, dnsSrv and xdevapi.dns-srv, for JDBC and X
DevAPI connections respectively. For example, this connection URL enables DNS SRV record support:
mysqlx://johndoe:secret@_mysql._tcp.mycompany.local/db?xdevapi.dns-srv=true
However, using the DNS SRV schema with the DNS SRV connection properties set to false results in
an error; for example:
mysqlx+srv://johndoe:secret@_mysql._tcp.mycompany.local/db?xdevapi.dns-srv=false
# The connection URL causes Connector/J to throw an error
Here are some requirements and restrictions on the DNS SRV record support by Connector/J:
• Connector/J throws an exception if multiple hosts are specified in the connection URL for a DNS SRV
connection (except for a replication set up, created using jdbc:mysql+srv:replication, which
requires exactly one source and one replica server to be specified).
• Connector/J throws an exception if a port number is specified in the connection URL for a DNS SRV
connection.
• DNS SRV records are supported only for TCP/IP connections. Connector/J throws an exception if you
attempt to enable DNS SRV record support Windows named pipe connections.
DNS SRV Record Support for Load Balancing and Failover. For load-balancing and failover
connections, Connector/J uses the priority field of the DNS SRV records to decide on the priorities for
connection attempts for hosts.
DNS SRV Record Support for Connection Pooling. In an X DevAPI connection pooling setup,
Connector/J re-queries the DNS SRV records regularly and phases out gracefully any connections whose
hosts no longer appear in the records, and readmits the connections into the pool when their hosts
reappear in the records.
Looking up DNS SRV Records. It is the users' responsibility to provide a full service host name;
Connector/J does not append any prefix nor validate the host name structure. The following are examples
of valid service host name patterns:
• foo.domain.local
• _mysql._tcp.foo.domain.local
• _mysqlx._tcp.foo.domain.local
• _readonly._tcp.foo.domain.local
• _readwrite._tcp.foo.domain.local
See Connections Using DNS SRV Records in the X DevAPI User Guide for details.
136

Client Session State Tracker
3.5.15 Client Session State Tracker
Connector/J can receive information on client session state changes tracked by the server if the tracking
has been enabled on the server. The reception of the information is enabled by setting the Connector/J
connection property trackSessionState to true (default value is false for the property).
When the function is enabled, information on session state changes received from the server are stored
inside the SessionStateChanges object, accessible through a ServerSessionStateController
and its getSessionStateChanges() method:
ServerSessionStateChanges ssc =
MysqlConnection.getServerSessionStateController().getSessionStateChanges();
In SessionStateChanges is a list of SessoinStateChange objects, accessible by the
getSessionStateChangesList() method:
List<SessionStateChange> sscList = ssc.getSessionStateChangesList();
Each SessionStateChange has the fields type and values, accessible by the getType() and
getValues() methods. The types and their corresponding values are described below:
Table 3.26 SessionStateChange Type and Values
Type Number of Values in the value
List
Values
SESSION_TRACK_SYSTEM_VARIABLES2 The name of the changed system
variable and its new value
SESSION_TRACK_SCHEMA 1 The new schema name
SESSION_TRACK_STATE_CHANGE 1 "1" or "0"
SESSION_TRACK_GTIDS 1 List of GTIDs as reported by
server
SESSION_TRACK_TRANSACTION_CHARACTERISTICS1 Transaction characteristics
statement
SESSION_TRACK_TRANSACTION_STATE1 Transaction state record
Connector/J receives changes only from the most recent OK packet sent by the server. With
getSessionStateChanges(), some changes returned by the intermediate queries issued
by Connector/J could be missed. However, the session state change information can also
be received using a SessionStateChangesListener, which has to be registered with a
ServerSessionStateController using the addSessionStateChangesListener() method.
The following example implements SessionStateChangesListener in a class, which also provides a
method to print the change information:
class SSCListener implements SessionStateChangesListener {
ServerSessionStateChanges changes = null;
public void handleSessionStateChanges(ServerSessionStateChanges ch) {
this.changes = ch;
for (SessionStateChange change : ch.getSessionStateChangesList()) {
printChange(change);
}
}
private void printChange(SessionStateChange change) {
System.out.print(change.getType() + " == > ");
int pos = 0;
if (change.getType() == ServerSessionStateController.SESSION_TRACK_SYSTEM_VARIABLES) {
// There are two values with this change type, the system variable name and its new value
System.out.print(change.getValues().get(pos++) + "=");
}
137

Mapping MySQL Error Numbers to JDBC SQLState Codes
System.out.println(change.getValues().get(pos));
}
}
SessionStateChangesListener listener = new SSCListener();
MysqlConnection.getServerSessionStateController().addSessionStateChangesListener(listener);
With a registered SessionStateChangesListener, users have access to all intermediate results,
though the listener might slow down the delivery of query results. That is because the listener is invoked
immediately after the OK packet is consumed by Connector/J, before the ResultSet is constructed.
3.5.16 Mapping MySQL Error Numbers to JDBC SQLState Codes
The table below provides a mapping of the MySQL error numbers to JDBC SQLState values.
Table 3.27 Mapping of MySQL Error Numbers to SQLStates
MySQL
Error
Number
MySQL Error Name SQL
Standard
SQLState
1002 ER_NO HY000
1003 ER_YES HY000
1004 ER_CANT_CREATE_FILE HY000
1005 ER_CANT_CREATE_TABLE HY000
1006 ER_CANT_CREATE_DB HY000
1007 ER_DB_CREATE_EXISTS HY000
1008 ER_DB_DROP_EXISTS HY000
1010 ER_DB_DROP_RMDIR HY000
1012 ER_CANT_FIND_SYSTEM_REC HY000
1013 ER_CANT_GET_STAT HY000
1015 ER_CANT_LOCK HY000
1016 ER_CANT_OPEN_FILE HY000
1017 ER_FILE_NOT_FOUND HY000
1018 ER_CANT_READ_DIR HY000
1020 ER_CHECKREAD HY000
1022 ER_DUP_KEY 23000
1024 ER_ERROR_ON_READ HY000
1025 ER_ERROR_ON_RENAME HY000
1026 ER_ERROR_ON_WRITE HY000
1027 ER_FILE_USED HY000
1030 ER_GET_ERRNO HY000
1031 ER_ILLEGAL_HA HY000
1032 ER_KEY_NOT_FOUND HY000
1033 ER_NOT_FORM_FILE HY000
1034 ER_NOT_KEYFILE HY000
1035 ER_OLD_KEYFILE HY000
1036 ER_OPEN_AS_READONLY HY000
138

Mapping MySQL Error Numbers to JDBC SQLState Codes
MySQL
Error
Number
MySQL Error Name SQL
Standard
SQLState
1037 ER_OUTOFMEMORY HY001
1038 ER_OUT_OF_SORTMEMORY HY001
1040 ER_CON_COUNT_ERROR 08004
1041 ER_OUT_OF_RESOURCES HY000
1042 ER_BAD_HOST_ERROR 08S01
1043 ER_HANDSHAKE_ERROR 08S01
1044 ER_DBACCESS_DENIED_ERROR 42000
1045 ER_ACCESS_DENIED_ERROR 28000
1046 ER_NO_DB_ERROR 3D000
1047 ER_UNKNOWN_COM_ERROR 08S01
1048 ER_BAD_NULL_ERROR 23000
1049 ER_BAD_DB_ERROR 42000
1050 ER_TABLE_EXISTS_ERROR 42S01
1051 ER_BAD_TABLE_ERROR 42S02
1052 ER_NON_UNIQ_ERROR 23000
1053 ER_SERVER_SHUTDOWN 08S01
1054 ER_BAD_FIELD_ERROR 42S22
1055 ER_WRONG_FIELD_WITH_GROUP 42000
1056 ER_WRONG_GROUP_FIELD 42000
1057 ER_WRONG_SUM_SELECT 42000
1058 ER_WRONG_VALUE_COUNT 21S01
1059 ER_TOO_LONG_IDENT 42000
1060 ER_DUP_FIELDNAME 42S21
1061 ER_DUP_KEYNAME 42000
1062 ER_DUP_ENTRY 23000
1063 ER_WRONG_FIELD_SPEC 42000
1064 ER_PARSE_ERROR 42000
1065 ER_EMPTY_QUERY 42000
1066 ER_NONUNIQ_TABLE 42000
1067 ER_INVALID_DEFAULT 42000
1068 ER_MULTIPLE_PRI_KEY 42000
1069 ER_TOO_MANY_KEYS 42000
1070 ER_TOO_MANY_KEY_PARTS 42000
1071 ER_TOO_LONG_KEY 42000
1072 ER_KEY_COLUMN_DOES_NOT_EXITS 42000
1073 ER_BLOB_USED_AS_KEY 42000
139

Mapping MySQL Error Numbers to JDBC SQLState Codes
MySQL
Error
Number
MySQL Error Name SQL
Standard
SQLState
1074 ER_TOO_BIG_FIELDLENGTH 42000
1075 ER_WRONG_AUTO_KEY 42000
1076 ER_READY HY000
1079 ER_SHUTDOWN_COMPLETE HY000
1080 ER_FORCING_CLOSE 08S01
1081 ER_IPSOCK_ERROR 08S01
1082 ER_NO_SUCH_INDEX 42S12
1083 ER_WRONG_FIELD_TERMINATORS 42000
1084 ER_BLOBS_AND_NO_TERMINATED 42000
1085 ER_TEXTFILE_NOT_READABLE HY000
1086 ER_FILE_EXISTS_ERROR HY000
1087 ER_LOAD_INFO HY000
1088 ER_ALTER_INFO HY000
1089 ER_WRONG_SUB_KEY HY000
1090 ER_CANT_REMOVE_ALL_FIELDS 42000
1091 ER_CANT_DROP_FIELD_OR_KEY 42000
1092 ER_INSERT_INFO HY000
1093 ER_UPDATE_TABLE_USED HY000
1094 ER_NO_SUCH_THREAD HY000
1095 ER_KILL_DENIED_ERROR HY000
1096 ER_NO_TABLES_USED HY000
1097 ER_TOO_BIG_SET HY000
1098 ER_NO_UNIQUE_LOGFILE HY000
1099 ER_TABLE_NOT_LOCKED_FOR_WRITE HY000
1100 ER_TABLE_NOT_LOCKED HY000
1101 ER_BLOB_CANT_HAVE_DEFAULT 42000
1102 ER_WRONG_DB_NAME 42000
1103 ER_WRONG_TABLE_NAME 42000
1104 ER_TOO_BIG_SELECT 42000
1105 ER_UNKNOWN_ERROR HY000
1106 ER_UNKNOWN_PROCEDURE 42000
1107 ER_WRONG_PARAMCOUNT_TO_PROCEDURE 42000
1108 ER_WRONG_PARAMETERS_TO_PROCEDURE HY000
1109 ER_UNKNOWN_TABLE 42S02
1110 ER_FIELD_SPECIFIED_TWICE 42000
1111 ER_INVALID_GROUP_FUNC_USE HY000
140

Mapping MySQL Error Numbers to JDBC SQLState Codes
MySQL
Error
Number
MySQL Error Name SQL
Standard
SQLState
1112 ER_UNSUPPORTED_EXTENSION 42000
1113 ER_TABLE_MUST_HAVE_COLUMNS 42000
1114 ER_RECORD_FILE_FULL HY000
1115 ER_UNKNOWN_CHARACTER_SET 42000
1116 ER_TOO_MANY_TABLES HY000
1117 ER_TOO_MANY_FIELDS HY000
1118 ER_TOO_BIG_ROWSIZE 42000
1119 ER_STACK_OVERRUN HY000
1120 ER_WRONG_OUTER_JOIN_UNUSED 42000
1121 ER_NULL_COLUMN_IN_INDEX 42000
1122 ER_CANT_FIND_UDF HY000
1123 ER_CANT_INITIALIZE_UDF HY000
1124 ER_UDF_NO_PATHS HY000
1125 ER_UDF_EXISTS HY000
1126 ER_CANT_OPEN_LIBRARY HY000
1127 ER_CANT_FIND_DL_ENTRY HY000
1128 ER_FUNCTION_NOT_DEFINED HY000
1129 ER_HOST_IS_BLOCKED HY000
1130 ER_HOST_NOT_PRIVILEGED HY000
1131 ER_PASSWORD_ANONYMOUS_USER 42000
1132 ER_PASSWORD_NOT_ALLOWED 42000
1133 ER_PASSWORD_NO_MATCH 42000
1134 ER_UPDATE_INFO HY000
1135 ER_CANT_CREATE_THREAD HY000
1136 ER_WRONG_VALUE_COUNT_ON_ROW 21S01
1137 ER_CANT_REOPEN_TABLE HY000
1138 ER_INVALID_USE_OF_NULL 22004
1139 ER_REGEXP_ERROR 42000
1140 ER_MIX_OF_GROUP_FUNC_AND_FIELDS 42000
1141 ER_NONEXISTING_GRANT 42000
1142 ER_TABLEACCESS_DENIED_ERROR 42000
1143 ER_COLUMNACCESS_DENIED_ERROR 42000
1144 ER_ILLEGAL_GRANT_FOR_TABLE 42000
1145 ER_GRANT_WRONG_HOST_OR_USER 42000
1146 ER_NO_SUCH_TABLE 42S02
1147 ER_NONEXISTING_TABLE_GRANT 42000
141

Mapping MySQL Error Numbers to JDBC SQLState Codes
MySQL
Error
Number
MySQL Error Name SQL
Standard
SQLState
1148 ER_NOT_ALLOWED_COMMAND 42000
1149 ER_SYNTAX_ERROR 42000
1152 ER_ABORTING_CONNECTION 08S01
1153 ER_NET_PACKET_TOO_LARGE 08S01
1154 ER_NET_READ_ERROR_FROM_PIPE 08S01
1155 ER_NET_FCNTL_ERROR 08S01
1156 ER_NET_PACKETS_OUT_OF_ORDER 08S01
1157 ER_NET_UNCOMPRESS_ERROR 08S01
1158 ER_NET_READ_ERROR 08S01
1159 ER_NET_READ_INTERRUPTED 08S01
1160 ER_NET_ERROR_ON_WRITE 08S01
1161 ER_NET_WRITE_INTERRUPTED 08S01
1162 ER_TOO_LONG_STRING 42000
1163 ER_TABLE_CANT_HANDLE_BLOB 42000
1164 ER_TABLE_CANT_HANDLE_AUTO_INCREMENT 42000
1166 ER_WRONG_COLUMN_NAME 42000
1167 ER_WRONG_KEY_COLUMN 42000
1168 ER_WRONG_MRG_TABLE HY000
1169 ER_DUP_UNIQUE 23000
1170 ER_BLOB_KEY_WITHOUT_LENGTH 42000
1171 ER_PRIMARY_CANT_HAVE_NULL 42000
1172 ER_TOO_MANY_ROWS 42000
1173 ER_REQUIRES_PRIMARY_KEY 42000
1175 ER_UPDATE_WITHOUT_KEY_IN_SAFE_MODE HY000
1176 ER_KEY_DOES_NOT_EXITS 42000
1177 ER_CHECK_NO_SUCH_TABLE 42000
1178 ER_CHECK_NOT_IMPLEMENTED 42000
1179 ER_CANT_DO_THIS_DURING_AN_TRANSACTION 25000
1180 ER_ERROR_DURING_COMMIT HY000
1181 ER_ERROR_DURING_ROLLBACK HY000
1182 ER_ERROR_DURING_FLUSH_LOGS HY000
1184 ER_NEW_ABORTING_CONNECTION 08S01
1188 ER_SOURCE HY000
1189 ER_SOURCE_NET_READ 08S01
1190 ER_SOURCE_NET_WRITE 08S01
1191 ER_FT_MATCHING_KEY_NOT_FOUND HY000
142

Mapping MySQL Error Numbers to JDBC SQLState Codes
MySQL
Error
Number
MySQL Error Name SQL
Standard
SQLState
1192 ER_LOCK_OR_ACTIVE_TRANSACTION HY000
1193 ER_UNKNOWN_SYSTEM_VARIABLE HY000
1194 ER_CRASHED_ON_USAGE HY000
1195 ER_CRASHED_ON_REPAIR HY000
1196 ER_WARNING_NOT_COMPLETE_ROLLBACK HY000
1197 ER_TRANS_CACHE_FULL HY000
1199 ER_REPLICA_NOT_RUNNING HY000
1200 ER_BAD_REPLICA HY000
1201 ER_CONNECTION_METADATA HY000
1202 ER_REPLICA_THREAD HY000
1203 ER_TOO_MANY_USER_CONNECTIONS 42000
1204 ER_SET_CONSTANTS_ONLY HY000
1205 ER_LOCK_WAIT_TIMEOUT 40001
1206 ER_LOCK_TABLE_FULL HY000
1207 ER_READ_ONLY_TRANSACTION 25000
1210 ER_WRONG_ARGUMENTS HY000
1211 ER_NO_PERMISSION_TO_CREATE_USER 42000
1213 ER_LOCK_DEADLOCK 40001
1214 ER_TABLE_CANT_HANDLE_FT HY000
1215 ER_CANNOT_ADD_FOREIGN HY000
1216 ER_NO_REFERENCED_ROW 23000
1217 ER_ROW_IS_REFERENCED 23000
1218 ER_CONNECT_TO_SOURCE 08S01
1220 ER_ERROR_WHEN_EXECUTING_COMMAND HY000
1221 ER_WRONG_USAGE HY000
1222 ER_WRONG_NUMBER_OF_COLUMNS_IN_SELECT 21000
1223 ER_CANT_UPDATE_WITH_READLOCK HY000
1224 ER_MIXING_NOT_ALLOWED HY000
1225 ER_DUP_ARGUMENT HY000
1226 ER_USER_LIMIT_REACHED 42000
1227 ER_SPECIFIC_ACCESS_DENIED_ERROR 42000
1228 ER_LOCAL_VARIABLE HY000
1229 ER_GLOBAL_VARIABLE HY000
1230 ER_NO_DEFAULT 42000
1231 ER_WRONG_VALUE_FOR_VAR 42000
1232 ER_WRONG_TYPE_FOR_VAR 42000
143

Mapping MySQL Error Numbers to JDBC SQLState Codes
MySQL
Error
Number
MySQL Error Name SQL
Standard
SQLState
1233 ER_VAR_CANT_BE_READ HY000
1234 ER_CANT_USE_OPTION_HERE 42000
1235 ER_NOT_SUPPORTED_YET 42000
1236 ER_SOURCE_FATAL_ERROR_READING_BINLOG HY000
1237 ER_REPLICA_IGNORED_TABLE HY000
1238 ER_INCORRECT_GLOBAL_LOCAL_VAR HY000
1239 ER_WRONG_FK_DEF 42000
1240 ER_KEY_REF_DO_NOT_MATCH_TABLE_REF HY000
1241 ER_OPERAND_COLUMNS 21000
1242 ER_SUBQUERY_NO_1_ROW 21000
1243 ER_UNKNOWN_STMT_HANDLER HY000
1244 ER_CORRUPT_HELP_DB HY000
1246 ER_AUTO_CONVERT HY000
1247 ER_ILLEGAL_REFERENCE 42S22
1248 ER_DERIVED_MUST_HAVE_ALIAS 42000
1249 ER_SELECT_REDUCED 01000
1250 ER_TABLENAME_NOT_ALLOWED_HERE 42000
1251 ER_NOT_SUPPORTED_AUTH_MODE 08004
1252 ER_SPATIAL_CANT_HAVE_NULL 42000
1253 ER_COLLATION_CHARSET_MISMATCH 42000
1256 ER_TOO_BIG_FOR_UNCOMPRESS HY000
1257 ER_ZLIB_Z_MEM_ERROR HY000
1258 ER_ZLIB_Z_BUF_ERROR HY000
1259 ER_ZLIB_Z_DATA_ERROR HY000
1260 ER_CUT_VALUE_GROUP_CONCAT HY000
1261 ER_WARN_TOO_FEW_RECORDS 01000
1262 ER_WARN_TOO_MANY_RECORDS 01000
1263 ER_WARN_NULL_TO_NOTNULL 22004
1264 ER_WARN_DATA_OUT_OF_RANGE 22003
1265 WARN_DATA_TRUNCATED 01000
1266 ER_WARN_USING_OTHER_HANDLER HY000
1267 ER_CANT_AGGREGATE_2COLLATIONS HY000
1269 ER_REVOKE_GRANTS HY000
1270 ER_CANT_AGGREGATE_3COLLATIONS HY000
1271 ER_CANT_AGGREGATE_NCOLLATIONS HY000
1272 ER_VARIABLE_IS_NOT_STRUCT HY000
144

Mapping MySQL Error Numbers to JDBC SQLState Codes
MySQL
Error
Number
MySQL Error Name SQL
Standard
SQLState
1273 ER_UNKNOWN_COLLATION HY000
1274 ER_REPLICA_IGNORED_SSL_PARAMS HY000
1276 ER_WARN_FIELD_RESOLVED HY000
1277 ER_BAD_REPLICA_UNTIL_COND HY000
1278 ER_MISSING_SKIP_REPLICA HY000
1279 ER_UNTIL_COND_IGNORED HY000
1280 ER_WRONG_NAME_FOR_INDEX 42000
1281 ER_WRONG_NAME_FOR_CATALOG 42000
1283 ER_BAD_FT_COLUMN HY000
1284 ER_UNKNOWN_KEY_CACHE HY000
1285 ER_WARN_HOSTNAME_WONT_WORK HY000
1286 ER_UNKNOWN_STORAGE_ENGINE 42000
1287 ER_WARN_DEPRECATED_SYNTAX HY000
1288 ER_NON_UPDATABLE_TABLE HY000
1289 ER_FEATURE_DISABLED HY000
1290 ER_OPTION_PREVENTS_STATEMENT HY000
1291 ER_DUPLICATED_VALUE_IN_TYPE HY000
1292 ER_TRUNCATED_WRONG_VALUE 22007
1294 ER_INVALID_ON_UPDATE HY000
1295 ER_UNSUPPORTED_PS HY000
1296 ER_GET_ERRMSG HY000
1297 ER_GET_TEMPORARY_ERRMSG HY000
1298 ER_UNKNOWN_TIME_ZONE HY000
1299 ER_WARN_INVALID_TIMESTAMP HY000
1300 ER_INVALID_CHARACTER_STRING HY000
1301 ER_WARN_ALLOWED_PACKET_OVERFLOWED HY000
1302 ER_CONFLICTING_DECLARATIONS HY000
1303 ER_SP_NO_RECURSIVE_CREATE 2F003
1304 ER_SP_ALREADY_EXISTS 42000
1305 ER_SP_DOES_NOT_EXIST 42000
1306 ER_SP_DROP_FAILED HY000
1307 ER_SP_STORE_FAILED HY000
1308 ER_SP_LILABEL_MISMATCH 42000
1309 ER_SP_LABEL_REDEFINE 42000
1310 ER_SP_LABEL_MISMATCH 42000
1311 ER_SP_UNINIT_VAR 01000
145

Mapping MySQL Error Numbers to JDBC SQLState Codes
MySQL
Error
Number
MySQL Error Name SQL
Standard
SQLState
1312 ER_SP_BADSELECT 0A000
1313 ER_SP_BADRETURN 42000
1314 ER_SP_BADSTATEMENT 0A000
1315 ER_UPDATE_LOG_DEPRECATED_IGNORED 42000
1316 ER_UPDATE_LOG_DEPRECATED_TRANSLATED 42000
1317 ER_QUERY_INTERRUPTED 70100
1318 ER_SP_WRONG_NO_OF_ARGS 42000
1319 ER_SP_COND_MISMATCH 42000
1320 ER_SP_NORETURN 42000
1321 ER_SP_NORETURNEND 2F005
1322 ER_SP_BAD_CURSOR_QUERY 42000
1323 ER_SP_BAD_CURSOR_SELECT 42000
1324 ER_SP_CURSOR_MISMATCH 42000
1325 ER_SP_CURSOR_ALREADY_OPEN 24000
1326 ER_SP_CURSOR_NOT_OPEN 24000
1327 ER_SP_UNDECLARED_VAR 42000
1328 ER_SP_WRONG_NO_OF_FETCH_ARGS HY000
1329 ER_SP_FETCH_NO_DATA 02000
1330 ER_SP_DUP_PARAM 42000
1331 ER_SP_DUP_VAR 42000
1332 ER_SP_DUP_COND 42000
1333 ER_SP_DUP_CURS 42000
1334 ER_SP_CANT_ALTER HY000
1335 ER_SP_SUBSELECT_NYI 0A000
1336 ER_STMT_NOT_ALLOWED_IN_SF_OR_TRG 0A000
1337 ER_SP_VARCOND_AFTER_CURSHNDLR 42000
1338 ER_SP_CURSOR_AFTER_HANDLER 42000
1339 ER_SP_CASE_NOT_FOUND 20000
1340 ER_FPARSER_TOO_BIG_FILE HY000
1341 ER_FPARSER_BAD_HEADER HY000
1342 ER_FPARSER_EOF_IN_COMMENT HY000
1343 ER_FPARSER_ERROR_IN_PARAMETER HY000
1344 ER_FPARSER_EOF_IN_UNKNOWN_PARAMETER HY000
1345 ER_VIEW_NO_EXPLAIN HY000
1347 ER_WRONG_OBJECT HY000
1348 ER_NONUPDATEABLE_COLUMN HY000
146

Mapping MySQL Error Numbers to JDBC SQLState Codes
MySQL
Error
Number
MySQL Error Name SQL
Standard
SQLState
1350 ER_VIEW_SELECT_CLAUSE HY000
1351 ER_VIEW_SELECT_VARIABLE HY000
1352 ER_VIEW_SELECT_TMPTABLE HY000
1353 ER_VIEW_WRONG_LIST HY000
1354 ER_WARN_VIEW_MERGE HY000
1355 ER_WARN_VIEW_WITHOUT_KEY HY000
1356 ER_VIEW_INVALID HY000
1357 ER_SP_NO_DROP_SP HY000
1359 ER_TRG_ALREADY_EXISTS HY000
1360 ER_TRG_DOES_NOT_EXIST HY000
1361 ER_TRG_ON_VIEW_OR_TEMP_TABLE HY000
1362 ER_TRG_CANT_CHANGE_ROW HY000
1363 ER_TRG_NO_SUCH_ROW_IN_TRG HY000
1364 ER_NO_DEFAULT_FOR_FIELD HY000
1365 ER_DIVISION_BY_ZERO 22012
1366 ER_TRUNCATED_WRONG_VALUE_FOR_FIELD HY000
1367 ER_ILLEGAL_VALUE_FOR_TYPE 22007
1368 ER_VIEW_NONUPD_CHECK HY000
1369 ER_VIEW_CHECK_FAILED HY000
1370 ER_PROCACCESS_DENIED_ERROR 42000
1371 ER_RELAY_LOG_FAIL HY000
1373 ER_UNKNOWN_TARGET_BINLOG HY000
1374 ER_IO_ERR_LOG_INDEX_READ HY000
1375 ER_BINLOG_PURGE_PROHIBITED HY000
1376 ER_FSEEK_FAIL HY000
1377 ER_BINLOG_PURGE_FATAL_ERR HY000
1378 ER_LOG_IN_USE HY000
1379 ER_LOG_PURGE_UNKNOWN_ERR HY000
1380 ER_RELAY_LOG_INIT HY000
1381 ER_NO_BINARY_LOGGING HY000
1382 ER_RESERVED_SYNTAX HY000
1390 ER_PS_MANY_PARAM HY000
1391 ER_KEY_PART_0 HY000
1392 ER_VIEW_CHECKSUM HY000
1393 ER_VIEW_MULTIUPDATE HY000
1394 ER_VIEW_NO_INSERT_FIELD_LIST HY000
147

Mapping MySQL Error Numbers to JDBC SQLState Codes
MySQL
Error
Number
MySQL Error Name SQL
Standard
SQLState
1395 ER_VIEW_DELETE_MERGE_VIEW HY000
1396 ER_CANNOT_USER HY000
1397 ER_XAER_NOTA XAE04
1398 ER_XAER_INVAL XAE05
1399 ER_XAER_RMFAIL XAE07
1400 ER_XAER_OUTSIDE XAE09
1401 ER_XAER_RMERR XAE03
1402 ER_XA_RBROLLBACK XA100
1403 ER_NONEXISTING_PROC_GRANT 42000
1404 ER_PROC_AUTO_GRANT_FAIL HY000
1405 ER_PROC_AUTO_REVOKE_FAIL HY000
1406 ER_DATA_TOO_LONG 22001
1407 ER_SP_BAD_SQLSTATE 42000
1408 ER_STARTUP HY000
1409 ER_LOAD_FROM_FIXED_SIZE_ROWS_TO_VAR HY000
1410 ER_CANT_CREATE_USER_WITH_GRANT 42000
1411 ER_WRONG_VALUE_FOR_TYPE HY000
1412 ER_TABLE_DEF_CHANGED HY000
1413 ER_SP_DUP_HANDLER 42000
1414 ER_SP_NOT_VAR_ARG 42000
1415 ER_SP_NO_RETSET 0A000
1416 ER_CANT_CREATE_GEOMETRY_OBJECT 22003
1418 ER_BINLOG_UNSAFE_ROUTINE HY000
1419 ER_BINLOG_CREATE_ROUTINE_NEED_SUPER HY000
1421 ER_STMT_HAS_NO_OPEN_CURSOR HY000
1422 ER_COMMIT_NOT_ALLOWED_IN_SF_OR_TRG HY000
1423 ER_NO_DEFAULT_FOR_VIEW_FIELD HY000
1424 ER_SP_NO_RECURSION HY000
1425 ER_TOO_BIG_SCALE 42000
1426 ER_TOO_BIG_PRECISION 42000
1427 ER_M_BIGGER_THAN_D 42000
1428 ER_WRONG_LOCK_OF_SYSTEM_TABLE HY000
1429 ER_CONNECT_TO_FOREIGN_DATA_SOURCE HY000
1430 ER_QUERY_ON_FOREIGN_DATA_SOURCE HY000
1431 ER_FOREIGN_DATA_SOURCE_DOESNT_EXIST HY000
1432 ER_FOREIGN_DATA_STRING_INVALID_CANT_CREATE HY000
148

Mapping MySQL Error Numbers to JDBC SQLState Codes
MySQL
Error
Number
MySQL Error Name SQL
Standard
SQLState
1433 ER_FOREIGN_DATA_STRING_INVALID HY000
1435 ER_TRG_IN_WRONG_SCHEMA HY000
1436 ER_STACK_OVERRUN_NEED_MORE HY000
1437 ER_TOO_LONG_BODY 42000
1438 ER_WARN_CANT_DROP_DEFAULT_KEYCACHE HY000
1439 ER_TOO_BIG_DISPLAYWIDTH 42000
1440 ER_XAER_DUPID XAE08
1441 ER_DATETIME_FUNCTION_OVERFLOW 22008
1442 ER_CANT_UPDATE_USED_TABLE_IN_SF_OR_TRG HY000
1443 ER_VIEW_PREVENT_UPDATE HY000
1444 ER_PS_NO_RECURSION HY000
1445 ER_SP_CANT_SET_AUTOCOMMIT HY000
1447 ER_VIEW_FRM_NO_USER HY000
1448 ER_VIEW_OTHER_USER HY000
1449 ER_NO_SUCH_USER HY000
1450 ER_FORBID_SCHEMA_CHANGE HY000
1451 ER_ROW_IS_REFERENCED_2 23000
1452 ER_NO_REFERENCED_ROW_2 23000
1453 ER_SP_BAD_VAR_SHADOW 42000
1454 ER_TRG_NO_DEFINER HY000
1455 ER_OLD_FILE_FORMAT HY000
1456 ER_SP_RECURSION_LIMIT HY000
1458 ER_SP_WRONG_NAME 42000
1459 ER_TABLE_NEEDS_UPGRADE HY000
1460 ER_SP_NO_AGGREGATE 42000
1461 ER_MAX_PREPARED_STMT_COUNT_REACHED 42000
1462 ER_VIEW_RECURSIVE HY000
1463 ER_NON_GROUPING_FIELD_USED 42000
1464 ER_TABLE_CANT_HANDLE_SPKEYS HY000
1465 ER_NO_TRIGGERS_ON_SYSTEM_SCHEMA HY000
1466 ER_REMOVED_SPACES HY000
1467 ER_AUTOINC_READ_FAILED HY000
1468 ER_USERNAME HY000
1469 ER_HOSTNAME HY000
1470 ER_WRONG_STRING_LENGTH HY000
1471 ER_NON_INSERTABLE_TABLE HY000
149

Mapping MySQL Error Numbers to JDBC SQLState Codes
MySQL
Error
Number
MySQL Error Name SQL
Standard
SQLState
1472 ER_ADMIN_WRONG_MRG_TABLE HY000
1473 ER_TOO_HIGH_LEVEL_OF_NESTING_FOR_SELECT HY000
1474 ER_NAME_BECOMES_EMPTY HY000
1475 ER_AMBIGUOUS_FIELD_TERM HY000
1476 ER_FOREIGN_SERVER_EXISTS HY000
1477 ER_FOREIGN_SERVER_DOESNT_EXIST HY000
1478 ER_ILLEGAL_HA_CREATE_OPTION HY000
1479 ER_PARTITION_REQUIRES_VALUES_ERROR HY000
1480 ER_PARTITION_WRONG_VALUES_ERROR HY000
1481 ER_PARTITION_MAXVALUE_ERROR HY000
1484 ER_PARTITION_WRONG_NO_PART_ERROR HY000
1485 ER_PARTITION_WRONG_NO_SUBPART_ERROR HY000
1486 ER_WRONG_EXPR_IN_PARTITION_FUNC_ERROR HY000
1488 ER_FIELD_NOT_FOUND_PART_ERROR HY000
1490 ER_INCONSISTENT_PARTITION_INFO_ERROR HY000
1491 ER_PARTITION_FUNC_NOT_ALLOWED_ERROR HY000
1492 ER_PARTITIONS_MUST_BE_DEFINED_ERROR HY000
1493 ER_RANGE_NOT_INCREASING_ERROR HY000
1494 ER_INCONSISTENT_TYPE_OF_FUNCTIONS_ERROR HY000
1495 ER_MULTIPLE_DEF_CONST_IN_LIST_PART_ERROR HY000
1496 ER_PARTITION_ENTRY_ERROR HY000
1497 ER_MIX_HANDLER_ERROR HY000
1498 ER_PARTITION_NOT_DEFINED_ERROR HY000
1499 ER_TOO_MANY_PARTITIONS_ERROR HY000
1500 ER_SUBPARTITION_ERROR HY000
1501 ER_CANT_CREATE_HANDLER_FILE HY000
1502 ER_BLOB_FIELD_IN_PART_FUNC_ERROR HY000
1503 ER_UNIQUE_KEY_NEED_ALL_FIELDS_IN_PF HY000
1504 ER_NO_PARTS_ERROR HY000
1505 ER_PARTITION_MGMT_ON_NONPARTITIONED HY000
1506 ER_FOREIGN_KEY_ON_PARTITIONED HY000
1507 ER_DROP_PARTITION_NON_EXISTENT HY000
1508 ER_DROP_LAST_PARTITION HY000
1509 ER_COALESCE_ONLY_ON_HASH_PARTITION HY000
1510 ER_REORG_HASH_ONLY_ON_SAME_NO HY000
1511 ER_REORG_NO_PARAM_ERROR HY000
150

Mapping MySQL Error Numbers to JDBC SQLState Codes
MySQL
Error
Number
MySQL Error Name SQL
Standard
SQLState
1512 ER_ONLY_ON_RANGE_LIST_PARTITION HY000
1513 ER_ADD_PARTITION_SUBPART_ERROR HY000
1514 ER_ADD_PARTITION_NO_NEW_PARTITION HY000
1515 ER_COALESCE_PARTITION_NO_PARTITION HY000
1516 ER_REORG_PARTITION_NOT_EXIST HY000
1517 ER_SAME_NAME_PARTITION HY000
1518 ER_NO_BINLOG_ERROR HY000
1519 ER_CONSECUTIVE_REORG_PARTITIONS HY000
1520 ER_REORG_OUTSIDE_RANGE HY000
1521 ER_PARTITION_FUNCTION_FAILURE HY000
1523 ER_LIMITED_PART_RANGE HY000
1524 ER_PLUGIN_IS_NOT_LOADED HY000
1525 ER_WRONG_VALUE HY000
1526 ER_NO_PARTITION_FOR_GIVEN_VALUE HY000
1527 ER_FILEGROUP_OPTION_ONLY_ONCE HY000
1528 ER_CREATE_FILEGROUP_FAILED HY000
1529 ER_DROP_FILEGROUP_FAILED HY000
1530 ER_TABLESPACE_AUTO_EXTEND_ERROR HY000
1531 ER_WRONG_SIZE_NUMBER HY000
1532 ER_SIZE_OVERFLOW_ERROR HY000
1533 ER_ALTER_FILEGROUP_FAILED HY000
1534 ER_BINLOG_ROW_LOGGING_FAILED HY000
1537 ER_EVENT_ALREADY_EXISTS HY000
1539 ER_EVENT_DOES_NOT_EXIST HY000
1542 ER_EVENT_INTERVAL_NOT_POSITIVE_OR_TOO_BIG HY000
1543 ER_EVENT_ENDS_BEFORE_STARTS HY000
1544 ER_EVENT_EXEC_TIME_IN_THE_PAST HY000
1551 ER_EVENT_SAME_NAME HY000
1553 ER_DROP_INDEX_FK HY000
1554 ER_WARN_DEPRECATED_SYNTAX_WITH_VER HY000
1556 ER_CANT_LOCK_LOG_TABLE HY000
1557 ER_FOREIGN_DUPLICATE_KEY_OLD_UNUSED 23000
1558 ER_COL_COUNT_DOESNT_MATCH_PLEASE_UPDATE HY000
1560 ER_STORED_FUNCTION_PREVENTS_SWITCH_BINLOG_FORMAT HY000
1562 ER_PARTITION_NO_TEMPORARY HY000
1563 ER_PARTITION_CONST_DOMAIN_ERROR HY000
151

Mapping MySQL Error Numbers to JDBC SQLState Codes
MySQL
Error
Number
MySQL Error Name SQL
Standard
SQLState
1564 ER_PARTITION_FUNCTION_IS_NOT_ALLOWED HY000
1566 ER_NULL_IN_VALUES_LESS_THAN HY000
1567 ER_WRONG_PARTITION_NAME HY000
1568 ER_CANT_CHANGE_TX_CHARACTERISTICS 25001
1569 ER_DUP_ENTRY_AUTOINCREMENT_CASE HY000
1571 ER_EVENT_SET_VAR_ERROR HY000
1572 ER_PARTITION_MERGE_ERROR HY000
1575 ER_BASE64_DECODE_ERROR HY000
1576 ER_EVENT_RECURSION_FORBIDDEN HY000
1578 ER_ONLY_INTEGERS_ALLOWED HY000
1579 ER_UNSUPORTED_LOG_ENGINE HY000
1580 ER_BAD_LOG_STATEMENT HY000
1581 ER_CANT_RENAME_LOG_TABLE HY000
1582 ER_WRONG_PARAMCOUNT_TO_NATIVE_FCT 42000
1583 ER_WRONG_PARAMETERS_TO_NATIVE_FCT 42000
1584 ER_WRONG_PARAMETERS_TO_STORED_FCT 42000
1585 ER_NATIVE_FCT_NAME_COLLISION HY000
1586 ER_DUP_ENTRY_WITH_KEY_NAME 23000
1587 ER_BINLOG_PURGE_EMFILE HY000
1588 ER_EVENT_CANNOT_CREATE_IN_THE_PAST HY000
1589 ER_EVENT_CANNOT_ALTER_IN_THE_PAST HY000
1591 ER_NO_PARTITION_FOR_GIVEN_VALUE_SILENT HY000
1592 ER_BINLOG_UNSAFE_STATEMENT HY000
1593 ER_BINLOG_FATAL_ERROR HY000
1598 ER_BINLOG_LOGGING_IMPOSSIBLE HY000
1599 ER_VIEW_NO_CREATION_CTX HY000
1600 ER_VIEW_INVALID_CREATION_CTX HY000
1602 ER_TRG_CORRUPTED_FILE HY000
1603 ER_TRG_NO_CREATION_CTX HY000
1604 ER_TRG_INVALID_CREATION_CTX HY000
1605 ER_EVENT_INVALID_CREATION_CTX HY000
1606 ER_TRG_CANT_OPEN_TABLE HY000
1609 ER_NO_FORMAT_DESCRIPTION_EVENT_BEFORE_BINLOG_STATEMENT HY000
1610 ER_REPLICA_CORRUPT_EVENT HY000
1612 ER_LOG_PURGE_NO_FILE HY000
1613 ER_XA_RBTIMEOUT XA106
152

Mapping MySQL Error Numbers to JDBC SQLState Codes
MySQL
Error
Number
MySQL Error Name SQL
Standard
SQLState
1614 ER_XA_RBDEADLOCK XA102
1615 ER_NEED_REPREPARE HY000
1617 WARN_NO_CONNECTION_METADATA HY000
1618 WARN_OPTION_IGNORED HY000
1619 ER_PLUGIN_DELETE_BUILTIN HY000
1620 WARN_PLUGIN_BUSY HY000
1621 ER_VARIABLE_IS_READONLY HY000
1622 ER_WARN_ENGINE_TRANSACTION_ROLLBACK HY000
1624 ER_REPLICA_HEARTBEAT_VALUE_OUT_OF_RANGE HY000
1625 ER_NDB_REPLICATION_SCHEMA_ERROR HY000
1626 ER_CONFLICT_FN_PARSE_ERROR HY000
1627 ER_EXCEPTIONS_WRITE_ERROR HY000
1628 ER_TOO_LONG_TABLE_COMMENT HY000
1629 ER_TOO_LONG_FIELD_COMMENT HY000
1630 ER_FUNC_INEXISTENT_NAME_COLLISION 42000
1631 ER_DATABASE_NAME HY000
1632 ER_TABLE_NAME HY000
1633 ER_PARTITION_NAME HY000
1634 ER_SUBPARTITION_NAME HY000
1635 ER_TEMPORARY_NAME HY000
1636 ER_RENAMED_NAME HY000
1637 ER_TOO_MANY_CONCURRENT_TRXS HY000
1638 WARN_NON_ASCII_SEPARATOR_NOT_IMPLEMENTED HY000
1639 ER_DEBUG_SYNC_TIMEOUT HY000
1640 ER_DEBUG_SYNC_HIT_LIMIT HY000
1641 ER_DUP_SIGNAL_SET 42000
1642 ER_SIGNAL_WARN 01000
1643 ER_SIGNAL_NOT_FOUND 02000
1644 ER_SIGNAL_EXCEPTION HY000
1645 ER_RESIGNAL_WITHOUT_ACTIVE_HANDLER 0K000
1646 ER_SIGNAL_BAD_CONDITION_TYPE HY000
1647 WARN_COND_ITEM_TRUNCATED HY000
1648 ER_COND_ITEM_TOO_LONG HY000
1649 ER_UNKNOWN_LOCALE HY000
1650 ER_REPLICA_IGNORE_SERVER_IDS HY000
1652 ER_SAME_NAME_PARTITION_FIELD HY000
153

Mapping MySQL Error Numbers to JDBC SQLState Codes
MySQL
Error
Number
MySQL Error Name SQL
Standard
SQLState
1653 ER_PARTITION_COLUMN_LIST_ERROR HY000
1654 ER_WRONG_TYPE_COLUMN_VALUE_ERROR HY000
1655 ER_TOO_MANY_PARTITION_FUNC_FIELDS_ERROR HY000
1656 ER_MAXVALUE_IN_VALUES_IN HY000
1657 ER_TOO_MANY_VALUES_ERROR HY000
1658 ER_ROW_SINGLE_PARTITION_FIELD_ERROR HY000
1659 ER_FIELD_TYPE_NOT_ALLOWED_AS_PARTITION_FIELD HY000
1660 ER_PARTITION_FIELDS_TOO_LONG HY000
1661 ER_BINLOG_ROW_ENGINE_AND_STMT_ENGINE HY000
1662 ER_BINLOG_ROW_MODE_AND_STMT_ENGINE HY000
1663 ER_BINLOG_UNSAFE_AND_STMT_ENGINE HY000
1664 ER_BINLOG_ROW_INJECTION_AND_STMT_ENGINE HY000
1665 ER_BINLOG_STMT_MODE_AND_ROW_ENGINE HY000
1666 ER_BINLOG_ROW_INJECTION_AND_STMT_MODE HY000
1667 ER_BINLOG_MULTIPLE_ENGINES_AND_SELF_LOGGING_ENGINE HY000
1668 ER_BINLOG_UNSAFE_LIMIT HY000
1670 ER_BINLOG_UNSAFE_SYSTEM_TABLE HY000
1671 ER_BINLOG_UNSAFE_AUTOINC_COLUMNS HY000
1672 ER_BINLOG_UNSAFE_UDF HY000
1673 ER_BINLOG_UNSAFE_SYSTEM_VARIABLE HY000
1674 ER_BINLOG_UNSAFE_SYSTEM_FUNCTION HY000
1675 ER_BINLOG_UNSAFE_NONTRANS_AFTER_TRANS HY000
1676 ER_MESSAGE_AND_STATEMENT HY000
1678 ER_REPLICA_CANT_CREATE_CONVERSION HY000
1679 ER_INSIDE_TRANSACTION_PREVENTS_SWITCH_BINLOG_FORMAT HY000
1680 ER_PATH_LENGTH HY000
1681 ER_WARN_DEPRECATED_SYNTAX_NO_REPLACEMENT HY000
1682 ER_WRONG_NATIVE_TABLE_STRUCTURE HY000
1683 ER_WRONG_PERFSCHEMA_USAGE HY000
1684 ER_WARN_I_S_SKIPPED_TABLE HY000
1685 ER_INSIDE_TRANSACTION_PREVENTS_SWITCH_BINLOG_DIRECT HY000
1686 ER_STORED_FUNCTION_PREVENTS_SWITCH_BINLOG_DIRECT HY000
1687 ER_SPATIAL_MUST_HAVE_GEOM_COL 42000
1688 ER_TOO_LONG_INDEX_COMMENT HY000
1689 ER_LOCK_ABORTED HY000
1690 ER_DATA_OUT_OF_RANGE 22003
154

Mapping MySQL Error Numbers to JDBC SQLState Codes
MySQL
Error
Number
MySQL Error Name SQL
Standard
SQLState
1692 ER_BINLOG_UNSAFE_MULTIPLE_ENGINES_AND_SELF_LOGGING_ENGINE HY000
1693 ER_BINLOG_UNSAFE_MIXED_STATEMENT HY000
1694 ER_INSIDE_TRANSACTION_PREVENTS_SWITCH_SQL_LOG_BIN HY000
1695 ER_STORED_FUNCTION_PREVENTS_SWITCH_SQL_LOG_BIN HY000
1696 ER_FAILED_READ_FROM_PAR_FILE HY000
1697 ER_VALUES_IS_NOT_INT_TYPE_ERROR HY000
1698 ER_ACCESS_DENIED_NO_PASSWORD_ERROR 28000
1701 ER_TRUNCATE_ILLEGAL_FK 42000
1702 ER_PLUGIN_IS_PERMANENT HY000
1703 ER_REPLICA_HEARTBEAT_VALUE_OUT_OF_RANGE_MIN HY000
1704 ER_REPLICA_HEARTBEAT_VALUE_OUT_OF_RANGE_MAX HY000
1705 ER_STMT_CACHE_FULL HY000
1706 ER_MULTI_UPDATE_KEY_CONFLICT HY000
1707 ER_TABLE_NEEDS_REBUILD HY000
1708 WARN_OPTION_BELOW_LIMIT HY000
1709 ER_INDEX_COLUMN_TOO_LONG HY000
1710 ER_ERROR_IN_TRIGGER_BODY HY000
1711 ER_ERROR_IN_UNKNOWN_TRIGGER_BODY HY000
1712 ER_INDEX_CORRUPT HY000
1713 ER_UNDO_RECORD_TOO_BIG HY000
1714 ER_BINLOG_UNSAFE_INSERT_IGNORE_SELECT HY000
1715 ER_BINLOG_UNSAFE_INSERT_SELECT_UPDATE HY000
1716 ER_BINLOG_UNSAFE_REPLACE_SELECT HY000
1717 ER_BINLOG_UNSAFE_CREATE_IGNORE_SELECT HY000
1718 ER_BINLOG_UNSAFE_CREATE_REPLACE_SELECT HY000
1719 ER_BINLOG_UNSAFE_UPDATE_IGNORE HY000
1720 ER_PLUGIN_NO_UNINSTALL HY000
1721 ER_PLUGIN_NO_INSTALL HY000
1722 ER_BINLOG_UNSAFE_WRITE_AUTOINC_SELECT HY000
1723 ER_BINLOG_UNSAFE_CREATE_SELECT_AUTOINC HY000
1724 ER_BINLOG_UNSAFE_INSERT_TWO_KEYS HY000
1725 ER_TABLE_IN_FK_CHECK HY000
1726 ER_UNSUPPORTED_ENGINE HY000
1727 ER_BINLOG_UNSAFE_AUTOINC_NOT_FIRST HY000
1728 ER_CANNOT_LOAD_FROM_TABLE_V2 HY000
1729 ER_SOURCE_DELAY_VALUE_OUT_OF_RANGE HY000
155

Mapping MySQL Error Numbers to JDBC SQLState Codes
MySQL
Error
Number
MySQL Error Name SQL
Standard
SQLState
1730 ER_ONLY_FD_AND_RBR_EVENTS_ALLOWED_IN_BINLOG_STATEMENT HY000
1731 ER_PARTITION_EXCHANGE_DIFFERENT_OPTION HY000
1732 ER_PARTITION_EXCHANGE_PART_TABLE HY000
1733 ER_PARTITION_EXCHANGE_TEMP_TABLE HY000
1734 ER_PARTITION_INSTEAD_OF_SUBPARTITION HY000
1735 ER_UNKNOWN_PARTITION HY000
1736 ER_TABLES_DIFFERENT_METADATA HY000
1737 ER_ROW_DOES_NOT_MATCH_PARTITION HY000
1738 ER_BINLOG_CACHE_SIZE_GREATER_THAN_MAX HY000
1739 ER_WARN_INDEX_NOT_APPLICABLE HY000
1740 ER_PARTITION_EXCHANGE_FOREIGN_KEY HY000
1742 ER_RPL_INFO_DATA_TOO_LONG HY000
1745 ER_BINLOG_STMT_CACHE_SIZE_GREATER_THAN_MAX HY000
1746 ER_CANT_UPDATE_TABLE_IN_CREATE_TABLE_SELECT HY000
1747 ER_PARTITION_CLAUSE_ON_NONPARTITIONED HY000
1748 ER_ROW_DOES_NOT_MATCH_GIVEN_PARTITION_SET HY000
1750 ER_CHANGE_RPL_INFO_REPOSITORY_FAILURE HY000
1751 ER_WARNING_NOT_COMPLETE_ROLLBACK_WITH_CREATED_TEMP_TABLEHY000
1752 ER_WARNING_NOT_COMPLETE_ROLLBACK_WITH_DROPPED_TEMP_TABLEHY000
1753 ER_MTA_FEATURE_IS_NOT_SUPPORTED HY000
1754 ER_MTA_UPDATED_DBS_GREATER_MAX HY000
1755 ER_MTA_CANT_PARALLEL HY000
1756 ER_MTA_INCONSISTENT_DATA HY000
1757 ER_FULLTEXT_NOT_SUPPORTED_WITH_PARTITIONING HY000
1758 ER_DA_INVALID_CONDITION_NUMBER 35000
1759 ER_INSECURE_PLAIN_TEXT HY000
1760 ER_INSECURE_CHANGE_SOURCE HY000
1761 ER_FOREIGN_DUPLICATE_KEY_WITH_CHILD_INFO 23000
1762 ER_FOREIGN_DUPLICATE_KEY_WITHOUT_CHILD_INFO 23000
1763 ER_SQLTHREAD_WITH_SECURE_REPLICA HY000
1764 ER_TABLE_HAS_NO_FT HY000
1765 ER_VARIABLE_NOT_SETTABLE_IN_SF_OR_TRIGGER HY000
1766 ER_VARIABLE_NOT_SETTABLE_IN_TRANSACTION HY000
1769 ER_SET_STATEMENT_CANNOT_INVOKE_FUNCTION HY000
1770 ER_GTID_NEXT_CANT_BE_AUTOMATIC_IF_GTID_NEXT_LIST_IS_NON_NULLHY000
1772 ER_MALFORMED_GTID_SET_SPECIFICATION HY000
156

Mapping MySQL Error Numbers to JDBC SQLState Codes
MySQL
Error
Number
MySQL Error Name SQL
Standard
SQLState
1773 ER_MALFORMED_GTID_SET_ENCODING HY000
1774 ER_MALFORMED_GTID_SPECIFICATION HY000
1775 ER_GNO_EXHAUSTED HY000
1776 ER_BAD_REPLICA_AUTO_POSITION HY000
1777 ER_AUTO_POSITION_REQUIRES_GTID_MODE_NOT_OFF HY000
1778 ER_CANT_DO_IMPLICIT_COMMIT_IN_TRX_WHEN_GTID_NEXT_IS_SET HY000
1779 ER_GTID_MODE_ON_REQUIRES_ENFORCE_GTID_CONSISTENCY_ON HY000
1781 ER_CANT_SET_GTID_NEXT_TO_GTID_WHEN_GTID_MODE_IS_OFF HY000
1782 ER_CANT_SET_GTID_NEXT_TO_ANONYMOUS_WHEN_GTID_MODE_IS_ON HY000
1783 ER_CANT_SET_GTID_NEXT_LIST_TO_NON_NULL_WHEN_GTID_MODE_IS_OFFHY000
1785 ER_GTID_UNSAFE_NON_TRANSACTIONAL_TABLE HY000
1786 ER_GTID_UNSAFE_CREATE_SELECT HY000
1788 ER_GTID_MODE_CAN_ONLY_CHANGE_ONE_STEP_AT_A_TIME HY000
1789 ER_SOURCE_HAS_PURGED_REQUIRED_GTIDS HY000
1790 ER_CANT_SET_GTID_NEXT_WHEN_OWNING_GTID HY000
1791 ER_UNKNOWN_EXPLAIN_FORMAT HY000
1792 ER_CANT_EXECUTE_IN_READ_ONLY_TRANSACTION 25006
1793 ER_TOO_LONG_TABLE_PARTITION_COMMENT HY000
1794 ER_REPLICA_CONFIGURATION HY000
1795 ER_INNODB_FT_LIMIT HY000
1796 ER_INNODB_NO_FT_TEMP_TABLE HY000
1797 ER_INNODB_FT_WRONG_DOCID_COLUMN HY000
1798 ER_INNODB_FT_WRONG_DOCID_INDEX HY000
1799 ER_INNODB_ONLINE_LOG_TOO_BIG HY000
1800 ER_UNKNOWN_ALTER_ALGORITHM HY000
1801 ER_UNKNOWN_ALTER_LOCK HY000
1802 ER_MTA_CHANGE_SOURCE_CANT_RUN_WITH_GAPS HY000
1803 ER_MTA_RECOVERY_FAILURE HY000
1804 ER_MTA_RESET_WORKERS HY000
1805 ER_COL_COUNT_DOESNT_MATCH_CORRUPTED_V2 HY000
1806 ER_REPLICA_SILENT_RETRY_TRANSACTION HY000
1807 ER_DISCARD_FK_CHECKS_RUNNING HY000
1808 ER_TABLE_SCHEMA_MISMATCH HY000
1809 ER_TABLE_IN_SYSTEM_TABLESPACE HY000
1810 ER_IO_READ_ERROR HY000
1811 ER_IO_WRITE_ERROR HY000
157

Mapping MySQL Error Numbers to JDBC SQLState Codes
MySQL
Error
Number
MySQL Error Name SQL
Standard
SQLState
1812 ER_TABLESPACE_MISSING HY000
1813 ER_TABLESPACE_EXISTS HY000
1814 ER_TABLESPACE_DISCARDED HY000
1815 ER_INTERNAL_ERROR HY000
1816 ER_INNODB_IMPORT_ERROR HY000
1817 ER_INNODB_INDEX_CORRUPT HY000
1818 ER_INVALID_YEAR_COLUMN_LENGTH HY000
1819 ER_NOT_VALID_PASSWORD HY000
1820 ER_MUST_CHANGE_PASSWORD HY000
1821 ER_FK_NO_INDEX_CHILD HY000
1822 ER_FK_NO_INDEX_PARENT HY000
1823 ER_FK_FAIL_ADD_SYSTEM HY000
1824 ER_FK_CANNOT_OPEN_PARENT HY000
1825 ER_FK_INCORRECT_OPTION HY000
1826 ER_FK_DUP_NAME HY000
1827 ER_PASSWORD_FORMAT HY000
1828 ER_FK_COLUMN_CANNOT_DROP HY000
1829 ER_FK_COLUMN_CANNOT_DROP_CHILD HY000
1830 ER_FK_COLUMN_NOT_NULL HY000
1831 ER_DUP_INDEX HY000
1832 ER_FK_COLUMN_CANNOT_CHANGE HY000
1833 ER_FK_COLUMN_CANNOT_CHANGE_CHILD HY000
1835 ER_MALFORMED_PACKET HY000
1836 ER_READ_ONLY_MODE HY000
1837 ER_GTID_NEXT_TYPE_UNDEFINED_GTID HY000
1838 ER_VARIABLE_NOT_SETTABLE_IN_SP HY000
1840 ER_CANT_SET_GTID_PURGED_WHEN_GTID_EXECUTED_IS_NOT_EMPTY HY000
1841 ER_CANT_SET_GTID_PURGED_WHEN_OWNED_GTIDS_IS_NOT_EMPTY HY000
1842 ER_GTID_PURGED_WAS_CHANGED HY000
1843 ER_GTID_EXECUTED_WAS_CHANGED HY000
1844 ER_BINLOG_STMT_MODE_AND_NO_REPL_TABLES HY000
1845 ER_ALTER_OPERATION_NOT_SUPPORTED 0A000
1846 ER_ALTER_OPERATION_NOT_SUPPORTED_REASON 0A000
1847 ER_ALTER_OPERATION_NOT_SUPPORTED_REASON_COPY HY000
1848 ER_ALTER_OPERATION_NOT_SUPPORTED_REASON_PARTITION HY000
1849 ER_ALTER_OPERATION_NOT_SUPPORTED_REASON_FK_RENAME HY000
158

Mapping MySQL Error Numbers to JDBC SQLState Codes
MySQL
Error
Number
MySQL Error Name SQL
Standard
SQLState
1850 ER_ALTER_OPERATION_NOT_SUPPORTED_REASON_COLUMN_TYPE HY000
1851 ER_ALTER_OPERATION_NOT_SUPPORTED_REASON_FK_CHECK HY000
1853 ER_ALTER_OPERATION_NOT_SUPPORTED_REASON_NOPK HY000
1854 ER_ALTER_OPERATION_NOT_SUPPORTED_REASON_AUTOINC HY000
1855 ER_ALTER_OPERATION_NOT_SUPPORTED_REASON_HIDDEN_FTS HY000
1856 ER_ALTER_OPERATION_NOT_SUPPORTED_REASON_CHANGE_FTS HY000
1857 ER_ALTER_OPERATION_NOT_SUPPORTED_REASON_FTS HY000
1859 ER_DUP_UNKNOWN_IN_INDEX 23000
1860 ER_IDENT_CAUSES_TOO_LONG_PATH HY000
1861 ER_ALTER_OPERATION_NOT_SUPPORTED_REASON_NOT_NULL HY000
1862 ER_MUST_CHANGE_PASSWORD_LOGIN HY000
1863 ER_ROW_IN_WRONG_PARTITION HY000
1864 ER_MTA_EVENT_BIGGER_PENDING_JOBS_SIZE_MAX HY000
1866 ER_BINLOG_LOGICAL_CORRUPTION HY000
1867 ER_WARN_PURGE_LOG_IN_USE HY000
1868 ER_WARN_PURGE_LOG_IS_ACTIVE HY000
1869 ER_AUTO_INCREMENT_CONFLICT HY000
1870 WARN_ON_BLOCKHOLE_IN_RBR HY000
1871 ER_REPLICA_CM_INIT_REPOSITORY HY000
1872 ER_REPLICA_AM_INIT_REPOSITORY HY000
1873 ER_ACCESS_DENIED_CHANGE_USER_ERROR 28000
1874 ER_INNODB_READ_ONLY HY000
1875 ER_STOP_REPLICA_SQL_THREAD_TIMEOUT HY000
1876 ER_STOP_REPLICA_IO_THREAD_TIMEOUT HY000
1877 ER_TABLE_CORRUPT HY000
1878 ER_TEMP_FILE_WRITE_FAILURE HY000
1879 ER_INNODB_FT_AUX_NOT_HEX_ID HY000
1880 ER_OLD_TEMPORALS_UPGRADED HY000
1881 ER_INNODB_FORCED_RECOVERY HY000
1882 ER_AES_INVALID_IV HY000
1883 ER_PLUGIN_CANNOT_BE_UNINSTALLED HY000
1884 ER_GTID_UNSAFE_BINLOG_SPLITTABLE_STATEMENT_AND_ASSIGNED_GTIDHY000
1885 ER_REPLICA_HAS_MORE_GTIDS_THAN_SOURCE HY000
1886 ER_MISSING_KEY HY000
1887 WARN_NAMED_PIPE_ACCESS_EVERYONE HY000
3000 ER_FILE_CORRUPT HY000
159

Mapping MySQL Error Numbers to JDBC SQLState Codes
MySQL
Error
Number
MySQL Error Name SQL
Standard
SQLState
3001 ER_ERROR_ON_SOURCE HY000
3003 ER_STORAGE_ENGINE_NOT_LOADED HY000
3004 ER_GET_STACKED_DA_WITHOUT_ACTIVE_HANDLER 0Z002
3005 ER_WARN_LEGACY_SYNTAX_CONVERTED HY000
3006 ER_BINLOG_UNSAFE_FULLTEXT_PLUGIN HY000
3007 ER_CANNOT_DISCARD_TEMPORARY_TABLE HY000
3008 ER_FK_DEPTH_EXCEEDED HY000
3009 ER_COL_COUNT_DOESNT_MATCH_PLEASE_UPDATE_V2 HY000
3010 ER_WARN_TRIGGER_DOESNT_HAVE_CREATED HY000
3011 ER_REFERENCED_TRG_DOES_NOT_EXIST HY000
3012 ER_EXPLAIN_NOT_SUPPORTED HY000
3013 ER_INVALID_FIELD_SIZE HY000
3014 ER_MISSING_HA_CREATE_OPTION HY000
3015 ER_ENGINE_OUT_OF_MEMORY HY000
3016 ER_PASSWORD_EXPIRE_ANONYMOUS_USER HY000
3017 ER_REPLICA_SQL_THREAD_MUST_STOP HY000
3018 ER_NO_FT_MATERIALIZED_SUBQUERY HY000
3019 ER_INNODB_UNDO_LOG_FULL HY000
3020 ER_INVALID_ARGUMENT_FOR_LOGARITHM 2201E
3021 ER_REPLICA_CHANNEL_IO_THREAD_MUST_STOP HY000
3022 ER_WARN_OPEN_TEMP_TABLES_MUST_BE_ZERO HY000
3023 ER_WARN_ONLY_SOURCE_LOG_FILE_NO_POS HY000
3024 ER_QUERY_TIMEOUT HY000
3025 ER_NON_RO_SELECT_DISABLE_TIMER HY000
3026 ER_DUP_LIST_ENTRY HY000
3028 ER_AGGREGATE_ORDER_FOR_UNION HY000
3029 ER_AGGREGATE_ORDER_NON_AGG_QUERY HY000
3030 ER_REPLICA_WORKER_STOPPED_PREVIOUS_THD_ERROR HY000
3031 ER_DONT_SUPPORT_REPLICA_PRESERVE_COMMIT_ORDER HY000
3032 ER_SERVER_OFFLINE_MODE HY000
3033 ER_GIS_DIFFERENT_SRIDS HY000
3034 ER_GIS_UNSUPPORTED_ARGUMENT HY000
3035 ER_GIS_UNKNOWN_ERROR HY000
3036 ER_GIS_UNKNOWN_EXCEPTION HY000
3037 ER_GIS_INVALID_DATA 22023
3038 ER_BOOST_GEOMETRY_EMPTY_INPUT_EXCEPTION HY000
160

Mapping MySQL Error Numbers to JDBC SQLState Codes
MySQL
Error
Number
MySQL Error Name SQL
Standard
SQLState
3039 ER_BOOST_GEOMETRY_CENTROID_EXCEPTION HY000
3040 ER_BOOST_GEOMETRY_OVERLAY_INVALID_INPUT_EXCEPTION HY000
3041 ER_BOOST_GEOMETRY_TURN_INFO_EXCEPTION HY000
3042 ER_BOOST_GEOMETRY_SELF_INTERSECTION_POINT_EXCEPTION HY000
3043 ER_BOOST_GEOMETRY_UNKNOWN_EXCEPTION HY000
3044 ER_STD_BAD_ALLOC_ERROR HY000
3045 ER_STD_DOMAIN_ERROR HY000
3046 ER_STD_LENGTH_ERROR HY000
3047 ER_STD_INVALID_ARGUMENT HY000
3048 ER_STD_OUT_OF_RANGE_ERROR HY000
3049 ER_STD_OVERFLOW_ERROR HY000
3050 ER_STD_RANGE_ERROR HY000
3051 ER_STD_UNDERFLOW_ERROR HY000
3052 ER_STD_LOGIC_ERROR HY000
3053 ER_STD_RUNTIME_ERROR HY000
3054 ER_STD_UNKNOWN_EXCEPTION HY000
3055 ER_GIS_DATA_WRONG_ENDIANESS HY000
3056 ER_CHANGE_SOURCE_PASSWORD_LENGTH HY000
3057 ER_USER_LOCK_WRONG_NAME 42000
3058 ER_USER_LOCK_DEADLOCK HY000
3059 ER_REPLACE_INACCESSIBLE_ROWS HY000
3060 ER_ALTER_OPERATION_NOT_SUPPORTED_REASON_GIS HY000
3061 ER_ILLEGAL_USER_VAR 42000
3062 ER_GTID_MODE_OFF HY000
3064 ER_INCORRECT_TYPE HY000
3065 ER_FIELD_IN_ORDER_NOT_SELECT HY000
3066 ER_AGGREGATE_IN_ORDER_NOT_SELECT HY000
3067 ER_INVALID_RPL_WILD_TABLE_FILTER_PATTERN HY000
3068 ER_NET_OK_PACKET_TOO_LARGE 08S01
3069 ER_INVALID_JSON_DATA HY000
3070 ER_INVALID_GEOJSON_MISSING_MEMBER HY000
3071 ER_INVALID_GEOJSON_WRONG_TYPE HY000
3072 ER_INVALID_GEOJSON_UNSPECIFIED HY000
3073 ER_DIMENSION_UNSUPPORTED HY000
3074 ER_REPLICA_CHANNEL_DOES_NOT_EXIST HY000
3076 ER_REPLICA_CHANNEL_NAME_INVALID_OR_TOO_LONG HY000
161

Mapping MySQL Error Numbers to JDBC SQLState Codes
MySQL
Error
Number
MySQL Error Name SQL
Standard
SQLState
3077 ER_REPLICA_NEW_CHANNEL_WRONG_REPOSITORY HY000
3079 ER_REPLICA_MULTIPLE_CHANNELS_CMD HY000
3080 ER_REPLICA_MAX_CHANNELS_EXCEEDED HY000
3081 ER_REPLICA_CHANNEL_MUST_STOP HY000
3082 ER_REPLICA_CHANNEL_NOT_RUNNING HY000
3083 ER_REPLICA_CHANNEL_WAS_RUNNING HY000
3084 ER_REPLICA_CHANNEL_WAS_NOT_RUNNING HY000
3085 ER_REPLICA_CHANNEL_SQL_THREAD_MUST_STOP HY000
3086 ER_REPLICA_CHANNEL_SQL_SKIP_COUNTER HY000
3087 ER_WRONG_FIELD_WITH_GROUP_V2 HY000
3088 ER_MIX_OF_GROUP_FUNC_AND_FIELDS_V2 HY000
3089 ER_WARN_DEPRECATED_SYSVAR_UPDATE HY000
3090 ER_WARN_DEPRECATED_SQLMODE HY000
3091 ER_CANNOT_LOG_PARTIAL_DROP_DATABASE_WITH_GTID HY000
3092 ER_GROUP_REPLICATION_CONFIGURATION HY000
3093 ER_GROUP_REPLICATION_RUNNING HY000
3094 ER_GROUP_REPLICATION_APPLIER_INIT_ERROR HY000
3095 ER_GROUP_REPLICATION_STOP_APPLIER_THREAD_TIMEOUT HY000
3096 ER_GROUP_REPLICATION_COMMUNICATION_LAYER_SESSION_ERROR HY000
3097 ER_GROUP_REPLICATION_COMMUNICATION_LAYER_JOIN_ERROR HY000
3098 ER_BEFORE_DML_VALIDATION_ERROR HY000
3099 ER_PREVENTS_VARIABLE_WITHOUT_RBR HY000
3100 ER_RUN_HOOK_ERROR HY000
3101 ER_TRANSACTION_ROLLBACK_DURING_COMMIT 40000
3102 ER_GENERATED_COLUMN_FUNCTION_IS_NOT_ALLOWED HY000
3103 ER_UNSUPPORTED_ALTER_INPLACE_ON_VIRTUAL_COLUMN HY000
3104 ER_WRONG_FK_OPTION_FOR_GENERATED_COLUMN HY000
3105 ER_NON_DEFAULT_VALUE_FOR_GENERATED_COLUMN HY000
3106 ER_UNSUPPORTED_ACTION_ON_GENERATED_COLUMN HY000
3107 ER_GENERATED_COLUMN_NON_PRIOR HY000
3108 ER_DEPENDENT_BY_GENERATED_COLUMN HY000
3109 ER_GENERATED_COLUMN_REF_AUTO_INC HY000
3110 ER_FEATURE_NOT_AVAILABLE HY000
3111 ER_CANT_SET_GTID_MODE HY000
3112 ER_CANT_USE_AUTO_POSITION_WITH_GTID_MODE_OFF HY000
3116 ER_CANT_ENFORCE_GTID_CONSISTENCY_WITH_ONGOING_GTID_VIOLATING_TXHY000
162

Mapping MySQL Error Numbers to JDBC SQLState Codes
MySQL
Error
Number
MySQL Error Name SQL
Standard
SQLState
3117 ER_ENFORCE_GTID_CONSISTENCY_WARN_WITH_ONGOING_GTID_VIOLATING_TXHY000
3118 ER_ACCOUNT_HAS_BEEN_LOCKED HY000
3119 ER_WRONG_TABLESPACE_NAME 42000
3120 ER_TABLESPACE_IS_NOT_EMPTY HY000
3121 ER_WRONG_FILE_NAME HY000
3122 ER_BOOST_GEOMETRY_INCONSISTENT_TURNS_EXCEPTION HY000
3123 ER_WARN_OPTIMIZER_HINT_SYNTAX_ERROR HY000
3124 ER_WARN_BAD_MAX_EXECUTION_TIME HY000
3125 ER_WARN_UNSUPPORTED_MAX_EXECUTION_TIME HY000
3126 ER_WARN_CONFLICTING_HINT HY000
3127 ER_WARN_UNKNOWN_QB_NAME HY000
3128 ER_UNRESOLVED_HINT_NAME HY000
3129 ER_WARN_ON_MODIFYING_GTID_EXECUTED_TABLE HY000
3130 ER_PLUGGABLE_PROTOCOL_COMMAND_NOT_SUPPORTED HY000
3131 ER_LOCKING_SERVICE_WRONG_NAME 42000
3132 ER_LOCKING_SERVICE_DEADLOCK HY000
3133 ER_LOCKING_SERVICE_TIMEOUT HY000
3134 ER_GIS_MAX_POINTS_IN_GEOMETRY_OVERFLOWED HY000
3135 ER_SQL_MODE_MERGED HY000
3136 ER_VTOKEN_PLUGIN_TOKEN_MISMATCH HY000
3137 ER_VTOKEN_PLUGIN_TOKEN_NOT_FOUND HY000
3138 ER_CANT_SET_VARIABLE_WHEN_OWNING_GTID HY000
3139 ER_REPLICA_CHANNEL_OPERATION_NOT_ALLOWED HY000
3140 ER_INVALID_JSON_TEXT 22032
3141 ER_INVALID_JSON_TEXT_IN_PARAM 22032
3142 ER_INVALID_JSON_BINARY_DATA HY000
3143 ER_INVALID_JSON_PATH 42000
3144 ER_INVALID_JSON_CHARSET 22032
3145 ER_INVALID_JSON_CHARSET_IN_FUNCTION 22032
3146 ER_INVALID_TYPE_FOR_JSON 22032
3147 ER_INVALID_CAST_TO_JSON 22032
3148 ER_INVALID_JSON_PATH_CHARSET 42000
3149 ER_INVALID_JSON_PATH_WILDCARD 42000
3150 ER_JSON_VALUE_TOO_BIG 22032
3151 ER_JSON_KEY_TOO_BIG 22032
3152 ER_JSON_USED_AS_KEY 42000
163

Mapping MySQL Error Numbers to JDBC SQLState Codes
MySQL
Error
Number
MySQL Error Name SQL
Standard
SQLState
3153 ER_JSON_VACUOUS_PATH 42000
3154 ER_JSON_BAD_ONE_OR_ALL_ARG 42000
3155 ER_NUMERIC_JSON_VALUE_OUT_OF_RANGE 22003
3156 ER_INVALID_JSON_VALUE_FOR_CAST 22018
3157 ER_JSON_DOCUMENT_TOO_DEEP 22032
3158 ER_JSON_DOCUMENT_NULL_KEY 22032
3159 ER_SECURE_TRANSPORT_REQUIRED HY000
3160 ER_NO_SECURE_TRANSPORTS_CONFIGURED HY000
3161 ER_DISABLED_STORAGE_ENGINE HY000
3162 ER_USER_DOES_NOT_EXIST HY000
3163 ER_USER_ALREADY_EXISTS HY000
3164 ER_AUDIT_API_ABORT HY000
3165 ER_INVALID_JSON_PATH_ARRAY_CELL 42000
3166 ER_BUFPOOL_RESIZE_INPROGRESS HY000
3167 ER_FEATURE_DISABLED_SEE_DOC HY000
3168 ER_SERVER_ISNT_AVAILABLE HY000
3169 ER_SESSION_WAS_KILLED HY000
3170 ER_CAPACITY_EXCEEDED HY000
3171 ER_CAPACITY_EXCEEDED_IN_RANGE_OPTIMIZER HY000
3173 ER_CANT_WAIT_FOR_EXECUTED_GTID_SET_WHILE_OWNING_A_GTID HY000
3174 ER_CANNOT_ADD_FOREIGN_BASE_COL_VIRTUAL HY000
3175 ER_CANNOT_CREATE_VIRTUAL_INDEX_CONSTRAINT HY000
3176 ER_ERROR_ON_MODIFYING_GTID_EXECUTED_TABLE HY000
3177 ER_LOCK_REFUSED_BY_ENGINE HY000
3178 ER_UNSUPPORTED_ALTER_ONLINE_ON_VIRTUAL_COLUMN HY000
3179 ER_MASTER_KEY_ROTATION_NOT_SUPPORTED_BY_SE HY000
3181 ER_MASTER_KEY_ROTATION_BINLOG_FAILED HY000
3182 ER_MASTER_KEY_ROTATION_SE_UNAVAILABLE HY000
3183 ER_TABLESPACE_CANNOT_ENCRYPT HY000
3184 ER_INVALID_ENCRYPTION_OPTION HY000
3185 ER_CANNOT_FIND_KEY_IN_KEYRING HY000
3186 ER_CAPACITY_EXCEEDED_IN_PARSER HY000
3187 ER_UNSUPPORTED_ALTER_ENCRYPTION_INPLACE HY000
3188 ER_KEYRING_UDF_KEYRING_SERVICE_ERROR HY000
3189 ER_USER_COLUMN_OLD_LENGTH HY000
3190 ER_CANT_RESET_SOURCE HY000
164

Mapping MySQL Error Numbers to JDBC SQLState Codes
MySQL
Error
Number
MySQL Error Name SQL
Standard
SQLState
3191 ER_GROUP_REPLICATION_MAX_GROUP_SIZE HY000
3192 ER_CANNOT_ADD_FOREIGN_BASE_COL_STORED HY000
3193 ER_TABLE_REFERENCED HY000
3197 ER_XA_RETRY HY000
3198 ER_KEYRING_AWS_UDF_AWS_KMS_ERROR HY000
3199 ER_BINLOG_UNSAFE_XA HY000
3200 ER_UDF_ERROR HY000
3201 ER_KEYRING_MIGRATION_FAILURE HY000
3202 ER_KEYRING_ACCESS_DENIED_ERROR 42000
3203 ER_KEYRING_MIGRATION_STATUS HY000
3218 ER_AUDIT_LOG_UDF_READ_INVALID_MAX_ARRAY_LENGTH_ARG_VALUE HY000
3231 ER_WRITE_SET_EXCEEDS_LIMIT HY000
3235 ER_AES_INVALID_KDF_NAME HY000
3236 ER_AES_INVALID_KDF_ITERATIONS HY000
3237 WARN_AES_KEY_SIZE HY000
3238 ER_AES_INVALID_KDF_OPTION_SIZE HY000
3500 ER_UNSUPPORT_COMPRESSED_TEMPORARY_TABLE HY000
3501 ER_ACL_OPERATION_FAILED HY000
3502 ER_UNSUPPORTED_INDEX_ALGORITHM HY000
3503 ER_NO_SUCH_DB 42Y07
3504 ER_TOO_BIG_ENUM HY000
3505 ER_TOO_LONG_SET_ENUM_VALUE HY000
3506 ER_INVALID_DD_OBJECT HY000
3507 ER_UPDATING_DD_TABLE HY000
3508 ER_INVALID_DD_OBJECT_ID HY000
3509 ER_INVALID_DD_OBJECT_NAME HY000
3510 ER_TABLESPACE_MISSING_WITH_NAME HY000
3511 ER_TOO_LONG_ROUTINE_COMMENT HY000
3512 ER_SP_LOAD_FAILED HY000
3513 ER_INVALID_BITWISE_OPERANDS_SIZE HY000
3514 ER_INVALID_BITWISE_AGGREGATE_OPERANDS_SIZE HY000
3515 ER_WARN_UNSUPPORTED_HINT HY000
3516 ER_UNEXPECTED_GEOMETRY_TYPE 22S01
3517 ER_SRS_PARSE_ERROR SR002
3518 ER_SRS_PROJ_PARAMETER_MISSING SR003
3519 ER_WARN_SRS_NOT_FOUND 01000
165

Mapping MySQL Error Numbers to JDBC SQLState Codes
MySQL
Error
Number
MySQL Error Name SQL
Standard
SQLState
3520 ER_SRS_NOT_CARTESIAN 22S00
3521 ER_SRS_NOT_CARTESIAN_UNDEFINED SR001
3522 ER_PK_INDEX_CANT_BE_INVISIBLE HY000
3523 ER_UNKNOWN_AUTHID HY000
3524 ER_FAILED_ROLE_GRANT HY000
3525 ER_OPEN_ROLE_TABLES HY000
3526 ER_FAILED_DEFAULT_ROLES HY000
3527 ER_COMPONENTS_NO_SCHEME HY000
3528 ER_COMPONENTS_NO_SCHEME_SERVICE HY000
3529 ER_COMPONENTS_CANT_LOAD HY000
3530 ER_ROLE_NOT_GRANTED HY000
3531 ER_FAILED_REVOKE_ROLE HY000
3532 ER_RENAME_ROLE HY000
3533 ER_COMPONENTS_CANT_ACQUIRE_SERVICE_IMPLEMENTATION HY000
3534 ER_COMPONENTS_CANT_SATISFY_DEPENDENCY HY000
3535 ER_COMPONENTS_LOAD_CANT_REGISTER_SERVICE_IMPLEMENTATION HY000
3536 ER_COMPONENTS_LOAD_CANT_INITIALIZE HY000
3537 ER_COMPONENTS_UNLOAD_NOT_LOADED HY000
3538 ER_COMPONENTS_UNLOAD_CANT_DEINITIALIZE HY000
3539 ER_COMPONENTS_CANT_RELEASE_SERVICE HY000
3540 ER_COMPONENTS_UNLOAD_CANT_UNREGISTER_SERVICE HY000
3541 ER_COMPONENTS_CANT_UNLOAD HY000
3542 ER_WARN_UNLOAD_THE_NOT_PERSISTED HY000
3543 ER_COMPONENT_TABLE_INCORRECT HY000
3544 ER_COMPONENT_MANIPULATE_ROW_FAILED HY000
3545 ER_COMPONENTS_UNLOAD_DUPLICATE_IN_GROUP HY000
3546 ER_CANT_SET_GTID_PURGED_DUE_SETS_CONSTRAINTS HY000
3547 ER_CANNOT_LOCK_USER_MANAGEMENT_CACHES HY000
3548 ER_SRS_NOT_FOUND SR001
3549 ER_VARIABLE_NOT_PERSISTED HY000
3550 ER_IS_QUERY_INVALID_CLAUSE HY000
3551 ER_UNABLE_TO_STORE_STATISTICS HY000
3552 ER_NO_SYSTEM_SCHEMA_ACCESS HY000
3553 ER_NO_SYSTEM_TABLESPACE_ACCESS HY000
3554 ER_NO_SYSTEM_TABLE_ACCESS HY000
3555 ER_NO_SYSTEM_TABLE_ACCESS_FOR_DICTIONARY_TABLE HY000
166

Mapping MySQL Error Numbers to JDBC SQLState Codes
MySQL
Error
Number
MySQL Error Name SQL
Standard
SQLState
3556 ER_NO_SYSTEM_TABLE_ACCESS_FOR_SYSTEM_TABLE HY000
3557 ER_NO_SYSTEM_TABLE_ACCESS_FOR_TABLE HY000
3558 ER_INVALID_OPTION_KEY 22023
3559 ER_INVALID_OPTION_VALUE 22023
3560 ER_INVALID_OPTION_KEY_VALUE_PAIR 22023
3561 ER_INVALID_OPTION_START_CHARACTER 22023
3562 ER_INVALID_OPTION_END_CHARACTER 22023
3563 ER_INVALID_OPTION_CHARACTERS 22023
3564 ER_DUPLICATE_OPTION_KEY 22023
3565 ER_WARN_SRS_NOT_FOUND_AXIS_ORDER 01000
3566 ER_NO_ACCESS_TO_NATIVE_FCT HY000
3567 ER_RESET_SOURCE_TO_VALUE_OUT_OF_RANGE HY000
3568 ER_UNRESOLVED_TABLE_LOCK HY000
3569 ER_DUPLICATE_TABLE_LOCK HY000
3570 ER_BINLOG_UNSAFE_SKIP_LOCKED HY000
3571 ER_BINLOG_UNSAFE_NOWAIT HY000
3572 ER_LOCK_NOWAIT HY000
3573 ER_CTE_RECURSIVE_REQUIRES_UNION HY000
3574 ER_CTE_RECURSIVE_REQUIRES_NONRECURSIVE_FIRST HY000
3575 ER_CTE_RECURSIVE_FORBIDS_AGGREGATION HY000
3576 ER_CTE_RECURSIVE_FORBIDDEN_JOIN_ORDER HY000
3577 ER_CTE_RECURSIVE_REQUIRES_SINGLE_REFERENCE HY000
3578 ER_SWITCH_TMP_ENGINE HY000
3579 ER_WINDOW_NO_SUCH_WINDOW HY000
3580 ER_WINDOW_CIRCULARITY_IN_WINDOW_GRAPH HY000
3581 ER_WINDOW_NO_CHILD_PARTITIONING HY000
3582 ER_WINDOW_NO_INHERIT_FRAME HY000
3583 ER_WINDOW_NO_REDEFINE_ORDER_BY HY000
3584 ER_WINDOW_FRAME_START_ILLEGAL HY000
3585 ER_WINDOW_FRAME_END_ILLEGAL HY000
3586 ER_WINDOW_FRAME_ILLEGAL HY000
3587 ER_WINDOW_RANGE_FRAME_ORDER_TYPE HY000
3588 ER_WINDOW_RANGE_FRAME_TEMPORAL_TYPE HY000
3589 ER_WINDOW_RANGE_FRAME_NUMERIC_TYPE HY000
3590 ER_WINDOW_RANGE_BOUND_NOT_CONSTANT HY000
3591 ER_WINDOW_DUPLICATE_NAME HY000
167

Mapping MySQL Error Numbers to JDBC SQLState Codes
MySQL
Error
Number
MySQL Error Name SQL
Standard
SQLState
3592 ER_WINDOW_ILLEGAL_ORDER_BY HY000
3593 ER_WINDOW_INVALID_WINDOW_FUNC_USE HY000
3594 ER_WINDOW_INVALID_WINDOW_FUNC_ALIAS_USE HY000
3595 ER_WINDOW_NESTED_WINDOW_FUNC_USE_IN_WINDOW_SPEC HY000
3596 ER_WINDOW_ROWS_INTERVAL_USE HY000
3597 ER_WINDOW_NO_GROUP_ORDER_UNUSED HY000
3598 ER_WINDOW_EXPLAIN_JSON HY000
3599 ER_WINDOW_FUNCTION_IGNORES_FRAME HY000
3600 ER_WL9236_NOW_UNUSED HY000
3601 ER_INVALID_NO_OF_ARGS HY000
3602 ER_FIELD_IN_GROUPING_NOT_GROUP_BY HY000
3603 ER_TOO_LONG_TABLESPACE_COMMENT HY000
3604 ER_ENGINE_CANT_DROP_TABLE HY000
3605 ER_ENGINE_CANT_DROP_MISSING_TABLE HY000
3606 ER_TABLESPACE_DUP_FILENAME HY000
3607 ER_DB_DROP_RMDIR2 HY000
3608 ER_IMP_NO_FILES_MATCHED HY000
3609 ER_IMP_SCHEMA_DOES_NOT_EXIST HY000
3610 ER_IMP_TABLE_ALREADY_EXISTS HY000
3611 ER_IMP_INCOMPATIBLE_MYSQLD_VERSION HY000
3612 ER_IMP_INCOMPATIBLE_DD_VERSION HY000
3613 ER_IMP_INCOMPATIBLE_SDI_VERSION HY000
3614 ER_WARN_INVALID_HINT HY000
3615 ER_VAR_DOES_NOT_EXIST HY000
3616 ER_LONGITUDE_OUT_OF_RANGE 22S02
3617 ER_LATITUDE_OUT_OF_RANGE 22S03
3618 ER_NOT_IMPLEMENTED_FOR_GEOGRAPHIC_SRS 22S00
3619 ER_ILLEGAL_PRIVILEGE_LEVEL HY000
3620 ER_NO_SYSTEM_VIEW_ACCESS HY000
3621 ER_COMPONENT_FILTER_FLABBERGASTED HY000
3622 ER_PART_EXPR_TOO_LONG HY000
3623 ER_UDF_DROP_DYNAMICALLY_REGISTERED HY000
3624 ER_UNABLE_TO_STORE_COLUMN_STATISTICS HY000
3625 ER_UNABLE_TO_UPDATE_COLUMN_STATISTICS HY000
3626 ER_UNABLE_TO_DROP_COLUMN_STATISTICS HY000
3627 ER_UNABLE_TO_BUILD_HISTOGRAM HY000
168

Mapping MySQL Error Numbers to JDBC SQLState Codes
MySQL
Error
Number
MySQL Error Name SQL
Standard
SQLState
3628 ER_MANDATORY_ROLE HY000
3629 ER_MISSING_TABLESPACE_FILE HY000
3630 ER_PERSIST_ONLY_ACCESS_DENIED_ERROR 42000
3631 ER_CMD_NEED_SUPER HY000
3632 ER_PATH_IN_DATADIR HY000
3633 ER_CLONE_DDL_IN_PROGRESS HY000
3634 ER_CLONE_TOO_MANY_CONCURRENT_CLONES HY000
3635 ER_APPLIER_LOG_EVENT_VALIDATION_ERROR HY000
3636 ER_CTE_MAX_RECURSION_DEPTH HY000
3637 ER_NOT_HINT_UPDATABLE_VARIABLE HY000
3638 ER_CREDENTIALS_CONTRADICT_TO_HISTORY HY000
3639 ER_WARNING_PASSWORD_HISTORY_CLAUSES_VOID HY000
3640 ER_CLIENT_DOES_NOT_SUPPORT HY000
3641 ER_I_S_SKIPPED_TABLESPACE HY000
3642 ER_TABLESPACE_ENGINE_MISMATCH HY000
3643 ER_WRONG_SRID_FOR_COLUMN HY000
3644 ER_CANNOT_ALTER_SRID_DUE_TO_INDEX HY000
3645 ER_WARN_BINLOG_PARTIAL_UPDATES_DISABLED HY000
3647 ER_WARN_BINLOG_PARTIAL_UPDATES_SUGGESTS_PARTIAL_IMAGES HY000
3648 ER_COULD_NOT_APPLY_JSON_DIFF HY000
3649 ER_CORRUPTED_JSON_DIFF HY000
3650 ER_RESOURCE_GROUP_EXISTS HY000
3651 ER_RESOURCE_GROUP_NOT_EXISTS HY000
3652 ER_INVALID_VCPU_ID HY000
3653 ER_INVALID_VCPU_RANGE HY000
3654 ER_INVALID_THREAD_PRIORITY HY000
3655 ER_DISALLOWED_OPERATION HY000
3656 ER_RESOURCE_GROUP_BUSY HY000
3657 ER_RESOURCE_GROUP_DISABLED HY000
3658 ER_FEATURE_UNSUPPORTED HY000
3659 ER_ATTRIBUTE_IGNORED HY000
3660 ER_INVALID_THREAD_ID HY000
3661 ER_RESOURCE_GROUP_BIND_FAILED HY000
3662 ER_INVALID_USE_OF_FORCE_OPTION HY000
3663 ER_GROUP_REPLICATION_COMMAND_FAILURE HY000
3664 ER_SDI_OPERATION_FAILED HY000
169

Mapping MySQL Error Numbers to JDBC SQLState Codes
MySQL
Error
Number
MySQL Error Name SQL
Standard
SQLState
3665 ER_MISSING_JSON_TABLE_VALUE 22035
3666 ER_WRONG_JSON_TABLE_VALUE 2203F
3667 ER_TF_MUST_HAVE_ALIAS 42000
3668 ER_TF_FORBIDDEN_JOIN_TYPE HY000
3669 ER_JT_VALUE_OUT_OF_RANGE 22003
3670 ER_JT_MAX_NESTED_PATH 42000
3671 ER_PASSWORD_EXPIRATION_NOT_SUPPORTED_BY_AUTH_METHOD HY000
3672 ER_INVALID_GEOJSON_CRS_NOT_TOP_LEVEL HY000
3673 ER_BAD_NULL_ERROR_NOT_IGNORED 23000
3674 WARN_USELESS_SPATIAL_INDEX HY000
3675 ER_DISK_FULL_NOWAIT HY000
3676 ER_PARSE_ERROR_IN_DIGEST_FN HY000
3677 ER_UNDISCLOSED_PARSE_ERROR_IN_DIGEST_FN HY000
3678 ER_SCHEMA_DIR_EXISTS HY000
3679 ER_SCHEMA_DIR_MISSING HY000
3680 ER_SCHEMA_DIR_CREATE_FAILED HY000
3681 ER_SCHEMA_DIR_UNKNOWN HY000
3682 ER_ONLY_IMPLEMENTED_FOR_SRID_0_AND_4326 22S00
3684 ER_REGEXP_BUFFER_OVERFLOW HY000
3685 ER_REGEXP_ILLEGAL_ARGUMENT HY000
3686 ER_REGEXP_INDEX_OUTOFBOUNDS_ERROR HY000
3687 ER_REGEXP_INTERNAL_ERROR HY000
3688 ER_REGEXP_RULE_SYNTAX HY000
3689 ER_REGEXP_BAD_ESCAPE_SEQUENCE HY000
3690 ER_REGEXP_UNIMPLEMENTED HY000
3691 ER_REGEXP_MISMATCHED_PAREN HY000
3692 ER_REGEXP_BAD_INTERVAL HY000
3693 ER_REGEXP_MAX_LT_MIN HY000
3694 ER_REGEXP_INVALID_BACK_REF HY000
3695 ER_REGEXP_LOOK_BEHIND_LIMIT HY000
3696 ER_REGEXP_MISSING_CLOSE_BRACKET HY000
3697 ER_REGEXP_INVALID_RANGE HY000
3698 ER_REGEXP_STACK_OVERFLOW HY000
3699 ER_REGEXP_TIME_OUT HY000
3700 ER_REGEXP_PATTERN_TOO_BIG HY000
3701 ER_CANT_SET_ERROR_LOG_SERVICE HY000
170

Mapping MySQL Error Numbers to JDBC SQLState Codes
MySQL
Error
Number
MySQL Error Name SQL
Standard
SQLState
3702 ER_EMPTY_PIPELINE_FOR_ERROR_LOG_SERVICE HY000
3703 ER_COMPONENT_FILTER_DIAGNOSTICS HY000
3704 ER_NOT_IMPLEMENTED_FOR_CARTESIAN_SRS 22S00
3705 ER_NOT_IMPLEMENTED_FOR_PROJECTED_SRS 22S00
3706 ER_NONPOSITIVE_RADIUS 22003
3707 ER_RESTART_SERVER_FAILED HY000
3708 ER_SRS_MISSING_MANDATORY_ATTRIBUTE SR006
3709 ER_SRS_MULTIPLE_ATTRIBUTE_DEFINITIONS SR006
3710 ER_SRS_NAME_CANT_BE_EMPTY_OR_WHITESPACE SR006
3711 ER_SRS_ORGANIZATION_CANT_BE_EMPTY_OR_WHITESPACE SR006
3712 ER_SRS_ID_ALREADY_EXISTS SR004
3713 ER_WARN_SRS_ID_ALREADY_EXISTS 01S00
3714 ER_CANT_MODIFY_SRID_0 SR000
3715 ER_WARN_RESERVED_SRID_RANGE 01S01
3716 ER_CANT_MODIFY_SRS_USED_BY_COLUMN SR005
3717 ER_SRS_INVALID_CHARACTER_IN_ATTRIBUTE SR006
3718 ER_SRS_ATTRIBUTE_STRING_TOO_LONG SR006
3719 ER_DEPRECATED_UTF8_ALIAS HY000
3720 ER_DEPRECATED_NATIONAL HY000
3721 ER_INVALID_DEFAULT_UTF8MB4_COLLATION HY000
3722 ER_UNABLE_TO_COLLECT_LOG_STATUS HY000
3723 ER_RESERVED_TABLESPACE_NAME HY000
3724 ER_UNABLE_TO_SET_OPTION HY000
3725 ER_REPLICA_POSSIBLY_DIVERGED_AFTER_DDL HY000
3726 ER_SRS_NOT_GEOGRAPHIC 22S00
3727 ER_POLYGON_TOO_LARGE 22023
3728 ER_SPATIAL_UNIQUE_INDEX HY000
3729 ER_INDEX_TYPE_NOT_SUPPORTED_FOR_SPATIAL_INDEX HY000
3730 ER_FK_CANNOT_DROP_PARENT HY000
3731 ER_GEOMETRY_PARAM_LONGITUDE_OUT_OF_RANGE 22S02
3732 ER_GEOMETRY_PARAM_LATITUDE_OUT_OF_RANGE 22S03
3733 ER_FK_CANNOT_USE_VIRTUAL_COLUMN HY000
3734 ER_FK_NO_COLUMN_PARENT HY000
3735 ER_CANT_SET_ERROR_SUPPRESSION_LIST HY000
3736 ER_SRS_GEOGCS_INVALID_AXES SR002
3737 ER_SRS_INVALID_SEMI_MAJOR_AXIS SR002
171

Mapping MySQL Error Numbers to JDBC SQLState Codes
MySQL
Error
Number
MySQL Error Name SQL
Standard
SQLState
3738 ER_SRS_INVALID_INVERSE_FLATTENING SR002
3739 ER_SRS_INVALID_ANGULAR_UNIT SR002
3740 ER_SRS_INVALID_PRIME_MERIDIAN SR002
3741 ER_TRANSFORM_SOURCE_SRS_NOT_SUPPORTED 22S00
3742 ER_TRANSFORM_TARGET_SRS_NOT_SUPPORTED 22S00
3743 ER_TRANSFORM_SOURCE_SRS_MISSING_TOWGS84 22S00
3744 ER_TRANSFORM_TARGET_SRS_MISSING_TOWGS84 22S00
3745 ER_TEMP_TABLE_PREVENTS_SWITCH_SESSION_BINLOG_FORMAT HY000
3746 ER_TEMP_TABLE_PREVENTS_SWITCH_GLOBAL_BINLOG_FORMAT HY000
3747 ER_RUNNING_APPLIER_PREVENTS_SWITCH_GLOBAL_BINLOG_FORMAT HY000
3748 ER_CLIENT_GTID_UNSAFE_CREATE_DROP_TEMP_TABLE_IN_TRX_IN_SBR HY000
3750 ER_TABLE_WITHOUT_PK HY000
3751 ER_WARN_DATA_TRUNCATED_FUNCTIONAL_INDEX 01000
3752 ER_WARN_DATA_OUT_OF_RANGE_FUNCTIONAL_INDEX 22003
3753 ER_FUNCTIONAL_INDEX_ON_JSON_OR_GEOMETRY_FUNCTION 42000
3754 ER_FUNCTIONAL_INDEX_REF_AUTO_INCREMENT HY000
3755 ER_CANNOT_DROP_COLUMN_FUNCTIONAL_INDEX HY000
3756 ER_FUNCTIONAL_INDEX_PRIMARY_KEY HY000
3757 ER_FUNCTIONAL_INDEX_ON_LOB HY000
3758 ER_FUNCTIONAL_INDEX_FUNCTION_IS_NOT_ALLOWED HY000
3759 ER_FULLTEXT_FUNCTIONAL_INDEX HY000
3760 ER_SPATIAL_FUNCTIONAL_INDEX HY000
3761 ER_WRONG_KEY_COLUMN_FUNCTIONAL_INDEX HY000
3762 ER_FUNCTIONAL_INDEX_ON_FIELD HY000
3763 ER_GENERATED_COLUMN_NAMED_FUNCTION_IS_NOT_ALLOWED HY000
3764 ER_GENERATED_COLUMN_ROW_VALUE HY000
3765 ER_GENERATED_COLUMN_VARIABLES HY000
3766 ER_DEPENDENT_BY_DEFAULT_GENERATED_VALUE HY000
3767 ER_DEFAULT_VAL_GENERATED_NON_PRIOR HY000
3768 ER_DEFAULT_VAL_GENERATED_REF_AUTO_INC HY000
3769 ER_DEFAULT_VAL_GENERATED_FUNCTION_IS_NOT_ALLOWED HY000
3770 ER_DEFAULT_VAL_GENERATED_NAMED_FUNCTION_IS_NOT_ALLOWED HY000
3771 ER_DEFAULT_VAL_GENERATED_ROW_VALUE HY000
3772 ER_DEFAULT_VAL_GENERATED_VARIABLES HY000
3773 ER_DEFAULT_AS_VAL_GENERATED HY000
3774 ER_UNSUPPORTED_ACTION_ON_DEFAULT_VAL_GENERATED HY000
172

Mapping MySQL Error Numbers to JDBC SQLState Codes
MySQL
Error
Number
MySQL Error Name SQL
Standard
SQLState
3775 ER_GTID_UNSAFE_ALTER_ADD_COL_WITH_DEFAULT_EXPRESSION HY000
3776 ER_FK_CANNOT_CHANGE_ENGINE HY000
3777 ER_WARN_DEPRECATED_USER_SET_EXPR HY000
3778 ER_WARN_DEPRECATED_UTF8MB3_COLLATION HY000
3779 ER_WARN_DEPRECATED_NESTED_COMMENT_SYNTAX HY000
3780 ER_FK_INCOMPATIBLE_COLUMNS HY000
3781 ER_GR_HOLD_WAIT_TIMEOUT HY000
3782 ER_GR_HOLD_KILLED HY000
3783 ER_GR_HOLD_MEMBER_STATUS_ERROR HY000
3784 ER_RPL_ENCRYPTION_FAILED_TO_FETCH_KEY HY000
3785 ER_RPL_ENCRYPTION_KEY_NOT_FOUND HY000
3786 ER_RPL_ENCRYPTION_KEYRING_INVALID_KEY HY000
3787 ER_RPL_ENCRYPTION_HEADER_ERROR HY000
3788 ER_RPL_ENCRYPTION_FAILED_TO_ROTATE_LOGS HY000
3789 ER_RPL_ENCRYPTION_KEY_EXISTS_UNEXPECTED HY000
3790 ER_RPL_ENCRYPTION_FAILED_TO_GENERATE_KEY HY000
3791 ER_RPL_ENCRYPTION_FAILED_TO_STORE_KEY HY000
3792 ER_RPL_ENCRYPTION_FAILED_TO_REMOVE_KEY HY000
3793 ER_RPL_ENCRYPTION_UNABLE_TO_CHANGE_OPTION HY000
3794 ER_RPL_ENCRYPTION_MASTER_KEY_RECOVERY_FAILED HY000
3795 ER_SLOW_LOG_MODE_IGNORED_WHEN_NOT_LOGGING_TO_FILE HY000
3796 ER_GRP_TRX_CONSISTENCY_NOT_ALLOWED HY000
3797 ER_GRP_TRX_CONSISTENCY_BEFORE HY000
3798 ER_GRP_TRX_CONSISTENCY_AFTER_ON_TRX_BEGIN HY000
3799 ER_GRP_TRX_CONSISTENCY_BEGIN_NOT_ALLOWED HY000
3800 ER_FUNCTIONAL_INDEX_ROW_VALUE_IS_NOT_ALLOWED HY000
3801 ER_RPL_ENCRYPTION_FAILED_TO_ENCRYPT HY000
3802 ER_PAGE_TRACKING_NOT_STARTED HY000
3803 ER_PAGE_TRACKING_RANGE_NOT_TRACKED HY000
3804 ER_PAGE_TRACKING_CANNOT_PURGE HY000
3805 ER_RPL_ENCRYPTION_CANNOT_ROTATE_BINLOG_MASTER_KEY HY000
3806 ER_BINLOG_MASTER_KEY_RECOVERY_OUT_OF_COMBINATION HY000
3807 ER_BINLOG_MASTER_KEY_ROTATION_FAIL_TO_OPERATE_KEY HY000
3808 ER_BINLOG_MASTER_KEY_ROTATION_FAIL_TO_ROTATE_LOGS HY000
3809 ER_BINLOG_MASTER_KEY_ROTATION_FAIL_TO_REENCRYPT_LOG HY000
3810 ER_BINLOG_MASTER_KEY_ROTATION_FAIL_TO_CLEANUP_UNUSED_KEYS HY000
173

Mapping MySQL Error Numbers to JDBC SQLState Codes
MySQL
Error
Number
MySQL Error Name SQL
Standard
SQLState
3811 ER_BINLOG_MASTER_KEY_ROTATION_FAIL_TO_CLEANUP_AUX_KEY HY000
3812 ER_NON_BOOLEAN_EXPR_FOR_CHECK_CONSTRAINT HY000
3813 ER_COLUMN_CHECK_CONSTRAINT_REFERENCES_OTHER_COLUMN HY000
3814 ER_CHECK_CONSTRAINT_NAMED_FUNCTION_IS_NOT_ALLOWED HY000
3815 ER_CHECK_CONSTRAINT_FUNCTION_IS_NOT_ALLOWED HY000
3816 ER_CHECK_CONSTRAINT_VARIABLES HY000
3817 ER_CHECK_CONSTRAINT_ROW_VALUE HY000
3818 ER_CHECK_CONSTRAINT_REFERS_AUTO_INCREMENT_COLUMN HY000
3819 ER_CHECK_CONSTRAINT_VIOLATED HY000
3820 ER_CHECK_CONSTRAINT_REFERS_UNKNOWN_COLUMN HY000
3821 ER_CHECK_CONSTRAINT_NOT_FOUND HY000
3822 ER_CHECK_CONSTRAINT_DUP_NAME HY000
3823 ER_CHECK_CONSTRAINT_CLAUSE_USING_FK_REFER_ACTION_COLUMN HY000
3824 WARN_UNENCRYPTED_TABLE_IN_ENCRYPTED_DB HY000
3825 ER_INVALID_ENCRYPTION_REQUEST HY000
3826 ER_CANNOT_SET_TABLE_ENCRYPTION HY000
3827 ER_CANNOT_SET_DATABASE_ENCRYPTION HY000
3828 ER_CANNOT_SET_TABLESPACE_ENCRYPTION HY000
3829 ER_TABLESPACE_CANNOT_BE_ENCRYPTED HY000
3830 ER_TABLESPACE_CANNOT_BE_DECRYPTED HY000
3831 ER_TABLESPACE_TYPE_UNKNOWN HY000
3832 ER_TARGET_TABLESPACE_UNENCRYPTED HY000
3833 ER_CANNOT_USE_ENCRYPTION_CLAUSE HY000
3834 ER_INVALID_MULTIPLE_CLAUSES HY000
3835 ER_UNSUPPORTED_USE_OF_GRANT_AS HY000
3836 ER_UKNOWN_AUTH_ID_OR_ACCESS_DENIED_FOR_GRANT_AS HY000
3837 ER_DEPENDENT_BY_FUNCTIONAL_INDEX HY000
3838 ER_PLUGIN_NOT_EARLY HY000
3839 ER_INNODB_REDO_LOG_ARCHIVE_START_SUBDIR_PATH HY000
3840 ER_INNODB_REDO_LOG_ARCHIVE_START_TIMEOUT HY000
3841 ER_INNODB_REDO_LOG_ARCHIVE_DIRS_INVALID HY000
3842 ER_INNODB_REDO_LOG_ARCHIVE_LABEL_NOT_FOUND HY000
3843 ER_INNODB_REDO_LOG_ARCHIVE_DIR_EMPTY HY000
3844 ER_INNODB_REDO_LOG_ARCHIVE_NO_SUCH_DIR HY000
3845 ER_INNODB_REDO_LOG_ARCHIVE_DIR_CLASH HY000
3846 ER_INNODB_REDO_LOG_ARCHIVE_DIR_PERMISSIONS HY000
174

Mapping MySQL Error Numbers to JDBC SQLState Codes
MySQL
Error
Number
MySQL Error Name SQL
Standard
SQLState
3847 ER_INNODB_REDO_LOG_ARCHIVE_FILE_CREATE HY000
3848 ER_INNODB_REDO_LOG_ARCHIVE_ACTIVE HY000
3849 ER_INNODB_REDO_LOG_ARCHIVE_INACTIVE HY000
3850 ER_INNODB_REDO_LOG_ARCHIVE_FAILED HY000
3851 ER_INNODB_REDO_LOG_ARCHIVE_SESSION HY000
3852 ER_STD_REGEX_ERROR HY000
3853 ER_INVALID_JSON_TYPE 22032
3854 ER_CANNOT_CONVERT_STRING HY000
3855 ER_DEPENDENT_BY_PARTITION_FUNC HY000
3856 ER_WARN_DEPRECATED_FLOAT_AUTO_INCREMENT HY000
3857 ER_RPL_CANT_STOP_REPLICA_WHILE_LOCKED_BACKUP HY000
3858 ER_WARN_DEPRECATED_FLOAT_DIGITS HY000
3859 ER_WARN_DEPRECATED_FLOAT_UNSIGNED HY000
3860 ER_WARN_DEPRECATED_INTEGER_DISPLAY_WIDTH HY000
3861 ER_WARN_DEPRECATED_ZEROFILL HY000
3862 ER_CLONE_DONOR HY000
3863 ER_CLONE_PROTOCOL HY000
3864 ER_CLONE_DONOR_VERSION HY000
3865 ER_CLONE_OS HY000
3866 ER_CLONE_PLATFORM HY000
3867 ER_CLONE_CHARSET HY000
3868 ER_CLONE_CONFIG HY000
3869 ER_CLONE_SYS_CONFIG HY000
3870 ER_CLONE_PLUGIN_MATCH HY000
3871 ER_CLONE_LOOPBACK HY000
3872 ER_CLONE_ENCRYPTION HY000
3873 ER_CLONE_DISK_SPACE HY000
3874 ER_CLONE_IN_PROGRESS HY000
3875 ER_CLONE_DISALLOWED HY000
3876 ER_CANNOT_GRANT_ROLES_TO_ANONYMOUS_USER HY000
3877 ER_SECONDARY_ENGINE_PLUGIN HY000
3878 ER_SECOND_PASSWORD_CANNOT_BE_EMPTY HY000
3879 ER_DB_ACCESS_DENIED HY000
3880 ER_DA_AUTH_ID_WITH_SYSTEM_USER_PRIV_IN_MANDATORY_ROLES HY000
3881 ER_DA_RPL_GTID_TABLE_CANNOT_OPEN HY000
3882 ER_GEOMETRY_IN_UNKNOWN_LENGTH_UNIT SU001
175

Mapping MySQL Error Numbers to JDBC SQLState Codes
MySQL
Error
Number
MySQL Error Name SQL
Standard
SQLState
3883 ER_DA_PLUGIN_INSTALL_ERROR HY000
3884 ER_NO_SESSION_TEMP HY000
3885 ER_DA_UNKNOWN_ERROR_NUMBER HY000
3886 ER_COLUMN_CHANGE_SIZE HY000
3887 ER_REGEXP_INVALID_CAPTURE_GROUP_NAME HY000
3888 ER_DA_SSL_LIBRARY_ERROR HY000
3889 ER_SECONDARY_ENGINE HY000
3890 ER_SECONDARY_ENGINE_DDL HY000
3891 ER_INCORRECT_CURRENT_PASSWORD HY000
3892 ER_MISSING_CURRENT_PASSWORD HY000
3893 ER_CURRENT_PASSWORD_NOT_REQUIRED HY000
3894 ER_PASSWORD_CANNOT_BE_RETAINED_ON_PLUGIN_CHANGE HY000
3895 ER_CURRENT_PASSWORD_CANNOT_BE_RETAINED HY000
3896 ER_PARTIAL_REVOKES_EXIST HY000
3897 ER_CANNOT_GRANT_SYSTEM_PRIV_TO_MANDATORY_ROLE HY000
3898 ER_XA_REPLICATION_FILTERS HY000
3899 ER_UNSUPPORTED_SQL_MODE HY000
3900 ER_REGEXP_INVALID_FLAG HY000
3901 ER_PARTIAL_REVOKE_AND_DB_GRANT_BOTH_EXISTS HY000
3902 ER_UNIT_NOT_FOUND SU001
3903 ER_INVALID_JSON_VALUE_FOR_FUNC_INDEX 22018
3904 ER_JSON_VALUE_OUT_OF_RANGE_FOR_FUNC_INDEX 22003
3905 ER_EXCEEDED_MV_KEYS_NUM HY000
3906 ER_EXCEEDED_MV_KEYS_SPACE HY000
3907 ER_FUNCTIONAL_INDEX_DATA_IS_TOO_LONG 22001
3908 ER_WRONG_MVI_VALUE HY000
3909 ER_WARN_FUNC_INDEX_NOT_APPLICABLE HY000
3910 ER_GRP_RPL_UDF_ERROR HY000
3911 ER_UPDATE_GTID_PURGED_WITH_GR HY000
3912 ER_GROUPING_ON_TIMESTAMP_IN_DST HY000
3913 ER_TABLE_NAME_CAUSES_TOO_LONG_PATH HY000
3914 ER_AUDIT_LOG_INSUFFICIENT_PRIVILEGE HY000
3916 ER_DA_GRP_RPL_STARTED_AUTO_REJOIN HY000
3917 ER_SYSVAR_CHANGE_DURING_QUERY HY000
3918 ER_GLOBSTAT_CHANGE_DURING_QUERY HY000
3919 ER_GRP_RPL_MESSAGE_SERVICE_INIT_FAILURE HY000
176

Mapping MySQL Error Numbers to JDBC SQLState Codes
MySQL
Error
Number
MySQL Error Name SQL
Standard
SQLState
3920 ER_CHANGE_SOURCE_WRONG_COMPRESSION_ALGORITHM_CLIENT HY000
3921 ER_CHANGE_SOURCE_WRONG_COMPRESSION_LEVEL_CLIENT HY000
3922 ER_WRONG_COMPRESSION_ALGORITHM_CLIENT HY000
3923 ER_WRONG_COMPRESSION_LEVEL_CLIENT HY000
3924 ER_CHANGE_SOURCE_WRONG_COMPRESSION_ALGORITHM_LIST_CLIENTHY000
3925 ER_CLIENT_PRIVILEGE_CHECKS_USER_CANNOT_BE_ANONYMOUS HY000
3926 ER_CLIENT_PRIVILEGE_CHECKS_USER_DOES_NOT_EXIST HY000
3927 ER_CLIENT_PRIVILEGE_CHECKS_USER_CORRUPT HY000
3928 ER_CLIENT_PRIVILEGE_CHECKS_USER_NEEDS_RPL_APPLIER_PRIV HY000
3929 ER_WARN_DA_PRIVILEGE_NOT_REGISTERED HY000
3930 ER_CLIENT_KEYRING_UDF_KEY_INVALID HY000
3931 ER_CLIENT_KEYRING_UDF_KEY_TYPE_INVALID HY000
3932 ER_CLIENT_KEYRING_UDF_KEY_TOO_LONG HY000
3933 ER_CLIENT_KEYRING_UDF_KEY_TYPE_TOO_LONG HY000
3934 ER_JSON_SCHEMA_VALIDATION_ERROR_WITH_DETAILED_REPORT HY000
3935 ER_DA_UDF_INVALID_CHARSET_SPECIFIED HY000
3936 ER_DA_UDF_INVALID_CHARSET HY000
3937 ER_DA_UDF_INVALID_COLLATION HY000
3938 ER_DA_UDF_INVALID_EXTENSION_ARGUMENT_TYPE HY000
3939 ER_MULTIPLE_CONSTRAINTS_WITH_SAME_NAME HY000
3940 ER_CONSTRAINT_NOT_FOUND HY000
3941 ER_ALTER_CONSTRAINT_ENFORCEMENT_NOT_SUPPORTED HY000
3942 ER_TABLE_VALUE_CONSTRUCTOR_MUST_HAVE_COLUMNS HY000
3943 ER_TABLE_VALUE_CONSTRUCTOR_CANNOT_HAVE_DEFAULT HY000
3944 ER_CLIENT_QUERY_FAILURE_INVALID_NON_ROW_FORMAT HY000
3945 ER_REQUIRE_ROW_FORMAT_INVALID_VALUE HY000
3946 ER_FAILED_TO_DETERMINE_IF_ROLE_IS_MANDATORY HY000
3947 ER_FAILED_TO_FETCH_MANDATORY_ROLE_LIST HY000
3948 ER_CLIENT_LOCAL_FILES_DISABLED 42000
3949 ER_IMP_INCOMPATIBLE_CFG_VERSION HY000
3950 ER_DA_OOM HY000
3951 ER_DA_UDF_INVALID_ARGUMENT_TO_SET_CHARSET HY000
3952 ER_DA_UDF_INVALID_RETURN_TYPE_TO_SET_CHARSET HY000
3953 ER_MULTIPLE_INTO_CLAUSES HY000
3954 ER_MISPLACED_INTO HY000
3955 ER_USER_ACCESS_DENIED_FOR_USER_ACCOUNT_BLOCKED_BY_PASSWORD_LOCKHY000
177

Mapping MySQL Error Numbers to JDBC SQLState Codes
MySQL
Error
Number
MySQL Error Name SQL
Standard
SQLState
3956 ER_WARN_DEPRECATED_YEAR_UNSIGNED HY000
3957 ER_CLONE_NETWORK_PACKET HY000
3958 ER_SDI_OPERATION_FAILED_MISSING_RECORD HY000
3959 ER_DEPENDENT_BY_CHECK_CONSTRAINT HY000
3960 ER_GRP_OPERATION_NOT_ALLOWED_GR_MUST_STOP HY000
3961 ER_WARN_DEPRECATED_JSON_TABLE_ON_ERROR_ON_EMPTY HY000
3962 ER_WARN_DEPRECATED_INNER_INTO HY000
3963 ER_WARN_DEPRECATED_VALUES_FUNCTION_ALWAYS_NULL HY000
3964 ER_WARN_DEPRECATED_SQL_CALC_FOUND_ROWS HY000
3965 ER_WARN_DEPRECATED_FOUND_ROWS HY000
3966 ER_MISSING_JSON_VALUE 22035
3967 ER_MULTIPLE_JSON_VALUES 22034
3968 ER_HOSTNAME_TOO_LONG HY000
3970 ER_GROUP_REPLICATION_USER_EMPTY_MSG HY000
3971 ER_GROUP_REPLICATION_USER_MANDATORY_MSG HY000
3972 ER_GROUP_REPLICATION_PASSWORD_LENGTH HY000
3973 ER_SUBQUERY_TRANSFORM_REJECTED HY000
3974 ER_DA_GRP_RPL_RECOVERY_ENDPOINT_FORMAT HY000
3975 ER_DA_GRP_RPL_RECOVERY_ENDPOINT_INVALID HY000
3976 ER_WRONG_VALUE_FOR_VAR_PLUS_ACTIONABLE_PART HY000
3977 ER_STATEMENT_NOT_ALLOWED_AFTER_START_TRANSACTION HY000
3978 ER_FOREIGN_KEY_WITH_ATOMIC_CREATE_SELECT HY000
3979 ER_NOT_ALLOWED_WITH_START_TRANSACTION HY000
3980 ER_INVALID_JSON_ATTRIBUTE HY000
3981 ER_ENGINE_ATTRIBUTE_NOT_SUPPORTED HY000
3982 ER_INVALID_USER_ATTRIBUTE_JSON HY000
3983 ER_INNODB_REDO_DISABLED HY000
3984 ER_INNODB_REDO_ARCHIVING_ENABLED HY000
3985 ER_MDL_OUT_OF_RESOURCES HY000
3986 ER_IMPLICIT_COMPARISON_FOR_JSON HY000
3987 ER_FUNCTION_DOES_NOT_SUPPORT_CHARACTER_SET HY000
3988 ER_IMPOSSIBLE_STRING_CONVERSION HY000
3989 ER_SCHEMA_READ_ONLY HY000
3990 ER_RPL_ASYNC_RECONNECT_GTID_MODE_OFF HY000
3991 ER_RPL_ASYNC_RECONNECT_AUTO_POSITION_OFF HY000
3992 ER_DISABLE_GTID_MODE_REQUIRES_ASYNC_RECONNECT_OFF HY000
178

Mapping MySQL Error Numbers to JDBC SQLState Codes
MySQL
Error
Number
MySQL Error Name SQL
Standard
SQLState
3993 ER_DISABLE_AUTO_POSITION_REQUIRES_ASYNC_RECONNECT_OFF HY000
3994 ER_INVALID_PARAMETER_USE HY000
3995 ER_CHARACTER_SET_MISMATCH HY000
3996 ER_WARN_VAR_VALUE_CHANGE_NOT_SUPPORTED HY000
3997 ER_INVALID_TIME_ZONE_INTERVAL HY000
3998 ER_INVALID_CAST HY000
3999 ER_HYPERGRAPH_NOT_SUPPORTED_YET 42000
4000 ER_WARN_HYPERGRAPH_EXPERIMENTAL HY000
4001 ER_DA_NO_ERROR_LOG_PARSER_CONFIGURED HY000
4002 ER_DA_ERROR_LOG_TABLE_DISABLED HY000
4003 ER_DA_ERROR_LOG_MULTIPLE_FILTERS HY000
4004 ER_DA_CANT_OPEN_ERROR_LOG HY000
4005 ER_USER_REFERENCED_AS_DEFINER HY000
4006 ER_CANNOT_USER_REFERENCED_AS_DEFINER HY000
4007 ER_REGEX_NUMBER_TOO_BIG HY000
4008 ER_SPVAR_NONINTEGER_TYPE HY000
4009 WARN_UNSUPPORTED_ACL_TABLES_READ HY000
4010 ER_BINLOG_UNSAFE_ACL_TABLE_READ_IN_DML_DDL HY000
4011 ER_STOP_REPLICA_MONITOR_IO_THREAD_TIMEOUT HY000
4012 ER_STARTING_REPLICA_MONITOR_IO_THREAD HY000
4013 ER_CANT_USE_ANONYMOUS_TO_GTID_WITH_GTID_MODE_NOT_ON HY000
4014 ER_CANT_COMBINE_ANONYMOUS_TO_GTID_AND_AUTOPOSITION HY000
4015 ER_ASSIGN_GTIDS_TO_ANONYMOUS_TRANSACTIONS_REQUIRES_GTID_MODE_ONHY000
4016 ER_SQL_REPLICA_SKIP_COUNTER_USED_WITH_GTID_MODE_ON HY000
4017 ER_USING_ASSIGN_GTIDS_TO_ANONYMOUS_TRANSACTIONS_AS_LOCAL_OR_UUIDHY000
4019 ER_CANT_SET_SQL_AFTER_OR_BEFORE_GTIDS_WITH_ANONYMOUS_TO_GTIDHY000
4020 ER_ANONYMOUS_TO_GTID_UUID_SAME_AS_GROUP_NAME HY000
4021 ER_CANT_USE_SAME_UUID_AS_GROUP_NAME HY000
4022 ER_GRP_RPL_RECOVERY_CHANNEL_STILL_RUNNING HY000
4023 ER_INNODB_INVALID_AUTOEXTEND_SIZE_VALUE HY000
4024 ER_INNODB_INCOMPATIBLE_WITH_TABLESPACE HY000
4025 ER_INNODB_AUTOEXTEND_SIZE_OUT_OF_RANGE HY000
4026 ER_CANNOT_USE_AUTOEXTEND_SIZE_CLAUSE HY000
4027 ER_ROLE_GRANTED_TO_ITSELF HY000
4028 ER_TABLE_MUST_HAVE_A_VISIBLE_COLUMN HY000
4029 ER_INNODB_COMPRESSION_FAILURE HY000
179

Mapping MySQL Error Numbers to JDBC SQLState Codes
MySQL
Error
Number
MySQL Error Name SQL
Standard
SQLState
4030 ER_WARN_ASYNC_CONN_FAILOVER_NETWORK_NAMESPACE HY000
4031 ER_CLIENT_INTERACTION_TIMEOUT HY000
4032 ER_INVALID_CAST_TO_GEOMETRY 22S01
4033 ER_INVALID_CAST_POLYGON_RING_DIRECTION 22S04
4034 ER_GIS_DIFFERENT_SRIDS_AGGREGATION 22S05
4035 ER_RELOAD_KEYRING_FAILURE HY000
4036 ER_SDI_GET_KEYS_INVALID_TABLESPACE HY000
4037 ER_CHANGE_RPL_SRC_WRONG_COMPRESSION_ALGORITHM_SIZE HY000
4039 ER_CANT_USE_SAME_UUID_AS_VIEW_CHANGE_UUID HY000
4040 ER_ANONYMOUS_TO_GTID_UUID_SAME_AS_VIEW_CHANGE_UUID HY000
4041 ER_GRP_RPL_VIEW_CHANGE_UUID_FAIL_GET_VARIABLE HY000
4042 ER_WARN_ADUIT_LOG_MAX_SIZE_AND_PRUNE_SECONDS HY000
4043 ER_WARN_ADUIT_LOG_MAX_SIZE_CLOSE_TO_ROTATE_ON_SIZE HY000
4044 ER_KERBEROS_CREATE_USER HY000
4045 ER_INSTALL_PLUGIN_CONFLICT_CLIENT HY000
4046 ER_DA_ERROR_LOG_COMPONENT_FLUSH_FAILED HY000
4047 ER_WARN_SQL_AFTER_MTS_GAPS_GAP_NOT_CALCULATED HY000
4048 ER_INVALID_ASSIGNMENT_TARGET 42000
4049 ER_OPERATION_NOT_ALLOWED_ON_GR_SECONDARY HY000
4050 ER_GRP_RPL_FAILOVER_CHANNEL_STATUS_PROPAGATION HY000
4051 ER_WARN_AUDIT_LOG_FORMAT_UNIX_TIMESTAMP_ONLY_WHEN_JSON HY000
4052 ER_INVALID_MFA_PLUGIN_SPECIFIED HY000
4053 ER_IDENTIFIED_BY_UNSUPPORTED HY000
4054 ER_INVALID_PLUGIN_FOR_REGISTRATION HY000
4055 ER_PLUGIN_REQUIRES_REGISTRATION HY000
4056 ER_MFA_METHOD_EXISTS HY000
4057 ER_MFA_METHOD_NOT_EXISTS HY000
4058 ER_AUTHENTICATION_POLICY_MISMATCH HY000
4059 ER_PLUGIN_REGISTRATION_DONE HY000
4060 ER_INVALID_USER_FOR_REGISTRATION HY000
4061 ER_USER_REGISTRATION_FAILED HY000
4062 ER_MFA_METHODS_INVALID_ORDER HY000
4063 ER_MFA_METHODS_IDENTICAL HY000
4064 ER_INVALID_MFA_OPERATIONS_FOR_PASSWORDLESS_USER HY000
4065 ER_CHANGE_REPLICATION_SOURCE_NO_OPTIONS_FOR_GTID_ONLY HY000
4066 ER_CHANGE_REP_SOURCE_CANT_DISABLE_REQ_ROW_FORMAT_WITH_GTID_ONLYHY000
180

Mapping MySQL Error Numbers to JDBC SQLState Codes
MySQL
Error
Number
MySQL Error Name SQL
Standard
SQLState
4067 ER_CHANGE_REP_SOURCE_CANT_DISABLE_AUTO_POSITION_WITH_GTID_ONLYHY000
4068 ER_CHANGE_REP_SOURCE_CANT_DISABLE_GTID_ONLY_WITHOUT_POSITIONSHY000
4069 ER_CHANGE_REP_SOURCE_CANT_DISABLE_AUTO_POS_WITHOUT_POSITIONSHY000
4070 ER_CHANGE_REP_SOURCE_GR_CHANNEL_WITH_GTID_MODE_NOT_ON HY000
4071 ER_CANT_USE_GTID_ONLY_WITH_GTID_MODE_NOT_ON HY000
4072 ER_WARN_C_DISABLE_GTID_ONLY_WITH_SOURCE_AUTO_POS_INVALID_POSHY000
4073 ER_DA_SSL_FIPS_MODE_ERROR HY000
4074 ER_VALUE_OUT_OF_RANGE HY000
4075 ER_FULLTEXT_WITH_ROLLUP HY000
4076 ER_REGEXP_MISSING_RESOURCE HY000
4077 ER_WARN_REGEXP_USING_DEFAULT HY000
4078 ER_REGEXP_MISSING_FILE HY000
4079 ER_WARN_DEPRECATED_COLLATION HY000
4080 ER_CONCURRENT_PROCEDURE_USAGE HY000
4081 ER_DA_GLOBAL_CONN_LIMIT HY000
4082 ER_DA_CONN_LIMIT HY000
4083 ER_ALTER_OPERATION_NOT_SUPPORTED_REASON_COLUMN_TYPE_INSTANTHY000
4084 ER_WARN_SF_UDF_NAME_COLLISION HY000
4085 ER_CANNOT_PURGE_BINLOG_WITH_BACKUP_LOCK HY000
4086 ER_TOO_MANY_WINDOWS HY000
4087 ER_MYSQLBACKUP_CLIENT_MSG HY000
4088 ER_COMMENT_CONTAINS_INVALID_STRING HY000
4089 ER_DEFINITION_CONTAINS_INVALID_STRING HY000
4090 ER_CANT_EXECUTE_COMMAND_WITH_ASSIGNED_GTID_NEXT HY000
4091 ER_XA_TEMP_TABLE HY000
4092 ER_INNODB_MAX_ROW_VERSION HY000
4094 ER_OPERATION_NOT_ALLOWED_WHILE_PRIMARY_CHANGE_IS_RUNNING HY000
4095 ER_WARN_DEPRECATED_DATETIME_DELIMITER HY000
4096 ER_WARN_DEPRECATED_SUPERFLUOUS_DELIMITER HY000
4097 ER_CANNOT_PERSIST_SENSITIVE_VARIABLES HY000
4098 ER_WARN_CANNOT_SECURELY_PERSIST_SENSITIVE_VARIABLES HY000
4099 ER_WARN_TRG_ALREADY_EXISTS HY000
4100 ER_IF_NOT_EXISTS_UNSUPPORTED_TRG_EXISTS_ON_DIFFERENT_TABLE HY000
4101 ER_IF_NOT_EXISTS_UNSUPPORTED_UDF_NATIVE_FCT_NAME_COLLISION HY000
4102 ER_SET_PASSWORD_AUTH_PLUGIN_ERROR HY000
4105 ER_SRS_INVALID_LATITUDE_OF_ORIGIN SR002
181

Mapping MySQL Error Numbers to JDBC SQLState Codes
MySQL
Error
Number
MySQL Error Name SQL
Standard
SQLState
4106 ER_SRS_INVALID_LONGITUDE_OF_ORIGIN SR002
4107 ER_SRS_UNUSED_PROJ_PARAMETER_PRESENT SR002
4108 ER_GIPK_COLUMN_EXISTS HY000
4109 ER_GIPK_FAILED_AUTOINC_COLUMN_EXISTS HY000
4110 ER_GIPK_COLUMN_ALTER_NOT_ALLOWED HY000
4111 ER_DROP_PK_COLUMN_TO_DROP_GIPK HY000
4112 ER_CREATE_SELECT_WITH_GIPK_DISALLOWED_IN_SBR HY000
4114 ER_CTE_RECURSIVE_NOT_UNION HY000
4115 ER_COMMAND_BACKEND_FAILED_TO_FETCH_SECURITY_CTX HY000
4116 ER_COMMAND_SERVICE_BACKEND_FAILED HY000
4117 ER_CLIENT_FILE_PRIVILEGE_FOR_REPLICATION_CHECKS HY000
4118 ER_GROUP_REPLICATION_FORCE_MEMBERS_COMMAND_FAILURE HY000
4119 ER_WARN_DEPRECATED_IDENT HY000
4120 ER_INTERSECT_ALL_MAX_DUPLICATES_EXCEEDED HY000
4121 ER_TP_QUERY_THRS_PER_GRP_EXCEEDS_TXN_THR_LIMIT HY000
4122 ER_BAD_TIMESTAMP_FORMAT HY000
4123 ER_SHAPE_PRIDICTION_UDF HY000
4124 ER_SRS_INVALID_HEIGHT SR002
4125 ER_SRS_INVALID_SCALING SR002
4126 ER_SRS_INVALID_ZONE_WIDTH SR002
4127 ER_SRS_INVALID_LATITUDE_POLAR_STERE_VAR_A SR002
4128 ER_WARN_DEPRECATED_CLIENT_NO_SCHEMA_OPTION HY000
4129 ER_TABLE_NOT_EMPTY HY000
4130 ER_TABLE_NO_PRIMARY_KEY HY000
4131 ER_TABLE_IN_SHARED_TABLESPACE HY000
4132 ER_INDEX_OTHER_THAN_PK HY000
4133 ER_LOAD_BULK_DATA_UNSORTED HY000
4134 ER_BULK_EXECUTOR_ERROR HY000
4135 ER_BULK_READER_LIBCURL_INIT_FAILED HY000
4136 ER_BULK_READER_LIBCURL_ERROR HY000
4137 ER_BULK_READER_SERVER_ERROR HY000
4138 ER_BULK_READER_COMMUNICATION_ERROR HY000
4139 ER_BULK_LOAD_DATA_FAILED HY000
4140 ER_BULK_LOADER_COLUMN_TOO_BIG_FOR_LEFTOVER_BUFFER HY000
4141 ER_BULK_LOADER_COMPONENT_ERROR HY000
4142 ER_BULK_LOADER_FILE_CONTAINS_LESS_LINES_THAN_IGNORE_CLAUSE HY000
182

Mapping MySQL Error Numbers to JDBC SQLState Codes
MySQL
Error
Number
MySQL Error Name SQL
Standard
SQLState
4143 ER_BULK_PARSER_MISSING_ENCLOSED_BY HY000
4144 ER_BULK_PARSER_ROW_BUFFER_MAX_TOTAL_COLS_EXCEEDED HY000
4145 ER_BULK_PARSER_COPY_BUFFER_SIZE_EXCEEDED HY000
4146 ER_BULK_PARSER_UNEXPECTED_END_OF_INPUT HY000
4147 ER_BULK_PARSER_UNEXPECTED_ROW_TERMINATOR HY000
4148 ER_BULK_PARSER_UNEXPECTED_CHAR_AFTER_ENDING_ENCLOSED_BY HY000
4149 ER_BULK_PARSER_UNEXPECTED_CHAR_AFTER_NULL_ESCAPE HY000
4150 ER_BULK_PARSER_UNEXPECTED_CHAR_AFTER_COLUMN_TERMINATOR HY000
4151 ER_BULK_PARSER_INCOMPLETE_ESCAPE_SEQUENCE HY000
4152 ER_LOAD_BULK_DATA_FAILED HY000
4153 ER_LOAD_BULK_DATA_WRONG_VALUE_FOR_FIELD HY000
4154 ER_LOAD_BULK_DATA_WARN_NULL_TO_NOTNULL HY000
4155 ER_REQUIRE_TABLE_PRIMARY_KEY_CHECK_GENERATE_WITH_GR HY000
4156 ER_CANT_CHANGE_SYS_VAR_IN_READ_ONLY_MODE HY000
4157 ER_INNODB_INSTANT_ADD_DROP_NOT_SUPPORTED_MAX_SIZE HY000
4158 ER_INNODB_INSTANT_ADD_NOT_SUPPORTED_MAX_FIELDS HY000
4159 ER_CANT_SET_PERSISTED HY000
4160 ER_INSTALL_COMPONENT_SET_NULL_VALUE HY000
4161 ER_INSTALL_COMPONENT_SET_UNUSED_VALUE HY000
4162 ER_WARN_DEPRECATED_USER_DEFINED_COLLATIONS HY000
4163 ER_USER_LOCK_OVERLONG_NAME 42000
4164 ER_WARN_NO_SPACE_VERSION_COMMENT HY000
4165 ER_VALIDATE_PASSWORD_INSUFFICIENT_CHANGED_CHARACTERS HY000
4166 ER_WARN_DEPRECATED_WITH_NOTE HY000
5000 ER_X_BAD_MESSAGE HY000
5001 ER_X_CAPABILITIES_PREPARE_FAILED HY000
5002 ER_X_CAPABILITY_NOT_FOUND HY000
5003 ER_X_INVALID_PROTOCOL_DATA HY000
5004 ER_X_BAD_CONNECTION_SESSION_ATTRIBUTE_VALUE_LENGTH HY000
5005 ER_X_BAD_CONNECTION_SESSION_ATTRIBUTE_KEY_LENGTH HY000
5006 ER_X_BAD_CONNECTION_SESSION_ATTRIBUTE_EMPTY_KEY HY000
5007 ER_X_BAD_CONNECTION_SESSION_ATTRIBUTE_LENGTH HY000
5008 ER_X_BAD_CONNECTION_SESSION_ATTRIBUTE_TYPE HY000
5009 ER_X_CAPABILITY_SET_NOT_ALLOWED HY000
5010 ER_X_SERVICE_ERROR HY000
5011 ER_X_SESSION HY000
183

Mapping MySQL Error Numbers to JDBC SQLState Codes
MySQL
Error
Number
MySQL Error Name SQL
Standard
SQLState
5012 ER_X_INVALID_ARGUMENT HY000
5013 ER_X_MISSING_ARGUMENT HY000
5014 ER_X_BAD_INSERT_DATA HY000
5015 ER_X_CMD_NUM_ARGUMENTS HY000
5016 ER_X_CMD_ARGUMENT_TYPE HY000
5017 ER_X_CMD_ARGUMENT_VALUE HY000
5018 ER_X_BAD_UPSERT_DATA HY000
5019 ER_X_DUPLICATED_CAPABILITIES HY000
5020 ER_X_CMD_ARGUMENT_OBJECT_EMPTY HY000
5021 ER_X_CMD_INVALID_ARGUMENT HY000
5050 ER_X_BAD_UPDATE_DATA HY000
5051 ER_X_BAD_TYPE_OF_UPDATE HY000
5052 ER_X_BAD_COLUMN_TO_UPDATE HY000
5053 ER_X_BAD_MEMBER_TO_UPDATE HY000
5110 ER_X_BAD_STATEMENT_ID HY000
5111 ER_X_BAD_CURSOR_ID HY000
5112 ER_X_BAD_SCHEMA HY000
5113 ER_X_BAD_TABLE HY000
5114 ER_X_BAD_PROJECTION HY000
5115 ER_X_DOC_ID_MISSING HY000
5116 ER_X_DUPLICATE_ENTRY HY000
5117 ER_X_DOC_REQUIRED_FIELD_MISSING HY000
5120 ER_X_PROJ_BAD_KEY_NAME HY000
5121 ER_X_BAD_DOC_PATH HY000
5122 ER_X_CURSOR_EXISTS HY000
5123 ER_X_CURSOR_REACHED_EOF HY000
5131 ER_X_PREPARED_STATMENT_CAN_HAVE_ONE_CURSOR HY000
5133 ER_X_PREPARED_EXECUTE_ARGUMENT_NOT_SUPPORTED HY000
5134 ER_X_PREPARED_EXECUTE_ARGUMENT_CONSISTENCY HY000
5150 ER_X_EXPR_BAD_OPERATOR HY000
5151 ER_X_EXPR_BAD_NUM_ARGS HY000
5152 ER_X_EXPR_MISSING_ARG HY000
5153 ER_X_EXPR_BAD_TYPE_VALUE HY000
5154 ER_X_EXPR_BAD_VALUE HY000
5156 ER_X_INVALID_COLLECTION HY000
5157 ER_X_INVALID_ADMIN_COMMAND HY000
184

Mapping MySQL Error Numbers to JDBC SQLState Codes
MySQL
Error
Number
MySQL Error Name SQL
Standard
SQLState
5158 ER_X_EXPECT_NOT_OPEN HY000
5159 ER_X_EXPECT_NO_ERROR_FAILED HY000
5160 ER_X_EXPECT_BAD_CONDITION HY000
5161 ER_X_EXPECT_BAD_CONDITION_VALUE HY000
5162 ER_X_INVALID_NAMESPACE HY000
5163 ER_X_BAD_NOTICE HY000
5164 ER_X_CANNOT_DISABLE_NOTICE HY000
5165 ER_X_BAD_CONFIGURATION HY000
5167 ER_X_MYSQLX_ACCOUNT_MISSING_PERMISSIONS HY000
5168 ER_X_EXPECT_FIELD_EXISTS_FAILED HY000
5169 ER_X_BAD_LOCKING HY000
5170 ER_X_FRAME_COMPRESSION_DISABLED HY000
5171 ER_X_DECOMPRESSION_FAILED HY000
5174 ER_X_BAD_COMPRESSED_FRAME HY000
5175 ER_X_CAPABILITY_COMPRESSION_INVALID_ALGORITHM HY000
5176 ER_X_CAPABILITY_COMPRESSION_INVALID_SERVER_STYLE HY000
5177 ER_X_CAPABILITY_COMPRESSION_INVALID_CLIENT_STYLE HY000
5178 ER_X_CAPABILITY_COMPRESSION_INVALID_OPTION HY000
5179 ER_X_CAPABILITY_COMPRESSION_MISSING_REQUIRED_FIELDS HY000
5180 ER_X_DOCUMENT_DOESNT_MATCH_EXPECTED_SCHEMA HY000
5181 ER_X_COLLECTION_OPTION_DOESNT_EXISTS HY000
5182 ER_X_INVALID_VALIDATION_SCHEMA HY000
6000 ER_LANGUAGE_COMPONENT HY000
6001 ER_LANGUAGE_COMPONENT_NOT_AVAILABLE HY000
6002 ER_LANGUAGE_COMPONENT_UNSUPPORTED_LANGUAGE HY000
6003 ER_LANGUAGE_COMPONENT_CANNOT_UNINSTALL HY000
6004 ER_SP_NO_ALTER_LANGUAGE HY000
6005 ER_EXPLAIN_INTO_ANALYZE_NOT_SUPPORTED 0A000
6006 ER_EXPLAIN_INTO_IMPLICIT_FORMAT_NOT_SUPPORTED 0A000
6007 ER_EXPLAIN_INTO_FORMAT_NOT_SUPPORTED 0A000
6008 ER_NULL_CANT_BE_PERSISTED_FOR_READONLY HY000
6009 ER_EXPLAIN_INTO_FOR_CONNECTION_NOT_SUPPORTED 0A000
6010 ER_INNODB_IMPORT_WRONG_DROPPED_ENUM_LENGTH HY000
6011 ER_INNODB_IMPORT_WRONG_NUMBER_OF_INDEXES_ZERO HY000
6012 ER_INNODB_IMPORT_WRONG_NUMBER_OF_INDEXES_TOO_HIGH HY000
6013 ER_INNODB_IMPORT_DROP_COL_METADATA_MISMATCH HY000
185

Mapping MySQL Error Numbers to JDBC SQLState Codes
MySQL
Error
Number
MySQL Error Name SQL
Standard
SQLState
6014 ER_INNODB_IMPORT_ENUM_NULL_TERMINATOR_MISSING HY000
6015 ER_SIMULATED_INJECTION_ERROR HY000
6016 ER_WARN_DEPRECATED_DYNAMIC_PRIV_IN_GRANT HY000
6017 ER_BULK_MULTI_READER_OPEN_FILE_FAILED HY000
6018 ER_BULK_MULTI_READER_READ_FILE_FAILED HY000
6019 ER_BULK_MERGE_INVALID_CHUNK HY000
6020 ER_BULK_MERGE_NOT_ALL_CHUNKS_CONSUMED HY000
6021 ER_BULK_WRITER_LIBCURL_INIT_FAILED HY000
6022 ER_BULK_WRITER_LIBCURL_ERROR HY000
6023 ER_BULK_SORTING_LOADER_WRITE HY000
6024 ER_BULK_SORTING_LOADER_WAIT HY000
6025 ER_BULK_READER_OPEN_FILE_FAILED HY000
6026 ER_BULK_LOAD_TABLE_HAS_INSTANT_COLS HY000
6027 ER_BULK_LOAD_RESOURCE HY000
6028 ER_BULK_LOAD_SECONDARY_ENGINE HY000
6029 ER_BULK_READER_ERROR HY000
6030 ER_BULK_READER_FILE_DOESNT_EXIST HY000
6031 ER_BULK_READER_COULDNT_RESOLVE_HOST HY000
6032 ER_START_REPLICA_CHANNEL_INVALID_CONFIGURATION HY000
6033 ER_CANNOT_EXECUTE_IN_PRIMARY HY000
6034 ER_TOO_MANY_GROUP_BY_MODIFIER_BRANCHES HY000
6035 ER_WARN_DEPRECATED_ENGINE_SYNTAX_NO_REPLACEMENT HY000
6036 ER_QUALIFY_WITHOUT_WINDOW_FUNCTION HY000
6037 ER_SUPPORTED_ONLY_WITH_HYPERGRAPH HY000
6038 ER_SPECIFIC_ACCESS_DENIED HY000
6039 ER_CANT_SET_GTID_NEXT_TO_AUTOMATIC_TAGGED_WHEN_GTID_MODE_IS_OFFHY000
6040 ER_GTID_NEXT_TAG_GTID_MODE_OFF HY000
6041 ER_LH_COL_NOT_NULLABLE HY000
6042 ER_LH_WARN_COL_MISSING_NOT_NULLABLE HY000
6043 ER_LH_COL_IS_EMPTY HY000
6044 ER_LH_COL_IS_EMPTY_WARN HY000
6045 ER_LH_BAD_VALUE HY000
6046 ER_LH_DECIMAL_UNKNOWN_ERR HY000
6047 ER_LH_DECIMAL_OOM_ERR HY000
6048 ER_LH_WARN_DECIMAL_ROUNDING HY000
6049 ER_LH_DECIMAL_PRECISION_EXCEEDS_SCHEMA HY000
186

Mapping MySQL Error Numbers to JDBC SQLState Codes
MySQL
Error
Number
MySQL Error Name SQL
Standard
SQLState
6050 ER_LH_EXCEEDS_MIN HY000
6051 ER_LH_EXCEEDS_MAX HY000
6052 ER_LH_WARN_EXCEEDS_MIN_TRUNCATING HY000
6053 ER_LH_WARN_EXCEEDS_MAX_TRUNCATING HY000
6054 ER_LH_REAL_IS_NAN HY000
6055 ER_LH_OUT_OF_RANGE HY000
6056 ER_LH_DATETIME_FORMAT HY000
6057 ER_LH_WARN_TRUNCATED HY000
6058 ER_LH_CANNOT_CONVERT_STRING HY000
6059 ER_LH_RESOURCE_PRINCIPAL_ERR HY000
6060 ER_LH_AWS_AUTH_ERR HY000
6061 ER_LH_CSV_PARSING_ERR HY000
6062 ER_LH_COLUMN_MISMATCH_ERR HY000
6063 ER_LH_COLUMN_MAX_ERR HY000
6064 ER_LH_CHARSET_UNSUPPORTED HY000
6065 ER_LH_PARQUET_DECIMAL_CONVERSION_ERR HY000
6066 ER_LH_STRING_TOO_LONG HY000
6067 ER_LH_RESOURCE_PRINCIPAL_BUCKET_ERR HY000
6068 ER_LH_NO_FILES_FOUND HY000
6069 ER_LH_EMPTY_FILE HY000
6070 ER_LH_DUPLICATE_FILE HY000
6071 ER_LH_AVRO_SCHEMA_DEPTH_EXCEEDS_MAX HY000
6072 ER_LH_AVRO_HEADER_MISMATCH HY000
6073 ER_LH_AVRO_ENUM_CANNOT_CONVERT_CHARSET HY000
6074 ER_LH_AVRO_ENUM_MISMATCH HY000
6075 ER_LH_AVRO_TYPE_CANNOT_CONVERT HY000
6076 ER_LH_AVRO_FILE_ENDS_UNEXPECTEDLY HY000
6077 ER_LH_AVRO_FILE_DATA_CORRUPT HY000
6078 ER_LH_AVRO_INVALID_UNION HY000
6079 ER_LH_AVRO_INVALID_BLOCK_SIZE HY000
6080 ER_LH_AVRO_INVALID_BLOCK_RECORD_COUNT HY000
6081 ER_LH_FORMAT_HEADER_NO_MAGIC_BYTES HY000
6082 ER_LH_AVRO_HEADER_METADATA_ERR HY000
6083 ER_LH_AVRO_HEADER_NO_SCHEMA HY000
6084 ER_LH_AVRO_NO_CODEC_IN_HEADER HY000
6085 ER_LH_AVRO_INVALID_NAME_IN_SCHEMA HY000
187

Mapping MySQL Error Numbers to JDBC SQLState Codes
MySQL
Error
Number
MySQL Error Name SQL
Standard
SQLState
6086 ER_LH_AVRO_DECODING_ERR HY000
6087 ER_LH_PARQUET_NON_UTF8_FILE_ENC HY000
6088 ER_LH_PARQUET_SCHEMA_MISMATCH HY000
6089 ER_LH_PARQUET_ROW_GROUP_SIZE_EXCEEDS_MAX HY000
6090 ER_LH_PARQUET_CANNOT_LOCATE_OFFSET HY000
6091 ER_LH_PARQUET_TYPE_CANNOT_CONVERT HY000
6092 ER_LH_PARQUET_CANNOT_LOCATE_SCHEMA HY000
6093 ER_LH_INFER_SCHEMA_MISMATCH HY000
6094 ER_LH_OOM HY000
6095 ER_LH_WARN_INFER_SKIPPED_LINES HY000
6096 ER_LH_WARN_INFER_SKIPPED_FILES HY000
6097 ER_LH_INFER_FILE_HAS_NO_DATA HY000
6098 ER_LH_INFER_NO_DATA HY000
6099 ER_LH_INFER_NO_FILES HY000
6100 ER_LH_WARN_INFER_USE_DEFAULT_COL_NAMES HY000
6101 ER_LH_PARQUET_CANNOT_READ_HEADER HY000
6102 ER_LH_INFER_WARN_GOT_EXCEPTION HY000
6103 ER_LH_AVRO_CANNOT_PARSE_HEADER HY000
6104 ER_LH_PARQUET_CANT_OPEN_FILE HY000
6105 ER_LH_TOO_LARGE_VALUE_ERR HY000
6106 ER_LH_TOO_LARGE_ROW_ERR HY000
6107 ER_TABLESAMPLE_PERCENTAGE 2202H
6108 ER_TABLESAMPLE_ONLY_ON_BASE_TABLES HY000
6110 ER_RESULT_SIZE_LIMIT_EXCEEDED HY000
6111 ER_LANGUAGE_COMPONENT_INTERNAL HY000
6112 ER_LANGUAGE_COMPONENT_CONCURRENCY_LIMIT HY000
6113 ER_LANGUAGE_COMPONENT_RUNTIME HY000
6114 ER_LANGUAGE_COMPONENT_TIMEZONE HY000
6115 ER_LANGUAGE_COMPONENT_KEYWORD HY000
6116 ER_LANGUAGE_COMPONENT_SET_SYSTEM_VARIABLE HY000
6117 ER_LANGUAGE_COMPONENT_UNSUPPORTED_TYPE HY000
6118 ER_LANGUAGE_COMPONENT_CONVERSION HY000
6119 ER_WARN_SP_STATEMENT_PARTIALLY_EXECUTED HY000
6120 ER_STMT_EXECUTION_NOT_ALLOWED_WITHIN_SP_OR_TRG_OR_UDF HY000
6121 ER_LH_JSON_PARSING HY000
6122 ER_ENGINE_CANNOT_BE_DEFAULT HY000
188

Mapping MySQL Error Numbers to JDBC SQLState Codes
MySQL
Error
Number
MySQL Error Name SQL
Standard
SQLState
6123 ER_PARTITION_PREFIX_KEY_NOT_SUPPORTED HY000
6124 ER_WARN_DEPRECATED_NON_STANDARD_KEY HY000
6125 ER_FK_NO_UNIQUE_INDEX_PARENT HY000
6126 ER_ACCESS_DENIED_NO_PROXY_GRANT HY000
6127 ER_ACCESS_DENIED_NO_PROXY HY000
6128 ER_LH_USER_DATA_ACCESS_FAILED HY000
6129 ER_BULK_READER_ZSTD_ERROR HY000
6130 ER_BULK_PARSER_ERROR HY000
6131 ER_LH_INVALID_JSON_FILE_FORMAT_SCHEMA HY000
6132 ER_LH_INFER_JSON_INVALID_SCHEMA HY000
6133 ER_LH_JSON_FILE_FORMAT_WARN_INFER_SCHEMA HY000
6134 ER_NON_SCALAR_USED_AS_KEY HY000
6135 ER_INCOMPATIBLE_TYPE_AGG HY000
6136 ER_DATA_INCOMPATIBLE_WITH_VECTOR HY000
6137 ER_EXCEEDS_VECTOR_MAX_DIMENSIONS HY000
6138 ER_TO_VECTOR_CONVERSION HY000
6139 ER_EXTERNAL_UNSUPPORTED_INDEX_ALGORITHM HY000
10000 ER_PARSER_TRACE XX999
10001 ER_BOOTSTRAP_CANT_THREAD HY000
10002 ER_TRIGGER_INVALID_VALUE HY000
10003 ER_OPT_WRONG_TREE HY000
10004 ER_DD_FAILSAFE HY000
10005 ER_DD_NO_WRITES_NO_REPOPULATION HY000
10006 ER_DD_VERSION_FOUND HY000
10007 ER_DD_VERSION_INSTALLED HY000
10008 ER_DD_VERSION_UNSUPPORTED HY000
10010 ER_LOG_SYSLOG_CANNOT_OPEN HY000
10011 ER_LOG_SLOW_CANNOT_OPEN HY000
10012 ER_LOG_GENERAL_CANNOT_OPEN HY000
10013 ER_LOG_CANNOT_WRITE HY000
10014 ER_RPL_ZOMBIE_ENCOUNTERED HY000
10015 ER_RPL_GTID_TABLE_CANNOT_OPEN HY000
10016 ER_SYSTEM_SCHEMA_NOT_FOUND HY000
10017 ER_DD_INIT_UPGRADE_FAILED HY000
10018 ER_VIEW_UNKNOWN_CHARSET_OR_COLLATION HY000
10019 ER_DD_VIEW_CANT_ALLOC_CHARSET HY000
189

Mapping MySQL Error Numbers to JDBC SQLState Codes
MySQL
Error
Number
MySQL Error Name SQL
Standard
SQLState
10020 ER_DD_INIT_FAILED HY000
10021 ER_DD_UPDATING_PLUGIN_MD_FAILED HY000
10023 ER_DD_VIEW_CANT_CREATE HY000
10024 ER_DD_METADATA_NOT_FOUND HY000
10025 ER_DD_CACHE_NOT_EMPTY_AT_SHUTDOWN HY000
10026 ER_DD_OBJECT_REMAINS HY000
10027 ER_DD_OBJECT_REMAINS_IN_RELEASER HY000
10028 ER_DD_OBJECT_RELEASER_REMAINS HY000
10029 ER_DD_CANT_GET_OBJECT_KEY HY000
10030 ER_DD_CANT_CREATE_OBJECT_KEY HY000
10031 ER_CANT_CREATE_HANDLE_MGR_THREAD HY000
10032 ER_RPL_REPO_HAS_GAPS HY000
10033 ER_INVALID_VALUE_FOR_ENFORCE_GTID_CONSISTENCY HY000
10034 ER_CHANGED_ENFORCE_GTID_CONSISTENCY HY000
10035 ER_CHANGED_GTID_MODE HY000
10036 ER_DISABLED_STORAGE_ENGINE_AS_DEFAULT HY000
10037 ER_DEBUG_SYNC_HIT HY000
10038 ER_DEBUG_SYNC_EXECUTED HY000
10039 ER_DEBUG_SYNC_THREAD_MAX HY000
10040 ER_DEBUG_SYNC_OOM HY000
10041 ER_CANT_INIT_TC_LOG HY000
10042 ER_EVENT_CANT_INIT_QUEUE HY000
10043 ER_EVENT_PURGING_QUEUE HY000
10044 ER_EVENT_LAST_EXECUTION HY000
10045 ER_EVENT_MESSAGE_STACK HY000
10046 ER_EVENT_EXECUTION_FAILED HY000
10047 ER_CANT_INIT_SCHEDULER_THREAD HY000
10048 ER_SCHEDULER_STOPPED HY000
10049 ER_CANT_CREATE_SCHEDULER_THREAD HY000
10050 ER_SCHEDULER_WAITING HY000
10051 ER_SCHEDULER_STARTED HY000
10052 ER_SCHEDULER_STOPPING_FAILED_TO_GET_EVENT HY000
10053 ER_SCHEDULER_STOPPING_FAILED_TO_CREATE_WORKER HY000
10054 ER_SCHEDULER_KILLING HY000
10055 ER_UNABLE_TO_RESOLVE_IP HY000
10056 ER_UNABLE_TO_RESOLVE_HOSTNAME HY000
190

Mapping MySQL Error Numbers to JDBC SQLState Codes
MySQL
Error
Number
MySQL Error Name SQL
Standard
SQLState
10057 ER_HOSTNAME_RESEMBLES_IPV4 HY000
10058 ER_HOSTNAME_DOESNT_RESOLVE_TO HY000
10059 ER_ADDRESSES_FOR_HOSTNAME_HEADER HY000
10060 ER_ADDRESSES_FOR_HOSTNAME_LIST_ITEM HY000
10061 ER_TRG_WITHOUT_DEFINER HY000
10062 ER_TRG_NO_CLIENT_CHARSET HY000
10063 ER_PARSING_VIEW HY000
10064 ER_COMPONENTS_INFRASTRUCTURE_BOOTSTRAP HY000
10065 ER_COMPONENTS_INFRASTRUCTURE_SHUTDOWN HY000
10066 ER_COMPONENTS_PERSIST_LOADER_BOOTSTRAP HY000
10067 ER_DEPART_WITH_GRACE HY000
10068 ER_CA_SELF_SIGNED HY000
10069 ER_SSL_LIBRARY_ERROR HY000
10070 ER_NO_THD_NO_UUID HY000
10071 ER_UUID_SALT HY000
10072 ER_UUID_IS HY000
10073 ER_UUID_INVALID HY000
10074 ER_UUID_SCRUB HY000
10075 ER_CREATING_NEW_UUID HY000
10076 ER_CANT_CREATE_UUID HY000
10077 ER_UNKNOWN_UNSUPPORTED_STORAGE_ENGINE HY000
10078 ER_SECURE_AUTH_VALUE_UNSUPPORTED HY000
10079 ER_INVALID_INSTRUMENT HY000
10080 ER_INNODB_MANDATORY HY000
10083 ER_VERBOSE_REQUIRES_HELP HY000
10084 ER_POINTLESS_WITHOUT_SLOWLOG HY000
10085 ER_WASTEFUL_NET_BUFFER_SIZE HY000
10086 ER_DEPRECATED_TIMESTAMP_IMPLICIT_DEFAULTS HY000
10087 ER_FT_BOOL_SYNTAX_INVALID HY000
10088 ER_CREDENTIALLESS_AUTO_USER_BAD HY000
10089 ER_CONNECTION_HANDLING_OOM HY000
10090 ER_THREAD_HANDLING_OOM HY000
10091 ER_CANT_CREATE_TEST_FILE HY000
10092 ER_CANT_CREATE_PID_FILE HY000
10093 ER_CANT_REMOVE_PID_FILE HY000
10094 ER_CANT_CREATE_SHUTDOWN_THREAD HY000
191

Mapping MySQL Error Numbers to JDBC SQLState Codes
MySQL
Error
Number
MySQL Error Name SQL
Standard
SQLState
10095 ER_SEC_FILE_PRIV_CANT_ACCESS_DIR HY000
10096 ER_SEC_FILE_PRIV_IGNORED HY000
10097 ER_SEC_FILE_PRIV_EMPTY HY000
10098 ER_SEC_FILE_PRIV_NULL HY000
10099 ER_SEC_FILE_PRIV_DIRECTORY_INSECURE HY000
10100 ER_SEC_FILE_PRIV_CANT_STAT HY000
10101 ER_SEC_FILE_PRIV_DIRECTORY_PERMISSIONS HY000
10102 ER_SEC_FILE_PRIV_ARGUMENT_TOO_LONG HY000
10103 ER_CANT_CREATE_NAMED_PIPES_THREAD HY000
10104 ER_CANT_CREATE_TCPIP_THREAD HY000
10105 ER_CANT_CREATE_SHM_THREAD HY000
10106 ER_CANT_CREATE_INTERRUPT_THREAD HY000
10107 ER_WRITABLE_CONFIG_REMOVED HY000
10108 ER_CORE_VALUES HY000
10109 ER_WRONG_DATETIME_SPEC HY000
10110 ER_RPL_BINLOG_FILTERS_OOM HY000
10111 ER_KEYCACHE_OOM HY000
10112 ER_CONFIRMING_THE_FUTURE HY000
10113 ER_BACK_IN_TIME HY000
10114 ER_FUTURE_DATE HY000
10115 ER_UNSUPPORTED_DATE HY000
10116 ER_STARTING_AS HY000
10117 ER_SHUTTING_DOWN_REPLICA_THREADS HY000
10118 ER_DISCONNECTING_REMAINING_CLIENTS HY000
10119 ER_ABORTING HY000
10120 ER_BINLOG_END HY000
10121 ER_CALL_ME_LOCALHOST HY000
10122 ER_USER_REQUIRES_ROOT HY000
10123 ER_REALLY_RUN_AS_ROOT HY000
10124 ER_USER_WHAT_USER HY000
10125 ER_TRANSPORTS_WHAT_TRANSPORTS HY000
10126 ER_FAIL_SETGID HY000
10127 ER_FAIL_SETUID HY000
10128 ER_FAIL_SETREGID HY000
10129 ER_FAIL_SETREUID HY000
10130 ER_FAIL_CHROOT HY000
192

Mapping MySQL Error Numbers to JDBC SQLState Codes
MySQL
Error
Number
MySQL Error Name SQL
Standard
SQLState
10131 ER_WIN_LISTEN_BUT_HOW HY000
10132 ER_NOT_RIGHT_NOW HY000
10133 ER_FIXING_CLIENT_CHARSET HY000
10134 ER_OOM HY000
10135 ER_FAILED_TO_LOCK_MEM HY000
10136 ER_MYINIT_FAILED HY000
10137 ER_BEG_INITFILE HY000
10138 ER_END_INITFILE HY000
10139 ER_CHANGED_MAX_OPEN_FILES HY000
10140 ER_CANT_INCREASE_MAX_OPEN_FILES HY000
10141 ER_CHANGED_MAX_CONNECTIONS HY000
10142 ER_CHANGED_TABLE_OPEN_CACHE HY000
10143 ER_THE_USER_ABIDES HY000
10144 ER_RPL_CANT_ADD_DO_TABLE HY000
10145 ER_RPL_CANT_ADD_IGNORE_TABLE HY000
10146 ER_TRACK_VARIABLES_BOGUS HY000
10147 ER_EXCESS_ARGUMENTS HY000
10148 ER_VERBOSE_HINT HY000
10149 ER_CANT_READ_ERRMSGS HY000
10150 ER_CANT_INIT_DBS HY000
10151 ER_LOG_OUTPUT_CONTRADICTORY HY000
10152 ER_NO_CSV_NO_LOG_TABLES HY000
10153 ER_RPL_REWRITEDB_MISSING_ARROW HY000
10154 ER_RPL_REWRITEDB_EMPTY_FROM HY000
10155 ER_RPL_REWRITEDB_EMPTY_TO HY000
10156 ER_LOG_FILES_GIVEN_LOG_OUTPUT_IS_TABLE HY000
10157 ER_LOG_FILE_INVALID HY000
10158 ER_LOWER_CASE_TABLE_NAMES_CS_DD_ON_CI_FS_UNSUPPORTED HY000
10159 ER_LOWER_CASE_TABLE_NAMES_USING_2 HY000
10160 ER_LOWER_CASE_TABLE_NAMES_USING_0 HY000
10161 ER_NEED_LOG_BIN HY000
10162 ER_NEED_FILE_INSTEAD_OF_DIR HY000
10163 ER_LOG_BIN_BETTER_WITH_NAME HY000
10164 ER_BINLOG_NEEDS_SERVERID HY000
10165 ER_RPL_CANT_MAKE_PATHS HY000
10166 ER_CANT_INITIALIZE_GTID HY000
193

Mapping MySQL Error Numbers to JDBC SQLState Codes
MySQL
Error
Number
MySQL Error Name SQL
Standard
SQLState
10167 ER_CANT_INITIALIZE_EARLY_PLUGINS HY000
10168 ER_CANT_INITIALIZE_BUILTIN_PLUGINS HY000
10169 ER_CANT_INITIALIZE_DYNAMIC_PLUGINS HY000
10170 ER_PERFSCHEMA_INIT_FAILED HY000
10171 ER_STACKSIZE_UNEXPECTED HY000
10173 ER_CANT_STAT_DATADIR HY000
10174 ER_CANT_CHOWN_DATADIR HY000
10175 ER_CANT_SET_UP_PERSISTED_VALUES HY000
10176 ER_CANT_SAVE_GTIDS HY000
10178 ER_CANT_JOIN_SHUTDOWN_THREAD HY000
10179 ER_CANT_HASH_DO_AND_IGNORE_RULES HY000
10180 ER_CANT_OPEN_CA HY000
10181 ER_CANT_ACCESS_CAPATH HY000
10182 ER_SSL_TRYING_DATADIR_DEFAULTS HY000
10183 ER_AUTO_OPTIONS_FAILED HY000
10184 ER_CANT_INIT_TIMER HY000
10185 ER_SERVERID_TOO_LARGE HY000
10186 ER_DEFAULT_SE_UNAVAILABLE HY000
10187 ER_CANT_OPEN_ERROR_LOG HY000
10188 ER_INVALID_ERROR_LOG_NAME HY000
10189 ER_RPL_INFINITY_DENIED HY000
10190 ER_RPL_INFINITY_IGNORED HY000
10192 ER_TABLE_CHECK_INTACT HY000
10193 ER_DD_TABLESPACE_NOT_FOUND HY000
10194 ER_DD_TRG_CONNECTION_COLLATION_MISSING HY000
10195 ER_DD_TRG_DB_COLLATION_MISSING HY000
10196 ER_DD_TRG_DEFINER_OOM HY000
10197 ER_DD_TRG_FILE_UNREADABLE HY000
10198 ER_TRG_CANT_PARSE HY000
10199 ER_DD_TRG_CANT_ADD HY000
10200 ER_DD_CANT_RESOLVE_VIEW HY000
10201 ER_DD_VIEW_WITHOUT_DEFINER HY000
10202 ER_PLUGIN_INIT_FAILED HY000
10203 ER_RPL_TRX_DELEGATES_INIT_FAILED HY000
10204 ER_RPL_BINLOG_STORAGE_DELEGATES_INIT_FAILED HY000
10205 ER_RPL_BINLOG_TRANSMIT_DELEGATES_INIT_FAILED HY000
194

Mapping MySQL Error Numbers to JDBC SQLState Codes
MySQL
Error
Number
MySQL Error Name SQL
Standard
SQLState
10206 ER_RPL_BINLOG_RELAY_DELEGATES_INIT_FAILED HY000
10207 ER_RPL_PLUGIN_FUNCTION_FAILED HY000
10208 ER_SQL_HA_READ_FAILED HY000
10209 ER_SR_BOGUS_VALUE HY000
10210 ER_SR_INVALID_CONTEXT HY000
10211 ER_READING_TABLE_FAILED HY000
10212 ER_DES_FILE_WRONG_KEY HY000
10214 ER_JSON_PARSE_ERROR HY000
10215 ER_CONFIG_OPTION_WITHOUT_GROUP HY000
10216 ER_VALGRIND_DO_QUICK_LEAK_CHECK HY000
10217 ER_VALGRIND_COUNT_LEAKS HY000
10218 ER_LOAD_DATA_INFILE_FAILED_IN_UNEXPECTED_WAY HY000
10219 ER_UNKNOWN_ERROR_NUMBER HY000
10220 ER_UDF_CANT_ALLOC_FOR_STRUCTURES HY000
10221 ER_UDF_CANT_ALLOC_FOR_FUNCTION HY000
10222 ER_UDF_INVALID_ROW_IN_FUNCTION_TABLE HY000
10223 ER_UDF_CANT_OPEN_FUNCTION_TABLE HY000
10224 ER_XA_RECOVER_FOUND_TRX_IN_SE HY000
10225 ER_XA_RECOVER_FOUND_XA_TRX HY000
10229 ER_XA_STARTING_RECOVERY HY000
10230 ER_XA_NO_MULTI_2PC_HEURISTIC_RECOVER HY000
10231 ER_XA_RECOVER_EXPLANATION HY000
10232 ER_XA_RECOVERY_DONE HY000
10233 ER_TRX_GTID_COLLECT_REJECT HY000
10234 ER_SQL_AUTHOR_DEFAULT_ROLES_FAIL HY000
10235 ER_SQL_USER_TABLE_CREATE_WARNING HY000
10236 ER_SQL_USER_TABLE_ALTER_WARNING HY000
10237 ER_ROW_IN_WRONG_PARTITION_PLEASE_REPAIR HY000
10238 ER_MYISAM_CRASHED_ERROR_IN_THREAD HY000
10239 ER_MYISAM_CRASHED_ERROR_IN HY000
10240 ER_TOO_MANY_STORAGE_ENGINES HY000
10241 ER_SE_TYPECODE_CONFLICT HY000
10242 ER_TRX_WRITE_SET_OOM HY000
10243 ER_HANDLERTON_OOM HY000
10244 ER_CONN_SHM_LISTENER HY000
10245 ER_CONN_SHM_CANT_CREATE_SERVICE HY000
195

Mapping MySQL Error Numbers to JDBC SQLState Codes
MySQL
Error
Number
MySQL Error Name SQL
Standard
SQLState
10246 ER_CONN_SHM_CANT_CREATE_CONNECTION HY000
10247 ER_CONN_PIP_CANT_CREATE_EVENT HY000
10248 ER_CONN_PIP_CANT_CREATE_PIPE HY000
10249 ER_CONN_PER_THREAD_NO_THREAD HY000
10250 ER_CONN_TCP_NO_SOCKET HY000
10251 ER_CONN_TCP_CREATED HY000
10252 ER_CONN_TCP_ADDRESS HY000
10253 ER_CONN_TCP_IPV6_AVAILABLE HY000
10254 ER_CONN_TCP_IPV6_UNAVAILABLE HY000
10255 ER_CONN_TCP_ERROR_WITH_STRERROR HY000
10256 ER_CONN_TCP_CANT_RESOLVE_HOSTNAME HY000
10257 ER_CONN_TCP_IS_THERE_ANOTHER_USING_PORT HY000
10258 ER_CONN_UNIX_IS_THERE_ANOTHER_USING_SOCKET HY000
10259 ER_CONN_UNIX_PID_CLAIMED_SOCKET_FILE HY000
10260 ER_CONN_TCP_CANT_RESET_V6ONLY HY000
10261 ER_CONN_TCP_BIND_RETRY HY000
10262 ER_CONN_TCP_BIND_FAIL HY000
10263 ER_CONN_TCP_IP_NOT_LOGGED HY000
10264 ER_CONN_TCP_RESOLVE_INFO HY000
10265 ER_CONN_TCP_START_FAIL HY000
10266 ER_CONN_TCP_LISTEN_FAIL HY000
10267 ER_CONN_UNIX_PATH_TOO_LONG HY000
10268 ER_CONN_UNIX_LOCK_FILE_FAIL HY000
10269 ER_CONN_UNIX_NO_FD HY000
10270 ER_CONN_UNIX_NO_BIND_NO_START HY000
10271 ER_CONN_UNIX_LISTEN_FAILED HY000
10272 ER_CONN_UNIX_LOCK_FILE_GIVING_UP HY000
10273 ER_CONN_UNIX_LOCK_FILE_CANT_CREATE HY000
10274 ER_CONN_UNIX_LOCK_FILE_CANT_OPEN HY000
10275 ER_CONN_UNIX_LOCK_FILE_CANT_READ HY000
10276 ER_CONN_UNIX_LOCK_FILE_EMPTY HY000
10277 ER_CONN_UNIX_LOCK_FILE_PIDLESS HY000
10278 ER_CONN_UNIX_LOCK_FILE_CANT_WRITE HY000
10279 ER_CONN_UNIX_LOCK_FILE_CANT_DELETE HY000
10280 ER_CONN_UNIX_LOCK_FILE_CANT_SYNC HY000
10281 ER_CONN_UNIX_LOCK_FILE_CANT_CLOSE HY000
196

Mapping MySQL Error Numbers to JDBC SQLState Codes
MySQL
Error
Number
MySQL Error Name SQL
Standard
SQLState
10282 ER_CONN_SOCKET_SELECT_FAILED HY000
10283 ER_CONN_SOCKET_ACCEPT_FAILED HY000
10284 ER_AUTH_RSA_CANT_FIND HY000
10285 ER_AUTH_RSA_CANT_PARSE HY000
10286 ER_AUTH_RSA_CANT_READ HY000
10287 ER_AUTH_RSA_FILES_NOT_FOUND HY000
10288 ER_CONN_ATTR_TRUNCATED HY000
10289 ER_X509_CIPHERS_MISMATCH HY000
10290 ER_X509_ISSUER_MISMATCH HY000
10291 ER_X509_SUBJECT_MISMATCH HY000
10292 ER_AUTH_CANT_ACTIVATE_ROLE HY000
10293 ER_X509_NEEDS_RSA_PRIVKEY HY000
10294 ER_X509_CANT_WRITE_KEY HY000
10295 ER_X509_CANT_CHMOD_KEY HY000
10296 ER_X509_CANT_READ_CA_KEY HY000
10297 ER_X509_CANT_READ_CA_CERT HY000
10298 ER_X509_CANT_CREATE_CERT HY000
10299 ER_X509_CANT_WRITE_CERT HY000
10300 ER_AUTH_CANT_CREATE_RSA_PAIR HY000
10301 ER_AUTH_CANT_WRITE_PRIVKEY HY000
10302 ER_AUTH_CANT_WRITE_PUBKEY HY000
10303 ER_AUTH_SSL_CONF_PREVENTS_CERT_GENERATION HY000
10304 ER_AUTH_USING_EXISTING_CERTS HY000
10305 ER_AUTH_CERTS_SAVED_TO_DATADIR HY000
10306 ER_AUTH_CERT_GENERATION_DISABLED HY000
10307 ER_AUTH_RSA_CONF_PREVENTS_KEY_GENERATION HY000
10308 ER_AUTH_KEY_GENERATION_SKIPPED_PAIR_PRESENT HY000
10309 ER_AUTH_KEYS_SAVED_TO_DATADIR HY000
10310 ER_AUTH_KEY_GENERATION_DISABLED HY000
10311 ER_AUTHCACHE_PROXIES_PRIV_SKIPPED_NEEDS_RESOLVE HY000
10312 ER_AUTHCACHE_PLUGIN_MISSING HY000
10313 ER_AUTHCACHE_PLUGIN_CONFIG HY000
10315 ER_AUTHCACHE_USER_SKIPPED_NEEDS_RESOLVE HY000
10316 ER_AUTHCACHE_USER_TABLE_DODGY HY000
10317 ER_AUTHCACHE_USER_IGNORED_DEPRECATED_PASSWORD HY000
10318 ER_AUTHCACHE_USER_IGNORED_NEEDS_PLUGIN HY000
197

Mapping MySQL Error Numbers to JDBC SQLState Codes
MySQL
Error
Number
MySQL Error Name SQL
Standard
SQLState
10319 ER_AUTHCACHE_USER_IGNORED_INVALID_PASSWORD HY000
10320 ER_AUTHCACHE_EXPIRED_PASSWORD_UNSUPPORTED HY000
10321 ER_NO_SUPER_WITHOUT_USER_PLUGIN HY000
10322 ER_AUTHCACHE_DB_IGNORED_EMPTY_NAME HY000
10323 ER_AUTHCACHE_DB_SKIPPED_NEEDS_RESOLVE HY000
10324 ER_AUTHCACHE_DB_ENTRY_LOWERCASED_REVOKE_WILL_FAIL HY000
10325 ER_AUTHCACHE_TABLE_PROXIES_PRIV_MISSING HY000
10326 ER_AUTHCACHE_CANT_OPEN_AND_LOCK_PRIVILEGE_TABLES HY000
10327 ER_AUTHCACHE_CANT_INIT_GRANT_SUBSYSTEM HY000
10328 ER_AUTHCACHE_PROCS_PRIV_SKIPPED_NEEDS_RESOLVE HY000
10329 ER_AUTHCACHE_PROCS_PRIV_ENTRY_IGNORED_BAD_ROUTINE_TYPE HY000
10330 ER_AUTHCACHE_TABLES_PRIV_SKIPPED_NEEDS_RESOLVE HY000
10331 ER_USER_NOT_IN_EXTRA_USERS_BINLOG_POSSIBLY_INCOMPLETE HY000
10332 ER_DD_SCHEMA_NOT_FOUND HY000
10333 ER_DD_TABLE_NOT_FOUND HY000
10334 ER_DD_SE_INIT_FAILED HY000
10335 ER_DD_ABORTING_PARTIAL_UPGRADE HY000
10336 ER_DD_FRM_EXISTS_FOR_TABLE HY000
10337 ER_DD_CREATED_FOR_UPGRADE HY000
10338 ER_ERRMSG_CANT_FIND_FILE HY000
10340 ER_ERRMSG_MISSING_IN_FILE HY000
10341 ER_ERRMSG_OOM HY000
10342 ER_ERRMSG_CANT_READ HY000
10343 ER_TABLE_INCOMPATIBLE_DECIMAL_FIELD HY000
10344 ER_TABLE_INCOMPATIBLE_YEAR_FIELD HY000
10345 ER_INVALID_CHARSET_AND_DEFAULT_IS_MB HY000
10346 ER_TABLE_WRONG_KEY_DEFINITION HY000
10347 ER_CANT_OPEN_FRM_FILE HY000
10348 ER_CANT_READ_FRM_FILE HY000
10349 ER_TABLE_CREATED_WITH_DIFFERENT_VERSION HY000
10350 ER_VIEW_UNPARSABLE HY000
10351 ER_FILE_TYPE_UNKNOWN HY000
10352 ER_INVALID_INFO_IN_FRM HY000
10353 ER_CANT_OPEN_AND_LOCK_PRIVILEGE_TABLES HY000
10354 ER_AUDIT_PLUGIN_DOES_NOT_SUPPORT_AUDIT_AUTH_EVENTS HY000
10355 ER_AUDIT_PLUGIN_HAS_INVALID_DATA HY000
198

Mapping MySQL Error Numbers to JDBC SQLState Codes
MySQL
Error
Number
MySQL Error Name SQL
Standard
SQLState
10356 ER_TZ_OOM_INITIALIZING_TIME_ZONES HY000
10357 ER_TZ_CANT_OPEN_AND_LOCK_TIME_ZONE_TABLE HY000
10358 ER_TZ_OOM_LOADING_LEAP_SECOND_TABLE HY000
10359 ER_TZ_TOO_MANY_LEAPS_IN_LEAP_SECOND_TABLE HY000
10360 ER_TZ_ERROR_LOADING_LEAP_SECOND_TABLE HY000
10361 ER_TZ_UNKNOWN_OR_ILLEGAL_DEFAULT_TIME_ZONE HY000
10362 ER_TZ_CANT_FIND_DESCRIPTION_FOR_TIME_ZONE HY000
10363 ER_TZ_CANT_FIND_DESCRIPTION_FOR_TIME_ZONE_ID HY000
10364 ER_TZ_TRANSITION_TYPE_TABLE_TYPE_TOO_LARGE HY000
10365 ER_TZ_TRANSITION_TYPE_TABLE_ABBREVIATIONS_EXCEED_SPACE HY000
10366 ER_TZ_TRANSITION_TYPE_TABLE_LOAD_ERROR HY000
10367 ER_TZ_TRANSITION_TABLE_TOO_MANY_TRANSITIONS HY000
10368 ER_TZ_TRANSITION_TABLE_BAD_TRANSITION_TYPE HY000
10369 ER_TZ_TRANSITION_TABLE_LOAD_ERROR HY000
10370 ER_TZ_NO_TRANSITION_TYPES_IN_TIME_ZONE HY000
10371 ER_TZ_OOM_LOADING_TIME_ZONE_DESCRIPTION HY000
10372 ER_TZ_CANT_BUILD_MKTIME_MAP HY000
10373 ER_TZ_OOM_WHILE_LOADING_TIME_ZONE HY000
10374 ER_TZ_OOM_WHILE_SETTING_TIME_ZONE HY000
10375 ER_REPLICA_SQL_THREAD_STOPPED_UNTIL_CONDITION_BAD HY000
10376 ER_REPLICA_SQL_THREAD_STOPPED_UNTIL_POSITION_REACHED HY000
10377 ER_REPLICA_SQL_THREAD_STOPPED_BEFORE_GTIDS_ALREADY_APPLIEDHY000
10378 ER_REPLICA_SQL_THREAD_STOPPED_BEFORE_GTIDS_REACHED HY000
10379 ER_REPLICA_SQL_THREAD_STOPPED_AFTER_GTIDS_REACHED HY000
10380 ER_REPLICA_SQL_THREAD_STOPPED_GAP_TRX_PROCESSED HY000
10381 ER_GROUP_REPLICATION_PLUGIN_NOT_INSTALLED HY000
10382 ER_GTID_ALREADY_ADDED_BY_USER HY000
10383 ER_FAILED_TO_DELETE_FROM_GTID_EXECUTED_TABLE HY000
10384 ER_FAILED_TO_COMPRESS_GTID_EXECUTED_TABLE HY000
10385 ER_FAILED_TO_COMPRESS_GTID_EXECUTED_TABLE_OOM HY000
10386 ER_FAILED_TO_INIT_THREAD_ATTR_FOR_GTID_TABLE_COMPRESSION HY000
10387 ER_FAILED_TO_CREATE_GTID_TABLE_COMPRESSION_THREAD HY000
10388 ER_FAILED_TO_JOIN_GTID_TABLE_COMPRESSION_THREAD HY000
10389 ER_NPIPE_FAILED_TO_INIT_SECURITY_DESCRIPTOR HY000
10390 ER_NPIPE_FAILED_TO_SET_SECURITY_DESCRIPTOR HY000
10391 ER_NPIPE_PIPE_ALREADY_IN_USE HY000
199

Mapping MySQL Error Numbers to JDBC SQLState Codes
MySQL
Error
Number
MySQL Error Name SQL
Standard
SQLState
10405 ER_RPL_CANT_OPEN_INFO_TABLE HY000
10406 ER_RPL_CANT_SCAN_INFO_TABLE HY000
10407 ER_RPL_CORRUPTED_INFO_TABLE HY000
10408 ER_RPL_CORRUPTED_KEYS_IN_INFO_TABLE HY000
10409 ER_RPL_WORKER_ID_IS HY000
10410 ER_RPL_INCONSISTENT_TIMESTAMPS_IN_TRX HY000
10411 ER_RPL_INCONSISTENT_SEQUENCE_NO_IN_TRX HY000
10413 ER_RPL_CHANNELS_REQUIRE_NON_ZERO_SERVER_ID HY000
10415 ER_RPL_ERROR_CREATING_CONNECTION_METADATA HY000
10418 ER_RPL_ERROR_CREATING_APPLIER_METADATA HY000
10420 ER_RPL_FAILED_TO_DELETE_FROM_REPLICA_WORKERS_INFO_REPOSITORYHY000
10421 ER_RPL_FAILED_TO_RESET_STATE_IN_REPLICA_INFO_REPOSITORY HY000
10423 ER_RPL_REPLICA_GENERIC_MESSAGE HY000
10424 ER_RPL_REPLICA_COULD_NOT_CREATE_CHANNEL_LIST HY000
10425 ER_RPL_MULTISOURCE_REQUIRES_TABLE_TYPE_REPOSITORIES HY000
10426 ER_RPL_REPLICA_FAILED_TO_INIT_A_CONNECTION_METADATA_STRUCTUREHY000
10427 ER_RPL_REPLICA_FAILED_TO_INIT_CONNECTION_METADATA_STRUCTUREHY000
10428 ER_RPL_REPLICA_FAILED_TO_CREATE_CHANNEL_FROM_CONNECTION_METADATAHY000
10429 ER_RPL_FAILED_TO_CREATE_NEW_INFO_FILE HY000
10430 ER_RPL_FAILED_TO_CREATE_CACHE_FOR_INFO_FILE HY000
10431 ER_RPL_FAILED_TO_OPEN_INFO_FILE HY000
10432 ER_RPL_GTID_MEMORY_FINALLY_AVAILABLE HY000
10433 ER_SERVER_COST_UNKNOWN_COST_CONSTANT HY000
10434 ER_SERVER_COST_INVALID_COST_CONSTANT HY000
10435 ER_ENGINE_COST_UNKNOWN_COST_CONSTANT HY000
10436 ER_ENGINE_COST_UNKNOWN_STORAGE_ENGINE HY000
10437 ER_ENGINE_COST_INVALID_DEVICE_TYPE_FOR_SE HY000
10438 ER_ENGINE_COST_INVALID_CONST_CONSTANT_FOR_SE_AND_DEVICE HY000
10439 ER_SERVER_COST_FAILED_TO_READ HY000
10440 ER_ENGINE_COST_FAILED_TO_READ HY000
10441 ER_FAILED_TO_OPEN_COST_CONSTANT_TABLES HY000
10442 ER_RPL_UNSUPPORTED_UNIGNORABLE_EVENT_IN_STREAM HY000
10443 ER_RPL_GTID_LOG_EVENT_IN_STREAM HY000
10444 ER_RPL_UNEXPECTED_BEGIN_IN_STREAM HY000
10445 ER_RPL_UNEXPECTED_COMMIT_ROLLBACK_OR_XID_LOG_EVENT_IN_STREAMHY000
10446 ER_RPL_UNEXPECTED_XA_ROLLBACK_IN_STREAM HY000
200

Mapping MySQL Error Numbers to JDBC SQLState Codes
MySQL
Error
Number
MySQL Error Name SQL
Standard
SQLState
10447 ER_EVENT_EXECUTION_FAILED_CANT_AUTHENTICATE_USER HY000
10448 ER_EVENT_EXECUTION_FAILED_USER_LOST_EVEN_PRIVILEGE HY000
10449 ER_EVENT_ERROR_DURING_COMPILATION HY000
10450 ER_EVENT_DROPPING HY000
10452 ER_RPL_INCOMPATIBLE_DECIMAL_IN_RBR HY000
10453 ER_INIT_ROOT_WITHOUT_PASSWORD HY000
10454 ER_INIT_GENERATING_TEMP_PASSWORD_FOR_ROOT HY000
10455 ER_INIT_CANT_OPEN_BOOTSTRAP_FILE HY000
10456 ER_INIT_BOOTSTRAP_COMPLETE HY000
10457 ER_INIT_DATADIR_NOT_EMPTY_WONT_INITIALIZE HY000
10458 ER_INIT_DATADIR_EXISTS_WONT_INITIALIZE HY000
10459 ER_INIT_DATADIR_EXISTS_AND_PATH_TOO_LONG_WONT_INITIALIZE HY000
10460 ER_INIT_DATADIR_EXISTS_AND_NOT_WRITABLE_WONT_INITIALIZE HY000
10461 ER_INIT_CREATING_DD HY000
10462 ER_RPL_BINLOG_STARTING_DUMP HY000
10463 ER_RPL_BINLOG_SOURCE_SENDS_HEARTBEAT HY000
10464 ER_RPL_BINLOG_SKIPPING_REMAINING_HEARTBEAT_INFO HY000
10465 ER_RPL_BINLOG_SOURCE_USES_CHECKSUM_AND_REPLICA_CANT HY000
10467 ER_KILLING_THREAD HY000
10468 ER_DETACHING_SESSION_LEFT_BY_PLUGIN HY000
10469 ER_CANT_DETACH_SESSION_LEFT_BY_PLUGIN HY000
10470 ER_DETACHED_SESSIONS_LEFT_BY_PLUGIN HY000
10471 ER_FAILED_TO_DECREMENT_NUMBER_OF_THREADS HY000
10472 ER_PLUGIN_DID_NOT_DEINITIALIZE_THREADS HY000
10473 ER_KILLED_THREADS_OF_PLUGIN HY000
10517 ER_DBUG_CHECK_SHARES_OPEN HY000
10518 ER_DBUG_CHECK_SHARES_INFO HY000
10519 ER_DBUG_CHECK_SHARES_DROPPED HY000
10520 ER_INVALID_OR_OLD_TABLE_OR_DB_NAME HY000
10521 ER_TC_RECOVERING_AFTER_CRASH_USING HY000
10522 ER_TC_CANT_AUTO_RECOVER_WITH_TC_HEURISTIC_RECOVER HY000
10523 ER_TC_BAD_MAGIC_IN_TC_LOG HY000
10524 ER_TC_NEED_N_SE_SUPPORTING_2PC_FOR_RECOVERY HY000
10525 ER_TC_RECOVERY_FAILED_THESE_ARE_YOUR_OPTIONS HY000
10526 ER_TC_HEURISTIC_RECOVERY_MODE HY000
10527 ER_TC_HEURISTIC_RECOVERY_FAILED HY000
201

Mapping MySQL Error Numbers to JDBC SQLState Codes
MySQL
Error
Number
MySQL Error Name SQL
Standard
SQLState
10528 ER_TC_RESTART_WITHOUT_TC_HEURISTIC_RECOVER HY000
10529 ER_RPL_REPLICA_FAILED_TO_CREATE_OR_RECOVER_INFO_REPOSITORIESHY000
10530 ER_RPL_REPLICA_AUTO_POSITION_IS_1_AND_GTID_MODE_IS_OFF HY000
10531 ER_RPL_REPLICA_CANT_START_REPLICA_FOR_CHANNEL HY000
10532 ER_RPL_REPLICA_CANT_STOP_REPLICA_FOR_CHANNEL HY000
10533 ER_RPL_RECOVERY_NO_ROTATE_EVENT_FROM_SOURCE HY000
10534 ER_RPL_RECOVERY_ERROR_READ_RELAY_LOG HY000
10536 ER_RPL_RECOVERY_SKIPPED_GROUP_REPLICATION_CHANNEL HY000
10537 ER_RPL_RECOVERY_ERROR HY000
10538 ER_RPL_RECOVERY_IO_ERROR_READING_RELAY_LOG_INDEX HY000
10539 ER_RPL_RECOVERY_FILE_SOURCE_POS_INFO HY000
10540 ER_RPL_RECOVERY_REPLICATE_SAME_SERVER_ID_REQUIRES_POSITIONHY000
10541 ER_RPL_MTA_RECOVERY_STARTING_COORDINATOR HY000
10542 ER_RPL_MTA_RECOVERY_FAILED_TO_START_COORDINATOR HY000
10543 ER_RPL_MTA_AUTOMATIC_RECOVERY_FAILED HY000
10544 ER_RPL_MTA_RECOVERY_CANT_OPEN_RELAY_LOG HY000
10545 ER_RPL_MTA_RECOVERY_SUCCESSFUL HY000
10546 ER_RPL_SERVER_ID_MISSING HY000
10547 ER_RPL_CANT_CREATE_REPLICA_THREAD HY000
10548 ER_RPL_REPLICA_IO_THREAD_WAS_KILLED HY000
10550 ER_RPL_REPLICA_USES_CHECKSUM_AND_SOURCE_PRE_50 HY000
10551 ER_RPL_REPLICA_SECONDS_BEHIND_SOURCE_DUBIOUS HY000
10552 ER_RPL_REPLICA_CANT_FLUSH_CONNECTION_METADATA_REPOS HY000
10553 ER_RPL_REPLICA_REPORT_HOST_TOO_LONG HY000
10554 ER_RPL_REPLICA_REPORT_USER_TOO_LONG HY000
10555 ER_RPL_REPLICA_REPORT_PASSWORD_TOO_LONG HY000
10556 ER_RPL_REPLICA_ERROR_RETRYING HY000
10557 ER_RPL_REPLICA_ERROR_READING_FROM_SERVER HY000
10558 ER_RPL_REPLICA_DUMP_THREAD_KILLED_BY_SOURCE HY000
10559 ER_RPL_MTA_STATISTICS HY000
10560 ER_RPL_MTA_RECOVERY_COMPLETE HY000
10561 ER_RPL_REPLICA_CANT_INIT_RELAY_LOG_POSITION HY000
10563 ER_RPL_REPLICA_IO_THREAD_KILLED HY000
10564 ER_RPL_REPLICA_IO_THREAD_CANT_REGISTER_ON_SOURCE HY000
10565 ER_RPL_REPLICA_FORCING_TO_RECONNECT_IO_THREAD HY000
10566 ER_RPL_REPLICA_ERROR_REQUESTING_BINLOG_DUMP HY000
202

Mapping MySQL Error Numbers to JDBC SQLState Codes
MySQL
Error
Number
MySQL Error Name SQL
Standard
SQLState
10567 ER_RPL_LOG_ENTRY_EXCEEDS_REPLICA_MAX_ALLOWED_PACKET HY000
10568 ER_RPL_REPLICA_STOPPING_AS_SOURCE_OOM HY000
10569 ER_RPL_REPLICA_IO_THREAD_ABORTED_WAITING_FOR_RELAY_LOG_SPACEHY000
10570 ER_RPL_REPLICA_IO_THREAD_EXITING HY000
10571 ER_RPL_REPLICA_CANT_INITIALIZE_REPLICA_WORKER HY000
10572 ER_RPL_MTA_GROUP_RECOVERY_APPLIER_METADATA_FOR_WORKER HY000
10573 ER_RPL_ERROR_LOOKING_FOR_LOG HY000
10574 ER_RPL_MTA_GROUP_RECOVERY_APPLIER_METADATA HY000
10575 ER_RPL_CANT_FIND_FOLLOWUP_FILE HY000
10576 ER_RPL_MTA_CHECKPOINT_PERIOD_DIFFERS_FROM_CNT HY000
10577 ER_RPL_REPLICA_WORKER_THREAD_CREATION_FAILED HY000
10578 ER_RPL_REPLICA_WORKER_THREAD_CREATION_FAILED_WITH_ERRNO HY000
10579 ER_RPL_REPLICA_FAILED_TO_INIT_PARTITIONS_HASH HY000
10581 ER_RPL_REPLICA_SQL_THREAD_STARTING HY000
10582 ER_RPL_REPLICA_SKIP_COUNTER_EXECUTED HY000
10583 ER_RPL_REPLICA_ADDITIONAL_ERROR_INFO_FROM_DA HY000
10584 ER_RPL_REPLICA_ERROR_INFO_FROM_DA HY000
10585 ER_RPL_REPLICA_ERROR_LOADING_USER_DEFINED_LIBRARY HY000
10586 ER_RPL_REPLICA_ERROR_RUNNING_QUERY HY000
10587 ER_RPL_REPLICA_SQL_THREAD_EXITING HY000
10588 ER_RPL_REPLICA_READ_INVALID_EVENT_FROM_SOURCE HY000
10589 ER_RPL_REPLICA_QUEUE_EVENT_FAILED_INVALID_CONFIGURATION HY000
10590 ER_RPL_REPLICA_IO_THREAD_DETECTED_UNEXPECTED_EVENT_SEQUENCEHY000
10591 ER_RPL_REPLICA_CANT_USE_CHARSET HY000
10592 ER_RPL_REPLICA_CONNECTED_TO_SOURCE_REPLICATION_RESUMED HY000
10593 ER_RPL_REPLICA_NEXT_LOG_IS_ACTIVE HY000
10594 ER_RPL_REPLICA_NEXT_LOG_IS_INACTIVE HY000
10595 ER_RPL_REPLICA_SQL_THREAD_IO_ERROR_READING_EVENT HY000
10596 ER_RPL_REPLICA_ERROR_READING_RELAY_LOG_EVENTS HY000
10597 ER_REPLICA_CHANGE_SOURCE_TO_EXECUTED HY000
10598 ER_RPL_REPLICA_NEW_C_M_NEEDS_REPOS_TYPE_OTHER_THAN_FILE HY000
10599 ER_RPL_FAILED_TO_STAT_LOG_IN_INDEX HY000
10600 ER_RPL_LOG_NOT_FOUND_WHILE_COUNTING_RELAY_LOG_SPACE HY000
10601 ER_REPLICA_CANT_USE_TEMPDIR HY000
10602 ER_RPL_RELAY_LOG_NEEDS_FILE_NOT_DIRECTORY HY000
10603 ER_RPL_RELAY_LOG_INDEX_NEEDS_FILE_NOT_DIRECTORY HY000
203

Mapping MySQL Error Numbers to JDBC SQLState Codes
MySQL
Error
Number
MySQL Error Name SQL
Standard
SQLState
10604 ER_RPL_PLEASE_USE_OPTION_RELAY_LOG HY000
10605 ER_RPL_OPEN_INDEX_FILE_FAILED HY000
10606 ER_RPL_CANT_INITIALIZE_GTID_SETS_IN_AM_INIT_INFO HY000
10607 ER_RPL_CANT_OPEN_LOG_IN_AM_INIT_INFO HY000
10608 ER_RPL_ERROR_WRITING_RELAY_LOG_CONFIGURATION HY000
10709 ER_TREE_CORRUPT_PARENT_SHOULD_POINT_AT_PARENT HY000
10710 ER_TREE_CORRUPT_ROOT_SHOULD_BE_BLACK HY000
10711 ER_TREE_CORRUPT_2_CONSECUTIVE_REDS HY000
10712 ER_TREE_CORRUPT_RIGHT_IS_LEFT HY000
10713 ER_TREE_CORRUPT_INCORRECT_BLACK_COUNT HY000
10714 ER_WRONG_COUNT_FOR_ORIGIN HY000
10715 ER_WRONG_COUNT_FOR_KEY HY000
10716 ER_WRONG_COUNT_OF_ELEMENTS HY000
10717 ER_RPL_ERROR_READING_REPLICA_WORKER_CONFIGURATION HY000
10719 ER_RPL_FAILED_TO_OPEN_RELAY_LOG HY000
10720 ER_RPL_WORKER_CANT_READ_RELAY_LOG HY000
10721 ER_RPL_WORKER_CANT_FIND_NEXT_RELAY_LOG HY000
10722 ER_RPL_MTA_REPLICA_COORDINATOR_HAS_WAITED HY000
10723 ER_BINLOG_FAILED_TO_WRITE_DROP_FOR_TEMP_TABLES HY000
10724 ER_BINLOG_OOM_WRITING_DELETE_WHILE_OPENING_HEAP_TABLE HY000
10725 ER_FAILED_TO_REPAIR_TABLE HY000
10726 ER_FAILED_TO_REMOVE_TEMP_TABLE HY000
10727 ER_SYSTEM_TABLE_NOT_TRANSACTIONAL HY000
10728 ER_RPL_ERROR_WRITING_SOURCE_CONFIGURATION HY000
10729 ER_RPL_ERROR_READING_SOURCE_CONFIGURATION HY000
10730 ER_RPL_SSL_INFO_IN_CONNECTION_METADATA_IGNORED HY000
10731 ER_PLUGIN_FAILED_DEINITIALIZATION HY000
10732 ER_PLUGIN_HAS_NONZERO_REFCOUNT_AFTER_DEINITIALIZATION HY000
10733 ER_PLUGIN_SHUTTING_DOWN_PLUGIN HY000
10734 ER_PLUGIN_REGISTRATION_FAILED HY000
10735 ER_PLUGIN_CANT_OPEN_PLUGIN_TABLE HY000
10736 ER_PLUGIN_CANT_LOAD HY000
10737 ER_PLUGIN_LOAD_PARAMETER_TOO_LONG HY000
10738 ER_PLUGIN_FORCING_SHUTDOWN HY000
10739 ER_PLUGIN_HAS_NONZERO_REFCOUNT_AFTER_SHUTDOWN HY000
10740 ER_PLUGIN_UNKNOWN_VARIABLE_TYPE HY000
204

Mapping MySQL Error Numbers to JDBC SQLState Codes
MySQL
Error
Number
MySQL Error Name SQL
Standard
SQLState
10741 ER_PLUGIN_VARIABLE_SET_READ_ONLY HY000
10742 ER_PLUGIN_VARIABLE_MISSING_NAME HY000
10743 ER_PLUGIN_VARIABLE_NOT_ALLOCATED_THREAD_LOCAL HY000
10744 ER_PLUGIN_OOM HY000
10745 ER_PLUGIN_BAD_OPTIONS HY000
10746 ER_PLUGIN_PARSING_OPTIONS_FAILED HY000
10747 ER_PLUGIN_DISABLED HY000
10748 ER_PLUGIN_HAS_CONFLICTING_SYSTEM_VARIABLES HY000
10749 ER_PLUGIN_CANT_SET_PERSISTENT_OPTIONS HY000
10750 ER_MY_NET_WRITE_FAILED_FALLING_BACK_ON_STDERR HY000
10751 ER_RETRYING_REPAIR_WITHOUT_QUICK HY000
10752 ER_RETRYING_REPAIR_WITH_KEYCACHE HY000
10753 ER_FOUND_ROWS_WHILE_REPAIRING HY000
10754 ER_ERROR_DURING_OPTIMIZE_TABLE HY000
10755 ER_ERROR_ENABLING_KEYS HY000
10756 ER_CHECKING_TABLE HY000
10757 ER_RECOVERING_TABLE HY000
10758 ER_CANT_CREATE_TABLE_SHARE_FROM_FRM HY000
10759 ER_CANT_LOCK_TABLE HY000
10760 ER_CANT_ALLOC_TABLE_OBJECT HY000
10761 ER_CANT_CREATE_HANDLER_OBJECT_FOR_TABLE HY000
10762 ER_CANT_SET_HANDLER_REFERENCE_FOR_TABLE HY000
10763 ER_CANT_LOCK_TABLESPACE HY000
10764 ER_CANT_UPGRADE_GENERATED_COLUMNS_TO_DD HY000
10765 ER_DD_ERROR_CREATING_ENTRY HY000
10766 ER_DD_CANT_FETCH_TABLE_DATA HY000
10767 ER_DD_CANT_FIX_SE_DATA HY000
10768 ER_DD_CANT_CREATE_SP HY000
10769 ER_CANT_OPEN_DB_OPT_USING_DEFAULT_CHARSET HY000
10770 ER_CANT_CREATE_CACHE_FOR_DB_OPT HY000
10771 ER_CANT_IDENTIFY_CHARSET_USING_DEFAULT HY000
10772 ER_DB_OPT_NOT_FOUND_USING_DEFAULT_CHARSET HY000
10773 ER_EVENT_CANT_GET_TIMEZONE_FROM_FIELD HY000
10774 ER_EVENT_CANT_FIND_TIMEZONE HY000
10775 ER_EVENT_CANT_GET_CHARSET HY000
10776 ER_EVENT_CANT_GET_COLLATION HY000
205

Mapping MySQL Error Numbers to JDBC SQLState Codes
MySQL
Error
Number
MySQL Error Name SQL
Standard
SQLState
10777 ER_EVENT_CANT_OPEN_TABLE_MYSQL_EVENT HY000
10778 ER_CANT_PARSE_STORED_ROUTINE_BODY HY000
10779 ER_CANT_OPEN_TABLE_MYSQL_PROC HY000
10780 ER_CANT_READ_TABLE_MYSQL_PROC HY000
10781 ER_FILE_EXISTS_DURING_UPGRADE HY000
10782 ER_CANT_OPEN_DATADIR_AFTER_UPGRADE_FAILURE HY000
10783 ER_CANT_SET_PATH_FOR HY000
10784 ER_CANT_OPEN_DIR HY000
10801 ER_EVENT_ERROR_CREATING_QUERY_TO_WRITE_TO_BINLOG HY000
10802 ER_EVENT_SCHEDULER_ERROR_LOADING_FROM_DB HY000
10803 ER_EVENT_SCHEDULER_ERROR_GETTING_EVENT_OBJECT HY000
10804 ER_EVENT_SCHEDULER_GOT_BAD_DATA_FROM_TABLE HY000
10805 ER_EVENT_CANT_GET_LOCK_FOR_DROPPING_EVENT HY000
10806 ER_EVENT_UNABLE_TO_DROP_EVENT HY000
10808 ER_BINLOG_CANT_RESIZE_CACHE HY000
10809 ER_BINLOG_FILE_BEING_READ_NOT_PURGED HY000
10810 ER_BINLOG_IO_ERROR_READING_HEADER HY000
10813 ER_BINLOG_FILE_EXTENSION_NUMBER_EXHAUSTED HY000
10814 ER_BINLOG_FILE_NAME_TOO_LONG HY000
10815 ER_BINLOG_FILE_EXTENSION_NUMBER_RUNNING_LOW HY000
10816 ER_BINLOG_CANT_OPEN_FOR_LOGGING HY000
10817 ER_BINLOG_FAILED_TO_SYNC_INDEX_FILE HY000
10818 ER_BINLOG_ERROR_READING_GTIDS_FROM_RELAY_LOG HY000
10819 ER_BINLOG_EVENTS_READ_FROM_APPLIER_METADATA HY000
10820 ER_BINLOG_ERROR_READING_GTIDS_FROM_BINARY_LOG HY000
10821 ER_BINLOG_EVENTS_READ_FROM_BINLOG_INFO HY000
10822 ER_BINLOG_CANT_GENERATE_NEW_FILE_NAME HY000
10823 ER_BINLOG_FAILED_TO_SYNC_INDEX_FILE_IN_OPEN HY000
10824 ER_BINLOG_CANT_USE_FOR_LOGGING HY000
10825 ER_BINLOG_FAILED_TO_CLOSE_INDEX_FILE_WHILE_REBUILDING HY000
10826 ER_BINLOG_FAILED_TO_DELETE_INDEX_FILE_WHILE_REBUILDING HY000
10827 ER_BINLOG_FAILED_TO_RENAME_INDEX_FILE_WHILE_REBUILDING HY000
10828 ER_BINLOG_FAILED_TO_OPEN_INDEX_FILE_AFTER_REBUILDING HY000
10829 ER_BINLOG_CANT_APPEND_LOG_TO_TMP_INDEX HY000
10830 ER_BINLOG_CANT_LOCATE_OLD_BINLOG_OR_RELAY_LOG_FILES HY000
10831 ER_BINLOG_CANT_DELETE_FILE HY000
206

Mapping MySQL Error Numbers to JDBC SQLState Codes
MySQL
Error
Number
MySQL Error Name SQL
Standard
SQLState
10832 ER_BINLOG_CANT_SET_TMP_INDEX_NAME HY000
10833 ER_BINLOG_FAILED_TO_OPEN_TEMPORARY_INDEX_FILE HY000
10835 ER_BINLOG_CANT_OPEN_TMP_INDEX HY000
10836 ER_BINLOG_CANT_COPY_INDEX_TO_TMP HY000
10837 ER_BINLOG_CANT_CLOSE_TMP_INDEX HY000
10838 ER_BINLOG_CANT_MOVE_TMP_TO_INDEX HY000
10839 ER_BINLOG_PURGE_LOGS_CALLED_WITH_FILE_NOT_IN_INDEX HY000
10840 ER_BINLOG_PURGE_LOGS_CANT_SYNC_INDEX_FILE HY000
10841 ER_BINLOG_PURGE_LOGS_CANT_COPY_TO_REGISTER_FILE HY000
10842 ER_BINLOG_PURGE_LOGS_CANT_FLUSH_REGISTER_FILE HY000
10843 ER_BINLOG_PURGE_LOGS_CANT_UPDATE_INDEX_FILE HY000
10844 ER_BINLOG_PURGE_LOGS_FAILED_TO_PURGE_LOG HY000
10845 ER_BINLOG_FAILED_TO_SET_PURGE_INDEX_FILE_NAME HY000
10846 ER_BINLOG_FAILED_TO_OPEN_REGISTER_FILE HY000
10847 ER_BINLOG_FAILED_TO_REINIT_REGISTER_FILE HY000
10848 ER_BINLOG_FAILED_TO_READ_REGISTER_FILE HY000
10849 ER_CANT_STAT_FILE HY000
10850 ER_BINLOG_CANT_DELETE_LOG_FILE_DOES_INDEX_MATCH_FILES HY000
10851 ER_BINLOG_CANT_DELETE_FILE_AND_READ_BINLOG_INDEX HY000
10852 ER_BINLOG_FAILED_TO_DELETE_LOG_FILE HY000
10853 ER_BINLOG_LOGGING_INCIDENT_TO_STOP_REPLICAS HY000
10854 ER_BINLOG_CANT_FIND_LOG_IN_INDEX HY000
10855 ER_BINLOG_RECOVERING_AFTER_CRASH_USING HY000
10856 ER_BINLOG_CANT_OPEN_CRASHED_BINLOG HY000
10857 ER_BINLOG_CANT_TRIM_CRASHED_BINLOG HY000
10858 ER_BINLOG_CRASHED_BINLOG_TRIMMED HY000
10859 ER_BINLOG_CANT_CLEAR_IN_USE_FLAG_FOR_CRASHED_BINLOG HY000
10860 ER_BINLOG_FAILED_TO_RUN_AFTER_SYNC_HOOK HY000
10861 ER_TURNING_LOGGING_OFF_FOR_THE_DURATION HY000
10862 ER_BINLOG_FAILED_TO_RUN_AFTER_FLUSH_HOOK HY000
10864 ER_BINLOG_WARNING_SUPPRESSED HY000
10865 ER_NDB_LOG_ENTRY HY000
10866 ER_NDB_LOG_ENTRY_WITH_PREFIX HY000
10868 ER_INNODB_UNKNOWN_COLLATION HY000
10869 ER_INNODB_INVALID_LOG_GROUP_HOME_DIR HY000
10870 ER_INNODB_INVALID_INNODB_UNDO_DIRECTORY HY000
207

Mapping MySQL Error Numbers to JDBC SQLState Codes
MySQL
Error
Number
MySQL Error Name SQL
Standard
SQLState
10871 ER_INNODB_ILLEGAL_COLON_IN_POOL HY000
10872 ER_INNODB_INVALID_PAGE_SIZE HY000
10873 ER_INNODB_DIRTY_WATER_MARK_NOT_LOW HY000
10874 ER_INNODB_IO_CAPACITY_EXCEEDS_MAX HY000
10875 ER_INNODB_FILES_SAME HY000
10876 ER_INNODB_UNREGISTERED_TRX_ACTIVE HY000
10877 ER_INNODB_CLOSING_CONNECTION_ROLLS_BACK HY000
10878 ER_INNODB_TRX_XLATION_TABLE_OOM HY000
10879 ER_INNODB_CANT_FIND_INDEX_IN_INNODB_DD HY000
10880 ER_INNODB_INDEX_COLUMN_INFO_UNLIKE_MYSQLS HY000
10882 ER_INNODB_CANT_BUILD_INDEX_XLATION_TABLE_FOR HY000
10883 ER_INNODB_PK_NOT_IN_MYSQL HY000
10884 ER_INNODB_PK_ONLY_IN_MYSQL HY000
10885 ER_INNODB_CLUSTERED_INDEX_PRIVATE HY000
10887 ER_ERRMSG_REPLACEMENT_DODGY HY000
10888 ER_ERRMSG_REPLACEMENTS_FAILED HY000
10889 ER_NPIPE_CANT_CREATE HY000
10890 ER_PARTITION_MOVE_CREATED_DUPLICATE_ROW_PLEASE_FIX HY000
10891 ER_AUDIT_CANT_ABORT_COMMAND HY000
10892 ER_AUDIT_CANT_ABORT_EVENT HY000
10893 ER_AUDIT_WARNING HY000
10897 ER_RPL_REPLICA_INSECURE_CHANGE_SOURCE HY000
10899 ER_RPL_REPLICA_INCORRECT_CHANNEL HY000
10900 ER_FAILED_TO_FIND_DL_ENTRY HY000
10901 ER_FAILED_TO_OPEN_SHARED_LIBRARY HY000
10902 ER_THREAD_PRIORITY_IGNORED HY000
10903 ER_BINLOG_CACHE_SIZE_TOO_LARGE HY000
10904 ER_BINLOG_STMT_CACHE_SIZE_TOO_LARGE HY000
10905 ER_FAILED_TO_GENERATE_UNIQUE_LOGFILE HY000
10906 ER_FAILED_TO_READ_FILE HY000
10907 ER_FAILED_TO_WRITE_TO_FILE HY000
10908 ER_BINLOG_UNSAFE_MESSAGE_AND_STATEMENT HY000
10909 ER_FORCE_CLOSE_THREAD HY000
10910 ER_SERVER_SHUTDOWN_COMPLETE HY000
10911 ER_RPL_CANT_HAVE_SAME_BASENAME HY000
10912 ER_RPL_GTID_MODE_REQUIRES_ENFORCE_GTID_CONSISTENCY_ON HY000
208

Mapping MySQL Error Numbers to JDBC SQLState Codes
MySQL
Error
Number
MySQL Error Name SQL
Standard
SQLState
10913 ER_WARN_NO_SERVERID_SPECIFIED HY000
10914 ER_ABORTING_USER_CONNECTION HY000
10915 ER_SQL_MODE_MERGED_WITH_STRICT_MODE HY000
10916 ER_GTID_PURGED_WAS_UPDATED HY000
10917 ER_GTID_EXECUTED_WAS_UPDATED HY000
10918 ER_DEPRECATE_MSG_WITH_REPLACEMENT HY000
10919 ER_TRG_CREATION_CTX_NOT_SET HY000
10920 ER_FILE_HAS_OLD_FORMAT HY000
10921 ER_VIEW_CREATION_CTX_NOT_SET HY000
10923 ER_TABLE_UPGRADE_REQUIRED HY000
10924 ER_GET_ERRNO_FROM_STORAGE_ENGINE HY000
10925 ER_ACCESS_DENIED_ERROR_WITHOUT_PASSWORD HY000
10926 ER_ACCESS_DENIED_ERROR_WITH_PASSWORD HY000
10927 ER_ACCESS_DENIED_FOR_USER_ACCOUNT_LOCKED HY000
10929 ER_SYSTEM_TABLES_NOT_SUPPORTED_BY_STORAGE_ENGINE HY000
10931 ER_SERVER_STARTUP_MSG HY000
10932 ER_FAILED_TO_FIND_LOCALE_NAME HY000
10933 ER_FAILED_TO_FIND_COLLATION_NAME HY000
10934 ER_SERVER_OUT_OF_RESOURCES HY000
10935 ER_SERVER_OUTOFMEMORY HY000
10936 ER_INVALID_COLLATION_FOR_CHARSET HY000
10937 ER_CANT_START_ERROR_LOG_SERVICE HY000
10938 ER_CREATING_NEW_UUID_FIRST_START HY000
10939 ER_FAILED_TO_GET_ABSOLUTE_PATH HY000
10940 ER_PERFSCHEMA_COMPONENTS_INFRASTRUCTURE_BOOTSTRAP HY000
10941 ER_PERFSCHEMA_COMPONENTS_INFRASTRUCTURE_SHUTDOWN HY000
10942 ER_DUP_FD_OPEN_FAILED HY000
10943 ER_SYSTEM_VIEW_INIT_FAILED HY000
10944 ER_RESOURCE_GROUP_POST_INIT_FAILED HY000
10945 ER_RESOURCE_GROUP_SUBSYSTEM_INIT_FAILED HY000
10946 ER_FAILED_START_MYSQLD_DAEMON HY000
10947 ER_CANNOT_CHANGE_TO_ROOT_DIR HY000
10948 ER_PERSISTENT_PRIVILEGES_BOOTSTRAP HY000
10949 ER_BASEDIR_SET_TO HY000
10950 ER_RPL_FILTER_ADD_WILD_DO_TABLE_FAILED HY000
10951 ER_RPL_FILTER_ADD_WILD_IGNORE_TABLE_FAILED HY000
209

Mapping MySQL Error Numbers to JDBC SQLState Codes
MySQL
Error
Number
MySQL Error Name SQL
Standard
SQLState
10952 ER_PRIVILEGE_SYSTEM_INIT_FAILED HY000
10953 ER_CANNOT_SET_LOG_ERROR_SERVICES HY000
10954 ER_PERFSCHEMA_TABLES_INIT_FAILED HY000
10958 ER_BINLOG_FILE_OPEN_FAILED HY000
10959 ER_BINLOG_EVENT_WRITE_TO_STMT_CACHE_FAILED HY000
10960 ER_REPLICA_RELAY_LOG_TRUNCATE_INFO HY000
10961 ER_REPLICA_RELAY_LOG_PURGE_FAILED HY000
10962 ER_RPL_REPLICA_FILTER_CREATE_FAILED HY000
10963 ER_RPL_REPLICA_GLOBAL_FILTERS_COPY_FAILED HY000
10964 ER_RPL_REPLICA_RESET_FILTER_OPTIONS HY000
10965 ER_MISSING_GRANT_SYSTEM_TABLE HY000
10966 ER_MISSING_ACL_SYSTEM_TABLE HY000
10967 ER_ANONYMOUS_AUTH_ID_NOT_ALLOWED_IN_MANDATORY_ROLES HY000
10968 ER_UNKNOWN_AUTH_ID_IN_MANDATORY_ROLE HY000
10969 ER_WRITE_ROW_TO_PARTITION_FAILED HY000
10970 ER_RESOURCE_GROUP_METADATA_UPDATE_SKIPPED HY000
10971 ER_FAILED_TO_PERSIST_RESOURCE_GROUP_METADATA HY000
10972 ER_FAILED_TO_DESERIALIZE_RESOURCE_GROUP HY000
10973 ER_FAILED_TO_UPDATE_RESOURCE_GROUP HY000
10974 ER_RESOURCE_GROUP_VALIDATION_FAILED HY000
10975 ER_FAILED_TO_ALLOCATE_MEMORY_FOR_RESOURCE_GROUP HY000
10976 ER_FAILED_TO_ALLOCATE_MEMORY_FOR_RESOURCE_GROUP_HASH HY000
10977 ER_FAILED_TO_ADD_RESOURCE_GROUP_TO_MAP HY000
10978 ER_RESOURCE_GROUP_IS_DISABLED HY000
10979 ER_FAILED_TO_APPLY_RESOURCE_GROUP_CONTROLLER HY000
10980 ER_FAILED_TO_ACQUIRE_LOCK_ON_RESOURCE_GROUP HY000
10981 ER_PFS_NOTIFICATION_FUNCTION_REGISTER_FAILED HY000
10982 ER_RES_GRP_SET_THR_AFFINITY_FAILED HY000
10983 ER_RES_GRP_SET_THR_AFFINITY_TO_CPUS_FAILED HY000
10984 ER_RES_GRP_THD_UNBIND_FROM_CPU_FAILED HY000
10985 ER_RES_GRP_SET_THREAD_PRIORITY_FAILED HY000
10986 ER_RES_GRP_FAILED_TO_DETERMINE_NICE_CAPABILITY HY000
10987 ER_RES_GRP_FAILED_TO_GET_THREAD_HANDLE HY000
10988 ER_RES_GRP_GET_THREAD_PRIO_NOT_SUPPORTED HY000
10989 ER_RES_GRP_FAILED_DETERMINE_CPU_COUNT HY000
10990 ER_RES_GRP_FEATURE_NOT_AVAILABLE HY000
210

Mapping MySQL Error Numbers to JDBC SQLState Codes
MySQL
Error
Number
MySQL Error Name SQL
Standard
SQLState
10991 ER_RES_GRP_INVALID_THREAD_PRIORITY HY000
10992 ER_RES_GRP_SOLARIS_PROCESSOR_BIND_TO_CPUID_FAILED HY000
10993 ER_RES_GRP_SOLARIS_PROCESSOR_BIND_TO_THREAD_FAILED HY000
10994 ER_RES_GRP_SOLARIS_PROCESSOR_AFFINITY_FAILED HY000
10995 ER_DD_UPGRADE_RENAME_IDX_STATS_FILE_FAILED HY000
10996 ER_DD_UPGRADE_DD_OPEN_FAILED HY000
10997 ER_DD_UPGRADE_FAILED_TO_FETCH_TABLESPACES HY000
10998 ER_DD_UPGRADE_FAILED_TO_ACQUIRE_TABLESPACE HY000
10999 ER_DD_UPGRADE_FAILED_TO_RESOLVE_TABLESPACE_ENGINE HY000
11000 ER_FAILED_TO_CREATE_SDI_FOR_TABLESPACE HY000
11001 ER_FAILED_TO_STORE_SDI_FOR_TABLESPACE HY000
11002 ER_DD_UPGRADE_FAILED_TO_FETCH_TABLES HY000
11003 ER_DD_UPGRADE_DD_POPULATED HY000
11004 ER_DD_UPGRADE_INFO_FILE_OPEN_FAILED HY000
11005 ER_DD_UPGRADE_INFO_FILE_CLOSE_FAILED HY000
11006 ER_DD_UPGRADE_TABLESPACE_MIGRATION_FAILED HY000
11007 ER_DD_UPGRADE_FAILED_TO_CREATE_TABLE_STATS HY000
11008 ER_DD_UPGRADE_TABLE_STATS_MIGRATE_COMPLETED HY000
11009 ER_DD_UPGRADE_FAILED_TO_CREATE_INDEX_STATS HY000
11010 ER_DD_UPGRADE_INDEX_STATS_MIGRATE_COMPLETED HY000
11011 ER_DD_UPGRADE_FAILED_FIND_VALID_DATA_DIR HY000
11012 ER_DD_UPGRADE_START HY000
11013 ER_DD_UPGRADE_FAILED_INIT_DD_SE HY000
11014 ER_DD_UPGRADE_FOUND_PARTIALLY_UPGRADED_DD_ABORT HY000
11015 ER_DD_UPGRADE_FOUND_PARTIALLY_UPGRADED_DD_CONTINUE HY000
11016 ER_DD_UPGRADE_SE_LOGS_FAILED HY000
11017 ER_DD_UPGRADE_SDI_INFO_UPDATE_FAILED HY000
11018 ER_SKIP_UPDATING_METADATA_IN_SE_RO_MODE HY000
11019 ER_CREATED_SYSTEM_WITH_VERSION HY000
11020 ER_UNKNOWN_ERROR_DETECTED_IN_SE HY000
11021 ER_READ_LOG_EVENT_FAILED HY000
11022 ER_ROW_DATA_TOO_BIG_TO_WRITE_IN_BINLOG HY000
11023 ER_FAILED_TO_CONSTRUCT_DROP_EVENT_QUERY HY000
11024 ER_FAILED_TO_BINLOG_DROP_EVENT HY000
11025 ER_FAILED_TO_START_REPLICA_THREAD HY000
11026 ER_RPL_IO_THREAD_KILLED HY000
211

Mapping MySQL Error Numbers to JDBC SQLState Codes
MySQL
Error
Number
MySQL Error Name SQL
Standard
SQLState
11027 ER_REPLICA_RECONNECT_FAILED HY000
11028 ER_REPLICA_KILLED_AFTER_RECONNECT HY000
11029 ER_REPLICA_NOT_STARTED_ON_SOME_CHANNELS HY000
11030 ER_FAILED_TO_ADD_RPL_FILTER HY000
11031 ER_PER_CHANNEL_RPL_FILTER_CONF_FOR_GRP_RPL HY000
11032 ER_RPL_FILTERS_NOT_ATTACHED_TO_CHANNEL HY000
11033 ER_FAILED_TO_BUILD_DO_AND_IGNORE_TABLE_HASHES HY000
11034 ER_CLONE_PLUGIN_NOT_LOADED_TRACE HY000
11035 ER_CLONE_HANDLER_EXIST_TRACE HY000
11036 ER_CLONE_CREATE_HANDLER_FAIL_TRACE HY000
11037 ER_CYCLE_TIMER_IS_NOT_AVAILABLE HY000
11038 ER_NANOSECOND_TIMER_IS_NOT_AVAILABLE HY000
11039 ER_MICROSECOND_TIMER_IS_NOT_AVAILABLE HY000
11040 ER_PFS_MALLOC_ARRAY_OVERFLOW HY000
11041 ER_PFS_MALLOC_ARRAY_OOM HY000
11042 ER_INNODB_FAILED_TO_FIND_IDX_WITH_KEY_NO HY000
11043 ER_INNODB_FAILED_TO_FIND_IDX HY000
11044 ER_INNODB_FAILED_TO_FIND_IDX_FROM_DICT_CACHE HY000
11045 ER_INNODB_ACTIVE_INDEX_CHANGE_FAILED HY000
11046 ER_INNODB_DIFF_IN_REF_LEN HY000
11047 ER_WRONG_TYPE_FOR_COLUMN_PREFIX_IDX_FLD HY000
11048 ER_INNODB_CANNOT_CREATE_TABLE HY000
11049 ER_INNODB_INTERNAL_INDEX HY000
11050 ER_INNODB_IDX_CNT_MORE_THAN_DEFINED_IN_MYSQL HY000
11051 ER_INNODB_IDX_CNT_FEWER_THAN_DEFINED_IN_MYSQL HY000
11052 ER_INNODB_IDX_COLUMN_CNT_DIFF HY000
11053 ER_INNODB_USE_MONITOR_GROUP_NAME HY000
11054 ER_INNODB_MONITOR_DEFAULT_VALUE_NOT_DEFINED HY000
11055 ER_INNODB_MONITOR_IS_ENABLED HY000
11056 ER_INNODB_INVALID_MONITOR_COUNTER_NAME HY000
11057 ER_WIN_LOAD_LIBRARY_FAILED HY000
11058 ER_PARTITION_HANDLER_ADMIN_MSG HY000
11059 ER_RPL_AM_INIT_INFO_MSG HY000
11060 ER_DD_UPGRADE_TABLE_INTACT_ERROR HY000
11061 ER_SERVER_INIT_COMPILED_IN_COMMANDS HY000
11062 ER_MYISAM_CHECK_METHOD_ERROR HY000
212

Mapping MySQL Error Numbers to JDBC SQLState Codes
MySQL
Error
Number
MySQL Error Name SQL
Standard
SQLState
11063 ER_MYISAM_CRASHED_ERROR HY000
11064 ER_WAITPID_FAILED HY000
11065 ER_FAILED_TO_FIND_MYSQLD_STATUS HY000
11066 ER_INNODB_ERROR_LOGGER_MSG HY000
11067 ER_INNODB_ERROR_LOGGER_FATAL_MSG HY000
11068 ER_DEPRECATED_SYNTAX_WITH_REPLACEMENT HY000
11069 ER_DEPRECATED_SYNTAX_NO_REPLACEMENT HY000
11070 ER_DEPRECATE_MSG_NO_REPLACEMENT HY000
11071 ER_LOG_PRINTF_MSG HY000
11072 ER_BINLOG_LOGGING_NOT_POSSIBLE HY000
11073 ER_FAILED_TO_SET_PERSISTED_OPTIONS HY000
11074 ER_COMPONENTS_FAILED_TO_ACQUIRE_SERVICE_IMPLEMENTATION HY000
11075 ER_RES_GRP_INVALID_VCPU_RANGE HY000
11076 ER_RES_GRP_INVALID_VCPU_ID HY000
11077 ER_ERROR_DURING_FLUSH_LOG_COMMIT_PHASE HY000
11078 ER_DROP_DATABASE_FAILED_RMDIR_MANUALLY HY000
11080 ER_BINLOG_MALFORMED_OR_OLD_RELAY_LOG HY000
11081 ER_DD_UPGRADE_VIEW_COLUMN_NAME_TOO_LONG HY000
11082 ER_TABLE_NEEDS_DUMP_UPGRADE HY000
11083 ER_DD_UPGRADE_FAILED_TO_UPDATE_VER_NO_IN_TABLESPACE HY000
11084 ER_KEYRING_MIGRATION_FAILED HY000
11085 ER_KEYRING_MIGRATION_SUCCESSFUL HY000
11086 ER_RESTART_RECEIVED_INFO HY000
11087 ER_LCTN_CHANGED HY000
11088 ER_DD_INITIALIZE HY000
11089 ER_DD_RESTART HY000
11090 ER_DD_UPGRADE HY000
11091 ER_DD_UPGRADE_OFF HY000
11092 ER_DD_UPGRADE_VERSION_NOT_SUPPORTED HY000
11093 ER_DD_UPGRADE_SCHEMA_UNAVAILABLE HY000
11094 ER_DD_MINOR_DOWNGRADE HY000
11095 ER_DD_MINOR_DOWNGRADE_VERSION_NOT_SUPPORTED HY000
11096 ER_DD_NO_VERSION_FOUND HY000
11097 ER_THREAD_POOL_NOT_SUPPORTED_ON_PLATFORM HY000
11098 ER_THREAD_POOL_SIZE_TOO_LOW HY000
11099 ER_THREAD_POOL_SIZE_TOO_HIGH HY000
213

Mapping MySQL Error Numbers to JDBC SQLState Codes
MySQL
Error
Number
MySQL Error Name SQL
Standard
SQLState
11100 ER_THREAD_POOL_ALGORITHM_INVALID HY000
11101 ER_THREAD_POOL_INVALID_STALL_LIMIT HY000
11102 ER_THREAD_POOL_INVALID_PRIO_KICKUP_TIMER HY000
11103 ER_THREAD_POOL_MAX_UNUSED_THREADS_INVALID HY000
11104 ER_THREAD_POOL_CON_HANDLER_INIT_FAILED HY000
11105 ER_THREAD_POOL_INIT_FAILED HY000
11107 ER_THREAD_POOL_CANNOT_SET_THREAD_SPECIFIC_DATA HY000
11108 ER_THREAD_POOL_FAILED_TO_CREATE_CONNECT_HANDLER_THD HY000
11109 ER_THREAD_POOL_FAILED_TO_CREATE_THD_AND_AUTH_CONN HY000
11110 ER_THREAD_POOL_FAILED_PROCESS_CONNECT_EVENT HY000
11111 ER_THREAD_POOL_FAILED_TO_CREATE_POOL HY000
11112 ER_THREAD_POOL_RATE_LIMITED_ERROR_MSGS HY000
11113 ER_TRHEAD_POOL_LOW_LEVEL_INIT_FAILED HY000
11114 ER_THREAD_POOL_LOW_LEVEL_REARM_FAILED HY000
11115 ER_THREAD_POOL_BUFFER_TOO_SMALL HY000
11116 ER_MECAB_NOT_SUPPORTED HY000
11117 ER_MECAB_NOT_VERIFIED HY000
11118 ER_MECAB_CREATING_MODEL HY000
11119 ER_MECAB_FAILED_TO_CREATE_MODEL HY000
11120 ER_MECAB_FAILED_TO_CREATE_TRIGGER HY000
11121 ER_MECAB_UNSUPPORTED_CHARSET HY000
11122 ER_MECAB_CHARSET_LOADED HY000
11123 ER_MECAB_PARSE_FAILED HY000
11124 ER_MECAB_OOM_WHILE_PARSING_TEXT HY000
11125 ER_MECAB_CREATE_LATTICE_FAILED HY000
11126 ER_SEMISYNC_TRACE_ENTER_FUNC HY000
11127 ER_SEMISYNC_TRACE_EXIT_WITH_INT_EXIT_CODE HY000
11128 ER_SEMISYNC_TRACE_EXIT_WITH_BOOL_EXIT_CODE HY000
11129 ER_SEMISYNC_TRACE_EXIT HY000
11130 ER_SEMISYNC_RPL_INIT_FOR_TRX HY000
11131 ER_SEMISYNC_FAILED_TO_ALLOCATE_TRX_NODE HY000
11132 ER_SEMISYNC_BINLOG_WRITE_OUT_OF_ORDER HY000
11133 ER_SEMISYNC_INSERT_LOG_INFO_IN_ENTRY HY000
11134 ER_SEMISYNC_PROBE_LOG_INFO_IN_ENTRY HY000
11135 ER_SEMISYNC_CLEARED_ALL_ACTIVE_TRANSACTION_NODES HY000
11136 ER_SEMISYNC_CLEARED_ACTIVE_TRANSACTION_TILL_POS HY000
214

Mapping MySQL Error Numbers to JDBC SQLState Codes
MySQL
Error
Number
MySQL Error Name SQL
Standard
SQLState
11137 ER_SEMISYNC_REPLY_MAGIC_NO_ERROR HY000
11138 ER_SEMISYNC_REPLY_PKT_LENGTH_TOO_SMALL HY000
11139 ER_SEMISYNC_REPLY_BINLOG_FILE_TOO_LARGE HY000
11140 ER_SEMISYNC_SERVER_REPLY HY000
11141 ER_SEMISYNC_FUNCTION_CALLED_TWICE HY000
11142 ER_SEMISYNC_RPL_ENABLED_ON_SOURCE HY000
11143 ER_SEMISYNC_SOURCE_OOM HY000
11144 ER_SEMISYNC_DISABLED_ON_SOURCE HY000
11145 ER_SEMISYNC_FORCED_SHUTDOWN HY000
11146 ER_SEMISYNC_SOURCE_GOT_REPLY_AT_POS HY000
11147 ER_SEMISYNC_SOURCE_SIGNAL_ALL_WAITING_THREADS HY000
11148 ER_SEMISYNC_SOURCE_TRX_WAIT_POS HY000
11149 ER_SEMISYNC_BINLOG_REPLY_IS_AHEAD HY000
11150 ER_SEMISYNC_MOVE_BACK_WAIT_POS HY000
11151 ER_SEMISYNC_INIT_WAIT_POS HY000
11152 ER_SEMISYNC_WAIT_TIME_FOR_BINLOG_SENT HY000
11153 ER_SEMISYNC_WAIT_FOR_BINLOG_TIMEDOUT HY000
11154 ER_SEMISYNC_WAIT_TIME_ASSESSMENT_FOR_COMMIT_TRX_FAILED HY000
11155 ER_SEMISYNC_RPL_SWITCHED_OFF HY000
11156 ER_SEMISYNC_RPL_SWITCHED_ON HY000
11157 ER_SEMISYNC_NO_SPACE_IN_THE_PKT HY000
11158 ER_SEMISYNC_SYNC_HEADER_UPDATE_INFO HY000
11159 ER_SEMISYNC_FAILED_TO_INSERT_TRX_NODE HY000
11160 ER_SEMISYNC_TRX_SKIPPED_AT_POS HY000
11161 ER_SEMISYNC_SOURCE_FAILED_ON_NET_FLUSH HY000
11162 ER_SEMISYNC_RECEIVED_ACK_IS_SMALLER HY000
11163 ER_SEMISYNC_ADD_ACK_TO_SLOT HY000
11164 ER_SEMISYNC_UPDATE_EXISTING_REPLICA_ACK HY000
11165 ER_SEMISYNC_FAILED_TO_START_ACK_RECEIVER_THD HY000
11166 ER_SEMISYNC_STARTING_ACK_RECEIVER_THD HY000
11167 ER_SEMISYNC_FAILED_TO_WAIT_ON_DUMP_SOCKET HY000
11168 ER_SEMISYNC_STOPPING_ACK_RECEIVER_THREAD HY000
11169 ER_SEMISYNC_FAILED_REGISTER_REPLICA_TO_RECEIVER HY000
11170 ER_SEMISYNC_START_BINLOG_DUMP_TO_REPLICA HY000
11171 ER_SEMISYNC_STOP_BINLOG_DUMP_TO_REPLICA HY000
11172 ER_SEMISYNC_UNREGISTER_TRX_OBSERVER_FAILED HY000
215

Mapping MySQL Error Numbers to JDBC SQLState Codes
MySQL
Error
Number
MySQL Error Name SQL
Standard
SQLState
11173 ER_SEMISYNC_UNREGISTER_BINLOG_STORAGE_OBSERVER_FAILED HY000
11174 ER_SEMISYNC_UNREGISTER_BINLOG_TRANSMIT_OBSERVER_FAILED HY000
11175 ER_SEMISYNC_UNREGISTERED_REPLICATOR HY000
11176 ER_SEMISYNC_SOCKET_FD_TOO_LARGE HY000
11177 ER_SEMISYNC_REPLICA_REPLY HY000
11178 ER_SEMISYNC_MISSING_MAGIC_NO_FOR_SEMISYNC_PKT HY000
11179 ER_SEMISYNC_REPLICA_START HY000
11180 ER_SEMISYNC_REPLICA_REPLY_WITH_BINLOG_INFO HY000
11181 ER_SEMISYNC_REPLICA_NET_FLUSH_REPLY_FAILED HY000
11182 ER_SEMISYNC_REPLICA_SEND_REPLY_FAILED HY000
11183 ER_SEMISYNC_EXECUTION_FAILED_ON_SOURCE HY000
11184 ER_SEMISYNC_NOT_SUPPORTED_BY_SOURCE HY000
11185 ER_SEMISYNC_REPLICA_SET_FAILED HY000
11186 ER_SEMISYNC_FAILED_TO_STOP_ACK_RECEIVER_THD HY000
11187 ER_FIREWALL_FAILED_TO_READ_FIREWALL_TABLES HY000
11188 ER_FIREWALL_FAILED_TO_REG_DYNAMIC_PRIVILEGES HY000
11189 ER_FIREWALL_RECORDING_STMT_WAS_TRUNCATED HY000
11190 ER_FIREWALL_RECORDING_STMT_WITHOUT_TEXT HY000
11191 ER_FIREWALL_SUSPICIOUS_STMT HY000
11192 ER_FIREWALL_ACCESS_DENIED HY000
11193 ER_FIREWALL_SKIPPED_UNKNOWN_USER_MODE HY000
11194 ER_FIREWALL_RELOADING_CACHE HY000
11195 ER_FIREWALL_RESET_FOR_USER HY000
11196 ER_FIREWALL_STATUS_FLUSHED HY000
11197 ER_KEYRING_LOGGER_ERROR_MSG HY000
11198 ER_AUDIT_LOG_FILTER_IS_NOT_INSTALLED HY000
11199 ER_AUDIT_LOG_SWITCHING_TO_INCLUDE_LIST HY000
11200 ER_AUDIT_LOG_CANNOT_SET_LOG_POLICY_WITH_OTHER_POLICIES HY000
11201 ER_AUDIT_LOG_ONLY_INCLUDE_LIST_USED HY000
11202 ER_AUDIT_LOG_INDEX_MAP_CANNOT_ACCESS_DIR HY000
11203 ER_AUDIT_LOG_WRITER_RENAME_FILE_FAILED HY000
11204 ER_AUDIT_LOG_WRITER_DEST_FILE_ALREADY_EXISTS HY000
11205 ER_AUDIT_LOG_WRITER_RENAME_FILE_FAILED_REMOVE_FILE_MANUALLYHY000
11206 ER_AUDIT_LOG_WRITER_INCOMPLETE_FILE_RENAMED HY000
11207 ER_AUDIT_LOG_WRITER_FAILED_TO_WRITE_TO_FILE HY000
11208 ER_AUDIT_LOG_EC_WRITER_FAILED_TO_INIT_ENCRYPTION HY000
216

Mapping MySQL Error Numbers to JDBC SQLState Codes
MySQL
Error
Number
MySQL Error Name SQL
Standard
SQLState
11209 ER_AUDIT_LOG_EC_WRITER_FAILED_TO_INIT_COMPRESSION HY000
11210 ER_AUDIT_LOG_EC_WRITER_FAILED_TO_CREATE_FILE HY000
11211 ER_AUDIT_LOG_RENAME_LOG_FILE_BEFORE_FLUSH HY000
11212 ER_AUDIT_LOG_FILTER_RESULT_MSG HY000
11213 ER_AUDIT_LOG_JSON_READER_FAILED_TO_PARSE HY000
11214 ER_AUDIT_LOG_JSON_READER_BUF_TOO_SMALL HY000
11215 ER_AUDIT_LOG_JSON_READER_FAILED_TO_OPEN_FILE HY000
11216 ER_AUDIT_LOG_JSON_READER_FILE_PARSING_ERROR HY000
11219 ER_AUDIT_LOG_FILTER_FAILED_TO_STORE_TABLE_FLDS HY000
11220 ER_AUDIT_LOG_FILTER_FAILED_TO_UPDATE_TABLE HY000
11221 ER_AUDIT_LOG_FILTER_FAILED_TO_INSERT_INTO_TABLE HY000
11222 ER_AUDIT_LOG_FILTER_FAILED_TO_DELETE_FROM_TABLE HY000
11223 ER_AUDIT_LOG_FILTER_FAILED_TO_INIT_TABLE_FOR_READ HY000
11224 ER_AUDIT_LOG_FILTER_FAILED_TO_READ_TABLE HY000
11225 ER_AUDIT_LOG_FILTER_FAILED_TO_CLOSE_TABLE_AFTER_READING HY000
11226 ER_AUDIT_LOG_FILTER_USER_AND_HOST_CANNOT_BE_EMPTY HY000
11227 ER_AUDIT_LOG_FILTER_FLD_FILTERNAME_CANNOT_BE_EMPTY HY000
11228 ER_VALIDATE_PWD_DICT_FILE_NOT_SPECIFIED HY000
11229 ER_VALIDATE_PWD_DICT_FILE_NOT_LOADED HY000
11230 ER_VALIDATE_PWD_DICT_FILE_TOO_BIG HY000
11231 ER_VALIDATE_PWD_FAILED_TO_READ_DICT_FILE HY000
11232 ER_VALIDATE_PWD_FAILED_TO_GET_FLD_FROM_SECURITY_CTX HY000
11233 ER_VALIDATE_PWD_FAILED_TO_GET_SECURITY_CTX HY000
11234 ER_VALIDATE_PWD_LENGTH_CHANGED HY000
11235 ER_REWRITER_QUERY_ERROR_MSG HY000
11236 ER_REWRITER_QUERY_FAILED HY000
11237 ER_XPLUGIN_STARTUP_FAILED HY000
11240 ER_XPLUGIN_USING_SSL_CONF_FROM_SERVER HY000
11241 ER_XPLUGIN_USING_SSL_CONF_FROM_MYSQLX HY000
11242 ER_XPLUGIN_FAILED_TO_USE_SSL_CONF HY000
11243 ER_XPLUGIN_USING_SSL_FOR_TLS_CONNECTION HY000
11244 ER_XPLUGIN_REFERENCE_TO_SECURE_CONN_WITH_XPLUGIN HY000
11245 ER_XPLUGIN_ERROR_MSG HY000
11246 ER_SHA_PWD_FAILED_TO_PARSE_AUTH_STRING HY000
11247 ER_SHA_PWD_FAILED_TO_GENERATE_MULTI_ROUND_HASH HY000
11248 ER_SHA_PWD_AUTH_REQUIRES_RSA_OR_SSL HY000
217

Mapping MySQL Error Numbers to JDBC SQLState Codes
MySQL
Error
Number
MySQL Error Name SQL
Standard
SQLState
11249 ER_SHA_PWD_RSA_KEY_TOO_LONG HY000
11250 ER_PLUGIN_COMMON_FAILED_TO_OPEN_FILTER_TABLES HY000
11251 ER_PLUGIN_COMMON_FAILED_TO_OPEN_TABLE HY000
11252 ER_AUTH_LDAP_ERROR_LOGGER_ERROR_MSG HY000
11253 ER_CONN_CONTROL_ERROR_MSG HY000
11254 ER_GRP_RPL_ERROR_MSG HY000
11255 ER_SHA_PWD_SALT_FOR_USER_CORRUPT HY000
11256 ER_SYS_VAR_COMPONENT_OOM HY000
11257 ER_SYS_VAR_COMPONENT_VARIABLE_SET_READ_ONLY HY000
11258 ER_SYS_VAR_COMPONENT_UNKNOWN_VARIABLE_TYPE HY000
11259 ER_SYS_VAR_COMPONENT_FAILED_TO_PARSE_VARIABLE_OPTIONS HY000
11260 ER_SYS_VAR_COMPONENT_FAILED_TO_MAKE_VARIABLE_PERSISTENT HY000
11261 ER_COMPONENT_FILTER_CONFUSED HY000
11262 ER_STOP_REPLICA_IO_THREAD_DISK_SPACE HY000
11263 ER_LOG_FILE_CANNOT_OPEN HY000
11268 ER_PERSIST_OPTION_STATUS HY000
11269 ER_NOT_IMPLEMENTED_GET_TABLESPACE_STATISTICS HY000
11272 ER_SSL_FIPS_MODE_ERROR HY000
11273 ER_CONN_INIT_CONNECT_IGNORED HY000
11275 ER_REWRITER_OOM HY000
11276 ER_REWRITER_TABLE_MALFORMED_ERROR HY000
11277 ER_REWRITER_LOAD_FAILED HY000
11278 ER_REWRITER_READ_FAILED HY000
11279 ER_CONN_CONTROL_EVENT_COORDINATOR_INIT_FAILED HY000
11280 ER_CONN_CONTROL_STAT_CONN_DELAY_TRIGGERED_UPDATE_FAILED HY000
11281 ER_CONN_CONTROL_STAT_CONN_DELAY_TRIGGERED_RESET_FAILED HY000
11282 ER_CONN_CONTROL_INVALID_CONN_DELAY_TYPE HY000
11283 ER_CONN_CONTROL_DELAY_ACTION_INIT_FAILED HY000
11284 ER_CONN_CONTROL_FAILED_TO_SET_CONN_DELAY HY000
11285 ER_CONN_CONTROL_FAILED_TO_UPDATE_CONN_DELAY_HASH HY000
11286 ER_XPLUGIN_FORCE_STOP_CLIENT HY000
11287 ER_XPLUGIN_MAX_AUTH_ATTEMPTS_REACHED HY000
11288 ER_XPLUGIN_BUFFER_PAGE_ALLOC_FAILED HY000
11289 ER_XPLUGIN_DETECTED_HANGING_CLIENTS HY000
11290 ER_XPLUGIN_FAILED_TO_ACCEPT_CLIENT HY000
11291 ER_XPLUGIN_FAILED_TO_SCHEDULE_CLIENT HY000
218

Mapping MySQL Error Numbers to JDBC SQLState Codes
MySQL
Error
Number
MySQL Error Name SQL
Standard
SQLState
11292 ER_XPLUGIN_FAILED_TO_PREPARE_IO_INTERFACES HY000
11293 ER_XPLUGIN_SRV_SESSION_INIT_THREAD_FAILED HY000
11294 ER_XPLUGIN_UNABLE_TO_USE_USER_SESSION_ACCOUNT HY000
11295 ER_XPLUGIN_REFERENCE_TO_USER_ACCOUNT_DOC_SECTION HY000
11296 ER_XPLUGIN_UNEXPECTED_EXCEPTION_DISPATCHING_CMD HY000
11297 ER_XPLUGIN_EXCEPTION_IN_TASK_SCHEDULER HY000
11298 ER_XPLUGIN_TASK_SCHEDULING_FAILED HY000
11299 ER_XPLUGIN_EXCEPTION_IN_EVENT_LOOP HY000
11300 ER_XPLUGIN_LISTENER_SETUP_FAILED HY000
11301 ER_XPLUING_NET_STARTUP_FAILED HY000
11302 ER_XPLUGIN_FAILED_AT_SSL_CONF HY000
11305 ER_XPLUGIN_FAILED_TO_CREATE_SESSION_FOR_CONN HY000
11306 ER_XPLUGIN_FAILED_TO_INITIALIZE_SESSION HY000
11307 ER_XPLUGIN_MESSAGE_TOO_LONG HY000
11308 ER_XPLUGIN_UNINITIALIZED_MESSAGE HY000
11309 ER_XPLUGIN_FAILED_TO_SET_MIN_NUMBER_OF_WORKERS HY000
11310 ER_XPLUGIN_UNABLE_TO_ACCEPT_CONNECTION HY000
11311 ER_XPLUGIN_ALL_IO_INTERFACES_DISABLED HY000
11314 ER_XPLUGIN_ERROR_READING_SOCKET HY000
11315 ER_XPLUGIN_PEER_DISCONNECTED_WHILE_READING_MSG_BODY HY000
11316 ER_XPLUGIN_READ_FAILED_CLOSING_CONNECTION HY000
11322 ER_XPLUGIN_LISTENER_SYS_VARIABLE_ERROR HY000
11323 ER_XPLUGIN_LISTENER_STATUS_MSG HY000
11324 ER_XPLUGIN_RETRYING_BIND_ON_PORT HY000
11327 ER_XPLUGIN_EXISTING_USER_ACCOUNT_WITH_INCOMPLETE_GRANTS HY000
11332 ER_XPLUGIN_IPv6_AVAILABLE HY000
11334 ER_XPLUGIN_CLIENT_KILL_MSG HY000
11335 ER_XPLUGIN_FAILED_TO_GET_SECURITY_CTX HY000
11337 ER_XPLUGIN_FAILED_TO_CLOSE_SQL_SESSION HY000
11338 ER_XPLUGIN_FAILED_TO_EXECUTE_ADMIN_CMD HY000
11339 ER_XPLUGIN_EMPTY_ADMIN_CMD HY000
11340 ER_XPLUGIN_FAILED_TO_GET_SYS_VAR HY000
11341 ER_XPLUGIN_FAILED_TO_GET_CREATION_STMT HY000
11342 ER_XPLUGIN_FAILED_TO_GET_ENGINE_INFO HY000
11345 ER_XPLUGIN_FAILED_TO_SET_SO_REUSEADDR_FLAG HY000
11346 ER_XPLUGIN_FAILED_TO_OPEN_INTERNAL_SESSION HY000
219

Mapping MySQL Error Numbers to JDBC SQLState Codes
MySQL
Error
Number
MySQL Error Name SQL
Standard
SQLState
11347 ER_XPLUGIN_FAILED_TO_SWITCH_CONTEXT HY000
11348 ER_XPLUGIN_FAILED_TO_UNREGISTER_UDF HY000
11351 ER_XPLUGIN_FAILED_TO_RESET_IPV6_V6ONLY_FLAG HY000
11352 ER_KEYRING_INVALID_KEY_TYPE HY000
11353 ER_KEYRING_INVALID_KEY_LENGTH HY000
11358 ER_KEYRING_CHECK_KEY_FAILED_DUE_TO_INVALID_KEY HY000
11359 ER_KEYRING_CHECK_KEY_FAILED_DUE_TO_EMPTY_KEY_ID HY000
11360 ER_KEYRING_OPERATION_FAILED_DUE_TO_INTERNAL_ERROR HY000
11361 ER_KEYRING_INCORRECT_FILE HY000
11362 ER_KEYRING_FOUND_MALFORMED_BACKUP_FILE HY000
11363 ER_KEYRING_FAILED_TO_RESTORE_FROM_BACKUP_FILE HY000
11364 ER_KEYRING_FAILED_TO_FLUSH_KEYRING_TO_FILE HY000
11365 ER_KEYRING_FAILED_TO_GET_FILE_STAT HY000
11366 ER_KEYRING_FAILED_TO_REMOVE_FILE HY000
11367 ER_KEYRING_FAILED_TO_TRUNCATE_FILE HY000
11368 ER_KEYRING_UNKNOWN_ERROR HY000
11370 ER_KEYRING_FILE_IO_ERROR HY000
11371 ER_KEYRING_FAILED_TO_LOAD_KEYRING_CONTENT HY000
11372 ER_KEYRING_FAILED_TO_FLUSH_KEYS_TO_KEYRING HY000
11373 ER_KEYRING_FAILED_TO_FLUSH_KEYS_TO_KEYRING_BACKUP HY000
11374 ER_KEYRING_KEY_FETCH_FAILED_DUE_TO_EMPTY_KEY_ID HY000
11375 ER_KEYRING_FAILED_TO_REMOVE_KEY_DUE_TO_EMPTY_ID HY000
11376 ER_KEYRING_OKV_INCORRECT_KEY_VAULT_CONFIGURED HY000
11377 ER_KEYRING_OKV_INIT_FAILED_DUE_TO_INCORRECT_CONF HY000
11378 ER_KEYRING_OKV_INIT_FAILED_DUE_TO_INTERNAL_ERROR HY000
11379 ER_KEYRING_OKV_INVALID_KEY_TYPE HY000
11380 ER_KEYRING_OKV_INVALID_KEY_LENGTH_FOR_CIPHER HY000
11381 ER_KEYRING_OKV_FAILED_TO_GENERATE_KEY_DUE_TO_INTERNAL_ERRORHY000
11382 ER_KEYRING_OKV_FAILED_TO_FIND_SERVER_ENTRY HY000
11383 ER_KEYRING_OKV_FAILED_TO_FIND_STANDBY_SERVER_ENTRY HY000
11384 ER_KEYRING_OKV_FAILED_TO_PARSE_CONF_FILE HY000
11385 ER_KEYRING_OKV_FAILED_TO_LOAD_KEY_UID HY000
11386 ER_KEYRING_OKV_FAILED_TO_INIT_SSL_LAYER HY000
11387 ER_KEYRING_OKV_FAILED_TO_INIT_CLIENT HY000
11388 ER_KEYRING_OKV_CONNECTION_TO_SERVER_FAILED HY000
11389 ER_KEYRING_OKV_FAILED_TO_REMOVE_KEY HY000
220

Mapping MySQL Error Numbers to JDBC SQLState Codes
MySQL
Error
Number
MySQL Error Name SQL
Standard
SQLState
11390 ER_KEYRING_OKV_FAILED_TO_ADD_ATTRIBUTE HY000
11391 ER_KEYRING_OKV_FAILED_TO_GENERATE_KEY HY000
11392 ER_KEYRING_OKV_FAILED_TO_STORE_KEY HY000
11393 ER_KEYRING_OKV_FAILED_TO_ACTIVATE_KEYS HY000
11394 ER_KEYRING_OKV_FAILED_TO_FETCH_KEY HY000
11395 ER_KEYRING_OKV_FAILED_TO_STORE_OR_GENERATE_KEY HY000
11396 ER_KEYRING_OKV_FAILED_TO_RETRIEVE_KEY_SIGNATURE HY000
11397 ER_KEYRING_OKV_FAILED_TO_RETRIEVE_KEY HY000
11398 ER_KEYRING_OKV_FAILED_TO_LOAD_SSL_TRUST_STORE HY000
11399 ER_KEYRING_OKV_FAILED_TO_SET_CERTIFICATE_FILE HY000
11400 ER_KEYRING_OKV_FAILED_TO_SET_KEY_FILE HY000
11401 ER_KEYRING_OKV_KEY_MISMATCH HY000
11415 ER_KEYRING_AWS_FAILED_TO_SET_CMK_ID HY000
11416 ER_KEYRING_AWS_FAILED_TO_SET_REGION HY000
11417 ER_KEYRING_AWS_FAILED_TO_OPEN_CONF_FILE HY000
11418 ER_KEYRING_AWS_FAILED_TO_ACCESS_KEY_ID_FROM_CONF_FILE HY000
11419 ER_KEYRING_AWS_FAILED_TO_ACCESS_KEY_FROM_CONF_FILE HY000
11420 ER_KEYRING_AWS_INVALID_CONF_FILE_PATH HY000
11421 ER_KEYRING_AWS_INVALID_DATA_FILE_PATH HY000
11422 ER_KEYRING_AWS_FAILED_TO_ACCESS_OR_CREATE_KEYRING_DIR HY000
11423 ER_KEYRING_AWS_FAILED_TO_ACCESS_OR_CREATE_KEYRING_DATA_FILEHY000
11424 ER_KEYRING_AWS_FAILED_TO_INIT_DUE_TO_INTERNAL_ERROR HY000
11425 ER_KEYRING_AWS_FAILED_TO_ACCESS_DATA_FILE HY000
11426 ER_KEYRING_AWS_CMK_ID_NOT_SET HY000
11427 ER_KEYRING_AWS_FAILED_TO_GET_KMS_CREDENTIAL_FROM_CONF_FILEHY000
11428 ER_KEYRING_AWS_INIT_FAILURE HY000
11429 ER_KEYRING_AWS_FAILED_TO_INIT_DUE_TO_PLUGIN_INTERNAL_ERROR HY000
11430 ER_KEYRING_AWS_INVALID_KEY_LENGTH_FOR_CIPHER HY000
11431 ER_KEYRING_AWS_FAILED_TO_GENERATE_KEY_DUE_TO_INTERNAL_ERRORHY000
11432 ER_KEYRING_AWS_INCORRECT_FILE HY000
11433 ER_KEYRING_AWS_FOUND_MALFORMED_BACKUP_FILE HY000
11434 ER_KEYRING_AWS_FAILED_TO_RESTORE_FROM_BACKUP_FILE HY000
11435 ER_KEYRING_AWS_FAILED_TO_FLUSH_KEYRING_TO_FILE HY000
11436 ER_KEYRING_AWS_INCORRECT_REGION HY000
11437 ER_KEYRING_AWS_FAILED_TO_CONNECT_KMS HY000
11438 ER_KEYRING_AWS_FAILED_TO_GENERATE_NEW_KEY HY000
221

Mapping MySQL Error Numbers to JDBC SQLState Codes
MySQL
Error
Number
MySQL Error Name SQL
Standard
SQLState
11439 ER_KEYRING_AWS_FAILED_TO_ENCRYPT_KEY HY000
11440 ER_KEYRING_AWS_FAILED_TO_RE_ENCRYPT_KEY HY000
11441 ER_KEYRING_AWS_FAILED_TO_DECRYPT_KEY HY000
11442 ER_KEYRING_AWS_FAILED_TO_ROTATE_CMK HY000
11443 ER_GRP_RPL_GTID_ALREADY_USED HY000
11444 ER_GRP_RPL_APPLIER_THD_KILLED HY000
11445 ER_GRP_RPL_EVENT_HANDLING_ERROR HY000
11446 ER_GRP_RPL_ERROR_GTID_EXECUTION_INFO HY000
11448 ER_GRP_RPL_CREATE_APPLIER_CACHE_ERROR HY000
11449 ER_GRP_RPL_UNBLOCK_WAITING_THD HY000
11450 ER_GRP_RPL_APPLIER_PIPELINE_NOT_DISPOSED HY000
11451 ER_GRP_RPL_APPLIER_THD_EXECUTION_ABORTED HY000
11452 ER_GRP_RPL_APPLIER_EXECUTION_FATAL_ERROR HY000
11453 ER_GRP_RPL_ERROR_STOPPING_CHANNELS HY000
11454 ER_GRP_RPL_ERROR_SENDING_SINGLE_PRIMARY_MSSG HY000
11457 ER_GRP_RPL_BROADCAST_COMMIT_TRANS_MSSG_FAILED HY000
11458 ER_GRP_RPL_GROUP_NAME_PARSE_ERROR HY000
11459 ER_GRP_RPL_ADD_GRPSID_TO_GRPGTIDSID_MAP_ERROR HY000
11460 ER_GRP_RPL_UPDATE_GRPGTID_EXECUTED_ERROR HY000
11461 ER_GRP_RPL_DONOR_TRANS_INFO_ERROR HY000
11462 ER_GRP_RPL_SERVER_CONN_ERROR HY000
11463 ER_GRP_RPL_ERROR_FETCHING_GTID_EXECUTED_SET HY000
11464 ER_GRP_RPL_ADD_GTID_TO_GRPGTID_EXECUTED_ERROR HY000
11465 ER_GRP_RPL_ERROR_FETCHING_GTID_SET HY000
11466 ER_GRP_RPL_ADD_RETRIEVED_SET_TO_GRP_GTID_EXECUTED_ERROR HY000
11467 ER_GRP_RPL_CERTIFICATION_INITIALIZATION_FAILURE HY000
11468 ER_GRP_RPL_UPDATE_LAST_CONFLICT_FREE_TRANS_ERROR HY000
11469 ER_GRP_RPL_UPDATE_TRANS_SNAPSHOT_REF_VER_ERROR HY000
11472 ER_GRP_RPL_CANT_GENERATE_GTID HY000
11473 ER_GRP_RPL_INVALID_GTID_SET HY000
11474 ER_GRP_RPL_UPDATE_GTID_SET_ERROR HY000
11475 ER_GRP_RPL_RECEIVED_SET_MISSING_GTIDS HY000
11477 ER_GRP_RPL_NULL_PACKET HY000
11478 ER_GRP_RPL_CANT_READ_GTID HY000
11479 ER_GRP_RPL_PROCESS_GTID_SET_ERROR HY000
11480 ER_GRP_RPL_PROCESS_INTERSECTION_GTID_SET_ERROR HY000
222

Mapping MySQL Error Numbers to JDBC SQLState Codes
MySQL
Error
Number
MySQL Error Name SQL
Standard
SQLState
11481 ER_GRP_RPL_SET_STABLE_TRANS_ERROR HY000
11482 ER_GRP_RPL_CANT_READ_GRP_GTID_EXTRACTED HY000
11483 ER_GRP_RPL_CANT_READ_WRITE_SET_ITEM HY000
11484 ER_GRP_RPL_INIT_CERTIFICATION_INFO_FAILURE HY000
11485 ER_GRP_RPL_CONFLICT_DETECTION_DISABLED HY000
11486 ER_GRP_RPL_MSG_DISCARDED HY000
11487 ER_GRP_RPL_MISSING_GRP_RPL_APPLIER HY000
11488 ER_GRP_RPL_CERTIFIER_MSSG_PROCESS_ERROR HY000
11489 ER_GRP_RPL_SRV_NOT_ONLINE HY000
11490 ER_GRP_RPL_SRV_ONLINE HY000
11491 ER_GRP_RPL_DISABLE_SRV_READ_MODE_RESTRICTED HY000
11492 ER_GRP_RPL_MEM_ONLINE HY000
11493 ER_GRP_RPL_MEM_UNREACHABLE HY000
11494 ER_GRP_RPL_MEM_REACHABLE HY000
11495 ER_GRP_RPL_SRV_BLOCKED HY000
11496 ER_GRP_RPL_SRV_BLOCKED_FOR_SECS HY000
11497 ER_GRP_RPL_CHANGE_GRP_MEM_NOT_PROCESSED HY000
11498 ER_GRP_RPL_MEMBER_CONTACT_RESTORED HY000
11499 ER_GRP_RPL_MEMBER_REMOVED HY000
11500 ER_GRP_RPL_PRIMARY_MEMBER_LEFT_GRP HY000
11501 ER_GRP_RPL_MEMBER_ADDED HY000
11502 ER_GRP_RPL_MEMBER_EXIT_PLUGIN_ERROR HY000
11503 ER_GRP_RPL_MEMBER_CHANGE HY000
11504 ER_GRP_RPL_MEMBER_LEFT_GRP HY000
11505 ER_GRP_RPL_MEMBER_EXPELLED HY000
11506 ER_GRP_RPL_SESSION_OPEN_FAILED HY000
11507 ER_GRP_RPL_NEW_PRIMARY_ELECTED HY000
11508 ER_GRP_RPL_DISABLE_READ_ONLY_FAILED HY000
11509 ER_GRP_RPL_ENABLE_READ_ONLY_FAILED HY000
11510 ER_GRP_RPL_SRV_PRIMARY_MEM HY000
11511 ER_GRP_RPL_SRV_SECONDARY_MEM HY000
11512 ER_GRP_RPL_NO_SUITABLE_PRIMARY_MEM HY000
11513 ER_GRP_RPL_SUPER_READ_ONLY_ACTIVATE_ERROR HY000
11514 ER_GRP_RPL_EXCEEDS_AUTO_INC_VALUE HY000
11515 ER_GRP_RPL_DATA_NOT_PROVIDED_BY_MEM HY000
11516 ER_GRP_RPL_MEMBER_ALREADY_EXISTS HY000
223

Mapping MySQL Error Numbers to JDBC SQLState Codes
MySQL
Error
Number
MySQL Error Name SQL
Standard
SQLState
11518 ER_GRP_RPL_GTID_EXECUTED_EXTRACT_ERROR HY000
11519 ER_GRP_RPL_GTID_SET_EXTRACT_ERROR HY000
11520 ER_GRP_RPL_START_FAILED HY000
11521 ER_GRP_RPL_MEMBER_VER_INCOMPATIBLE HY000
11522 ER_GRP_RPL_TRANS_NOT_PRESENT_IN_GRP HY000
11523 ER_GRP_RPL_TRANS_GREATER_THAN_GRP HY000
11524 ER_GRP_RPL_MEMBER_VERSION_LOWER_THAN_GRP HY000
11525 ER_GRP_RPL_LOCAL_GTID_SETS_PROCESS_ERROR HY000
11526 ER_GRP_RPL_MEMBER_TRANS_GREATER_THAN_GRP HY000
11527 ER_GRP_RPL_BLOCK_SIZE_DIFF_FROM_GRP HY000
11528 ER_GRP_RPL_TRANS_WRITE_SET_EXTRACT_DIFF_FROM_GRP HY000
11529 ER_GRP_RPL_MEMBER_CFG_INCOMPATIBLE_WITH_GRP_CFG HY000
11530 ER_GRP_RPL_MEMBER_STOP_RPL_CHANNELS_ERROR HY000
11531 ER_GRP_RPL_PURGE_APPLIER_LOGS HY000
11532 ER_GRP_RPL_RESET_APPLIER_MODULE_LOGS_ERROR HY000
11533 ER_GRP_RPL_APPLIER_THD_SETUP_ERROR HY000
11534 ER_GRP_RPL_APPLIER_THD_START_ERROR HY000
11535 ER_GRP_RPL_APPLIER_THD_STOP_ERROR HY000
11536 ER_GRP_RPL_FETCH_TRANS_DATA_FAILED HY000
11537 ER_GRP_RPL_REPLICA_IO_THD_PRIMARY_UNKNOWN HY000
11538 ER_GRP_RPL_SALVE_IO_THD_ON_SECONDARY_MEMBER HY000
11539 ER_GRP_RPL_REPLICA_SQL_THD_PRIMARY_UNKNOWN HY000
11540 ER_GRP_RPL_REPLICA_SQL_THD_ON_SECONDARY_MEMBER HY000
11541 ER_GRP_RPL_NEEDS_INNODB_TABLE HY000
11542 ER_GRP_RPL_PRIMARY_KEY_NOT_DEFINED HY000
11543 ER_GRP_RPL_FK_WITH_CASCADE_UNSUPPORTED HY000
11544 ER_GRP_RPL_AUTO_INC_RESET HY000
11545 ER_GRP_RPL_AUTO_INC_OFFSET_RESET HY000
11546 ER_GRP_RPL_AUTO_INC_SET HY000
11547 ER_GRP_RPL_AUTO_INC_OFFSET_SET HY000
11548 ER_GRP_RPL_FETCH_TRANS_CONTEXT_FAILED HY000
11549 ER_GRP_RPL_FETCH_FORMAT_DESC_LOG_EVENT_FAILED HY000
11550 ER_GRP_RPL_FETCH_TRANS_CONTEXT_LOG_EVENT_FAILED HY000
11551 ER_GRP_RPL_FETCH_SNAPSHOT_VERSION_FAILED HY000
11552 ER_GRP_RPL_FETCH_GTID_LOG_EVENT_FAILED HY000
11553 ER_GRP_RPL_UPDATE_SERV_CERTIFICATE_FAILED HY000
224

Mapping MySQL Error Numbers to JDBC SQLState Codes
MySQL
Error
Number
MySQL Error Name SQL
Standard
SQLState
11554 ER_GRP_RPL_ADD_GTID_INFO_WITH_LOCAL_GTID_FAILED HY000
11555 ER_GRP_RPL_ADD_GTID_INFO_WITHOUT_LOCAL_GTID_FAILED HY000
11556 ER_GRP_RPL_NOTIFY_CERTIFICATION_OUTCOME_FAILED HY000
11557 ER_GRP_RPL_ADD_GTID_INFO_WITH_REMOTE_GTID_FAILED HY000
11558 ER_GRP_RPL_ADD_GTID_INFO_WITHOUT_REMOTE_GTID_FAILED HY000
11559 ER_GRP_RPL_FETCH_VIEW_CHANGE_LOG_EVENT_FAILED HY000
11562 ER_GRP_RPL_FETCH_LOG_EVENT_FAILED HY000
11563 ER_GRP_RPL_START_GRP_RPL_FAILED HY000
11564 ER_GRP_RPL_CONN_INTERNAL_PLUGIN_FAIL HY000
11565 ER_GRP_RPL_SUPER_READ_ON HY000
11566 ER_GRP_RPL_SUPER_READ_OFF HY000
11567 ER_GRP_RPL_KILLED_SESSION_ID HY000
11568 ER_GRP_RPL_KILLED_FAILED_ID HY000
11569 ER_GRP_RPL_INTERNAL_QUERY HY000
11570 ER_GRP_RPL_COPY_FROM_EMPTY_STRING HY000
11571 ER_GRP_RPL_QUERY_FAIL HY000
11572 ER_GRP_RPL_CREATE_SESSION_UNABLE HY000
11573 ER_GRP_RPL_MEMBER_NOT_FOUND HY000
11574 ER_GRP_RPL_MAXIMUM_CONNECTION_RETRIES_REACHED HY000
11575 ER_GRP_RPL_ALL_DONORS_LEFT_ABORT_RECOVERY HY000
11576 ER_GRP_RPL_ESTABLISH_RECOVERY_WITH_DONOR HY000
11577 ER_GRP_RPL_ESTABLISH_RECOVERY_WITH_ANOTHER_DONOR HY000
11578 ER_GRP_RPL_NO_VALID_DONOR HY000
11579 ER_GRP_RPL_CONFIG_RECOVERY HY000
11580 ER_GRP_RPL_ESTABLISHING_CONN_GRP_REC_DONOR HY000
11581 ER_GRP_RPL_CREATE_GRP_RPL_REC_CHANNEL HY000
11582 ER_GRP_RPL_DONOR_SERVER_CONN HY000
11583 ER_GRP_RPL_CHECK_STATUS_TABLE HY000
11584 ER_GRP_RPL_STARTING_GRP_REC HY000
11585 ER_GRP_RPL_DONOR_CONN_TERMINATION HY000
11586 ER_GRP_RPL_STOPPING_GRP_REC HY000
11587 ER_GRP_RPL_PURGE_REC HY000
11588 ER_GRP_RPL_UNABLE_TO_KILL_CONN_REC_DONOR_APPLIER HY000
11589 ER_GRP_RPL_UNABLE_TO_KILL_CONN_REC_DONOR_FAILOVER HY000
11590 ER_GRP_RPL_FAILED_TO_NOTIFY_GRP_MEMBERSHIP_EVENT HY000
11591 ER_GRP_RPL_FAILED_TO_BROADCAST_GRP_MEMBERSHIP_NOTIFICATIONHY000
225

Mapping MySQL Error Numbers to JDBC SQLState Codes
MySQL
Error
Number
MySQL Error Name SQL
Standard
SQLState
11592 ER_GRP_RPL_FAILED_TO_BROADCAST_MEMBER_STATUS_NOTIFICATION HY000
11593 ER_GRP_RPL_OOM_FAILED_TO_GENERATE_IDENTIFICATION_HASH HY000
11594 ER_GRP_RPL_WRITE_IDENT_HASH_BASE64_ENCODING_FAILED HY000
11595 ER_GRP_RPL_INVALID_BINLOG_FORMAT HY000
11598 ER_GRP_RPL_UNSUPPORTED_TRANS_ISOLATION HY000
11599 ER_GRP_RPL_CANNOT_EXECUTE_TRANS_WHILE_STOPPING HY000
11600 ER_GRP_RPL_CANNOT_EXECUTE_TRANS_WHILE_RECOVERING HY000
11601 ER_GRP_RPL_CANNOT_EXECUTE_TRANS_IN_ERROR_STATE HY000
11602 ER_GRP_RPL_CANNOT_EXECUTE_TRANS_IN_OFFLINE_MODE HY000
11603 ER_GRP_RPL_MULTIPLE_CACHE_TYPE_NOT_SUPPORTED_FOR_SESSION HY000
11604 ER_GRP_RPL_FAILED_TO_REINIT_BINLOG_CACHE_FOR_READ HY000
11605 ER_GRP_RPL_FAILED_TO_CREATE_TRANS_CONTEXT HY000
11606 ER_GRP_RPL_FAILED_TO_EXTRACT_TRANS_WRITE_SET HY000
11607 ER_GRP_RPL_FAILED_TO_GATHER_TRANS_WRITE_SET HY000
11608 ER_GRP_RPL_TRANS_SIZE_EXCEEDS_LIMIT HY000
11611 ER_GRP_RPL_WRITE_TO_TRANSACTION_MESSAGE_FAILED HY000
11612 ER_GRP_RPL_FAILED_TO_REGISTER_TRANS_OUTCOME_NOTIFICTION HY000
11613 ER_GRP_RPL_MSG_TOO_LONG_BROADCASTING_TRANS_FAILED HY000
11614 ER_GRP_RPL_BROADCASTING_TRANS_TO_GRP_FAILED HY000
11615 ER_GRP_RPL_ERROR_WHILE_WAITING_FOR_CONFLICT_DETECTION HY000
11620 ER_GRP_RPL_FATAL_REC_PROCESS HY000
11622 ER_GRP_RPL_UNABLE_TO_EVALUATE_APPLIER_STATUS HY000
11623 ER_GRP_RPL_ONLY_ONE_SERVER_ALIVE HY000
11624 ER_GRP_RPL_CERTIFICATION_REC_PROCESS HY000
11625 ER_GRP_RPL_UNABLE_TO_ENSURE_EXECUTION_REC HY000
11626 ER_GRP_RPL_WHILE_SENDING_MSG_REC HY000
11628 ER_GRP_RPL_READ_UNABLE_FOR_READ_ONLY_SUPER_READ_ONLY HY000
11629 ER_GRP_RPL_UNABLE_TO_RESET_SERVER_READ_MODE HY000
11630 ER_GRP_RPL_UNABLE_TO_CERTIFY_PLUGIN_TRANS HY000
11631 ER_GRP_RPL_UNBLOCK_CERTIFIED_TRANS HY000
11633 ER_GRP_RPL_FAILED_TO_START_WITH_INVALID_SERVER_ID HY000
11634 ER_GRP_RPL_FORCE_MEMBERS_MUST_BE_EMPTY HY000
11635 ER_GRP_RPL_PLUGIN_STRUCT_INIT_NOT_POSSIBLE_ON_SERVER_START HY000
11636 ER_GRP_RPL_FAILED_TO_ENABLE_SUPER_READ_ONLY_MODE HY000
11637 ER_GRP_RPL_FAILED_TO_INIT_COMMUNICATION_ENGINE HY000
11638 ER_GRP_RPL_FAILED_TO_START_ON_SECONDARY_WITH_ASYNC_CHANNELSHY000
226

Mapping MySQL Error Numbers to JDBC SQLState Codes
MySQL
Error
Number
MySQL Error Name SQL
Standard
SQLState
11639 ER_GRP_RPL_FAILED_TO_START_COMMUNICATION_ENGINE HY000
11640 ER_GRP_RPL_TIMEOUT_ON_VIEW_AFTER_JOINING_GRP HY000
11641 ER_GRP_RPL_FAILED_TO_CALL_GRP_COMMUNICATION_INTERFACE HY000
11642 ER_GRP_RPL_MEMBER_SERVER_UUID_IS_INCOMPATIBLE_WITH_GRP HY000
11643 ER_GRP_RPL_MEMBER_CONF_INFO HY000
11644 ER_GRP_RPL_FAILED_TO_CONFIRM_IF_SERVER_LEFT_GRP HY000
11645 ER_GRP_RPL_SERVER_IS_ALREADY_LEAVING HY000
11646 ER_GRP_RPL_SERVER_ALREADY_LEFT HY000
11647 ER_GRP_RPL_WAITING_FOR_VIEW_UPDATE HY000
11648 ER_GRP_RPL_TIMEOUT_RECEIVING_VIEW_CHANGE_ON_SHUTDOWN HY000
11649 ER_GRP_RPL_REQUESTING_NON_MEMBER_SERVER_TO_LEAVE HY000
11650 ER_GRP_RPL_IS_STOPPING HY000
11651 ER_GRP_RPL_IS_STOPPED HY000
11652 ER_GRP_RPL_FAILED_TO_ENABLE_READ_ONLY_MODE_ON_SHUTDOWN HY000
11653 ER_GRP_RPL_RECOVERY_MODULE_TERMINATION_TIMED_OUT_ON_SHUTDOWNHY000
11654 ER_GRP_RPL_APPLIER_TERMINATION_TIMED_OUT_ON_SHUTDOWN HY000
11655 ER_GRP_RPL_FAILED_TO_SHUTDOWN_REGISTRY_MODULE HY000
11656 ER_GRP_RPL_FAILED_TO_INIT_HANDLER HY000
11657 ER_GRP_RPL_FAILED_TO_REGISTER_SERVER_STATE_OBSERVER HY000
11658 ER_GRP_RPL_FAILED_TO_REGISTER_TRANS_STATE_OBSERVER HY000
11659 ER_GRP_RPL_FAILED_TO_REGISTER_BINLOG_STATE_OBSERVER HY000
11660 ER_GRP_RPL_FAILED_TO_START_ON_BOOT HY000
11661 ER_GRP_RPL_FAILED_TO_STOP_ON_PLUGIN_UNINSTALL HY000
11662 ER_GRP_RPL_FAILED_TO_UNREGISTER_SERVER_STATE_OBSERVER HY000
11663 ER_GRP_RPL_FAILED_TO_UNREGISTER_TRANS_STATE_OBSERVER HY000
11664 ER_GRP_RPL_FAILED_TO_UNREGISTER_BINLOG_STATE_OBSERVER HY000
11665 ER_GRP_RPL_ALL_OBSERVERS_UNREGISTERED HY000
11666 ER_GRP_RPL_FAILED_TO_PARSE_THE_GRP_NAME HY000
11667 ER_GRP_RPL_FAILED_TO_GENERATE_SIDNO_FOR_GRP HY000
11668 ER_GRP_RPL_APPLIER_NOT_STARTED_DUE_TO_RUNNING_PREV_SHUTDOWNHY000
11669 ER_GRP_RPL_FAILED_TO_INIT_APPLIER_MODULE HY000
11670 ER_GRP_RPL_APPLIER_INITIALIZED HY000
11671 ER_GRP_RPL_COMMUNICATION_SSL_CONF_INFO HY000
11672 ER_GRP_RPL_ABORTS_AS_SSL_NOT_SUPPORTED_BY_MYSQLD HY000
11673 ER_GRP_RPL_SSL_DISABLED HY000
11674 ER_GRP_RPL_UNABLE_TO_INIT_COMMUNICATION_ENGINE HY000
227

Mapping MySQL Error Numbers to JDBC SQLState Codes
MySQL
Error
Number
MySQL Error Name SQL
Standard
SQLState
11675 ER_GRP_RPL_BINLOG_DISABLED HY000
11676 ER_GRP_RPL_GTID_MODE_OFF HY000
11677 ER_GRP_RPL_LOG_REPLICA_UPDATES_NOT_SET HY000
11679 ER_GRP_RPL_APPLIER_METADATA_REPO_MUST_BE_TABLE HY000
11680 ER_GRP_RPL_CONNECTION_METADATA_REPO_MUST_BE_TABLE HY000
11681 ER_GRP_RPL_INCORRECT_TYPE_SET_FOR_PARALLEL_APPLIER HY000
11682 ER_GRP_RPL_REPLICA_PRESERVE_COMMIT_ORDER_NOT_SET HY000
11683 ER_GRP_RPL_SINGLE_PRIM_MODE_NOT_ALLOWED_WITH_UPDATE_EVERYWHEREHY000
11684 ER_GRP_RPL_MODULE_TERMINATE_ERROR HY000
11685 ER_GRP_RPL_GRP_NAME_OPTION_MANDATORY HY000
11686 ER_GRP_RPL_GRP_NAME_IS_TOO_LONG HY000
11687 ER_GRP_RPL_GRP_NAME_IS_NOT_VALID_UUID HY000
11688 ER_GRP_RPL_FLOW_CTRL_MIN_QUOTA_GREATER_THAN_MAX_QUOTA HY000
11689 ER_GRP_RPL_FLOW_CTRL_MIN_RECOVERY_QUOTA_GREATER_THAN_MAX_QUOTAHY000
11690 ER_GRP_RPL_FLOW_CTRL_MAX_QUOTA_SMALLER_THAN_MIN_QUOTAS HY000
11691 ER_GRP_RPL_INVALID_SSL_RECOVERY_STRING HY000
11694 ER_GRP_RPL_GRP_COMMUNICATION_INIT_WITH_CONF HY000
11695 ER_GRP_RPL_UNKNOWN_GRP_RPL_APPLIER_PIPELINE_REQUESTED HY000
11696 ER_GRP_RPL_FAILED_TO_BOOTSTRAP_EVENT_HANDLING_INFRASTRUCTUREHY000
11697 ER_GRP_RPL_APPLIER_HANDLER_NOT_INITIALIZED HY000
11698 ER_GRP_RPL_APPLIER_HANDLER_IS_IN_USE HY000
11699 ER_GRP_RPL_APPLIER_HANDLER_ROLE_IS_IN_USE HY000
11700 ER_GRP_RPL_FAILED_TO_INIT_APPLIER_HANDLER HY000
11701 ER_GRP_RPL_SQL_SERVICE_FAILED_TO_INIT_SESSION_THREAD HY000
11702 ER_GRP_RPL_SQL_SERVICE_COMM_SESSION_NOT_INITIALIZED HY000
11703 ER_GRP_RPL_SQL_SERVICE_SERVER_SESSION_KILLED HY000
11704 ER_GRP_RPL_SQL_SERVICE_FAILED_TO_RUN_SQL_QUERY HY000
11705 ER_GRP_RPL_SQL_SERVICE_SERVER_INTERNAL_FAILURE HY000
11706 ER_GRP_RPL_SQL_SERVICE_RETRIES_EXCEEDED_ON_SESSION_STATE HY000
11707 ER_GRP_RPL_SQL_SERVICE_FAILED_TO_FETCH_SECURITY_CTX HY000
11708 ER_GRP_RPL_SQL_SERVICE_SERVER_ACCESS_DENIED_FOR_USER HY000
11709 ER_GRP_RPL_SQL_SERVICE_MAX_CONN_ERROR_FROM_SERVER HY000
11710 ER_GRP_RPL_SQL_SERVICE_SERVER_ERROR_ON_CONN HY000
11711 ER_GRP_RPL_UNREACHABLE_MAJORITY_TIMEOUT_FOR_MEMBER HY000
11712 ER_GRP_RPL_SERVER_SET_TO_READ_ONLY_DUE_TO_ERRORS HY000
11713 ER_GRP_RPL_GMS_LISTENER_FAILED_TO_LOG_NOTIFICATION HY000
228

Mapping MySQL Error Numbers to JDBC SQLState Codes
MySQL
Error
Number
MySQL Error Name SQL
Standard
SQLState
11714 ER_GRP_RPL_GRP_COMMUNICATION_ENG_INIT_FAILED HY000
11715 ER_GRP_RPL_SET_GRP_COMMUNICATION_ENG_LOGGER_FAILED HY000
11716 ER_GRP_RPL_DEBUG_OPTIONS HY000
11717 ER_GRP_RPL_INVALID_DEBUG_OPTIONS HY000
11718 ER_GRP_RPL_EXIT_GRP_GCS_ERROR HY000
11719 ER_GRP_RPL_GRP_MEMBER_OFFLINE HY000
11720 ER_GRP_RPL_GCS_INTERFACE_ERROR HY000
11721 ER_GRP_RPL_FORCE_MEMBER_VALUE_SET_ERROR HY000
11722 ER_GRP_RPL_FORCE_MEMBER_VALUE_SET HY000
11723 ER_GRP_RPL_FORCE_MEMBER_VALUE_TIME_OUT HY000
11724 ER_GRP_RPL_BROADCAST_COMMIT_MSSG_TOO_BIG HY000
11725 ER_GRP_RPL_SEND_STATS_ERROR HY000
11726 ER_GRP_RPL_MEMBER_STATS_INFO HY000
11727 ER_GRP_RPL_FLOW_CONTROL_STATS HY000
11728 ER_GRP_RPL_UNABLE_TO_CONVERT_PACKET_TO_EVENT HY000
11729 ER_GRP_RPL_PIPELINE_CREATE_FAILED HY000
11730 ER_GRP_RPL_PIPELINE_REINIT_FAILED_WRITE HY000
11731 ER_GRP_RPL_UNABLE_TO_CONVERT_EVENT_TO_PACKET HY000
11732 ER_GRP_RPL_PIPELINE_FLUSH_FAIL HY000
11733 ER_GRP_RPL_PIPELINE_REINIT_FAILED_READ HY000
11735 ER_GRP_RPL_GCS_GR_ERROR_MSG HY000
11736 ER_GRP_RPL_REPLICA_IO_THREAD_UNBLOCKED HY000
11737 ER_GRP_RPL_REPLICA_IO_THREAD_ERROR_OUT HY000
11738 ER_GRP_RPL_REPLICA_APPLIER_THREAD_UNBLOCKED HY000
11739 ER_GRP_RPL_REPLICA_APPLIER_THREAD_ERROR_OUT HY000
11740 ER_LDAP_AUTH_FAILED_TO_CREATE_OR_GET_CONNECTION HY000
11741 ER_LDAP_AUTH_DEINIT_FAILED HY000
11742 ER_LDAP_AUTH_SKIPPING_USER_GROUP_SEARCH HY000
11743 ER_LDAP_AUTH_POOL_DISABLE_MAX_SIZE_ZERO HY000
11744 ER_LDAP_AUTH_FAILED_TO_CREATE_LDAP_OBJECT_CREATOR HY000
11745 ER_LDAP_AUTH_FAILED_TO_CREATE_LDAP_OBJECT HY000
11746 ER_LDAP_AUTH_TLS_CONF HY000
11747 ER_LDAP_AUTH_TLS_CONNECTION HY000
11748 ER_LDAP_AUTH_CONN_POOL_NOT_CREATED HY000
11749 ER_LDAP_AUTH_CONN_POOL_INITIALIZING HY000
11750 ER_LDAP_AUTH_CONN_POOL_DEINITIALIZING HY000
229

Mapping MySQL Error Numbers to JDBC SQLState Codes
MySQL
Error
Number
MySQL Error Name SQL
Standard
SQLState
11751 ER_LDAP_AUTH_ZERO_MAX_POOL_SIZE_UNCHANGED HY000
11752 ER_LDAP_AUTH_POOL_REINITIALIZING HY000
11753 ER_LDAP_AUTH_FAILED_TO_WRITE_PACKET HY000
11754 ER_LDAP_AUTH_SETTING_USERNAME HY000
11755 ER_LDAP_AUTH_USER_AUTH_DATA HY000
11757 ER_LDAP_AUTH_USER_GROUP_SEARCH_INFO HY000
11758 ER_LDAP_AUTH_GRP_SEARCH_SPECIAL_HDL HY000
11759 ER_LDAP_AUTH_GRP_IS_FULL_DN HY000
11760 ER_LDAP_AUTH_USER_NOT_FOUND_IN_ANY_GRP HY000
11761 ER_LDAP_AUTH_USER_FOUND_IN_MANY_GRPS HY000
11762 ER_LDAP_AUTH_USER_HAS_MULTIPLE_GRP_NAMES HY000
11763 ER_LDAP_AUTH_SEARCHED_USER_GRP_NAME HY000
11764 ER_LDAP_AUTH_OBJECT_CREATE_TIMESTAMP HY000
11765 ER_LDAP_AUTH_CERTIFICATE_NAME HY000
11766 ER_LDAP_AUTH_FAILED_TO_POOL_DEINIT HY000
11767 ER_LDAP_AUTH_FAILED_TO_INITIALIZE_POOL_IN_RECONSTRUCTING HY000
11768 ER_LDAP_AUTH_FAILED_TO_INITIALIZE_POOL_IN_INIT_STATE HY000
11769 ER_LDAP_AUTH_FAILED_TO_INITIALIZE_POOL_IN_DEINIT_STATE HY000
11770 ER_LDAP_AUTH_FAILED_TO_DEINITIALIZE_POOL_IN_RECONSTRUCT_STATEHY000
11771 ER_LDAP_AUTH_FAILED_TO_DEINITIALIZE_NOT_READY_POOL HY000
11772 ER_LDAP_AUTH_FAILED_TO_GET_CONNECTION_AS_PLUGIN_NOT_READY HY000
11773 ER_LDAP_AUTH_CONNECTION_POOL_INIT_FAILED HY000
11774 ER_LDAP_AUTH_MAX_ALLOWED_CONNECTION_LIMIT_HIT HY000
11775 ER_LDAP_AUTH_MAX_POOL_SIZE_SET_FAILED HY000
11776 ER_LDAP_AUTH_PLUGIN_FAILED_TO_READ_PACKET HY000
11777 ER_LDAP_AUTH_CREATING_LDAP_CONNECTION HY000
11778 ER_LDAP_AUTH_GETTING_CONNECTION_FROM_POOL HY000
11779 ER_LDAP_AUTH_RETURNING_CONNECTION_TO_POOL HY000
11780 ER_LDAP_AUTH_SEARCH_USER_GROUP_ATTR_NOT_FOUND HY000
11781 ER_LDAP_AUTH_LDAP_INFO_NULL HY000
11782 ER_LDAP_AUTH_FREEING_CONNECTION HY000
11783 ER_LDAP_AUTH_CONNECTION_PUSHED_TO_POOL HY000
11784 ER_LDAP_AUTH_CONNECTION_CREATOR_ENTER HY000
11785 ER_LDAP_AUTH_STARTING_TLS HY000
11786 ER_LDAP_AUTH_CONNECTION_GET_LDAP_INFO_NULL HY000
11787 ER_LDAP_AUTH_DELETING_CONNECTION_KEY HY000
230

Mapping MySQL Error Numbers to JDBC SQLState Codes
MySQL
Error
Number
MySQL Error Name SQL
Standard
SQLState
11788 ER_LDAP_AUTH_POOLED_CONNECTION_KEY HY000
11789 ER_LDAP_AUTH_CREATE_CONNECTION_KEY HY000
11790 ER_LDAP_AUTH_COMMUNICATION_HOST_INFO HY000
11791 ER_LDAP_AUTH_METHOD_TO_CLIENT HY000
11792 ER_LDAP_AUTH_SASL_REQUEST_FROM_CLIENT HY000
11793 ER_LDAP_AUTH_SASL_PROCESS_SASL HY000
11794 ER_LDAP_AUTH_SASL_BIND_SUCCESS_INFO HY000
11795 ER_LDAP_AUTH_STARTED_FOR_USER HY000
11796 ER_LDAP_AUTH_DISTINGUISHED_NAME HY000
11797 ER_LDAP_AUTH_INIT_FAILED HY000
11798 ER_LDAP_AUTH_OR_GROUP_RETRIEVAL_FAILED HY000
11799 ER_LDAP_AUTH_USER_GROUP_SEARCH_FAILED HY000
11800 ER_LDAP_AUTH_USER_BIND_FAILED HY000
11801 ER_LDAP_AUTH_POOL_GET_FAILED_TO_CREATE_CONNECTION HY000
11802 ER_LDAP_AUTH_FAILED_TO_CREATE_LDAP_CONNECTION HY000
11803 ER_LDAP_AUTH_FAILED_TO_ESTABLISH_TLS_CONNECTION HY000
11804 ER_LDAP_AUTH_FAILED_TO_SEARCH_DN HY000
11805 ER_LDAP_AUTH_CONNECTION_POOL_REINIT_ENTER HY000
11806 ER_SYSTEMD_NOTIFY_PATH_TOO_LONG HY000
11807 ER_SYSTEMD_NOTIFY_CONNECT_FAILED HY000
11808 ER_SYSTEMD_NOTIFY_WRITE_FAILED HY000
11809 ER_FOUND_MISSING_GTIDS HY000
11810 ER_PID_FILE_PRIV_DIRECTORY_INSECURE HY000
11811 ER_CANT_CHECK_PID_PATH HY000
11812 ER_VALIDATE_PWD_STATUS_VAR_REGISTRATION_FAILED HY000
11813 ER_VALIDATE_PWD_STATUS_VAR_UNREGISTRATION_FAILED HY000
11814 ER_VALIDATE_PWD_DICT_FILE_OPEN_FAILED HY000
11815 ER_VALIDATE_PWD_COULD_BE_NULL HY000
11816 ER_VALIDATE_PWD_STRING_CONV_TO_LOWERCASE_FAILED HY000
11817 ER_VALIDATE_PWD_STRING_CONV_TO_BUFFER_FAILED HY000
11818 ER_VALIDATE_PWD_STRING_HANDLER_MEM_ALLOCATION_FAILED HY000
11819 ER_VALIDATE_PWD_STRONG_POLICY_DICT_FILE_UNSPECIFIED HY000
11820 ER_VALIDATE_PWD_CONVERT_TO_BUFFER_FAILED HY000
11821 ER_VALIDATE_PWD_VARIABLE_REGISTRATION_FAILED HY000
11822 ER_VALIDATE_PWD_VARIABLE_UNREGISTRATION_FAILED HY000
11823 ER_KEYRING_MIGRATION_EXTRA_OPTIONS HY000
231

Mapping MySQL Error Numbers to JDBC SQLState Codes
MySQL
Error
Number
MySQL Error Name SQL
Standard
SQLState
11825 ER_IB_MSG_0 HY000
11826 ER_IB_MSG_1 HY000
11827 ER_IB_MSG_2 HY000
11828 ER_IB_MSG_3 HY000
11829 ER_IB_MSG_4 HY000
11830 ER_IB_MSG_5 HY000
11831 ER_IB_MSG_6 HY000
11832 ER_IB_MSG_7 HY000
11833 ER_IB_MSG_8 HY000
11834 ER_IB_MSG_9 HY000
11835 ER_IB_MSG_10 HY000
11836 ER_IB_MSG_11 HY000
11837 ER_IB_MSG_12 HY000
11838 ER_IB_MSG_13 HY000
11839 ER_IB_MSG_14 HY000
11840 ER_IB_MSG_15 HY000
11841 ER_IB_MSG_16 HY000
11842 ER_IB_MSG_17 HY000
11843 ER_IB_MSG_18 HY000
11844 ER_IB_MSG_19 HY000
11845 ER_IB_MSG_20 HY000
11846 ER_IB_MSG_21 HY000
11847 ER_IB_MSG_22 HY000
11848 ER_IB_MSG_23 HY000
11849 ER_IB_MSG_24 HY000
11850 ER_IB_MSG_25 HY000
11851 ER_IB_MSG_26 HY000
11852 ER_IB_MSG_27 HY000
11853 ER_IB_MSG_28 HY000
11854 ER_IB_MSG_29 HY000
11855 ER_IB_MSG_30 HY000
11857 ER_IB_MSG_32 HY000
11858 ER_IB_MSG_33 HY000
11859 ER_IB_MSG_34 HY000
11860 ER_IB_MSG_35 HY000
11861 ER_IB_MSG_36 HY000
232

Mapping MySQL Error Numbers to JDBC SQLState Codes
MySQL
Error
Number
MySQL Error Name SQL
Standard
SQLState
11862 ER_IB_MSG_37 HY000
11863 ER_IB_MSG_38 HY000
11864 ER_IB_MSG_39 HY000
11865 ER_IB_MSG_40 HY000
11866 ER_IB_MSG_41 HY000
11867 ER_IB_MSG_42 HY000
11868 ER_IB_MSG_43 HY000
11869 ER_IB_MSG_44 HY000
11870 ER_IB_MSG_45 HY000
11871 ER_IB_MSG_46 HY000
11872 ER_IB_MSG_47 HY000
11873 ER_IB_MSG_48 HY000
11874 ER_IB_MSG_49 HY000
11875 ER_IB_MSG_50 HY000
11876 ER_IB_MSG_51 HY000
11877 ER_IB_MSG_52 HY000
11878 ER_IB_MSG_53 HY000
11879 ER_IB_MSG_54 HY000
11880 ER_IB_MSG_55 HY000
11881 ER_IB_MSG_56 HY000
11882 ER_IB_MSG_57 HY000
11883 ER_IB_MSG_58 HY000
11884 ER_IB_MSG_59 HY000
11885 ER_IB_MSG_60 HY000
11886 ER_IB_MSG_61 HY000
11887 ER_IB_MSG_62 HY000
11888 ER_IB_MSG_63 HY000
11889 ER_IB_MSG_64 HY000
11890 ER_IB_MSG_65 HY000
11891 ER_IB_MSG_66 HY000
11892 ER_IB_MSG_67 HY000
11893 ER_IB_MSG_68 HY000
11894 ER_IB_MSG_69 HY000
11895 ER_IB_MSG_70 HY000
11896 ER_IB_MSG_71 HY000
11897 ER_IB_MSG_72 HY000
233

Mapping MySQL Error Numbers to JDBC SQLState Codes
MySQL
Error
Number
MySQL Error Name SQL
Standard
SQLState
11898 ER_IB_MSG_73 HY000
11899 ER_IB_MSG_74 HY000
11900 ER_IB_MSG_75 HY000
11901 ER_IB_MSG_76 HY000
11902 ER_IB_MSG_77 HY000
11903 ER_IB_MSG_78 HY000
11904 ER_IB_MSG_79 HY000
11905 ER_IB_MSG_80 HY000
11906 ER_IB_MSG_81 HY000
11907 ER_IB_MSG_82 HY000
11908 ER_IB_MSG_83 HY000
11909 ER_IB_MSG_84 HY000
11910 ER_IB_MSG_85 HY000
11911 ER_IB_MSG_86 HY000
11920 ER_IB_MSG_95 HY000
11921 ER_IB_MSG_96 HY000
11922 ER_IB_MSG_97 HY000
11923 ER_IB_MSG_98 HY000
11924 ER_IB_MSG_99 HY000
11925 ER_IB_MSG_100 HY000
11926 ER_IB_MSG_101 HY000
11927 ER_IB_MSG_102 HY000
11928 ER_IB_MSG_103 HY000
11929 ER_IB_MSG_104 HY000
11930 ER_IB_MSG_105 HY000
11931 ER_IB_MSG_106 HY000
11932 ER_IB_MSG_107 HY000
11933 ER_IB_MSG_108 HY000
11934 ER_IB_MSG_109 HY000
11935 ER_IB_MSG_110 HY000
11936 ER_IB_MSG_111 HY000
11937 ER_IB_MSG_112 HY000
11944 ER_IB_MSG_119 HY000
11945 ER_IB_MSG_120 HY000
11946 ER_IB_MSG_121 HY000
11947 ER_IB_MSG_122 HY000
234

Mapping MySQL Error Numbers to JDBC SQLState Codes
MySQL
Error
Number
MySQL Error Name SQL
Standard
SQLState
11948 ER_IB_MSG_123 HY000
11949 ER_IB_MSG_124 HY000
11950 ER_IB_MSG_125 HY000
11951 ER_IB_MSG_126 HY000
11952 ER_IB_MSG_127 HY000
11953 ER_IB_MSG_128 HY000
11954 ER_IB_MSG_129 HY000
11955 ER_IB_MSG_130 HY000
11956 ER_IB_MSG_131 HY000
11957 ER_IB_MSG_132 HY000
11958 ER_IB_MSG_133 HY000
11959 ER_IB_MSG_134 HY000
11960 ER_IB_MSG_135 HY000
11961 ER_IB_MSG_136 HY000
11962 ER_IB_MSG_137 HY000
11963 ER_IB_MSG_138 HY000
11964 ER_IB_MSG_139 HY000
11965 ER_IB_MSG_140 HY000
11966 ER_IB_MSG_141 HY000
11967 ER_IB_MSG_142 HY000
11968 ER_IB_MSG_143 HY000
11969 ER_IB_MSG_144 HY000
11970 ER_IB_MSG_145 HY000
11971 ER_IB_MSG_146 HY000
11972 ER_IB_MSG_147 HY000
11973 ER_IB_MSG_148 HY000
11974 ER_IB_CLONE_INTERNAL HY000
11975 ER_IB_CLONE_TIMEOUT HY000
11976 ER_IB_CLONE_STATUS_FILE HY000
11977 ER_IB_CLONE_SQL HY000
11978 ER_IB_CLONE_VALIDATE HY000
11979 ER_IB_CLONE_PUNCH_HOLE HY000
11980 ER_IB_CLONE_GTID_PERSIST HY000
11981 ER_IB_MSG_156 HY000
11982 ER_IB_MSG_157 HY000
11983 ER_IB_MSG_158 HY000
235

Mapping MySQL Error Numbers to JDBC SQLState Codes
MySQL
Error
Number
MySQL Error Name SQL
Standard
SQLState
11984 ER_IB_MSG_159 HY000
11985 ER_IB_MSG_160 HY000
11986 ER_IB_MSG_161 HY000
11987 ER_IB_MSG_162 HY000
11988 ER_IB_MSG_163 HY000
11989 ER_IB_MSG_164 HY000
11990 ER_IB_MSG_165 HY000
11991 ER_IB_MSG_166 HY000
11992 ER_IB_MSG_167 HY000
11993 ER_IB_MSG_168 HY000
11994 ER_IB_MSG_169 HY000
11995 ER_IB_MSG_170 HY000
11996 ER_IB_MSG_171 HY000
11997 ER_IB_MSG_172 HY000
11998 ER_IB_MSG_173 HY000
11999 ER_IB_MSG_174 HY000
12000 ER_IB_MSG_175 HY000
12001 ER_IB_MSG_176 HY000
12002 ER_IB_MSG_177 HY000
12003 ER_IB_MSG_178 HY000
12004 ER_IB_MSG_179 HY000
12005 ER_IB_MSG_180 HY000
12006 ER_IB_LONG_AHI_DISABLE_WAIT HY000
12007 ER_IB_MSG_182 HY000
12008 ER_IB_MSG_183 HY000
12009 ER_IB_MSG_184 HY000
12012 ER_IB_MSG_187 HY000
12013 ER_IB_MSG_188 HY000
12014 ER_IB_MSG_189 HY000
12015 ER_IB_MSG_190 HY000
12016 ER_IB_MSG_191 HY000
12017 ER_IB_MSG_192 HY000
12018 ER_IB_MSG_193 HY000
12019 ER_IB_MSG_194 HY000
12020 ER_IB_MSG_195 HY000
12021 ER_IB_MSG_196 HY000
236

Mapping MySQL Error Numbers to JDBC SQLState Codes
MySQL
Error
Number
MySQL Error Name SQL
Standard
SQLState
12022 ER_IB_MSG_197 HY000
12023 ER_IB_MSG_198 HY000
12024 ER_IB_MSG_199 HY000
12025 ER_IB_MSG_200 HY000
12026 ER_IB_MSG_201 HY000
12027 ER_IB_MSG_202 HY000
12028 ER_IB_MSG_203 HY000
12029 ER_IB_MSG_204 HY000
12030 ER_IB_MSG_205 HY000
12031 ER_IB_MSG_206 HY000
12032 ER_IB_MSG_207 HY000
12033 ER_IB_MSG_208 HY000
12034 ER_IB_MSG_209 HY000
12035 ER_IB_MSG_210 HY000
12036 ER_IB_MSG_211 HY000
12037 ER_IB_MSG_212 HY000
12038 ER_IB_MSG_213 HY000
12039 ER_IB_MSG_214 HY000
12040 ER_IB_MSG_215 HY000
12041 ER_IB_MSG_216 HY000
12042 ER_IB_MSG_217 HY000
12043 ER_IB_MSG_218 HY000
12044 ER_IB_MSG_219 HY000
12045 ER_IB_MSG_220 HY000
12046 ER_IB_MSG_221 HY000
12047 ER_IB_MSG_222 HY000
12048 ER_IB_MSG_223 HY000
12049 ER_IB_MSG_224 HY000
12050 ER_IB_MSG_225 HY000
12051 ER_IB_MSG_226 HY000
12054 ER_IB_MSG_229 HY000
12055 ER_IB_MSG_230 HY000
12056 ER_IB_MSG_231 HY000
12057 ER_IB_MSG_232 HY000
12058 ER_IB_MSG_233 HY000
12059 ER_IB_MSG_234 HY000
237

Mapping MySQL Error Numbers to JDBC SQLState Codes
MySQL
Error
Number
MySQL Error Name SQL
Standard
SQLState
12060 ER_IB_MSG_235 HY000
12061 ER_IB_MSG_236 HY000
12062 ER_IB_MSG_237 HY000
12063 ER_IB_MSG_238 HY000
12064 ER_IB_MSG_239 HY000
12065 ER_IB_MSG_240 HY000
12066 ER_IB_MSG_241 HY000
12067 ER_IB_MSG_242 HY000
12068 ER_IB_MSG_243 HY000
12069 ER_IB_MSG_244 HY000
12070 ER_IB_MSG_245 HY000
12071 ER_IB_MSG_246 HY000
12072 ER_IB_MSG_247 HY000
12073 ER_IB_MSG_248 HY000
12074 ER_IB_MSG_249 HY000
12075 ER_IB_MSG_250 HY000
12076 ER_IB_MSG_251 HY000
12077 ER_IB_MSG_252 HY000
12078 ER_IB_MSG_253 HY000
12079 ER_IB_MSG_254 HY000
12080 ER_IB_MSG_255 HY000
12081 ER_IB_MSG_256 HY000
12082 ER_IB_MSG_257 HY000
12083 ER_IB_MSG_258 HY000
12084 ER_IB_MSG_259 HY000
12085 ER_IB_MSG_260 HY000
12086 ER_IB_MSG_261 HY000
12087 ER_IB_MSG_262 HY000
12088 ER_IB_MSG_263 HY000
12089 ER_IB_MSG_264 HY000
12090 ER_IB_MSG_265 HY000
12091 ER_IB_MSG_266 HY000
12092 ER_IB_MSG_267 HY000
12093 ER_IB_MSG_268 HY000
12094 ER_IB_MSG_269 HY000
12095 ER_IB_MSG_270 HY000
238

Mapping MySQL Error Numbers to JDBC SQLState Codes
MySQL
Error
Number
MySQL Error Name SQL
Standard
SQLState
12096 ER_IB_MSG_271 HY000
12097 ER_IB_MSG_272 HY000
12098 ER_IB_MSG_273 HY000
12103 ER_IB_MSG_278 HY000
12105 ER_IB_MSG_280 HY000
12106 ER_IB_MSG_281 HY000
12107 ER_IB_MSG_282 HY000
12108 ER_IB_MSG_283 HY000
12109 ER_IB_MSG_284 HY000
12110 ER_IB_MSG_285 HY000
12111 ER_IB_WARN_ACCESSING_NONEXISTINC_SPACE HY000
12112 ER_IB_MSG_287 HY000
12113 ER_IB_MSG_288 HY000
12114 ER_IB_MSG_289 HY000
12116 ER_IB_MSG_291 HY000
12117 ER_IB_MSG_292 HY000
12118 ER_IB_MSG_293 HY000
12119 ER_IB_MSG_294 HY000
12120 ER_IB_MSG_295 HY000
12121 ER_IB_MSG_296 HY000
12122 ER_IB_MSG_297 HY000
12123 ER_IB_MSG_298 HY000
12124 ER_IB_MSG_299 HY000
12125 ER_IB_MSG_300 HY000
12126 ER_IB_MSG_301 HY000
12127 ER_IB_MSG_UNEXPECTED_FILE_EXISTS HY000
12128 ER_IB_MSG_303 HY000
12129 ER_IB_MSG_304 HY000
12130 ER_IB_MSG_305 HY000
12131 ER_IB_MSG_306 HY000
12132 ER_IB_MSG_307 HY000
12133 ER_IB_MSG_308 HY000
12134 ER_IB_MSG_309 HY000
12135 ER_IB_MSG_310 HY000
12136 ER_IB_MSG_311 HY000
12137 ER_IB_MSG_312 HY000
239

Mapping MySQL Error Numbers to JDBC SQLState Codes
MySQL
Error
Number
MySQL Error Name SQL
Standard
SQLState
12138 ER_IB_MSG_313 HY000
12139 ER_IB_MSG_314 HY000
12140 ER_IB_MSG_315 HY000
12141 ER_IB_MSG_316 HY000
12142 ER_IB_MSG_317 HY000
12143 ER_IB_MSG_318 HY000
12144 ER_IB_MSG_319 HY000
12145 ER_IB_MSG_320 HY000
12146 ER_IB_MSG_321 HY000
12147 ER_IB_MSG_322 HY000
12148 ER_IB_MSG_323 HY000
12149 ER_IB_MSG_324 HY000
12150 ER_IB_MSG_325 HY000
12151 ER_IB_MSG_326 HY000
12153 ER_IB_MSG_328 HY000
12154 ER_IB_MSG_329 HY000
12155 ER_IB_MSG_330 HY000
12156 ER_IB_MSG_331 HY000
12157 ER_IB_MSG_332 HY000
12158 ER_IB_MSG_333 HY000
12159 ER_IB_MSG_334 HY000
12160 ER_IB_MSG_335 HY000
12161 ER_IB_MSG_336 HY000
12162 ER_IB_MSG_337 HY000
12163 ER_IB_MSG_338 HY000
12164 ER_IB_MSG_339 HY000
12165 ER_IB_MSG_340 HY000
12166 ER_IB_MSG_341 HY000
12167 ER_IB_MSG_342 HY000
12168 ER_IB_MSG_343 HY000
12169 ER_IB_MSG_344 HY000
12170 ER_IB_MSG_345 HY000
12171 ER_IB_MSG_346 HY000
12172 ER_IB_MSG_347 HY000
12173 ER_IB_MSG_348 HY000
12174 ER_IB_MSG_349 HY000
240

Mapping MySQL Error Numbers to JDBC SQLState Codes
MySQL
Error
Number
MySQL Error Name SQL
Standard
SQLState
12175 ER_IB_MSG_350 HY000
12177 ER_IB_MSG_UNPROTECTED_LOCATION_ALLOWED HY000
12179 ER_IB_MSG_354 HY000
12180 ER_IB_MSG_355 HY000
12181 ER_IB_MSG_356 HY000
12182 ER_IB_MSG_357 HY000
12183 ER_IB_MSG_358 HY000
12184 ER_IB_MSG_359 HY000
12185 ER_IB_MSG_360 HY000
12186 ER_IB_MSG_361 HY000
12187 ER_IB_MSG_362 HY000
12189 ER_IB_MSG_364 HY000
12190 ER_IB_MSG_365 HY000
12191 ER_IB_MSG_IGNORE_SCAN_PATH HY000
12192 ER_IB_MSG_367 HY000
12193 ER_IB_MSG_368 HY000
12194 ER_IB_MSG_369 HY000
12195 ER_IB_MSG_370 HY000
12196 ER_IB_MSG_371 HY000
12197 ER_IB_MSG_372 HY000
12198 ER_IB_MSG_373 HY000
12199 ER_IB_MSG_374 HY000
12200 ER_IB_MSG_375 HY000
12201 ER_IB_MSG_376 HY000
12202 ER_IB_MSG_377 HY000
12203 ER_IB_MSG_378 HY000
12204 ER_IB_MSG_379 HY000
12205 ER_IB_MSG_380 HY000
12206 ER_IB_MSG_381 HY000
12207 ER_IB_MSG_382 HY000
12208 ER_IB_MSG_383 HY000
12209 ER_IB_MSG_384 HY000
12210 ER_IB_MSG_385 HY000
12211 ER_IB_MSG_386 HY000
12212 ER_IB_MSG_387 HY000
12213 ER_IB_MSG_GENERAL_TABLESPACE_UNDER_DATADIR HY000
241

Mapping MySQL Error Numbers to JDBC SQLState Codes
MySQL
Error
Number
MySQL Error Name SQL
Standard
SQLState
12214 ER_IB_MSG_IMPLICIT_TABLESPACE_IN_DATADIR HY000
12215 ER_IB_MSG_390 HY000
12216 ER_IB_MSG_391 HY000
12217 ER_IB_MSG_392 HY000
12218 ER_IB_MSG_393 HY000
12219 ER_IB_MSG_394 HY000
12220 ER_IB_MSG_395 HY000
12221 ER_IB_MSG_396 HY000
12222 ER_IB_MSG_397 HY000
12223 ER_IB_MSG_398 HY000
12224 ER_IB_MSG_399 HY000
12226 ER_IB_MSG_401 HY000
12227 ER_IB_MSG_402 HY000
12228 ER_IB_MSG_403 HY000
12229 ER_IB_MSG_404 HY000
12230 ER_IB_MSG_405 HY000
12231 ER_IB_MSG_406 HY000
12232 ER_IB_MSG_407 HY000
12233 ER_IB_MSG_408 HY000
12234 ER_IB_MSG_409 HY000
12235 ER_IB_MSG_410 HY000
12236 ER_IB_MSG_411 HY000
12237 ER_IB_MSG_412 HY000
12238 ER_IB_MSG_413 HY000
12239 ER_IB_MSG_414 HY000
12240 ER_IB_MSG_415 HY000
12241 ER_IB_MSG_416 HY000
12242 ER_IB_MSG_417 HY000
12243 ER_IB_MSG_418 HY000
12244 ER_IB_MSG_419 HY000
12245 ER_IB_MSG_420 HY000
12246 ER_IB_MSG_421 HY000
12247 ER_IB_MSG_422 HY000
12248 ER_IB_MSG_423 HY000
12249 ER_IB_MSG_424 HY000
12250 ER_IB_MSG_425 HY000
242

Mapping MySQL Error Numbers to JDBC SQLState Codes
MySQL
Error
Number
MySQL Error Name SQL
Standard
SQLState
12251 ER_IB_MSG_426 HY000
12252 ER_IB_MSG_427 HY000
12253 ER_IB_MSG_428 HY000
12254 ER_IB_MSG_429 HY000
12255 ER_IB_MSG_430 HY000
12256 ER_IB_MSG_431 HY000
12257 ER_IB_MSG_432 HY000
12258 ER_IB_MSG_433 HY000
12259 ER_IB_MSG_434 HY000
12260 ER_IB_MSG_435 HY000
12261 ER_IB_MSG_436 HY000
12262 ER_IB_MSG_437 HY000
12263 ER_IB_MSG_438 HY000
12264 ER_IB_MSG_439 HY000
12265 ER_IB_MSG_440 HY000
12266 ER_IB_MSG_441 HY000
12267 ER_IB_MSG_442 HY000
12268 ER_IB_MSG_443 HY000
12270 ER_IB_MSG_445 HY000
12271 ER_IB_MSG_446 HY000
12272 ER_IB_MSG_447 HY000
12273 ER_IB_MSG_448 HY000
12274 ER_IB_MSG_449 HY000
12275 ER_IB_MSG_450 HY000
12276 ER_IB_MSG_451 HY000
12277 ER_IB_MSG_452 HY000
12278 ER_IB_MSG_453 HY000
12279 ER_IB_MSG_454 HY000
12280 ER_IB_MSG_455 HY000
12281 ER_IB_MSG_456 HY000
12282 ER_IB_MSG_457 HY000
12283 ER_IB_MSG_458 HY000
12284 ER_IB_MSG_459 HY000
12285 ER_IB_MSG_460 HY000
12286 ER_IB_MSG_461 HY000
12287 ER_IB_MSG_462 HY000
243

Mapping MySQL Error Numbers to JDBC SQLState Codes
MySQL
Error
Number
MySQL Error Name SQL
Standard
SQLState
12288 ER_IB_MSG_463 HY000
12289 ER_IB_MSG_464 HY000
12290 ER_IB_MSG_465 HY000
12291 ER_IB_MSG_466 HY000
12292 ER_IB_MSG_467 HY000
12293 ER_IB_MSG_468 HY000
12294 ER_IB_MSG_469 HY000
12295 ER_IB_MSG_470 HY000
12296 ER_IB_MSG_471 HY000
12297 ER_IB_MSG_472 HY000
12298 ER_IB_MSG_473 HY000
12299 ER_IB_MSG_474 HY000
12300 ER_IB_MSG_475 HY000
12301 ER_IB_MSG_476 HY000
12302 ER_IB_MSG_477 HY000
12303 ER_IB_MSG_478 HY000
12304 ER_IB_MSG_479 HY000
12305 ER_IB_MSG_480 HY000
12306 ER_IB_MSG_481 HY000
12307 ER_IB_MSG_482 HY000
12308 ER_IB_MSG_483 HY000
12309 ER_IB_MSG_484 HY000
12310 ER_IB_MSG_485 HY000
12311 ER_IB_MSG_486 HY000
12312 ER_IB_MSG_487 HY000
12313 ER_IB_MSG_488 HY000
12314 ER_IB_MSG_489 HY000
12315 ER_IB_MSG_490 HY000
12316 ER_IB_MSG_491 HY000
12317 ER_IB_MSG_492 HY000
12318 ER_IB_MSG_493 HY000
12319 ER_IB_MSG_494 HY000
12320 ER_IB_MSG_495 HY000
12321 ER_IB_MSG_496 HY000
12322 ER_IB_MSG_497 HY000
12323 ER_IB_MSG_498 HY000
244

Mapping MySQL Error Numbers to JDBC SQLState Codes
MySQL
Error
Number
MySQL Error Name SQL
Standard
SQLState
12324 ER_IB_MSG_499 HY000
12325 ER_IB_MSG_500 HY000
12326 ER_IB_MSG_501 HY000
12327 ER_IB_MSG_502 HY000
12328 ER_IB_MSG_503 HY000
12329 ER_IB_MSG_504 HY000
12330 ER_IB_MSG_505 HY000
12331 ER_IB_MSG_506 HY000
12332 ER_IB_MSG_507 HY000
12333 ER_IB_MSG_508 HY000
12334 ER_IB_MSG_509 HY000
12335 ER_IB_MSG_510 HY000
12336 ER_IB_MSG_511 HY000
12337 ER_IB_MSG_512 HY000
12338 ER_IB_MSG_513 HY000
12339 ER_IB_MSG_514 HY000
12340 ER_IB_MSG_515 HY000
12341 ER_IB_MSG_516 HY000
12342 ER_IB_MSG_517 HY000
12343 ER_IB_MSG_518 HY000
12344 ER_IB_MSG_519 HY000
12345 ER_IB_MSG_520 HY000
12346 ER_IB_MSG_521 HY000
12347 ER_IB_MSG_522 HY000
12348 ER_IB_MSG_523 HY000
12349 ER_IB_MSG_524 HY000
12350 ER_IB_MSG_525 HY000
12351 ER_IB_MSG_526 HY000
12352 ER_IB_MSG_527 HY000
12355 ER_IB_MSG_530 HY000
12356 ER_IB_MSG_531 HY000
12357 ER_IB_MSG_532 HY000
12358 ER_IB_MSG_533 HY000
12359 ER_IB_MSG_534 HY000
12362 ER_IB_MSG_537 HY000
12363 ER_IB_MSG_538 HY000
245

Mapping MySQL Error Numbers to JDBC SQLState Codes
MySQL
Error
Number
MySQL Error Name SQL
Standard
SQLState
12364 ER_IB_MSG_539 HY000
12365 ER_IB_MSG_540 HY000
12366 ER_IB_MSG_541 HY000
12368 ER_IB_MSG_543 HY000
12369 ER_IB_MSG_544 HY000
12370 ER_IB_MSG_545 HY000
12371 ER_IB_MSG_546 HY000
12372 ER_IB_MSG_547 HY000
12373 ER_IB_MSG_548 HY000
12374 ER_IB_MSG_549 HY000
12375 ER_IB_MSG_550 HY000
12376 ER_IB_MSG_551 HY000
12377 ER_IB_MSG_552 HY000
12378 ER_IB_MSG_553 HY000
12379 ER_IB_MSG_554 HY000
12380 ER_IB_MSG_555 HY000
12381 ER_IB_MSG_556 HY000
12382 ER_IB_MSG_557 HY000
12383 ER_IB_MSG_558 HY000
12384 ER_IB_MSG_559 HY000
12385 ER_IB_MSG_560 HY000
12386 ER_IB_MSG_561 HY000
12387 ER_IB_MSG_562 HY000
12388 ER_IB_MSG_563 HY000
12389 ER_IB_MSG_564 HY000
12390 ER_IB_MSG_INVALID_LOCATION_FOR_TABLE HY000
12391 ER_IB_MSG_566 HY000
12392 ER_IB_MSG_567 HY000
12393 ER_IB_MSG_568 HY000
12394 ER_IB_MSG_569 HY000
12395 ER_IB_MSG_570 HY000
12396 ER_IB_MSG_571 HY000
12398 ER_IB_MSG_573 HY000
12399 ER_IB_MSG_574 HY000
12403 ER_IB_MSG_578 HY000
12404 ER_IB_MSG_579 HY000
246

Mapping MySQL Error Numbers to JDBC SQLState Codes
MySQL
Error
Number
MySQL Error Name SQL
Standard
SQLState
12405 ER_IB_MSG_580 HY000
12406 ER_IB_MSG_581 HY000
12407 ER_IB_MSG_582 HY000
12408 ER_IB_MSG_583 HY000
12409 ER_IB_MSG_584 HY000
12410 ER_IB_MSG_585 HY000
12411 ER_IB_MSG_586 HY000
12412 ER_IB_MSG_587 HY000
12413 ER_IB_MSG_588 HY000
12414 ER_IB_MSG_589 HY000
12415 ER_IB_MSG_590 HY000
12416 ER_IB_MSG_591 HY000
12417 ER_IB_MSG_592 HY000
12418 ER_IB_MSG_593 HY000
12419 ER_IB_MSG_594 HY000
12420 ER_IB_MSG_595 HY000
12421 ER_IB_MSG_596 HY000
12422 ER_IB_MSG_597 HY000
12423 ER_IB_MSG_598 HY000
12424 ER_IB_MSG_599 HY000
12425 ER_IB_MSG_600 HY000
12426 ER_IB_MSG_601 HY000
12427 ER_IB_MSG_602 HY000
12428 ER_IB_MSG_603 HY000
12429 ER_IB_MSG_604 HY000
12430 ER_IB_MSG_605 HY000
12431 ER_IB_MSG_606 HY000
12432 ER_IB_MSG_607 HY000
12433 ER_IB_MSG_608 HY000
12434 ER_IB_MSG_609 HY000
12436 ER_IB_MSG_611 HY000
12437 ER_IB_MSG_612 HY000
12438 ER_IB_MSG_613 HY000
12439 ER_IB_MSG_614 HY000
12440 ER_IB_MSG_615 HY000
12441 ER_IB_MSG_616 HY000
247

Mapping MySQL Error Numbers to JDBC SQLState Codes
MySQL
Error
Number
MySQL Error Name SQL
Standard
SQLState
12442 ER_IB_MSG_617 HY000
12444 ER_IB_MSG_619 HY000
12445 ER_IB_MSG_IBUF_CURSOR_RESTORATION_FAILED HY000
12447 ER_IB_MSG_IBUF_FAILED_TO_RESTORE_POSITION HY000
12448 ER_IB_MSG_623 HY000
12449 ER_IB_MSG_624 HY000
12451 ER_IB_MSG_626 HY000
12452 ER_IB_MSG_627 HY000
12453 ER_IB_MSG_628 HY000
12454 ER_IB_MSG_629 HY000
12455 ER_IB_MSG_630 HY000
12456 ER_IB_MSG_631 HY000
12457 ER_IB_MSG_632 HY000
12458 ER_IB_MSG_633 HY000
12459 ER_IB_MSG_634 HY000
12460 ER_IB_MSG_635 HY000
12461 ER_IB_MSG_636 HY000
12462 ER_IB_MSG_637 HY000
12463 ER_IB_MSG_638 HY000
12464 ER_IB_MSG_639 HY000
12467 ER_IB_MSG_642 HY000
12468 ER_IB_MSG_643 HY000
12469 ER_IB_MSG_644 HY000
12470 ER_IB_MSG_645 HY000
12471 ER_IB_MSG_646 HY000
12472 ER_IB_MSG_647 HY000
12473 ER_IB_MSG_648 HY000
12474 ER_IB_MSG_649 HY000
12475 ER_IB_MSG_650 HY000
12476 ER_IB_MSG_651 HY000
12477 ER_IB_MSG_652 HY000
12478 ER_IB_MSG_DDL_LOG_DELETE_BY_ID_OK HY000
12479 ER_IB_MSG_654 HY000
12480 ER_IB_MSG_655 HY000
12481 ER_IB_MSG_656 HY000
12482 ER_IB_MSG_657 HY000
248

Mapping MySQL Error Numbers to JDBC SQLState Codes
MySQL
Error
Number
MySQL Error Name SQL
Standard
SQLState
12483 ER_IB_MSG_658 HY000
12484 ER_IB_MSG_659 HY000
12485 ER_IB_MSG_660 HY000
12486 ER_IB_MSG_661 HY000
12487 ER_IB_MSG_662 HY000
12488 ER_IB_MSG_663 HY000
12519 ER_IB_MSG_694 HY000
12520 ER_IB_MSG_695 HY000
12521 ER_IB_MSG_696 HY000
12522 ER_IB_MSG_697 HY000
12523 ER_IB_MSG_LOG_CORRUPT HY000
12524 ER_IB_MSG_699 HY000
12525 ER_IB_MSG_LOG_FORMAT_OLD_AND_LOG_CORRUPTED HY000
12526 ER_IB_MSG_LOG_FORMAT_OLD_AND_NO_CLEAN_SHUTDOWN HY000
12529 ER_IB_MSG_LOG_FORMAT_BEFORE_8_0_30 HY000
12530 ER_IB_MSG_LOG_FILE_FORMAT_UNKNOWN HY000
12531 ER_IB_MSG_RECOVERY_CHECKPOINT_NOT_FOUND HY000
12532 ER_IB_MSG_707 HY000
12533 ER_IB_MSG_708 HY000
12534 ER_IB_MSG_709 HY000
12535 ER_IB_MSG_710 HY000
12536 ER_IB_MSG_711 HY000
12537 ER_IB_MSG_712 HY000
12538 ER_IB_MSG_713 HY000
12539 ER_IB_MSG_714 HY000
12540 ER_IB_MSG_715 HY000
12541 ER_IB_MSG_716 HY000
12543 ER_IB_MSG_718 HY000
12544 ER_IB_MSG_719 HY000
12545 ER_IB_MSG_720 HY000
12546 ER_IB_MSG_RECOVERY_SKIPPED_IN_READ_ONLY_MODE HY000
12547 ER_IB_MSG_722 HY000
12548 ER_IB_MSG_723 HY000
12549 ER_IB_MSG_724 HY000
12550 ER_IB_MSG_725 HY000
12551 ER_IB_MSG_726 HY000
249

Mapping MySQL Error Numbers to JDBC SQLState Codes
MySQL
Error
Number
MySQL Error Name SQL
Standard
SQLState
12552 ER_IB_MSG_727 HY000
12553 ER_IB_MSG_728 HY000
12554 ER_IB_MSG_LOG_FILES_CREATED_BY_MEB_AND_READ_ONLY_MODE HY000
12555 ER_IB_MSG_LOG_FILES_CREATED_BY_MEB HY000
12556 ER_IB_MSG_LOG_FILES_CREATED_BY_CLONE HY000
12557 ER_IB_MSG_LOG_FORMAT_OLD HY000
12559 ER_IB_MSG_RECOVERY_CHECKPOINT_FROM_BEFORE_CLEAN_SHUTDOWNHY000
12560 ER_IB_MSG_RECOVERY_IS_NEEDED HY000
12561 ER_IB_MSG_RECOVERY_IN_READ_ONLY HY000
12562 ER_IB_MSG_737 HY000
12563 ER_IB_MSG_738 HY000
12564 ER_IB_MSG_739 HY000
12565 ER_IB_MSG_740 HY000
12566 ER_IB_MSG_741 HY000
12567 ER_IB_MSG_742 HY000
12568 ER_IB_MSG_743 HY000
12569 ER_IB_MSG_744 HY000
12570 ER_IB_MSG_745 HY000
12571 ER_IB_MSG_746 HY000
12572 ER_IB_MSG_747 HY000
12573 ER_IB_MSG_748 HY000
12574 ER_IB_MSG_749 HY000
12575 ER_IB_MSG_750 HY000
12576 ER_IB_MSG_751 HY000
12577 ER_IB_MSG_752 HY000
12578 ER_IB_MSG_753 HY000
12579 ER_IB_MSG_754 HY000
12580 ER_IB_MSG_755 HY000
12581 ER_IB_MSG_756 HY000
12582 ER_IB_MSG_757 HY000
12583 ER_IB_MSG_758 HY000
12584 ER_IB_MSG_759 HY000
12585 ER_IB_MSG_760 HY000
12586 ER_IB_MSG_761 HY000
12587 ER_IB_MSG_762 HY000
12588 ER_IB_MSG_763 HY000
250

Mapping MySQL Error Numbers to JDBC SQLState Codes
MySQL
Error
Number
MySQL Error Name SQL
Standard
SQLState
12589 ER_IB_MSG_764 HY000
12590 ER_IB_MSG_765 HY000
12591 ER_IB_MSG_766 HY000
12592 ER_IB_MSG_767 HY000
12593 ER_IB_MSG_768 HY000
12594 ER_IB_MSG_769 HY000
12595 ER_IB_MSG_770 HY000
12596 ER_IB_MSG_771 HY000
12597 ER_IB_MSG_772 HY000
12598 ER_IB_MSG_773 HY000
12599 ER_IB_MSG_774 HY000
12600 ER_IB_MSG_775 HY000
12601 ER_IB_MSG_776 HY000
12602 ER_IB_MSG_777 HY000
12603 ER_IB_MSG_778 HY000
12604 ER_IB_MSG_779 HY000
12605 ER_IB_MSG_780 HY000
12606 ER_IB_MSG_781 HY000
12607 ER_IB_MSG_782 HY000
12608 ER_IB_MSG_783 HY000
12609 ER_IB_MSG_784 HY000
12610 ER_IB_MSG_785 HY000
12611 ER_IB_MSG_786 HY000
12612 ER_IB_MSG_787 HY000
12613 ER_IB_MSG_788 HY000
12614 ER_IB_MSG_789 HY000
12615 ER_IB_MSG_790 HY000
12616 ER_IB_MSG_791 HY000
12617 ER_IB_MSG_792 HY000
12618 ER_IB_MSG_793 HY000
12619 ER_IB_MSG_794 HY000
12620 ER_IB_MSG_795 HY000
12621 ER_IB_MSG_796 HY000
12622 ER_IB_MSG_797 HY000
12623 ER_IB_MSG_798 HY000
12624 ER_IB_MSG_799 HY000
251

Mapping MySQL Error Numbers to JDBC SQLState Codes
MySQL
Error
Number
MySQL Error Name SQL
Standard
SQLState
12625 ER_IB_MSG_800 HY000
12626 ER_IB_MSG_801 HY000
12627 ER_IB_MSG_802 HY000
12628 ER_IB_MSG_803 HY000
12629 ER_IB_MSG_804 HY000
12630 ER_IB_MSG_805 HY000
12631 ER_IB_MSG_806 HY000
12632 ER_IB_MSG_807 HY000
12633 ER_IB_MSG_808 HY000
12634 ER_IB_MSG_809 HY000
12635 ER_IB_MSG_810 HY000
12636 ER_IB_MSG_811 HY000
12637 ER_IB_MSG_812 HY000
12638 ER_IB_MSG_813 HY000
12639 ER_IB_MSG_814 HY000
12640 ER_IB_MSG_815 HY000
12641 ER_IB_MSG_816 HY000
12642 ER_IB_MSG_817 HY000
12643 ER_IB_MSG_818 HY000
12644 ER_IB_MSG_819 HY000
12645 ER_IB_MSG_820 HY000
12646 ER_IB_MSG_821 HY000
12647 ER_IB_MSG_822 HY000
12648 ER_IB_MSG_823 HY000
12649 ER_IB_MSG_824 HY000
12650 ER_IB_MSG_825 HY000
12651 ER_IB_MSG_826 HY000
12652 ER_IB_MSG_827 HY000
12653 ER_IB_MSG_828 HY000
12654 ER_IB_MSG_829 HY000
12655 ER_IB_MSG_830 HY000
12656 ER_IB_MSG_831 HY000
12657 ER_IB_MSG_832 HY000
12658 ER_IB_MSG_833 HY000
12659 ER_IB_MSG_834 HY000
12660 ER_IB_MSG_835 HY000
252

Mapping MySQL Error Numbers to JDBC SQLState Codes
MySQL
Error
Number
MySQL Error Name SQL
Standard
SQLState
12661 ER_IB_MSG_836 HY000
12662 ER_IB_MSG_837 HY000
12663 ER_IB_MSG_838 HY000
12664 ER_IB_MSG_839 HY000
12665 ER_IB_MSG_840 HY000
12666 ER_IB_MSG_841 HY000
12667 ER_IB_MSG_842 HY000
12668 ER_IB_MSG_CANT_ENCRYPT_REDO_LOG_DATA HY000
12669 ER_IB_MSG_844 HY000
12670 ER_IB_MSG_845 HY000
12671 ER_IB_MSG_CANT_DECRYPT_REDO_LOG HY000
12672 ER_IB_MSG_847 HY000
12673 ER_IB_MSG_848 HY000
12674 ER_IB_MSG_849 HY000
12675 ER_IB_MSG_850 HY000
12676 ER_IB_MSG_851 HY000
12677 ER_IB_MSG_852 HY000
12678 ER_IB_MSG_853 HY000
12679 ER_IB_MSG_854 HY000
12680 ER_IB_MSG_855 HY000
12681 ER_IB_MSG_856 HY000
12682 ER_IB_MSG_857 HY000
12683 ER_IB_MSG_858 HY000
12684 ER_IB_MSG_859 HY000
12685 ER_IB_MSG_860 HY000
12686 ER_IB_MSG_861 HY000
12687 ER_IB_MSG_862 HY000
12688 ER_IB_MSG_863 HY000
12689 ER_IB_MSG_864 HY000
12690 ER_IB_MSG_865 HY000
12691 ER_IB_MSG_866 HY000
12692 ER_IB_MSG_867 HY000
12693 ER_IB_MSG_868 HY000
12694 ER_IB_MSG_869 HY000
12695 ER_IB_MSG_870 HY000
12696 ER_IB_MSG_871 HY000
253

Mapping MySQL Error Numbers to JDBC SQLState Codes
MySQL
Error
Number
MySQL Error Name SQL
Standard
SQLState
12697 ER_IB_MSG_872 HY000
12698 ER_IB_MSG_873 HY000
12699 ER_IB_MSG_874 HY000
12700 ER_IB_MSG_875 HY000
12701 ER_IB_MSG_876 HY000
12702 ER_IB_MSG_877 HY000
12703 ER_IB_MSG_878 HY000
12704 ER_IB_MSG_879 HY000
12705 ER_IB_MSG_880 HY000
12706 ER_IB_MSG_881 HY000
12707 ER_IB_MSG_882 HY000
12708 ER_IB_MSG_883 HY000
12709 ER_IB_MSG_884 HY000
12710 ER_IB_MSG_885 HY000
12711 ER_IB_MSG_886 HY000
12712 ER_IB_MSG_887 HY000
12713 ER_IB_MSG_888 HY000
12714 ER_IB_MSG_889 HY000
12715 ER_IB_MSG_890 HY000
12716 ER_IB_MSG_891 HY000
12717 ER_IB_MSG_892 HY000
12718 ER_IB_MSG_893 HY000
12719 ER_IB_MSG_894 HY000
12720 ER_IB_MSG_895 HY000
12721 ER_IB_MSG_896 HY000
12722 ER_IB_MSG_897 HY000
12723 ER_IB_MSG_898 HY000
12724 ER_IB_MSG_899 HY000
12725 ER_IB_MSG_900 HY000
12726 ER_IB_MSG_901 HY000
12727 ER_IB_MSG_902 HY000
12728 ER_IB_MSG_903 HY000
12729 ER_IB_MSG_904 HY000
12730 ER_IB_MSG_905 HY000
12731 ER_IB_MSG_906 HY000
12732 ER_IB_MSG_907 HY000
254

Mapping MySQL Error Numbers to JDBC SQLState Codes
MySQL
Error
Number
MySQL Error Name SQL
Standard
SQLState
12733 ER_IB_MSG_908 HY000
12734 ER_IB_MSG_909 HY000
12735 ER_IB_MSG_910 HY000
12736 ER_IB_MSG_911 HY000
12737 ER_IB_MSG_912 HY000
12738 ER_IB_MSG_913 HY000
12739 ER_IB_MSG_914 HY000
12740 ER_IB_MSG_915 HY000
12741 ER_IB_MSG_916 HY000
12742 ER_IB_MSG_917 HY000
12743 ER_IB_MSG_918 HY000
12744 ER_IB_MSG_919 HY000
12745 ER_IB_MSG_920 HY000
12746 ER_IB_MSG_921 HY000
12747 ER_IB_MSG_922 HY000
12748 ER_IB_MSG_923 HY000
12749 ER_IB_MSG_924 HY000
12750 ER_IB_MSG_925 HY000
12751 ER_IB_MSG_926 HY000
12752 ER_IB_MSG_927 HY000
12753 ER_IB_MSG_928 HY000
12754 ER_IB_MSG_929 HY000
12755 ER_IB_MSG_930 HY000
12756 ER_IB_MSG_931 HY000
12757 ER_IB_MSG_932 HY000
12758 ER_IB_MSG_933 HY000
12759 ER_IB_MSG_934 HY000
12760 ER_IB_MSG_935 HY000
12761 ER_IB_MSG_936 HY000
12762 ER_IB_MSG_937 HY000
12763 ER_IB_MSG_938 HY000
12764 ER_IB_MSG_939 HY000
12765 ER_IB_MSG_940 HY000
12766 ER_IB_MSG_941 HY000
12767 ER_IB_MSG_942 HY000
12768 ER_IB_MSG_943 HY000
255

Mapping MySQL Error Numbers to JDBC SQLState Codes
MySQL
Error
Number
MySQL Error Name SQL
Standard
SQLState
12769 ER_IB_MSG_944 HY000
12770 ER_IB_MSG_945 HY000
12771 ER_IB_MSG_946 HY000
12772 ER_IB_IMPORT_INDEX_METADATA_READ_FAILED HY000
12773 ER_IB_MSG_948 HY000
12774 ER_IB_MSG_949 HY000
12775 ER_IB_MSG_950 HY000
12776 ER_IB_MSG_951 HY000
12777 ER_IB_MSG_952 HY000
12778 ER_IB_MSG_953 HY000
12779 ER_IB_MSG_954 HY000
12780 ER_IB_MSG_955 HY000
12781 ER_IB_MSG_956 HY000
12782 ER_IB_MSG_957 HY000
12783 ER_IB_MSG_958 HY000
12784 ER_IB_MSG_959 HY000
12785 ER_IB_MSG_960 HY000
12786 ER_IB_MSG_961 HY000
12787 ER_IB_MSG_962 HY000
12788 ER_IB_MSG_963 HY000
12789 ER_IB_MSG_964 HY000
12790 ER_IB_MSG_965 HY000
12791 ER_IB_MSG_966 HY000
12792 ER_IB_MSG_967 HY000
12793 ER_IB_MSG_968 HY000
12794 ER_IB_MSG_969 HY000
12795 ER_IB_MSG_970 HY000
12796 ER_IB_MSG_971 HY000
12797 ER_IB_MSG_972 HY000
12798 ER_IB_MSG_973 HY000
12799 ER_IB_MSG_974 HY000
12800 ER_IB_MSG_975 HY000
12801 ER_IB_MSG_976 HY000
12802 ER_IB_MSG_977 HY000
12803 ER_IB_MSG_978 HY000
12804 ER_IB_MSG_979 HY000
256

Mapping MySQL Error Numbers to JDBC SQLState Codes
MySQL
Error
Number
MySQL Error Name SQL
Standard
SQLState
12805 ER_IB_MSG_980 HY000
12806 ER_IB_MSG_981 HY000
12807 ER_IB_MSG_982 HY000
12808 ER_IB_MSG_983 HY000
12809 ER_IB_MSG_984 HY000
12810 ER_IB_MSG_985 HY000
12811 ER_IB_MSG_986 HY000
12812 ER_IB_MSG_987 HY000
12813 ER_IB_MSG_988 HY000
12814 ER_IB_MSG_989 HY000
12815 ER_IB_MSG_990 HY000
12816 ER_IB_MSG_991 HY000
12817 ER_IB_MSG_992 HY000
12818 ER_IB_MSG_993 HY000
12819 ER_IB_MSG_994 HY000
12820 ER_IB_MSG_995 HY000
12821 ER_IB_MSG_996 HY000
12822 ER_IB_MSG_997 HY000
12823 ER_IB_MSG_998 HY000
12824 ER_IB_MSG_999 HY000
12825 ER_IB_MSG_1000 HY000
12826 ER_IB_MSG_1001 HY000
12827 ER_IB_MSG_1002 HY000
12828 ER_IB_MSG_1003 HY000
12829 ER_IB_MSG_1004 HY000
12830 ER_IB_MSG_1005 HY000
12831 ER_IB_MSG_1006 HY000
12832 ER_IB_MSG_1007 HY000
12833 ER_IB_MSG_1008 HY000
12834 ER_IB_MSG_1009 HY000
12835 ER_IB_MSG_1010 HY000
12836 ER_IB_MSG_1011 HY000
12837 ER_IB_MSG_1012 HY000
12838 ER_IB_MSG_1013 HY000
12839 ER_IB_IMPORT_START_CFG_NAME HY000
12840 ER_IB_MSG_1015 HY000
257

Mapping MySQL Error Numbers to JDBC SQLState Codes
MySQL
Error
Number
MySQL Error Name SQL
Standard
SQLState
12841 ER_IB_MSG_1016 HY000
12842 ER_IB_MSG_1017 HY000
12843 ER_IB_MSG_1018 HY000
12844 ER_IB_MSG_1019 HY000
12845 ER_IB_MSG_1020 HY000
12846 ER_IB_MSG_1021 HY000
12847 ER_IB_MSG_1022 HY000
12848 ER_IB_MSG_1023 HY000
12849 ER_IB_MSG_1024 HY000
12850 ER_IB_MSG_1025 HY000
12851 ER_IB_MSG_1026 HY000
12852 ER_IB_MSG_1027 HY000
12853 ER_IB_MSG_1028 HY000
12854 ER_IB_MSG_1029 HY000
12855 ER_IB_MSG_1030 HY000
12856 ER_IB_MSG_1031 HY000
12857 ER_IB_MSG_1032 HY000
12858 ER_IB_MSG_1033 HY000
12859 ER_IB_MSG_1034 HY000
12860 ER_IB_MSG_1035 HY000
12861 ER_IB_MSG_1036 HY000
12862 ER_IB_MSG_1037 HY000
12863 ER_IB_MSG_1038 HY000
12864 ER_IB_MSG_1039 HY000
12865 ER_IB_MSG_1040 HY000
12866 ER_IB_MSG_1041 HY000
12867 ER_IB_MSG_1042 HY000
12868 ER_IB_MSG_1043 HY000
12869 ER_IB_MSG_1044 HY000
12870 ER_IB_MSG_1045 HY000
12871 ER_IB_MSG_1046 HY000
12872 ER_IB_MSG_1047 HY000
12873 ER_IB_MSG_1048 HY000
12874 ER_IB_MSG_1049 HY000
12876 ER_IB_MSG_1051 HY000
12877 ER_IB_MSG_1052 HY000
258

Mapping MySQL Error Numbers to JDBC SQLState Codes
MySQL
Error
Number
MySQL Error Name SQL
Standard
SQLState
12878 ER_IB_MSG_1053 HY000
12879 ER_IB_MSG_1054 HY000
12880 ER_IB_MSG_1055 HY000
12881 ER_IB_MSG_1056 HY000
12882 ER_IB_MSG_1057 HY000
12883 ER_IB_MSG_1058 HY000
12884 ER_IB_MSG_1059 HY000
12885 ER_IB_MSG_1060 HY000
12886 ER_IB_MSG_LOG_FILE_OS_CREATE_FAILED HY000
12887 ER_IB_MSG_FILE_RESIZE HY000
12888 ER_IB_MSG_LOG_FILE_RESIZE_FAILED HY000
12889 ER_IB_MSG_LOG_FILES_CREATE_AND_READ_ONLY_MODE HY000
12890 ER_IB_MSG_1065 HY000
12891 ER_IB_MSG_LOG_FILE_PREPARE_ON_CREATE_FAILED HY000
12893 ER_IB_MSG_LOG_FILES_INITIALIZED HY000
12894 ER_IB_MSG_LOG_FILE_OPEN_FAILED HY000
12895 ER_IB_MSG_1070 HY000
12896 ER_IB_MSG_1071 HY000
12897 ER_IB_MSG_1072 HY000
12898 ER_IB_MSG_1073 HY000
12899 ER_IB_MSG_1074 HY000
12900 ER_IB_MSG_1075 HY000
12901 ER_IB_MSG_1076 HY000
12902 ER_IB_MSG_1077 HY000
12903 ER_IB_MSG_1078 HY000
12904 ER_IB_MSG_1079 HY000
12905 ER_IB_MSG_1080 HY000
12906 ER_IB_MSG_1081 HY000
12907 ER_IB_MSG_1082 HY000
12908 ER_IB_MSG_1083 HY000
12909 ER_IB_MSG_CANNOT_OPEN_57_UNDO HY000
12910 ER_IB_MSG_1085 HY000
12911 ER_IB_MSG_1086 HY000
12912 ER_IB_MSG_1087 HY000
12913 ER_IB_MSG_1088 HY000
12914 ER_IB_MSG_1089 HY000
259

Mapping MySQL Error Numbers to JDBC SQLState Codes
MySQL
Error
Number
MySQL Error Name SQL
Standard
SQLState
12915 ER_IB_MSG_1090 HY000
12916 ER_IB_MSG_1091 HY000
12917 ER_IB_MSG_1092 HY000
12918 ER_IB_MSG_1093 HY000
12919 ER_IB_MSG_1094 HY000
12920 ER_IB_MSG_1095 HY000
12921 ER_IB_MSG_1096 HY000
12922 ER_IB_MSG_1097 HY000
12923 ER_IB_MSG_1098 HY000
12924 ER_IB_MSG_1099 HY000
12925 ER_IB_MSG_1100 HY000
12926 ER_IB_MSG_1101 HY000
12927 ER_IB_MSG_1102 HY000
12928 ER_IB_MSG_1103 HY000
12929 ER_IB_MSG_1104 HY000
12930 ER_IB_MSG_1105 HY000
12931 ER_IB_MSG_BUF_PENDING_IO HY000
12932 ER_IB_MSG_1107 HY000
12933 ER_IB_MSG_1108 HY000
12934 ER_IB_MSG_1109 HY000
12935 ER_IB_MSG_1110 HY000
12936 ER_IB_MSG_1111 HY000
12937 ER_IB_MSG_1112 HY000
12938 ER_IB_MSG_1113 HY000
12939 ER_IB_MSG_1114 HY000
12940 ER_IB_MSG_1115 HY000
12941 ER_IB_MSG_1116 HY000
12942 ER_IB_MSG_1117 HY000
12944 ER_IB_MSG_1119 HY000
12945 ER_IB_MSG_1120 HY000
12946 ER_IB_MSG_1121 HY000
12947 ER_IB_MSG_1122 HY000
12948 ER_IB_MSG_1123 HY000
12949 ER_IB_MSG_1124 HY000
12950 ER_IB_MSG_1125 HY000
12951 ER_IB_MSG_1126 HY000
260

Mapping MySQL Error Numbers to JDBC SQLState Codes
MySQL
Error
Number
MySQL Error Name SQL
Standard
SQLState
12952 ER_IB_MSG_1127 HY000
12953 ER_IB_MSG_1128 HY000
12954 ER_IB_MSG_1129 HY000
12955 ER_IB_MSG_1130 HY000
12956 ER_IB_MSG_1131 HY000
12957 ER_IB_MSG_1132 HY000
12958 ER_IB_MSG_1133 HY000
12959 ER_IB_MSG_1134 HY000
12960 ER_IB_MSG_DATA_DIRECTORY_NOT_INITIALIZED_OR_CORRUPTED HY000
12961 ER_IB_MSG_LOG_FILES_INVALID_SET HY000
12962 ER_IB_MSG_LOG_FILE_SIZE_INVALID HY000
12963 ER_IB_MSG_LOG_FILES_DIFFERENT_SIZES HY000
12964 ER_IB_MSG_1139 HY000
12965 ER_IB_MSG_RECOVERY_CORRUPT HY000
12967 ER_IB_MSG_1142 HY000
12968 ER_IB_MSG_LOG_FILES_REWRITING HY000
12969 ER_IB_MSG_1144 HY000
12970 ER_IB_MSG_1145 HY000
12971 ER_IB_MSG_1146 HY000
12972 ER_IB_MSG_1147 HY000
12973 ER_IB_MSG_1148 HY000
12974 ER_IB_MSG_1149 HY000
12975 ER_IB_MSG_1150 HY000
12976 ER_IB_MSG_1151 HY000
12977 ER_IB_MSG_1152 HY000
12979 ER_IB_MSG_1154 HY000
12980 ER_IB_MSG_1155 HY000
12981 ER_IB_MSG_1156 HY000
12982 ER_IB_MSG_1157 HY000
12983 ER_IB_MSG_1158 HY000
12984 ER_IB_MSG_1159 HY000
12985 ER_IB_MSG_1160 HY000
12986 ER_IB_MSG_1161 HY000
12987 ER_IB_MSG_1162 HY000
12988 ER_IB_MSG_1163 HY000
12989 ER_IB_MSG_1164 HY000
261

Mapping MySQL Error Numbers to JDBC SQLState Codes
MySQL
Error
Number
MySQL Error Name SQL
Standard
SQLState
12990 ER_IB_MSG_1165 HY000
12991 ER_IB_MSG_UNDO_TRUNCATE_FAIL_TO_READ_LOG_FILE HY000
12992 ER_IB_MSG_UNDO_MARKED_FOR_TRUNCATE HY000
12994 ER_IB_MSG_UNDO_TRUNCATE_START HY000
12996 ER_IB_MSG_UNDO_TRUNCATE_DELAY_BY_LOG_CREATE HY000
12998 ER_IB_MSG_UNDO_TRUNCATE_DELAY_BY_FAILURE HY000
13000 ER_IB_MSG_UNDO_TRUNCATE_COMPLETE HY000
13002 ER_IB_MSG_1177 HY000
13003 ER_IB_MSG_1178 HY000
13004 ER_IB_MSG_1179 HY000
13005 ER_IB_MSG_1180 HY000
13006 ER_IB_MSG_1181 HY000
13007 ER_IB_MSG_1182 HY000
13008 ER_IB_MSG_1183 HY000
13009 ER_IB_ERR_ACCESSING_OUT_OF_BOUND_FIELD_IN_INDEX HY000
13010 ER_IB_MSG_1185 HY000
13011 ER_IB_MSG_1186 HY000
13012 ER_IB_MSG_1187 HY000
13013 ER_IB_MSG_1188 HY000
13014 ER_IB_MSG_1189 HY000
13015 ER_IB_MSG_TRX_RECOVERY_ROLLBACK_COMPLETED HY000
13016 ER_IB_MSG_1191 HY000
13017 ER_IB_MSG_1192 HY000
13018 ER_IB_MSG_1193 HY000
13019 ER_IB_MSG_1194 HY000
13020 ER_IB_MSG_1195 HY000
13021 ER_IB_MSG_1196 HY000
13022 ER_IB_MSG_1197 HY000
13023 ER_IB_MSG_1198 HY000
13024 ER_IB_MSG_1199 HY000
13025 ER_IB_MSG_1200 HY000
13026 ER_IB_MSG_1201 HY000
13027 ER_IB_MSG_1202 HY000
13028 ER_IB_MSG_1203 HY000
13029 ER_IB_MSG_1204 HY000
13030 ER_IB_MSG_1205 HY000
262

Mapping MySQL Error Numbers to JDBC SQLState Codes
MySQL
Error
Number
MySQL Error Name SQL
Standard
SQLState
13031 ER_IB_MSG_1206 HY000
13032 ER_IB_MSG_1207 HY000
13033 ER_IB_MSG_1208 HY000
13034 ER_IB_MSG_1209 HY000
13035 ER_IB_MSG_1210 HY000
13036 ER_IB_MSG_1211 HY000
13037 ER_IB_MSG_1212 HY000
13038 ER_IB_MSG_1213 HY000
13039 ER_IB_MSG_1214 HY000
13040 ER_IB_MSG_1215 HY000
13041 ER_IB_MSG_LOG_FILES_RESIZE_ON_START HY000
13042 ER_IB_MSG_1217 HY000
13043 ER_IB_MSG_1218 HY000
13044 ER_IB_MSG_1219 HY000
13045 ER_IB_MSG_1220 HY000
13046 ER_IB_MSG_1221 HY000
13047 ER_IB_MSG_1222 HY000
13048 ER_IB_MSG_1223 HY000
13049 ER_IB_MSG_1224 HY000
13050 ER_IB_MSG_1225 HY000
13051 ER_IB_MSG_1226 HY000
13052 ER_IB_MSG_1227 HY000
13053 ER_IB_MSG_1228 HY000
13054 ER_IB_MSG_1229 HY000
13056 ER_IB_MSG_1231 HY000
13058 ER_IB_MSG_1233 HY000
13059 ER_IB_MSG_LOG_WRITER_OUT_OF_SPACE HY000
13060 ER_IB_MSG_1235 HY000
13061 ER_IB_MSG_LOG_WRITER_ABORTS_LOG_ARCHIVER HY000
13062 ER_IB_MSG_LOG_WRITER_WAITING_FOR_ARCHIVER HY000
13063 ER_IB_MSG_1238 HY000
13064 ER_IB_MSG_1239 HY000
13066 ER_IB_MSG_1241 HY000
13067 ER_IB_MSG_LOG_FILES_CANNOT_ENCRYPT_IN_READ_ONLY HY000
13068 ER_IB_MSG_LOG_FILES_ENCRYPTION_INIT_FAILED HY000
13070 ER_IB_MSG_1245 HY000
263

Mapping MySQL Error Numbers to JDBC SQLState Codes
MySQL
Error
Number
MySQL Error Name SQL
Standard
SQLState
13071 ER_IB_MSG_1246 HY000
13072 ER_IB_MSG_1247 HY000
13073 ER_IB_MSG_1248 HY000
13074 ER_IB_MSG_1249 HY000
13075 ER_IB_MSG_1250 HY000
13076 ER_IB_MSG_1251 HY000
13077 ER_IB_MSG_BUF_PENDING_IO_ON_SHUTDOWN HY000
13078 ER_IB_MSG_1253 HY000
13080 ER_IB_MSG_1255 HY000
13081 ER_IB_MSG_1256 HY000
13082 ER_IB_MSG_1257 HY000
13083 ER_IB_MSG_1258 HY000
13084 ER_IB_MSG_1259 HY000
13085 ER_IB_MSG_1260 HY000
13086 ER_IB_MSG_1261 HY000
13087 ER_IB_MSG_1262 HY000
13088 ER_IB_MSG_1263 HY000
13089 ER_IB_MSG_LOG_FILE_HEADER_INVALID_CHECKSUM HY000
13090 ER_IB_MSG_LOG_FORMAT_BEFORE_5_7_9 HY000
13091 ER_IB_MSG_1266 HY000
13092 ER_IB_MSG_LOG_PARAMS_CONCURRENCY_MARGIN_UNSAFE HY000
13093 ER_IB_MSG_1268 HY000
13094 ER_IB_MSG_1269 HY000
13095 ER_IB_MSG_THREAD_CONCURRENCY_CHANGED HY000
13096 ER_RPL_REPLICA_SQL_THREAD_STOP_CMD_EXEC_TIMEOUT HY000
13097 ER_RPL_REPLICA_IO_THREAD_STOP_CMD_EXEC_TIMEOUT HY000
13098 ER_RPL_GTID_UNSAFE_STMT_ON_NON_TRANS_TABLE HY000
13099 ER_RPL_GTID_UNSAFE_STMT_CREATE_SELECT HY000
13101 ER_BINLOG_ROW_VALUE_OPTION_IGNORED HY000
13103 ER_BINLOG_ROW_VALUE_OPTION_USED_ONLY_FOR_AFTER_IMAGES HY000
13104 ER_CONNECTION_ABORTED HY000
13105 ER_NORMAL_SERVER_SHUTDOWN HY000
13106 ER_KEYRING_MIGRATE_FAILED HY000
13107 ER_GRP_RPL_LOWER_CASE_TABLE_NAMES_DIFF_FROM_GRP HY000
13108 ER_OOM_SAVE_GTIDS HY000
13109 ER_LCTN_NOT_FOUND HY000
264

Mapping MySQL Error Numbers to JDBC SQLState Codes
MySQL
Error
Number
MySQL Error Name SQL
Standard
SQLState
13111 ER_COMPONENT_FILTER_WRONG_VALUE HY000
13112 ER_XPLUGIN_FAILED_TO_STOP_SERVICES HY000
13113 ER_INCONSISTENT_ERROR HY000
13114 ER_SERVER_SOURCE_FATAL_ERROR_READING_BINLOG HY000
13115 ER_NETWORK_READ_EVENT_CHECKSUM_FAILURE HY000
13116 ER_REPLICA_CREATE_EVENT_FAILURE HY000
13117 ER_REPLICA_FATAL_ERROR HY000
13118 ER_REPLICA_HEARTBEAT_FAILURE HY000
13119 ER_REPLICA_INCIDENT HY000
13120 ER_REPLICA_SOURCE_COM_FAILURE HY000
13121 ER_REPLICA_RELAY_LOG_READ_FAILURE HY000
13122 ER_REPLICA_RELAY_LOG_WRITE_FAILURE HY000
13123 ER_SERVER_REPLICA_CM_INIT_REPOSITORY HY000
13124 ER_SERVER_REPLICA_AM_INIT_REPOSITORY HY000
13125 ER_SERVER_NET_PACKET_TOO_LARGE HY000
13126 ER_SERVER_NO_SYSTEM_TABLE_ACCESS HY000
13128 ER_SERVER_UNKNOWN_SYSTEM_VARIABLE HY000
13129 ER_SERVER_NO_SESSION_TO_SEND_TO HY000
13130 ER_SERVER_NEW_ABORTING_CONNECTION 08S01
13131 ER_SERVER_OUT_OF_SORTMEMORY HY000
13132 ER_SERVER_RECORD_FILE_FULL HY000
13133 ER_SERVER_DISK_FULL_NOWAIT HY000
13134 ER_SERVER_HANDLER_ERROR HY000
13135 ER_SERVER_NOT_FORM_FILE HY000
13136 ER_SERVER_CANT_OPEN_FILE HY000
13137 ER_SERVER_FILE_NOT_FOUND HY000
13138 ER_SERVER_FILE_USED HY000
13139 ER_SERVER_CANNOT_LOAD_FROM_TABLE_V2 HY000
13140 ER_ERROR_INFO_FROM_DA HY000
13141 ER_SERVER_TABLE_CHECK_FAILED HY000
13142 ER_SERVER_COL_COUNT_DOESNT_MATCH_PLEASE_UPDATE_V2 HY000
13143 ER_SERVER_COL_COUNT_DOESNT_MATCH_CORRUPTED_V2 HY000
13144 ER_SERVER_ACL_TABLE_ERROR HY000
13145 ER_SERVER_REPLICA_INIT_QUERY_FAILED HY000
13146 ER_SERVER_REPLICA_CONVERSION_FAILED HY000
13147 ER_SERVER_REPLICA_IGNORED_TABLE HY000
265

Mapping MySQL Error Numbers to JDBC SQLState Codes
MySQL
Error
Number
MySQL Error Name SQL
Standard
SQLState
13148 ER_CANT_REPLICATE_ANONYMOUS_WITH_AUTO_POSITION HY000
13149 ER_CANT_REPLICATE_ANONYMOUS_WITH_GTID_MODE_ON HY000
13150 ER_CANT_REPLICATE_GTID_WITH_GTID_MODE_OFF HY000
13151 ER_SERVER_TEST_MESSAGE HY000
13152 ER_AUDIT_LOG_JSON_FILTER_PARSING_ERROR HY000
13153 ER_AUDIT_LOG_JSON_FILTERING_NOT_ENABLED HY000
13154 ER_PLUGIN_FAILED_TO_OPEN_TABLES HY000
13155 ER_PLUGIN_FAILED_TO_OPEN_TABLE HY000
13156 ER_AUDIT_LOG_JSON_FILTER_NAME_CANNOT_BE_EMPTY HY000
13157 ER_AUDIT_LOG_USER_NAME_INVALID_CHARACTER HY000
13158 ER_AUDIT_LOG_UDF_INSUFFICIENT_PRIVILEGE HY000
13159 ER_AUDIT_LOG_NO_KEYRING_PLUGIN_INSTALLED HY000
13160 ER_AUDIT_LOG_HOST_NAME_INVALID_CHARACTER HY000
13161 ER_AUDIT_LOG_ENCRYPTION_PASSWORD_HAS_NOT_BEEN_SET HY000
13162 ER_AUDIT_LOG_COULD_NOT_CREATE_AES_KEY HY000
13163 ER_AUDIT_LOG_ENCRYPTION_PASSWORD_CANNOT_BE_FETCHED HY000
13164 ER_COULD_NOT_REINITIALIZE_AUDIT_LOG_FILTERS HY000
13165 ER_AUDIT_LOG_JSON_USER_NAME_CANNOT_BE_EMPTY HY000
13166 ER_AUDIT_LOG_USER_FIRST_CHARACTER_MUST_BE_ALPHANUMERIC HY000
13167 ER_AUDIT_LOG_JSON_FILTER_DOES_NOT_EXIST HY000
13169 ER_STARTING_INIT HY000
13170 ER_ENDING_INIT HY000
13171 ER_IB_MSG_1272 HY000
13172 ER_SERVER_SHUTDOWN_INFO HY000
13173 ER_GRP_RPL_PLUGIN_ABORT HY000
13177 ER_AUDIT_LOG_TABLE_DEFINITION_NOT_UPDATED HY000
13178 ER_DD_INITIALIZE_SQL_ERROR HY000
13179 ER_NO_PATH_FOR_SHARED_LIBRARY HY000
13180 ER_UDF_ALREADY_EXISTS HY000
13181 ER_SET_EVENT_FAILED HY000
13182 ER_FAILED_TO_ALLOCATE_SSL_BIO HY000
13183 ER_IB_MSG_1273 HY000
13184 ER_PID_FILEPATH_LOCATIONS_INACCESSIBLE HY000
13185 ER_UNKNOWN_VARIABLE_IN_PERSISTED_CONFIG_FILE HY000
13186 ER_FAILED_TO_HANDLE_DEFAULTS_FILE HY000
13187 ER_DUPLICATE_SYS_VAR HY000
266

Mapping MySQL Error Numbers to JDBC SQLState Codes
MySQL
Error
Number
MySQL Error Name SQL
Standard
SQLState
13188 ER_FAILED_TO_INIT_SYS_VAR HY000
13189 ER_SYS_VAR_NOT_FOUND HY000
13190 ER_IB_MSG_1274 HY000
13191 ER_IB_MSG_1275 HY000
13193 ER_IB_MSG_WAIT_FOR_ENCRYPT_THREAD HY000
13194 ER_IB_MSG_1277 HY000
13195 ER_IB_MSG_NO_ENCRYPT_PROGRESS_FOUND HY000
13196 ER_IB_MSG_RESUME_OP_FOR_SPACE HY000
13197 ER_IB_MSG_1280 HY000
13198 ER_IB_MSG_1281 HY000
13199 ER_IB_MSG_1282 HY000
13200 ER_IB_MSG_1283 HY000
13201 ER_IB_MSG_1284 HY000
13202 ER_CANT_SET_ERROR_SUPPRESSION_LIST_FROM_COMMAND_LINE HY000
13203 ER_INVALID_VALUE_OF_BIND_ADDRESSES HY000
13204 ER_RELAY_LOG_SPACE_LIMIT_DISABLED HY000
13205 ER_GRP_RPL_ERROR_GTID_SET_EXTRACTION HY000
13206 ER_GRP_RPL_MISSING_GRP_RPL_ACTION_COORDINATOR HY000
13207 ER_GRP_RPL_JOIN_WHEN_GROUP_ACTION_RUNNING HY000
13208 ER_GRP_RPL_JOINER_EXIT_WHEN_GROUP_ACTION_RUNNING HY000
13209 ER_GRP_RPL_CHANNEL_THREAD_WHEN_GROUP_ACTION_RUNNING HY000
13210 ER_GRP_RPL_APPOINTED_PRIMARY_NOT_PRESENT HY000
13211 ER_GRP_RPL_ERROR_ON_MESSAGE_SENDING HY000
13212 ER_GRP_RPL_CONFIGURATION_ACTION_ERROR HY000
13213 ER_GRP_RPL_CONFIGURATION_ACTION_LOCAL_TERMINATION HY000
13214 ER_GRP_RPL_CONFIGURATION_ACTION_START HY000
13215 ER_GRP_RPL_CONFIGURATION_ACTION_END HY000
13216 ER_GRP_RPL_CONFIGURATION_ACTION_KILLED_ERROR HY000
13217 ER_GRP_RPL_PRIMARY_ELECTION_PROCESS_ERROR HY000
13218 ER_GRP_RPL_PRIMARY_ELECTION_STOP_ERROR HY000
13219 ER_GRP_RPL_NO_STAGE_SERVICE HY000
13220 ER_GRP_RPL_UDF_REGISTER_ERROR HY000
13221 ER_GRP_RPL_UDF_UNREGISTER_ERROR HY000
13222 ER_GRP_RPL_UDF_REGISTER_SERVICE_ERROR HY000
13223 ER_GRP_RPL_SERVER_UDF_ERROR HY000
13227 ER_SERVER_WRONG_VALUE_FOR_VAR HY000
267

Mapping MySQL Error Numbers to JDBC SQLState Codes
MySQL
Error
Number
MySQL Error Name SQL
Standard
SQLState
13228 ER_COULD_NOT_CREATE_WINDOWS_REGISTRY_KEY HY000
13229 ER_SERVER_GTID_UNSAFE_CREATE_DROP_TEMP_TABLE_IN_TRX_IN_SBRHY000
13233 ER_XPLUGIN_FAILED_TO_SWITCH_SECURITY_CTX HY000
13234 ER_RPL_GTID_UNSAFE_ALTER_ADD_COL_WITH_DEFAULT_EXPRESSION HY000
13235 ER_UPGRADE_PARSE_ERROR HY000
13236 ER_DATA_DIRECTORY_UNUSABLE HY000
13237 ER_LDAP_AUTH_USER_GROUP_SEARCH_ROOT_BIND HY000
13238 ER_PLUGIN_INSTALL_ERROR HY000
13239 ER_PLUGIN_UNINSTALL_ERROR HY000
13240 ER_SHARED_TABLESPACE_USED_BY_PARTITIONED_TABLE HY000
13241 ER_UNKNOWN_TABLESPACE_TYPE HY000
13242 ER_WARN_DEPRECATED_UTF8_ALIAS_OPTION HY000
13243 ER_WARN_DEPRECATED_UTF8MB3_CHARSET_OPTION HY000
13244 ER_WARN_DEPRECATED_UTF8MB3_COLLATION_OPTION HY000
13245 ER_SSL_MEMORY_INSTRUMENTATION_INIT_FAILED HY000
13246 ER_IB_MSG_MADV_DONTDUMP_UNSUPPORTED HY000
13247 ER_IB_MSG_MADVISE_FAILED HY000
13249 ER_WARN_REMOVED_SQL_MODE HY000
13250 ER_IB_MSG_FAILED_TO_ALLOCATE_WAIT HY000
13252 ER_IB_MSG_USING_UNDO_SPACE HY000
13253 ER_IB_MSG_FAIL_TO_SAVE_SPACE_STATE HY000
13254 ER_IB_MSG_MAX_UNDO_SPACES_REACHED HY000
13255 ER_IB_MSG_ERROR_OPENING_NEW_UNDO_SPACE HY000
13256 ER_IB_MSG_FAILED_SDI_Z_BUF_ERROR HY000
13257 ER_IB_MSG_FAILED_SDI_Z_MEM_ERROR HY000
13258 ER_IB_MSG_SDI_Z_STREAM_ERROR HY000
13259 ER_IB_MSG_SDI_Z_UNKNOWN_ERROR HY000
13260 ER_IB_MSG_FOUND_WRONG_UNDO_SPACE HY000
13261 ER_IB_MSG_NOT_END_WITH_IBU HY000
13266 ER_IB_MSG_FAILED_TO_FINISH_TRUNCATE HY000
13267 ER_IB_MSG_DEPRECATED_INNODB_UNDO_TABLESPACES HY000
13268 ER_IB_MSG_WRONG_TABLESPACE_DIR HY000
13269 ER_IB_MSG_LOCK_FREE_HASH_USAGE_STATS HY000
13270 ER_CLONE_DONOR_TRACE HY000
13271 ER_CLONE_PROTOCOL_TRACE HY000
13272 ER_CLONE_CLIENT_TRACE HY000
268

Mapping MySQL Error Numbers to JDBC SQLState Codes
MySQL
Error
Number
MySQL Error Name SQL
Standard
SQLState
13273 ER_CLONE_SERVER_TRACE HY000
13274 ER_THREAD_POOL_PFS_TABLES_INIT_FAILED HY000
13275 ER_THREAD_POOL_PFS_TABLES_ADD_FAILED HY000
13276 ER_CANT_SET_DATA_DIR HY000
13277 ER_INNODB_INVALID_INNODB_UNDO_DIRECTORY_LOCATION HY000
13278 ER_SERVER_RPL_ENCRYPTION_FAILED_TO_FETCH_KEY HY000
13279 ER_SERVER_RPL_ENCRYPTION_KEY_NOT_FOUND HY000
13280 ER_SERVER_RPL_ENCRYPTION_KEYRING_INVALID_KEY HY000
13281 ER_SERVER_RPL_ENCRYPTION_HEADER_ERROR HY000
13282 ER_SERVER_RPL_ENCRYPTION_FAILED_TO_ROTATE_LOGS HY000
13283 ER_SERVER_RPL_ENCRYPTION_KEY_EXISTS_UNEXPECTED HY000
13284 ER_SERVER_RPL_ENCRYPTION_FAILED_TO_GENERATE_KEY HY000
13285 ER_SERVER_RPL_ENCRYPTION_FAILED_TO_STORE_KEY HY000
13286 ER_SERVER_RPL_ENCRYPTION_FAILED_TO_REMOVE_KEY HY000
13287 ER_SERVER_RPL_ENCRYPTION_MASTER_KEY_RECOVERY_FAILED HY000
13288 ER_SERVER_RPL_ENCRYPTION_UNABLE_TO_INITIALIZE HY000
13289 ER_SERVER_RPL_ENCRYPTION_UNABLE_TO_ROTATE_MASTER_KEY_AT_STARTUPHY000
13290 ER_SERVER_RPL_ENCRYPTION_IGNORE_ROTATE_MASTER_KEY_AT_STARTUPHY000
13291 ER_INVALID_ADMIN_ADDRESS HY000
13292 ER_SERVER_STARTUP_ADMIN_INTERFACE HY000
13293 ER_CANT_CREATE_ADMIN_THREAD HY000
13294 ER_WARNING_RETAIN_CURRENT_PASSWORD_CLAUSE_VOID HY000
13295 ER_WARNING_DISCARD_OLD_PASSWORD_CLAUSE_VOID HY000
13299 ER_WARNING_AUTHCACHE_INVALID_USER_ATTRIBUTES HY000
13300 ER_MYSQL_NATIVE_PASSWORD_SECOND_PASSWORD_USED_INFORMATIONHY000
13301 ER_SHA256_PASSWORD_SECOND_PASSWORD_USED_INFORMATION HY000
13302 ER_CACHING_SHA2_PASSWORD_SECOND_PASSWORD_USED_INFORMATIONHY000
13303 ER_GRP_RPL_SEND_TRX_PREPARED_MESSAGE_FAILED HY000
13304 ER_GRP_RPL_RELEASE_COMMIT_AFTER_GROUP_PREPARE_FAILED HY000
13305 ER_GRP_RPL_TRX_ALREADY_EXISTS_ON_TCM_ON_AFTER_CERTIFICATIONHY000
13306 ER_GRP_RPL_FAILED_TO_INSERT_TRX_ON_TCM_ON_AFTER_CERTIFICATIONHY000
13307 ER_GRP_RPL_REGISTER_TRX_TO_WAIT_FOR_GROUP_PREPARE_FAILED HY000
13308 ER_GRP_RPL_TRX_WAIT_FOR_GROUP_PREPARE_FAILED HY000
13309 ER_GRP_RPL_TRX_DOES_NOT_EXIST_ON_TCM_ON_HANDLE_REMOTE_PREPAREHY000
13310 ER_GRP_RPL_RELEASE_BEGIN_TRX_AFTER_DEPENDENCIES_COMMIT_FAILEDHY000
13311 ER_GRP_RPL_REGISTER_TRX_TO_WAIT_FOR_DEPENDENCIES_FAILED HY000
269

Mapping MySQL Error Numbers to JDBC SQLState Codes
MySQL
Error
Number
MySQL Error Name SQL
Standard
SQLState
13312 ER_GRP_RPL_WAIT_FOR_DEPENDENCIES_FAILED HY000
13313 ER_GRP_RPL_REGISTER_TRX_TO_WAIT_FOR_SYNC_BEFORE_EXECUTION_FAILEDHY000
13314 ER_GRP_RPL_SEND_TRX_SYNC_BEFORE_EXECUTION_FAILED HY000
13315 ER_GRP_RPL_TRX_WAIT_FOR_SYNC_BEFORE_EXECUTION_FAILED HY000
13316 ER_GRP_RPL_RELEASE_BEGIN_TRX_AFTER_WAIT_FOR_SYNC_BEFORE_EXECHY000
13317 ER_GRP_RPL_TRX_WAIT_FOR_GROUP_GTID_EXECUTED HY000
13320 ER_WARN_PROPERTY_STRING_PARSE_FAILED HY000
13321 ER_INVALID_PROPERTY_KEY HY000
13322 ER_GRP_RPL_GTID_SET_EXTRACT_ERROR_DURING_RECOVERY HY000
13323 ER_SERVER_RPL_ENCRYPTION_FAILED_TO_ENCRYPT HY000
13324 ER_CANNOT_GET_SERVER_VERSION_FROM_TABLESPACE_HEADER HY000
13325 ER_CANNOT_SET_SERVER_VERSION_IN_TABLESPACE_HEADER HY000
13326 ER_SERVER_UPGRADE_VERSION_NOT_SUPPORTED HY000
13327 ER_SERVER_UPGRADE_FROM_VERSION HY000
13328 ER_GRP_RPL_ERROR_ON_CERT_DB_INSTALL HY000
13329 ER_GRP_RPL_FORCE_MEMBERS_WHEN_LEAVING HY000
13330 ER_TRG_WRONG_ORDER HY000
13332 ER_LDAP_AUTH_GRP_SEARCH_NOT_SPECIAL_HDL HY000
13333 ER_LDAP_AUTH_GRP_USER_OBJECT_HAS_GROUP_INFO HY000
13334 ER_LDAP_AUTH_GRP_INFO_FOUND_IN_MANY_OBJECTS HY000
13335 ER_LDAP_AUTH_GRP_INCORRECT_ATTRIBUTE HY000
13336 ER_LDAP_AUTH_GRP_NULL_ATTRIBUTE_VALUE HY000
13337 ER_LDAP_AUTH_GRP_DN_PARSING_FAILED HY000
13338 ER_LDAP_AUTH_GRP_OBJECT_HAS_USER_INFO HY000
13339 ER_LDAP_AUTH_LDAPS HY000
13340 ER_LDAP_MAPPING_GET_USER_PROXY HY000
13341 ER_LDAP_MAPPING_USER_DONT_BELONG_GROUP HY000
13342 ER_LDAP_MAPPING_INFO HY000
13343 ER_LDAP_MAPPING_EMPTY_MAPPING HY000
13344 ER_LDAP_MAPPING_PROCESS_MAPPING HY000
13345 ER_LDAP_MAPPING_CHECK_DELIMI_QUOTE HY000
13346 ER_LDAP_MAPPING_PROCESS_DELIMITER HY000
13347 ER_LDAP_MAPPING_PROCESS_DELIMITER_EQUAL_NOT_FOUND HY000
13348 ER_LDAP_MAPPING_PROCESS_DELIMITER_TRY_COMMA HY000
13349 ER_LDAP_MAPPING_PROCESS_DELIMITER_COMMA_NOT_FOUND HY000
13350 ER_LDAP_MAPPING_NO_SEPEARATOR_END_OF_GROUP HY000
270

Mapping MySQL Error Numbers to JDBC SQLState Codes
MySQL
Error
Number
MySQL Error Name SQL
Standard
SQLState
13351 ER_LDAP_MAPPING_GETTING_NEXT_MAPPING HY000
13352 ER_LDAP_MAPPING_PARSING_CURRENT_STATE HY000
13353 ER_LDAP_MAPPING_PARSING_MAPPING_INFO HY000
13354 ER_LDAP_MAPPING_PARSING_ERROR HY000
13355 ER_LDAP_MAPPING_TRIMMING_SPACES HY000
13356 ER_LDAP_MAPPING_IS_QUOTE HY000
13357 ER_LDAP_MAPPING_NON_DESIRED_STATE HY000
13358 ER_INVALID_NAMED_PIPE_FULL_ACCESS_GROUP HY000
13359 ER_PREPARE_FOR_SECONDARY_ENGINE HY000
13360 ER_SERVER_WARN_DEPRECATED HY000
13361 ER_AUTH_ID_WITH_SYSTEM_USER_PRIV_IN_MANDATORY_ROLES HY000
13362 ER_SERVER_BINLOG_MASTER_KEY_RECOVERY_OUT_OF_COMBINATION HY000
13363 ER_SERVER_BINLOG_MASTER_KEY_ROTATION_FAIL_TO_CLEANUP_AUX_KEYHY000
13368 ER_TURNING_ON_PARTIAL_REVOKES HY000
13369 ER_WARN_PARTIAL_REVOKE_AND_DB_GRANT HY000
13370 ER_WARN_INCORRECT_PRIVILEGE_FOR_DB_RESTRICTIONS HY000
13371 ER_WARN_INVALID_DB_RESTRICTIONS HY000
13372 ER_GRP_RPL_INVALID_COMMUNICATION_PROTOCOL HY000
13373 ER_GRP_RPL_STARTED_AUTO_REJOIN HY000
13374 ER_GRP_RPL_TIMEOUT_RECEIVED_VC_ON_REJOIN HY000
13375 ER_GRP_RPL_FINISHED_AUTO_REJOIN HY000
13376 ER_GRP_RPL_DEFAULT_TABLE_ENCRYPTION_DIFF_FROM_GRP HY000
13377 ER_SERVER_UPGRADE_OFF HY000
13378 ER_SERVER_UPGRADE_SKIP HY000
13379 ER_SERVER_UPGRADE_PENDING HY000
13380 ER_SERVER_UPGRADE_FAILED HY000
13381 ER_SERVER_UPGRADE_STATUS HY000
13382 ER_SERVER_UPGRADE_REPAIR_REQUIRED HY000
13383 ER_SERVER_UPGRADE_REPAIR_STATUS HY000
13384 ER_SERVER_UPGRADE_INFO_FILE HY000
13385 ER_SERVER_UPGRADE_SYS_SCHEMA HY000
13386 ER_SERVER_UPGRADE_MYSQL_TABLES HY000
13387 ER_SERVER_UPGRADE_SYSTEM_TABLES HY000
13388 ER_SERVER_UPGRADE_EMPTY_SYS HY000
13389 ER_SERVER_UPGRADE_NO_SYS_VERSION HY000
13390 ER_SERVER_UPGRADE_SYS_VERSION_EMPTY HY000
271

Mapping MySQL Error Numbers to JDBC SQLState Codes
MySQL
Error
Number
MySQL Error Name SQL
Standard
SQLState
13391 ER_SERVER_UPGRADE_SYS_SCHEMA_OUTDATED HY000
13392 ER_SERVER_UPGRADE_SYS_SCHEMA_UP_TO_DATE HY000
13393 ER_SERVER_UPGRADE_SYS_SCHEMA_OBJECT_COUNT HY000
13394 ER_SERVER_UPGRADE_CHECKING_DB HY000
13395 ER_IB_MSG_DDL_LOG_DELETE_BY_ID_TMCT HY000
13396 ER_IB_MSG_POST_RECOVER_DDL_LOG_RECOVER HY000
13397 ER_IB_MSG_POST_RECOVER_POST_TS_ENCRYPT HY000
13398 ER_IB_MSG_DDL_LOG_FAIL_POST_DDL HY000
13399 ER_SERVER_BINLOG_UNSAFE_SYSTEM_FUNCTION HY000
13400 ER_SERVER_UPGRADE_HELP_TABLE_STATUS HY000
13404 ER_BINLOG_UNABLE_TO_ROTATE_GTID_TABLE_READONLY HY000
13405 ER_NETWORK_NAMESPACES_NOT_SUPPORTED HY000
13406 ER_UNKNOWN_NETWORK_NAMESPACE HY000
13407 ER_NETWORK_NAMESPACE_NOT_ALLOWED_FOR_WILDCARD_ADDRESS HY000
13408 ER_SETNS_FAILED HY000
13409 ER_WILDCARD_NOT_ALLOWED_FOR_MULTIADDRESS_BIND HY000
13410 ER_NETWORK_NAMESPACE_FILE_PATH_TOO_LONG HY000
13411 ER_IB_MSG_TOO_LONG_PATH HY000
13412 ER_IB_RECV_FIRST_REC_GROUP_INVALID HY000
13413 ER_DD_UPGRADE_COMPLETED HY000
13415 ER_PERSIST_OPTION_USER_TRUNCATED HY000
13416 ER_PERSIST_OPTION_HOST_TRUNCATED HY000
13417 ER_NET_WAIT_ERROR HY000
13418 ER_IB_MSG_1285 HY000
13419 ER_IB_MSG_CLOCK_MONOTONIC_UNSUPPORTED HY000
13420 ER_IB_MSG_CLOCK_GETTIME_FAILED HY000
13421 ER_PLUGIN_NOT_EARLY_DUP HY000
13422 ER_PLUGIN_NO_INSTALL_DUP HY000
13425 ER_BINLOG_UNSAFE_DEFAULT_EXPRESSION_IN_SUBSTATEMENT HY000
13426 ER_GRP_RPL_MEMBER_VER_READ_COMPATIBLE HY000
13427 ER_LOCK_ORDER_INIT_FAILED HY000
13428 ER_AUDIT_LOG_KEYRING_ID_TIMESTAMP_VALUE_IS_INVALID HY000
13429 ER_AUDIT_LOG_FILE_NAME_TIMESTAMP_VALUE_IS_MISSING_OR_INVALIDHY000
13430 ER_AUDIT_LOG_FILE_NAME_DOES_NOT_HAVE_REQUIRED_FORMAT HY000
13431 ER_AUDIT_LOG_FILE_NAME_KEYRING_ID_VALUE_IS_MISSING HY000
13432 ER_AUDIT_LOG_FILE_HAS_BEEN_SUCCESSFULLY_PROCESSED HY000
272

Mapping MySQL Error Numbers to JDBC SQLState Codes
MySQL
Error
Number
MySQL Error Name SQL
Standard
SQLState
13433 ER_AUDIT_LOG_COULD_NOT_OPEN_FILE_FOR_READING HY000
13434 ER_AUDIT_LOG_INVALID_FILE_CONTENT HY000
13435 ER_AUDIT_LOG_CANNOT_READ_PASSWORD HY000
13436 ER_AUDIT_LOG_CANNOT_STORE_PASSWORD HY000
13437 ER_AUDIT_LOG_CANNOT_REMOVE_PASSWORD HY000
13438 ER_AUDIT_LOG_PASSWORD_HAS_BEEN_COPIED HY000
13447 ER_LDAP_EMPTY_USERDN_PASSWORD HY000
13449 ER_ACL_WRONG_OR_MISSING_ACL_TABLES_LOG HY000
13450 ER_LOCK_ORDER_FAILED_WRITE_FILE HY000
13451 ER_LOCK_ORDER_FAILED_READ_FILE HY000
13452 ER_LOCK_ORDER_MESSAGE HY000
13453 ER_LOCK_ORDER_DEPENDENCIES_SYNTAX HY000
13454 ER_LOCK_ORDER_SCANNER_SYNTAX HY000
13455 ER_DATA_DIRECTORY_UNUSABLE_DELETABLE HY000
13456 ER_IB_MSG_BTREE_LEVEL_LIMIT_EXCEEDED HY000
13457 ER_IB_CLONE_START_STOP HY000
13458 ER_IB_CLONE_OPERATION HY000
13459 ER_IB_CLONE_RESTART HY000
13460 ER_IB_CLONE_USER_DATA HY000
13461 ER_IB_CLONE_NON_INNODB_TABLE HY000
13462 ER_CLONE_SHUTDOWN_TRACE HY000
13463 ER_GRP_RPL_GTID_PURGED_EXTRACT_ERROR HY000
13464 ER_GRP_RPL_CLONE_PROCESS_PREPARE_ERROR HY000
13465 ER_GRP_RPL_CLONE_PROCESS_EXEC_ERROR HY000
13466 ER_GRP_RPL_RECOVERY_EVAL_ERROR HY000
13467 ER_GRP_RPL_NO_POSSIBLE_RECOVERY HY000
13468 ER_GRP_RPL_CANT_KILL_THREAD HY000
13469 ER_GRP_RPL_RECOVERY_STRAT_CLONE_THRESHOLD HY000
13470 ER_GRP_RPL_RECOVERY_STRAT_CLONE_PURGED HY000
13471 ER_GRP_RPL_RECOVERY_STRAT_CHOICE HY000
13472 ER_GRP_RPL_RECOVERY_STRAT_FALLBACK HY000
13473 ER_GRP_RPL_RECOVERY_STRAT_NO_FALLBACK HY000
13474 ER_GRP_RPL_REPLICA_THREAD_ERROR_ON_CLONE HY000
13475 ER_UNKNOWN_TABLE_IN_UPGRADE HY000
13476 ER_IDENT_CAUSES_TOO_LONG_PATH_IN_UPGRADE HY000
13477 ER_XA_CANT_CREATE_MDL_BACKUP HY000
273

Mapping MySQL Error Numbers to JDBC SQLState Codes
MySQL
Error
Number
MySQL Error Name SQL
Standard
SQLState
13478 ER_AUDIT_LOG_SUPER_PRIVILEGE_REQUIRED HY000
13479 ER_AUDIT_LOG_UDF_INVALID_ARGUMENT_TYPE HY000
13480 ER_AUDIT_LOG_UDF_INVALID_ARGUMENT_COUNT HY000
13481 ER_AUDIT_LOG_HAS_NOT_BEEN_INSTALLED HY000
13482 ER_AUDIT_LOG_UDF_READ_INVALID_MAX_ARRAY_LENGTH_ARG_TYPE HY000
13483 ER_LOG_CANNOT_WRITE_EXTENDED HY000
13485 ER_KEYRING_AWS_INCORRECT_PROXY HY000
13486 ER_GRP_RPL_SERVER_SET_TO_OFFLINE_MODE_DUE_TO_ERRORS HY000
13487 ER_GRP_RPL_MESSAGE_SERVICE_FATAL_ERROR HY000
13488 ER_WARN_WRONG_COMPRESSION_ALGORITHM_LOG HY000
13489 ER_WARN_WRONG_COMPRESSION_LEVEL_LOG HY000
13490 ER_PROTOCOL_COMPRESSION_RESET_LOG HY000
13491 ER_XPLUGIN_COMPRESSION_ERROR HY000
13492 ER_MYSQLBACKUP_MSG HY000
13493 ER_WARN_UNKNOWN_KEYRING_AWS_REGION HY000
13494 ER_WARN_LOG_PRIVILEGE_CHECKS_USER_DOES_NOT_EXIST HY000
13495 ER_WARN_LOG_PRIVILEGE_CHECKS_USER_CORRUPT HY000
13496 ER_WARN_LOG_PRIVILEGE_CHECKS_USER_NEEDS_RPL_APPLIER_PRIV HY000
13497 ER_OBSOLETE_FILE_PRIVILEGE_FOR_REPLICATION_CHECKS HY000
13498 ER_RPL_REPLICA_SQL_THREAD_STARTING_WITH_PRIVILEGE_CHECKS HY000
13499 ER_AUDIT_LOG_CANNOT_GENERATE_PASSWORD HY000
13500 ER_INIT_FAILED_TO_GENERATE_ROOT_PASSWORD HY000
13501 ER_PLUGIN_LOAD_OPTIONS_IGNORED HY000
13502 ER_WARN_AUTH_ID_WITH_SYSTEM_USER_PRIV_IN_MANDATORY_ROLES HY000
13503 ER_IB_MSG_SKIP_HIDDEN_DIR HY000
13504 ER_WARN_RPL_RECOVERY_NO_ROTATE_EVENT_FROM_SOURCE_EOF HY000
13505 ER_IB_LOB_ROLLBACK_INDEX_LEN HY000
13506 ER_CANT_PROCESS_EXPRESSION_FOR_GENERATED_COLUMN_TO_DD HY000
13507 ER_RPL_REPLICA_QUEUE_EVENT_FAILED_INVALID_NON_ROW_FORMAT HY000
13508 ER_OBSOLETE_REQUIRE_ROW_FORMAT_VIOLATION HY000
13509 ER_LOG_PRIV_CHECKS_REQUIRE_ROW_FORMAT_NOT_SET HY000
13510 ER_RPL_REPLICA_SQL_THREAD_DETECTED_UNEXPECTED_EVENT_SEQUENCEHY000
13511 ER_IB_MSG_UPGRADE_PARTITION_FILE HY000
13512 ER_IB_MSG_DOWNGRADE_PARTITION_FILE HY000
13513 ER_IB_MSG_UPGRADE_PARTITION_FILE_IMPORT HY000
13514 ER_IB_WARN_OPEN_PARTITION_FILE HY000
274

Mapping MySQL Error Numbers to JDBC SQLState Codes
MySQL
Error
Number
MySQL Error Name SQL
Standard
SQLState
13515 ER_IB_MSG_FIL_STATE_MOVED_CORRECTED HY000
13516 ER_IB_MSG_FIL_STATE_MOVED_CHANGED_PATH HY000
13517 ER_IB_MSG_FIL_STATE_MOVED_CHANGED_NAME HY000
13518 ER_IB_MSG_FIL_STATE_MOVED_TOO_MANY HY000
13519 ER_GR_ELECTED_PRIMARY_GTID_INFORMATION HY000
13520 ER_SCHEMA_NAME_IN_UPPER_CASE_NOT_ALLOWED HY000
13521 ER_TABLE_NAME_IN_UPPER_CASE_NOT_ALLOWED HY000
13522 ER_SCHEMA_NAME_IN_UPPER_CASE_NOT_ALLOWED_FOR_FK HY000
13523 ER_TABLE_NAME_IN_UPPER_CASE_NOT_ALLOWED_FOR_FK HY000
13524 ER_IB_MSG_DICT_PARTITION_NOT_FOUND HY000
13525 ER_ACCESS_DENIED_FOR_USER_ACCOUNT_BLOCKED_BY_PASSWORD_LOCKHY000
13526 ER_INNODB_OUT_OF_RESOURCES HY000
13528 ER_MIGRATE_TABLE_TO_DD_OOM HY000
13529 ER_RPL_RELAY_LOG_RECOVERY_INFO_AFTER_CLONE HY000
13530 ER_IB_MSG_57_UNDO_SPACE_DELETE_FAIL HY000
13531 ER_IB_MSG_DBLWR_1285 HY000
13532 ER_IB_MSG_DBLWR_1286 HY000
13533 ER_IB_MSG_DBLWR_1287 HY000
13534 ER_IB_MSG_DBLWR_1288 HY000
13535 ER_IB_MSG_DBLWR_1290 HY000
13536 ER_IB_MSG_BAD_DBLWR_FILE_NAME HY000
13538 ER_IB_MSG_DBLWR_1293 HY000
13539 ER_IB_MSG_DBLWR_1294 HY000
13540 ER_IB_MSG_DBLWR_1295 HY000
13541 ER_IB_MSG_DBLWR_1296 HY000
13542 ER_IB_MSG_DBLWR_1297 HY000
13543 ER_IB_MSG_DBLWR_1298 HY000
13544 ER_IB_MSG_DBLWR_1300 HY000
13545 ER_IB_MSG_DBLWR_1301 HY000
13546 ER_IB_MSG_DBLWR_1304 HY000
13547 ER_IB_MSG_DBLWR_1305 HY000
13548 ER_IB_MSG_DBLWR_1306 HY000
13549 ER_IB_MSG_DBLWR_1307 HY000
13550 ER_IB_MSG_DBLWR_1308 HY000
13551 ER_IB_MSG_DBLWR_1309 HY000
13552 ER_IB_MSG_DBLWR_1310 HY000
275

Mapping MySQL Error Numbers to JDBC SQLState Codes
MySQL
Error
Number
MySQL Error Name SQL
Standard
SQLState
13553 ER_IB_MSG_DBLWR_1311 HY000
13554 ER_IB_MSG_DBLWR_1312 HY000
13555 ER_IB_MSG_DBLWR_1313 HY000
13556 ER_IB_MSG_DBLWR_1314 HY000
13557 ER_IB_MSG_DBLWR_1315 HY000
13558 ER_IB_MSG_DBLWR_1316 HY000
13559 ER_IB_MSG_DBLWR_1317 HY000
13560 ER_IB_MSG_DBLWR_1318 HY000
13561 ER_IB_MSG_DBLWR_LOAD_WRONG_SIZE HY000
13562 ER_IB_MSG_DBLWR_1320 HY000
13563 ER_IB_MSG_DBLWR_1321 HY000
13564 ER_IB_MSG_DBLWR_OPEN_OR_CREATE_WRONG_SIZE HY000
13565 ER_IB_MSG_DBLWR_1323 HY000
13566 ER_IB_MSG_DBLWR_1324 HY000
13567 ER_IB_MSG_DBLWR_1325 HY000
13568 ER_IB_MSG_DBLWR_1326 HY000
13569 ER_IB_MSG_DBLWR_1327 HY000
13570 ER_IB_MSG_GTID_FLUSH_AT_SHUTDOWN HY000
13571 ER_IB_MSG_57_STAT_SPACE_DELETE_FAIL HY000
13572 ER_NDBINFO_UPGRADING_SCHEMA HY000
13573 ER_NDBINFO_NOT_UPGRADING_SCHEMA HY000
13574 ER_NDBINFO_UPGRADING_SCHEMA_FAIL HY000
13576 ER_IB_MSG_INNODB_START_INITIALIZE HY000
13577 ER_IB_MSG_INNODB_END_INITIALIZE HY000
13578 ER_IB_MSG_PAGE_ARCH_NO_RESET_POINTS HY000
13579 ER_IB_WRN_PAGE_ARCH_FLUSH_DATA HY000
13580 ER_IB_ERR_PAGE_ARCH_INVALID_DOUBLE_WRITE_BUF HY000
13581 ER_IB_ERR_PAGE_ARCH_RECOVERY_FAILED HY000
13582 ER_IB_ERR_PAGE_ARCH_INVALID_FORMAT HY000
13583 ER_INVALID_XPLUGIN_SOCKET_SAME_AS_SERVER HY000
13584 ER_INNODB_UNABLE_TO_ACQUIRE_DD_OBJECT HY000
13586 ER_IB_MSG_UNDO_TRUNCATE_TOO_OFTEN HY000
13587 ER_GRP_RPL_IS_STARTING HY000
13588 ER_IB_MSG_INVALID_LOCATION_FOR_TABLESPACE HY000
13589 ER_IB_MSG_INVALID_LOCATION_WRONG_DB HY000
13590 ER_IB_MSG_CANNOT_FIND_DD_UNDO_SPACE HY000
276

Mapping MySQL Error Numbers to JDBC SQLState Codes
MySQL
Error
Number
MySQL Error Name SQL
Standard
SQLState
13591 ER_GRP_RPL_RECOVERY_ENDPOINT_FORMAT HY000
13592 ER_GRP_RPL_RECOVERY_ENDPOINT_INVALID HY000
13593 ER_GRP_RPL_RECOVERY_ENDPOINT_INVALID_DONOR_ENDPOINT HY000
13594 ER_GRP_RPL_RECOVERY_ENDPOINT_INTERFACES_IPS HY000
13595 ER_WARN_TLS_CHANNEL_INITIALIZATION_ERROR HY000
13596 ER_XPLUGIN_FAILED_TO_VALIDATE_ADDRESS HY000
13597 ER_XPLUGIN_FAILED_TO_BIND_INTERFACE_ADDRESS HY000
13598 ER_IB_ERR_RECOVERY_REDO_DISABLED HY000
13599 ER_IB_WRN_FAST_SHUTDOWN_REDO_DISABLED HY000
13600 ER_IB_WRN_REDO_DISABLED HY000
13601 ER_IB_WRN_REDO_ENABLED HY000
13602 ER_TLS_CONFIGURED_FOR_CHANNEL HY000
13603 ER_TLS_CONFIGURATION_REUSED HY000
13604 ER_IB_TABLESPACE_PATH_VALIDATION_SKIPPED HY000
13605 ER_IB_CANNOT_UPGRADE_WITH_DISCARDED_TABLESPACES HY000
13606 ER_USERNAME_TRUNKATED HY000
13607 ER_HOSTNAME_TRUNKATED HY000
13608 ER_IB_MSG_TRX_RECOVERY_ROLLBACK_NOT_COMPLETED HY000
13609 ER_AUTHCACHE_ROLE_EDGES_IGNORED_EMPTY_NAME HY000
13610 ER_AUTHCACHE_ROLE_EDGES_UNKNOWN_AUTHORIZATION_ID HY000
13611 ER_AUTHCACHE_DEFAULT_ROLES_IGNORED_EMPTY_NAME HY000
13612 ER_AUTHCACHE_DEFAULT_ROLES_UNKNOWN_AUTHORIZATION_ID HY000
13613 ER_IB_ERR_DDL_LOG_INSERT_FAILURE HY000
13614 ER_IB_LOCK_VALIDATE_LATCH_ORDER_VIOLATION HY000
13615 ER_IB_RELOCK_LATCH_ORDER_VIOLATION HY000
13621 ER_IB_MSG_1357 HY000
13622 ER_IB_MSG_1358 HY000
13623 ER_IB_MSG_1359 HY000
13624 ER_IB_FAILED_TO_DELETE_TABLESPACE_FILE HY000
13625 ER_IB_UNABLE_TO_EXPAND_TEMPORARY_TABLESPACE_POOL HY000
13626 ER_IB_TMP_TABLESPACE_CANNOT_CREATE_DIRECTORY HY000
13627 ER_IB_MSG_SCANNING_TEMP_TABLESPACE_DIR HY000
13628 ER_IB_ERR_TEMP_TABLESPACE_DIR_DOESNT_EXIST HY000
13629 ER_IB_ERR_TEMP_TABLESPACE_DIR_EMPTY HY000
13630 ER_IB_ERR_TEMP_TABLESPACE_DIR_CONTAINS_SEMICOLON HY000
13631 ER_IB_ERR_TEMP_TABLESPACE_DIR_SUBDIR_OF_DATADIR HY000
277

Mapping MySQL Error Numbers to JDBC SQLState Codes
MySQL
Error
Number
MySQL Error Name SQL
Standard
SQLState
13632 ER_IB_ERR_SCHED_SETAFFNINITY_FAILED HY000
13633 ER_IB_ERR_UNKNOWN_PAGE_FETCH_MODE HY000
13634 ER_IB_ERR_LOG_PARSING_BUFFER_OVERFLOW HY000
13635 ER_IB_ERR_NOT_ENOUGH_MEMORY_FOR_PARSE_BUFFER HY000
13636 ER_IB_MSG_1372 HY000
13637 ER_IB_MSG_1373 HY000
13638 ER_IB_MSG_1374 HY000
13639 ER_IB_MSG_1375 HY000
13640 ER_IB_ERR_ZLIB_UNCOMPRESS_FAILED HY000
13641 ER_IB_ERR_ZLIB_BUF_ERROR HY000
13642 ER_IB_ERR_ZLIB_MEM_ERROR HY000
13643 ER_IB_ERR_ZLIB_DATA_ERROR HY000
13644 ER_IB_ERR_ZLIB_UNKNOWN_ERROR HY000
13645 ER_IB_MSG_1381 HY000
13646 ER_IB_ERR_INDEX_RECORDS_WRONG_ORDER HY000
13647 ER_IB_ERR_INDEX_DUPLICATE_KEY HY000
13648 ER_IB_ERR_FOUND_N_DUPLICATE_KEYS HY000
13649 ER_IB_ERR_FOUND_N_RECORDS_WRONG_ORDER HY000
13650 ER_IB_ERR_PARALLEL_READ_OOM HY000
13651 ER_IB_MSG_UNDO_MARKED_ACTIVE HY000
13652 ER_IB_MSG_UNDO_ALTERED_ACTIVE HY000
13653 ER_IB_MSG_UNDO_ALTERED_INACTIVE HY000
13654 ER_IB_MSG_UNDO_MARKED_EMPTY HY000
13655 ER_IB_MSG_UNDO_TRUNCATE_DELAY_BY_CLONE HY000
13656 ER_IB_MSG_UNDO_TRUNCATE_DELAY_BY_MDL HY000
13657 ER_IB_MSG_INJECT_CRASH HY000
13658 ER_IB_MSG_INJECT_FAILURE HY000
13659 ER_GRP_RPL_TIMEOUT_RECEIVED_VC_LEAVE_ON_REJOIN HY000
13660 ER_RPL_ASYNC_RECONNECT_FAIL_NO_SOURCE HY000
13661 ER_UDF_REGISTER_SERVICE_ERROR HY000
13662 ER_UDF_REGISTER_ERROR HY000
13663 ER_UDF_UNREGISTER_ERROR HY000
13664 ER_EMPTY_PRIVILEGE_NAME_IGNORED HY000
13665 ER_IB_MSG_INCORRECT_SIZE HY000
13666 ER_TMPDIR_PATH_TOO_LONG HY000
13667 ER_ERROR_LOG_DESTINATION_NOT_A_FILE HY000
278

Mapping MySQL Error Numbers to JDBC SQLState Codes
MySQL
Error
Number
MySQL Error Name SQL
Standard
SQLState
13668 ER_NO_ERROR_LOG_PARSER_CONFIGURED HY000
13669 ER_UPGRADE_NONEXISTENT_SCHEMA HY000
13670 ER_IB_MSG_CREATED_UNDO_SPACE HY000
13671 ER_IB_MSG_DROPPED_UNDO_SPACE HY000
13672 ER_IB_MSG_MASTER_KEY_ROTATED HY000
13673 ER_IB_DBLWR_DECOMPRESS_FAILED HY000
13674 ER_IB_DBLWR_DECRYPT_FAILED HY000
13675 ER_IB_DBLWR_KEY_MISSING HY000
13676 ER_INNODB_IO_WRITE_ERROR_RETRYING HY000
13677 ER_INNODB_IO_WRITE_FAILED HY000
13678 ER_LOG_COMPONENT_CANNOT_INIT HY000
13679 ER_RPL_ASYNC_CHANNEL_CANT_CONNECT HY000
13680 ER_RPL_ASYNC_SENDER_ADDED HY000
13681 ER_RPL_ASYNC_SENDER_REMOVED HY000
13682 ER_RPL_ASYNC_CHANNEL_STOPPED_QUORUM_LOST HY000
13683 ER_RPL_ASYNC_CHANNEL_CANT_CONNECT_NO_QUORUM HY000
13685 ER_RPL_REPLICA_MONITOR_IO_THREAD_EXITING HY000
13686 ER_RPL_ASYNC_MANAGED_NAME_REMOVED HY000
13687 ER_RPL_ASYNC_MANAGED_NAME_ADDED HY000
13688 ER_RPL_ASYNC_READ_FAILOVER_TABLE HY000
13689 ER_RPL_REPLICA_MONITOR_IO_THREAD_RECONNECT_CHANNEL HY000
13690 ER_REPLICA_ANON_TO_GTID_IS_LOCAL_OR_UUID_AND_GTID_MODE_NOT_ONHY000
13691 ER_REPLICA_ANONYMOUS_TO_GTID_UUID_SAME_AS_GROUP_NAME HY000
13692 ER_GRP_RPL_GRP_NAME_IS_SAME_AS_ANONYMOUS_TO_GTID_UUID HY000
13693 ER_WARN_GTID_THRESHOLD_BREACH HY000
13694 ER_HEALTH_INFO HY000
13695 ER_HEALTH_WARNING HY000
13696 ER_HEALTH_ERROR HY000
13697 ER_HEALTH_WARNING_DISK_USAGE_LEVEL_1 HY000
13698 ER_HEALTH_WARNING_DISK_USAGE_LEVEL_2 HY000
13699 ER_HEALTH_WARNING_DISK_USAGE_LEVEL_3 HY000
13700 ER_IB_INNODB_TBSP_OUT_OF_SPACE HY000
13701 ER_GRP_RPL_APPLIER_CHANNEL_STILL_RUNNING HY000
13702 ER_RPL_ASYNC_RECONNECT_GTID_MODE_OFF_CHANNEL HY000
13703 ER_FIREWALL_SERVICES_NOT_ACQUIRED HY000
13704 ER_FIREWALL_UDF_REGISTER_FAILED HY000
279

Mapping MySQL Error Numbers to JDBC SQLState Codes
MySQL
Error
Number
MySQL Error Name SQL
Standard
SQLState
13705 ER_FIREWALL_PFS_TABLE_REGISTER_FAILED HY000
13706 ER_IB_MSG_STATS_SAMPLING_TOO_LARGE HY000
13707 ER_AUDIT_LOG_FILE_PRUNE_FAILED HY000
13708 ER_AUDIT_LOG_FILE_AUTO_PRUNED HY000
13709 ER_COMPONENTS_INFRASTRUCTURE_MANIFEST_INIT HY000
13710 ER_COMPONENTS_INFRASTRUCTURE_MANIFEST_DEINIT HY000
13711 ER_WARN_COMPONENTS_INFRASTRUCTURE_MANIFEST_NOT_RO HY000
13712 ER_WARN_NO_KEYRING_COMPONENT_SERVICE_FOUND HY000
13713 ER_NOTE_KEYRING_COMPONENT_INITIALIZED HY000
13714 ER_KEYRING_COMPONENT_NOT_INITIALIZED HY000
13715 ER_KEYRING_COMPONENT_EXCEPTION HY000
13716 ER_KEYRING_COMPONENT_MEMORY_ALLOCATION_ERROR HY000
13717 ER_NOTE_KEYRING_COMPONENT_AES_INVALID_MODE_BLOCK_SIZE HY000
13718 ER_NOTE_KEYRING_COMPONENT_AES_DATA_IDENTIFIER_EMPTY HY000
13719 ER_NOTE_KEYRING_COMPONENT_AES_INVALID_KEY HY000
13720 ER_NOTE_KEYRING_COMPONENT_AES_OPERATION_ERROR HY000
13721 ER_NOTE_KEYRING_COMPONENT_READ_DATA_NOT_FOUND HY000
13722 ER_NOTE_KEYRING_COMPONENT_WRITE_MAXIMUM_DATA_LENGTH HY000
13723 ER_NOTE_KEYRING_COMPONENT_STORE_FAILED HY000
13724 ER_NOTE_KEYRING_COMPONENT_REMOVE_FAILED HY000
13725 ER_NOTE_KEYRING_COMPONENT_GENERATE_FAILED HY000
13726 ER_NOTE_KEYRING_COMPONENT_KEYS_METADATA_ITERATOR_FETCH_FAILEDHY000
13727 ER_NOTE_KEYRING_COMPONENT_METADATA_ITERATOR_INVALID_OUT_PARAMHY000
13728 ER_IB_WRN_FAILED_TO_ACQUIRE_SERVICE HY000
13729 ER_IB_WRN_OLD_GEOMETRY_TYPE HY000
13730 ER_NET_WAIT_ERROR2 HY000
13731 ER_GRP_RPL_MEMBER_ACTION_TRIGGERED HY000
13732 ER_GRP_RPL_MEMBER_ACTION_FAILURE_IGNORE HY000
13733 ER_GRP_RPL_MEMBER_ACTION_FAILURE HY000
13734 ER_GRP_RPL_MEMBER_ACTION_PARSE_ON_RECEIVE HY000
13735 ER_GRP_RPL_MEMBER_ACTION_UPDATE_ACTIONS HY000
13736 ER_GRP_RPL_MEMBER_ACTION_GET_EXCHANGEABLE_DATA HY000
13737 ER_GRP_RPL_MEMBER_ACTION_DEFAULT_CONFIGURATION HY000
13738 ER_GRP_RPL_MEMBER_ACTION_UNABLE_TO_SET_DEFAULT_CONFIGURATIONHY000
13739 ER_GRP_RPL_MEMBER_ACTION_PARSE_ON_MEMBER_JOIN HY000
13740 ER_GRP_RPL_MEMBER_ACTION_UPDATE_ACTIONS_ON_MEMBER_JOIN HY000
280

Mapping MySQL Error Numbers to JDBC SQLState Codes
MySQL
Error
Number
MySQL Error Name SQL
Standard
SQLState
13741 ER_GRP_RPL_MEMBER_ACTION_INVALID_ACTIONS_ON_MEMBER_JOIN HY000
13742 ER_GRP_RPL_MEMBER_ACTION_ENABLED HY000
13743 ER_GRP_RPL_MEMBER_ACTION_DISABLED HY000
13744 ER_GRP_RPL_MEMBER_ACTIONS_RESET HY000
13747 ER_FIREWALL_DEPRECATED_USER_PROFILE HY000
13748 ER_GRP_RPL_VIEW_CHANGE_UUID_INVALID HY000
13749 ER_GRP_RPL_VIEW_CHANGE_UUID_SAME_AS_GROUP_NAME HY000
13750 ER_GRP_RPL_GROUP_NAME_SAME_AS_VIEW_CHANGE_UUID HY000
13751 ER_GRP_RPL_VIEW_CHANGE_UUID_IS_SAME_AS_ANONYMOUS_TO_GTID_UUIDHY000
13752 ER_GRP_RPL_GRP_VIEW_CHANGE_UUID_IS_INCOMPATIBLE_WITH_SERVER_UUIDHY000
13753 ER_GRP_RPL_VIEW_CHANGE_UUID_DIFF_FROM_GRP HY000
13754 ER_WARN_REPLICA_ANONYMOUS_TO_GTID_UUID_SAME_AS_VIEW_CHANGE_UUIDHY000
13755 ER_GRP_RPL_FAILED_TO_PARSE_THE_VIEW_CHANGE_UUID HY000
13756 ER_GRP_RPL_FAILED_TO_GENERATE_SIDNO_FOR_VIEW_CHANGE_UUID HY000
13757 ER_GRP_RPL_VIEW_CHANGE_UUID_PARSE_ERROR HY000
13758 ER_GRP_RPL_UPDATE_GRPGTID_VIEW_CHANGE_UUID_EXECUTED_ERRORHY000
13759 ER_GRP_RPL_ADD_VIEW_CHANGE_UUID_TO_GRP_SID_MAP_ERROR HY000
13760 ER_GRP_RPL_DONOR_VIEW_CHANGE_UUID_TRANS_INFO_ERROR HY000
13761 ER_WARN_GRP_RPL_VIEW_CHANGE_UUID_FAIL_GET_VARIABLE HY000
13762 ER_WARN_ADUIT_LOG_MAX_SIZE_AND_PRUNE_SECONDS_LOG HY000
13763 ER_WARN_ADUIT_LOG_MAX_SIZE_CLOSE_TO_ROTATE_ON_SIZE_LOG HY000
13764 ER_PLUGIN_INVALID_TABLE_DEFINITION HY000
13765 ER_AUTH_KERBEROS_LOGGER_GENERIC_MSG HY000
13766 ER_INSTALL_PLUGIN_CONFLICT_LOG HY000
13767 ER_DEPRECATED_PERSISTED_VARIABLE_WITH_ALIAS HY000
13768 ER_LOG_COMPONENT_FLUSH_FAILED HY000
13769 ER_IB_MSG_REENCRYPTED_TABLESPACE_KEY HY000
13770 ER_IB_MSG_REENCRYPTED_GENERAL_TABLESPACE_KEY HY000
13771 ER_IB_ERR_PAGE_ARCH_DBLWR_INIT_FAILED HY000
13772 ER_IB_MSG_RECOVERY_NO_SPACE_IN_REDO_LOG__SKIP_IBUF_MERGES HY000
13773 ER_IB_MSG_RECOVERY_NO_SPACE_IN_REDO_LOG__UNEXPECTED HY000
13774 ER_WARN_AUDIT_LOG_FORMAT_UNIX_TIMESTAMP_ONLY_WHEN_JSON_LOGHY000
13775 ER_PREPARE_FOR_PRIMARY_ENGINE HY000
13776 ER_IB_MSG_PAR_RSEG_INIT_COMPLETE_MSG HY000
13777 ER_IB_MSG_PAR_RSEG_INIT_TIME_MSG HY000
13778 ER_DDL_MSG_1 HY000
281

Mapping MySQL Error Numbers to JDBC SQLState Codes
MySQL
Error
Number
MySQL Error Name SQL
Standard
SQLState
13779 ER_MTR_MSG_1 HY000
13780 ER_GRP_RPL_MYSQL_NETWORK_PROVIDER_CLIENT_ERROR_CONN_ERR HY000
13781 ER_GRP_RPL_MYSQL_NETWORK_PROVIDER_CLIENT_ERROR_COMMAND_ERRHY000
13782 ER_GRP_RPL_FAILOVER_CONF_GET_EXCHANGEABLE_DATA HY000
13783 ER_GRP_RPL_FAILOVER_CONF_DEFAULT_CONFIGURATION HY000
13784 ER_GRP_RPL_FAILOVER_CONF_UNABLE_TO_SET_DEFAULT_CONFIGURATIONHY000
13785 ER_GRP_RPL_FAILOVER_CONF_PARSE_ON_MEMBER_JOIN HY000
13786 ER_GRP_RPL_FAILOVER_CONF_CHANNEL_DOES_NOT_EXIST HY000
13787 ER_GRP_RPL_FAILOVER_REGISTER_MESSAGE_LISTENER_SERVICE HY000
13788 ER_GRP_RPL_FAILOVER_PRIMARY_WITHOUT_MAJORITY HY000
13789 ER_GRP_RPL_FAILOVER_PRIMARY_BACK_TO_MAJORITY HY000
13790 ER_RPL_INCREMENTING_MEMBER_ACTION_VERSION HY000
13791 ER_GRP_RPL_REPLICA_THREAD_ERROR_ON_SECONDARY_MEMBER HY000
13792 ER_IB_MSG_CLONE_DDL_NTFN HY000
13793 ER_IB_MSG_CLONE_DDL_APPLY HY000
13794 ER_IB_MSG_CLONE_DDL_INVALIDATE HY000
13795 ER_IB_MSG_UNDO_ENCRYPTION_INFO_LOADED HY000
13796 ER_IB_WRN_ENCRYPTION_INFO_SIZE_MISMATCH HY000
13797 ER_INVALID_AUTHENTICATION_POLICY HY000
13798 ER_AUTHENTICATION_PLUGIN_REGISTRATION_FAILED HY000
13799 ER_AUTHENTICATION_PLUGIN_REGISTRATION_INSUFFICIENT_BUFFER HY000
13800 ER_AUTHENTICATION_PLUGIN_AUTH_DATA_CORRUPT HY000
13801 ER_AUTHENTICATION_PLUGIN_SIGNATURE_CORRUPT HY000
13802 ER_AUTHENTICATION_PLUGIN_VERIFY_SIGNATURE_FAILED HY000
13803 ER_AUTHENTICATION_PLUGIN_OOM HY000
13804 ER_AUTHENTICATION_PLUGIN_LOG HY000
13805 ER_WARN_REPLICA_GTID_ONLY_AND_GTID_MODE_NOT_ON HY000
13806 ER_WARN_L_DISABLE_GTID_ONLY_WITH_SOURCE_AUTO_POS_INVALID_POSHY000
13807 ER_RPL_CANNOT_OPEN_RELAY_LOG HY000
13808 ER_AUTHENTICATION_OCI_PLUGIN_NOT_INITIALIZED HY000
13809 ER_AUTHENTICATION_OCI_PRIVATE_KEY_ERROR HY000
13810 ER_AUTHENTICATION_OCI_DOWNLOAD_PUBLIC_KEY HY000
13811 ER_AUTHENTICATION_OCI_IMDS HY000
13812 ER_AUTHENTICATION_OCI_IAM HY000
13813 ER_AUTHENTICATION_OCI_INVALID_AUTHENTICATION_STRING HY000
13814 ER_AUTHENTICATION_OCI_NO_MATCHING_GROUPS HY000
282

Mapping MySQL Error Numbers to JDBC SQLState Codes
MySQL
Error
Number
MySQL Error Name SQL
Standard
SQLState
13815 ER_AUTHENTICATION_OCI_NO_GROUPS_FOUND HY000
13816 ER_AUTHENTICATION_OCI_NONCE HY000
13817 ER_HEALTH_WARNING_MEMORY_USAGE_LEVEL_1 HY000
13818 ER_HEALTH_WARNING_MEMORY_USAGE_LEVEL_2 HY000
13819 ER_HEALTH_WARNING_MEMORY_USAGE_LEVEL_3 HY000
13820 ER_GRP_RPL_SET_SINGLE_CONSENSUS_LEADER HY000
13821 ER_GRP_RPL_ERROR_SET_SINGLE_CONSENSUS_LEADER HY000
13822 ER_GRP_RPL_SET_MULTI_CONSENSUS_LEADER HY000
13823 ER_GRP_RPL_ERROR_SET_MULTI_CONSENSUS_LEADER HY000
13824 ER_GRP_RPL_PAXOS_SINGLE_LEADER_DIFF_FROM_GRP HY000
13825 ER_MFA_USER_ATTRIBUTES_CORRUPT HY000
13826 ER_MFA_PLUGIN_NOT_LOADED HY000
13827 ER_WARN_DEPRECATED_CHARSET_OPTION HY000
13828 ER_WARN_DEPRECATED_COLLATION_OPTION HY000
13829 ER_REGEXP_MISSING_ICU_DATADIR HY000
13830 ER_IB_WARN_MANY_NON_LRU_FILES_OPENED HY000
13831 ER_IB_MSG_TRYING_TO_OPEN_FILE_FOR_LONG_TIME HY000
13832 ER_GLOBAL_CONN_LIMIT HY000
13833 ER_CONN_LIMIT HY000
13834 ER_WARN_AUDIT_LOG_DISABLED HY000
13835 ER_INVALID_TLS_VERSION HY000
13836 ER_RPL_RELAY_LOG_RECOVERY_GTID_ONLY HY000
13837 ER_KEYRING_OKV_STANDBY_SERVER_COUNT_EXCEEDED HY000
13838 ER_WARN_MIGRATION_EMPTY_SOURCE_KEYRING HY000
13839 ER_WARN_CANNOT_PERSIST_SENSITIVE_VARIABLES HY000
13840 ER_CANNOT_INTERPRET_PERSISTED_SENSITIVE_VARIABLES HY000
13841 ER_PERSISTED_VARIABLES_KEYRING_SUPPORT_REQUIRED HY000
13842 ER_PERSISTED_VARIABLES_MASTER_KEY_NOT_FOUND HY000
13843 ER_PERSISTED_VARIABLES_MASTER_KEY_CANNOT_BE_GENERATED HY000
13844 ER_PERSISTED_VARIABLES_ENCRYPTION_FAILED HY000
13845 ER_PERSISTED_VARIABLES_DECRYPTION_FAILED HY000
13846 ER_PERSISTED_VARIABLES_LACK_KEYRING_SUPPORT HY000
13847 ER_MY_MALLOC_USING_JEMALLOC HY000
13848 ER_MY_MALLOC_USING_STD_MALLOC HY000
13849 ER_MY_MALLOC_LOADLIBRARY_FAILED HY000
13850 ER_MY_MALLOC_GETPROCADDRESS_FAILED HY000
283

Mapping MySQL Error Numbers to JDBC SQLState Codes
MySQL
Error
Number
MySQL Error Name SQL
Standard
SQLState
13851 ER_ACCOUNT_WITH_EXPIRED_PASSWORD HY000
13852 ER_THREAD_POOL_PLUGIN_STARTED HY000
13853 ER_THREAD_POOL_DEDICATED_LISTENERS_INVALID HY000
13854 ER_IB_DBLWR_BYTES_INFO HY000
13855 ER_IB_RDBLWR_BYTES_INFO HY000
13856 ER_IB_MSG_LOG_FILE_IS_EMPTY HY000
13857 ER_IB_MSG_LOG_FILE_TOO_SMALL HY000
13858 ER_IB_MSG_LOG_FILE_TOO_BIG HY000
13859 ER_IB_MSG_LOG_FILE_HEADER_READ_FAILED HY000
13860 ER_IB_MSG_LOG_INIT_DIR_NOT_EMPTY_WONT_INITIALIZE HY000
13861 ER_IB_MSG_LOG_INIT_DIR_LIST_FAILED HY000
13862 ER_IB_MSG_LOG_INIT_DIR_MISSING_SUBDIR HY000
13863 ER_IB_MSG_LOG_FILES_CREATED_BY_CLONE_AND_READ_ONLY_MODE HY000
13864 ER_IB_MSG_LOG_WRITER_WRITE_FAILED HY000
13865 ER_IB_MSG_LOG_WRITER_WAIT_ON_NEW_LOG_FILE HY000
13866 ER_IB_MSG_RECOVERY_CHECKPOINT_OUTSIDE_LOG_FILE HY000
13867 ER_IB_MSG_LOG_WRITER_ENTERED_EXTRA_MARGIN HY000
13868 ER_IB_MSG_LOG_WRITER_EXITED_EXTRA_MARGIN HY000
13869 ER_IB_MSG_LOG_PARAMS_FILE_SIZE_UNUSED HY000
13870 ER_IB_MSG_LOG_PARAMS_N_FILES_UNUSED HY000
13871 ER_IB_MSG_LOG_UPGRADE_FORCED_RECV HY000
13872 ER_IB_MSG_LOG_UPGRADE_IN_READ_ONLY_MODE HY000
13873 ER_IB_MSG_LOG_UPGRADE_CLONED_DB HY000
13874 ER_IB_MSG_LOG_UPGRADE_UNINITIALIZED_FILES HY000
13875 ER_IB_MSG_LOG_UPGRADE_CORRUPTION__UNEXPECTED HY000
13879 ER_IB_MSG_LOG_FILE_FOREIGN_UUID HY000
13880 ER_IB_MSG_LOG_FILE_INVALID_START_LSN HY000
13881 ER_IB_MSG_LOG_FILE_INVALID_LSN_RANGES HY000
13882 ER_IB_MSG_LOG_FILE_MISSING_FOR_ID HY000
13883 ER_IB_MSG_LOG_CHECKPOINT_FOUND HY000
13884 ER_IB_MSG_LOG_FILES_CAPACITY_CHANGED HY000
13885 ER_IB_MSG_LOG_FILES_RESIZE_REQUESTED HY000
13886 ER_IB_MSG_LOG_FILES_RESIZE_CANCELLED HY000
13887 ER_IB_MSG_LOG_FILES_RESIZE_FINISHED HY000
13888 ER_IB_MSG_LOG_FILES_UPGRADE HY000
13889 ER_IB_MSG_LOG_FILE_MARK_CURRENT_AS_INCOMPLETE HY000
284

Mapping MySQL Error Numbers to JDBC SQLState Codes
MySQL
Error
Number
MySQL Error Name SQL
Standard
SQLState
13890 ER_IB_MSG_LOG_FILE_REMOVE_FAILED HY000
13891 ER_IB_MSG_LOG_FILE_RENAME_ON_CREATE_FAILED HY000
13892 ER_IB_MSG_LOG_FILES_CREATED_BY_UNKNOWN_CREATOR HY000
13893 ER_IB_MSG_LOG_FILES_FOUND_MISSING HY000
13894 ER_IB_MSG_LOG_FILE_FORMAT_TOO_NEW HY000
13895 ER_IB_MSG_LOG_FILE_FORMAT_TOO_OLD HY000
13896 ER_IB_MSG_LOG_FILE_DIFFERENT_FORMATS HY000
13897 ER_IB_MSG_LOG_PRE_8_0_30_MISSING_FILE0 HY000
13898 ER_IB_MSG_LOG_PFS_ACQUIRE_SERVICES_FAILED HY000
13899 ER_IB_MSG_LOG_PFS_CREATE_TABLES_FAILED HY000
13900 ER_IB_MSG_LOG_FILE_TRUNCATE HY000
13901 ER_IB_MSG_LOG_FILE_UNUSED_RESIZE_FAILED HY000
13902 ER_IB_MSG_LOG_FILE_UNUSED_REMOVE_FAILED HY000
13903 ER_IB_MSG_LOG_FILE_UNUSED_RENAME_FAILED HY000
13904 ER_IB_MSG_LOG_FILE_UNUSED_MARK_AS_IN_USE_FAILED HY000
13905 ER_IB_MSG_LOG_FILE_MARK_AS_UNUSED_FAILED HY000
13906 ER_IB_MSG_LOG_PARAMS_DEDICATED_SERVER_IGNORED HY000
13907 ER_IB_MSG_LOG_PARAMS_LEGACY_USAGE HY000
13908 ER_GRP_RPL_FAILED_TO_LOG_VIEW_CHANGE HY000
13909 ER_BINLOG_CRASH_RECOVERY_MALFORMED_LOG HY000
13910 ER_BINLOG_CRASH_RECOVERY_ERROR_RETURNED_SE HY000
13911 ER_BINLOG_CRASH_RECOVERY_ENGINE_RESULTS HY000
13912 ER_BINLOG_CRASH_RECOVERY_COMMIT_FAILED HY000
13913 ER_BINLOG_CRASH_RECOVERY_ROLLBACK_FAILED HY000
13914 ER_BINLOG_CRASH_RECOVERY_PREPARE_FAILED HY000
13915 ER_COMPONENT_EE_SYS_VAR_REGISTRATION_FAILURE HY000
13916 ER_COMPONENT_EE_SYS_VAR_DEREGISTRATION_FAILURE HY000
13917 ER_COMPONENT_EE_FUNCTION_REGISTRATION_FAILURE HY000
13918 ER_COMPONENT_EE_FUNCTION_DEREGISTRATION_FAILURE HY000
13919 ER_COMPONENT_EE_FUNCTION_INVALID_ARGUMENTS HY000
13920 ER_COMPONENT_EE_FUNCTION_INVALID_ALGORITHM HY000
13921 ER_COMPONENT_EE_FUNCTION_KEY_LENGTH_OUT_OF_RANGE HY000
13922 ER_COMPONENT_EE_FUNCTION_PRIVATE_KEY_GENERATION_FAILURE HY000
13923 ER_COMPONENT_EE_FUNCTION_PUBLIC_KEY_GENERATION_FAILURE HY000
13924 ER_COMPONENT_EE_DATA_LENGTH_OUT_OF_RAGE HY000
13925 ER_COMPONENT_EE_DATA_ENCRYPTION_ERROR HY000
285

Mapping MySQL Error Numbers to JDBC SQLState Codes
MySQL
Error
Number
MySQL Error Name SQL
Standard
SQLState
13926 ER_COMPONENT_EE_DATA_DECRYPTION_ERROR HY000
13927 ER_COMPONENT_EE_DATA_SIGN_ERROR HY000
13928 ER_COMPONENT_EE_OPENSSL_ERROR HY000
13929 ER_COMPONENT_EE_INSUFFICIENT_LENGTH HY000
13930 ER_SYSTEMD_NOTIFY_DEBUG HY000
13931 ER_TMP_SESSION_FOR_VAR HY000
13932 ER_BUILD_ID HY000
13933 ER_THREAD_POOL_CANNOT_REGISTER_DYNAMIC_PRIVILEGE HY000
13934 ER_IB_MSG_LOG_WRITER_WAIT_ON_CONSUMER HY000
13935 ER_CONDITIONAL_DEBUG HY000
13936 ER_IB_MSG_PARSE_OLD_REDO_INDEX_VERSION HY000
13941 ER_IB_MSG_CLEAR_INSTANT_DROP_COLUMN_METADATA HY000
13942 ER_COMPONENT_KEYRING_OCI_OPEN_KEY_FILE HY000
13943 ER_COMPONENT_KEYRING_OCI_CREATE_PRIVATE_KEY HY000
13944 ER_COMPONENT_KEYRING_OCI_READ_KEY_FILE HY000
13945 ER_NOTE_COMPONENT_KEYRING_OCI_MISSING_NAME_OR_TYPE HY000
13946 ER_WARN_COMPONENT_KEYRING_OCI_DUPLICATE_KEY HY000
13947 ER_KEYRING_OCI_PARSE_JSON HY000
13948 ER_KEYRING_OCI_INVALID_JSON HY000
13949 ER_KEYRING_OCI_HTTP_REQUEST HY000
13950 ER_THREAD_POOL_SYSVAR_CHANGE HY000
13951 ER_STACK_BACKTRACE HY000
13952 ER_IB_MSG_BUF_POOL_RESIZE_COMPLETE_CUR_CODE HY000
13953 ER_IB_MSG_BUF_POOL_RESIZE_PROGRESS_UPDATE HY000
13954 ER_IB_MSG_BUF_POOL_RESIZE_CODE_STATUS HY000
13955 ER_THREAD_POOL_QUERY_THREADS_PER_GROUP_INVALID HY000
13956 ER_THREAD_POOL_QUERY_THRS_PER_GRP_EXCEEDS_TXN_THR_LIMIT HY000
13957 ER_IB_MSG_INVALID_PAGE_TYPE HY000
13958 ER_IB_PARALLEL_READER_WORKER_INFO HY000
13959 ER_IB_BULK_LOAD_SUBTREE_INFO HY000
13960 ER_IB_BULK_FLUSHER_INFO HY000
13961 ER_IB_BUFFER_POOL_OVERUSE HY000
13962 ER_IB_BUFFER_POOL_FULL HY000
13963 ER_IB_DUPLICATE_KEY HY000
13964 ER_REPLICATION_INCOMPATIBLE_TABLE_WITH_GIPK HY000
13965 ER_BULK_EXECUTOR_INFO HY000
286

Mapping MySQL Error Numbers to JDBC SQLState Codes
MySQL
Error
Number
MySQL Error Name SQL
Standard
SQLState
13966 ER_BULK_LOADER_INFO HY000
13967 ER_BULK_LOADER_FILE_CONTAINS_LESS_LINES_THAN_IGNORE_CLAUSE_LOGHY000
13968 ER_BULK_READER_INFO HY000
13969 ER_BULK_READER_LIBCURL_INIT_FAILED_LOG HY000
13970 ER_BULK_READER_LIBCURL_ERROR_LOG HY000
13971 ER_BULK_READER_SERVER_ERROR_LOG HY000
13972 ER_BULK_READER_COMMUNICATION_ERROR_LOG HY000
13973 ER_BULK_PARSER_MISSING_ENCLOSED_BY_LOG HY000
13974 ER_BULK_PARSER_ROW_BUFFER_MAX_TOTAL_COLS_EXCEEDED_LOG HY000
13975 ER_BULK_PARSER_COPY_BUFFER_SIZE_EXCEEDED_LOG HY000
13976 ER_BULK_PARSER_UNEXPECTED_END_OF_INPUT_LOG HY000
13977 ER_BULK_PARSER_UNEXPECTED_ROW_TERMINATOR_LOG HY000
13978 ER_BULK_PARSER_UNEXPECTED_CHAR_AFTER_ENDING_ENCLOSED_BY_LOGHY000
13979 ER_BULK_PARSER_UNEXPECTED_CHAR_AFTER_NULL_ESCAPE_LOG HY000
13980 ER_BULK_PARSER_UNEXPECTED_CHAR_AFTER_COLUMN_TERMINATOR_LOGHY000
13981 ER_BULK_PARSER_INCOMPLETE_ESCAPE_SEQUENCE_LOG HY000
13982 ER_LOAD_BULK_DATA_WRONG_VALUE_FOR_FIELD_LOG HY000
13983 ER_LOAD_BULK_DATA_WARN_NULL_TO_NOTNULL_LOG HY000
13984 ER_IB_BULK_LOAD_THREAD_FAIL HY000
13985 ER_IB_BULK_LOAD_MERGE_FAIL HY000
13986 ER_IB_LOAD_BULK_CONCURRENCY_REDUCED HY000
13987 ER_PLUGIN_EXCEPTION_OPERATION_FAILED HY000
13988 ER_REQUIRE_TABLE_PRIMARY_KEY_CHECK_GENERATE_WITH_GR_IN_REPOHY000
13989 ER_CHECK_TABLE_INSTANT_VERSION_BIT_SET HY000
13990 ER_GRP_RPL_PAXOS_SINGLE_LEADER_DIFF_FROM_OLD_GRP HY000
13991 ER_IB_WRN_IGNORE_REDO_LOG_CAPACITY HY000
13992 ER_IB_PRIMARY_KEY_IS_INSTANT HY000
13993 ER_THREAD_POOL_IDLE_CONNECTION_CLOSED HY000
13994 ER_IB_HIDDEN_NAME_CONFLICT HY000
13995 ER_IB_DICT_INVALID_COLUMN_POSITION HY000
13996 ER_IB_DICT_LOG_TABLE_INFO HY000
13997 ER_RPL_ASYNC_NEXT_FAILOVER_CHANNEL_SELECTED HY000
13998 ER_RPL_REPLICA_SOURCE_UUID_HAS_NOT_CHANGED HY000
13999 ER_RPL_REPLICA_SOURCE_UUID_HAS_CHANGED_HOST_PORT_UNCHANGEDHY000
14000 ER_RPL_REPLICA_SOURCE_UUID_HOST_PORT_HAS_CHANGED HY000
14001 ER_RPL_REPLICA_CONNECTED_TO_SOURCE_RPL_STARTED_FILE_BASEDHY000
287

Mapping MySQL Error Numbers to JDBC SQLState Codes
MySQL
Error
Number
MySQL Error Name SQL
Standard
SQLState
14002 ER_RPL_REPLICA_CONNECTED_TO_SOURCE_RPL_STARTED_GTID_BASEDHY000
14003 ER_IB_INDEX_LOADER_DONE HY000
14004 ER_IB_INDEX_BUILDER_DONE HY000
14005 ER_WARN_DEPRECATED_USER_DEFINED_COLLATIONS_OPTION HY000
14006 ER_IB_INDEX_BUILDER_INIT HY000
14007 ER_IB_SELECT_COUNT_STAR HY000
14008 ER_IB_INDEX_LOG_VERSION_MISMATCH HY000
14009 ER_WARN_COMPONENTS_INFRASTRUCTURE_MANIFEST_MULTIPLE_KEYRINGHY000
14010 ER_GRP_RPL_HAS_STARTED HY000
14011 ER_CHECK_TABLE_MIN_REC_FLAG_SET HY000
14012 ER_CHECK_TABLE_MIN_REC_FLAG_NOT_SET HY000
14013 ER_NOTE_COMPONENT_SLOT_REGISTRATION_SUCCESS HY000
14014 ER_NOTE_COMPONENT_SLOT_DEREGISTRATION_SUCCESS HY000
14015 ER_WARN_CANNOT_FREE_COMPONENT_DATA_DEALLOCATION_FAILED HY000
14016 ER_IB_RESURRECT_TRX_INSERT HY000
14017 ER_IB_RESURRECT_TRX_UPDATE HY000
14018 ER_IB_RESURRECT_IDENTIFY_TABLE_TO_LOCK HY000
14019 ER_IB_RESURRECT_ACQUIRE_TABLE_LOCK HY000
14020 ER_IB_RESURRECT_RECORD_PROGRESS HY000
14021 ER_IB_RESURRECT_RECORD_COMPLETE HY000
14022 ER_IB_RESURRECT_TRX_INSERT_COMPLETE HY000
14023 ER_IB_RESURRECT_TRX_UPDATE_COMPLETE HY000
14024 ER_AUTHENTICATION_OCI_INVALID_TOKEN HY000
14025 ER_AUTHENTICATION_OCI_TOKEN_DETAILS_MISMATCH HY000
14026 ER_AUTHENTICATION_OCI_TOKEN_NOT_VERIFIED HY000
14027 ER_AUTHENTICATION_OCI_DOWNLOAD_IDDP_PUBLIC_KEY HY000
14029 ER_SYS_VAR_REGISTRATION HY000
14030 ER_SYS_VAR_DEREGISTRATION HY000
14031 ER_UDF_REGISTRATION HY000
14032 ER_UDF_DEREGISTRATION HY000
14033 ER_PRIVILEGE_REGISTRATION HY000
14034 ER_PRIVILEGE_DEREGISTRATION HY000
14035 ER_UDF_EXEC_FAILURE HY000
14036 ER_UDF_EXEC_FAILURE_REASON HY000
14037 ER_COMPONENT_SERVICE_CALL HY000
14038 ER_COMPONENT_SERVICE_CALL_RESULT HY000
288

Mapping MySQL Error Numbers to JDBC SQLState Codes
MySQL
Error
Number
MySQL Error Name SQL
Standard
SQLState
14039 ER_COMPONENT_LOCK HY000
14040 ER_COMPONENT_UNLOCK HY000
14041 ER_COMPONENT_MASKING_OTHER_ERROR HY000
14042 ER_COMPONENT_MASKING_ABI HY000
14043 ER_COMPONENT_MASKING_ABI_REASON HY000
14044 ER_COMPONENT_MASKING_RANDOM_CREATE HY000
14045 ER_COMPONENT_MASKING_RANDOM_CREATE_REASON HY000
14046 ER_COMPONENT_MASKING_CANNOT_ACCESS_TABLE HY000
14047 ER_REDUCED_DBLWR_FILE_CORRUPTED HY000
14048 ER_REDUCED_DBLWR_PAGE_FOUND HY000
14049 ER_CONN_INIT_CONNECT_IGNORED_MFA HY000
14050 ER_SECONDARY_ENGINE_DDL_FAILED HY000
14051 ER_THREAD_POOL_CONNECTION_REPORT HY000
14052 ER_WARN_SCHEDULED_TASK_RUN_FAILED HY000
14053 ER_AUDIT_LOG_INVALID_FLUSH_INTERVAL_VALUE HY000
14054 ER_LOG_CANNOT_PURGE_BINLOG_WITH_BACKUP_LOCK HY000
14055 ER_CONVERT_MULTI_VALUE HY000
14056 ER_IB_DDL_CONVERT_HEAP_NOT_FOUND HY000
14057 ER_SERVER_DOWNGRADE_FROM_VERSION HY000
14058 ER_BEYOND_SERVER_DOWNGRADE_THRESHOLD HY000
14059 ER_BEYOND_SERVER_UPGRADE_THRESHOLD HY000
14060 ER_INVALID_SERVER_UPGRADE_NOT_LTS HY000
14061 ER_INVALID_SERVER_DOWNGRADE_NOT_PATCH HY000
14062 ER_FAILED_GET_DD_PROPERTY HY000
14063 ER_FAILED_SET_DD_PROPERTY HY000
14064 ER_SERVER_DOWNGRADE_STATUS HY000
14065 ER_INFORMATION_SCHEMA_VERSION_CHANGE HY000
14066 ER_PERFORMANCE_SCHEMA_VERSION_CHANGE HY000
14067 ER_WARN_DEPRECATED_OR_BLOCKED_CIPHER HY000
14068 ER_IB_MSG_DDL_FAIL_NO_BUILDER HY000
14069 ER_GRP_RPL_MEMBER_INFO_DOES_NOT_EXIST HY000
14070 ER_USAGE_DEPRECATION_COUNTER HY000
15000 ER_LANGUAGE_COMPONENT_INFO HY000
15001 ER_LANGUAGE_COMPONENT_WARNING HY000
15002 ER_LANGUAGE_COMPONENT_ERROR HY000
15003 ER_IB_BULK_FLUSHER_PUNCH_HOLE HY000
289

Mapping MySQL Error Numbers to JDBC SQLState Codes
MySQL
Error
Number
MySQL Error Name SQL
Standard
SQLState
15004 ER_GRP_RPL_CONN_KILLED HY000
15005 ER_WARN_CANT_OPEN_CERTIFICATE HY000
15006 ER_FAILED_TO_VALIDATE_CERTIFICATES_SERVER_EXIT HY000
15007 ER_WARN_CA_CERT_VERIFY_FAILED HY000
15008 ER_WARN_FAILED_TO_SETUP_TLS HY000
15009 ER_TLS_LIBRARY_ERROR_INTERNAL HY000
15010 ER_SERVER_CERT_VERIFY_FAILED HY000
15011 ER_WARN_CERTIFICATE_ERROR_STRING HY000
15012 ER_TELEMETRY_INFO HY000
15013 ER_TELEMETRY_WARNING HY000
15014 ER_TELEMETRY_ERROR HY000
15015 ER_SRV_START HY000
15016 ER_SRV_END HY000
15017 ER_SRV_INIT_START HY000
15018 ER_SRV_INIT_END HY000
15019 ER_PLUGINS_SHUTDOWN_START HY000
15020 ER_PLUGINS_SHUTDOWN_END HY000
15021 ER_COMPONENTS_INFRASTRUCTURE_SHUTDOWN_START HY000
15022 ER_COMPONENTS_INFRASTRUCTURE_SHUTDOWN_END HY000
15023 ER_CONNECTIONS_SHUTDOWN_START HY000
15024 ER_CONNECTIONS_SHUTDOWN_END HY000
15025 ER_THREAD_STILL_ALIVE HY000
15026 ER_NUM_THREADS_STILL_ALIVE HY000
15027 ER_GRP_RPL_MYSQL_NETWORK_PROVIDER_SERVER_ERROR_COMMAND_ERRHY000
15028 ER_COMPONENT_KEYRING_OCI_INVALID_CONFIG_VAR HY000
15029 ER_WARN_OPTION_RESET_AND_IGNORED_DURING_INITIALIZE HY000
15030 ER_FIREWALL_SCHEDULER_REGISTER_FAILED HY000
15031 ER_FIREWALL_INVALID_RELOAD_INTERVAL_VALUE HY000
15032 ER_WARN_DEPRECATED_DYNAMIC_PRIV_FOR_USER HY000
15033 ER_BULK_MULTI_READER_INFO HY000
15034 ER_BULK_MERGE_LOADER_INFO HY000
15035 ER_BULK_SORTING_LOADER_INFO HY000
15036 ER_BULK_WRITER_INFO HY000
15037 ER_BULK_WRITER_LIBCURL_INIT_FAILED_LOG HY000
15038 ER_BULK_WRITER_LIBCURL_ERROR_LOG HY000
15039 ER_IB_WRONG_PAGE_ID HY000
290

Mapping MySQL Error Numbers to JDBC SQLState Codes
MySQL
Error
Number
MySQL Error Name SQL
Standard
SQLState
15040 ER_IB_FIXED_PAGE_ID HY000
15041 ER_IB_WRONG_PAGEID_AFTER_SYNC_READ HY000
15042 ER_IB_SYNC_READ_FAILED HY000
15043 ER_START_REPLICA_CHANNEL_INVALID_CONFIGURATION_LOG HY000
15044 ER_GROUP_REPLICATION_CERTIFIER_MESSAGE_LARGE HY000
15045 ER_GROUP_REPLICATION_METADATA_SENDER_IS_REMOTE HY000
15046 ER_GROUP_REPLICATION_METADATA_SENDER HY000
15047 ER_GROUP_REPLICATION_ERROR_COMPRESS_INITIALIZE HY000
15048 ER_GROUP_REPLICATION_COMPRESS_PROCESS HY000
15049 ER_GROUP_REPLICATION_UNKOWN_COMPRESSION_TYPE HY000
15050 ER_GROUP_REPLICATION_COMPRESS_EXCEEDS_MAX_SIZE HY000
15051 ER_GROUP_REPLICATION_COMPRESS_OUT_OF_MEMORY HY000
15052 ER_GROUP_REPLICATION_ERROR_DECOMPRESS_INITIALIZE HY000
15053 ER_GROUP_REPLICATION_DECOMPRESS_EXCEEDS_MAX_SIZE HY000
15054 ER_GROUP_REPLICATION_DECOMPRESS_OUT_OF_MEMORY HY000
15055 ER_GROUP_REPLICATION_DECOMPRESS_TRUNCATED HY000
15056 ER_GROUP_REPLICATION_DECOMPRESS_CORRUPTED HY000
15057 ER_GROUP_REPLICATION_DECOMPRESS_END HY000
15058 ER_GROUP_REPLICATION_DECOMPRESS_PROCESS HY000
15059 ER_GRP_RPL_VCLE_NOT_BEING_LOGGED HY000
15060 ER_GROUP_REPLICATION_METADATA_PROTOBUF_PARSING HY000
15061 ER_GROUP_REPLICATION_PROTOBUF_SERIALIZING_ERROR HY000
15062 ER_GROUP_REPLICATION_ERROR_RECEIVED_WAITING_METADATA HY000
15063 ER_GROUP_REPLICATION_TIMEOUT_ERROR_FETCHING_METADATA HY000
15064 ER_GROUP_REPLICATION_METADATA_PAYLOAD_EMPTY HY000
15065 ER_GROUP_REPLICATION_METADATA_MESSAGE_PAYLOAD_EMPTY HY000
15066 ER_GROUP_REPLICATION_METADATA_READ_GTID_EXECUTED HY000
15067 ER_GROUP_REPLICATION_METADATA_PAYLOAD_DECODING HY000
15068 ER_GROUP_REPLICATION_METADATA_SEND_ERROR HY000
15069 ER_GROUP_REPLICATION_METADATA_SAVE_RECOVERY_COPY HY000
15070 ER_GROUP_REPLICATION_METADATA_CERT_INFO_ERROR_PROCESSING HY000
15071 ER_GROUP_REPLICATION_METADATA_CERT_INFO_PACKET_EMPTY HY000
15072 ER_GROUP_REPLICATION_METADATA_ERROR_ON_SEND_ERROR_MESSAGEHY000
15073 ER_GROUP_REPLICATION_METADATA_SET_IN_RECOVERY_FAILED HY000
15074 ER_GROUP_REPLICATION_CERTIFICATION_MODULE_FAILURE HY000
15075 ER_GROUP_REPLICATION_METADATA_INITIALIZATION_FAILURE HY000
291

Mapping MySQL Error Numbers to JDBC SQLState Codes
MySQL
Error
Number
MySQL Error Name SQL
Standard
SQLState
15076 ER_GROUP_REPLICATION_METADATA_MEMORY_ALLOC HY000
15077 ER_GROUP_REPLICATION_RECOVERY_SKIPPED_GTID_PRESENT HY000
15078 ER_GROUP_REPLICATION_RECOVERY_FETCHING_GTID_EXECUTED_SET HY000
15079 ER_GROUP_REPLICATION_RECOVERY_ERROR_ADD_GTID_EXECUTED HY000
15080 ER_GROUP_REPLICATION_RECOVERY_METADATA_SENDER_NOT_FOUND HY000
15081 ER_GROUP_REPLICATION_METADATA_CERT_INFO_PACKET_COUNT_ERRORHY000
15082 ER_GROUP_REPLICATION_METADATA_CERT_INFO_ENCODING_ERROR HY000
15083 ER_GROUP_REPLICATION_METADATA_NO_VALID_DONOR HY000
15084 ER_GROUP_REPLICATION_NO_CERTIFICATION_DONOR_AVAILABLE HY000
15085 ER_GROUP_REPLICATION_RECOVERY_STOPPED_GTID_PRESENT HY000
15086 ER_RPL_ASYNC_CHECK_CONNECTION_ERROR HY000
15087 ER_RPL_ASYNC_MONITOR_IO_THD_FETCH_GROUP_MAJORITY_ERROR HY000
15088 ER_RPL_ASYNC_REPLICA_IO_THD_FETCH_GROUP_MAJORITY_ERROR HY000
15089 ER_RPL_ASYNC_GET_GROUP_MEMBERSHIP_DETAILS_ERROR HY000
15090 ER_IB_ERR_CORRUPT_TABLESPACE_UNRECOVERABLE HY000
15091 ER_IB_BULK_LOAD_STATS_WARN HY000
15092 ER_COMPONENT_MASKING_INVALID_FLUSH_INTERVAL_VALUE HY000
15093 ER_COMPONENT_MASKING_VAR_REGISTRATION_FAILURE HY000
15094 ER_COMPONENT_MASKING_NOTIFICATION_REGISTRATION_FAILURE HY000
15095 ER_GRP_RPL_MSG_DECODING_FAILED HY000
15096 ER_GRP_RPL_APPLIER_ERROR_PACKET_RECEIVED HY000
15097 ER_LANGUAGE_COMPONENT_INSTALL_ERROR HY000
15098 ER_WARN_LANGUAGE_COMPONENT_CANNOT_UNINSTALL HY000
15099 ER_LANGUAGE_COMPONENT_SERVER_ERROR HY000
15100 ER_LANGUAGE_COMPONENT_INTERNAL_ERROR HY000
15101 ER_LANGUAGE_COMPONENT_VM_API_FUNCTION_ERROR HY000
15102 ER_LANGUAGE_COMPONENT_VM_INTERNAL_ERROR HY000
15103 ER_WARN_LANGUAGE_COMPONENT_RESOURCE_LIMIT HY000
15104 ER_BLOCKED_CIPHER HY000
15105 ER_KEYRING_COMPONENT_KEYRING_FILE_NAME_EMPTY HY000
15106 ER_KEYRING_COMPONENT_KEYRING_FILE_READ_FAILED HY000
15107 ER_KEYRING_COMPONENT_KEYRING_FILE_DECRYPT_FAILED HY000
15108 ER_KEYRING_COMPONENT_KEYRING_FILE_INVALID_FORMAT HY000
15109 ER_KEYRING_COMPONENT_KEYRING_FILE_JSON_EXTRACT_FAILED HY000
15110 ER_KEYRING_COMPONENT_KEYRING_FILE_KEY_EXTRACT_FAILED HY000
15111 ER_NOTE_KEYRING_COMPONENT_NOT_INITIALIZED HY000
292

JDBC Concepts
MySQL
Error
Number
MySQL Error Name SQL
Standard
SQLState
15112 ER_NOTE_KEYRING_COMPONENT_EMPTY_DATA_ID HY000
15113 ER_NOTE_KEYRING_COMPONENT_KEYS_METADATA_ITERATOR_INIT_FAILEDHY000
15114 ER_NOTE_KEYRING_COMPONENT_KEY_READ_ITERATOR_INIT_FAILED HY000
15115 ER_NOTE_KEYRING_COMPONENT_KEY_READ_ITERATOR_FETCH_FAILED HY000
15116 ER_BACKGROUND_HISTOGRAM_UPDATE HY000
15117 ER_IB_MSG_SUBMIT_DETAILED_BUG_REPORT HY000
15118 ER_AUTO_INCREMENT_NOT_SUPPORTED_FOR_FLOAT_DOUBLE HY000
15119 ER_SERVER_DOWNGRADE_SYS_SCHEMA HY000
15120 ER_SERVER_DOWNGRADE_HELP_TABLE_STATUS HY000
15121 ER_KEYRING_MIGRATE_SKIPPED_KEY HY000
15122 ER_KEYRING_MIGRATE_MEMORY_DEALLOCATION_FAILED HY000
15123 ER_LOG_CLIENT_INTERACTION_TIMEOUT HY000
15124 ER_GRP_RPL_PREEMPTIVE_GARBAGE_COLLECTION_DIFF_FROM_GRP HY000
15125 ER_IB_LONG_ROLLBACK_FULL HY000
15126 ER_IB_LONG_ROLLBACK HY000
15127 ER_INVALID_FILE_FORMAT HY000
15128 ER_LOG_SANITIZATION HY000
15129 ER_WARN_LOG_DEPRECATED_NON_STANDARD_KEY HY000
15130 ER_THREAD_POOL_MTL_DISABLE HY000
15131 ER_THREAD_POOL_MTL_REENABLE HY000
15132 ER_LOG_PARTITION_PREFIX_KEY_NOT_SUPPORTED HY000
15133 ER_LDAP_AUTH_INFO_USER_MAP HY000
15134 ER_ACCESS_DENIED_NO_PROXY_GRANT_WITH_NAME HY000
15135 ER_ACCESS_DENIED_NO_PROXY_WITH_NAME HY000
15136 ER_GRP_RPL_RECOVERY_WAIT_APPLIER_BACKLOG_START HY000
15137 ER_GRP_RPL_RECOVERY_WAIT_APPLIER_BACKLOG_FINISH HY000
15138 ER_BULK_READER_ZSTD_ERROR_LOG HY000
15139 ER_SECONDARY_ENGINE_DDL_TRACK_PROGRESS HY000
15140 ER_IB_MSG_INNODB_FLUSH_METHOD HY000
3.6 JDBC Concepts
This section provides some general JDBC background.
3.6.1 Connecting to MySQL Using the JDBC DriverManager Interface
When you are using JDBC outside of an application server, the DriverManager class manages the
establishment of connections.
293

Connecting to MySQL Using the JDBC DriverManager Interface
Specify to the DriverManager which JDBC drivers to try to make Connections with. The easiest way to
do this is to use Class.forName() on the class that implements the java.sql.Driver interface. With
MySQL Connector/J, the name of this class is com.mysql.cj.jdbc.Driver. With this method, you
could use an external configuration file to supply the driver class name and driver parameters to use when
connecting to a database.
The following section of Java code shows how you might register MySQL Connector/J from the main()
method of your application. If testing this code, first read the installation section at Section 3.3, “Connector/
J Installation”, to make sure you have connector installed correctly and the CLASSPATH set up. Also,
ensure that MySQL is configured to accept external TCP/IP connections.
import java.sql.Connection;
import java.sql.DriverManager;
import java.sql.SQLException;
// Notice, do not import com.mysql.cj.jdbc.*
// or you will have problems!
public class LoadDriver {
public static void main(String[] args) {
try {
// The newInstance() call is a work around for some
// broken Java implementations
Class.forName("com.mysql.cj.jdbc.Driver").newInstance();
} catch (Exception ex) {
// handle the error
}
}
}
After the driver has been registered with the DriverManager, you can obtain a Connection instance
that is connected to a particular database by calling DriverManager.getConnection():
Example 3.4 Connector/J: Obtaining a connection from the DriverManager
If you have not already done so, please review the portion of Section 3.6.1, “Connecting to MySQL Using
the JDBC DriverManager Interface” above before working with the example below.
This example shows how you can obtain a Connection instance from the DriverManager. There are
a few different signatures for the getConnection() method. Consult the API documentation that comes
with your JDK for more specific information on how to use them.
import java.sql.Connection;
import java.sql.DriverManager;
import java.sql.SQLException;
Connection conn = null;
...
try {
conn =
DriverManager.getConnection("jdbc:mysql://localhost/test?" +
"user=minty&password=greatsqldb");
// Do something with the Connection
...
} catch (SQLException ex) {
// handle any errors
System.out.println("SQLException: " + ex.getMessage());
System.out.println("SQLState: " + ex.getSQLState());
System.out.println("VendorError: " + ex.getErrorCode());
}
Once a Connection is established, it can be used to create Statement and PreparedStatement
objects, as well as retrieve metadata about the database. This is explained in the following sections.
When the user for the connection is unspecified, Connector/J's implementations of the authentication
plugins use by default the name of the OS user who runs the application for authentication with the MySQL
294

Using JDBC Statement Objects to Execute SQL
server (except when the Kerberos authentication plugin is being used; see Section 3.5.12.2, “Connecting
Using Kerberos” for details).
Note
A user name is considered unspecified only when the following conditions are all
met:
1. The method DriverManager.getConnection(String url, String
user, String password) is not used.
2. The connection property user is not used in, for example, the connection
URL,or elsewhere.
3. The user is not mentioned in the authority of the connection URL, as
in jdbc:mysql://localhost:3306/test, or jdbc:mysql://
@localhost:3306/test.
Notice if (1) or (2) is not true and an empty string is passed, the user name is an
empty string then, and is not considered unspecified.
3.6.2 Using JDBC Statement Objects to Execute SQL
Statement objects allow you to execute basic SQL queries and retrieve the results through the
ResultSet class, which is described later.
To create a Statement instance, you call the createStatement() method on the
Connection object you have retrieved using one of the DriverManager.getConnection() or
DataSource.getConnection() methods described earlier.
Once you have a Statement instance, you can execute a SELECT query by calling the
executeQuery(String) method with the SQL you want to use.
To update data in the database, use the executeUpdate(String SQL) method. This method returns
the number of rows matched by the update statement, not the number of rows that were modified.
If you do not know ahead of time whether the SQL statement will be a SELECT or an UPDATE/INSERT,
then you can use the execute(String SQL) method. This method will return true if the SQL query
was a SELECT, or false if it was an UPDATE, INSERT, or DELETE statement. If the statement was a
SELECT query, you can retrieve the results by calling the getResultSet() method. If the statement
was an UPDATE, INSERT, or DELETE statement, you can retrieve the affected rows count by calling
getUpdateCount() on the Statement instance.
Example 3.5 Connector/J: Using java.sql.Statement to execute a SELECT query
import java.sql.Connection;
import java.sql.DriverManager;
import java.sql.SQLException;
import java.sql.Statement;
import java.sql.ResultSet;
// assume that conn is an already created JDBC connection (see previous examples)
Statement stmt = null;
ResultSet rs = null;
try {
stmt = conn.createStatement();
rs = stmt.executeQuery("SELECT foo FROM bar");
// or alternatively, if you don't know ahead of time that
// the query will be a SELECT...
if (stmt.execute("SELECT foo FROM bar")) {
295

Using JDBC CallableStatements to Execute Stored Procedures
rs = stmt.getResultSet();
}
// Now do something with the ResultSet ....
}
catch (SQLException ex){
// handle any errors
System.out.println("SQLException: " + ex.getMessage());
System.out.println("SQLState: " + ex.getSQLState());
System.out.println("VendorError: " + ex.getErrorCode());
}
finally {
// it is a good idea to release
// resources in a finally{} block
// in reverse-order of their creation
// if they are no-longer needed
if (rs != null) {
try {
rs.close();
} catch (SQLException sqlEx) { } // ignore
rs = null;
}
if (stmt != null) {
try {
stmt.close();
} catch (SQLException sqlEx) { } // ignore
stmt = null;
}
}
3.6.3 Using JDBC CallableStatements to Execute Stored Procedures
Connector/J fully implements the java.sql.CallableStatement interface.
For more information on MySQL stored procedures, please refer to Using Stored Routines.
Connector/J exposes stored procedure functionality through JDBC's CallableStatement interface.
The following example shows a stored procedure that returns the value of inOutParam incremented by 1,
and the string passed in using inputParam as a ResultSet:
Example 3.6 Connector/J: Calling Stored Procedures
CREATE PROCEDURE demoSp(IN inputParam VARCHAR(255), \
INOUT inOutParam INT)
BEGIN
DECLARE z INT;
SET z = inOutParam + 1;
SET inOutParam = z;
SELECT inputParam;
SELECT CONCAT('zyxw', inputParam);
END
To use the demoSp procedure with Connector/J, follow these steps:
1. Prepare the callable statement by using Connection.prepareCall().
Notice that you have to use JDBC escape syntax, and that the parentheses surrounding the parameter
placeholders are not optional:
Example 3.7 Connector/J: Using Connection.prepareCall()
import java.sql.CallableStatement;
...
296

Using JDBC CallableStatements to Execute Stored Procedures
//
// Prepare a call to the stored procedure 'demoSp'
// with two parameters
//
// Notice the use of JDBC-escape syntax ({call ...})
//
CallableStatement cStmt = conn.prepareCall("{call demoSp(?, ?)}");
cStmt.setString(1, "abcdefg");
Note
Connection.prepareCall() is an expensive method, due to the metadata
retrieval that the driver performs to support output parameters. For performance
reasons, minimize unnecessary calls to Connection.prepareCall() by
reusing CallableStatement instances in your code.
2. Register the output parameters (if any exist)
To retrieve the values of output parameters (parameters specified as OUT or INOUT when you created
the stored procedure), JDBC requires that they be specified before statement execution using the
various registerOutputParameter() methods in the CallableStatement interface:
Example 3.8 Connector/J: Registering output parameters
import java.sql.Types;
...
//
// Connector/J supports both named and indexed
// output parameters. You can register output
// parameters using either method, as well
// as retrieve output parameters using either
// method, regardless of what method was
// used to register them.
//
// The following examples show how to use
// the various methods of registering
// output parameters (you should of course
// use only one registration per parameter).
//
//
// Registers the second parameter as output, and
// uses the type 'INTEGER' for values returned from
// getObject()
//
cStmt.registerOutParameter(2, Types.INTEGER);
//
// Registers the named parameter 'inOutParam', and
// uses the type 'INTEGER' for values returned from
// getObject()
//
cStmt.registerOutParameter("inOutParam", Types.INTEGER);
...
3. Set the input parameters (if any exist)
Input and in/out parameters are set as for PreparedStatement objects. However,
CallableStatement also supports setting parameters by name:
Example 3.9 Connector/J: Setting CallableStatement input parameters
...
//
// Set a parameter by index
//
297

Retrieving AUTO_INCREMENT Column Values through JDBC
cStmt.setString(1, "abcdefg");
//
// Alternatively, set a parameter using
// the parameter name
//
cStmt.setString("inputParam", "abcdefg");
//
// Set the 'in/out' parameter using an index
//
cStmt.setInt(2, 1);
//
// Alternatively, set the 'in/out' parameter
// by name
//
cStmt.setInt("inOutParam", 1);
...
4. Execute the CallableStatement, and retrieve any result sets or output parameters.
Although CallableStatement supports calling any of the Statement execute methods
(executeUpdate(), executeQuery() or execute()), the most flexible method to call is
execute(), as you do not need to know ahead of time if the stored procedure returns result sets:
Example 3.10 Connector/J: Retrieving results and output parameter values
...
boolean hadResults = cStmt.execute();
//
// Process all returned result sets
//
while (hadResults) {
ResultSet rs = cStmt.getResultSet();
// process result set
...
hadResults = cStmt.getMoreResults();
}
//
// Retrieve output parameters
//
// Connector/J supports both index-based and
// name-based retrieval
//
int outputValue = cStmt.getInt(2); // index-based
outputValue = cStmt.getInt("inOutParam"); // name-based
...
3.6.4 Retrieving AUTO_INCREMENT Column Values through JDBC
getGeneratedKeys() is the preferred method to use if you need to retrieve AUTO_INCREMENT keys
and through JDBC; this is illustrated in the first example below. The second example shows how you
can retrieve the same value using a standard SELECT LAST_INSERT_ID() query. The final example
shows how updatable result sets can retrieve the AUTO_INCREMENT value when using the insertRow()
method.
Example 3.11 Connector/J: Retrieving AUTO_INCREMENT column values using
Statement.getGeneratedKeys()
Statement stmt = null;
ResultSet rs = null;
try {
//
// Create a Statement instance that we can use for
// 'normal' result sets assuming you have a
298

Retrieving AUTO_INCREMENT Column Values through JDBC
// Connection 'conn' to a MySQL database already
// available
stmt = conn.createStatement();
//
// Issue the DDL queries for the table for this example
//
stmt.executeUpdate("DROP TABLE IF EXISTS autoIncTutorial");
stmt.executeUpdate(
"CREATE TABLE autoIncTutorial ("
+ "priKey INT NOT NULL AUTO_INCREMENT, "
+ "dataField VARCHAR(64), PRIMARY KEY (priKey))");
//
// Insert one row that will generate an AUTO INCREMENT
// key in the 'priKey' field
//
stmt.executeUpdate(
"INSERT INTO autoIncTutorial (dataField) "
+ "values ('Can I Get the Auto Increment Field?')",
Statement.RETURN_GENERATED_KEYS);
//
// Example of using Statement.getGeneratedKeys()
// to retrieve the value of an auto-increment
// value
//
int autoIncKeyFromApi = -1;
rs = stmt.getGeneratedKeys();
if (rs.next()) {
autoIncKeyFromApi = rs.getInt(1);
} else {
// throw an exception from here
}
System.out.println("Key returned from getGeneratedKeys():"
+ autoIncKeyFromApi);
} finally {
if (rs != null) {
try {
rs.close();
} catch (SQLException ex) {
// ignore
}
}
if (stmt != null) {
try {
stmt.close();
} catch (SQLException ex) {
// ignore
}
}
}
Example 3.12 Connector/J: Retrieving AUTO_INCREMENT column values using SELECT
LAST_INSERT_ID()
Statement stmt = null;
ResultSet rs = null;
try {
//
// Create a Statement instance that we can use for
// 'normal' result sets.
stmt = conn.createStatement();
//
// Issue the DDL queries for the table for this example
//
stmt.executeUpdate("DROP TABLE IF EXISTS autoIncTutorial");
stmt.executeUpdate(
"CREATE TABLE autoIncTutorial ("
+ "priKey INT NOT NULL AUTO_INCREMENT, "
299

Retrieving AUTO_INCREMENT Column Values through JDBC
+ "dataField VARCHAR(64), PRIMARY KEY (priKey))");
//
// Insert one row that will generate an AUTO INCREMENT
// key in the 'priKey' field
//
stmt.executeUpdate(
"INSERT INTO autoIncTutorial (dataField) "
+ "values ('Can I Get the Auto Increment Field?')");
//
// Use the MySQL LAST_INSERT_ID()
// function to do the same thing as getGeneratedKeys()
//
int autoIncKeyFromFunc = -1;
rs = stmt.executeQuery("SELECT LAST_INSERT_ID()");
if (rs.next()) {
autoIncKeyFromFunc = rs.getInt(1);
} else {
// throw an exception from here
}
System.out.println("Key returned from " +
"'SELECT LAST_INSERT_ID()': " +
autoIncKeyFromFunc);
} finally {
if (rs != null) {
try {
rs.close();
} catch (SQLException ex) {
// ignore
}
}
if (stmt != null) {
try {
stmt.close();
} catch (SQLException ex) {
// ignore
}
}
}
Example 3.13 Connector/J: Retrieving AUTO_INCREMENT column values in Updatable ResultSets
Statement stmt = null;
ResultSet rs = null;
try {
//
// Create a Statement instance that we can use for
// 'normal' result sets as well as an 'updatable'
// one, assuming you have a Connection 'conn' to
// a MySQL database already available
//
stmt = conn.createStatement(java.sql.ResultSet.TYPE_FORWARD_ONLY,
java.sql.ResultSet.CONCUR_UPDATABLE);
//
// Issue the DDL queries for the table for this example
//
stmt.executeUpdate("DROP TABLE IF EXISTS autoIncTutorial");
stmt.executeUpdate(
"CREATE TABLE autoIncTutorial ("
+ "priKey INT NOT NULL AUTO_INCREMENT, "
+ "dataField VARCHAR(64), PRIMARY KEY (priKey))");
//
// Example of retrieving an AUTO INCREMENT key
// from an updatable result set
//
rs = stmt.executeQuery("SELECT priKey, dataField "
+ "FROM autoIncTutorial");
rs.moveToInsertRow();
300

Connection Pooling with Connector/J
rs.updateString("dataField", "AUTO INCREMENT here?");
rs.insertRow();
//
// the driver adds rows at the end
//
rs.last();
//
// We should now be on the row we just inserted
//
int autoIncKeyFromRS = rs.getInt("priKey");
System.out.println("Key returned for inserted row: "
+ autoIncKeyFromRS);
} finally {
if (rs != null) {
try {
rs.close();
} catch (SQLException ex) {
// ignore
}
}
if (stmt != null) {
try {
stmt.close();
} catch (SQLException ex) {
// ignore
}
}
}
Running the preceding example code should produce the following output:
Key returned from getGeneratedKeys(): 1
Key returned from SELECT LAST_INSERT_ID(): 1
Key returned for inserted row: 1
At times, it can be tricky to use the SELECT LAST_INSERT_ID() query, as that function's value is scoped
to a connection. So, if some other query happens on the same connection, the value is overwritten. On the
other hand, the getGeneratedKeys() method is scoped by the Statement instance, so it can be used
even if other queries happen on the same connection, but not on the same Statement instance.
3.7 Connection Pooling with Connector/J
Connection pooling is a technique of creating and managing a pool of connections that are ready for use
by any thread that needs them. Connection pooling can greatly increase the performance of your Java
application, while reducing overall resource usage.
How Connection Pooling Works
Most applications only need a thread to have access to a JDBC connection when they are actively
processing a transaction, which often takes only milliseconds to complete. When not processing a
transaction, the connection sits idle. Connection pooling enables the idle connection to be used by some
other thread to do useful work.
In practice, when a thread needs to do work against a MySQL or other database with JDBC, it requests a
connection from the pool. When the thread is finished using the connection, it returns it to the pool, so that
it can be used by any other threads.
When the connection is loaned out from the pool, it is used exclusively by the thread that
requested it. From a programming point of view, it is the same as if your thread called
DriverManager.getConnection() every time it needed a JDBC connection. With connection pooling,
your thread may end up using either a new connection or an already-existing connection.
301

Benefits of Connection Pooling
Benefits of Connection Pooling
The main benefits to connection pooling are:
• Reduced connection creation time.
Although this is not usually an issue with the quick connection setup that MySQL offers compared to
other databases, creating new JDBC connections still incurs networking and JDBC driver overhead that
will be avoided if connections are recycled.
• Simplified programming model.
When using connection pooling, each individual thread can act as though it has created its own JDBC
connection, allowing you to use straightforward JDBC programming techniques.
• Controlled resource usage.
If you create a new connection every time a thread needs one rather than using connection pooling,
your application's resource usage can be wasteful, and it could lead to unpredictable behaviors for your
application when it is under a heavy load.
Using Connection Pooling with Connector/J
The concept of connection pooling in JDBC has been standardized through the JDBC 2.0 Optional
interfaces, and all major application servers have implementations of these APIs that work with MySQL
Connector/J.
Generally, you configure a connection pool in your application server configuration files, and access it
through the Java Naming and Directory Interface (JNDI). The following code shows how you might use a
connection pool from an application deployed in a J2EE application server:
Example 3.14 Connector/J: Using a connection pool with a J2EE application server
import java.sql.Connection;
import java.sql.SQLException;
import java.sql.Statement;
import javax.naming.InitialContext;
import javax.sql.DataSource;
public class MyServletJspOrEjb {
public void doSomething() throws Exception {
/*
* Create a JNDI Initial context to be able to
* lookup the DataSource
*
* In production-level code, this should be cached as
* an instance or static variable, as it can
* be quite expensive to create a JNDI context.
*
* Note: This code only works when you are using servlets
* or EJBs in a J2EE application server. If you are
* using connection pooling in standalone Java code, you
* will have to create/configure datasources using whatever
* mechanisms your particular connection pooling library
* provides.
*/
InitialContext ctx = new InitialContext();
/*
* Lookup the DataSource, which will be backed by a pool
* that the application server provides. DataSource instances
* are also a good candidate for caching as an instance
* variable, as JNDI lookups can be expensive as well.
302

Sizing the Connection Pool
*/
DataSource ds =
(DataSource)ctx.lookup("java:comp/env/jdbc/MySQLDB");
/*
* The following code is what would actually be in your
* Servlet, JSP or EJB 'service' method...where you need
* to work with a JDBC connection.
*/
Connection conn = null;
Statement stmt = null;
try {
conn = ds.getConnection();
/*
* Now, use normal JDBC programming to work with
* MySQL, making sure to close each resource when you're
* finished with it, which permits the connection pool
* resources to be recovered as quickly as possible
*/
stmt = conn.createStatement();
stmt.execute("SOME SQL QUERY");
stmt.close();
stmt = null;
conn.close();
conn = null;
} finally {
/*
* close any jdbc instances here that weren't
* explicitly closed during normal code path, so
* that we don't 'leak' resources...
*/
if (stmt != null) {
try {
stmt.close();
} catch (sqlexception sqlex) {
// ignore, as we can't do anything about it here
}
stmt = null;
}
if (conn != null) {
try {
conn.close();
} catch (sqlexception sqlex) {
// ignore, as we can't do anything about it here
}
conn = null;
}
}
}
}
As shown in the example above, after obtaining the JNDI InitialContext, and looking up the
DataSource, the rest of the code follows familiar JDBC conventions.
When using connection pooling, always make sure that connections, and anything created by them
(such as statements or result sets) are closed. This rule applies no matter what happens in your code
(exceptions, flow-of-control, and so forth). When these objects are closed, they can be re-used; otherwise,
they will be stranded, which means that the MySQL server resources they represent (such as buffers,
locks, or sockets) are tied up for some time, or in the worst case can be tied up forever.
Sizing the Connection Pool
Each connection to MySQL has overhead (memory, CPU, context switches, and so forth) on both the client
and server side. Every connection limits how many resources there are available to your application as
well as the MySQL server. Many of these resources will be used whether or not the connection is actually
303

Validating Connections
doing any useful work! Connection pools can be tuned to maximize performance, while keeping resource
utilization below the point where your application will start to fail rather than just run slower.
The optimal size for the connection pool depends on anticipated load and average database transaction
time. In practice, the optimal connection pool size can be smaller than you might expect. If you take
Oracle's Java Petstore blueprint application for example, a connection pool of 15-20 connections can serve
a relatively moderate load (600 concurrent users) using MySQL and Tomcat with acceptable response
times.
To correctly size a connection pool for your application, create load test scripts with tools such as Apache
JMeter or The Grinder, and load test your application.
An easy way to determine a starting point is to configure your connection pool's maximum number of
connections to be unbounded, run a load test, and measure the largest amount of concurrently used
connections. You can then work backward from there to determine what values of minimum and maximum
pooled connections give the best performance for your particular application.
Validating Connections
MySQL Connector/J can validate the connection by executing a lightweight ping against a server. In the
case of load-balanced connections, this is performed against all active pooled internal connections that are
retained. This is beneficial to Java applications using connection pools, as the pool can use this feature to
validate connections. Depending on your connection pool and configuration, this validation can be carried
out at different times:
1. Before the pool returns a connection to the application.
2. When the application returns a connection to the pool.
3. During periodic checks of idle connections.
To use this feature, specify a validation query in your connection pool that starts with /* ping
*/. Note that the syntax must be exactly as specified. This will cause the driver send a ping to the
server and return a dummy lightweight result set. When using a ReplicationConnection or
LoadBalancedConnection, the ping will be sent across all active connections.
It is critical that the syntax be specified correctly. The syntax needs to be exact for reasons of efficiency, as
this test is done for every statement that is executed:
protected static final String PING_MARKER = "/* ping */";
...
if (sql.charAt(0) == '/') {
if (sql.startsWith(PING_MARKER)) {
doPingInstead();
...
None of the following snippets will work, because the ping syntax is sensitive to whitespace, capitalization,
and placement:
sql = "/* PING */ SELECT 1";
sql = "SELECT 1 /* ping*/";
sql = "/*ping*/ SELECT 1";
sql = " /* ping */ SELECT 1";
sql = "/*to ping or not to ping*/ SELECT 1";
All of the previous statements will issue a normal SELECT statement and will not be transformed into
the lightweight ping. Further, for load-balanced connections, the statement will be executed against one
connection in the internal pool, rather than validating each underlying physical connection. This results
304

Multi-Host Connections
in the non-active physical connections assuming a stale state, and they may die. If Connector/J then re-
balances, it might select a dead connection, resulting in an exception being passed to the application.
To help prevent this, you can use loadBalanceValidateConnectionOnSwapServer to validate the
connection before use.
If your Connector/J deployment uses a connection pool that allows you to specify a validation query, take
advantage of it, but ensure that the query starts exactly with /* ping */. This is particularly important
if you are using the load-balancing or replication-aware features of Connector/J, as it will help keep alive
connections which otherwise will go stale and die, causing problems later.
3.8 Multi-Host Connections
The following sections discuss a number of topics that involve multi-host connections, namely, server load-
balancing, failover, and replication.
Developers should know the following things about multi-host connections that are managed through
Connector/J:
• Each multi-host connection is a wrapper of the underlying physical connections.
• Each of the underlying physical connections has its own session. Sessions cannot be tracked, shared, or
copied, given the MySQL architecture.
• Every switch between physical connections means a switch between sessions.
• Within a transaction boundary, there are no switches between physical connections. Beyond a
transaction boundary, there is no guarantee that a switch does not occur.
Note
If an application reuses session-scope data (for example, variables, SSPs)
beyond a transaction boundary, failures are possible, as a switch between the
physical connections (which is also a switch between sessions) might occur.
Therefore, the application should re-prepare the session data and also restart the
last transaction in case of an exception, or it should re-prepare session data for
each new transaction if it does not want to deal with exception handling.
3.8.1 Configuring Server Failover for Connections Using JDBC
MySQL Connector/J supports server failover. A failover happens when connection-related errors occur for
an underlying, active connection. The connection errors are, by default, propagated to the client, which
has to handle them by, for example, recreating the working objects (Statement, ResultSet, etc.) and
restarting the processes. Sometimes, the driver might eventually fall back to the original host automatically
before the client application continues to run, in which case the host switch is transparent and the client
application will not even notice it.
A connection using failover support works just like a standard connection: the client does not experience
any disruptions in the failover process. This means the client can rely on the same connection instance
even if two successive statements might be executed on two different physical hosts. However, this does
not mean the client does not have to deal with the exception that triggered the server switch.
The failover is configured at the initial setup stage of the server connection by the connection URL (see
explanations for its format here):
jdbc:mysql://[primary host][:port],[secondary host 1][:port][,[secondary host 2][:port]]...[/[database]]»
[?propertyName1=propertyValue1[&propertyName2=propertyValue2]...]
305

Configuring Server Failover for Connections Using JDBC
The host list in the connection URL comprises of two types of hosts, the primary and the secondary. When
starting a new connection, the driver always tries to connect to the primary host first and, if required, fails
over to the secondary hosts on the list sequentially when communication problems are experienced. Even
if the initial connection to the primary host fails and the driver gets connected to a secondary host, the
primary host never loses its special status: for example, it can be configured with an access mode distinct
from those of the secondary hosts, and it can be put on a higher priority when a host is to be picked during
a failover process.
The failover support is configured by the following connection properties (their functions are explained in
the paragraphs below):
• failOverReadOnly
• secondsBeforeRetrySource
• queriesBeforeRetrySource
• retriesAllDown
• autoReconnect
• autoReconnectForPools
Configuring Connection Access Mode
As with any standard connection, the initial connection to the primary host is in read/write mode. However,
if the driver fails to establish the initial connection to the primary host and it automatically switches to the
next host on the list, the access mode now depends on the value of the property failOverReadOnly,
which is “true” by default. The same happens if the driver is initially connected to the primary host and,
because of some connection failure, it fails over to a secondary host. Every time the connection falls
back to the primary host, its access mode will be read/write, irrespective of whether or not the primary
host has been connected to before. The connection access mode can be changed any time at runtime
by calling the method Connection.setReadOnly(boolean), which partially overrides the property
failOverReadOnly. When failOverReadOnly=false and the access mode is explicitly set to either
true or false, it becomes the mode for every connection after a host switch, no matter what host type
are being connected to; but, if failOverReadOnly=true, changing the access mode to read/write is
only possible if the driver is connecting to the primary host; however, even if the access mode cannot be
changed for the current connection, the driver remembers the client's last intention and, when falling back
to the primary host, that is the mode that will be used. For an illustration, see the following successions of
events with a two-host connection.
• Sequence A, with failOverReadOnly=true:
1. Connects to primary host in read/write mode
2. Sets Connection.setReadOnly(true); primary host now in read-only mode
3. Failover event; connects to secondary host in read-only mode
4. Sets Connection.setReadOnly(false); secondary host remains in read-only mode
5. Falls back to primary host; connection now in read/write mode
• Sequence B, with failOverReadOnly=false
1. Connects to primary host in read/write mode
2. Sets Connection.setReadOnly(true); primary host now in read-only mode
306

Configuring Server Failover for Connections Using JDBC
3. Failover event; connects to secondary host in read-only mode
4. Set Connection.setReadOnly(false); connection to secondary host switches to read/write
mode
5. Falls back to primary host; connection now in read/write mode
The difference between the two scenarios is in step 4: the access mode for the secondary host in
sequence A does not change at that step, but the driver remembers and uses the set mode when falling
back to the primary host, which would be read-only otherwise; but in sequence B, the access mode for the
secondary host changes immediately.
Configuring Fallback to Primary Host
As already mentioned, the primary host is special in the failover arrangement when it comes to the
host's access mode. Additionally, the driver tries to fall back to the primary host as soon as possible by
default, even if no communication exception occurs. Two properties, secondsBeforeRetrySource and
queriesBeforeRetrySource, determine when the driver is ready to retry a reconnection to the primary
host (the Source in the property names stands for the primary host of our connection URL, which is not
necessarily a source host in a replication setup):
• secondsBeforeRetrySource determines how much time the driver waits before trying to fall back to
the primary host
• queriesBeforeRetrySource determines the number of queries that are executed
before the driver tries to fall back to the primary host. Note that for the driver, each call to a
Statement.execute*() method increments the query execution counter; therefore, when calls are
made to Statement.executeBatch() or if allowMultiQueries or rewriteBatchStatements
are enabled, the driver may not have an accurate count of the actual number of queries executed on the
server. Also, the driver calls the Statement.execute*() methods internally in several occasions. All
these mean you can only use queriesBeforeRetrySource only as a coarse specification for when to
fall back to the primary host.
In general, an attempt to fallback to the primary host is made when at least one of the conditions specified
by the two properties is met, and the attempt always takes place at transaction boundaries. However,
if auto-commit is turned off, the check happens only when the method Connection.commit() or
Connection.rollback() is called. The automatic fallback to the primary host can be turned off by
setting simultaneously secondsBeforeRetrySource and queriesBeforeRetrySource to “0”.
Setting only one of the properties to “0” only disables one part of the check.
Configuring Reconnection Attempts
When establishing a new connection or when a failover event occurs, the driver tries to connect
successively to the next candidate on the host list. When the end of the list has been reached, it restarts
all over again from the beginning of the list; however, the primary host is skipped over, if (a) NOT all
the secondary hosts have already been tested at least once, AND (b) the fallback conditions defined by
secondsBeforeRetrySource and queriesBeforeRetrySource are not yet fulfilled. Each run-
through of the whole host list, (which is not necessarily completed at the end of the host list) counts as a
single connection attempt. The driver tries as many connection attempts as specified by the value of the
property retriesAllDown.
Seamless Reconnection
Although not recommended, you can make the driver perform failovers without invalidating the
active Statement or ResultSet instances by setting either the parameter autoReconnect or
307

Configuring Server Failover for Connections Using X DevAPI
autoReconnectForPools to true. This allows the client to continue using the same object instances
after a failover event, without taking any exceptional measures. This, however, may lead to unexpected
results: for example, if the driver is connected to the primary host with read/write access mode and it fails-
over to a secondary host in read-only mode, further attempts to issue data-changing queries will result
in errors, and the client will not be aware of that. This limitation is particularly relevant when using data
streaming: after the failover, the ResultSet looks to be alright, but the underlying connection may have
changed already, and no backing cursor is available anymore.
Configuring Server Failover Using JDBC with DNS SRV
See Section 3.5.14, “Support for DNS SRV Records” for details.
3.8.2 Configuring Server Failover for Connections Using X DevAPI
When using the X Protocol, Connector/J supports a client-side failover feature for establishing a Session.
If multiple hosts are specified in the connection URL, when Connector/J fails to connect to a listed host, it
tries to connect to another one. This is a sample X DevAPI URL for configuring client-side failover:
mysqlx://sandy:mypassword@[host1:33060,host2:33061]/test
With the client-side failover configured, when there is a failure to establish a connection, Connector/J
keeps attempting to connect to a host on the host list. The order in which the hosts are attempted for
connection is as follows:
• For connections with the priority property set for each host in the connection URL, hosts are
attempted according to the set priorities for the hosts, which are specified by any numbers between 0 to
100, with a larger number indicating a higher priority for connection. For example:
mysqlx://sandy:mypassword@[(address=host1:33060,priority=2),(address=host2:33061,priority=1)]/test
In this example, host1 is always attempted before host2 when new sessions are created.
Priorities should either be set for all or no hosts.
• For connections with the priority property NOT set for each host in the connection URL, hosts are
attempted one after another in a random order.
Notice that the server failover feature for X DevAPI only allows for a failover when Connector/J is trying to
establish a connection, but not during operations after a connection has already been made.
Connection Pooling Using X DevAPI. When using connection pooling with X DevAPI,
Connector/J keeps track of any host it failed to connect to and, for a short waiting period after
the failure, avoids connecting to it during the creation or retrieval of a Session. However, if
all other hosts have already been tried, those excluded hosts will be retried without waiting.
Once all hosts have been tried and no connections can be established, Connector/J throws a
com.mysql.cj.exceptions.CJCommunicationsException and returns the message Unable to
connect to any of the target hosts.
Configuring Server Failover Using X DevAPI with DNS SRV
See Section 3.5.14, “Support for DNS SRV Records” for details.
3.8.3 Configuring Load Balancing with Connector/J
Connector/J has long provided an effective means to distribute read/write load across multiple MySQL
server instances for Cluster or source-source replication deployments. You can dynamically configure load-
308

Configuring Load Balancing with Connector/J
balanced connections, with no service outage. In-process transactions are not lost, and no application
exceptions are generated if any application is trying to use that particular server instance.
The load balancing is configured at the initial setup stage of the server connection by the following
connection URL, which has a similar format as the general JDBC URL for MySQL connection, but a
specialized scheme:
jdbc:mysql:loadbalance://[host1][:port],[host2][:port][,[host3][:port]]...[/[database]] »
[?propertyName1=propertyValue1[&propertyName2=propertyValue2]...]
There are two configuration properties associated with this functionality:
• loadBalanceConnectionGroup – This provides the ability to group connections from different
sources. This allows you to manage these JDBC sources within a single class loader in any combination
you choose. If they use the same configuration, and you want to manage them as a logical single
group, give them the same name. This is the key property for management: if you do not define a
name (string) for loadBalanceConnectionGroup, you cannot manage the connections. All load-
balanced connections sharing the same loadBalanceConnectionGroup value, regardless of how the
application creates them, will be managed together.
• ha.enableJMX – The ability to manage the connections is exposed when you define a
loadBalanceConnectionGroup; but if you want to manage this externally, enable JMX by
setting this property to true. This enables a JMX implementation, which exposes the management
and monitoring operations of a connection group. Further, start your application with the -
Dcom.sun.management.jmxremote JVM flag. You can then perform connect and perform operations
using a JMX client such as jconsole.
Once a connection has been made using the correct connection properties, a number of monitoring
properties are available:
• Current active host count.
• Current active physical connection count.
• Current active logical connection count.
• Total logical connections created.
• Total transaction count.
The following management operations can also be performed:
• Add host.
• Remove host.
The JMX interface, com.mysql.cj.jdbc.jmx.LoadBalanceConnectionGroupManagerMBean, has
the following methods:
• int getActiveHostCount(String group);
• int getTotalHostCount(String group);
• long getTotalLogicalConnectionCount(String group);
• long getActiveLogicalConnectionCount(String group);
• long getActivePhysicalConnectionCount(String group);
309

Configuring Load Balancing with Connector/J
• long getTotalPhysicalConnectionCount(String group);
• long getTotalTransactionCount(String group);
• void removeHost(String group, String host) throws SQLException;
• void stopNewConnectionsToHost(String group, String host) throws SQLException;
• void addHost(String group, String host, boolean forExisting);
• String getActiveHostsList(String group);
• String getRegisteredConnectionGroups();
The getRegisteredConnectionGroups() method returns the names of all connection groups defined
in that class loader.
You can test this setup with the following code:
public class Test {
private static String URL = "jdbc:mysql:loadbalance://" +
"localhost:3306,localhost:3310/test?" +
"loadBalanceConnectionGroup=first&ha.enableJMX=true";
public static void main(String[] args) throws Exception {
new Thread(new Repeater()).start();
new Thread(new Repeater()).start();
new Thread(new Repeater()).start();
}
static Connection getNewConnection() throws SQLException, ClassNotFoundException {
Class.forName("com.mysql.cj.jdbc.Driver");
return DriverManager.getConnection(URL, "root", "");
}
static void executeSimpleTransaction(Connection c, int conn, int trans){
try {
c.setAutoCommit(false);
Statement s = c.createStatement();
s.executeQuery("SELECT SLEEP(1) /* Connection: " + conn + ", transaction: " + trans + " */");
c.commit();
} catch (SQLException e) {
e.printStackTrace();
}
}
public static class Repeater implements Runnable {
public void run() {
for(int i=0; i < 100; i++){
try {
Connection c = getNewConnection();
for(int j=0; j < 10; j++){
executeSimpleTransaction(c, i, j);
Thread.sleep(Math.round(100 * Math.random()));
}
c.close();
Thread.sleep(100);
} catch (Exception e) {
e.printStackTrace();
}
}
}
}
}
After compiling, the application can be started with the -Dcom.sun.management.jmxremote
flag, to enable remote management. jconsole can then be started. The Test main class
310

Configuring Source/Replica Replication with Connector/J
will be listed by jconsole. Select this and click Connect. You can then navigate to the
com.mysql.cj.jdbc.jmx.LoadBalanceConnectionGroupManager bean. At this point, you can
click on various operations and examine the returned result.
If you now had an additional instance of MySQL running on port 3309, you could ensure that Connector/J
starts using it by using the addHost(), which is exposed in jconsole. Note that these operations can be
performed dynamically without having to stop the application running.
For further information on the combination of load balancing and failover, see Section 3.8.5, “Advanced
Load-balancing and Failover Configuration”.
Configuring Load Balancing with DNS SRV
See Section 3.5.14, “Support for DNS SRV Records” for details.
3.8.4 Configuring Source/Replica Replication with Connector/J
This section describe a number of features of Connector/J's support for replication-aware deployments.
The replication is configured at the initial setup stage of the server connection by the connection URL,
which has a similar format as the general JDBC URL for MySQL connection, but a specialized scheme:
jdbc:mysql:replication://[source host][:port],[replica host 1][:port][,[replica host 2][:port]]...[/[database]] »
[?propertyName1=propertyValue1[&propertyName2=propertyValue2]...]
Users may specify the property allowSourceDownConnections=true to allow Connection objects
to be created even though no source hosts are reachable. Such Connection objects report they are
read-only, and isSourceConnection() returns false for them. The Connection tests for available
source hosts when Connection.setReadOnly(false) is called, throwing an SQLException if it cannot
establish a connection to a source, or switching to a source connection if the host is available.
Users may specify the property allowReplicasDownConnections=true to allow Connection
objects to be created even though no replica hosts are reachable. A Connection then, at runtime, tests
for available replica hosts when Connection.setReadOnly(true) is called (see explanation for
the method below), throwing an SQLException if it cannot establish a connection to a replica, unless
the property readFromSourceWhenNoReplicas is set to be “true” (see below for a description of the
property).
Scaling out Read Load by Distributing Read Traffic to Replicas
Connector/J supports replication-aware connections. It can automatically send queries to a read/
write source host, or a failover or round-robin loadbalanced set of replicas based on the state of
Connection.getReadOnly().
An application signals that it wants a transaction to be read-only by calling
Connection.setReadOnly(true). The replication-aware connection will use one of
the replica connections, which are load-balanced per replica host using a round-robin
scheme. A given connection is sticky to a replica until a transaction boundary command
(a commit or rollback) is issued, or until the replica is removed from service. After calling
Connection.setReadOnly(true), if you want to allow connection to a source when no replicas
are available, set the property readFromSourceWhenNoReplicas to “true.” Notice that the source
host will be used in read-only state in those cases, as if it is a replica host. Also notice that setting
readFromSourceWhenNoReplicas=true might result in an extra load for the source host in a
transparent manner.
If you have a write transaction, or if you have a read that is time-sensitive (remember, replication in MySQL
is asynchronous), set the connection to be not read-only, by calling Connection.setReadOnly(false)
311

Configuring Source/Replica Replication with Connector/J
and the driver will ensure that further calls are sent to the source MySQL server. The driver takes care of
propagating the current state of autocommit, isolation level, and catalog between all of the connections that
it uses to accomplish this load balancing functionality.
To enable this functionality, use the specialized replication scheme ( jdbc:mysql:replication://)
when connecting to the server.
Here is a short example of how a replication-aware connection might be used in a standalone application:
import java.sql.Connection;
import java.sql.ResultSet;
import java.util.Properties;
import java.sql.DriverManager;
public class ReplicationDemo {
public static void main(String[] args) throws Exception {
Properties props = new Properties();
// We want this for failover on the replicas
props.put("autoReconnect", "true");
// We want to load balance between the replicas
props.put("roundRobinLoadBalance", "true");
props.put("user", "foo");
props.put("password", "password");
//
// Looks like a normal MySQL JDBC url, with a
// comma-separated list of hosts, the first
// being the 'source', the rest being any number
// of replicas that the driver will load balance against
//
Connection conn =
DriverManager.getConnection("jdbc:mysql:replication://source,replica1,replica2,replica3/test",
props);
//
// Perform read/write work on the source
// by setting the read-only flag to "false"
//
conn.setReadOnly(false);
conn.setAutoCommit(false);
conn.createStatement().executeUpdate("UPDATE some_table ....");
conn.commit();
//
// Now, do a query from a replica, the driver automatically picks one
// from the list
//
conn.setReadOnly(true);
ResultSet rs =
conn.createStatement().executeQuery("SELECT a,b FROM alt_table");
.......
}
}
Consider using the Load Balancing JDBC Pool (lbpool) tool, which provides a wrapper around the
standard JDBC driver and enables you to use DB connection pools that includes checks for system failures
and uneven load distribution. For more information, see Load Balancing JDBC Driver for MySQL (mysql-
lbpool).
Support for Multiple-Source Replication Topographies
Connector/J supports multi-source replication topographies.
The connection URL for replication discussed earlier (i.e., in the format of
jdbc:mysql:replication://source,replica1,replica2,replica3/test) assumes that
the first (and only the first) host is the source host. Supporting deployments with an arbitrary number of
312

Configuring Source/Replica Replication with Connector/J
sources and replicas requires the "address-equals" URL syntax for multiple host connection discussed in
Section 3.5.2, “Connection URL Syntax”, with the property type=[source|replica]; for example:
jdbc:mysql:replication://address=(type=source)(host=source1host),address=(type=source)(host=source2host),address=(type=replica)(host=replica1host)/database
Connector/J uses a load-balanced connection internally for management of the source connections, which
means that ReplicationConnection, when configured to use multiple sources, exposes the same
options to balance load across source hosts as described in Section 3.8.3, “Configuring Load Balancing
with Connector/J”.
Live Reconfiguration of Replication Topography
Connector/J also supports live management of replication host (single or multi-source) topographies. This
enables users to promote replicas for Java applications without requiring an application restart.
The replication hosts are most effectively managed in the context of a replication connection group. A
ReplicationConnectionGroup class represents a logical grouping of connections which can be managed
together. There may be one or more such replication connection groups in a given Java class loader (there
can be an application with two different JDBC resources needing to be managed independently). This key
class exposes host management methods for replication connections, and ReplicationConnection
objects register themselves with the appropriate ReplicationConnectionGroup if a value for the new
replicationConnectionGroup property is specified. The ReplicationConnectionGroup object
tracks these connections until they are closed, and it is used to manipulate the hosts associated with these
connections.
Some important methods related to host management include:
• getSourceHosts(): Returns a collection of strings representing the hosts configured as source hosts
• getReplicaHosts(): Returns a collection of strings representing the hosts configured as replica hosts
• addReplicaHost(String host): Adds new host to pool of possible replica hosts for selection at
start of new read-only workload
• promoteReplicaToSource(String host): Removes the host from the pool of potential replica
hosts for future read-only processes (existing read-only process is allowed to continue to completion)
and adds the host to the pool of potential source hosts
• removeReplicaHost(String host, boolean closeGently): Removes the host (host name
match must be exact) from the list of configured replica hosts; if closeGently is false, existing
connections which have this host as currently active will be closed hardly (application should expect
exceptions)
• removeSourceHost(String host, boolean closeGently): Same as
removeReplicaHost(), but removes the host from the list of configured source hosts
Some useful management metrics include:
• getConnectionCountWithHostAsReplica(String host): Returns the number of
ReplicationConnection objects that have the given host configured as a possible replica host
• getConnectionCountWithHostAsSource(String host): Returns the number of
ReplicationConnection objects that have the given host configured as a possible source host
• getNumberOfReplicasAdded(): Returns the number of times a replica host has been dynamically
added to the group pool
• getNumberOfReplicasRemoved(): Returns the number of times a replica host has been dynamically
removed from the group pool
313

Advanced Load-balancing and Failover Configuration
• getNumberOfReplicaPromotions(): Returns the number of times a replica host has been promoted
to be a source host
• getTotalConnectionCount(): Returns the number of ReplicationConnection objects which have
been registered with this group
• getActiveConnectionCount(): Returns the number of ReplicationConnection objects currently
being managed by this group
ReplicationConnectionGroupManager
com.mysql.cj.jdbc.ha.ReplicationConnectionGroupManager provides access to the
replication connection groups, together with some utility methods.
• getConnectionGroup(String groupName): Returns the ReplicationConnectionGroup object
matching the groupName provided
The other methods in ReplicationConnectionGroupManager mirror those of
ReplicationConnectionGroup, except that the first argument is a String group name. These methods
will operate on all matching ReplicationConnectionGroups, which are helpful for removing a server from
service and have it decommissioned across all possible ReplicationConnectionGroups.
These methods might be useful for in-JVM management of replication hosts if an application triggers
topography changes. For managing host configurations from outside the JVM, JMX can be used.
Using JMX for Managing Replication Hosts
When Connector/J is started with ha.enableJMX=true and a value set for the
property replicationConnectionGroup, a JMX MBean will be registered, allowing
manipulation of replication hosts by a JMX client. The MBean interface is defined in
com.mysql.cj.jdbc.jmx.ReplicationGroupManagerMBean, and leverages the
ReplicationConnectionGroupManager static methods:
public abstract void addReplicaHost(String groupFilter, String host) throws SQLException;
public abstract void removeReplicaHost(String groupFilter, String host) throws SQLException;
public abstract void promoteReplicaToSource(String groupFilter, String host) throws SQLException;
public abstract void removeSourceHost(String groupFilter, String host) throws SQLException;
public abstract String getSourceHostsList(String group);
public abstract String getReplicaHostsList(String group);
public abstract String getRegisteredConnectionGroups();
public abstract int getActiveSourceHostCount(String group);
public abstract int getActiveReplicaHostCount(String group);
public abstract int getReplicaPromotionCount(String group);
public abstract long getTotalLogicalConnectionCount(String group);
public abstract long getActiveLogicalConnectionCount(String group);
Configuring Source/Replica Replication with DNS SRV
See Section 3.5.14, “Support for DNS SRV Records” for details.
3.8.5 Advanced Load-balancing and Failover Configuration
Connector/J provides a useful load-balancing implementation for MySQL Cluster or multi-source
deployments, as explained in Section 3.8.3, “Configuring Load Balancing with Connector/J” and Support
for Multiple-Source Replication Topographies. This same implementation is used for balancing load
between read-only replicas for replication-aware connections.
When trying to balance workload between multiple servers, the driver has to determine when it is safe to
swap servers, doing so in the middle of a transaction, for example, could cause problems. It is important
314

Advanced Load-balancing and Failover Configuration
not to lose state information. For this reason, Connector/J will only try to pick a new server when one of the
following happens:
1. At transaction boundaries (transactions are explicitly committed or rolled back).
2. A communication exception (SQL State starting with "08") is encountered.
3. When a SQLException matches conditions defined by user, using the extension points defined by
the loadBalanceSQLStateFailover, loadBalanceSQLExceptionSubclassFailover or
loadBalanceExceptionChecker properties.
The third condition revolves around three properties, which allow you to control which SQLExceptions
trigger failover:
• loadBalanceExceptionChecker - The loadBalanceExceptionChecker property
is really the key. This takes a fully-qualified class name which implements the new
com.mysql.cj.jdbc.ha.LoadBalanceExceptionChecker interface. This interface is very simple,
and you only need to implement the following method:
public boolean shouldExceptionTriggerFailover(SQLException ex)
A SQLException is passed in, and a boolean returned. A value of true triggers a failover, false does
not.
You can use this to implement your own custom logic. An example where this might be useful is when
dealing with transient errors when using MySQL Cluster, where certain buffers may become overloaded.
The following code snippet illustrates this:
public class NdbLoadBalanceExceptionChecker
extends StandardLoadBalanceExceptionChecker {
public boolean shouldExceptionTriggerFailover(SQLException ex) {
return super.shouldExceptionTriggerFailover(ex)
|| checkNdbException(ex);
}
private boolean checkNdbException(SQLException ex){
// Have to parse the message since most NDB errors
// are mapped to the same DEMC.
return (ex.getMessage().startsWith("Lock wait timeout exceeded") ||
(ex.getMessage().startsWith("Got temporary error")
&& ex.getMessage().endsWith("from NDB")));
}
}
The code above extends com.mysql.cj.jdbc.ha.StandardLoadBalanceExceptionChecker,
which is the default implementation. There are a few convenient shortcuts built into this, for those
who want to have some level of control using properties, without writing Java code. This default
implementation uses the two remaining properties: loadBalanceSQLStateFailover and
loadBalanceSQLExceptionSubclassFailover.
• loadBalanceSQLStateFailover - allows you to define a comma-delimited list of SQLState code
prefixes, against which a SQLException is compared. If the prefix matches, failover is triggered. So, for
example, the following would trigger a failover if a given SQLException starts with "00", or is "12345":
loadBalanceSQLStateFailover=00,12345
• loadBalanceSQLExceptionSubclassFailover - can be used in conjunction with
loadBalanceSQLStateFailover or on its own. If you want certain subclasses of SQLException to
trigger failover, simply provide a comma-delimited list of fully-qualified class or interface names to check
315

Using the X DevAPI with Connector/J: Special Topics
against. For example, if you want all SQLTransientConnectionExceptions to trigger failover, you
would specify:
loadBalanceSQLExceptionSubclassFailover=java.sql.SQLTransientConnectionException
While the three failover conditions enumerated earlier suit most situations, if autocommit is enabled,
Connector/J never re-balances, and continues using the same physical connection. This can be
problematic, particularly when load-balancing is being used to distribute read-only load across multiple
replicas. However, Connector/J can be configured to re-balance after a certain number of statements are
executed, when autocommit is enabled. This functionality is dependent upon the following properties:
• loadBalanceAutoCommitStatementThreshold – defines the number of matching statements
which will trigger the driver to potentially swap physical server connections. The default value, 0, retains
the behavior that connections with autocommit enabled are never balanced.
• loadBalanceAutoCommitStatementRegex – the regular expression against which statements must
match. The default value, blank, matches all statements. So, for example, using the following properties
will cause Connector/J to re-balance after every third statement that contains the string “test”:
loadBalanceAutoCommitStatementThreshold=3
loadBalanceAutoCommitStatementRegex=.*test.*
loadBalanceAutoCommitStatementRegex can prove useful in a number of situations. Your
application may use temporary tables, server-side session state variables, or connection state, where
letting the driver arbitrarily swap physical connections before processing is complete could cause data
loss or other problems. This allows you to identify a trigger statement that is only executed when it is
safe to swap physical connections.
Configuring Load Balancing and Failover with DNS SRV
See Section 3.5.14, “Support for DNS SRV Records” for details.
3.9 Using the X DevAPI with Connector/J: Special Topics
Connector/J 8.0 supports the X DevAPI, through which native support by MySQL for JSON, NoSQL,
document collection, and other features are provided to Java applications. See Using MySQL as a
Document Store, the X DevAPI User Guide, and the Connector/J X DevAPI Reference available at
Connectors and APIs for details.
Information on using the X DevAPI with Connector/J can be found in different chapters in this manual. This
chapter explores some special topics that are not covered elsewhere.
3.9.1 Connection Compression Using X DevAPI
Connector/J supports data compression for X DevAPI connections when working with MySQL Server
8.0.19 and later. General details about this feature can be found in Connection Compression with X
Plugin. For details on how to configure connection compression for Connector/J, see the descriptions
for the connection properties xdevapi.compression, xdevapi.compression-algorithms, and
xdevapi.compression-extensions in Section 3.5.3, “Configuration Properties”. The following is a
summary of the feature:
The compression algorithms to be negotiated with the server and the priority of negotiation can be
specified using the connection property xdevapi.compression-algorithms. It accepts a list of
[algorithm-name]_[operation-mode], separated by commas (,). If the property is not set, the
default value of “zstd_stream,lz4_message,deflate_stream” is used. The priority for negotiation
follows the order the algorithms appear in the list. Setting an empty string explicitly for the property means
compression should be disabled for the connection.
316

Schema Validation
Note
When specifying compression algorithms with xdevapi.compression-
algorithms, the aliases zstd, lz4, and deflate can be used in place of
zstd_stream, lz4_message, and deflate_stream, respectively.
Out of all the compression algorithms now supported by MySQL Server for X DevAPI connections,
Connector/J provides out-of-the-box support for Deflate only; this is because none of the other
compression algorithms (LZ4 and zstd, for now) are natively supported by the existing JREs. To support
those algorithms, the client application must provide implementations for the corresponding deflate and
inflate operations in the form of an OutputStream and an InputStream object, respectively. The easiest
way to accomplish this is by using a third-party library such as the Apache Commons Compress library,
which supports LZ4 and zstd. The connection option xdevapi.compression-extensions allows
users to configure Connector/J to use any compression algorithm that is supported by MySQL Server, as
long as there is a Java implementation for that algorithm. The option takes a list of triplets separated by
commas (,), and each triplet in turn contains the following elements, separated by colons (:):
• The compression algorithm name, indicated by the identifier used by the server (see Connection
Compression with X Plugin; aliases mentioned in the Note above can be used).
• A fully-qualified name of a class implementing the interface java.io.InputStream that will be used to
inflate data compressed with the named algorithm.
• A fully-qualified name of a class implementing the interface java.io.OutputStream that will be used
to deflate data using the named algorithm.
Here is an example that sets up the support for the algorithms lz4_message and zstd_stream using the
Apache Commons Compress library:
String connStr = "jdbc:mysql://johndoe:secret@localhost:33060/mydb?"
+ "xdevapi.compression-extensions="
+ "lz4_message"+":" // LZ4 triplet
+ FramedLZ4CompressorInputStream.class.getName() + ":"
+ FramedLZ4CompressorOutputStream.class.getName() + ","
+ "zstd_stream"+":" // zstd triplet
+ ZstdCompressorInputStream.class.getName() + ":"
+ ZstdCompressorOutputStream.class.getName();
SessionFactory sessFact = new SessionFactory();
Session sess = sessFact.getSession(connStr);
Collection col = sess.getDefaultSchema().getCollection("myCollection");
// (...)
sess.close();
Note
For Connector/J 8.0.21 and earlier: The connection property
xdevapi.compression-extensions described above is named
xdevapi.compression-algorithm for Connector/J 8.0.21 and earlier, and the
elements in each triplet should be separated by commas (,) instead of colons (:).
Negotiation for a compression algorithm is attempted by default (xdevapi.compression=Preferred
by default), unless the connection property xdevapi.compression is set to DISABLED. The final
choice of compression algorithm depends on what algorithms are enabled on the server. By default,
because compression is not required, if the negotiation fails, the connection will not be compressed,
but the client will still be able to communicate with the server; however, if the connection property
xdevapi.compression is set to REQUIRED, the connection attempt fails with an error if no algorithm can
be negotiated for successfully.
3.9.2 Schema Validation
317

Schema Validation
When working with MySQL Server 8.0.19 and later: Schema validation can be configured for a
Collection, so that documents in the Collection are validated against a schema before they can
be inserted or updated. This is done by specifying a JSON Schema during Collection creation or
modification; schema validation is then performed by the server at a document creation or update, and an
error is returned if the document does not validate against the assigned schema. For more information on
JSON schema validation in MySQL, see JSON Schema Validation Functions. This section describes how
to configure schema validation for a Collection with Connector/J.
To configure schema validation during the creation of a Collection, pass to the createCollection()
method a CreateCollectionOptions object, which has these fields:
• reuse: a boolean set by the setReuseExisting method. If it is true, when the Collection to be
created already exists within the Schema that is to contain it, Connector/J returns success (without any
attempt to apply JSON schema to the existing Collection); in the same case, Connector/J returns an
error if the parameter is set to false. If reuse is not set, it is taken to be false.
• validation: a Validation object set by the setValidation() method. A Validation object in
turns contains these fields:
• level: a enumeration of the class ValidationLevel, set by the setLevel() method; it can be
one of the following two values:
• STRICT: Strict validation. Attempting to insert or modify a document that violates the validation
schema results in a server error being raised.
• OFF: No validation. Schema validation is turned off.
If level is not set, it is taken as OFF for MySQL Server 8.0.19, and STRICT for 8.0.20 and later.
• schema: A string representing a JSON Schema to be used to validate a Document in the
Collection; set by the setSchema() method.
If schema is not provided but level is set to STRICT, the Collection is validated against the
default schema {"type" : "object"}.
This is an example of how to configure schema validation at the creation of a Collection:
Collection coll = this.schema.createCollection(collName,
new CreateCollectionOptions()
.setReuseExisting(false)
.setValidation(new Validation()
.setLevel(ValidationLevel.STRICT)
.setSchema(
"{\"id\": \"http://json-schema.org/geo\","
+ "\"$schema\": \"http://json-schema.org/draft-06/schema#\","
+ " \"description\": \"A geographical coordinate\","
+ " \"type\": \"object\","
+ " \"properties\": {"
+ " \"latitude\": {"
+ " \"type\": \"number\""
+ " },"
+ " \"longitude\": {"
+ " \"type\": \"number\""
+ " }"
+ " },"
+ " \"required\": [\"latitude\", \"longitude\"]"
+ " }"
)));
318

Using the Connector/J Interceptor Classes
The set fields are accessible by the corresponding getter methods.
To modify the schema validation configuration for a Collection, use the modifyCollection()
method and pass to it a ModifyCollectionOptions object, which has the same fields as
the CreateCollectionOptions object except for the reuse field, which does not exist for a
ModifyCollectionOptions object. For the Validation object of a ModifyCollectionOptions
object, users can set either its level or schema, or both. Here is an example of using the
modifyCollection() to change the schema validation configuration:
schema.modifyCollection(collName,
new ModifyCollectionOptions()
.setValidation(new Validation()
.setLevel(ValidationLevel.OFF)
.setSchema(
"{\"id\": \"http://json-schema.org/geo\","
+ "\"$schema\": \"http://json-schema.org/draft-06/schema#\","
+ " \"description\": \"NEW geographical coordinate\","
+ " \"type\": \"object\","
+ " \"properties\": {"
+ " \"latitude\": {"
+ " \"type\": \"number\""
+ " },"
+ " \"longitude\": {"
+ " \"type\": \"number\""
+ " }"
+ " },"
+ " \"required\": [\"latitude\", \"longitude\"]"
+ " }"
)));
If the Collection contains documents that do not validate against the new JSON schema supplied through
ModifyCollectionOptions, the server will reject the schema modification with the error ERROR 5180
(HY000) Document is not valid according to the schema assigned to collection.
Note
createCollection() and modifyCollection() are overloaded: they can
be called without passing to them the CreateCollectionOptions or the
ModifyCollectionOptions, respectively, in which case schema validation will
not be applied to the Collection.
3.10 Using the Connector/J Interceptor Classes
An interceptor is a software design pattern that provides a transparent way to extend or modify some
aspect of a program, similar to a user exit. No recompiling is required. With Connector/J, the interceptors
are enabled and disabled by updating the connection string to refer to different sets of interceptor classes
that you instantiate.
The connection properties that control the interceptors are explained in Section 3.5.3, “Configuration
Properties”:
• connectionLifecycleInterceptors, where you specify the fully qualified names of classes that
implement the com.mysql.cj.jdbc.interceptors.ConnectionLifecycleInterceptor
interface. In these kinds of interceptor classes, you might log events such as rollbacks, measure the time
between transaction start and end, or count events such as calls to setAutoCommit().
• exceptionInterceptors, where you specify the fully qualified names of classes that implement
the com.mysql.cj.exceptions.ExceptionInterceptor interface. In these kinds of interceptor
classes, you might add extra diagnostic information to exceptions that can have multiple causes or
319

Using Logging Frameworks with SLF4J
indicate a problem with server settings. exceptionInterceptors classes are called when handling
an Exception thrown from Connector/J code.
• queryInterceptors, where you specify the fully qualified names of classes that implement the
com.mysql.cj.interceptors.QueryInterceptor interface. In these kinds of interceptor classes,
you might change or augment the processing done by certain kinds of statements, such as automatically
checking for queried data in a memcached server, rewriting slow queries, logging information about
statement execution, or route requests to remote servers.
3.11 Using Logging Frameworks with SLF4J
Besides its default logger com.mysql.cj.log.StandardLogger, which logs to stderr, Connector/
J supports the SLF4J logging facade, allowing end users of applications using Connector/J to plug
in logging frameworks of their own choices at deployment time. Popular logging frameworks such as
java.util.logging, logback, and log4j are supported by SLF4J. Follow these requirements to use
a logging framework with SLF4J and Connector/J:
• In the development environment:
• Install on your system slf4j-api-x.y.z.jar (available at https://www.slf4j.org/download.html) and
add it to the Java classpath.
• In the code of your application, obtain an SLF4JLogger as a Log instantiated within a
MysqlConnection Session, and then use the Log instance for your logging.
• On the deployment system:
• Install on your system slf4j-api-x.y.z.jar and add it to the Java classpath
• Install on your system the SLF4J binding for the logging framework of your choice and add it
to your Java classpath. SLF4J bindings are available at, for example, https://www.slf4j.org/
manual.html#swapping.
Note
Do not put more than one SLF4J binding in you Java classpath. Switch from
one logging framework to another by removing a binding and adding a new one
to the classpath.
• Install the logging framework of your choice on your system and add it to the Java classpath.
• Configure the logging framework of your choice. This often consists of setting up appenders or
handlers for log messages using a configuration file; see your logging framework's documentation for
details.
• When connecting the application to the MySQL Server, set the Connector/J connection property
logger to Slf4JLogger.
The log category name used by Connector/J with SLF4J is MySQL. See the SLF4J user manual for more
details about using SLF4J, including discussions on Maven dependency and bindings. Here is a sample
code for using SLF4J with Connector/J:
import java.sql.DriverManager;
import java.sql.Connection;
import java.sql.ResultSet;
import java.sql.SQLException;
import java.sql.Statement;
320

Using Connector/J with Tomcat
import com.mysql.cj.jdbc.JdbcConnection;
import com.mysql.cj.log.Log;
public class JDBCDemo {
public static void main(String[] args) {
Connection conn = null;
Statement statement = null;
ResultSet resultSet = null;
Log logger = null;
try {
// Database parameters
String url = "jdbc:mysql://myexample.com:3306/pets?logger=Slf4JLogger&explainSlowQueries=true";
String user = "user";
String password = "password";
// create a connection to the database
conn = DriverManager.getConnection(url, user, password);
logger = ((JdbcConnection)conn).getSession().getLog();
}
catch (SQLException e) {
System.err.println(e.getMessage());
System.exit(1);
}
try {
statement = conn.createStatement();
resultSet = statement.executeQuery("SELECT * FROM pets.dogs");
while(resultSet.next()){
System.out.printf("%d\t%s\t%s\t %4$ty.%4$tm.%4$td \n",
resultSet.getInt(1),
resultSet.getString(2),
resultSet.getString(3),
resultSet.getDate(4));
}
}
catch(SQLException e) {
logger.logWarn("Warning: Select failed!");
}
}
}
If you want to use, for example, Log4j 2.17.1 as your logging framework when running this program, put
these JAR files in your Java classpath:
• slf4j-api-2.0.3.jar (SLF4J API module, available at, for example, https://central.sonatype.com/
artifact/org.slf4j/slf4j-api/2.0.3/jar).
• log4j-api-2.17.1.jar and log4j-core-2.17.1.jar (Log4J library, available at, for example,
https://central.sonatype.com/artifact/org.apache.logging.log4j/log4j-api/2.17.1/jar and https://
central.sonatype.com/artifact/org.apache.logging.log4j/log4j-core/2.17.1/jar).
• log4j-slf4j-impl-2.17.1.jar (SLF4J's binding for Log4J 2.17.1, available at, for example, https://
central.sonatype.com/artifact/org.apache.logging.log4j/log4j-slf4j-impl/2.17.1/jar).
Here is output of the program when the SELECT statement failed:
[2021-09-05 12:06:19,624] WARN 0[main] - WARN MySQL - Warning: Select failed!
3.12 Using Connector/J with Tomcat
The following instructions are based on the instructions for Tomcat-5.x, available at http://
tomcat.apache.org/tomcat-5.5-doc/jndi-datasource-examples-howto.html which is current at the time this
document was written.
321

Using Connector/J with Tomcat
First, install the .jar file that comes with Connector/J in $CATALINA_HOME/common/lib so that it is
available to all applications installed in the container.
Next, configure the JNDI DataSource by adding a declaration resource to $CATALINA_HOME/conf/
server.xml in the context that defines your web application:
<Context ....>
...
<Resource name="jdbc/MySQLDB"
auth="Container"
type="javax.sql.DataSource"/>
<ResourceParams name="jdbc/MySQLDB">
<parameter>
<name>factory</name>
<value>org.apache.commons.dbcp.BasicDataSourceFactory</value>
</parameter>
<parameter>
<name>maxActive</name>
<value>10</value>
</parameter>
<parameter>
<name>maxIdle</name>
<value>5</value>
</parameter>
<parameter>
<name>validationQuery</name>
<value>SELECT 1</value>
</parameter>
<parameter>
<name>testOnBorrow</name>
<value>true</value>
</parameter>
<parameter>
<name>testWhileIdle</name>
<value>true</value>
</parameter>
<parameter>
<name>timeBetweenEvictionRunsMillis</name>
<value>10000</value>
</parameter>
<parameter>
<name>minEvictableIdleTimeMillis</name>
<value>60000</value>
</parameter>
<parameter>
<name>username</name>
<value>someuser</value>
</parameter>
<parameter>
<name>password</name>
<value>somepass</value>
</parameter>
<parameter>
<name>driverClassName</name>
<value>com.mysql.cj.jdbc.Driver</value>
</parameter>
<parameter>
<name>url</name>
<value>jdbc:mysql://localhost:3306/test</value>
</parameter>
</ResourceParams>
</Context>
Connector/J introduces a facility whereby, rather than use a validationQuery value of SELECT 1, it
is possible to use validationQuery with a value set to /* ping */. This sends a ping to the server
which then returns a fake result set. This is a lighter weight solution. It also has the advantage that if using
322

Using Connector/J with Spring
ReplicationConnection or LoadBalancedConnection type connections, the ping will be sent
across all active connections. The following XML snippet illustrates how to select this option:
<parameter>
<name>validationQuery</name>
<value>/* ping */</value>
</parameter>
Note that /* ping */ has to be specified exactly.
In general, follow the installation instructions that come with your version of Tomcat, as the way you
configure datasources in Tomcat changes from time to time, and if you use the wrong syntax in your XML
file, you will most likely end up with an exception similar to the following:
Error: java.sql.SQLException: Cannot load JDBC driver class 'null ' SQL
state: null
Note that the auto-loading of drivers having the META-INF/service/java.sql.Driver class in JDBC
4.0 and later causes an improper undeployment of the Connector/J driver in Tomcat on Windows. Namely,
the Connector/J jar remains locked. This is an initialization problem that is not related to the driver. The
possible workarounds, if viable, are as follows: use "antiResourceLocking=true" as a Tomcat Context
attribute, or remove the META-INF/ directory.
3.13 Using Connector/J with Spring
The Spring Framework is a Java-based application framework designed for assisting in application design
by providing a way to configure components. The technique used by Spring is a well known design pattern
called Dependency Injection (see Inversion of Control Containers and the Dependency Injection pattern).
This article will focus on Java-oriented access to MySQL databases with Spring 2.0. For those wondering,
there is a .NET port of Spring appropriately named Spring.NET.
Spring is not only a system for configuring components, but also includes support for aspect oriented
programming (AOP). This is one of the main benefits and the foundation for Spring's resource and
transaction management. Spring also provides utilities for integrating resource management with JDBC
and Hibernate.
For the examples in this section the MySQL world sample database will be used. The first task is to set up
a MySQL data source through Spring. Components within Spring use the “bean” terminology. For example,
to configure a connection to a MySQL server supporting the world sample database, you might use:
<util:map id="dbProps">
<entry key="db.driver" value="com.mysql.cj.jdbc.Driver"/>
<entry key="db.jdbcurl" value="jdbc:mysql://localhost/world"/>
<entry key="db.username" value="myuser"/>
<entry key="db.password" value="mypass"/>
</util:map>
In the above example, we are assigning values to properties that will be used in the configuration. For the
datasource configuration:
<bean id="dataSource"
class="org.springframework.jdbc.datasource.DriverManagerDataSource">
<property name="driverClassName" value="${db.driver}"/>
<property name="url" value="${db.jdbcurl}"/>
<property name="username" value="${db.username}"/>
323

Using JdbcTemplate
<property name="password" value="${db.password}"/>
</bean>
The placeholders are used to provide values for properties of this bean. This means that we can specify
all the properties of the configuration in one place instead of entering the values for each property on
each bean. We do, however, need one more bean to pull this all together. The last bean is responsible for
actually replacing the placeholders with the property values.
<bean
class="org.springframework.beans.factory.config.PropertyPlaceholderConfigurer">
<property name="properties" ref="dbProps"/>
</bean>
Now that we have our MySQL data source configured and ready to go, we write some Java code to access
it. The example below will retrieve three random cities and their corresponding country using the data
source we configured with Spring.
// Create a new application context. this processes the Spring config
ApplicationContext ctx =
new ClassPathXmlApplicationContext("ex1appContext.xml");
// Retrieve the data source from the application context
DataSource ds = (DataSource) ctx.getBean("dataSource");
// Open a database connection using Spring's DataSourceUtils
Connection c = DataSourceUtils.getConnection(ds);
try {
// retrieve a list of three random cities
PreparedStatement ps = c.prepareStatement(
"select City.Name as 'City', Country.Name as 'Country' " +
"from City inner join Country on City.CountryCode = Country.Code " +
"order by rand() limit 3");
ResultSet rs = ps.executeQuery();
while(rs.next()) {
String city = rs.getString("City");
String country = rs.getString("Country");
System.out.printf("The city %s is in %s%n", city, country);
}
} catch (SQLException ex) {
// something has failed and we print a stack trace to analyse the error
ex.printStackTrace();
// ignore failure closing connection
try { c.close(); } catch (SQLException e) { }
} finally {
// properly release our connection
DataSourceUtils.releaseConnection(c, ds);
}
This is very similar to normal JDBC access to MySQL with the main difference being that we are using
DataSourceUtils instead of the DriverManager to create the connection.
While it may seem like a small difference, the implications are somewhat far reaching. Spring manages
this resource in a way similar to a container managed data source in a J2EE application server. When a
connection is opened, it can be subsequently accessed in other parts of the code if it is synchronized with
a transaction. This makes it possible to treat different parts of your application as transactional instead of
passing around a database connection.
3.13.1 Using JdbcTemplate
Spring makes extensive use of the Template method design pattern (see Template Method
Pattern). Our immediate focus will be on the JdbcTemplate and related classes, specifically
324

Using JdbcTemplate
NamedParameterJdbcTemplate. The template classes handle obtaining and releasing a connection for
data access when one is needed.
The next example shows how to use NamedParameterJdbcTemplate inside of a DAO (Data Access
Object) class to retrieve a random city given a country code.
public class Ex2JdbcDao {
/**
* Data source reference which will be provided by Spring.
*/
private DataSource dataSource;
/**
* Our query to find a random city given a country code. Notice
* the ":country" parameter toward the end. This is called a
* named parameter.
*/
private String queryString = "select Name from City " +
"where CountryCode = :country order by rand() limit 1";
/**
* Retrieve a random city using Spring JDBC access classes.
*/
public String getRandomCityByCountryCode(String cntryCode) {
// A template that permits using queries with named parameters
NamedParameterJdbcTemplate template =
new NamedParameterJdbcTemplate(dataSource);
// A java.util.Map is used to provide values for the parameters
Map params = new HashMap();
params.put("country", cntryCode);
// We query for an Object and specify what class we are expecting
return (String)template.queryForObject(queryString, params, String.class);
}
/**
* A JavaBean setter-style method to allow Spring to inject the data source.
* @param dataSource
*/
public void setDataSource(DataSource dataSource) {
this.dataSource = dataSource;
}
}
The focus in the above code is on the getRandomCityByCountryCode() method. We pass a country
code and use the NamedParameterJdbcTemplate to query for a city. The country code is placed in a
Map with the key "country", which is the parameter is named in the SQL query.
To access this code, you need to configure it with Spring by providing a reference to the data source.
<bean id="dao" class="code.Ex2JdbcDao">
<property name="dataSource" ref="dataSource"/>
</bean>
At this point, we can just grab a reference to the DAO from Spring and call
getRandomCityByCountryCode().
// Create the application context
ApplicationContext ctx =
new ClassPathXmlApplicationContext("ex2appContext.xml");
// Obtain a reference to our DAO
Ex2JdbcDao dao = (Ex2JdbcDao) ctx.getBean("dao");
String countryCode = "USA";
// Find a few random cities in the US
for(int i = 0; i < 4; ++i)
System.out.printf("A random city in %s is %s%n", countryCode,
dao.getRandomCityByCountryCode(countryCode));
325

Transactional JDBC Access
This example shows how to use Spring's JDBC classes to completely abstract away the use of traditional
JDBC classes including Connection and PreparedStatement.
3.13.2 Transactional JDBC Access
Spring allows us to add transactions into our code without having to deal directly with the JDBC classes.
For that purpose, Spring provides a transaction management package that not only replaces JDBC
transaction management, but also enables declarative transaction management (configuration instead of
code).
To use transactional database access, we will need to change the storage engine of the tables in the world
database. The downloaded script explicitly creates MyISAM tables, which do not support transactional
semantics. The InnoDB storage engine does support transactions and this is what we will be using. We
can change the storage engine with the following statements.
ALTER TABLE City ENGINE=InnoDB;
ALTER TABLE Country ENGINE=InnoDB;
ALTER TABLE CountryLanguage ENGINE=InnoDB;
A good programming practice emphasized by Spring is separating interfaces and implementations. What
this means is that we can create a Java interface and only use the operations on this interface without any
internal knowledge of what the actual implementation is. We will let Spring manage the implementation and
with this it will manage the transactions for our implementation.
First you create a simple interface:
public interface Ex3Dao {
Integer createCity(String name, String countryCode,
String district, Integer population);
}
This interface contains one method that will create a new city record in the database and return the id of
the new record. Next you need to create an implementation of this interface.
public class Ex3DaoImpl implements Ex3Dao {
protected DataSource dataSource;
protected SqlUpdate updateQuery;
protected SqlFunction idQuery;
public Integer createCity(String name, String countryCode,
String district, Integer population) {
updateQuery.update(new Object[] { name, countryCode,
district, population });
return getLastId();
}
protected Integer getLastId() {
return idQuery.run();
}
}
You can see that we only operate on abstract query objects here and do not deal directly with the JDBC
API. Also, this is the complete implementation. All of our transaction management will be dealt with in the
configuration. To get the configuration started, we need to create the DAO.
<bean id="dao" class="code.Ex3DaoImpl">
<property name="dataSource" ref="dataSource"/>
<property name="updateQuery">...</property>
<property name="idQuery">...</property>
</bean>
326

Connection Pooling with Spring
Now we need to set up the transaction configuration. The first thing we must do is create transaction
manager to manage the data source and a specification of what transaction properties are required for the
dao methods.
<bean id="transactionManager"
class="org.springframework.jdbc.datasource.DataSourceTransactionManager">
<property name="dataSource" ref="dataSource"/>
</bean>
<tx:advice id="txAdvice" transaction-manager="transactionManager">
<tx:attributes>
<tx:method name="*"/>
</tx:attributes>
</tx:advice>
The preceding code creates a transaction manager that handles transactions for the data source provided
to it. The txAdvice uses this transaction manager and the attributes specify to create a transaction for all
methods. Finally we need to apply this advice with an AOP pointcut.
<aop:config>
<aop:pointcut id="daoMethods"
expression="execution(* code.Ex3Dao.*(..))"/>
<aop:advisor advice-ref="txAdvice" pointcut-ref="daoMethods"/>
</aop:config>
This basically says that all methods called on the Ex3Dao interface will be wrapped in a transaction. To
make use of this, we only have to retrieve the dao from the application context and call a method on the
dao instance.
Ex3Dao dao = (Ex3Dao) ctx.getBean("dao");
Integer id = dao.createCity(name, countryCode, district, pop);
We can verify from this that there is no transaction management happening in our Java code and it is all
configured with Spring. This is a very powerful notion and regarded as one of the most beneficial features
of Spring.
3.13.3 Connection Pooling with Spring
In many situations, such as web applications, there will be a large number of small database transactions.
When this is the case, it usually makes sense to create a pool of database connections available for web
requests as needed. Although MySQL does not spawn an extra process when a connection is made,
there is still a small amount of overhead to create and set up the connection. Pooling of connections also
alleviates problems such as collecting large amounts of sockets in the TIME_WAIT state.
Setting up pooling of MySQL connections with Spring is as simple as changing the data source
configuration in the application context. There are a number of configurations that we can use. The
first example is based on the Jakarta Commons DBCP library. The example below replaces the source
configuration that was based on DriverManagerDataSource with DBCP's BasicDataSource.
<bean id="dataSource" destroy-method="close"
class="org.apache.commons.dbcp.BasicDataSource">
<property name="driverClassName" value="${db.driver}"/>
<property name="url" value="${db.jdbcurl}"/>
<property name="username" value="${db.username}"/>
<property name="password" value="${db.password}"/>
<property name="initialSize" value="3"/>
</bean>
327

Troubleshooting Connector/J Applications
The configuration of the two solutions is very similar. The difference is that DBCP will pool connections
to the database instead of creating a new connection every time one is requested. We have also set a
parameter here called initialSize. This tells DBCP that we want three connections in the pool when it
is created.
3.14 Troubleshooting Connector/J Applications
This section explains the symptoms and resolutions for the most commonly encountered issues with
applications using MySQL Connector/J.
Questions
• 3.14.1: When I try to connect to the database with MySQL Connector/J, I get the following exception:
SQLException: Server configuration denies access to data source
SQLState: 08001
VendorError: 0
What is going on? I can connect just fine with the MySQL command-line client.
• 3.14.2: My application throws an SQLException 'No Suitable Driver'. Why is this happening?
• 3.14.3: I'm trying to use MySQL Connector/J in an applet or application and I get an exception similar to:
SQLException: Cannot connect to MySQL server on host:3306.
Is there a MySQL server running on the machine/port you
are trying to connect to?
(java.security.AccessControlException)
SQLState: 08S01
VendorError: 0
• 3.14.4: I have a servlet/application that works fine for a day, and then stops working overnight
• 3.14.5: I cannot connect to the MySQL server using Connector/J, and I'm sure the connection
parameters are correct.
• 3.14.6: Updating a table that contains a primary key that is either FLOAT or compound primary key that
uses FLOAT fails to update the table and raises an exception.
• 3.14.7: I get an ER_NET_PACKET_TOO_LARGE exception, even though the binary blob size I want to
insert using JDBC is safely below the max_allowed_packet size.
• 3.14.8: What should I do if I receive error messages similar to the following: “Communications link
failure – Last packet sent to the server was X ms ago”?
• 3.14.9: Why does Connector/J not reconnect to MySQL and re-issue the statement after a
communication failure instead of throwing an Exception, even though I use the autoReconnect
connection string option?
• 3.14.10: How can I use 3-byte UTF8 with Connector/J?
• 3.14.11: How can I use 4-byte UTF8 (utf8mb4) with Connector/J?
• 3.14.12: Using useServerPrepStmts=false and certain character encodings can lead to corruption
when inserting BLOBs. How can this be avoided?
Questions and Answers
3.14.1: When I try to connect to the database with MySQL Connector/J, I get the following
exception:
328

Troubleshooting Connector/J Applications
SQLException: Server configuration denies access to data source
SQLState: 08001
VendorError: 0
What is going on? I can connect just fine with the MySQL command-line client.
Connector/J normally uses TCP/IP sockets to connect to MySQL (see Section 3.5.10, “Connecting
Using Unix Domain Sockets” and Section 3.5.11, “Connecting Using Named Pipes” for exceptions). The
security manager on the MySQL server uses its grant tables to determine whether a TCP/IP connection
is permitted. You must therefore add the necessary security credentials to the MySQL server for the
connection by issuing a GRANT statement to your MySQL Server. See GRANT Statement, for more
information.
Warning
Changing privileges and permissions improperly on MySQL can potentially cause
your server installation to have non-optimal security properties.
Note
Testing your connectivity with the mysql command-line client will not work unless
you add the --host flag, and use something other than localhost for the
host. The mysql command-line client will try to use Unix domain sockets if you
use the special host name localhost. If you are testing TCP/IP connectivity to
localhost, use 127.0.0.1 as the host name instead.
3.14.2: My application throws an SQLException 'No Suitable Driver'. Why is this happening?
There are three possible causes for this error:
• The Connector/J driver is not in your CLASSPATH, see Section 3.3, “Connector/J Installation”.
• The format of your connection URL is incorrect, or you are referencing the wrong JDBC driver.
• When using DriverManager, the jdbc.drivers system property has not been populated with the
location of the Connector/J driver.
3.14.3: I'm trying to use MySQL Connector/J in an applet or application and I get an exception
similar to:
SQLException: Cannot connect to MySQL server on host:3306.
Is there a MySQL server running on the machine/port you
are trying to connect to?
(java.security.AccessControlException)
SQLState: 08S01
VendorError: 0
Either you're running an Applet, your MySQL server has been installed with the skip_networking
system variable enabled, or your MySQL server has a firewall sitting in front of it.
Applets can only make network connections back to the machine that runs the web server that served
the .class files for the applet. This means that MySQL must run on the same machine (or you must have
some sort of port re-direction) for this to work. This also means that you will not be able to test applets from
your local file system, but must always deploy them to a web server.
Connector/J normally uses TCP/IP sockets to connect to MySQL (see Section 3.5.10, “Connecting
Using Unix Domain Sockets” and Section 3.5.11, “Connecting Using Named Pipes” for exceptions).
TCP/IP communication with MySQL can be affected by the skip_networking system variable or the
server firewall. If MySQL has been started with skip_networking enabled, you need to comment it
329

Troubleshooting Connector/J Applications
out in the file /etc/mysql/my.cnf or /etc/my.cnf for TCP/IP connections to work. (Note that your
server configuration file might also exist in the data directory of your MySQL server, or somewhere else,
depending on how MySQL was compiled; binaries created by Oracle always look for /etc/my.cnf and
datadir/my.cnf; see Using Option Files for details.) If your MySQL server has been firewalled, you will
need to have the firewall configured to allow TCP/IP connections from the host where your Java code is
running to the MySQL server on the port that MySQL is listening to (by default, 3306).
3.14.4: I have a servlet/application that works fine for a day, and then stops working overnight
MySQL closes connections after 8 hours of inactivity. You either need to use a connection pool that
handles stale connections or use the autoReconnect parameter (see Section 3.5.3, “Configuration
Properties”).
Also, catch SQLExceptions in your application and deal with them, rather than propagating them all
the way until your application exits. This is just good programming practice. MySQL Connector/J will set
the SQLState (see java.sql.SQLException.getSQLState() in your API docs) to 08S01 when it
encounters network-connectivity issues during the processing of a query. Attempt to reconnect to MySQL
at this point.
The following (simplistic) example shows what code that can handle these exceptions might look like:
Example 3.15 Connector/J: Example of transaction with retry logic
public void doBusinessOp() throws SQLException {
Connection conn = null;
Statement stmt = null;
ResultSet rs = null;
//
// How many times do you want to retry the transaction
// (or at least _getting_ a connection)?
//
int retryCount = 5;
boolean transactionCompleted = false;
do {
try {
conn = getConnection(); // assume getting this from a
// javax.sql.DataSource, or the
// java.sql.DriverManager
conn.setAutoCommit(false);
//
// Okay, at this point, the 'retry-ability' of the
// transaction really depends on your application logic,
// whether or not you're using autocommit (in this case
// not), and whether you're using transactional storage
// engines
//
// For this example, we'll assume that it's _not_ safe
// to retry the entire transaction, so we set retry
// count to 0 at this point
//
// If you were using exclusively transaction-safe tables,
// or your application could recover from a connection going
// bad in the middle of an operation, then you would not
// touch 'retryCount' here, and just let the loop repeat
// until retryCount == 0.
//
retryCount = 0;
stmt = conn.createStatement();
String query = "SELECT foo FROM bar ORDER BY baz";
rs = stmt.executeQuery(query);
while (rs.next()) {
}
rs.close();
330

Troubleshooting Connector/J Applications
rs = null;
stmt.close();
stmt = null;
conn.commit();
conn.close();
conn = null;
transactionCompleted = true;
} catch (SQLException sqlEx) {
//
// The two SQL states that are 'retry-able' are 08S01
// for a communications error, and 40001 for deadlock.
//
// Only retry if the error was due to a stale connection,
// communications problem or deadlock
//
String sqlState = sqlEx.getSQLState();
if ("08S01".equals(sqlState) || "40001".equals(sqlState)) {
retryCount -= 1;
} else {
retryCount = 0;
}
} finally {
if (rs != null) {
try {
rs.close();
} catch (SQLException sqlEx) {
// You'd probably want to log this...
}
}
if (stmt != null) {
try {
stmt.close();
} catch (SQLException sqlEx) {
// You'd probably want to log this as well...
}
}
if (conn != null) {
try {
//
// If we got here, and conn is not null, the
// transaction should be rolled back, as not
// all work has been done
try {
conn.rollback();
} finally {
conn.close();
}
} catch (SQLException sqlEx) {
//
// If we got an exception here, something
// pretty serious is going on, so we better
// pass it up the stack, rather than just
// logging it...
throw sqlEx;
}
}
}
} while (!transactionCompleted && (retryCount > 0));
}
Note
Use of the autoReconnect option is not recommended because there is no safe
method of reconnecting to the MySQL server without risking some corruption of
the connection state or database state information. Instead, use a connection
pool, which will enable your application to connect to the MySQL server using an
331

Troubleshooting Connector/J Applications
available connection from the pool. The autoReconnect facility is deprecated, and
may be removed in a future release.
3.14.5: I cannot connect to the MySQL server using Connector/J, and I'm sure the connection
parameters are correct.
Make sure that the skip_networking system variable has not been enabled on your server. Connector/
J must be able to communicate with your server over TCP/IP; named sockets are not supported. Also
ensure that you are not filtering connections through a firewall or other network security system. For more
information, see Can't connect to [local] MySQL server.
3.14.6: Updating a table that contains a primary key that is either FLOAT or compound primary key
that uses FLOAT fails to update the table and raises an exception.
Connector/J adds conditions to the WHERE clause during an UPDATE to check the old values of the primary
key. If there is no match, then Connector/J considers this a failure condition and raises an exception.
The problem is that rounding differences between supplied values and the values stored in the database
may mean that the values never match, and hence the update fails. The issue will affect all queries, not
just those from Connector/J.
To prevent this issue, use a primary key that does not use FLOAT. If you have to use a floating point
column in your primary key, use DOUBLE or DECIMAL types in place of FLOAT.
3.14.7: I get an ER_NET_PACKET_TOO_LARGE exception, even though the binary blob size I want to
insert using JDBC is safely below the max_allowed_packet size.
This is because the hexEscapeBlock() method in
com.mysql.cj.AbstractPreparedQuery.streamToBytes() may almost double the size of your
data.
3.14.8: What should I do if I receive error messages similar to the following: “Communications link
failure – Last packet sent to the server was X ms ago”?
Generally speaking, this error suggests that the network connection has been closed. There can be several
root causes:
• Firewalls or routers may clamp down on idle connections (the MySQL client/server protocol does not
ping).
• The MySQL Server may be closing idle connections that exceed the wait_timeout or
interactive_timeout threshold.
Although network connections can be volatile, the following can be helpful in avoiding problems:
• Ensure connections are valid when used from the connection pool. Use a query that starts with /* ping
*/ to execute a lightweight ping instead of full query. Note, the syntax of the ping needs to be exactly as
specified here.
• Minimize the duration a connection object is left idle while other application logic is executed.
• Explicitly validate the connection before using it if the connection has been left idle for an extended
period of time.
• Ensure that wait_timeout and interactive_timeout are set sufficiently high.
• Ensure that tcpKeepalive is enabled.
332

Troubleshooting Connector/J Applications
• Ensure that any configurable firewall or router timeout settings allow for the maximum expected
connection idle time.
Note
Do not expect to be able to reuse a connection without problems if it has being lying
idle for a period. If a connection is to be reused after being idle for any length of
time, ensure that you explicitly test it before reusing it.
3.14.9: Why does Connector/J not reconnect to MySQL and re-issue the statement after a
communication failure instead of throwing an Exception, even though I use the autoReconnect
connection string option?
There are several reasons for this. The first is transactional integrity. The MySQL Reference Manual states
that “there is no safe method of reconnecting to the MySQL server without risking some corruption of the
connection state or database state information”. Consider the following series of statements for example:
conn.createStatement().execute(
"UPDATE checking_account SET balance = balance - 1000.00 WHERE customer='Smith'");
conn.createStatement().execute(
"UPDATE savings_account SET balance = balance + 1000.00 WHERE customer='Smith'");
conn.commit();
Consider the case where the connection to the server fails after the UPDATE to checking_account.
If no exception is thrown, and the application never learns about the problem, it will continue executing.
However, the server did not commit the first transaction in this case, so that will get rolled back. But
execution continues with the next transaction, and increases the savings_account balance by 1000.
The application did not receive an exception, so it continued regardless, eventually committing the second
transaction, as the commit only applies to the changes made in the new connection. Rather than a transfer
taking place, a deposit was made in this example.
Note that running with autocommit enabled does not solve this problem. When Connector/J encounters
a communication problem, there is no means to determine whether the server processed the currently
executing statement or not. The following theoretical states are equally possible:
• The server never received the statement, and therefore no related processing occurred on the server.
• The server received the statement, executed it in full, but the response was not received by the client.
If you are running with autocommit enabled, it is not possible to guarantee the state of data on the server
when a communication exception is encountered. The statement may have reached the server, or it may
not. All you know is that communication failed at some point, before the client received confirmation (or
data) from the server. This does not only affect autocommit statements though. If the communication
problem occurred during Connection.commit(), the question arises of whether the transaction was
committed on the server before the communication failed, or whether the server received the commit
request at all.
The second reason for the generation of exceptions is that transaction-scoped contextual data may be
vulnerable, for example:
• Temporary tables.
• User-defined variables.
• Server-side prepared statements.
333

Known Issues and Limitations
These items are lost when a connection fails, and if the connection silently reconnects without generating
an exception, this could be detrimental to the correct execution of your application.
In summary, communication errors generate conditions that may well be unsafe for Connector/J to simply
ignore by silently reconnecting. It is necessary for the application to be notified. It is then for the application
developer to decide how to proceed in the event of connection errors and failures.
3.14.10: How can I use 3-byte UTF8 with Connector/J?
Because there is no Java-style character set name for utfmb3 that you can use with the connection option
charaterEncoding, the only way to use utf8mb3 as your connection character set is to use a utf8mb3
collation (for example, utf8_general_ci) for the connection option connectionCollation, which
forces a utf8mb3 character set to be used. See Section 3.5.7, “Using Character Sets and Unicode” for
details.
3.14.11: How can I use 4-byte UTF8 (utf8mb4) with Connector/J?
To use 4-byte UTF8 with Connector/J configure the MySQL server with
character_set_server=utf8mb4. Connector/J will then use that setting, if characterEncoding and
connectionCollation have not been set in the connection string. This is equivalent to autodetection
of the character set. See Section 3.5.7, “Using Character Sets and Unicode” for details. You can use
characterEncoding=UTF-8 to use utf8mb4, even if character_set_server on the server has
been set to something else.
3.14.12: Using useServerPrepStmts=false and certain character encodings can lead to
corruption when inserting BLOBs. How can this be avoided?
When using certain character encodings, such as SJIS, CP932, and BIG5, it is possible that BLOB data
contains characters that can be interpreted as control characters, for example, backslash, '\'. This can lead
to corrupted data when inserting BLOBs into the database. There are two things that need to be done to
avoid this:
1. Set the connection string option useServerPrepStmts to true.
2. Set SQL_MODE to NO_BACKSLASH_ESCAPES.
3.15 Known Issues and Limitations
The following are some known issues and limitations for MySQL Connector/J:
• When Connector/J retrieves timestamps for a daylight saving time (DST) switch day using the
getTimeStamp() method on the result set, some of the returned values might be wrong. In order to
avoid such errors, we recommend setting a connection time zone that uses a monotonic clock by, for
example, setting connectionTimeZone=UTC, and configuring other date-time connection properties
according to your needs; see Section 3.5.6, “Handling of Date-Time Values” for details.
• The functionality of the property elideSetAutoCommits has been disabled due to Bug# 66884. Any
value given for the property is ignored by Connector/J.
• MySQL Server uses a proleptic Gregorian calendar internally. However, Connector/J uses
java.sql.Date, which is non-proleptic. Therefore, when setting and retrieving dates that were before
the Julian-Gregorian cutover (October 15, 1582) using the PreparedStatement methods, always
supply explicitly a proleptic Gregorian calendar to the setDate() and getDate() methods, in order to
avoid possible errors with dates stored to and calculated by the server.
• To use Windows named pipes for connections, the MySQL Server that Connector/J wants to connect
to must be started with the system variable named_pipe_full_access_group; see Section 3.5.11,
“Connecting Using Named Pipes” for details.
334

Connector/J Support
3.16 Connector/J Support
3.16.1 Connector/J Community Support
You can join the #connectors channel in the MySQL Community Slack workspace, where you can get
help directly from MySQL developers and other users.
3.16.2 How to Report Connector/J Bugs or Problems
The normal place to report bugs is http://bugs.mysql.com/, which is the address for our bugs database.
This database is public, and can be browsed and searched by anyone. If you log in to the system, you will
also be able to enter new reports.
If you find a sensitive security bug in MySQL Server, please let us know immediately by sending an email
message to <[email protected]>. Exception: Support customers should report all problems,
including security bugs, to Oracle Support at http://support.oracle.com/.
Writing a good bug report takes patience, but doing it right the first time saves time both for us and for
yourself. A good bug report, containing a full test case for the bug, makes it very likely that we will fix
sooner rather than later.
This section will help you write your report correctly so that you do not waste your time doing things that
may not help us much or at all.
If you have a repeatable bug report, please report it to the bugs database at http://bugs.mysql.com/. Any
bug that we are able to repeat has a high chance of being fixed sooner rather than later.
To report other problems, you can use one of the MySQL mailing lists.
Remember that it is possible for us to respond to a message containing too much information, but not to
one containing too little. People often omit facts because they think they know the cause of a problem and
assume that some details do not matter.
A good principle is this: If you are in doubt about stating something, state it. It is faster and less
troublesome to write a couple more lines in your report than to wait longer for the answer if we must ask
you to provide information that was missing from the initial report.
The most common errors made in bug reports are (a) not including the version number of Connector/J or
MySQL used, and (b) not fully describing the platform on which Connector/J is installed (including the JVM
version, and the platform type and version number that MySQL itself is installed on).
This is highly relevant information, and in 99 cases out of 100, the bug report is useless without it. Very
often we get questions like, “Why doesn't this work for me?” Then we find that the feature requested was
not implemented in that MySQL version, or that a bug described in a report has already been fixed in
newer MySQL versions.
Sometimes the error is platform-dependent; in such cases, it is next to impossible for us to fix anything
without knowing the operating system and the version number of the platform.
If at all possible, create a repeatable, standalone testcase that doesn't involve any third-party classes.
To streamline this process, we ship a base class for testcases with Connector/J, named
'com.mysql.cj.jdbc.util.BaseBugReport'. To create a testcase for Connector/J using this class,
create your own class that inherits from com.mysql.cj.jdbc.util.BaseBugReport and override the
methods setUp(), tearDown() and runTest().
335

How to Report Connector/J Bugs or Problems
In the setUp() method, create code that creates your tables, and populates them with any data needed to
demonstrate the bug.
In the runTest() method, create code that demonstrates the bug using the tables and data you created
in the setUp method.
In the tearDown() method, drop any tables you created in the setUp() method.
In any of the above three methods, use one of the variants of the getConnection() method to create a
JDBC connection to MySQL:
• getConnection() - Provides a connection to the JDBC URL specified in getUrl(). If a connection
already exists, that connection is returned, otherwise a new connection is created.
• getNewConnection() - Use this if you need to get a new connection for your bug report (that is, there
is more than one connection involved).
• getConnection(String url) - Returns a connection using the given URL.
• getConnection(String url, Properties props) - Returns a connection using the given URL
and properties.
If you need to use a JDBC URL that is different from 'jdbc:mysql:///test', override the method getUrl() as
well.
Use the assertTrue(boolean expression) and assertTrue(String failureMessage,
boolean expression) methods to create conditions that must be met in your testcase demonstrating
the behavior you are expecting (vs. the behavior you are observing, which is why you are most likely filing
a bug report).
Finally, create a main() method that creates a new instance of your testcase, and calls the run method:
public static void main(String[] args) throws Exception {
new MyBugReport().run();
}
Once you have finished your testcase, and have verified that it demonstrates the bug you are reporting,
upload it with your bug report to http://bugs.mysql.com/.
336

Chapter 4 MySQL Connector/NET Developer Guide
Table of Contents
4.1 Introduction to MySQL Connector/NET ...................................................................................... 338
4.2 Connector/NET Versions ........................................................................................................... 339
4.3 Connector/NET Installation ........................................................................................................ 341
4.3.1 Installing Connector/NET on Windows ............................................................................ 341
4.3.2 Installing Connector/NET on Unix with Mono ................................................................... 344
4.3.3 Installing Connector/NET from Source ............................................................................ 345
4.4 Connector/NET Connections ..................................................................................................... 346
4.4.1 Creating a Connector/NET Connection String .................................................................. 346
4.4.2 Managing a Connection Pool in Connector/NET .............................................................. 349
4.4.3 Handling Connection Errors ............................................................................................ 350
4.4.4 Connector/NET Authentication ........................................................................................ 351
4.4.5 Connector/NET Connection Options Reference ............................................................... 356
4.5 Connector/NET Programming .................................................................................................... 373
4.5.1 Using GetSchema on a Connection ................................................................................ 373
4.5.2 Using MySqlCommand ................................................................................................... 375
4.5.3 Using Connector/NET with Table Caching ....................................................................... 378
4.5.4 Preparing Statements in Connector/NET ......................................................................... 378
4.5.5 Creating and Calling Stored Procedures ......................................................................... 379
4.5.6 Handling BLOB Data With Connector/NET ...................................................................... 383
4.5.7 Working with Partial Trust / Medium Trust ....................................................................... 386
4.5.8 Writing a Custom Authentication Plugin ........................................................................... 390
4.5.9 Using the Connector/NET Interceptor Classes ................................................................. 393
4.5.10 Handling Date and Time Information in Connector/NET .................................................. 395
4.5.11 Using the MySqlBulkLoader Class ................................................................................ 396
4.5.12 Connector/NET Tracing ................................................................................................ 398
4.5.13 Using Connector/NET with Crystal Reports ................................................................... 403
4.5.14 Asynchronous Methods ................................................................................................ 407
4.5.15 Binary and Nonbinary Issues ........................................................................................ 414
4.5.16 Character Set Considerations for Connector/NET .......................................................... 414
4.6 Connector/NET Tutorials ........................................................................................................... 415
4.6.1 Tutorial: An Introduction to Connector/NET Programming ................................................. 415
4.6.2 ASP.NET Provider Model and Tutorials ........................................................................... 424
4.6.3 Tutorial: Using an Entity Framework Entity as a Windows Forms Data Source ................... 441
4.6.4 Tutorial: Data Binding in ASP.NET Using LINQ on Entities ............................................... 449
4.6.5 Tutorial: Generating MySQL DDL from an Entity Framework Model .................................. 452
4.6.6 Tutorial: Basic CRUD Operations with Connector/NET ..................................................... 453
4.6.7 Tutorial: Configuring SSL with Connector/NET ................................................................. 456
4.6.8 Tutorial: Using MySqlScript ............................................................................................ 459
4.7 Connector/NET for Entity Framework ......................................................................................... 463
4.7.1 Entity Framework 6 Support ........................................................................................... 463
4.7.2 Entity Framework Core Support ...................................................................................... 469
4.8 Connector/NET API Reference .................................................................................................. 478
4.8.1 MySql.Data.Common.DnsClient ...................................................................................... 478
4.8.2 MySql.Data.MySqlClient Namespace .............................................................................. 478
4.8.3 MySql.Data.MySqlClient.Authentication Namespace ......................................................... 481
4.8.4 MySql.Data.MySqlClient.Interceptors Namespace ............................................................ 482
4.8.5 MySql.Data.MySqlClient.Replication Namespace ............................................................. 482
4.8.6 MySql.Data.Types Namespace ....................................................................................... 482
337

Introduction to MySQL Connector/NET
4.8.7 MySql.Data.EntityFramework Namespace ....................................................................... 483
4.8.8 Microsoft.EntityFrameworkCore Namespace .................................................................... 484
4.8.9 MySql.EntityFrameworkCore Namespace ........................................................................ 484
4.8.10 MySql.Web Namespace ............................................................................................... 487
4.9 Connector/NET Support ............................................................................................................ 488
4.9.1 Connector/NET Community Support ............................................................................... 488
4.9.2 How to Report Connector/NET Problems or Bugs ............................................................ 488
MySQL Connector/NET is the connector that enables .NET applications to communicate with MySQL
servers.
For notes detailing the changes in each release of Connector/NET, see MySQL Connector/NET Release
Notes.
For legal information, see the Legal Notices.
For help with using MySQL, please visit the MySQL Forums, where you can discuss your issues with other
MySQL users.
Licensing information. This product may include third-party software, used under license. If you
are using a Commercial release of MySQL Connector/NET, see this document for licensing information,
including licensing information relating to third-party software that may be included in this Commercial
release. If you are using a Community release of MySQL Connector/NET, see this document for licensing
information, including licensing information relating to third-party software that may be included in this
Community release.
4.1 Introduction to MySQL Connector/NET
MySQL Connector/NET enables you to develop .NET applications that require secure, high-performance
data connectivity with MySQL. It implements the required ADO.NET interfaces and integrates into
ADO.NET-aware tools. You can build applications using your choice of .NET languages. Connector/NET
is a fully managed ADO.NET data provider written in 100% pure C#. It does not use the MySQL C client
library.
Connector/NET source code and tests are available from the NuGet Gallery and GitHub. For notes
detailing the changes in each release of Connector/NET, see MySQL Connector/NET Release Notes.
Connector/NET includes full support for:
• Features provided by MySQL Server, up to and including the MySQL 9.0 release series.
• MySQL as a document store (NoSQL), along with X Protocol connection support to access MySQL data
using X Plugin ports.
• Large-packet support for sending and receiving rows and BLOB values up to 2 gigabytes in size.
• Protocol compression, which enables compressing the data stream between the client and server.
• Connections using TCP/IP sockets, named pipes, or shared memory on Windows.
• Connections using TCP/IP sockets or Unix sockets on Unix.
• Encrypted connections using:
• TLSv1.2 protocol over TCP/IP with Connector/NET 8.0.11 and later.
• TLSv1.3 protocol over TCP/IP with Connector/NET 8.0.20 and later.
• .NET Standard and runs on the Universal Windows Platform (UWP) .NET implementation.
338

Key Topics
• Entity Framework 6 and Entity Framework Core to migrate data to and from MySQL data tables.
• The Open Source Mono framework developed by Novell.
Connector/NET supports Microsoft Visual Studio 2013, 2015, 2017, and 2019, although the extent of
support may be limited depending on the versions of Connector/NET and Visual Studio you use. For
details, see Section 4.2, “Connector/NET Versions”.
Key Topics
• For connection string properties when using the MySqlConnection class, see Section 4.4.5,
“Connector/NET Connection Options Reference”.
4.2 Connector/NET Versions
MySQL Connector/NET 9.0 is a continuation of Connector/NET 8.0, but now named to synchronize
with the (latest) MySQL server version it supports. This version combines the functionality of the
previous Connector/NET release series, including support for X Protocol connections. Connector/NET
customizes Entity Framework Core to operate with MySQL data, enables compression in the .NET driver
implementation, and extends cross-platform support to Linux and macOS.
Secure connections using the TLSv1.2 protocol require Connector/NET 8.0.11 or later. In addition, your
Microsoft Windows host must have the TLSv1.2 protocol enabled. Connections made using Windows
named pipes or shared memory do not support the TLSv1.2 protocol. For general guidance about
configuring the server and clients for secure connections, see Configuring MySQL to Use Encrypted
Connections.
Note
.NET 6, 7, 8, 9, and .NET Framework 4.6 (as of 8.4.0) and 4.8 include support for
the TLSv1.3 protocol. Be sure to confirm that the operating system running your
application also supports TLSv1.3 before using it exclusively for connections.
The following table shows the versions of ADO.NET, .NET (Core and Framework), and MySQL Server
that are supported or required by MySQL Connector/NET. For the specific Entity Framework versions that
Connector/NET targets, see Section 4.7, “Connector/NET for Entity Framework”.
Table 4.1 Connector/NET Requirements for Related Products
Connector/NET
Version
ADO.NET
Version
.NET Versions and Visual Studio MySQL
Server
9.1.0 2.x+ For apps that target .NET 9 preview, use VS 2022
(v17.9 or later)
For apps that target .NET 8, use VS 2022 (v17.8 or
later)
For apps that target .NET 6, use VS 2022 (v17.0 and
later) or VS 2022 for Mac (v17.6 or later)
For apps that target .NET Framework 4.8, use VS
2019 (v16.3 or later)
For apps that target .NET Framework 4.6.2, use VS
2017 (v15.9 or later)
MySQL 8.0 or
later
Archived Connector/NET versions and their requirements:
339

Connector/NET Versions
• C/NET 9.0.0: .NET 8, use VS 2022 (v17.8 or later) | .NET 6, use VS 2022 (v17.0 and later) or VS 2022
for Mac (v17.6 or later) | .NET Framework 4.8, use VS 2019 (v16.3 or later) | .NET Framework 4.6.2, use
VS 2017 (v15.9 or later)
Recommended server versions: MySQL 8.0 or later
• C/NET 8.4.0: .NET 8, use VS 2022 (v17.8 or later) | .NET 7, use VS 2022 (v17.4 or later) | .NET 6,
use VS 2022 (v17.0 and later) or VS 2022 for Mac (v17.6 or later) | .NET Framework 4.8, use VS 2019
(v16.3 or later) | .NET Framework 4.6.2, use VS 2017 (v15.9 or later)
Recommended server versions: MySQL 8.0 or later
• C/NET 8.3.0: .NET 8, use VS 2022 (v17.8 or later) | .NET 7, use VS 2022 (v17.4 or later) | .NET 6,
use VS 2022 (v17.0 and later) or VS 2022 for Mac (v17.6 or later) | .NET Framework 4.8, use VS 2019
(v16.3 or later) | .NET Framework 4.6.2, use VS 2017 (v15.9 or later)
Recommended server versions: MySQL 8.3, MySQL 8.0, or MySQL 5.7
• C/NET 8.2.0: .NET 8 preview, use VS 2022 (v17.6 or later) | .NET 7, use VS 2022 (v17.4 or later) | .NET
6, use VS 2022 (v17.0 and later) or VS 2022 for Mac (v17.6 or later) | .NET Framework 4.8, use VS 2019
(v16.3 or later) | .NET Framework 4.6.2, use VS 2017 (v15.9 or later)
Recommended server versions: MySQL 8.2, MySQL 8.0, or MySQL 5.7
• C/NET 8.1.0: .NET 7, use VS 2022 (v17.4 or later) | .NET 6, use VS 2022 (v17.0 and later) or VS 2022
for Mac (v17.6 or later) | .NET Framework 4.8, use VS 2019 (v16.3 or later) | .NET Framework 4.6.2, use
VS 2017 (v15.9 or later)
Recommended server versions: MySQL 8.1, MySQL 8.0, or MySQL 5.7
• C/NET 8.0.33: .NET 7, use VS 2022 (v17.4 or later) | .NET 6, use VS 2022 (v17.0) or VS 2022 for Mac
(v17.0 preview) | .NET Core 3.1, use VS 2019 (v16.4 or later) | .NET Framework 4.8, use VS 2019
(v16.3 or later) | .NET Framework 4.6.2, use VS 2017 (v15.9 or later)
Recommended minimum server version: MySQL 8.0.33 or MySQL 5.7.42
• C/NET 8.0.28+: .NET 6, use VS 2022 (v17.0 or later) or VS 2019 for Mac (v8.10) | .NET 5, use VS 2019
(v16.8) or VS 2019 for Mac (v8.8) | .NET Core 3.1, use VS 2019 (v16.4 or later) | .NET Framework 4.8,
use VS 2019 (v16.3 or later) | .NET Framework 4.6.2, use VS 2017 (v15.9 or later)
Recommended minimum server version: MySQL 8.0.28 or MySQL 5.7.37
• C/NET 8.0.23+: .NET 5, use VS 2019 (v16.8) or VS 2019 for Mac (v8.8) | .NET Core 3.1, use VS 2019
(v16.4 or later) | .NET Framework 4.8, use VS 2019 (v16.3 or later)
Recommended minimum server version: MySQL 8.0.23 or MySQL 5.7.33
• C/NET 8.0.22+: .NET 5, use VS 2019 (v16.7) or VS 2019 for Mac (v8.7) | .NET Core 3.1, use VS 2019
(v16.4 or later) | .NET Framework 4.8, use VS 2019 (v16.3 or later)
Recommended minimum server version: MySQL 8.0.22 or MySQL 5.7.32
• C/NET 8.0.20+: .NET Core 3.1, use VS 2019 (v16.4 or later) | .NET Framework 4.8, use VS 2019 (v16.3
or later)
Recommended minimum server version: MySQL 8.0.20 or MySQL 5.7.30
• C/NET 8.0.19+: .NET Core 3.0, use VS 2019 (v16.3 or later) | .NET Framework 4.8, use VS 2019 (v16.3
or later)
340

Connector/NET Installation
Recommended minimum server version: MySQL 8.0.19 or MySQL 5.7.29
• C/NET 8.0.18+: .NET Core 3.0, use VS 2019 (v16.3 or later)
Recommended minimum server version: MySQL 8.0.18 or MySQL 5.7.28
• C/NET 8.0.17+: .NET Core 2.2, use VS 2017 (v15.0.9 or later) | .NET Core 2.1, use VS 2017 (v15.0.7 or
later)
Recommended minimum server version: MySQL 8.0.17 or MySQL 5.7.27
• C/NET 8.0.10+: .NET Core 2.0, use VS 2017 (v15.0.3 or later)
Recommended minimum server version: MySQL 8.0.17 or MySQL 5.7.27
• C/NET 8.0.8+: .NET Framework 4.5.x, use VS 2013 / 2015 / 2017
Recommended minimum server version: MySQL 8.0.17 or MySQL 5.7.27
4.3 Connector/NET Installation
MySQL Connector/NET runs on any platform that supports the .NET Standard (.NET Framework, .NET
Core, and Mono). The .NET Framework is primarily supported on recent versions of Microsoft Windows
and Microsoft Windows Server.
Cross-platform options:
• .NET Core provides support on Windows, macOS, and Linux.
• Open Source Mono platform provides support on Linux.
Connector/NET is available for download as a standalone MSI Installer or from the NuGet gallery. The
source code is available for download from MySQL Download MySQL Connector/NET or at GitHub from
the MySQL Connector/NET repository.
Note
Starting with Connector/NET 8.0.33, application developers must ensure the
availability of following libraries at run time. Previously, the libraries were bundled
with Connector/NET installations.
For applications using OCI Authentication and SSL Certificates validation:
• Portable.BouncyCastle (see https://www.nuget.org/packages/
Portable.BouncyCastle)
For applications using X DevAPI:
• K4os.Compression.LZ4.Streams (see https://www.nuget.org/packages/
K4os.Compression.LZ4.Streams)
• Google.Protobuf (see https://www.nuget.org/packages/Google.Protobuf)
4.3.1 Installing Connector/NET on Windows
On Microsoft Windows, you can install either through a binary installation process using a Connector/NET
MSI, using NuGet, or by downloading and using the source code.
341

Installing Connector/NET on Windows
Before installing, ensure that your system is up to date, including installing the latest version of the .NET
Framework or .NET Core. For additional information, see Section 4.2, “Connector/NET Versions”.
4.3.1.1 Installing Connector/NET Using the Standalone Installer
You can install MySQL Connector/NET through a Windows Installer (.msi) installation package, which
can install Connector/NET on supported Windows operating systems. The MSI package is a file named
mysql-connector-net-version.msi, where version indicates the Connector/NET version.
To install Connector/NET:
1. Double-click the MSI installer file, and click Next to start the installation.
2. Choose the type of installation to perform (Typical, Custom, or Complete) and then click Next.
• The typical installation is suitable in most cases. Click Typical and proceed to Step 5.
• A Complete installation installs all the available files. To conduct a Complete installation, click the
Complete button and proceed to step 5.
• To customize your installation, including choosing the components to install and some installation
options, click the Custom button and proceed to Step 3.
The Connector/NET installer will register the connector within the Global Assembly Cache (GAC) - this
will make the Connector/NET component available to all applications, not just those where you explicitly
reference the Connector/NET component. The installer will also create the necessary links in the Start
menu to the documentation and release notes.
3. If you have chosen a custom installation, you can select the individual components to install, including
the core interface component, supporting documentation options, examples, and the source code. Click
Disk Usage to determine the disk-space requirements of your component choices.
Select the items and their installation level and then click Next to continue the installation.
4. You will be given a final opportunity to confirm the installation. Click Install to copy and install the files
onto your computer. Use Back to return to the modify your component options.
5. When prompted, click Finish to exit the MSI installer.
Unless you choose a different folder, Connector/NET is installed in C:\Program Files (x86)\MySQL
\MySQL Connector Net version (the version installed). New installations do not overwrite existing
versions of Connector/NET.
You may also use the /quiet or /q command-line option with the msiexec tool to install the Connector/
NET package automatically (using the default options) with no notification to the user. Using this method
the user cannot select options. Additionally, no prompts, messages or dialog boxes will be displayed.
C:\> msiexec /package connector-net.msi /quiet
To provide a progress bar to the user during automatic installation, use the /passive option.
4.3.1.2 Installing Connector/NET Using NuGet
MySQL Connector/NET functionality is available as packages from NuGet, an open-source package
manager for the Microsoft development platform (including .NET Core). The NuGet Gallery is the central
software package repository populated with the most recent NuGet packages for Connector/NET.
342

Installing Connector/NET on Windows
You can install or upgrade one or more individual Connector/NET packages with NuGet, making it a
convenient way to introduce existing technology, such as Entity Framework, to your project. NuGet
manages dependencies across the related packages and all of the prerequisites are listed in the NuGet
Gallery. For a description of each Connector/NET package, see Connector/NET Packages (NuGet).
Important
For projects that require Connector/NET assemblies to be stored in the GAC or
integration with Entity Framework Designer (Visual Studio), use the standalone MSI
to install Connector/NET, rather than installing the NuGet packages.
Consuming Connector/NET Packages with NuGet
The NuGet Gallery (https://www.nuget.org/) provides several client tools that can help you install or
upgrade Connector/NET packages. If you are not familiar with the tool options or processes, see Package
consumption workflow to get started. After locating a package description in NuGet, confirm the following
information:
• The identity and version number of the package are correct. Use the Version History list to select the
current version.
• All of the prerequisites are installed. See the Dependencies list for details.
• The license terms are met. See the License Info link to view this information.
Connector/NET Packages (NuGet)
Connector/NET provides the following five NuGet packages:
MySql.Data This package contains the core functionality of Connector/NET,
including using MySQL as a document store (with Connector/NET 8.0
only). It implements the required ADO.NET interfaces and integrates
with ADO.NET-aware tools. In addition, the packages provides access
to multiple versions of MySQL server and encapsulates database-
specific protocols.
MySql.Web The MySql.Web package includes support for the ASP.NET 2.0
provider model (see Section 4.6.2, “ASP.NET Provider Model and
Tutorials”). This model enables you to focus on the business logic of
your application, rather than having to recreate boilerplate items such as
membership and roles support. The package supports the membership,
role, profile, and session-state providers.
Package dependency: MySql.Data.
MySql.Data.EntityFrameworkThis package provides object-relational mapper (ORM) capabilities,
which enables you to work with MySQL databases using domain-
specific objects, thereby eliminating the need for most of the data
access code. Select this package for your Entity Framework 6
applications (see Section 4.7.1, “Entity Framework 6 Support”).
Package dependency: MySql.Data.
MySql.Data.EntityFrameworkCoreThis package is similar to the MySql.Data.EntityFramework
package; however, it provides multi-platform support for Entity
Framework tasks. Select this package for your Entity Framework Core
applications (see Section 4.7.2, “Entity Framework Core Support”).
343

Installing Connector/NET on Unix with Mono
MySql.Data.EntityFrameworkCore.DesignThe MySql.Data.EntityFrameworkCore.Design package
includes shared design-time components for Entity Framework Core
tools, which enable you to scaffold and migrate MySQL databases.
Note
Beginning with Connector/NET 8.0.20,
the functionality provided in this
package has been relocated to the
MySql.Data.EntityFrameworkCore
package. The original
MySql.Data.EntityFrameworkCore.Design
package is deprecated.
4.3.2 Installing Connector/NET on Unix with Mono
There is no installer available for installing the MySQL Connector/NET component on your Unix
installation. Before installing, ensure that you have a working Mono project installation. To test whether
your system has Mono installed, enter:
$> mono --version
The version of the Mono JIT compiler is displayed.
To compile C# source code, make sure a Mono C# compiler is installed.
Note
There are three Mono C# compilers available: mcs, which accesses the 1.0-profile
libraries, gmcs, which accesses the 2.0-profile libraries, and dmcs, which accesses
the 4.0-profile libraries.
To install Connector/NET on Unix/Mono:
1. Download the mysql-connector-net-version-noinstall.zip and extract the contents to a
directory of your choice, for example: ~/connector-net/.
2. In the directory where you unzipped the connector to, change into the bin subdirectory. Ensure the file
MySql.Data.dll is present. This filename is case-sensitive.
3. You must register the Connector/NET component, MySql.Data, in the Global Assembly Cache (GAC).
In the current directory enter the gacutil command:
#> gacutil /i MySql.Data.dll
This will register MySql.Data into the GAC. You can check this by listing the contents of /usr/lib/
mono/gac, where you will find MySql.Data if the registration has been successful.
You are now ready to compile your application. You must ensure that when you compile your application
you include the Connector/NET component using the -r: command-line option. For example:
$> gmcs -r:System.dll -r:System.Data.dll -r:MySql.Data.dll HelloWorld.cs
The referenced assemblies depend on the requirements of the application, but applications using
Connector/NET must provide -r:MySql.Data at a minimum.
You can further check your installation by running the compiled program, for example:
$> mono HelloWorld.exe
344

Installing Connector/NET from Source
4.3.3 Installing Connector/NET from Source
Building MySQL Connector/NET from the source code enables you to customize build parameters and
target platforms such as Linux and macOS. The procedures in this section describe how to build source
with Microsoft Visual Studio (Windows or macOS) and .NET Core CLI (Windows, macOS, or Linux).
MySQL Connector/NET source code is available for download from https://dev.mysql.com/downloads/
connector/net/. Select Source Code from the Select Operating System list. Use the Archive tab to
download a previous version of Connector/NET source code.
Source code is packaged as a ZIP archive file with a name similar to mysql-connector-net-8.0.19-
src.zip. Unzip the file to local directory.
The file includes the following directories with source files:
• EFCore: Source and test files for Entity Framework Core features.
• EntityFramework: Source and test files for Entity Framework 6 features.
• MySQL.Data: Source and test files for features using the MySQL library.
• MySQL.Web: Source and test files for the web providers, including the membership, role, profile
providers that are used in ASP.NET or ASP.NET Core websites.
Building Source Code with Visual Studio
The following procedure can be used to build the connector on Microsoft Windows or macOS. Connector/
NET supports various versions of Microsoft Visual Studio and .NET libraries. For guidance about the
Connector/NET version you intend to build, see Section 4.2, “Connector/NET Versions” before you begin.
1. Navigate to the root of the source code directory and then to the directory with the source files to build,
such as MySql.Data. Each source directory contains a Microsoft Visual Studio solution file with the
.sln (for example, MySqlData.sln).
2. Double-click the solutions file to start Visual Studio and open the solution.
Visual Studio opens the solution files in the Solution Explorer. All of the projects related to the solution
also appear in the navigation tree. These related projects can include test files and the projects that
your solutions requires.
3. Locate the project with the same name as the solution (MySql.Data in this example). Right-click the
node and select Build from the context menu to build the solution.
Building Source Code with .NET Core CLI
The following procedure can be used to build the connector on Microsoft Windows, Linux, or macOS.
A current version of the .NET Core SDK must be installed locally to execute dotnet commands. For
additional usage information, visit https://docs.microsoft.com/en-us/dotnet/core/tools/.
1. Open a terminal such as PowerShell, Command Prompt, or bash.
Navigate to the root of the source code directory and then to the directory with the source files to build,
such as MySQL.Data.
2. Clean the output of the previous build.
dotnet clean
345

Connector/NET Connections
3. Type the following command to build the solution file (MySql.Data.sln in this example) using the
default command arguments:
dotnet build
Solution and project default. When no directory and file name is provided on the command line,
the default value depends on the current directory. If the command is executed from the top directory,
such as MySQL.Data, the solution file is selected (new with the .NET Core 3.0 SDK). Otherwise, if
executed from the src subdirectory, the project file is used.
Configuration default, -c | --configuration. Defaults to the Debug build configuration.
Alternatively, -c Release is the other supported build configuration argument value.
Framework default, -f | --framework. When no framework is specified on the command line, the
solution or project is built for all possible frameworks that apply. To determine which frameworks are
supported, use a text editor to open the related project file (for example, MySql.Data.csproj in the
src subdirectory) and search for the <TargetFrameworks> element.
To build source code on Linux and macOS, you must target .NET Standard (-f netstandard2.0 or
-f netstandard2.1). To build source code on Microsoft Windows, you can target .NET Standard
and .NET Framework (-f net452 or -f net48).
4.4 Connector/NET Connections
All interaction between a .NET application and the MySQL server is routed through a MySqlConnection
object when using the classic MySQL protocol. Before your application can interact with the server, it must
instantiate, configure, and open a MySqlConnection object.
Even when using the MySqlHelper class, a MySqlConnection object is created by the helper class.
Likewise, when using the MySqlConnectionStringBuilder class to expose the connection options as
properties, your application must open a MySqlConnection object.
This sections in this chapter describe how to connect to MySQL using the MySqlConnection object.
4.4.1 Creating a Connector/NET Connection String
The MySqlConnection object is configured using a connection string. A connection string contains
several key-value pairs, separated by semicolons. In each key-value pair, the option name and its
corresponding value are joined by an equal sign. For the list of option names to use in the connection
string, see Section 4.4.5, “Connector/NET Connection Options Reference”.
The following is a sample connection string:
"server=127.0.0.1;uid=root;pwd=12345;database=test"
In this example, the MySqlConnection object is configured to connect to a MySQL server at
127.0.0.1, with a user name of root and a password of 12345. The default database for all statements
will be the test database.
Connector/NET supports several connection models:
• Opening a Connection to a Single Server
• Opening a Connection for Multiple Hosts with Failover
• Opening a Connection Using a Single DNS Domain
346

Creating a Connector/NET Connection String
Opening a Connection to a Single Server
After you have created a connection string it can be used to open a connection to the MySQL server.
The following code is used to create a MySqlConnection object, assign the connection string, and open
the connection.
MySQL Connector/NET can also connect using the native Windows authentication plugin. See
Section 4.4.4, “Connector/NET Authentication” for details.
You can further extend the authentication mechanism by writing your own authentication plugin. See
Section 4.5.8, “Writing a Custom Authentication Plugin” for details.
C# Example
MySql.Data.MySqlClient.MySqlConnection conn;
string myConnectionString;
myConnectionString = "server=127.0.0.1;uid=root;" +
"pwd=12345;database=test";
try
{
conn = new MySql.Data.MySqlClient.MySqlConnection();
conn.ConnectionString = myConnectionString;
conn.Open();
}
catch (MySql.Data.MySqlClient.MySqlException ex)
{
MessageBox.Show(ex.Message);
}
Visual Basic Example
Dim conn As New MySql.Data.MySqlClient.MySqlConnection
Dim myConnectionString as String
myConnectionString = "server=127.0.0.1;" _
& "uid=root;" _
& "pwd=12345;" _
& "database=test"
Try
conn.ConnectionString = myConnectionString
conn.Open()
Catch ex As MySql.Data.MySqlClient.MySqlException
MessageBox.Show(ex.Message)
End Try
You can also pass the connection string to the constructor of the MySqlConnection class:
C# Example
MySql.Data.MySqlClient.MySqlConnection conn;
string myConnectionString;
myConnectionString = "server=127.0.0.1;uid=root;" +
"pwd=12345;database=test";
try
{
conn = new MySql.Data.MySqlClient.MySqlConnection(myConnectionString);
conn.Open();
}
catch (MySql.Data.MySqlClient.MySqlException ex)
{
MessageBox.Show(ex.Message);
}
Visual Basic Example
347

Creating a Connector/NET Connection String
Dim myConnectionString as String
myConnectionString = "server=127.0.0.1;" _
& "uid=root;" _
& "pwd=12345;" _
& "database=test"
Try
Dim conn As New MySql.Data.MySqlClient.MySqlConnection(myConnectionString)
conn.Open()
Catch ex As MySql.Data.MySqlClient.MySqlException
MessageBox.Show(ex.Message)
End Try
After the connection is open, it can be used by the other Connector/NET classes to communicate with the
MySQL server.
Opening a Connection for Multiple Hosts with Failover
Data used by applications can be stored on multiple MySQL servers to provide high availability. Connector/
NET provides a simple way to specify multiple hosts in a connection string for cases in which multiple
MySQL servers are configured for replication and you are not concerned about the precise server your
application connects to in the set. For an example of how to configure multiple hosts with replication, see
Using Replication & Load balancing.
Starting in Connector/NET 8.0.19, both classic MySQL protocol and X Protocol connections permit the use
of multiple host names and multiple endpoints (a host:port pair) in a connection string or URI scheme.
For example:
// classic protocol example
"server=10.10.10.10:3306,192.101.10.2:3305,localhost:3306;uid=test;password=xxxx"
// X Protocol example
mysqlx://test:test@[192.1.10.10:3305,127.0.0.1:3306]
An updated failover approach selects the target for connection first by priority order, if provided, or random
order when no priority is specified. If the attempted connection to a selected target is unsuccessful,
Connector/NET selects a new target from the list until no more hosts are available. If enabled, Connector/
NET uses connection pooling to manage unsuccessful connections (see Section 4.4.2, “Managing a
Connection Pool in Connector/NET”).
Opening a Connection Using a Single DNS Domain
When multiple MySQL instances provide the same service in your installation, you can apply DNS Service
(SRV) records to provide failover, load balancing, and replication services. DNS SRV records remove the
need for clients to identify each possible host in the connection string, or for connections to be handled by
an additional software component. They can also be updated centrally by administrators when servers are
added or removed from the configuration or when their host names are changed. DNS SRV records can be
used in combination with connection pooling, in which case connections to hosts that are no longer in the
current list of SRV records are removed from the pool when they become idle. For information about DNS
SRV support in MySQL, see Connecting to the Server Using DNS SRV Records.
A service record is a specification of data managed by your domain name system that defines the
location (host name and port number) of servers for the specified services. The record format defines
the priority, weight, port, and target for the service as defined in the RFC 2782 specification (see
https://tools.ietf.org/html/rfc2782). In the following SRV record example with four server targets (for
_mysql._tcp.foo.abc.com.), Connector/NET uses the server selection order of foo2, foo1, foo3,
and foo4.
Name TTL Class Priority Weight Port Target
_mysql._tcp.foo.abc.com. 86400 IN SRV 0 5 3306 foo1.abc.com
_mysql._tcp.foo.abc.com. 86400 IN SRV 0 10 3306 foo2.abc.com
_mysql._tcp.foo.abc.com. 86400 IN SRV 10 5 3306 foo3.abc.com
348

Managing a Connection Pool in Connector/NET
_mysql._tcp.foo.abc.com. 86400 IN SRV 20 5 3306 foo4.abc.com
To open a connection using DNS SRV records, add the dns-srv connection option to your connection
string. For example:
C# Example
var conn = new MySqlConnection("server=_mysql._tcp.foo.abc.com.;dns-srv=true;" +
"user id=user;password=****;database=test");
For additional usage examples and restrictions for both classic MySQL protocol and X Protocol, see
Options for Both Classic MySQL Protocol and X Protocol.
4.4.2 Managing a Connection Pool in Connector/NET
The MySQL Connector/NET supports connection pooling for better performance and scalability with
database-intensive applications. This is enabled by default. You can turn it off or adjust its performance
characteristics using the connection string options Pooling, Connection Reset, Connection
Lifetime, Cache Server Properties, Max Pool Size and Min Pool Size. See Section 4.4.1,
“Creating a Connector/NET Connection String” for further information.
Connection pooling works by keeping the native connection to the server live when the client disposes of
a MySqlConnection. Subsequently, if a new MySqlConnection object is opened, it is created from the
connection pool, rather than creating a new native connection. This improves performance.
Guidelines
To work as designed, it is best to let the connection pooling system manage all connections. Do not create
a globally accessible instance of MySqlConnection and then manually open and close it. This interferes
with the way the pooling works and can lead to unpredictable results or even exceptions.
One approach that simplifies things is to avoid creating a MySqlConnection object manually. Instead,
use the overloaded methods that take a connection string as an argument. With this approach, Connector/
NET automatically creates, opens, closes and destructs connections, using the connection pooling system
for best performance.
Typed Datasets and the MembershipProvider and RoleProvider classes use this approach. Most
classes that have methods that take a MySqlConnection as an argument, also have methods that take a
connection string as an argument. This includes MySqlDataAdapter.
Instead of creating MySqlCommand objects manually, you can use the static methods of the
MySqlHelper class. These methods take a connection string as an argument and they fully support
connection pooling.
Resource Usage
Connector/NET runs a background job every three minutes and removes connections from pool that have
been idle (unused) for more than three minutes. The pool cleanup frees resources on both client and
server side. This is because on the client side every connection uses a socket, and on the server side
every connection uses a socket and a thread.
Multiple endpoints. Starting with Connector/NET 8.0.19, a connection string can include multiple
endpoints (server:port) with connection pooling enabled. At runtime, Connector/NET selects one of
the addresses from the pool randomly (or by priority when provided) and attempts to connect to it. If the
connection attempt is unsuccessful, Connector/NET selects another address until the set of addresses is
exhausted. Unsuccessful endpoints are retried every two minutes. Successful connections are managed
by the connection pooling mechanism.
349

Handling Connection Errors
4.4.3 Handling Connection Errors
Because connecting to an external server is unpredictable, it is important to add error handling to
your .NET application. When there is an error connecting, the MySqlConnection class will return a
MySqlException object. This object has two properties that are of interest when handling errors:
• Message: A message that describes the current exception.
• Number: The MySQL error number.
When handling errors, you can adapt the response of your application based on the error number. The two
most common error numbers when connecting are as follows:
• 0: Cannot connect to server.
• 1045: Invalid user name, user password, or both.
The following code example shows how to manage the response of an application based on the actual
error:
C# Example
MySql.Data.MySqlClient.MySqlConnection conn;
string myConnectionString;
myConnectionString = "server=127.0.0.1;uid=root;" +
"pwd=12345;database=test";
try
{
conn = new MySql.Data.MySqlClient.MySqlConnection(myConnectionString);
conn.Open();
}
catch (MySql.Data.MySqlClient.MySqlException ex)
{
switch (ex.Number)
{
case 0:
MessageBox.Show("Cannot connect to server. Contact administrator");
break;
case 1045:
MessageBox.Show("Invalid username/password, please try again");
break;
}
}
Visual Basic Example
Dim myConnectionString as String
myConnectionString = "server=127.0.0.1;" _
& "uid=root;" _
& "pwd=12345;" _
& "database=test"
Try
Dim conn As New MySql.Data.MySqlClient.MySqlConnection(myConnectionString)
conn.Open()
Catch ex As MySql.Data.MySqlClient.MySqlException
Select Case ex.Number
Case 0
MessageBox.Show("Cannot connect to server. Contact administrator")
Case 1045
MessageBox.Show("Invalid username/password, please try again")
End Select
End Try
350

Connector/NET Authentication
Important
If you are using multilanguage databases then you must specify the character set
in the connection string. If you do not specify the character set, the connection
defaults to the latin1 character set. You can specify the character set as part of
the connection string, for example:
MySqlConnection myConnection = new MySqlConnection("server=127.0.0.1;uid=root;" +
"pwd=12345;database=test;Charset=latin1");
4.4.4 Connector/NET Authentication
MySQL Connector/NET implements a variety of authentication plugins that MySQL Server can invoke to
authenticate a user. Pluggable authentication enables the server to determine which plugin applies, based
on the user name and host name that your application passes to the server when making a connection. For
a complete description of the authentication process, see Pluggable Authentication.
Connector/NET provides the following authentication plugins and methods:
• authentication_kerberos_client
• authentication_ldap_sasl_client
• authentication_oci_client
• authentication_webauthn_client
• authentication_windows_client
• caching_sha2_password
• mysql_clear_password
• mysql_native_password
• sha256_password
authentication_kerberos_client
For general information, see Kerberos Pluggable Authentication.
Applications and MySQL servers are able use the Kerberos authentication protocol to authenticate MySQL
Enterprise Edition user accounts and services. With the authentication_kerberos_client plugin,
both the user and the server are able to verify each other's identity. No passwords are ever sent over the
network and Kerberos protocol messages are protected against eavesdropping and replay attacks. The
server-side plugin is supported only on Linux.
Note
The Defaultauthenticationplugin connection-string option is mandatory for
supporting userless and passwordless Kerberos authentications (see Options for
Classic MySQL Protocol Only).
The availability of and the requirements for enabling Kerberos authentication differ by host type.
Connector/NET does not provide Kerberos authentication for .NET applications running on macOS.
On Windows, the Kerberos mode can be set using the KerberosAuthMode connection option (see
Section 4.4.5, “Connector/NET Connection Options Reference”).
Applications running on Linux and Windows participate in Kerberos authentication based on the following
interfaces:
351

Connector/NET Authentication
• Generic Security Service Application Program Interface (GSSAPI)
Minimum version:
• Connector/NET 8.0.26 for classic MySQL protocol connections. Supported on Linux only.
• Connector/NET 8.0.32 for classic MySQL protocol connections through the MIT Kerberos library.
Supported on Windows only.
MIT Kerberos must be installed on each client system to enable authentication of request tickets for
Connector/NET by a MySQL server. The libgssapi_krb5.so.2 library for Linux is required. On
Windows, use the KRB5_CONFIG and KRB5CCNAME environment variables to specify configuration and
cache locations when using GSSAPI through the MIT Kerberos library.
For an overview of the connection process, see Connection Commands for Linux Clients.
• Security Support Provider Interface (SSPI) for Windows
Minimum version: Connector/NET 8.0.27 for classic MySQL protocol connections. Supported on
Windows only.
Connector/NET uses SSPI/Kerberos for authentication. On Windows, SSPI implements GSSAPI. The
behavioral differences between SSPI and GSSAPI include:
• Configuration. Windows clients do not use any external libraries or Kerberos configuration. For
example, with GSSAPI you can set the ticket-granting ticket (TGT) expiry time, key distribution center
(KDC) port, and so on. With SSPI, you cannot set any of these options.
• TGT tickets caching. If you provide a user name and password for authentication in SSPI mode,
those credentials can be obtained from the Windows in-memory cache, but the obtained tickets are
not stored in the Kerberos cache. New tickets are obtained every time.
• Userless and passwordless authentication. In SSPI mode, Windows logged-in user name and
credentials are used. Windows client must be part of the Active Directory domain of the server for a
successful login.
For an overview of the connection process, see Connection Commands for Windows Clients in SPPI
Mode.
authentication_ldap_sasl_client
For general information, see LDAP Pluggable Authentication.
SASL-based LDAP authentication requires MySQL Enterprise Edition and can be used to establish classic
MySQL protocol connections only. This authentication protocol applies to applications running on Linux,
Windows (partial support), but not macOS.
Minimum version:
• Connector/NET 8.0.22 (SCRAM-SHA-1) on Linux and Windows.
• Connector/NET 8.0.23 (SCRAM-SHA-256) on Linux and Windows.
• Connector/NET 8.0.24 (GSSAPI) on Linux only.
MIT Kerberos must be installed on each client system to enable authentication of request tickets for
Connector/NET by a MySQL server. The authentication_ldap_sasl plugin must be configured to
use the GSSAPI mechanism and the application user must be identified as follows:
352

Connector/NET Authentication
IDENTIFIED WITH 'authentication_ldap_sasl'
The libgssapi_krb5.so.2 library for Linux is required.
authentication_oci_client
Minimum version: Connector/NET 8.0.27 for classic MySQL protocol connections only.
Connector/NET supports Oracle Cloud Infrastructure pluggable authentication, which enables .NET
applications to access HeatWave Service in a secure way without using passwords. This pluggable
authentication is not supported for .NET Framework 4.5.x implementations.
Prerequisites for this type of connection include access to a tenancy, a Compute instance, a DB System
attached to a private network, and properly configured groups, compartments, and policies. An Oracle
Cloud Infrastructure administrator can provide the basic setup for MySQL user accounts.
In addition, the DB System must have the server-side authentication plugin installed and loaded before a
connection can be attempted. Connector/NET implements the client-side authentication plugin.
During authentication, the client-side plugin locates the client user’s Oracle Cloud Infrastructure
configuration file from which it obtains a signing key file. The location of the configuration file can
be specified with the ociConfigFile connection option; otherwise, the default location is used. In
Connector/NET 8.0.33, the OciConfigProfile connection option permits selecting a profile in the
configuration file to use for authentication. Connector/NET then signs a token it receives from the server,
uses the token to create the SHA256 RSA signature that it returns to the server, and waits for the success
or failure of the authentication process.
To support Oracle Cloud Infrastructure ephemeral key-based authentication, Connector/NET 8.0.33 (and
later) obtains the location of the token file from the security_token_file entry. For example:
[DEFAULT]
fingerprint=59:8a:0b[...]
key_file=~/.oci/sessions/DEFAULT/oci_api_key.pem
tenancy=ocid1.tenancy.oc1.[...]
region=us-ashburn-1
security_token_file=~/.oci/sessions/DEFAULT/token
Connector/NET sends to the server a JSON attribute (named "token") with the value extracted from the
security_token_file field. If the target file referenced in the profile does not exist, or if the file exceeds
a specified maximum value, then Connector/NET terminates the action and returns an exception with the
cause.
Connector/NET sends an empty token value in the JSON payload if:
• The security-token file is empty.
• The configuration option security_token_file is found but the value in the configuration file is
empty.
In all other cases, Connector/NET adds the content of the security-token file intact to the JSON document.
Potential error conditions include:
• Private key could not be found at location given by OCI configuration entry
'key_file'.
Connector/NET could not find the private key at the specified location.
• OCI configuration entry 'key_file' does not reference a valid key file.
353

Connector/NET Authentication
Connector/NET was unable to load or use the specified private key.
• OCI configuration file does not contain a 'fingerprint' or 'key_file' entry.
The configuration file is missing the fingerprint entry, the key_file entry, or both.
• OCI configuration file could not be read
Connector/NET could not find or load the configuration file. Be sure the ociConfigFile value matches
the location of the file.
• The OCI SDK cannot be found or is not installed
Connector/NET could not load the Oracle Cloud Infrastructure SDK library at run time.
Connector/NET references the OCI.DotNetSDK.Common NuGet package in the Oracle Cloud
Infrastructure SDK library to read configuration-file entry values and this package must be available.
Tip
To manage the size of your .NET project, include only the required package for
authentication rather than the full set of packages in the library.
For specific details about usage and support, see SDK and CLI Configuration File.
authentication_webauthn_client
For general information, see WebAuthn Pluggable Authentication.
MySQL Enterprise Edition supports authentication to MySQL Server 8.2.0 (and higher) using devices such
as smart cards, security keys, and biometric readers. This authentication method is based on the FIDO
and FIDO2 standards, and uses a pair of plugins, authentication_webauthn on the server side and
authentication_webauthn_client on the client side. Connector/NET 8.2.0 supports the client-side
WebAuthn authentication plugin.
The WebAuthn authentication method can be used directly for one-factor authentication (1FA) or combined
with existing MySQL authentication methods to support accounts that use 2FA or 3FA. Connector/NET
provides a callback mechanism to notify the application that the user is expected to interact with the FIDO/
FIDO2 device through its authenticator. For example:
public void OpenConnection()
{
using(var connection = new MySQLConnection("host=foo; .. "))
connection.WebAuthnActionRequested += WebAuthnActionRequested;
connection.Open();
// ...
}
public void WebAuthnActionRequested()
{
Console.WriteLine("Please insert WebAuthn device and perform gesture action for authentication to complete.");
}
If the following requirements are satisfied, Connector/NET notifies the application that it is expecting user
interaction with the FIDO/FIDO2 device:
• The FIDO/FIDO2 device must be registered for the specific authentication factor associated with each
user account.
• The application, Connector/NET, and the FIDO/FIDO2 device must be available on the same host or
within a trusted network.
354

Connector/NET Authentication
• On Windows, the application must run as administrator to access the required libfido2 library, which
must be present on the client.
The authentication process terminates after a reasonable time interval has elapsed without user-device
interaction.
Note
The related authentication_fido_client plugin and FidoActionCallback
callback (both added in Connector/NET 8.0.29) were removed in Connector/NET
8.4.0 in favor of using WebAuthn authentication.
authentication_windows_client
Supported for all versions of Connector/NET. For general information, see Windows Pluggable
Authentication.
MySQL Connector/NET applications can authenticate to a MySQL server using the Windows Native
Authentication Plugin. Users who have logged in to Windows can connect from MySQL client programs to
the server based on the information in their environment without specifying an additional password. The
interface matches the MySql.Data.MySqlClient object. To enable, pass in Integrated Security to the
connection string with a value of yes or sspi.
Passing in a user ID is optional. When Windows authentication is set up, a MySQL user is created and
configured to be used by Windows authentication. By default, this user ID is named auth_windows,
but can be defined using a different name. If the default name is used, then passing the user ID to the
connection string from Connector/NET is optional, because it will use the auth_windows user. Otherwise,
the name must be passed to the connection string using the standard user ID element.
caching_sha2_password
Minimum version: Connector/NET 8.0.11 for classic MySQL protocol connections only. For general
information, see Caching SHA-2 Pluggable Authentication.
mysql_clear_password
Minimum version: Connector/NET 8.0.22 for classic MySQL protocol connections only. For general
information, see Client-Side Cleartext Pluggable Authentication.
mysql_clear_password requires a secure connection to the server, which is satisfied by either
condition at the client:
• The SslMode connection option has a value other than Disabled or None (deprecated in Connector/
NET 8.0.29). The value is set to Preferred by default.
• The ConnectionProtocol connection option is set to unix for Unix domain sockets.
mysql_native_password
Supported for all versions of Connector/NET to establish classic MySQL protocol and X Protocol
connections. For general information, see Native Pluggable Authentication.
Note
The mysql_native_password plugin is disabled by default as of MySQL Server
8.4.0 and removed as of MySQL Server 9.0.0.
355

Connector/NET Connection Options Reference
sha256_password
Minimum version: Connector/NET 8.0.11 for classic MySQL protocol connections or X Protocol
connections with the MYSQL41 mechanism (see the Auth connection option). For general information, see
SHA-256 Pluggable Authentication.
Note
The sha256_password plugin is deprecated as of MySQL Server 8.0.16 and
subject to removal in a future version.
4.4.5 Connector/NET Connection Options Reference
This chapter describes the full set of MySQL Connector/NET 8.0 connection options. The protocol you use
to make a connection to the server (classic MySQL protocol or X Protocol) determines which options you
should use. Connection options have a default value that you can override by defining the new value in the
connection string (classic MySQL protocol and X Protocol) or in the URI-like connection string (X Protocol).
Connector/NET option names and synonyms are not case sensitive.
For instructions about how to use connection strings, see Section 4.4.1, “Creating a Connector/NET
Connection String”. For alternative connection styles, see Connecting to the Server Using URI-Like Strings
or Key-Value Pairs.
The following sections list the connection options that apply to both protocols, classic MySQL protocol only,
and X Protocol only:
• Options for Both Classic MySQL Protocol and X Protocol
• Options for Classic MySQL Protocol Only
• Options for X Protocol Only
Options for Both Classic MySQL Protocol and X Protocol
The following Connector/NET connection options can be used with either protocol.
Connector/NET 8.0 exposes the options in this section as properties in both
the MySql.Data.MySqlClient.MySqlConnectionStringBuilder and
MySqlX.XDevAPI.MySqlXConnectionStringBuilder classes.
CertificateFile ,
Certificate File
Default: null
This option specifies the path to a certificate file in PKCS #12 format
(.pfx). For an example of usage, see Section 4.6.7.2, “Using PFX
Certificates in Connector/NET”.
CertificatePassword ,
Certificate Password
Default: null
Specifies a password that is used in conjunction with a certificate
specified using the option CertificateFile. For an example of
usage, see Section 4.6.7.2, “Using PFX Certificates in Connector/NET”.
CertificateStoreLocation
, Certificate Store
Location
Default: null
Enables you to access a certificate held in a personal store, rather than
use a certificate file and password combination. For an example of
usage, see Section 4.6.7.2, “Using PFX Certificates in Connector/NET”.
356

Connector/NET Connection Options Reference
CertificateThumbprint ,
Certificate Thumbprint
Default: null
Specifies a certificate thumbprint to ensure correct identification of a
certificate contained within a personal store. For an example of usage,
see Section 4.6.7.2, “Using PFX Certificates in Connector/NET”.
CharacterSet , Character
Set , CharSet
Specifies the character set that should be used to encode all queries
sent to the server. Results are still returned in the character set of the
result data.
ConnectionProtocol ,
Protocol , Connection
Protocol
Default: socket (or tcp)
Specifies the type of connection to make to the server. Values can be:
• socket or tcp for a socket connection using TCP/IP.
• pipe for a named pipe connection (not supported with X Protocol).
• unix for a UNIX socket connection.
• memory to use MySQL shared memory (not supported with X
Protocol).
Database , Initial
Catalog
Default: mysql
The case-sensitive name of the database to use initially.
dns-srv , dnssrv Default: false
Enables the connection to resolve service (SRV) addresses in a DNS
SRV record, which defines the location (host name and port number)
of servers for the specified services when it is used with the default
transport protocol (tcp). A single DNS domain can map to multiple
targets (servers) using SRV address records. Each SRV record includes
the host name, port, priority, and weight. DNS SRV support was
introduced in Connector/NET 8.0.19 to remove the need for clients
to identify each possible host in the connection string, with or without
connection pooling.
Specifying multiple host names, a port number, or a Unix socket, named
pipe, or shared memory connection (see the ConnectionProtocol
option) in the connection string is not permitted when DNS SRV is
enabled.
Using classic MySQL protocol. The dns-srv option applies
to connection strings; the DnsSrv property is declared in the
MySqlConnectionStringBuilder class.
// Connection string example
var conn = new MySqlConnection("server=_mysql._tcp.example.abc.com.;
dns-srv=true;
user id=user;
password=****;
database=test");
// MySqlConnectionStringBuilder class example
357

Connector/NET Connection Options Reference
var sb = new MySqlConnectionStringBuilder();
{
Server = "_mysql._tcp.example.abc.com.",
UserID = "user",
Password = "****",
DnsSrv = true,
Database = "test"
};
var conn = new MySqlConnection(sb.ConnectionString);
Using X Protocol. The dns-srv option applies to connection
strings and anonymous objects. The DnsSrv property is declared in
the MySqlXConnectionStringBuilder class. An error is raised
if both dns-srv=false and the URI scheme of mysqlx+srv://
are combined to create a conflicting connection configuration. For
details about using the mysqlx+srv:// scheme element in URI-like
connection strings, see Connections Using DNS SRV Records.
// Connection string example
var session = MySQLX.GetSession("server=_mysqlx._tcp.example.abc.com.;
dns-srv=true;
user id=user;
password=****;
database=test");
// Anonymous object example
var connstring = new
{
server = "_mysqlx._tcp.example.abc.com.",
user = "user",
password = "****",
dnssrv = true
};
var session = MySQLX.GetSession(connString);
// MySqlXConnectionStringBuilder class example
var sb = new MySqlXConnectionStringBuilder();
{
Server = "_mysqlx._tcp.example.abc.com.",
UserID = "user",
Password = "****",
DnsSrv = true,
Database = "test"
};
var session = MySQLX.GetSession(sb.ConnectionString);
Keepalive , Keep Alive Default: 0
For TCP connections, idle connection time measured in seconds, before
the first keepalive packet is sent. A value of 0 indicates that keepalive
is not used. Before Connector/NET 6.6.7/6.7.5/6.8.4, this value was
measured in milliseconds.
358

Connector/NET Connection Options Reference
Password , Password1 , pwd
, pwd1
Default: an empty string
The password for the MySQL account being used for one-factor/single-
factor authentication (1FA/SFA), which uses only one authentication
method such as a password.
Starting with Connector/NET 8.0.28, this option also provides the first
secret password for an account that has multiple authentication factors.
The server can require one (1FA), two (2FA), or three (3FA) passwords
to authenticate the MySQL account. For example, if an account with
2FA is created as follows:
CREATE USER 'abe'@'localhost'
IDENTIFIED WITH caching_sha2_password
BY 'sha2_password'
AND IDENTIFIED WITH authentication_ldap_sasl
AS 'uid=u1_ldap,ou=People,dc=example,dc=com';
Then your application can specify a connection string with this option
(password or its synonyms) and a value, sha2_password in this
case, to satisfy the first authentication factor.
var connString = "server=localhost;
user=abe;
password=sha2_password;
password2=ldap_password;
port=3306";
Alternatively, for a connection made using the
MySqlConnectionStringBuilder object:
MySqlConnectionStringBuilder settings = new MySqlConnectionStringBuilder()
{
Server = "localhost",
UserID = "abe",
Pwd1 = "sha2_password",
Pwd2 = "ldap_password",
Port = 3306
};
If the server does not require a secret password be used with an
authentication method, then the value specified for the password,
password2, or password3 option is ignored.
Password2 , pwd2 Default: an empty string
The second secret password for an account that has multiple
authentication factors (see the Password connection option).
Password3 , pwd3 Default: an empty string
The third secret password for an account that has multiple
authentication factors (see the Password connection option).
Port Default: 3306
The port MySQL is using to listen for connections. This value is ignored
if Unix socket is used.
359

Connector/NET Connection Options Reference
Server , Host , Data
Source , DataSource
Default: localhost
The name or network address of one or more host computers. Multiple
hosts are separated by commas and a priority (0 to 100), if provided,
determines the host selection order. As of Connector/NET 8.0.19, host
selection is random when priorities are omitted or are the same for each
host.
// Selects the host with the highest priority (100) first
server=(address=192.10.1.52:3305,priority=60),(address=localhost:3306,priority=100);
No attempt is made by the provider to synchronize writes to the
database, so take care when using this option. In UNIX environments
with Mono, this can be a fully qualified path to a MySQL socket file.
With this configuration, the UNIX socket is used instead of the TCP/IP
socket. Currently, only a single socket name can be given, so accessing
MySQL in a replicated environment using UNIX sockets is not currently
supported.
SslCa , Ssl-Ca Default: null
Based on the type of certificates being used, this option either specifies
the path to a certificate file in PKCS #12 format (.pfx) or the path to a
file in PEM format (.pem) that contains a list of trusted SSL certificate
authorities (CA).
With PFX certificates in use, this option engages when the SslMode
connection option is set to a value of Required, VerifyCA, or
VerifyFull; otherwise, it is ignored.
With PEM certificates in use, this option engages when the SslMode
connection option is set to a value of VerifyCA or VerifyFull;
otherwise, it is ignored.
For examples of usage, see Section 4.6.7.1, “Using PEM Certificates in
Connector/NET”.
SslCert , Ssl-Cert Default: null
The name of the SSL certificate file in PEM format to use for
establishing an encrypted connection. This option engages only when
VerifyFull is set for the SslMode connection option and the SslCa
connection option uses a PEM certificate; otherwise, it is ignored. For
an example of usage, see Section 4.6.7.1, “Using PEM Certificates in
Connector/NET”.
SslKey , Ssl-Key Default: null
The name of the SSL key file in PEM format to use for establishing an
encrypted connection. This option engages only when VerifyFull
is set for the SslMode connection option and the SslCa connection
option uses a PEM certificate; otherwise, it is ignored. For an example
of usage, see Section 4.6.7.1, “Using PEM Certificates in Connector/
NET”.
360

Connector/NET Connection Options Reference
SslMode , Ssl Mode , Ssl-
Mode
Default: Depends on the version of Connector/NET and the protocol in
use. Named-pipe and shared-memory connections are not supported
with X Protocol.
• Required for 8.0.8 to 8.0.12 (both protocols); 8.0.13 and later (X
Protocol only).
• Preferred for 8.0.13 and later (classic MySQL protocol only).
This option has the following values:
• Disabled – Do not use SSL. Non-SSL enabled servers require this
option be set to Disabled explicitly for Connector/NET 8.0.29 or
later.
• None – Do not use SSL. Non-SSL enabled servers require this option
be set to None explicitly for Connector/NET 8.0.8 or later.
Note
This value is deprecated starting with
Connector/NET 8.0.29. Use Disabled
instead.
• Preferred – Use SSL if the server supports it, but allow connection
in all cases. This option was removed in Connector/NET 8.0.8 and
reimplemented in 8.0.13 for classic MySQL protocol only.
Note
Do not use this option for X Protocol
operations.
• Required – Always use SSL. Deny connection if server does not
support SSL.
• VerifyCA – Always use SSL. Validate the certificate authorities
(CA), but tolerate a name mismatch.
• VerifyFull – Always use SSL. Fail if the host name is not correct.
tlsversion , tls-version ,
tls version
Default: A fallback solution decides which version of TLS to use.
Restricts the set of TLS protocol versions to use during the TLS
handshake when both the client and server support the TLS versions
indicated and the value of the SslMode connection-string option is
not set to Disabled or None (deprecated in Connector/NET 8.0.29).
This option accepts a single version or a list of versions separated by a
comma, for example, tls-version=TLSv1.2, TLSv1.3;.
Connector/NET supports the following values:
• TLSv1.3
361

Connector/NET Connection Options Reference
• TLSv1.2
An error is reported when a value other than those listed is assigned.
Likewise, an error is reported when an empty list is provided as
the value, or if all of the versions in the list are unsupported and no
connection attempt is made.
UserID , User Id ,
Username , Uid , User name
, User
Default: null
The MySQL login account being used.
Options for Classic MySQL Protocol Only
Options related to systems using a connection pool appear together at the end of the list of general options
(see Connection-Pooling Options). Connector/NET 8.0 exposes the options in this section as properties in
the MySql.Data.MySqlClient.MySqlConnectionStringBuilder class.
General Options. The Connector/NET options that follow are for general use with connection strings
and the options apply to all MySQL server configurations:
AllowBatch , Allow Batch Default: true
When true, multiple SQL statements can be sent with one command
execution. Batch statements should be separated by the server-defined
separator character.
AllowLoadLocalInfile ,
Allow Load Local Infile
Default: false
Disables (by default) or enables the server functionality to load the
data local infile. If this option is set to true, uploading files from
any location is enabled, regardless of the path specified with the
AllowLoadLocalInfileInPath option.
AllowLoadLocalInfileInPath
, Allow Load Local
Infile In Path
Default: null
Specifies a safe path from where files can be read and uploaded
to the server. When the related AllowLoadLocalInfile
option is set to false, which is the default value, only those
files from the safe path or any valid subfolder specified with the
AllowLoadLocalInfileInPath option can be loaded. For example,
if /tmp is set as the restricted folder, then file requests for /tmp/
myfile and /tmp/myfolder/myfile can succeed. No relative paths
or symlinks that fall outside of this path are permitted.
The following table shows the behavior that results when the
AllowLoadLocalInfile and AllowLoadLocalInfileInPath
connection string options are combined.
AllowLoadLocalInfile
Value
AllowLoadLocalInfileInPath
Value
Behavior
true Empty string or
null value
All uploads are
permitted.
true A valid path All uploads
are permitted
362

Connector/NET Connection Options Reference
AllowLoadLocalInfile
Value
AllowLoadLocalInfileInPath
Value
Behavior
(the path is not
respected).
false Empty string or
null value
No uploads are
permitted.
false A valid path Only uploads
from the
specified folder
and subfolder
are permitted.
AllowPublicKeyRetrieval Default: false
Setting this option to true informs Connector/NET that RSA public
keys should be retrieved from the server and that connections using
the classic MySQL protocol, when SSL is disabled, will fail by default.
Exceptions to the default behavior can occur when previous successful
connection attempts were made or when pooling is enabled and a
pooled connection can be reused. This option was introduced with the
8.0.10 connector.
Caution
This option is prone to man-in-the-middle
attacks, so it should be used only in situations
where you can ensure by other means that your
connections are made to trusted servers.
AllowUserVariables ,
Allow User Variables
Default: false
Setting this to true indicates that the provider expects user variables in
the SQL.
AllowZeroDateTime , Allow
Zero Datetime
Default: false
If set to True, MySqlDataReader.GetValue() returns a
MySqlDateTime object for date or datetime columns that
have disallowed values, such as zero datetime values, and a
System.DateTime object for valid values. If set to False (the default
setting) it causes a System.DateTime object to be returned for all
valid values and an exception to be thrown for disallowed values, such
as zero datetime values.
AutoEnlist , Auto Enlist Default: true
If AutoEnlist is set to true, which is the default, a connection
opened using TransactionScope participates in this
scope, it commits when the scope commits and rolls back if
TransactionScope does not commit. However, this feature is
considered security sensitive and therefore cannot be used in a medium
trust environment.
As of 8.0.10, this option is supported in .NET Core 2.0 implementations.
363

Connector/NET Connection Options Reference
BlobAsUTF8ExcludePattern Default: null
A POSIX-style regular expression that matches the names of BLOB
columns that do not contain UTF-8 character data. See Section 4.5.16,
“Character Set Considerations for Connector/NET” for usage details.
BlobAsUTF8IncludePattern Default: null
A POSIX-style regular expression that matches the names of BLOB
columns containing UTF-8 character data. See Section 4.5.16,
“Character Set Considerations for Connector/NET” for usage details.
CheckParameters , Check
Parameters
Default: true
Indicates if stored routine parameters should be checked against the
server.
CommandInterceptors ,
Command Interceptors
The list of interceptors that can intercept SQL command operations.
ConnectionTimeout
, Connect Timeout ,
Connection Timeout
Default: 15
The length of time (in seconds) to wait for a connection to the server
before terminating the attempt and generating an error.
ConvertZeroDateTime ,
Convert Zero Datetime
Default: false
Use true to have MySqlDataReader.GetValue() and
MySqlDataReader.GetDateTime() return DateTime.MinValue
for date or datetime columns that have disallowed values.
DefaultAuthenticationPluginTakes precedence over the server-side default authentication
plugin when a valid authentication plugin is specified
(see Section 4.4.4, “Connector/NET Authentication”). The
Defaultauthenticationplugin option is mandatory for supporting
userless and passwordless Kerberos authentications in which the
credentials are retrieved from a cache or the Key Distribution Center
(KDC). For example:
MySqlConnectionStringBuilder settings = new MySqlConnectionStringBuilder()
{
Server = "localhost",
UserID = "",
Password = "",
Database = "mydb",
Port = 3306,
DefaultAuthenticationPlugin = "authentication_kerberos_client"
};
If no value is set, the server-side default authentication plugin is used.
This option was introduced with the 8.0.26 connector.
DefaultCommandTimeout ,
Default Command Timeout
Default: 30
Sets the default value of the command timeout to be used. This does
not supersede the individual command timeout property on an individual
command object. If you set the command timeout property, that will be
used.
364

Connector/NET Connection Options Reference
DefaultTableCacheAge ,
Default Table Cache Age
Default: 60
Specifies how long a TableDirect result should be cached, in
seconds. For usage information about table caching, see Section 4.5.3,
“Using Connector/NET with Table Caching”.
ExceptionInterceptors ,
Exception Interceptors
The list of interceptors that can triage thrown MySqlException
exceptions.
FunctionsReturnString ,
Functions Return String
Default: false
Causes the connector to return binary or varbinary values as
strings, if they do not have a table name in the metadata.
Includesecurityasserts ,
Include security asserts
Default: false
Must be set to true when using the MySQLClientPermissions class
in a partial trust environment, with the library installed in the GAC of the
hosting environment. See Section 4.5.7, “Working with Partial Trust /
Medium Trust” for details.
As of 8.0.10, this option is supported in .NET Core 2.0 implementations.
InteractiveSession ,
Interactive , Interactive
Session
Default: false
If set to true, the client is interactive. An interactive client is one
in which the server variable CLIENT_INTERACTIVE is set. If an
interactive client is set, the wait_timeout variable is set to the value
of interactive_timeout. The client session then times out after this
period of inactivity. For more information, see Server System Variables
in the MySQL Reference Manual.
As of 8.0.10, this option is supported in .NET Core 2.0 implementations.
IntegratedSecurity ,
Integrated Security
Default: no
Use Windows authentication when connecting to server. By default, it
is turned off. To enable, specify a value of yes. (You can also use the
value sspi as an alternative to yes.) For details, see Section 4.4.4,
“Connector/NET Authentication”.
Currently not supported for .NET Core implementations.
KerberosAuthMode ,
kerberos auth mode
Default: AUTO
On Windows, provides authentication support using Security Support
Provider Interface (SSPI), which is capable of acquiring credentials
from the Windows in-memory cache, and Generic Security Service
Application Program Interface (GSSAPI) through the MIT Kerberos
library. GSSAPI is capable of acquiring cached credentials previously
generated using the kinit command. The default value for this option
365

Connector/NET Connection Options Reference
(AUTO) attempts to authenticate with GSSAPI if the authentication using
SSPI fails.
Note
This option is permitted in Windows
environments only. Using it in non-Windows
environments produces an Option not supported
exception.
Possible values for this connection option are:
• AUTO – Use SSPI and fall back to GSSAPI in case of failure.
• SSPI – Use SSPI only and raise an exception in case of failure.
• GSSAPI – Use GSSAPI only and raise an exception in case of failure.
Always use the KRB5_CONFIG and KRB5CCNAME environment
variables to specify configuration and cache locations when using
GSSAPI through the MIT Kerberos library on Windows.
Logging Default: false
When the value is set to true, various pieces of information are sent
to all configured trace listeners. For a more detailed description, see
Section 4.5.12, “Connector/NET Tracing”.
As of 8.0.10, this option is supported in .NET Core 2.0 implementations.
ociConfigFile , OCI
Config File
Defaults to one of the following path names:
• ~/.oci/config on Linux and macOS host types
• %HOMEDRIVE%%HOMEPATH%\.oci\config on Windows host types
If set, this option specifies an alternative location to the Oracle Cloud
Infrastructure configuration file. Connector/NET 8.0.27 (and later) uses
the Oracle Cloud Infrastructure SDK to obtain a fingerprint of the API
key to use for authentication (fingerprint entry) and location of a
PEM file with the private part of the API key (key_file entry). The
entries should be specified in the [DEFAULT] profile. If the [DEFAULT]
profile is missing from the configuration file, Connector/NET locates the
next profile to use instead.
Not supported for .NET Framework 4.5.x implementations.
OciConfigProfile , OCI
Config Profile
If set in Connector/NET 8.0.33 (or later), this option specifies which
profile in an Oracle Cloud Infrastructure configuration file to use. The
profile value defaults to the DEFAULT profile when no value is provided.
Not supported for .NET Framework 4.5.x implementations.
OldGuids , Old Guids Default: false
The back-end representation of a GUID type was changed from
BINARY(16) to CHAR(36). This was done to allow developers to
use the server function UUID() to populate a GUID table - UUID()
366

Connector/NET Connection Options Reference
generates a 36-character string. Developers of older applications can
add 'Old Guids=true' to the connection string to use a GUID of
data type BINARY(16).
OldGetStringBehavior Default: false
As of Connector/NET 8.3.0, calling the MySqlDataReader.GetString()
method throws an InvalidCastException exception if the column is
not a string type. All text types including char and varchar are allowed;
and blob is not considered a text type.
Setting this OldGetStringBehavior connection option to true restores
previous behavior by logging a deprecation warning instead of throwing
the exception.
This option was added in 8.3.0 and removed in 9.0.0.
PersistSecurityInfo ,
Persist Security Info
Default: false
When set to false or no (strongly recommended), security-sensitive
information, such as the password, is not returned as part of the
connection if the connection is open or has ever been in an open state.
Resetting the connection string resets all connection string values,
including the password. Recognized values are true, false, yes, and
no.
PipeName , Pipe Name ,
Pipe
Default: mysql
When set to the name of a named pipe, the MySqlConnection
attempts to connect to MySQL on that named pipe. This setting only
applies to the Windows platform.
Important
For MySQL 8.0.14 and later, 5.7.25 and later,
and 5.6.43 and later, minimal permissions
on named pipes are granted to clients that
use them to connect to the server. However,
Connector/NET can use named pipes only
when granted full access on them. As a
workaround, create a Windows local group
containing the user that executes the client
application. Restart the target server with the
named_pipe_full_access_group system
variable and specify the local group name as its
value.
Currently not supported for .NET Core implementations.
ProcedureCacheSize ,
Procedure Cache Size
, procedure cache ,
procedurecache
Default: 25
Sets the size of the stored procedure cache. By default, Connector/NET
stores the metadata (input/output data types) about the last 25 stored
procedures used. To disable the stored procedure cache, set the value
to zero (0).
Replication Default: false
367

Connector/NET Connection Options Reference
Indicates if this connection is to use replicated servers.
As of 8.0.10, this option is supported in .NET Core 2.0 implementations.
RespectBinaryFlags ,
Respect Binary Flags
Default: true
Setting this option to false means that Connector/NET ignores a
column's binary flags as set by the server.
SharedMemoryName , Shared
Memory Name
Default: mysql
The name of the shared memory object to use for communication if
the transport protocol is set to memory. This setting only applies to the
Windows platform.
Currently not supported for .NET Core implementations.
SqlServerMode , Sql
Server Mode
Default: false
Allow SQL Server syntax. When set to true, enables Connector/NET
to support square brackets around symbols instead of backticks. This
enables Visual Studio wizards that bracket symbols between the [
and ] characters to work with Connector/NET. This option incurs a
performance hit, so should only be used if necessary.
TableCaching , Table
Cache , TableCache
Default: false
Enables or disables caching of TableDirect commands. A value of
true enables the cache while false disables it. For usage information
about table caching, see Section 4.5.3, “Using Connector/NET with
Table Caching”.
TreatBlobsAsUTF8 , Treat
BLOBs as UTF8
Default: false
Setting this value to true causes BLOB columns to have a
character set of utf8 with the default collation for that character
set. To convert only some of your BLOB columns, you can
make use of the 'BlobAsUTF8IncludePattern' and
'BlobAsUTF8ExcludePattern' keywords. Set these to a regular
expression pattern that matches the column names to include or
exclude respectively.
TreatTinyAsBoolean ,
Treat Tiny As Boolean
Default: true
Setting this value to false causes TINYINT(1) to be treated as an
INT. See Numeric Data Type Syntax for a further explanation of the
TINYINT and BOOL data types.
UseAffectedRows , Use
Affected Rows
Default: false
When true, the connection reports changed rows instead of found
rows.
368

Connector/NET Connection Options Reference
UseCompression , Compress
, Use Compression
Default: false
Setting this option to true enables compression of packets exchanged
between the client and the server. This exchange is defined by the
MySQL client/server protocol.
Compression is used if both client and server support ZLIB
compression, and the client has requested compression using this
option.
A compressed packet header is: packet length (3 bytes), packet
number (1 byte), and Uncompressed Packet Length (3 bytes). The
Uncompressed Packet Length is the number of bytes in the original,
uncompressed packet. If this is zero, the data in this packet has not
been compressed. When the compression protocol is in use, either the
client or the server may compress packets. However, compression will
not occur if the compressed length is greater than the original length.
Thus, some packets will contain compressed data while other packets
will not.
UseDefaultCommandTimeoutForEF
, Use Default Command
Timeout For EF
Default: false
Enforces the command timeout of EFMySqlCommand, which is set to
the value provided by the DefaultCommandTimeout property.
UsePerformanceMonitor ,
Use Performance Monitor ,
UserPerfMon , PerfMon
Default: false
Indicates that performance counters should be updated during
execution.
Currently not supported for .NET Core implementations.
UseUsageAdvisor , Use
Usage Advisor , Usage
Advisor
Default: false
Logs inefficient database operations.
As of 8.0.10, this option is supported in .NET Core 2.0 implementations.
Connection-Pooling Options. The following options are related to connection pooling within
connection strings. For more information about connection pooling, see Opening a Connection to a Single
Server.
CacheServerProperties ,
Cache Server Properties
Default: false
Specifies whether server variable settings are updated by a SHOW
VARIABLES command each time a pooled connection is returned.
Enabling this setting speeds up connections in a connection pool
environment. Your application is not informed of any changes to
configuration variables made by other connections.
ConnectionLifeTime ,
Connection Lifetime
Default: 0
When a connection is returned to the pool, its creation time is compared
with the current time and the connection is destroyed if that time span
(in seconds) exceeds the value specified by Connection Lifetime.
This option is useful in clustered configurations to force load balancing
369

Connector/NET Connection Options Reference
between a running server and a server just brought online. A value of
zero (0) sets pooled connections to the maximum connection timeout.
ConnectionReset ,
Connection Reset
Default: false
If true, the connection state is reset when it is retrieved from the pool.
The default value of false avoids making an additional server round trip
when obtaining a connection, but the connection state is not reset.
MaximumPoolsize , Max
Pool Size , Maximum Pool
Size , MaxPoolSize
Default: 100
The maximum number of connections allowed in the pool.
MinimumPoolSize , Min
Pool Size , Minimum Pool
Size , MinPoolSize
Default: 0
The minimum number of connections allowed in the pool.
Pooling Default: true
When true, the MySqlConnection object is drawn from the
appropriate pool, or if necessary, is created and added to the
appropriate pool. Recognized values are true, false, yes, and no.
Options for X Protocol Only
The connection options that follow are valid for connections made with X Protocol.
Connector/NET 8.0 exposes the options in this section as properties in the
MySqlX.XDevAPI.MySqlXConnectionStringBuilder class.
Auth , Authentication ,
Authentication Mode
Authentication mechanism to use with the X Protocol. This option was
introduced with the 8.0.9 connector and has the following values, which
are not case-sensitive: MYSQL41, PLAIN, and EXTERNAL. If the Auth
option is not set, the mechanism is chosen depending on the connection
type. PLAIN is used for secure connections (TLS or Unix sockets) and
MYSQL41 is used for unencrypted connections. EXTERNAL is used for
external authentication methods such as PAM, Windows login IDs,
LDAP, or Kerberos. (EXTERNAL is not currently supported.)
The Auth option is not supported for classic MySQL protocol
connections and returns NotSupportedException if used.
Compression , use-
compression
Default: preferred
Compression is used to send and receive data when both the client
and server support it for X Protocol connections and the client requests
compression using this option. After a successful algorithm negotiation
is made, Connector/NET can start compressing data immediately.
To prevent the compression of small data packets, or of data already
compressed, Connector/NET defines a size threshold of 1000 bytes.
When multiple compression algorithms are supported by the server,
Connector/NET applies the following priority by default: zstd_stream
(first), lz4_message (second), and deflate_stream (third). The
deflate_stream algorithm is supported for use with .NET Core, but
not for .NET Framework.
370

Connector/NET Connection Options Reference
Tip
Use the compression-algorithms option to
specify one ore more supported algorithms in a
different order. The algorithms are negotiated in
the order provided by client. For usage details,
see the compression-algorithms option.
Data compression for X Protocol connections was added in the
Connector/NET 8.0.20 release. The Compression option accepts the
following values:
• preferred to apply data compression if the server supports the
algorithms chosen by the client. Otherwise, the data is sent and
received without compression.
• required to ensure that compression is used or to terminate the
connection and return an error message.
• disabled to prevent data compression.
compression-algorithms ,
CompressionAlgorithms
As of Connector/NET 8.0.22, a client application can specify the order
in which supported compression algorithms are negotiated with the
server. The value of the Compression connection option must be set
to preferred or to required for this option to apply. Unsupported
algorithms are ignored.
This option accepts the following algorithm names and synonyms:
• lz4_message or lz4
• zstd_stream or zstd
• deflate_stream or deflate (not valid with .NET Framework)
Algorithm names and synonyms can be combined in a comma-
separated list or provided as a standalone value (with or without
brackets). Examples:
// Compression option set to preferred (default)
MySQLX.GetSession("mysqlx://test:test@localhost:3306?compression-algorithms=[lz4_message,deflate]
MySQLX.GetSession("mysqlx://test:test@localhost:3306?compressionalgorithms=lz4
MySQLX.GetSession("mysqlx://test:test@localhost:3306?compression=preferred&compression-algorithms=[zstd]
// Compression option set to required
MySQLX.GetSession("mysqlx://test:test@localhost:3306?compression=required&compression-algorithms=[zstd_stream,lz4_message]
MySQLX.GetSession("mysqlx://test:test@localhost:3306?compression=required&compression-algorithms=[lz4]
MySQLX.GetSession("mysqlx://test:test@localhost:3306?compression=required&compression-algorithms=zstd_stream
// Connection string
MySQLX.GetSession("server=localhost;port=3306;uid=test;password=test;compression=required;compression-algorithms=lz4_message;")
// Anonymous object
MySQLX.GetSession(new {
server = "localhost",
port = "3306",
uid = "test",
password = "test",
compression="required",
371

Connector/NET Connection Options Reference
compressionalgorithms = "deflate_stream" })
For additional information, see Connection Compression with X Plugin.
connection-attributes ,
ConnectionAttributes
Default: true
This option was introduced in Connector/NET 8.0.16 for submitting
a set of attributes to be passed together with default connection
attributes to the server. The aggregate size of connection
attribute data sent by a client is limited by the value of the
performance_schema_session_connect_attrs_size server
variable. The total size of the data package should be less than the
value of the server variable. For general information about connection
attributes, see Performance Schema Connection Attribute Tables.
The connection-attributes parameter value can be empty (the same as
specifying true), a Boolean value (true or false to enable or disable
the default attribute set), or a list or zero or more key=value specifiers
separated by commas (to be sent in addition to the default attribute
set). Within a list, a missing key value evaluates as the NULL value.
Examples:
// Sessions
MySQLX.GetSession($"mysqlx://user@host/schema")
MySQLX.GetSession($"mysqlx://user@host/schema?connection-attributes")
MySQLX.GetSession($"mysqlx://user@host/schema?connection-attributes=true")
MySQLX.GetSession($"mysqlx://user@host/schema?connection-attributes=false")
MySQLX.GetSession($"mysqlx://user@host/schema?connection-attributes=[attr1=val1,attr2,attr3=]")
MySQLX.GetSession($"mysqlx://user@host/schema?connection-attributes=[]")
// Pooling
MySQLX.GetClient($"mysqlx://user@host/schema")
MySQLX.GetClient($"mysqlx://user@host/schema?connection-attributes")
MySQLX.GetClient($"mysqlx://user@host/schema?connection-attributes=true")
MySQLX.GetClient($"mysqlx://user@host/schema?connection-attributes=false")
MySQLX.GetClient($"mysqlx://user@host/schema?connection-attributes=[attr1=val1,attr2,attr3=]")
MySQLX.GetClient($"mysqlx://user@host/schema?connection-attributes=[]")
Application-defined attribute names cannot begin with _ because such
names are reserved for internal attributes.
If connection attributes are not specified in a valid way, an error occurs
and the connection attempt fails.
Connect-Timeout ,
ConnectTimeout
Default: 10000
The length of time (in milliseconds) to wait for an X Protocol connection
to the server before terminating the attempt and generating an error.
You can disable the connection timeout by setting the value to zero.
This option can be specified as follows:
• URI-like connection string example
MySQLX.GetSession("mysqlx://test:test@localhost:33060?connect-timeout=2000");
• Connection string example
MySQLX.GetSession("server=localhost;user=test;port=33060;connect-timeout=2000");
• Anonymous object example
372

Connector/NET Programming
MySQLX.GetSession(new { server="localhost", user="test", port=33060, connecttimeout=2000 });
• MySqlXConnectionStringBuilder class example
var builder = new MySqlXConnectionStringBuilder("server=localhost;user=test;port=33060");
builder.ConnectTimeout = 2000;
MySQLX.GetSession(builder.ConnectionString);
SslCrl , Ssl-Crl Default: null
Path to a local file containing certificate revocation lists.
Important
Although the SslCrl connection-string
option is valid for use, applying it raises a
NotSupportedException message.
4.5 Connector/NET Programming
MySQL Connector/NET comprises several classes that are used to connect to the database, execute
queries and statements, and manage query results.
The following are the major classes of Connector/NET:
• MySqlConnection: Represents an open connection to a MySQL database (see Section 4.4,
“Connector/NET Connections”).
The MySqlConnectionStringBuilder class aids in the creation of a connection string by exposing
the connection options as properties.
• MySqlCommand: Represents an SQL statement to execute against a MySQL database.
• MySqlCommandBuilder: Automatically generates single-table commands used to reconcile changes
made to a DataSet with the associated MySQL database.
• MySqlDataAdapter: Represents a set of data commands and a database connection that are used to
fill a data set and update a MySQL database.
• MySqlDataReader: Provides a means of reading a forward-only stream of rows from a MySQL
database.
• MySqlException: The exception that is thrown when MySQL returns an error.
• MySqlHelper: Helper class that makes it easier to work with the provider.
• MySqlTransaction: Represents an SQL transaction to be made in a MySQL database.
4.5.1 Using GetSchema on a Connection
The GetSchema() method of the connection object can be used to retrieve schema information about the
database currently connected to. The schema information is returned in the form of a DataTable. The
schema information is organized into a number of collections. Different forms of the GetSchema() method
can be used depending on the information required. There are three forms of the GetSchema() method:
• GetSchema() - This call will return a list of available collections.
373

Using GetSchema on a Connection
• GetSchema(String) - This call returns information about the collection named in the string parameter.
If the string “MetaDataCollections” is used then a list of all available collections is returned. This is the
same as calling GetSchema() without any parameters.
• GetSchema(String, String[]) - In this call the first string parameter represents the collection
name, and the second parameter represents a string array of restriction values. Restriction values
limit the amount of data that will be returned. Restriction values are explained in more detail in the
Microsoft .NET documentation.
Collections
The collections can be broadly grouped into two types: collections that are common to all data providers,
and collections specific to a particular provider.
Common Collections. The following collections are common to all data providers:
• MetaDataCollections
• DataSourceInformation
• DataTypes
• Restrictions
• ReservedWords
Provider-Specific Collections. The following are the collections currently provided by Connector/NET,
in addition to the common collections shown previously:
• Databases
• Tables
• Columns
• Users
• Foreign Keys
• IndexColumns
• Indexes
• Foreign Key Columns
• UDF
• Views
• ViewColumns
• Procedure Parameters
• Procedures
• Triggers
C# Code Example. A list of available collections can be obtained using the following code:
using System;
using System.Data;
374

Using MySqlCommand
using System.Text;
using MySql.Data;
using MySql.Data.MySqlClient;
namespace ConsoleApplication2
{
class Program
{
private static void DisplayData(System.Data.DataTable table)
{
foreach (System.Data.DataRow row in table.Rows)
{
foreach (System.Data.DataColumn col in table.Columns)
{
Console.WriteLine("{0} = {1}", col.ColumnName, row[col]);
}
Console.WriteLine("============================");
}
}
static void Main(string[] args)
{
string connStr = "server=localhost;user=root;database=world;port=3306;password=******";
MySqlConnection conn = new MySqlConnection(connStr);
try
{
Console.WriteLine("Connecting to MySQL...");
conn.Open();
DataTable table = conn.GetSchema("MetaDataCollections");
//DataTable table = conn.GetSchema("UDF");
DisplayData(table);
conn.Close();
}
catch (Exception ex)
{
Console.WriteLine(ex.ToString());
}
Console.WriteLine("Done.");
}
}
}
Further information on the GetSchema() method and schema collections can be found in the
Microsoft .NET documentation.
4.5.2 Using MySqlCommand
The MySqlCommand class represents a SQL statement to execute against a MySQL database. Class
methods enable you to perform the following database operations:
• Query a database
• Insert, update, and delete data
• Return a single value
Command-based database operations can run within a transaction, if needed. For a short tutorial
demonstrating how and when to use the ExecuteReader, ExecuteNonQuery, and ExecuteScalar
methods, see Section 4.6.1.2, “The MySqlCommand Object”.
An instance of MySqlCommand can be organized to execute as a prepared statement for faster excecution
and reuse, or as a stored procedure. A flexible set of class properties permits you to package MySQL
commands in several forms. The remainder of this section describes following MySqlCommand properties:
• CommandText and CommandType Properties
375

Using MySqlCommand
• Parameters Property
• Attributes Property
• CommandTimeout Property
CommandText and CommandType Properties
The MySqlCommand class provides the CommandText and CommandType properties that you may
combine to create the type of SQL statements needed for your project. The CommandText property
is interpreted differently, depending on how you set the CommandType property. The following
CommandType types are permitted:
• Text - An SQL text command (default).
• StoredProcedure - Name of a stored procedure.
• TableDirect - Name of a table.
The default CommandType type, Text, is used for executing queries and other SQL commands. See
Section 4.6.1.2, “The MySqlCommand Object” for usage examples.
If CommandType is set to StoredProcedure, set CommandText to the name of the stored procedure
to access. For use-case examples of the CommandType property with type StoredProcedure, see
Section 4.5.5, “Creating and Calling Stored Procedures”.
If CommandType is set to TableDirect, all rows and columns of the named table are returned when you
call one of the execute methods. In effect, this command performs a SELECT * on the table specified. The
CommandText property is set to the name of the table to query. This usage is illustrated by the following
code snippet:
...
MySqlCommand cmd = new MySqlCommand();
cmd.CommandText = "mytable";
cmd.Connection = someConnection;
cmd.CommandType = CommandType.TableDirect;
MySqlDataReader reader = cmd.ExecuteReader();
while (reader.Read())
{
Console.WriteLn(reader[0], reader[1]...);
}
...
Parameters Property
The Parameters property gives you control over the data you use to build a SQL query. Defining a
parameter is the preferred practice to reduce the risk of acquiring unwanted or malicous input. For usage
information and examples, see:
• Working with Parameters
• Accessing a Stored Procedure
• Preparing Statements in Connector/NET
Attributes Property
As of Connector/NET 8.0.26, an instance of MySqlCommand can be organized to execute simple Transact-
SQL statements or stored procedures, both can be used in a prepared statement for faster execution and
reuse. The query_attributes component must be installed on the server (see Prerequisites for Using
Query Attributes) before attributes can be searched for and used on the server side.
376

Using MySqlCommand
Query-attributes support varies by server version:
• Prior to MySQL Server 8.0.23: no support for query attributes.
• MySQL Server 8.0.23 to 8.0.24: support for query attributes in regular statements only.
• MySQL Server 8.0.25 and higher: support for query attributes in both regular and prepared statements.
If you send query attribute metadata to a server that does not support query attributes, the attempt is
logged by the connector but no error is emitted.
Like parameters, attributes must be named. Unlike a parameter, an attribute represents an object from the
underlying query, such as a field or table. Connector/NET does not check or enforce whether your attribute
names are unique. Parameters and attributes can be combined together in commands without restrictions.
You can declare an attritue name and value directly by using the SetAttribute method to create an
instance of MySqlAttribute that is exposed in a collection through the MySqlAttributeCollection
object within MySqlCommand. For example, to declare a single attribute named qa1, use the following C#
syntax:
myCommand.Attributes.SetAttribute("qa1", "qaValue");
Alternatively, you can declare a variable of type MySqlAttribute to hold your attribute name and
value. Both forms persist the attribute after the query is executed, until the Clear method is called on the
MySqlAttributeCollection object. The next snippet declares two attributes named qa1 and qa2 as
variables mySqlAttribute1 and mySqlAttribute2.
MySqlCommand myCommand = new MySqlCommand();
myCommand.Connection = myConnection;
MySqlAttribute mySqlAttribute1 = new MySqlAttribute("qa1", "qaValue");
MySqlAttribute mySqlAttribute2 = new MySqlAttribute("qa2", 2);
myCommand.Attributes.SetAttribute(mySqlAttribute1);
myCommand.Attributes.SetAttribute(mySqlAttribute2);
With attribute names and values defined, a statement specifying attributes can be sent to the server. The
following SELECT statement includes the mysql_query_attribute_string() loadable function that
is used to retrieve the two attributes decared previously and then prints the results. For more readable and
convenient syntax, the $ symbol is used in this example to identify string literals as interpolated strings.
myCommand.CommandText = $"SELECT mysql_query_attribute_string('{mySqlAttribute1.AttributeName}') AS attr1," +
$"mysql_query_attribute_string('{mySqlAttribute2.AttributeName}') AS attr2";
using (var reader = myCommand.ExecuteReader())
{
while (reader.Read())
{
Console.WriteLine($"Attribute1 Value: {reader.GetString(0)}");
Console.WriteLine($"Attribute2 Value: {reader.GetString(1)}");
}
}
/* Output:
Attribute1 Value: qaValue
Attribute2 Value: 2
*/
The following code block shows the same process for setting attributes and retrieving the results using
Visual Basic syntax.
Public Sub CreateMySqlCommandWithQueryAttributes(ByVal myConnection As MySqlConnection)
Dim myCommand As MySqlCommand = New MySqlCommand()
myCommand.Connection = myConnection
Dim mySqlAttribute1 As MySqlAttribute = New MySqlAttribute("qa1", "qaValue")
Dim mySqlAttribute2 As MySqlAttribute = New MySqlAttribute("qa2", 2)
myCommand.Attributes.SetAttribute(mySqlAttribute1)
377

Using Connector/NET with Table Caching
myCommand.Attributes.SetAttribute(mySqlAttribute2)
myCommand.CommandText = $"SELECT mysql_query_attribute_string('{mySqlAttribute1.AttributeName}') AS attr1," &
$"mysql_query_attribute_string('{mySqlAttribute2.AttributeName}') AS attr2"
Using reader = myCommand.ExecuteReader()
While reader.Read()
Console.WriteLine($"Attribute1 Value: {reader.GetString(0)}")
Console.WriteLine($"Attribute2 Value: {reader.GetString(1)}")
End While
End Using
End Sub
CommandTimeout Property
Commands can have a timeout associated with them. This feature is useful as you may not want a
situation were a command takes up an excessive amount of time. A timeout can be set using the
CommandTimeout property. The following code snippet sets a timeout of one minute:
MySqlCommand cmd = new MySqlCommand();
cmd.CommandTimeout = 60;
The default value is 30 seconds. Avoid a value of 0, which indicates an indefinite wait. To change the
default command timeout, use the connection string option Default Command Timeout.
Connector/NET supports timeouts that are aligned with how Microsoft handles
SqlCommand.CommandTimeout. This property is the cumulative timeout for all network reads
and writes during command execution or processing of the results. A timeout can still occur in the
MySqlReader.Read method after the first row is returned, and does not include user processing time,
only IO operations.
Further details on this can be found in the relevant Microsoft documentation.
4.5.3 Using Connector/NET with Table Caching
Table caching is a feature that can be used to cache slow-changing datasets on the client side. This is
useful for applications that are designed to use readers, but still want to minimize trips to the server for
slow-changing tables.
This feature is transparent to the application, and is disabled by default.
Configuration
• To enable table caching, add 'table cache = true' to the connection string.
• Optionally, specify the 'Default Table Cache Age' connection string option, which represents the
number of seconds a table is cached before the cached data is discarded. The default value is 60.
• You can turn caching on and off and set caching options at runtime, on a per-command basis.
4.5.4 Preparing Statements in Connector/NET
Prepared statements can provide significant performance improvements on queries that are executed
more than one time. Prepared execution is faster than direct execution for statements executed more
than once, primarily because the query is parsed only one time. In the case of direct execution, the query
is parsed every time it is executed. In addition, prepared execution can provide a reduction of network
traffic because for each execution of the prepared statement, it is necessary only to send the data for the
parameters.
Another advantage of prepared statements is that, with server-side prepared statements enabled, it uses a
binary protocol that makes data transfer between client and server more efficient.
378

Creating and Calling Stored Procedures
To prepare a statement, use the following sequence of steps:
1. Create a MySqlCommand object and set the CommandText property to your query.
2. After entering your statement, call the Prepare method of the command object. When the statement is
prepared, add parameters for each of the dynamic elements in the query.
3. Execute the statement using the ExecuteNonQuery(), ExecuteScalar(), or ExecuteReader
methods.
For subsequent executions, you need only modify the values of the parameters and call the execute
method again, there is no need to set the CommandText property or redefine the parameters.
C# Code Example
MySql.Data.MySqlClient.MySqlConnection conn;
MySql.Data.MySqlClient.MySqlCommand cmd;
conn = new MySql.Data.MySqlClient.MySqlConnection();
cmd = new MySql.Data.MySqlClient.MySqlCommand();
conn.ConnectionString = strConnection;
try
{
conn.Open();
cmd.Connection = conn;
cmd.CommandText = "INSERT INTO myTable VALUES(NULL, @number, @text)";
cmd.Prepare();
cmd.Parameters.AddWithValue("@number", 1);
cmd.Parameters.AddWithValue("@text", "One");
for (int i=1; i <= 1000; i++)
{
cmd.Parameters["@number"].Value = i;
cmd.Parameters["@text"].Value = "A string value";
cmd.ExecuteNonQuery();
}
}
catch (MySql.Data.MySqlClient.MySqlException ex)
{
MessageBox.Show("Error " + ex.Number + " has occurred: " + ex.Message,
"Error", MessageBoxButtons.OK, MessageBoxIcon.Error);
}
Visual Basic Code Example
Dim conn As New MySqlConnection
Dim cmd As New MySqlCommand
conn.ConnectionString = strConnection
Try
conn.Open()
cmd.Connection = conn
cmd.CommandText = "INSERT INTO myTable VALUES(NULL, @number, @text)"
cmd.Prepare()
cmd.Parameters.AddWithValue("@number", 1)
cmd.Parameters.AddWithValue("@text", "One")
For i = 1 To 1000
cmd.Parameters("@number").Value = i
cmd.Parameters("@text").Value = "A string value"
cmd.ExecuteNonQuery()
Next
Catch ex As MySqlException
MessageBox.Show("Error " & ex.Number & " has occurred: " &
ex.Message, "Error", MessageBoxButtons.OK, MessageBoxIcon.Error)
End Try
4.5.5 Creating and Calling Stored Procedures
379

Creating and Calling Stored Procedures
A stored procedure is a set of SQL statements that is stored in the server. Clients make a single call to the
stored procedure, passing parameters that can influence the procedure logic and query conditions, rather
than issuing individual hardcoded SQL statements.
Stored procedures can be particularly useful in situations such as the following:
• Stored procedures can act as an API or abstraction layer, allowing multiple client applications to perform
the same database operations. The applications can be written in different languages and run on
different platforms. The applications do not need to hardcode table and column names, complicated
queries, and so on. When you extend and optimize the queries in a stored procedure, all the applications
that call the procedure automatically receive the benefits.
• When security is paramount, stored procedures keep applications from directly manipulating tables, or
even knowing details such as table and column names. Banks, for example, use stored procedures for
all common operations. This provides a consistent and secure environment, and procedures can ensure
that each operation is properly logged. In such a setup, applications and users would not get any access
to the database tables directly, but can only execute specific stored procedures.
This section does not provide in-depth information on creating stored procedures. For such information,
see Using Stored Routines.
Creating a Stored Procedure
Stored procedures in MySQL can be created using a variety of tools, such as:
• The mysql command-line client
• MySQL Workbench
• The MySqlCommand object
Unlike the command-line and GUI clients, you are not required to specify a special delimiter when creating
stored procedures in Connector/NET using the MySqlCommand class. For example, to create a stored
procedure named add_emp, use the CommandText property with the default command type (SQL text
commands) to execute each individual SQL statement in the context of your command that has an open
connection to a server.
cmd.CommandText = "DROP PROCEDURE IF EXISTS add_emp";
cmd.ExecuteNonQuery();
cmd.CommandText = "DROP TABLE IF EXISTS emp";
cmd.ExecuteNonQuery();
cmd.CommandText = "CREATE TABLE emp ( +
"empno INT UNSIGNED NOT NULL AUTO_INCREMENT PRIMARY KEY, first_name VARCHAR(20)," +
"last_name VARCHAR(20), birthdate DATE)";
cmd.ExecuteNonQuery();
cmd.CommandText = "CREATE PROCEDURE add_emp(" +
"IN fname VARCHAR(20), IN lname VARCHAR(20), IN bday DATETIME, OUT empno INT)" +
"BEGIN INSERT INTO emp(first_name, last_name, birthdate) " +
"VALUES(fname, lname, DATE(bday)); SET empno = LAST_INSERT_ID(); END";
cmd.ExecuteNonQuery();
Accessing a Stored Procedure
After the stored procedure is named, you define one MySqlCommand parameter for every parameter in the
stored procedure. IN parameters are defined with the parameter name and the object containing the value,
OUT parameters are defined with the parameter name and the data type that is expected to be returned. All
parameters need the parameter direction defined.
To call a stored procedure using Connector/NET, you create a MySqlCommand object and pass the
stored procedure name as the CommandText property. You then set the CommandType property to
380

Creating and Calling Stored Procedures
CommandType.StoredProcedure. After defining the parameters, you call the stored procedure by using
the MySqlCommand.ExecuteNonQuery() method.
cmd.CommandText = "add_emp";
cmd.CommandType = CommandType.StoredProcedure;
cmd.Parameters.AddWithValue("@lname", "Jones");
cmd.Parameters["@lname"].Direction = ParameterDirection.Input;
cmd.Parameters.AddWithValue("@fname", "Tom");
cmd.Parameters["@fname"].Direction = ParameterDirection.Input;
cmd.Parameters.AddWithValue("@bday", "1940-06-07");
cmd.Parameters["@bday"].Direction = ParameterDirection.Input;
cmd.Parameters.Add("@empno", MySqlDbType.Int32);
cmd.Parameters["@empno"].Direction = ParameterDirection.Output;
cmd.ExecuteNonQuery();
Connector/NET supports the calling of stored procedures through the MySqlCommand object. Data can
be passed in and out of a MySQL stored procedure through use of the MySqlCommand.Parameters
collection.
After the stored procedure is called, the values of the output parameters can be retrieved by using the
.Value property of the MySqlCommand.Parameters collection.
Console.WriteLine("Employee number: "+cmd.Parameters["@empno"].Value);
Console.WriteLine("Birthday: " + cmd.Parameters["@bday"].Value);
Note
When a stored procedure is called using MySqlCommand.ExecuteReader, and
the stored procedure has output parameters, the output parameters are set only
after the MySqlDataReader returned by ExecuteReader is closed.
Stored Procedure Code Example
The following C# code example demonstrates the use of stored procedures. This example assumes the
'employees' database was created in advance:
using System;
using System.Collections.Generic;
using System.Linq;
using System.Text;
using System.Data;
using MySql.Data;
using MySql.Data.MySqlClient;
namespace UsingStoredProcedures
{
class Program
{
static void Main(string[] args)
{
MySqlConnection conn = new MySqlConnection();
conn.ConnectionString = "server=localhost;user=root;database=employees;port=3306;password=******";
MySqlCommand cmd = new MySqlCommand();
try
{
Console.WriteLine("Connecting to MySQL...");
conn.Open();
cmd.Connection = conn;
cmd.CommandText = "DROP PROCEDURE IF EXISTS add_emp";
cmd.ExecuteNonQuery();
cmd.CommandText = "DROP TABLE IF EXISTS emp";
cmd.ExecuteNonQuery();
cmd.CommandText = "CREATE TABLE emp (" +
"empno INT UNSIGNED NOT NULL AUTO_INCREMENT PRIMARY KEY," +
"first_name VARCHAR(20), last_name VARCHAR(20), birthdate DATE)";
cmd.ExecuteNonQuery();
381

Creating and Calling Stored Procedures
cmd.CommandText = "CREATE PROCEDURE add_emp(" +
"IN fname VARCHAR(20), IN lname VARCHAR(20), IN bday DATETIME, OUT empno INT)" +
"BEGIN INSERT INTO emp(first_name, last_name, birthdate) " +
"VALUES(fname, lname, DATE(bday)); SET empno = LAST_INSERT_ID(); END";
cmd.ExecuteNonQuery();
}
catch (MySqlException ex)
{
Console.WriteLine ("Error " + ex.Number + " has occurred: " + ex.Message);
}
conn.Close();
Console.WriteLine("Connection closed.");
try
{
Console.WriteLine("Connecting to MySQL...");
conn.Open();
cmd.Connection = conn;
cmd.CommandText = "add_emp";
cmd.CommandType = CommandType.StoredProcedure;
cmd.Parameters.AddWithValue("@lname", "Jones");
cmd.Parameters["@lname"].Direction = ParameterDirection.Input;
cmd.Parameters.AddWithValue("@fname", "Tom");
cmd.Parameters["@fname"].Direction = ParameterDirection.Input;
cmd.Parameters.AddWithValue("@bday", "1940-06-07");
cmd.Parameters["@bday"].Direction = ParameterDirection.Input;
cmd.Parameters.Add("@empno", MySqlDbType.Int32);
cmd.Parameters["@empno"].Direction = ParameterDirection.Output;
cmd.ExecuteNonQuery();
Console.WriteLine("Employee number: "+cmd.Parameters["@empno"].Value);
Console.WriteLine("Birthday: " + cmd.Parameters["@bday"].Value);
}
catch (MySql.Data.MySqlClient.MySqlException ex)
{
Console.WriteLine("Error " + ex.Number + " has occurred: " + ex.Message);
}
conn.Close();
Console.WriteLine("Done.");
}
}
}
The following code shows the same application in Visual Basic:
Imports System
Imports System.Collections.Generic
Imports System.Linq
Imports System.Text
Imports System.Data
Imports MySql.Data
Imports MySql.Data.MySqlClient
Module Module1
Sub Main()
Dim conn As New MySqlConnection()
conn.ConnectionString = "server=localhost;user=root;database=world;port=3306;password=******"
Dim cmd As New MySqlCommand()
Try
Console.WriteLine("Connecting to MySQL...")
conn.Open()
cmd.Connection = conn
cmd.CommandText = "DROP PROCEDURE IF EXISTS add_emp"
cmd.ExecuteNonQuery()
cmd.CommandText = "DROP TABLE IF EXISTS emp"
cmd.ExecuteNonQuery()
cmd.CommandText = "CREATE TABLE emp (" &
"empno INT UNSIGNED NOT NULL AUTO_INCREMENT PRIMARY KEY,
"first_name VARCHAR(20), last_name VARCHAR(20), birthdate DATE)"
cmd.ExecuteNonQuery()
382

Handling BLOB Data With Connector/NET
cmd.CommandText = "CREATE PROCEDURE add_emp(" &
"IN fname VARCHAR(20), IN lname VARCHAR(20), IN bday DATETIME, OUT empno INT)" &
"BEGIN INSERT INTO emp(first_name, last_name, birthdate) " &
"VALUES(fname, lname, DATE(bday)); SET empno = LAST_INSERT_ID(); END"
cmd.ExecuteNonQuery()
Catch ex As MySqlException
Console.WriteLine(("Error " & ex.Number & " has occurred: ") + ex.Message)
End Try
conn.Close()
Console.WriteLine("Connection closed.")
Try
Console.WriteLine("Connecting to MySQL...")
conn.Open()
cmd.Connection = conn
cmd.CommandText = "add_emp"
cmd.CommandType = CommandType.StoredProcedure
cmd.Parameters.AddWithValue("@lname", "Jones")
cmd.Parameters("@lname").Direction = ParameterDirection.Input
cmd.Parameters.AddWithValue("@fname", "Tom")
cmd.Parameters("@fname").Direction = ParameterDirection.Input
cmd.Parameters.AddWithValue("@bday", "1940-06-07")
cmd.Parameters("@bday").Direction = ParameterDirection.Input
cmd.Parameters.Add("@empno", MySqlDbType.Int32)
cmd.Parameters("@empno").Direction = ParameterDirection.Output
cmd.ExecuteNonQuery()
Console.WriteLine("Employee number: " & cmd.Parameters("@empno").Value)
Console.WriteLine("Birthday: " & cmd.Parameters("@bday").Value)
Catch ex As MySql.Data.MySqlClient.MySqlException
Console.WriteLine(("Error " & ex.Number & " has occurred: ") + ex.Message)
End Try
conn.Close()
Console.WriteLine("Done.")
End Sub
End Module
4.5.6 Handling BLOB Data With Connector/NET
One common use for MySQL is the storage of binary data in BLOB columns. MySQL supports four different
BLOB data types: TINYBLOB, BLOB, MEDIUMBLOB, and LONGBLOB, all described in The BLOB and TEXT
Types and Data Type Storage Requirements.
Data stored in a BLOB column can be accessed using MySQL Connector/NET and manipulated using
client-side code. There are no special requirements for using Connector/NET with BLOB data.
Simple code examples will be presented within this section, and a full sample application can be found in
the Samples directory of the Connector/NET installation.
4.5.6.1 Preparing the MySQL Server
The first step is using MySQL with BLOB data is to configure the server. To start, create a table that can
be accessed. File tables often have four columns: an AUTO_INCREMENT column of appropriate size
(UNSIGNED SMALLINT) to serve as a primary key to identify the file, a VARCHAR column that stores the file
name, an UNSIGNED MEDIUMINT column that stores the size of the file, and a MEDIUMBLOB column that
stores the file itself. For this example, use the following table definition:
CREATE TABLE file(
file_id SMALLINT UNSIGNED AUTO_INCREMENT NOT NULL PRIMARY KEY,
file_name VARCHAR(64) NOT NULL,
file_size MEDIUMINT UNSIGNED NOT NULL,
file MEDIUMBLOB NOT NULL);
After creating a table, you might need to modify the max_allowed_packet system variable. This variable
determines how large of a packet (that is, a single row) can be sent to the MySQL server. By default, the
383

Handling BLOB Data With Connector/NET
server only accepts a maximum size of 1MB from the client application. If you intend to exceed 1MB in
your file transfers, increase this number.
The max_allowed_packet option can be modified using the MySQL Workbench Server Administration
screen. Adjust the Maximum permitted option in the Data / Memory size section of the Networking
tab to an appropriate setting. After adjusting the value, click the Apply button and restart the server
using the Startup / Shutdown screen of MySQL Workbench. You can also adjust this value
directly in the my.cnf file (add a line that reads max_allowed_packet=xxM), or use the SET
max_allowed_packet=xxM; syntax from within MySQL.
Try to be conservative when setting max_allowed_packet, as transfers of BLOB data can take some
time to complete. Try to set a value that will be adequate for your intended use and increase the value if
necessary.
4.5.6.2 Writing a File to the Database
To write a file to a database, we need to convert the file to a byte array, then use the byte array as a
parameter to an INSERT query.
The following code opens a file using a FileStream object, reads it into a byte array, and inserts it into the
file table:
C# Code Example
MySql.Data.MySqlClient.MySqlConnection conn;
MySql.Data.MySqlClient.MySqlCommand cmd;
conn = new MySql.Data.MySqlClient.MySqlConnection();
cmd = new MySql.Data.MySqlClient.MySqlCommand();
string SQL;
UInt32 FileSize;
byte[] rawData;
FileStream fs;
conn.ConnectionString = "server=127.0.0.1;uid=root;" +
"pwd=12345;database=test";
try
{
fs = new FileStream(@"c:\image.png", FileMode.Open, FileAccess.Read);
FileSize = fs.Length;
rawData = new byte[FileSize];
fs.Read(rawData, 0, FileSize);
fs.Close();
conn.Open();
SQL = "INSERT INTO file VALUES(NULL, @FileName, @FileSize, @File)";
cmd.Connection = conn;
cmd.CommandText = SQL;
cmd.Parameters.AddWithValue("@FileName", strFileName);
cmd.Parameters.AddWithValue("@FileSize", FileSize);
cmd.Parameters.AddWithValue("@File", rawData);
cmd.ExecuteNonQuery();
MessageBox.Show("File Inserted into database successfully!",
"Success!", MessageBoxButtons.OK, MessageBoxIcon.Asterisk);
conn.Close();
}
catch (MySql.Data.MySqlClient.MySqlException ex)
{
MessageBox.Show("Error " + ex.Number + " has occurred: " + ex.Message,
"Error", MessageBoxButtons.OK, MessageBoxIcon.Error);
}
Visual Basic Code Example
Dim conn As New MySqlConnection
Dim cmd As New MySqlCommand
Dim SQL As String
384

Handling BLOB Data With Connector/NET
Dim FileSize As UInt32
Dim rawData() As Byte
Dim fs As FileStream
conn.ConnectionString = "server=127.0.0.1;" _
& "uid=root;" _
& "pwd=12345;" _
& "database=test"
Try
fs = New FileStream("c:\image.png", FileMode.Open, FileAccess.Read)
FileSize = fs.Length
rawData = New Byte(FileSize) {}
fs.Read(rawData, 0, FileSize)
fs.Close()
conn.Open()
SQL = "INSERT INTO file VALUES(NULL, @FileName, @FileSize, @File)"
cmd.Connection = conn
cmd.CommandText = SQL
cmd.Parameters.AddWithValue("@FileName", strFileName)
cmd.Parameters.AddWithValue("@FileSize", FileSize)
cmd.Parameters.AddWithValue("@File", rawData)
cmd.ExecuteNonQuery()
MessageBox.Show("File Inserted into database successfully!", _
"Success!", MessageBoxButtons.OK, MessageBoxIcon.Asterisk)
conn.Close()
Catch ex As Exception
MessageBox.Show("There was an error: " & ex.Message, "Error", _
MessageBoxButtons.OK, MessageBoxIcon.Error)
End Try
The Read method of the FileStream object is used to load the file into a byte array which is sized
according to the Length property of the FileStream object.
After assigning the byte array as a parameter of the MySqlCommand object, the ExecuteNonQuery
method is called and the BLOB is inserted into the file table.
4.5.6.3 Reading a BLOB from the Database to a File on Disk
After a file is loaded into the file table, we can use the MySqlDataReader class to retrieve it.
The following code retrieves a row from the file table, then loads the data into a FileStream object to
be written to disk:
C# Code Example
MySql.Data.MySqlClient.MySqlConnection conn;
MySql.Data.MySqlClient.MySqlCommand cmd;
MySql.Data.MySqlClient.MySqlDataReader myData;
conn = new MySql.Data.MySqlClient.MySqlConnection();
cmd = new MySql.Data.MySqlClient.MySqlCommand();
string SQL;
UInt32 FileSize;
byte[] rawData;
FileStream fs;
conn.ConnectionString = "server=127.0.0.1;uid=root;" +
"pwd=12345;database=test";
SQL = "SELECT file_name, file_size, file FROM file";
try
{
conn.Open();
cmd.Connection = conn;
cmd.CommandText = SQL;
myData = cmd.ExecuteReader();
if (! myData.HasRows)
throw new Exception("There are no BLOBs to save");
myData.Read();
385

Working with Partial Trust / Medium Trust
FileSize = myData.GetUInt32(myData.GetOrdinal("file_size"));
rawData = new byte[FileSize];
myData.GetBytes(myData.GetOrdinal("file"), 0, rawData, 0, (int)FileSize);
fs = new FileStream(@"C:\newfile.png", FileMode.OpenOrCreate, FileAccess.Write);
fs.Write(rawData, 0, (int)FileSize);
fs.Close();
MessageBox.Show("File successfully written to disk!",
"Success!", MessageBoxButtons.OK, MessageBoxIcon.Asterisk);
myData.Close();
conn.Close();
}
catch (MySql.Data.MySqlClient.MySqlException ex)
{
MessageBox.Show("Error " + ex.Number + " has occurred: " + ex.Message,
"Error", MessageBoxButtons.OK, MessageBoxIcon.Error);
}
Visual Basic Code Example
Dim conn As New MySqlConnection
Dim cmd As New MySqlCommand
Dim myData As MySqlDataReader
Dim SQL As String
Dim rawData() As Byte
Dim FileSize As UInt32
Dim fs As FileStream
conn.ConnectionString = "server=127.0.0.1;" _
& "uid=root;" _
& "pwd=12345;" _
& "database=test"
SQL = "SELECT file_name, file_size, file FROM file"
Try
conn.Open()
cmd.Connection = conn
cmd.CommandText = SQL
myData = cmd.ExecuteReader
If Not myData.HasRows Then Throw New Exception("There are no BLOBs to save")
myData.Read()
FileSize = myData.GetUInt32(myData.GetOrdinal("file_size"))
rawData = New Byte(FileSize) {}
myData.GetBytes(myData.GetOrdinal("file"), 0, rawData, 0, FileSize)
fs = New FileStream("C:\newfile.png", FileMode.OpenOrCreate, FileAccess.Write)
fs.Write(rawData, 0, FileSize)
fs.Close()
MessageBox.Show("File successfully written to disk!", "Success!", MessageBoxButtons.OK, MessageBoxIcon.Asterisk)
myData.Close()
conn.Close()
Catch ex As Exception
MessageBox.Show("There was an error: " & ex.Message, "Error", MessageBoxButtons.OK, MessageBoxIcon.Error)
End Try
After connecting, the contents of the file table are loaded into a MySqlDataReader object. The
GetBytes method of the MySqlDataReader is used to load the BLOB into a byte array, which is then
written to disk using a FileStream object.
The GetOrdinal method of the MySqlDataReader can be used to determine the integer index of a
named column. Use of the GetOrdinal method prevents errors if the column order of the SELECT query is
changed.
4.5.7 Working with Partial Trust / Medium Trust
.NET applications operate under a given trust level. Normal desktop applications operate under full
trust, while web applications that are hosted in shared environments are normally run under the partial
trust level (also known as “medium trust”). Some hosting providers host shared applications in their own
386

Working with Partial Trust / Medium Trust
app pools and allow the application to run under full trust, but this configuration is relatively rare. The
MySQL Connector/NET support for partial trust has improved over time to simplify the configuration and
deployment process for hosting providers.
4.5.7.1 Evolution of Partial Trust Support Across Connector/NET Versions
The partial trust support for MySQL Connector/NET has improved rapidly throughout the 6.5.x and 6.6.x
versions. The latest enhancements do require some configuration changes in existing deployments. Here
is a summary of the changes for each version.
6.6.4 and Above: Library Can Be Inside or Outside GAC
Now you can install the MySql.Data.dll library in the Global Assembly Cache (GAC) as explained in
Section 4.5.7.2, “Configuring Partial Trust with Connector/NET Library Installed in GAC”, or in a bin or
lib folder inside the project or solution as explained in Section 4.5.7.3, “Configuring Partial Trust with
Connector/NET Library Not Installed in GAC”. If the library is not in the GAC, the only protocol supported is
TCP/IP.
6.5.1 and Above: Partial Trust Requires Library in the GAC
Connector/NET 6.5 fully enables our provider to run in a partial trust environment when the library is
installed in the Global Assembly Cache (GAC). The new MySqlClientPermission class, derived from
the .NET DBDataPermission class, helps to simplify the permission setup.
5.0.8 / 5.1.3 and Above: Partial Trust Requires Socket Permissions
Starting with these versions, Connector/NET can be used under partial trust hosting that has been
modified to allow the use of sockets for communication. By default, partial trust does not include
SocketPermission. Connector/NET uses sockets to talk with the MySQL server, so the hosting provider
must create a new trust level that is an exact clone of partial trust but that has the following permissions
added:
• System.Net.SocketPermission
• System.Security.Permissions.ReflectionPermission
• System.Net.DnsPermission
• System.Security.Permissions.SecurityPermission
Prior to 5.0.8 / 5.1.3: Partial Trust Not Supported
Connector/NET versions prior to 5.0.8 and 5.1.3 were not compatible with partial trust hosting.
4.5.7.2 Configuring Partial Trust with Connector/NET Library Installed in GAC
If the library is installed in the GAC, you must include the connection option
includesecurityasserts=true in your connection string. This is a new requirement as of MySQL
Connector/NET 6.6.4.
The following list shows steps and code fragments needed to run a Connector/NET application in a partial
trust environment. For illustration purposes, we use the Pipe Connections protocol in this example.
1. Install Connector/NET: version 6.6.1 or later, or 6.5.4 or later.
2. After installing the library, make the following configuration changes:
In the SecurityClasses section, add a definition for the MySqlClientPermission class, including
the version to use.
387

Working with Partial Trust / Medium Trust
<configuration>
<mscorlib>
<security>
<policy>
<PolicyLevel version="1">
<SecurityClasses>
....
<SecurityClass Name="MySqlClientPermission" Description="MySql.Data.MySqlClient.MySqlClientPermission,
MySql.Data, Version=6.6.4.0, Culture=neutral, PublicKeyToken=c5687fc88969c44d" />
Scroll down to the ASP.Net section:
<PermissionSet class="NamedPermissionSet" version="1" Name="ASP.Net">
Add a new entry for the detailed configuration of the MySqlClientPermission class:
<IPermission class="MySqlClientPermission" version="1" Unrestricted="true"/>
Note
This configuration is the most generalized way that includes all keywords.
3. Configure the MySQL server to accept pipe connections, by adding the --enable-named-pipe
option on the command line. If you need more information about this, see Installing MySQL on
Microsoft Windows.
4. Confirm that the hosting provider has installed the Connector/NET library (MySql.Data.dll) in the
GAC.
5. Optionally, the hosting provider can avoid granting permissions globally by using
the new MySqlClientPermission class in the trust policies. (The alternative
is to globally enable the permissions System.Net.SocketPermission,
System.Security.Permissions.ReflectionPermission, System.Net.DnsPermission,
and System.Security.Permissions.SecurityPermission.)
6. Create a simple web application using Visual Studio 2010.
7. Add the reference in your application for the MySql.Data.MySqlClient library.
8. Edit your web.config file so that your application runs using a Medium trust level:
<system.web>
<trust level="Medium"/>
</system.web>
9. Add the MySql.Data.MySqlClient namespace to your server-code page.
10. Define the connection string, in slightly different ways depending on the Connector/NET version.
Only for 6.6.4 or later: To use the connections inside any web application that will run in
Medium trust, add the new includesecurityasserts option to the connection string.
includesecurityasserts=true that makes the library request the following permissions
when required: SocketPermissions, ReflectionPermissions, DnsPermissions,
SecurityPermissions among others that are not granted in Medium trust levels.
For Connector/NET 6.6.3 or earlier: No special setting for security is needed within the connection
string.
MySqlConnectionStringBuilder myconnString = new MySqlConnectionStringBuilder("server=localhost;User Id=root;database=test");
myconnString.PipeName = "MySQL55";
388

Working with Partial Trust / Medium Trust
myconnString.ConnectionProtocol = MySqlConnectionProtocol.Pipe;
// Following attribute is a new requirement when the library is in the GAC.
// Could also be done by adding includesecurityasserts=true; to the string literal
// in the constructor above.
// Not needed with Connector/NET 6.6.3 and earlier.
myconnString.IncludeSecurityAsserts = true;
11. Define the MySqlConnection to use:
MySqlConnection myconn = new MySqlConnection(myconnString.ConnectionString);
myconn.Open();
12. Retrieve some data from your tables:
MySqlCommand cmd = new MySqlCommand("Select * from products", myconn);
MySqlDataAdapter da = new MySqlDataAdapter(cmd);
DataSet1 tds = new DataSet1();
da.Fill(tds, tds.Tables[0].TableName);
GridView1.DataSource = tds;
GridView1.DataBind();
myconn.Close()
13. Run the program. It should execute successfully, without requiring any special code or encountering
any security problems.
4.5.7.3 Configuring Partial Trust with Connector/NET Library Not Installed in GAC
When deploying a web application to a Shared Hosted environment, where this environment is configured
to run all their .NET applications under a partial or medium trust level, you might not be able to install the
MySQL Connector/NET library in the GAC. Instead, you put a reference to the library in the bin or lib
folder inside the project or solution. In this case, you configure the security in a different way than when the
library is in the GAC.
Connector/NET is commonly used by applications that run in Windows environments where the default
communication for the protocol is used via sockets or by TCP/IP. For this protocol to operate is necessary
have the required socket permissions in the web configuration file as follows:
1. Open the medium trust policy web configuration file, which should be under this folder:
%windir%\Microsoft.NET\Framework\{version}\CONFIG\web_mediumtrust.config
Use Framework64 in the path instead of Framework if you are using a 64-bit installation of the
framework.
2. Locate the SecurityClasses tag:
<SecurityClass Name="SocketPermission"
Description="System.Net.SocketPermission, System, Version=4.0.0.0,
Culture=neutral, PublicKeyToken=b77a5c561934e089"/>
3. Scroll down and look for the following PermissionSet:
<PermissionSet version="1" Name="ASP.Net">
4. Add the following inside this PermissionSet:
<IPermission class="SocketPermission" version="1" Unrestricted="true" />
This configuration lets you use the driver with the default Windows protocol TCP/IP without having any
security issues. This approach only supports the TCP/IP protocol, so you cannot use any other type of
connection.
389

Writing a Custom Authentication Plugin
Also, since the MySQLClientPermissions class is not added to the medium trust policy, you cannot
use it. This configuration is the minimum required in order to work with Connector/NET without the
GAC.
4.5.8 Writing a Custom Authentication Plugin
Advanced users with special security requirements can create their own authentication plugins for
MySQL Connector/NET applications. You can extend the handshake protocol, adding custom logic. For
background and usage information about MySQL authentication plugins, see Authentication Plugins and
Writing Authentication Plugins.
To write a custom authentication plugin, you will need a reference to the assembly MySql.Data.dll.
The classes relevant for writing authentication plugins are available at the namespace
MySql.Data.MySqlClient.Authentication.
How the Custom Authentication Plugin Works
At some point during handshake, the internal method
void Authenticate(bool reset)
of MySqlAuthenticationPlugin is called. This method in turns calls several overridable methods of
the current plugin.
Creating the Authentication Plugin Class
You put the authentication plugin logic inside a new class derived from
MySql.Data.MySqlClient.Authentication.MySqlAuthenticationPlugin. The following
methods are available to be overridden:
protected virtual void CheckConstraints()
protected virtual void AuthenticationFailed(Exception ex)
protected virtual void AuthenticationSuccessful()
protected virtual byte[] MoreData(byte[] data)
protected virtual void AuthenticationChange()
public abstract string PluginName { get; }
public virtual string GetUsername()
public virtual object GetPassword()
protected byte[] AuthData;
The following is a brief explanation of each one:
/// <summary>
/// This method must check authentication method specific constraints in the
environment and throw an Exception
/// if the conditions are not met. The default implementation does nothing.
/// </summary>
protected virtual void CheckConstraints()
/// <summary>
/// This method, called when the authentication failed, provides a chance to
plugins to manage the error
/// the way they consider decide (either showing a message, logging it, etc.).
/// The default implementation wraps the original exception in a MySqlException
with an standard message and rethrows it.
/// </summary>
/// <param name="ex">The exception with extra information on the error.</param>
protected virtual void AuthenticationFailed(Exception ex)
/// <summary>
/// This method is invoked when the authentication phase was successful accepted
by the server.
/// Derived classes must override this if they want to be notified of such
condition.
390

Writing a Custom Authentication Plugin
/// </summary>
/// <remarks>The default implementation does nothing.</remarks>
protected virtual void AuthenticationSuccessful()
/// <summary>
/// This method provides a chance for the plugin to send more data when the
server requests so during the
/// authentication phase. This method will be called at least once, and more
than one depending upon whether the
/// server response packets have the 0x01 prefix.
/// </summary>
/// <param name="data">The response data from the server, during the
authentication phase the first time is called is null, in
subsequent calls contains the server response.</param>
/// <returns>The data generated by the plugin for server consumption.</returns>
/// <remarks>The default implementation always returns null.</remarks>
protected virtual byte[] MoreData(byte[] data)
/// <summary>
/// The plugin name.
/// </summary>
public abstract string PluginName { get; }
/// <summary>
/// Gets the user name to send to the server in the authentication phase.
/// </summary>
/// <returns>An string with the user name</returns>
/// <remarks>Default implementation returns the UserId passed from the
connection string.</remarks>
public virtual string GetUsername()
/// <summary>
/// Gets the password to send to the server in the authentication phase. This
can be a string or a
/// </summary>
/// <returns>An object, can be byte[], string or null, with the password.
</returns>
/// <remarks>Default implementation returns null.</remarks>
public virtual object GetPassword()
/// <summary>
/// The authentication data passed when creating the plugin.
/// For example in mysql_native_password this is the seed to encrypt the
password.
/// </summary>
protected byte[] AuthData;
Authentication Plugin Example
This example shows how to create the authentication plugin and then enable it by means of a configuration
file.
1. Create a console app, adding a reference to MySql.Data.dll.
2. Design the main C# program as follows:
using System;
using System.Collections.Generic;
using System.Linq;
using System.Text;
using MySql.Data.MySqlClient;
namespace AuthPluginTest
{
class Program
{
static void Main(string[] args)
{
// Customize the connection string as necessary.
MySqlConnection con = new MySqlConnection("server=localhost;
database=test; user id=myuser; password=mypass");
con.Open();
391

Writing a Custom Authentication Plugin
con.Close();
}
}
}
3. Create your plugin class. In this example, we add an “alternative” implementation of the Native
password plugin by just using the same code from the original plugin.
Note
The mysql_native_password plugin is disabled by default as of MySQL Server
8.4.0 and removed as of MySQL Server 9.0.0.
We name our class MySqlNativePasswordPlugin2:
using System.IO;
using System;
using System.Text;
using System.Security.Cryptography;
using MySql.Data.MySqlClient.Authentication;
using System.Diagnostics;
namespace AuthPluginTest
{
public class MySqlNativePasswordPlugin2 : MySqlAuthenticationPlugin
{
public override string PluginName
{
get { return "mysql_native_password"; }
}
public override object GetPassword()
{
Debug.WriteLine("Calling MySqlNativePasswordPlugin2.GetPassword");
return Get411Password(Settings.Password, AuthData);
}
/// <summary>
/// Returns a byte array containing the proper encryption of the
/// given password/seed according to the new 4.1.1 authentication scheme.
/// </summary>
/// <param name="password"></param>
/// <param name="seed"></param>
/// <returns></returns>
private byte[] Get411Password(string password, byte[] seedBytes)
{
// if we have no password, then we just return 1 zero byte
if (password.Length == 0) return new byte[1];
SHA1 sha = new SHA1CryptoServiceProvider();
byte[] firstHash = sha.ComputeHash(Encoding.Default.GetBytes(password));
byte[] secondHash = sha.ComputeHash(firstHash);
byte[] input = new byte[seedBytes.Length + secondHash.Length];
Array.Copy(seedBytes, 0, input, 0, seedBytes.Length);
Array.Copy(secondHash, 0, input, seedBytes.Length, secondHash.Length);
byte[] thirdHash = sha.ComputeHash(input);
byte[] finalHash = new byte[thirdHash.Length + 1];
finalHash[0] = 0x14;
Array.Copy(thirdHash, 0, finalHash, 1, thirdHash.Length);
for (int i = 1; i < finalHash.Length; i++)
finalHash[i] = (byte)(finalHash[i] ^ firstHash[i - 1]);
return finalHash;
}
}
}
Notice that the plugin implementation just overrides GetPassword, and provides an implementation
to encrypt the password using the 4.1 protocol. Add the following line in the GetPassword body to
provide confirmation that the plugin was effectively used.
392

Using the Connector/NET Interceptor Classes
Debug.WriteLine("Calling MySqlNativePasswordPlugin2.GetPassword");
Tip
You could also put a breakpoint on that method.
4. Enable the new plugin in the configuration file:
<?xml version="1.0"?>
<configuration>
<configSections>
<section name="MySQL" type="MySql.Data.MySqlClient.MySqlConfiguration,
MySql.Data"/>
</configSections>
<MySQL>
<AuthenticationPlugins>
<add name="mysql_native_password"
type="AuthPluginTest.MySqlNativePasswordPlugin2, AuthPluginTest"></add>
</AuthenticationPlugins>
</MySQL>
<startup><supportedRuntime version="v4.0" sku=".NETFramework,Version=v4.0"/>
</startup></configuration>
5. Run the application. In Visual Studio, you will see the message Calling
MySqlNativePasswordPlugin2.GetPassword in the debug window.
Continue enhancing the authentication logic, overriding more methods if you required.
4.5.9 Using the Connector/NET Interceptor Classes
An interceptor is a software design pattern that provides a transparent way to extend or modify some
aspect of a program, similar to a user exit. No recompiling is required. With MySQL Connector/NET,
the interceptors are enabled and disabled by updating the connection string to refer to different sets of
interceptor classes that you instantiate.
Note
The classes and methods presented in this section do not apply to Connector/NET
applications developed with the .NET Core 1.1 framework.
Connector/NET includes the following interceptor classes:
• The BaseCommandInterceptor lets you perform additional operations when a program issues a
SQL command. For example, you can examine the SQL statement for logging or debugging purposes,
substitute your own result set to implement a caching mechanism, and so on. Depending on the use
case, your code can supplement the SQL command or replace it entirely.
The BaseCommandInterceptor class has these methods that you can override:
public virtual bool ExecuteScalar(string sql, ref object returnValue);
public virtual bool ExecuteNonQuery(string sql, ref int returnValue);
public virtual bool ExecuteReader(string sql, CommandBehavior behavior, ref MySqlDataReader returnValue);
public virtual void Init(MySqlConnection connection);
If your interceptor overrides one of the Execute... methods, set the returnValue output parameter
and return true if you handled the event, or false if you did not handle the event. The SQL command
is processed normally only when all command interceptors return false.
The connection passed to the Init method is the connection that is attached to this interceptor.
393

Using the Connector/NET Interceptor Classes
• The BaseExceptionInterceptor lets you perform additional operations when a program encounters
an SQL exception. The exception interception mechanism is modeled after the Connector/J model. You
can code an interceptor class and connect it to an existing program without recompiling, and intercept
exceptions when they are created. You can then change the exception type and optionally attach
information to it. This capability lets you turn on and off logging and debugging code without hardcoding
anything in the application. This technique applies to exceptions raised at the SQL level, not to lower-
level system or I/O errors.
You develop an exception interceptor first by creating a subclass of the BaseExceptionInterceptor
class. You must override the InterceptException() method. You can also override the Init()
method to do some one-time initialization.
Each exception interceptor has 2 methods:
public abstract Exception InterceptException(Exception exception,
MySqlConnection connection);
public virtual void Init(MySqlConnection connection);
The connection passed to Init() is the connection that is attached to this interceptor.
Each interceptor is required to override InterceptException and return an exception. It can return
the exception it is given, or it can wrap it in a new exception. We currently do not offer the ability to
suppress the exception.
Here are examples of using the FQN (fully qualified name) on the connection string:
MySqlConnection c1 = new MySqlConnection(@"server=localhost;pooling=false;
commandinterceptors=CommandApp.MyCommandInterceptor,CommandApp");
MySqlConnection c2 = new MySqlConnection(@"server=localhost;pooling=false;
exceptioninterceptors=ExceptionStackTraceTest.MyExceptionInterceptor,ExceptionStackTraceTest");
In this example, the command interceptor is called CommandApp.MyCommandInterceptor
and exists in the CommandApp assembly. The exception interceptor is called
ExceptionStackTraceTest.MyExceptionInterceptor and exists in the
ExceptionStackTraceTest assembly.
To shorten the connection string, you can register your exception interceptors in your app.config or
web.config file like this:
<configSections>
<section name="MySQL" type="MySql.Data.MySqlClient.MySqlConfiguration,MySql.Data"/>
</configSections>
<MySQL>
<CommandInterceptors>
<add name="myC" type="CommandApp.MyCommandInterceptor,CommandApp" />
</CommandInterceptors>
</MySQL>
<configSections>
<section name="MySQL" type="MySql.Data.MySqlClient.MySqlConfiguration,
MySql.Data"/>
</configSections>
<MySQL>
<ExceptionInterceptors>
<add name="myE"
type="ExceptionStackTraceTest.MyExceptionInterceptor,ExceptionStackTraceTest" />
</ExceptionInterceptors>
</MySQL>
After you have done that, your connection strings can look like these:
MySqlConnection c1 = new MySqlConnection(@"server=localhost;pooling=false;
commandinterceptors=myC");
394

Handling Date and Time Information in Connector/NET
MySqlConnection c2 = new MySqlConnection(@"server=localhost;pooling=false;
exceptioninterceptors=myE");
4.5.10 Handling Date and Time Information in Connector/NET
MySQL and the .NET languages handle date and time information differently, with MySQL allowing dates
that cannot be represented by a .NET data type, such as '0000-00-00 00:00:00'. These differences
can cause problems if not properly handled.
The following sections demonstrate how to properly handle date and time information when using MySQL
Connector/NET.
4.5.10.1 Fractional Seconds
MySQL Connector/NET supports the fractional seconds feature in MySQL, where the fractional seconds
part of temporal values is preserved in data stored and retrieved through SQL. For fractional second
handling in MySQL 5.6.4 and higher, see Fractional Seconds in Time Values.
To use the more precise date and time types, specify a value from 1 to 6 when creating the table
column, for example TIME(3) or DATETIME(6), representing the number of digits of precision after
the decimal point. Specifying a precision of 0 leaves the fractional part out entirely. In your C# or
Visual Basic code, refer to the Millisecond member to retrieve the fractional second value from the
MySqlDateTime object returned by the GetMySqlDateTime function. The DateTime object returned by
the GetDateTime function also contains the fractional value, but only the first 3 digits.
For related code examples, see the following blog post: https://blogs.oracle.com/MySqlOnWindows/entry/
milliseconds_value_support_on_datetime
4.5.10.2 Problems when Using Invalid Dates
The differences in date handling can cause problems for developers who use invalid dates. Invalid MySQL
dates cannot be loaded into native .NET DateTime objects, including NULL dates.
Because of this issue, .NET DataSet objects cannot be populated by the Fill method of the
MySqlDataAdapter class as invalid dates will cause a System.ArgumentOutOfRangeException
exception to occur.
4.5.10.3 Restricting Invalid Dates
The best solution to the date problem is to restrict users from entering invalid dates. This can be done on
either the client or the server side.
Restricting invalid dates on the client side is as simple as always using the .NET DateTime class to
handle dates. The DateTime class will only allow valid dates, ensuring that the values in your database
are also valid. The disadvantage of this is that it is not useful in a mixed environment where .NET and
non .NET code are used to manipulate the database, as each application must perform its own date
validation.
Users of MySQL 5.0.2 and higher can use the new traditional SQL mode to restrict invalid date
values. For information on using the traditional SQL mode, see Server SQL Modes.
4.5.10.4 Handling Invalid Dates
Although it is strongly recommended that you avoid the use of invalid dates within your .NET application, it
is possible to use invalid dates by means of the MySqlDateTime data type.
The MySqlDateTime data type supports the same date values that are supported by the MySQL
server. The default behavior of Connector/NET is to return a .NET DateTime object for valid date values,
395

Using the MySqlBulkLoader Class
and return an error for invalid dates. This default can be modified to cause Connector/NET to return
MySqlDateTime objects for invalid dates.
To instruct Connector/NET to return a MySqlDateTime object for invalid dates, add the following line to
your connection string:
Allow Zero Datetime=True
The MySqlDateTime class can still be problematic. The following are some known issues:
• Data binding for invalid dates can still cause errors (zero dates like 0000-00-00 do not seem to have this
problem).
• The ToString method return a date formatted in the standard MySQL format (for example,
2005-02-23 08:50:25). This differs from the ToString behavior of the .NET DateTime class.
• The MySqlDateTime class supports NULL dates, while the .NET DateTime class does not. This can
cause errors when trying to convert a MySQLDateTime to a DateTime if you do not check for NULL first.
Because of the known issues, the best recommendation is still to use only valid dates in your application.
4.5.10.5 Handling NULL Dates
The .NET DateTime data type cannot handle NULL values. As such, when assigning values from a query
to a DateTime variable, you must first check whether the value is in fact NULL.
When using a MySqlDataReader, use the .IsDBNull method to check whether a value is NULL before
making the assignment:
C# Code Example
if (! myReader.IsDBNull(myReader.GetOrdinal("mytime")))
myTime = myReader.GetDateTime(myReader.GetOrdinal("mytime"));
else
myTime = DateTime.MinValue;
Visual Basic Code Example
If Not myReader.IsDBNull(myReader.GetOrdinal("mytime")) Then
myTime = myReader.GetDateTime(myReader.GetOrdinal("mytime"))
Else
myTime = DateTime.MinValue
End If
NULL values will work in a data set and can be bound to form controls without special handling.
4.5.11 Using the MySqlBulkLoader Class
MySQL Connector/NET features a bulk loader class that wraps the MySQL statement LOAD DATA
INFILE. This gives Connector/NET the ability to load a data file from a local or remote host to the server,
or a stream to a database (from Connector/NET 8.0.32).
The class concerned is MySqlBulkLoader. This class has various methods, the main overloaded method
being load, which permits a stream object to be loaded directly to a database (8.0.32) or the specified file
to the server. Various parameters can be set to control how the data file is processed. This is achieved
through setting various properties of the class. For example, the field separator used, such as comma or
tab, can be specified, along with the record terminator, such as newline.
The following code shows a simple example of using the MySqlBulkLoader class. First an empty table
needs to be created, in this case in the test database.
396

Using the MySqlBulkLoader Class
CREATE TABLE Career (
Name VARCHAR(100) NOT NULL,
Age INTEGER,
Profession VARCHAR(200)
);
A simple tab-delimited data file is also created (it could use any other field delimiter such as comma).
Table Career in Test Database
Name Age Profession
Tony 47 Technical Writer
Ana 43 Nurse
Fred 21 IT Specialist
Simon 45 Hairy Biker
The first three lines need to be ignored with this test file, as they do not contain table data. This task is
accomplished in the following C# code example by setting the NumberOfLinesToSkip property . The file
can then be loaded and used to populate the Career table in the test database.
Note
As of Connector/NET 8.0.15, the Local property must be set to True explicitly to
enable the local-infile capability. Previous versions set this value to True by default.
using System;
using System.Text;
using MySql.Data;
using MySql.Data.MySqlClient;
namespace ConsoleApplication1
{
class Program
{
static void Main(string[] args)
{
string connStr = "server=localhost;user=root;database=test;port=3306;password=******";
MySqlConnection conn = new MySqlConnection(connStr);
MySqlBulkLoader bl = new MySqlBulkLoader(conn);
bl.Local = true;
bl.TableName = "Career";
bl.FieldTerminator = "\t";
bl.LineTerminator = "\n";
bl.FileName = "c:/career_data.txt";
bl.NumberOfLinesToSkip = 3;
try
{
Console.WriteLine("Connecting to MySQL...");
conn.Open();
// Upload data from file
int count = bl.Load();
Console.WriteLine(count + " lines uploaded.");
string sql = "SELECT Name, Age, Profession FROM Career";
MySqlCommand cmd = new MySqlCommand(sql, conn);
MySqlDataReader rdr = cmd.ExecuteReader();
while (rdr.Read())
{
Console.WriteLine(rdr[0] + " -- " + rdr[1] + " -- " + rdr[2]);
}
rdr.Close();
conn.Close();
}
catch (Exception ex)
{
Console.WriteLine(ex.ToString());
}
Console.WriteLine("Done.");
397

Connector/NET Tracing
}
}
}
Further information on LOAD DATA INFILE can be found in LOAD DATA Statement. Further information
on MySqlBulkLoader can be found in the reference documentation that was included with your
connector.
4.5.12 Connector/NET Tracing
4.5.12.1 Enabling OpenTelemetry Tracing
OpenTelementry (OTel) standardizes instrumentation, generation, collecting and exporting telemetry data
to be consumed by an Observability backend. For more details on OpenTelemetry, visit its official site.
Starting in Connector/NET 8.1.0, support for OTel is encapsulated in the MySQL.Data.OpenTelemetry
NuGet package. This package implements the functionality to add the connector to the tracer provider
using OpenTelementry.Api. Connector/NET neither creates nor provides the means to create an OTel
exporter. Instead, it relies on the default exporter supplied by your application.
Note
OTel context forwarding works only with MySQL Enterprise Edition, a commercial
product. To learn more about commercial products, see https://www.mysql.com/
products/.
Requirements for Enabling Tracing
• .NET 5 and later.
• Connector/NET MySQL.Data.OpenTelemetry and MySQL.Data NuGet packages.
Note
The Connector/NET MSI file does not include support for this OTel
implementation.
• An OpenTelemetry SDK of your choosing and an appropriate exporter package.
• MySQL Enterprise Edition server with the query attributes enabled. If the server does not support query
attributes or has them disabled, then Connector/NET skips the entire context propagation flow.
• Code that uses OTel instrumentation. If your code does not use instrumentation, then the connector
does not forward the current OTel context for each executed statement.
Enabling OpenTelemetry
To enable OTel tracing using the Connector/NET implementation, add the connector to the trace provider
builder as follows:
var tracerProvider = sdk.TraceProviderBuilder().AddConnectorNet().Build();
When you build code that links to Connector/NET and uses OTel instrumentation, the additional spans
generated by the connector appear in the traces generated by your code. Spans generated by the
connector are sent to the same destination (trace exporter) where other spans generated by the user code
are sent as configured by user code. It is not possible to send spans generated by the connector to any
other destination.
4.5.12.2 Using the Connector/NET Trace Source Object
398

Connector/NET Tracing
The .NET tracing architecture consists of four main parts:
• Source - This is the originator of the trace information. The source is used to send trace messages. The
name of the source provided by Connector/NET is mysql.
• Switch - This defines the level of trace information to emit. Typically, this is specified in the app.config
file, so that it is not necessary to recompile an application to change the trace level.
• Listener - Trace listeners define where the trace information will be written to. Supported listeners
include, for example, the Visual Studio Output window, the Windows Event Log, and the console.
• Filter - Filters can be attached to listeners. Filters determine the level of trace information that will be
written. While a switch defines the level of information that will be written to all listeners, a filter can be
applied on a per-listener basis, giving finer grained control of trace information.
To use tracing MySql.Data.MySqlClient.MySqlTrace can be used as a TraceSource for Connector/NET
and the connection string must include "Logging=True".
To enable trace messages, configure a trace switch. Trace switches have associated with them a trace
level enumeration, these are Off, Error, Warning, Info, and Verbose.
MySqlTrace.Switch.Level = SourceLevels.Verbose;
This sets the trace level to Verbose, meaning that all trace messages will be written.
It is convenient to be able to change the trace level without having to recompile the code. This is achieved
by specifying the trace level in application configuration file, app.config. You then simply need to specify
the desired trace level in the configuration file and restart the application. The trace source is configured
within the system.diagnostics section of the file. The following XML snippet illustrates this:
<configuration>
...
<system.diagnostics>
<sources>
<source name="mysql" switchName="MySwitch"
switchType="System.Diagnostics.SourceSwitch" />
...
</sources>
<switches>
<add name="MySwitch" value="Verbose"/>
...
</switches>
</system.diagnostics>
...
</configuration>
By default, trace information is written to the Output window of Microsoft Visual Studio. There are a
wide range of listeners that can be attached to the trace source, so that trace messages can be written
out to various destinations. You can also create custom listeners to allow trace messages to be written
to other destinations as mobile devices and web services. A commonly used example of a listener is
ConsoleTraceListener, which writes trace messages to the console.
To add a listener at runtime, use code such as the following:
ts.Listeners.Add(new ConsoleTraceListener());
Then, call methods on the trace source object to generate trace information. For example, the
TraceInformation(), TraceEvent(), or TraceData() methods can be used.
Viewing MySQL Trace Information
This section describes how to set up your application to view MySQL trace information.
399

Connector/NET Tracing
The first thing you need to do is create a suitable app.config file for your application. For example:
<?xml version="1.0" encoding="utf-8" ?>
<configuration>
<system.diagnostics>
<sources>
<source name="mysql" switchName="SourceSwitch"
switchType="System.Diagnostics.SourceSwitch" >
<listeners>
<add name="console" />
<remove name ="Default" />
</listeners>
</source>
</sources>
<switches>
<!-- You can set the level at which tracing is to occur -->
<add name="SourceSwitch" value="Verbose" />
<!-- You can turn tracing off -->
<!--add name="SourceSwitch" value="Off" -->
</switches>
<sharedListeners>
<add name="console"
type="System.Diagnostics.ConsoleTraceListener"
initializeData="false"/>
</sharedListeners>
</system.diagnostics>
</configuration>
This configuration ensures that a suitable trace source is created, along with a switch. The switch level in
this case is set to Verbose to display the maximum amount of information.
Next, add logging=true to the connection string in your C# application. For example:
using System;
using System.Collections.Generic;
using System.Linq;
using System.Text;
using System.Diagnostics;
using MySql.Data;
using MySql.Data.MySqlClient;
using MySql.Web;
namespace ConsoleApplication1
{
class Program
{
static void Main(string[] args)
{
string connStr = "server=localhost;user=root;database=world;port=3306;password=******;logging=true";
MySqlConnection conn = new MySqlConnection(connStr);
try
{
Console.WriteLine("Connecting to MySQL...");
conn.Open();
string sql = "SELECT Name, HeadOfState FROM Country WHERE Continent='Oceania'";
MySqlCommand cmd = new MySqlCommand(sql, conn);
MySqlDataReader rdr = cmd.ExecuteReader();
while (rdr.Read())
{
Console.WriteLine(rdr[0] + " -- " + rdr[1]);
}
rdr.Close();
conn.Close();
}
catch (Exception ex)
{
Console.WriteLine(ex.ToString());
}
400

Connector/NET Tracing
Console.WriteLine("Done.");
}
}
}
This simple application then generates the following output:
Connecting to MySQL...
mysql Information: 1 : 1: Connection Opened: connection string = 'server=localhost;User Id=root;database=world;port=3306
;password=******;logging=True'
mysql Information: 3 : 1: Query Opened: SHOW VARIABLES
mysql Information: 4 : 1: Resultset Opened: field(s) = 2, affected rows = -1, inserted id = -1
mysql Information: 5 : 1: Resultset Closed. Total rows=272, skipped rows=0, size (bytes)=7058
mysql Information: 6 : 1: Query Closed
mysql Information: 3 : 1: Query Opened: SHOW COLLATION
mysql Information: 4 : 1: Resultset Opened: field(s) = 6, affected rows = -1, inserted id = -1
mysql Information: 5 : 1: Resultset Closed. Total rows=127, skipped rows=0, size (bytes)=4102
mysql Information: 6 : 1: Query Closed
mysql Information: 3 : 1: Query Opened: SET character_set_results=NULL
mysql Information: 4 : 1: Resultset Opened: field(s) = 0, affected rows = 0, inserted id = 0
mysql Information: 5 : 1: Resultset Closed. Total rows=0, skipped rows=0, size (bytes)=0
mysql Information: 6 : 1: Query Closed
mysql Information: 10 : 1: Set Database: world
mysql Information: 3 : 1: Query Opened: SELECT Name, HeadOfState FROM Country WHERE Continent='Oceania'
mysql Information: 4 : 1: Resultset Opened: field(s) = 2, affected rows = -1, inserted id = -1
American Samoa -- George W. Bush
Australia -- Elisabeth II
...
Wallis and Futuna -- Jacques Chirac
Vanuatu -- John Bani
United States Minor Outlying Islands -- George W. Bush
mysql Information: 5 : 1: Resultset Closed. Total rows=28, skipped rows=0, size (bytes)=788
mysql Information: 6 : 1: Query Closed
Done.
mysql Information: 2 : 1: Connection Closed
The first number displayed in the trace message corresponds to the MySQL event type. The second
number displayed in the trace message is the connection count. The following table describes each
MySQL event type.
Event Type Description
1 ConnectionOpened: connection string
2 ConnectionClosed:
3 QueryOpened: mysql server thread id, query text
4 ResultOpened: field count, affected rows (-1 if select), inserted id (-1 if
select)
5 ResultClosed: total rows read, rows skipped, size of result set in bytes
6 QueryClosed:
7 StatementPrepared: prepared sql, statement id
8 StatementExecuted: statement id, mysql server thread id
9 StatementClosed: statement id
10 NonQuery: [varies]
11 UsageAdvisorWarning: usage advisor flag. NoIndex = 1, BadIndex = 2,
SkippedRows = 3, SkippedColumns = 4, FieldConversion = 5.
12 Warning: level, code, message
13 Error: error number, error message
401

Connector/NET Tracing
Although this example uses the ConsoleTraceListener, any of the other standard listeners can
be used. Another possibility is to create a custom listener that uses the information passed in with the
TraceEvent method. For example, a custom trace listener can be created to perform active monitoring of
the MySQL event messages, rather than simply writing these to an output device.
It is also possible to add listeners to the MySQL Trace Source at runtime. This can be done with the
following code:
MySqlTrace.Listeners.Add(new ConsoleTraceListener());
Connector/NET provides the ability to switch tracing on and off at runtime. This can be achieved using
the calls MySqlTrace.EnableQueryAnalyzer(string host, int postInterval) and
MySqlTrace.DisableQueryAnalyzer(). The parameter host is the URL of the MySQL Enterprise
Monitor server to monitor. The parameter postInterval is how often to post the data to MySQL
Enterprise Monitor, in seconds.
Building Custom Listeners
To build custom listeners that work with the MySQL Connector/NET Trace Source, it is necessary to
understand the key methods used, and the event data formats used.
The main method involved in passing trace messages is the TraceSource.TraceEvent method. This
has the prototype:
public void TraceEvent(
TraceEventType eventType,
int id,
string format,
params Object[] args
)
This trace source method will process the list of attached listeners and call the listener's
TraceListener.TraceEvent method. The prototype for the TraceListener.TraceEvent method is
as follows:
public virtual void TraceEvent(
TraceEventCache eventCache,
string source,
TraceEventType eventType,
int id,
string format,
params Object[] args
)
The first three parameters are used in the standard as defined by Microsoft. The last three parameters
contain MySQL-specific trace information. Each of these parameters is now discussed in more detail.
int id
This is a MySQL-specific identifier. It identifies the MySQL event type that has occurred, resulting in a trace
message being generated. This value is defined by the MySqlTraceEventType public enum contained in
the Connector/NET code:
public enum MySqlTraceEventType : int
{
ConnectionOpened = 1,
ConnectionClosed,
QueryOpened,
ResultOpened,
ResultClosed,
QueryClosed,
StatementPrepared,
402

Using Connector/NET with Crystal Reports
StatementExecuted,
StatementClosed,
NonQuery,
UsageAdvisorWarning,
Warning,
Error
}
The MySQL event type also determines the contents passed using the parameter params Object[]
args. The nature of the args parameters are described in further detail in the following material.
string format
This is the format string that contains zero or more format items, which correspond to objects in the args
array. This would be used by a listener such as ConsoleTraceListener to write a message to the
output device.
params Object[] args
This is a list of objects that depends on the MySQL event type, id. However, the first parameter passed
using this list is always the driver id. The driver id is a unique number that is incremented each time
the connector is opened. This enables groups of queries on the same connection to be identified. The
parameters that follow driver id depend on the MySQL event id, and are as follows:
MySQL-specific event type Arguments (params Object[] args)
ConnectionOpened Connection string
ConnectionClosed No additional parameters
QueryOpened mysql server thread id, query text
ResultOpened field count, affected rows (-1 if select), inserted id (-1 if select)
ResultClosed total rows read, rows skipped, size of result set in bytes
QueryClosed No additional parameters
StatementPrepared prepared sql, statement id
StatementExecuted statement id, mysql server thread id
StatementClosed statement id
NonQuery Varies
UsageAdvisorWarning usage advisor flag. NoIndex = 1, BadIndex = 2, SkippedRows = 3,
SkippedColumns = 4, FieldConversion = 5.
Warning level, code, message
Error error number, error message
This information allows you to create custom trace listeners that can actively monitor the MySQL-specific
events.
4.5.13 Using Connector/NET with Crystal Reports
Crystal Reports is a common tool used by Windows application developers to perform reporting and
document generation. In this section we will show how to use Crystal Reports XI with MySQL and MySQL
Connector/NET.
4.5.13.1 Creating a Data Source
When creating a report in Crystal Reports there are two options for accessing the MySQL data while
designing your report.
403

Using Connector/NET with Crystal Reports
The first option is to use Connector/ODBC as an ADO data source when designing your report. You will be
able to browse your database and choose tables and fields using drag and drop to build your report. The
disadvantage of this approach is that additional work must be performed within your application to produce
a data set that matches the one expected by your report.
The second option is to create a data set in VB.NET and save it as XML. This XML file can then be used
to design a report. This works quite well when displaying the report in your application, but is less versatile
at design time because you must choose all relevant columns when creating the data set. If you forget a
column you must re-create the data set before the column can be added to the report.
The following code can be used to create a data set from a query and write it to disk:
C# Code Example
DataSet myData = new DataSet();
MySql.Data.MySqlClient.MySqlConnection conn;
MySql.Data.MySqlClient.MySqlCommand cmd;
MySql.Data.MySqlClient.MySqlDataAdapter myAdapter;
conn = new MySql.Data.MySqlClient.MySqlConnection();
cmd = new MySql.Data.MySqlClient.MySqlCommand();
myAdapter = new MySql.Data.MySqlClient.MySqlDataAdapter();
conn.ConnectionString = "server=127.0.0.1;uid=root;" +
"pwd=12345;database=test";
try
{
cmd.CommandText = "SELECT city.name AS cityName, city.population AS CityPopulation, " +
"country.name, country.population, country.continent " +
"FROM country, city ORDER BY country.continent, country.name";
cmd.Connection = conn;
myAdapter.SelectCommand = cmd;
myAdapter.Fill(myData);
myData.WriteXml(@"C:\dataset.xml", XmlWriteMode.WriteSchema);
}
catch (MySql.Data.MySqlClient.MySqlException ex)
{
MessageBox.Show(ex.Message, "Report could not be created",
MessageBoxButtons.OK, MessageBoxIcon.Error);
}
Visual Basic Code Example
Dim myData As New DataSet
Dim conn As New MySqlConnection
Dim cmd As New MySqlCommand
Dim myAdapter As New MySqlDataAdapter
conn.ConnectionString = "server=127.0.0.1;" _
& "uid=root;" _
& "pwd=12345;" _
& "database=world"
Try
conn.Open()
cmd.CommandText = "SELECT city.name AS cityName, city.population AS CityPopulation, " _
& "country.name, country.population, country.continent " _
& "FROM country, city ORDER BY country.continent, country.name"
cmd.Connection = conn
myAdapter.SelectCommand = cmd
myAdapter.Fill(myData)
myData.WriteXml("C:\dataset.xml", XmlWriteMode.WriteSchema)
Catch ex As Exception
MessageBox.Show(ex.Message, "Report could not be created", MessageBoxButtons.OK, MessageBoxIcon.Error)
End Try
The resulting XML file can be used as an ADO.NET XML datasource when designing your report.
If you choose to design your reports using Connector/ODBC, it can be downloaded from dev.mysql.com.
404

Using Connector/NET with Crystal Reports
4.5.13.2 Creating the Report
For most purposes, the Standard Report wizard helps with the initial creation of a report. To start the
wizard, open Crystal Reports and choose the New > Standard Report option from the File menu.
The wizard first prompts you for a data source. If you use Connector/ODBC as your data source, use the
OLEDB provider for ODBC option from the OLE DB (ADO) tree instead of the ODBC (RDO) tree when
choosing a data source. If using a saved data set, choose the ADO.NET (XML) option and browse to your
saved data set.
The remainder of the report creation process is done automatically by the wizard.
After the report is created, choose the Report Options entry from the File menu. Un-check the Save
Data With Report option. This prevents saved data from interfering with the loading of data within our
application.
4.5.13.3 Displaying the Report
To display a report we first populate a data set with the data needed for the report, then load the report and
bind it to the data set. Finally we pass the report to the crViewer control for display to the user.
The following references are needed in a project that displays a report:
• CrystalDecisions.CrystalReports.Engine
• CrystalDecisions.ReportSource
• CrystalDecisions.Shared
• CrystalDecisions.Windows.Forms
The following code assumes that you created your report using a data set saved using the code shown in
Section 4.5.13.1, “Creating a Data Source”, and have a crViewer control on your form named myViewer.
C# Code Example
using CrystalDecisions.CrystalReports.Engine;
using System.Data;
using MySql.Data.MySqlClient;
ReportDocument myReport = new ReportDocument();
DataSet myData = new DataSet();
MySql.Data.MySqlClient.MySqlConnection conn;
MySql.Data.MySqlClient.MySqlCommand cmd;
MySql.Data.MySqlClient.MySqlDataAdapter myAdapter;
conn = new MySql.Data.MySqlClient.MySqlConnection();
cmd = new MySql.Data.MySqlClient.MySqlCommand();
myAdapter = new MySql.Data.MySqlClient.MySqlDataAdapter();
conn.ConnectionString = "server=127.0.0.1;uid=root;" +
"pwd=12345;database=test";
try
{
cmd.CommandText = "SELECT city.name AS cityName, city.population AS CityPopulation, " +
"country.name, country.population, country.continent " +
"FROM country, city ORDER BY country.continent, country.name";
cmd.Connection = conn;
myAdapter.SelectCommand = cmd;
myAdapter.Fill(myData);
myReport.Load(@".\world_report.rpt");
myReport.SetDataSource(myData);
myViewer.ReportSource = myReport;
}
catch (MySql.Data.MySqlClient.MySqlException ex)
{
405

Using Connector/NET with Crystal Reports
MessageBox.Show(ex.Message, "Report could not be created",
MessageBoxButtons.OK, MessageBoxIcon.Error);
}
Visual Basic Code Example
Imports CrystalDecisions.CrystalReports.Engine
Imports System.Data
Imports MySql.Data.MySqlClient
Dim myReport As New ReportDocument
Dim myData As New DataSet
Dim conn As New MySqlConnection
Dim cmd As New MySqlCommand
Dim myAdapter As New MySqlDataAdapter
conn.ConnectionString = _
"server=127.0.0.1;" _
& "uid=root;" _
& "pwd=12345;" _
& "database=test"
Try
conn.Open()
cmd.CommandText = "SELECT city.name AS cityName, city.population AS CityPopulation, " _
& "country.name, country.population, country.continent " _
& "FROM country, city ORDER BY country.continent, country.name"
cmd.Connection = conn
myAdapter.SelectCommand = cmd
myAdapter.Fill(myData)
myReport.Load(".\world_report.rpt")
myReport.SetDataSource(myData)
myViewer.ReportSource = myReport
Catch ex As Exception
MessageBox.Show(ex.Message, "Report could not be created", MessageBoxButtons.OK, MessageBoxIcon.Error)
End Try
A new data set it generated using the same query used to generate the previously saved data set. Once
the data set is filled, a ReportDocument is used to load the report file and bind it to the data set. The
ReportDocument is the passed as the ReportSource of the crViewer.
This same approach is taken when a report is created from a single table using Connector/ODBC. The
data set replaces the table used in the report and the report is displayed properly.
When a report is created from multiple tables using Connector/ODBC, a data set with multiple tables must
be created in our application. This enables each table in the report data source to be replaced with a report
in the data set.
We populate a data set with multiple tables by providing multiple SELECT statements in our
MySqlCommand object. These SELECT statements are based on the SQL query shown in Crystal Reports
in the Database menu's Show SQL Query option. Assume the following query:
SELECT `country`.`Name`, `country`.`Continent`, `country`.`Population`, `city`.`Name`, `city`.`Population`
FROM `world`.`country` `country` LEFT OUTER JOIN `world`.`city` `city` ON `country`.`Code`=`city`.`CountryCode`
ORDER BY `country`.`Continent`, `country`.`Name`, `city`.`Name`
This query is converted to two SELECT queries and displayed with the following code:
C# Code Example
using CrystalDecisions.CrystalReports.Engine;
using System.Data;
using MySql.Data.MySqlClient;
ReportDocument myReport = new ReportDocument();
DataSet myData = new DataSet();
MySql.Data.MySqlClient.MySqlConnection conn;
MySql.Data.MySqlClient.MySqlCommand cmd;
406

Asynchronous Methods
MySql.Data.MySqlClient.MySqlDataAdapter myAdapter;
conn = new MySql.Data.MySqlClient.MySqlConnection();
cmd = new MySql.Data.MySqlClient.MySqlCommand();
myAdapter = new MySql.Data.MySqlClient.MySqlDataAdapter();
conn.ConnectionString = "server=127.0.0.1;uid=root;" +
"pwd=12345;database=test";
try
{
cmd.CommandText = "SELECT name, population, countrycode FROM city ORDER " +
"BY countrycode, name; SELECT name, population, code, continent FROM " +
"country ORDER BY continent, name";
cmd.Connection = conn;
myAdapter.SelectCommand = cmd;
myAdapter.Fill(myData);
myReport.Load(@".\world_report.rpt");
myReport.Database.Tables(0).SetDataSource(myData.Tables(0));
myReport.Database.Tables(1).SetDataSource(myData.Tables(1));
myViewer.ReportSource = myReport;
}
catch (MySql.Data.MySqlClient.MySqlException ex)
{
MessageBox.Show(ex.Message, "Report could not be created",
MessageBoxButtons.OK, MessageBoxIcon.Error);
}
Visual Basic Code Example
Imports CrystalDecisions.CrystalReports.Engine
Imports System.Data
Imports MySql.Data.MySqlClient
Dim myReport As New ReportDocument
Dim myData As New DataSet
Dim conn As New MySqlConnection
Dim cmd As New MySqlCommand
Dim myAdapter As New MySqlDataAdapter
conn.ConnectionString = "server=127.0.0.1;" _
& "uid=root;" _
& "pwd=12345;" _
& "database=world"
Try
conn.Open()
cmd.CommandText = "SELECT name, population, countrycode FROM city ORDER BY countrycode, name; " _
& "SELECT name, population, code, continent FROM country ORDER BY continent, name"
cmd.Connection = conn
myAdapter.SelectCommand = cmd
myAdapter.Fill(myData)
myReport.Load(".\world_report.rpt")
myReport.Database.Tables(0).SetDataSource(myData.Tables(0))
myReport.Database.Tables(1).SetDataSource(myData.Tables(1))
myViewer.ReportSource = myReport
Catch ex As Exception
MessageBox.Show(ex.Message, "Report could not be created", MessageBoxButtons.OK, MessageBoxIcon.Error)
End Try
It is important to order the SELECT queries in alphabetic order, as this is the order the report will expect its
source tables to be in. One SetDataSource statement is needed for each table in the report.
This approach can cause performance problems because Crystal Reports must bind the tables together on
the client-side, which will be slower than using a pre-saved data set.
4.5.14 Asynchronous Methods
The Task-based Asynchronous Pattern (TAP) is a pattern for asynchrony in the .NET Framework. It is
based on the Task and Task<TResult> types in the System.Threading.Tasks namespace, which
are used to represent arbitrary asynchronous operations.
407

Asynchronous Methods
Async-Await are new keywords introduced to work with the TAP. The Async modifier is used to specify
that a method, lambda expression, or anonymous method is asynchronous. The Await operator is applied
to a task in an asynchronous method to suspend the execution of the method until the awaited task
completes.
Requirements
• Async-Await support requires .NET Framework 4.5 or later
• TAP support requires .NET Framework 4.0 or later
• MySQL Connector/NET 6.9 or later
Methods
The following methods can be used with either TAP or Async-Await.
• Namespace MySql.Data.Entity
• Class EFMySqlCommand
• Task PrepareAsync()
• Task PrepareAsync(CancellationToken)
• Namespace MySql.Data
• Class MySqlBulkLoader
• Task<int> LoadAsync()
• Task<int> LoadAsync(CancellationToken
• Class MySqlConnection
• Task<MySqlTransaction> BeginTransactionAsync()
• Task<MySqlTransaction> BeginTransactionAsync (CancellationToken)
• Task<MySqlTransaction> BeginTransactionAsync(IsolationLevel)
• Task<MySqlTransaction> BeginTransactionAsync (IsolationLevel ,
CancellationToken)
• Task ChangeDatabaseAsync(string)
• Task ChangeDatabaseAsync(string, CancellationToken)
• Task CloseAsync()
• Task CloseAsync(CancellationToken)
• Task ClearPoolAsync(MySqlConnection)
• Task ClearPoolAsync(MySqlConnection, CancellationToken)
• Task ClearAllPoolsAsync()
• Task ClearAllPoolsAsync(CancellationToken)
408

Asynchronous Methods
• Task<MySqlSchemaCollection> GetSchemaCollection(string, string[])
• Task<MySqlSchemaCollection> GetSchemaCollection(string, string[],
CancellationToken)
• Class MySqlDataAdapter
• Task<int> FillAsync(DataSet)
• Task<int> FillAsync(DataSet, CancellationToken)
• Task<int> FillAsync(DataTable)
• Task<int> FillAsync(DataTable, CancellationToken)
• Task<int> FillAsync(DataSet, string)
• Task<int> FillAsync(DataSet, string, CancellationToken)
• Task<int> FillAsync(DataTable, IDataReader)
• Task<int> FillAsync(DataTable, IDataReader, CancellationToken)
• Task<int> FillAsync(DataTable, IDbCommand, CommandBehavior)
• Task<int> FillAsync(DataTable, IDbCommand, CommandBehavior,
CancellationToken)
• Task<int> FillAsync(int, int, params DataTable[])
• Task<int> FillAsync(int, int, params DataTable[], CancellationToken)
• Task<int> FillAsync(DataSet, int, int, string)
• Task<int> FillAsync(DataSet, int, int, string, CancellationToken)
• Task<int> FillAsync(DataSet, string, IDataReader, int, int)
• Task<int> FillAsync(DataSet, string, IDataReader, int, int,
CancellationToken)
• Task<int> FillAsync(DataTable[], int, int, IDbCommand, CommandBehavior)
• Task<int> FillAsync(DataTable[], int, int, IDbCommand, CommandBehavior,
CancellationToken)
• Task<int> FillAsync(DataSet, int, int, string, IDbCommand,
CommandBehavior)
• Task<int> FillAsync(DataSet, int, int, string, IDbCommand,
CommandBehavior, CancellationToken)
• Task<DataTable[]> FillSchemaAsync(DataSet, SchemaType)
• Task<DataTable[]> FillSchemaAsync(DataSet, SchemaType, CancellationToken)
• Task<DataTable[]> FillSchemaAsync(DataSet, SchemaType, string)
409

Asynchronous Methods
• Task<DataTable[]> FillSchemaAsync(DataSet, SchemaType, string,
CancellationToken)
• Task<DataTable[]> FillSchemaAsync(DataSet, SchemaType, string,
IDataReader)
• Task<DataTable[]> FillSchemaAsync(DataSet, SchemaType, string,
IDataReader, CancellationToken)
• Task<DataTable[]> FillSchemaAsync(DataSet, SchemaType, IDbCommand, string,
CommandBehavior)
• Task<DataTable[]> FillSchemaAsync(DataSet, SchemaType, IDbCommand, string,
CommandBehavior, CancellationToken)
• Task<DataTable> FillSchemaAsync(DataTable, SchemaType)
• Task<DataTable> FillSchemaAsync(DataTable, SchemaType, CancellationToken)
• Task<DataTable> FillSchemaAsync(DataTable, SchemaType, IDataReader)
• Task<DataTable> FillSchemaAsync(DataTable, SchemaType, IDataReader,
CancellationToken)
• Task<DataTable> FillSchemaAsync(DataTable, SchemaType, IDbCommand,
CommandBehavior)
• Task<DataTable> FillSchemaAsync(DataTable, SchemaType, IDbCommand,
CommandBehavior, CancellationToken)
• Task<int> UpdateAsync(DataRow[])
• Task<int> UpdateAsync(DataRow[], CancellationToken)
• Task<int> UpdateAsync(DataSet)
• Task<int> UpdateAsync(DataSet, CancellationToken)
• Task<int> UpdateAsync(DataTable)
• Task<int> UpdateAsync(DataTable, CancellationToken)
• Task<int> UpdateAsync(DataRow[], DataTableMapping, CancellationToken)
• Task<int> UpdateAsync(DataSet, string)
• Task<int> UpdateAsync(DataSet, string, CancellationToken)
• Class MySqlHelper
• Task<DataRow> ExecuteDataRowAsync(string, string, params MySqlParameter[])
• Task<DataRow> ExecuteDataRowAsync(string, string, CancellationToken,
params MySqlParameter[])
• Task<int> ExecuteNonQueryAsync(MySqlConnection, string, params
MySqlParameter[])
410

Asynchronous Methods
• Task<int> ExecuteNonQueryAsync(MySqlConnection, string, CancellationToken,
params MySqlParameter[])
• Task<int> ExecuteNonQueryAsync(string, string, params MySqlParameter[])
• Task<int> ExecuteNonQueryAsync(string, string, CancellationToken, params
MySqlParameter[])
• Task<DataSet> ExecuteDatasetAsync(string, string)
• Task<DataSet> ExecuteDatasetAsync(string, string, CancellationToken)
• Task<DataSet> ExecuteDatasetAsync(string, string, CancellationToken,
params MySqlParameter[])
• Task<DataSet> ExecuteDatasetAsync(MySqlConnection, string)
• Task<DataSet> ExecuteDatasetAsync(MySqlConnection, string,
CancellationToken)
• Task<DataSet> ExecuteDatasetAsync(MySqlConnection, string, params
MySqlParameter[])
• Task<DataSet> ExecuteDatasetAsync(MySqlConnection, string,
CancellationToken, params MySqlParameter[])
• Task UpdateDataSetAsync(string, string, DataSet, string)
• Task UpdateDataSetAsync(string, string, DataSet, string,
CancellationToken)
• Task<MySqlDataReader> ExecuteReaderAsync(MySqlConnection,
MySqlTransaction, string, MySqlParameter[], bool)
• Task<MySqlDataReader> ExecuteReaderAsync(MySqlConnection,
MySqlTransaction, string, MySqlParameter[], bool, CancellationToken)
• Task<MySqlDataReader> ExecuteReaderAsync(string, string)
• Task<MySqlDataReader> ExecuteReaderAsync(string, string,
CancellationToken)
• Task<MySqlDataReader> ExecuteReaderAsync(MySqlConnection, string)
• Task<MySqlDataReader> ExecuteReaderAsync(MySqlConnection, string,
CancellationToken)
• Task<MySqlDataReader> ExecuteReaderAsync(string, string, params
MySqlParameter[])
• Task<MySqlDataReader> ExecuteReaderAsync(string, string,
CancellationToken, params MySqlParameter[])
• Task<MySqlDataReader> ExecuteReaderAsync(MySqlConnection, string, params
MySqlParameter[])
411

Asynchronous Methods
• Task<MySqlDataReader> ExecuteReaderAsync(MySqlConnection, string,
CancellationToken, params MySqlParameter[])
• Task<object> ExecuteScalarAsync(string, string)
• Task<object> ExecuteScalarAsync(string, string, CancellationToken)
• Task<object> ExecuteScalarAsync(string, string, params MySqlParameter[])
• Task<object> ExecuteScalarAsync(string, string, CancellationToken, params
MySqlParameter[])
• Task<object> ExecuteScalarAsync(MySqlConnection, string)
• Task<object> ExecuteScalarAsync(MySqlConnection, string,
CancellationToken)
• Task<object> ExecuteScalarAsync(MySqlConnection, string, params
MySqlParameter[])
• Task<object> ExecuteScalarAsync(MySqlConnection, string,
CancellationToken, params MySqlParameter[])
• Class MySqlScript
• Task<int> ExecuteAsync()
• Task<int> ExecuteAsync(CancellationToken)
In addition to the methods listed above, the following are methods inherited from the .NET Framework:
• Namespace MySql.Data.Entity
• Class EFMySqlCommand
• Task<DbDataReader> ExecuteDbDataReaderAsync(CommandBehaviour,
CancellationToken)
• Task<int> ExecuteNonQueryAsync()
• Task<int> ExecuteNonQueryAsync(CancellationToken)
• Task<DbDataReader> ExecuteReaderAsync()
• Task<DbDataReader> ExecuteReaderAsync(CancellationToken)
• Task<DbDataReader> ExecuteReaderAsync(CommandBehaviour)
• Task<DbDataReader> ExecuteReaderAsync(CommandBehaviour, CancellationToken)
• Task<object> ExecuteScalarAsync()
• Task<object> ExecuteScalarAsync(CancellationToken)
• Namespace MySql.Data
• Class MySqlCommand
412

Asynchronous Methods
• Task<DbDataReader> ExecuteDbDataReaderAsync(CommandBehaviour,
CancellationToken)
• Task<int> ExecuteNonQueryAsync()
• Task<int> ExecuteNonQueryAsync(CancellationToken)
• Task<DbDataReader> ExecuteReaderAsync()
• Task<DbDataReader> ExecuteReaderAsync(CancellationToken)
• Task<DbDataReader> ExecuteReaderAsync(CommandBehaviour)
• Task<DbDataReader> ExecuteReaderAsync(CommandBehaviour, CancellationToken)
• Task<object> ExecuteScalarAsync()
• Task<object> ExecuteScalarAsync(CancellationToken)
• Class MySqlConnection
• Task OpenAsync()
• Task OpenAsync(CancellationToken)
• Class MySqlDataReader
• Task<T> GetFieldValueAsync<T>(int)
• Task<T> GetFieldValueAsync<T>(int, CancellationToken)
• Task<bool> IsDBNullAsync(int)
• Task<bool> IsDBNullAsync(int, CancellationToken)
• Task<bool> NextResultAsync()
• Task<bool> NextResultAsync(CancellationToken)
• Task<bool> ReadAsync()
• Task<bool> ReadAsync(CancellationToken)
Examples
The following C# code examples demonstrate how to use the asynchronous methods:
In this example, a method has the async modifier because the method await call made applies to the
method LoadAsync. The method returns a Task object that contains information about the result of the
awaited method. Returning Task is like having a void method, but you should not use async void if your
method is not a top-level access method like an event.
public async Task BulkLoadAsync()
{
MySqlConnection myConn = new MySqlConnection("MyConnectionString");
MySqlBulkLoader loader = new MySqlBulkLoader(myConn);
loader.TableName = "BulkLoadTest";
413

Binary and Nonbinary Issues
loader.FileName = @"c:\MyPath\MyFile.txt";
loader.Timeout = 0;
var result = await loader.LoadAsync();
}
In this example, an "async void" method is used with "await" for the ExecuteNonQueryAsync method, to
correspond to the onclick event of a button. This is why the method does not return a Task.
private async void myButton_Click()
{
MySqlConnection myConn = new MySqlConnection("MyConnectionString");
MySqlCommand proc = new MySqlCommand("MyAsyncSpTest", myConn);
proc.CommandType = CommandType.StoredProcedure;
int result = await proc.ExecuteNonQueryAsync();
}
4.5.15 Binary and Nonbinary Issues
There are certain situations where MySQL will return incorrect metadata about one or more columns. More
specifically, the server can sometimes report that a column is binary when it is not (and the reverse). In
these situations, it becomes practically impossible for the connector to be able to correctly identify the
correct metadata.
Some examples of situations that may return incorrect metadata are:
• Execution of SHOW PROCESSLIST. Some of the columns are returned as binary even though they only
hold string data.
• When a temporary table is used to process a result set, some columns may be returned with incorrect
binary flags.
• Some server functions such DATE_FORMAT return the column incorrectly as binary.
With the availability of BINARY and VARBINARY data types, it is important to respect the metadata returned
by the server. However, some existing applications may encounter issues with this change and can use
a connection string option to enable or disable it. By default, Connector/NET respects the binary flags
returned by the server. You might need to make small changes to your application to accommodate this
change.
In the event that the changes required to your application are too large, adding 'respect binary
flags=false' to your connection string causes the connector to use the prior behavior: any column that
is marked as string, regardless of binary flags, will be returned as string. Only columns that are specifically
marked as a BLOB will be returned as BLOB.
4.5.16 Character Set Considerations for Connector/NET
Treating Binary Blobs As UTF8
Before the introduction of 4-byte UTF-8 character set, MySQL did not support 4-byte UTF8 sequences.
This makes it difficult to represent some multibyte languages such as Japanese. To try and alleviate this,
MySQL Connector/NET supports a mode where binary blobs can be treated as strings.
To do this, you set the 'Treat Blobs As UTF8' connection string keyword to true. This is
all that needs to be done to enable conversion of all binary blobs to UTF8 strings. To convert only
some of your BLOB columns, you can make use of the 'BlobAsUTF8IncludePattern' and
414

Connector/NET Tutorials
'BlobAsUTF8ExcludePattern' keywords. Set these to a regular expression pattern that matches the
column names to include or exclude respectively.
When the regular expression patterns both match a single column, the include pattern is applied before the
exclude pattern. The result, in this case, is that the column is excluded. Also, be aware that this mode does
not apply to columns of type BINARY or VARBINARY and also do not apply to nonbinary BLOB columns.
This mode only applies to reading strings out of MySQL. To insert 4-byte UTF8 strings into blob columns,
use the .NET Encoding.GetBytes function to convert your string to a series of bytes. You can then set
this byte array as a parameter for a BLOB column.
4.6 Connector/NET Tutorials
The following MySQL Connector/NET tutorials illustrate how to develop MySQL programs using
technologies such as Visual Studio, C#, ASP.NET, and the .NET, .NET Core, and Mono frameworks. Work
through the first tutorial to verify that you have the right software components installed and configured, then
choose other tutorials to try depending on the features you intend to use in your applications.
4.6.1 Tutorial: An Introduction to Connector/NET Programming
This section provides a gentle introduction to programming with MySQL Connector/NET. The code
example is written in C#, and is designed to work on both Microsoft .NET Framework and Mono.
This tutorial is designed to get you up and running with Connector/NET as quickly as possible, it does not
go into detail on any particular topic. However, the following sections of this manual describe each of the
topics introduced in this tutorial in more detail. In this tutorial you are encouraged to type in and run the
code, modifying it as required for your setup.
This tutorial assumes you have MySQL and Connector/NET already installed. It also assumes that you
have installed the world database sample, which can be downloaded from the MySQL Documentation
page. You can also find details on how to install the database on the same page.
Note
Before compiling the code example, make sure that you have added References to
your project as required. The References required are System, System.Data and
MySql.Data.
4.6.1.1 The MySqlConnection Object
For your MySQL Connector/NET application to connect to a MySQL database, it must establish a
connection by using a MySqlConnection object.
The MySqlConnection constructor takes a connection string as one of its parameters. The connection
string provides necessary information to make the connection to the MySQL database. The connection
string is discussed more fully in Section 4.4, “Connector/NET Connections”. For a list of supported
connection string options, see Section 4.4.5, “Connector/NET Connection Options Reference”.
The following code shows how to create a connection object/
using System;
using System.Data;
using MySql.Data;
using MySql.Data.MySqlClient;
public class Tutorial1
{
415

Tutorial: An Introduction to Connector/NET Programming
public static void Main()
{
string connStr = "server=localhost;user=root;database=world;port=3306;password=******";
MySqlConnection conn = new MySqlConnection(connStr);
try
{
Console.WriteLine("Connecting to MySQL...");
conn.Open();
// Perform database operations
}
catch (Exception ex)
{
Console.WriteLine(ex.ToString());
}
conn.Close();
Console.WriteLine("Done.");
}
}
When the MySqlConnection constructor is invoked, it returns a connection object, which is used for
subsequent database operations. Open the connection before any other operations take place. Before the
application exits, close the connection to the database by calling Close on the connection object.
Sometimes an attempt to perform an Open on a connection object can fail, generating an exception that
can be handled using standard exception handling code.
In this section you have learned how to create a connection to a MySQL database, and open and close the
corresponding connection object.
4.6.1.2 The MySqlCommand Object
When a connection has been established with the MySQL database, the next step enables you to perform
database operations. This task can be achieved through the use of the MySqlCommand object.
After it has been created, there are three main methods of interest that you can call:
• ExecuteReader to query the database. Results are usually returned in a MySqlDataReader object,
created by ExecuteReader.
• ExecuteNonQuery to insert, update, and delete data.
• ExecuteScalar to return a single value.
After the MySqlCommand object is created, you can call one of the previous methods on it to carry out a
database operation, such as perform a query. The results are usually returned into a MySqlDataReader
object, and then processed. For example, the results might be displayed as the following code example
demonstrates.
using System;
using System.Data;
using MySql.Data;
using MySql.Data.MySqlClient;
public class Tutorial2
{
public static void Main()
{
string connStr = "server=localhost;user=root;database=world;port=3306;password=******";
MySqlConnection conn = new MySqlConnection(connStr);
try
{
Console.WriteLine("Connecting to MySQL...");
416

Tutorial: An Introduction to Connector/NET Programming
conn.Open();
string sql = "SELECT Name, HeadOfState FROM Country WHERE Continent='Oceania'";
MySqlCommand cmd = new MySqlCommand(sql, conn);
MySqlDataReader rdr = cmd.ExecuteReader();
while (rdr.Read())
{
Console.WriteLine(rdr[0]+" -- "+rdr[1]);
}
rdr.Close();
}
catch (Exception ex)
{
Console.WriteLine(ex.ToString());
}
conn.Close();
Console.WriteLine("Done.");
}
}
When a connection has been created and opened, the code then creates a MySqlCommand object.
Then the SQL query to be executed is passed to the MySqlCommand constructor. The ExecuteReader
method is then used to generate a MySqlReader object. The MySqlReader object contains the results
generated by the SQL executed on the MySqlCommand object. When the results have been obtained in a
MySqlReader object, the results can be processed. In this case, the information is printed out by a while
loop. Finally, the MySqlReader object is disposed of by invoking the Close method.
The next example shows how to use the ExecuteNonQuery method.
The procedure for performing an ExecuteNonQuery method call is simpler, as there is no need to create
an object to store results. This is because ExecuteNonQuery is only used for inserting, updating and
deleting data. The following example illustrates a simple update to the Country table:
using System;
using System.Data;
using MySql.Data;
using MySql.Data.MySqlClient;
public class Tutorial3
{
public static void Main()
{
string connStr = "server=localhost;user=root;database=world;port=3306;password=******";
MySqlConnection conn = new MySqlConnection(connStr);
try
{
Console.WriteLine("Connecting to MySQL...");
conn.Open();
string sql = "INSERT INTO Country (Name, HeadOfState, Continent) VALUES ('Disneyland','Mickey Mouse', 'North America')";
MySqlCommand cmd = new MySqlCommand(sql, conn);
cmd.ExecuteNonQuery();
}
catch (Exception ex)
{
Console.WriteLine(ex.ToString());
}
conn.Close();
Console.WriteLine("Done.");
}
}
417

Tutorial: An Introduction to Connector/NET Programming
The query is constructed, the MySqlCommand object created and the ExecuteNonQuery method called
on the MySqlCommand object. You can access your MySQL database with mysql and verify that the
update was carried out correctly.
Finally, you can use the ExecuteScalar method to return a single value. Again, this is straightforward, as
a MySqlDataReader object is not required to store results, a variable is used instead. The following code
illustrates how to use the ExecuteScalar method:
using System;
using System.Data;
using MySql.Data;
using MySql.Data.MySqlClient;
public class Tutorial4
{
public static void Main()
{
string connStr = "server=localhost;user=root;database=world;port=3306;password=******";
MySqlConnection conn = new MySqlConnection(connStr);
try
{
Console.WriteLine("Connecting to MySQL...");
conn.Open();
string sql = "SELECT COUNT(*) FROM Country";
MySqlCommand cmd = new MySqlCommand(sql, conn);
object result = cmd.ExecuteScalar();
if (result != null)
{
int r = Convert.ToInt32(result);
Console.WriteLine("Number of countries in the world database is: " + r);
}
}
catch (Exception ex)
{
Console.WriteLine(ex.ToString());
}
conn.Close();
Console.WriteLine("Done.");
}
}
This example uses a simple query to count the rows in the Country table. The result is obtained by calling
ExecuteScalar on the MySqlCommand object.
4.6.1.3 Working with Decoupled Data
Previously, when using MySqlDataReader, the connection to the database was continually maintained
unless explicitly closed. It is also possible to work in a manner where a connection is only established
when needed. For example, in this mode, a connection could be established to read a chunk of data, the
data could then be modified by the application as required. A connection could then be reestablished only
if and when the application writes data back to the database. This decouples the working data set from the
database.
This decoupled mode of working with data is supported by MySQL Connector/NET. There are several
parts involved in allowing this method to work:
• Data Set. The Data Set is the area in which data is loaded to read or modify it. A DataSet object is
instantiated, which can store multiple tables of data.
418

Tutorial: An Introduction to Connector/NET Programming
• Data Adapter. The Data Adapter is the interface between the Data Set and the database itself. The
Data Adapter is responsible for efficiently managing connections to the database, opening and closing
them as required. The Data Adapter is created by instantiating an object of the MySqlDataAdapter
class. The MySqlDataAdapter object has two main methods: Fill which reads data into the Data
Set, and Update, which writes data from the Data Set to the database.
• Command Builder. The Command Builder is a support object. The Command Builder works in
conjunction with the Data Adapter. When a MySqlDataAdapter object is created, it is typically given
an initial SELECT statement. From this SELECT statement the Command Builder can work out the
corresponding INSERT, UPDATE and DELETE statements that would be required to update the database.
To create the Command Builder, an object of the class MySqlCommandBuilder is created.
The remaining sections describe each of these classes in more detail.
Instantiating a DataSet Object
A DataSet object can be created simply, as shown in the following code-snippet:
DataSet dsCountry;
...
dsCountry = new DataSet();
Although this creates the DataSet object, it has not yet filled it with data. For that, a Data Adapter is
required.
Instantiating a MySqlDataAdapter Object
The MySqlDataAdapter can be created as illustrated by the following example:
MySqlDataAdapter daCountry;
...
string sql = "SELECT Code, Name, HeadOfState FROM Country WHERE Continent='North America'";
daCountry = new MySqlDataAdapter (sql, conn);
Note
The MySqlDataAdapter is given the SQL specifying the data to work with.
Instantiating a MySqlCommandBuilder Object
Once the MySqlDataAdapter has been created, it is necessary to generate the additional statements
required for inserting, updating and deleting data. There are several ways to do this, but in this tutorial
you will see how this can most easily be done with MySqlCommandBuilder. The following code snippet
illustrates how this is done:
MySqlCommandBuilder cb = new MySqlCommandBuilder(daCountry);
Note
The MySqlDataAdapter object is passed as a parameter to the command builder.
Filling the Data Set
To do anything useful with the data from your database, you need to load it into a Data Set. This is one of
the jobs of the MySqlDataAdapter object, and is carried out with its Fill method. The following code
example illustrates this point.
DataSet dsCountry;
...
419

Tutorial: An Introduction to Connector/NET Programming
dsCountry = new DataSet();
...
daCountry.Fill(dsCountry, "Country");
The Fill method is a MySqlDataAdapter method, and the Data Adapter knows how to establish a
connection with the database and retrieve the required data, and then populate the Data Set when the
Fill method is called. The second parameter “Country” is the table in the Data Set to update.
Updating the Data Set
The data in the Data Set can now be manipulated by the application as required. At some point, changes
to data will need to be written back to the database. This is achieved through a MySqlDataAdapter
method, the Update method.
daCountry.Update(dsCountry, "Country");
Again, the Data Set and the table within the Data Set to update are specified.
Working Example
The interactions between the DataSet, MySqlDataAdapter and MySqlCommandBuilder classes can
be a little confusing, so their operation can perhaps be best illustrated by working code.
In this example, data from the world database is read into a Data Grid View control. Here, the data can
be viewed and changed before clicking an update button. The update button then activates code to write
changes back to the database. The code uses the principles explained previously. The application was
built using the Microsoft Visual Studio to place and create the user interface controls, but the main code
that uses the key classes described previously is shown in the next code example, and is portable.
using System;
using System.Collections.Generic;
using System.ComponentModel;
using System.Data;
using System.Drawing;
using System.Linq;
using System.Text;
using System.Windows.Forms;
using MySql.Data;
using MySql.Data.MySqlClient;
namespace WindowsFormsApplication5
{
public partial class Form1 : Form
{
MySqlDataAdapter daCountry;
DataSet dsCountry;
public Form1()
{
InitializeComponent();
}
private void Form1_Load(object sender, EventArgs e)
{
string connStr = "server=localhost;user=root;database=world;port=3306;password=******";
MySqlConnection conn = new MySqlConnection(connStr);
try
{
label2.Text = "Connecting to MySQL...";
string sql = "SELECT Code, Name, HeadOfState FROM Country WHERE Continent='North America'";
420

Tutorial: An Introduction to Connector/NET Programming
daCountry = new MySqlDataAdapter (sql, conn);
MySqlCommandBuilder cb = new MySqlCommandBuilder(daCountry);
dsCountry = new DataSet();
daCountry.Fill(dsCountry, "Country");
dataGridView1.DataSource = dsCountry;
dataGridView1.DataMember = "Country";
}
catch (Exception ex)
{
label2.Text = ex.ToString();
}
}
private void button1_Click(object sender, EventArgs e)
{
daCountry.Update(dsCountry, "Country");
label2.Text = "MySQL Database Updated!";
}
}
}
The following figure shows the application started. The World Database Application updated data in three
columns: Code, Name, and HeadOfState.
Figure 4.1 World Database Application
4.6.1.4 Working with Parameters
This part of the tutorial shows you how to use parameters in your MySQL Connector/NET application.
Although it is possible to build SQL query strings directly from user input, this is not advisable as it does
not prevent erroneous or malicious information being entered. It is safer to use parameters as they will be
processed as field data only. For example, imagine the following query was constructed from user input:
421

Tutorial: An Introduction to Connector/NET Programming
string sql = "SELECT Name, HeadOfState FROM Country WHERE Continent = "+user_continent;
If the string user_continent came from a Text Box control, there would potentially be no control over
the string entered by the user. The user could enter a string that generates a runtime error, or in the worst
case actually harms the system. When using parameters it is not possible to do this because a parameter
is only ever treated as a field parameter, rather than an arbitrary piece of SQL code.
The same query written using a parameter for user input is:
string sql = "SELECT Name, HeadOfState FROM Country WHERE Continent = @Continent";
Note
The parameter is preceded by an '@' symbol to indicate it is to be treated as a
parameter.
As well as marking the position of the parameter in the query string, it is necessary to add a parameter to
the MySqlCommand object. This is illustrated by the following code snippet:
cmd.Parameters.AddWithValue("@Continent", "North America");
In this example the string "North America" is supplied as the parameter value statically, but in a more
practical example it would come from a user input control.
A further example illustrates the complete process:
using System;
using System.Data;
using MySql.Data;
using MySql.Data.MySqlClient;
public class Tutorial5
{
public static void Main()
{
string connStr = "server=localhost;user=root;database=world;port=3306;password=******";
MySqlConnection conn = new MySqlConnection(connStr);
try
{
Console.WriteLine("Connecting to MySQL...");
conn.Open();
string sql = "SELECT Name, HeadOfState FROM Country WHERE Continent=@Continent";
MySqlCommand cmd = new MySqlCommand(sql, conn);
Console.WriteLine("Enter a continent e.g. 'North America', 'Europe': ");
string user_input = Console.ReadLine();
cmd.Parameters.AddWithValue("@Continent", user_input);
MySqlDataReader rdr = cmd.ExecuteReader();
while (rdr.Read())
{
Console.WriteLine(rdr["Name"]+" --- "+rdr["HeadOfState"]);
}
rdr.Close();
}
catch (Exception ex)
{
Console.WriteLine(ex.ToString());
}
422

Tutorial: An Introduction to Connector/NET Programming
conn.Close();
Console.WriteLine("Done.");
}
}
In this part of the tutorial you have see how to use parameters to make your code more secure.
4.6.1.5 Working with Stored Procedures
This section illustrates how to work with stored procedures. Putting database-intensive operations into
stored procedures lets you define an API for your database application. You can reuse this API across
multiple applications and multiple programming languages. This technique avoids duplicating database
code, saving time and effort when you make updates due to schema changes, tune the performance of
queries, or add new database operations for logging, security, and so on. Before working through this
tutorial, familiarize yourself with the CREATE PROCEDURE and CREATE FUNCTION statements that create
different kinds of stored routines.
For the purposes of this tutorial, you will create a simple stored procedure to see how it can be called from
MySQL Connector/NET. In the MySQL Client program, connect to the world database and enter the
following stored procedure:
DELIMITER //
CREATE PROCEDURE country_hos
(IN con CHAR(20))
BEGIN
SELECT Name, HeadOfState FROM Country
WHERE Continent = con;
END //
DELIMITER ;
Test that the stored procedure works as expected by typing the following into the mysql command
interpreter:
CALL country_hos('Europe');
Note
The stored routine takes a single parameter, which is the continent to restrict your
search to.
Having confirmed that the stored procedure is present and correct, you can see how to access it from
Connector/NET.
Calling a stored procedure from your Connector/NET application is similar to techniques you have seen
earlier in this tutorial. A MySqlCommand object is created, but rather than taking an SQL query as a
parameter, it takes the name of the stored procedure to call. Set the MySqlCommand object to the type of
stored procedure, as shown by the following code snippet:
string rtn = "country_hos";
MySqlCommand cmd = new MySqlCommand(rtn, conn);
cmd.CommandType = CommandType.StoredProcedure;
In this case, the stored procedure requires you to pass a parameter. This can be achieved using the
techniques seen in the previous section on parameters, Section 4.6.1.4, “Working with Parameters”, as
shown in the following code snippet:
cmd.Parameters.AddWithValue("@con", "Europe");
423

ASP.NET Provider Model and Tutorials
The value of the parameter @con could more realistically have come from a user input control, but for
simplicity it is set as a static string in this example.
At this point, everything is set up and you can call the routine using techniques also learned in earlier
sections. In this case, the ExecuteReader method of the MySqlCommand object is used.
The following code shows the complete stored procedure example.
using System;
using System.Data;
using MySql.Data;
using MySql.Data.MySqlClient;
public class Tutorial6
{
public static void Main()
{
string connStr = "server=localhost;user=root;database=world;port=3306;password=******";
MySqlConnection conn = new MySqlConnection(connStr);
try
{
Console.WriteLine("Connecting to MySQL...");
conn.Open();
string rtn = "country_hos";
MySqlCommand cmd = new MySqlCommand(rtn, conn);
cmd.CommandType = CommandType.StoredProcedure;
cmd.Parameters.AddWithValue("@con", "Europe");
MySqlDataReader rdr = cmd.ExecuteReader();
while (rdr.Read())
{
Console.WriteLine(rdr[0] + " --- " + rdr[1]);
}
rdr.Close();
}
catch (Exception ex)
{
Console.WriteLine(ex.ToString());
}
conn.Close();
Console.WriteLine("Done.");
}
}
In this section, you have seen how to call a stored procedure from Connector/NET. For the moment, this
concludes our introductory tutorial on programming with Connector/NET.
4.6.2 ASP.NET Provider Model and Tutorials
MySQL Connector/NET includes a provider model for use with ASP.NET applications. This model enables
developers to focus on the business logic of their application instead of having to recreate such boilerplate
items as membership and roles support.
Connector/NET supports the following web providers:
• Membership provider
• Roles provider
424

ASP.NET Provider Model and Tutorials
• Profiles provider
• Session state provider
The following tables show the supported providers, their default provider and the corresponding MySQL
provider.
Membership Provider
Default Provider System.Web.Security.SqlMembershipProvider
MySQL Provider MySql.Web.Security.MySQLMembershipProvider
Role Provider
Default Provider System.Web.Security.SqlRoleProvider
MySQL Provider MySql.Web.Security.MySQLRoleProvider
Profile Provider
Default Provider System.Web.Profile.SqlProfileProvider
MySQL Provider MySql.Web.Profile.MySQLProfileProvider
Session State Provider
Default Provider System.Web.SessionState.InProcSessionStateStore
MySQL Provider MySql.Web.SessionState.MySqlSessionStateStore
Note
The MySQL session state provider uses slightly different capitalization on the class
name compared to the other MySQL providers.
Installing the Providers
The installation of Connector/NET installs the providers and registers them in the .NET configuration file
(machine.config) on your computer. The additional entries modify the system.web section of the file,
which appears similar to the following example after the installation.
<system.web>
<processModel autoConfig="true" />
<httpHandlers />
<membership>
<providers>
<add name="AspNetSqlMembershipProvider" type="System.Web.Security.SqlMembershipProvider, System.Web, Version=2.0.0.0, Culture=neutral, PublicKeyToken=b03f5f7f11d50a3a" connectionStringName="LocalSqlServer" enablePasswordRetrieval="false" enablePasswordReset="true" requiresQuestionAndAnswer="true" applicationName="/" requiresUniqueEmail="false" passwordFormat="Hashed" maxInvalidPasswordAttempts="5" minRequiredPasswordLength="7" minRequiredNonalphanumericCharacters="1" passwordAttemptWindow="10" passwordStrengthRegularExpression="" />
<add name="MySQLMembershipProvider" type="MySql.Web.Security.MySQLMembershipProvider, MySql.Web, Version=6.1.1.0, Culture=neutral, PublicKeyToken=c5687fc88969c44d" connectionStringName="LocalMySqlServer" enablePasswordRetrieval="false" enablePasswordReset="true" requiresQuestionAndAnswer="true" applicationName="/" requiresUniqueEmail="false" passwordFormat="Clear" maxInvalidPasswordAttempts="5" minRequiredPasswordLength="7" minRequiredNonalphanumericCharacters="1" passwordAttemptWindow="10" passwordStrengthRegularExpression="" />
</providers>
</membership>
<profile>
<providers>
<add name="AspNetSqlProfileProvider" connectionStringName="LocalSqlServer" applicationName="/" type="System.Web.Profile.SqlProfileProvider, System.Web, Version=2.0.0.0, Culture=neutral, PublicKeyToken=b03f5f7f11d50a3a" />
<add name="MySQLProfileProvider" type="MySql.Web.Profile.MySQLProfileProvider, MySql.Web, Version=6.1.1.0, Culture=neutral, PublicKeyToken=c5687fc88969c44d" connectionStringName="LocalMySqlServer" applicationName="/" />
</providers>
</profile>
425

ASP.NET Provider Model and Tutorials
<roleManager>
<providers>
<add name="AspNetSqlRoleProvider" connectionStringName="LocalSqlServer" applicationName="/" type="System.Web.Security.SqlRoleProvider, System.Web, Version=2.0.0.0, Culture=neutral, PublicKeyToken=b03f5f7f11d50a3a" />
<add name="AspNetWindowsTokenRoleProvider" applicationName="/" type="System.Web.Security.WindowsTokenRoleProvider, System.Web, Version=2.0.0.0, Culture=neutral, PublicKeyToken=b03f5f7f11d50a3a" />
<add name="MySQLRoleProvider" type="MySql.Web.Security.MySQLRoleProvider, MySql.Web, Version=6.1.1.0, Culture=neutral, PublicKeyToken=c5687fc88969c44d" connectionStringName="LocalMySqlServer" applicationName="/" />
</providers>
</roleManager>
</system.web>
Each provider type can have multiple provider implementations. The default provider can also be set here
using the defaultProvider attribute, but usually this is set in the web.config file either manually or by
using the ASP.NET configuration tool.
At time of writing, the MySqlSessionStateStore is not added to machine.config at install time, and
so add the following:
<sessionState>
<providers>
<add name="MySqlSessionStateStore" type="MySql.Web.SessionState.MySqlSessionStateStore, MySql.Web, Version=6.1.1.0, Culture=neutral, PublicKeyToken=c5687fc88969c44d" connectionStringName="LocalMySqlServer" applicationName="/" />
</providers>
</sessionState>
The session state provider uses the customProvider attribute, rather than defaultProvider, to set
the provider as the default. A typical web.config file might contain:
<system.web>
<membership defaultProvider="MySQLMembershipProvider" />
<roleManager defaultProvider="MySQLRoleProvider" />
<profile defaultProvider="MySQLProfileProvider" />
<sessionState customProvider="MySqlSessionStateStore" />
<compilation debug="false">
...
This sets the MySQL Providers as the defaults to be used in this web application.
The providers are implemented in the file mysql.web.dll and this file can be found in your Connector/
NET installation folder. There is no need to run any type of SQL script to set up the database schema, as
the providers create and maintain the proper schema automatically.
Working with MySQL Providers
The easiest way to start using the providers is to use the ASP.NET configuration tool that is available on
the Solution Explorer toolbar when you have a website project loaded.
In the web pages that open, you can select the MySQL membership and roles providers by picking a
custom provider for each area.
When the provider is installed, it creates a dummy connection string named LocalMySqlServer.
Although this has to be done so that the provider will work in the ASP.NET configuration tool, you override
this connection string in your web.config file. You do this by first removing the dummy connection string
and then adding in the proper one, as shown in the following example:
<connectionStrings>
<remove name="LocalMySqlServer"/>
<add name="LocalMySqlServer" connectionString="server=xxx;uid=xxx;pwd=xxx;database=xxx"/>
</connectionStrings>
Note
You must specify the database in this connection.
426

ASP.NET Provider Model and Tutorials
A tutorial demonstrating how to use the membership and role providers can be found in the following
section Section 4.6.2.1, “Tutorial: Connector/NET ASP.NET Membership and Role Provider”.
Deployment
To use the providers on a production server, distribute the MySql.Data and the MySql.Web assemblies,
and either register them in the remote systems Global Assembly Cache or keep them in the bin directory
of your application.
4.6.2.1 Tutorial: Connector/NET ASP.NET Membership and Role Provider
Many websites feature the facility for the user to create a user account. They can then log into the website
and enjoy a personalized experience. This requires that the developer creates database tables to store
user information, along with code to gather and process this data. This represents a burden on the
developer, and there is the possibility for security issues to creep into the developed code. However,
ASP.NET introduced the membership system. This system is designed around the concept of membership,
profile, and role providers, which together provide all of the functionality to implement a user system, that
previously would have to have been created by the developer from scratch.
Currently, MySQL Connector/NET includes web providers for membership (or simple membership), roles,
profiles, session state, site map, and web personalization.
This tutorial shows you how to set up your ASP.NET web application to use the Connector/NET
membership and role providers. It assumes that you have MySQL Server installed, along with Connector/
NET and Microsoft Visual Studio. This tutorial was tested with Connector/NET 6.0.4 and Microsoft Visual
Studio 2008 Professional Edition. It is recommended you use 6.0.4 or above for this tutorial.
1. Create a new MySQL database using the MySQL Command-Line Client program (mysql), or other
suitable tool. It does not matter what name is used for the database, but record it. You specify it in the
connection string constructed later in this tutorial. This database contains the tables, automatically
created for you later, used to store data about users and roles.
2. Create a new ASP.NET website in Visual Studio. If you are not sure how to do this, refer to
Section 4.6.4, “Tutorial: Data Binding in ASP.NET Using LINQ on Entities”, which demonstrates how to
create a simple ASP.NET website.
3. Add References to MySql.Data and MySql.Web to the website project.
4. Locate the machine.config file on your system, which is the configuration file for the .NET
Framework.
5. Search the machine.config file to find the membership provider MySQLMembershipProvider.
6. Add the attribute autogenerateschema="true". The appropriate section should now resemble the
following example.
Note
For the sake of brevity, some information is excluded.
<membership>
<providers>
<add name="AspNetSqlMembershipProvider"
type="System.Web.Security.SqlMembershipProvider"
...
connectionStringName="LocalSqlServer"
... />
427

ASP.NET Provider Model and Tutorials
<add name="MySQLMembershipProvider"
autogenerateschema="true"
type="MySql.Web.Security.MySQLMembershipProvider,
MySql.Web, Version=6.0.4.0, Culture=neutral,
PublicKeyToken=c5687fc88969c44d"
connectionStringName="LocalMySqlServer"
... />
</providers>
</membership>
Note
The connection string, LocalMySqlServer, connects to the MySQL server
that contains the membership database.
The autogenerateschema="true" attribute will cause Connector/NET to silently create, or
upgrade, the schema on the database server, to contain the required tables for storing membership
information.
7. It is now necessary to create the connection string referenced in the previous step. Load the
web.config file for the website into Visual Studio.
8. Locate the section marked <connectionStrings>. Add the following connection string information.
<connectionStrings>
<remove name="LocalMySqlServer"/>
<add name="LocalMySqlServer"
connectionString="Datasource=localhost;Database=users;uid=root;pwd=password"
providerName="MySql.Data.MySqlClient"/>
</connectionStrings>
The database specified is the one created in the first step. You could alternatively have used an
existing database.
9. At this point build the solution to ensure no errors are present. This can be done by selecting Build,
Build Solution from the main menu, or pressing F6.
10. ASP.NET supports the concept of locally and remotely authenticated users. With local authentication
the user is validated using their Windows credentials when they attempt to access the website. This
can be useful in an Intranet environment. With remote authentication, a user is prompted for their
login details when accessing the website, and these credentials are checked against the membership
information stored in a database server such as MySQL Server. You will now see how to choose this
form of authentication.
Start the ASP.NET Website Administration Tool. This can be done quickly by clicking the small
hammer/Earth icon in the Solution Explorer. You can also launch this tool by selecting Website and
then ASP.NET Configuration from the main menu.
11. In the ASP.NET Website Administration Tool click the Security tab and do the following:
a. Click the User Authentication Type link.
b. Select the From the internet option. The website will now need to provide a form to allow the user
to enter their login details. The details will be checked against membership information stored in the
MySQL database.
12. You now need to specify the role and membership provider to be used. Click the Provider tab and do
the following:
a. Click the Select a different provider for each feature (advanced) link.
428

ASP.NET Provider Model and Tutorials
b. For membership provider, select the MySQLMembershipProvider option and for role provider,
select the MySQLRoleProvider option.
13. In Visual Studio, rebuild the solution by clicking Build and then Rebuild Solution from the main menu.
14. Check that the necessary schema has been created. This can be achieved using SHOW DATABASES;
and SHOW TABLES; the mysql command interpreter.
mysql> SHOW DATABASES;
+---------------------+
| Database |
+---------------------+
| information_schema |
| mysql |
| test |
| users |
| world |
+---------------------+
5 rows in set (0.01 sec)
mysql> SHOW TABLES;
+---------------------------+
| Tables_in_users |
+---------------------------+
| my_aspnet_applications |
| my_aspnet_membership |
| my_aspnet_profiles |
| my_aspnet_roles |
| my_aspnet_schemaversion |
| my_aspnet_users |
| my_aspnet_usersinroles |
+---------------------------+
7 rows in set (0.00 sec)
15. Assuming all is present and correct, you can now create users and roles for your web application.
The easiest way to do this is with the ASP.NET Website Administration Tool. However, many web
applications contain their own modules for creating roles and users. For simplicity, the ASP.NET
Website Administration Tool will be used in this tutorial.
16. In the ASP.NET Website Administration Tool, click the Security tab. Now that both the membership
and role provider are enabled, you will see links for creating roles and users. Click the Create or
Manage Roles link.
17. You can now enter the name of a new Role and click Add Role to create the new Role. Create new
Roles as required.
18. Click the Back button.
19. Click the Create User link. You can now fill in information about the user to be created, and also
allocate that user to one or more Roles.
20. Using the mysql command interpreter, you can check that your database has been correctly populated
with the membership and role data.
mysql> SELECT * FROM my_aspnet_users;
mysql> SELECT * FROM my_aspnet_roles;
In this tutorial, you have seen how to set up the Connector/NET membership and role providers for use in
your ASP.NET web application.
4.6.2.2 Tutorial: Connector/NET ASP.NET Profile Provider
429

ASP.NET Provider Model and Tutorials
This tutorial shows you how to use the MySQL Profile Provider to store user profile information in a MySQL
database. The tutorial uses MySQL Connector/NET 6.9.9, MySQL Server 5.7.21 and Microsoft Visual
Studio 2017 Professional Edition.
Many modern websites allow the user to create a personal profile. This requires a significant amount of
code, but ASP.NET reduces this considerable by including the functionality in its Profile classes. The
Profile Provider provides an abstraction between these classes and a data source. The MySQL Profile
Provider enables profile data to be stored in a MySQL database. This enables the profile properties to be
written to a persistent store, and be retrieved when required. The Profile Provider also enables profile data
to be managed effectively, for example it enables profiles that have not been accessed since a specific
date to be deleted.
The following steps show you how you can select the MySQL Profile Provider:
1. Create a new ASP.NET web project.
2. Select the MySQL Application Configuration tool.
3. In the MySQL Application Configuration tool navigate through the tool to the Profiles page.
4. Select the Use MySQL to manage my profiles check box.
5. Select the Autogenerate Schema check box.
6. Click Edit and then configure a connection string for the database that will be used to store user profile
information.
7. Navigate to the last page of the tool and click Finish to save your changes and exit the tool.
At this point you are now ready to start using the MySQL Profile Provider. With the following steps you can
carry out a preliminary test of your installation.
1. Open your web.config file.
2. Add a simple profile such as the following example.
<system.web>
<anonymousIdentification enabled="true"/>
<profile defaultProvider="MySQLProfileProvider">
...
<properties>
<add name="Name" allowAnonymous="true"/>
<add name="Age" allowAnonymous="true" type="System.UInt16"/>
<group name="UI">
<add name="Color" allowAnonymous="true" defaultValue="Blue"/>
<add name="Style" allowAnonymous="true" defaultValue="Plain"/>
</group>
</properties>
</profile>
...
Setting anonymousIdentification to true enables unauthenticated users to use profiles. They are
identified by a GUID in a cookie rather than by a user name.
Now that the simple profile has been defined in web.config, the next step is to write some code to test
the profile.
1. In Design View, design a simple page with the added controls. The following figure shows the
Default.aspx tab open with various text box, list, and button controls.
430

ASP.NET Provider Model and Tutorials
Figure 4.2 Simple Profile Application
These will allow the user to enter some profile information. The user can also use the buttons to save
their profile, clear the page, and restore their profile data.
2. In the Code View add the following code snippet.
...
protected void Page_Load(object sender, EventArgs e)
{
if (!IsPostBack)
{
TextBox1.Text = Profile.Name;
TextBox2.Text = Profile.Age.ToString();
Label1.Text = Profile.UI.Color;
}
}
// Store Profile
protected void Button1_Click(object sender, EventArgs e)
{
Profile.Name = TextBox1.Text;
Profile.Age = UInt16.Parse(TextBox2.Text);
}
// Clear Form
protected void Button2_Click(object sender, EventArgs e)
{
TextBox1.Text = "";
TextBox2.Text = "";
Label1.Text = "";
}
// Retrieve Profile
protected void Button3_Click(object sender, EventArgs e)
431

ASP.NET Provider Model and Tutorials
{
TextBox1.Text = Profile.Name;
TextBox2.Text = Profile.Age.ToString();
Label1.Text = Profile.UI.Color;
}
protected void DropDownList1_SelectedIndexChanged(object sender, EventArgs e)
{
Profile.UI.Color = DropDownList1.SelectedValue;
}
...
3. Save all files and build the solution to check that no errors have been introduced.
4. Run the application.
5. Enter your name, age, and select a color from the list. Now store this information in your profile by
clicking Store Profile.
Not selecting a color from the list uses the default color, Blue, that was specified in the web.config
file.
6. Click Clear Form to clear text from the text boxes and the label that displays your chosen color.
7. Now click Retrieve Profile to restore your profile data from the MySQL database.
8. Now exit the browser to terminate the application.
9. Run the application again, which also restores your profile information from the MySQL database.
In this tutorial you have seen how to using the MySQL Profile Provider with Connector/NET.
4.6.2.3 Tutorial: Web Parts Personalization Provider
MySQL Connector/NET provides a web parts personalization provider that allows you to use a MySQL
server to store personalization data.
Note
This feature was added in Connector/NET 6.9.0.
This tutorial demonstrates how to configure the web parts personalization provider using Connector/NET.
Minimum Requirements
• An ASP.NET website or web application with a membership provider
• .NET Framework 3.0
• MySQL 5.5
Configuring MySQL Web Parts Personalization Provider
To configure the provider, do the following:
1. Add References to MySql.Data and MySql.Web to the website or web application project.
2. Include a Connector/NET personalization provider into the system.web section in the web.config
file.
<webParts>
<personalization defaultProvider="MySQLPersonalizationProvider">
<providers>
432

ASP.NET Provider Model and Tutorials
<clear/>
<add name="MySQLPersonalizationProvider"
type="MySql.Web.Personalization.MySqlPersonalizationProvider,
MySql.Web, Version=6.9.3.0, Culture=neutral,
PublicKeyToken=c5687fc88969c44d"
connectionStringName="LocalMySqlServer"
applicationName="/" />
</providers>
<authorization>
<allow verbs="modifyState" users="*" />
<allow verbs="enterSharedScope" users="*"/>
</authorization>
</personalization>
</webParts>
Creating Web Part Controls
To create the web part controls, follow these steps:
1. Create a web application using Connector/NET ASP.NET Membership. For information about doing
this, see Section 4.6.2.1, “Tutorial: Connector/NET ASP.NET Membership and Role Provider”.
2. Create a new ASP.NET page and then change to the Design view.
3. From the Toolbox, drag a WebPartManager control to the page.
4. Now define an HTML table with three columns and one row.
5. From the WebParts Toolbox, drag and drop a WebPartZone control into both the first and second
columns.
6. From the WebParts Toolbox, drag and drop a CatalogZone with PageCatalogPart and
EditorZone controls into the third column.
7. Add controls to the WebPartZone, which should look similar to the following example:
<table>
<tr>
<td>
<asp:WebPartZone ID="LeftZone" runat="server" HeaderText="Left Zone">
<ZoneTemplate>
<asp:Label ID="Label1" runat="server" title="Left Zone">
<asp:BulletedList ID="BulletedList1" runat="server">
<asp:ListItem Text="Item 1"></asp:ListItem>
<asp:ListItem Text="Item 2"></asp:ListItem>
<asp:ListItem Text="Item 3"></asp:ListItem>
</asp:BulletedList>
</asp:Label>
</ZoneTemplate>
</asp:WebPartZone>
</td>
<td>
<asp:WebPartZone ID="MainZone" runat="server" HeaderText="Main Zone">
<ZoneTemplate>
<asp:Label ID="Label11" runat="server" title="Main Zone">
<h2>This is the Main Zone</h2>
</asp:Label>
</ZoneTemplate>
</asp:WebPartZone>
</td>
<td>
<asp:CatalogZone ID="CatalogZone1" runat="server">
<ZoneTemplate>
<asp:PageCatalogPart ID="PageCatalogPart1" runat="server" />
</ZoneTemplate>
433

ASP.NET Provider Model and Tutorials
</asp:CatalogZone>
<asp:EditorZone ID="EditorZone1" runat="server">
<ZoneTemplate>
<asp:LayoutEditorPart ID="LayoutEditorPart1" runat="server" />
<asp:AppearanceEditorPart ID="AppearanceEditorPart1" runat="server" />
</ZoneTemplate>
</asp:EditorZone>
</td>
</tr>
</table>
8. Outside of the HTML table, add a drop-down list, two buttons, and a label as follows.
<asp:DropDownList ID="DisplayModes" runat="server" AutoPostBack="True"
OnSelectedIndexChanged="DisplayModes_SelectedIndexChanged">
</asp:DropDownList>
<asp:Button ID="ResetButton" runat="server" Text="Reset"
OnClick="ResetButton_Click" />
<asp:Button ID="ToggleButton" runat="server" OnClick="ToggleButton_Click"
Text="Toggle Scope" />
<asp:Label ID="ScopeLabel" runat="server"></asp:Label>
9. The following code fills the list for the display modes, shows the current scope, resets the
personalization state, toggles the scope (between user and the shared scope), and changes the display
mode.
public partial class WebPart : System.Web.UI.Page
{
protected void Page_Load(object sender, EventArgs e)
{
if (!IsPostBack)
{
foreach (WebPartDisplayMode mode in WebPartManager1.SupportedDisplayModes)
{
if (mode.IsEnabled(WebPartManager1))
{
DisplayModes.Items.Add(mode.Name);
}
}
}
ScopeLabel.Text = WebPartManager1.Personalization.Scope.ToString();
}
protected void ResetButton_Click(object sender, EventArgs e)
{
if (WebPartManager1.Personalization.IsEnabled &&
WebPartManager1.Personalization.IsModifiable)
{
WebPartManager1.Personalization.ResetPersonalizationState();
}
}
protected void ToggleButton_Click(object sender, EventArgs e)
{
WebPartManager1.Personalization.ToggleScope();
}
protected void DisplayModes_SelectedIndexChanged(object sender, EventArgs e)
{
var mode = WebPartManager1.SupportedDisplayModes[DisplayModes.SelectedValue];
if (mode != null && mode.IsEnabled(WebPartManager1))
{
WebPartManager1.DisplayMode = mode;
}
}
}
434

ASP.NET Provider Model and Tutorials
Testing Web Part Changes
Use the following steps to validate your changes:
1. Run the application and open the web part page. The page should look like similar to the example
shown in the following figure in which the Toggle Scope button is set to Shared. The page also
includes the drop-down list, the Reset button, and the Left Zone and Main Zone controls.
Figure 4.3 Web Parts Page
Initially when the user account is not authenticated, the scope is Shared by default. The user account
must be authenticated to change settings on the web-part controls. The following figure shows an
example in which an authenticated user is able to customize the controls by using the Browse drop-
down list. The options in the list are Design, Catalog, and Edit.
Figure 4.4 Authenticated User Controls
2. Click Toggle Scope to switch the application back to the shared scope.
3. Now you can personalize the zones using the Edit or Catalog display modes at a specific user or
all-users level. The next figure shows Catalog selected from the drop-down list, which include the
Catalog Zone control that was added previously.
435

ASP.NET Provider Model and Tutorials
Figure 4.5 Personalize Zones
4.6.2.4 Tutorial: Simple Membership Web Provider
This section documents the ability to use a simple membership provider on MVC 4 templates. The
configuration OAuth compatible for the application to login using external credentials from third-party
providers like Google, Facebook, Twitter, or others.
This tutorial creates an application using a simple membership provider and then adds third-party (Google)
OAuth authentication support.
Note
This feature was added in MySQL Connector/NET 6.9.0.
Requirements
• Connector/NET 6.9.x or later
• .NET Framework 4.0 or later
• Visual Studio 2012 or later
• MVC 4
Creating and Configuring a New Project
To get started with a new project, do the following:
1. Open Visual Studio, create a new project of ASP.NET MVC 4 Web Application type, and configure
the project to use .NET Framework 4.5. The following figure shows and example of the New Project
window with the items selected.
436

ASP.NET Provider Model and Tutorials
Figure 4.6 Simple Membership: New Project
2. Choose the template and view engine that you like. This tutorial uses the Internet Application
Template with the Razor view engine (see the next figure). Optionally, you can add a unit test project
by selecting Create a unit test project.
Figure 4.7 Simple Membership: Choose Template and Engine
3. Add references to the MySql.Data, MySql.Data.Entities, and MySql.Web assemblies. The
assemblies chosen must match the .NET Framework and Entity Framework versions added to the
project by the template.
437

ASP.NET Provider Model and Tutorials
4. Add a valid MySQL connection string to the web.config file, similar to the following example.
<add
name="MyConnection"
connectionString="server=localhost;
UserId=root;
password=pass;
database=MySqlSimpleMembership;
logging=true;port=3305"
providerName="MySql.Data.MySqlClient"/>
5. Under the <system.data> node, add configuration information similar to the following example.
<membership defaultProvider="MySqlSimpleMembershipProvider">
<providers>
<clear/>
<add
name="MySqlSimpleMembershipProvider"
type="MySql.Web.Security.MySqlSimpleMembershipProvider,MySql.Web,
Version=6.9.2.0,Culture=neutral,PublicKeyToken=c5687fc88969c44d"
applicationName="MySqlSimpleMembershipTest"
description="MySQLdefaultapplication"
connectionStringName="MyConnection"
userTableName="MyUserTable"
userIdColumn="MyUserIdColumn"
userNameColumn="MyUserNameColumn"
autoGenerateTables="True"/>
</providers>
</membership>
6. Update the configuration with valid values for the following properties: connectionStringName,
userTableName, userIdColumn, userNameColumn, and autoGenerateTables.
• userTableName: Name of the table to store the user information. This table is independent from the
schema generated by the provider, and it can be changed in the future.
• userId: Name of the column that stores the ID for the records in the userTableName.
• userName: Name of the column that stores the name/user for the records in the userTableName.
• connectionStringName: This property must match a connection string defined in web.config
file.
• autoGenerateTables: This must be set to false if the table to handle the credentials already
exists.
7. Update your DBContext class with the connection string name configured.
8. Open the InitializeSimpleMembershipAttribute.cs file from the Filters/
folder and locate the SimpleMembershipInitializer class. Then find the
WebSecurity.InitializeDatabaseConnection method call and update the parameters
with the configuration for connectionStringName, userTableName, userIdColumn, and
userNameColumn.
9. If the database configured in the connection string does not exist, then create it.
438

ASP.NET Provider Model and Tutorials
10. After running the web application, the generated home page is displayed on success (see the figure
that follows).
Figure 4.8 Simple Membership: Generated Home Page
11. If the application executed with success, then the generated schema will be similar to the following
figure showing an object browser open to the tables.
Figure 4.9 Simple Membership: Generated Schema and Tables
12. To create a user login, click Register on the generated web page. Type the user name and password,
and then execute the registration form. This action redirects you to the home page with the newly
created user logged in.
The data for the newly created user can be located in the UserProfile and Webpages_Membership
tables.
439
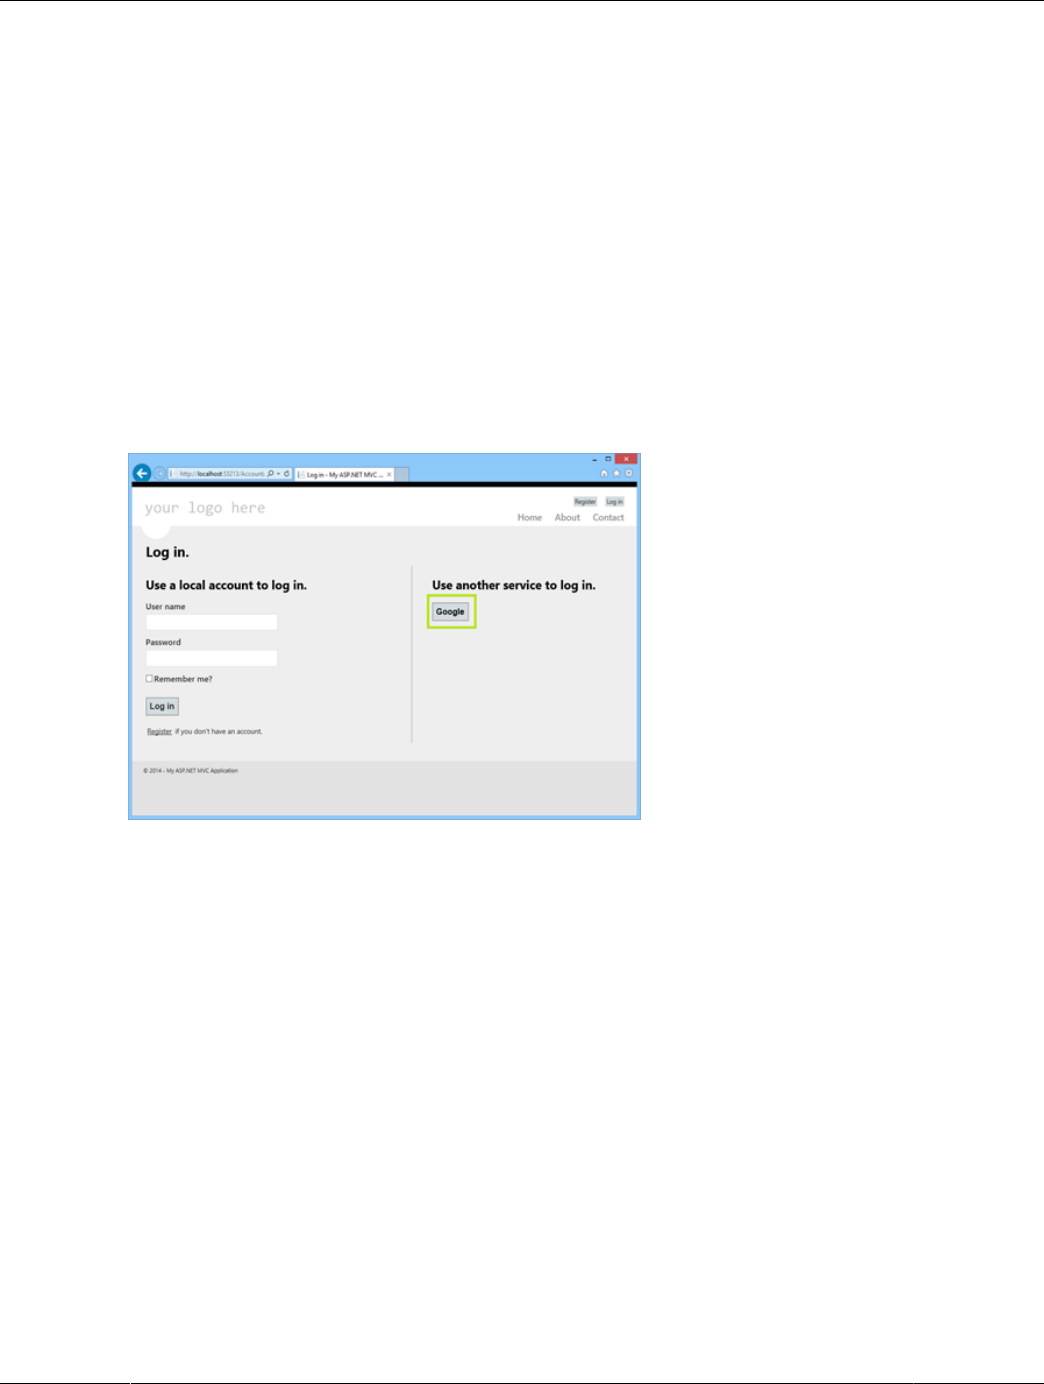
ASP.NET Provider Model and Tutorials
Adding OAuth Authentication to a Project
OAuth is another authentication option for websites that use the simple membership provider. A user can
be validated using an external account like Facebook, Twitter, Google, and others.
Use the following steps to enable authentication using a Google account in the application:
1. Locate the AuthConfig.cs file in the App_Start folder.
2. As this tutorial uses Google, find the RegisterAuth method and uncomment the last line where it
calls OauthWebSecurity.RegisterGoogleClient.
3. Run the application. When the application is running, click Log in to open the log in page. Then, click
Google under Use another service to log in (shown in the figure that follows).
Figure 4.10 Simple Membership with OAuth: Google Service
4. This action redirects to the Google login page (at google.com), and requests you to sign in with your
Google account information.
5. After submitting the correct credentials, a message requests permission for your application to access
the user's information. Read the description and then click Accept to allow the quoted actions, and to
redirect back to the login page of the application.
6. The application now can register the account. The User name field will be filled in with the appropriate
information (in this case, the email address that is associated with the Google account). Click Register
to register the user with your application.
Now the new user is logged into the application from an external source using OAuth. Information about
the new user is stored in the UserProfile and Webpages_OauthMembership tables.
To use another external option to authenticate users, you must enable the client in the same class where
we enabled the Google provider in this tutorial. Typically, providers require you to register your application
before allowing OAuth authentication, and once registered they typically provide a token/key and an ID that
must be used when registering the provider in the application.
440

Tutorial: Using an Entity Framework Entity as a Windows Forms Data Source
4.6.3 Tutorial: Using an Entity Framework Entity as a Windows Forms Data
Source
This tutorial describes how to create a Windows Forms Data Source from an Entity in an Entity Data Model
using Microsoft Visual Studio. The steps are:
• Creating a New Windows Forms Application
• Adding an Entity Data Model
• Adding a New Data Source
• Using the Data Source in a Windows Form
• Adding Code to Populate the Data Grid View
• Adding Code to Save Changes to the Database
To perform the steps in this tutorial, first install the world database sample, which you may download from
the MySQL Documentation page. You can also find details on how to install the database on the same
page.
Creating a New Windows Forms Application
The first step is to create a new Windows Forms application.
1. In Visual Studio, select File, New, and then Project from the main menu.
2. Choose the Windows Forms Application installed template. Click OK. The solution is created.
To acquire the latest Entity Framework assembly for MySQL, download the NuGet package.
Adding an Entity Data Model
To add an Entity Data Model to your solution, do the following:
1. In the Solution Explorer, right-click your application and select Add and then New Item. From Visual
Studio installed templates, select ADO.NET Entity Data Model (see the figure that follows). Click
Add.
441

Tutorial: Using an Entity Framework Entity as a Windows Forms Data Source
Figure 4.11 Add Entity Data Model
2. You will now see the Entity Data Model Wizard. You will use the wizard to generate the Entity Data
Model from the world database sample. Select the icon EF Designer from database (or Generate
from database in older versions of Visual Studio). Click Next.
442

Tutorial: Using an Entity Framework Entity as a Windows Forms Data Source
3. You can now select the localhost(world) connection you made earlier to the database. Select the
following items:
• Yes, include the sensitive data in the connection string.
• Save entity connection settings in App.config as:
worldEntities
If you have not already done so, you can create the new connection at this time by clicking New
Connection (see the figure that follows).
Figure 4.12 Entity Data Model Wizard - Connection
Make a note of the entity connection settings to be used in App.Config, as these will be used later to
write the necessary control code. Click Next.
4. The Entity Data Model Wizard connects to the database.
As the next figure shows, you are then presented with a tree structure of the database. From here you
can select the object you would like to include in your model. If you also created Views and Stored
443
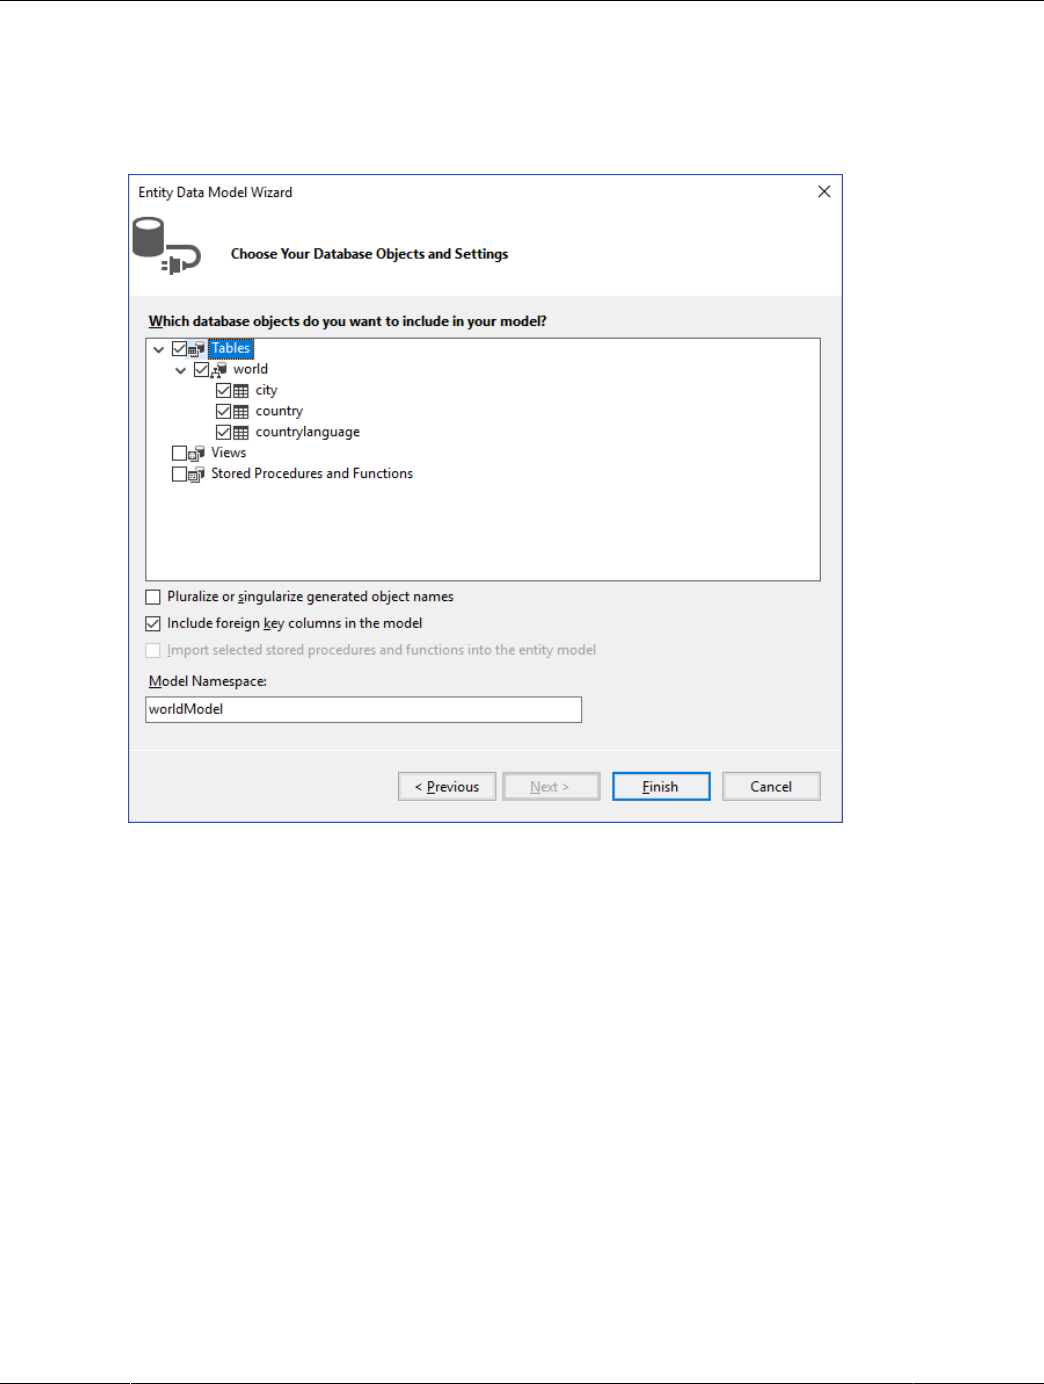
Tutorial: Using an Entity Framework Entity as a Windows Forms Data Source
Routines, these items will be displayed along with any tables. In this example you just need to select
the tables. Click Finish to create the model and exit the wizard.
Figure 4.13 Entity Data Model Wizard - Objects and Settings
Visual Studio generates a model with three tables (city, country, and countrylanguage) and then display
it, as the following figure shows.
444

Tutorial: Using an Entity Framework Entity as a Windows Forms Data Source
Figure 4.14 Entity Data Model Diagram
5. From the Visual Studio main menu, select Build and then Build Solution to ensure that everything
compiles correctly so far.
Adding a New Data Source
You will now add a new Data Source to your project and see how it can be used to read and write to the
database.
1. From the Visual Studio main menu select Data and then Add New Data Source. You will be presented
with the Data Source Configuration Wizard.
2. Select the Object icon. Click Next.
3. Select the object to bind to. Expand the tree as the next figure shows.
In this tutorial, you will select the city table. After the city table has been selected click Next.
445

Tutorial: Using an Entity Framework Entity as a Windows Forms Data Source
Figure 4.15 Data Source Configuration Wizard
4. The wizard will confirm that the city object is to be added. Click Finish.
5. The city object will now appear in the Data Sources panel. If the Data Sources panel is not displayed,
select Data and then Show Data Sources from the Visual Studio main menu. The docked panel will
then be displayed.
Using the Data Source in a Windows Form
This step describes how to use the Data Source in a Windows Form.
1. In the Data Sources panel select the Data Source you just created and drag and drop it onto the Form
Designer. By default, the Data Source object will be added as a Data Grid View control as the following
figure shows.
Note
The Data Grid View control is bound to cityBindingSource, and the
Navigator control is bound to cityBindingNavigator.
446

Tutorial: Using an Entity Framework Entity as a Windows Forms Data Source
Figure 4.16 Data Form Designer
2. Save and rebuild the solution before continuing.
Adding Code to Populate the Data Grid View
You are now ready to add code to ensure that the Data Grid View control will be populated with data from
the city database table.
1. Double-click the form to access its code.
2. Add the following code to instantiate the Entity Data Model EntityContainer object and retrieve
data from the database to populate the control.
using System.Windows.Forms;
namespace WindowsFormsApplication4
{
public partial class Form1 : Form
{
worldEntities we;
public Form1()
{
InitializeComponent();
}
private void Form1_Load(object sender, EventArgs e)
{
we = new worldEntities();
cityBindingSource.DataSource = we.city.ToList();
}
}
}
3. Save and rebuild the solution.
4. Run the solution. Confirm that the grid is populated (see the next figure for an example) and that you
can navigate the database.
447

Tutorial: Using an Entity Framework Entity as a Windows Forms Data Source
Figure 4.17 The Populated Grid Control
Adding Code to Save Changes to the Database
This step explains how to add code that enables you to save changes to the database.
The Binding source component ensures that changes made in the Data Grid View control are also made to
the Entity classes bound to it. However, that data needs to be saved back from the entities to the database
itself. This can be achieved by the enabling of the Save button in the Navigator control, and the addition of
some code.
1. In the Form Designer, click the save icon in the form toolbar and confirm that its Enabled property is
set to True.
2. Double-click the save icon in the form toolbar to display its code.
3. Add the following (or similar) code to ensure that data is saved to the database when a user clicks the
save button in the application.
public Form1()
{
InitializeComponent();
}
private void Form1_Load(object sender, EventArgs e)
{
we = new worldEntities();
cityBindingSource.DataSource = we.city.ToList();
}
private void cityBindingNavigatorSaveItem_Click(object sender, EventArgs e)
{
we.SaveChanges();
}
}
}
4. When the code has been added, save the solution and then rebuild it. Run the application and verify
that changes made in the grid are saved.
448

Tutorial: Data Binding in ASP.NET Using LINQ on Entities
4.6.4 Tutorial: Data Binding in ASP.NET Using LINQ on Entities
In this tutorial you create an ASP.NET web page that binds LINQ queries to entities using the Entity
Framework mapping with MySQL Connector/NET.
If you have not already done so, install the world database sample prior to attempting this tutorial. See the
tutorial Section 4.6.3, “Tutorial: Using an Entity Framework Entity as a Windows Forms Data Source” for
instructions on downloading and installing this database.
Creating an ASP.NET Website
In this part of the tutorial, you create an ASP.NET website. The website uses the world database. The
main web page features a drop-down list from which you can select a country. Data about the cities of that
country is then displayed in a GridView control.
1. From the Visual Studio main menu select File, New, and then Web Site.
2. From the Visual Studio installed templates select ASP.NET Web Site. Click OK. You will be presented
with the Source view of your web page by default.
3. Click the Design view tab situated underneath the Source view panel.
4. In the Design view panel, enter some text to decorate the blank web page.
5. Click Toolbox. From the list of controls, select DropDownList. Drag and drop the control to a location
beneath the text on your web page.
6. From the DropDownList control context menu, ensure that the Enable AutoPostBack check box
is enabled. This will ensure the control's event handler is called when an item is selected. The user's
choice will in turn be used to populate the GridView control.
7. From the Toolbox select the GridView control. Drag and drop the GridView control to a location just
below the drop-down list you already placed.
The following figure shows an example of the decorative text and two controls in the Design view tab.
The added GridView control produced a grid with three columns (Column0, Column1, and Column3)
and the string abc in each cell of the grid.
449
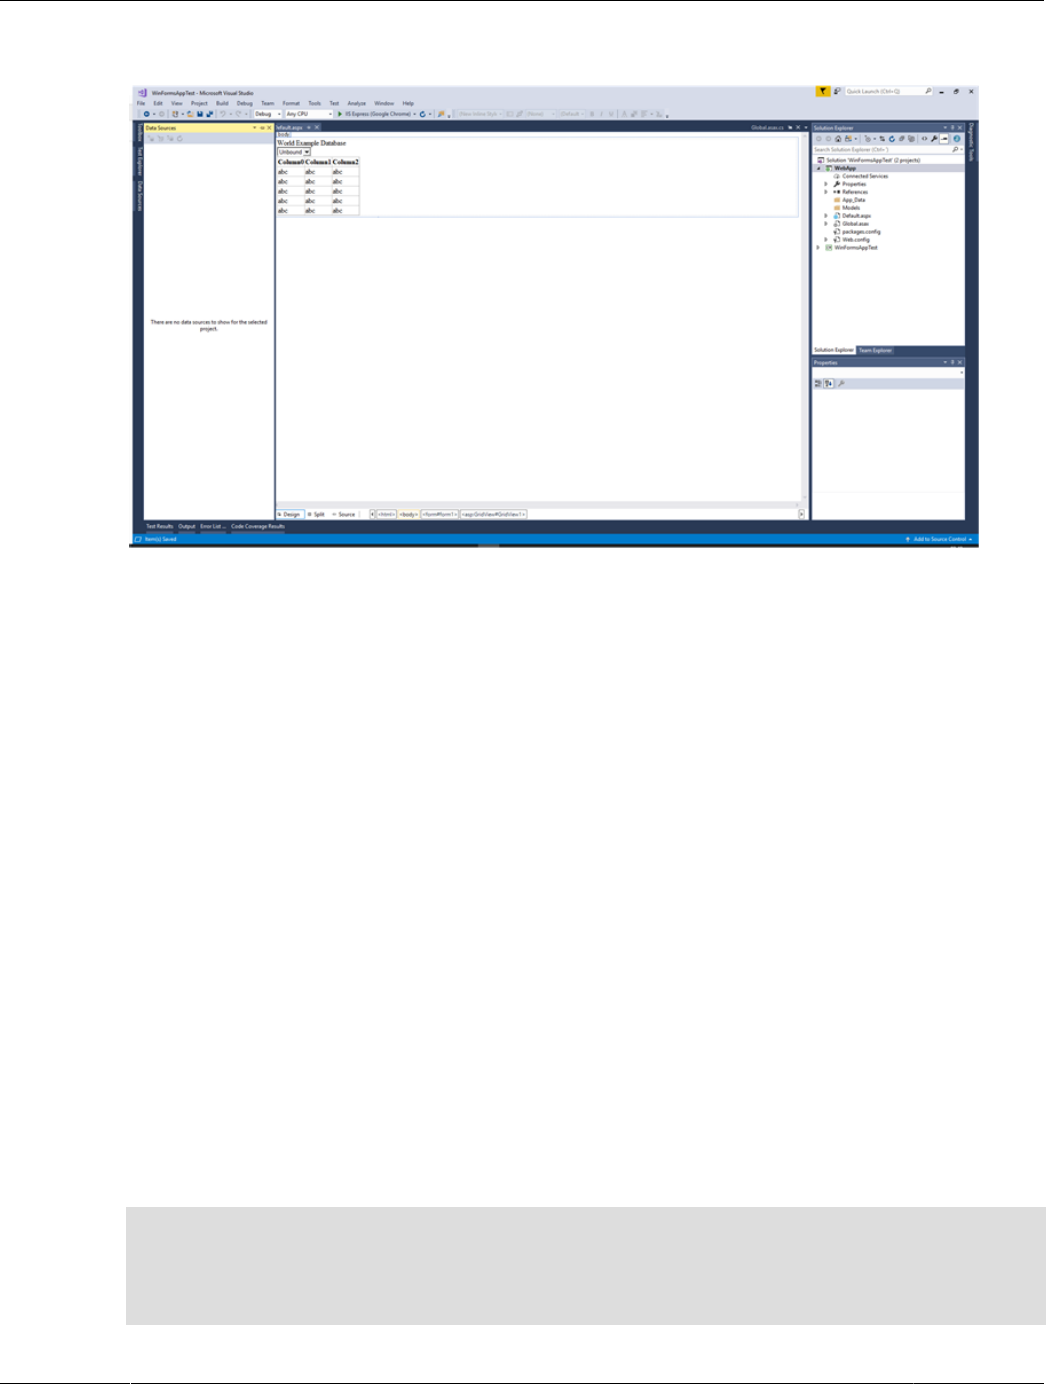
Tutorial: Data Binding in ASP.NET Using LINQ on Entities
Figure 4.18 Placed GridView Control
8. At this point it is recommended that you save your solution, and build the solution to ensure that there
are no errors.
9. If you run the solution you will see that the text and drop down list are displayed, but the list is empty.
Also, the grid view does not appear at all. Adding this functionality is described in the following sections.
At this stage you have a website that will build, but further functionality is required. The next step will be to
use the Entity Framework to create a mapping from the world database into entities that you can control
programmatically.
Creating an ADO.NET Entity Data Model
In this stage of the tutorial you will add an ADO.NET Entity Data Model to your project, using the world
database at the storage level. The procedure for doing this is described in the tutorial Section 4.6.3,
“Tutorial: Using an Entity Framework Entity as a Windows Forms Data Source”, and so will not be repeated
here.
Populating a List Box by Using the Results of a Entity LINQ Query
In this part of the tutorial you will write code to populate the DropDownList control. When the web page
loads the data to populate the list will be achieved by using the results of a LINQ query on the model
created previously.
1. In the Design view panel, double-click any blank area. This brings up the Page_Load method.
2. Modify the relevant section of code according to the following listing example.
...
public partial class _Default : System.Web.UI.Page
{
worldModel.worldEntities we;
protected void Page_Load(object sender, EventArgs e)
450

Tutorial: Data Binding in ASP.NET Using LINQ on Entities
{
we = new worldModel.worldEntities();
if (!IsPostBack)
{
var countryQuery = from c in we.country
orderby c.Name
select new { c.Code, c.Name };
DropDownList1.DataValueField = "Code";
DropDownList1.DataTextField = "Name";
DropDownList1.DataSource = countryQuery.ToList();
DataBind();
}
}
...
The list control only needs to be populated when the page first loads. The conditional code ensures
that if the page is subsequently reloaded, the list control is not repopulated, which would cause the user
selection to be lost.
3. Save the solution, build it and run it. You should see that the list control has been populated. You can
select an item, but as yet the GridView control does not appear.
At this point you have a working Drop Down List control, populated by a LINQ query on your entity data
model.
Populating a Grid View Control by Using an Entity LINQ Query
In the last part of this tutorial you will populate the Grid View Control using a LINQ query on your entity
data model.
1. In the Design view, double-click the DropDownList control. This action causes its
SelectedIndexChanged code to be displayed. This method is called when a user selects an item in
the list control and thus generates an AutoPostBack event.
2. Modify the relevant section of code accordingly to the following listing example.
...
protected void DropDownList1_SelectedIndexChanged(object sender, EventArgs e)
{
var cityQuery = from c in we.city
where c.CountryCode == DropDownList1.SelectedValue
orderby c.Name
select new { c.Name, c.Population, c.CountryCode };
GridView1.DataSource = cityQuery;
DataBind();
}
...
The grid view control is populated from the result of the LINQ query on the entity data model.
3. Save, build, and run the solution. As you select a country you will see its cities are displayed in the
GridView control. The following figure shows Belgium selected from the list box and a table with three
columns: Name, Population, and CountryCode.
451

Tutorial: Generating MySQL DDL from an Entity Framework Model
Figure 4.19 The Working Website
In this tutorial you have seen how to create an ASP.NET website, you have also seen how you can access
a MySQL database using LINQ queries on an entity data model.
4.6.5 Tutorial: Generating MySQL DDL from an Entity Framework Model
This tutorial demonstrates how to create MySQL DDL from an Entity Framework model. Minimally, you will
need Microsoft Visual Studio 2017 and MySQL Connector/NET 6.10 to perform this tutorial.
1. Create a new console application in Visual Studio 2017.
2. Using the Solution Explorer, add a reference to MySql.Data.Entity.
3. From the Solution Explorer select Add, New Item. In the Add New Item dialog select Online
Templates. Select ADO.NET Entity Data Model and click Add to open the Entity Data Model dialog.
4. In the Entity Data Model dialog select Empty Model. Click Finish to create a blank model.
5. Create a simple model. A single Entity will do for the purposes of this tutorial.
6. In the Properties panel select ConceptualEntityModel from the drop-down list.
7. In the Properties panel, locate the DDL Generation Template in the category Database Script
Generation.
8. For the DDL Generation property select SSDLToMySQL.tt(VS) from the drop-down list.
9. Save the solution.
10. Right-click an empty space in the model design area to open the context-sensitive menu. From the
menu select Generate Database from Model to open the Generate Database Wizard dialog.
11. In the Generate Database Wizard dialog select an existing connection, or create a new connection to
a server. Select an appropriate option to show or hide sensitive data. For the purposes of this tutorial,
you can select Yes, although you might skip this for commercial applications.
452

Tutorial: Basic CRUD Operations with Connector/NET
12. Click Next to generate MySQL compatible DDL code and then click Finish to exit the wizard.
You have seen how to create MySQL DDL code from an Entity Framework model.
4.6.6 Tutorial: Basic CRUD Operations with Connector/NET
This tutorial provides instructions to get you started using MySQL as a document store with MySQL
Connector/NET.
• Minimum Requirements
• Import the Document Store Sample
• Add References to Required DLLs
• Import Namespaces
• Create a Session
• Find a Row Within a Collection
• Insert a New Document into a Collection
• Update an Existing Document
• Delete a Specific Document
• Close the Session
• Complete Code Example
For concepts and additional usage examples, see X DevAPI User Guide.
Minimum Requirements
• MySQL Server 8.0.11 with X Protocol enabled
• Connector/NET 8.0.11
• Visual Studio 2013/2015/2017
• world_x database sample
Import the Document Store Sample
A MySQL script is provided with data and a JSON collection. The sample contains the following:
• Collection
• countryinfo: Information about countries in the world.
• Tables
• country: Minimal information about countries of the world.
• city: Information about some of the cities in those countries.
• countrylanguage: Languages spoken in each country.
To install the world_x database sample, follow these steps:
453

Tutorial: Basic CRUD Operations with Connector/NET
1. Download world_x.zip from http://dev.mysql.com/doc/index-other.html.
2. Extract the installation archive to a temporary location such as /tmp/.
Unpacking the archive results in two files, one of them named world_x.sql.
3. Connect to the MySQL server using the MySQL Client with the following command:
$> mysql -u root -p
Enter your password when prompted. A non-root account can be used as long as the account has
privileges to create new databases. For more information about using the MySQL Client, see mysql —
The MySQL Command-Line Client.
4. Execute the world_x.sql script to create the database structure and insert the data as follows:
mysql> SOURCE /temp/world_x.sql;
Replace /temp/ with the path to the world_x.sql file on your system.
Add References to Required DLLs
Create a new Visual Studio Console Project targeting .NET Framework 4.6.2 (or later), .NET Core 1.1,
or .NET Core 2.0. The code examples in this tutorial are shown in the C# language, but you can use
any .NET language.
Add a reference in your project to the following DLLs:
• MySql.Data.dll
• Google.Protobuf.dll
Import Namespaces
Import the required namespaces by adding the following statements:
using MySqlX.XDevAPI;
using MySqlX.XDevAPI.Common;
using MySqlX.XDevAPI.CRUD;
Create a Session
A session in the X DevAPI is a high-level database session concept that is different from working with
traditional low-level MySQL connections. It is important to understand that this session is not the same as a
traditional MySQL session. Sessions encapsulate one or more actual MySQL connections.
The following example opens a session, which you can use later to retrieve a schema and perform basic
CRUD operations.
string schemaName = "world_x";
// Define the connection string
string connectionURI = "mysqlx://test:test@localhost:33060";
Session session = MySQLX.GetSession(connectionURI);
// Get the schema object
Schema schema = session.GetSchema(schemaName);
Find a Row Within a Collection
After the session is instantiated, you can execute a find operation. The next example uses the session
object that you created:
454

Tutorial: Basic CRUD Operations with Connector/NET
// Use the collection 'countryinfo'
var myCollection = schema.GetCollection("countryinfo");
var docParams = new DbDoc(new { name1 = "Albania", _id1 = "ALB" });
// Find a document
DocResult foundDocs = myCollection.Find("Name = :name1 || _id = :_id1").Bind(docParams).Execute();
while (foundDocs.Next())
{
Console.WriteLine(foundDocs.Current["Name"]);
Console.WriteLine(foundDocs.Current["_id"]);
}
Insert a New Document into a Collection
//Insert a new document with an identifier
var obj = new { _id = "UKN", Name = "Unknown" };
Result r = myCollection.Add(obj).Execute();
Update an Existing Document
// using the same docParams object previously created
docParams = new DbDoc(new { name1 = "Unknown", _id1 = "UKN" });
r = myCollection.Modify("_id = :Id").Bind("id", "UKN").Set("GNP", "3308").Execute();
if (r.AffectedItemsCount == 1)
{
foundDocs = myCollection.Find("Name = :name1|| _id = :_id1").Bind(docParams).Execute();
while (foundDocs.Next())
{
Console.WriteLine(foundDocs.Current["Name"]);
Console.WriteLine(foundDocs.Current["_id"]);
Console.WriteLine(foundDocs.Current["GNP"]);
}
}
Delete a Specific Document
r = myCollection.Remove("_id = :id").Bind("id", "UKN").Execute();
Close the Session
session.Close();
Complete Code Example
The following example shows the basic operations that you can perform with a collection.
using MySqlX.XDevAPI;
using MySqlX.XDevAPI.Common;
using MySqlX.XDevAPI.CRUD;
using System;
namespace MySQLX_Tutorial
{
class Program
{
static void Main(string[] args)
{
string schemaName = "world_x";
string connectionURI = "mysqlx://test:test@localhost:33060";
Session session = MySQLX.GetSession(connectionURI);
Schema schema = session.GetSchema(schemaName);
455

Tutorial: Configuring SSL with Connector/NET
// Use the collection 'countryinfo'
var myCollection = schema.GetCollection("countryinfo");
var docParams = new DbDoc(new { name1 = "Albania", _id1 = "ALB" });
// Find a document
DocResult foundDocs = myCollection.Find("Name = :name1 || _id = :_id1").Bind(docParams).Execute();
while (foundDocs.Next())
{
Console.WriteLine(foundDocs.Current["Name"]);
Console.WriteLine(foundDocs.Current["_id"]);
}
//Insert a new document with an id
var obj = new { _id = "UKN", Name = "Unknown" };
Result r = myCollection.Add(obj).Execute();
//update an existing document
docParams = new DbDoc(new { name1 = "Unknown", _id1 = "UKN" });
r = myCollection.Modify("_id = :Id").Bind("id", "UKN").Set("GNP", "3308").Execute();
if (r.AffectedItemsCount == 1)
{
foundDocs = myCollection.Find("Name = :name1|| _id = :_id1").Bind(docParams).Execute();
while (foundDocs.Next())
{
Console.WriteLine(foundDocs.Current["Name"]);
Console.WriteLine(foundDocs.Current["_id"]);
Console.WriteLine(foundDocs.Current["GNP"]);
}
}
// delete a row in a document
r = myCollection.Remove("_id = :id").Bind("id", "UKN").Execute();
//close the session
session.Close();
Console.ReadKey();
}
}
}
4.6.7 Tutorial: Configuring SSL with Connector/NET
In this tutorial you will learn how you can use MySQL Connector/NET to connect to a MySQL server
configured to use SSL. Support for SSL client PFX certificates was added to the Connector/NET 6.2
release series. PFX is the native format of certificates on Microsoft Windows. More recently, support for
SSL client PEM certificates was added in the Connector/NET 8.0.16 release.
MySQL Server uses the PEM format for certificates and private keys. Connector/NET enables the use of
either PEM or PFX certificates with both classic MySQL protocol and X Protocol. This tutorial uses the test
certificates from the server test suite by way of example. You can obtain the MySQL Server source code
from MySQL Downloads. The certificates can be found in the ./mysql-test/std_data directory.
To apply the server-side startup configuration for SSL connections:
1. In the MySQL Server configuration file, set the SSL parameters as shown in the follow PEM format
example. Adjust the directory paths according to the location in which you installed the MySQL source
code.
ssl-ca=path/to/repo/mysql-test/std_data/cacert.pem
456

Tutorial: Configuring SSL with Connector/NET
ssl-cert=path/to/repo/mysql-test/std_data/server-cert.pem
ssl-key=path/to/repo/mysql-test/std_data/server-key.pem
The SslCa connection option accepts both PEM and PFX format certificates, using the file extension to
determine how to process certificates. Change cacert.pem to cacert.pfx if you intend to continue
with the PFX portion of this tutorial.
For a description of the connection string options used in this tutorial, see Section 4.4.5, “Connector/
NET Connection Options Reference”.
2. Create a test user account to use in this tutorial and set the account to require SSL. Using the MySQL
Command-Line Client, connect as root and create the user sslclient (with test as the account
password). Then, grant all privileges to the new user account as follows:
CREATE USER sslclient@'%' IDENTIFIED BY 'test' REQUIRE SSL;
GRANT ALL PRIVILEGES ON *.* TO sslclient@'%';
For detailed information about account-management strategies, see Access Control and Account
Management.
Now that the server-side configuration is finished, you can begin the client-side configuration using either
PEM or PFX format certificates in Connector/NET.
4.6.7.1 Using PEM Certificates in Connector/NET
The direct use of PEM format certificates was introduced to simplify certificate management in
multiplatform environments that include similar MySQL products. In previous versions of Connector/NET,
your only choice was to use platform-dependent PFX format certificates.
For this example, use the test client certificates from the MySQL server repository (server-
repository-root/mysql-test/std_data). In your application, add a connection string using the
test database and the sslclient user account (created previously). For example:
1. Set the SslMode connection option to the level of security needed. PEM certificates are only validated
for VerifyCA and VerifyFull SSL mode values. All other mode values ignore certificates even if
they are provided.
using (MySqlConnection connection = new MySqlConnection(
"database=test;user=sslclient;" +
"SslMode=VerifyFull"
2. Add the appropriate SSL certificates. Because this tutorial sets the SslMode option to VerifyFull,
you must also provide values for the SslCa, SslCert, and SslKey connection options. Each option
must point to a file with the .pem file extension.
"SslCa=ca.pem;" +
"SslCert=client-cert.pem;" +
"SslKey=client-key.pem;"))
Alternatively, if you set the SSL mode to VerifyCA, only the SslCa connection option is required.
3. Open a connection. The following example opens a connection using the classic MySQL protocol, but
you can perform a similar test using X Protocol.
using (MySqlConnection connection = new MySqlConnection(
"database=test;user=sslclient;" +
"SslMode=VerifyFull" +
"SslCa=ca.pem;" +
457

Tutorial: Configuring SSL with Connector/NET
"SslCert=client-cert.pem;" +
"SslKey=client-key.pem;"))
{
connection.Open();
}
Errors found when processing the PEM certificates will result in an exception being thrown. For additional
information, see Command Options for Encrypted Connections.
4.6.7.2 Using PFX Certificates in Connector/NET
.NET does not provide native support the PEM format. Instead, Windows includes a certificate store that
provides platform-dependent certificates in PFX format. For the purposes of this example, use test client
certificates from the MySQL server repository (./mysql-test/std_data). Convert these to PFX format
first. This format is also known as PKCS#12.
To complete the steps in this tutorial for PFX certificates, you must have Open SSL installed. This can be
downloaded for Microsoft Windows at no charge from Shining Light Productions.
Creating a Certificate File to Use with the .NET Client
1. From the directory server-repository-root/mysql-test/std_data, issue the following
command.
openssl pkcs12 -export -in client-cert.pem -inkey client-key.pem -certfile cacert.pem -out client.pfx
2. When asked for an export password, enter the password “pass”. The file client.pfx will be
generated. This file is used in the remainder of the tutorial.
Connecting to the Server Using a File-Based Certificate
1. Use the client.pfx file that you created in the previous step to authenticate the client. The
following example demonstrates how to connect using the SslMode, CertificateFile, and
CertificatePassword connection string options.
using (MySqlConnection connection = new MySqlConnection(
"database=test;user=sslclient;" +
"CertificateFile=H:\\git\\mysql-trunk\\mysql-test\\std_data\\client.pfx;" +
"CertificatePassword=pass;" +
"SslMode=Required "))
{
connection.Open();
}
The path to the certificate file needs to be changed to reflect your individual installation. When using
PFX format certificates, the SslMode connection option validates certificates for all SSL mode values,
except Disabled or None (deprecated in Connector/NET 8.0.29).
Connecting to the Server Using a Store-Based Certificate
1. The first step is to import the PFX file, client.pfx, into the Personal Store. Double-click the file in
Windows explorer. This launches the Certificate Import Wizard.
2. Follow the steps dictated by the wizard, and when prompted for the password for the PFX file, enter
“pass”.
3. Click Finish to close the wizard and import the certificate into the personal store.
458

Tutorial: Using MySqlScript
Examining Certificates in the Personal Store
1. Start the Microsoft Management Console by entering mmc.exe at a command prompt.
2. Select Add/Remove snap-in from the File menu. Click Add. Select Certificates from the list of
available snap-ins.
3. In the dialog, click Add and then select the My user account option. This option is used for personal
certificates.
4. Click Finish.
5. Click OK to close the Add/Remove Snap-in dialog.
6. You now have Certificates – Current User displayed in the left panel of the Microsoft Management
Console. Expand the Certificates - Current User tree item and select Personal, Certificates. The right
panel displays a certificate issued to MySQL that was previously imported. Double-click the certificate
to display its details.
7. After you have imported the certificate to the Personal Store, you can use a more succinct connection
string to connect to the database, as illustrated by the following code:
using (MySqlConnection connection = new MySqlConnection(
"database=test;user=sslclient;" +
"Certificate Store Location=CurrentUser;" +
"SslMode=Required"))
{
connection.Open();
}
Certificate Thumbprint Parameter
If you have a large number of certificates in your store, and many have the same Issuer, this can be a
source of confusion and result in the wrong certificate being used. To alleviate this situation, there is an
optional Certificate Thumbprint parameter that can additionally be specified as part of the connection
string. As mentioned before, you can double-click a certificate in the Microsoft Management Console to
display the certificate's details. When the Certificate dialog is displayed click the Details tab and scroll
down to see the thumbprint. The thumbprint will typically be a number such as 47 94 36 00 9a 40 f3
01 7a 14 5c f8 47 9e 76 94 d7 aa de f0. This thumbprint can be used in the connection string,
as the following code illustrates:
using (MySqlConnection connection = new MySqlConnection(
"database=test;user=sslclient;" +
"Certificate Store Location=CurrentUser;" +
"Certificate Thumbprint=479436009a40f3017a145cf8479e7694d7aadef0;"+
"SSL Mode=Required"))
{
connection.Open();
}
Spaces in the thumbprint parameter are optional and the value is not case-sensitive.
4.6.8 Tutorial: Using MySqlScript
This tutorial teaches you how to use the MySqlScript class. This class enables you to execute a
series of statements. Depending on the circumstances, this can be more convenient than using the
MySqlCommand approach.
459

Tutorial: Using MySqlScript
Further details of the MySqlScript class can be found in the reference documentation supplied with
MySQL Connector/NET.
To run the example programs in this tutorial, set up a simple test database and table using the mysql
Command-Line Client or MySQL Workbench. Commands for the mysql Command-Line Client are given
here:
CREATE DATABASE TestDB;
USE TestDB;
CREATE TABLE TestTable (id INT NOT NULL PRIMARY KEY
AUTO_INCREMENT, name VARCHAR(100));
The main method of the MySqlScript class is the Execute method. This method causes the script
(sequence of statements) assigned to the Query property of the MySqlScript object to be executed.
The Query property can be set through the MySqlScript constructor or by using the Query property.
Execute returns the number of statements executed.
The MySqlScript object will execute the specified script on the connection set using the Connection
property. Again, this property can be set directly or through the MySqlScript constructor. The following
code snippets illustrate this:
string sql = "SELECT * FROM TestTable";
...
MySqlScript script = new MySqlScript(conn, sql);
...
MySqlScript script = new MySqlScript();
script.Query = sql;
script.Connection = conn;
...
script.Execute();
The MySqlScript class has several events associated with it. There are:
1. Error - generated if an error occurs.
2. ScriptCompleted - generated when the script successfully completes execution.
3. StatementExecuted - generated after each statement is executed.
It is possible to assign event handlers to each of these events. These user-provided routines are called
back when the connected event occurs. The following code shows how the event handlers are set up.
script.Error += new MySqlScriptErrorEventHandler(script_Error);
script.ScriptCompleted += new EventHandler(script_ScriptCompleted);
script.StatementExecuted += new MySqlStatementExecutedEventHandler(script_StatementExecuted);
In VisualStudio, you can save typing by using tab completion to fill out stub routines. Start by typing, for
example, “script.Error +=”. Then press TAB, and then press TAB again. The assignment is completed, and
a stub event handler created. A complete working example is shown below:
using System;
using System.Collections.Generic;
using System.Linq;
using System.Text;
using System.Data;
using MySql.Data;
using MySql.Data.MySqlClient;
namespace MySqlScriptTest
{
460

Tutorial: Using MySqlScript
class Program
{
static void Main(string[] args)
{
string connStr = "server=localhost;user=root;database=TestDB;port=3306;password=******";
MySqlConnection conn = new MySqlConnection(connStr);
try
{
Console.WriteLine("Connecting to MySQL...");
conn.Open();
string sql = "INSERT INTO TestTable(name) VALUES ('Superman');" +
"INSERT INTO TestTable(name) VALUES ('Batman');" +
"INSERT INTO TestTable(name) VALUES ('Wolverine');" +
"INSERT INTO TestTable(name) VALUES ('Storm');";
MySqlScript script = new MySqlScript(conn, sql);
script.Error += new MySqlScriptErrorEventHandler(script_Error);
script.ScriptCompleted += new EventHandler(script_ScriptCompleted);
script.StatementExecuted += new MySqlStatementExecutedEventHandler(script_StatementExecuted);
int count = script.Execute();
Console.WriteLine("Executed " + count + " statement(s).");
Console.WriteLine("Delimiter: " + script.Delimiter);
}
catch (Exception ex)
{
Console.WriteLine(ex.ToString());
}
conn.Close();
Console.WriteLine("Done.");
}
static void script_StatementExecuted(object sender, MySqlScriptEventArgs args)
{
Console.WriteLine("script_StatementExecuted");
}
static void script_ScriptCompleted(object sender, EventArgs e)
{
/// EventArgs e will be EventArgs.Empty for this method
Console.WriteLine("script_ScriptCompleted!");
}
static void script_Error(Object sender, MySqlScriptErrorEventArgs args)
{
Console.WriteLine("script_Error: " + args.Exception.ToString());
}
}
}
In the script_ScriptCompleted event handler, the EventArgs parameter e will be
EventArgs.Empty. In the case of the ScriptCompleted event there is no additional data to be
obtained, which is why the event object is EventArgs.Empty.
Using Delimiters with MySqlScript
Depending on the nature of the script, you may need control of the delimiter used to separate the
statements that will make up a script. The most common example of this is where you have a multi-
statement stored routine as part of your script. In this case if the default delimiter of “;” is used you will get
an error when you attempt to execute the script. For example, consider the following stored routine:
461

Tutorial: Using MySqlScript
CREATE PROCEDURE test_routine()
BEGIN
SELECT name FROM TestTable ORDER BY name;
SELECT COUNT(name) FROM TestTable;
END
This routine actually needs to be executed on the MySQL Server as a single statement. However, with
the default delimiter of “;”, the MySqlScript class would interpret the above as two statements, the first
being:
CREATE PROCEDURE test_routine()
BEGIN
SELECT name FROM TestTable ORDER BY name;
Executing this as a statement would generate an error. To solve this problem MySqlScript supports
the ability to set a different delimiter. This is achieved through the Delimiter property. For example, you
could set the delimiter to “??”, in which case the above stored routine would no longer generate an error
when executed. Multiple statements can be delimited in the script, so for example, you could have a three
statement script such as:
string sql = "DROP PROCEDURE IF EXISTS test_routine??" +
"CREATE PROCEDURE test_routine() " +
"BEGIN " +
"SELECT name FROM TestTable ORDER BY name;" +
"SELECT COUNT(name) FROM TestTable;" +
"END??" +
"CALL test_routine()";
You can change the delimiter back at any point by setting the Delimiter property. The following code shows
a complete working example:
using System;
using System.Collections.Generic;
using System.Linq;
using System.Text;
using MySql.Data;
using MySql.Data.MySqlClient;
namespace ConsoleApplication8
{
class Program
{
static void Main(string[] args)
{
string connStr = "server=localhost;user=root;database=TestDB;port=3306;password=******";
MySqlConnection conn = new MySqlConnection(connStr);
try
{
Console.WriteLine("Connecting to MySQL...");
conn.Open();
string sql = "DROP PROCEDURE IF EXISTS test_routine??" +
"CREATE PROCEDURE test_routine() " +
"BEGIN " +
"SELECT name FROM TestTable ORDER BY name;" +
"SELECT COUNT(name) FROM TestTable;" +
"END??" +
"CALL test_routine()";
MySqlScript script = new MySqlScript(conn);
script.Query = sql;
script.Delimiter = "??";
462

Connector/NET for Entity Framework
int count = script.Execute();
Console.WriteLine("Executed " + count + " statement(s)");
script.Delimiter = ";";
Console.WriteLine("Delimiter: " + script.Delimiter);
Console.WriteLine("Query: " + script.Query);
}
catch (Exception ex)
{
Console.WriteLine(ex.ToString());
}
conn.Close();
Console.WriteLine("Done.");
}
}
}
4.7 Connector/NET for Entity Framework
Entity Framework is the name given to a set of technologies that support the development of data-oriented
software applications. MySQL Connector/NET supports Entity Framework 6.0 (EF6 or EF 6.4) and Entity
Framework Core (EF Core), which is the most recent framework available to .NET developers who work
with MySQL data using .NET objects.
The following table identifies each Entity Framework release and shows which Connector/NET series
supports the release. Backward compatibility of each feature set is determined by the framework rather
than by Connector/NET.
Table 4.2 Entity Framework Support by Connector/NET Version
Framework Type Connector/NET Support
EF Core • EF Core 8.0: Full support with 8.3.0 and later on platforms that
support .NET 8.
• EF Core 6.0: Full support with 8.0.28 and later on platforms that
support .NET 6.
EF6 | EF 6.4 • EF 6.4: Full cross-platform support in 8.0.22 and later.
• EF6: Full support on Windows only in 8.0.11 and later.
4.7.1 Entity Framework 6 Support
MySQL Connector/NET integrates support for Entity Framework 6 (EF6), which now includes support for
cross-platform application deployment with the EF 6.4 version. This chapter describes how to configure
and use the EF6 features that are implemented in Connector/NET.
In this section:
• Minimum Requirements for EF6 on Windows Only
• Minimum Requirements for EF 6.4 with Cross-Platform Support
• Configuration
• EF6 Features
• Code First Features
463

Entity Framework 6 Support
• Example for Using EF6
Minimum Requirements for EF6 on Windows Only
• Connector/NET 6.10 or 8.0.11
• MySQL Server 5.6
• Entity Framework 6 assemblies
• .NET Framework 4.6.2
Minimum Requirements for EF 6.4 with Cross-Platform Support
• Connector/NET 8.0.22
• MySQL Server 5.6
• Entity Framework 6.4 assemblies
• .NET Standard 2.1 (.NET Core SDK 3.1 and Visual Studio 2019 version 16.5)
Configuration
Note
The MySQL Connector/NET 8.0 release series has a naming scheme for EF6
assemblies and NuGet packages that differs from the scheme used with previous
release series, such as 6.9 and 6.10. To configure Connector/NET 6.9 or 6.10 for
use with EF6, substitute the assembly and package names in this section with the
following:
• Assembly: MySql.Data.Entity.EF6
• NuGet package: MySql.Data.Entity
For more information about the MySql.Data.Entity NuGet package and its
uses, see https://www.nuget.org/packages/MySql.Data.Entity/.
To configure Connector/NET support for EF6:
1. Edit the configuration sections in the app.config file to add the connection string and the Connector/
NET provider.
<connectionStrings>
<add name="MyContext" providerName="MySql.Data.MySqlClient"
connectionString="server=localhost;port=3306;database=mycontext;uid=root;password=********"/>
</connectionStrings>
<entityFramework>
<defaultConnectionFactory type="System.Data.Entity.Infrastructure.SqlConnectionFactory, EntityFramework"/>
<providers>
<provider invariantName="MySql.Data.MySqlClient"
type="MySql.Data.MySqlClient.MySqlProviderServices, MySql.Data.EntityFramework"/>
<provider invariantName="System.Data.SqlClient"
type="System.Data.Entity.SqlServer.SqlProviderServices, EntityFramework.SqlServer"/>
</providers>
</entityFramework>
2. Apply the assembly reference using one of the following techniques:
464

Entity Framework 6 Support
• NuGet package. Install the NuGet package to add this reference automatically to the
app.config or web.config file during the installation. For example, to install the package for
Connector/NET 8.0.22, use one of the following installation options:
• Command Line Interface (CLI)
dotnet add package MySql.Data.EntityFramework -Version 8.0.22
• Package Manager Console (PMC)
Install-Package MySql.Data.EntityFramework -Version 8.0.22
• Visual Studio with NuGet Package Manager. For this option, select nuget.org
as the package source, search for mysql.data, and install a stable version of
MySql.Data.EntityFramework.
• MySQL Connector/NET MSI file. Install MySQL Connector/NET and then add a reference for the
MySql.Data.EntityFramework assembly to your project. Depending on the .NET Framework
version used, the assembly is taken from the v4.0, v4.5, or v4.8 folder.
• MySQL Connector/NET source code. Build Connector/NET from source and then insert the
following data provider information into the app.config or web.config file:
<system.data>
<DbProviderFactories>
<remove invariant="MySql.Data.MySqlClient" />
<add name="MySQL Data Provider" invariant="MySql.Data.MySqlClient" description=".Net Framework Data Provider for MySQL"
type="MySql.Data.MySqlClient.MySqlClientFactory, MySql.Data, Version=8.0.22.0, Culture=neutral, PublicKeyToken=c5687fc88969c44d" />
</DbProviderFactories>
</system.data>
Important
Always update the version number to match the one in the MySql.Data.dll
assembly.
3. Set the new DbConfiguration class for MySQL. This step is optional but highly recommended,
because it adds all the dependency resolvers for MySQL classes. This can be done in three ways:
• Adding the DbConfigurationTypeAttribute on the context class:
[DbConfigurationType(typeof(MySqlEFConfiguration))]
• Calling DbConfiguration.SetConfiguration(new MySqlEFConfiguration()) at the
application start up.
• Set the DbConfiguration type in the configuration file:
<entityFramework codeConfigurationType="MySql.Data.Entity.MySqlEFConfiguration, MySql.Data.EntityFramework">
It is also possible to create a custom DbConfiguration class and add the dependency resolvers
needed.
EF6 Features
Following are the new features in Entity Framework 6 implemented in Connector/NET:
• Cross-platform support in Connector/NET 8.0.22 implements EF 6.4 as the initial provider version to
include Linux and macOS compatibility with .NET Standard 2.1 from Microsoft.
465

Entity Framework 6 Support
• Async Query and Save adds support for the task-based asynchronous patterns that have been available
since .NET 4.5. The new asynchronous methods supported by Connector/NET are:
• ExecuteNonQueryAsync
• ExecuteScalarAsync
• PrepareAsync
• Connection Resiliency / Retry Logic enables automatic recovery from transient connection failures. To
use this feature, add to the OnCreateModel method:
SetExecutionStrategy(MySqlProviderInvariantName.ProviderName, () => new MySqlExecutionStrategy());
• Code-Based Configuration gives you the option of performing configuration in code, instead of
performing it in a configuration file, as it has been done traditionally.
• Dependency Resolution introduces support for the Service Locator. Some pieces of functionality that can
be replaced with custom implementations have been factored out. To add a dependency resolver, use:
AddDependencyResolver(new MySqlDependencyResolver());
The following resolvers can be added:
• DbProviderFactory -> MySqlClientFactory
• IDbConnectionFactory -> MySqlConnectionFactory
• MigrationSqlGenerator -> MySqlMigrationSqlGenerator
• DbProviderServices -> MySqlProviderServices
• IProviderInvariantName -> MySqlProviderInvariantName
• IDbProviderFactoryResolver -> MySqlProviderFactoryResolver
• IManifestTokenResolver -> MySqlManifestTokenResolver
• IDbModelCacheKey -> MySqlModelCacheKeyFactory
• IDbExecutionStrategy -> MySqlExecutionStrategy
• Interception/SQL logging provides low-level building blocks for interception of Entity Framework
operations with simple SQL logging built on top:
myContext.Database.Log = delegate(string message) { Console.Write(message); };
• DbContext can now be created with a DbConnection that is already opened, which enables scenarios
where it would be helpful if the connection could be open when creating the context (such as sharing a
connection between components when you cannot guarantee the state of the connection)
[DbConfigurationType(typeof(MySqlEFConfiguration))]
class JourneyContext : DbContext
{
public DbSet<MyPlace> MyPlaces { get; set; }
public JourneyContext()
: base()
{
}
466

Entity Framework 6 Support
public JourneyContext(DbConnection existingConnection, bool contextOwnsConnection)
: base(existingConnection, contextOwnsConnection)
{
}
}
using (MySqlConnection conn = new MySqlConnection("<connectionString>"))
{
conn.Open();
...
using (var context = new JourneyContext(conn, false))
{
...
}
}
• Improved Transaction Support provides support for a transaction external to the framework as
well as improved ways of creating a transaction within the Entity Framework. Starting with Entity
Framework 6, Database.ExecuteSqlCommand() will wrap by default the command in a transaction
if one was not already present. There are overloads of this method that allow users to override this
behavior if wished. Execution of stored procedures included in the model through APIs such as
ObjectContext.ExecuteFunction() does the same. It is also possible to pass an existing
transaction to the context.
• DbSet.AddRange/RemoveRange provides an optimized way to add or remove multiple entities from a
set.
Code First Features
Following are new Code First features supported by Connector/NET:
• Code First Mapping to Insert/Update/Delete Stored Procedures supported:
modelBuilder.Entity<EntityType>().MapToStoredProcedures();
• Idempotent migrations scripts allow you to generate an SQL script that can upgrade a database
at any version up to the latest version. To do so, run the Update-Database -Script -
SourceMigration: $InitialDatabase command in Package Manager Console.
• Configurable Migrations History Table allows you to customize the definition of the migrations history
table.
Example for Using EF6
The following C# code example represents the structure of an Entity Framework 6 model.
using MySql.Data.Entity;
using System.Data.Common;
using System.Data.Entity;
namespace EF6
{
// Code-Based Configuration and Dependency resolution
[DbConfigurationType(typeof(MySqlEFConfiguration))]
public class Parking : DbContext
{
public DbSet<Car> Cars { get; set; }
public Parking()
467

Entity Framework 6 Support
: base()
{
}
// Constructor to use on a DbConnection that is already opened
public Parking(DbConnection existingConnection, bool contextOwnsConnection)
: base(existingConnection, contextOwnsConnection)
{
}
protected override void OnModelCreating(DbModelBuilder modelBuilder)
{
base.OnModelCreating(modelBuilder);
modelBuilder.Entity<Car>().MapToStoredProcedures();
}
}
public class Car
{
public int CarId { get; set; }
public string Model { get; set; }
public int Year { get; set; }
public string Manufacturer { get; set; }
}
}
The C# code example that follows shows how to use the entities from the previous model in an application
that stores the data within a MySQL table.
using MySql.Data.MySqlClient;
using System;
using System.Collections.Generic;
namespace EF6
{
class Example
{
public static void ExecuteExample()
{
string connectionString = "server=localhost;port=3305;database=parking;uid=root";
using (MySqlConnection connection = new MySqlConnection(connectionString))
{
// Create database if not exists
using (Parking contextDB = new Parking(connection, false))
{
contextDB.Database.CreateIfNotExists();
}
connection.Open();
MySqlTransaction transaction = connection.BeginTransaction();
try
{
// DbConnection that is already opened
using (Parking context = new Parking(connection, false))
{
// Interception/SQL logging
context.Database.Log = (string message) => { Console.WriteLine(message); };
// Passing an existing transaction to the context
468

Entity Framework Core Support
context.Database.UseTransaction(transaction);
// DbSet.AddRange
List<Car> cars = new List<Car>();
cars.Add(new Car { Manufacturer = "Nissan", Model = "370Z", Year = 2012 });
cars.Add(new Car { Manufacturer = "Ford", Model = "Mustang", Year = 2013 });
cars.Add(new Car { Manufacturer = "Chevrolet", Model = "Camaro", Year = 2012 });
cars.Add(new Car { Manufacturer = "Dodge", Model = "Charger", Year = 2013 });
context.Cars.AddRange(cars);
context.SaveChanges();
}
transaction.Commit();
}
catch
{
transaction.Rollback();
throw;
}
}
}
}
}
4.7.2 Entity Framework Core Support
MySQL Connector/NET integrates support for Entity Framework Core (EF Core). The requirements and
configuration of EF Core depend on the version of Connector/NET installed and the features that you
require. Use the table that follows to evaluate the minimum requirements.
Table 4.3 Connector/NET Versions and Entity Framework Core Support
Connector/NET EF Core 9.0 EF Core 8.0 EF Core 7.0 EF Core 6.0
9.1.0 .NET 9
preview, .NET
8, .NET 6
Not supported .NET 6
9.0.0 .NET 8, .NET 6 Not supported .NET 6
8.3.0 and 8.4.0 Not supported .NET 8, .NET
7, .NET 6
.NET 7, .NET 6
.NET 6
8.2.0 Not supported .NET 8 preview .NET 7 .NET 6
8.1.0 Not supported Not supported .NET 7 .NET 6
8.0.33 Not supported Not supported .NET 7 .NET 6
8.0.28 Not supported Not supported Not supported .NET 6
8.0.23 to 8.0.27 Not supported Not supported Not supported EF Core 6.0
preview
In this section:
• General Requirements for EF Core Support
• Configuration with MySQL
• Limitations
469

Entity Framework Core Support
• Maximum String Length
General Requirements for EF Core Support
• Server version: MySQL 8.0 or later
• Entity Framework Core packages (replace n with a valid number to complete the full version of the
package):
• MySql.EntityFrameworkCore 8.0.n+MySQL8.n
• MySql.EntityFrameworkCore 6.0.n+MySQL8.n
• An implementation of .NET Standard or .NET Framework that is supported by Connector/NET (see
Table 4.3, “Connector/NET Versions and Entity Framework Core Support”)
• .NET | .NET Core SDK
• .NET 8.0 for all supported platforms: https://dotnet.microsoft.com/es-es/download/dotnet/8.0
• .NET 6.0 for all supported platforms: https://dotnet.microsoft.com/download/dotnet/6.0
• .NET Core for Microsoft Windows: https://www.microsoft.com/net/core#windowscmd
• .NET Core for Linux: https://www.microsoft.com/net/core#linuxredhat
• .NET Core for macOS: https://www.microsoft.com/net/core#macos
• Docker: https://www.microsoft.com/net/core#dockercmd
• Optional: Microsoft Visual Studio 2017, 2019, 2022, or Code
Note
For the minimum version of Visual Studio to use with Connector/NET, see
Table 4.1, “Connector/NET Requirements for Related Products”.
Configuration with MySQL
To use Entity Framework Core with a MySQL database, do the following:
1. Install the NuGet package.
When you install either the MySql.EntityFrameworkCore or
MySql.Data.EntityFrameworkCore package, all of the related packages required to run your
application are installed for you. For instructions on adding a NuGet package, see the relevant
Microsoft documentation.
2. In the class that derives from the DbContext class, override the OnConfiguring method to set the
MySQL data provider with UseMySQL. The following example shows how to set the provider using a
generic connection string in C#.
protected override void OnConfiguring(DbContextOptionsBuilder optionsBuilder)
{
#warning To protect potentially sensitive information in your connection string,
you should move it out of source code. See http://go.microsoft.com/fwlink/?LinkId=723263
for guidance on storing connection strings.
optionsBuilder.UseMySQL("server=localhost;database=library;user=user;password=password");
}
470

Entity Framework Core Support
Limitations
The Connector/NET implementation of EF Core has the following limitations:
• Memory-Optimized Tables is not supported.
Maximum String Length
The following table shows the maximum length of string types supported by the Connector/NET
implementation of EF Core. Length values are in bytes for nonbinary and binary string types, depending on
the character set used.
Table 4.4 Maximum Length of strings used with Entity Framework Core
Data Type Maximum Length .NET Type
CHAR 255 string
BINARY 255 byte[]
VARCHAR, VARBINARY 65,535 string, byte[]
TINYBLOB, TINYTEXT 255 byte[]
BLOB, TEXT 65,535 byte[]
MEDIUMBLOB, MEDIUMTEXT 16,777,215 byte[]
LONGBLOB, LONGTEXT 4,294,967,295 byte[]
ENUM 65,535 string
SET 65,535 string
For additional information about the storage requirements of the string types, see String Type Storage
Requirements.
4.7.2.1 Creating a Database with Code First in EF Core
The Code First approach enables you to define an entity model in code, create a database from the model,
and then add data to the database. MySQL Connector/NET is compatible with multiple versions of Entity
Framework Core. For specific compatibility information, see Table 4.3, “Connector/NET Versions and
Entity Framework Core Support”.
The following example shows the process of creating a database from existing code. Although this
example uses the C# language, you can use any .NET language and run the resulting application on
Windows, macOS, or Linux.
1. Create a console application for this example.
a. Initialize a valid .NET Core project and console application using the .NET Core command-line
interface (CLI) and then switch to the newly created folder (mysqlefcore).
dotnet new console –o mysqlefcore
cd mysqlefcore
b. Add the MySql.EntityFrameworkCore package to the application by using the dotnet CLI or the
Package Manager Console in Visual Studio.
dotnet CLI
Enter the following command to add the MySQL EF Core 7.0 package for use with Connector/NET
8.0.33 and later.
471

Entity Framework Core Support
dotnet add package MySql.EntityFrameworkCore --version 7.0.2
Package Manager Console
Enter the following command to add the MySQL EF Core 7.0 package for use with Connector/NET
8.0.33 and later.
Install-Package MySql.EntityFrameworkCore -Version 7.0.2
c. Restore dependencies and project-specific tools that are specified in the project file as follows:
dotnet restore
2. Create the model and run the application.
The model in this example is to be used by the console application. It consists of two entities related to
a book library that are configured in the LibraryContext class (or database context).
a. Create a new file named LibraryModel.cs and then add the following Book and Publisher
classes to the mysqlefcore namespace.
namespace mysqlefcore
{
public class Book
{
public string ISBN { get; set; }
public string Title { get; set; }
public string Author { get; set; }
public string Language { get; set; }
public int Pages { get; set; }
public virtual Publisher Publisher { get; set; }
}
public class Publisher
{
public int ID { get; set; }
public string Name { get; set; }
public virtual ICollection<Book> Books { get; set; }
}
}
b. Create a new file named LibraryContext.cs and add the code that follows. Replace the generic
connection string with one that is appropriate for your MySQL server configuration.
Note
The MySQL.EntityFrameworkCore.Extensions namespace applies
to Connector/NET 8.0.23 and later. Earlier connector versions require the
MySQL.Data.EntityFrameworkCore.Extensions namespace.
using Microsoft.EntityFrameworkCore;
using MySQL.EntityFrameworkCore.Extensions;
namespace mysqlefcore
{
public class LibraryContext : DbContext
{
public DbSet<Book> Book { get; set; }
public DbSet<Publisher> Publisher { get; set; }
protected override void OnConfiguring(DbContextOptionsBuilder optionsBuilder)
472

Entity Framework Core Support
{
optionsBuilder.UseMySQL("server=localhost;database=library;user=user;password=password");
}
protected override void OnModelCreating(ModelBuilder modelBuilder)
{
base.OnModelCreating(modelBuilder);
modelBuilder.Entity<Publisher>(entity =>
{
entity.HasKey(e => e.ID);
entity.Property(e => e.Name).IsRequired();
});
modelBuilder.Entity<Book>(entity =>
{
entity.HasKey(e => e.ISBN);
entity.Property(e => e.Title).IsRequired();
entity.HasOne(d => d.Publisher)
.WithMany(p => p.Books);
});
}
}
}
The LibraryContex class contains the entities to use and it enables the configuration of specific
attributes of the model, such as Key, required columns, references, and so on.
c. Insert the following code into the existing Program.cs file, replacing the default C# code.
using Microsoft.EntityFrameworkCore;
using System;
using System.Text;
namespace mysqlefcore
{
class Program
{
static void Main(string[] args)
{
InsertData();
PrintData();
}
private static void InsertData()
{
using(var context = new LibraryContext())
{
// Creates the database if not exists
context.Database.EnsureCreated();
// Adds a publisher
var publisher = new Publisher
{
Name = "Mariner Books"
};
context.Publisher.Add(publisher);
// Adds some books
context.Book.Add(new Book
{
ISBN = "978-0544003415",
Title = "The Lord of the Rings",
Author = "J.R.R. Tolkien",
Language = "English",
Pages = 1216,
473

Entity Framework Core Support
Publisher = publisher
});
context.Book.Add(new Book
{
ISBN = "978-0547247762",
Title = "The Sealed Letter",
Author = "Emma Donoghue",
Language = "English",
Pages = 416,
Publisher = publisher
});
// Saves changes
context.SaveChanges();
}
}
private static void PrintData()
{
// Gets and prints all books in database
using (var context = new LibraryContext())
{
var books = context.Book
.Include(p => p.Publisher);
foreach(var book in books)
{
var data = new StringBuilder();
data.AppendLine($"ISBN: {book.ISBN}");
data.AppendLine($"Title: {book.Title}");
data.AppendLine($"Publisher: {book.Publisher.Name}");
Console.WriteLine(data.ToString());
}
}
}
}
}
d. Use the following CLI commands to restore the dependencies and then run the application.
dotnet restore
dotnet run
The output from running the application is represented by the following example:
ISBN: 978-0544003415
Title: The Lord of the Rings
Publisher: Mariner Books
ISBN: 978-0547247762
Title: The Sealed Letter
Publisher: Mariner Books
4.7.2.2 Scaffolding an Existing Database in EF Core
Scaffolding a database produces an Entity Framework model from an existing database. The resulting
entities are created and mapped to the tables in the specified database. For an overview of the
requirements to use EF Core with MySQL, see Table 4.3, “Connector/NET Versions and Entity Framework
Core Support”).
NuGet packages have the ability to select the best target for a project, which means that NuGet installs the
libraries related to that specific framework version.
There are two different ways to scaffold an existing database:
474

Entity Framework Core Support
• Scaffolding a Database Using .NET Core CLI
• Scaffolding a Database Using Package Manager Console in Visual Studio
This section shows how to scaffold the sakila database using both approaches. Additional scaffolding
techniques are:
• Scaffolding a Database by Filtering Tables
• Scaffolding with Multiple Schemas
Requirements
For the components needed to reproduce each scaffolding approach, see General Requirements for EF
Core Support. With the Package Manager Console approach, determine which version of Visual Studio is
recommended for the version of .NET or .NET Core in use (see Table 4.1, “Connector/NET Requirements
for Related Products”).
To download sakila database, see https://dev.mysql.com/doc/sakila/en/.
Note
When upgrading ASP.NET Core applications to a newer framework, be sure to use
the appropriate EF Core version (see https://docs.microsoft.com/en-us/aspnet/core/
migration/30-to-31?view=aspnetcore-3.1).
Scaffolding a Database Using .NET Core CLI
1. Initialize a valid .NET Core project and console application using the .NET Core command-line interface
(CLI) and then change to the newly created folder (sakilaConsole).
dotnet new console –o sakilaConsole
cd sakilaConsole
2. Add the MySQL NuGet package for EF Core using the CLI. For example, use the following command to
add the MySQL EF Core 7.0 package for use with Connector/NET 8.0.33 and later.
dotnet add package MySql.EntityFrameworkCore --version 7.0.2
3. Add the following Microsoft.EntityFrameworkCore.Design Nuget package:
dotnet add package Microsoft.EntityFrameworkCore.Tools
4. Restore dependencies and project-specific tools that are specified in the project file as follows:
dotnet restore
5. Create the Entity Framework Core model by executing the following command. The connection string
for this example must include database=sakila. For information about using connection strings, see
Section 4.4.1, “Creating a Connector/NET Connection String”.
Note
If you are using a connector version earlier than Connector/
NET 8.0.23, replace MySql.EntityFrameworkCore with
MySql.Data.EntityFrameworkCore.
dotnet ef dbcontext scaffold "connection-string" MySql.EntityFrameworkCore -o sakila -f
475

Entity Framework Core Support
To validate that the model has been created, open the new sakila folder. You should see files
corresponding to all tables mapped to entities. In addition, look for the sakilaContext.cs file, which
contains the DbContext for this database.
Scaffolding a Database Using Package Manager Console in Visual Studio
1. Open Visual Studio and create a new Console App (.NET Core) for C#.
2. Add the MySQL NuGet package for EF Core using the Package Manager Console. For example, use
the following command to add the MySQL EF Core 7.0 package for use the Connector/NET 8.0.33 and
later.
Install-Package MySql.EntityFrameworkCore -Version 7.0.2
3. Install the following NuGet package by selecting either Package Manager Console (or Manage
NuGet Packages for Solution and then NuGet Package Manager) from the Tools menu:
Microsoft.EntityFrameworkCore.Tools.
4. Open Package Manager Console and enter the following command at the prompt to create the
entities and DbContext for the sakila database. The connection string for this example must include
database=sakila. For information about using connection strings, see Section 4.4.1, “Creating a
Connector/NET Connection String”.
Note
If you are using a connector version earlier than Connector/
NET 8.0.23, replace MySql.EntityFrameworkCore with
MySql.Data.EntityFrameworkCore.
Scaffold-DbContext "connection-string" MySql.EntityFrameworkCore -OutputDir sakila -f
Visual Studio creates a new sakila folder inside the project, which contains all the tables mapped to
entities and the sakilaContext.cs file.
Scaffolding a Database by Filtering Tables
It is possible to specify the exact tables in a schema to use when scaffolding database and to omit the rest.
The command-line examples that follow show the parameters needed for filtering tables. The connection
string for this example must include database=sakila.
If you are using a connector version earlier than Connector/NET 8.0.23, replace
MySql.EntityFrameworkCore with MySql.Data.EntityFrameworkCore.
.NET Core CLI:
dotnet ef dbcontext scaffold "connection-string" MySql.EntityFrameworkCore -o sakila -t actor -t film -t film_actor -t language -f
Package Manager Console in Visual Studio:
Scaffold-DbContext "connection-string" MySql.EntityFrameworkCore -OutputDir Sakila -Tables actor,film,language -f
Scaffolding with Multiple Schemas
When scaffolding a database, you can use more than one schema or database. Note that the account
used to connect to the MySQL server must have access to each schema to be included within the context.
The following command-line examples show how to incorporate the sakila and world schemas
within a single context. If you are using a connector version earlier than Connector/NET 8.0.23, replace
MySql.EntityFrameworkCore with MySql.Data.EntityFrameworkCore.
476

Entity Framework Core Support
.NET Core CLI:
dotnet ef dbcontext scaffold "connection-string" MySql.EntityFrameworkCore -o sakila --schema sakila --schema world -f
Package Manager Console in Visual Studio:
Scaffold-DbContext "connection-string" MySql.EntityFrameworkCore -OutputDir Sakila -Schemas sakila,world -f
4.7.2.3 Configuring Character Sets and Collations in EF Core
This section describes how to change the character set, collation, or both at the entity and entity-property
level in an Entity Framework (EF) Core model. Modifications made to the model affect the tables and
columns generated from your code.
There are two distinct approaches available for configuring character sets and collations in code-first
scenarios. Data annotation enables you to apply attributes directly to your EF Core model. Alternatively,
you can override the OnModelCreating method on your derived DbContext class and use the code-first
fluent API to configure specific characteristics of the model. An example of each approach follows.
For more information about supported character sets and collations, see Character Sets and Collations in
MySQL.
Using Data Annotation
Before you can annotate an EF Core model with character set and collation attributes, add a reference to
the following namespace in the file that contains your entity model.
Note
The MySQL.EntityFrameworkCore.DataAnnotations namespace applies
to Connector/NET 8.0.23 and later. Earlier connector versions require the
MySQL.Data.EntityFrameworkCore.DataAnnotations namespace.
using MySql.EntityFrameworkCore.DataAnnotations;
Add one or more [MySqlCharset] attributes to store data using a variety of character sets and one
or more [MySqlCollation] attributes to perform comparisons according to a variety of collations.
In the following example, the ComplexKey class represents an entity (or table) and Key1, Key2, and
CollationColumn represent entity properties (or columns).
[MySqlCharset("utf8")]
public class ComplexKey
{
[MySqlCharset("latin1")
public string Key1 { get; set; }
[MySqlCharset("latin1")]
public string Key2 { get; set; }
[MySqlCollation("latin1_spanish_ci")]
public string CollationColumn { get; set; }
}
Using the Code-First Fluent API
Add the following directive to reference the methods related to character set and collation configuration.
Note
The MySQL.EntityFrameworkCore.Extensions namespace applies
to Connector/NET 8.0.23 and later. Earlier connector versions require the
MySQL.Data.EntityFrameworkCore.Extensions namespace.
477

Connector/NET API Reference
using MySQL.EntityFrameworkCore.Extensions;
When using the fluent API approach, the EF Core model remains unchanged. Fluent API overrides any
rule set by an attribute.
public class ComplexKey
{
public string Key1 { get; set; }
public string Key2 { get; set; }
public string CollationColumn { get; set; }
}
In this example, the entity and various entity properties are reconfigured, including the conventional
mappings to character sets and collations. This approach uses the ForMySQLHasCharset and
ForMySQLHasCollation methods.
public class MyContext : DbContext
{
public DbSet<ComplexKey> ComplexKeys { get; set; }
protected override void OnModelCreating(ModelBuilder modelBuilder)
{
modelBuilder.Entity<ComplexKey>(e =>
{
e.HasKey(p => new { p.Key1, p.Key2 });
e.ForMySQLHasCollation("ascii_bin"); // defining collation at Entity level
e.Property(p => p.Key1).ForMySQLHasCharset("latin1"); // defining charset in a property
e.Property(p => p.CollationColumnFA).ForMySQLHasCollation("utf8_bin"); // defining collation in a property
});
}
}
4.8 Connector/NET API Reference
This chapter provides a high-level reference to the ADO.NET and .NET Core components that are
implemented in the most recent version of Connector/NET. For a complete API listing, visit MySQL
Documentation to locate the Connector/NET 8.0 API reference guide that is generated from embedded
documentation.
4.8.1 MySql.Data.Common.DnsClient
Enumerations
Enumeration Description
OPCode DNS Record OpCode. A four bit field that specifies
kind of query in this message. This value is set
by the originator of a query and copied into the
response.
4.8.2 MySql.Data.MySqlClient Namespace
Classes
Class Description
AuthenticationPluginConfigurationElementRetrieves the authentication plugin configuration
from the configuration file.
478

MySql.Data.MySqlClient Namespace
Class Description
BaseCommandInterceptor Provides a means of enhancing or replacing SQL
commands through the connection string rather than
recompiling.
BaseTableCache Provides a base class used for the table cache.
CharacterSet Specifies a character set.
GenericConfigurationElementCollection<T>Retrieves an element collection from the
configuration file.
InterceptorConfigurationElement Class used in the configuration file to get
configuration details for interceptors.
MySqlAttribute Represents a query attribute to a MySqlCommand.
MySqlAttributeCollection Represents a collection of query attributes relevant
to a MySqlCommand.
MySqlBaseConnectionStringBuilder Abstract class that provides common functionality
for connection options that apply for all protocols.
MySqlBulkLoader Load many rows into the database.
MySqlClientFactory Represents the DBProviderFactory
implementation for MySqlClient.
MySqlClientPermission Derived from the .NET DBDataPermission class.
For usage information, see Section 4.5.7, “Working
with Partial Trust / Medium Trust”.
MySqlClientPermissionAttribute Associates a security action with a custom security
attribute.
MySqlCommand Represents an SQL statement to execute against a
MySQL database. This class cannot be inherited.
MySqlCommandBuilder Automatically generates single-table commands
used to reconcile changes made to a data set with
the associated MySQL database. This class cannot
be inherited.
MySqlConfiguration Defines a configuration section that contains the
information specific to MySQL.
MySqlConnection Represents an open connection to a MySQL Server
database. This class cannot be inherited.
MySqlConnectionStringBuilder Defines all of the connection string options that can
be used.
MySqlDataAdapter Represents a set of data commands and a database
connection that are used to fill a data set and update
a MySQL database. This class cannot be inherited.
MySqlDataReader Provides a means of reading a forward-only stream
of rows from a MySQL database. This class cannot
be inherited.
MySqlError Collection of error codes that can be returned by the
server
MySqlException The exception that is thrown when MySQL returns
an error. This class cannot be inherited.
479

MySql.Data.MySqlClient Namespace
Class Description
MySqlHelper Helper class that makes it easier to work with the
provider.
MySqlInfoMessageEventArgs Provides data for the InfoMessage event. This
class cannot be inherited.
MySqlParameter Represents a parameter to a
MySql.Data.MySqlClient.MySqlCommand, and
optionally, its mapping to columns in a dataset. This
class cannot be inherited.
MySqlParameterCollection Represents a collection of parameters relevant to a
MySql.Data.MySqlClient.MySqlCommand as
well as their respective mappings to columns in a
dataset. This class cannot be inherited.
MySqlRowUpdatedEventArgs Provides data for the RowUpdated event. This class
cannot be inherited.
MySqlRowUpdatingEventArgs Provides data for the RowUpdating event. This
class cannot be inherited.
MySqlSchemaCollection Contains information about a schema.
MySqlSchemaRow Represents a row within a schema.
MySqlScript Provides a class capable of executing an SQL
script containing multiple SQL statements including
CREATE PROCEDURE statements that require
changing the delimiter.
MySqlScriptErrorEventArgs Provides an error event argument used in
MySqlScript.
MySqlScriptEventArgs Provides an event argument used in MySqlScript.
MySqlSecurityPermission Creates permission sets.
MySqlTrace Logs events in a defined listener.
MySqlTransaction Represents an SQL transaction to be made in a
MySQL database. This class cannot be inherited.
ReplicationConfigurationElement Defines a replication configuration element in the
configuration file.
ReplicationServerConfigurationElement Defines a replication server in the configuration file.
ReplicationServerGroupConfigurationElementDefines a replication server group in the
configuration file
SchemaColumn Represents a column object within a schema.
Delegates
Delegate Description
FidoActionCallback Represents the method to handle the
FidoActionRequested event of a
MySqlConnection.
MySqlInfoMessageEventHandler Represents the method to handle the
InfoMessage event of a MySqlConnection.
480

MySql.Data.MySqlClient.Authentication Namespace
Delegate Description
MySqlRowUpdatedEventHandler Represents the method to handle the
RowUpdatedevent of a MySqlDataAdapter.
MySqlRowUpdatingEventHandler Represents the method to handle the
RowUpdatingevent of a MySqlDataAdapter.
MySqlScriptErrorEventHandler Represents the method to handle an error in
MySqlScript.
MySqlStatementExecutedEventHandler Represents the method to be called after the
execution of a statement in MySqlScript.
Enumerations
Enumeration Description
CloseNotification The warnings that cause a connection to close.
CompressionAlgorithms Defines the compression algorithms that can be
used.
CompressionType Defines the type of compression used when data is
exchanged between client and server.
KerberosAuthMode Defines the different modes that can be used for
Kerberos authentication.
LockContention Defines waiting options that may be used with row
locking options.
MySqlAuthenticationMode Specifies the authentication mechanism that should
be used.
MySqlBulkLoaderConflictOption Defines the action to perform when a conflict is
found.
MySqlBulkLoaderPriority Defines the load priority.
MySqlCertificateStoreLocation Defines the certificate store location.
MySqlConnectionProtocol Specifies the type of connection to use.
MySqlDbType Specifies the MySQL data type
of a field or property for use in a
MySql.Data.MySqlClient.MySqlParameter.
MySqlDriverType Specifies the connection types that are supported.
MySqlErrorCode Provides a reference to error codes returned by
MySQL.
MySQLGuidFormat Specifies the stored type for a MySQL GUID data
type.
MySqlSslMode Provides the SSL options for a connection.
MySqlTraceEventType Defines the log event type in MySqlTrace.
UsageAdvisorWarningFlags Defines the usage advisor warning type.
4.8.3 MySql.Data.MySqlClient.Authentication Namespace
481

MySql.Data.MySqlClient.Interceptors Namespace
Classes
Class Description
MySqlAuthenticationPlugin Abstract class used to define an authentication
plugin.
MySqlClearPasswordPlugin Allows connections to a user account set with the
mysql_clear_password authentication plugin.
MySqlNativePasswordPlugin Implements the mysql_native_password
authentication plugin.
MySqlPemReader Provides functionality to read, decode, and convert
PEM files into objects supported in .NET.
4.8.4 MySql.Data.MySqlClient.Interceptors Namespace
Classes
Class Description
BaseExceptionInterceptor Represents the base class for all user-defined
exception interceptors.
4.8.5 MySql.Data.MySqlClient.Replication Namespace
The MySql.Data.MySqlClient.Replication namespace contains members for replication and load-
balancing components.
Classes
Class Description
ReplicationRoundRobinServerGroup Class that implements round-robin load balancing.
ReplicationServer Represents a server in the replication environment.
ReplicationServerGroup Base class used to implement load-balancing
features.
4.8.6 MySql.Data.Types Namespace
The MySql.Data.Types namespace contains members for converting MySQL types.
Classes
Class Description
MySqlConversionException Represents exceptions returned during the
conversion of MySQL types.
Structures
Structure Description
MySqlDateTime Defines operations that apply to MySqlDateTime
objects.
482

MySql.Data.EntityFramework Namespace
Structure Description
MySqlDecimal Defines operations that apply to MySqlDecimal
objects.
MySqlGeometry Defines operations that apply to MySqlGeometry
objects.
4.8.7 MySql.Data.EntityFramework Namespace
Classes
Class Description
BackoffAlgorithm Represents the base class for backoff algorithms.
BackoffAlgorithmErr1040 Backoff algorithm customized for the MySQL error
code 1040 - Too many connections.
BackoffAlgorithmErr1205 Backoff algorithm customized for the MySQL
error code 1205 - Lock wait timeout exceeded; try
restarting transaction.
BackoffAlgorithmErr1213 Backoff algorithm customized for MySQL error code
1213 - Deadlock found when trying to get lock; try
restarting transaction.
BackoffAlgorithmErr1614 Backoff algorithm for the MySQL error code 1614 -
Transaction branch was rolled back: deadlock was
detected.
BackoffAlgorithmErr2006 Backoff algorithm customized for MySQL error code
2006 - MySQL server has gone away.
BackoffAlgorithmErr2013 Backoff algorithm customized for MySQL error code
2013 - Lost connection to MySQL server during
query.
BackoffAlgorithmNdb Backoff algorithm customized for MySQL Cluster
(NDB) errors.
MySqlConnectionFactory Used for creating connections in Code First 4.3.
MySqlDependencyResolver Class used to resolve implementation of services.
MySqlEFConfiguration Class used to define the MySQL services used in
Entity Framework.
MySqlExecutionStrategy Provided an execution strategy tailored for handling
MySQL server transient errors.
MySqlHistoryContext Class used by code first migrations to read and write
migration history from the database.
MySqlLogger Provides the logger class for use with Entity
Framework.
MySqlManifestTokenResolver Represents a service for getting a provider manifest
token given a connection.
MySqlMigrationCodeGenerator Class used to customized code generation to avoid
the dbo. prefix added on table names.
MySqlMigrationSqlGenerator Implements the MySQL SQL generator for EF 4.3
data migrations.
483

Microsoft.EntityFrameworkCore Namespace
Class Description
MySqlModelCacheKey Represents a key value that uniquely identifies an
Entity Framework model that has been loaded into
memory.
MySqlProviderFactoryResolver Represents a service for obtaining the correct
MySQL DbProviderFactory from a connection.
MySqlProviderInvariantName Defines the MySQL provider name.
Enumerations
Enumeration Description
OpType Represents a set of database operations.
4.8.8 Microsoft.EntityFrameworkCore Namespace
Enables access to .NET Core command-line interface (CLI) tools.
Classes
Class Description
MySQLDbContextOptionsExtensions Represents the context-option extensions
implemented for MySQL.
4.8.9 MySql.EntityFrameworkCore Namespace
Namespaces in this section:
• MySql.EntityFrameworkCore.DataAnnotations Namespace
• MySQL.EntityFrameworkCore.Diagnostics Namespace
• MySql.EntityFrameworkCore.Extensions Namespace
• MySql.EntityFrameworkCore.Infrastructure Namespace
• MySql.EntityFrameworkCore.Infrastructure.Internal Namespace
• MySql.EntityFrameworkCore.Metadata Namespace
• MySql.EntityFrameworkCore.Migrations.Operations Namespace
• MySql.EntityFrameworkCore.Query Namespace
MySql.EntityFrameworkCore.DataAnnotations Namespace
Classes
Class Description
MySqlCharsetAttribute Establishes the character set of an entity property.
MySqlCollationAttribute Sets the collation in an entity property.
MySQL.EntityFrameworkCore.Diagnostics Namespace
484

MySql.EntityFrameworkCore Namespace
Classes
Class Description
MySQLEventId Event IDs for MySQL events that correspond to
messages logged to an ILogger and events
sent to a DiagnosticSource. The IDs are also
used with WarningsConfigurationBuilder to
configure the behavior of warnings.
MySql.EntityFrameworkCore.Extensions Namespace
Classes
Class Description
MySQLDatabaseFacadeExtensions MySQL specific extension methods for
Database().
MySQLDbFunctionsExtensions Provides CLR methods that get translated to
database functions when used in LINQ to Entities
queries. The methods on this class are accessed via
Functions().
MySQLEntityTypeExtensions MySQL specific extension methods for entity types.
MySqlIndexBuilderExtensions Inheritance
MySQLIndexExtensions Extension methods for IIndex for SQL Server-
specific metadata.
MySQLKeyBuilderExtensions Inheritance
MySQLKeyExtensions Extension methods for IKey for MySQL-specific
metadata.
MySQLMigrationBuilderExtensions MySQL specific extension methods for
MigrationBuilder.
MySQLModelBuilderExtensions Inheritance
MySQLPropertyBuilderExtensions Represents the implementation of MySQL property-
builder extensions used in Fluent API.
MySQLPropertyExtensions Extension methods for IProperty for MySQL
Server-specific metadata.
MySQLServiceCollectionExtensions MySQL extension class for IServiceCollection.
Enumerations
Enumeration Description
MySQLMatchSearchMode Performs a search against a text collection.
MySql.EntityFrameworkCore.Infrastructure Namespace
Classes
Class Description
MySQLDbContextOptionsBuilder Represents the
RelationalDbContextOptionsBuilder type
implemented for MySQL.
485

MySql.EntityFrameworkCore Namespace
Delegates
Delegate Description
MySQLSchemaNameTranslator Translates the specified schema and object to an
output object name whenever a schema is being
used.
Enumerations
Enumeration Description
MySqlSchemaBehavior Represents the behavior of the schema.
MySql.EntityFrameworkCore.Infrastructure.Internal Namespace
Classes
Class Description
MySQLOptionsExtension Represents the RelationalOptionsExtension
type implemented for MySQL.
Interfaces
Interface Description
IMySQLOptions Represents options to set on the provider.
MySql.EntityFrameworkCore.Metadata Namespace
Enumerations
Enumeration Description
MySQLValueGenerationStrategy An internal enumeration that supports the Entity
Framework Core infrastructure.
MySql.EntityFrameworkCore.Migrations.Operations Namespace
Classes
Class Description
MySQLDropPrimaryKeyAndRecreateForeignKeysOperationA migration operation for dropping a primary key
and recreating foreign keys.
MySQLDropUniqueConstraintAndRecreateForeignKeysOperationA migration operation for dropping a unique
constraint and recreating foreign keys.
MySql.EntityFrameworkCore.Query Namespace
Classes
Class Description
MySQLJsonString Represents a string that contains valid JSON data.
To mark a string as containing JSON data, just cast
the string to MySQLJsonString.
486

MySql.Web Namespace
4.8.10 MySql.Web Namespace
The MySql.Web namespace includes a set of subordinate namespaces that represent the features
managed by various MySQL providers and available for use within ASP.NET applications.
Namespaces in this section:
• MySql.Web.Common Namespace
• MySql.Web.Personalization Namespace
• MySql.Web.Profile Namespace
• MySql.Web.Security Namespace
• MySql.Web.SessionState Namespace
• MySql.Web.SiteMap Namespace
MySql.Web.Common Namespace
Classes
Class Description
SchemaManager Manages schema-related operations.
MySql.Web.Personalization Namespace
Classes
Class Description
MySqlPersonalizationProvider Implements a personalization provider enabling the
use of web parts at ASP.NET websites.
MySql.Web.Profile Namespace
Classes
Class Description
MySQLProfileProvider Implements a profile provider for the MySQL
database.
MySql.Web.Security Namespace
Classes
Class Description
MySQLMembershipProvider Manages storage of membership information for an
ASP.NET application in a MySQL database.
MySQLRoleProvider Manages storage of role membership information for
an ASP.NET application in a MySQL database.
487

Connector/NET Support
Class Description
MySqlSimpleMembershipProvider Provides support for website membership tasks,
such as creating accounts, deleting accounts, and
managing passwords.
MySqlSimpleRoleProvider Provides basic role-management functionality.
MySqlWebSecurity Provides security and authentication features for
ASP.NET Web Pages applications, including the
ability to create user accounts, log users in and out,
reset or change passwords, and perform related
tasks.
MySql.Web.SessionState Namespace
Classes
Class Description
MySqlSessionStateStore Enables ASP.NET applications to store and manage
session state information in a MySQL database.
Expired session data is periodically deleted from the
database.
MySql.Web.SiteMap Namespace
Classes
Class Description
MySqlSiteMapProvider Implements a site-map provider for the MySQL
database.
4.9 Connector/NET Support
The developers of MySQL Connector/NET greatly value the input of our users in the software development
process. If you find Connector/NET lacking some feature important to you, or if you discover a bug and
need to file a bug report, please use the instructions in How to Report Bugs or Problems.
4.9.1 Connector/NET Community Support
• Community support for MySQL Connector/NET can be found through the forums at http://
forums.mysql.com.
• Paid support is available from Oracle. Additional information is available at http://dev.mysql.com/
support/.
4.9.2 How to Report Connector/NET Problems or Bugs
If you encounter difficulties or problems with MySQL Connector/NET, contact the Connector/NET
community, as explained in Section 4.9.1, “Connector/NET Community Support”.
First try to execute the same SQL statements and commands from the mysql client program. This helps
you determine whether the error is in Connector/NET or MySQL.
If reporting a problem, ideally include the following information with the email:
488

How to Report Connector/NET Problems or Bugs
• Operating system and version.
• Connector/NET version.
• MySQL server version.
• Copies of error messages or other unexpected output.
• Simple reproducible sample.
Remember that the more information you can supply to us, the more likely it is that we can fix the problem.
If you believe the problem to be a bug, then you must report the bug through http://bugs.mysql.com/.
489

490

Chapter 5 MySQL Connector/ODBC Developer Guide
Table of Contents
5.1 Introduction to MySQL Connector/ODBC ................................................................................... 492
5.2 Connector/ODBC Versions ........................................................................................................ 493
5.3 General Information About ODBC and Connector/ODBC ............................................................ 493
5.3.1 Connector/ODBC Architecture ........................................................................................ 493
5.3.2 ODBC Driver Managers ................................................................................................. 495
5.4 Connector/ODBC Installation ..................................................................................................... 496
5.4.1 Installing Connector/ODBC on Windows .......................................................................... 497
5.4.2 Installing Connector/ODBC on Unix-like Systems ............................................................. 499
5.4.3 Installing Connector/ODBC on macOS ............................................................................ 502
5.4.4 Building Connector/ODBC from a Source Distribution on Windows ................................... 503
5.4.5 Building Connector/ODBC from a Source Distribution on Unix .......................................... 504
5.4.6 Building Connector/ODBC from a Source Distribution on macOS ...................................... 507
5.4.7 Installing Connector/ODBC from the Development Source Tree ........................................ 507
5.5 Configuring Connector/ODBC .................................................................................................... 507
5.5.1 Overview of Connector/ODBC Data Source Names ......................................................... 507
5.5.2 Connector/ODBC Connection Parameters ....................................................................... 508
5.5.3 Configuring a Connector/ODBC DSN on Windows ........................................................... 518
5.5.4 Configuring a Connector/ODBC DSN on macOS ............................................................. 523
5.5.5 Configuring a Connector/ODBC DSN on Unix ................................................................. 526
5.5.6 Connecting Without a Predefined DSN ........................................................................... 526
5.5.7 ODBC Connection Pooling ............................................................................................. 527
5.5.8 OpenTelemetry Tracing Support ..................................................................................... 527
5.5.9 Authentication Options ................................................................................................... 528
5.5.10 Getting an ODBC Trace File ......................................................................................... 529
5.6 Connector/ODBC Examples ...................................................................................................... 531
5.6.1 Basic Connector/ODBC Application Steps ....................................................................... 531
5.6.2 Step-by-step Guide to Connecting to a MySQL Database through Connector/ODBC .......... 532
5.6.3 Connector/ODBC and Third-Party ODBC Tools ............................................................... 533
5.6.4 Using Connector/ODBC with Microsoft Access ................................................................ 534
5.6.5 Using Connector/ODBC with Microsoft Word or Excel ...................................................... 545
5.6.6 Using Connector/ODBC with Crystal Reports .................................................................. 547
5.6.7 Connector/ODBC Programming ...................................................................................... 553
5.7 Connector/ODBC Reference ...................................................................................................... 560
5.7.1 Connector/ODBC API Reference .................................................................................... 560
5.7.2 Connector/ODBC Data Types ......................................................................................... 564
5.7.3 Connector/ODBC Error Codes ........................................................................................ 565
5.8 Connector/ODBC Notes and Tips .............................................................................................. 566
5.8.1 Connector/ODBC General Functionality ........................................................................... 566
5.8.2 Connector/ODBC Application-Specific Tips ...................................................................... 568
5.8.3 Connector/ODBC and the Application Both Use OpenSSL ............................................... 573
5.8.4 Connector/ODBC Errors and Resolutions (FAQ) .............................................................. 573
5.9 Connector/ODBC Support ......................................................................................................... 578
5.9.1 Connector/ODBC Community Support ............................................................................. 578
5.9.2 How to Report Connector/ODBC Problems or Bugs ......................................................... 579
5.9.3 Connector/ODBC Version History ................................................................................... 579
MySQL Connector/ODBC is the driver that enables ODBC applications to communicate with MySQL
servers.
491

Introduction to MySQL Connector/ODBC
For notes detailing the changes in each release of Connector/ODBC, see MySQL Connector/ODBC
Release Notes.
For legal information, see the Legal Notices.
For help with using MySQL, please visit the MySQL Forums, where you can discuss your issues with other
MySQL users.
Licensing information. This product may include third-party software, used under license. If you are
using a Commercial release of MySQL Connector/ODBC, see this document for licensing information,
including licensing information relating to third-party software that may be included in this Commercial
release. If you are using a Community release of MySQL Connector/ODBC, see this document for
licensing information, including licensing information relating to third-party software that may be included in
this Community release.
5.1 Introduction to MySQL Connector/ODBC
The MySQL Connector/ODBC is the name for the family of MySQL ODBC drivers (previously called
MyODBC drivers) that provide access to a MySQL database using the industry standard Open Database
Connectivity (ODBC) API. This reference covers Connector/ODBC 9.0, which includes the functionality of
the Unicode driver and the ANSI driver.
MySQL Connector/ODBC provides both driver-manager based and native interfaces to the MySQL
database, with full support for MySQL functionality, including stored procedures, transactions and full
Unicode compliance.
For more information on the ODBC API standard and how to use it, refer to http://support.microsoft.com/
kb/110093.
The application development section of the ODBC API reference assumes a good working knowledge of
C, general DBMS, and a familiarity with MySQL. For more information about MySQL functionality and its
syntax, refer to https://dev.mysql.com/doc/.
Typically, you need to install Connector/ODBC only on Windows machines. For Unix and macOS, you
can use the native MySQL network or named pipes to communicate with your MySQL database. You may
need Connector/ODBC for Unix or macOS if you have an application that requires an ODBC interface to
communicate with the database. Applications that require ODBC to communicate with MySQL include
ColdFusion, Microsoft Office, and Filemaker Pro.
For notes detailing the changes in each release of Connector/ODBC, see MySQL Connector/ODBC
Release Notes.
Key Connector/ODBC topics include:
• Installing Connector/ODBC: Section 5.4, “Connector/ODBC Installation”.
• The configuration options: Section 5.5.2, “Connector/ODBC Connection Parameters”.
• An example that connects to a MySQL database from a Windows host: Section 5.6.2, “Step-by-step
Guide to Connecting to a MySQL Database through Connector/ODBC”.
• An example that uses Microsoft Access as an interface to a MySQL database: Section 5.6.4, “Using
Connector/ODBC with Microsoft Access”.
• General tips and notes, including how to obtain the last auto-increment ID: Section 5.8.1, “Connector/
ODBC General Functionality”.
492

Connector/ODBC Versions
• Application-specific usage tips and notes: Section 5.8.2, “Connector/ODBC Application-Specific Tips”.
• A FAQ (Frequently Asked Questions) list: Section 5.8.4, “Connector/ODBC Errors and Resolutions
(FAQ)”.
• Additional Connector/ODBC support options: Section 5.9, “Connector/ODBC Support”.
5.2 Connector/ODBC Versions
The latest version of Connector/ODBC supports all active MySQL Server versions, which today includes
MySQL Server 8.0 and higher. As an example, use Connector/ODBC 9.0.0 with MySQL Server 8.0, 8.4,
and 9.0.
Information about each Connector/ODBC version; for release notes, see the Connector/ODBC release
notes.
Information about major changes per Connector/ODBC series is described at Section 5.9.3, “Connector/
ODBC Version History”.
5.3 General Information About ODBC and Connector/ODBC
ODBC (Open Database Connectivity) provides a way for client programs to access a wide range of
databases or data sources. ODBC is a standardized API that enables connections to SQL database
servers. It was developed according to the specifications of the SQL Access Group and defines a set of
function calls, error codes, and data types that can be used to develop database-independent applications.
ODBC usually is used when database independence or simultaneous access to different data sources is
required.
For more information about ODBC, refer to http://support.microsoft.com/kb/110093.
Open Database Connectivity (ODBC) is a widely accepted application-programming interface (API) for
database access. It is based on the Call-Level Interface (CLI) specifications from X/Open and ISO/IEC for
database APIs and uses Structured Query Language (SQL) as its database access language.
A survey of ODBC functions supported by Connector/ODBC is given at Section 5.7.1, “Connector/ODBC
API Reference”. For general information about ODBC, see http://support.microsoft.com/kb/110093.
5.3.1 Connector/ODBC Architecture
The Connector/ODBC architecture is based on five components, as shown in the following diagram:
493
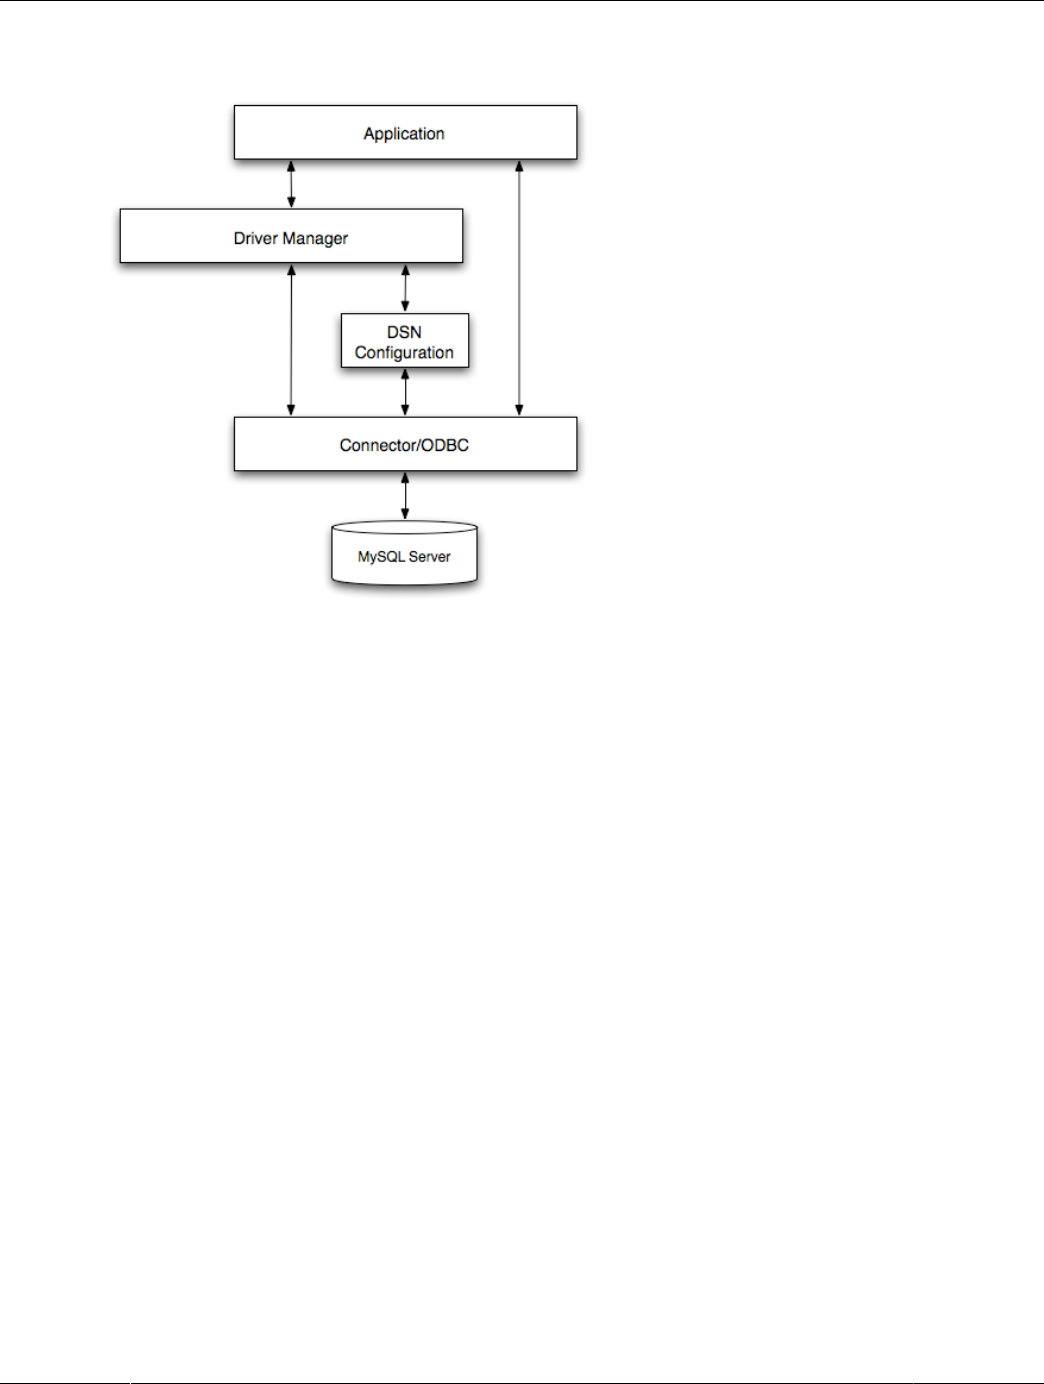
Connector/ODBC Architecture
Figure 5.1 Connector/ODBC Architecture Components
• Application:
The Application uses the ODBC API to access the data from the MySQL server. The ODBC API in turn
communicates with the Driver Manager. The Application communicates with the Driver Manager using
the standard ODBC calls. The Application does not care where the data is stored, how it is stored, or
even how the system is configured to access the data. It needs to know only the Data Source Name
(DSN).
A number of tasks are common to all applications, no matter how they use ODBC. These tasks are:
• Selecting the MySQL server and connecting to it.
• Submitting SQL statements for execution.
• Retrieving results (if any).
• Processing errors.
• Committing or rolling back the transaction enclosing the SQL statement.
• Disconnecting from the MySQL server.
Because most data access work is done with SQL, the primary tasks for applications that use ODBC are
submitting SQL statements and retrieving any results generated by those statements.
• Driver manager:
The Driver Manager is a library that manages communication between application and driver or drivers.
It performs the following tasks:
494

ODBC Driver Managers
• Resolves Data Source Names (DSN). The DSN is a configuration string that identifies a given
database driver, database, database host and optionally authentication information that enables an
ODBC application to connect to a database using a standardized reference.
Because the database connectivity information is identified by the DSN, any ODBC-compliant
application can connect to the data source using the same DSN reference. This eliminates the need to
separately configure each application that needs access to a given database; instead you instruct the
application to use a pre-configured DSN.
• Loading and unloading of the driver required to access a specific database as defined within the
DSN. For example, if you have configured a DSN that connects to a MySQL database then the driver
manager will load the Connector/ODBC driver to enable the ODBC API to communicate with the
MySQL host.
• Processes ODBC function calls or passes them to the driver for processing.
• Connector/ODBC Driver:
The Connector/ODBC driver is a library that implements the functions supported by the ODBC API. It
processes ODBC function calls, submits SQL requests to MySQL server, and returns results back to
the application. If necessary, the driver modifies an application's request so that the request conforms to
syntax supported by MySQL.
• DSN Configuration:
The ODBC configuration file stores the driver and database information required to connect to the
server. It is used by the Driver Manager to determine which driver to be loaded according to the
definition in the DSN. The driver uses this to read connection parameters based on the DSN specified.
For more information, Section 5.5, “Configuring Connector/ODBC”.
• MySQL Server:
The MySQL database where the information is stored. The database is used as the source of the data
(during queries) and the destination for data (during inserts and updates).
5.3.2 ODBC Driver Managers
An ODBC Driver Manager is a library that manages communication between the ODBC-aware application
and any drivers. Its main functionality includes:
• Resolving Data Source Names (DSN).
• Driver loading and unloading.
• Processing ODBC function calls or passing them to the driver.
Most ODBC Driver Manager implementations also include an administration application that makes the
configuration of DSN and drivers easier. Examples and information on ODBC Driver Managers for different
operating systems are listed below:
• Windows: Microsoft Windows ODBC Driver Manager (odbc32.dll). It is included in the Windows
operating system. See http://support.microsoft.com/kb/110093 for more information.
• macOS: ODBC Administrator is a GUI application for macOS. It provides a simplified configuration
mechanism for the iODBC Driver Manager. You can configure DSN and driver information either through
ODBC Administrator or through the iODBC configuration files. This also means that you can test ODBC
495

Connector/ODBC Installation
Administrator configurations using the iodbctest command. See http://support.apple.com/kb/DL895
for more information.
• Unix:
• unixODBC Driver Manager for Unix (libodbc.so). See http://www.unixodbc.org, for more
information.
• iODBC Driver Manager for Unix (libiodbc.so). See http://www.iodbc.org, for more information.
5.4 Connector/ODBC Installation
This section explains where to download Connector/ODBC, and how to run the installer, copy the files
manually, or build from source.
Where to Get Connector/ODBC
You can get a copy of the latest version of Connector/ODBC binaries and sources from our website at
https://dev.mysql.com/downloads//connector/odbc/.
Choosing Binary or Source Installation Method
You can install the Connector/ODBC drivers using two different methods:
• The binary installation is the easiest and most straightforward method of installation. You receive all
the necessary libraries and other files pre-built, with an installer program or batch script to perform all
necessary copying and configuration.
• The source installation method is intended for platforms where a binary installation package is not
available, or in situations where you want to customize or modify the installation process or Connector/
ODBC drivers before installation.
If a binary distribution is not available for a particular platform, and you build the driver from the original
source code.
Connector/ODBC binary distributions include an INFO_BIN file that describes the environment and
configuration options used to build the distribution. If you installed Connector/ODBC from a binary
distribution and experience build-related issues on a platform, it may help to check the settings that were
used to build the distribution on that platform. Binary and source distributions include an INFO_SRC file that
provides information about the product version and the source repository from which the distribution was
produced. This information was added in Connector/ODBC 8.0.14.
Supported Platforms
Connector/ODBC can be used on all major platforms supported by MySQL according to https://
www.mysql.com/en/support/supportedplatforms/database.html. This includes Windows, most Unix-like
operation systems, and macOS.
Note
On all non-Windows platforms except macOS, the driver is built against unixODBC
and is expecting a 2-byte SQLWCHAR, not 4 bytes as iODBC is using. For this
reason, the binaries are only compatible with unixODBC; recompile the driver
against iODBC to use them together. For further information, see Section 5.3.2,
“ODBC Driver Managers”.
496

Choosing Unicode or ANSI Driver
For further instructions, consult the documentation corresponding to the platform where you are installing
and whether you are running a binary installer or building from source:
Platform Binary Installer Build from Source
Windows Installation Instructions Build Instructions
Unix/Linux Installation Instructions Build Instructions
macOS Installation Instructions
Choosing Unicode or ANSI Driver
Connector/ODBC offers the flexibility to handle data using any character set through its Unicode-enabled
driver, or the maximum raw speed for a more limited range of character sets through its ANSI driver. Both
kinds of drivers are provided in the same download package, and are both installed onto your systems
by the installation program or script that comes with the download package. Users who install Connector/
ODBC and register it to the ODBC manager manually can choose to install and register either one or both
of the drivers; the different drivers are identified by a w (for “wide characters”) for the Unicode driver and a
for the ANSI driver at the end of the library names. For example, myodbc9w.dll versus myodbc9a.dll,
or libmyodbc9w.so versus libmyodbc9a.so.
Note
Related: The previously described file names contain an "9", such as
myodbc9a.dll, which means they are for Connector/ODBC 9.x. File names with a
"5", such as myodbc5a.dll, are for Connector/ODBC 5.x.
Prerequisites
The ODBC driver is linked against the MySQL Server client library, so it inherits its dependencies for its
shared libraries. For example, the MySQL Server client library depends on C++ runtime libraries.
5.4.1 Installing Connector/ODBC on Windows
Before installing the Connector/ODBC drivers on Windows:
• Make sure your Microsoft Data Access Components (MDAC) are up to date. You can obtain the latest
version from the Microsoft Data Access and Storage website.
• Make sure the Visual C++ Redistributable for Visual Studio is installed.
• Connector/ODBC 8.0.14 or higher: VC++ Runtime 2015 or VC++ Runtime 2017
• Connector/ODBC 8.0.11 to 8.0.13: VC++ Runtime 2015
• Connector/ODBC 5.3: VC++ Runtime 2013
Use the version of the package that matches the system type of your Connector/ODBC driver: use the
64-bit version (marked by “x64” in the package's title and filename) if you are running a 64-bit driver, and
use the 32-bit version (marked by “x86” in the package's title and filename) if you are running a 32-bit
driver.
• OpenSSL is a required dependency. The MSI package bundles OpenSSL libraries used by Connector/
ODBC while the Zip Archive does not and requires that you install OpenSSL on the system.
There are different distribution types to use when installing for Windows. The software that is installed is
identical in each case, only the installation method is different.
497

Installing Connector/ODBC on Windows
• MSI: The Windows MSI Installer Package wizard installs Connector/ODBC. Download it from https://
dev.mysql.com/downloads/connector/odbc/. Configure ODBC connections using Section 5.5,
“Configuring Connector/ODBC” after the installation.
• Zip Archive: Contains DLL files that must be manually installed. See Section 5.4.1.1, “Installing the
Windows Connector/ODBC Driver Using the Zipped DLL Package” for additional details.
• Connector/ODBC 8.0 and below: MySQL Installer: The general MySQL Installer application for
Windows can install, upgrade, configure, and manage most MySQL 8.0 products, including Connector/
ODBC 8.0 and its prerequisites. Download it from http://dev.mysql.com/downloads/windows/installer/
and see the MySQL Installer documentation for additional details. This is not a Connector/ODBC specific
installer.
5.4.1.1 Installing the Windows Connector/ODBC Driver Using the Zipped DLL Package
If you have downloaded the zipped DLL package:
1. Unzip the installation files to the location you want it installed.
2. Run the included batch file to perform an installation from the current directory and registers the ODBC
driver.
3. Alternatively to the batch file, install the individual files required for Connector/ODBC operation
manually.
4. Optionally install debug related files that are bundled in a different Zip file.
To install using the batch file:
1. Unzip the Connector/ODBC zipped Connector/ODBC package to the desired installation directory. For
example, to C:\Program Files\MySQL\Connector ODBC 9.0\.
Note
Multiple Zip files are available: 32-bit and 64-bit, and (as of 8.0.31) a separate
Debug Zip file that includes PDB files and unit tests.
2. Open a command prompt (with Admin privileges) and change the location to that directory.
3. Run Install.bat to register the Connector/ODBC driver with the Windows ODBC manager for both
the ANSI and Unicode versions. Output is similar to:
cd C:\Program Files\MySQL\Connector ODBC 9.0\
Install.bat
Registering Unicode driver
Checking if "MySQL ODBC 9.0 Unicode Driver" is not already registered
Registering "MySQL ODBC 9.0 Unicode Driver"
Success: Usage count is 1
Registering ANSI driver
Checking if "MySQL ODBC 9.0 ANSI Driver" is not already registered
Registering "MySQL ODBC 9.0 ANSI Driver"
Success: Usage count is 1
Note
Install.bat assumes the default naming scheme but optionally accepts a
custom name as the first parameter. For example, "Install.bat Fun" yields "Fun
Unicode" and "Fun ANSI" as the driver names.
Optionally use myodbc-installer.exe to list the registered drivers, for example:
498

Installing Connector/ODBC on Unix-like Systems
cd C:\Program Files\MySQL\Connector ODBC 9.0\bin
myodbc-installer -d -l
SQL Server
MySQL ODBC 9.0 Unicode Driver
MySQL ODBC 9.0 ANSI Driver
Note
Changing or adding a new DSN (data source name) may be accomplished using
either the GUI, or from the command-line using myodbc-installer.exe.
Using Install.bat is optional, directly using myodbc-installer.exe is an alternative option to
register drivers. For example:
# For Unicode-enabled driver:
myodbc-installer -a -d -n "MySQL ODBC 9.0 Unicode Driver" -t "DRIVER=myodbc9w.dll;SETUP=myodbc9S.dll"
# For ANSI driver:
myodbc-installer -a -d -n "MySQL ODBC 9.0 ANSI Driver" -t "DRIVER=myodbc9a.dll;SETUP=myodbc9S.dll"
5.4.1.2 Installing the Windows Connector/ODBC Debug Packages
The associated Debug files are bundled in its own Zip file, including two lib/ directories:
• lib/: PDB files to use with regular builds; they are built in RelWithDebInfo mode.
• Debug/lib/: Debug builds built in Debug mode; includes driver, PDB files, and unit tests in test/
subdirectory.
Note
The separate debug Zip file was added in v8.0.31.
Add Debug Functionality to Regular Build
Download the debug zip and copy its lib/ contents to your driver installation directory; this adds the PDB
files generated in the RelWithDebInfo build.
Note
Regular builds are built with RelWithDebInfo so not all debugging information is
available. For example, some variables might be optimized out.
Replace Regular Build with Debug Build
Manually copy Debug/lib/ files from the Zip package into the driver installation directory to replace the
DLL and PDB files inside. No new driver registration is required.
Install an Independent Debug Build
This requires copying the plugin/ directory and dependency libraries (lib*.dll) from the regular
driver build, and optionally copying additional authentication plugins (fido2.dll, libsasl.dll, and
saslSCRAM.dll) depending on the plugins you use.
Register with the myodbc-installer command line tool from the regular driver bin/ sub-directory.
5.4.2 Installing Connector/ODBC on Unix-like Systems
There are three methods available for installing Connector/ODBC on a Unix-like system from a binary
distribution. For most Unix environments, you will use the tarball distribution. For Linux systems, RPM
distributions are available, through the MySQL Yum repository (for some platforms) or direct download.
499

Installing Connector/ODBC on Unix-like Systems
Prerequisites
• unixODBC 2.2.12 or later
• OpenSSL
• C++ runtime libraries (libstdc++)
Note
Connector/ODBC provides generic Linux packages for Intel architecture (both
32 and 64 bits). As of Connector/ODBC 8.0.32, generic Linux packages for ARM
architecture (64 bit) are also available.
5.4.2.1 Installing Connector/ODBC Using the MySQL Yum Repository
The MySQL Yum repository for Oracle Linux, Red Hat Enterprise Linux, CentOS, and Fedora provides
Connector/ODBC RPM packages using the MySQL Yum repository. You must have the MySQL Yum
repository on your system's repository list (see Adding the MySQL Yum Repository for details). Make sure
your Yum repository setup is up-to-date by running:
$> su root
$> yum update mysql-community-release
You can then install Connector/ODBC by the following command:
$> yum install mysql-connector-odbc
See Installing Additional MySQL Products and Components with Yum for more details.
5.4.2.2 Installing Connector/ODBC from a Binary Tarball Distribution
To install the driver from a tarball distribution (.tar.gz file), download the latest version of the driver for
your operating system and follow these steps, substituting the appropriate file and directory names based
on the package you download (some of the steps below might require superuser privileges):
1. Extract the archive:
$> gunzip mysql-connector-odbc-9.0.0-i686-pc-linux.tar.gz
$> tar xvf mysql-connector-odbc-9.0.0-i686-pc-linux.tar
2. The extra directory contains two subdirectories, lib and bin. Copy their contents to the proper
locations on your system (we use /usr/local/bin and /usr/local/lib in this example; replace
them with the destinations of your choice):
$> cp bin/* /usr/local/bin
$> cp lib/* /usr/local/lib
The last command copies both the Connector/ODBC ANSI and the Unicode drivers from lib into /
usr/local/lib; if you do not need both, you can just copy the one you want. See Choosing Unicode
or ANSI Driver for details.
3. Finally, register the driver version of your choice (the ANSI version, the Unicode version, or both) with
your system's ODBC manager (for example, iODBC or unixodbc) using the myodbc-installer tool
that was included in the package under the bin subdirectory (and is now under the /usr/local/bin
directory, if the last step was followed); for example, this registers the Unicode driver with the ODBC
manager:
// Registers the Unicode driver:
$> myodbc-installer -a -d -n "MySQL ODBC 9.0 Unicode Driver" -t "Driver=/usr/local/lib/libmyodbc9w.so"
500

Installing Connector/ODBC on Unix-like Systems
// Registers the ANSI driver
$> myodbc-installer -a -d -n "MySQL ODBC 9.0 ANSI Driver" -t "Driver=/usr/local/lib/libmyodbc9a.so"
4. Verify that the driver is installed and registered using the ODBC manager, or the myodbc-installer
utility:
$> myodbc-installer -d -l
Next, see Section 5.5.5, “Configuring a Connector/ODBC DSN on Unix” on how to configure a DSN for
Connector/ODBC.
5.4.2.3 Installing Connector/ODBC from a DEB Distribution
Connector/ODBC Debian packages (.deb files) are available (as of v8.0.20) for Debian or Debian-like Linux
systems from the Connector/ODBC downloads page. The two package types are:
• mysql-connector-odbc: This driver package installs MySQL ODBC driver libraries and the installer
tool. It installs these files:
${LibDir}/odbc/libmyodbc9a.so
${LibDir}/odbc/libmyodbc9w.so
${BinDir}/myodbc-installer
${DocDir}/mysql-connector-odbc/*
Prerequisites: it depends on the unixODBC libraries (libodbc, libodbcinst).
It installs and registers both the Unicode (MySQL ODBC 9.0 Unicode Driver) and ANSI (MySQL ODBC
9.0 ANSI Driver) drivers.
This driver package does not conflict with the official Debian package libmyodbc. It is possible to install/
uninstall/use both packages independently.
• mysql-connector-odbc-setup: This setup package provides the GUI configuration widget library. It
installs these files:
${LibDir}/odbc/libmyodbc9S.so
${DocDir}/mysql-connector-odbc-setup/*
The installation process registers the setup library for ODBC drivers with the ODBC manager.
The ${LibDir}, ${BinDir}, ${DocDir} locations used above should be the standard locations where DEB
packages install libraries/executables/documentation. The library location contains architecture component,
and here are example locations:
/usr/lib/x86_64-linux-gnu/odbc/libmyodbc9a.so
/usr/lib/x86_64-linux-gnu/odbc/libmyodbc9w.so
/usr/lib/x86_64-linux-gnu/odbc/libmyodbc9S.so
/usr/bin/myodbc-installer
/usr/share/doc/mysql-connector-odbc/*
/usr/share/doc/mysql-connector-odbc-setup/*
5.4.2.4 Installing Connector/ODBC from an RPM Distribution
To install or upgrade Connector/ODBC from an RPM distribution on Linux, simply download the RPM
distribution of the latest version of Connector/ODBC and follow the instructions below. Use su root to
become root, then install the RPM file.
If you are installing for the first time:
$> su root
$> rpm -ivh mysql-connector-odbc-9.0.0.i686.rpm
501

Installing Connector/ODBC on macOS
If the driver exists, upgrade it like this:
$> su root
$> rpm -Uvh mysql-connector-odbc-9.0.0.i686.rpm
If there is any dependency error for MySQL client library, libmysqlclient, simply ignore it by supplying
the --nodeps option, and then make sure the MySQL client shared library is in the path or set through
LD_LIBRARY_PATH.
This installs the driver libraries and related documents to /usr/local/lib and /usr/share/doc/
MyODBC, respectively. See Section 5.5.5, “Configuring a Connector/ODBC DSN on Unix” for the post-
installation configuration steps.
To uninstall the driver, become root and execute an rpm command:
$> su root
$> rpm -e mysql-connector-odbc
5.4.3 Installing Connector/ODBC on macOS
macOS is based on the FreeBSD operating system, and you can normally use the MySQL network port
for connecting to MySQL servers on other hosts. Installing the Connector/ODBC driver lets you connect
to MySQL databases on any platform through the ODBC interface. If your application requires an ODBC
interface, install the Connector/ODBC driver.
On macOS, the ODBC Administrator, based on the iODBC manager, provides easy administration of
ODBC drivers and configuration, allowing the updates of the underlying iODBC configuration files through
a GUI tool. The tool is included in macOS v10.5 and earlier; users of later versions of macOS need
to download it from http://www.iodbc.org/dataspace/doc/iodbc/wiki/iodbcWiki/Downloads and install it
manually.
Prerequisites
• iODBC
• OpenSSL is a required dependency. The macOS installation binaries bundle OpenSSL, while the
compressed tar archives do not and require that you install OpenSSL on your system before the
installation process.
• C++ runtime libraries (libc++)
There are two ways to install Connector/ODBC on macOS. You can use either the package provided in
a compressed tar archive that you manually install, or use a compressed disk image (.dmg) file, which
includes an installer.
To install using the compressed tar archive (some of the steps below might require superuser privileges):
1. Download the compressed tar archive.
2. Extract the archive:
$> tar xvzf mysql-connector-odbc-x.y.z-macos10.z-x86-(32|64)bit.tar.gz
3. The directory created contains two subdirectories, lib and bin. Copy these to a suitable location such
as /usr/local:
$> cp bin/* /usr/local/bin
$> cp lib/* /usr/local/lib
4. Finally, register the driver with iODBC using the myodbc-installer tool that was included in the
package:
502

Building Connector/ODBC from a Source Distribution on Windows
$> myodbc-installer -a -d -n "MySQL ODBC 9.0 Driver" -t "Driver=/usr/local/lib/libmyodbc9w.so"
To install using the a compressed disk image (.dmg) file:
Important
iODBC 3.52.12 or later must be installed on the macOS system before you can
install Connector/ODBC using a compressed disk image. See Section 5.4.3,
“Installing Connector/ODBC on macOS” [502].
1. Download the disk image.
2. Double click the disk image to open it. You see the Connector/ODBC installer inside.
3. Double click the Connector/ODBC installer, and you will be guided through the rest of the installation
process. You need superuser privileges to finish the installation.
To verify the installed drivers, either use the ODBC Administrator application or the myodbc-installer
utility:
$> myodbc-installer -d -l
5.4.4 Building Connector/ODBC from a Source Distribution on Windows
You only need to build Connector/ODBC from source on Windows to modify the source or installation
location. If you are unsure whether to install from source, please use the binary installation detailed in
Section 5.4.1, “Installing Connector/ODBC on Windows”.
Building Connector/ODBC from source on Windows requires a number of different tools and packages:
• MDAC, Microsoft Data Access SDK from https://www.microsoft.com/en-in/download/details.aspx?
id=21995.
• A suitable C++ compiler, such as Microsoft Visual C++ or the C++ compiler included with Microsoft
Visual Studio 2015 or later. Compiling Connector/ODBC 5.3 can use VS 2013.
• CMake.
• The MySQL client library and include files from MySQL 8.0 or higher for Connector/ODBC 9.0, or
MySQL 5.7 for Connector/ODBC 5.3. This is required because Connector/ODBC uses calls and
structures that do not exist in older versions of the library. To get the client library and include files, visit
https://dev.mysql.com/downloads/.
Build Steps
Set the environment variables for the Visual Studio toolchain. Visual Studio includes a batch file to set
these for you, and installs a Start menu shortcut that opens a command prompt with these variables set.
Set MYSQL_DIR to the MySQL server installation path, while using the short-style file names. For example:
C:\> set MYSQL_DIR=C:\PROGRA~1\MySQL\MYSQLS~1.0
Build Connector/ODBC using the cmake command-line tool by executing the following from the source root
directory (in a command prompt window):
C:\> cmake -G "Visual Studio 12 2013"
This produces a project file that you can open with Visual Studio, or build from the command line with
either of the following commands:
503

Building Connector/ODBC from a Source Distribution on Unix
C:\> devenv.com MySQL_Connector_ODBC.sln /build Release
While building Connector/ODBC from source, dynamic linking with the MySQL client library is selected by
default—that is, the MYSQLCLIENT_STATIC_LINKING cmake option is FALSE by default (however, the
binary distributions of Connector/ODBC from Oracle are linked statically to the client library). If you want to
link statically to the MySQL client library, set the MYSQLCLIENT_STATIC_LINKING option to TRUE, and
use the MYSQLCLIENT_LIB_NAME option to supply the client library's name for static linking:
C:\> cmake -G "Visual Studio 12 2013" -DMYSQLCLIENT_STATIC_LINKING:BOOL=TRUE \
DMYSQLCLIENT_LIB_NAME=client_lib_name_with_extension
Also use the MYSQLCLIENT_LIB_NAME option to link dynamically to a MySQL client library other than
libmysql.dll. cmake looks for the client library under the location specified by the MYSQL_LIB_DIR
option; if the option is not specified, cmake looks under the default locations inside the folder specified by
the MYSQL_DIR option.
Since Connector/ODBC 8.0.11, use BUNDLE_DEPENDENCIES to install external library runtime
dependencies, such as OpenSSL, together with the connector. For dependencies inherited from the
MySQL client library, this only works if these dependencies are bundled with the client library itself.
INFO_SRC: this file provides information about the product version and the source repository from which
the distribution was produced. Was added in Connector/ODBC 8.0.14.
Optionally link Connector/ODBC statically (equivalent to the /MT compiler option in Visual Studio) or
dynamically (equivalent to the /MD compiler option in Visual Studio) to the Visual C++ runtime. The default
option is to link dynamically; if you want to link statically, set the option STATIC_MSVCRT:BOOL=TRUE, that
is:
C:\> cmake -G "Visual Studio 12 2013" -DSTATIC_MSVCRT:BOOL=TRUE
The STATIC_MSVCRT option and the MYSQLCLIENT_STATIC_LINKING option are independent of each
other; that is, you can link Connector/ODBC dynamically to the Visual C++ runtime while linking statically to
the MySQL client library, and vice versa. However, if you link Connector/ODBC dynamically to the Visual C
++ runtime, you also need to link to a MySQL client library that is itself linked dynamically to the Visual C+
+ runtime; and similarly, linking Connector/ODBC statically to the Visual C++ runtime requires linking to a
MySQL client library that is itself linked statically to the Visual C++ runtime.
To compile a debug build, set the cmake build type so that the correct versions of the MySQL client
libraries are used; also, because the MySQL C client library built by Oracle is not built with the debug
options, when linking to it while building Connector/ODBC in debug mode, use the WITH_NODEFAULTLIB
option to tell cmake to ignore the default non-debug C++ runtime:
C:\> cmake -G "Visual Studio 14 2015" -DWITH_DEBUG=1 -DWITH_NODEFAULTLIB=libcmt
Create the debug build then with this command:
C:\> devenv.com MySQL_Connector_ODBC.sln /build Debug
Upon completion, the executables are in the bin/ and lib/ subdirectories.
See Section 5.4.1.1, “Installing the Windows Connector/ODBC Driver Using the Zipped DLL Package” on
how to complete the installation by copying the binary files to the right locations and registering Connector/
ODBC with the ODBC manager.
5.4.5 Building Connector/ODBC from a Source Distribution on Unix
You need the following tools to build MySQL from source on Unix:
504

Building Connector/ODBC from a Source Distribution on Unix
• A working ANSI C++ compiler. GCC 4.2.1 or later, Sun Studio 12.1 or later, and many current vendor-
supplied compilers are known to work.
• CMake.
• MySQL client libraries and include files. To get the client libraries and include files, visit https://
dev.mysql.com/downloads/.
• A compatible ODBC manager must be installed. Connector/ODBC is known to work with the iODBC and
unixODBC managers. See Section 5.3.2, “ODBC Driver Managers” for more information.
• If you are using a character set that is not compiled into the MySQL client library, install the MySQL
character definitions from the charsets directory into SHAREDIR (by default, /usr/local/mysql/
share/mysql/charsets). These should be in place if you have installed the MySQL server on the
same machine. See Character Sets, Collations, Unicode for more information on character set support.
Once you have all the required files, unpack the source files to a separate directory, then run cmake with
the following command:
$> cmake -G "Unix Makefiles"
Typical cmake Parameters and Options
You might need to help cmake find the MySQL headers and libraries by setting the environment variables
MYSQL_INCLUDE_DIR, MYSQL_LIB_DIR, and MYSQL_DIR to the appropriate locations; for example:
$> export MYSQL_INCLUDE_DIR=/usr/local/mysql/include
$> export MYSQL_LIB_DIR=/usr/local/mysql/lib
$> export MYSQL_DIR=/usr/local/mysql
When you run cmake, you might add options to the command line. Here are some examples:
• -DODBC_INCLUDES=dir_name: Use when the ODBC include directory is not found within the system
$PATH.
• -DODBC_LIB_DIR=dir_name: Use when the ODBC library directory is not found within the system
$PATH.
• -DWITH_UNIXODBC=1: Enables unixODBC support. iODBC is the default ODBC library used when
building Connector/ODBC from source on Linux platforms. Alternatively, unixODBC may be used by
setting this option to “1”.
• -DMYSQLCLIENT_STATIC_LINKING=boolean: Link statically to the MySQL client
library. Dynamic linking with the MySQL client library is selected by default—that is, the
MYSQLCLIENT_STATIC_LINKING cmake option is FALSE by default (however, the binary
distributions of Connector/ODBC from Oracle are linked statically to the client library). If you want to
link statically to the MySQL client library, set the option to TRUE. See also the description for the -
DMYSQLCLIENT_LIB_NAME=client_lib_name_with_extension option.
• -DBUNDLE_DEPENDENCIES=boolean: Enable to install external library runtime dependencies, such as
OpenSSL, together with the connector. For dependencies inherited from the MySQL client library, this
only works if these dependencies are bundled with the client library itself. Option added in v8.0.11.
• -DMYSQLCLIENT_LIB_NAME=client_lib_name_with_extension: Location of the MySQL client
library. See the description for MYSQLCLIENT_STATIC_LINKING. To link statically to the MySQL client
library, use this option to supply the client library's name for static linking. Also use this option If you
want to link dynamically to a MySQL client library other than libmysqlclient.so. cmake looks for the
client library under the location specified by the environment variable MYSQL_LIB_DIR; if the variable
505

Building Connector/ODBC from a Source Distribution on Unix
is not specified, cmake looks under the default locations inside the folder specified by the environment
variable MYSQL_DIR.
• -DMYSQL_CONFIG_EXECUTABLE=/path/to/mysql_config: Specifies location of the utility
mysql_config, which is used to fetch values of the variables MYSQL_INCLUDE_DIR, MYSQL_LIB_DIR,
MYSQL_LINK_FLAGS, and MYSQL_CXXFLAGS. Values fetched by mysql_config are overridden by values
provided directly to cmake as parameters.
• -DMYSQL_EXTRA_LIBRARIES=dependencies: When linking the MySQL client library
statically (-DMYSQLCLIENT_STATIC_LINKING=ON) and when setting MYSQL_LIB_DIR and
MYSQL_INCLUDE_DIR (so that the mysql_config is not used to detect settings), use this to define a
list of dependencies required by the client library.
• -DMYSQL_LINK_FLAGS=MySQL link flags
• -DMYSQL_CXXFLAGS=MySQL C++ linkage flags
• -DMYSQL_CXX_LINKAGE=1: Enables C++ linkage to MySQL client library. By default,
MYSQL_CXX_LINKAGE is enabled for MySQL 5.6.4 or later. For MySQL 5.6.3 and earlier, this option
must be set explicitly to 1.
Build Steps for Unix
To build the driver libraries, execute make:
$> make
If any errors occur, correct them and continue with the build process. If you are not able to finish the build,
see Section 5.9.1, “Connector/ODBC Community Support”.
Installing Driver Libraries
To install the driver libraries, execute the following command:
$> make install
For more information on build process, refer to the BUILD file that comes with the source distribution.
Testing Connector/ODBC on Unix
Some tests for Connector/ODBC are provided in the distribution with the libraries that you built. To run the
tests:
1. Make sure you have an odbc.ini file in place, by which you can configure your DSN entries. A
sample odbc.ini file is generated by the build process under the test folder. Set the environment
variable ODBCINI to the location of your odbc.ini file.
2. Set up a test DSN in your odbc.ini file (see Section 5.5.5, “Configuring a Connector/ODBC DSN on
Unix” for details ). A sample DSN entry, which you can use for your tests, can be found in the sample
odbc.ini file.
3. Set the environment variable TEST_DSN to the name of your test DSN.
4. Set the environment variable TEST_UID and perhaps also TEST_PASSWORD to the user name
and password for the tests, if needed. By default, the tests use “root” as the user and do not enter
a password; if you want the tests to use another user name or password, set TEST_UID and
TEST_PASSWORD accordingly.
5. Make sure that your MySQL server is running.
506

Building Connector/ODBC from a Source Distribution on macOS
6. Run the following command:
$> make test
5.4.6 Building Connector/ODBC from a Source Distribution on macOS
To build Connector/ODBC from source on macOS, follow the same instructions given for Section 5.4.5,
“Building Connector/ODBC from a Source Distribution on Unix”. Notice that iODBC is the default ODBC
library used when building Connector/ODBC on macOS from source. Alternatively, unixODBC may be
used by setting the option -DWITH_UNIXODBC=1.
5.4.7 Installing Connector/ODBC from the Development Source Tree
Caution
This section is only for users who are interested in helping us test our new code. To
just get MySQL Connector/ODBC up and running on your system, use a standard
release distribution.
The Connector/ODBC code repository uses Git. To check out the latest source code, visit GitHub: https://
github.com/mysql/mysql-connector-odbc To clone the Git repository to your machine, use this command
$> git clone https://github.com/mysql/mysql-connector-odbc.git
You should now have a copy of the entire Connector/ODBC source tree in the directory mysql-
connector-odbc. To build and then install the driver libraries from this source tree on Unix or Linux, use
the same steps outlined in Section 5.4.5, “Building Connector/ODBC from a Source Distribution on Unix”.
On Windows, make use of Windows Makefiles WIN-Makefile and WIN-Makefile_debug in building
the driver. For more information, see Section 5.4.4, “Building Connector/ODBC from a Source Distribution
on Windows”.
After the initial checkout operation to get the source tree, run git pull periodically to update your source
according to the latest version.
5.5 Configuring Connector/ODBC
Before you connect to a MySQL database using the Connector/ODBC driver, you configure an ODBC Data
Source Name (DSN). The DSN associates the various configuration parameters required to communicate
with a database to a specific name. You use the DSN in an application to communicate with the database,
rather than specifying individual parameters within the application itself. DSN information can be user-
specific, system-specific, or provided in a special file. ODBC data source names are configured in different
ways, depending on your platform and ODBC driver.
5.5.1 Overview of Connector/ODBC Data Source Names
A Data Source Name associates the configuration parameters for communicating with a specific database.
Generally, a DSN consists of the following parameters:
• Name
• Host Name
• Database Name
• Login
• Password
507

Connector/ODBC Connection Parameters
In addition, different ODBC drivers, including Connector/ODBC, may accept additional driver-specific
options and parameters.
There are three types of DSN:
• A System DSN is a global DSN definition that is available to any user and application on a particular
system. A System DSN can normally only be configured by a systems administrator, or by a user who
has specific permissions that let them create System DSNs.
• A User DSN is specific to an individual user, and can be used to store database connectivity information
that the user regularly uses.
• A File DSN uses a simple file to define the DSN configuration. File DSNs can be shared between users
and machines and are therefore more practical when installing or deploying DSN information as part of
an application across many machines.
DSN information is stored in different locations depending on your platform and environment.
5.5.2 Connector/ODBC Connection Parameters
You can specify the parameters in the following tables for Connector/ODBC when configuring a DSN:
• Table 5.1, “Connector/ODBC DSN Configuration Options”
• Table 5.3, “Connector/ODBC Option Parameters”
Users on Windows can use the ODBC Data Source Administrator to set these parameters;
see Section 5.5.3, “Configuring a Connector/ODBC DSN on Windows” on how to do that, and see
Table 5.1, “Connector/ODBC DSN Configuration Options” for information on the options and the fields
and check boxes they corrrespond to on the graphical user interface of the ODBC Data Source
Administrator. On Unix and macOS, use the parameter name and value as the keyword/value pair
in the DSN configuration. Alternatively, you can set these parameters within the InConnectionString
argument in the SQLDriverConnect() call.
Table 5.1 Connector/ODBC DSN Configuration Options
Parameter GUI Option Default Value Comment
user User ODBC The user name used to connect to MySQL.
uid User ODBC Synonymous with user. Added in 3.51.16.
server TCP/IP Server localhost The host name of the MySQL server. Can define multiple hosts if MULTI_HOST
is enabled.
database Database - The default database.
option - 0 Options that specify how Connector/ODBC works. See Table 5.3, “Connector/
ODBC Option Parameters” and Table 5.4, “Recommended Connector/ODBC
Option Values for Different Configurations”.
port Port 3306 The TCP/IP port to use if server is not localhost.
initstmt Initial Statement - Initial statement. A statement to execute when connecting to MySQL. In
version 3.51 the parameter is called stmt. The driver supports the initial
statement being executed only at the time of the initial connection.
password Password - The password for the user account on server. pwd is an alias.
password1,
password2,
password3
Password - For Multi-Factor Authentication (MFA); password1 is an alias for password.
There'as also the pwd1, pwd2, and pwd3 aliases. These were added in 8.0.28.
508

Connector/ODBC Connection Parameters
Parameter GUI Option Default Value Comment
socket - - The Unix socket file or Windows named pipe to connect to; only define socket
if server is set to localhost
ssl-ca SSL Certificate - Alias of SSLCA as an eventual replacement; added in v8.0.29.
SSLCA SSL Certificate - The path to a file with a list of trust SSL CAs.
An ssl-ca alias was added in 8.0.29, which is preferred over SSLCA.
ssl-
capath
SSL CA Path - Alias of SSLCAPATH as an eventual replacement; added in v8.0.29.
SSLCAPATHSSL CA Path - The path to a directory that contains trusted SSL CA certificates in PEM
format.
An ssl-capath alias was added in 8.0.29, which is preferred over
SSLCAPATH.
ssl-cert SSL Certificate - Alias of SSLCERT as an eventual replacement; added in v8.0.29.
SSLCERT SSL Certificate - The name of the SSL certificate file to use for establishing a secure
connection.
An ssl-cert alias was added in 8.0.29, which is preferred over SSLCERT.
ssl-
cipher
SSL Cipher - Alias of SSLCIPHER as an eventual replacement; added in v8.0.29.
SSLCIPHERSSL Cipher - The list of permissible ciphers for SSL encryption. The cipher list has the same
format as the openssl ciphers command.
An ssl-cipher alias was added in 8.0.29, which is preferred over
SSLCIPHER.
ssl-key SSL Key - Alias of SSLKEY as an eventual replacement; added in v8.0.29.
SSLKEY SSL Key - The name of the SSL key file to use for establishing a secure connection.
An ssl-key alias was added in 8.0.29, which is preferred over SSLKEY.
ssl-crl The path name of
the file containing
certificate revocation
lists in PEM format.
- Added in 8.0.31
ssl-
crlpath
The path of the
directory that contains
certificate revocation
list files in PEM format.
- Added in 8.0.31
rsakey RSA Public Key - The full-path name of the PEM file that contains the RSA public key for using
the SHA256 authentication plugin of MySQL. Added in 5.3.4.
sslverifyVerify SSL 0 If set to 1, the SSL certificate will be verified when used with the MySQL
connection. If not set, then the default behavior is to ignore SSL certificate
verification.
Note
The option is deprecated since Connector/ODBC 5.3.7.
It is preferable to use the SSLMODE option parameter
instead.
509

Connector/ODBC Connection Parameters
Parameter GUI Option Default Value Comment
authentication-
kerberos-
mode
Kerberos
implementation
SSPI Acceptable values are "SSPI" (default) or "GSSAPI". For functionality details,
see Kerberos Pluggable Authentication. The SSPI option is only supported by
Windows, whereas GSSAPI is supported by both Windows and other operating
systems. Added in Connector/ODBC 8.0.32.
OPENTELEMETRYOpenTelemetry
implementation
PREFERRED Acceptable values are PREFERRED (default) or DISABLED. For functionality
details, see Section 5.5.8, “OpenTelemetry Tracing Support”. Added in
Connector/ODBC 8.1.0.
MULTI_HOSTWhether to enable
multiple host
functionality
0 Enable new connections to try multiple hosts until a successful connection is
established. A list of hosts is defined with SERVER in the connection string.
For example, SERVER=address1[:port1],address2[:port2];MULTI_HOST=1 --
option added in 8.0.19.
ENABLE_DNS_SRVWhether to use DNS
+SRV usage in the
DSN
0 If set to 1, enables DNS+SRV usage in the DSN; the host
is passed for SRV lookup without a port and with a full
lookup name. Example usage: DRIVER={MySQL ODBC 9.0
Driver};SERVER=_mysql._tcp.foo.abc.com;ENABLE_DNS_SRV=1;USER=user;PWD=passwd;
-- option added in Connector/ODBC 8.0.19.
charset Character Set - The character set to use for the connection. Added in 3.51.17. Note: executing
SET NAMES is not allowed as of 5.1. This option is deprecated for the
Unicode driver as of 9.0.0.
readtimeout- - The timeout in seconds for attempts to read from the server. Each attempt
uses this timeout value and there are retries if necessary, so the total
effective timeout value is three times the option value. You can set the
value so that a lost connection can be detected earlier than the TCP/IP
Close_Wait_Timeout value of 10 minutes. This option works only for TCP/
IP connections, and only for Windows prior to MySQL 5.1.12. Corresponds to
the MYSQL_OPT_READ_TIMEOUT option of the MySQL Client Library. Added in
3.51.27.
writetimeout- - The timeout in seconds for attempts to write to the server. Each attempt uses
this timeout value and there are net_retry_count retries if necessary, so
the total effective timeout value is net_retry_count times the option value.
This option works only for TCP/IP connections, and only for Windows prior to
MySQL 5.1.12. Corresponds to the MYSQL_OPT_WRITE_TIMEOUT option of
the MySQL Client Library. Added in 3.51.27.
interactiveInteractive Client 0 If set to 1, the CLIENT_INTERACTIVE connection option of mysql-real-
connect() is enabled. Added in 5.1.7.
OCI_CONFIG_FILEOracle Clound
Infastructure
configuration file path
~/.oci/config on
Linux and macOS,
and %HOMEDRIVE%
%HOMEPATH%\.oci
\config on Windows.
Used by the authentication_oci_client plugin for the Oracle Cloud Infrastructure
(OCI) to support ephemeral key pairs and security tokens. The default profile
is DEFAULT and can be configured using OCI_CONFIG_PROFILE. Option
added in Connector/ODBC 8.0.27.
OCI_CONFIG_PROFILEOracle Clound
Infastructure
configuration profile
name
DEFAULT Defaults to DEFAULT, optionally specify a specific profile as defined in
OCI_CONFIG_FILE. Option added in Connector/ODBC 8.0.33.
prefetch Prefetch from server by
_ rows at a time
0 When set to a non-zero value N, causes all queries in the connection to return
N rows at a time rather than the entire result set. Useful for queries against
very large tables where it is not practical to retrieve the whole result set at
once. You can scroll through the result set, N records at a time.
510

Connector/ODBC Connection Parameters
Parameter GUI Option Default Value Comment
This option works only with forward-only cursors. It does not work when the
option parameter MULTI_STATEMENTS is set. It can be used in combination
with the option parameter NO_CACHE. Its behavior in ADO applications is
undefined: the prefetching might or might not occur. Added in 5.1.11.
no_ssps - 0 In Connector/ODBC 5.2 and after, by default, server-side prepared statements
are used. When this option is set to a non-zero value, prepared statements
are emulated on the client side, which is the same behavior as in 5.1 and 3.51.
Added in 5.2.0.
can_handle_exp_pwdCan Handle Expired
Password
0 Indicates that the application can deal with an expired password, which
is signalled by an SQL state of 08004 (“Server rejected the connection”)
and a native error code ER_MUST_CHANGE_PASSWORD_LOGIN (1862).
The connection is “sandboxed”, and can do nothing other than issue a SET
PASSWORD statement. To establish a connection in this case, your application
must either use the initstmt connection option to set a new password at the
start, or issue a SET PASSWORD statement immediately after connecting. Once
the expired password is reset, the restrictions on the connection are lifted. See
ALTER USER Statement for details about password expiration for MySQL
server accounts. Added in 5.2.4.
ENABLE_CLEARTEXT_PLUGINEnable Cleartext
Authentication
0 Set to 1 to enable cleartext authentication. Added in 5.1.13 and 5.2.5.
ENABLE_LOCAL_INFILEEnable LOAD DATA
operations
0 A connection string, DSN, and GUI option. Set ENABLE_LOCAL_INFILE=1
to enable LOAD DATA operations. This toggles the
MYSQL_OPT_LOCAL_INFILE mysql_options() option. The connection string
overrides the DSN value if both are set. Added in 5.3.12 and 8.0.14.
LOAD_DATA_LOCAL_DIRRestrict LOAD DATA
operations
A connection string, DSN, and GUI option. Set LOAD_DATA_LOCAL_DIR
to a specific directory, such as LOAD_DATA_LOCAL_DIR=/
tmp, to restrict uploading files to a specific path. This sets the
MYSQL_OPT_LOAD_DATA_LOCAL_DIR mysql_options() option. The
connection string overrides the DSN value if both are set. This option has no
effect if ENABLE_LOCAL_INFILE=1. Added in 8.0.22.
GET_SERVER_PUBLIC_KEYGet Server Public Key 0 When connecting to accounts that use caching_sha2_password
authentication over non-secure connection (TLS disabled), Connector/ODBC
requests the RSA public key required to perform the authentication from
the server. The option is ignored if the authentication mechanism used for
the connection is different from caching_sha2_password. This option
corresponds to the MYSQL_OPT_GET_SERVER_PUBLIC_KEY option for the
mysql_options() C API function. The value is a boolean.
The option is added in Connector/ODBC versions 8.0.11 and 5.3.11. It requires
Connector/ODBC built using OpenSSL-based MySQL client library. If MySQL
client library used by Connector/ODBC was built with YaSSL, as is the case for
GPL distributions of Connector/ODBC 5.3, the option does not function and is
ignored
NO_TLS_1_0Disable TLS 1.0 0 This option was removed in v8.0.28. It disallowed the use of TLS 1.0 for
connection encryption. All versions of TLS are allowed by default, and this
option exluded version 1.0 from being used. Added in 5.3.7. TLS 1.0 support
was deprecated in v8.0.26 before removal in v8.0.28.
NO_TLS_1_1Disable TLS 1.1 0 This option was removed in v8.0.28. It disallowed the use of TLS 1.1 for
connection encryption. All versions of TLS are allowed by default, and this
511

Connector/ODBC Connection Parameters
Parameter GUI Option Default Value Comment
option exluded version 1.1 from being used. Added in 5.3.7. TLS 1.1 support
was deprecated in v8.0.26 before removal in v8.0.28.
NO_TLS_1_2Disable TLS 1.2 0 Disallows the use of TLS 1.2 for connection encryption. All versions of TLS are
allowed by default, and this option exludes version 1.2 from being used. Added
in 5.3.7.
NO_TLS_1_3Disable TLS 1.3 0 Disallows the use of TLS 1.3 for connection encryption. All versions of TLS are
allowed by default, and this option exludes version 1.3 from being used. Added
in 8.0.26.
tls-
versions
Define the allowed TLS
protocol versions
TLSv1.2,TLSv1.3 (set
by libmysqlclient)
Accepts TLSv1.2 and/or TLSv1.3; while other values generate an error. It
has no effect if ssl-mode=DISABLED, and overrides (disables) the related
NO_TLS_X_Y connection options such as NO_TLS_1_2. Added in 8.0.30.
SSL_ENFORCEEnforce SSL 0 Enforce the requirement to use SSL for connections to server. See Table 5.2,
“Combined Effects of SSL_ENFORCE and DISABLE_SSL_DEFAULT ”.
Added in 5.3.6.
Note
This option is deprecated since Connector/ODBC
5.3.7 and removed in 8.0.13. It is preferable to use the
SSLMODE option parameter instead.
DISABLE_SSL_DEFAULTDisable default SSL 0 Disable the default requirement to use SSL for connections to server.
When set to “0” [default], Connector/ODBC tries to connect with SSL
first, and falls back to unencrypted connection if it is not possible to
establish an SSL connection. When set to “1,” Connection with SSL is not
attempted, and unencrypted connection is used, unless SSL_ENFORCE is
also set to “1.” See Table 5.2, “Combined Effects of SSL_ENFORCE and
DISABLE_SSL_DEFAULT ”. Added in 5.3.6.
Note
The option is deprecated since Connector/ODBC
5.3.7 and removed in 8.0.13. Use the SSLMODE option
parameter instead.
ssl-mode SSL Mode - Alias of SSLMODE as an eventual replacement; added in v8.0.29.
SSLMODE SSL Mode - Sets the SSL mode of the server connection. The option can be set to any
of the following values: DISABLED, PREFERRED, REQUIRED, VERIFY_CA,
or VERIFY_IDENTITY. See description for the --ssl-mode option in the
MySQL 8.0 Reference Manual for the meaning of each of the option values.
An ssl-mode alias was added in 8.0.29, which is preferred over SSLMODE.
If SSLMODE is not explicitly set, use of the SSLCA or SSLCAPTH option implies
SSLMODE=VERIFY_CA.
Added in 5.3.7. This option overrides the deprecatedsslverify and
SSL_ENFORCE options.
Note
The SSL configuration parameters can also be automatically loaded from a my.ini
or my.cnf file. See Using Option Files.
512

Connector/ODBC Connection Parameters
Table 5.2 Combined Effects of SSL_ENFORCE and DISABLE_SSL_DEFAULT
DISABLE_SSL_DEFAULT =
0
DISABLE_SSL_DEFAULT =
1
SSL_ENFORCE = 0 (Default) Connection with
SSL is attempted first; if
not possible, fall back to
unencrypted connection.
Connection with SSL is not
attempted; use unencrypted
connection.
SSL_ENFORCE = 1 Connect with SSL; throw an
error if an SSL connection
cannot be established.
Connect with SSL; throw an
error if an SSL connection
cannot be established.
DISABLE_SSL_DEFAULT=1 is
overridden.
The behavior of Connector/ODBC can be also modified by using special option parameters listed in
Table 5.3, “Connector/ODBC Option Parameters”, specified in the connection string or through the GUI
dialog box. All of the connection parameters also have their own numeric constant values, which can
be added up as a combined value for the option parameter for specifying those options. However, the
numerical option value in the connection string can only enable, but not disable parameters enabled on
the DSN, which can only be overridden by specifying the option parameters using their text names in the
connection string.
Note
While the combined numerical value for the option parameter can be easily
constructed by addition of the options' constant values, decomposing the value to
verify if particular options are enabled can be difficult. We recommend using the
options' parameter names instead in the connection string, because they are self-
explanatory.
Table 5.3 Connector/ODBC Option Parameters
Parameter Name GUI Option Constant Value Description
FOUND_ROWS Return matched rows instead
of affected rows
2 The client cannot handle when MySQL returns
the true value of affected rows. If this flag is set,
MySQL returns “found rows” instead. You must
have MySQL 3.21.14 or newer for this to work.
BIG_PACKETS Allow big result set 8 Do not set any packet limit for results and bind
parameters. Without this option, parameter
binding will be truncated to 255 characters.
NO_PROMPT Don't prompt when connecting 16 Do not prompt for questions even if driver would
like to prompt.
DYNAMIC_CURSOR Enable Dynamic Cursors 32 Enable or disable the dynamic cursor support.
NO_SCHEMA Disables support for ODBC
schemas
64 Ignore use of database schema name in
catalog.schema.table.column. See
also the related NO_CATALOG option. This
option was removed in Connector/ODBC
8.0.13 but served no function before then,
and was reintroduced in Connector/ODBC
8.0.26. This option is enabled by default as of
Connector/ODBC 8.0.27. For usage details, see
Section 5.8.1.3, “Configuring Catalog and Schema
Support”
513

Connector/ODBC Connection Parameters
Parameter Name GUI Option Constant Value Description
NO_DEFAULT_CURSOR Disable driver-provided cursor
support
128 Force use of ODBC manager cursors
(experimental).
NO_LOCALE Don't use setlocale() 256 Disable the use of extended fetch (experimental).
PAD_SPACE Pad CHAR to full length with
space
512 Pad CHAR columns to full column length.
FULL_COLUMN_NAMES Include table name in
SQLDescribeCol()
1024 SQLDescribeCol() returns fully-qualified
column names.
COMPRESSED_PROTO Use compression 2048 Use the compressed client/server protocol.
IGNORE_SPACE Ignore space after function
names
4096 Tell server to ignore space after function name
and before “(” (needed by PowerBuilder). This
makes all function names keywords.
NAMED_PIPE Named Pipe 8192 Connect with named pipes to a mysqld server
running on NT.
NO_BIGINT Treat BIGINT columns as INT
columns
16384 Change BIGINT columns to INT columns (some
applications cannot handle BIGINT).
NO_CATALOG Disable catalog support 32768 Forces results from the catalog functions, such
as SQLTables, to always return NULL and the
driver to report that catalogs are not supported.
See also the related NO_SCHEMA option. For
usage details, see Section 5.8.1.3, “Configuring
Catalog and Schema Support”
USE_MYCNF Read options from my.cnf 65536 Read parameters from the [client] and
[odbc] groups from my.cnf.
SAFE Enable safe options 131072 Add some extra safety checks.
NO_TRANSACTIONS Disable transaction support 262144 Disable transactions.
LOG_QUERY Log queries to %TEMP%
\myodbc.sql
524288 Enable query logging to c:\myodbc.sql(/tmp/
myodbc.sql) file. (Enabled only in debug mode.)
NO_CACHE Don't cache results of forward-
only cursors
1048576 Do not cache the results locally in
the driver, instead read from server
(mysql_use_result()). This works only for
forward-only cursors. This option is very important
in dealing with large tables when you do not want
the driver to cache the entire result set.
FORWARD_CURSOR Force use of forward-only
cursors
2097152 Force the use of Forward-only cursor type. In
cases of applications setting the default static/
dynamic cursor type and one wants the driver to
use noncache result sets, this option ensures the
forward-only cursor behavior.
AUTO_RECONNECT Enable automatic reconnect 4194304 Enables auto-reconnection functionality. Do not
use this option with transactions, since an auto-
reconnection during a incomplete transaction
may cause corruption. An auto-reconnected
connection will not inherit the same settings and
environment as the original connection. MySQL
Server deprecated this functionality in 8.0.34/8.1.0
and removed it in 8.3.0. This connection option
514

Connector/ODBC Connection Parameters
Parameter Name GUI Option Constant Value Description
was removed from Connector/ODBC 8.3.0 and
setting it returns SQL_SUCCESS_WITH_INFO
with an HY000 error stating that it's no longer
supported.
AUTO_IS_NULL Enable SQL_AUTO_IS_NULL 8388608 When AUTO_IS_NULL is set, the driver does not
change the default value of sql_auto_is_null,
leaving it at 1, so you get the MySQL default, not
the SQL standard behavior.
When AUTO_IS_NULL is not set, the
driver changes the default value of
SQL_AUTO_IS_NULL to 0 after connecting, so
you get the SQL standard, not the MySQL default
behavior.
Thus, omitting the flag disables the compatibility
option and forces SQL standard behavior.
See IS NULL. Added in 3.51.13.
ZERO_DATE_TO_MIN Return SQL_NULL_DATA for
zero date
16777216 Translates zero dates (XXXX-00-00) into the
minimum date values supported by ODBC,
XXXX-01-01. This resolves an issue where
some statements will not work because the date
returned and the minimum ODBC date value are
incompatible. Added in 3.51.17.
MIN_DATE_TO_ZERO Bind minimal date as zero date 33554432 Translates the minimum ODBC date value
(XXXX-01-01) to the zero date format supported
by MySQL (XXXX-00-00). This resolves an issue
where some statements will not work because the
date returned and the minimum ODBC date value
are incompatible. Added in 3.51.17.
NO_DATE_OVERFLOW Ignore data overflow error 0 Continue with the query execution rather then
return error if the time portion is missing. The
server will ignore the time component and the
result is the same as if they were zeros. Added in
5.3.8.
MULTI_STATEMENTS Allow multiple statements 67108864 Enables support for batched statements. As of
8.0.24, preparing a query with multiple statements
raises an error. The direct execution of parameter-
less statements prepared using the SQLPrepare()
function is not supported. Multiple statements can
only be executed through the SQLExecDirec()
ODBC function.
COLUMN_SIZE_S32 Limit column size to signed 32-
bit range
134217728 Limits the column size to a signed 32-bit value
to prevent problems with larger column sizes in
applications that do not support them. This option
is automatically enabled when working with ADO
applications. Added in 3.51.22.
515

Connector/ODBC Connection Parameters
Parameter Name GUI Option Constant Value Description
NO_BINARY_RESULT Always handle binary function
results as character data
268435456 When set, this option disables charset 63 for
columns with an empty org_table. Added in
3.51.26.
DFLT_BIGINT_BIND_STR Bind BIGINT parameters as
strings
536870912 Causes BIGINT parameters to be bound as
strings. Microsoft Access treats BIGINT as a
string on linked tables. The value is read correctly,
but bound as a string. This option is used
automatically if the driver is used by Microsoft
Access. Added in 5.1.3.
NO_I_S Don't use
INFORMATION_SCHEMA for
metadata
1073741824 Tells catalog functions not to use
INFORMATION_SCHEMA, but rather use legacy
algorithms. The trade-off here is usually speed for
information quality. Added in 5.1.7, deprecated in
8.0.26, and removed (and now ignored) in 8.0.31.
CB_FIDO_GLOBAL Registers a global
callback function for the
authentication_webauthn
connection
20480 User-defined constant (see Connector/
ODBC WebAuthn and FIDO Information);
the last registered global callback is reused
in connections not defining a callback. Only
use with connections that use the MySQL
ODBC driver; using with other connections
might lead to undefined behavior. Example
usage: SQLSetConnectAttr(hdbc,
CB_FIDO_GLOBAL, &my_user_callback,
SQL_IS_POINTER);. Support added in 8.2.0.
CB_FIDO_CONNECTION Registers a per-connection
callback function for the
authentication_webauthn
connection
20481 User-defined constant (see Connector/ODBC
WebAuthn and FIDO Information); the callback
is registered for a single connection. Only use
with connections that use the MySQL ODBC
driver; using with other connections might lead to
undefined behavior. Support added in 8.2.0.
Table 5.4, “Recommended Connector/ODBC Option Values for Different Configurations” shows some
recommended parameter settings and their corresponding option values for various configurations:
Table 5.4 Recommended Connector/ODBC Option Values for Different Configurations
ConfigurationParameter
Settings
Option
Value
Microsoft
Access,
Visual
Basic
FOUND_ROWS=1;2
Microsoft
Access
(with
improved
DELETE
queries)
FOUND_ROWS=1;DYNAMIC_CURSOR=1;34
516

Connector/ODBC Connection Parameters
ConfigurationParameter
Settings
Option
Value
Microsoft
SQL
Server
COLUMN_SIZE_S32=1;134217728
Large
tables
with
too
many
rows
COMPRESSED_PROTO=1;2048
Sybase
PowerBuilder
IGNORE_SPACE=1;FLAG_SAFE=1;135168
Query
log
generation
(Debug
mode)
LOG_QUERY=1;524288
Large
tables
with
no-
cache
results
NO_CACHE=1;FORWARD_CURSOR=1;3145728
Applications
that
run
full-
table
"SELECT
*
FROM ...
"
query,
but
read
only
a
small
number
(N)
of
rows
from
the
result
PREFETCH=NNot
Applicable
517

Configuring a Connector/ODBC DSN on Windows
5.5.3 Configuring a Connector/ODBC DSN on Windows
To add or configure a Connector/ODBC 5.x or 8.x DSN on Windows, use either the ODBC Data Source
Administrator GUI, or the command-line tool myodbc-installer.exe that comes with Connector/
ODBC.
5.5.3.1 Configuring a Connector/ODBC DSN on Windows with the ODBC Data Source
Administrator GUI
The ODBC Data Source Administrator on Windows lets you create DSNs, check driver installation,
and configure ODBC functions such as tracing (used for debugging) and connection pooling. The following
are steps for creating and configuring a DSN with the ODBC Data Source Administrator:
1. Open the ODBC Data Source Administrator.
Different editions and versions of Windows store the ODBC Data Source Administrator in
different locations. For instructions on opening the ODBC Data Source Administrator, see
the documentation for you Windows version; these instructions from Microsoft cover some popuar
Windows platforms. You should see a window similar to the following when you open the ODBC Data
Source Administrator:
Figure 5.2 ODBC Data Source Administrator Dialog
2. To create a System DSN (which will be available to all users), select the System DSN tab. To create a
User DSN, which will be available only to the current user, click the Add... button to open the "Create
New Data Source" dialog.
3. From the "Create New Data Source" dialog, select the MySQL ODBC 5.x ANSI or Unicode Driver, then
click Finish to open its connection parameters dialog.
518

Configuring a Connector/ODBC DSN on Windows
Figure 5.3 Create New Data Source Dialog: Choosing a MySQL ODBC Driver
519

Configuring a Connector/ODBC DSN on Windows
4. You now need to configure the specific fields for the DSN you are creating through the Connection
Parameters dialog.
Figure 5.4 Data Source Configuration Connection Parameters Dialog
In the Data Source Name box, enter the name of the data source to access. It can be any valid name
that you choose.
Tip
To identify whether a DSN was created using the 32-bit or the 64-bit
driver, include the driver being used within the DSN identifier. This will
help you to identify the right DSN to use with applications such as Excel
that are only compatible with the 32-bit driver. For example, you might
add Using32bitCODBC to the DSN identifier for the 32-bit interface and
Using64bitCODBC for those using the 64-bit Connector/ODBC driver.
5. In the Description box, enter some text to help identify the connection.
6. In the Server field, enter the name of the MySQL server host to access. By default, it is localhost.
7. In the User field, enter the user name to use for this connection.
8. In the Password field, enter the corresponding password for this connection.
9. The Database pop-up should be automatically populated with the list of databases that the user has
permissions to access.
10. To communicate over a different TCP/IP port than the default (3306), change the value of the Port.
11. Click OK to save the DSN.
520

Configuring a Connector/ODBC DSN on Windows
To verify the connection using the parameters you have entered, click the Test button. If the connection
can be made successfully, you will be notified with a Connection Successful dialog; otherwise, you
will be notified with a Connection Failed dialog.
You can configure a number of options for a specific DSN by clicking the Details button.
Figure 5.5 Connector/ODBC Connect Options Dialog
Toggling the Details button opens (or closes) an additional tabbed display where you set additional options
that include the following:
• Connections, Metadata, and Cursors/Results enable you to select the additional flags for the DSN
connection. For more information on these flags, see Section 5.5.2, “Connector/ODBC Connection
Parameters”.
521

Configuring a Connector/ODBC DSN on Windows
Note
For the Unicode version of Connector/ODBC, due to its native Unicode
support, you do not need to specify the initial character set to be used with
your connection. However, for the ANSI version, if you want to use a multibyte
character set such as UTF-16 or UTF-32 initially, specify it in Character Set box;
however, that is not necessary for using UTF-8 or UTF-8-MB4 initially, because
they do not contain \0 bytes in any characters, and therefore the ANSI driver will
not truncate the strings by accident when finding \0 bytes.
• Debug lets you turn on ODBC debugging to record the queries you execute through the DSN to the
myodbc.sql file. For more information, see Section 5.5.10, “Getting an ODBC Trace File”.
• SSL configures the additional options required for using the Secure Sockets Layer (SSL) when
communicating with MySQL server.
Figure 5.6 Connector/ODBC Connect Options Dialog: SSL Options
You must also enable and configure SSL on the MySQL server with suitable certificates to communicate
using it using SSL.
5.5.3.2 Configuring a Connector/ODBC DSN on Windows, Using the Command Line
Use myodbc-installer.exe when configuring Connector/ODBC from the command-line.
Execute myodbc-installer.exe without arguments to view a list of available options.
5.5.3.3 Troubleshooting ODBC Connection Problems
This section answers Connector/ODBC connection-related questions.
• While configuring a Connector/ODBC DSN, a Could Not Load Translator or Setup
Library error occurs
For more information, refer to MS KnowledgeBase Article(Q260558). Also, make sure you have the
latest valid ctl3d32.dll in your system directory.
• The Connector/ODBC .dll (Windows) and .so (Linux) file names depend on several factors:
522

Configuring a Connector/ODBC DSN on macOS
Connector/ODBC Version: A digit in the file name indicates the major Connector/ODBC version
number. For example, a file named myodbc9w.dll is for Connector/ODBC 9.x whereas myodbc5w.dll is
for Connector/ODBC 5.x.
Driver Type: The Unicode driver adds the letter "w" to file names to indicate that wide characters are
supported. For example, myodbc9w.dll is for the Unicode driver. The ANSI driver adds the letter "a"
instead of a "w", like myodbc9a.dll.
GUI Setup module: The GUI setup module files add the letter "S" to file names.
• Enabling Debug Mode: typically debug mode is not enabled as it decreases performance. The driver
must be compiled with debug mode enabled.
5.5.4 Configuring a Connector/ODBC DSN on macOS
To configure a DSN on macOS, you can either use the command-line utility (myodbc-installer), edit
the odbc.ini file within the Library/ODBC directory of the user, or use the ODBC Administrator GUI.
Note
The ODBC Administrator is included in OS X v10.5 and earlier; users of later
versions of OS X and macOS need to download and install it manually.
To create a DSN using the myodbc-installer utility, you only need to specify the DSN type and the
DSN connection string. For example:
$> myodbc-installer -a -s -t"DSN=mydb;DRIVER=MySQL ODBC 9.0 Driver;SERVER=mysql;USER=username;PASSWORD=pass"
To use ODBC Administrator:
Warning
• For correct operation of ODBC Administrator, ensure that the /Library/
ODBC/odbc.ini file used to set up ODBC connectivity and DSNs are writable
by the admin group. If this file is not writable by this group, then the ODBC
Administrator may fail, or may appear to work but not generate the correct entry.
• There are known issues with the macOS ODBC Administrator and Connector/
ODBC that may prevent you from creating a DSN using this method. In that case,
use the command line or edit the odbc.ini file directly. Existing DSNs or those
that you created using the myodbc-installer tool can still be checked and
edited using ODBC Administrator.
1. Open the ODBC Administrator from the Utilities folder in the Applications folder.
523

Configuring a Connector/ODBC DSN on macOS
Figure 5.7 ODBC Administrator Dialog
2. From the ODBC Administrator dialog, choose either the User DSN or System DSN tab and click
Add.
3. Select the Connector/ODBC driver and click OK.
524

Configuring a Connector/ODBC DSN on macOS
4. You will be presented with the Data Source Name (DSN) dialog. Enter the Data Source Name and
an optional Description for the DSN.
Figure 5.8 ODBC Administrator Data Source Name Dialog
5. Click Add to add a new keyword/value pair to the panel. Configure at least four pairs to specify
the server, username, password and database connection parameters. See Section 5.5.2,
“Connector/ODBC Connection Parameters”.
6. Click OK to add the DSN to the list of configured data source names.
A completed DSN configuration may look like this:
Figure 5.9 ODBC Administrator Sample DSN Dialog
You can configure other ODBC options in your DSN by adding further keyword/value pairs and setting the
corresponding values. See Section 5.5.2, “Connector/ODBC Connection Parameters”.
525

Configuring a Connector/ODBC DSN on Unix
5.5.5 Configuring a Connector/ODBC DSN on Unix
On Unix, you configure DSN entries directly in the odbc.ini file. Here is a typical odbc.ini file that
configures myodbc9w (Unicode) and myodbc9a (ANSI) as DSN names for Connector/ODBC 9.0:
;
; odbc.ini configuration for Connector/ODBC 9.0 driver
;
[ODBC Data Sources]
myodbc9w = MyODBC 9.0 UNICODE Driver DSN
myodbc9a = MyODBC 9.0 ANSI Driver DSN
[myodbc9w]
Driver = /usr/local/lib/libmyodbc9w.so
Description = Connector/ODBC 9.0 UNICODE Driver DSN
SERVER = localhost
PORT =
USER = root
Password =
Database = test
OPTION = 3
SOCKET =
[myodbc9a]
Driver = /usr/local/lib/libmyodbc9a.so
Description = Connector/ODBC 9.0 ANSI Driver DSN
SERVER = localhost
PORT =
USER = root
Password =
Database = test
OPTION = 3
SOCKET =
Refer to the Section 5.5.2, “Connector/ODBC Connection Parameters”, for the list of connection
parameters that can be supplied.
Note
If you are using unixODBC, you can use the following tools to set up the DSN:
• ODBCConfig GUI tool (HOWTO: ODBCConfig)
• odbcinst
In some cases when using unixODBC, you might get this error:
Data source name not found and no default driver specified
If this happens, make sure the ODBCINI and ODBCSYSINI environment variables are pointing to the right
odbc.ini file. For example, if your odbc.ini file is located in /usr/local/etc, set the environment
variables like this:
export ODBCINI=/usr/local/etc/odbc.ini
export ODBCSYSINI=/usr/local/etc
5.5.6 Connecting Without a Predefined DSN
You can connect to the MySQL server using SQLDriverConnect, by specifying the DRIVER name field.
Here are the connection strings for Connector/ODBC using DSN-less connections:
For Connector/ODBC 9.0:
ConnectionString = "DRIVER={MySQL ODBC 9.0 Unicode Driver};\
526

ODBC Connection Pooling
SERVER=localhost;\
DATABASE=test;\
USER=venu;\
PASSWORD=venu;\
FOUND_ROWS=1;"
Substitute “MySQL ODBC 9.0 Driver” with the name by which you have registered your Connector/ODBC
driver with the ODBC driver manager, if it is different. If your programming language converts backslash
followed by whitespace to a space, it is preferable to specify the connection string as a single long string,
or to use a concatenation of multiple strings that does not add spaces in between. For example:
ConnectionString = "DRIVER={MySQL ODBC 9.0 Unicode Driver};"
"SERVER=localhost;"
"DATABASE=test;"
"USER=venu;"
"PASSWORD=venu;"
"FOUND_ROWS=1;"
Note. On macOS, you might need to specify the full path to the Connector/ODBC driver library.
Refer to Section 5.5.2, “Connector/ODBC Connection Parameters” for the list of connection parameters
that can be supplied.
5.5.7 ODBC Connection Pooling
Connection pooling enables the ODBC driver to re-use existing connections to a given database from a
pool of connections, instead of opening a new connection each time the database is accessed. By enabling
connection pooling you can improve the overall performance of your application by lowering the time taken
to open a connection to a database in the connection pool.
For more information about connection pooling: http://support.microsoft.com/default.aspx?scid=kb;EN-
US;q169470.
5.5.8 OpenTelemetry Tracing Support
For applications on Linux systems that use OpenTelemetry (OTel) instrumentation, the connector
adds query and connection spans to the trace generated by application code and forwards the current
OpenTelemetry context to the server. OpenTelemetry tracing was introduced in the Connector/ODBC 8.1.0
release.
Note
OTel context forwarding works only with MySQL Enterprise Edition, a commercial
product. To learn more about commercial products, see https://www.mysql.com/
products/.
Enabling and Disabling Tracing
By default, the connector forwards the context only when an instrumented application installs the required
OpenTelemetry SDK libraries and configures the trace exporter to send trace data to some destination. If
the application code does not use instrumentation, then the legacy connector does not use it either.
Connector/ODBC supports a connection property option, OPENTELEMETRY, which has these values:
• PREFERRED: Default. Use instrumentation in the connection if the required OpenTelemetry
instrumentation is available. Otherwise, permit the connection to operate without any OpenTelemetry
instrumentation.
527

Authentication Options
• DISABLED: The connector does not create OpenTelemetry spans or forward the OpenTelemetry context
to the server.
Setting to boolean false behaves the same as DISABLED.
When you build code that links to Connector/ODBC and uses OTel instrumentation, the additional spans
generated by the connector appear in the traces generated by your code. Spans generated by the
connector are sent to the same destination (trace exporter) where other spans generated by the user code
are sent as configured by user code. It is not possible to send spans generated by the connector to any
other destination.
This implementation is distinct from the implementation provided through the MySQL client library (or the
related telemetry_client client-side plugin).
Limitation
OTel instrumentation in the ODBC driver only functions if the application is built with the -rdynamic
compiler option so that symbols defined in user code are externally visible. Without this, the OTel context
is not forwarded to the server (as the driver has no way of getting the current OTel context) and the spans
generated by the ODBC driver will be not sent to the destination specified in the application (they will be
discarded).
5.5.9 Authentication Options
Connector/ODBC supports different authentication methods, including:
• Standard authentication using a MySQL username and password, such as caching_sha2_password.
• The Kerberos authentication protocol for passwordless authentication. For more information about
Kerberos authentication, see Kerberos Pluggable Authentication.
Support added in Connector/ODBC 8.0.26 for Linux clients, and 8.0.27 for Windows clients.
• Multi-Factor Authentication (MFA) by utilizing the PASSWORD1 (alias of PASSWORD), PASSWORD2, and
PASSWORD3 connection options. In addition there are PWD1, PWD2, and PWD3 aliases.
Support added in Connector/ODBC 8.0.28.
• FIDO-based authentication is supported and Connector/ODBC supports the FIDO-based WebAuthn
Pluggable Authentication plugin. See the general WebAuthn Pluggable Authentication documentation for
installation requirements and implementation details.
Note
Support for the authentication_webauthn plugin was added in Connector/ODBC
8.2.0. Support for the authentication_fido plugin was added in 8.0.29, deprecated
in 8.2.0, and removed in 8.4.0.
A callback usage example:
// SQL_DRIVER_CONNECT_ATTR_BASE is not defined in all driver managers.
// Therefore use a custom constant until it becomes a standard.
#define MYSQL_DRIVER_CONNECT_ATTR_BASE 0x00004000
// Custom constants used for callback
#define CB_FIDO_GLOBAL MYSQL_DRIVER_CONNECT_ATTR_BASE + 0x00001000
#define CB_FIDO_CONNECTION MYSQL_DRIVER_CONNECT_ATTR_BASE + 0x00001001
// Usage example
// Callback function inside code:
528

Getting an ODBC Trace File
void user_callback(const char* msg)
{
// Do something ...
}
SQLHENV henv = nullptr;
SQLAllocHandle(SQL_HANDLE_ENV, nullptr, &henv);
// Set the ODBC version to 3.80 otherwise the custom constants don't work
SQLSetEnvAttr(henv, SQL_ATTR_ODBC_VERSION,
(SQLPOINTER)SQL_OV_ODBC3_80, 0);
SQLHDBC hdbc = nullptr;
SQLAllocHandle(SQL_HANDLE_DBC, henv, &hdbc);
// CB_FIDO_X is either CB_FIDO_GLOBAL or CB_FIDO_CONNECTION
SQLSetConnectAttr(hdbc, CB_FIDO_X, &user_callback, SQL_IS_POINTER);
SQLDriverConnect(hdbc, hwnd, conn_str, ....);
5.5.10 Getting an ODBC Trace File
If you encounter difficulties or problems with Connector/ODBC, start by making a log file from the ODBC
Manager and Connector/ODBC. This is called tracing, and is enabled through the ODBC Manager. The
procedure for this differs for Windows, macOS and Unix.
5.5.10.1 Enabling ODBC Tracing on Windows
To enable the trace option on Windows:
1. The Tracing tab of the ODBC Data Source Administrator dialog box lets you configure the way ODBC
function calls are traced.
Figure 5.10 ODBC Data Source Administrator Tracing Dialog
2. When you activate tracing from the Tracing tab, the Driver Manager logs all ODBC function calls
for all subsequently run applications.
3. ODBC function calls from applications running before tracing is activated are not logged. ODBC
function calls are recorded in a log file you specify.
4. Tracing ceases only after you click Stop Tracing Now. Remember that while tracing is on, the log
file continues to increase in size and that tracing affects the performance of all your ODBC applications.
529
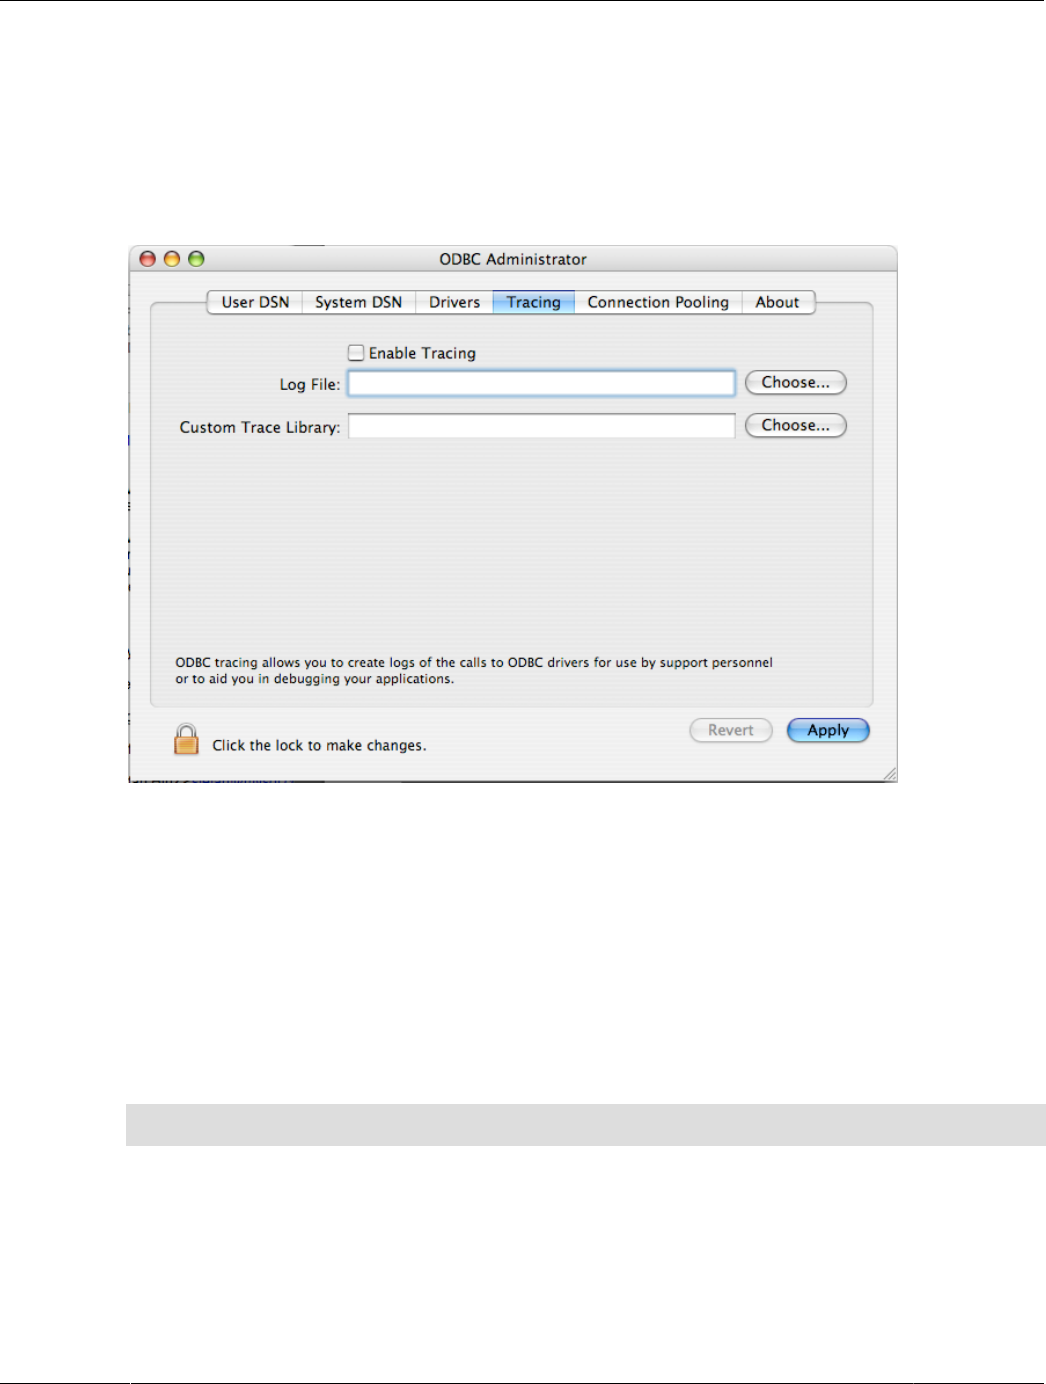
Getting an ODBC Trace File
5.5.10.2 Enabling ODBC Tracing on macOS
To enable the trace option on macOS, use the Tracing tab within ODBC Administrator .
1. Open the ODBC Administrator.
2. Select the Tracing tab.
Figure 5.11 ODBC Administrator Tracing Dialog
3. Select the Enable Tracing check box.
4. Enter the location to save the Tracing log. To append information to an existing log file, click the
Choose... button.
5.5.10.3 Enabling ODBC Tracing on Unix
To enable the trace option on OS X 10.2 (or earlier) or Unix, add the trace option to the ODBC
configuration:
1. On Unix, explicitly set the Trace option in the ODBC.INI file.
Set the tracing ON or OFF by using TraceFile and Trace parameters in odbc.ini as shown below:
TraceFile = /tmp/odbc.trace
Trace = 1
TraceFile specifies the name and full path of the trace file and Trace is set to ON or OFF. You can
also use 1 or YES for ON and 0 or NO for OFF. If you are using ODBCConfig from unixODBC, then
follow the instructions for tracing unixODBC calls at HOWTO-ODBCConfig.
5.5.10.4 Enabling a Connector/ODBC Log
To generate a Connector/ODBC log, do the following:
530

Connector/ODBC Examples
1. Within Windows, enable the Trace Connector/ODBC option flag in the Connector/ODBC connect/
configure screen. The log is written to file C:\myodbc.log. If the trace option is not remembered
when you are going back to the above screen, it means that you are not using the myodbcd.dll
driver, see Section 5.5.3.3, “Troubleshooting ODBC Connection Problems”.
On macOS, Unix, or if you are using a DSN-less connection, either supply OPTION=4 in the connection
string, or set the corresponding keyword/value pair in the DSN.
2. Start your application and try to get it to fail. Then check the Connector/ODBC trace file to find out what
could be wrong.
If you need help determining what is wrong, see Section 5.9.1, “Connector/ODBC Community Support”.
5.6 Connector/ODBC Examples
Once you have configured a DSN to provide access to a database, how you access and use that
connection is dependent on the application or programming language. As ODBC is a standardized
interface, any application or language that supports ODBC can use the DSN and connect to the configured
database.
5.6.1 Basic Connector/ODBC Application Steps
Interacting with a MySQL server from an applications using the Connector/ODBC typically involves the
following operations:
• Configure the Connector/ODBC DSN.
• Connect to MySQL server.
This might include: allocate environment handle, set ODBC version, allocate connection handle, connect
to MySQL Server, and set optional connection attributes.
• Initialization statements.
This might include: allocate statement handle and set optional statement attributes.
• Execute SQL statements.
This might include: prepare the SQL statement and execute the SQL statement, or execute it directly
without prepare.
• Retrieve results, depending on the statement type.
For SELECT / SHOW / Catalog API the results might include: get number of columns, get column
information, fetch rows, and get the data to buffers. For Delete / Update / Insert the results might include
the number of rows affected.
• Perform transactions; perform commit or rollback.
• Disconnect from the server.
This might include: disconnect the connection and free the connection and environment handles.
Most applications use some variation of these steps. The basic application steps are also shown in the
following diagram:
531

Step-by-step Guide to Connecting to a MySQL Database through Connector/ODBC
Figure 5.12 Connector/ODBC Programming Flowchart
5.6.2 Step-by-step Guide to Connecting to a MySQL Database through
Connector/ODBC
A typical situation where you would install Connector/ODBC is to access a database on a Linux or Unix
host from a Windows machine.
As an example of the process required to set up access between two machines, the steps below take you
through the basic steps. These instructions assume that you connect to system ALPHA from system BETA
with a user name and password of myuser and mypassword.
On system ALPHA (the MySQL server) follow these steps:
1. Start the MySQL server.
532

Connector/ODBC and Third-Party ODBC Tools
2. Use GRANT to set up an account with a user name of myuser that can connect from system BETA
using a password of myuser to the database test:
GRANT ALL ON test.* to 'myuser'@'BETA' IDENTIFIED BY 'mypassword';
For more information about MySQL privileges, refer to Access Control and Account Management.
On system BETA (the Connector/ODBC client), follow these steps:
1. Configure a Connector/ODBC DSN using parameters that match the server, database and
authentication information that you have just configured on system ALPHA.
Parameter Value Comment
DSN remote_test A name to identify the connection.
SERVER ALPHA The address of the remote server.
DATABASE test The name of the default database.
USER myuser The user name configured for access to this database.
PASSWORD mypassword The password for myuser.
2. Using an ODBC-capable application, such as Microsoft Office, connect to the MySQL server using the
DSN you have just created. If the connection fails, use tracing to examine the connection process. See
Section 5.5.10, “Getting an ODBC Trace File”, for more information.
5.6.3 Connector/ODBC and Third-Party ODBC Tools
Once you have configured your Connector/ODBC DSN, you can access your MySQL database through
any application that supports the ODBC interface, including programming languages and third-party
applications. This section contains guides and help on using Connector/ODBC with various ODBC-
compatible tools and applications, including Microsoft Word, Microsoft Excel and Adobe/Macromedia
ColdFusion.
Connector/ODBC has been tested with the following applications:
Publisher Application Notes
Adobe ColdFusion Formerly Macromedia ColdFusion
Borland C++ Builder
Builder 4
Delphi
Business Objects Crystal Reports
Claris Filemaker Pro
Corel Paradox
Computer Associates Visual Objects
Also known as CAVO
AllFusion ERwin Data
Modeler
Gupta Team Developer
Previously known as Centura Team Developer;
Gupta SQL/Windows
Gensym G2-ODBC Bridge
Inline iHTML
533

Using Connector/ODBC with Microsoft Access
Publisher Application Notes
Lotus Notes Versions 4.5 and 4.6
Microsoft Access
Excel
Visio Enterprise
Visual C++
Visual Basic
ODBC.NET Using C#, Visual Basic, C++
FoxPro
Visual Interdev
OpenOffice.org OpenOffice.org
Perl DBD::ODBC
Pervasive Software DataJunction
Sambar Technologies Sambar Server
SPSS SPSS
SoftVelocity Clarion
SQLExpress SQLExpress for Xbase++
Sun StarOffice
SunSystems Vision
Sybase PowerBuilder
PowerDesigner
theKompany.com Data Architect
5.6.4 Using Connector/ODBC with Microsoft Access
You can use a MySQL database with Microsoft Access using Connector/ODBC. The MySQL database
can be used as an import source, an export source, or as a linked table for direct use within an Access
application, so you can use Access as the front-end interface to a MySQL database.
5.6.4.1 Exporting Access Data to MySQL
Important
Make sure that the information that you are exporting to the MySQL table is valid for
the corresponding MySQL data types. Values that are valid within Access but are
outside of the supported ranges of the MySQL data types may trigger an “overflow”
error during the export.
To export a table of data from an Access database to MySQL, follow these instructions:
1. With an Access database opened, the navigation plane on the right should display, among other things,
all the tables in the database that are available for export (if that is not the case, adjust the navigation
plane's display settings). Right click on the table you want to export, and in the menu that appears,
choose Export , ODBC Database.
534

Using Connector/ODBC with Microsoft Access
Figure 5.13 Access: Export ODBC Database Menu Selected
2. The Export dialog box appears. Enter the desired name for the table after its import into the MySQL
server, and click OK.
Figure 5.14 Entering Name For Table To Be Exported
3. The Select Data Source dialog box appears; it lists the defined data sources for any ODBC drivers
installed on your computer. Click either the File Data Source or Machine Data Source tab, and then
double-click the Connector/ODBC DSN to which you want to export your table. To define a new DSN
535
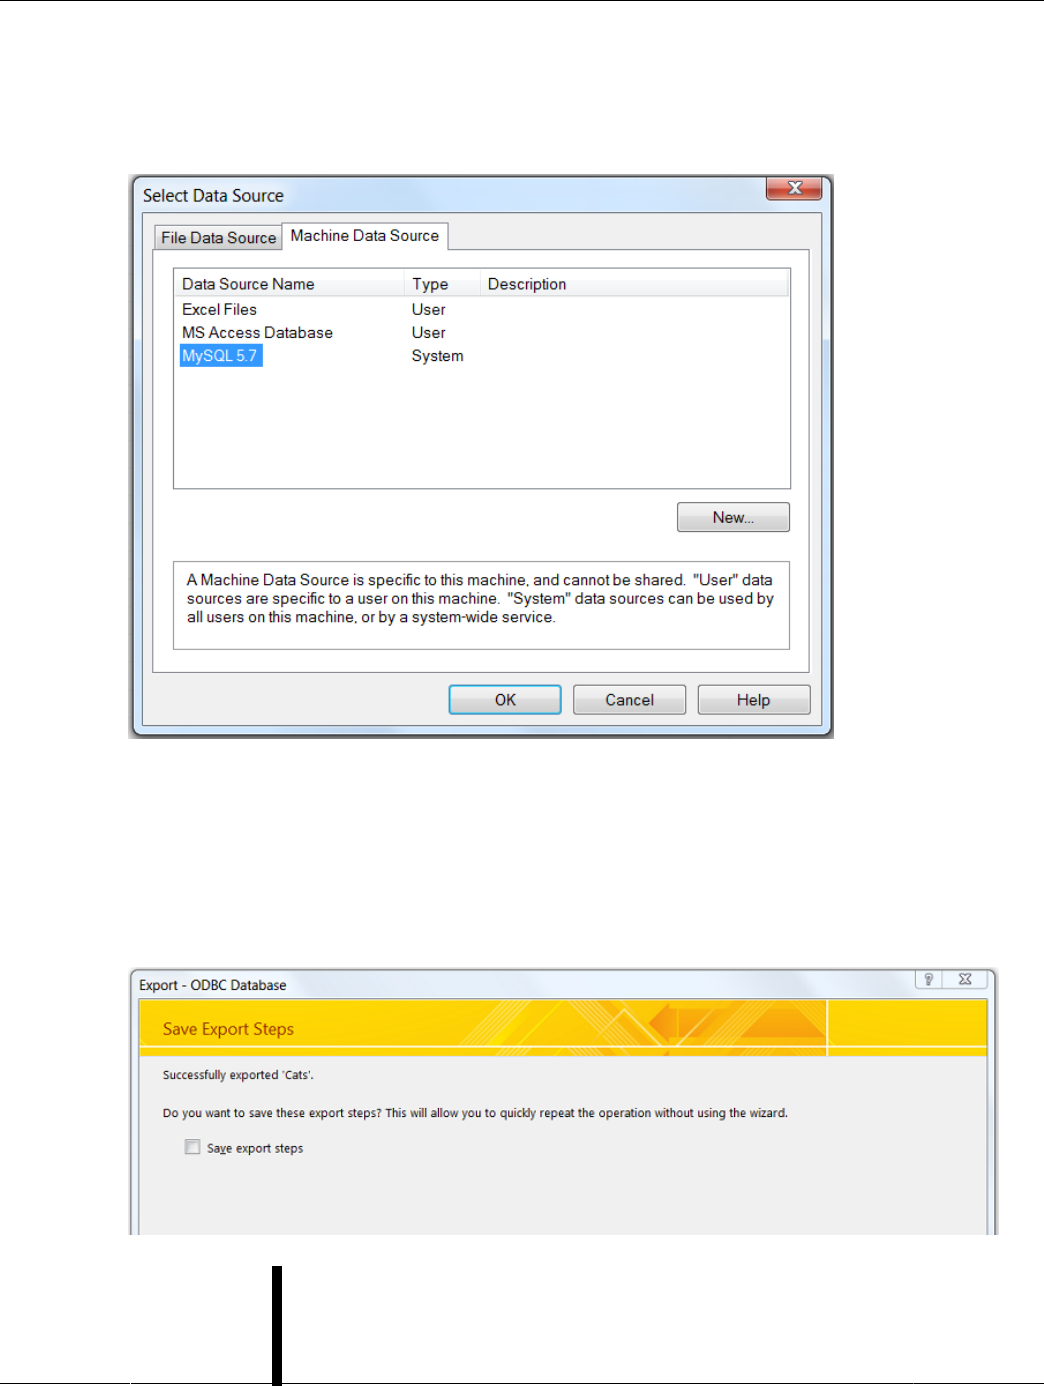
Using Connector/ODBC with Microsoft Access
for Connector/ODBC instead, click New and follow the instructions in Section 5.5.3, “Configuring a
Connector/ODBC DSN on Windows”; double click the new DSN after it has been created.
Figure 5.15 Selecting An ODBC Database
If the ODBC data source that you selected requires you to log in, enter your login ID and password
(additional information might also be required), and then click OK.
4. A dialog box appears with a success message if the export is successful. In the dialog box, you can
choose to save the export steps for easy repetitions in the future.
Figure 5.16 Save Export Success Message
Note
If you see the following error message instead when you try to export to the
Connector/ODBC DSN, it means you did not choose the Database to connect
to when you defined or logged in to the DSN. Reconfigure the DSN and specify
536

Using Connector/ODBC with Microsoft Access
the Database to connect to (see Section 5.5.3, “Configuring a Connector/ODBC
DSN on Windows” for details), or choose a Database when you log in to the
DSN .
Figure 5.17 Error Message Dialog: Database Not Selected
5.6.4.2 Importing MySQL Data to Access
To import tables from MySQL to Access, follow these instructions:
1. Open the Access database into which that you want to import MySQL data.
2. On the External Data tab, choose ODBC Database.
Figure 5.18 External Data: ODBC Database
3. In the Get External Data dialog box that appears, choose Import the source data into a new
table in the current database and click OK.
537
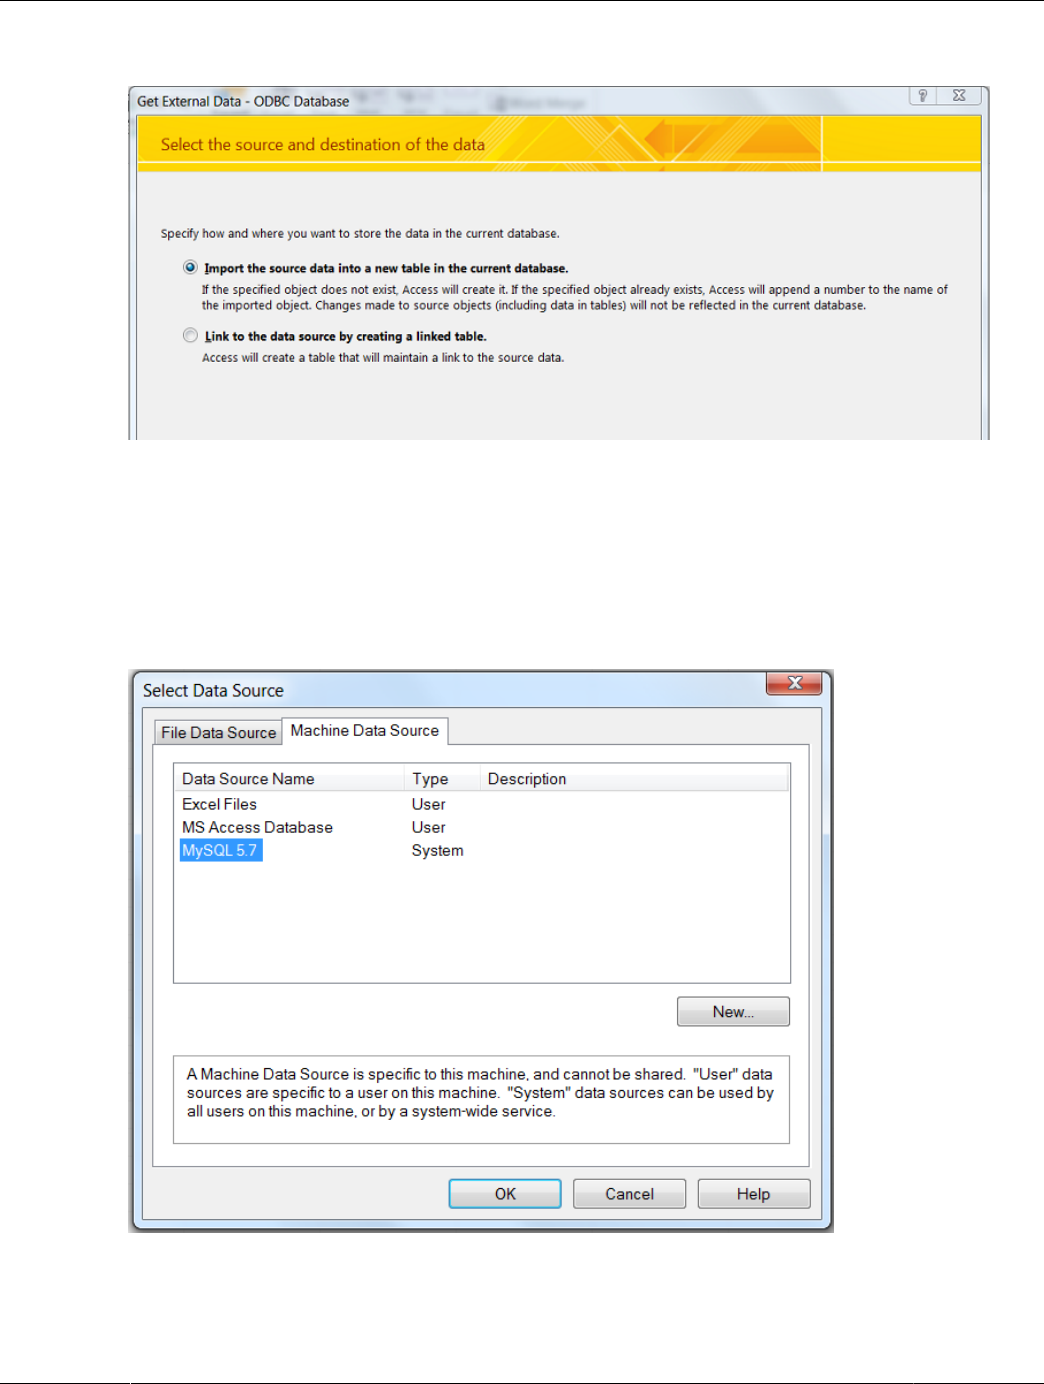
Using Connector/ODBC with Microsoft Access
Figure 5.19 Get External Data: ODBC Database
4. The Select Data Source dialog box appears. It lists the defined data sources for any ODBC drivers
installed on your computer. Click either the File Data Source or Machine Data Source tab, and then
double-click the Connector/ODBC DSN from which you want to import your table. To define a new DSN
for Connector/ODBC instead, click New and follow the instructions in Section 5.5.3, “Configuring a
Connector/ODBC DSN on Windows”; double click the new DSN after it has been created.
Figure 5.20 Select Data Source Dialog: Selecting an ODBC Database
If the ODBC data source that you selected requires you to log in, enter your login ID and password
(additional information might also be required), and then click OK.
538

Using Connector/ODBC with Microsoft Access
5. Microsoft Access connects to the MySQL server and displays the list of tables (objects) that you can
import. Select the tables you want to import from this Import Objects dialog (or click Select All), and
then click OK.
Figure 5.21 Import Objects Dialog: Selecting Tables To Import
Notes
• If no tables show up for you to select, it might be because you did not
choose the Database to connect to when you defined or logged in to the
DSN. Reconfigure the DSN and specify the Database to connect to (see
Section 5.5.3, “Configuring a Connector/ODBC DSN on Windows” for details),
or choose a Database when you log in to the DSN .
• If your Access database already has a table with the same name as the one
you are importing, Access will append a number to the name of the imported
table.
6. A dialog box appears with a success message if the import is successful. In the dialog box, you can
choose to save the import steps for easy repetitions in the future.
Figure 5.22 Get External Data: Save Import Steps Dialog
5.6.4.3 Using Microsoft Access as a Front-end to MySQL
You can use Microsoft Access as a front end to MySQL by linking tables within your Microsoft Access
database to tables that exist within your MySQL database. When a query is requested on a table within
Access, ODBC is used to execute the queries on the MySQL database.
To create a linked table:
539

Using Connector/ODBC with Microsoft Access
1. Open the Access database that you want to link to MySQL.
2. On the External Data tab, choose ODBC Database.
Figure 5.23 External Data: ODBC Database
3. In the Get External Data dialog box that appears, choose Link to the data source by creating a
linked table and click OK.
Figure 5.24 Get External Data: Link To ODBC Database Option Chosen
4. The Select Data Source dialog box appears; it lists the defined data sources for any ODBC drivers
installed on your computer. Click either the File Data Source or Machine Data Source tab, and
then double-click the Connector/ODBC DSN you want to link your table to. To define a new DSN
540

Using Connector/ODBC with Microsoft Access
for Connector/ODBC instead, click New and follow the instructions in Section 5.5.3, “Configuring a
Connector/ODBC DSN on Windows”; double click the new DSN after it has been created.
Figure 5.25 Selecting An ODBC Database
If the ODBC data source that you selected requires you to log in, enter your login ID and password
(additional information might also be required), and then click OK.
541

Using Connector/ODBC with Microsoft Access
5. Microsoft Access connects to the MySQL server and displays the list of tables that you can link to.
Choose the tables you want to link to (or click Select All), and then click OK.
Figure 5.26 Link Tables Dialog: Selecting Tables to Link
Notes
• If no tables show up for you to select, it might be because you did not
choose the Database to connect to when you defined or logged in to the
DSN. Reconfigure the DSN and specify the Database to connect to (see
Section 5.5.3, “Configuring a Connector/ODBC DSN on Windows” for details),
or choose a Database when you log in to the DSN.
• If your database on Access already has a table with the same name as the
one you are linking to, Access will append a number to the name of the new
linked table.
542

Using Connector/ODBC with Microsoft Access
6. If Microsoft Access is unable to determine the unique record identifier for a table automatically, it will
ask you to choose a column (or a combination of columns) to be used to uniquely identify each row
from the source table. Select the column[s] to use and click OK.
Figure 5.27 Linking Microsoft Access Tables To MySQL Tables, Choosing Unique Record
Identifier
Once the process has been completed, you can build interfaces and queries to the linked tables just as you
would for any Access database.
Use the following procedure to view links or to refresh them when the structures of the linked tables have
changed.
To view or refresh links:
1. Open the database that contains links to MySQL tables.
2. On the External Data tab, choose Linked Table Manager.
543
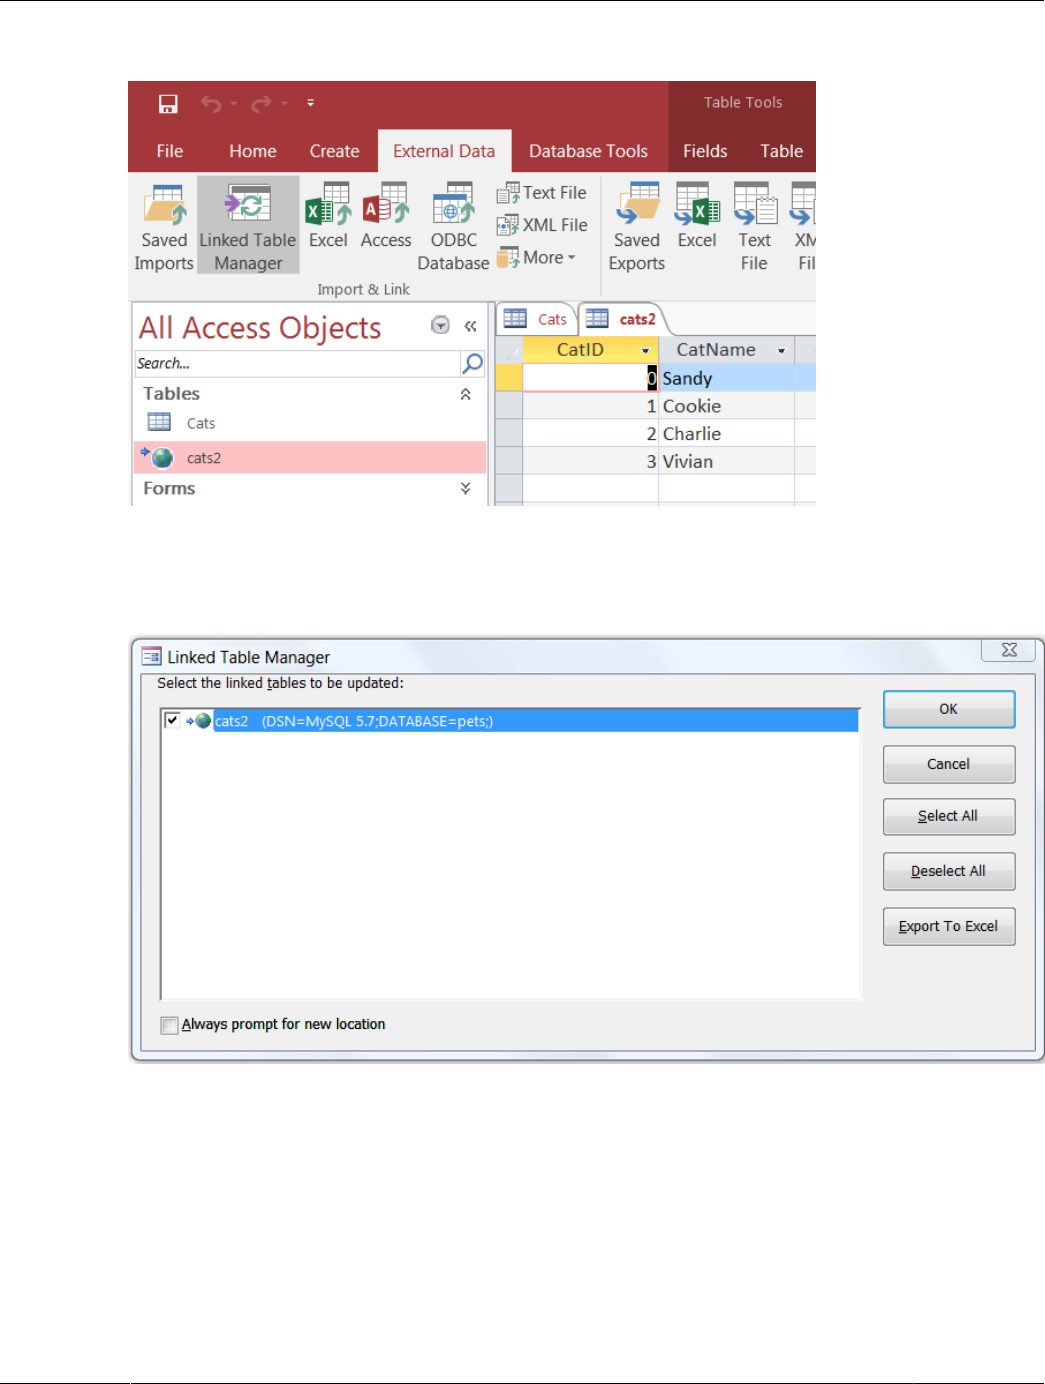
Using Connector/ODBC with Microsoft Access
Figure 5.28 External Data: Linked Table Manager
3. The Linked Table Manager appears. Select the check box for the tables whose links you want to
refresh. Click OK to refresh the links.
Figure 5.29 External Data: Linked Table Manager Dialog
If the ODBC data source requires you to log in, enter your login ID and password (additional information
might also be required), and then click OK.
Microsoft Access confirms a successful refresh or, if the tables are not found, returns an error message, in
which case you should update the links with the steps below.
To change the path for a set of linked tables (for pictures of the GUI dialog boxes involved, see the
instructions above for linking tables and refreshing links) :
1. Open the database that contains the linked tables.
544

Using Connector/ODBC with Microsoft Word or Excel
2. On the External Data tab, choose Linked Table Manager.
3. In the Linked Table Manager that appears, select the Always Prompt For A New Location check
box.
4. Select the check box for the tables whose links you want to change, and then click OK.
5. The Select Data Source dialog box appears. Select the new DSN and database with it.
5.6.5 Using Connector/ODBC with Microsoft Word or Excel
You can use Microsoft Word and Microsoft Excel to access information from a MySQL database using
Connector/ODBC. Within Microsoft Word, this facility is most useful when importing data for mailmerge,
or for tables and data to be included in reports. Within Microsoft Excel, you can execute queries on your
MySQL server and import the data directly into an Excel Worksheet, presenting the data as a series of
rows and columns.
With both applications, data is accessed and imported into the application using Microsoft Query, which
lets you execute a query though an ODBC source. You use Microsoft Query to build the SQL statement to
be executed, selecting the tables, fields, selection criteria and sort order. For example, to insert information
from a table in the World test database into an Excel spreadsheet, using the DSN samples shown in
Section 5.5, “Configuring Connector/ODBC”:
1. Create a new Worksheet.
2. From the Data menu, choose Import External Data, and then select New Database Query.
3. Microsoft Query will start. First, you need to choose the data source, by selecting an existing Data
Source Name.
Figure 5.30 Microsoft Query Wizard: Choose Data Source Dialog
4. Within the Query Wizard, choose the columns to import. The list of tables available to the user
configured through the DSN is shown on the left, the columns that will be added to your query are
shown on the right. The columns you choose are equivalent to those in the first section of a SELECT
query. Click Next to continue.
545

Using Connector/ODBC with Microsoft Word or Excel
Figure 5.31 Microsoft Query Wizard: Choose Columns
5. You can filter rows from the query (the equivalent of a WHERE clause) using the Filter Data dialog.
Click Next to continue.
Figure 5.32 Microsoft Query Wizard: Filter Data
546

Using Connector/ODBC with Crystal Reports
6. Select an (optional) sort order for the data. This is equivalent to using a ORDER BY clause in your SQL
query. You can select up to three fields for sorting the information returned by the query. Click Next to
continue.
Figure 5.33 Microsoft Query Wizard: Sort Order
7. Select the destination for your query. You can select to return the data Microsoft Excel, where you
can choose a worksheet and cell where the data will be inserted; you can continue to view the query
and results within Microsoft Query, where you can edit the SQL query and further filter and sort the
information returned; or you can create an OLAP Cube from the query, which can then be used directly
within Microsoft Excel. Click Finish.
Figure 5.34 Microsoft Query Wizard: Selecting A Destination
The same process can be used to import data into a Word document, where the data will be inserted as a
table. This can be used for mail merge purposes (where the field data is read from a Word table), or where
you want to include data and reports within a report or other document.
5.6.6 Using Connector/ODBC with Crystal Reports
Crystal Reports can use an ODBC DSN to connect to a database from which you to extract data and
information for reporting purposes.
547

Using Connector/ODBC with Crystal Reports
Note
There is a known issue with certain versions of Crystal Reports where the
application is unable to open and browse tables and fields through an ODBC
connection. Before using Crystal Reports with MySQL, please ensure that you have
update to the latest version, including any outstanding service packs and hotfixes.
For more information on this issue, see the Business) Objects Knowledgebase for
more information.
For example, to create a simple crosstab report within Crystal Reports XI, follow these steps:
1. Create a DSN using the Data Sources (ODBC) tool. You can either specify a complete database,
including user name and password, or you can build a basic DSN and use Crystal Reports to set the
user name and password.
For the purposes of this example, a DSN that provides a connection to an instance of the MySQL
Sakila sample database has been created.
2. Open Crystal Reports and create a new project, or an open an existing reporting project into which you
want to insert data from your MySQL data source.
3. Start the Cross-Tab Report Wizard, either by clicking the option on the Start Page. Expand the Create
New Connection folder, then expand the ODBC (RDO) folder to obtain a list of ODBC data sources.
You will be asked to select a data source.
Figure 5.35 Cross-Tab Report Creation Wizard
4. When you first expand the ODBC (RDO) folder you will be presented the Data Source Selection
screen. From here you can select either a pre-configured DSN, open a file-based DSN or enter and
manual connection string. For this example, the pre-configured Sakila DSN will be used.
548

Using Connector/ODBC with Crystal Reports
If the DSN contains a user name/password combination, or you want to use different authentication
credentials, click Next to enter the user name and password that you want to use. Otherwise, click
Finish to continue the data source selection wizard.
Figure 5.36 ODBC (RDO) Data Source Selection Wizard
5. You will be returned the Cross-Tab Report Creation Wizard. You now need to select the database and
tables that you want to include in your report. For our example, we will expand the selected Sakila
549

Using Connector/ODBC with Crystal Reports
database. Click the city table and use the > button to add the table to the report. Then repeat the
action with the country table. Alternatively you can select multiple tables and add them to the report.
Finally, you can select the parent Sakila resource and add of the tables to the report.
Once you have selected the tables you want to include, click Next to continue.
Figure 5.37 Cross-Tab Report Creation Wizard with Example ODBC (RDO) Data
6. Crystal Reports will now read the table definitions and automatically identify the links between the
tables. The identification of links between tables enables Crystal Reports to automatically lookup and
summarize information based on all the tables in the database according to your query. If Crystal
550

Using Connector/ODBC with Crystal Reports
Reports is unable to perform the linking itself, you can manually create the links between fields in the
tables you have selected.
Click Next to continue the process.
Figure 5.38 Cross-Tab Report Creation Wizard: Table Links
7. You can now select the columns and rows that to include within the Cross-Tab report. Drag and drop or
use the > buttons to add fields to each area of the report. In the example shown, we will report on cities,
551

Using Connector/ODBC with Crystal Reports
organized by country, incorporating a count of the number of cities within each country. If you want to
browse the data, select a field and click the Browse Data... button.
Click Next to create a graph of the results. Since we are not creating a graph from this data, click
Finish to generate the report.
Figure 5.39 Cross-Tab Report Creation Wizard: Cross-Tab Selection Dialog
552

Connector/ODBC Programming
8. The finished report will be shown, a sample of the output from the Sakila sample database is shown
below.
Figure 5.40 Cross-Tab Report Creation Wizard: Final Report
Once the ODBC connection has been opened within Crystal Reports, you can browse and add any fields
within the available tables into your reports.
5.6.7 Connector/ODBC Programming
With a suitable ODBC Manager and the Connector/ODBC driver installed, any programming language or
environment that can support ODBC can connect to a MySQL database through Connector/ODBC.
This includes, but is not limited to, Microsoft support languages (including Visual Basic, C# and interfaces
such as ODBC.NET), Perl (through the DBI module, and the DBD::ODBC driver).
5.6.7.1 Using Connector/ODBC with Visual Basic Using ADO, DAO and RDO
This section contains simple examples of the use of Connector/ODBC with ADO, DAO and RDO.
ADO: rs.addNew, rs.delete, and rs.update
The following ADO (ActiveX Data Objects) example creates a table my_ado and demonstrates the use of
rs.addNew, rs.delete, and rs.update.
Private Sub myodbc_ado_Click()
Dim conn As ADODB.Connection
Dim rs As ADODB.Recordset
Dim fld As ADODB.Field
Dim sql As String
'connect to MySQL server using Connector/ODBC
Set conn = New ADODB.Connection
553

Connector/ODBC Programming
conn.ConnectionString = "DRIVER={MySQL ODBC 9.0 Unicode Driver};"_
& "SERVER=localhost;"_
& " DATABASE=test;"_
& "UID=venu;PWD=venu; FOUND_ROWS=1"
conn.Open
'create table
conn.Execute "DROP TABLE IF EXISTS my_ado"
conn.Execute "CREATE TABLE my_ado(id int not null primary key, name varchar(20)," _
& "txt text, dt date, tm time, ts timestamp)"
'direct insert
conn.Execute "INSERT INTO my_ado(id,name,txt) values(1,100,'venu')"
conn.Execute "INSERT INTO my_ado(id,name,txt) values(2,200,'MySQL')"
conn.Execute "INSERT INTO my_ado(id,name,txt) values(3,300,'Delete')"
Set rs = New ADODB.Recordset
rs.CursorLocation = adUseServer
'fetch the initial table ..
rs.Open "SELECT * FROM my_ado", conn
Debug.Print rs.RecordCount
rs.MoveFirst
Debug.Print String(50, "-") & "Initial my_ado Result Set " & String(50, "-")
For Each fld In rs.Fields
Debug.Print fld.Name,
Next
Debug.Print
Do Until rs.EOF
For Each fld In rs.Fields
Debug.Print fld.Value,
Next
rs.MoveNext
Debug.Print
Loop
rs.Close
'rs insert
rs.Open "select * from my_ado", conn, adOpenDynamic, adLockOptimistic
rs.AddNew
rs!ID = 8
rs!Name = "Mandy"
rs!txt = "Insert row"
rs.Update
rs.Close
'rs update
rs.Open "SELECT * FROM my_ado"
rs!Name = "update"
rs!txt = "updated-row"
rs.Update
rs.Close
'rs update second time..
rs.Open "SELECT * FROM my_ado"
rs!Name = "update"
rs!txt = "updated-second-time"
rs.Update
rs.Close
'rs delete
rs.Open "SELECT * FROM my_ado"
rs.MoveNext
rs.MoveNext
rs.Delete
rs.Close
'fetch the updated table ..
rs.Open "SELECT * FROM my_ado", conn
Debug.Print rs.RecordCount
rs.MoveFirst
Debug.Print String(50, "-") & "Updated my_ado Result Set " & String(50, "-")
For Each fld In rs.Fields
Debug.Print fld.Name,
Next
Debug.Print
554

Connector/ODBC Programming
Do Until rs.EOF
For Each fld In rs.Fields
Debug.Print fld.Value,
Next
rs.MoveNext
Debug.Print
Loop
rs.Close
conn.Close
End Sub
DAO: rs.addNew, rs.update, and Scrolling
The following DAO (Data Access Objects) example creates a table my_dao and demonstrates the use of
rs.addNew, rs.update, and result set scrolling.
Private Sub myodbc_dao_Click()
Dim ws As Workspace
Dim conn As Connection
Dim queryDef As queryDef
Dim str As String
'connect to MySQL using MySQL ODBC 9.0 Unicode Driver
Set ws = DBEngine.CreateWorkspace("", "venu", "venu", dbUseODBC)
str = "odbc;DRIVER={MySQL ODBC 9.0 Unicode Driver};"_
& "SERVER=localhost;"_
& " DATABASE=test;"_
& "UID=venu;PWD=venu; FOUND_ROWS=1"
Set conn = ws.OpenConnection("test", dbDriverNoPrompt, False, str)
'Create table my_dao
Set queryDef = conn.CreateQueryDef("", "drop table if exists my_dao")
queryDef.Execute
Set queryDef = conn.CreateQueryDef("", "create table my_dao(Id INT AUTO_INCREMENT PRIMARY KEY, " _
& "Ts TIMESTAMP(14) NOT NULL, Name varchar(20), Id2 INT)")
queryDef.Execute
'Insert new records using rs.addNew
Set rs = conn.OpenRecordset("my_dao")
Dim i As Integer
For i = 10 To 15
rs.AddNew
rs!Name = "insert record" & i
rs!Id2 = i
rs.Update
Next i
rs.Close
'rs update..
Set rs = conn.OpenRecordset("my_dao")
rs.Edit
rs!Name = "updated-string"
rs.Update
rs.Close
'fetch the table back...
Set rs = conn.OpenRecordset("my_dao", dbOpenDynamic)
str = "Results:"
rs.MoveFirst
While Not rs.EOF
str = " " & rs!Id & " , " & rs!Name & ", " & rs!Ts & ", " & rs!Id2
Debug.Print "DATA:" & str
rs.MoveNext
Wend
'rs Scrolling
rs.MoveFirst
str = " FIRST ROW: " & rs!Id & " , " & rs!Name & ", " & rs!Ts & ", " & rs!Id2
Debug.Print str
rs.MoveLast
str = " LAST ROW: " & rs!Id & " , " & rs!Name & ", " & rs!Ts & ", " & rs!Id2
Debug.Print str
rs.MovePrevious
555

Connector/ODBC Programming
str = " LAST-1 ROW: " & rs!Id & " , " & rs!Name & ", " & rs!Ts & ", " & rs!Id2
Debug.Print str
'free all resources
rs.Close
queryDef.Close
conn.Close
ws.Close
End Sub
RDO: rs.addNew and rs.update
The following RDO (Remote Data Objects) example creates a table my_rdo and demonstrates the use of
rs.addNew and rs.update.
Dim rs As rdoResultset
Dim cn As New rdoConnection
Dim cl As rdoColumn
Dim SQL As String
'cn.Connect = "DSN=test;"
cn.Connect = "DRIVER={MySQL ODBC 9.0 Unicode Driver};"_
& "SERVER=localhost;"_
& " DATABASE=test;"_
& "UID=venu;PWD=venu; FOUND_ROWS=1"
cn.CursorDriver = rdUseOdbc
cn.EstablishConnection rdDriverPrompt
'drop table my_rdo
SQL = "drop table if exists my_rdo"
cn.Execute SQL, rdExecDirect
'create table my_rdo
SQL = "create table my_rdo(id int, name varchar(20))"
cn.Execute SQL, rdExecDirect
'insert - direct
SQL = "insert into my_rdo values (100,'venu')"
cn.Execute SQL, rdExecDirect
SQL = "insert into my_rdo values (200,'MySQL')"
cn.Execute SQL, rdExecDirect
'rs insert
SQL = "select * from my_rdo"
Set rs = cn.OpenResultset(SQL, rdOpenStatic, rdConcurRowVer, rdExecDirect)
rs.AddNew
rs!id = 300
rs!Name = "Insert1"
rs.Update
rs.Close
'rs insert
SQL = "select * from my_rdo"
Set rs = cn.OpenResultset(SQL, rdOpenStatic, rdConcurRowVer, rdExecDirect)
rs.AddNew
rs!id = 400
rs!Name = "Insert 2"
rs.Update
rs.Close
'rs update
SQL = "select * from my_rdo"
Set rs = cn.OpenResultset(SQL, rdOpenStatic, rdConcurRowVer, rdExecDirect)
rs.Edit
rs!id = 999
rs!Name = "updated"
rs.Update
rs.Close
'fetch back...
SQL = "select * from my_rdo"
Set rs = cn.OpenResultset(SQL, rdOpenStatic, rdConcurRowVer, rdExecDirect)
Do Until rs.EOF
For Each cl In rs.rdoColumns
Debug.Print cl.Value,
Next
556

Connector/ODBC Programming
rs.MoveNext
Debug.Print
Loop
Debug.Print "Row count="; rs.RowCount
'close
rs.Close
cn.Close
End Sub
5.6.7.2 Using Connector/ODBC with .NET
This section contains simple examples that demonstrate the use of Connector/ODBC drivers with
ODBC.NET.
Using Connector/ODBC with ODBC.NET and C# (C sharp)
The following sample creates a table my_odbc_net and demonstrates its use in C#.
/**
* @sample : mycon.cs
* @purpose : Demo sample for ODBC.NET using Connector/ODBC
*
**/
/* build command
*
* csc /t:exe
* /out:mycon.exe mycon.cs
* /r:System.Data.Odbc.dll
*/
using Console = System.Console;
using System.Data.Odbc;
namespace myodbc3
{
class mycon
{
static void Main(string[] args)
{
try
{
//Connection string for Connector/ODBC 9.0
string MyConString = "DRIVER={MySQL ODBC 9.0 Unicode Driver};" +
"SERVER=localhost;" +
"DATABASE=test;" +
"UID=venu;" +
"PASSWORD=venu;" +
"FOUND_ROWS=1";
//Connect to MySQL using Connector/ODBC
OdbcConnection MyConnection = new OdbcConnection(MyConString);
MyConnection.Open();
Console.WriteLine("\n !!! success, connected successfully !!!\n");
//Display connection information
Console.WriteLine("Connection Information:");
Console.WriteLine("\tConnection String:" +
MyConnection.ConnectionString);
Console.WriteLine("\tConnection Timeout:" +
MyConnection.ConnectionTimeout);
Console.WriteLine("\tDatabase:" +
MyConnection.Database);
Console.WriteLine("\tDataSource:" +
MyConnection.DataSource);
Console.WriteLine("\tDriver:" +
MyConnection.Driver);
Console.WriteLine("\tServerVersion:" +
MyConnection.ServerVersion);
//Create a sample table
OdbcCommand MyCommand =
557

Connector/ODBC Programming
new OdbcCommand("DROP TABLE IF EXISTS my_odbc_net",
MyConnection);
MyCommand.ExecuteNonQuery();
MyCommand.CommandText =
"CREATE TABLE my_odbc_net(id int, name varchar(20), idb bigint)";
MyCommand.ExecuteNonQuery();
//Insert
MyCommand.CommandText =
"INSERT INTO my_odbc_net VALUES(10,'venu', 300)";
Console.WriteLine("INSERT, Total rows affected:" +
MyCommand.ExecuteNonQuery());;
//Insert
MyCommand.CommandText =
"INSERT INTO my_odbc_net VALUES(20,'mysql',400)";
Console.WriteLine("INSERT, Total rows affected:" +
MyCommand.ExecuteNonQuery());
//Insert
MyCommand.CommandText =
"INSERT INTO my_odbc_net VALUES(20,'mysql',500)";
Console.WriteLine("INSERT, Total rows affected:" +
MyCommand.ExecuteNonQuery());
//Update
MyCommand.CommandText =
"UPDATE my_odbc_net SET id=999 WHERE id=20";
Console.WriteLine("Update, Total rows affected:" +
MyCommand.ExecuteNonQuery());
//COUNT(*)
MyCommand.CommandText =
"SELECT COUNT(*) as TRows FROM my_odbc_net";
Console.WriteLine("Total Rows:" +
MyCommand.ExecuteScalar());
//Fetch
MyCommand.CommandText = "SELECT * FROM my_odbc_net";
OdbcDataReader MyDataReader;
MyDataReader = MyCommand.ExecuteReader();
while (MyDataReader.Read())
{
Console.WriteLine("Data:" + MyDataReader.GetInt32(0) + " " +
MyDataReader.GetString(1) + " " +
MyDataReader.GetInt64(2));
}
//Close all resources
MyDataReader.Close();
MyConnection.Close();
}
catch (OdbcException MyOdbcException) //Catch any ODBC exception ..
{
for (int i=0; i < MyOdbcException.Errors.Count; i++)
{
Console.Write("ERROR #" + i + "\n" +
"Message: " +
MyOdbcException.Errors[i].Message + "\n" +
"Native: " +
MyOdbcException.Errors[i].NativeError.ToString() + "\n" +
"Source: " +
MyOdbcException.Errors[i].Source + "\n" +
"SQL: " +
MyOdbcException.Errors[i].SQLState + "\n");
}
}
}
}
}
Using Connector/ODBC with ODBC.NET and Visual Basic
The following sample creates a table my_vb_net and demonstrates the use in VB.
558

Connector/ODBC Programming
' @sample : myvb.vb
' @purpose : Demo sample for ODBC.NET using Connector/ODBC
'
'
' build command
'
' vbc /target:exe
' /out:myvb.exe
' /r:System.Data.Odbc.dll
' /r:System.dll
' /r:System.Data.dll
'
Imports System.Data.Odbc
Imports System
Module myvb
Sub Main()
Try
Dim MyConString As String = "DRIVER={MySQL ODBC 9.0 Unicode Driver};" & _
"SERVER=localhost;" & _
"DATABASE=test;" & _
"UID=venu;" & _
"PASSWORD=venu;" & _
"FOUND_ROWS=1;"
'Connection
Dim MyConnection As New OdbcConnection(MyConString)
MyConnection.Open()
Console.WriteLine("Connection State::" & MyConnection.State.ToString)
'Drop
Console.WriteLine("Dropping table")
Dim MyCommand As New OdbcCommand()
MyCommand.Connection = MyConnection
MyCommand.CommandText = "DROP TABLE IF EXISTS my_vb_net"
MyCommand.ExecuteNonQuery()
'Create
Console.WriteLine("Creating....")
MyCommand.CommandText = "CREATE TABLE my_vb_net(id int, name varchar(30))"
MyCommand.ExecuteNonQuery()
'Insert
MyCommand.CommandText = "INSERT INTO my_vb_net VALUES(10,'venu')"
Console.WriteLine("INSERT, Total rows affected:" & _
MyCommand.ExecuteNonQuery())
'Insert
MyCommand.CommandText = "INSERT INTO my_vb_net VALUES(20,'mysql')"
Console.WriteLine("INSERT, Total rows affected:" & _
MyCommand.ExecuteNonQuery())
'Insert
MyCommand.CommandText = "INSERT INTO my_vb_net VALUES(20,'mysql')"
Console.WriteLine("INSERT, Total rows affected:" & _
MyCommand.ExecuteNonQuery())
'Insert
MyCommand.CommandText = "INSERT INTO my_vb_net(id) VALUES(30)"
Console.WriteLine("INSERT, Total rows affected:" & _
MyCommand.ExecuteNonQuery())
'Update
MyCommand.CommandText = "UPDATE my_vb_net SET id=999 WHERE id=20"
Console.WriteLine("Update, Total rows affected:" & _
MyCommand.ExecuteNonQuery())
'COUNT(*)
MyCommand.CommandText = "SELECT COUNT(*) as TRows FROM my_vb_net"
Console.WriteLine("Total Rows:" & MyCommand.ExecuteScalar())
'Select
Console.WriteLine("Select * FROM my_vb_net")
MyCommand.CommandText = "SELECT * FROM my_vb_net"
Dim MyDataReader As OdbcDataReader
MyDataReader = MyCommand.ExecuteReader
While MyDataReader.Read
If MyDataReader("name") Is DBNull.Value Then
559

Connector/ODBC Reference
Console.WriteLine("id = " & _
CStr(MyDataReader("id")) & " name = " & _
"NULL")
Else
Console.WriteLine("id = " & _
CStr(MyDataReader("id")) & " name = " & _
CStr(MyDataReader("name")))
End If
End While
'Catch ODBC Exception
Catch MyOdbcException As OdbcException
Dim i As Integer
Console.WriteLine(MyOdbcException.ToString)
'Catch program exception
Catch MyException As Exception
Console.WriteLine(MyException.ToString)
End Try
End Sub
5.7 Connector/ODBC Reference
This section provides reference material for the Connector/ODBC API, showing supported functions and
methods, supported MySQL column types and the corresponding native type in Connector/ODBC, and the
error codes returned by Connector/ODBC when a fault occurs.
5.7.1 Connector/ODBC API Reference
This section summarizes ODBC routines, categorized by functionality.
For the complete ODBC API reference, please refer to the ODBC Programmer's Reference at http://
msdn.microsoft.com/en-us/library/ms714177.aspx.
An application can call SQLGetInfo function to obtain conformance information about Connector/
ODBC. To obtain information about support for a specific function in the driver, an application can call
SQLGetFunctions.
Note
For backward compatibility, the Connector/ODBC driver supports all deprecated
functions.
The following tables list Connector/ODBC API calls grouped by task:
Table 5.5 ODBC API Calls for Connecting to a Data Source
Function Name Connector/
ODBC
Supports?
Standard Purpose
SQLAllocHandle Yes ISO 92 Obtains an environment, connection, statement, or
descriptor handle.
SQLConnect Yes ISO 92 Connects to a specific driver by data source name,
user ID, and password.
SQLDriverConnect Yes ODBC Connects to a specific driver by connection string or
requests that the Driver Manager and driver display
connection dialog boxes for the user.
SQLAllocEnv Yes Deprecated Obtains an environment handle allocated from
driver.
SQLAllocConnect Yes Deprecated Obtains a connection handle
560

Connector/ODBC API Reference
Table 5.6 ODBC API Calls for Obtaining Information about a Driver and Data Source
Function Name Connector/
ODBC
Supports?
Standard Purpose
SQLDataSources No ISO 92 Returns the list of available data sources, handled
by the Driver Manager
SQLDrivers No ODBC Returns the list of installed drivers and their
attributes, handles by Driver Manager
SQLGetInfo Yes ISO 92 Returns information about a specific driver and data
source.
SQLGetFunctions Yes ISO 92 Returns supported driver functions.
SQLGetTypeInfo Yes ISO 92 Returns information about supported data types.
Table 5.7 ODBC API Calls for Setting and Retrieving Driver Attributes
Function Name Connector/
ODBC
Supports?
Standard Purpose
SQLSetConnectAttr Yes ISO 92 Sets a connection attribute.
SQLGetConnectAttr Yes ISO 92 Returns the value of a connection attribute.
SQLSetConnectOption Yes Deprecated Sets a connection option
SQLGetConnectOption Yes Deprecated Returns the value of a connection option
SQLSetEnvAttr Yes ISO 92 Sets an environment attribute.
SQLGetEnvAttr Yes ISO 92 Returns the value of an environment attribute.
SQLSetStmtAttr Yes ISO 92 Sets a statement attribute.
SQLGetStmtAttr Yes ISO 92 Returns the value of a statement attribute.
SQLSetStmtOption Yes Deprecated Sets a statement option
SQLGetStmtOption Yes Deprecated Returns the value of a statement option
Table 5.8 ODBC API Calls for Preparing SQL Requests
Function Name Connector/
ODBC
Supports?
Standard Purpose
SQLAllocStmt Yes Deprecated Allocates a statement handle
SQLPrepare Yes ISO 92 Prepares an SQL statement for later execution.
SQLBindParameter Yes ODBC Assigns storage for a parameter in an SQL
statement. Connector/ODBC 5.2 adds
support for “out” and “inout” parameters,
through the SQL_PARAM_OUTPUT or
SQL_PARAM_INPUT_OUTPUT type specifiers.
(“Out” and “inout” parameters are not supported for
LONGTEXT and LONGBLOB columns.)
SQLGetCursorName Yes ISO 92 Returns the cursor name associated with a
statement handle.
SQLSetCursorName Yes ISO 92 Specifies a cursor name.
SQLSetScrollOptions Yes ODBC Sets options that control cursor behavior.
561

Connector/ODBC API Reference
Table 5.9 ODBC API Calls for Submitting Requests
Function Name Connector/
ODBC
Supports?
Standard Purpose
SQLExecute Yes ISO 92 Executes a prepared statement.
SQLExecDirect Yes ISO 92 Executes a statement
SQLNativeSql Yes ODBC Returns the text of an SQL statement as translated
by the driver.
SQLDescribeParam No ODBC Returns the description for a specific parameter in a
statement. Not supported by Connector/ODBC—the
returned results should not be trusted.
SQLNumParams Yes ISO 92 Returns the number of parameters in a statement.
SQLParamData Yes ISO 92 Used in conjunction with SQLPutData to supply
parameter data at execution time. (Useful for long
data values.)
SQLPutData Yes ISO 92 Sends part or all of a data value for a parameter.
(Useful for long data values.)
Table 5.10 ODBC API Calls for Retrieving Results and Information about Results
Function Name Connector/
ODBC
Supports?
Standard Purpose
SQLRowCount Yes ISO 92 Returns the number of rows affected by an insert,
update, or delete request.
SQLNumResultCols Yes ISO 92 Returns the number of columns in the result set.
SQLDescribeCol Yes ISO 92 Describes a column in the result set.
SQLColAttribute Yes ISO 92 Describes attributes of a column in the result set.
SQLColAttributes Yes Deprecated Describes attributes of a column in the result set.
SQLFetch Yes ISO 92 Returns multiple result rows.
SQLFetchScroll Yes ISO 92 Returns scrollable result rows.
SQLExtendedFetch Yes Deprecated Returns scrollable result rows.
SQLSetPos Yes ODBC Positions a cursor within a fetched block of data and
enables an application to refresh data in the rowset
or to update or delete data in the result set.
SQLBulkOperations Yes ODBC Performs bulk insertions and bulk bookmark
operations, including update, delete, and fetch by
bookmark.
Table 5.11 ODBC API Calls for Retrieving Error or Diagnostic Information
Function Name Connector/
ODBC
Supports?
Standard Purpose
SQLError Yes Deprecated Returns additional error or status information
SQLGetDiagField Yes ISO 92 Returns additional diagnostic information (a single
field of the diagnostic data structure).
562

Connector/ODBC API Reference
Function Name Connector/
ODBC
Supports?
Standard Purpose
SQLGetDiagRec Yes ISO 92 Returns additional diagnostic information (multiple
fields of the diagnostic data structure).
Table 5.12 ODBC API Calls for Obtaining Information about the Data Source's System Tables
(Catalog Functions) Item
Function Name Connector/
ODBC
Supports?
Standard Purpose
SQLColumnPrivileges Yes ODBC Returns a list of columns and associated privileges
for one or more tables.
SQLColumns Yes X/Open Returns the list of column names in specified tables.
SQLForeignKeys Yes ODBC Returns a list of column names that make up foreign
keys, if they exist for a specified table.
SQLPrimaryKeys Yes ODBC Returns the list of column names that make up the
primary key for a table.
SQLSpecialColumns Yes X/Open Returns information about the optimal set of
columns that uniquely identifies a row in a specified
table, or the columns that are automatically
updated when any value in the row is updated by a
transaction.
SQLStatistics Yes ISO 92 Returns statistics about a single table and the list of
indexes associated with the table.
SQLTablePrivileges Yes ODBC Returns a list of tables and the privileges associated
with each table.
SQLTables Yes X/Open Returns the list of table names stored in a specific
data source.
Table 5.13 ODBC API Calls for Performing Transactions
Function Name Connector/
ODBC
Supports?
Standard Purpose
SQLTransact Yes Deprecated Commits or rolls back a transaction
SQLEndTran Yes ISO 92 Commits or rolls back a transaction.
Table 5.14 ODBC API Calls for Terminating a Statement
Function Name Connector/
ODBC
Supports?
Standard Purpose
SQLFreeStmt Yes ISO 92 Ends statement processing, discards pending
results, and, optionally, frees all resources
associated with the statement handle.
SQLCloseCursor Yes ISO 92 Closes a cursor that has been opened on a
statement handle.
SQLCancel Yes ISO 92 Cancels an SQL statement.
563

Connector/ODBC Data Types
Table 5.15 ODBC API Calls for Terminating a Connection
Function Name Connector/
ODBC
Supports?
Standard Purpose
SQLDisconnect Yes ISO 92 Closes the connection.
SQLFreeHandle Yes ISO 92 Releases an environment, connection, statement, or
descriptor handle.
SQLFreeConnect Yes Deprecated Releases connection handle.
SQLFreeEnv Yes Deprecated Releases an environment handle.
5.7.2 Connector/ODBC Data Types
The following table illustrates how Connector/ODBC maps the server data types to default SQL and C data
types.
Table 5.16 How Connector/ODBC Maps MySQL Data Types to SQL and C Data Types
Native Value SQL Type C Type
bigint unsigned SQL_BIGINT SQL_C_UBIGINT
bigint SQL_BIGINT SQL_C_SBIGINT
bit SQL_BIT SQL_C_BIT
bit SQL_CHAR SQL_C_CHAR
blob SQL_LONGVARBINARY SQL_C_BINARY
bool SQL_CHAR SQL_C_CHAR
char SQL_CHAR SQL_C_CHAR
date SQL_DATE SQL_C_DATE
datetime SQL_TIMESTAMP SQL_C_TIMESTAMP
decimal SQL_DECIMAL SQL_C_CHAR
double precision SQL_DOUBLE SQL_C_DOUBLE
double SQL_FLOAT SQL_C_DOUBLE
enum SQL_VARCHAR SQL_C_CHAR
float SQL_REAL SQL_C_FLOAT
int unsigned SQL_INTEGER SQL_C_ULONG
int SQL_INTEGER SQL_C_SLONG
integer unsigned SQL_INTEGER SQL_C_ULONG
integer SQL_INTEGER SQL_C_SLONG
long varbinary SQL_LONGVARBINARY SQL_C_BINARY
long varchar SQL_LONGVARCHAR SQL_C_CHAR
longblob SQL_LONGVARBINARY SQL_C_BINARY
longtext SQL_LONGVARCHAR SQL_C_CHAR
mediumblob SQL_LONGVARBINARY SQL_C_BINARY
mediumint unsigned SQL_INTEGER SQL_C_ULONG
mediumint SQL_INTEGER SQL_C_SLONG
564

Connector/ODBC Error Codes
Native Value SQL Type C Type
mediumtext SQL_LONGVARCHAR SQL_C_CHAR
numeric SQL_NUMERIC SQL_C_CHAR
real SQL_FLOAT SQL_C_DOUBLE
set SQL_VARCHAR SQL_C_CHAR
smallint unsigned SQL_SMALLINT SQL_C_USHORT
smallint SQL_SMALLINT SQL_C_SSHORT
text SQL_LONGVARCHAR SQL_C_CHAR
time SQL_TIME SQL_C_TIME
timestamp SQL_TIMESTAMP SQL_C_TIMESTAMP
tinyblob SQL_LONGVARBINARY SQL_C_BINARY
tinyint unsigned SQL_TINYINT SQL_C_UTINYINT
tinyint SQL_TINYINT SQL_C_STINYINT
tinytext SQL_LONGVARCHAR SQL_C_CHAR
varchar SQL_VARCHAR SQL_C_CHAR
year SQL_SMALLINT SQL_C_SHORT
5.7.3 Connector/ODBC Error Codes
The following tables lists the error codes returned by Connector/ODBC apart from the server errors.
Table 5.17 Special Error Codes Returned by Connector/ODBC
Native
Code
SQLSTATE 2 SQLSTATE 3 Error Message
500 01000 01000 General warning
501 01004 01004 String data, right truncated
502 01S02 01S02 Option value changed
503 01S03 01S03 No rows updated/deleted
504 01S04 01S04 More than one row updated/deleted
505 01S06 01S06 Attempt to fetch before the result set returned the first row
set
506 07001 07002 SQLBindParameter not used for all parameters
507 07005 07005 Prepared statement not a cursor-specification
508 07009 07009 Invalid descriptor index
509 08002 08002 Connection name in use
510 08003 08003 Connection does not exist
511 24000 24000 Invalid cursor state
512 25000 25000 Invalid transaction state
513 25S01 25S01 Transaction state unknown
514 34000 34000 Invalid cursor name
515 S1000 HY000 General driver defined error
565

Connector/ODBC Notes and Tips
Native
Code
SQLSTATE 2 SQLSTATE 3 Error Message
516 S1001 HY001 Memory allocation error
517 S1002 HY002 Invalid column number
518 S1003 HY003 Invalid application buffer type
519 S1004 HY004 Invalid SQL data type
520 S1009 HY009 Invalid use of null pointer
521 S1010 HY010 Function sequence error
522 S1011 HY011 Attribute can not be set now
523 S1012 HY012 Invalid transaction operation code
524 S1013 HY013 Memory management error
525 S1015 HY015 No cursor name available
526 S1024 HY024 Invalid attribute value
527 S1090 HY090 Invalid string or buffer length
528 S1091 HY091 Invalid descriptor field identifier
529 S1092 HY092 Invalid attribute/option identifier
530 S1093 HY093 Invalid parameter number
531 S1095 HY095 Function type out of range
532 S1106 HY106 Fetch type out of range
533 S1117 HY117 Row value out of range
534 S1109 HY109 Invalid cursor position
535 S1C00 HYC00 Optional feature not implemented
0 21S01 21S01 Column count does not match value count
0 23000 23000 Integrity constraint violation
0 42000 42000 Syntax error or access violation
0 42S02 42S02 Base table or view not found
0 42S12 42S12 Index not found
0 42S21 42S21 Column already exists
0 42S22 42S22 Column not found
0 08S01 08S01 Communication link failure
5.8 Connector/ODBC Notes and Tips
Here are some common notes and tips for using Connector/ODBC within different environments,
applications and tools. The notes provided here are based on the experiences of Connector/ODBC
developers and users.
5.8.1 Connector/ODBC General Functionality
This section provides help with common queries and areas of functionality in MySQL and how to use them
with Connector/ODBC.
5.8.1.1 Obtaining Auto-Increment Values
566

Connector/ODBC General Functionality
Obtaining the value of column that uses AUTO_INCREMENT after an INSERT statement can be achieved in
a number of different ways. To obtain the value immediately after an INSERT, use a SELECT query with the
LAST_INSERT_ID() function.
For example, using Connector/ODBC you would execute two separate statements, the INSERT statement
and the SELECT query to obtain the auto-increment value.
INSERT INTO tbl (auto,text) VALUES(NULL,'text');
SELECT LAST_INSERT_ID();
If you do not require the value within your application, but do require the value as part of another INSERT,
the entire process can be handled by executing the following statements:
INSERT INTO tbl (auto,text) VALUES(NULL,'text');
INSERT INTO tbl2 (id,text) VALUES(LAST_INSERT_ID(),'text');
Certain ODBC applications (including Delphi and Access) may have trouble obtaining the auto-increment
value using the previous examples. In this case, try the following statement as an alternative:
SELECT * FROM tbl WHERE auto IS NULL;
This alternative method requires that sql_auto_is_null variable is not set to 0. See Server System
Variables.
See also Obtaining the Unique ID for the Last Inserted Row.
5.8.1.2 Dynamic Cursor Support
Support for the dynamic cursor is provided in Connector/ODBC 3.51, but dynamic cursors are not
enabled by default. You can enable this function within Windows by selecting the Enable Dynamic
Cursor check box within the ODBC Data Source Administrator.
On other platforms, you can enable the dynamic cursor by adding 32 to the OPTION value when creating
the DSN.
5.8.1.3 Configuring Catalog and Schema Support
Many relational databases reference CATALOG and SCHEMA in ways that do not directly correspond to
what MySQL refers to as a database. It is neither a CATALOG nor a SCHEMA. Generally, catalogs are
collections of schemas, so the fully qualified name would look like catalog.schema.table.column.
Historically with MySQL ODBC Driver, CATALOG and DATABASE were two names used for the same
thing. At the same time SCHEMA was often used as a synonym for a MySQL Database. This would
suggest that CATALOG equals a SCHEMA, which is incorrect, but in the MySQL Server context they
would be the same thing.
In ODBC both schemas and catalogs can be used when referring to database objects such as tables. The
expectation on how to interpret these schema and catalog notions differs between developers, which is
why both the NO_CATALOG and NO_SCHEMA options exist: to cover all these expectations and allow
one to disable interpreting ODBC function parameters as CATALOG or SCHEMA explicitly.
The Connector/ODBC driver does not allow using catalog and schema functionality at the same time
because it would cause unsupported naming. However, some software such as MS SQL Server might
try do so through the linked server objects. This is why Connector/ODBC 8.0.26 added a NO_SCHEMA
option to MySQL ODBC Driver to report schemas as not supported, which is already done for catalogs
with the NO_CATALOG option. Using NO_SCHEMA causes the driver to report schema operations
unsupported through SQLGetInfo() call. As a result the client software will not attempt to access tables as
catalog.schema.table, but instead as catalog.table.
567

Connector/ODBC Application-Specific Tips
Table 5.18 Connector/ODBC NO_CATALOG and NO_SCHEMA combinations
NO_CATALOGNO_SCHEMADescription and notes
true true Driver does not support catalogs nor schemas.
false true Catalogs are supported and interpreted as MySQL database names, specifying
schema triggers an error.
true false Schemas are supported and interpreted as MySQL database names, specifying
catalog triggers an error.
false false Both catalogs and schemas are supported but it is an error if both are specified
at the same time. If only catalog or only schema is specified, it is interpreted as a
MySQL database name.
5.8.1.4 Connector/ODBC Performance
The Connector/ODBC driver has been optimized to provide very fast performance. If you experience
problems with the performance of Connector/ODBC, or notice a large amount of disk activity for simple
queries, there are a number of aspects to check:
• Ensure that ODBC Tracing is not enabled. With tracing enabled, a lot of information is recorded in
the tracing file by the ODBC Manager. You can check, and disable, tracing within Windows using the
Tracing panel of the ODBC Data Source Administrator. Within macOS, check the Tracing panel of
ODBC Administrator. See Section 5.5.10, “Getting an ODBC Trace File”.
• Make sure you are using the standard version of the driver, and not the debug version. The debug
version includes additional checks and reporting measures.
• Disable the Connector/ODBC driver trace and query logs. These options are enabled for each DSN,
so make sure to examine only the DSN that you are using in your application. Within Windows, you
can disable the Connector/ODBC and query logs by modifying the DSN configuration. Within macOS
and Unix, ensure that the driver trace (option value 4) and query logging (option value 524288) are not
enabled.
5.8.1.5 Setting ODBC Query Timeout in Windows
For more information on how to set the query timeout on Microsoft Windows when executing queries
through an ODBC connection, read the Microsoft knowledgebase document at https://docs.microsoft.com/
en-us/office/client-developer/access/desktop-database-reference/database-querytimeout-property-dao.
5.8.2 Connector/ODBC Application-Specific Tips
Most programs should work with Connector/ODBC, but for each of those listed here, there are specific
notes and tips to improve or enhance the way you work with Connector/ODBC and these applications.
With all applications, ensure that you are using the latest Connector/ODBC drivers, ODBC Manager and
any supporting libraries and interfaces used by your application. For example, on Windows, using the
latest version of Microsoft Data Access Components (MDAC) will improve the compatibility with ODBC in
general, and with the Connector/ODBC driver.
5.8.2.1 Using Connector/ODBC with Microsoft Applications
The majority of Microsoft applications have been tested with Connector/ODBC, including Microsoft Office,
Microsoft Access and the various programming languages supported within ASP and Microsoft Visual
Studio.
Microsoft Access
568

Connector/ODBC Application-Specific Tips
To improve the integration between Microsoft Access and MySQL through Connector/ODBC:
• For all versions of Access, enable the Connector/ODBC Return matching rows option. For Access
2.0, also enable the Simulate ODBC 1.0 option.
• Include a TIMESTAMP column in all tables that you want to be able to update. For maximum portability,
do not use a length specification in the column declaration (which is unsupported within MySQL in
versions earlier than 4.1).
• Include a primary key in each MySQL table you want to use with Access. If not, new or updated rows
may show up as #DELETED#.
• Use only DOUBLE float fields. Access fails when comparing with single-precision floats. The symptom
usually is that new or updated rows may show up as #DELETED# or that you cannot find or update rows.
• If you are using Connector/ODBC to link to a table that has a BIGINT column, the results are displayed
as #DELETED#. The work around solution is:
• Have one more dummy column with TIMESTAMP as the data type.
• Select the Change BIGINT columns to INT option in the connection dialog in ODBC DSN
Administrator.
• Delete the table link from Access and re-create it.
Old records may still display as #DELETED#, but newly added/updated records are displayed properly.
• If you still get the error Another user has changed your data after adding a TIMESTAMP
column, the following trick may help you:
Do not use a table data sheet view. Instead, create a form with the fields you want, and use that form
data sheet view. Set the DefaultValue property for the TIMESTAMP column to NOW(). Consider hiding
the TIMESTAMP column from view so your users are not confused.
• In some cases, Access may generate SQL statements that MySQL cannot understand. You can fix this
by selecting "Query|SQLSpecific|Pass-Through" from the Access menu.
• On Windows NT, Access reports BLOB columns as OLE OBJECTS. If you want to have MEMO columns
instead, change BLOB columns to TEXT with ALTER TABLE.
• Access cannot always handle the MySQL DATE column properly. If you have a problem with these,
change the columns to DATETIME.
• If you have in Access a column defined as BYTE, Access tries to export this as TINYINT instead of
TINYINT UNSIGNED. This gives you problems if you have values larger than 127 in the column.
• If you have very large (long) tables in Access, it might take a very long time to open them. Or you might
run low on virtual memory and eventually get an ODBC Query Failed error and the table cannot open.
To deal with this, select the following options:
• Return Matching Rows (2)
• Allow BIG Results (8).
These add up to a value of 10 (OPTION=10).
Some external articles and tips that may be useful when using Access, ODBC and Connector/ODBC:
• Read How to Trap ODBC Login Error Messages in Access
569

Connector/ODBC Application-Specific Tips
• Optimizing Access ODBC Applications
• Optimizing for Client/Server Performance
• Tips for Converting Applications to Using ODBCDirect
• Tips for Optimizing Queries on Attached SQL Tables
Microsoft Excel and Column Types
If you have problems importing data into Microsoft Excel, particularly numeric, date, and time values, this
is probably because of a bug in Excel, where the column type of the source data is used to determine the
data type when that data is inserted into a cell within the worksheet. The result is that Excel incorrectly
identifies the content and this affects both the display format and the data when it is used within
calculations.
To address this issue, use the CONCAT() function in your queries. The use of CONCAT() forces Excel
to treat the value as a string, which Excel will then parse and usually correctly identify the embedded
information.
However, even with this option, some data may be incorrectly formatted, even though the source data
remains unchanged. Use the Format Cells option within Excel to change the format of the displayed
information.
Microsoft Visual Basic
To be able to update a table, you must define a primary key for the table.
Visual Basic with ADO cannot handle big integers. This means that some queries like SHOW
PROCESSLIST do not work properly. The fix is to use OPTION=16384 in the ODBC connect string or to
select the Change BIGINT columns to INT option in the Connector/ODBC connect screen. You may
also want to select the Return matching rows option.
Microsoft Visual InterDev
If you have a BIGINT in your result, you may get the error [Microsoft][ODBC Driver Manager]
Driver does not support this parameter. Try selecting the Change BIGINT columns to
INT option in the Connector/ODBC connect screen.
Visual Objects
Select the Don't optimize column widths option.
Microsoft ADO
When you are coding with the ADO API and Connector/ODBC, you need to pay attention to some
default properties that aren't supported by the MySQL server. For example, using the CursorLocation
Property as adUseServer returns a result of −1 for the RecordCount Property. To have the right
value, you need to set this property to adUseClient, as shown in the VB code here:
Dim myconn As New ADODB.Connection
Dim myrs As New Recordset
Dim mySQL As String
Dim myrows As Long
myconn.Open "DSN=MyODBCsample"
mySQL = "SELECT * from user"
myrs.Source = mySQL
570

Connector/ODBC Application-Specific Tips
Set myrs.ActiveConnection = myconn
myrs.CursorLocation = adUseClient
myrs.Open
myrows = myrs.RecordCount
myrs.Close
myconn.Close
Another workaround is to use a SELECT COUNT(*) statement for a similar query to get the correct row
count.
To find the number of rows affected by a specific SQL statement in ADO, use the RecordsAffected
property in the ADO execute method. For more information on the usage of execute method, refer to http://
msdn.microsoft.com/library/default.asp?url=/library/en-us/ado270/htm/mdmthcnnexecute.asp.
For information, see ActiveX Data Objects(ADO) Frequently Asked Questions.
Using Connector/ODBC with Active Server Pages (ASP)
Select the Return matching rows option in the DSN.
For more information about how to access MySQL through ASP using Connector/ODBC, refer to the
following articles:
• Using MyODBC To Access Your MySQL Database Via ASP
• ASP and MySQL at DWAM.NT
A Frequently Asked Questions list for ASP can be found at http://support.microsoft.com/default.aspx?scid=/
Support/ActiveServer/faq/data/adofaq.asp.
Using Connector/ODBC with Visual Basic (ADO, DAO and RDO) and ASP
Some articles that may help with Visual Basic and ASP:
5.8.2.2 Using Connector/ODBC with Borland Applications
With all Borland applications where the Borland Database Engine (BDE) is used, follow these steps to
improve compatibility:
• Update to BDE 3.2 or newer.
• Enable the Don't optimize column widths option in the DSN.
• Enabled the Return matching rows option in the DSN.
Using Connector/ODBC with Borland Builder 4
When you start a query, you can use the Active property or the Open method.
The Active property starts by automatically issuing a SELECT * FROM ... query. That may affect
performance for large tables.
Using Connector/ODBC with Delphi
571

Connector/ODBC Application-Specific Tips
Also, here is some potentially useful Delphi code that sets up both an ODBC entry and a BDE entry for
Connector/ODBC. The BDE entry requires a BDE Alias Editor that is free at a Delphi Super Page near you.
(Thanks to Bryan Brunton <[email protected]> for this):
fReg:= TRegistry.Create;
fReg.OpenKey('\Software\ODBC\ODBC.INI\DocumentsFab', True);
fReg.WriteString('Database', 'Documents');
fReg.WriteString('Description', ' ');
fReg.WriteString('Driver', 'C:\WINNT\System32\myodbc.dll');
fReg.WriteString('Flag', '1');
fReg.WriteString('Password', '');
fReg.WriteString('Port', ' ');
fReg.WriteString('Server', 'xmark');
fReg.WriteString('User', 'winuser');
fReg.OpenKey('\Software\ODBC\ODBC.INI\ODBC Data Sources', True);
fReg.WriteString('DocumentsFab', 'MySQL');
fReg.CloseKey;
fReg.Free;
Memo1.Lines.Add('DATABASE NAME=');
Memo1.Lines.Add('USER NAME=');
Memo1.Lines.Add('ODBC DSN=DocumentsFab');
Memo1.Lines.Add('OPEN MODE=READ/WRITE');
Memo1.Lines.Add('BATCH COUNT=200');
Memo1.Lines.Add('LANGDRIVER=');
Memo1.Lines.Add('MAX ROWS=-1');
Memo1.Lines.Add('SCHEMA CACHE DIR=');
Memo1.Lines.Add('SCHEMA CACHE SIZE=8');
Memo1.Lines.Add('SCHEMA CACHE TIME=-1');
Memo1.Lines.Add('SQLPASSTHRU MODE=SHARED AUTOCOMMIT');
Memo1.Lines.Add('SQLQRYMODE=');
Memo1.Lines.Add('ENABLE SCHEMA CACHE=FALSE');
Memo1.Lines.Add('ENABLE BCD=FALSE');
Memo1.Lines.Add('ROWSET SIZE=20');
Memo1.Lines.Add('BLOBS TO CACHE=64');
Memo1.Lines.Add('BLOB SIZE=32');
AliasEditor.Add('DocumentsFab','MySQL',Memo1.Lines);
Using Connector/ODBC with C++ Builder
Tested with BDE 3.0. The only known problem is that when the table schema changes, query fields are
not updated. BDE, however, does not seem to recognize primary keys, only the index named PRIMARY,
although this has not been a problem.
5.8.2.3 Using Connector/ODBC with ColdFusion
The following information is taken from the ColdFusion documentation:
Use the following information to configure ColdFusion Server for Linux to use the unixODBC driver with
Connector/ODBC for MySQL data sources. You can download Connector/ODBC at https://dev.mysql.com/
downloads/Connector/ODBC/.
ColdFusion version 4.5.1 lets you use the ColdFusion Administrator to add the MySQL data source.
However, the driver is not included with ColdFusion version 4.5.1. Before the MySQL driver appears in the
ODBC data sources drop-down list, build and copy the Connector/ODBC driver to /opt/coldfusion/
lib/libmyodbc.so.
The Contrib directory contains the program mydsn-xxx.zip which lets you build and remove the DSN
registry file for the Connector/ODBC driver on ColdFusion applications.
For more information and guides on using ColdFusion and Connector/ODBC, see the following external
sites:
572

Connector/ODBC and the Application Both Use OpenSSL
• Troubleshooting Data Sources and Database Connectivity for Unix Platforms.
5.8.2.4 Using Connector/ODBC with OpenOffice.org
Open Office (http://www.openoffice.org) How-to: MySQL + OpenOffice. How-to: OpenOffice + MyODBC +
unixODBC.
5.8.2.5 Using Connector/ODBC with Pervasive Software DataJunction
You have to change it to output VARCHAR rather than ENUM, as it exports the latter in a manner that causes
MySQL problems.
5.8.2.6 Using Connector/ODBC with SunSystems Vision
Select the Return matching rows option.
5.8.3 Connector/ODBC and the Application Both Use OpenSSL
If Connector/ODBC is connecting securely with the MySQL server and the application using the connection
makes calls itself to an OpenSSL library, the application might then fail, as two copies of the OpenSSL
library will then be in use.
Note
Connector/ODBC 8.0 and higher link to OpenSSL dynamically while earlier
Connector/ODBC versions link to OpenSSL statically. This solves problems related
to using two OpenSSL copies from the same application.
Note
The TLSv1.0 and TLSv1.1 connection protocols were deprecated in Connector/
ODBC 8.0.26 and removed in version 8.0.28.
Note
See also the tls-versions connection option.
To prevent the issue, in your application, do not allow OpenSSL initialization in one thread and the
opening of an Connector/ODBC connection in another thread (which also initializes openSSL) to happen
simultaneously. For example, use a mutex to ensure synchronization between SQLDriverConnect() or
SQLConnect() calls and openSSL initialization. In addition to that, implement the following if possible:
• Use a build of Connector/ODBC that links (statically or dynamically) to a version of the
libmysqlclient library that is in turn dynamically linked to the same OpenSSL library that the
application calls.
• When creating a build of Connector/ODBC that links (statically or dynamically) to a version of the
libmysqlclient library that is in turn statically linked to an OpenSSL library, do NOT export OpenSSL
symbols in your build. That prevents incorrect resolution of application symbols; however, that does not
prevent other issues that come with running two copies of OpenSSL code within a single application.
5.8.4 Connector/ODBC Errors and Resolutions (FAQ)
The following section details some common errors and their suggested fix or alternative solution. If you are
still experiencing problems, use the Connector/ODBC mailing list; see Section 5.9.1, “Connector/ODBC
Community Support”.
573

Connector/ODBC Errors and Resolutions (FAQ)
Many problems can be resolved by upgrading your Connector/ODBC drivers to the latest available release.
On Windows, make sure that you have the latest versions of the Microsoft Data Access Components
(MDAC) installed.
64-Bit Windows and ODBC Data Source Administrator
I have installed Connector/ODBC on Windows XP x64 Edition or Windows Server 2003 R2 x64. The
installation completed successfully, but the Connector/ODBC driver does not appear in ODBC Data
Source Administrator.
This is not a bug, but is related to the way Windows x64 editions operate with the ODBC driver. On
Windows x64 editions, the Connector/ODBC driver is installed in the %SystemRoot%\SysWOW64
folder. However, the default ODBC Data Source Administrator that is available through the
Administrative Tools or Control Panel in Windows x64 Editions is located in the %SystemRoot%
\system32 folder, and only searches this folder for ODBC drivers.
On Windows x64 editions, use the ODBC administration tool located at %SystemRoot%
\SysWOW64\odbcad32.exe, this will correctly locate the installed Connector/ODBC drivers and enable
you to create a Connector/ODBC DSN.
This issue was originally reported as Bug #20301.
Error 10061 (Cannot connect to server)
When connecting or using the Test button in ODBC Data Source Administrator I get error 10061
(Cannot connect to server)
This error can be raised by a number of different issues, including server problems, network problems, and
firewall and port blocking problems. For more information, see Can't connect to [local] MySQL server.
"Transactions are not enabled" Error
The following error is reported when using transactions: Transactions are not enabled
This error indicates that you are trying to use transactions with a MySQL table that does not support
transactions. Transactions are supported within MySQL when using the InnoDB database engine, which
is the default storage engine in MySQL 5.5 and higher. In versions of MySQL before MySQL 5.1, you may
also use the BDB engine.
Check the following before continuing:
• Verify that your MySQL server supports a transactional database engine. Use SHOW ENGINES to obtain
a list of the available engine types.
• Verify that the tables you are updating use a transactional database engine.
• Ensure that you have not enabled the disable transactions option in your DSN.
#DELETED# Records Reported by Access
Access reports records as #DELETED# when inserting or updating records in linked tables.
If the inserted or updated records are shown as #DELETED# in Access, then:
• If you are using Access 2000, get and install the newest (version 2.6 or higher) Microsoft MDAC
(Microsoft Data Access Components) from https://www.microsoft.com/en-in/download/
details.aspx?id=21995. This fixes a bug in Access that when you export data to MySQL, the table and
column names aren't specified.
574

Connector/ODBC Errors and Resolutions (FAQ)
Also, get and apply the Microsoft Jet 4.0 Service Pack 5 (SP5), which can be found at http://
support.microsoft.com/default.aspx?scid=kb;EN-US;q239114. This fixes some cases where columns are
marked as #DELETED# in Access.
• For all versions of Access, enable the Connector/ODBC Return matching rows option. For Access
2.0, also enable the Simulate ODBC 1.0 option.
• Include a TIMESTAMP in all tables that you want to be able to update.
• Include a primary key in the table. If not, new or updated rows may show up as #DELETED#.
• Use only DOUBLE float fields. Access fails when comparing with single-precision floats. The symptom
usually is that new or updated rows may show up as #DELETED# or that you cannot find or update rows.
• If you are using Connector/ODBC to link to a table that has a BIGINT column, the results are displayed
as #DELETED. The work around solution is:
• Have one more dummy column with TIMESTAMP as the data type.
• Select the Change BIGINT columns to INT option in the connection dialog in ODBC DSN
Administrator.
• Delete the table link from Access and re-create it.
Old records still display as #DELETED#, but newly added/updated records are displayed properly.
Write Conflicts or Row Location Errors
How do I handle Write Conflicts or Row Location errors?
If you see the following errors, select the Return Matching Rows option in the DSN configuration
dialog, or specify OPTION=2, as the connection parameter:
Write Conflict. Another user has changed your data.
Row cannot be located for updating. Some values may have been changed
since it was last read.
Importing from Access 97
Exporting data from Access 97 to MySQL reports a Syntax Error.
This error is specific to Access 97 and versions of Connector/ODBC earlier than 3.51.02. Update to the
latest version of the Connector/ODBC driver to resolve this problem.
Importing from Microsoft DTS
Exporting data from Microsoft DTS to MySQL reports a Syntax Error.
This error occurs only with MySQL tables using the TEXT or VARCHAR data types. You can fix this error by
upgrading your Connector/ODBC driver to version 3.51.02 or higher.
SQL_NO_DATA Exception from ODBC.NET
Using ODBC.NET with Connector/ODBC, while fetching empty string (0 length), it starts giving the
SQL_NO_DATA exception.
You can get the patch that addresses this problem from http://support.microsoft.com/default.aspx?
scid=kb;EN-US;q319243.
575

Connector/ODBC Errors and Resolutions (FAQ)
Error with SELECT COUNT(*)
Using SELECT COUNT(*) FROM tbl_name within Visual Basic and ASP returns an error.
This error occurs because the COUNT(*) expression is returning a BIGINT, and ADO cannot make sense
of a number this big. Select the Change BIGINT columns to INT option (option value 16384).
Multiple-Step Operation Error
Using the AppendChunk() or GetChunk() ADO methods, the Multiple-step operation
generated errors. Check each status value error is returned.
The GetChunk() and AppendChunk() methods from ADO do not work as expected when the cursor
location is specified as adUseServer. On the other hand, you can overcome this error by using
adUseClient.
A simple example can be found from http://www.dwam.net/iishelp/ado/docs/adomth02_4.htm
Modified Record Error
Access returns Another user had modified the record that you have modified while
editing records on a Linked Table.
In most cases, this can be solved by doing one of the following things:
• Add a primary key for the table if one doesn't exist.
• Add a timestamp column if one doesn't exist.
• Only use double-precision float fields. Some programs may fail when they compare single-precision
floats.
If these strategies do not help, start by making a log file from the ODBC manager (the log you get when
requesting logs from ODBCADMIN) and a Connector/ODBC log to help you figure out why things go
wrong. For instructions, see Section 5.5.10, “Getting an ODBC Trace File”.
Direct Application Linking Under Unix or Linux
When linking an application directly to the Connector/ODBC library under Unix or Linux, the application
crashes.
Connector/ODBC under Unix or Linux is not compatible with direct application linking. To connect to an
ODBC source, use a driver manager, such as iODBC or unixODBC.
Microsoft Office and DATE or TIMESTAMP Columns
Applications in the Microsoft Office suite cannot update tables that have DATE or TIMESTAMP columns.
This is a known issue with Connector/ODBC. Ensure that the field has a default value (rather than NULL)
and that the default value is nonzero (that is, something other than 0000-00-00 00:00:00).
INFORMATION_SCHEMA Database
When connecting Connector/ODBC 5.x to a MySQL 4.x server, the error 1044 Access denied for
user 'xxx'@'%' to database 'information_schema' is returned.
Connector/ODBC 5.x is designed to work with MySQL 5.0 or later, taking advantage of the
INFORMATION_SCHEMA database to determine data definition information. Support for MySQL 4.1 is
planned for the final release.
576

Connector/ODBC Errors and Resolutions (FAQ)
S1T00 Error
When calling SQLTables, the error S1T00 is returned, but I cannot find this in the list of error numbers for
Connector/ODBC.
The S1T00 error indicates that a general timeout has occurred within the ODBC system and is not a
MySQL error. Typically it indicates that the connection you are using is stale, the server is too busy to
accept your request or that the server has gone away.
"Table does not exist" Error in Access 2000
When linking to tables in Access 2000 and generating links to tables programmatically, rather than through
the table designer interface, you may get errors about tables not existing.
There is a known issue with a specific version of the msjet40.dll that exhibits this issue. The version
affected is 4.0.9025.0. Reverting to an older version will enable you to create the links. If you have recently
updated your version, check your WINDOWS directory for the older version of the file and copy it to the
drivers directory.
Batched Statements
When I try to use batched statements, the execution of the batched statements fails.
Batched statement support was added in 3.51.18. Support for batched statements is not enabled by
default. Enable option FLAG_MULTI_STATEMENTS, value 67108864, or select the Allow multiple
statements flag within a GUI configuration. Batched statements using prepared statements is not
supported in MySQL.
Packet Errors with ADODB and Excel
When connecting to a MySQL server using ADODB and Excel, occasionally the application fails to
communicate with the server and the error Got an error reading communication packets
appears in the error log.
This error may be related to Keyboard Logger 1.1 from PanteraSoft.com, which is known to interfere with
the network communication between MySQL Connector/ODBC and MySQL.
Outer Join Error
When using some applications to access a MySQL server using Connector/ODBC and outer joins, an error
is reported regarding the Outer Join Escape Sequence.
This is a known issue with MySQL Connector/ODBC which is not correctly parsing the "Outer Join Escape
Sequence", as per the specs at Microsoft ODBC Specs. Currently, Connector/ODBC will return a value >
0 when asked for SQL_OJ_CAPABILITIES even though no parsing takes place in the driver to handle the
outer join escape sequence.
Hebrew/CJK Characters
I can correctly store extended characters in the database (Hebrew/CJK) using Connector/ODBC 5.1, but
when I retrieve the data, the text is not formatted correctly and I get garbled characters.
When using ASP and UTF8 characters, add the following to your ASP files to ensure that the data returned
is correctly encoded:
Response.CodePage = 65001
Response.CharSet = "utf-8"
577

Connector/ODBC Support
Duplicate Entry in Installed Programs List
I have a duplicate MySQL Connector/ODBC entry within my Installed Programs list, but I cannot delete
one of them.
This problem can occur when you upgrade an existing Connector/ODBC installation, rather than removing
and then installing the updated version.
Warning
To fix the problem, use any working uninstallers to remove existing installations;
then may have to edit the contents of the registry. Make sure you have a backup of
your registry information before attempting any editing of the registry contents.
Values Truncated to 255 Characters
When submitting queries with parameter binding using UPDATE, my field values are being truncated to 255
characters.
Ensure that the FLAG_BIG_PACKETS option is set for your connection. This removes the 255 character
limitation on bound parameters.
Disabling Data-At-Execution
Is it possible to disable data-at-execution using a flag?
If you do not want to use data-at-execution, remove the corresponding calls. For example:
SQLLEN ylen = SQL_LEN_DATA_AT_EXEC(10);
SQLBindCol(hstmt,2,SQL_C_BINARY, buf, 10, &ylen);
Would become:
SQLBindCol(hstmt,2,SQL_C_BINARY, buf, 10, NULL);
This example also replaced &ylen with NULL in the call to SQLBindCol().
For further information, refer to the MSDN documentation for SQLBindCol().
NULLABLE Attribute for AUTO_INCREMENT Columns
When you call SQLColumns() for a table column that is AUTO_INCREMENT, the NULLABLE column of the
result set is always SQL_NULLABLE (1).
This is because MySQL reports the DEFAULT value for such a column as NULL. It means, if you insert a
NULL value into the column, you will get the next integer value for the table's auto_increment counter.
5.9 Connector/ODBC Support
There are many different places where you can get support for using Connector/ODBC. Always try
the Connector/ODBC Mailing List or Connector/ODBC Forum. See Section 5.9.1, “Connector/ODBC
Community Support”, for help before reporting a specific bug or issue to MySQL.
5.9.1 Connector/ODBC Community Support
Community support from experienced users is also available through the ODBC Forum. You may also find
help from other users in the other MySQL Forums, located at http://forums.mysql.com.
578

How to Report Connector/ODBC Problems or Bugs
5.9.2 How to Report Connector/ODBC Problems or Bugs
If you encounter difficulties or problems with Connector/ODBC, start by making a log file from the ODBC
Manager (the log you get when requesting logs from ODBC ADMIN) and Connector/ODBC. The procedure
for doing this is described in Section 5.5.10, “Getting an ODBC Trace File”.
Check the Connector/ODBC trace file to find out what could be wrong. Determine what statements were
issued by searching for the string >mysql_real_query in the myodbc.log file.
Also, try issuing the statements from the mysql client program or from admndemo. This helps you
determine whether the error is in Connector/ODBC or MySQL.
Ideally, include the following information with your bug report:
• Operating system and version
• Connector/ODBC version
• ODBC Driver Manager type and version
• MySQL server version
• ODBC trace from Driver Manager
• Connector/ODBC log file from Connector/ODBC driver
• Simple reproducible sample
The more information you supply, the more likely it is that we can fix the problem.
If you are unable to find out what is wrong, the last option is to create an archive in tar or zip format that
contains a Connector/ODBC trace file, the ODBC log file, and a README file that explains the problem.
Initiate a bug report for our bugs database at http://bugs.mysql.com/, then click the Files tab in the bug
report for instructions on uploading the archive to the bugs database. Only MySQL engineers have access
to the files you upload, and we are very discreet with the data.
If you can create a program that also demonstrates the problem, please include it in the archive as well.
If the program works with another SQL server, include an ODBC log file where you perform exactly the
same SQL statements so that we can compare the results between the two systems.
Remember that the more information you can supply to us, the more likely it is that we can fix the problem.
5.9.3 Connector/ODBC Version History
This section highlights substantial changes per major Connector/ODBC release series, especially useful
when updating legacy code. The connector release model changed after version 8.0, and now releases
one version. The latest Connector/ODBC version supports all active MySQL Server versions.
Information about each Connector/ODBC version; for release notes, see the Connector/ODBC release
notes.
• Connector/ODBC 8.x: 8.1.0 is the first GA release version that supersedes the 8.0 series. MySQL
connector releases use the latest Innovation release number. For example, when MySQL Server
released versions 5.7.43, 8.0.34, and 8.1.0, this connector released connector version (8.1.0) that
connects to all three MySQL Server versions.
579

Connector/ODBC Version History
This is the first series without 32-bit support, which ended for all MySQL products.
• Connector/ODBC 8.0: added MySQL Server 8.0 support, including caching_sha2_password and the
related GET_SERVER_PUBLIC_KEY connection attribute.
Note
As of 8.0.35, 32-bit Connector/ODBC builds exist for Windows. The 8.0 series no
longer includes new functionality but it does contain bug fixes. You're encouraged
to use the latest Connector/ODBC version and not the 8.0 series if you do not
need 32-bit builds.
• Connector/ODBC 5.3: functions with MySQL Server versions between 4.1 and 5.7. It does not
work with 4.0 or earlier releases, and does not support all MySQL 8 features. It conforms to the
ODBC 3.8 specification and contains key ODBC 3.8 features including self-identification as a ODBC
3.8 driver, streaming of output parameters (supported for binary types only), and support of the
SQL_ATTR_RESET_CONNECTION connection attribute (for the Unicode driver only). Connector/ODBC
5.3 also introduces a GTK+-based setup library, providing GUI DSN setup dialog on some Unix-based
systems. The library is currently included in the Oracle Linux 6 and Debian 6 binary packages. Other
new features in the 5.3 series include file DSN and bookmark support.
Connector/ODBC 5.3.11 added caching_sha2_password support by adding the
GET_SERVER_PUBLIC_KEY connection attribute.
• Connector/ODBC 5.2: upgrades the ANSI driver of Connector/ODBC 3.51 to the 5.x code base. It also
includes new features, such as enabling server-side prepared statements by default. At installation
time, you can choose the Unicode driver for the broadest compatibility with data sources using various
character sets, or the ANSI driver for optimal performance with a more limited range of character sets. It
works with MySQL versions 4.1 to 5.7.
• Connector/ODBC 5.1: is a partial rewrite of the of the 3.51 code base, and is designed to work with
MySQL versions 4.1 to 5.7.
Connector/ODBC 5.1: also includes the following changes and improvements over the 3.51 release:
• Improved support on Windows 64-bit platforms.
• Full Unicode support at the driver level. This includes support for the SQL_WCHAR data type, and
support for Unicode login, password and DSN configurations. For more information, see Microsoft
Knowledgebase Article #716246.
• Support for the SQL_NUMERIC_STRUCT data type, which provides easier access to the precise
definition of numeric values. For more information, see Microsoft Knowledgebase Article #714556
• Native Windows setup library. This replaces the Qt library based interface for configuring DSN
information within the ODBC Data Sources application.
• Support for the ODBC descriptor, which improves the handling and metadata of columns and
parameter data. For more information, see Microsoft Knowledgebase Article #716339.
• Connector/ODBC 3.51, also known as the MySQL ODBC 3.51 driver, is a 32-bit ODBC driver.
Connector/ODBC 3.51 has support for ODBC 3.5x specification level 1 (complete core API + level 2
features) to continue to provide all functionality of ODBC for accessing MySQL.
The manual for versions of Connector/ODBC older than 5.3 can be located in the corresponding binary or
source distribution.
580

Connector/ODBC Version History
Note
Versions of Connector/ODBC earlier than the 3.51 revision were not fully compliant
with the ODBC specification.
Note
From this section onward, the primary focus of this guide is the Connector/ODBC
5.3 driver.
Note
Version numbers for MySQL products are formatted as X.X.X. However, Windows
tools (Control Panel, properties display) may show the version numbers as
XX.XX.XX. For example, the official MySQL formatted version number 5.0.9 may
be displayed by Windows tools as 5.00.09. The two versions are the same; only the
number display formats are different.
581

582

Chapter 6 MySQL Connector/Python Developer Guide
Table of Contents
6.1 Introduction to MySQL Connector/Python ................................................................................... 584
6.2 Guidelines for Python Developers .............................................................................................. 584
6.3 Connector/Python Versions ....................................................................................................... 586
6.4 Connector/Python Installation .................................................................................................... 588
6.4.1 Obtaining Connector/Python ........................................................................................... 588
6.4.2 Installing Connector/Python from a Binary Distribution ..................................................... 588
6.4.3 Installing Connector/Python from a Source Distribution .................................................... 589
6.4.4 Verifying Your Connector/Python Installation ................................................................... 591
6.5 Connector/Python Coding Examples .......................................................................................... 591
6.5.1 Connecting to MySQL Using Connector/Python ............................................................... 592
6.5.2 Creating Tables Using Connector/Python ........................................................................ 594
6.5.3 Inserting Data Using Connector/Python ........................................................................... 596
6.5.4 Querying Data Using Connector/Python .......................................................................... 597
6.6 Connector/Python Tutorials ....................................................................................................... 598
6.6.1 Tutorial: Raise Employee's Salary Using a Buffered Cursor .............................................. 598
6.7 Connector/Python Connection Establishment ............................................................................. 599
6.7.1 Connector/Python Connection Arguments ....................................................................... 599
6.7.2 Connector/Python Option-File Support ............................................................................ 607
6.8 Connector/Python Other Topics ................................................................................................. 609
6.8.1 Connector/Python Logging .............................................................................................. 609
6.8.2 Telemetry Support ......................................................................................................... 609
6.8.3 Asynchronous Connectivity ............................................................................................. 612
6.8.4 Connector/Python Connection Pooling ............................................................................ 621
6.8.5 Connector/Python Django Back End ............................................................................... 622
6.9 Connector/Python API Reference .............................................................................................. 623
6.9.1 mysql.connector Module ................................................................................................. 624
6.9.2 connection.MySQLConnection Class ............................................................................... 625
6.9.3 pooling.MySQLConnectionPool Class .............................................................................. 637
6.9.4 pooling.PooledMySQLConnection Class .......................................................................... 639
6.9.5 cursor.MySQLCursor Class ............................................................................................ 640
6.9.6 Subclasses cursor.MySQLCursor .................................................................................... 649
6.9.7 constants.ClientFlag Class .............................................................................................. 653
6.9.8 constants.FieldType Class .............................................................................................. 653
6.9.9 constants.SQLMode Class .............................................................................................. 653
6.9.10 constants.CharacterSet Class ....................................................................................... 654
6.9.11 constants.RefreshOption Class ..................................................................................... 654
6.9.12 Errors and Exceptions .................................................................................................. 654
MySQL Connector/Python is a self-contained Python driver for communicating with MySQL servers.
For notes detailing the changes in each release of Connector/Python, see MySQL Connector/Python
Release Notes.
For legal information, see the Legal Notices.
For help with using MySQL, please visit the MySQL Forums, where you can discuss your issues with other
MySQL users.
583

Introduction to MySQL Connector/Python
Licensing information. This product may include third-party software, used under license. If you are
using a Commercial release of MySQL Connector/Python, see this document for licensing information,
including licensing information relating to third-party software that may be included in this Commercial
release. If you are using a Community release of MySQL Connector/Python, see this document for
licensing information, including licensing information relating to third-party software that may be included in
this Community release.
6.1 Introduction to MySQL Connector/Python
MySQL Connector/Python enables Python programs to access MySQL databases, using an API that is
compliant with the Python Database API Specification v2.0 (PEP 249).
For notes detailing the changes in each release of Connector/Python, see MySQL Connector/Python
Release Notes.
MySQL Connector/Python includes support for:
• Almost all features provided by MySQL Server version 8.0 and higher.
• Connector/Python supports X DevAPI. For X DevAPI specific documentation, see X DevAPI User Guide.
Note
X DevAPI support was separated into its own package (mysqlx-connector-
python) in Connector/Python 8.3.0. For related information, see Section 6.4,
“Connector/Python Installation”.
• Converting parameter values back and forth between Python and MySQL data types, for example
Python datetime and MySQL DATETIME. You can turn automatic conversion on for convenience, or off
for optimal performance.
• All MySQL extensions to standard SQL syntax.
• Protocol compression, which enables compressing the data stream between the client and server.
• Connections using TCP/IP sockets and on Unix using Unix sockets.
• Secure TCP/IP connections using SSL.
• Self-contained driver. Connector/Python does not require the MySQL client library or any Python
modules outside the standard library.
For information about which versions of Python can be used with different versions of MySQL Connector/
Python, see Section 6.3, “Connector/Python Versions”.
Note
Connector/Python does not support the old MySQL Server authentication methods,
which means that MySQL versions prior to 4.1 will not work.
6.2 Guidelines for Python Developers
The following guidelines cover aspects of developing MySQL applications that might not be immediately
obvious to developers coming from a Python background:
• For security, do not hardcode the values needed to connect and log into the database in your main
script. Python has the convention of a config.py module, where you can keep such values separate
from the rest of your code.
584

Guidelines for Python Developers
• Python scripts often build up and tear down large data structures in memory, up to the limits of available
RAM. Because MySQL often deals with data sets that are many times larger than available memory,
techniques that optimize storage space and disk I/O are especially important. For example, in MySQL
tables, you typically use numeric IDs rather than string-based dictionary keys, so that the key values
are compact and have a predictable length. This is especially important for columns that make up the
primary key for an InnoDB table, because those column values are duplicated within each secondary
index.
• Any application that accepts input must expect to handle bad data.
The bad data might be accidental, such as out-of-range values or misformatted strings. The application
can use server-side checks such as unique constraints and NOT NULL constraints, to keep the bad data
from ever reaching the database. On the client side, use techniques such as exception handlers to report
any problems and take corrective action.
The bad data might also be deliberate, representing an “SQL injection” attack. For example, input values
might contain quotation marks, semicolons, % and _ wildcard characters and other characters significant
in SQL statements. Validate input values to make sure they have only the expected characters. Escape
any special characters that could change the intended behavior when substituted into an SQL statement.
Never concatenate a user input value into an SQL statement without doing validation and escaping first.
Even when accepting input generated by some other program, expect that the other program could also
have been compromised and be sending you incorrect or malicious data.
• Because the result sets from SQL queries can be very large, use the appropriate method to retrieve
items from the result set as you loop through them. fetchone() retrieves a single item, when you know
the result set contains a single row. fetchall() retrieves all the items, when you know the result set
contains a limited number of rows that can fit comfortably into memory. fetchmany() is the general-
purpose method when you cannot predict the size of the result set: you keep calling it and looping
through the returned items, until there are no more results to process.
• Since Python already has convenient modules such as pickle and cPickle to read and write
data structures on disk, data that you choose to store in MySQL instead is likely to have special
characteristics:
• Too large to all fit in memory at one time. You use SELECT statements to query only the precise
items you need, and aggregate functions to perform calculations across multiple items. You configure
the innodb_buffer_pool_size option within the MySQL server to dedicate a certain amount of
RAM for caching table and index data.
• Too complex to be represented by a single data structure. You divide the data between different
SQL tables. You can recombine data from multiple tables by using a join query. You make sure that
related data is kept in sync between different tables by setting up foreign key relationships.
• Updated frequently, perhaps by multiple users simultaneously. The updates might only affect
a small portion of the data, making it wasteful to write the whole structure each time. You use the
SQL INSERT, UPDATE, and DELETE statements to update different items concurrently, writing only
the changed values to disk. You use InnoDB tables and transactions to keep write operations from
conflicting with each other, and to return consistent query results even as the underlying data is being
updated.
• Using MySQL best practices for performance can help your application to scale without requiring major
rewrites and architectural changes. See Optimization for best practices for MySQL performance. It offers
guidelines and tips for SQL tuning, database design, and server configuration.
• You can avoid reinventing the wheel by learning the MySQL SQL statements for common operations:
operators to use in queries, techniques for bulk loading data, and so on. Some statements and clauses
585

Connector/Python Versions
are extensions to the basic ones defined by the SQL standard. See Data Manipulation Statements, Data
Definition Statements, and SELECT Statement for the main classes of statements.
• Issuing SQL statements from Python typically involves declaring very long, possibly multi-line string
literals. Because string literals within the SQL statements could be enclosed by single quotation, double
quotation marks, or contain either of those characters, for simplicity you can use Python's triple-quoting
mechanism to enclose the entire statement. For example:
'''It doesn't matter if this string contains 'single'
or "double" quotes, as long as there aren't 3 in a
row.'''
You can use either of the ' or " characters for triple-quoting multi-line string literals.
• Many of the secrets to a fast, scalable MySQL application involve using the right syntax at the very
start of your setup procedure, in the CREATE TABLE statements. For example, Oracle recommends
the ENGINE=INNODB clause for most tables, and makes InnoDB the default storage engine in MySQL
5.5 and up. Using InnoDB tables enables transactional behavior that helps scalability of read-write
workloads and offers automatic crash recovery. Another recommendation is to declare a numeric
primary key for each table, which offers the fastest way to look up values and can act as a pointer to
associated values in other tables (a foreign key). Also within the CREATE TABLE statement, using
the most compact column data types that meet your application requirements helps performance and
scalability because that enables the database server to move less data back and forth between memory
and disk.
6.3 Connector/Python Versions
This section describes both version releases, such as 8.0.34, along with notes specific to the two
implementations (C Extension and Pure Python).
Connector/Python Releases
The following table summarizes the available Connector/Python versions. For series that have reached
General Availability (GA) status, development releases in the series prior to the GA version are no longer
supported.
Note
MySQL Connectors and other MySQL client tools and applications now synchronize
the first digit of their version number with the (highest) MySQL server version they
support. For example, MySQL Connector/Python 8.0.12 would be designed to
support all features of MySQL server version 8 (or lower). This change makes it
easy and intuitive to decide which client version to use for which server version.
Connector/Python 8.0.4 is the first release to use the new numbering. It is the
successor to Connector/Python 2.2.3.
Table 6.1 Connector/Python Version Reference
Connector/Python
Version
MySQL Server
Versions
Python Versions Connector Status
9.1.0 8.0 and later 3.13*, 3.12, 3.11,
3.10, 3.9
General Availability
8.4.0 and 9.0.0 8.0 and later 3.12, 3.11, 3.10,
3.9, 3.8
General Availability
586

Connector/Python Implementations
Connector/Python
Version
MySQL Server
Versions
Python Versions Connector Status
8.1.0 through 8.3.0 5.7 and later 3.12 (8.2.0+), 3.11,
3.10, 3.9, 3.8
General Availability
8.0 8.0, 5.7, 5.6, 5.5 3.11, 3.10, 3.9, 3.8,
3.7, (3.6 before
8.0.29), (2.7 and 3.5
before 8.0.24)
General Availability
2.2 (continues as
8.0)
5.7, 5.6, 5.5 3.5, 3.4, 2.7 Developer
Milestone, No
releases
2.1 5.7, 5.6, 5.5 3.5, 3.4, 2.7, 2.6 General Availability
2.0 5.7, 5.6, 5.5 3.5, 3.4, 2.7, 2.6 GA, final release on
2016-10-26
1.2 5.7, 5.6, 5.5 (5.1,
5.0, 4.1)
3.4, 3.3, 3.2, 3.1,
2.7, 2.6
GA, final release on
2014-08-22
Note
MySQL server and Python versions within parentheses are known to work with
Connector/Python, but are not officially supported. Bugs might not get fixed for
those versions.
Note
Python 3.13 enables ssl.VERIFY_X509_STRICT SSL validation by default, which
means SSL certificates must now be RFC-5280 compliant when using Python 3.13
and higher.
Note
On macOS x86_64 ARM: Python 3.7 is not supported with the c-ext
implementation; note this is a non-default version of Python on macOS.
Connector/Python Implementations
Connector/Python implements the MySQL client/server protocol two ways:
• As pure Python; an implementation written in Python. It depends on the Python Standard Library.
The X DevAPI variant of the connector requires Python Protobuf. The required version is 4.25.3, and
was >= 4.21.1,<= 4.21.12 before Connector/Python 9.0.0.
• As a C Extension that interfaces with the MySQL C client library. This implementation of the protocol
is dependent on the client library, but can use the library provided by MySQL Server packages (see
MySQL C API Implementations).
Neither implementation of the client/server protocol has any third-party dependencies. However, if you
need SSL support, verify that your Python installation has been compiled using the OpenSSL libraries.
Note
Support for distutils was removed in Connector/Python 8.0.32.
Python terminology regarding distributions:
587

Connector/Python Installation
• Built Distribution: A package created in the native packaging format intended for a given platform. It
contains both sources and platform-independent bytecode. Connector/Python binary distributions are
built distributions.
• Source Distribution: A distribution that contains only source files and is generally platform independent.
6.4 Connector/Python Installation
Connector/Python runs on any platform where Python is installed. Python comes preinstalled on most Unix
and Unix-like systems, such as Linux, macOS, and FreeBSD. On Microsoft Windows, a Python installer is
available at the Python Download website or via the Microsoft app store. If necessary, download and install
Python for Windows before attempting to install Connector/Python.
Note
Connector/Python requires python in the system's PATH.
Quick Installation Guide: use pip
$> pip install mysql-connector-python
6.4.1 Obtaining Connector/Python
Using pip is the preferred method to obtain, install, and upgrade Connector/Python. Alternatively, see the
Connector/Python download site.
Note
The mysql-connector-python package installs an interface to the commonly
used classic MySQL protocol. Alternatively, an X DevAPI interface is available
as its own mysqlx-connector-python package. Prior to Connector/Python
8.3.0, mysql-connector-python installed interfaces to both the X and classic
protocols.
Debian, Solaris, and most RPM (except Enterprise Linux) packages are not available from dev.mysql.com.
Instead, using pip to manage Connector/Python is recommended. Packages for those platforms were
available before Connector/Python 9.0.0.
6.4.2 Installing Connector/Python from a Binary Distribution
Installing Connector/Python with pip
Use pip to install and upgrade Connector/Python:
# Installation
$> pip install mysql-connector-python
# Upgrade
$> pip install mysql-connector-python --upgrade
# Optional, installs the X DevAPI interface
$> pip install mysqlx-connector-python
Installing Connector/Python on Microsoft Windows
Use pip; installing Python on Windows also makes pip available from the command line (cmd.exe).
Installing Connector/Python on macOS
Use pip; installing Python on macOS also makes pip available.
588

Installing Connector/Python from a Source Distribution
Note
DMG installer packages were available before Connector/Python 8.1.0.
Installing Connector/Python on Linux Using the MySQL Yum Repository
EL-based platforms can optionally use RPMs instead of pip, either by using the Connector/Python
RPM downloads or by using the MySQL Yum repository (see Installing Additional MySQL Products and
Components with Yum and Adding the MySQL Yum Repository).
RPM Prerequisites
• A python3-protobuf RPM package is not available for Python 3.8 on these platforms, so the
dependency is not part of the RPM specification; instead it must be manually installed with the likes of
pip install protobuf. This is required as of v8.0.29.
• The mysql-community-client-plugins package is required to use modern authentication
methods, such as caching_sha2_password, which is the default authentication method as of MySQL
8.0.
$> sudo yum install mysql-community-client-plugins
Then install Connector/Python as follows:
$> sudo yum install mysql-connector-python
Installing Connector/Python on Linux Using an RPM Package
Connector/Python Linux RPM packages (.rpm files) are available from the Connector/Python download
site (see Section 6.4.1, “Obtaining Connector/Python”).
To install a Connector/Python RPM package (denoted here as PACKAGE.rpm), use this command:
$> rpm -i PACKAGE.rpm
Prerequisites
• A python3-protobuf RPM package is not available for Python 3.8 on these platforms, so the
dependency is not part of the RPM specification; instead it must be manually installed with the likes of
pip install protobuf. This is required as of v8.0.29.
• The mysql-community-client-plugins package is required to use newer authentication methods,
such as caching_sha2_password, which is the default authentication method as of MySQL 8.0.
RPM provides a feature to verify the integrity and authenticity of packages before installing them. To learn
more, see Verifying Package Integrity Using MD5 Checksums or GnuPG.
6.4.3 Installing Connector/Python from a Source Distribution
Connector/Python source distributions are platform independent and can be used on any platform. Source
distributions are packaged in two formats:
• Zip archive format (.zip file)
• Compressed tar archive format (.tar.gz file)
Either packaging format can be used on any platform, but Zip archives are more commonly used on
Windows systems and tar archives on Unix and Unix-like systems.
589

Installing Connector/Python from a Source Distribution
Prerequisites for Compiling Connector/Python with the C Extension
Source distributions include the C Extension that interfaces with the MySQL C client library. You can build
the distribution with or without support for this extension. To build Connector/Python with support for the C
Extension, you must satisfy the following prerequisites.
Note
Python 2.7 support was removed in Connector/Python 8.0.24, and Python 3.7
support was removed in Connector/Python 8.1.0.
• Linux: A C/C++ compiler, such as gcc
Windows: Current version of Visual Studio
• Protobuf C++ (version >= 4.21.1,<=4.21.12) for the C extension and/or Python's protobuf package for the
pure Python implementation
• Python development files
• MySQL Server installed, including development files to compile the optional C Extension that interfaces
with the MySQL C client library
You must install MySQL Server if it is not already present on your system. To obtain it, visit the MySQL
download site.
Installing Connector/Python from Source on Microsoft Windows
A Connector/Python Zip archive (.zip file) is available from the Connector/Python download site (see
Section 6.4.1, “Obtaining Connector/Python”).
To install Connector/Python from a Zip archive, download the latest version and follow these steps:
1. Unpack the Zip archive in the intended installation directory (for example, C:\mysql-connector\)
using WinZip or another tool that can read .zip files.
2. Start a console window and change location to the folder where you unpacked the Zip archive:
$> cd C:\mysql-connector\
3. Inside the Connector/Python folder, perform the installation using this command:
$> python setup.py install
To include the C Extension (available as of Connector/Python 2.1.1), use this command instead:
$> python setup.py install --with-mysql-capi="path_name"
The argument to --with-mysql-capi is the path to the installation directory of MySQL Server.
To see all options and commands supported by setup.py, use this command:
$> python setup.py --help
Installing Connector/Python from Source on Unix and Unix-Like Systems
For Unix and Unix-like systems such as Linux, Solaris, macOS, and FreeBSD, a Connector/Python tar
archive (.tar.gz file) is available from the Connector/Python download site (see Section 6.4.1, “Obtaining
Connector/Python”).
590

Verifying Your Connector/Python Installation
To install Connector/Python from a tar archive, download the latest version (denoted here as VER), and
execute these commands:
$> tar xzf mysql-connector-python-VER.tar.gz
$> cd mysql-connector-python-VER
$> sudo python setup.py install \
--with-protobuf-include-dir=/dir/to/protobuf/include \
--with-protobuf-lib-dir=/dir/to/protobuf/lib \
--with-protoc=/path/to/protoc/binary
To include the C Extension (available as of Connector/Python 2.1.1) that interfaces with the MySQL C
client library, also add the --with-mysql-capi such as:
$> sudo python setup.py install \
--with-protobuf-include-dir=/dir/to/protobuf/include \
--with-protobuf-lib-dir=/dir/to/protobuf/lib \
--with-protoc=/path/to/protoc/binary \
--with-mysql-capi="path_name
The argument to --with-mysql-capi is the path to the installation directory of MySQL Server, or the
path to the mysql_config command.
To see all options and commands supported by setup.py, use this command:
$> python setup.py --help
6.4.4 Verifying Your Connector/Python Installation
On Windows, the default Connector/Python installation location is C:\PythonX.Y\Lib\site-packages
\, where X.Y is the Python version you used to install the connector.
On Unix-like systems, the default Connector/Python installation location is /prefix/pythonX.Y/site-
packages/, where prefix is the location where Python is installed and X.Y is the Python version. See
How installation works in the Python manual.
The C Extension is installed as _mysql_connector.so in the site-packages directory, not in the
mysql/connector directory.
Depending on your platform, the installation path might differ from the default. If you are not sure where
Connector/Python is installed, do the following to determine its location. The output here shows installation
locations as might be seen on macOS:
$> python
>>> from distutils.sysconfig import get_python_lib
>>> print get_python_lib() # Python v2.x
/Library/Python/2.7/site-packages
>>> print(get_python_lib()) # Python v3.x
/Library/Frameworks/Python.framework/Versions/3.1/lib/python3.1/site-packages
To test that your Connector/Python installation is working and able to connect to MySQL Server, you can
run a very simple program where you supply the login credentials and host information required for the
connection. For an example, see Section 6.5.1, “Connecting to MySQL Using Connector/Python”.
6.5 Connector/Python Coding Examples
These coding examples illustrate how to develop Python applications and scripts which connect to MySQL
Server using MySQL Connector/Python.
591

Connecting to MySQL Using Connector/Python
6.5.1 Connecting to MySQL Using Connector/Python
The connect() constructor creates a connection to the MySQL server and returns a MySQLConnection
object.
The following example shows how to connect to the MySQL server:
import mysql.connector
cnx = mysql.connector.connect(user='scott', password='password',
host='127.0.0.1',
database='employees')
cnx.close()
Section 6.7.1, “Connector/Python Connection Arguments” describes the permitted connection arguments.
It is also possible to create connection objects using the connection.MySQLConnection() class:
from mysql.connector import (connection)
cnx = connection.MySQLConnection(user='scott', password='password',
host='127.0.0.1',
database='employees')
cnx.close()
Both forms (either using the connect() constructor or the class directly) are valid and functionally equal,
but using connect() is preferred and used by most examples in this manual.
To handle connection errors, use the try statement and catch all errors using the errors.Error exception:
import mysql.connector
from mysql.connector import errorcode
try:
cnx = mysql.connector.connect(user='scott',
database='employ')
except mysql.connector.Error as err:
if err.errno == errorcode.ER_ACCESS_DENIED_ERROR:
print("Something is wrong with your user name or password")
elif err.errno == errorcode.ER_BAD_DB_ERROR:
print("Database does not exist")
else:
print(err)
else:
cnx.close()
Defining connection arguments in a dictionary and using the ** operator is another option:
import mysql.connector
config = {
'user': 'scott',
'password': 'password',
'host': '127.0.0.1',
'database': 'employees',
'raise_on_warnings': True
}
cnx = mysql.connector.connect(**config)
cnx.close()
Defining Logger options, a reconnection routine, and defined as a connection method named
connect_to_mysql:
import logging
import time
592

Connecting to MySQL Using Connector/Python
import mysql.connector
# Set up logger
logger = logging.getLogger(__name__)
logger.setLevel(logging.INFO)
formatter = logging.Formatter("%(asctime)s - %(name)s - %(levelname)s - %(message)s")
# Log to console
handler = logging.StreamHandler()
handler.setFormatter(formatter)
logger.addHandler(handler)
# Also log to a file
file_handler = logging.FileHandler("cpy-errors.log")
file_handler.setFormatter(formatter)
logger.addHandler(file_handler)
def connect_to_mysql(config, attempts=3, delay=2):
attempt = 1
# Implement a reconnection routine
while attempt < attempts + 1:
try:
return mysql.connector.connect(**config)
except (mysql.connector.Error, IOError) as err:
if (attempts is attempt):
# Attempts to reconnect failed; returning None
logger.info("Failed to connect, exiting without a connection: %s", err)
return None
logger.info(
"Connection failed: %s. Retrying (%d/%d)...",
err,
attempt,
attempts-1,
)
# progressive reconnect delay
time.sleep(delay ** attempt)
attempt += 1
return None
Connecting and using the Sakila database using the above routine, assuming it's defined in a file named
myconnection.py:
from myconnection import connect_to_mysql
config = {
"host": "127.0.0.1",
"user": "user",
"password": "pass",
"database": "sakila",
}
cnx = connect_to_mysql(config, attempts=3)
if cnx and cnx.is_connected():
with cnx.cursor() as cursor:
result = cursor.execute("SELECT * FROM actor LIMIT 5")
rows = cursor.fetchall()
for rows in rows:
print(rows)
cnx.close()
else:
print("Could not connect")
Using the Connector/Python Python or C Extension
Connector/Python offers two implementations: a pure Python interface and a C extension that uses the
MySQL C client library (see The Connector/Python C Extension). This can be configured at runtime using
the use_pure connection argument. It defaults to False as of MySQL 8, meaning the C extension
is used. If the C extension is not available on the system then use_pure defaults to True. Setting
593

Creating Tables Using Connector/Python
use_pure=False causes the connection to use the C Extension if your Connector/Python installation
includes it, while use_pure=True to False means the Python implementation is used if available.
Note
The use_pure option and C extension were added in Connector/Python 2.1.1.
The following example shows how to set use_pure to False.
import mysql.connector
cnx = mysql.connector.connect(user='scott', password='password',
host='127.0.0.1',
database='employees',
use_pure=False)
cnx.close()
It is also possible to use the C Extension directly by importing the _mysql_connector module rather than
the mysql.connector module. For more information, see The _mysql_connector C Extension Module.
6.5.2 Creating Tables Using Connector/Python
All DDL (Data Definition Language) statements are executed using a handle structure known as a cursor.
The following examples show how to create the tables of the Employee Sample Database. You need them
for the other examples.
In a MySQL server, tables are very long-lived objects, and are often accessed by multiple applications
written in different languages. You might typically work with tables that are already set up, rather than
creating them within your own application. Avoid setting up and dropping tables over and over again, as
that is an expensive operation. The exception is temporary tables, which can be created and dropped
quickly within an application.
from __future__ import print_function
import mysql.connector
from mysql.connector import errorcode
DB_NAME = 'employees'
TABLES = {}
TABLES['employees'] = (
"CREATE TABLE `employees` ("
" `emp_no` int(11) NOT NULL AUTO_INCREMENT,"
" `birth_date` date NOT NULL,"
" `first_name` varchar(14) NOT NULL,"
" `last_name` varchar(16) NOT NULL,"
" `gender` enum('M','F') NOT NULL,"
" `hire_date` date NOT NULL,"
" PRIMARY KEY (`emp_no`)"
") ENGINE=InnoDB")
TABLES['departments'] = (
"CREATE TABLE `departments` ("
" `dept_no` char(4) NOT NULL,"
" `dept_name` varchar(40) NOT NULL,"
" PRIMARY KEY (`dept_no`), UNIQUE KEY `dept_name` (`dept_name`)"
") ENGINE=InnoDB")
TABLES['salaries'] = (
"CREATE TABLE `salaries` ("
" `emp_no` int(11) NOT NULL,"
" `salary` int(11) NOT NULL,"
" `from_date` date NOT NULL,"
" `to_date` date NOT NULL,"
" PRIMARY KEY (`emp_no`,`from_date`), KEY `emp_no` (`emp_no`),"
" CONSTRAINT `salaries_ibfk_1` FOREIGN KEY (`emp_no`) "
" REFERENCES `employees` (`emp_no`) ON DELETE CASCADE"
") ENGINE=InnoDB")
TABLES['dept_emp'] = (
594

Creating Tables Using Connector/Python
"CREATE TABLE `dept_emp` ("
" `emp_no` int(11) NOT NULL,"
" `dept_no` char(4) NOT NULL,"
" `from_date` date NOT NULL,"
" `to_date` date NOT NULL,"
" PRIMARY KEY (`emp_no`,`dept_no`), KEY `emp_no` (`emp_no`),"
" KEY `dept_no` (`dept_no`),"
" CONSTRAINT `dept_emp_ibfk_1` FOREIGN KEY (`emp_no`) "
" REFERENCES `employees` (`emp_no`) ON DELETE CASCADE,"
" CONSTRAINT `dept_emp_ibfk_2` FOREIGN KEY (`dept_no`) "
" REFERENCES `departments` (`dept_no`) ON DELETE CASCADE"
") ENGINE=InnoDB")
TABLES['dept_manager'] = (
" CREATE TABLE `dept_manager` ("
" `emp_no` int(11) NOT NULL,"
" `dept_no` char(4) NOT NULL,"
" `from_date` date NOT NULL,"
" `to_date` date NOT NULL,"
" PRIMARY KEY (`emp_no`,`dept_no`),"
" KEY `emp_no` (`emp_no`),"
" KEY `dept_no` (`dept_no`),"
" CONSTRAINT `dept_manager_ibfk_1` FOREIGN KEY (`emp_no`) "
" REFERENCES `employees` (`emp_no`) ON DELETE CASCADE,"
" CONSTRAINT `dept_manager_ibfk_2` FOREIGN KEY (`dept_no`) "
" REFERENCES `departments` (`dept_no`) ON DELETE CASCADE"
") ENGINE=InnoDB")
TABLES['titles'] = (
"CREATE TABLE `titles` ("
" `emp_no` int(11) NOT NULL,"
" `title` varchar(50) NOT NULL,"
" `from_date` date NOT NULL,"
" `to_date` date DEFAULT NULL,"
" PRIMARY KEY (`emp_no`,`title`,`from_date`), KEY `emp_no` (`emp_no`),"
" CONSTRAINT `titles_ibfk_1` FOREIGN KEY (`emp_no`)"
" REFERENCES `employees` (`emp_no`) ON DELETE CASCADE"
") ENGINE=InnoDB")
The preceding code shows how we are storing the CREATE statements in a Python dictionary called
TABLES. We also define the database in a global variable called DB_NAME, which enables you to easily
use a different schema.
cnx = mysql.connector.connect(user='scott')
cursor = cnx.cursor()
A single MySQL server can manage multiple databases. Typically, you specify the database to switch to
when connecting to the MySQL server. This example does not connect to the database upon connection,
so that it can make sure the database exists, and create it if not:
def create_database(cursor):
try:
cursor.execute(
"CREATE DATABASE {} DEFAULT CHARACTER SET 'utf8'".format(DB_NAME))
except mysql.connector.Error as err:
print("Failed creating database: {}".format(err))
exit(1)
try:
cursor.execute("USE {}".format(DB_NAME))
except mysql.connector.Error as err:
print("Database {} does not exists.".format(DB_NAME))
if err.errno == errorcode.ER_BAD_DB_ERROR:
create_database(cursor)
print("Database {} created successfully.".format(DB_NAME))
cnx.database = DB_NAME
else:
print(err)
exit(1)
595

Inserting Data Using Connector/Python
We first try to change to a particular database using the database property of the connection object cnx.
If there is an error, we examine the error number to check if the database does not exist. If so, we call the
create_database function to create it for us.
On any other error, the application exits and displays the error message.
After we successfully create or change to the target database, we create the tables by iterating over the
items of the TABLES dictionary:
for table_name in TABLES:
table_description = TABLES[table_name]
try:
print("Creating table {}: ".format(table_name), end='')
cursor.execute(table_description)
except mysql.connector.Error as err:
if err.errno == errorcode.ER_TABLE_EXISTS_ERROR:
print("already exists.")
else:
print(err.msg)
else:
print("OK")
cursor.close()
cnx.close()
To handle the error when the table already exists, we notify the user that it was already there. Other errors
are printed, but we continue creating tables. (The example shows how to handle the “table already exists”
condition for illustration purposes. In a real application, we would typically avoid the error condition entirely
by using the IF NOT EXISTS clause of the CREATE TABLE statement.)
The output would be something like this:
Database employees does not exists.
Database employees created successfully.
Creating table employees: OK
Creating table departments: already exists.
Creating table salaries: already exists.
Creating table dept_emp: OK
Creating table dept_manager: OK
Creating table titles: OK
To populate the employees tables, use the dump files of the Employee Sample Database. Note that
you only need the data dump files that you will find in an archive named like employees_db-dump-
files-1.0.5.tar.bz2. After downloading the dump files, execute the following commands, adding
connection options to the mysql commands if necessary:
$> tar xzf employees_db-dump-files-1.0.5.tar.bz2
$> cd employees_db
$> mysql employees < load_employees.dump
$> mysql employees < load_titles.dump
$> mysql employees < load_departments.dump
$> mysql employees < load_salaries.dump
$> mysql employees < load_dept_emp.dump
$> mysql employees < load_dept_manager.dump
6.5.3 Inserting Data Using Connector/Python
Inserting or updating data is also done using the handler structure known as a cursor. When you use a
transactional storage engine such as InnoDB (the default in MySQL 5.5 and higher), you must commit the
data after a sequence of INSERT, DELETE, and UPDATE statements.
This example shows how to insert new data. The second INSERT depends on the value of the newly
created primary key of the first. The example also demonstrates how to use extended formats. The task is
to add a new employee starting to work tomorrow with a salary set to 50000.
596

Querying Data Using Connector/Python
Note
The following example uses tables created in the example Section 6.5.2, “Creating
Tables Using Connector/Python”. The AUTO_INCREMENT column option for
the primary key of the employees table is important to ensure reliable, easily
searchable data.
from __future__ import print_function
from datetime import date, datetime, timedelta
import mysql.connector
cnx = mysql.connector.connect(user='scott', database='employees')
cursor = cnx.cursor()
tomorrow = datetime.now().date() + timedelta(days=1)
add_employee = ("INSERT INTO employees "
"(first_name, last_name, hire_date, gender, birth_date) "
"VALUES (%s, %s, %s, %s, %s)")
add_salary = ("INSERT INTO salaries "
"(emp_no, salary, from_date, to_date) "
"VALUES (%(emp_no)s, %(salary)s, %(from_date)s, %(to_date)s)")
data_employee = ('Geert', 'Vanderkelen', tomorrow, 'M', date(1977, 6, 14))
# Insert new employee
cursor.execute(add_employee, data_employee)
emp_no = cursor.lastrowid
# Insert salary information
data_salary = {
'emp_no': emp_no,
'salary': 50000,
'from_date': tomorrow,
'to_date': date(9999, 1, 1),
}
cursor.execute(add_salary, data_salary)
# Make sure data is committed to the database
cnx.commit()
cursor.close()
cnx.close()
We first open a connection to the MySQL server and store the connection object in the variable cnx. We
then create a new cursor, by default a MySQLCursor object, using the connection's cursor() method.
We could calculate tomorrow by calling a database function, but for clarity we do it in Python using the
datetime module.
Both INSERT statements are stored in the variables called add_employee and add_salary. Note that
the second INSERT statement uses extended Python format codes.
The information of the new employee is stored in the tuple data_employee. The query to insert
the new employee is executed and we retrieve the newly inserted value for the emp_no column (an
AUTO_INCREMENT column) using the lastrowid property of the cursor object.
Next, we insert the new salary for the new employee, using the emp_no variable in the dictionary holding
the data. This dictionary is passed to the execute() method of the cursor object if an error occurred.
Since by default Connector/Python turns autocommit off, and MySQL 5.5 and higher uses transactional
InnoDB tables by default, it is necessary to commit your changes using the connection's commit()
method. You could also roll back using the rollback() method.
6.5.4 Querying Data Using Connector/Python
The following example shows how to query data using a cursor created using the connection's cursor()
method. The data returned is formatted and printed on the console.
597

Connector/Python Tutorials
The task is to select all employees hired in the year 1999 and print their names and hire dates to the
console.
import datetime
import mysql.connector
cnx = mysql.connector.connect(user='scott', database='employees')
cursor = cnx.cursor()
query = ("SELECT first_name, last_name, hire_date FROM employees "
"WHERE hire_date BETWEEN %s AND %s")
hire_start = datetime.date(1999, 1, 1)
hire_end = datetime.date(1999, 12, 31)
cursor.execute(query, (hire_start, hire_end))
for (first_name, last_name, hire_date) in cursor:
print("{}, {} was hired on {:%d %b %Y}".format(
last_name, first_name, hire_date))
cursor.close()
cnx.close()
We first open a connection to the MySQL server and store the connection object in the variable cnx. We
then create a new cursor, by default a MySQLCursor object, using the connection's cursor() method.
In the preceding example, we store the SELECT statement in the variable query. Note that we are using
unquoted %s-markers where dates should have been. Connector/Python converts hire_start and
hire_end from Python types to a data type that MySQL understands and adds the required quotes. In this
case, it replaces the first %s with '1999-01-01', and the second with '1999-12-31'.
We then execute the operation stored in the query variable using the execute() method. The data used
to replace the %s-markers in the query is passed as a tuple: (hire_start, hire_end).
After executing the query, the MySQL server is ready to send the data. The result set could be zero rows,
one row, or 100 million rows. Depending on the expected volume, you can use different techniques to
process this result set. In this example, we use the cursor object as an iterator. The first column in the
row is stored in the variable first_name, the second in last_name, and the third in hire_date.
We print the result, formatting the output using Python's built-in format() function. Note that hire_date
was converted automatically by Connector/Python to a Python datetime.date object. This means that
we can easily format the date in a more human-readable form.
The output should be something like this:
..
Wilharm, LiMin was hired on 16 Dec 1999
Wielonsky, Lalit was hired on 16 Dec 1999
Kamble, Dannz was hired on 18 Dec 1999
DuBourdieux, Zhongwei was hired on 19 Dec 1999
Fujisawa, Rosita was hired on 20 Dec 1999
..
6.6 Connector/Python Tutorials
These tutorials illustrate how to develop Python applications and scripts that connect to a MySQL database
server using MySQL Connector/Python.
6.6.1 Tutorial: Raise Employee's Salary Using a Buffered Cursor
The following example script gives a long-overdue 15% raise effective tomorrow to all employees who
joined in the year 2000 and are still with the company.
To iterate through the selected employees, we use buffered cursors. (A buffered cursor fetches and
buffers the rows of a result set after executing a query; see Section 6.9.6.1, “cursor.MySQLCursorBuffered
598

Connector/Python Connection Establishment
Class”.) This way, it is unnecessary to fetch the rows in a new variables. Instead, the cursor can be used
as an iterator.
Note
This script is an example; there are other ways of doing this simple task.
from __future__ import print_function
from decimal import Decimal
from datetime import datetime, date, timedelta
import mysql.connector
# Connect with the MySQL Server
cnx = mysql.connector.connect(user='scott', database='employees')
# Get two buffered cursors
curA = cnx.cursor(buffered=True)
curB = cnx.cursor(buffered=True)
# Query to get employees who joined in a period defined by two dates
query = (
"SELECT s.emp_no, salary, from_date, to_date FROM employees AS e "
"LEFT JOIN salaries AS s USING (emp_no) "
"WHERE to_date = DATE('9999-01-01')"
"AND e.hire_date BETWEEN DATE(%s) AND DATE(%s)")
# UPDATE and INSERT statements for the old and new salary
update_old_salary = (
"UPDATE salaries SET to_date = %s "
"WHERE emp_no = %s AND from_date = %s")
insert_new_salary = (
"INSERT INTO salaries (emp_no, from_date, to_date, salary) "
"VALUES (%s, %s, %s, %s)")
# Select the employees getting a raise
curA.execute(query, (date(2000, 1, 1), date(2000, 12, 31)))
# Iterate through the result of curA
for (emp_no, salary, from_date, to_date) in curA:
# Update the old and insert the new salary
new_salary = int(round(salary * Decimal('1.15')))
curB.execute(update_old_salary, (tomorrow, emp_no, from_date))
curB.execute(insert_new_salary,
(emp_no, tomorrow, date(9999, 1, 1,), new_salary))
# Commit the changes
cnx.commit()
cnx.close()
6.7 Connector/Python Connection Establishment
Connector/Python provides a connect() call used to establish connections to the MySQL server. The
following sections describe the permitted arguments for connect() and describe how to use option files
that supply additional arguments.
6.7.1 Connector/Python Connection Arguments
A connection with the MySQL server can be established using either the mysql.connector.connect()
function or the mysql.connector.MySQLConnection() class:
cnx = mysql.connector.connect(user='joe', database='test')
cnx = MySQLConnection(user='joe', database='test')
The following table describes the arguments that can be used to initiate a connection. An asterisk (*)
following an argument indicates a synonymous argument name, available only for compatibility with other
Python MySQL drivers. Oracle recommends not to use these alternative names.
599

Connector/Python Connection Arguments
Table 6.2 Connection Arguments for Connector/Python
Argument Name Default Description
user (username*) The user name used to authenticate with the MySQL
server.
password (passwd*) The password to authenticate the user with the MySQL
server.
password1, password2, and
password3
For Multi-Factor Authentication (MFA); password1 is an
alias for password. Added in 8.0.28.
database (db*) The database name to use when connecting with the
MySQL server.
host 127.0.0.1 The host name or IP address of the MySQL server.
unix_socket The location of the Unix socket file.
port 3306 The TCP/IP port of the MySQL server. Must be an
integer.
conn_attrs Standard
performance_schema.session_connect_attrs
values are sent; use conn_attrs to optionally set
additional custom connection attributes as defined by a
dictionary such as config['conn_attrs'] = {"foo": "bar"}.
The c-ext and pure python implementations differ.
The c-ext implementation depends on the mysqlclient
library so its standard conn_attrs values originate from
it. For example, '_client_name' is 'libmysql' with c-ext
but 'mysql-connector-python' with pure python. C-ext
adds these additional attributes: '_connector_version',
'_connector_license', '_connector_name', and
'_source_host'.
This option was added in 8.0.17, as was the default
session_connect_attrs behavior.
init_command Command (SQL query) executed immediately after the
connection is established as part of the initialization
process. Added in 8.0.32.
auth_plugin Authentication plugin to use. Added in 1.2.1.
fido_callback Deprecated as of 8.2.0 and removed in 8.4.0; instead use
webauthn_callback.
A callable defined by the optional fido_callback
option is executed when it's ready for user interaction
with the hardware FIDO device. This option can be a
callable object or a string path that the connector can
import in runtime and execute. It does not block and is
only used to notify the user of the need for interaction
with the hardware FIDO device.
This functionality was only available in the C extension.
A NotSupportedError was raised when using the pure
Python implementation.
600

Connector/Python Connection Arguments
Argument Name Default Description
webauthn_callback A callable defined by the optional webauthn_callback
option is executed when it's ready for user interaction
with the hardware WebAuthn device. This option can
be a callable object or a string path that the connector
can import in runtime and execute. It does not block
and is only used to notify the user of the need for
interaction with the hardware FIDO device. Enable the
authentication_webauthn_client auth_plugin in
the connection configuration to use.
This option was added in 8.2.0, and it deprecated the
fido_callback option that was removed in version
8.4.0.
use_unicode True Whether to use Unicode.
charset utf8mb4 Which MySQL character set to use.
collation utf8mb4_general_ai_ci
(is
utf8_general_ci
in 2.x
Which MySQL collation to use. The 8.x default values are
generated from the latest MySQL Server 8.0 defaults.
autocommit False Whether to autocommit transactions.
time_zone Set the time_zone session variable at connection time.
sql_mode Set the sql_mode session variable at connection time.
get_warnings False Whether to fetch warnings.
raise_on_warnings False Whether to raise an exception on warnings.
connection_timeout
(connect_timeout*)
Timeout for the TCP and Unix socket connections.
client_flags MySQL client flags.
buffered False Whether cursor objects fetch the results immediately after
executing queries.
raw False Whether MySQL results are returned as is, rather than
converted to Python types.
consume_results False Whether to automatically read result sets.
tls_versions ["TLSv1.2",
"TLSv1.3"]
TLS versions to support; allowed versions are TLSv1.2
and TLSv1.3. Versions TLSv1 and TLSv1.1 were
removed in Connector/Python 8.0.28.
ssl_ca File containing the SSL certificate authority.
ssl_cert File containing the SSL certificate file.
ssl_disabled False True disables SSL/TLS usage. The TLSv1 and TLSv1.1
connection protocols are deprecated as of Connector/
Python 8.0.26 and removed as of Connector/Python
8.0.28.
ssl_key File containing the SSL key.
ssl_verify_cert False When set to True, checks the server certificate against
the certificate file specified by the ssl_ca option. Any
mismatch causes a ValueError exception.
601

Connector/Python Connection Arguments
Argument Name Default Description
ssl_verify_identity False When set to True, additionally perform host name
identity verification by checking the host name that
the client uses for connecting to the server against the
identity in the certificate that the server sends to the
client. Option added in Connector/Python 8.0.14.
force_ipv6 False When set to True, uses IPv6 when an address resolves
to both IPv4 and IPv6. By default, IPv4 is used in such
cases.
kerberos_auth_mode SSPI Windows-only, for choosing between
SSPI and GSSAPI at runtime for the
authentication_kerberos_client authentication
plugin on Windows. Option added in Connector/Python
8.0.32.
oci_config_file "" Optionally define a specific path to the
authentication_oci server-side authentication
configuration file. The profile name can be configured
with oci_config_profile.
The default file path on Linux and macOS is ~/.oci/
config, and %HOMEDRIVE%%HOMEPATH%\.oci
\config on Windows.
oci_config_profile "DEFAULT" Used to specify a profile to use from the OCI
configuration file that contains the generated ephemeral
key pair and security token. The OCI configuration file
location can be defined by oci_config_file. Option
oci_config_profile was added in Connector/Python
8.0.33.
dsn Not supported (raises NotSupportedError when
used).
pool_name Connection pool name. The pool name is restricted to
alphanumeric characters and the special characters .,
_, *, $, and #. The pool name must be no more than
pooling.CNX_POOL_MAXNAMESIZE characters long
(default 64).
pool_size 5 Connection pool size. The pool size must
be greater than 0 and less than or equal to
pooling.CNX_POOL_MAXSIZE (default 32).
pool_reset_session True Whether to reset session variables when connection is
returned to pool.
compress False Whether to use compressed client/server protocol.
converter_class Converter class to use.
converter_str_fallback False Enable the conversion to str of value types not supported
by the Connector/Python converter class or by a custom
converter class.
failover Server failover sequence.
option_files Which option files to read. Added in 2.0.0.
602

Connector/Python Connection Arguments
Argument Name Default Description
option_groups ['client',
'connector_python']
Which groups to read from option files. Added in 2.0.0.
allow_local_infile True Whether to enable LOAD DATA LOCAL INFILE. Added
in 2.0.0.
use_pure False as of
8.0.11, and
True in earlier
versions.
If only one
implementation
(C or Python)
is available,
then then
the default
value is set
to enable
the available
implementation.
Whether to use pure Python or C Extension. If
use_pure=False and the C Extension is not
available, then Connector/Python will automatically
fall back to the pure Python implementation. Can
be set with mysql.connector.connect() but not
MySQLConnection.connect(). Added in 2.1.1.
krb_service_principal The "@realm"
defaults to the
default realm,
as configured
in the
krb5.conf
file.
Must be a string in the form "primary/instance@realm"
such as "ldap/[email protected]" where "@realm"
is optional. Added in 8.0.23.
MySQL Authentication Options
Authentication with MySQL typically uses a username and password.
When the database argument is given, the current database is set to the given value. To change
the current database later, execute a USE SQL statement or set the database property of the
MySQLConnection instance.
By default, Connector/Python tries to connect to a MySQL server running on the local host using TCP/IP.
The host argument defaults to IP address 127.0.0.1 and port to 3306. Unix sockets are supported by
setting unix_socket. Named pipes on the Windows platform are not supported.
Connector/Python supports authentication plugins available as of MySQL 8.0, including the preferred
caching_sha2_password authentication plugin.
The deprecated mysql_native_password plugin is supported, but it is disabled by default as of MySQL
Server 8.4.0 and removed as of MySQL Server 9.0.0.
The connect() method supports an auth_plugin argument that can be used to force use of a
particular authentication plugin.
Note
MySQL Connector/Python does not support the old, less-secure password
protocols of MySQL versions prior to 4.1.
Connector/Python supports the Kerberos authentication protocol for passwordless authentication. Linux
clients are supported as of Connector/Python 8.0.26, and Windows support was added in Connector/
603

Connector/Python Connection Arguments
Python 8.0.27 with the C extension implementation, and in Connector/Python 8.0.29 with the pure Python
implementation. For Windows, the related kerberos_auth_mode connection option was added in 8.0.32
to configure the mode as either SSPI (default) or GSSAPI (via the pure Python implementation, or the C
extension implementation as of 8.4.0). While Windows supports both modes, Linux only supports GSSAPI.
The following example assumes LDAP Pluggable Authentication is set up to utilize GSSAPI/Kerberos
SASL authentication:
import mysql.connector as cpy
import logging
logging.basicConfig(level=logging.DEBUG)
SERVICE_NAME = "ldap"
LDAP_SERVER_IP = "server_ip or hostname" # e.g., winexample01
config = {
"host": "127.0.0.1",
"port": 3306,
"user": "[email protected]",
"password": "s3cret",
"use_pure": True,
"krb_service_principal": f"{SERVICE_NAME}/{LDAP_SERVER_IP}"
}
with cpy.connect(**config) as cnx:
with cnx.cursor() as cur:
cur.execute("SELECT @@version")
res = cur.fetchone()
print(res[0])
Connector/Python supports Multi-Factor Authentication (MFA) as of v8.0.28 by utilizing the password1
(alias of password), password2, and password3 connection options.
Connector/Python supports WebAuthn Pluggable Authentication as of Connector/Python 8.2.0, which
is supported in MySQL Enterprise Edition. Optionally use the Connector/Python webauthn_callback
connection option to notify users that they need to touch the hardware device. This functionality is present
in the C implementation (which uses libmysqlclient) but the pure Python implementation requires the
FIDO2 dependency that is not provided with the MySQL connector and is assumed to already be present
in your environment. It can be independently installed using:
$> pip install fido2
Previously, the now removed (as of version 8.4.0) authentication_fido MySQL Server plugin was
supported using the fido_callback option that was available in the C extension implementation.
Character Encoding
By default, strings coming from MySQL are returned as Python Unicode literals. To change this behavior,
set use_unicode to False. You can change the character setting for the client connection through the
charset argument. To change the character set after connecting to MySQL, set the charset property of
the MySQLConnection instance. This technique is preferred over using the SET NAMES SQL statement
directly. Similar to the charset property, you can set the collation for the current MySQL session.
Transactions
The autocommit value defaults to False, so transactions are not automatically committed. Call the
commit() method of the MySQLConnection instance within your application after doing a set of related
insert, update, and delete operations. For data consistency and high throughput for write operations, it is
best to leave the autocommit configuration option turned off when using InnoDB or other transactional
tables.
604

Connector/Python Connection Arguments
Time Zones
The time zone can be set per connection using the time_zone argument. This is useful, for example, if
the MySQL server is set to UTC and TIMESTAMP values should be returned by MySQL converted to the
PST time zone.
SQL Modes
MySQL supports so-called SQL Modes. which change the behavior of the server globally or per
connection. For example, to have warnings raised as errors, set sql_mode to TRADITIONAL. For more
information, see Server SQL Modes.
Troubleshooting and Error Handling
Warnings generated by queries are fetched automatically when get_warnings is set to True. You can
also immediately raise an exception by setting raise_on_warnings to True. Consider using the MySQL
sql_mode setting for turning warnings into errors.
To set a timeout value for connections, use connection_timeout.
Enabling and Disabling Features Using Client Flags
MySQL uses client flags to enable or disable features. Using the client_flags argument, you have
control of what is set. To find out what flags are available, use the following:
from mysql.connector.constants import ClientFlag
print '\n'.join(ClientFlag.get_full_info())
If client_flags is not specified (that is, it is zero), defaults are used for MySQL 4.1 and higher. If you
specify an integer greater than 0, make sure all flags are set properly. A better way to set and unset flags
individually is to use a list. For example, to set FOUND_ROWS, but disable the default LONG_FLAG:
flags = [ClientFlag.FOUND_ROWS, -ClientFlag.LONG_FLAG]
mysql.connector.connect(client_flags=flags)
Result Set Handling
By default, MySQL Connector/Python does not buffer or prefetch results. This means that after a query
is executed, your program is responsible for fetching the data. This avoids excessive memory use when
queries return large result sets. If you know that the result set is small enough to handle all at once, you
can fetch the results immediately by setting buffered to True. It is also possible to set this per cursor
(see Section 6.9.2.6, “MySQLConnection.cursor() Method”).
Results generated by queries normally are not read until the client program fetches them. To automatically
consume and discard result sets, set the consume_results option to True. The result is that all results
are read, which for large result sets can be slow. (In this case, it might be preferable to close and reopen
the connection.)
Type Conversions
By default, MySQL types in result sets are converted automatically to Python types. For example, a
DATETIME column value becomes a datetime.datetime object. To disable conversion, set the raw option to
True. You might do this to get better performance or perform different types of conversion yourself.
Connecting through SSL
Using SSL connections is possible when your Python installation supports SSL, that is, when it is compiled
against the OpenSSL libraries. When you provide the ssl_ca, ssl_key and ssl_cert options, the
605

Connector/Python Connection Arguments
connection switches to SSL, and the client_flags option includes the ClientFlag.SSL value
automatically. You can use this in combination with the compressed option set to True.
As of Connector/Python 2.2.2, if the MySQL server supports SSL connections, Connector/Python attempts
to establish a secure (encrypted) connection by default, falling back to an unencrypted connection
otherwise.
From Connector/Python 1.2.1 through Connector/Python 2.2.1, it is possible to establish an SSL
connection using only the ssl_ca opion. The ssl_key and ssl_cert arguments are optional. However,
when either is given, both must be given or an AttributeError is raised.
# Note (Example is valid for Python v2 and v3)
from __future__ import print_function
import sys
#sys.path.insert(0, 'python{0}/'.format(sys.version_info[0]))
import mysql.connector
from mysql.connector.constants import ClientFlag
config = {
'user': 'ssluser',
'password': 'password',
'host': '127.0.0.1',
'client_flags': [ClientFlag.SSL],
'ssl_ca': '/opt/mysql/ssl/ca.pem',
'ssl_cert': '/opt/mysql/ssl/client-cert.pem',
'ssl_key': '/opt/mysql/ssl/client-key.pem',
}
cnx = mysql.connector.connect(**config)
cur = cnx.cursor(buffered=True)
cur.execute("SHOW STATUS LIKE 'Ssl_cipher'")
print(cur.fetchone())
cur.close()
cnx.close()
Connection Pooling
With either the pool_name or pool_size argument present, Connector/Python creates the new pool. If
the pool_name argument is not given, the connect() call automatically generates the name, composed
from whichever of the host, port, user, and database connection arguments are given, in that order. If
the pool_size argument is not given, the default size is 5 connections.
The pool_reset_session permits control over whether session variables are reset when the connection
is returned to the pool. The default is to reset them.
For additional information about connection pooling, see Section 6.8.4, “Connector/Python Connection
Pooling”.
Protocol Compression
The boolean compress argument indicates whether to use the compressed client/server protocol (default
False). This provides an easier alternative to setting the ClientFlag.COMPRESS flag. This argument is
available as of Connector/Python 1.1.2.
Converter Class
The converter_class argument takes a class and sets it when configuring the
connection. An AttributeError is raised if the custom converter class is not a subclass of
conversion.MySQLConverterBase.
606

Connector/Python Option-File Support
Server Failover
The connect() method accepts a failover argument that provides information to use for server failover
in the event of connection failures. The argument value is a tuple or list of dictionaries (tuple is preferred
because it is nonmutable). Each dictionary contains connection arguments for a given server in the failover
sequence. Permitted dictionary values are: user, password, host, port, unix_socket, database,
pool_name, pool_size. This failover option was added in Connector/Python 1.2.1.
Option File Support
As of Connector/Python 2.0.0, option files are supported using two options for connect():
• option_files: Which option files to read. The value can be a file path name (a string) or a sequence
of path name strings. By default, Connector/Python reads no option files, so this argument must be given
explicitly to cause option files to be read. Files are read in the order specified.
• option_groups: Which groups to read from option files, if option files are read. The value can
be an option group name (a string) or a sequence of group name strings. If this argument is not
given, the default value is ['client', 'connector_python'] to read the [client] and
[connector_python] groups.
For more information, see Section 6.7.2, “Connector/Python Option-File Support”.
LOAD DATA LOCAL INFILE
Prior to Connector/Python 2.0.0, to enable use of LOAD DATA LOCAL INFILE, clients had to explicitly
set the ClientFlag.LOCAL_FILES flag. As of 2.0.0, this flag is enabled by default. To disable it, the
allow_local_infile connection option can be set to False at connect time (the default is True).
Compatibitility with Other Connection Interfaces
passwd, db and connect_timeout are valid for compatibility with other MySQL interfaces and are
respectively the same as password, database and connection_timeout. The latter take precedence.
Data source name syntax or dsn is not used; if specified, it raises a NotSupportedError exception.
Client/Server Protocol Implementation
Connector/Python can use a pure Python interface to MySQL, or a C Extension that uses the MySQL
C client library. The use_pure mysql.connector.connect() connection argument determines which. The
default changed in Connector/Python 8 from True (use the pure Python implementation) to False. Setting
use_pure changes the implementation used.
The use_pure argument is available as of Connector/Python 2.1.1. For more information about the C
extension, see The Connector/Python C Extension.
6.7.2 Connector/Python Option-File Support
As of version 2.0.0, Connector/Python has the capability of reading options from option files. (For general
information about option files in MySQL, see Using Option Files.) Two arguments for the connect() call
control use of option files in Connector/Python programs:
• option_files: Which option files to read. The value can be a file path name (a string) or a sequence
of path name strings. By default, Connector/Python reads no option files, so this argument must be given
explicitly to cause option files to be read. Files are read in the order specified.
• option_groups: Which groups to read from option files, if option files are read. The value can
be an option group name (a string) or a sequence of group name strings. If this argument is not
607

Connector/Python Option-File Support
given, the default value is ['client', 'connector_python'], to read the [client] and
[connector_python] groups.
Connector/Python also supports the !include and !includedir inclusion directives within option files.
These directives work the same way as for other MySQL programs (see Using Option Files).
This example specifies a single option file as a string:
cnx = mysql.connector.connect(option_files='/etc/mysql/connectors.cnf')
This example specifies multiple option files as a sequence of strings:
mysql_option_files = [
'/etc/mysql/connectors.cnf',
'./development.cnf',
]
cnx = mysql.connector.connect(option_files=mysql_option_files)
Connector/Python reads no option files by default, for backward compatibility with versions older than
2.0.0. This differs from standard MySQL clients such as mysql or mysqldump, which do read option files
by default. To find out which option files the standard clients read on your system, invoke one of them with
its --help option and examine the output. For example:
$> mysql --help
...
Default options are read from the following files in the given order:
/etc/my.cnf /etc/mysql/my.cnf /usr/local/mysql/etc/my.cnf ~/.my.cnf
...
If you specify the option_files connection argument to read option files, Connector/Python reads
the [client] and [connector_python] option groups by default. To specify explicitly which
groups to read, use the option_groups connection argument. The following example causes only the
[connector_python] group to be read:
cnx = mysql.connector.connect(option_files='/etc/mysql/connectors.cnf',
option_groups='connector_python')
Other connection arguments specified in the connect() call take precedence over options read from
option files. Suppose that /etc/mysql/connectors.conf contains these lines:
[client]
database=cpyapp
The following connect() call includes no database connection argument. The resulting connection uses
cpyapp, the database specified in the option file:
cnx = mysql.connector.connect(option_files='/etc/mysql/connectors.cnf')
By contrast, the following connect() call specifies a default database different from the one found in the
option file. The resulting connection uses cpyapp_dev as the default database, not cpyapp:
cnx2 = mysql.connector.connect(option_files='/etc/mysql/connectors.cnf',
database='cpyapp_dev')
Connector/Python raises a ValueError if an option file cannot be read, or has already been read. This
includes files read by inclusion directives.
For the [connector_python] group, only options supported by Connector/Python are accepted.
Unrecognized options cause a ValueError to be raised.
For other option groups, Connector/Python ignores unrecognized options.
608

Connector/Python Other Topics
It is not an error for a named option group not to exist.
Connector/Python treats option values in option files as strings and evaluates them using eval(). This
enables specification of option values more complex than simple scalars.
6.8 Connector/Python Other Topics
This section describes additional Connection/Python features:
• Connection pooling: Section 6.8.4, “Connector/Python Connection Pooling”
• Django back end for MySQL: Section 6.8.5, “Connector/Python Django Back End”
6.8.1 Connector/Python Logging
By default, logging functionality follows the default Python logging behavior. If logging functionality is not
configured, only events with a severity level of WARNING and greater are printed to sys.stderr. For related
information, see Python's Configuring Logging for a Library documentation.
Outputting additional levels requires configuration. For example, to output debug events to sys.stderr set
logging.DEBUG and add the logging.StreamHandler handler. Additional handles can also be added, such
as logging.FileHandler. This example sets both:
# Classic Protocol Example
import logging
import mysql.connector
logger = logging.getLogger("mysql.connector")
logger.setLevel(logging.DEBUG)
formatter = logging.Formatter("%(asctime)s - %(name)s - %(levelname)s- %(message)s")
stream_handler = logging.StreamHandler()
stream_handler.setFormatter(formatter)
logger.addHandler(stream_handler)
file_handler = logging.FileHandler("cpy.log")
file_handler.setFormatter(formatter)
logger.addHandler(file_handler)
# XDevAPI Protocol Example
import logging
import mysqlx
logger = logging.getLogger("mysqlx")
logger.setLevel(logging.DEBUG)
formatter = logging.Formatter("%(asctime)s - %(name)s - %(levelname)s- %(message)s")
stream_handler = logging.StreamHandler()
stream_handler.setFormatter(formatter)
logger.addHandler(stream_handler)
file_handler = logging.FileHandler("cpy.log")
file_handler.setFormatter(formatter)
logger.addHandler(file_handler)
6.8.2 Telemetry Support
MySQL Server added OpenTelemetry support in MySQL Enterprise Edition version 8.1.0, which is a
commercial product. OpenTelemetry tracing support was added in Connector/Python 8.1.0.
Introduction to OpenTelemetry
OpenTelemetry is an observability framework and toolkit designed to create and manage telemetry data
such as traces, metrics, and logs. Visit What is OpenTelemetry? for an explanation of what OpenTelemetry
offers.
Connector/Python only supports tracing, so this guide does not include information about metric and log
signals.
609

Telemetry Support
Installing Telemetry Support
Install the OpenTelemetry API, SDK, and OTLP Exporter packages on the system along with Connector/
Python. Optionally use the [telemetry] shortcut when installing the mysql-connector-python pip
package to pull in specific OpenTelemetry versions as defined by the connector.
Manual installation:
pip install opentelemetry-api
pip install opentelemetry-sdk
pip install opentelemetry-exporter-otlp-proto-http
pip install mysql-connector-python
Or pass in [telemetry] when installing Connector/Python to perform the same actions except it installs a
specific and tested OpenTelemetry version, which for Connector/Python 9.0.0 is OpenTelemetry v1.18.0:
pip install mysql-connector-python[telemetry]
Connector/Python 8.1.0 through 8.4.0 included an [opentelemetry] option that installed a bundled version
of the OpenTelemetry SDK/API libraries. Doing so in those versions was not recommended.
Instrumentation
For instrumenting an application, Connector/Python utilizes the official OpenTelemetry SDK to initialize
OpenTelemetry, and the official OpenTelemetry API to instrument the application's code. This emits
telemetry from the application and from utilized libraries that include instrumentation.
An application can be instrumented as demonstrated by this generic example:
from opentelemetry import trace
from opentelemetry.sdk.trace import TracerProvider
from opentelemetry.sdk.trace.export import BatchSpanProcessor
from opentelemetry.sdk.trace.export import ConsoleSpanExporter
provider = TracerProvider()
processor = BatchSpanProcessor(ConsoleSpanExporter())
provider.add_span_processor(processor)
trace.set_tracer_provider(provider)
tracer = trace.get_tracer(__name__)
with tracer.start_as_current_span("app"):
my_app()
To better understand and get started using OpenTelemetry tracing for Python, see the official
OpenTelemetry Python Instrumentation guide.
MySQL Connector/Python
Connector/Python includes a MySQL instrumentor to instrument MySQL connections. This instrumentor
provides an API and usage similar to OpenTelemetry's own MySQL package named opentelemetry-
instrumentation-mysql.
An exception is raised if a system does not support OpenTelemetry when attempting to use the
instrumentor.
An example that utilizes the system's OpenTelemetry SDK/API and implements tracing with MySQL
Connector/Python:
import os
import mysql.connector
# An instrumentor that comes with mysql-connector-python
from mysql.connector.opentelemetry.instrumentation import (
MySQLInstrumentor as OracleMySQLInstrumentor,
)
610

Telemetry Support
# Loading SDK from the system
from opentelemetry import trace
from opentelemetry.sdk.trace import TracerProvider
from opentelemetry.sdk.trace.export import BatchSpanProcessor
from opentelemetry.sdk.trace.export import ConsoleSpanExporter
provider = TracerProvider()
processor = BatchSpanProcessor(ConsoleSpanExporter())
provider.add_span_processor(processor)
trace.set_tracer_provider(provider)
tracer = trace.get_tracer(__name__)
config = {
"host": "127.0.0.1",
"user": "root",
"password": os.environ.get("password"),
"use_pure": True,
"port": 3306,
"database": "test",
}
# Global instrumentation: all connection objects returned by
# mysql.connector.connect will be instrumented.
OracleMySQLInstrumentor().instrument()
with tracer.start_as_current_span("client_app"):
with mysql.connector.connect(**config) as cnx:
with cnx.cursor() as cur:
cur.execute("SELECT @@version")
_ = cur.fetchall()
Morphology of the Emitted Traces
A trace generated by the Connector/Python instrumentor contains one connection span, and zero or more
query spans as described in the rest of this section.
Connection Span
• Time from connection initialization to the moment the connection ends. The span is named
connection.
• If the application does not provide a span, the connection span generated is a ROOT span, originating in
the connector.
• If the application does provide a span, the query span generated is a CHILD span, originating in the
connector.
Query Span
• Time from when an SQL statement is requested (on the connector side) to the moment the connector
finishes processing the server's reply to this statement.
• A query span is created for each query request sent to the server. If the application does not provide a
span, the query span generated is a ROOT span, originating in the connector.
• If the application does provide a span, the query span generated is a CHILD span, originating in the
connector.
• The query span is linked to the existing connection span of the connection the query was executed.
• Query attributes with prepared statements is supported as of MySQL Enterprise Edition 8.3.0.
• Query spans for the connection object is supported as of Connector/Python 8.3.0, which includes
methods such as commit(), rollback(), and cmd_change_user().
Context Propagation
611

Asynchronous Connectivity
By default, the trace context of the span in progress (if any) is propagated to the MySQL server.
Propagation has no effect when the MySQL server either disabled or does not support OpenTelemetry
(the trace context is ignored by the server), however, when connecting to a server with OpenTelemetry
enabled and configured, the server processes the propagated traces and creates parent-child relationships
between the spans from the connector and those from the server. In other words, this provides trace
continuity.
Note
Context propagation with prepared statements is supported as of MySQL Enterprise
Edition 8.3.0.
• The trace context is propagated for statements with query attributes defined in the MySQL client/server
protocol, such as COM_QUERY.
The trace context is not propagated for statements without query attributes defined in the MySQL client/
server protocol, statements such as COM_PING.
• Trace context propagation is done via query attributes where a new attribute named "traceparent" is
defined. Its value is based on the current span context. For details on how this value is computed, read
the traceparent header W3C specification.
If the "traceparent" query attribute is manually set for a query, then it is not be overwritten by the
connector; it's assumed that it provides OTel context intended to forward to the server.
Disabling Trace Context Propagation
The boolean connection property named otel_context_propagation is True by default. Setting it to
False disables context propagation.
Since otel_context_propagation is a connection property that can be changed after a connection is
established (a connection object is created), setting such property to False does not have an effect over
the spans generated during the connection phase. In other words, spans generated during the connection
phase are always propagated since otel_context_propagation is True by default.
This implementation is distinct from the implementation provided through the MySQL client library (or the
related telemetry_client client-side plugin).
6.8.3 Asynchronous Connectivity
Installing Connector/Python also installs the mysql.connector.aio package that integrates asyncio
with the connector to allow integrating asynchronous MySQL interactions with an application.
Here are code examples that integrate mysql.connector.aio functionality:
Basic Usage:
from mysql.connector.aio import connect
# Connect to a MySQL server and get a cursor
cnx = await connect(user="myuser", password="mypass")
cur = await cnx.cursor()
# Execute a non-blocking query
await cur.execute("SELECT version()")
# Retrieve the results of the query asynchronously
results = await cur.fetchall()
print(results)
# Close cursor and connection
await cur.close()
await cnx.close()
612

Asynchronous Connectivity
Usage with context managers:
from mysql.connector.aio import connect
# Connect to a MySQL server and get a cursor
async with await connect(user="myuser", password="mypass") as cnx:
async with await cnx.cursor() as cur:
# Execute a non-blocking query
await cur.execute("SELECT version()")
# Retrieve the results of the query asynchronously
results = await cur.fetchall()
print(results)
Running Multiple Tasks Asynchronously
This example showcases how to run tasks asynchronously and the usage of to_thread, which is the
backbone to asynchronously run blocking functions:
Note
The synchronous version of this example implements coroutines instead of
following a common synchronous approach; this to explicitly demonstrate that
only awaiting coroutines does not make the code run asynchronously. Functions
included in the asyncio API must be used to achieve asynchronicity.
import asyncio
import os
import time
from mysql.connector.aio import connect
# Global variable which will help to format the job sequence output.
# DISCLAIMER: this is an example for showcasing/demo purposes,
# you should avoid global variables usage for production code.
global indent
indent = 0
# MySQL Connection arguments
config = {
"host": "127.0.0.1",
"user": "root",
"password": os.environ.get("MYPASS", ":("),
"use_pure": True,
"port": 3306,
}
async def job_sleep(n):
"""Take a nap for n seconds.
This job represents any generic task - it may be or not an IO task.
"""
# Increment indent
global indent
offset = "\t" * indent
indent += 1
# Emulating a generic job/task
print(f"{offset}START_SLEEP")
await asyncio.sleep(n)
print(f"{offset}END_SLEEP")
return f"I slept for {n} seconds"
async def job_mysql():
"""Connect to a MySQL Server and do some operations.
Run queries, run procedures, insert data, etc.
"""
# Increment indent
global indent
offset = "\t" * indent
indent += 1
# MySQL operations
print(f"{offset}START_MYSQL_OPS")
async with await connect(**config) as cnx:
613

Asynchronous Connectivity
async with await cnx.cursor() as cur:
await cur.execute("SELECT @@version")
res = await cur.fetchone()
time.sleep(1) # for simulating that the fetch isn't immediate
print(f"{offset}END_MYSQL_OPS")
# return server version
return res
async def job_io():
"""Emulate an IO operation.
`to_thread` allows to run a blocking function asynchronously.
References:
[asyncio.to_thread]: https://docs.python.org/3/library/asyncio-task.html#asyncio.to_thread
"""
# Emulating a native blocking IO procedure
def io():
"""Blocking IO operation."""
time.sleep(5)
# Increment indent
global indent
offset = "\t" * indent
indent += 1
# Showcasing how a native blocking IO procedure can be awaited,
print(f"{offset}START_IO")
await asyncio.to_thread(io)
print(f"{offset}END_IO")
return "I am an IO operation"
async def main_asynchronous():
"""Running tasks asynchronously.
References:
[asyncio.gather]: https://docs.python.org/3/library/asyncio-task.html#asyncio.gather
"""
print("-------------------- ASYNCHRONOUS --------------------")
# reset indent
global indent
indent = 0
clock = time.time()
# `asyncio.gather()` allows to run awaitable objects
# in the aws sequence asynchronously.\
# If all awaitables are completed successfully,
# the result is an aggregate list of returned values.
aws = (job_io(), job_mysql(), job_sleep(4))
returned_vals = await asyncio.gather(*aws)
print(f"Elapsed time: {time.time() - clock:0.2f}")
# The order of result values corresponds to the
# order of awaitables in aws.
print(returned_vals, end="\n" * 2)
# Example expected output
# -------------------- ASYNCHRONOUS --------------------
# START_IO
# START_MYSQL_OPS
# START_SLEEP
# END_MYSQL_OPS
# END_SLEEP
# END_IO
# Elapsed time: 5.01
# ['I am an IO operation', ('8.3.0-commercial',), 'I slept for 4 seconds']
async def main_non_asynchronous():
"""Running tasks non-asynchronously"""
print("------------------- NON-ASYNCHRONOUS -------------------")
# reset indent
global indent
indent = 0
clock = time.time()
# Sequence of awaitable objects
aws = (job_io(), job_mysql(), job_sleep(4))
# The line below this docstring is the short version of:
# coro1, coro2, coro3 = *aws
614

Asynchronous Connectivity
# res1 = await coro1
# res2 = await coro2
# res3 = await coro3
# returned_vals = [res1, res2, res3]
# NOTE: Simply awaiting a coro does not make the code run asynchronously!
returned_vals = [await coro for coro in aws] # this will run synchronously
print(f"Elapsed time: {time.time() - clock:0.2f}")
print(returned_vals, end="\n")
# Example expected output
# ------------------- NON-ASYNCHRONOUS -------------------
# START_IO
# END_IO
# START_MYSQL_OPS
# END_MYSQL_OPS
# START_SLEEP
# END_SLEEP
# Elapsed time: 10.07
# ['I am an IO operation', ('8.3.0-commercial',), 'I slept for 4 seconds']
if __name__ == "__main__":
# `asyncio.run()`` allows to execute a coroutine (`coro`) and return the result.
# You cannot run a coro without it.
# References:
# [asyncio.run]: https://docs.python.org/3/library/asyncio-runner.html#asyncio.run
assert asyncio.run(main_asynchronous()) == asyncio.run(main_non_asynchronous())
It shows these three jobs running asynchronously:
• job_io: Emulate an I/O operation; with to_thread to allow running a blocking function asynchronously.
Starts first, and takes five seconds to complete so is the last job to finish.
• job_mysql: Connects to a MySQL server to perform operations such as queries and stored
procedures.
Starts second, and takes one second to complete so is the first job to finish.
• job_sleep: Sleeps for n seconds to represent a generic task.
Starts last, and takes four seconds to complete so is the second job to finish.
Note
A lock/mutex wasn't added to the indent variable because multithreading isn't
used; instead the unique active thread executes all of the jobs. Asynchronous
execution is about completing other jobs while waiting for the result of an I/O
operation.
Asynchronous MySQL Queries
This is a similar example that uses MySQL queries instead of generic jobs.
Note
While cursors are not utilized in the these examples, the principles and workflow
could apply to cursors by letting every connection object create a cursor to operate
from.
Synchronous code to create and populate hundreds of tables:
import os
import time
from typing import TYPE_CHECKING, Callable, List, Tuple
from mysql.connector import connect
615

Asynchronous Connectivity
if TYPE_CHECKING:
from mysql.connector.abstracts import (
MySQLConnectionAbstract,
)
# MySQL Connection arguments
config = {
"host": "127.0.0.1",
"user": "root",
"password": os.environ.get("MYPASS", ":("),
"use_pure": True,
"port": 3306,
}
exec_sequence = []
def create_table(
exec_seq: List[str], table_names: List[str], cnx: "MySQLConnectionAbstract", i: int
) -> None:
"""Creates a table."""
if i >= len(table_names):
return False
exec_seq.append(f"start_{i}")
stmt = f"""
CREATE TABLE IF NOT EXISTS {table_names[i]} (
dish_id INT(11) UNSIGNED AUTO_INCREMENT UNIQUE KEY,
category TEXT,
dish_name TEXT,
price FLOAT,
servings INT,
order_time TIME
)
"""
cnx.cmd_query(f"DROP TABLE IF EXISTS {table_names[i]}")
cnx.cmd_query(stmt)
exec_seq.append(f"end_{i}")
return True
def drop_table(
exec_seq: List[str], table_names: List[str], cnx: "MySQLConnectionAbstract", i: int
) -> None:
"""Drops a table."""
if i >= len(table_names):
return False
exec_seq.append(f"start_{i}")
cnx.cmd_query(f"DROP TABLE IF EXISTS {table_names[i]}")
exec_seq.append(f"end_{i}")
return True
def main(
kernel: Callable[[List[str], List[str], "MySQLConnectionAbstract", int], None],
table_names: List[str],
) -> Tuple[List, List]:
exec_seq = []
database_name = "TABLE_CREATOR"
with connect(**config) as cnx:
# Create/Setup database
cnx.cmd_query(f"CREATE DATABASE IF NOT EXISTS {database_name}")
cnx.cmd_query(f"USE {database_name}")
# Execute Kernel: Create or Delete tables
for i in range(len(table_names)):
kernel(exec_seq, table_names, cnx, i)
# Show tables
cnx.cmd_query("SHOW tables")
show_tables = cnx.get_rows()[0]
# Return execution sequence and table names retrieved with `SHOW tables;`.
return exec_seq, show_tables
if __name__ == "__main__":
# with num_tables=511 -> Elapsed time ~ 25.86
clock = time.time()
print_exec_seq = False
num_tables = 511
616

Asynchronous Connectivity
table_names = [f"table_sync_{n}" for n in range(num_tables)]
print("-------------------- SYNC CREATOR --------------------")
exec_seq, show_tables = main(kernel=create_table, table_names=table_names)
assert len(show_tables) == num_tables
if print_exec_seq:
print(exec_seq)
print("-------------------- SYNC DROPPER --------------------")
exec_seq, show_tables = main(kernel=drop_table, table_names=table_names)
assert len(show_tables) == 0
if print_exec_seq:
print(exec_seq)
print(f"Elapsed time: {time.time() - clock:0.2f}")
# Expected output with num_tables = 11:
# -------------------- SYNC CREATOR --------------------
# [
# "start_0",
# "end_0",
# "start_1",
# "end_1",
# "start_2",
# "end_2",
# "start_3",
# "end_3",
# "start_4",
# "end_4",
# "start_5",
# "end_5",
# "start_6",
# "end_6",
# "start_7",
# "end_7",
# "start_8",
# "end_8",
# "start_9",
# "end_9",
# "start_10",
# "end_10",
# ]
# -------------------- SYNC DROPPER --------------------
# [
# "start_0",
# "end_0",
# "start_1",
# "end_1",
# "start_2",
# "end_2",
# "start_3",
# "end_3",
# "start_4",
# "end_4",
# "start_5",
# "end_5",
# "start_6",
# "end_6",
# "start_7",
# "end_7",
# "start_8",
# "end_8",
# "start_9",
# "end_9",
# "start_10",
# "end_10",
# ]
That script creates and deletes {num_tables} tables, and is fully sequential in that it creates and deletes
table_{i} before moving to table_{i+1}.
617

Asynchronous Connectivity
An asynchronous code example for the same task:
import asyncio
import os
import time
from typing import TYPE_CHECKING, Callable, List, Tuple
from mysql.connector.aio import connect
if TYPE_CHECKING:
from mysql.connector.aio.abstracts import (
MySQLConnectionAbstract,
)
# MySQL Connection arguments
config = {
"host": "127.0.0.1",
"user": "root",
"password": os.environ.get("MYPASS", ":("),
"use_pure": True,
"port": 3306,
}
exec_sequence = []
async def create_table(
exec_seq: List[str], table_names: List[str], cnx: "MySQLConnectionAbstract", i: int
) -> None:
"""Creates a table."""
if i >= len(table_names):
return False
exec_seq.append(f"start_{i}")
stmt = f"""
CREATE TABLE IF NOT EXISTS {table_names[i]} (
dish_id INT(11) UNSIGNED AUTO_INCREMENT UNIQUE KEY,
category TEXT,
dish_name TEXT,
price FLOAT,
servings INT,
order_time TIME
)
"""
await cnx.cmd_query(f"DROP TABLE IF EXISTS {table_names[i]}")
await cnx.cmd_query(stmt)
exec_seq.append(f"end_{i}")
return True
async def drop_table(
exec_seq: List[str], table_names: List[str], cnx: "MySQLConnectionAbstract", i: int
) -> None:
"""Drops a table."""
if i >= len(table_names):
return False
exec_seq.append(f"start_{i}")
await cnx.cmd_query(f"DROP TABLE IF EXISTS {table_names[i]}")
exec_seq.append(f"end_{i}")
return True
async def main_async(
kernel: Callable[[List[str], List[str], "MySQLConnectionAbstract", int], None],
table_names: List[str],
num_jobs: int = 2,
) -> Tuple[List, List]:
"""The asynchronous tables creator...
Reference:
[as_completed]: https://docs.python.org/3/library/asyncio-task.html#asyncio.as_completed
"""
exec_seq = []
database_name = "TABLE_CREATOR"
# Create/Setup database
# ---------------------
# No asynchronous execution is done here.
# NOTE: observe usage WITH context manager.
async with await connect(**config) as cnx:
618

Asynchronous Connectivity
await cnx.cmd_query(f"CREATE DATABASE IF NOT EXISTS {database_name}")
await cnx.cmd_query(f"USE {database_name}")
config["database"] = database_name
# Open connections
# ----------------
# `as_completed` allows to run awaitable objects in the `aws` iterable asynchronously.
# NOTE: observe usage WITHOUT context manager.
aws = [connect(**config) for _ in range(num_jobs)]
cnxs: List["MySQLConnectionAbstract"] = [
await coro for coro in asyncio.as_completed(aws)
]
# Execute Kernel: Create or Delete tables
# -------------
# N tables must be created/deleted and we can run up to `num_jobs` jobs asynchronously,
# therefore we execute jobs in batches of size num_jobs`.
returned_values, i = [True], 0
while any(returned_values): # Keep running until i >= len(table_names) for all jobs
# Prepare coros: map connections/cursors and table-name IDs to jobs.
aws = [
kernel(exec_seq, table_names, cnx, i + idx) for idx, cnx in enumerate(cnxs)
]
# When i >= len(table_names) coro simply returns False, else True.
returned_values = [await coro for coro in asyncio.as_completed(aws)]
# Update table-name ID offset based on the number of jobs
i += num_jobs
# Close cursors
# -------------
# `as_completed` allows to run awaitable objects in the `aws` iterable asynchronously.
for coro in asyncio.as_completed([cnx.close() for cnx in cnxs]):
await coro
# Load table names
# ----------------
# No asynchronous execution is done here.
async with await connect(**config) as cnx:
# Show tables
await cnx.cmd_query("SHOW tables")
show_tables = (await cnx.get_rows())[0]
# Return execution sequence and table names retrieved with `SHOW tables;`.
return exec_seq, show_tables
if __name__ == "__main__":
# `asyncio.run()`` allows to execute a coroutine (`coro`) and return the result.
# You cannot run a coro without it.
# References:
# [asyncio.run]: https://docs.python.org/3/library/asyncio-runner.html#asyncio.run
# with num_tables=511 and num_jobs=3 -> Elapsed time ~ 19.09
# with num_tables=511 and num_jobs=12 -> Elapsed time ~ 13.15
clock = time.time()
print_exec_seq = False
num_tables = 511
num_jobs = 12
table_names = [f"table_async_{n}" for n in range(num_tables)]
print("-------------------- ASYNC CREATOR --------------------")
exec_seq, show_tables = asyncio.run(
main_async(kernel=create_table, table_names=table_names, num_jobs=num_jobs)
)
assert len(show_tables) == num_tables
if print_exec_seq:
print(exec_seq)
print("-------------------- ASYNC DROPPER --------------------")
exec_seq, show_tables = asyncio.run(
main_async(kernel=drop_table, table_names=table_names, num_jobs=num_jobs)
)
assert len(show_tables) == 0
if print_exec_seq:
print(exec_seq)
print(f"Elapsed time: {time.time() - clock:0.2f}")
# Expected output with num_tables = 11 and num_jobs = 3:
619

Asynchronous Connectivity
# -------------------- ASYNC CREATOR --------------------
# 11
# [
# "start_2",
# "start_1",
# "start_0",
# "end_2",
# "end_0",
# "end_1",
# "start_5",
# "start_3",
# "start_4",
# "end_3",
# "end_5",
# "end_4",
# "start_8",
# "start_7",
# "start_6",
# "end_7",
# "end_8",
# "end_6",
# "start_10",
# "start_9",
# "end_9",
# "end_10",
# ]
# -------------------- ASYNC DROPPER --------------------
# [
# "start_1",
# "start_2",
# "start_0",
# "end_1",
# "end_2",
# "end_0",
# "start_3",
# "start_5",
# "start_4",
# "end_4",
# "end_5",
# "end_3",
# "start_6",
# "start_8",
# "start_7",
# "end_7",
# "end_6",
# "end_8",
# "start_10",
# "start_9",
# "end_9",
# "end_10",
# ]
This output shows how the job flow isn't sequential in that up to {num_jobs} can be executed
asynchronously. The jobs are run following a batch-like approach of {num_jobs} and waits until all
terminate before launching the next batch, and the loop ends once no tables remain to create.
Performance comparison for these examples: the asynchronous implementation is about 26% faster
when using 3 jobs, and 49% faster using 12 jobs. Note that increasing the number of jobs does add job
management overhead which at some point evaporates the initial speed-up. The optimal number of jobs is
problem-dependent, and is a value determined with experience.
As demonstrated, the asynchronous version requires more code to function than the non-asynchronous
variant. Is it worth the effort? It depends on the goal as asynchronous code better optimizes performance,
such as CPU usage, whereas writing standard synchronous code is simpler.
620

Connector/Python Connection Pooling
For additional information about the asyncio module, see the official Asynchronous I/O Python
Documentation.
6.8.4 Connector/Python Connection Pooling
Simple connection pooling is supported that has these characteristics:
• The mysql.connector.pooling module implements pooling.
• A pool opens a number of connections and handles thread safety when providing connections to
requesters.
• The size of a connection pool is configurable at pool creation time. It cannot be resized thereafter.
• A connection pool can be named at pool creation time. If no name is given, one is generated using the
connection parameters.
• The connection pool name can be retrieved from the connection pool or connections obtained from it.
• It is possible to have multiple connection pools. This enables applications to support pools of
connections to different MySQL servers, for example.
• For each connection request, the pool provides the next available connection. No round-robin or other
scheduling algorithm is used. If a pool is exhausted, a PoolError is raised.
• It is possible to reconfigure the connection parameters used by a pool. These apply to connections
obtained from the pool thereafter. Reconfiguring individual connections obtained from the pool by calling
the connection config() method is not supported.
Applications that can benefit from connection-pooling capability include:
• Middleware that maintains multiple connections to multiple MySQL servers and requires connections to
be readily available.
• websites that can have more “permanent” connections open to the MySQL server.
A connection pool can be created implicitly or explicitly.
To create a connection pool implicitly: Open a connection and specify one or more pool-related
arguments (pool_name, pool_size). For example:
dbconfig = {
"database": "test",
"user": "joe"
}
cnx = mysql.connector.connect(pool_name = "mypool",
pool_size = 3,
**dbconfig)
The pool name is restricted to alphanumeric characters and the special characters ., _, *, $, and #. The
pool name must be no more than pooling.CNX_POOL_MAXNAMESIZE characters long (default 64).
The pool size must be greater than 0 and less than or equal to pooling.CNX_POOL_MAXSIZE (default
32).
With either the pool_name or pool_size argument present, Connector/Python creates the new pool. If
the pool_name argument is not given, the connect() call automatically generates the name, composed
621

Connector/Python Django Back End
from whichever of the host, port, user, and database connection arguments are given, in that order. If
the pool_size argument is not given, the default size is 5 connections.
Subsequent calls to connect() that name the same connection pool return connections from the existing
pool. Any pool_size or connection parameter arguments are ignored, so the following connect() calls
are equivalent to the original connect() call shown earlier:
cnx = mysql.connector.connect(pool_name = "mypool", pool_size = 3)
cnx = mysql.connector.connect(pool_name = "mypool", **dbconfig)
cnx = mysql.connector.connect(pool_name = "mypool")
Pooled connections obtained by calling connect() with a pool-related argument have a class
of PooledMySQLConnection (see Section 6.9.4, “pooling.PooledMySQLConnection Class”).
PooledMySQLConnection pooled connection objects are similar to MySQLConnection unpooled
connection objects, with these differences:
• To release a pooled connection obtained from a connection pool, invoke its close() method, just as
for any unpooled connection. However, for a pooled connection, close() does not actually close the
connection but returns it to the pool and makes it available for subsequent connection requests.
• A pooled connection cannot be reconfigured using its config() method. Connection changes must be
done through the pool object itself, as described shortly.
• A pooled connection has a pool_name property that returns the pool name.
To create a connection pool explicitly: Create a MySQLConnectionPool object (see Section 6.9.3,
“pooling.MySQLConnectionPool Class”):
dbconfig = {
"database": "test",
"user": "joe"
}
cnxpool = mysql.connector.pooling.MySQLConnectionPool(pool_name = "mypool",
pool_size = 3,
**dbconfig)
To request a connection from the pool, use its get_connection() method:
cnx1 = cnxpool.get_connection()
cnx2 = cnxpool.get_connection()
When you create a connection pool explicitly, it is possible to use the pool object's set_config() method
to reconfigure the pool connection parameters:
dbconfig = {
"database": "performance_schema",
"user": "admin",
"password": "password"
}
cnxpool.set_config(**dbconfig)
Connections requested from the pool after the configuration change use the new parameters. Connections
obtained before the change remain unaffected, but when they are closed (returned to the pool) are
reopened with the new parameters before being returned by the pool for subsequent connection requests.
6.8.5 Connector/Python Django Back End
Connector/Python includes a mysql.connector.django module that provides a Django back end for
MySQL. This back end supports new features found as of MySQL 5.6 such as fractional seconds support
for temporal data types.
622

Connector/Python API Reference
Django Configuration
Django uses a configuration file named settings.py that contains a variable called DATABASES (see
https://docs.djangoproject.com/en/1.5/ref/settings/#std:setting-DATABASES). To configure Django to use
Connector/Python as the MySQL back end, the example found in the Django manual can be used as a
basis:
DATABASES = {
'default': {
'NAME': 'user_data',
'ENGINE': 'mysql.connector.django',
'HOST': '127.0.0.1',
'PORT': 3306,
'USER': 'mysql_user',
'PASSWORD': 'password',
'OPTIONS': {
'autocommit': True,
'use_oure': True,
'init_command': "SET foo='bar';"
},
}
}
It is possible to add more connection arguments using OPTIONS.
Support for MySQL Features
Django can launch the MySQL client application mysql. When the Connector/Python back end does this, it
arranges for the sql_mode system variable to be set to TRADITIONAL at startup.
Some MySQL features are enabled depending on the server version. For example, support for fractional
seconds precision is enabled when connecting to a server from MySQL 5.6.4 or higher. Django's
DateTimeField is stored in a MySQL column defined as DATETIME(6), and TimeField is stored as
TIME(6). For more information about fractional seconds support, see Fractional Seconds in Time Values.
Using a custom class for data type conversation is supported as a subclass of
mysql.connector.django.base.DjangoMySQLConverter. This support was added in Connector/Python
8.0.29.
6.9 Connector/Python API Reference
This chapter contains the public API reference for Connector/Python. Examples should be considered
working for Python 2.7, and Python 3.1 and greater. They might also work for older versions (such as
Python 2.4) unless they use features introduced in newer Python versions. For example, exception
handling using the as keyword was introduced in Python 2.6 and will not work in Python 2.4.
Note
Python 2.7 support was removed in Connector/Python 8.0.24.
The following overview shows the mysql.connector package with its modules. Currently, only the most
useful modules, classes, and methods for end users are documented.
mysql.connector
errorcode
errors
connection
constants
conversion
623

mysql.connector Module
cursor
dbapi
locales
eng
client_error
protocol
utils
6.9.1 mysql.connector Module
The mysql.connector module provides top-level methods and properties.
6.9.1.1 mysql.connector.connect() Method
This method sets up a connection, establishing a session with the MySQL server. If no arguments are
given, it uses the already configured or default values. For a complete list of possible arguments, see
Section 6.7.1, “Connector/Python Connection Arguments”.
A connection with the MySQL server can be established using either the mysql.connector.connect()
method or the mysql.connector.MySQLConnection() class:
cnx = mysql.connector.connect(user='joe', database='test')
cnx = MySQLConnection(user='joe', database='test')
For descriptions of connection methods and properties, see Section 6.9.2, “connection.MySQLConnection
Class”.
6.9.1.2 mysql.connector.apilevel Property
This property is a string that indicates the supported DB API level.
>>> mysql.connector.apilevel
'2.0'
6.9.1.3 mysql.connector.paramstyle Property
This property is a string that indicates the Connector/Python default parameter style.
>>> mysql.connector.paramstyle
'pyformat'
6.9.1.4 mysql.connector.threadsafety Property
This property is an integer that indicates the supported level of thread safety provided by Connector/
Python.
>>> mysql.connector.threadsafety
1
6.9.1.5 mysql.connector.__version__ Property
This property indicates the Connector/Python version as a string. It is available as of Connector/Python
1.1.0.
624

connection.MySQLConnection Class
>>> mysql.connector.__version__
'1.1.0'
6.9.1.6 mysql.connector.__version_info__ Property
This property indicates the Connector/Python version as an array of version components. It is available as
of Connector/Python 1.1.0.
>>> mysql.connector.__version_info__
(1, 1, 0, 'a', 0)
6.9.2 connection.MySQLConnection Class
The MySQLConnection class is used to open and manage a connection to a MySQL server. It also used
to send commands and SQL statements and read the results.
6.9.2.1 connection.MySQLConnection() Constructor
Syntax:
cnx = MySQLConnection(**kwargs)
The MySQLConnection constructor initializes the attributes and when at least one argument is passed, it
tries to connect to the MySQL server.
For a complete list of arguments, see Section 6.7.1, “Connector/Python Connection Arguments”.
6.9.2.2 MySQLConnection.close() Method
Syntax:
cnx.close()
close() is a synonym for disconnect(). See Section 6.9.2.20, “MySQLConnection.disconnect()
Method”.
For a connection obtained from a connection pool, close() does not actually close it but returns it to the
pool and makes it available for subsequent connection requests. See Section 6.8.4, “Connector/Python
Connection Pooling”.
6.9.2.3 MySQLConnection.commit() Method
This method sends a COMMIT statement to the MySQL server, committing the current transaction. Since
by default Connector/Python does not autocommit, it is important to call this method after every transaction
that modifies data for tables that use transactional storage engines.
>>> cursor.execute("INSERT INTO employees (first_name) VALUES (%s), (%s)", ('Jane', 'Mary'))
>>> cnx.commit()
To roll back instead and discard modifications, see the rollback() method.
6.9.2.4 MySQLConnection.config() Method
625

connection.MySQLConnection Class
Syntax:
cnx.config(**kwargs)
Configures a MySQLConnection instance after it has been instantiated. For a complete list of possible
arguments, see Section 6.7.1, “Connector/Python Connection Arguments”.
Arguments:
• kwargs: Connection arguments.
You could use the config() method to change (for example) the user name, then call reconnect().
Example:
cnx = mysql.connector.connect(user='joe', database='test')
# Connected as 'joe'
cnx.config(user='jane')
cnx.reconnect()
# Now connected as 'jane'
For a connection obtained from a connection pool, config() raises an exception. See Section 6.8.4,
“Connector/Python Connection Pooling”.
6.9.2.5 MySQLConnection.connect() Method
Syntax:
MySQLConnection.connect(**kwargs)
This method sets up a connection, establishing a session with the MySQL server. If no arguments are
given, it uses the already configured or default values. For a complete list of possible arguments, see
Section 6.7.1, “Connector/Python Connection Arguments”.
Arguments:
• kwargs: Connection arguments.
Example:
cnx = MySQLConnection(user='joe', database='test')
For a connection obtained from a conection pool, the connection object class is
PooledMySQLConnection. A pooled connection differs from an unpooled connection as described in
Section 6.8.4, “Connector/Python Connection Pooling”.
6.9.2.6 MySQLConnection.cursor() Method
Syntax:
cursor = cnx.cursor([arg=value[, arg=value]...])
This method returns a MySQLCursor() object, or a subclass of it depending on the passed arguments.
The returned object is a cursor.CursorBase instance. For more information about cursor objects, see
Section 6.9.5, “cursor.MySQLCursor Class”, and Section 6.9.6, “Subclasses cursor.MySQLCursor”.
Arguments may be passed to the cursor() method to control what type of cursor to create:
626

connection.MySQLConnection Class
• If buffered is True, the cursor fetches all rows from the server after an operation is executed. This is
useful when queries return small result sets. buffered can be used alone, or in combination with the
dictionary or named_tuple argument.
buffered can also be passed to connect() to set the default buffering mode for all cursors created
from the connection object. See Section 6.7.1, “Connector/Python Connection Arguments”.
For information about the implications of buffering, see Section 6.9.6.1, “cursor.MySQLCursorBuffered
Class”.
• If raw is True, the cursor skips the conversion from MySQL data types to Python types when fetching
rows. A raw cursor is usually used to get better performance or when you want to do the conversion
yourself.
raw can also be passed to connect() to set the default raw mode for all cursors created from the
connection object. See Section 6.7.1, “Connector/Python Connection Arguments”.
• If dictionary is True, the cursor returns rows as dictionaries. This argument is available as of
Connector/Python 2.0.0.
• If named_tuple is True, the cursor returns rows as named tuples. This argument is available as of
Connector/Python 2.0.0.
• If prepared is True, the cursor is used for executing prepared statements. This argument is available
as of Connector/Python 1.1.2. The C extension supports this as of Connector/Python 8.0.17.
• The cursor_class argument can be used to pass a class to use for instantiating a new cursor. It must
be a subclass of cursor.CursorBase.
The returned object depends on the combination of the arguments. Examples:
• If not buffered and not raw: MySQLCursor
• If buffered and not raw: MySQLCursorBuffered
• If not buffered and raw: MySQLCursorRaw
• If buffered and raw: MySQLCursorBufferedRaw
6.9.2.7 MySQLConnection.cmd_change_user() Method
Changes the user using username and password. It also causes the specified database to become the
default (current) database. It is also possible to change the character set using the charset argument.
Syntax:
cnx.cmd_change_user(username='', password='', database='', charset=33)
Returns a dictionary containing the OK packet information.
6.9.2.8 MySQLConnection.cmd_debug() Method
Instructs the server to write debugging information to the error log. The connected user must have the
SUPER privilege.
Returns a dictionary containing the OK packet information.
6.9.2.9 MySQLConnection.cmd_init_db() Method
627

connection.MySQLConnection Class
Syntax:
cnx.cmd_init_db(db_name)
This method makes specified database the default (current) database. In subsequent queries, this
database is the default for table references that include no explicit database qualifier.
Returns a dictionary containing the OK packet information.
6.9.2.10 MySQLConnection.cmd_ping() Method
Checks whether the connection to the server is working.
This method is not to be used directly. Use ping() or is_connected() instead.
Returns a dictionary containing the OK packet information.
6.9.2.11 MySQLConnection.cmd_process_info() Method
This method raises the NotSupportedError exception. Instead, use the SHOW PROCESSLIST statement or
query the tables found in the database INFORMATION_SCHEMA.
Deprecation
This MySQL Server functionality is deprecated.
6.9.2.12 MySQLConnection.cmd_process_kill() Method
Syntax:
cnx.cmd_process_kill(mysql_pid)
Deprecation
This MySQL Server functionality is deprecated.
Asks the server to kill the thread specified by mysql_pid. Although still available, it is better to use the
KILL SQL statement.
Returns a dictionary containing the OK packet information.
The following two lines have the same effect:
>>> cnx.cmd_process_kill(123)
>>> cnx.cmd_query('KILL 123')
6.9.2.13 MySQLConnection.cmd_query() Method
Syntax:
cnx.cmd_query(statement)
This method sends the given statement to the MySQL server and returns a result. To send multiple
statements, use the cmd_query_iter() method instead.
628

connection.MySQLConnection Class
The returned dictionary contains information depending on what kind of query was executed. If the query is
a SELECT statement, the result contains information about columns. Other statements return a dictionary
containing OK or EOF packet information.
Errors received from the MySQL server are raised as exceptions. An InterfaceError is raised when
multiple results are found.
Returns a dictionary.
6.9.2.14 MySQLConnection.cmd_query_iter() Method
Syntax:
cnx.cmd_query_iter(statement)
Similar to the cmd_query() method, but returns a generator object to iterate through results. Use
cmd_query_iter() when sending multiple statements, and separate the statements with semicolons.
The following example shows how to iterate through the results after sending multiple statements:
statement = 'SELECT 1; INSERT INTO t1 VALUES (); SELECT 2'
for result in cnx.cmd_query_iter(statement):
if 'columns' in result:
columns = result['columns']
rows = cnx.get_rows()
else:
# do something useful with INSERT result
Returns a generator object.
6.9.2.15 MySQLConnection.cmd_quit() Method
This method sends a QUIT command to the MySQL server, closing the current connection. Since there is
no response from the MySQL server, the packet that was sent is returned.
6.9.2.16 MySQLConnection.cmd_refresh() Method
Syntax:
cnx.cmd_refresh(options)
Deprecation
This MySQL Server functionality is deprecated.
This method flushes tables or caches, or resets replication server information. The connected user must
have the RELOAD privilege.
The options argument should be a bitmask value constructed using constants from the
constants.RefreshOption class.
For a list of options, see Section 6.9.11, “constants.RefreshOption Class”.
Example:
>>> from mysql.connector import RefreshOption
>>> refresh = RefreshOption.LOG | RefreshOption.THREADS
>>> cnx.cmd_refresh(refresh)
629

connection.MySQLConnection Class
6.9.2.17 MySQLConnection.cmd_reset_connection() Method
Syntax:
cnx.cmd_reset_connection()
Resets the connection by sending a COM_RESET_CONNECTION command to the server to clear the
session state.
This method permits the session state to be cleared without reauthenticating. For MySQL servers older
than 5.7.3 (when COM_RESET_CONNECTION was introduced), the reset_session() method can be
used instead. That method resets the session state by reauthenticating, which is more expensive.
This method was added in Connector/Python 1.2.1.
6.9.2.18 MySQLConnection.cmd_shutdown() Method
Deprecation
This MySQL Server functionality is deprecated.
Asks the database server to shut down. The connected user must have the SHUTDOWN privilege.
Returns a dictionary containing the OK packet information.
6.9.2.19 MySQLConnection.cmd_statistics() Method
Returns a dictionary containing information about the MySQL server including uptime in seconds and the
number of running threads, questions, reloads, and open tables.
6.9.2.20 MySQLConnection.disconnect() Method
This method tries to send a QUIT command and close the socket. It raises no exceptions.
MySQLConnection.close() is a synonymous method name and more commonly used.
To shut down the connection without sending a QUIT command first, use shutdown().
6.9.2.21 MySQLConnection.get_row() Method
This method retrieves the next row of a query result set, returning a tuple.
The tuple returned by get_row() consists of:
• The row as a tuple containing byte objects, or None when no more rows are available.
• EOF packet information as a dictionary containing status_flag and warning_count, or None when
the row returned is not the last row.
The get_row() method is used by MySQLCursor to fetch rows.
6.9.2.22 MySQLConnection.get_rows() Method
Syntax:
cnx.get_rows(count=None)
630

connection.MySQLConnection Class
This method retrieves all or remaining rows of a query result set, returning a tuple containing the rows as
sequences and the EOF packet information. The count argument can be used to obtain a given number of
rows. If count is not specified or is None, all rows are retrieved.
The tuple returned by get_rows() consists of:
• A list of tuples containing the row data as byte objects, or an empty list when no rows are available.
• EOF packet information as a dictionary containing status_flag and warning_count.
An InterfaceError is raised when all rows have been retrieved.
MySQLCursor uses the get_rows() method to fetch rows.
Returns a tuple.
6.9.2.23 MySQLConnection.get_server_info() Method
This method returns the MySQL server information verbatim as a string, for example '5.6.11-log', or
None when not connected.
6.9.2.24 MySQLConnection.get_server_version() Method
This method returns the MySQL server version as a tuple, or None when not connected.
6.9.2.25 MySQLConnection.is_connected() Method
Reports whether the connection to MySQL Server is available.
This method checks whether the connection to MySQL is available using the ping() method, but unlike
ping(), is_connected() returns True when the connection is available, False otherwise.
6.9.2.26 MySQLConnection.isset_client_flag() Method
Syntax:
cnx.isset_client_flag(flag)
This method returns True if the client flag was set, False otherwise.
6.9.2.27 MySQLConnection.ping() Method
Syntax:
cnx.ping(reconnect=False, attempts=1, delay=0)
Check whether the connection to the MySQL server is still available.
When reconnect is set to True, one or more attempts are made to try to reconnect to the MySQL
server, and these options are forwarded to the reconnect()>method. Use the delay argument (seconds) if
you want to wait between each retry.
When the connection is not available, an InterfaceError is raised. Use the is_connected() method to
check the connection without raising an error.
Raises InterfaceError on errors.
6.9.2.28 MySQLConnection.reconnect() Method
631

connection.MySQLConnection Class
Syntax:
cnx.reconnect(attempts=1, delay=0)
Attempt to reconnect to the MySQL server.
The argument attempts specifies the number of times a reconnect is tried. The delay argument is the
number of seconds to wait between each retry.
You might set the number of attempts higher and use a longer delay when you expect the MySQL server to
be down for maintenance, or when you expect the network to be temporarily unavailable.
6.9.2.29 MySQLConnection.reset_session() Method
Syntax:
cnx.reset_session(user_variables = None, session_variables = None)
Resets the connection by reauthenticating to clear the session state. user_variables, if given, is a
dictionary of user variable names and values. session_variables, if given, is a dictionary of system
variable names and values. The method sets each variable to the given value.
Example:
user_variables = {'var1': '1', 'var2': '10'}
session_variables = {'wait_timeout': 100000, 'sql_mode': 'TRADITIONAL'}
self.cnx.reset_session(user_variables, session_variables)
This method resets the session state by reauthenticating. For MySQL servers 5.7 or higher, the
cmd_reset_connection() method is a more lightweight alternative.
This method was added in Connector/Python 1.2.1.
6.9.2.30 MySQLConnection.rollback() Method
This method sends a ROLLBACK statement to the MySQL server, undoing all data changes from the
current transaction. By default, Connector/Python does not autocommit, so it is possible to cancel
transactions when using transactional storage engines such as InnoDB.
>>> cursor.execute("INSERT INTO employees (first_name) VALUES (%s), (%s)", ('Jane', 'Mary'))
>>> cnx.rollback()
To commit modifications, see the commit() method.
6.9.2.31 MySQLConnection.set_charset_collation() Method
Syntax:
cnx.set_charset_collation(charset=None, collation=None)
This method sets the character set and collation to be used for the current connection. The charset
argument can be either the name of a character set, or the numerical equivalent as defined in
constants.CharacterSet.
When collation is None, the default collation for the character set is used.
632

connection.MySQLConnection Class
In the following example, we set the character set to latin1 and the collation to latin1_swedish_ci
(the default collation for: latin1):
>>> cnx = mysql.connector.connect(user='scott')
>>> cnx.set_charset_collation('latin1')
Specify a given collation as follows:
>>> cnx = mysql.connector.connect(user='scott')
>>> cnx.set_charset_collation('latin1', 'latin1_general_ci')
6.9.2.32 MySQLConnection.set_client_flags() Method
Syntax:
cnx.set_client_flags(flags)
This method sets the client flags to use when connecting to the MySQL server, and returns the new value
as an integer. The flags argument can be either an integer or a sequence of valid client flag values (see
Section 6.9.7, “constants.ClientFlag Class”).
If flags is a sequence, each item in the sequence sets the flag when the value is positive or unsets it
when negative. For example, to unset LONG_FLAG and set the FOUND_ROWS flags:
>>> from mysql.connector.constants import ClientFlag
>>> cnx.set_client_flags([ClientFlag.FOUND_ROWS, -ClientFlag.LONG_FLAG])
>>> cnx.reconnect()
Note
Client flags are only set or used when connecting to the MySQL server. It is
therefore necessary to reconnect after making changes.
6.9.2.33 MySQLConnection.shutdown() Method
This method closes the socket. It raises no exceptions.
Unlike disconnect(), shutdown() closes the client connection without attempting to send a QUIT
command to the server first. Thus, it will not block if the connection is disrupted for some reason such as
network failure.
shutdown() was added in Connector/Python 2.0.1.
6.9.2.34 MySQLConnection.start_transaction() Method
This method starts a transaction. It accepts arguments indicating whether to use a consistent snapshot,
which transaction isolation level to use, and the transaction access mode:
cnx.start_transaction(consistent_snapshot=bool,
isolation_level=level,
readonly=access_mode)
The default consistent_snapshot value is False. If the value is True, Connector/Python sends WITH
CONSISTENT SNAPSHOT with the statement. MySQL ignores this for isolation levels for which that option
does not apply.
633

connection.MySQLConnection Class
The default isolation_level value is None, and permitted values are 'READ UNCOMMITTED', 'READ
COMMITTED', 'REPEATABLE READ', and 'SERIALIZABLE'. If the isolation_level value is None,
no isolation level is sent, so the default level applies.
The readonly argument can be True to start the transaction in READ ONLY mode or False to start
it in READ WRITE mode. If readonly is omitted, the server's default access mode is used. For details
about transaction access mode, see the description for the START TRANSACTION statement at START
TRANSACTION, COMMIT, and ROLLBACK Statements. If the server is older than MySQL 5.6.5, it does
not support setting the access mode and Connector/Python raises a ValueError.
Invoking start_transaction() raises a ProgrammingError if invoked while a transaction is currently
in progress. This differs from executing a START TRANSACTION SQL statement while a transaction is in
progress; the statement implicitly commits the current transaction.
To determine whether a transaction is active for the connection, use the in_transaction property.
start_transaction() was added in MySQL Connector/Python 1.1.0. The readonly argument was
added in Connector/Python 1.1.5.
6.9.2.35 MySQLConnection.autocommit Property
This property can be assigned a value of True or False to enable or disable the autocommit feature of
MySQL. The property can be invoked to retrieve the current autocommit setting.
Note
Autocommit is disabled by default when connecting through Connector/Python. This
can be enabled using the autocommit connection parameter.
When the autocommit is turned off, you must commit transactions when using transactional storage
engines such as InnoDB or NDBCluster.
>>> cnx.autocommit
False
>>> cnx.autocommit = True
>>> cnx.autocommit
True
6.9.2.36 MySQLConnection.unread_results Property
Indicates whether there is an unread result. It is set to False if there is not an unread result, otherwise
True. This is used by cursors to check whether another cursor still needs to retrieve its result set.
Do not set the value of this property, as only the connector should change the value. In other words, treat
this as a read-only property.
6.9.2.37 MySQLConnection.can_consume_results Property
This property indicates the value of the consume_results connection parameter that controls whether
result sets produced by queries are automatically read and discarded. See Section 6.7.1, “Connector/
Python Connection Arguments”.
This method was added in Connector/Python 2.1.1.
6.9.2.38 MySQLConnection.charset Property
634

connection.MySQLConnection Class
This property returns a string indicating which character set is used for the connection, whether or not it is
connected.
6.9.2.39 MySQLConnection.collation Property
This property returns a string indicating which collation is used for the connection, whether or not it is
connected.
6.9.2.40 MySQLConnection.connection_id Property
This property returns the integer connection ID (thread ID or session ID) for the current connection or None
when not connected.
6.9.2.41 MySQLConnection.database Property
This property sets the current (default) database by executing a USE statement. The property can also be
used to retrieve the current database name.
>>> cnx.database = 'test'
>>> cnx.database = 'mysql'
>>> cnx.database
u'mysql'
Returns a string.
6.9.2.42 MySQLConnection.get_warnings Property
This property can be assigned a value of True or False to enable or disable whether warnings should be
fetched automatically. The default is False (default). The property can be invoked to retrieve the current
warnings setting.
Fetching warnings automatically can be useful when debugging queries. Cursors make warnings available
through the method MySQLCursor.fetchwarnings().
>>> cnx.get_warnings = True
>>> cursor.execute('SELECT "a"+1')
>>> cursor.fetchall()
[(1.0,)]
>>> cursor.fetchwarnings()
[(u'Warning', 1292, u"Truncated incorrect DOUBLE value: 'a'")]
Returns True or False.
6.9.2.43 MySQLConnection.in_transaction Property
This property returns True or False to indicate whether a transaction is active for the connection. The
value is True regardless of whether you start a transaction using the start_transaction() API call or
by directly executing an SQL statement such as START TRANSACTION or BEGIN.
>>> cnx.start_transaction()
>>> cnx.in_transaction
True
>>> cnx.commit()
635

connection.MySQLConnection Class
>>> cnx.in_transaction
False
in_transaction was added in MySQL Connector/Python 1.1.0.
6.9.2.44 MySQLConnection.raise_on_warnings Property
This property can be assigned a value of True or False to enable or disable whether warnings should
raise exceptions. The default is False (default). The property can be invoked to retrieve the current
exceptions setting.
Setting raise_on_warnings also sets get_warnings because warnings need to be fetched so they
can be raised as exceptions.
Note
You might always want to set the SQL mode if you would like to have the
MySQL server directly report warnings as errors (see Section 6.9.2.47,
“MySQLConnection.sql_mode Property”). It is also good to use transactional
engines so transactions can be rolled back when catching the exception.
Result sets needs to be fetched completely before any exception can be raised. The following example
shows the execution of a query that produces a warning:
>>> cnx.raise_on_warnings = True
>>> cursor.execute('SELECT "a"+1')
>>> cursor.fetchall()
..
mysql.connector.errors.DataError: 1292: Truncated incorrect DOUBLE value: 'a'
Returns True or False.
6.9.2.45 MySQLConnection.server_host Property
This read-only property returns the host name or IP address used for connecting to the MySQL server.
Returns a string.
6.9.2.46 MySQLConnection.server_port Property
This read-only property returns the TCP/IP port used for connecting to the MySQL server.
Returns an integer.
6.9.2.47 MySQLConnection.sql_mode Property
This property is used to retrieve and set the SQL Modes for the current connection. The value should
be a list of different modes separated by comma (","), or a sequence of modes, preferably using the
constants.SQLMode class.
To unset all modes, pass an empty string or an empty sequence.
>>> cnx.sql_mode = 'TRADITIONAL,NO_ENGINE_SUBSTITUTION'
>>> cnx.sql_mode.split(',')
[u'STRICT_TRANS_TABLES', u'STRICT_ALL_TABLES', u'NO_ZERO_IN_DATE',
636

pooling.MySQLConnectionPool Class
u'NO_ZERO_DATE', u'ERROR_FOR_DIVISION_BY_ZERO', u'TRADITIONAL',
u'NO_AUTO_CREATE_USER', u'NO_ENGINE_SUBSTITUTION']
>>> from mysql.connector.constants import SQLMode
>>> cnx.sql_mode = [ SQLMode.NO_ZERO_DATE, SQLMode.REAL_AS_FLOAT]
>>> cnx.sql_mode
u'REAL_AS_FLOAT,NO_ZERO_DATE'
Returns a string.
6.9.2.48 MySQLConnection.time_zone Property
This property is used to set or retrieve the time zone session variable for the current connection.
>>> cnx.time_zone = '+00:00'
>>> cursor = cnx.cursor()
>>> cursor.execute('SELECT NOW()') ; cursor.fetchone()
(datetime.datetime(2012, 6, 15, 11, 24, 36),)
>>> cnx.time_zone = '-09:00'
>>> cursor.execute('SELECT NOW()') ; cursor.fetchone()
(datetime.datetime(2012, 6, 15, 2, 24, 44),)
>>> cnx.time_zone
u'-09:00'
Returns a string.
6.9.2.49 MySQLConnection.unix_socket Property
This read-only property returns the Unix socket file for connecting to the MySQL server.
Returns a string.
6.9.2.50 MySQLConnection.user Property
This read-only property returns the user name used for connecting to the MySQL server.
Returns a string.
6.9.3 pooling.MySQLConnectionPool Class
This class provides for the instantiation and management of connection pools.
6.9.3.1 pooling.MySQLConnectionPool Constructor
Syntax:
MySQLConnectionPool(pool_name=None,
pool_size=5,
pool_reset_session=True,
**kwargs)
This constructor instantiates an object that manages a connection pool.
Arguments:
• pool_name: The pool name. If this argument is not given, Connector/Python automatically generates
the name, composed from whichever of the host, port, user, and database connection arguments
are given in kwargs, in that order.
637

pooling.MySQLConnectionPool Class
It is not an error for multiple pools to have the same name. An application that must distinguish pools by
their pool_name property should create each pool with a distinct name.
• pool_size: The pool size. If this argument is not given, the default is 5.
• pool_reset_session: Whether to reset session variables when the connection is returned to the pool.
This argument was added in Connector/Python 1.1.5. Before 1.1.5, session variables are not reset.
• kwargs: Optional additional connection arguments, as described in Section 6.7.1, “Connector/Python
Connection Arguments”.
Example:
dbconfig = {
"database": "test",
"user": "joe",
}
cnxpool = mysql.connector.pooling.MySQLConnectionPool(pool_name = "mypool",
pool_size = 3,
**dbconfig)
6.9.3.2 MySQLConnectionPool.add_connection() Method
Syntax:
cnxpool.add_connection(cnx = None)
This method adds a new or existing MySQLConnection to the pool, or raises a PoolError if the pool is
full.
Arguments:
• cnx: The MySQLConnection object to be added to the pool. If this argument is missing, the pool
creates a new connection and adds it.
Example:
cnxpool.add_connection() # add new connection to pool
cnxpool.add_connection(cnx) # add existing connection to pool
6.9.3.3 MySQLConnectionPool.get_connection() Method
Syntax:
cnxpool.get_connection()
This method returns a connection from the pool, or raises a PoolError if no connections are available.
Example:
cnx = cnxpool.get_connection()
6.9.3.4 MySQLConnectionPool.set_config() Method
Syntax:
cnxpool.set_config(**kwargs)
This method sets the configuration parameters for connections in the pool. Connections requested from
the pool after the configuration change use the new parameters. Connections obtained before the change
638

pooling.PooledMySQLConnection Class
remain unaffected, but when they are closed (returned to the pool) are reopened with the new parameters
before being returned by the pool for subsequent connection requests.
Arguments:
• kwargs: Connection arguments.
Example:
dbconfig = {
"database": "performance_schema",
"user": "admin",
"password": "password",
}
cnxpool.set_config(**dbconfig)
6.9.3.5 MySQLConnectionPool.pool_name Property
Syntax:
cnxpool.pool_name
This property returns the connection pool name.
Example:
name = cnxpool.pool_name
6.9.4 pooling.PooledMySQLConnection Class
This class is used by MySQLConnectionPool to return a pooled connection instance. It is also the class
used for connections obtained with calls to the connect() method that name a connection pool (see
Section 6.8.4, “Connector/Python Connection Pooling”).
PooledMySQLConnection pooled connection objects are similar to MySQLConnection unpooled
connection objects, with these differences:
• To release a pooled connection obtained from a connection pool, invoke its close() method, just as
for any unpooled connection. However, for a pooled connection, close() does not actually close the
connection but returns it to the pool and makes it available for subsequent connection requests.
• A pooled connection cannot be reconfigured using its config() method. Connection changes must
be done through the pool object itself, as described by Section 6.8.4, “Connector/Python Connection
Pooling”.
• A pooled connection has a pool_name property that returns the pool name.
6.9.4.1 pooling.PooledMySQLConnection Constructor
Syntax:
PooledMySQLConnection(cnxpool, cnx)
This constructor takes connection pool and connection arguments and returns a pooled connection. It is
used by the MySQLConnectionPool class.
Arguments:
• cnxpool: A MySQLConnectionPool instance.
639

cursor.MySQLCursor Class
• cnx: A MySQLConnection instance.
Example:
pcnx = mysql.connector.pooling.PooledMySQLConnection(cnxpool, cnx)
6.9.4.2 PooledMySQLConnection.close() Method
Syntax:
cnx.close()
Returns a pooled connection to its connection pool.
For a pooled connection, close() does not actually close it but returns it to the pool and makes it
available for subsequent connection requests.
If the pool configuration parameters are changed, a returned connection is closed and reopened with the
new configuration before being returned from the pool again in response to a connection request.
6.9.4.3 PooledMySQLConnection.config() Method
For pooled connections, the config() method raises a PoolError exception. Configuration for pooled
connections should be done using the pool object.
6.9.4.4 PooledMySQLConnection.pool_name Property
Syntax:
cnx.pool_name
This property returns the name of the connection pool to which the connection belongs.
Example:
cnx = cnxpool.get_connection()
name = cnx.pool_name
6.9.5 cursor.MySQLCursor Class
The MySQLCursor class instantiates objects that can execute operations such as SQL statements. Cursor
objects interact with the MySQL server using a MySQLConnection object.
To create a cursor, use the cursor() method of a connection object:
import mysql.connector
cnx = mysql.connector.connect(database='world')
cursor = cnx.cursor()
Several related classes inherit from MySQLCursor. To create a cursor of one of these types, pass the
appropriate arguments to cursor():
• MySQLCursorBuffered creates a buffered cursor. See Section 6.9.6.1, “cursor.MySQLCursorBuffered
Class”.
cursor = cnx.cursor(buffered=True)
• MySQLCursorRaw creates a raw cursor. See Section 6.9.6.2, “cursor.MySQLCursorRaw Class”.
640

cursor.MySQLCursor Class
cursor = cnx.cursor(raw=True)
• MySQLCursorBufferedRaw creates a buffered raw cursor. See Section 6.9.6.3,
“cursor.MySQLCursorBufferedRaw Class”.
cursor = cnx.cursor(raw=True, buffered=True)
• MySQLCursorDict creates a cursor that returns rows as dictionaries. See Section 6.9.6.4,
“cursor.MySQLCursorDict Class”.
cursor = cnx.cursor(dictionary=True)
• MySQLCursorBufferedDict creates a buffered cursor that returns rows as dictionaries. See
Section 6.9.6.5, “cursor.MySQLCursorBufferedDict Class”.
cursor = cnx.cursor(dictionary=True, buffered=True)
• MySQLCursorNamedTuple creates a cursor that returns rows as named tuples. See Section 6.9.6.6,
“cursor.MySQLCursorNamedTuple Class”.
cursor = cnx.cursor(named_tuple=True)
• MySQLCursorBufferedNamedTuple creates a buffered cursor that returns rows as named tuples.
See Section 6.9.6.7, “cursor.MySQLCursorBufferedNamedTuple Class”.
cursor = cnx.cursor(named_tuple=True, buffered=True)
• MySQLCursorPrepared creates a cursor for executing prepared statements. See Section 6.9.6.8,
“cursor.MySQLCursorPrepared Class”.
cursor = cnx.cursor(prepared=True)
6.9.5.1 cursor.MySQLCursor Constructor
In most cases, the MySQLConnection cursor() method is used to instantiate a MySQLCursor object:
import mysql.connector
cnx = mysql.connector.connect(database='world')
cursor = cnx.cursor()
It is also possible to instantiate a cursor by passing a MySQLConnection object to MySQLCursor:
import mysql.connector
from mysql.connector.cursor import MySQLCursor
cnx = mysql.connector.connect(database='world')
cursor = MySQLCursor(cnx)
The connection argument is optional. If omitted, the cursor is created but its execute() method raises an
exception.
6.9.5.2 MySQLCursor.add_attribute() Method
Syntax:
cursor.add_attribute(name, value)
Adds a new named query attribute to the list, as part of MySQL server's Query Attributes functionality.
name: The name must be a string, but no other validation checks are made; attributes are sent as is to the
server and errors, if any, will be detected and reported by the server.
641

cursor.MySQLCursor Class
value: a value converted to the MySQL Binary Protocol, similar to how prepared statement parameters
are converted. An error is reported if the conversion fails.
Query attributes must be enabled on the server, and are disabled by default. A warning is logged when
setting query attributes server connection that does not support them. See also Prerequisites for Using
Query Attributes for enabling the query_attributes MySQL server component.
Example query attribute usage:
# Each invocation of `add_attribute` method will add a new query attribute:
cur.add_attribute("foo", 2)
cur.execute("SELECT first_name, last_name FROM clients")
# The query above sent attibute "foo" with value 2.
cur.add_attribute(*("bar", "3"))
cur.execute("SELECT * FROM products WHERE price < ?", 10)
# The query above sent attibutes ("foo", 2) and ("bar", "3").
my_attributes = [("page_name", "root"), ("previous_page", "login")]
for attribute_tuple in my_attributes:
cur.add_attribute(*attribute_tuple)
cur.execute("SELECT * FROM offers WHERE publish = ?", 0)
# The query above sent 4 attibutes.
# To check the current query attributes:
print(cur.get_attributes())
# prints:
[("foo", 2), ("bar", "3"), ("page_name", "root"), ("previous_page", "login")]
# Query attributes are not cleared until the cursor is closed or
# of the clear_attributes() method is invoked:
cur.clear_attributes()
print(cur.get_attributes())
# prints:
[]
cur.execute("SELECT first_name, last_name FROM clients")
# The query above did not send any attibute.
This method was added in Connector/Python 8.0.26.
6.9.5.3 MySQLCursor.clear_attributes() Method
Syntax:
cursor.clear_attributes()
Clear the list of query attributes on the connector's side, as set by Section 6.9.5.2,
“MySQLCursor.add_attribute() Method”.
This method was added in Connector/Python 8.0.26.
6.9.5.4 MySQLCursor.get_attributes() Method
Syntax:
cursor.get_attributes()
Return a list of existing query attributes, as set by Section 6.9.5.2, “MySQLCursor.add_attribute() Method”.
This method was added in Connector/Python 8.0.26.
6.9.5.5 MySQLCursor.callproc() Method
Syntax:
642

cursor.MySQLCursor Class
result_args = cursor.callproc(proc_name, args=())
This method calls the stored procedure named by the proc_name argument. The args sequence of
parameters must contain one entry for each argument that the procedure expects. callproc() returns
a modified copy of the input sequence. Input parameters are left untouched. Output and input/output
parameters may be replaced with new values.
Result sets produced by the stored procedure are automatically fetched and stored as
MySQLCursorBuffered instances. For more information about using these result sets, see
stored_results().
Suppose that a stored procedure takes two parameters, multiplies the values, and returns the product:
CREATE PROCEDURE multiply(IN pFac1 INT, IN pFac2 INT, OUT pProd INT)
BEGIN
SET pProd := pFac1 * pFac2;
END;
The following example shows how to execute the multiply() procedure:
>>> args = (5, 6, 0) # 0 is to hold value of the OUT parameter pProd
>>> cursor.callproc('multiply', args)
('5', '6', 30L)
Connector/Python 1.2.1 and up permits parameter types to be specified. To do this, specify a parameter
as a two-item tuple consisting of the parameter value and type. Suppose that a procedure sp1() has this
definition:
CREATE PROCEDURE sp1(IN pStr1 VARCHAR(20), IN pStr2 VARCHAR(20),
OUT pConCat VARCHAR(100))
BEGIN
SET pConCat := CONCAT(pStr1, pStr2);
END;
To execute this procedure from Connector/Python, specifying a type for the OUT parameter, do this:
args = ('ham', 'eggs', (0, 'CHAR'))
result_args = cursor.callproc('sp1', args)
print(result_args[2])
6.9.5.6 MySQLCursor.close() Method
Syntax:
cursor.close()
Use close() when you are done using a cursor. This method closes the cursor, resets all results, and
ensures that the cursor object has no reference to its original connection object.
6.9.5.7 MySQLCursor.execute() Method
Syntax:
cursor.execute(operation, params=None, multi=False)
iterator = cursor.execute(operation, params=None, multi=True)
This method executes the given database operation (query or command). The parameters found in
the tuple or dictionary params are bound to the variables in the operation. Specify variables using %s or
%(name)s parameter style (that is, using format or pyformat style). execute() returns an iterator if
multi is True.
643

cursor.MySQLCursor Class
Note
In Python, a tuple containing a single value must include a comma. For example,
('abc') is evaluated as a scalar while ('abc',) is evaluated as a tuple.
This example inserts information about a new employee, then selects the data for that person. The
statements are executed as separate execute() operations:
insert_stmt = (
"INSERT INTO employees (emp_no, first_name, last_name, hire_date) "
"VALUES (%s, %s, %s, %s)"
)
data = (2, 'Jane', 'Doe', datetime.date(2012, 3, 23))
cursor.execute(insert_stmt, data)
select_stmt = "SELECT * FROM employees WHERE emp_no = %(emp_no)s"
cursor.execute(select_stmt, { 'emp_no': 2 })
The data values are converted as necessary from Python objects to something MySQL understands. In the
preceding example, the datetime.date() instance is converted to '2012-03-23'.
If multi is set to True, execute() is able to execute multiple statements specified in the operation
string. It returns an iterator that enables processing the result of each statement. However, using
parameters does not work well in this case, and it is usually a good idea to execute each statement on its
own.
The following example selects and inserts data in a single execute() operation and displays the result of
each statement:
operation = 'SELECT 1; INSERT INTO t1 VALUES (); SELECT 2'
for result in cursor.execute(operation, multi=True):
if result.with_rows:
print("Rows produced by statement '{}':".format(
result.statement))
print(result.fetchall())
else:
print("Number of rows affected by statement '{}': {}".format(
result.statement, result.rowcount))
If the connection is configured to fetch warnings, warnings generated by the operation are available
through the MySQLCursor.fetchwarnings() method.
6.9.5.8 MySQLCursor.executemany() Method
Syntax:
cursor.executemany(operation, seq_of_params)
This method prepares a database operation (query or command) and executes it against all parameter
sequences or mappings found in the sequence seq_of_params.
Note
In Python, a tuple containing a single value must include a comma. For example,
('abc') is evaluated as a scalar while ('abc',) is evaluated as a tuple.
In most cases, the executemany() method iterates through the sequence of parameters, each time
passing the current parameters to the execute() method.
An optimization is applied for inserts: The data values given by the parameter sequences are batched
using multiple-row syntax. The following example inserts three records:
644

cursor.MySQLCursor Class
data = [
('Jane', date(2005, 2, 12)),
('Joe', date(2006, 5, 23)),
('John', date(2010, 10, 3)),
]
stmt = "INSERT INTO employees (first_name, hire_date) VALUES (%s, %s)"
cursor.executemany(stmt, data)
For the preceding example, the INSERT statement sent to MySQL is:
INSERT INTO employees (first_name, hire_date)
VALUES ('Jane', '2005-02-12'), ('Joe', '2006-05-23'), ('John', '2010-10-03')
With the executemany() method, it is not possible to specify multiple statements to execute in the
operation argument. Doing so raises an InternalError exception. Consider using execute() with
multi=True instead.
6.9.5.9 MySQLCursor.fetchall() Method
Syntax:
rows = cursor.fetchall()
The method fetches all (or all remaining) rows of a query result set and returns a list of tuples. If no more
rows are available, it returns an empty list.
The following example shows how to retrieve the first two rows of a result set, and then retrieve any
remaining rows:
>>> cursor.execute("SELECT * FROM employees ORDER BY emp_no")
>>> head_rows = cursor.fetchmany(size=2)
>>> remaining_rows = cursor.fetchall()
You must fetch all rows for the current query before executing new statements using the same connection.
6.9.5.10 MySQLCursor.fetchmany() Method
Syntax:
rows = cursor.fetchmany(size=1)
This method fetches the next set of rows of a query result and returns a list of tuples. If no more rows are
available, it returns an empty list.
The number of rows returned can be specified using the size argument, which defaults to one. Fewer
rows are returned if fewer rows are available than specified.
You must fetch all rows for the current query before executing new statements using the same connection.
6.9.5.11 MySQLCursor.fetchone() Method
Syntax:
row = cursor.fetchone()
This method retrieves the next row of a query result set and returns a single sequence, or None if no
more rows are available. By default, the returned tuple consists of data returned by the MySQL server,
converted to Python objects. If the cursor is a raw cursor, no such conversion occurs; see Section 6.9.6.2,
“cursor.MySQLCursorRaw Class”.
645

cursor.MySQLCursor Class
The fetchone() method is used by fetchall() and fetchmany(). It is also used when a cursor is used as
an iterator.
The following example shows two equivalent ways to process a query result. The first uses fetchone()
in a while loop, the second uses the cursor as an iterator:
# Using a while loop
cursor.execute("SELECT * FROM employees")
row = cursor.fetchone()
while row is not None:
print(row)
row = cursor.fetchone()
# Using the cursor as iterator
cursor.execute("SELECT * FROM employees")
for row in cursor:
print(row)
You must fetch all rows for the current query before executing new statements using the same connection.
6.9.5.12 MySQLCursor.fetchwarnings() Method
Syntax:
tuples = cursor.fetchwarnings()
This method returns a list of tuples containing warnings generated by the previously executed operation.
To set whether to fetch warnings, use the connection's get_warnings property.
The following example shows a SELECT statement that generates a warning:
>>> cnx.get_warnings = True
>>> cursor.execute("SELECT 'a'+1")
>>> cursor.fetchall()
[(1.0,)]
>>> cursor.fetchwarnings()
[(u'Warning', 1292, u"Truncated incorrect DOUBLE value: 'a'")]
When warnings are generated, it is possible to raise errors instead, using the connection's
raise_on_warnings property.
6.9.5.13 MySQLCursor.stored_results() Method
Syntax:
iterator = cursor.stored_results()
This method returns a list iterator object that can be used to process result sets produced by a stored
procedure executed using the callproc() method. The result sets remain available until you use the cursor
to execute another operation or call another stored procedure.
The following example executes a stored procedure that produces two result sets, then uses
stored_results() to retrieve them:
>>> cursor.callproc('myproc')
()
>>> for result in cursor.stored_results():
... print result.fetchall()
...
[(1,)]
[(2,)]
6.9.5.14 MySQLCursor.column_names Property
646

cursor.MySQLCursor Class
Syntax:
sequence = cursor.column_names
This read-only property returns the column names of a result set as sequence of Unicode strings.
The following example shows how to create a dictionary from a tuple containing data with keys using
column_names:
cursor.execute("SELECT last_name, first_name, hire_date "
"FROM employees WHERE emp_no = %s", (123,))
row = dict(zip(cursor.column_names, cursor.fetchone()))
print("{last_name}, {first_name}: {hire_date}".format(row))
Alternatively, as of Connector/Python 2.0.0, you can fetch rows as dictionaries directly; see Section 6.9.6.4,
“cursor.MySQLCursorDict Class”.
6.9.5.15 MySQLCursor.description Property
Syntax:
tuples = cursor.description
This read-only property returns a list of tuples describing the columns in a result set. Each tuple in the list
contains values as follows:
(column_name,
type,
None,
None,
None,
None,
null_ok,
column_flags)
The following example shows how to interpret description tuples:
import mysql.connector
from mysql.connector import FieldType
...
cursor.execute("SELECT emp_no, last_name, hire_date "
"FROM employees WHERE emp_no = %s", (123,))
for i in range(len(cursor.description)):
print("Column {}:".format(i+1))
desc = cursor.description[i]
print(" column_name = {}".format(desc[0]))
print(" type = {} ({})".format(desc[1], FieldType.get_info(desc[1])))
print(" null_ok = {}".format(desc[6]))
print(" column_flags = {}".format(desc[7]))
The output looks like this:
Column 1:
column_name = emp_no
type = 3 (LONG)
null_ok = 0
column_flags = 20483
Column 2:
column_name = last_name
type = 253 (VAR_STRING)
null_ok = 0
column_flags = 4097
647

cursor.MySQLCursor Class
Column 3:
column_name = hire_date
type = 10 (DATE)
null_ok = 0
column_flags = 4225
The column_flags value is an instance of the constants.FieldFlag class. To see how to interpret it,
do this:
>>> from mysql.connector import FieldFlag
>>> FieldFlag.desc
6.9.5.16 MySQLCursor.lastrowid Property
Syntax:
id = cursor.lastrowid
This read-only property returns the value generated for an AUTO_INCREMENT column by the previous
INSERT or UPDATE statement or None when there is no such value available. For example, if you
perform an INSERT into a table that contains an AUTO_INCREMENT column, lastrowid returns the
AUTO_INCREMENT value for the new row. For an example, see Section 6.5.3, “Inserting Data Using
Connector/Python”.
The lastrowid property is like the mysql_insert_id() C API function; see mysql_insert_id().
6.9.5.17 MySQLCursor.rowcount Property
Syntax:
count = cursor.rowcount
This read-only property returns the number of rows returned for SELECT statements, or the number of
rows affected by DML statements such as INSERT or UPDATE. For an example, see Section 6.9.5.7,
“MySQLCursor.execute() Method”.
For nonbuffered cursors, the row count cannot be known before the rows have been fetched. In this case,
the number of rows is -1 immediately after query execution and is incremented as rows are fetched.
The rowcount property is like the mysql_affected_rows() C API function; see
mysql_affected_rows().
6.9.5.18 MySQLCursor.statement Property
Syntax:
str = cursor.statement
This read-only property returns the last executed statement as a string. The statement property can be
useful for debugging and displaying what was sent to the MySQL server.
The string can contain multiple statements if a multiple-statement string was executed. This occurs for
execute() with multi=True. In this case, the statement property contains the entire statement
string and the execute() call returns an iterator that can be used to process results from the individual
statements. The statement property for this iterator shows statement strings for the individual
statements.
6.9.5.19 MySQLCursor.with_rows Property
648

Subclasses cursor.MySQLCursor
Syntax:
boolean = cursor.with_rows
This read-only property returns True or False to indicate whether the most recently executed operation
could have produced rows.
The with_rows property is useful when it is necessary to determine whether a statement produces a
result set and you need to fetch rows. The following example retrieves the rows returned by the SELECT
statements, but reports only the affected-rows value for the UPDATE statement:
import mysql.connector
cnx = mysql.connector.connect(user='scott', database='test')
cursor = cnx.cursor()
operation = 'SELECT 1; UPDATE t1 SET c1 = 2; SELECT 2'
for result in cursor.execute(operation, multi=True):
if result.with_rows:
result.fetchall()
else:
print("Number of affected rows: {}".format(result.rowcount))
6.9.6 Subclasses cursor.MySQLCursor
The cursor classes described in the following sections inherit from the MySQLCursor class, which is
described in Section 6.9.5, “cursor.MySQLCursor Class”.
6.9.6.1 cursor.MySQLCursorBuffered Class
The MySQLCursorBuffered class inherits from MySQLCursor.
After executing a query, a MySQLCursorBuffered cursor fetches the entire result set from the server and
buffers the rows.
For queries executed using a buffered cursor, row-fetching methods such as fetchone() return rows
from the set of buffered rows. For nonbuffered cursors, rows are not fetched from the server until a row-
fetching method is called. In this case, you must be sure to fetch all rows of the result set before executing
any other statements on the same connection, or an InternalError (Unread result found) exception will
be raised.
MySQLCursorBuffered can be useful in situations where multiple queries, with small result sets, need to
be combined or computed with each other.
To create a buffered cursor, use the buffered argument when calling a connection's cursor() method.
Alternatively, to make all cursors created from the connection buffered by default, use the buffered
connection argument.
Example:
import mysql.connector
cnx = mysql.connector.connect()
# Only this particular cursor will buffer results
cursor = cnx.cursor(buffered=True)
# All cursors created from cnx2 will be buffered by default
cnx2 = mysql.connector.connect(buffered=True)
For a practical use case, see Section 6.6.1, “Tutorial: Raise Employee's Salary Using a Buffered Cursor”.
6.9.6.2 cursor.MySQLCursorRaw Class
The MySQLCursorRaw class inherits from MySQLCursor.
649

Subclasses cursor.MySQLCursor
A MySQLCursorRaw cursor skips the conversion from MySQL data types to Python types when fetching
rows. A raw cursor is usually used to get better performance or when you want to do the conversion
yourself.
To create a raw cursor, use the raw argument when calling a connection's cursor() method.
Alternatively, to make all cursors created from the connection raw by default, use the raw connection
argument.
Example:
import mysql.connector
cnx = mysql.connector.connect()
# Only this particular cursor will be raw
cursor = cnx.cursor(raw=True)
# All cursors created from cnx2 will be raw by default
cnx2 = mysql.connector.connect(raw=True)
6.9.6.3 cursor.MySQLCursorBufferedRaw Class
The MySQLCursorBufferedRaw class inherits from MySQLCursor.
A MySQLCursorBufferedRaw cursor is like a MySQLCursorRaw cursor, but is buffered: After executing
a query, it fetches the entire result set from the server and buffers the rows. For information about the
implications of buffering, see Section 6.9.6.1, “cursor.MySQLCursorBuffered Class”.
To create a buffered raw cursor, use the raw and buffered arguments when calling a connection's
cursor() method. Alternatively, to make all cursors created from the connection raw and buffered by
default, use the raw and buffered connection arguments.
Example:
import mysql.connector
cnx = mysql.connector.connect()
# Only this particular cursor will be raw and buffered
cursor = cnx.cursor(raw=True, buffered=True)
# All cursors created from cnx2 will be raw and buffered by default
cnx2 = mysql.connector.connect(raw=True, buffered=True)
6.9.6.4 cursor.MySQLCursorDict Class
The MySQLCursorDict class inherits from MySQLCursor. This class is available as of Connector/Python
2.0.0.
A MySQLCursorDict cursor returns each row as a dictionary. The keys for each dictionary object are the
column names of the MySQL result.
Example:
cnx = mysql.connector.connect(database='world')
cursor = cnx.cursor(dictionary=True)
cursor.execute("SELECT * FROM country WHERE Continent = 'Europe'")
print("Countries in Europe:")
for row in cursor:
print("* {Name}".format(Name=row['Name']
The preceding code produces output like this:
Countries in Europe:
* Albania
* Andorra
* Austria
650

Subclasses cursor.MySQLCursor
* Belgium
* Bulgaria
...
It may be convenient to pass the dictionary to format() as follows:
cursor.execute("SELECT Name, Population FROM country WHERE Continent = 'Europe'")
print("Countries in Europe with population:")
for row in cursor:
print("* {Name}: {Population}".format(**row))
6.9.6.5 cursor.MySQLCursorBufferedDict Class
The MySQLCursorBufferedDict class inherits from MySQLCursor. This class is available as of
Connector/Python 2.0.0.
A MySQLCursorBufferedDict cursor is like a MySQLCursorDict cursor, but is buffered: After
executing a query, it fetches the entire result set from the server and buffers the rows. For information
about the implications of buffering, see Section 6.9.6.1, “cursor.MySQLCursorBuffered Class”.
To get a buffered cursor that returns dictionaries, add the buffered argument when instantiating a new
dictionary cursor:
cursor = cnx.cursor(dictionary=True, buffered=True)
6.9.6.6 cursor.MySQLCursorNamedTuple Class
The MySQLCursorNamedTuple class inherits from MySQLCursor. This class is available as of
Connector/Python 2.0.0.
A MySQLCursorNamedTuple cursor returns each row as a named tuple. The attributes for each named-
tuple object are the column names of the MySQL result.
Example:
cnx = mysql.connector.connect(database='world')
cursor = cnx.cursor(named_tuple=True)
cursor.execute("SELECT * FROM country WHERE Continent = 'Europe'")
print("Countries in Europe with population:")
for row in cursor:
print("* {Name}: {Population}".format(
Name=row.Name,
Population=row.Population
))
6.9.6.7 cursor.MySQLCursorBufferedNamedTuple Class
The MySQLCursorBufferedNamedTuple class inherits from MySQLCursor. This class is available as of
Connector/Python 2.0.0.
A MySQLCursorBufferedNamedTuple cursor is like a MySQLCursorNamedTuple cursor, but is
buffered: After executing a query, it fetches the entire result set from the server and buffers the rows. For
information about the implications of buffering, see Section 6.9.6.1, “cursor.MySQLCursorBuffered Class”.
To get a buffered cursor that returns named tuples, add the buffered argument when instantiating a new
named-tuple cursor:
cursor = cnx.cursor(named_tuple=True, buffered=True)
6.9.6.8 cursor.MySQLCursorPrepared Class
651

Subclasses cursor.MySQLCursor
The MySQLCursorPrepared class inherits from MySQLCursor.
Note
This class is available as of Connector/Python 1.1.0. The C extension supports it as
of Connector/Python 8.0.17.
In MySQL, there are two ways to execute a prepared statement:
• Use the PREPARE and EXECUTE statements.
• Use the binary client/server protocol to send and receive data. To repeatedly execute the same
statement with different data for different executions, this is more efficient than using PREPARE and
EXECUTE. For information about the binary protocol, see C API Prepared Statement Interface.
In Connector/Python, there are two ways to create a cursor that enables execution of prepared statements
using the binary protocol. In both cases, the cursor() method of the connection object returns a
MySQLCursorPrepared object:
• The simpler syntax uses a prepared=True argument to the cursor() method. This syntax is
available as of Connector/Python 1.1.2.
import mysql.connector
cnx = mysql.connector.connect(database='employees')
cursor = cnx.cursor(prepared=True)
• Alternatively, create an instance of the MySQLCursorPrepared class using the cursor_class
argument to the cursor() method. This syntax is available as of Connector/Python 1.1.0.
import mysql.connector
from mysql.connector.cursor import MySQLCursorPrepared
cnx = mysql.connector.connect(database='employees')
cursor = cnx.cursor(cursor_class=MySQLCursorPrepared)
A cursor instantiated from the MySQLCursorPrepared class works like this:
• The first time you pass a statement to the cursor's execute() method, it prepares the statement. For
subsequent invocations of execute(), the preparation phase is skipped if the statement is the same.
• The execute() method takes an optional second argument containing a list of data values to associate
with parameter markers in the statement. If the list argument is present, there must be one value per
parameter marker.
Example:
cursor = cnx.cursor(prepared=True)
stmt = "SELECT fullname FROM employees WHERE id = %s" # (1)
cursor.execute(stmt, (5,)) # (2)
# ... fetch data ...
cursor.execute(stmt, (10,)) # (3)
# ... fetch data ...
1. The %s within the statement is a parameter marker. Do not put quote marks around parameter markers.
2. For the first call to the execute() method, the cursor prepares the statement. If data is given in the
same call, it also executes the statement and you should fetch the data.
3. For subsequent execute() calls that pass the same SQL statement, the cursor skips the preparation
phase.
652

constants.ClientFlag Class
Prepared statements executed with MySQLCursorPrepared can use the format (%s) or qmark (?)
parameterization style. This differs from nonprepared statements executed with MySQLCursor, which can
use the format or pyformat parameterization style.
To use multiple prepared statements simultaneously, instantiate multiple cursors from the
MySQLCursorPrepared class.
The MySQL client/server protocol has an option to send prepared statement parameters via the
COM_STMT_SEND_LONG_DATA command. To use this from Connector/Python scripts, send the parameter
in question using the IOBase interface. Example:
from io import IOBase
...
cur = cnx.cursor(prepared=True)
cur.execute("SELECT (%s)", (io.BytesIO(bytes("A", "latin1")), ))
6.9.7 constants.ClientFlag Class
This class provides constants defining MySQL client flags that can be used when the connection
is established to configure the session. The ClientFlag class is available when importing
mysql.connector.
>>> import mysql.connector
>>> mysql.connector.ClientFlag.FOUND_ROWS
2
See Section 6.9.2.32, “MySQLConnection.set_client_flags() Method” and the connection argument
client_flag.
The ClientFlag class cannot be instantiated.
6.9.8 constants.FieldType Class
This class provides all supported MySQL field or data types. They can be useful when dealing with raw
data or defining your own converters. The field type is stored with every cursor in the description for each
column.
The following example shows how to print the name of the data type for each column in a result set.
from __future__ import print_function
import mysql.connector
from mysql.connector import FieldType
cnx = mysql.connector.connect(user='scott', database='test')
cursor = cnx.cursor()
cursor.execute(
"SELECT DATE(NOW()) AS `c1`, TIME(NOW()) AS `c2`, "
"NOW() AS `c3`, 'a string' AS `c4`, 42 AS `c5`")
rows = cursor.fetchall()
for desc in cursor.description:
colname = desc[0]
coltype = desc[1]
print("Column {} has type {}".format(
colname, FieldType.get_info(coltype)))
cursor.close()
cnx.close()
The FieldType class cannot be instantiated.
6.9.9 constants.SQLMode Class
653

constants.CharacterSet Class
This class provides all known MySQL Server SQL Modes. It is mostly used when setting the SQL
modes at connection time using the connection's sql_mode property. See Section 6.9.2.47,
“MySQLConnection.sql_mode Property”.
The SQLMode class cannot be instantiated.
6.9.10 constants.CharacterSet Class
This class provides all known MySQL characters sets and their default collations. For examples, see
Section 6.9.2.31, “MySQLConnection.set_charset_collation() Method”.
The CharacterSet class cannot be instantiated.
6.9.11 constants.RefreshOption Class
This class performs various flush operations.
• RefreshOption.GRANT
Refresh the grant tables, like FLUSH PRIVILEGES.
• RefreshOption.LOG
Flush the logs, like FLUSH LOGS.
• RefreshOption.TABLES
Flush the table cache, like FLUSH TABLES.
• RefreshOption.HOSTS
Flush the host cache, like FLUSH HOSTS.
• RefreshOption.STATUS
Reset status variables, like FLUSH STATUS.
• RefreshOption.THREADS
Flush the thread cache.
• RefreshOption.REPLICA
On a replica replication server, reset the source server information and restart the replica, like RESET
SLAVE. This constant was named "RefreshOption.SLAVE" before v8.0.23.
6.9.12 Errors and Exceptions
The mysql.connector.errors module defines exception classes for errors and warnings raised
by MySQL Connector/Python. Most classes defined in this module are available when you import
mysql.connector.
The exception classes defined in this module mostly follow the Python Database API Specification v2.0
(PEP 249). For some MySQL client or server errors it is not always clear which exception to raise. It is
good to discuss whether an error should be reclassified by opening a bug report.
654

Errors and Exceptions
MySQL Server errors are mapped with Python exception based on their SQLSTATE value (see Server
Error Message Reference). The following table shows the SQLSTATE classes and the exception
Connector/Python raises. It is, however, possible to redefine which exception is raised for each server
error. The default exception is DatabaseError.
Table 6.3 Mapping of Server Errors to Python Exceptions
SQLSTATE Class Connector/Python Exception
02 DataError
02 DataError
07 DatabaseError
08 OperationalError
0A NotSupportedError
21 DataError
22 DataError
23 IntegrityError
24 ProgrammingError
25 ProgrammingError
26 ProgrammingError
27 ProgrammingError
28 ProgrammingError
2A ProgrammingError
2B DatabaseError
2C ProgrammingError
2D DatabaseError
2E DatabaseError
33 DatabaseError
34 ProgrammingError
35 ProgrammingError
37 ProgrammingError
3C ProgrammingError
3D ProgrammingError
3F ProgrammingError
40 InternalError
42 ProgrammingError
44 InternalError
HZ OperationalError
XA IntegrityError
0K OperationalError
HY DatabaseError
6.9.12.1 errorcode Module
655

Errors and Exceptions
This module contains both MySQL server and client error codes defined as module attributes with the error
number as value. Using error codes instead of error numbers could make reading the source code a bit
easier.
>>> from mysql.connector import errorcode
>>> errorcode.ER_BAD_TABLE_ERROR
1051
For more information about MySQL errors, see Error Messages and Common Problems.
6.9.12.2 errors.Error Exception
This exception is the base class for all other exceptions in the errors module. It can be used to catch all
errors in a single except statement.
The following example shows how we could catch syntax errors:
import mysql.connector
try:
cnx = mysql.connector.connect(user='scott', database='employees')
cursor = cnx.cursor()
cursor.execute("SELECT * FORM employees") # Syntax error in query
cnx.close()
except mysql.connector.Error as err:
print("Something went wrong: {}".format(err))
Initializing the exception supports a few optional arguments, namely msg, errno, values and sqlstate.
All of them are optional and default to None. errors.Error is internally used by Connector/Python to
raise MySQL client and server errors and should not be used by your application to raise exceptions.
The following examples show the result when using no arguments or a combination of the arguments:
>>> from mysql.connector.errors import Error
>>> str(Error())
'Unknown error'
>>> str(Error("Oops! There was an error."))
'Oops! There was an error.'
>>> str(Error(errno=2006))
'2006: MySQL server has gone away'
>>> str(Error(errno=2002, values=('/tmp/mysql.sock', 2)))
"2002: Can't connect to local MySQL server through socket '/tmp/mysql.sock' (2)"
>>> str(Error(errno=1146, sqlstate='42S02', msg="Table 'test.spam' doesn't exist"))
"1146 (42S02): Table 'test.spam' doesn't exist"
The example which uses error number 1146 is used when Connector/Python receives an error packet from
the MySQL Server. The information is parsed and passed to the Error exception as shown.
Each exception subclassing from Error can be initialized using the previously mentioned arguments.
Additionally, each instance has the attributes errno, msg and sqlstate which can be used in your code.
The following example shows how to handle errors when dropping a table which does not exist (when the
DROP TABLE statement does not include a IF EXISTS clause):
import mysql.connector
from mysql.connector import errorcode
cnx = mysql.connector.connect(user='scott', database='test')
cursor = cnx.cursor()
656

Errors and Exceptions
try:
cursor.execute("DROP TABLE spam")
except mysql.connector.Error as err:
if err.errno == errorcode.ER_BAD_TABLE_ERROR:
print("Creating table spam")
else:
raise
Prior to Connector/Python 1.1.1, the original message passed to errors.Error() is not saved in such
a way that it could be retrieved. Instead, the Error.msg attribute was formatted with the error number
and SQLSTATE value. As of 1.1.1, only the original message is saved in the Error.msg attribute. The
formatted value together with the error number and SQLSTATE value can be obtained by printing or
getting the string representation of the error object. Example:
try:
conn = mysql.connector.connect(database = "baddb")
except mysql.connector.Error as e:
print "Error code:", e.errno # error number
print "SQLSTATE value:", e.sqlstate # SQLSTATE value
print "Error message:", e.msg # error message
print "Error:", e # errno, sqlstate, msg values
s = str(e)
print "Error:", s # errno, sqlstate, msg values
errors.Error is a subclass of the Python StandardError.
6.9.12.3 errors.DataError Exception
This exception is raised when there were problems with the data. Examples are a column set to NULL that
cannot be NULL, out-of-range values for a column, division by zero, column count does not match value
count, and so on.
errors.DataError is a subclass of errors.DatabaseError.
6.9.12.4 errors.DatabaseError Exception
This exception is the default for any MySQL error which does not fit the other exceptions.
errors.DatabaseError is a subclass of errors.Error.
6.9.12.5 errors.IntegrityError Exception
This exception is raised when the relational integrity of the data is affected. For example, a duplicate key
was inserted or a foreign key constraint would fail.
The following example shows a duplicate key error raised as IntegrityError:
cursor.execute("CREATE TABLE t1 (id int, PRIMARY KEY (id))")
try:
cursor.execute("INSERT INTO t1 (id) VALUES (1)")
cursor.execute("INSERT INTO t1 (id) VALUES (1)")
except mysql.connector.IntegrityError as err:
print("Error: {}".format(err))
errors.IntegrityError is a subclass of errors.DatabaseError.
6.9.12.6 errors.InterfaceError Exception
This exception is raised for errors originating from Connector/Python itself, not related to the MySQL
server.
657

Errors and Exceptions
errors.InterfaceError is a subclass of errors.Error.
6.9.12.7 errors.InternalError Exception
This exception is raised when the MySQL server encounters an internal error, for example, when a
deadlock occurred.
errors.InternalError is a subclass of errors.DatabaseError.
6.9.12.8 errors.NotSupportedError Exception
This exception is raised when some feature was used that is not supported by the version of MySQL that
returned the error. It is also raised when using functions or statements that are not supported by stored
routines.
errors.NotSupportedError is a subclass of errors.DatabaseError.
6.9.12.9 errors.OperationalError Exception
This exception is raised for errors which are related to MySQL's operations. For example: too many
connections; a host name could not be resolved; bad handshake; server is shutting down, communication
errors.
errors.OperationalError is a subclass of errors.DatabaseError.
6.9.12.10 errors.PoolError Exception
This exception is raised for connection pool errors. errors.PoolError is a subclass of errors.Error.
6.9.12.11 errors.ProgrammingError Exception
This exception is raised on programming errors, for example when you have a syntax error in your SQL or
a table was not found.
The following example shows how to handle syntax errors:
try:
cursor.execute("CREATE DESK t1 (id int, PRIMARY KEY (id))")
except mysql.connector.ProgrammingError as err:
if err.errno == errorcode.ER_SYNTAX_ERROR:
print("Check your syntax!")
else:
print("Error: {}".format(err))
errors.ProgrammingError is a subclass of errors.DatabaseError.
6.9.12.12 errors.Warning Exception
This exception is used for reporting important warnings, however, Connector/Python does not use it. It is
included to be compliant with the Python Database Specification v2.0 (PEP-249).
Consider using either more strict Server SQL Modes or the raise_on_warnings connection argument to
make Connector/Python raise errors when your queries produce warnings.
errors.Warning is a subclass of the Python StandardError.
6.9.12.13 errors.custom_error_exception() Function
658

Errors and Exceptions
Syntax:
errors.custom_error_exception(error=None, exception=None)
This method defines custom exceptions for MySQL server errors and returns current customizations.
If error is a MySQL Server error number, you must also pass the exception class. The error
argument can be a dictionary, in which case the key is the server error number, and value the class of the
exception to be raised.
To reset the customizations, supply an empty dictionary.
import mysql.connector
from mysql.connector import errorcode
# Server error 1028 should raise a DatabaseError
mysql.connector.custom_error_exception(1028, mysql.connector.DatabaseError)
# Or using a dictionary:
mysql.connector.custom_error_exception({
1028: mysql.connector.DatabaseError,
1029: mysql.connector.OperationalError,
})
# To reset, pass an empty dictionary:
mysql.connector.custom_error_exception({})
659

660

Chapter 7 MySQL and PHP
Table of Contents
7.1 Introduction to the MySQL PHP API .......................................................................................... 661
This chapter describes the PHP extensions and interfaces that can be used with MySQL.
For legal information, see the Legal Notices.
For help with using MySQL, please visit the MySQL Forums, where you can discuss your issues with other
MySQL users.
7.1 Introduction to the MySQL PHP API
PHP is a server-side, HTML-embedded scripting language that may be used to create dynamic Web
pages. It is available for most operating systems and Web servers, and can access most common
databases, including MySQL. PHP may be run as a separate program or compiled as a module for use
with a Web server.
PHP provides several different MySQL API extensions:
Note
The PHP documentation assumes PHP 7 and higher is used; functionality specific
to PHP 5 and below is not documented.
• MySQLi: Stands for “MySQL, Improved”; this extension is available as of PHP 5.0.0. It is intended for
use with MySQL 4.1.1 and later. This extension fully supports the authentication protocol used in MySQL
5.0, as well as the Prepared Statements and Multiple Statements APIs. In addition, this extension
provides an advanced, object-oriented programming interface.
• PDO_MySQL: Not its own API, but instead it's a MySQL driver for the PHP database abstraction layer
PDO (PHP Data Objects). The PDO MySQL driver sits in the layer below PDO itself, and provides
MySQL-specific functionality. This extension is available as of PHP 5.1.0.
• MySQL_XDevAPI: This extension uses MySQL's X DevAPI and is available as a PECL extension named
mysql_xdevapi. For general concepts and X DevAPI usage details, see X DevAPI User Guide.
Note
This documentation, and other publications, sometimes uses the term Connector/
PHP. This term refers to the full set of MySQL related functionality in PHP, which
includes the APIs that are described in the preceding discussion, along with the
mysqlnd core library and all of its plugins.
The PHP distribution and documentation are available from the PHP website.
661

662
