
Getting Started with Windows Mobile Development – Windows
Mobile SDK – C#
Contents
Overview ...................................................................................................................................................................... 2
Target Audience .......................................................................................................................................................... 2
System Prerequisites ................................................................................................................................................. 2
Installations .................................................................................................................................................................. 5
Creating Your First Zebra Mobile Application ........................................................................................................ 6
Deploying Your Mobile Application ........................................................................................................................ 30
See Also ..................................................................................................................................................................... 32

Overview
This document demonstrates the process of designing a Windows Mobile application using the Link-OS Multiplatform
SDK. The videos' contents demonstrate creating the user interface, adding code in C# to the project, running the project
in a Windows Mobile Device Simulator, packaging the project and finally deploying to a real Windows Mobile device.
The sample code used in this guide is available on GitHub in the Zebra Technologies repository here.
For information on joining the ISV Program contact a Program manager in your area. Details here.
Target Audience
The information delivered in this document assumes the reader has reasonable technical competence covering
Microsoft Windows and Mobile device environments, core programming concepts and rationales.
System Prerequisites
The following system prerequisites must be satisfied in order to complete this tutorial.
Java Runtime Environment
For more information including system prerequisites and download links for Java, click here.
Microsoft Visual Studio 2008 Professional Edition
Microsoft Visual Studio is the integrated development environment (IDE) used to develop applications for Windows
Mobile.
Note: Visual Studio 2008 Express Edition is not compatible with the Microsoft Mobile Development Tool Kit which is a
requirement for developing applications for Windows Mobile platform.
Microsoft .NET Compact Framework 3.5
The Microsoft .NET Compact Framework 3.5 includes everything you need to test .NET Compact Framework (Versions
1, 2 and 3.5) applications.
For more information including system prerequisites and download links for .NET Compact Framework, click here.
Microsoft Windows Mobile 6 Professional SDK
The toolkit is distributed free of charge by Microsoft. It adds sample code, header and library files, emulator images and
tools to Visual Studio that let you build applications for Windows Mobile 6.
For more information including system prerequisites and download links, click here.
Microsoft Windows Mobile Development Tool Kit
The toolkit is distributed free of charge by Microsoft. It includes documentation, sample code, code library files and
emulator images and tools required to develop applications for Windows Mobile.
For more information including system prerequisites and download links, click here.
Microsoft Windows Mobile Active Sync or Windows Vista Mobile Device Center
Activesync / Windows Mobile Device Center are required to deploy applications to a Windows Mobile device.
For more information including system prerequisites and download links for ActiveSync, click here.
Windows Mobile Device Center replaces ActiveSync when developing and deploying when using Windows Vista.
For more information including system prerequisites and download links for Windows Mobile Device Center, click here.
Zebra Multiplatform SDK
The Zebra Multiplatform SDK contains all the required components to develop applications for Zebra label printers. The
SDK includes a Microsoft .Net library (.dll) which provides the means to scan for, connect to and print on Zebra label
printers.
For more information, including system prerequisites and download links for Zebra Multiplatform SDK, click here.

Zebra Network-Enabled Label Printer
In order to fully test the application created during the course of this tutorial, a network-enabled Zebra printer capable of
understanding ZPL or CPCL.
Bluetooth connectivity is available through the Zebra Multiplatform SDK and covered in other available tutorials.
For more information on Zebra label printers, click here.
Windows Mobile Device
Whilst the Windows Mobile Emulator included in the Windows Mobile Development Toolkit satisfies most of the
anticipated requirements for developing against Windows Mobile, it is recommended that all development is fully tested
against a physical device.
Note: For the list of printers and mobile devices that are supported by the Zebra Multiplatform SDK, click here.

Installations
All the items listed in the “System Prerequisites must be installed. The default installation options for all these
prerequisites are satisfactory.

Creating Your First Zebra Mobile Application
You will be guided on how to create a mobile application that allows the handheld device to establish a TCP connection
with a Zebra mobile printer.
1. Launch Microsoft Visual Studio 2008. Go to Start -> Programs -> Microsoft Visual Studio 2008 -> Microsoft
Visual Studio 2008.
2. Create a Smart Device Project.
a. Click on File -> New -> Project.
b. A New Project dialog appears. In the Project Types pane, expand Visual C# and select Smart Device,
then select the Smart Device Project template.

c. Enter “IP Connection” in the Name field. Choose your project location and make sure the Create
directory for solution checkbox is checked. Click OK.
d. On the Add New Smart Device Project dialog, select Windows Mobile 6 Professional SDK, then select
.NET Compact Framework Version 3.5. If these options are not available, refer to system prerequisites
on instructions on how to install these options. Select Device Application template, and then click OK.

e. You now have a project opened in the IDE. The Form Design is opened by default.

3. Design the Form Layout.
a. Rename the form name in the solution explorer. Right-click Form1.cs and select Rename. Enter
“IPConnectionForm.cs” and hit Enter. Click Yes when prompted to rename all references of “Form1”.

b. Right-click anywhere on the form and select Properties. This brings up the Properties table on the bottom
right panel. Enter “IP Connection Demo” in the Text field. This changes the text on the title bar.
c. On the Properties table, set MinimizeBox to False. This changes the “x” in the upper right corner of the
form to “ok” which when clicked, closes the application instead of minimizing it.
d. We will use a Label to create a status bar for the TCP connection. Expand the Toolbox to the left, click
and drag a Label onto the form. Position the label at the top and stretch it to fit the width of the form.

e. In the Properties window, set Text to blank, and TextAlign to TopCenter.
f. Insert a Label to the bottom left of the status bar, and set its Text to “IP Address:”.
g. Insert another Label to the bottom of the “IP Address:” label, and set its Text to “Port:”. The form layout
should now look like this.

h. Drag a TextBox from the Toolbox and position it to the right of the “IP Address:” label.
i. Add another TextBox to the right of the “Port:” label, and set its Text to “6101”. The form layout should
now look like this.
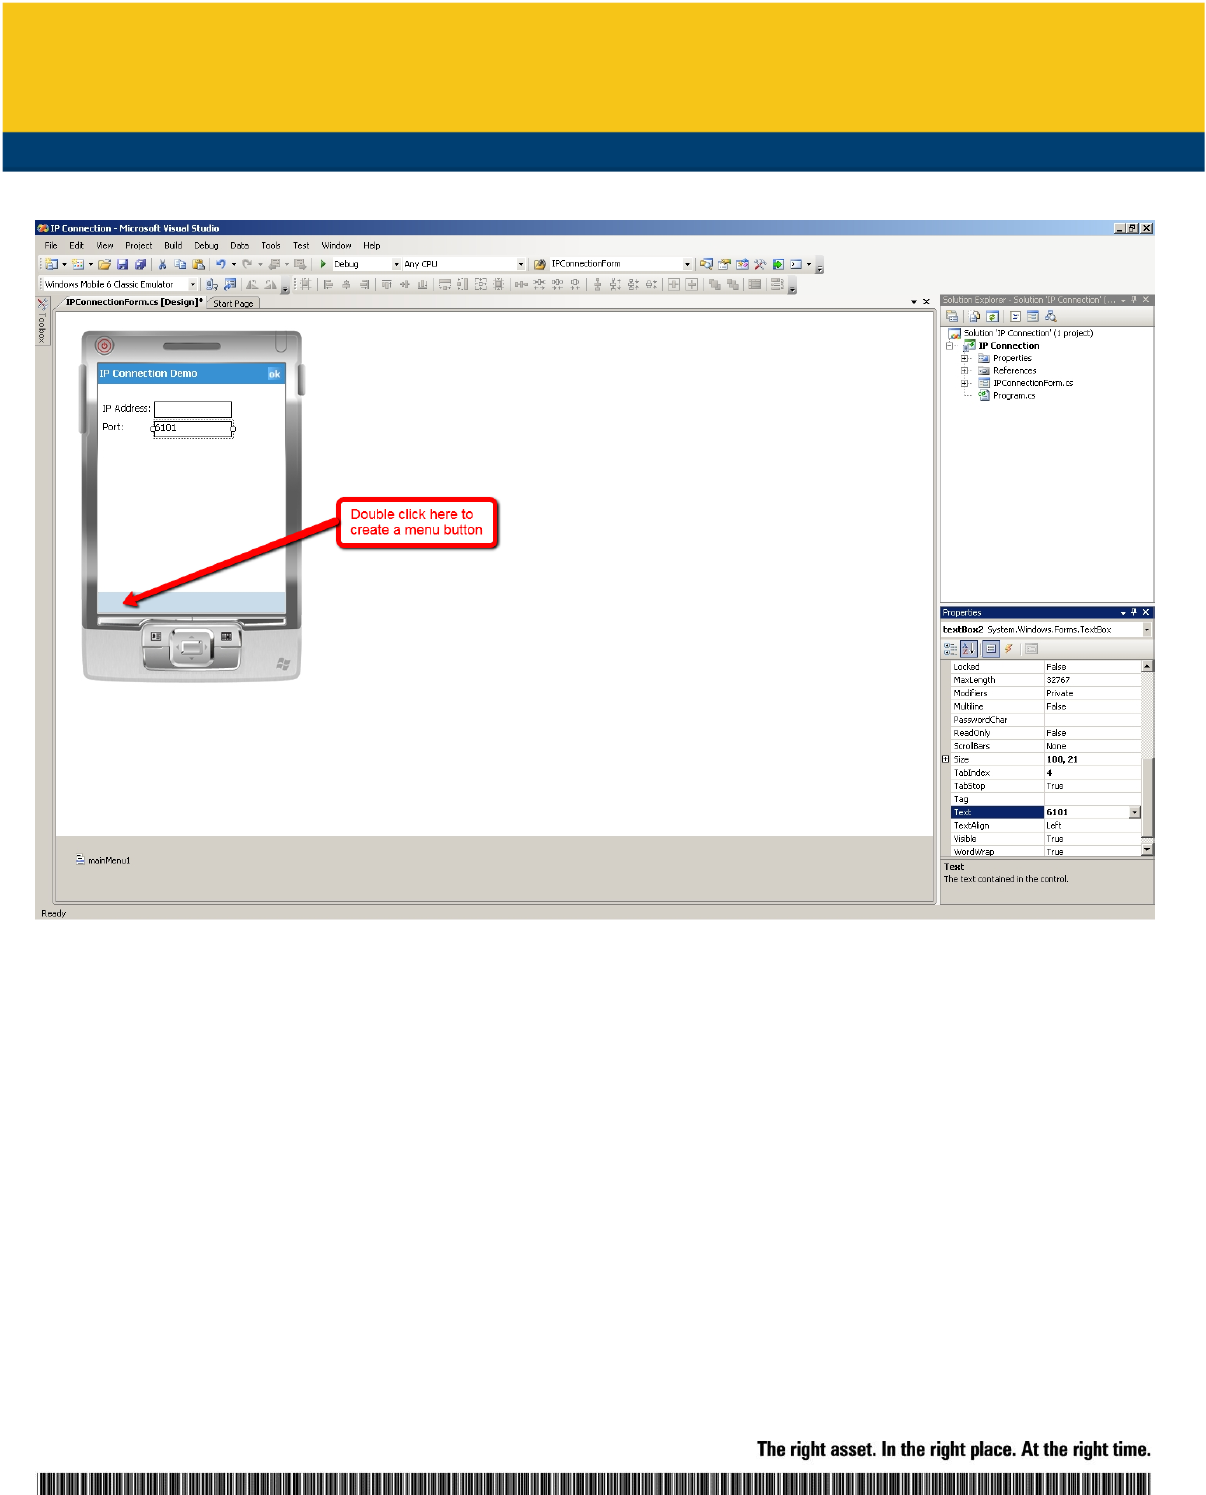
j. Double click the bottom left of the screen where the light blue bar is to create a menu button. Type
“Connect” and hit Enter. The layout should look like this.

4. Putting Them Altogether.
a. Rename the status bar label added in step 3d. Click on the label. On the properties page at the bottom
right, enter “statusBar” in the Name field.

b. Select the text box to the right of the “IP Address:” label. Change its Name to IPTextBox.
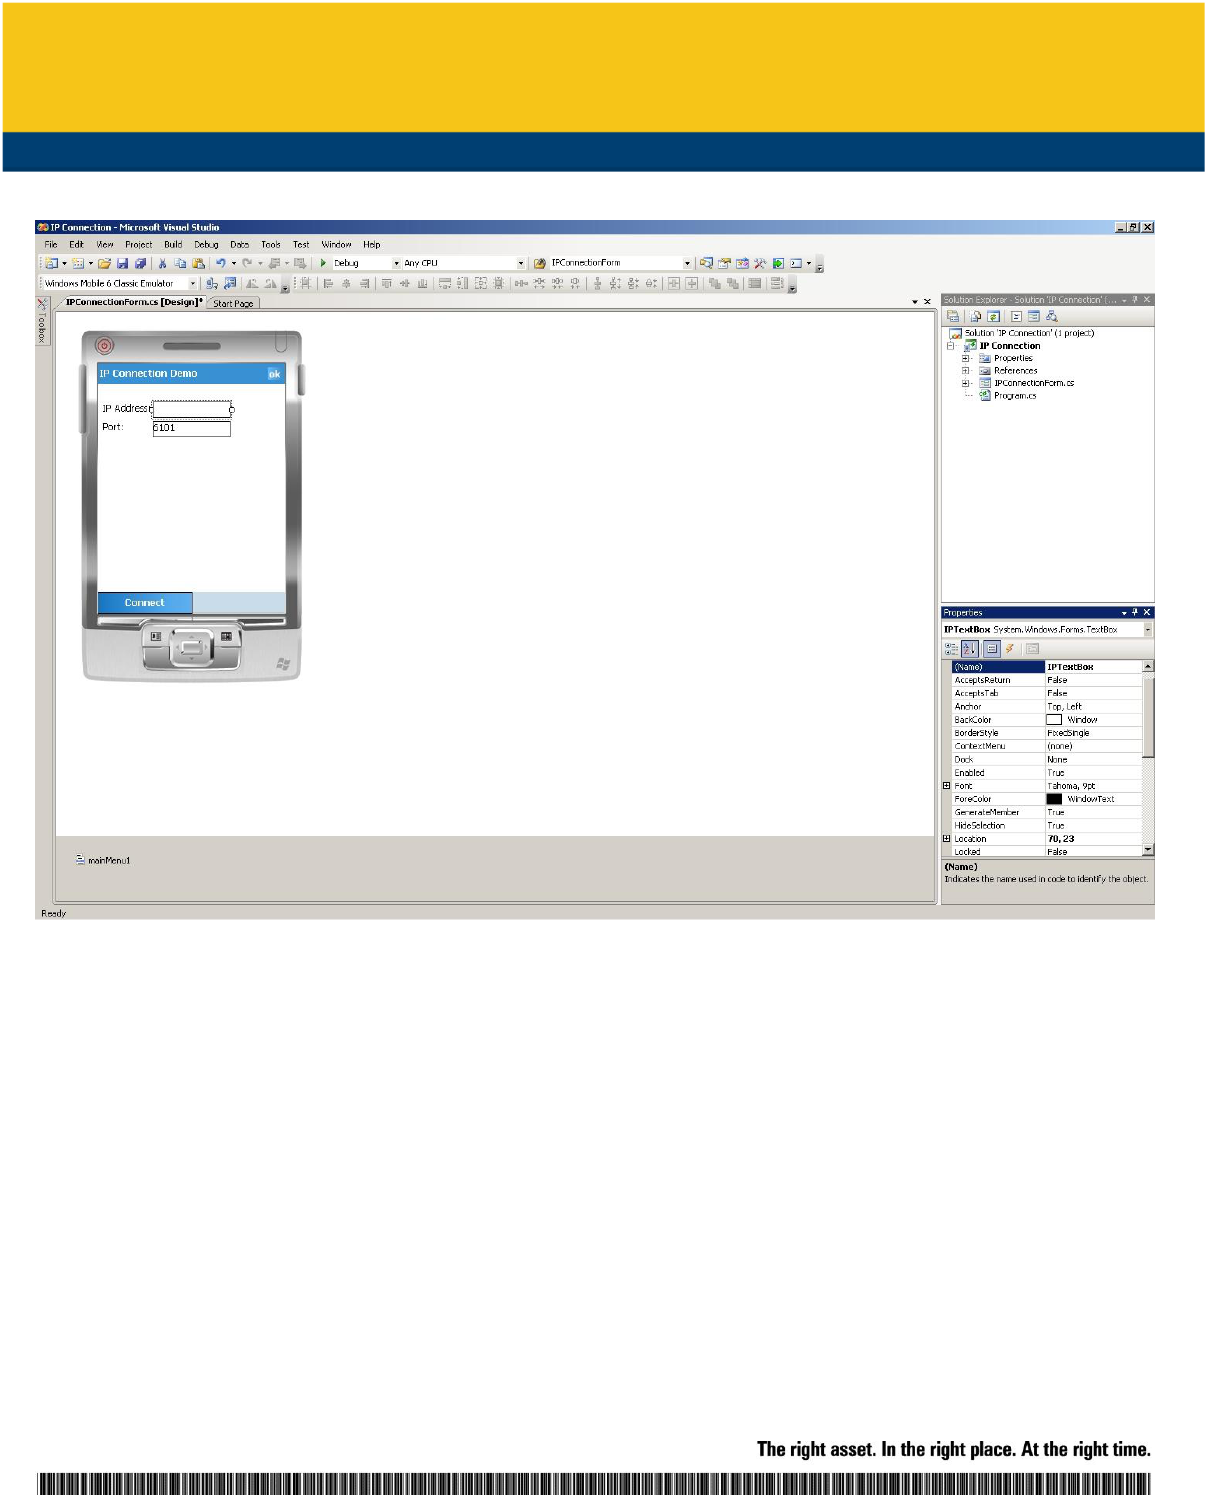
c. Change the Name of the textbox that is next to the “Port:” label to “portTextBox”.

d. Change the Name of the Connect button to “connectButton”.

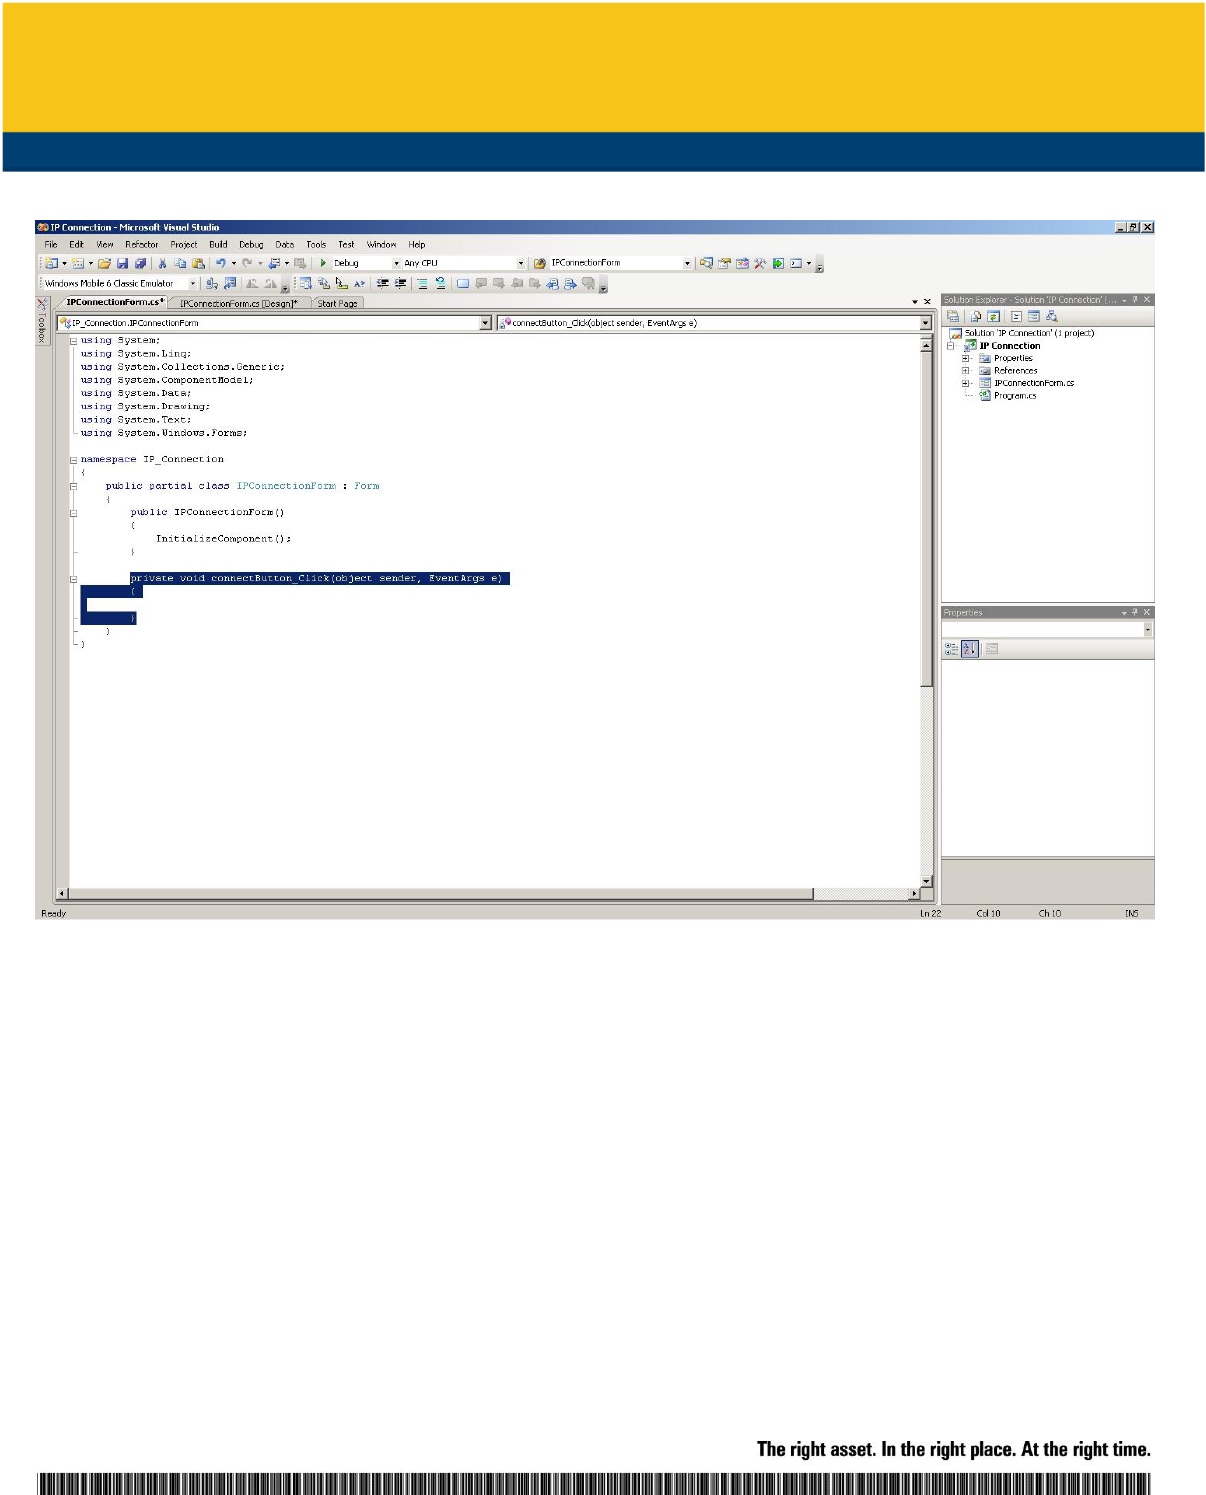
e. With the Connect button still selected, click on the Lightning icon on the Properties panel to display the
Events for the button. Click the “Click” event and type “onConnectButtonClick” and hit enter. The source
code for the form will be displayed.

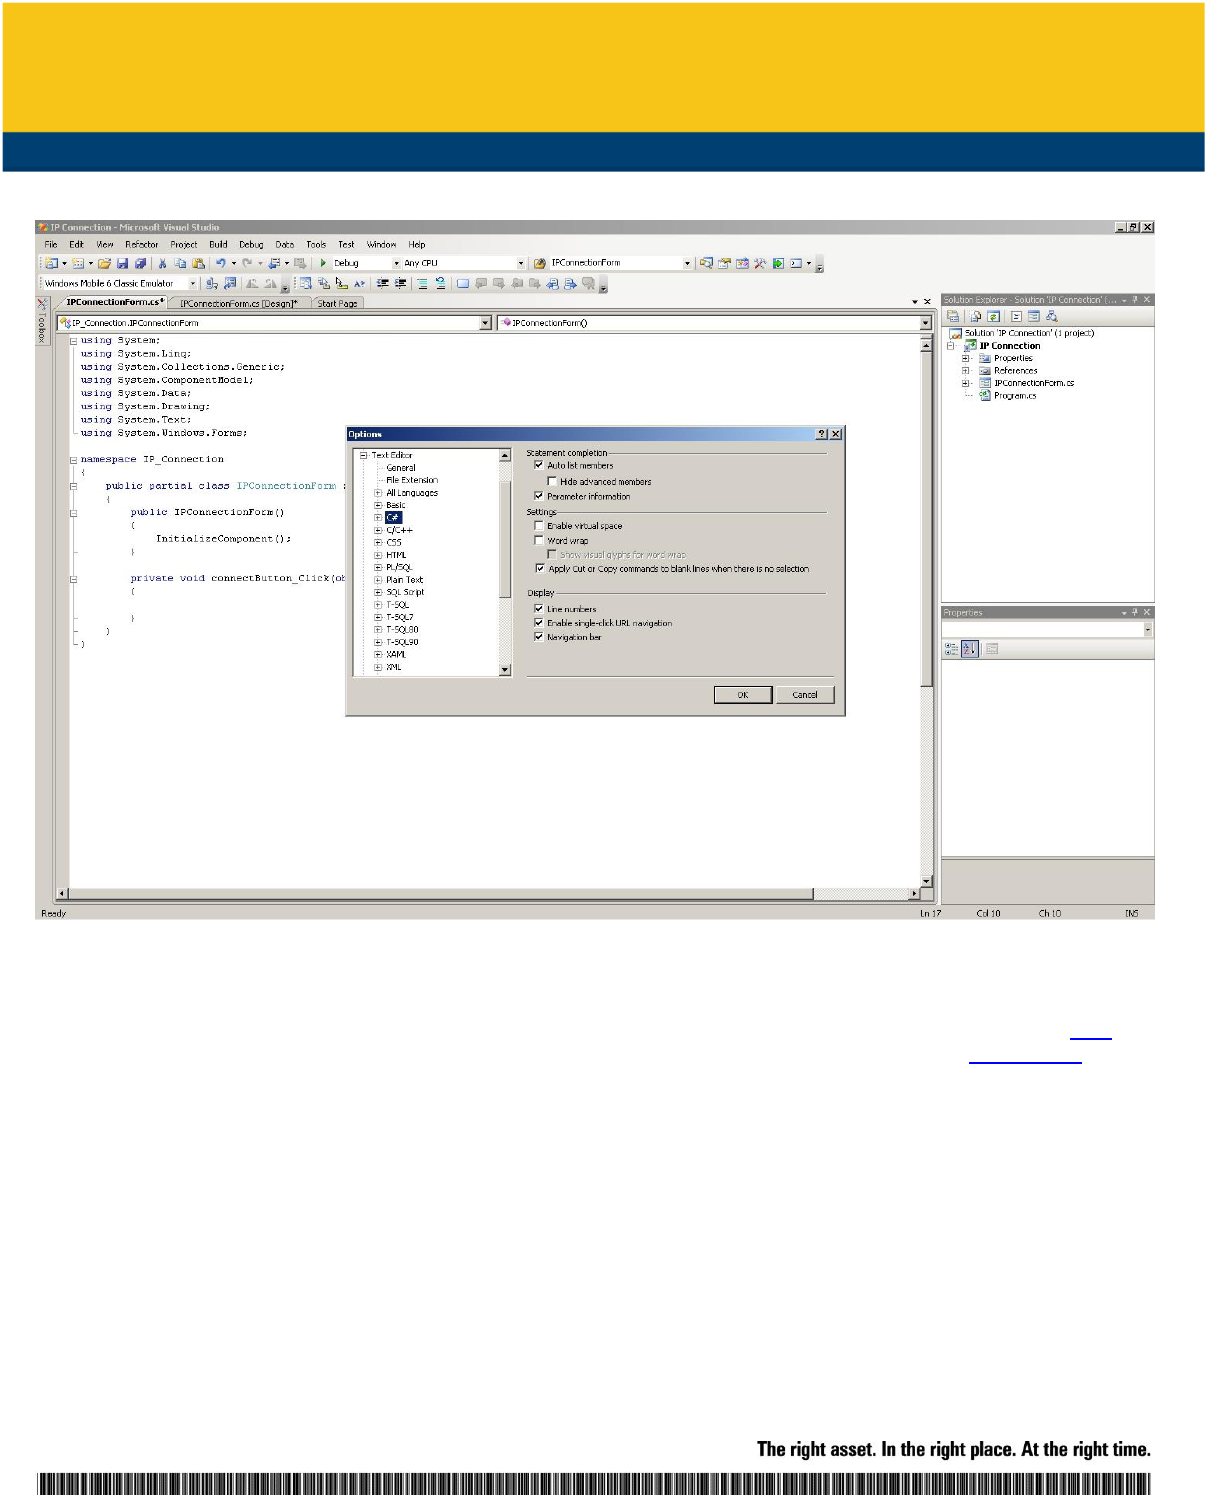
f. At this point, you might want to enable the line number before you insert our sample source code later.
To do so, click on Tools -> Options.

g. An Options dialog is displayed. Expand Text Editor on the left panel, click on C#, and on the right, check
the Line numbers option.
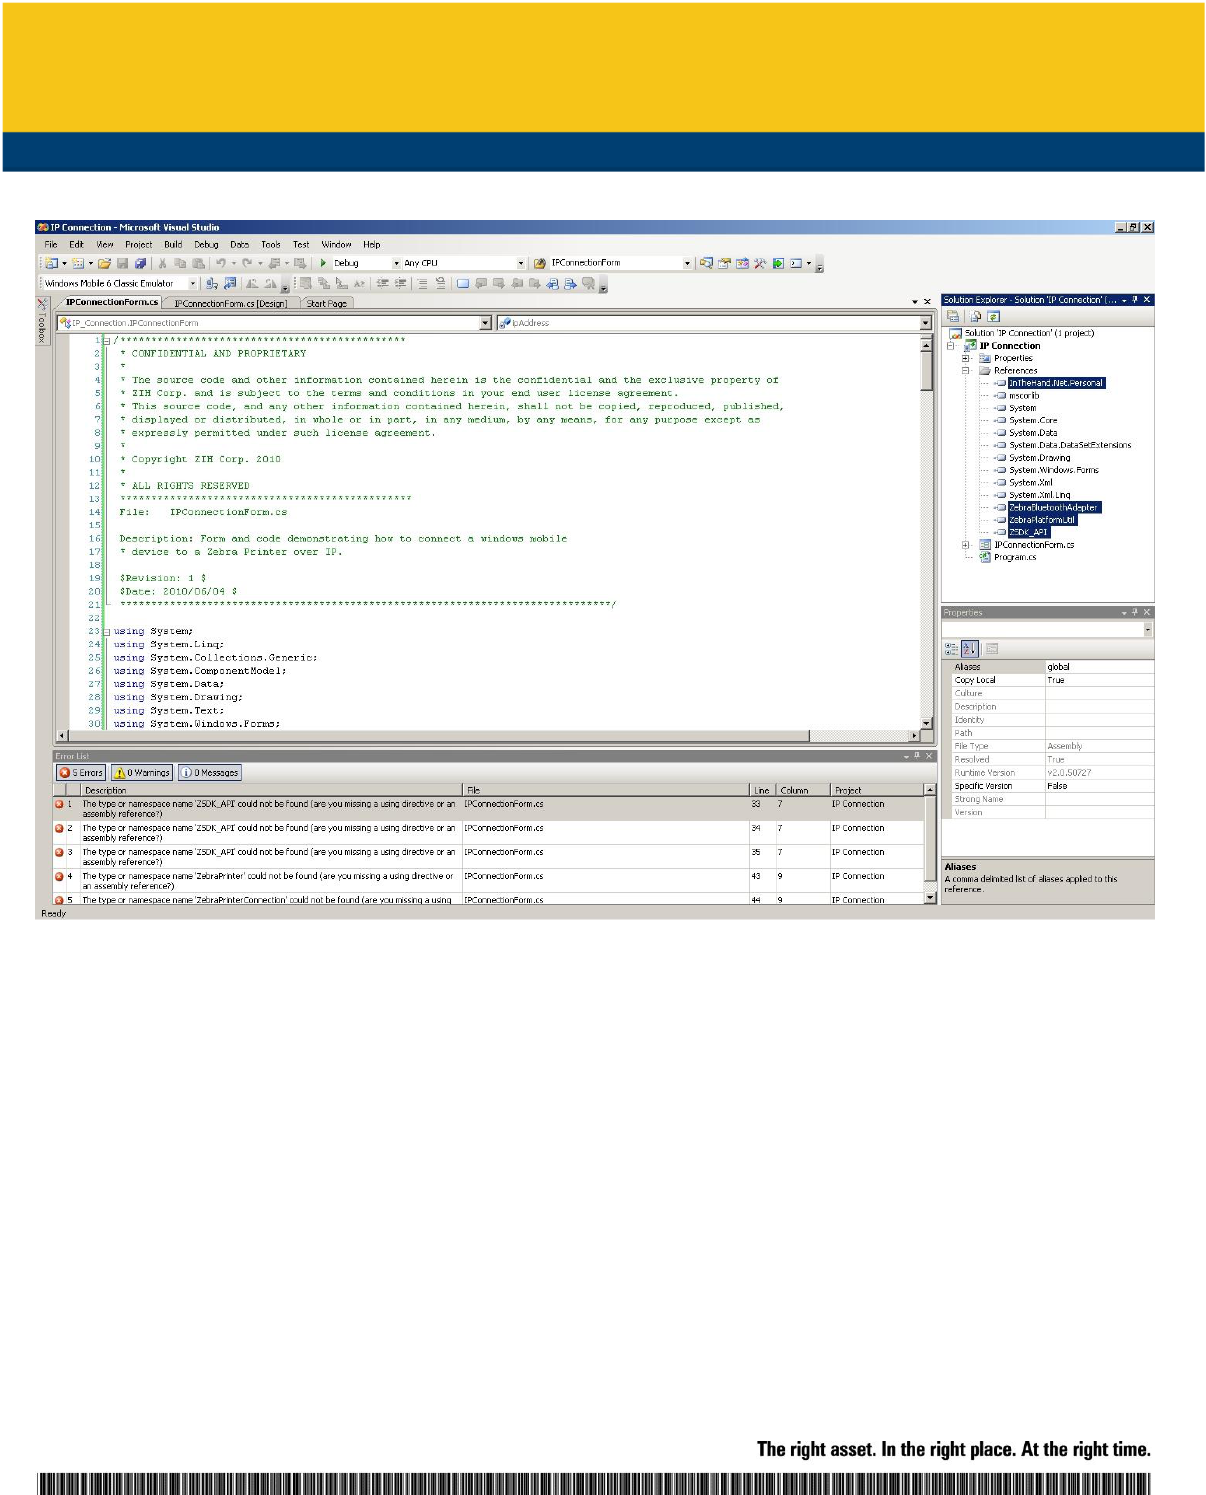
h. Replace the entire source code in IPConnectionForm.cs with the contents of the IPConnectionForm.cs
file from the “Connecting Over IP – Windows Mobile SDK – C#” sample code.
The sample code used in this guide is available on GitHub in the Zebra Technologies repository here.
For information on joining the ISV Program contact a Program manager in your area. Details here.
i. Click on the Start Debugging button to build and run the project.

j. You will see a list of errors caused by missing dependencies.

k. To add the dependencies, on the Solution Explorer on the right, expand the IP Connection project, right-
click References, and Add Reference to bring up the Add Reference dialog.

l. Select the “Browse” tab. Assuming you have the Link-OS Multiplatform SDK installed at the default
location, browse to C:\Program Files\Zebra Technologies\zebralink_sdk\windows_mobile\v1.0.118\lib.

m. Select all three dll files – ZebraBluetoothAdapter.dll, ZebraPlatformUtil.dll and ZSDK_API.dll – and click
ok.
n. Add another reference. This time, browse to C:\Program Files\Zebra
Technologies\zebralink_sdk\windows_mobile\v1.0.118\third_party, select InTheHand.Net.Personal.dll
and click ok.
o. On the Solution Explorer, you should now see four new dll files added under References.
p. Click on the Start Debugging button to build and run the project. There should be no errors reported. A
Deploy IP Connection dialog should appear.
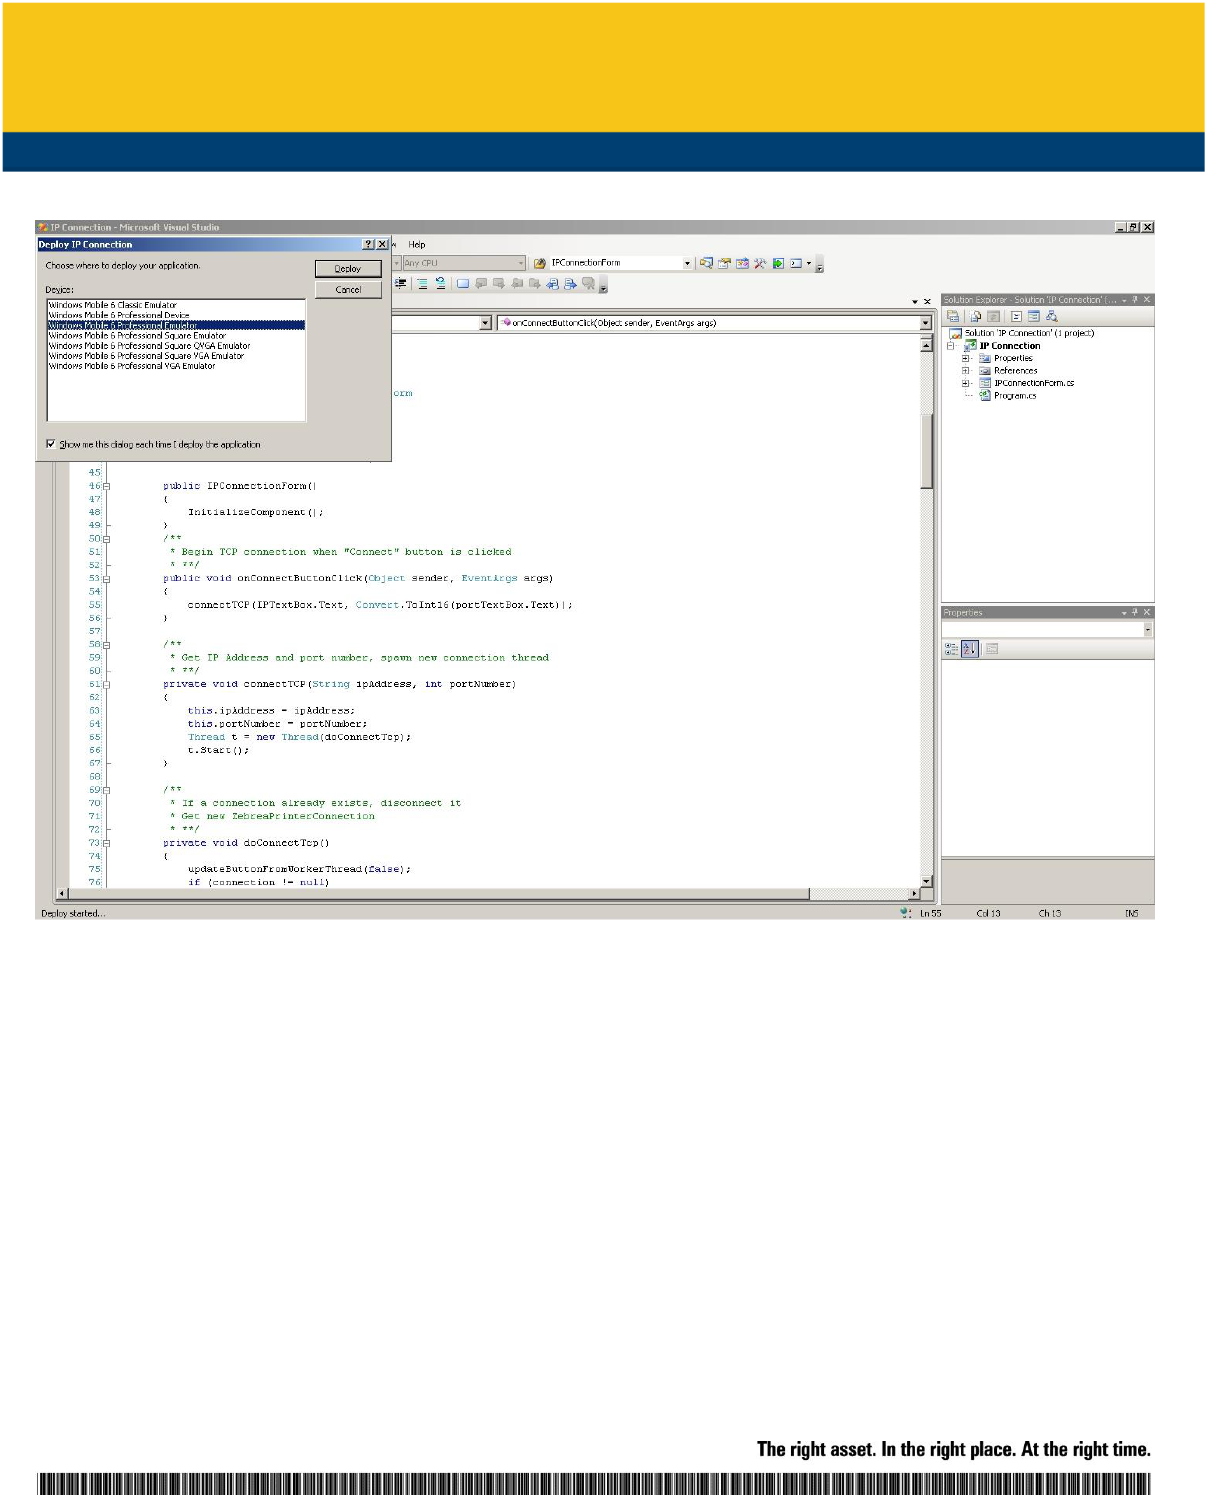
q. Select Windows Mobile 6 Professional Emulator, and click Deploy. This launches the application in the
emulator. It will take a while for the emulated device to fully start up and load the application.

r. Congratulations. You now have your first Zebra mobile application running on an emulator! To exit the
application, simply go to File -> Exit. When prompted to save emulator state, click No.
Deploying Your Mobile Application
After your Smart Device project is built and completed, it may be packaged into a CAB file for deployment on a Smart
Device.
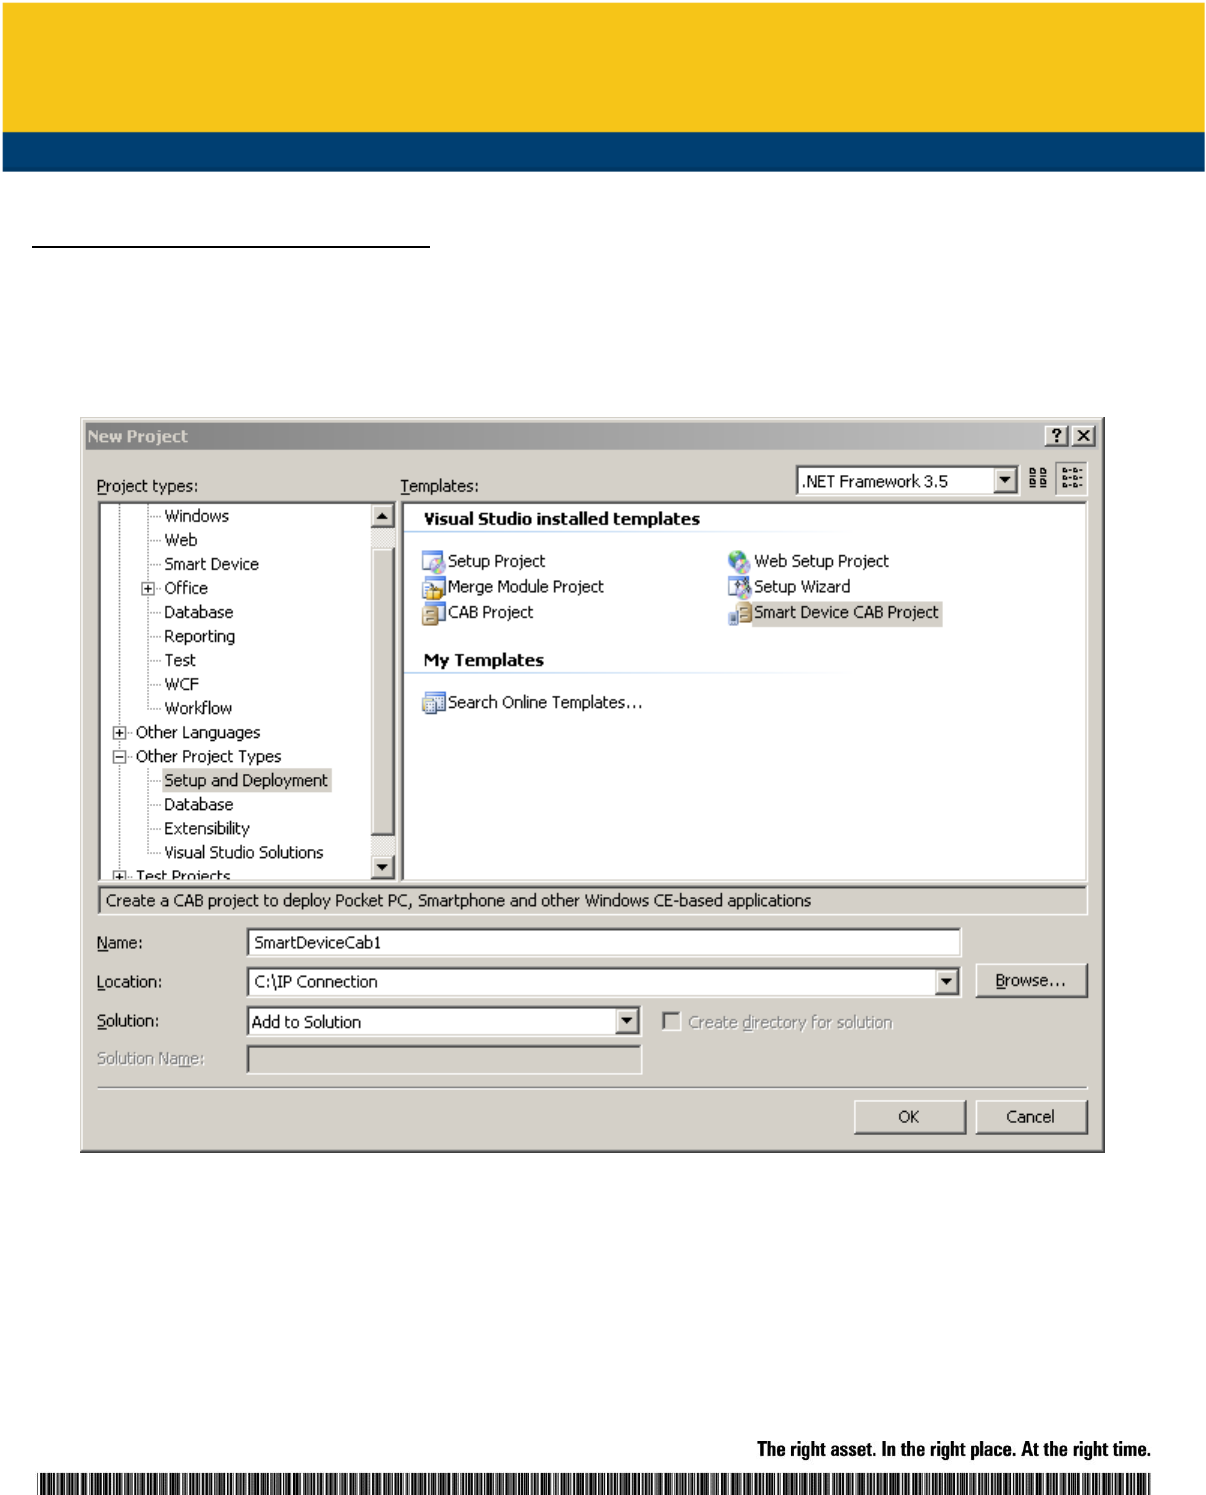
1. While your current Smart Device project is open, add a new Smart Device CAB Project to it. Select File -> New
Project -> Other Project Types -> Setup and Deployment -> Smart Device CAB Project.
2. Provide a name for your CAB file.
3. Next to Solution, select ”Add to Solution”. This will create a CAB project in your current workspace.

4. Once the CAB project has been created, right click the CAB project and select Add -> Project Output. The
following dialog will appear:
5. Select ”Content Files”. This will add all your project dependencies under ‘Content Files’.
6. Select ”Primary output”. This will add your target application to the CAB file.
7. Right click your CAB project then select “Build” or “Rebuild“. This will build your CAB file.
8. Copy this file to your device and run it to install your application and related dependencies.

*Specifications subject to change without notice.
©2009 ZIH Corp. EPL, APL, ZBI 2.0, ZBI-Developer, Element Energy Equalizer, E 3, ZebraLink, EPL2, ZebraNet, and all product names and numbers are Zebra trademarks, and Zebra, the Zebra head graphic
stripe, ZPL, ZebraNet, and ZPL II are registered trademarks of ZIH Corp. All rights reserved. Unicode is a trademark of Unicode, Inc. CG Triumvirate is a trademark of Agfa Division, Miles In c. IBM is a registered
trademark of International Business Machines Corporation. UFST is a trademark of Monotype Imaging Inc. a nd may be registered in certain jurisdictions. All other trademarks are the property of their respective
owners.
Corporate Headquarters
Asia-Pacific Headquarters
EMEA Headquarters
Latin America Headquarters
+1 800 423 0442
+65 6858 0722
+44 (0)1628 556000
+1 847 955 2283
E-mail: [email protected]
E-mail: [email protected]
E-mail: [email protected]
E-mail: [email protected]
Other Locations
USA: California, Georgia, Rhode Island, Texas, Wisconsin Europe: France, Germany, Italy, Netherlands, Poland, Spain, Sweden Asia Pacific: Australia, China, Japan, South Korea
Latin America: Argentina, Brazil, Florida (USA), Mexico Africa/Middle East: India, Russia, South Africa, United Arab Emirates
GSA#: GS-35F-0268N
13919L-001 Rev. 9 (11/08)
See Also
• For further information on ZPL, see the ZPL Programming Guide on the Zebra website
• For further information on CPCL, see the CPCL Programming Guide on the Zebra website.
• For any further information, sample code and solutions or to request further content, visit the Zebra Developer
Portal.
Document Control
Version
Date
Description
1.0
9-Nov-10
Initial Release
1.1
28-Feb-11
See Also section updates
1.2
23-Jun-11
Updated disclaimer comments
2.0
01-Jul-12
Updated Chinese link into document
3.0
16-Sep-12
Updated Spanish and Portuguese link into
document
4.0
2nd October 2017
Updated URLs
All links and information correct at time of writing
Created for the Zebra Global ISV Program by Zebra Development Services
