
GE Digital Proficy Historian and Operations Hub: Data Analysis in Context 1
Proficy HMI/SCADA -
iFIX 2022
Writing Scripts

Proprietary Notice
The information contained in this publication is believed to be accurate and reliable. However, General Electric Company assumes no
responsibilities for any errors, omissions or inaccuracies. Information contained in the publication is subject to change without notice.
No part of this publication may be reproduced in any form, or stored in a database or retrieval system, or transmitted or distributed in any
form by any means, electronic, mechanical photocopying, recording or otherwise, without the prior written permission of General Electric
Company. Information contained herein is subject to change without notice.
© 2022, General Electric Company. All rights reserved.
Trademark Notices
GE, the GE Monogram, and Predix are either registered trademarks or trademarks of General Electric Company.
Microsoft® is a registered trademark of Microsoft Corporation, in the United States and/or other countries.
All other trademarks are the property of their respective owners.
We want to hear from you. If you have any comments, questions, or suggestions about our documentation, send them to the following email
address:

Table of Contents
Writing Scripts 1
Introduction 1
Common Scripting Solutions 1
Sample Code 1
Working with iFIX Objects 2
Manipulating Pictures 2
Accessing Real-time Data 2
Accessing Data from a Relational Database: Using ADO 2
Working in the Run-time Environment 2
Working with the Scheduler 3
Manipulating Charts 3
Working with iFIX Security 3
Creating Tag Groups 3
Using Samples in the VBA Help File and Source Code 3
To view the Visual Basic source code: 3
Development Tips 4
Getting Started with iFIX and VBA 4
What You Can Do With iFIX and VBA 4
VBA Features Not Supported in iFIX 5
Components of a VBA Project 5
Host Application 5
Visual Basic Editor 5
Modules 5
Forms 6
Components of the VBA Editor 6
Project Explorer 7
Properties Window 7
Code Window 9
Using VBA Forms 10
© 2022 General Electric Company. All rights reserved. i

Using VBA Forms within iFIX 10
VBA File Types 11
VBA Naming Conventions 11
To correct naming conflicts for a picture: 12
Renaming VBA Objects Through Scripting 12
Testing Your Code 13
Saving Your Work 13
Configuring VBA Options 13
Tips for Configuring VBA Options 13
Require Variable Declaration 14
To configure VBA to automatically add the Option Explicit statement to a new project: 14
Clear the Compile On Demand Check Box 14
Configuring VBA Project Options 14
Datatype Checking and the VBA Compiler 14
Error Example 15
Workarounds 15
Optimizing Your VBA Project Development 16
Using iFIX Subroutines and Experts 16
Sending Operator Messages to Alarm Areas 17
Using the Multiple Command Script Wizard 18
Keyboard Accelerators 18
General iFIX Scripting Tips 19
Creating an iFIX Shape with a VBA Script 20
Using iFIX Collections 20
Connecting Animation Objects to Data Sources 20
Reusing Scripts 21
Cutting and Pasting Code 21
VBA References 21
Deleting Objects Referenced by Name in a Script 21
Using Deleted Object Types in Scripts 22
Dragging and Dropping Dynamo Objects or Toolbar Buttons 22
ii © 2022 General Electric Company. All rights reserved.

Tracking Errors in Subroutines 22
Examples 23
Filtering out Global Pages 23
VBA Coding Help Features 23
Auto List Members 24
Auto Quick Info 24
Context Sensitive Help 25
Working with iFIX Objects 25
VBA Object Count Limit 25
Object Availability in the VB Editor 26
To make a single object available in the VB Editor: 26
To make a group of objects available in the VB Editor: 26
Understanding the iFIX Object Hierarchy 27
VBA Object Browser 27
Connecting Objects to Data Sources to Create Animations 28
Making Connections 29
Directly Connecting to a Data Source 29
To make a direct connection using the Animations dialog box: 30
Making a Direct Connection by Writing a Script 30
To make a direction connection using a script: 30
Making Connections through Animations 31
To make a linear animation connection using the Animations dialog box: 31
Making an Animation Connection through a Script 31
Example: Building an Animation Connection through a Script 31
Connecting or Disconnecting an Object's Property to a Data Source 33
Retrieving Connection Information from a Property's Data Source 33
Is the Object Connected to a Data Source? 34
Is the Connection Valid? 34
Example: Script Using ParseConnectionSource Method 34
How Many Properties Are Connected to the Data Source? 34
What Other Connection Information Is Available? 35
© 2022 General Electric Company. All rights reserved. iii

Example: Script Using GetConnectionInformation Method with IsConnected Method 35
Determining if an Object's Property is Being Used as a Data Source 35
Retrieving General Connection Information 35
GetPropertyAttributes Method 36
Example: Script Using the GetPropertyAttributes Method 36
CanConstruct Method 36
Example: Script Using CanConstruct Method 36
Construct Method 36
Example: Script Using Construct Method 37
ValidateSource Method 37
Example: Script Using ValidateSource Method 37
Animation Properties and Methods 37
General Animation Object Properties and Methods 37
Linear Animation Object Properties 38
Lookup Animation Object Properties and Methods 38
Connection Examples: Using the Lookup Object 39
Example: Using Range Comparison 39
Example: Using Exact Match Lookup 40
Format Animation Object Properties 41
Connection Example: Animating the Rotation of a Rectangle 42
Example: Animating the Rotation of an Object 42
Rotating a Group 44
To rotate a group using scripting: 44
Example: Rotating a Group Using a Script 44
Manipulating Pictures 45
Understanding Picture Events 45
Automatically Starting a Picture 46
Example: Creating a Toolbar 47
Managing Multiple Displays 47
Setting a Pushbutton Property 48
To set the Pushbutton property of a bitmap: 48
iv © 2022 General Electric Company. All rights reserved.

Setting the Active Document 48
Creating a Global Variable 48
To create a global variable object to hold the string for the current active picture: 48
Changing Displays Using Global Subroutines 49
Example: Using an Alias to Open and Close Displays 50
Example: Using the ReplacePicture Subroutine 50
Closing Pictures with Active Scripts 51
Using the Workspace Application Object 51
Creating Global Scripts 51
Creating a Global Variable Object 51
To make a variable object global by adding it to the User page: 52
To create a global variable using the Variable Expert: 52
How FIX32 Predefined Variables Map to iFIX Object Properties 52
Creating a Global Threshold Table 54
To create a global threshold table that is used for all current alarms in the system: 54
To name the table: 55
To connect an oval to a global threshold table: 55
Creating A Global Procedure 55
To add a global subroutine to the User page: 56
Accessing Real-time Data 56
Using the Data System OCX for Group Reads and Writes 56
Example: Group Write 57
Example: Group Read 58
Example: Writes to Alternate Sources 58
Reading from and Writing to a Database Tag 59
Writing a Value to a Defined Database Tag 59
Writing a Value Using the WriteValue Subroutine 59
Write a Value Using the Database Tag's Value Property 60
Example: Using the Database Tag's Value Property 60
Accessing Data from a Relational Database 61
Database Access in VBA: MDAC 61
© 2022 General Electric Company. All rights reserved. v

Using ActiveX Data Objects 61
Creating ADO Objects 61
Example: Creating an ADO Record set 62
Populating an MSFlexGrid or Similar Spreadsheet OCX with ADO 62
Example: Populating a Flexgrid with Data from an ADO Record set 62
Adding a Record to the Database through ADO 63
Example: Adding a Record to a Database Using an ADO Recordset 63
Updating a Record in the Database through ADO 64
Example: Updating a Database Using an ADO Record set 64
Deleting a Record from the Database through ADO 64
Example: Deleting a Record from a Database Using an ADO Record set 64
Advanced Topic: Using SQL 65
Working in the Run-time Environment 65
Changing Data Sources 65
Creating a Direct Connection to an Object 66
To connect an AI tag to the Horizontal Fill Percentage of a rectangle when you click it: 66
Example: Changing the Data Source of an Animation Connected to an Object 66
To set an object and change the source of the animation object that is connected to it: 66
Changing a Text Object's Caption 67
To change a text object's caption: 67
Changing a Variable Object's Current Value 67
To change a Variable object's caption: 68
Changing the Data Source of a Data Link 68
To change the data source of a Data link using the Format object: 68
Change a FIX Event's Data Source 68
To change the data source of a FIX event in the run-time environment: 68
Replacing String Properties 69
To search for AO data sources in a picture and replace with them AI data sources: 69
Creating Global Forms for Data Entry 69
Example: Form Code 70
Example: Module Code 71
vi © 2022 General Electric Company. All rights reserved.

Example: iFIX Object Code 71
Working with the Scheduler 71
Scheduler 71
DoEvents Function 72
Using Timers in place of DoEvents 72
Using Scripts with Time-based Entries 74
Example: Checking Disk Space and Triggering an Alarm if Too Low 74
Using Scripts with Event-based Entries 75
Example: Recording DownTime Monitoring 76
Manipulating Charts 78
Switching from Real-time to Historical Data 79
Example: Scroll Back and Scroll Forward Buttons 79
Scrolling Historical Data 80
Example: Creating Buttons that Scroll Back and Scroll Forward through Historical Data and Set
Current Time 80
Automatically Updating a Chart 81
Environment-specific Chart Properties and Methods 81
Chart Properties Limited to the Configuration Environment 81
Chart Properties Limited to the Run-time Environment 82
Chart Methods Limited to the Run-time Environment 82
Environment-specific Pen Properties and Methods 82
Pen Properties Limited to the Configuration Environment 82
Pen Properties Limited to the Run-time Environment 83
Pen Methods Limited to the Run-time Environment 83
Setting the Properties of Multiple Pens with One Call 83
Adding a Pen 84
Deleting a Pen 84
Changing Data Sources in a Pen 85
To change the data source of a pen by editing an object's Click event: 85
Passing in External Data to a Pen 86
Example: Using GetPenDataArray to Extract Data from Pen 86
Example: SetPenDataArray Method with Hardcoded Values 87
© 2022 General Electric Company. All rights reserved. vii

Changing the Chart Duration 88
Changing the Start and End Times 88
Zooming 88
Pausing a Real-time Chart 89
Keyboard Accelerators 89
Using the Pens Collection 89
Using RefreshChartData 89
Scrolling an Enhanced Chart VBA Example 90
Creating Custom Dynamos 91
Creating a New Custom Dynamo 91
To build a Dynamo object: 91
To build a Dynamo form: 92
To create a Master Dynamo and place it in a Dynamo set: 92
Working with iFIX Security 93
Using the Login Subroutine 93
Example: Excerpt from Script which opens the Login Application 93
Getting User Information 93
Example: Using the System Object's FixGetUserInfo Method 93
Creating Tag Groups 94
Creating the Tag Group File Object 94
Retrieving Tag Group Data 94
Modifying Tag Group Data 95
Example: Modifying Tag Group Data 95
Manipulating Tag Groups 95
Example: Manipulating Tag Group Data 96
Index 97
viii © 2022 General Electric Company. All rights reserved.

Writing Scripts
The Writing Scripts manual is intended for system integrators, OEMs, and process control engineers
responsible for customizing their iFIX® software automation solution using Visual Basic for Applications.
The manual assumes that you are familiar with Microsoft Windows and the Visual Basic programming lan-
guage.
The first few sections of the book provide some background on Microsoft Visual Basic for Applications
(VBA), but the intent of this manual is to describe the implementation of VBA within iFIX, not to explain
how to program in Visual Basic.
If you are new to the Visual Basic language, you may want to consult one of several sources of inform-
ation on the basics of VB programming, which are beyond the scope of this book. If you are a novice VB
programmer, check out the Getting Started with iFIX and VBA chapter to learn where to find information
on general VB programming topics.
Introduction
This introduction contains the following sections:
l Common Scripting Solutions
l Sample Code
l Development Tips
The Getting Started with iFIX and VBA chapter describes basic information on using the VBA pro-
gramming language, and describes several key components of the VBA environment.
Starting with the section Optimizing Your VBA Project Development, this manual teaches you how to
write VBA code for iFIX objects. The intention of these sections is to teach you how to code by example,
and many times the best explanation of the sample code lies within the commented lines (lines that
begin with an apostrophe — these lines are for explanatory remarks and are ignored by the VBA com-
piler), so look carefully. Because each section is dedicated to a different object, you can find the inform-
ation you need quickly and easily.
Common Scripting Solutions
Several of this manual's VBA scripting examples were added based on feedback that we received from
iFIX users like yourself. Check the section names in the Table of Contents for the task that best describes
what you want to do through scripting.
If you find one that matches what you're looking for, click it to jump to the related section in this manual.
If you don't find a match, browse the section that most closely fits your needs, as there are several
examples or related topics within each section.
Sample Code
© 2022 General Electric Company. All rights reserved. 1

One of the best ways to learn any programming language is to examine code that already exists and try
to decipher how the code works. This manual contains a great deal of sample code that you can cut and
paste directly into the Visual Basic Editor. The following is a list of the sample scripts included in this
manual. You can click on an example title to view the sample code.
Working with iFIX Objects
l Example: Building an Animation Connection through a Script
l Example: Script Using ParseConnectionSource Method
l Example: Script Using GetConnectionInformation Method with IsConnected Method
l Example: Script Using the GetPropertyAttributes Method
l Example: Script Using CanConstruct Method
l Example: Script Using Construct Method
l Example: Script Using ValidateSource Method
l Example: Using Range Comparison
l Example: Using Exact Match Lookup
l Example: Animating the Rotation of an Object
l Example: Rotating a Group Using a Script
Manipulating Pictures
l Example: Creating a Toolbar
l Example: Using an Alias to Open and Close Displays
l Example: Using the ReplacePicture Subroutine
Accessing Real-time Data
l Example: Group Write
l Example: Group Read
l Example: Writes to Alternate Sources
l Example: Using the Database Tag's Value Property
Accessing Data from a Relational Database:
Using ADO
l Example: Creating an ADO Record set
l Example: Populating a Flexgrid with Data from an ADO Record set
l Example: Adding a Record to a Database Using an ADO Recordset
l Example: Updating a Database Using an ADO Record set
l Example: Deleting a Record from a Database Using an ADO Record set
Working in the Run-time Environment
l Example: Changing the Data Source of an Animation Connected to an Object
l Example: Form Code
l Example: Module Code
l Example: iFIX Object Code
2 © 2022 General Electric Company. All rights reserved.

Working with the Scheduler
l Example: Checking Disk Space and Triggering an Alarm if Too Low
l Example: Recording DownTime Monitoring
Manipulating Charts
l Example: Scroll Back and Scroll Forward Buttons
l Example: Creating Buttons that Scroll Back and Scroll Forward through Historical Data and Set
Current Time
l Example: Using GetPenDataArray to Extract Data from Pen
l Example: SetPenDataArray Method with Hardcoded Values
Working with iFIX Security
l Example: Excerpt from Script which opens the Login Application
l Example: Using the System Object's FixGetUserInfo Method
Creating Tag Groups
l Example: Modifying Tag Group Data
l Example: Manipulating Tag Group Data
Using Samples in the VBA Help File and Source Code
Also, the iFIX Automation Interfaces help file has an example for each method in the system, and the VBA
Help file contains an entire section devoted to nothing but sample code.
You can also look at the Visual Basic source code for all iFIX toolbars, Experts, and Wizards.
To view the Visual Basic source code:
1. In the iFIX WorkSpace, open a new picture.
2. In Ribbon vView, on the Home tab, in the WorkSpace group, click Settings, and then click Toolbars.
- Or -
In Classic view, on the WorkSpace menu, click Toolbars.
3. Select each toolbar in the Toolbars list box. Click the Close button.
4. In Ribbon view, on the Home tab, in the WorkSpace group, click Visual Basic Editor.
- Or -
In Classic view, on the WorkSpace menu, click Visual Basic Editor.
5. In the VBE, select the Project Explorer command from the View menu.
6. In the Project Explorer, click the plus sign (+) next to any of the available projects to show the con-
tents of the project.
7. Double-click a form or module within the project to display it in the VBE. For example, if you
expand the Project_Experts project, expand its Forms folder, and double-click the frmFill form to
view the Fill Expert form.
© 2022 General Electric Company. All rights reserved. 3

WARNING: Although you can look at the source code for the above mentioned objects within iFIX, do not
modify any of the code or your environment may not work as expected.
Development Tips
The open architecture of iFIX provides an extremely flexible automation interface. In fact, you may learn
that, in some cases, you can write two or more very different VBA scripts that achieve the same end res-
ult. In the code samples throughout this manual, you will find tips, suggestions, and tricks in an effort to
help you discover the most efficient ways to automate iFIX with VBA.
Getting Started with iFIX and VBA
Visual Basic for Applications, or VBA, is the standard scripting language built into iFIX®. VBA was once
only available in Microsoft Office applications. However, Microsoft has made VBA available through licens-
ing, so companies like GE can integrate the language directly into their products.
Refer to the following sections for more information on how to get started with iFIX and VBA:
l What You Can Do With iFIX and VBA
l Components of a VBA Project
l Components of the VBA Editor
l Using VBA Forms
l VBA File Types
l Testing Your Code
l Saving Your Work
l Configuring VBA Options
l Configuring VBA Project Options
l Datatype Checking and the VBA Compiler
What You Can Do With iFIX and VBA
VBA can be used to customize and extend the functionality of iFIX. For example, you can create a custom
wizard that automatically builds an iFIX picture at the click of a button. This functionality allows a user to
develop automatic picture creation templates that can greatly reduce development time and effort when
developing applications with large numbers of pictures. In addition, VBA enables you to manipulate,
retrieve, and modify data from iFIX applications. For example, you can write a script that reads data from
a database block and stores that information into a Microsoft SQL Server database. You can manipulate
the objects in an iFIX picture based on the information in a Microsoft Word document. When you use VBA
with iFIX, you build the most powerful industrial automation solution available.
4 © 2022 General Electric Company. All rights reserved.

Once you begin working with the iFIX object model, you will start to understand how powerful VBA really
is. Through VBA, you can:
l Extend or customize the functionality of iFIX applications.
l Manipulate an iFIX application or its data.
l Create your own custom dialog boxes to exchange data with operators.
l Integrate data from several iFIX applications.
l Create wizards that can perform several tasks at the click of a button.
VBA Features Not Supported in iFIX
l Ability to choose ActiveX Designers as project items.
l Developer add-ins (COM add-ins).
l Digital signatures for VBA projects.
l Multi-threaded projects.
l Strengthened project passwords.
Components of a VBA Project
First, let's take a look at the components of a VBA project:
l Host Application
l Visual Basic Editor
l Modules
l Forms
Host Application
All VBA projects must be associated with an application; you cannot create a stand-alone VBA project.
The application that the VBA project is tied to is called the host application. In the case of iFIX, the host
application is the iFIX WorkSpace, and each VBA project is embedded in an iFIX picture file (*.GRF), tool-
bar file (*.TBX), toolbar category file (*.TBC), schedule file (*.EVS), Dynamo set file (*.FDS), or User file
(USER.FXG).
Visual Basic Editor
The Visual Basic Editor, or VBE, is the development environment that allows you to write and debug code,
develop user forms, and view the properties of your VBA project.
Modules
© 2022 General Electric Company. All rights reserved. 5

If you are developing large VBA projects, it may make sense to separate the code into several modules.
Modules are self-contained blocks of code that perform a particular function. For example, if you wanted
to write a wizard that creates a real-time chart for a specific data point, you may want to break the pro-
ject up into three modules: one module to retrieve the value after prompting the operator to specify a
data source, one module to plot the data after prompting the operator to specify a chart type, and one
module to create the chart based on the operator's specifications.
NOTE: Do not include modules in Dynamo objects, since they are not moved with the Dynamo object.
Forms
Forms are custom dialog boxes that you create in VBA in order to exchange information with the oper-
ator. Examples of forms are message boxes, input dialogs, and configuration screens. Forms are essential
in helping the application and the operator interact.
Components of the VBA Editor
There are several ways to launch VBA from iFIX. You can:
l In the iFIX WorkSpace, in Ribbon view, on the Tools tab, click Visual Basic Editor.
l In Classic view, select the Visual Basic Editor command from the WorkSpace menu.
l In Classic view, click the Visual Basic Editor toolbar button on the Standard Toolbar.
l Right-click the object that you want to write a script for and select Edit Script from the pop-up
menu.
l Click the Edit Script button when adding a button to a custom toolbar through the Customize Tool-
bar dialog box. See the Understanding Toolbars section of the Understanding iFIX manual for more
information on how to customize toolbars.
l Click the VB Editor button on the Add Timer Entry and Add Event Entry dialog boxes when creating
an iFIX schedule or when using the Event or Timer Experts.
After you launch VBA, the Visual Basic Editor appears. The VBE consists of several different tools and win-
dows to help you design, create, and manage your VBA projects. The tools you will use most often are
shown in the following figure.
6 © 2022 General Electric Company. All rights reserved.

Microsoft Visual Basic Editor
Project Explorer
The Project Explorer is a special window in the VBE that shows each of the elements of your VBA project.
The elements are presented in a tree format, with each branch displaying related information, such as
forms, code modules, and elements from iFIX, such as pictures, toolbars, and global pages.
The Project Explorer makes it easy to select the project elements that you want to work with. For
example, if you want to add a button to a particular form you've been working on, you can select the form
from the Project Explorer. After you select a project element to edit, the VBA editor opens the appro-
priate tool. For example, if you select a form, the form displays on screen with the Form Toolbox avail-
able.
There are two ways to select and edit a project element that displays in the Project Explorer:
l Double-click the object.
l Choose the object, right-click, and then choose either View Object or View Code. Only the appro-
priate choice will be available. For example, View Object would not be available if you chose a
code module.
To view the Project Explorer, select the Project Explorer command from the View menu or press Ctrl+R.
To learn more about the Project Explorer, refer to the Help topics within the sections Visual Basic User
Interface Help and Visual Basic How-To Topics of the Visual Basic for Applications Help file, or search for
the Index keywords "Project Explorer".
Properties Window
© 2022 General Electric Company. All rights reserved. 7

The Properties window is used to review and set properties for project objects. For example, you can set
the background color for an iFIX picture in the Properties window, or you can change the name of a rect-
angle within that picture.
Properties Window
To view the Properties window:
In Ribbon view, on the View tab, in the Window group, click Property Window.
- Or -
In Classic view, on the View Menu, select the Property Window command.
- Or -
Press <F4>.
The Properties window displays the properties for the current object. When you select different objects
in your VBA project, the Properties window changes to show just the properties of the object you selec-
ted. You can select the current object to work with in the Properties window by:
8 © 2022 General Electric Company. All rights reserved.

l Selecting the object from the drop-down list at the top of the Properties window.
l Selecting the object from the Project Explorer and then returning to the Properties window.
l Selecting the object (or control) within a form and then returning to the Properties window.
The Properties window consists of two panes: the names of the current object's properties appear in the
left pane; the values for these properties appear in the right pane. To change a property, select the prop-
erty in the left pane and click and edit the value in the right pane. Some properties have a predefined list
of valid values, which allows you to choose from a drop-down list. Other properties require a value of Yes
or No. In this case, you can simply double-click the Value column to toggle the value between Yes and No.
To learn more about the Property Window, refer to the Help topics within the sections Visual Basic User
Interface Help and Visual Basic How-To Topics of the Visual Basic for Applications Help file, or search for
the Index keyword "windows".
Code Window
The Code window is where you write any code associated with your VBA project. You could write code
which is executed when the user clicks a button in an iFIX picture, or it could be a part of a procedure lib-
rary you've written to serve your entire project.
Code Window
Two drop-down lists are located just below the title bar. One drop-down list shows all of the objects ref-
erenced in the code module, while the other drop-down list shows the procedures associated with each
object.
To display the code window, do any of the following:
l Right-click an object in the iFIX WorkSpace and select Edit Script from the pop-up menu.
l Double-click any code element in your application in the Project Explorer, such as modules and
class modules.
l Double-click anywhere on any form in your VBA project or any control on a form.
l Choose View Code from the VBE window. If you want to view the code for a specific project ele-
ment, such as a worksheet, be sure you select that element first in the Project Explorer.
© 2022 General Electric Company. All rights reserved. 9

l Choose the Module command from the Insert menu, or right-click the Project Explorer and then
choose Insert Module.
Once the Code window is displayed, you can enter your code directly into the window.
To learn more about the Code window, refer to the Help topics within the sections Visual Basic User
Interface Help and Visual Basic How-To Topics of the Visual Basic for Applications Help file, or search for
the Index keyword "code window".
TIP: Remember, a great way to learn how to use VBA with iFIX is to view the scripts behind all of the Application Tool-
bar buttons. To view the code behind these buttons, run the Visual Basic Editor and expand the Toolbar (Applic-
ationToolbar) project in the Project Window.
WARNING: Do not update these files. Doing so may cause the toolbar buttons to stop working properly.
Using VBA Forms
It is likely that your VBA project will need a custom form. For example, you might provide the operator
with a choice of options before your program executes some task, like importing data. Or you might want
to provide the operator with a custom data entry dialog box.
In VBA, you build these forms yourself. These forms are just like the dialog boxes you've seen or used in
Microsoft Windows, such as the logon dialog box shown when you start up. The only difference is that you
get to choose how these dialogs appear, when they appear, and what they do.
To learn more about Visual Basic forms, refer to the Help topics within the sections Microsoft Forms
Design Reference, Microsoft Forms Developer's Tips, and Microsoft Forms Object Model Reference of the
Visual Basic for Applications Help file, or search for the Index keyword "forms".
Using VBA Forms within iFIX
One concept that you should keep in mind when launching forms from iFIX is the idea of modal and mode-
less forms. A form is modal if it does not allow you to work with its host application while it is being dis-
played. Conversely, if a form is modeless it allows you to work with its host application even while it is
displayed.
If you launch a modal form from a VBA script within iFIX, users must respond to the form before they can
continue working with the iFIX environment (which includes selecting menus, toolbars, objects in a pic-
ture, and so forth). No subsequent code is executed until the form is hidden or unloaded. When a form is
modeless, all subsequent code is executed as it is encountered.
WARNING: Never try to unload a form from within the same form, or from any control within the form. Instead, call
the Hide method from within the form, and unload it from the main routine once it is hidden.
Modeless forms do not appear in the task bar and are not in the window tab order. To call a modeless
form, use the following code:
userForm1.Show vbModeless
NOTE: You may lose data associated with a modeless UserForm if you make a change to the UserForm project that
causes it to recompile, for example, removing a code module.
10 © 2022 General Electric Company. All rights reserved.

When using a modeless form, if you do not want to allow the user to get to the WorkSpace, use the
DeActivateWorkspaceUI which essentially disables the WorkSpace UI. For more information, see the
DeActivateWorkspaceUI method topic in the iFIX Automation Interfaces Electronic Book.
Inserting an Alarm Summary object into a VBA form may cause unpredictable results when opening the
picture or switching environments from run-time to configuration or vice versa.
VBA File Types
The VBA Editor allows you to import and export components of your VBA projects. This makes it easy to
share your work with other applications and Visual Basic projects.
If there is a component of another VBA project you would like included in the project you are working on,
that component must first be exported from the source project and imported into your project. Com-
ponents of a VBA application are always stored separately, so you can load a component from a VB pro-
ject easily. The following table shows the typical extensions used for VBA components, so you will know
what type of file to look for when you import to VBA:
Extension Component
FRM Form
CLS Class Module
BAS Code Module
To learn more about importing and exporting Visual Basic files, refer to the Help topics within the section
Visual Basic User Interface Help of the Visual Basic for Applications Help file, or search for the Index
keywords "import" and "export".
VBA Naming Conventions
You must adhere to the following standard VBA naming conventions when naming iFIX pictures, sched-
ules, objects, variables, modules, and procedures. You can find this information in the Help topics within
the section Visual Basic Naming Rules of the Visual Basic for Applications Help file:
l You must use a letter as the first character.
l Names cannot exceed 255 characters in length.
NOTE: Visual Basic for Applications isn't case-sensitive, but it preserves the capitalization in the statement
where the name is declared.
l You should not use any names that are identical to the functions, statements, and methods in
Visual Basic because you may shadow the same keywords in the language.
l To use an intrinsic language function, statement, or method that conflicts with an assigned
name, you must explicitly identify it.
© 2022 General Electric Company. All rights reserved. 11

l Precede the intrinsic function, statement, or method name with the name of the asso-
ciated type library. For example, if you have a variable called Right, you can only invoke the
Right function using VBA.Right.
l You cannot repeat names within the same level of scope. For example, you cannot declare two
variables named level within the same procedure. However, you can declare a private variable
named level and a procedure-level variable named level within the same module.
l You cannot use a space, hyphen (-), period (.), exclamation mark (!), or the characters @, &, $, # in
the name.
NOTE: If you have database tags that contain invalid VBA characters, such as hyphens, and you want to manip-
ulate these tags through scripts, you can use two iFIX subroutines (ReadValue and WriteValue) to do so. You can
learn more about the ReadValue and WriteValue subroutines in the section Optimizing Your VBA Project Devel-
opment, or in the iFIX Automation Interfaces Electronic Book.
l You should not use an underscore (_) in the name. It may cause problems with scripting, because
VBA uses underscores in the naming of scripts associated with objects.
l Pictures, schedules, Dynamo sets, toolbars, and toolbar categories require unique names so that
the iFIX WorkSpace can load them simultaneously. This is true even though the file name exten-
sions differ for different document types. The following scenarios illustrate this point:
l If you attempt to open a picture whose name conflicts with a document that is already
open, you will not be able to open the picture. Instead, the following text appears:
Another Schedule, Picture, Toolbar, or Dynamo Set with same name is already open.
l If you attempt to enable a toolbar whose name conflicts with a picture that is already
open, the iFIX WorkSpace will not enable the toolbar.
l If you open a picture that has the same name as a toolbar category, and then either click
the Buttons tab on the Customize Toolbars dialog box or run the Task Wizard, the iFIX
WorkSpace will not display the toolbar category.
To correct naming conflicts for a picture:
1. Close the picture.
2. Rename the picture to a name that does not conflict with the other document.
3. Close the conflicting Dynamo set, schedule, picture, or toolbar.
4. Restart the WorkSpace.
5. Open the renamed picture and save it.
Avoid naming an object, a picture, and a global subroutine with the same name, particularly if you refer to
the object in a Visual Basic script. This ensures that VBA can distinguish between your objects and your
subroutines. Otherwise, you may receive the following error when running a script:
Expected procedure, not variable.
Renaming VBA Objects Through Scripting
Avoid renaming VBA objects in a VBA script. Doing so will cause the code associated with those objects
not to function. For example, if a rectangle named Rect1 has an associated event called Sub Rect1_Click
(), changing the name of the rectangle to Rect2 will cause Sub Rect1_Click() not to function since there is
no longer an object called Rect1.
12 © 2022 General Electric Company. All rights reserved.

The script below prompts the user to enter a new name for a rectangle object when that object (Rect1)
is clicked. When you enter a new name and click OK, the object Rect1 no longer exists and the code
becomes orphaned and useless.
Private Sub Rect1_Click()
Dim strNewName as String
strNewName = InputBox("Enter new name")
Rect1.Name = strNewName
End Sub
Testing Your Code
You will need to run your project a number of times before it is finished. To run a procedure, position the
cursor anywhere in the procedure and choose Run Sub/User Form from the Run menu, or press F5.
You can also display the form you are working on, execute any code that you have attached to event pro-
cedures within the form, and test the controls that you have placed on the form. To run the form, pos-
ition the cursor anywhere on the form, and then choose Run Sub/User Form from the Run menu, or press
F5.
To learn more about running your VBA code, refer to the Help topics within the section Visual Basic How-
To Topics of the Visual Basic for Applications Help file, or search for the Index keywords "running code" or
"executing code".
Saving Your Work
Code, forms, and modules you create with VBA are associated with an iFIX picture, toolbar, toolbar cat-
egory, schedule, Dynamo set, or User Global file within the WorkSpace application. Therefore, saving the
work you completed in a VBA project only occurs when you save these iFIX documents.
To save a picture from VBA, choose the Save command from the File menu. This will save any changes
that you have made to the picture, as well as to the VBA project.
NOTE: Toolbar and toolbar category files are saved automatically when you exit the WorkSpace. If you made changes
to the User Global file, iFIX displays a message box that asks you if you want to save your changes.
Configuring VBA Options
You can configure the VBA Editor with a number of different options. These options are set in the Options
dialog box. The Options dialog box displays when you select Options from the Tool menu. There are
options on four different tabbed pages: Editor, Editor Format, General, and Docking. To choose a set of
options to work with, click the appropriate tab. When you have made all of the required changes, click OK.
Tips for Configuring VBA Options
This section describes two specific items or settings that we recommend you take advantage of when
configuring your VBA options.
© 2022 General Electric Company. All rights reserved. 13

Require Variable Declaration
Although it is not required, you should use the Option Explicit statement in the Declarations section of a
module to require variable declaration. The Option Explicit statement forces you to use variables that
have already been declared as a certain type. Using the Option Explicit statement will help you avoid a
common programming error and will shorten your debugging time.
To configure VBA to automatically add the Option Explicit statement to a new project:
1. On the Tools menu, click Options.
2. Select the Editor tab.
3. Select the Require Variable Declaration check box.
4. Click OK to activate this new option for all modules.
From this point on, when you create a new module, the Option Explicit statement will be added auto-
matically. To learn more about setting VBA Editor options, click the Help button in the Options dialog box.
Clear the Compile On Demand Check Box
The Compile On Demand option, located on the General tab of the Options dialog box, determines
whether a project is fully compiled before it starts, or whether code is compiled as needed, allowing the
application to start sooner. We recommend that you clear this check box so you can more easily debug
errors in your code.
WARNING: Do not enable the Notify Before State Loss option, located on the General tab of the Options dialog box.
Doing so may cause an error or interruption in the iFIX WorkSpace.
Configuring VBA Project Options
In the previous section, you looked at the options available for configuring VBA. In this section, you will
look at options specific to your project. These options are set in the VBA Project—Project Properties dia-
log box. You can display this dialog by selecting VBA Project Properties from the Tools menu, or when you
right-click the project in the Project Explorer and select Project Properties. The options appear on two dif-
ferent pages. To choose a set of options, click the appropriate tab. When you have made all of the appro-
priate changes, click OK.
One option that you can enable for your project is to specify a Help file that you may have built for your
project and the context ID that enables it to run with your project. For more information on how to cre-
ate a picture-specific Help file, see the Creating Picture-Specific Help Files section of the Mastering iFIX
manual.
For more information on the other project properties that are available, refer to the sections Visual Basic
User Interface Help and Visual Basic How-To Topics in the Visual Basic for Applications Help file, or
search for the Index keyword "properties" and select "project".
Datatype Checking and the VBA Compiler
The VBA 6.0 compiler uses stricter type checking than the VBA 5.0 compiler. You must use the exact data-
types that are defined in the function or subroutine declaration. The way variables are converted when
being passed has changed. If executing code that meets the following conditions:
14 © 2022 General Electric Company. All rights reserved.

1. One subroutine or function has a variable which is declared as type Variant. If you do not explicitly
assign a type, it is Variant.
2. This variable is passed to a second subroutine or function.
3. The second subroutine or function is set up to accept a value from the first subroutine or function,
but of a type other than Variant (Integer, long, or object, for example).
You may get this error:
Compile Error; ByRef argument type mismatch
Error Example
The following example shows two subroutines: the first subroutine gets a rectangle's downstream anim-
ation object, which is connected to the rectangle's VerticalFill Percentage. The second subroutine gets
the animation object's class type. Since the second subroutine is defined as an object, and the first is
passed in as a Variant/ObjectArrayItem, the VBA 6.0 compiler displays the ByRef argument mismatch
error.
Private Sub CommandButton1_Click()
Dim sSource As String
Dim sFullQualSource As String
Dim vSourceObjs As Variant
Dim vTolerance As Variant
Dim vDeadBand As Variant
Dim vUpdateRate As Variant
Rect1.GetConnectionInformation 1, "VerticalFillPercentage", _
sSource, sFullQualSource, vSourceObjs, vTolerance, vDeadBand, _
vUpdateRate
CheckSourceObject vSourceObjs(0)
End Sub
'display the classname of the source object
Public Sub CheckSourceObject(objSrcObj As Object)
MsgBox objSrcObj.ClassName
End Sub
This scenario is acceptable in a VBA 5.0 environment, but a ByRef Argument mismatch error is generated
when running or compiling in VBA 6.0.
Workarounds
Either the calling routine or called routine has to change. The following scripts are workarounds that will
satisfy the compiler and provide the exact same functionality.
Workaround 1 – This script changes the called routine and is the easier correction. Referring to the pre-
vious example, if you change the CheckSourceObject routine to specify that the argument is passed in
by value, this will pass the compiler check. Since the parameter passed is not being modified, it is safe
to pass by value.
'display the classname of the source object
Public Sub CheckSourceObject(ByVal objSrcObj As Object)
MsgBox objSrcObj.ClassName
End Sub
© 2022 General Electric Company. All rights reserved. 15

Workaround 2 – This script changes the calling routine so that the coercion is performed before the call.
Private Sub CommandButton1_Click()
Dim sSource As String
Dim sFullQualSource As String
Dim vSourceObjs As Variant
Dim vTolerance As Variant
Dim vDeadBand As Variant
Dim vUpdateRate As Variant
Dim objSourceObject As Object
Rect1.GetConnectionInformation 1, "VerticalFillPercentage", _
sSource, sFullQualSource, vSourceObjs, vTolerance, vDeadBand, _
vUpdateRate
Set objSourceObject = vSourceObjs(0)
CheckSourceObject objSourceObject
Set objSourceObject = Nothing
End Sub
In this corrected call, there is an additional declaration for objSourceObject. The following line is also
added:
Set objSourceObject = vSourceObjs(0)
Set objSourceObject = Nothing
This line assigns a declared Object to the first element of the variant array. Next, we pass in the
objSourceObject, which is an Object instead of the Variant/ObjectArrayItem. This passes the compiler
check.
Optimizing Your VBA Project Development
VBA is a powerful scripting tool integral to iFIX. Many features of iFIX allow you to use VBA more effect-
ively. This chapter presents many options that help you build your projects more easily:
l Using iFIX Subroutines and Experts
l Keyboard Accelerators
l General iFIX Scripting Tips
l VBA Coding Help Features
Using iFIX Subroutines and Experts
iFIX includes several subroutines that can help simplify scripts that are intended to perform common
tasks, such as acknowledging alarms or replacing pictures. Since these subroutines are stored in the Fact-
oryGlobals project, they can be accessed directly through the Visual Basic Editor. For more information
on FactoryGlobals, see the Creating Global Scripts chapter of this manual.
In addition to providing the code necessary to perform the task at hand, subroutines offer several extras
that you would normally have to code yourself, including:
16 © 2022 General Electric Company. All rights reserved.

l Generic error handling.
l Posting of operator messages to the alarm system.
l Conformance to VBA naming conventions.
If you are using tag names that contain special characters, this is a perfect case for using the ReadValue
and WriteValue global subroutines to access your tags in VBA.
For example, suppose you have the following tag:
Fix32.SCADA.SORTER|SIZER|BLOCK10|PT.F_CV
In VBA, you can read this tag with the following syntax:
Private Sub Text1_Click()
Dim x As Variant
x = ReadValue("Fix32.SCADA.SORTER|SIZER|BLOCK10|PT.F_CV")
Text1.Caption = x
End Sub
Once the value is stored as a variant (x), you can use it in expressions.
Sending Operator Messages to Alarm Areas
In some cases, you may need to handle the sending of operator messages to alarm areas in your own
scripts. For example, a subroutine may not exist for the exact task that you want to perform. The fol-
lowing is an example of a specific case involving the WriteValue subroutine.
As stated in the previous section, subroutines handle the posting of operator messages to alarm areas
for you. Therefore, the following script:
Writevalue "1", "sample"
will send out this message:
Fix32.ThisNode.sample.f_cv was set to 1.
However, this script will not generate an operator message:
Fix32.ThisNode.sample.f_cv=1
A separate subroutine, SendOperatorMessage, is provided for that purpose. Simply add a call to the
SendOperatorMessage to generate the desired message.
WriteValue, ReadValue, SendOperatorMessage, and all other iFIX subroutines are described in more
detail in the Subroutine Summary section of the iFIX Automation Interfaces Electronic Book.
The code within the global subroutines offers a wealth of information to the developer who is learning
how to automate iFIX with VBA.
The global subroutines can be found in the FactoryGlobals VBA project. The FactoryGlobals file is write-
protected to maintain the integrity of these scripts. For your convenience, you can view the content of
the global subroutines module by clicking the following link: globalsubroutines.txt. This file contains all of
the code exported from within these subroutines in a text file.
iFIX also provides several Experts to help you perform the most common functionality. Just as sub-
routines offer help to the seasoned VBA programmer, Experts can help developers who want to achieve
© 2022 General Electric Company. All rights reserved. 17

similar results without having to write any VBA code at all. These Experts, which look like standard dialog
boxes, actually generate VBA code for you, based on how you configured the options within the Expert.
You can learn more about Experts in the Creating Pictures manual.
Using the Multiple Command Script Wizard
The Multiple Command Script Wizard is a graphical interface that uses command Experts to assemble
one or more VBA script commands into a sequence. The wizard can be used to generate a scripted com-
mand sequence that is triggered by a mouse click on an object, a Scheduler entry, or a key macro.
You can use the wizard to rearrange or delete discrete command script segments in the sequence. You
can also use the Visual Basic Editor to manually edit a script sequence created with the wizard, although
you cannot use the wizard to manipulate manually edited sections of VBA script.
The following is an example of a VBA script generated by the Multiple Command Script Wizard:
Private Sub Rect2_Click()
'***** Scripts Authoring Tool *****
'The Comments below have been added automatically.
'Any changes could cause adverse effects to the functionality
'of the Script Authoring Experts.
'WizardLast=Wizard2
'WizardEditing=Wizard0
'WizardName=MultipleCommands
'Wizard1=AcknowledgeAlarm
'Property1=Fix32.THISNODE.AI0.F_CV
'Property2=False
'PropertyDescription=AcknowledgeAnAlarm: Property1=Database Tag, Property2=Select Tag in Run mode
AcknowledgeAnAlarm "Fix32.THISNODE.AI0.F_CV"
'WizardEnd
'Wizard2=AlarmHorn
'Property1=optExpertTypeSilence
'PropertyDescription=AlarmHornSilence: Property1=Type
AlarmHornSilence
'WizardEnd
End Sub
NOTES:
l Although the Multiple Command Script Wizard's purpose is to fully automate the VBA command scripting pro-
cess, you can manually edit scripts generated by the wizard with the VB Editor. You may add or edit VBA scripts
anywhere before the Scripts Authoring Tool header line (***** Scripts Authoring Tool *****), or directly between
a "WizardEnd" and a “Wizard[x]=” statement. Do not edit any of the commented areas in the wizard-generated
script. If the Multiple Command Script Wizard detects an improperly customized VBA script, you may encounter
an error.
l The Multiple Command Script Wizard does not check the command sequence to make sure commands occur in
a logical order.
For more information about the Multiple Command Script Wizard, see the Creating Pictures ebook.
Keyboard Accelerators
18 © 2022 General Electric Company. All rights reserved.

You can use keyboard accelerators, key sequences that allow you to perform a function, to fire scripts
using the KeyUp or KeyDown events. However, the built-in WorkSpace keyboard accelerators take pre-
cedence over any KeyUp or KeyDown events in the picture or user area. Therefore, you should avoid
using keyboard accelerators that conflict with those that are reserved for internal use. The following
table lists all of the reserved accelerators in the run-time and configuration environments.
Keyboard Accel-
erator
Purpose
Works
in
Run-
time
Mode
Works in Con-
figure Mode
F1 Invokes Help. No Yes
F10, Ctrl + F10, Alt
(alone)
Activates the WorkSpace menu bar. Yes Yes
Ctrl + F4 Closes document. Yes Yes
Ctrl + W Toggles between configuration or run-time
environment.
Yes Yes
Ctrl + O Activates Open File dialog. Yes Yes
Ctrl + P Activates Print File dialog. Yes Yes
Ctrl + Esc Activates Windows Start menu (unless dis-
abled through security).
Yes Yes
Ctrl + Break, Ctrl +
Alt +Break
Breaks script execution. Yes No
Ctrl + Alt + Esc, Ctrl
+ Alt + Shift + Esc
WorkSpace window becomes inactive (unless
disable through security).
Yes Yes
Ctrl + Alt + Del Brings up Windows Login (or Security) dialog
box, unless disabled through security.
Yes Yes
All Alt key com-
binations
Activates the WorkSpace menu. Yes Yes
Shift + letter com-
binations
Alphanumeric data entry (could trigger when
entering an uppercase letter).
Yes Yes
Ctrl + A Selects all No Yes
Ctrl + C Copies No Yes
Ctrl + D Duplicates No Yes
Ctrl + F Finds and replaces No Yes
Ctrl + O Opens document Yes Yes
Ctrl + P Prints document Yes Yes
Ctrl + S Saves document No Yes
Ctrl + V Pastes from the clipboard No Yes
Ctrl + Z Undoes the last action No Yes
General iFIX Scripting Tips
This section lists some tips to keep in mind when writing VBA scripts within iFIX when:
l Creating an iFIX Shape with a VBA Script
l Using iFIX Collections
© 2022 General Electric Company. All rights reserved. 19

l Connecting Animation Objects to Data Sources
l Reusing Scripts
l Cutting and Pasting Code
l VBA References
l Tracking Errors in Subroutines
l Filtering out Global Pages
Creating an iFIX Shape with a VBA Script
Use the following script to create a shape through a VBA script:
Dim Pic As Object
Dim Shape As Object
Set Pic = Application.ActiveDocument.Page
Shape.HorizontalPosition = 10
Shape.VerticalPosition = 10
Shape.Width = 30
Shape.Height = 30
Shape.ForegroundColor = RGB( 255, 0, 0 )
The BuildObject method creates the object. Once the object is created, you can perform one of these
options:
l Set the object's properties through VBA code.
l Call the CreateWithMouse method (as in the above example) to change your mouse cursor into
the draw cursor and then configure the properties of the object using the traditional iFIX user
interface.
Using iFIX Collections
Use a BaseCount of 1 when using iFIX collections such as SelectedShapes, Procedures, Con-
tainedSelections, ContainedObjects, and Documents. See the VBA Help file for more information on col-
lections.
Connecting Animation Objects to Data Sources
To connect an animation object and a data source, use the SetSource method to set the Animation
object's source property:
AnimationObj.SetSource "FIX32.NODE.TAG.FIELD", False, _
ExpressionEditor1.RefreshRate, ExpressionEditor1.DeadBand, _
ExpressionEditor1.Tolerance
20 © 2022 General Electric Company. All rights reserved.

The SetSource method allows you to set the data source's refresh rate, deadband, and tolerance. The
second parameter lets you set an undefined object as the data source. (True indicates a UseAnyway con-
dition.)
Reusing Scripts
You can develop scripts directly in the main VBA project; however, this approach makes reusing the
scripts more difficult. Instead, you should store subroutines in a separate module and then call these sub-
routines from the main project when you want to reuse the scripts. This allows you to export and then
import the scripts into a new project with minimal modification, and also provides a more modular, com-
ponent-based design.
Cutting and Pasting Code
You can cut (or copy) and paste an object from one project to another by dragging and dropping that
object. Although this operation directly copies the VB code within the object to the new project, it does
not automatically copy the event entries (a Click event, for example). Make sure you copy the content of
the event entry into a subroutine (by selecting Edit Script from the object's pop-up menu) before pasting
the code into the new project.
VBA References
VBA allows you to add an object library or type library reference to your project, which makes another
application's objects available in your code. These additions to your VBA project are called references. You
can view, add, and delete references by selecting the References command from the Tools menu in the
Visual Basic Editor (VBE).
Whenever you add a control into a picture, the control's type library is referenced by the picture within
VBA. When you delete a control from a picture, the reference to the control is automatically removed to
increase performance. However, you should never manually remove the references to "Project_Fact-
oryGlobals" or "Project_User".
Whenever you reference objects, controls, or mechanisms in VBA, follow the guidelines in the following
sections. To learn more about references in VBA, refer to the VBA Help file.
Deleting Objects Referenced by Name in a Script
Any object that is referenced by name in a script cannot be deleted. For example, in the following sample
script the code in Rect2_Click will execute, but the pen will not be deleted:
Rect1_Click()
Pen1.Source = "Fix32.ThisNode.AI_30.F_CV"
End Sub
Rect2_Click()
Chart1.DeletePen 1
End Sub
If you wanted to access the object in this example without referencing it by name, you could use the fol-
lowing code in Rect1_Click ():
Rect1_Click()
© 2022 General Electric Company. All rights reserved. 21

Dim o as object
set o = Chart1.Pens.Item(1)
o.Source = "Fix32.ThisNode.AI_30.F_CV"
End Sub
Using Deleted Object Types in Scripts
When an object (2Dshape, FixDynamics object, ActiveX control) is deleted from a picture and no object of
that type are left in the picture, the reference to that object's type library in the VBA project is removed.
To continue to use this object's type in scripts, you must manually add a reference to the type library in
the VBE by selecting References from the Tools menu and selecting the type library.
Dragging and Dropping Dynamo Objects or Toolbar Buttons
You should be aware of the following behavior when dragging and dropping a Dynamo object into a pic-
ture, cutting and pasting a Dynamo object, or dragging and dropping a toolbar button from a category into
a toolbar:
l VBA copies all forms, scripts, events, and sub-forms associated with the toolbar button or
Dynamo object.
l VBA does not copy any VBA modules or class modules associated with the toolbar button or
Dynamo object. Code that you put in these modules will not run if you drag the Dynamo object or
the toolbar button to another picture or toolbar.
l VBA does not copy references to other objects such as controls or DLLs that you create for tool-
bar buttons or Dynamo objects. For example, if you include a third-party OCX as a control on a
form for a toolbar button, VBA does not copy the reference when you drag the toolbar button to a
toolbar. The script will not run until you open the Visual Basic Editor and create a reference to the
OCX for the toolbar project.
Tracking Errors in Subroutines
Every global subroutine includes an optional parameter called intErrorMode. The intErrorMode para-
meter allows users to trap errors and to send them to Alarm Services. There are three options for the
intErrorMode.
Enter this
option...
To...
0 Use the default error handling. Allows subroutines to provide the error messages. If
no entry is made for the intErrorMode parameter, the default is used.
1 Allow the user to handle the error messages. Errors in the subroutines are passed
back to the calling routine for handling.
2 Write errors to all Alarm Services. No error messages display. Instead, the errors
are written to all iFIX Alarm Services, including the Alarm History window.
For example, if you use the intErrorMode parameter with the OpenDigitalPoint subroutine, the command
would look like:
OpenDigitalPoint [DigitalPoint], [intErrorMode]
22 © 2022 General Electric Company. All rights reserved.

Examples
For the OpenPicture subroutine, you get the standard error message if you enter 0 for the intErrorMode,
as shown in the following example:
OpenPicture "BadPic", , , , 0
When you use 0 for the intErrorMode, if you try to open a picture that does not exist, a message box
appears whose title is the name of the picture that made the erroneous call and whose contents are the
error number and error description.
If you enter a 1 for intErrorMode, the error is raised for you to handle:
OpenPicture "BadPic", , , , 1
Your error handling code would have to look something like this:
On Error Goto Errorhandler
OpenPicture "BadPic", , , , 1
End Sub
Errorhandler:
Msgbox "my error message" + Chr(13) + Cstr(Err.Number) + Chr(13) + Err.Description, , Err.Source
If you enter a 2 for intErrorMode, the error is sent to all Alarm Services, including the Alarm History win-
dow using the SendOperatorMessage method:
OpenPicture "BadPic", , , , 2
When you use 2 for the intErrorMode, you provide for silent error tracking.
Filtering out Global Pages
Plug and Solve® and expert globals can affect existing scripts that loop through the documents collection.
If you have scripts that loop through the documents collection, and you want to filter out all global pages
to look at your documents only, look at the Document.Type property using the following sample code:
If docobj.Type = "FixGlobalsServer.FixGlobalsServer.1" then
'this is a global page
VBA Coding Help Features
The VBA editor includes a number of extremely useful features to help you write code accurately and
quickly. These features try to anticipate what you are writing in the code, and they prompt you with pos-
sible data types, built-in procedure templates, member functions, and more, as you type.
Visual Basic makes writing code easy, with features that can automatically fill in statements, properties,
and arguments for you. As you enter code, the editor displays lists of appropriate choices, statement or
function prototypes, or values. Options for enabling or disabling these and other code settings are avail-
able on the Editor tab of the Options dialog, which you can access by selecting Options from the Tools
menu.
Refer to the following sections for more information on these VBA coding help features:
© 2022 General Electric Company. All rights reserved. 23

l Auto List Members
l Auto Quick Info
l Context Sensitive Help
Auto List Members
When you enter the name of a control in your code, the Auto List Members feature presents a drop-down
list of properties available for that control. Type in the first few letters of the property name and the
name will be selected from the list; the <TAB> key will complete the typing for you. This option is also
helpful when you aren't sure which properties are available for a given control.
Auto List Members Feature
Auto Quick Info
The Auto Quick Info feature displays the syntax for statements and functions. When you enter the name
of a valid Visual Basic statement or function the syntax is shown immediately below the current line, with
the first argument in bold. After you enter the first argument value, the second argument appears in bold.
24 © 2022 General Electric Company. All rights reserved.

Auto Quick Info Feature
Context Sensitive Help
Many parts of Visual Basic are context sensitive, which means that you can get Help on these parts dir-
ectly without having to go through the Help menu. For example, to get Help on any iFIX object, method,
property, or event, or any VBA keyword, click that word and press F1.
Working with iFIX Objects
The integration of VBA into iFIX provides you with additional control and flexibility to develop, manipulate,
and animate objects and graphics in the iFIX WorkSpace. This is important since objects make up a large
part of your application.
This chapter gives you some specific examples on how you can use VBA scripting to enhance the per-
formance of iFIX objects in your application. It also gives you helpful tips for working with objects and
their characteristics.
Refer to the following sections for more information on working with iFIX objects:
l VBA Object Count Limit
l Object Availability in the VB Editor
l Understanding the iFIX Object Hierarchy
l Connecting Objects to Data Sources to Create Animations
l Making Connections
l Animation Properties and Methods
l Connection Example: Animating the Rotation of a Rectangle
l Rotating a Group
VBA Object Count Limit
© 2022 General Electric Company. All rights reserved. 25

Microsoft currently limits the amount of VBA controls to 1207 per project. An iFIX picture is considered a
VBA project. The current version of iFIX provides a VBA Object Count warning that notifies you when you
are approaching the maximum level.
After creating your 1147th control, iFIX provides a dialog box notifying you that you are approaching the
maximum allowed and should begin to remove unnecessary controls. If you continue to create scripts
without removing them, you will continue to receive the warning. If you try to create your 1208th control,
iFIX notifies you that the script cannot be created. To continue adding scripts, you must remove some
VBA controls.
Object Availability in the VB Editor
The following steps describe how to make a single object available in the VB Editor.
To make a single object available in the VB Editor:
1. Select the object in the picture.
2. Select Edit Script from the right-click menu.
To make a group of objects available in the VB Editor:
1. Select the group of objects in the picture.
2. Select Enable Scripts from the right-click menu.
NOTE: When you select Enable Scripts, iFIX adds the objects to the VBA project, but does not start the VB Editor.
Objects that are visible, such as rectangles and ovals, are not automatically available in the Editor.
For optimization purposes, if you choose not to tie a script to the object, it does not remain available
after you close the picture. You will have to select it again in the picture and add the objects to the VBE if
you want to use them in a script.
You can, however, forward-reference objects that are not available in the VBE. For example, you can
write a script tied to Rect1 that references Oval1, as shown in the following example:
Oval1.Visible = False
The above code is acceptable even when Oval1 is not available to the VBE. The only difference in the VBE
between objects that are available and objects that are not available is that the list of properties and
methods available to the object appear when you type the period (.) after available objects. When for-
ward-referencing objects, the objects will be added to the project when the picture is closed or saved.
The following objects are always available in the VBE:
l Timer objects
l Event objects
l Buttons
l Dynamos
l ActiveX controls
l Variables
l Any objects that have been added to the Global page
26 © 2022 General Electric Company. All rights reserved.

Understanding the iFIX Object Hierarchy
There is a general hierarchy of objects in iFIX. The individual objects, as well as all of their related prop-
erties, methods, and events, are described in much greater detail in the Object Summary Help Topic in
the iFIX Automation Interfaces Electronic Book.
The top layers in the object hierarchy are the Application and the System objects. The Application object
represents the iFIX WorkSpace application. The System object is on the same level as the Application
object and includes system information, date, time, and paths.
The next level below the Application object is the documents object which is a collection of active doc-
uments within the WorkSpace such as pictures and schedules.
The third level in the object hierarchy is the Page Object, which may be a picture, dynamo set, or sched-
uler object. If the page object is a picture, it can contain lines, rectangles, ovals, or other graphic objects. If
the page object is a Scheduler object, it might contain timer or event objects.
Animation objects are unique to iFIX pictures and do not apply to other document objects.
VBA Object Browser
In addition to the iFIX Automation Interfaces Electronic Book, another great tool for visualizing the iFIX
object hierarchy is the VBA Object Browser. The Object Browser displays the classes, properties, meth-
ods, events, and constants available from object libraries and the procedures in your project. You can use
it to find and use objects you create, as well as all objects within iFIX. To launch the Object Browser in the
VBE, press F2 or select the Object Browser command from the View menu.
© 2022 General Electric Company. All rights reserved. 27

Object Browser
Press F1 to display the associated Help topic in the iFIX Automation Interfaces Electronic Book while posi-
tioned on any iFIX object, property, method, or event.
Connecting Objects to Data Sources to Create Animations
In order to animate the property of an object, you must connect that property to the data source that is
providing the data. For example, if you want a tank to fill based on the output of a PLC connected to the
tank, you would connect the vertical fill property of the tank's cylinder with the database point that con-
tains the real-time value of the correct PLC address.
The transformation of data between objects occurs through animationobjects. There are three types of
animation objects:
Linear – Converts data from one range of values to another, thereby performing signal conditioning. For
example, if a data source has EGU limits from 0 to 65535, and a tank's fill percentage has a range of 0
to 100, the Linear object transforms the data source range to the tank's fill percentage range. Refer
to the Understanding Signal Conditioning section of the Building a SCADA System manual for more
detail on how the Linear object works.
28 © 2022 General Electric Company. All rights reserved.

Lookup – Uses a table structure to map either a range of values or exact values from a data source to a
single value of the connected object's property. For example, if a data source has multiple alarm val-
ues, the Lookup object maps each alarm value to a rectangle's color. You can also set up a Lookup
object to divide a range of values into levels or rows, and map those levels to a rectangle's color. The
Lookup object also has a Toggle property that can be used for blinking colors.
Format – Converts the source data into a string. When you set up a data source for a data link, for
example, you actually create a Format object that transforms the data source into a string.
You will see examples of these objects in the scripting examples throughout this section. For more inform-
ation on animation objects, including object-to-object connections, refer to the Creating Pictures manual.
For a detailed explanation of all the animation properties and methods for each of the animation object
types, refer to the Animation Properties and Methods section.
Visual Basic has many methods you can use to make connections to data sources. These various meth-
ods are detailed in the following sections.
Making Connections
A very important element of connecting objects to data sources is the way in which they are connected.
You can connect to the data source:
l From an object's property directly to the data source.
l From an object's property to an animation object and then from the animation object to the data
source.
Refer to the following sections for more information about making connections:
l Directly Connecting to a Data Source
l Making Connections through Animations
l Connecting or Disconnecting an Object's Property to a Data Source
l Retrieving Connection Information from a Property's Data Source
l Determining if an Object's Property is Being Used as a Data Source
l Retrieving General Connection Information
Directly Connecting to a Data Source
There are times when you may want to establish a direct connection to a data source, such as when you
want to connect iFIX objects to some third-party controls. For more information, see the Creating Pic-
tures manual.
The following figure illustrates the concept of a direct connection.
© 2022 General Electric Company. All rights reserved. 29

Direct Connection Example
You can form a direct connection either by using the Animations dialog box or by writing a script. Both
methods are described below.
NOTE: You cannot perform a Find and Replace on an object when that object has a direct connection to another object.
To perform a find on an object in an object to object connection, use the One Tag search type in the Cross Reference
Tool. For more information, refer to the Searching for One Tag section of the Mastering iFIX manual.
To make a direct connection using the Animations dialog box:
1. Open the object's Animation dialog box.
2. Click the Size tab, and then click the height check box.
3. Enter a data source to animate the object's property.
4. In the Data Conversion area, select Object.
Making a Direct Connection by Writing a Script
To make a direct connection using a script, you need to call the Connect method. The following procedure
shows you how to make a direct animation from an object to a data source on the Click event of a toolbar
button in the configuration environment.
NOTE: For OPC data sources you need to remove any character, such as single quotes, that is not part of the valid
server address syntax. For example: "ServerName.'Device:MyAddress'" should change to "Server-
Name.Device:MyAddress" after you remove the single quotes.
To make a direction connection using a script:
1. Insert a rectangle into a picture and name it MyRect. Right-click the rectangle and select Edit
Script to make MyRect available to the Visual Basic Editor.
2. Create a new toolbar and add a button named DirectConnect. See the Understanding Toolbars
section of the Understanding iFIX manual for more information on creating toolbars and adding
toolbar buttons.
3. Add the following code to the toolbar button's Click event:
Private Sub DirectConnect_Click( )
30 © 2022 General Electric Company. All rights reserved.
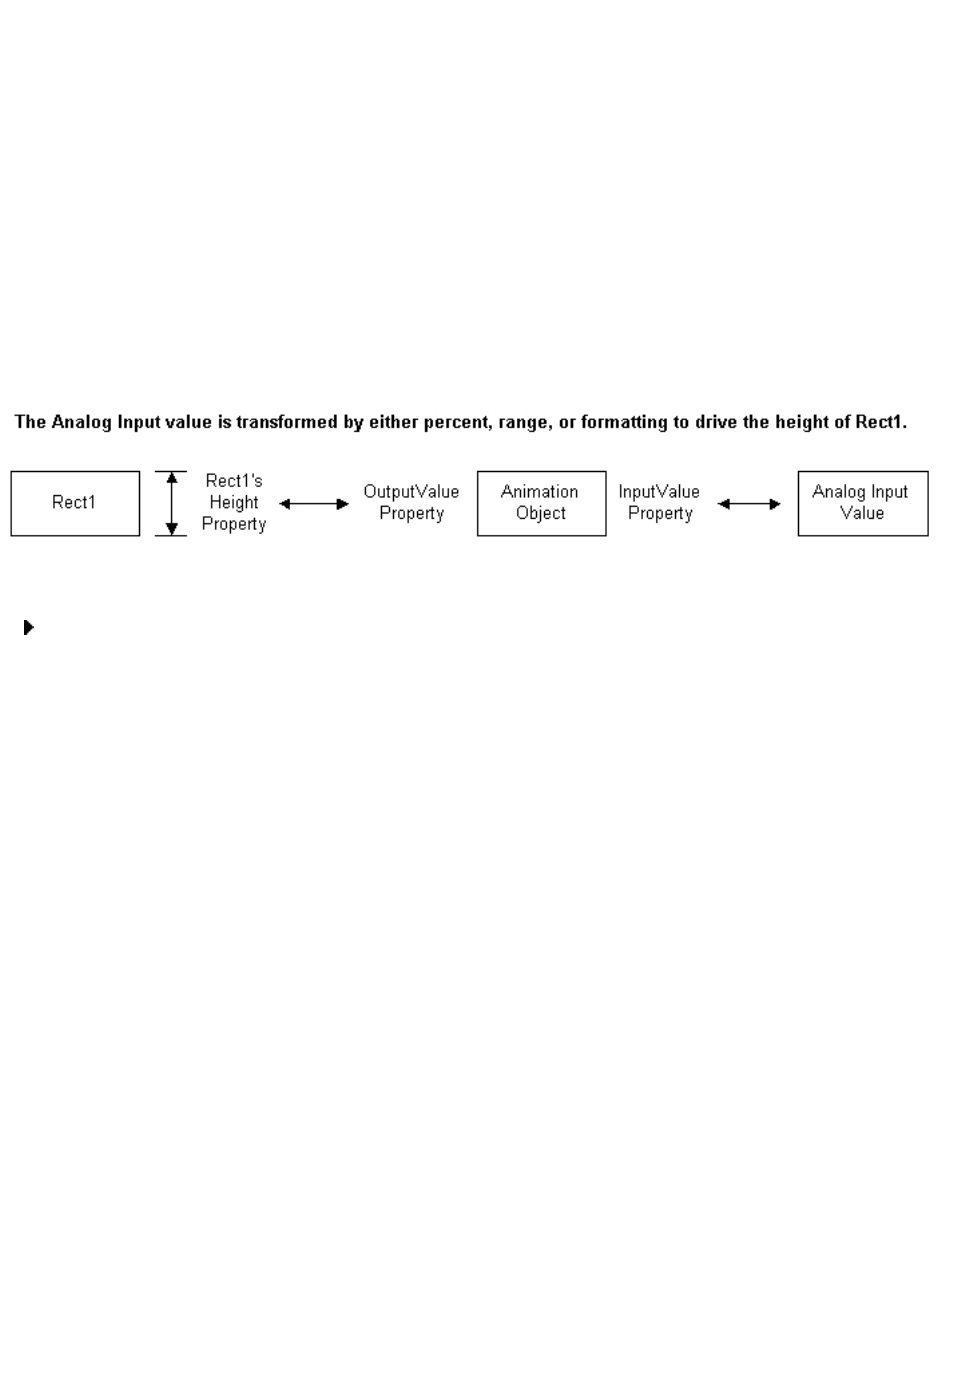
Dim lStatus as Long
MyRect.Connect("Horizontal Position", _
"FIX32.NODE.AI1.F_CV", lStatus)
End Sub
4. Close the Visual Basic Editor.
5. Click the DirectConnect button and switch to the run-time environment. The horizontal position of
MyRect is now driven by the tag FIX32.NODE.AI1.F_CV.
Making Connections through Animations
Usually, you will make connections using Animation objects. Animation objects perform the data con-
version between data source and connected object. The figure below illustrates the concept of Animation
connections.
Animation Connections Example
To make a linear animation connection using the Animations dialog box:
1. Double-click a rectangle. The Animations dialog box appears.
2. Select the Size tab and click the Height button. The Animations dialog box expands.
3. Enter a data source to animate the rectangle's height.
4. From the Data Conversion list box, select Range. This will allow the rectangle's height to change
within a specific range based on the value of the data source.
5. Click OK. Note that the rectangle now has a linear animation object associated with it that trans-
forms the data source value to scale the rectangle's height.
Making an Animation Connection through a Script
The following script uses the Linear Animation object to form the connection from a rectangle's Vertical
Position property to a data source. This script is entered in the Click event of a toolbar named btnDir-
ectConn. In this example, Animations is the picture name. For more information on the methods and
properties used in the script, namely SetSource, Connect, DoesPropertyHaveTargets, and GetProp-
ertyTargets, see the iFIX Automation Interfaces Electronic Book.
Example: Building an Animation Connection through a Script
Private Sub btnDirectConn_Click()
Dim iRect As Object
Dim iOval As Object
Dim LinearObject As Object
Dim strFullname As String
Dim blnHasTargets As Boolean
Dim lngStatus As Long
Dim lngNumTargets As Long
Dim lngIndex As Long
© 2022 General Electric Company. All rights reserved. 31

Dim strPropertyName As String
Dim strSource As String
Dim vtTargets()
'Create a rectangle and an oval
Set iRect = Animations.BuildObject("rect")
Set iOval = Animations.BuildObject("oval")
'Set some positioning and size attributes on
'the rectangle
iRect.HorizontalPosition = 80
iRect.VerticalPosition = 45
iRect.Height = 5
iRect.Width = 10
iOval.HorizontalPosition = 60
iOval.VerticalPosition = 35
iOval.Height = 5
iOval.Width = 10
iRect.Commit
iOval.Commit
'Create a Linear animation object for the rectangle
Set LinearObject = iRect.BuildObject("linear")
'Set the source of the Linear animation object
LinearObject.SetSource "AI1.F_CV", True
'Specify the Linear animation object's minimum and
'maximum Input and Output values
LinearObject.LoInValue = 0
LinearObject.LoOutValue = 0
LinearObject.HiInValue = 100
LinearObject.HiOutValue = 50
'Set UseDelta to True to ensure that the base position
'of the object will be added to the output value when
'the Linear object evaluates. If UseDelta is set to
'False, the output value would be absolute when the
'Linear object evaluates
LinearObject.UseDelta = True
'Connect the rectangle's VerticalPosition property to
'the output value of the Linear animation object
strFullname = LinearObject.FullyQualifiedName & _
".OutputValue"
iRect.Connect "VerticalPosition", strFullname, lngStatus
'Create a string containing the fully qualified data
'source for the rectangle's VerticalPosition property
strSource = "Animations." + iRect.Name + _
".VerticalPosition"
'Connect the oval's HorizontalFillPercentage property
'to the rectangle's VerticalPosition property by using
'the string created above as a data source
iOval.Connect "HorizontalFillPercentage", strSource, _
lngStatus
'Once connected, you can verify that the Rectangle's
'Vertical Position is being used as a data source for the
'Oval's Horizontal Fill Percentage using the Target methods.
'Now that there is a direct connection to the rectangle's
'VerticalPosition property, retrieve information about
'the objects that are using the VerticalPosition property
32 © 2022 General Electric Company. All rights reserved.

'as a data source. This call will return if the property
'is being used as a data source, how many objects are
'using it as a data source, the status of the objects,
'and the index of the object be passed to the
'GetPropertyTargets method.
'NOTE: If you only want to determine the number of
'objects using the property as a data source, you can use
'the NumberOfTargets property instead.
iRect.DoesPropertyHaveTargets "VerticalPosition", _
blnHasTargets, lngNumTargets, lngStatus, lngIndex
'Use the lngIndex value from the DoesPropertyHaveTargets
'call to determine which property of the rectangle has
'targets and to obtain a list of object names that have
'built connections to this property.
iRect.GetPropertyTargets lngIndex, strPropertyName, _
vtTargets
End Sub
Connecting or Disconnecting an Object's Property to a Data Source
The methods in this section connect or disconnect an object's property to a data source.
NOTE: Entries within brackets ([ ]) are optional.
The Connect method shown below connects an object's property to a data source:
Object.Connect(PropertyName As String, Source As String, _
(Returned) Status As Long, [Tolerance], [Flags], _
[DeadBand], [UpdateRate])
This call connects the property (defined in the PropertyName parameter), to a source (defined in the
source parameter.) For example, if you want to connect a rectangle's height property directly to tag AI,
you would enter the following:
Dim 1status as Long
Rect1.Connect("Height", "FIX32.NODE.AI.F_CV", 1status)
The Disconnect method disconnects the object's property from a data source:
Sub Disconnect(PropertyName As String)
The SetSource method sets the connection properties for an animation object. Use the SetSource
method instead of directly setting the animation object's source property if additional properties have to
be specified for the connection. You do not need to specify the data source.
Object.SetSource bstrExpression, [bUseAnyway], _
[vaUpdateRate], [vaDeadband], [vaTolerance], _
[vaConnectionFlags]
NOTE: If you are performing run-time source substitutions, and you want to preserve the tolerance, deadband, and the
update rate for the tag, use the SetSource command instead of the Source property. If you use the Source property, the
tolerance, deadband, and update rate settings are reinitialized to 0. The SetSource command provides the appropriate
parameters to effectively set these attributes. You can only use the SetSource method for animation objects.
Retrieving Connection Information from a Property's Data Source
© 2022 General Electric Company. All rights reserved. 33

The methods described in this section let you retrieve and manipulate a data source that is connected to
a specified object's property. For more information on these methods, refer to the Visual Basic for Applic-
ations Help file.
Is the Object Connected to a Data Source?
The IsConnected method determines whether an object's property is connected to a data source:
Object.IsConnected(PropertyName As String, (Returned) _
HasConnection As Boolean (Returned) Index As Long, _
(Returned) Status As Long)
This method is typically used in conjunction with the GetConnectionInformation method, which is
described later in this section. For more information on the parameters for the IsConnected method, see
the IsConnected method topic of the iFIX Automation Interfaces Electronic Book.
Is the Connection Valid?
The ParseConnectionSource method parses the Data Source name to determine if a connection to an
object's property exists. If a connection does exist, it returns the object that is connected to the property,
as well as its fully qualified name. It accepts complex expressions and returns individual data sources for
a complex expression:
Object.ParseConnectionSource(PropertyName As String, _
Source As String, (Returned) Status As Long, _
Returned Array) ValidObjects, (Returned Array) _
UndefinedObjects, (Returned) FullyQualifiedSource As String)
Example: Script Using ParseConnectionSource Method
The following example parses the AI1.F_CV source to the VerticalFillPercentage property of Oval Oval1 to
determine the validity of the data source.
Dim iStatus As Long
Dim validObjs As Variant
Dim UndObjs As Variant
Dim FQSource As String
Oval1.ParseConnectionSource "VerticalFillPercentage", "AI1.F_CV", iStatus, validObjs, UndObjs, FQSource
How Many Properties Are Connected to the Data Source?
The ConnectedPropertyCount method returns the number of the object's properties that are con-
nected to a data source.
Object.ConnectedPropertyCount (1connectedPropertyCount _
As Long)
The following example lets you find out how many properties in the object Rect1 are connected to data
sources, and then converts that number into an integer.
Dim 1ConnectedCount as Long
Dim iNumProperties as Integer
Rect1.ConnectedPropertyCount 1ConnectedCount
iNumProperties = Cint (1ConnectedCount)
In the above example, the number 4 might be returned, which indicates that four of Rect1's properties
are connected to data sources. You could use this number to retrieve the connections with the GetCon-
nectionInformation method described in the Retrieving Other Connection Information section.
34 © 2022 General Electric Company. All rights reserved.

What Other Connection Information Is Available?
The GetConnectionInformation method retrieves information from an object, such as the property
that object is connected to, the full name of the data source, and all the source objects:
Object.GetConnectionInformation(Index As Long, (Returned) _
PropertyName as Sting (Returned) Source As String, _
(Returned) FullyQualifiedSource As String, (Returned) _
SourceObjects, [Tolerance], [Deadband], [UpdateRate])
This method is typically used in conjunction with the IsConnected method described earlier. In this
example, notice the addition of the index parameter. You can get the index number with the IsConnected
method or the ConnectedPropertyCount method. See the iFIX Automation Interfaces Electronic Book
for more information on these methods.
Example: Script Using GetConnectionInformation Method with IsConnected Method
Dim blnHasConnection As Boolean
Dim lngStatus As Long
Dim lngIndex As Long
Dim strExpression As String
Dim strFullyQualifiedExpression As String
Dim vtSourceObjects
Dim Tolerance
Dim DeadBand
Dim UpdateRate
HorizontalObj.IsConnected "InputValue", blnHasConnection, lngIndex, lngStatus
If blnHasConnection Then
HorizontalObj.GetConnectionInformation lngIndex, "InputValue", strExpression, strFullyQualifiedExpression, vtSourceObjects, Tolerance, DeadBand, UpdateRate
End If
Determining if an Object's Property is Being Used as a Data Source
The NumberOfTargets method returns the number of the object's properties that contain targets, that
is, objects that use that object's property as their data source:
Object.NumberOfTargets(NumberOfTargets As Long)
The DoesPropertyHaveTargets method determines if the object's property (as defined by the Prop-
ertyName parameter) is being used as a data source and what object is using it:
Object.DoesPropertyHaveTargets(PropertyName As String, _
(Returned) HasTrargets As Boolean, (Returned) _
NumberOfTargets As Long, (Returned) Status As Long, _
Index As Long)
The GetPropertyTargets method retrieves the target object(s) and the property that the target(s) is
connected to for the object's specified index number:
Object.GetPropertyTargets(Index As Long, (Returned) _
PropertyName As String, (Returned) Targets)
Retrieving General Connection Information
© 2022 General Electric Company. All rights reserved. 35

This section describes additional connection methods for retrieving connection information and making
connections. These methods include CanConstruct, Construct, GetPropertyAttributes, and Val-
idateSource.
GetPropertyAttributes Method
The GetPropertyAttributes method retrieves a list of property attributes for the specified Data Item
object. For a tag reference, these are properties such as new alarm status and property range inform-
ation (EGU limits, list of strings alarm strings (HIHI, LOLO, etc.)). Each property queried may have a dif-
ferent set of attributes. For more information on this method, refer to the iFIX Automation Interfaces
Electronic Book.
Object.GetPropertyAttributes(FullyQualifiedName As String, _
Attribute As Long, (Returned) Results, (Returned) _
AttributeNames, (Returned) Status As Long)
Example: Script Using the GetPropertyAttributes Method
The following example fetches the attribute information for the HighEGU attribute of the AI1 block on
node NODE1.
Dim vtResults
Dim vtAttributes
Dim lStatus As Long
Dim strLoEGU as String
Dim LoEGUval
Oval1.GetPropertyAttributes "FIX32.NODE1.AI1.F_CV", 3, vtResults, vtAttributes, lStatus
strLoEGU = vtAttributes(0)
LoEGUval = vtResults(0)
In the above example, the variable strLoEGU will now hold the string "FIX32.NODE1.AI1.A_ELO" and the
variable LoEGUval will hold tag AI1's low EGU value.
CanConstruct Method
The CanConstruct method checks a data source reference for valid syntax. The CanConstruct method
must have the default data system defined as part of the object name. For example, the object name AI
would not work correctly.
Object.CanConstruct(ObjectName As String, (Returned)_
CanConstruct As Boolean)
Example: Script Using CanConstruct Method
The following example determines whether the datasource AI1 for NODE1 has valid syntax for the Pic-
ture TestPicture.
Dim bCanConstruct As Boolean
TestPicture.CanConstruct "FIX32.NODE1.AI1", bCanConstruct
Construct Method
The Construct method launches the Quick Add user interface and prompts you for information needed
to create the tag. If Status returns 0, then the tag has been created:
Object.Construct(ObjectName As String, (Returned) Status _
As Long)
36 © 2022 General Electric Company. All rights reserved.

Example: Script Using Construct Method
The following example displays the QuickAdd user interface that prompts the user for the information
needed to create the tag NewAI1 for the Oval object Oval1 on node NODE1.
Dim lStatus As Long
Oval1.Construct "FIX32.NODE1.NEWAI", lStatus
ValidateSource Method
The ValidateSource method determines if a data source exists:
Object.ValidateSource(Object As String, (Returned) Status _
As Long, (Returned) Object As Object, (Returned) _
PropertyName As String)
Example: Script Using ValidateSource Method
The following example validates the AI1 source for the Oval Oval1.
Dim iStatus As Long
Dim iObj As Object
Dim sPropName As String
Oval2.ValidateSource "AI1", iStatus, iObj, sPropName
Animation Properties and Methods
The following sections detail the animation properties and methods you can use to connect an object's
properties to data sources and create animations:
l General Animation Object Properties and Methods
l Linear Animation Object Properties
l Lookup Animation Object Properties and Methods
l Connection Examples: Using the Lookup Object
l Format Animation Object Properties
General Animation Object Properties and Methods
The following table provides the syntax and description for general animation object properties and meth-
ods.
Syntax Description
Object.ConnectionFailed Determines if the connection attempt was successful.
Object.Failed Source Returns the source of the connection attempt, if the SetSource
method failed.
Object.InputValue Contains raw data from the data source which will be transformed
General Animation Object Properties and Methods
© 2022 General Electric Company. All rights reserved. 37

by the animation object.
Object.OutputValue Contains the data which resulted from the transformation of the
InputValue data.
Object.Source Contains the source string for an animation (the input data source.)
This property internally builds a connection between the input value
property of the animation and the data source specified by this prop-
erty. If you have used the correct syntax for the source, setting the
Source property will work correctly. Using the SetSource method is
the more effective way to set an animation object's source.
Object.SourceValidated Specifies whether the animation object's source property has a valid
data source connection.
Object.SetSource
(bstrExpression As
String, [bUseAnyway As
_ Boolean], [vaUp-
dateRate], _ [vaDead-
band], _ [vaTolerance], _
[vaConnectionFlags]
Sets the connection properties for an animation object. This method
is used instead of directly setting the animation object's source prop-
erty if additional properties have to be specified for the connection.
You do not need to specify the data source.
NOTE: The SetSource method can only be used for animation
objects.
Linear Animation Object Properties
The following table provides the syntax and description of linear animation object properties.
Syntax Description
Object.HiInValue Specifies the upper limit on the input value range.
Object.HiOutValue Specifies the upper limit on the output value range.
Object.LoInValue Specifies the lower limit on the input value range.
Object.LoOutValue Specifies the lower limit on the output value range.
Object.UseDelta Specifies whether to use the absolute or relative value to set the output
value range. The object will always start at the low output value.
Linear Animation Object Properties
Lookup Animation Object Properties and Methods
The following table provides the syntax and description of lookup animation object properties and meth-
ods.
Syntax Description
Object.ColorTable Specifies whether the Lookup object's output values are colors.
Object.DefaultOutputValue Specifies the value written to the object's property if the input
value is not found within the Lookup object table.
Object.ExactMatch Specifies if the Lookup object is a range or an exact match table.
For example, if you are using a linear animation to animate the
position of an object on your screen:
Lookup Animation Object Properties and Methods
38 © 2022 General Electric Company. All rights reserved.

l If you set use delta to True, the object's position will be set
to its base position on the screen and the transformed out-
put value.
l If you set use delta to False, the object's position will
always fail within the set output range.
Object.ToggleSource Contains the toggle source string name. This applies to all levels of
a lookup object table. When the toggle source's value is true, the
Lookup object levels toggle between the output value and the
global toggle value. You set the global toggle value with the Global
Toggle property (for example, setting the toggle source as blink on
new alarm).
Object.GlobalOutputToggle Specifies if the table has a global toggle source.
Object.GlobalToggle Specifies the value that will be toggled to if the value of the global
toggle source is true.
Object.SharedTableName Specifies the name of a shared lookup table in a picture or shared
threshold table in user globals. If this value is set, the object will
use the table that can be shared by other objects, rather than its
own unique table.
Object.ToggleRate Specifies the rate at which the output of the Lookup object
toggles between output1 and output2. For example, in a color
table, this property is the blinking rate.
Object.Tolerance Specifies the tolerance for exact match lookup tables.
Object.AddLevel (pInput1,
pOutput1, [pInput2, pOut-
put2])
Adds a new level to the Lookup object table.
Object.GetLevel (iIndex, pIn-
put1, pOutput1, [pInput2,
pOutput2])
Gets the level properties for the specified level index of the
Lookup object. Indexing begins at 1.
Object.RemoveAllLevels Removes all levels from the Lookup table.
Object.Removelevel Removes a level of a lookup table. Indexing begins at 1.
Connection Examples: Using the Lookup Object
This example shows you how to check to see if an object is connected to a data source, then lets you
build a Lookup object that overwrites an existing color table.
Example: Using Range Comparison
In this example, the picture contains a rectangle named Rect1.
Private Sub BtnLookup_Click()
Dim blnIsConnected As Boolean
Dim lngIndex As Long
Dim lngStatus As Long
Dim strPropName As String
Dim strSource As String
Dim strFQSource As String
Dim vtSourceObjects
Dim LookupObject As Object
Dim strFullname As String
Dim blnIsEmpty As Boolean
© 2022 General Electric Company. All rights reserved. 39

'Check to see if the rectangle's ForegroundColor
'property is already connected to a data source
Rect1.IsConnected "ForegroundColor", blnIsConnected, _
lngIndex, lngStatus
'If it is, use the Disconnect method to remove the
'existing property connection
If blnIsConnected Then
Rect1.Disconnect "ForegroundColor"
End If
'If a ForegroundColor animation does not exist, build an
'empty lookup animation object off of the rectangle
If (TypeName(LookupObject) = "Nothing") Then
Set LookupObject = Rect1.BuildObject("lookup")
End If
'Add levels to your lookup animation object with a range
'comparison using the AddLevel method. The following
'table will have inputs between 10 and 20 displaying the
'color with the RGB value of 255 (red), 21 through 40
'would display RGB 65535 and so on
LookupObject.AddLevel 10, 255, 20
LookupObject.AddLevel 20, 65535, 40
LookupObject.AddLevel 40, 65280, 60
LookupObject.AddLevel 60, 16711680, 80
LookupObject.AddLevel 80, 8388736, 100
'Use the SetSource method to connect the lookup animation
'object to the data source object. This connection
'overwrites any existing color table set up
LookupObject.SetSource "AI1.F_CV", True
'We have connected the InputValue property of the lookup
'animation object to the data source. Now, we will
'connect the animation object's OutputValue property to
'the shape. Its output is connected to the object it is
'animating.
strFullname = LookupObject.FullyQualifiedName & _
".OutputValue"
Rect1.Connect "ForegroundColor", strFullname, lngStatus
End Sub
Similarly, you can create an Exact Match color table using the LookupExact method and the ExactMatch
property of an object. The following example shows you how.
Notice that, again, the example first checks that the object is connected in the first place, then proceeds
to manipulate the object's property based on that connection.
Example: Using Exact Match Lookup
In this example, the picture contains a rectangle named Rect2.
Private Sub BtnLookupExact_Click()
Dim blnIsConnected As Boolean
Dim lngIndex As Long
Dim lngStatus As Long
Dim strPropName As String
Dim strSource As String
Dim strFQSource As String
Dim vtSourceObjects
Dim LookupObject As Object
Dim strFullname As String
Dim blnIsEmpty As Boolean
40 © 2022 General Electric Company. All rights reserved.

'Check to see if the rectangle's ForegroundColor property
'is already connected to a data source
Rect2.IsConnected "ForegroundColor", blnIsConnected, _
lngIndex, lngStatus
'If it is, use the Disconnect method to remove the
'property connection
If blnIsConnected Then
Rect2.Disconnect "ForegroundColor"
End If
'If a ForegroundColor animation does not exist, build an
'empty lookup animation object off of the rectangle
If (TypeName(LookupObject) = "Nothing") Then
Set LookupObject = Rect2.BuildObject("lookup")
End If
'To create an exact match color table, the user can do
'two things: (1) Call AddLevel with the same parameters
'as a range comparison and set the ExactMatch property to
'true OR (2) Call AddLevel without the second input
'parameter. The following table will have inputs 10
'displaying the color with an RGB value of 255
'(red), 21 would display RGB 65535 and so on.
LookupObject.AddLevel 10, 255, 20
LookupObject.AddLevel 21, 65535, 40
LookupObject.AddLevel 41, 65280, 60
LookupObject.AddLevel 61, 16711680, 80
LookupObject.AddLevel 81, 8388736, 100
LookupObject.ExactMatch = True
'Use the SetSource method to connect the lookup animation
'object to the data source object. This connection
'overwrites any existing ColorTable set up.
LookupObject.SetSource "AI1.F_CV", True
'We have connected the InputValue property of the lookup
'animation object to the data source. Now, we will
'connect the animation object's OutputValue property to
'the shape. Its output is connected to the object it is
'animating.
strFullname = LookupObject.FullyQualifiedName & _
".OutputValue"
Rect2.Connect "ForegroundColor", strFullname, lngStatus
End Sub
For more information on data sources, refer to the Creating Pictures manual. For information on chan-
ging data sources at run-time, refer to the Changing Data Sources section.
Format Animation Object Properties
This table provides the syntax and description of Format Animation Object properties.
Syntax Description
Object.Format Specified the C Sprintf Format string into which the
input is formatted for the Format object.
Format Animation Object Properties
© 2022 General Electric Company. All rights reserved. 41

Object.SetNumericFormat ([WholeDi-
gits], [DecimalDigits], _ [Justify])
Sets the format of a numeric value.
Object.SetStringFormat ([Format]) Sets the raw formatting for a string value.
Connection Example: Animating the Rotation of a Rectangle
The example in this section shows you how to animate an object through a VBA script; specifically, anim-
ating the rotation of a rectangle named Rect1. The code is taken directly from the iFIX Rotate Expert.
For this example, you need to provide operators with an interface in the configuration environment which
allows them to animate the rotation of the selected object. You also need to allow them to select a data
source with the Expression Editor control. For this example, assume that the operators will select a data-
base block as their data source. You also want to allow them to select the minimum and maximum input
and output values. After applying this form to a selected object, the operator can switch to run and see
the object rotating as specified.
First, develop the basic form as shown in the following figure:
Rotate the Selected Object Dialog Box
The following script is intended for the OK button's Click event. The script creates an animation object,
connects the animation object to the data point, and then connects the animation object to the selected
shape. See the Creating Pictures manual for more information on Animation objects.
Example: Animating the Rotation of an Object
Private Sub cmdOK_Click()
Dim CurrentObject as Object
Dim RotateObject As Object
Dim i As Integer
Dim blnHasConnection As Boolean
Dim lngIndex As Long
Dim lngStatus As Long
Dim strFullName As String
Dim Result As Boolean
Dim FailedSourceString As String
Dim strPropertyName As String
Dim strFullQualifiedSource As String
42 © 2022 General Electric Company. All rights reserved.

Dim strExpression As String
Dim strFullyQualifiedExpression As String
Dim vtSourceObjects
Dim dblTolerance As Double
Dim dblDeadband As Double
Dim dblUpdateRate As Double
On Error GoTo ErrorHandler
'Set CurrentObject equal to the first selected object in
'the picture.
Set CurrentObject = _
Application.ActiveDocument.Page.SelectedShapes.Item(1)
'Check if the selected object's RotationAngle property is
'already connected to a datasoure using the IsConnected
'method.
CurrentObject.IsConnected "RotationAngle", blnHasConnection, lngIndex, _
lngStatus
'If it is, use the GetConnectionInformation method to get
'the fully qualified name of the data source as well as the
'data source object.
If blnHasConnection Then
CurrentObject.GetConnectionInformation lngIndex, _ 0
strPropertyName, strExpression, _
strFullyQualifiedExpression, vtSourceObjects
'vtSourceObjects is a variant array of the data source
'objects connected to the RotationAngle property of the
'selected object. Get the first object in the array.
'Assume that the first object connected to the
'RotationAngle is the one you want.
Set RotateObject = vtSourceObjects(0)
End If
'If a rotation connection does not exist, build an empty
'linear animation object off of the current object.
If (TypeName(RotateObject) = "Nothing") Then
Set RotateObject = CurrentObject.BuildObject("Linear")
End If
'Use the SetSource method to connect the Animation object to
'the data source object that the user entered in the Expression
'Editor. This connection overwrites any existing Rotation set
'up.
RotateObject.SetSource ExpressionEditor1.EditText, True, _
ExpressionEditor1.RefreshRate, ExpressionEditor1.DeadBand, _
ExpressionEditor1.Tolerance
'Check the Animation object's ConnectionFailed property. If the
'connection failed, send a message to the user.
If RotateObject.ConnectionFailed = True Then
FailedSourceString = "Data Source: " & _
RotateObject.FailedSource & " doesn't exist."
Result = MsgBox(FailedSourceString, vbOKOnly)
Exit Sub
End If
'Now, we can set the LoInValue, HiInValue, LoOutValue, and
'HiOutValue of the Animation object with the values the user
'entered in the form.
RotateObject.LoInValue = Val(txtLoIn.Value)
RotateObject.HiInValue = Val(txtHiIn.Value)
RotateObject.LoOutValue = Val(txtMinAngle.Value)
RotateObject.HiOutValue = Val(txtMaxAngle.Value)
© 2022 General Electric Company. All rights reserved. 43

'We connected the InputValue property of the Animation object
'to the data source. Animation objects receive their input
'from sources. Now, we will connect the Animation object's
'OutputValue property to the shape. It's output is connected
'to the object it is animating.
strFullName = RotateObject.FullyQualifiedName & ".OutputValue"
CurrentObject.Connect "RotationAngle", strFullName, lngStatus
Rotating a Group
To rotate a group using scripting, please use the following preferred method listed in the steps below.
To rotate a group using scripting:
1. Create a variable object that is used to store the rotation angle of the group.
2. Animate the group's rotation angle using that variable's current value as the source of the anim-
ation.
3. Set the current value of the variable using the script instead of changing the rotation angle of the
group directly.
Example: Rotating a Group Using a Script
Dim bUp As Boolean
Private Sub CFixPicture_Initialize()
bUp = True
CommandButton1.Caption = "Rotate Up"
End Sub
Private Sub CommandButton1_Click()
Dim o As Object
Dim dVal As Double
' get the variable object, using FindObject
' to keep group out of VBA
Set o = Me.FindObject("RotationAngle")
' get the current value of the variable
dVal = o.CurrentValue
If bUp Then
' increment the value
dVal = dVal + 5
' if we hit 45 then rotate down next time
If dVal = 45 Then
bUp = False
CommandButton1.Caption = "Rotate Down"
End If
Else
' decrement the value
dVal = dVal - 5
' if we hit 0 then rotate up next time
If dVal = 0 Then
bUp = True
CommandButton1.Caption = "Rotate Up"
End If
End If
44 © 2022 General Electric Company. All rights reserved.

' set the current value of the variable object
' which will result in rotating the group
o.CurrentValue = dVal
End Sub
Manipulating Pictures
This chapter provides source code examples that show how to manipulate iFIX pictures using VBA. This
section also describes some important characteristics of using VBA scripting in your pictures. It includes
the following sections:
l Understanding Picture Events
l Automatically Starting a Picture
l Managing Multiple Displays
l Changing Displays Using Global Subroutines
l Closing Pictures with Active Scripts
l Using the Workspace Application Object
After reading this section, you will be able to do the following tasks entirely through VBA scripts:
l Manage multiple displays
l Change displays using global subroutines
Understanding Picture Events
Each picture you create executes events when you open or close it. By writing a script for each event's
handler, you can automatically complete specific task (such as initialization of variables) when a picture
opens or closes.
The events that a picture executes vary depending on the WorkSpace environment. The following tables
summarize the picture events the occur.
When you open a picture in the... The following events occur...
Configuration environment InitializeConfigure
Run-time environment 1. Initialize
2. Activated
When you close a picture in the... The following events occur...
Configuration environment N/A
Run-time Close
© 2022 General Electric Company. All rights reserved. 45

If you open a picture with an OpenPicture subroutine, the open events (Initialize and Activated) execute
immediately. However, if the OpenPicture call is inside looping or branching structure (such as a FOR loop
or an IF statement) then the open events do not fire until the OpenPicture script completes.
Conversely, if you close a picture with a ClosePicture subroutine, the Close event of the picture being
closed never fires because the picture is removed from memory before its script has a chance to run.
Pictures also execute Activated and Deactivated events as you switch from one picture to another. The
Activated event occurs whenever of picture gains focus. The Deactivated event executes when a picture
loses focus. For example, suppose you have two pictures open and the first picture, Picture1, has focus.
When you select the second picture, Picture2, Picture1 executes the Deactivated event and Picture2
executes the Activated event. When you switch back, Picture2 executes the Deactivated event and Pic-
ture1 executes the Activated event.
Automatically Starting a Picture
This section describes how to create a run-time environment that contains a virtual toolbar and several
pictures of the same size.
NOTE: This section only applies to pictures created with Enhanced Coordinates. This section does not support the leg-
acy Logical Coordinates System.
The figure below shows a sample picture design, consisting of three untitled pictures: a main picture, a
navigational banner, and an alarm banner.
Typical Picture Design
46 © 2022 General Electric Company. All rights reserved.

Since the main picture has to be a certain size and position in the run-time environment, you may want
to create a toolbar button to create pictures of the same size to fill the main process picture area. To do
so, you must first create a picture area, navigation (or toolbar) area, and other run-time areas that are
reserved as "special pictures." After creating these pictures, write down the following coordinates of the
pictures so it will be easier to enter them into the script:
l Window top
l Window left
l Document height
l Document width
These coordinates can be found in the Properties window for the picture. See the Creating Pictures
manual for more information on picture coordinates.
When opening iFIX pictures through scripts, you may want to remove any unwanted scroll bars by execut-
ing the FitWindowToDocument method, which is also illustrated in this code sample.
Let's take a look at the toolbar script. Wherever possible, comments are provided to help you understand
that particular part of the script. These bold-faced comments will appear by default as green text when
pasted into the VBA code window. Comment colors are configured in the VBA Option dialog.
Example: Creating a Toolbar
Dim iNewDoc As Object
Dim iPage As Object
'Create a new picture.
Set iNewDoc = Application.Documents.Add("FIX.PICTURE")
Set iPage = iNewDoc.Page
With iPage
'Set the height of the document.
.DocumentHeight = 51.3
'Set the width of the document.
.DocumentWidth = 100.44
'Call the FitWindowToDocument method to expand the
'window size so it matches the size of the document.
'This action removes all scrollbars.
.FitWindowToDocument
.windowtoppercentage = 7.03
.windowleftpercentage = 0#
.titlebar = False
End With
Set iNewDoc = Nothing
Set iPage = Nothing
Managing Multiple Displays
Notice that there is a virtual toolbar at the top of the display in the illustration in the Automatically Start-
ing a Picture section. The buttons on this toolbar are actually bitmaps that have their ButtonStyle prop-
erty set to Pushbutton.
For more information on managing displays, refer to the following sections:
© 2022 General Electric Company. All rights reserved. 47

l Setting a Pushbutton Property
l Setting the Active Document
l Creating a Global Variable
Setting a Pushbutton Property
The steps below describe how to set a Pushbutton property in your picture.
To set the Pushbutton property of a bitmap:
1. From the iFIX WorkSpace, in Ribbon view, on the Insert tab, in the Objects/Links group, click
Objects/Links and then click Bitmap.
- Or -
In Classic view, on the Insert menu, click Bitmap to insert a bitmap into your iFIX picture.
2. Right-click the bitmap and select Button Styles, PushButton from the pop-up menu. A 3D effect
will appear around the bitmap to give it the appearance of a button.
3. Optionally, you can configure a second bitmap to be displayed when the button is depressed. To
do this, right-click the bitmap and select Load Image, Secondary. You can also configure a ToolTip
by entering the desired text for the ToolTip into the Description property of the bitmap and set-
ting the EnableTooltips property to TRUE.
The top toolbar is actually a separate picture with no titlebar. Clicking a button in this area changes focus
and changes what is known in VBA as the ActiveDocument. To be sure that the correct picture is oper-
ated on when you click the toolbar button, you should first set the active document.
Setting the Active Document
To set the active document, you need to create a variable object to hold the main picture name, or pic-
ture alias. In the code that follows, a variable object is used because the script requires multiple main pic-
tures to be opened.
If you use an alias instead of a variable, an error would occur if the alias was set to the same name
("MainPicture"), when more than one main picture is opened at the same time. See the Creating Pictures
manual for more information on aliases.
Creating a Global Variable
To work with the script in this section, you must first create a global variable object to hold the string
that represents the current active picture.
To create a global variable object to hold the string for the current active picture:
1. In the iFIX WorkSpace system tree's Globals folder, right-click the User icon, and select Create
Variable from the pop-up menu.
48 © 2022 General Electric Company. All rights reserved.

2. Set the Name property to CurrentPicture and the VariableType property to 8 - vtString. The sys-
tem tree should look like the following:
System Tree Example
Once you have created the variable, add the following code to the Activate method of the main picture to
set a Global variable:
Private Sub CFixPicture_Activated()
'Set the user global variable when you activate to find
'out the name of current active picture.
user.CurrentPicture.CurrentValue = Me.FullyQualifiedName
'Me is a VB intrinsic variable that tells you the name
'of the current project (picture object).
End Sub
The Global variable lets you know which main picture has focus so the toolbar can act on it. Now you can
add the following script to the bitmap object by right-clicking it and selecting the Edit Script command
from the pop-up menu:
Dim PicObj As Object
'Loop through the documents that are open.
For Each PicObj In Application.Documents
'If the document that is open has the same name as the
'current active main picture, set the active property,
'which will in turn set the active document.
If PicObj.Name = user.CurrentPicture.CurrentValue Then
PicObj.active = True
'Acknowledge alarms of the selected items in the
'active picture.
AcknowledgeAnAlarm
Exit Sub
End If
Next PicObj
Changing Displays Using Global Subroutines
The FactoryGlobals global subroutines provide you with commands that allow you to manage your oper-
ator displays. Picture management subroutines include:
l OpenPicture
l ClosePicture
l ReplacePicture
l PictureAlias
Refer to the subroutines topic of the iFIX Automation Interfaces Electronic Book for more information on
calling these subroutines.
© 2022 General Electric Company. All rights reserved. 49

In the next example, an overview display contains four push buttons that allow operators to monitor
plant lines. The first button opens the first line picture, the second button opens the second line picture,
and so forth.
Push Button Example
The VBA scripts that make the command buttons operational are provided in this section. The use of ali-
ases (in the following script, Line is the name of an alias) gives the script control over the opening and clos-
ing of displays, regardless of the exact picture names. Each time the operator selects the appropriate
button, the script closes any picture with an alias of Line, and reassigns the alias to the opened picture.
Example: Using an Alias to Open and Close Displays
Private Sub OpenLine1Command_Click()
ClosePicture "Line"
OpenPicture "Line1", "Line"
End Sub
Private Sub OpenLine2Command_Click()
ClosePicture "Line"
OpenPicture "Line2", "Line"
End Sub
Private Sub OpenLine3Command_Click()
ClosePicture "Line"
OpenPicture "Line3", "Line"
End Sub
Private Sub OpenLine4Command_Click()
ClosePicture "Line"
OpenPicture "Line4", "Line"
End Sub
The following script performs the same function using the ReplacePicture subroutine, without using ali-
ases. With ReplacePicture, all pictures display in the same window:
Example: Using the ReplacePicture Subroutine
Private Sub OpenLine1Command_Click()
ReplacePicture ("Line1")
End Sub
Private Sub OpenLine2Command_Click()
ReplacePicture ("Line2")
End Sub
Private Sub OpenLine3Command_Click()
ReplacePicture ("Line3")
50 © 2022 General Electric Company. All rights reserved.

End Sub
Private Sub OpenLine4Command_Click()
ReplacePicture ("Line4")
End Sub
Closing Pictures with Active Scripts
A script cannot be fully executed if the picture containing it is closed or replaced. Therefore, if you use the
Close method on the picture which contains the active script, the Close method should appear as the
last method in the script. Otherwise, the picture closes before the rest of the script can run.
Remember that some command subroutines, such as ReplacePicture and ClosePicture, contain the
Close method, so they are also affected.
Using the Workspace Application Object
When using the WorkSpace Application object from another task, you must tell the operating system you
are done with it by setting it to Nothing (set Application = Nothing) before the WorkSpace is shutdown.
Creating Global Scripts
iFIX includes two global pages that allow you to store public objects, methods, forms, and variable objects
so they can be accessed from anywhere within your system.
The FactoryGlobals page contains the iFIX subroutines and all of their supporting variables, forms, and
functions. The FactoryGlobals file is write-protected to maintain the integrity of these scripts. See the
Global Subroutines section for more information on the iFIX subroutines that are stored in the Fact-
oryGlobals page.
The User page is the location where you can put your own objects, methods, forms, and variables that
you want to use globally.
Since you can access the items that you define as public in the User page from anywhere in the system,
make sure that what you enter is really what you want to expose. If you create a global public variable,
remember that it can be changed from any script at any time.
This section provides examples of the items that you might want to include in your User page, including:
l Variable objects
l Threshold tables
l Procedures (VBA subroutines and functions)
l Forms
Creating a Global Variable Object
© 2022 General Electric Company. All rights reserved. 51

Variable objects can be stored in the iFIX User page so that they can be accessible throughout your applic-
ation, regardless of which pictures are open. You can read more about variable objects in the Creating Pic-
tures manual.
To make a variable object global by adding it to the User page:
1. In the WorkSpace system tree, double-click the Globals folder.
2. Right-click the User icon and select Create Variable. An icon representing the Variable object
appears under the User icon.
3. Right-click the Variable object icon and select Animations. The Animations dialog box appears.
4. Set values for the Variable object and click OK.
To create a global variable using the Variable Expert:
1. Select the Variable Expert from the Toolbox.
2. Assign a name and type for the variable.
3. Select the Global Variable option and click OK.
How FIX32 Predefined Variables Map to iFIX Object Properties
In FIX32, a predefined variable is a read-only variable whose name is reserved for use by the Command
Language. Predefined variables have the following scope:
l Global variables – available to any running script. In FIX32, global scope variables begin with the
prefix #GS_ (for global scope string variables) or #GN_ (for global scope numeric variables).
l Picture variables – available to scripts running in a given picture. In FIX32, picture scope variables
begin with the prefix #PS_ (for picture scope string variables) or #PN_ (for picture scope numeric
variables).
In iFIX, both global and picture variables can be accessed as an object property through an object link or a
VBA command script. These object properties include link, picture, screen, security, system, and time
properties.
Refer to the following table for a list of the FIX32 predefined variables and the corresponding iFIX object
properties, with the proper syntax.
FIX32 Variable Syntax iFIX Object Syntax iFIX VBA Syntax Description
#PS_CUR_LINK Untitled1.
SelectedDatasource
Me.SelectedDatasource
or Untitled1.
SelectedDatasource
Contains the data source
of the currently selected
object.
#PS_CUR_SHDW Untitled1.
HighlightedDatasource
Me.
HighlightedDatasource
or Untitled1.
HighlightedDatasource
Containsthe data source
of the currently high-
lighted object.
#PS_CUR_NODE Untitled1.
SelectedNodeName
Me.SelectedNodename
or Untitled1.
SelectedNodeName
Containsthe SCADA node
from the currently selec-
ted object.
#PS_CUR_TAG Untitled1.
SelectedTagName
Me.SelectedTagname or
Untitled1.
Containsthe tag name or
OPC element (item) of the
52 © 2022 General Electric Company. All rights reserved.
SelectedTagname currently selected object.
#PS_CUR_FIELD Untitled1.
SelectedFieldName
Untitled1.
SelectedFieldName
Contains the field name of
the currently selected
object.
#PS_PICTURE Untitled1.PictureName Me.PictureName or
Untitled1.PictureName
Contains the picture name
or alias.
#PN_PICTURE_WIDTH
and #PS_PICTURE_WIDTH
Untitled1.PictureWidth Me.PictureWidth or
Untitled1.PictureWidth
Containsthe picture
width, in pixels.
#PN_PICTURE_HEIGHT
and #PS_PICTURE_
HEIGHT
Untitled1.PictureHeight Me.PictureHeight or
Untitled1.PictureHeight
Containsthe picture
height, in pixels.
#GN_SCREEN_WIDTH
and
#GS_SCREEN _WIDTH
System.ScreenWidth System.ScreenWidth Contains the display
screen width, in pixels.
#GN_SCREEN_HEIGHT
and
#GS_SCREEN _ HEIGHT
System.ScreenHeight System.ScreenHeight Containsthe display
screen height, in pixels.
#GS_LOGIN_NAME System.
LoginUserName
System.LoginUserName Containsthe user ID of
the currently logged in
user. If security is dis-
abled, this string is empty.
#GS_FULL_NAME System.
LoginUserFullName
System.
LoginUserFullName
Containsthe full name of
the currently logged in
user. If security is dis-
abled, this string is empty.
#GS_GROUP System.LoginGroup System.LoginGroup Contains the first group
name that the currently
logged in user belongs to.
If security is disabled, this
string is empty.
#GS_NODE System.
MyNodeName
System.MyNodeName Contains the iFIX physical
node name.
#GS_CURRENT_PICTURE System.
CurrentPicture
System.CurrentPicture Contains the currently act-
ive picture displayed in the
iFIX WorkSpace.
#GS_DATE System.CurrentDate System.CurrentDate Containsthe current sys-
tem date. The date string
is formatted according to
the "short date" format in
the Regional and Language
Options in the Control
Panel.
#GS_TIME System.CurrentTime System.CurrentTime Containsthe current sys-
tem time. The time string
is formatted according to
the "time" format in the
© 2022 General Electric Company. All rights reserved. 53

Regional and Language
Options in the Control
Panel.
#GS_HOUR and #GN_
HOUR
System.
CurrentTimeHour
System.
CurrentTimeHour
Containsthe hour com-
ponent of the current sys-
tem time.
#GS_MIN and
#GN_MIN
System.
CurrentTimeMinute
System.
CurrentTimeMinute
Contains the minute com-
ponent of the current sys-
tem time.
#GS_SEC and
#GN_SEC
System.
CurrentTimeSecond
System.
CurrentTimeSecond
Contains the second com-
ponent of the current sys-
tem time.
#GS_DAY and
#GN_DAY
System.
CurrentDateDay
System.
CurrentDateDay
Contains the day com-
ponent of the current sys-
tem date.
#GS_ MONTH and #GN_
MONTH
System.
CurrentDateMonth
System.
CurrentDateMonth
Contains the month com-
ponent of the current sys-
tem date.
#GS_ YEAR and #GN_
YEAR
System.
CurrentDateYear
System.
CurrentDateYear
Containsthe 4-digit year
component of the current
system date.
Creating a Global Threshold Table
You can also configure a system-wide threshold table. Global threshold tables provide you with more
centralized control over your system's data conversions. If you created a global threshold table that
defined colors for value ranges, and you need to change a color or a value because you are moving to a dif-
ferent system, you only need to change it in one place.
To create a global threshold table that is used for all current alarms in the system:
1. In the iFIX WorkSpace system tree, double-click the Globals folder.
2. Right-click the User icon and select Create Threshold Table from the pop-up menu. The Custom
Lookup Table dialog box appears as shown in the following figure.
54 © 2022 General Electric Company. All rights reserved.

Custom Lookup Table Dialog Box
3. Keep the default values of the dialog box and click OK. A threshold table icon appears under the
User icon.
To name the table:
1. In the iFIX WorkSpace system tree, right-click the new threshold table's icon, and select Property
Window from the pop-up menu.
2. Enter a value for the Name property. If you are creating a global threshold table that is used for all
current alarms in the system, enter CurrentAlarmThresholds.
Once you have named your threshold table, you can make connections from iFIX objects to this table. The
following procedure provides an example of how to connect an object, in this case an oval, to a global
threshold table named CurrentAlarmThresholds.
To connect an oval to a global threshold table:
1. Create an oval.
2. Click the Foreground Color Expert button.
3. In the Data Source field, enter a database tag.
4. Select the Current Alarm option.
5. Select the Use Shared Threshold Table check box.
6. Enter CurrentAlarmThresholds, the name of the global table that you created, in the Shared Table
field.
The oval will now use the CurrentAlarmThresholds table instead of a custom table. Likewise, you can con-
figure all objects that are assigned a Color By Current Alarm animation to use the Cur-
rentAlarmThresholds table. If you ever need to change a color, value, or type, you only have to change it in
one place.
Creating A Global Procedure
© 2022 General Electric Company. All rights reserved. 55

You may want global access to subroutines and functions if you use them frequently. iFIX provides global
subroutines and functions, such as OpenPicture, ToggleDigitalPoint, and OnScan, that you can use in
your pictures and schedules. You can also include your own global subroutines and functions in the User
page.
To add a global subroutine to the User page:
1. Open the Visual Basic Editor.
2. If the Project Explorer is not already displayed in the VBE, select Project Explorer from the View
menu.
3. In the Project Explorer, select the Project_User project.
4. On the Insert menu, click Module. You need to store your code in a module and not in the Project_
User page itself.
5. Enter the following code in the Code window:
Public Sub DisplayMyMessage()
MsgBox "This is my message box."
End Sub
6. Close the Code window and create a rectangle in your picture.
7. Right-click the rectangle and select Edit Script from the pop-up menu. VBE opens the Code win-
dow for the rectangle's Click event. Enter the following in the Code window:
DisplayMyMessage
8. When you click the rectangle in the run-time environment, the message box that was stored in
the Project_User page appears.
Accessing Real-time Data
iFIX gives you the flexibility to access all kinds of data to perform your scripting applications. This chapter
details how to access real-time data through various methods. The examples show you how to use the
Data System OCX to perform group reads and writes and how to write to a database tag.
Refer to the following sections for more details:
l Using the Data System OCX for Group Reads and Writes
l Reading from and Writing to a Database Tag
Using the Data System OCX for Group Reads and Writes
The Data System OCX (FixDataSystems.ocx) is a logical control that gives you flexible read and write cap-
ability, allowing you to perform group reads and writes to a database. Typically, performing a read and
write through scripting involves the following steps:
1. Create the data item (DI).
2. Validate and add the DI to the OPC server.
56 © 2022 General Electric Company. All rights reserved.

3. Write the value to the DI.
This process can take time, as each data item must be processed in the OPC server. If the OPC server is
running at slower speeds, the process can take even longer. The Data System OCX simplifies this process
by not requiring that you write to a single data item, changing the read and write process to the following
steps:
1. Create the data item (DI).
2. Validate and add the DI to the OPC server.
3. Hold the DI in memory, create and validate other DIs, and read and write the DIs in a group.
Because it allows group reads and writes, the Data System OCX optimizes reading from and writing to
large numbers of data points. You can create groups from VB scripts which can be returned from memory
and written to at any time.
NOTE: To use the Datasystem OCX, you must ensure the reference to the Intellution iFIX Data System Access Control
v1.0 Type Library is included in the project. To add this reference in VBA, on the Tools menu, click References. The Refer-
ences dialog box appears. Select Intellution iFIX Data System Access Control v1.0 Type Library check box, and click OK.
The following example illustrates how to use the Data System OCX to create a group of database tags
and perform a group read and group write on them.
The following example writes a value of 50 to a group of database tags:
Example: Group Write
Public Sub WriteValueToGroup()
'Create the Data Server Object.
Dim FDS As Object
Dim DIItem As Object
'Create an instance of the Data System control.
Set FDS = CreateObject("FixDataSystems.Intellution FD Data _
System Control")
'You do not need to call CreateObject if you include a
'reference to the FIX Data System. This control can handle
'multiple groups. For this example, we only need one group.
'We will add all the data sources with new alarms to the
'group and do a group read and then a group write.
FDS.Groups.Add "TankGroup"
'Add all the Tank tags to the Data System OCX's Data Item
'collection. You can add or delete groups without affecting
'the order of the group should the position of an item
'change. This is achieved by specifying a group name
'("TankGroup")rather than listing item numbers.
FDS.Groups("TankGroup").DataItems.Add "FIX32.MYNODE.TANK1.F_CV"
FDS.Groups("TankGroup").DataItems.Add "FIX32.MYNODE.TANK2.F_CV"
FDS.Groups("TankGroup").DataItems.Add "FIX32.MYNODE.TANK3.F_CV"
FDS.Groups("TankGroup").DataItems.Add "FIX32.MYNODE.TANK4.F_CV"
FDS.Groups("TankGroup").DataItems.Add "FIX32.MYNODE.TANK5.F_CV"
FDS.Groups("TankGroup").DataItems.Add "FIX32.MYNODE.TANK6.F_CV"
FDS.Groups("TankGroup").DataItems.Add "FIX32.MYNODE.TANK7.F_CV"
FDS.Groups("TankGroup").DataItems.Add "FIX32.MYNODE.TANK8.F_CV"
FDS.Groups("TankGroup").DataItems.Add "FIX32.MYNODE.TANK9.F_CV"
FDS.Groups("TankGroup").DataItems.Add _
"FIX32.MYNODE.TANK10.F_CV"
'Read all of the data items that you added to the Data System
'control.
© 2022 General Electric Company. All rights reserved. 57

FDS.Groups("TankGroup").Read
'If the value of each tag is not 50, then set it to 50.
For Each DIItem in FDS.Groups("TankGroup").DataItems
If DIItem.Value <> 50 Then
DIItem.Value = 50
End If
Next
'Now write 50 to each tag in the database.
FDS.Groups("TankGroup").Write
End Sub
The next example does the following:
1. Creates a Data System OCX FDS.
2. Adds the data group DataGroup1 to the Groups collection.
3. Adds a Data Item to the DataItems collection.
4. Reads the group DataGroup1.
5. Reads the DataItem.
Example: Group Read
Public Sub ReadValueFromGroup()
'Create the Data System OCX
Dim FDS As Object
Set FDS = CreateObject("FixDataSystems.Intellution FD Data _
System Control")
'Add a group to the Groups collection
FDS.Groups.Add ("DataGroup1")
FDS.Groups.Item("DataGroup1").DataItems.Add("Fix32._
THISNODE.AI1.F_CV")
'Read DataGroup1
FDS.Groups.Item("DataGroup1").Read
'Read the DataItem
FDS.Groups.Item("DataGroup1").DataItems.Item(1).Read
End Sub
The final example in this section shows you how to perform writes to alternate data sources:
1. Creates a Data System OCX FDS.
2. Adds the data group DataGroup1 to the Groups collection.
3. Adds a Data Item to the DataItems collection.
4. Writes the value of the Group DataGroup1.
5. Writes a value to the DataItem.
Example: Writes to Alternate Sources
Public Sub WriteToAlternateSources()
'Create the Data System OCX
Dim FDS As New FixDataSystem
Dim g1 As FixDataSystems.Group
'Create the first group to read from
FDS.Groups.Add("DataGroup1")
Set g1=FDS.Groups.Item("DataGroup1")
'Add an item to the group to be read
58 © 2022 General Electric Company. All rights reserved.

g1.DataItems.Add("Fix32.MYNODE.AI1.F_CV")
'Read the group
g1.Read
'Get the value of the item
Dim x As Long
x=g1.DataItems.Item(1).Value
'Create the second group to write
Dim g2 As FixDataSystems.Group
FDS.Groups.Add("Group2")
Set g2=FDS.Groups.Item("Group2")
'Add the item, set it's value and write the group
g2.DataItems.Add("Fix32.MYNODE.AI2.F_CV")
g2.DataItems.Item(1).Value = x+1
g2.Write
End Sub
For more information on using the Data System OCX, including its related properties and methods, refer
to the DataSystem OCX object topic of the iFIX Automation Interfaces Electronic Book.
Reading from and Writing to a Database Tag
There are several ways to write a value to a database tag. The examples in this section show you how to:
l Write a value directly to a defined database tag.
l Write a value to a database tag using the WriteValue global subroutine.
l Write a value to a database tag using its Value property.
NOTES:
l An unsigned write occurs when a database tag is configured for electronic signature, but you write a value dir-
ectly to that tag without capturing a signature. If you are working in a secure environment with the Electronic
Signature option enabled, you must be aware of the impact of unsigned writes to the process database.
l Unsigned writes can originate from scripts. Refer to the Implications of Database Writes With Electronic Sig-
nature section of the Using Electronic Signatures manual for detailed information.
Writing a Value to a Defined Database Tag
The easiest way to write a value to a defined database tag is to perform a direct write:
FIX32.NODE.AI1.F_CV = 50#
In this example, a value of 50 is written to the database tag FIX32.NODE.AI1.F_CV. Because of the restric-
tions enforced by VBA naming conventions, this is not the recommended method for writing values
through VBA scripting (see the VBA Naming Conventions section). The easiest methods for reading and
writing values through VBA scripting are by using the WriteValue and ReadValue subroutines. These sub-
routines are described in more detail in the next section.
Writing a Value Using the WriteValue Subroutine
© 2022 General Electric Company. All rights reserved. 59

In order to overcome the limitations of VBA's naming conventions, iFIX provides the global subroutines
WriteValue and ReadValue for writing values to and reading values from database tags. The following
two examples show how to use the WriteValue subroutine to write a value to a tag.
This script writes a value of 50 to the FIX32.MYNODE.AI-1.F_CV tag:
Private Sub CommandButton1_Click()
WriteValue "50", "AI-1"
Exit Sub
If you omit the second parameter, the WriteValue subroutine writes a value of 60 to the first connection
of the selected object in the run-time environment. For example, let's say that you have a rectangle selec-
ted in your picture, and that rectangle has a VerticalFillPercentage animation tied to the tag
FIX32.MYNODE.AO3.F_CV. When you click a push button containing the following script:
Private Sub CommandButton1_Click()
WriteValue "60"
Exit Sub
iFIX writes a value of 60 to the FIX32.MYNODE.AO3.F_CV tag.
Write a Value Using the Database Tag's Value Property
This example assumes that there is a color animation on a shape named Rect1. It receives the database
tag connected to Rect1's ForegroundColor property and writes a value of 70.
Example: Using the Database Tag's Value Property
Private Sub CommandButton1_Click()
Dim objDataTag as Object
Dim blnHasConnection as Boolean
Dim lStatus as Long
Dim lIndex as Long
Dim strPropertyName as String
Dim strExpression as String
Dim strFQE as String
Dim vtAnimationObjects
Dim objDataTag as Object
Dim strDataSourceName as String
Rect1.IsConnected "ForegroundColor", blnHasConnection, _
lIndex, lStatus
Rect.GetConnectionInformation lIndex, strPropertyName, _
strExpression, strFQE, vtAnimationObjects
'Assume that the first Animation object is the color
'animation object you are looking for. Set the string
'name for the data source equal to the data source of
'the animation object.
strDataSourceName= vtAnimationObjects(0).Source
'Use the FindObject method to get the database tag
'object with the string name FIX32.MYNODE.AI1.F_CV.
Set objDataTag = _
System.FindObject("FIX32.MYNODE.AI1.F_CV")
'Set the Value property of the Database Tag object
'equal to 70.
ObjDataTag.Value = 70
60 © 2022 General Electric Company. All rights reserved.

End Sub
Accessing Data from a Relational Database
iFIX not only gives you the ability to access real-time data, but also has the flexibility to access data from
a relational database. This chapter shows you how to access data from a relational database using Act-
iveX Data Objects (ADO).
The chapter also discusses how to effectively query an SQL database. You can also perform this task
using VisiconX, which is now included as an integral part of iFIX.
For more information on VisiconX, see the Using VisiconX manual.
Database Access in VBA: MDAC
While iFIX supports the Data Access Object (DAO), the Remote Data Object (RDO), and the ActiveX Data
Object (ADO), it is recommended in most cases that you use ADO for all iFIX VBA scripts that deal with
database access. ADO is part of Microsoft Data Access Components (MDAC).
For a summary of Microsoft's database technologies, refer to article ID 190463 on the Microsoft web site.
This article describes database technologies such as MDAC, DA SDK, ODBC, OLE DB, ADO, RDS, and
ADO/MD, and the differences between them. For information on MDAC and iFIX, refer to the Third-Party
Software Installed During the iFIX Install section in the Getting Started with iFIX electronic book.
Using ActiveX Data Objects
This example shows how to manipulate data in a relational database using ActiveX Data Objects (ADO).
ADO is a free download from Microsoft's web site. Currently, Microsoft is encouraging VBA developers to
use ADO over the other types of data access. The key elements covered in this section include:
l Creating ADO objects.
l Populating an MSFlexGrid from a Select statement.
l Adding a record to the database.
l Updating a record in the database.
l Deleting a record from the database.
Creating ADO Objects
In order to use ActiveX Data Objects to manipulate data, you need to reference the ActiveX Data Objects
Library in your picture's project. Select the References command from the VBE Tools menu and then
select the ADO type library. The object variables are declared at the Module level, which means that they
are available in all of the other routines in this example. If you don't need to manipulate the records after
reading them, then they can be declared at the Procedure level.
© 2022 General Electric Company. All rights reserved. 61

Example: Creating an ADO Record set
'General Declarations
Dim conODBC As ADODB.Connection
'This stores the link to the database.
Dim adoRS As ADODB.Recordset
'This stores the results of the query.
Private Sub InitADO()
Dim strQuery As String
On Error GoTo ErrorHandler
'SQL query that ADO will run.
strQuery = "SELECT Recipe_ID, Recipe_Name, Batch_Size, " _
& "Milk_Quan , Choc_Quan, Mix_Time, Milk_Type _
FROM ACCEPT_TEST & "ORDER _BY _Recipe_Name ASC"
Set conODBC = New ADODB.Connection
'Create ADO Connection Object.
'Connect to the database. Connect string can be DSN-less.
'This varies by database type.
conODBC.Open "driver= _
& " SQL server};server=thunder;uid=sa;pwd=;database=master"
Set adoRS = New ADODB.Recordset
'Create ADO Recordset Object.
'Run the query, and set options to allow read/write access.
adoRS.Open strQuery, conODBC, adOpenDynamic, _
adLockPessimistic, adCmdText
Exit Sub
ErrorHandler:
HandleError
End Sub
Populating an MSFlexGrid or Similar Spreadsheet OCX with ADO
To get the data out of the record set for display, a spreadsheet or grid is handy. The following code shows
how to copy the data into the grid.
NOTE: The example provided here uses the MSFlexGrid. You can use this or any similar spreadsheet, such as the
VideoSoft VSFlexGrid, in your applications. GE does not provide the MSFlexGrid; it is referenced in the documentation
for illustration purposes only.
Example: Populating a Flexgrid with Data from an ADO Record set
This example builds upon the previous example for the population of ADORS. It assumes a flexgrid
already exists in a picture.
Private Sub LoadRecipes()
Dim iRow As Integer
Dim iCol As Integer
On Error GoTo ErrorHandler
'Set MSFlexGrid column sizes and titles.
InitGrid
iRow = 0
'Read though the entire record to populate the grid.
While adoRS.EOF <> True
62 © 2022 General Electric Company. All rights reserved.

iRow = iRow + 1
MSFlexGrid1.Row = iRow
For iCol = 0 To 5
MSFlexGrid1.Col = iCol
MSFlexGrid1.Text = adoRS(iCol)
'After setting the row and column of the grid, insert
'data into the cell.
Next iCol
'Move to the next record returned from the query.
adoRS.MoveNext
Wend
'The row number will show the number of records returned.
RecipeCount.Value = Str(iRow)
Exit Sub
ErrorHandler:
HandleError
End Sub
Adding a Record to the Database through ADO
If the recordset is not opened as read-only, you can add records to the database through ADO.
Example: Adding a Record to a Database Using an ADO Recordset
Private Sub AddRecipe()
Dim lIndex As Long
On Error GoTo ErrorHandler
If RecipeName.Value = "" Then
MsgBox "Please Enter Recipe Parameters First",_
vbExclamation, "Recipe Control"
Exit Sub
End If
adoRS.AddNew 'Adds a new record to the recordset.
'Populate the record with data.
adoRS!Batch_Size = CLng(BatchSize.Value)
Milk_Quan = CLng(MilkQuan.Value)
adoRS!Choc_Quan = CLng(ChocQuan.Value)
adoRS!Mix_Time = CLng(MixTime.Value)
adoRS!Milk_Type = CLng("1")
adoRS!Recipe_Name = RecipeName.Value
adoRS.Update 'Commits the new record to the database.
adoRS.Requery 'Refreshes the recordset.
LoadRecipes 'Populates the grid.
Exit Sub
ErrorHandler:
'Handle the error returned if any columns need to be unique
'(such as recipe name) but weren't.
If Err.Number = -2147217887 Then
MsgBox "Recipe Names Must be Unique", vbExclamation, _
"Recipe" & "Control"
Exit Sub
End If
HandleError
End Sub
© 2022 General Electric Company. All rights reserved. 63

Updating a Record in the Database through ADO
If the recordset is not read-only, you can change values in a record and write them to the database with
ADO.
Example: Updating a Database Using an ADO Record set
Private Sub UpdateRecipe()
On Error GoTo ErrorHandler
'Check for primary key setting before update.
If RecipeID.Value = "" Then
MsgBox "Please Select a Recipe First", vbExclamation, _
"Recipe" & "Control"
Exit Sub
End If
adoRS.Requery 'Refresh the recordset.
While adoRS!Recipe_ID <> CLng(RecipeID.Value)
adoRS.MoveNext
'Move to the selected record to be updated.
Wend
'Set any changed values.
adoRS!Batch_Size = CLng(BatchSize.Value)
adoRS!Milk_Quan = CLng(MilkQuan.Value)
adoRS!Choc_Quan = CLng(ChocQuan.Value)
adoRS!Mix_Time = CLng(MixTime.Value)
adoRS.Update 'Commits the updated record to the database.
adoRS.Requery 'Refreshes the recordset.
LoadRecipes 'Populates the grid.
Exit Sub
ErrorHandler:
HandleError
End Sub
Deleting a Record from the Database through ADO
If the recordset is not read-only, you can delete records from the database with ADO.
Example: Deleting a Record from a Database Using an ADO Record set
Private Sub DeleteRecipe()
On Error GoTo ErrorHandler
'Check for primary key setting before delete.
If RecipeID.Value = "" Then
MsgBox "Please Select a Recipe First", vbExclamation, _
"Recipe Control"
Exit Sub
End If
adoRS.Requery 'Refresh the recordset.
While adoRS!Recipe_ID <> CLng(RecipeID.Value)
adoRS.MoveNext
'Move to the selected record to be updated.
Wend
adoRS.Delete 'Deletes the current record in the recordset.
adoRS.Update 'Commits the deleted record to the database.
adoRS.Requery 'Refreshes the recordset.
LoadRecipes 'Populates the grid.
Exit Sub
64 © 2022 General Electric Company. All rights reserved.

ErrorHandler:
HandleError
End Sub
For more information on ADO, refer to the Advanced Topic: Using SQL section.
Advanced Topic: Using SQL
Structured Query Language (SQL) is a standard language that is used by relational databases to retrieve,
update, and manage data. Although it provides the common syntax for applications to use, it does not
provide a common application program interface (API). Open Database Connectivity (ODBC) is Microsoft's
standard API for accessing, viewing, and modifying data from a variety of relational databases.
Previously, accessing data meant writing a Microsoft Visual Basic script, which can be tedious and
requires knowledge of Visual Basic. However, VisiconX, a component of the current version of iFIX, har-
nesses Microsoft ADO technology. By using ADO, VisiconX lets you access data easily and quickly without
writing scripts. For more information, refer to the Using VisiconX manual.
Working in the Run-time Environment
iFIX VBA allows you to dynamically control your objects and pictures while you are working in the run-
time environment. This chapter focuses on how you can script your applications to perform a variety of
functions at run time, such as:
l Changing data sources.
l Changing properties in objects, or in pens of a chart.
l Entering data in global forms.
Changing Data Sources
This section illustrates how you can write scripts that dynamically change the data source of objects "on
the fly" at run-time. As we discussed in the Working with iFIX Objects chapter, animating objects begins
by making a connection to a data source. The first example shows you how to create a direct connection
while in the run-time environment. It includes the following topics:
l Creating a Direct Connection to an Object
l Changing a Text Object's Caption
l Changing a Variable Object's Current Value
l Changing the Data Source of a Data Link
l Change a FIX Event's Data Source
l Replacing String Properties
NOTE: When you change a data source at run time, the change does not remain intact when you switch back to the con-
figuration environment. The behavior of the picture depends on the status of the picture cache. In addition, if you add or
© 2022 General Electric Company. All rights reserved. 65

delete scripts in run mode, the picture will not be loaded into cache when it is closed. Refer to the Using Picture Caching
section of the Creating Pictures manual.
Creating a Direct Connection to an Object
The following example connects an AI tag to the Horizontal Fill Percentage of a rectangle when you click it
in the run-time environment.
To connect an AI tag to the Horizontal Fill Percentage of a rectangle when you click it:
1. Draw a rectangle on your screen.
2. Create an AI database Tag with RA as the I/O address (using the SIM driver).
3. Right-click the rectangle and select Edit Script from the pop-up menu.
4. Enter the following code in the rectangle's Click event:
Dim lstatus as Long
Rect1.Connect "HorizontalFillPercentage", _ "Fix32.Thisnode.AI.F_CV", lstatus
5. Switch to Run and Click the rectangle.
Before you click the rectangle, it is solid. After you click it, the rectangle starts to fill based on the AI tag's
value. You have dynamically connected the rectangle's fill level to the database tag.
Example: Changing the Data Source of an Animation Connected to an Object
As we discussed in the Working with iFIX Objects chapter, there are three different types of animation
objects — Lookup, Linear, and Format. The example below shows you how to set an object, and change
the source of the animation object that is connected to it while you are in the run-time environment.
To set an object and change the source of the animation object that is connected to it:
1. Create an AI block (AI1) with RA as the I/O address, and another AI block (AI2) with RG as the I/O
address.
2. Create two Data links. Connect one Data link to AI1, and connect the other to AI2.
3. Add a rectangle, and animate its Foreground Color (a Lookup object) using AI1 as the data source.
4. Now animate the fill of the rectangle (a Linear object), and use AI1as the data source.
5. Edit the rectangle's Click event.
6. Enter the following code:
Dim AllObj As Object
Dim SingleObj As Object
Dim Count As Integer
Dim ObjCount as Integer
'Set AllObj equal to the collection of contained objects
'in the picture.
Set AllObj = _
Application.ActiveDocument.Page.ContainedObjects
'Check how many objects are in the picture.
For Each SingleObj In AllObj
Count = AllObj.Count
'Look through all of the objects in the picture.
While Count > 0
'If the current object (shape) has contained objects,
66 © 2022 General Electric Company. All rights reserved.

'check the number of objects (animations) it contains.
If SingleObj.ContainedObjects.Count > 0 Then
ObjCount = SingleObj.ContainedObjects.Count
'For each object contained in the current object,
'check its class name.
While ObjCount > 0
Select Case _
SingleObj.ContainedObjects._
Item(ObjCount).ClassName
'If the contained object is a Lookup
'(table), change the data source to
'FIX32.THISNODE.AI2.F_CV
Case "Lookup"
SingleObj.ContainedObjects._
Item(ObjCount).Source = _
"Fix32.Thisnode.AI2.F_CV"
'If the contained object is a Linear object,
'change the data source to
'FIX32.THISNODE.AI2.F_CV
Case "Linear"
SingleObj.ContainedObjects._
Item(ObjCount).Source = _
"Fix32.Thisnode.AI2.F_CV"
End Select
ObjCount = ObjCount - 1
Wend
End If
Count = Count - 1
Wend
Next SingleObj
7. Switch to the run-time environment and click the rectangle.
Both the Fill and Color animations change from the current value of AI1 to the current value of AI2.
Changing a Text Object's Caption
The following example changes the caption of text you have entered when you click on the text at run-
time.
To change a text object's caption:
1. Create a Text object and enter "Hello".
2. Edit the Text object's Click event.
3. Enter the following code:
Text1.Caption = "New Caption"
4. Switch to Run and click on the Text object.
The caption of the Text object will change from Hello to New Caption.
Changing a Variable Object's Current Value
© 2022 General Electric Company. All rights reserved. 67

This example shows you how to write a script that changes a Variable object's current value when click-
ing text at run time.
To change a Variable object's caption:
1. Create a Variable object.
2. Change the object's type to Long.
3. Create a Text object.
4. Using the Animations dialog box, animate the Text object's Caption using the Variable object's Cur-
rentValue property as its data source.
5. Right-click the Text object and select Edit Script from the pop-up menu.
6. Enter the following code in the Text object's Click event:
Variable1.CurrentValue = Variable1.CurrentValue + 10
7. Switch to the run-time environment and click the Text object.
The caption of the Text object increments by 10 (as will the Variable's current value).
Changing the Data Source of a Data Link
This example details how to change the data source of a Data link in the run-time environment using the
Format object.
To change the data source of a Data link using the Format object:
1. Create an AI block with RA as the I/O address, and a DO block in the database.
2. Create a Data link and connect it to the AI block.
3. Right-click the Data link and select Edit Script from the pop-up menu.
4. Enter the following code in the Data link's Click event:
DataLink1.ContainedObjects.Item(1).Source = _
"Fix32.Thisnode.DO.F_CV"
5. Initialize the DO block, switch to the run-time environment, and click the Data link.
The caption of the Data link changes to the current value of the DO block.
Change a FIX Event's Data Source
The steps that follow describe how to change the data source of a FIX event in the run-time envir-
onment.
To change the data source of a FIX event in the run-time environment:
1. In Database Manager, create an AI block and a DO block.
2. Create a new Picture.
3. Insert a FIX event.
4. Name the FIX event, and choose the AI block as a data source.
68 © 2022 General Electric Company. All rights reserved.

5. Add a rectangle to your picture. Right-click the rectangle and select Edit Script from the pop-up
menu.
6. Enter the following code in the rectangle's Click event:
Dim obj As Object
Dim Count As Integer
'Set obj equal to the collection of objects contained in 'the active picture
Set obj = Application.ActiveDocument.Page.ContainedObjects
Count = obj.Count
'Loop through all of the objects in the picture to find 'any that are Event objects.
While Count > 0
'If the object is an Event object, change its source
If obj.Item(Count).ClassName = "FixEvent" Then
obj.Item(Count).Source = "Fix32.ThisNode.DO.F_CV"
'Display a message box that describes the change.
MsgBox "The Fix Event " & obj.Item(Count).Name & _
" is now connected to the data source " & _
obj.Item(Count).Source
End If
Count = Count – 1
Wend
7. Switch to the run-time environment and click the rectangle. The message box appears stating
that the source has changed.
Replacing String Properties
You can use the FindReplace object to replace string properties of an object at run time. The following
example uses the FindReplaceInObject method to accomplish this.
The code in this example searches through a group of objects within a picture and changes their data
sources by replacing AO with AI.
To search for AO data sources in a picture and replace with them AI data sources:
1. Insert a Data link and assign Fix32.Thisnode.AO.F_CV as the data source.
2. Insert a rectangle and animate its HorizontalFillPercentage using AO as the data source.
3. Now duplicate the rectangle three times.
4. Select all the rectangles and group them.
5. Name the group "MyGroup".
6. Create a Push button. Right-click the Push button and select Edit Script from the pop-up menu.
7. Enter the following code in the Push button's Click event:
Dim Success As Boolean
FindReplace.FindReplaceInObject MyGroup, 4, "AO", "AI",_
Success
'The 4 indicates to search through data sources only.
8. Switch to the run-time environment and click the Push button.
The FindReplace object searches MyGroup and changes all instances of AO to AI. Because the
Data link's data source falls outside of MyGroup, it remains unchanged.
Creating Global Forms for Data Entry
© 2022 General Electric Company. All rights reserved. 69

This example shows how to create a UserForm in the UserGlobals page and reference it from a picture
for the purpose of data entry. Inserting run-time accessible forms in the User Globals page allows only
one copy of the form on the system. This makes version control easier and minimizes the size of iFIX pic-
ture files.
This example uses a form that you create in User Globals. The following figure shows how it should
appear in the run-time environment.
Data Entry Dialog Box
This example contains a UserForm frmListEntry and a module UGSubs, both of which are located in Pro-
ject_User. The name of the picture is LISTENTRY1.GRF.
Example: Form Code
Option Explicit
Dim strDataSource As String
'Custom subroutine to pass DataSource and List items to form
Public Sub SetupTheData(DataSource As String, _
Optional Item1 As String, Optional Item2 As String, _
Optional Item3 As String, Optional Item4 As String, _
Optional Item5 As String, Optional Item6 As String)
'Get the data source and any passed-in items for the list.
'This example uses six items, but there is no limit.
strDataSource = DataSource
If Item1 <> "" Then EntryBox.AddItem Item1
If Item2 <> "" Then EntryBox.AddItem Item2
If Item3 <> "" Then EntryBox.AddItem Item3
If Item4 <> "" Then EntryBox.AddItem Item4
If Item5 <> "" Then EntryBox.AddItem Item5
If Item6 <> "" Then EntryBox.AddItem Item6
End Sub
Private Sub CancelButton_Click()
Unload Me
End Sub
Private Sub OKButton_Click()
Dim DataObj As Object
On Error GoTo ErrorHandler
'Write the chosen value from the list to the tag.
Set DataObj = System.FindObject(strDataSource)
DataObj.Value = EntryBox.Value
70 © 2022 General Electric Company. All rights reserved.

Unload Me
Exit Sub
ErrorHandler:
MsgBox "Error " + Str(Err.Number) + " has occurred" _
+ Chr(10) + Chr(13) + Err.Description
End Sub
Example: Module Code
Option Explicit
'Declare the Form object.
'This must be in a Module to use the user-defined data type.
'The user-defined data type allows Quick Info and Auto
'Complete to work.
Public ListForm As frmListEntry
Public Sub GetListForm()
'Creates a new instance of the form.
Set ListForm = New frmListEntry
End Sub
Example: iFIX Object Code
Private Sub CommandButton1_Click()
On Error GoTo ErrorHandler
'Create an instance of the form.
UGSubs.GetListForm
'Pass in the tag to control and load the form list with
'choices. Use text or numbers as appropriate for the
'tag-field data type.
UGSubs.ListForm.SetupTheData _
"Fix32.BATCH1.BATCH-RECIPENAME.A_CV", _
"Off", "Low", "Medium", "High"
'Show the form.
UGSubs.ListForm.Show
Exit Sub
ErrorHandler:
HandleError
End Sub
Working with the Scheduler
This section briefly discusses the Scheduler application and the VBA DoEvents function. It includes the fol-
lowing topics:
l Scheduler
l DoEvents Function
l Using Timers in place of DoEvents
l Using Scripts with Time-based Entries
l Using Scripts with Event-based Entries
For more information on the Scheduler application, refer to the Mastering iFIX manual. For more inform-
ation on the DoEvents function, refer to the iFIX Automation Reference. The examples that appear later
in this section illustrate how to work with the two Scheduler objects: Timer and Event.
Scheduler
© 2022 General Electric Company. All rights reserved. 71

There are certain tasks that you may want to perform at a specified time or interval, or when a change
occurs in a database value or in any OPC data server value. For example, you may want to run a script
that generates a report at the end of every shift or replaces the currently-displayed picture when a data-
base point exceeds a certain value.
The Scheduler allows you to create, edit, monitor, and run both types of actions as scheduled entries. In
the Scheduler, you define the time or event that triggers a scheduled entry, and the action, referred to as
an operation, that you want to occur.
The Scheduler is useful because it allows iFIX to schedule time- or event-based scripts to run as back-
ground tasks. This makes it ideal for reducing overhead, since you do not have to use VBA for monitoring
purposes. Because schedules can be run as background tasks, they have their own VBA thread. This
allows you to have two scripts running at the same time; one in the background and one in the active
application.
If you will be writing scripts from a background task that will be manipulating objects or pictures in the
iFIX WorkSpace, you must first get a pointer to the WorkSpace application. The script below shows how
you can use the GetObject method to do this:
Dim App As Object
Set App = GetObject("", "WorkSpace.Application")
Once you have the pointer to the WorkSpace application, you can use the App object in your code to rep-
resent the Application object in the iFIX WorkSpace.
See the Mastering iFIX manual for more information on the FixBackgroundServer task and the Scheduler
application.
DoEvents Function
Within iFIX, VBA functions as a single-threaded application. The system can initiate more than one script;
however, only one script can be running at any one time. When an event triggers a script, it is placed in a
queue. Each script in the queue is executed in the order in which it is received once the previous script
has run to completion. For this reason, scripts that loop and scripts that take a long time to run can delay
execution of the scripts behind them in the queue. The DoEvents Function allows the operating system to
process events and messages waiting in the queue and enables an event to yield execution so that the
operating system can process other UI events. Use the VBA DoEvents function in scripts that take a long
time to run.
WARNING: Any time you temporarily yield the processor within an event procedure, make sure the procedure is not
executed again from a different part of your code before the first call returns; this could cause unpredictable results. It is
strongly advised that you do not use DoEvents functions in your iFIX scripting.
See the Visual Basic for Applications Help file for more information, including an example of the DoEvents
function.
For more information on DoEvents, go to the Microsoft Support web site and search for Article ID:
118468.
Using Timers in place of DoEvents
72 © 2022 General Electric Company. All rights reserved.

The DoEvents call allows a program to process events while in VBA script. However, the DoEvents call
cannot control what is executed and does not control what is currently executing.
The following script is an example of a DoEvents call:
Dim I as Integer
For I = 0 to 10000
If I Mod 100 = 0 Then
DoEvents
'Execute events every hundredth iteration through the loop
End If
'Do Something
Next I
If your code is tied to an event, your code may be executed again before DoEvents returns. If the code is
operating on global data or data that exists outside the scope of the script, you could corrupt your own
data by reentering the routine.
You can solve this problem by using timers in place of DoEvents to execute portions of the code.
The following script outlines the solution:
'Here is a global variable to track the iterations through the
'loop.
'Note that it is initialized to zero by VBA
Dim IndexCount As Integer
Sub StartRoutine() 'Execute this routine to start
IndexCount = () 'We are starting a new loop
FixTimer.StartTimer 'Get the timer going
End Sub
Private Sub StopRoutine()
'The timer routine will execute this when completed
FixTimer.StopTimer
End Sub
Private Sub CfixPicture_Initialize()
'Make sure that the timer is stopped on picture load
StopRoutine
End Sub
Private Sub CommandButton1_Click().
'This will launch the routine from a button
StartRoutine
End Sub
Private Sub FixTimer_OnTimeOut(ByVal1TimerId As Long)
'This is the timer routine
'This variable ensures that another timer event doesn't execute 'the routine
Static iAlreadyHere As Integer
If (iAlreadyHere = 1) Then
Exit Sub
End If
© 2022 General Electric Company. All rights reserved. 73

'Lock out other callers
iAlreadyHere = 1
Dim I As Integer
For i = IndexCount to 10000
'Note: We will exit this loop before we hit 10,000
'Do Something
If i Mod 100 = 0 Then
IndexCount = i + 1
iAlreadyHere = 0 'Timers can now execute this routine
Exit Sub 'Give up process and allow other things to run
End If
Next i
StopRouting 'We are done
iAlreadyHere = 0
End Sub
Using timers to execute portions of code allows VBA, the picture, and global variables to be in a pre-
dictable state while executing your VBA script.
Using Scripts with Time-based Entries
There are certain tasks that you will want to perform at a specified time or interval or when a change
occurs in the process. To schedule these tasks you will need to define the time that triggers the action
that you want to occur. You can use the Scheduler application within iFIX or you can write your own VBA
script. For more information on the Scheduler, refer to the Scheduler section of the Mastering iFIX
manual.
The following example periodically checks the amount of available hard disk space. If the amount of disk
space gets too low, it triggers an alarm in the iFIX database. The OnTimeOut event occurs at an interval
defined in the properties of the CheckDiskSpace event.
Example: Checking Disk Space and Triggering an Alarm if Too Low
'First, declare the Windows API function call
'GetDiskFreeSpace so you can use it to get the amount of
'free space available on the disk.
Private Declare Function GetDiskFreeSpace Lib "kernel32" _
Alias "GetDiskFreeSpaceA" (ByVal lpRootPathName As String, _
lpSectorsPerCluster As Long, lpBytesPerSector As Long, _
lpNumberOfFreeClusters As Long, lpTotalNumberOfClusters _
As Long) As Long
'Check the disk space on the Timer Event's OnTimeOut
'event. If it is less than 150MB, set an alarm.
'CheckDiskSpace is the name of the Timer object
'created in the Scheduler.
Private Sub CheckDiskSpace_OnTimeOut(ByVal lTimerId As Long)
Dim lAnswer As Long
Dim lpRootPathName As String
Dim lpSectorsPerCluster As Long
74 © 2022 General Electric Company. All rights reserved.

Dim lpBytesPerSector As Long
Dim lpNumberOfFreeClusters As Long
Dim lpTotalNumberOfClusters As Long
Dim lBytesPerCluster As Long
Dim lNumFreeBytes As Double
Dim lDiskSpace As Double
'Warning: The parameter below hard codes C: as the drive to
'check. If you do not nave a C: drive, this code will return 0
'as the free space. You need to change this parameter to match
'the drive you want checked.
lpRootPathName = "c:\"
lAnswer = GetDiskFreeSpace(lpRootPathName, _
lpSectorsPerCluster, lpBytesPerSector, _
lpNumberOfFreeClusters, lpTotalNumberOfClusters)
lBytesPerCluster = lpSectorsPerCluster * lpBytesPerSector
lNumFreeBytes = lBytesPerCluster * lpNumberOfFreeClusters
lDiskSpace = Format(((lNumFreeBytes / 1024) / 1024), _
"0.00")
If lDiskSpace < 150# Then
Fix32.NODE1.lowdiskspacealarm.f_cv = 1
Else
Fix32.NODE1.lowdiskspacealarm.f_cv = 0
End If
End Sub
Using Scripts with Event-based Entries
The following is an example of downtime monitoring. The Scheduler application waits for the value of
FIX32.NODE1.DOWNTIMESTART.F_CV to be true. When it is true, the script launches a form that allows
the user to enter the reason for the downtime occurrence. When the user clicks OK, the script opens the
appropriate database and writes the time, date, data source, and downtime description to the database.
Use the parameters in the following table to create the event object and the form. Be careful to place the
Option Buttons inside the Frame.
OBJECT PROPERTY SETTING
Event Name
Event Type
Data Source
Line1Packer1DownTime
On True
Fix32.NodeName.DownTimeStart.F_CV
Form Name
Caption
frmDownTime
Downtime Monitoring Logging to Relational Database
Command Button Name
Caption
cmdOK
OK
Frame Name
Caption
fraLine1Packer1
Packaging Line 1 Packer 1
Option Button Name
Caption
optDownTimeReasonOne
Bad packaging material
Option Button Name
Caption
optDownTimeReasonTwo
Fallen bottle or bottle jam on line to packer
Option Button Name
Caption
optDownTimeReasonThree
Low oil pressure in packer drive
DownTime Start Event Properties
© 2022 General Electric Company. All rights reserved. 75

Option Button Name
Caption
optDownTimeReasonFour
<Leave this caption blank>
Textbox Name
Enabled
TxtDownTimeReasonFour
False
Example: Recording DownTime Monitoring
'Place the following code into the subroutine created after
'clicking the VB Editor button in the Modify Event Entry dialog.
'On the Event object's OnTrue event, initialize the form
'with the Event's data source and then show the form.
'Line1Packer1DownTime is the name of the event created
'in Scheduler.
Private Sub Line1Packer1DownTime_OnTrue()
frmDownTime.InitializeDataSource _
(Line1Packer1DownTime.Source)
frmDownTime.Show
End Sub
Downtime Monitoring Logging to the Relational Database
'Place the following code directly in the form you create and 'set a reference to Microsoft DAO 3.X Object Library. See 'Visual Basic Editor Help for details on setting references.
Public sDataSource As String
'This is the initialize routine that is called from the Event
'object's OnTrue event. It creates a public instance of the
'string name of the data source for the form to use.
Public Sub InitializeDataSource(DataSource As String)
sDataSource = DataSource
End Sub
'When the option button beside the text box is selected,
'enable and set focus to the text box.
Private Sub optDownTimeReasonFour_Click()
txtDownTimeReasonFour.Enabled = True
txtDownTimeReasonFour.SetFocus
End Sub
76 © 2022 General Electric Company. All rights reserved.

'When the form gets activated, set the first option to true
Private Sub UserForm_Activate()
optDownTimeReasonOne.Value = True
End Sub
'When the user selects OK, store which reason they chose.
Private Sub cmdOK_Click()
Dim DownTimeReason As String
If optDownTimeReasonOne.Value = True Then
DownTimeReason = optDownTimeReasonOne.Caption
ElseIf optDownTimeReasonTwo.Value = True Then
DownTimeReason = optDownTimeReasonTwo.Caption
ElseIf optDownTimeReasonThree.Value = True Then
DownTimeReason = optDownTimeReasonThree.Caption
ElseIf optDownTimeReasonFour.Value = True Then
If txtDownTimeReasonFour.Text <> "" Then
DownTimeReason = txtDownTimeReasonFour.Text
Else
MsgBox "Please enter a reason for the _
downtime event"
txtDownTimeReasonFour.SetFocus
End If
End If
'Call the AddDownTimeEventData subroutine to add the
'downtime information to the database.
Call AddDownTImeEventData(DownTimeReason)
Unload Me
End Sub
'This subroutine writes the data to the database and
'updates it.
'This database has not been provided and will need to be created
'for this subroutine to execute without error.
Public Sub AddDownTImeEventData(DownTimeReason As String)
'Create an instance of the Workspace.
Dim wrkSpace As Workspace
Set wrkSpace = CreateWorkspace("", "admin", "", dbUseJet)
'Open the downtime database.
Dim db As Database
Set db = wrkSpace.OpenDatabase(System.PicturePath & _
"\downtime.mdb")
'Create a recordset.
Dim rs As Recordset
Set rs = db.OpenRecordset("Packaging", dbOpenDynaset)
'Set up the time of downtime occurrence.
Dim TimeDate As Date
TimeDate = Now
rs.AddNew
rs.Fields(1) = TimeDate
rs.Fields(2) = TimeDate
rs.Fields(3) = sDataSource
rs.Fields(4) = DownTimeReason
rs.Fields(5) = Fix32.NODE1.downtimeperiod.f_cv
rs.Update
End Sub
© 2022 General Electric Company. All rights reserved. 77

Manipulating Charts
This chapter shows how to use VBA scripts to manipulate charts so they display real-time and historical
data for a given process value at the click of a button. The examples in this chapter show how to perform
the following chart tasks through scripting:
l Switch from real-time data to historical data at run time.
l Scroll historical data in a chart.
l Automatically update historical data in a chart.
l Set chart and pen properties at run time.
l Add a pen.
l Delete a pen.
l Change the pen data sources.
l Passing in external data to a pen.
l Change a chart's duration.
l Change a chart's start and end times.
l Zoom a pen.
l Pause a real-time chart.
For this example to work properly, you must have a previously-configured Extended Trend tag and you
must have already successfully trended this tag's data in a chart. Also, you will need to add three com-
mand buttons to your iFIX picture. The figure below shows how the picture might look.
78 © 2022 General Electric Company. All rights reserved.

Historical Trending Example
Switching from Real-time to Historical Data
This method uses two chart pens for the same value - one real-time pen and one historical pen - and
uses the Visibility property to switch between the two. Although you can do nearly the same thing by
simply changing the Source property on a single pen, this script is more advantageous because the his-
torical data is fetched while the historical pen is invisible. Therefore, operators do not have to wait as
long for the historical data to display. The pens are switched when the Back button is clicked, and the For-
ward button switches back to real-time once the scroll returns to the present time.
The code for these buttons is shown below:
Example: Scroll Back and Scroll Forward Buttons
Private Sub CommandButton2_Click() 'Scroll back button.
'If the real-time pen is scrolled back in time, switch
'to historical data.
If Chart1.Pens.Item(1).ShowLine = 1 Then
'Make the real-time pen invisible and historical
'pen visible.
Chart1.Pens.Item(1).ShowLine = False
Chart1.Pens.Item(2).ShowLine = True
© 2022 General Electric Company. All rights reserved. 79

'Set the historical pen to active.
Chart1.CurrentPen = 2
'Make real-time pen legend invisible and historic pen
'legend visible.
Chart1.Pens.Item(1).Legend.Visible = False
Chart1.Pens.Item(2).Legend.Visible = True
'Change the data type indicator.
Text26.Caption = "Historical Data"
End If
'If it's a historical pen, scroll the chart backward.
Chart1.ScrollBack
End Sub
Private Sub CommandButton1_Click() 'scrollforwardbutton
'If it's a real-time pen, scrolling forward is
'not available.
If Chart1.Pens.Item(1).ShowLine = 1 Then
MsgBox "Can't move into the future!", _
vbExclamation, "This isn't a Time Machine."
Exit Sub
End If
'If historical pen, scroll the chart forward.
Chart1.ScrollForward
'If historical pen is scrolled beyond current
'time, switch back to real-time.
If Chart1.EndTime >= Now Then
'Make the historical pen invisible and
'real-time pen visible.
Chart1.Pens.Item(2).ShowLine = False
Chart1.Pens.Item(1).ShowLine = True
'Set the real-time pen to active.
Chart1.CurrentPen = 1
'Make historical pen legend invisible
'and real-time pen legend visible.
Chart1.Pens.Item(1).Legend.Visible = True
Chart1.Pens.Item(2).Legend.Visible = False
'Change the data type indicator.
Text26.Caption = "Real-Time Data"
End If
End Sub
Scrolling Historical Data
This example shows how to create buttons to scroll through historical data and set the current time in a
chart.
Example: Creating Buttons that Scroll Back and Scroll Forward through Historical Data
and Set Current Time
Private Sub CommandButton1_Click() 'Scroll back button.
Chart1.ScrollBack
End Sub
80 © 2022 General Electric Company. All rights reserved.

Private Sub CommandButton2_Click() 'Scroll forward button.
Chart1.ScrollForward
End Sub
Private Sub CommandButton3_Click()
'This button manually sets the chart to the current time and
'refreshes the data.
Chart1.EndTime = Now
Chart1.RefreshChartData
End Sub
Automatically Updating a Chart
In a picture with a chart that contains historical data, you can create an event object that fires a script
while a digital tag is closed at a predefined interval. You can use this script to update your chart auto-
matically.
'This script sets the chart to the current time and refreshes
'the data at the interval specified in the event. For
'example, if you want a one minute refresh, the interval will
'be 60,000 ms.
Private Sub HistRefresh_WhileTrue()
Chart1.EndTime = Now
Chart1.RefreshChartData
End Sub
For more information on how charts scroll, refer to the Trending Historical Data manual.
Environment-specific Chart Properties and Methods
Most chart properties and methods function in both the configuration and the run-time environments.
However, some properties and methods are limited to a specific environment. These properties and
methods are listed in the following sections:
l Chart Properties Limited to the Configuration Environment
l Chart Properties Limited to the Run-time Environment
l Chart Methods Limited to the Run-time Environment
Chart Properties Limited to the Configuration Environment
The following Chart properties only function in the Configuration environment:
l DaysBeforeNow
l FixedDate
l FixedTime
l StartDateMode
© 2022 General Electric Company. All rights reserved. 81

l StartTimeMode
l TimeBeforeNow
NOTE: Run-time changes that you make to the configuration properties of a chart revert back to the original settings
once the display is closed.
Chart Properties Limited to the Run-time Environment
The following Chart properties only function in the run-time environment:
l EndTime
l StartTime
Chart Methods Limited to the Run-time Environment
The following Chart properties only function in the run-time environment:
l AutoScaleDisplayLimits
l GetTimeCursorInfo
l Refresh
l RefreshChartData
l ResetChartData
l ResetZoom
l ScrollBack
l ScrollForward
l SetTimeCursorTime
l XYHitTest
l Zoom
Environment-specific Pen Properties and Methods
Most Pen properties and methods function in both the Configuration and the run-time environments.
However, some properties and methods are limited to a specific environment. These properties and
methods are listed in the following sections:
l Pen Properties Limited to the Configuration Environment
l Pen Properties Limited to the Run-time Environment
l Pen Methods Limited to the Run-time Environment
Pen Properties Limited to the Configuration Environment
82 © 2022 General Electric Company. All rights reserved.

The following Pen properties only function in the Configuration environment:
l FixedDate
l FixedTime
l DaysBeforeNow
l TimeBeforeNow
l StartTimeType
l StartDateType
NOTE: Run-time changes that you make to the configuration properties of a Pen revert back to the original settings
once the display is closed.
Pen Properties Limited to the Run-time Environment
The following Pen properties only function in the run-time environment:
l AverageDataValue
l CurrentValue
l HighestDataValue
l LowestDataValue
l Starttime
l EndTime
Pen Methods Limited to the Run-time Environment
The following Pen properties only function in the run-time environment:
l AutoScaleDisplayLimits
l GetCurrentValue
l GetPenDataArray
l ResetChartData
l Refresh
l ScrollTimeForward
l ScrollTimeBack
l SetCurrentValue
l SetPenDataArray
l ValueTimeFromXY
l XYFromValueTime
Setting the Properties of Multiple Pens with One Call
© 2022 General Electric Company. All rights reserved. 83

Some Pen properties are also exposed at the Chart level, which allows you to set the properties of all
Pens within a Chart with one call. In some cases, the Chart property will reflect the value of the Cur-
rentPen. Keep in mind that if you have customized the properties of one of the Pens, setting one of these
properties through the Chart will overwrite any previous changes.
The following Pen properties can be set through the Chart:
l AutoScaleDisplayLimits l DaysBeforeNow
l Duration l EndTime
l FixedDate l FixedTime
l GetDuration l GetInterval
l GetTimeBeforeNow l HorizontalGridColor
l HorizontalGridStyle l Interval
l NumberofHorizontalGridLines l NumberofVerticalGridLines
l ScrollBack l ScrollForward
l SetDuration l SetInterval
l SetTimeBeforwNow l ShowDate
l ShowHorizontalGrid l ShowVerticalGrid
l ShowLegend l ShowTimeAxis
l ShowValueAxis l StartTimeMode
l ShowTimeAxisTitle l ShowValueAxisTitle
l StartDateMode l StartTime
l TimeAxisNumLabels l ValueAxisNumLabels
l TimeAxisNumTicks l ValueAxisNumTicks
l TimeAxisTitle l ValueAxisTitle
l VerticalGridColor l VerticalGridStyle
Adding a Pen
To add a new pen to a chart, use the following syntax:
Chart.AddPen("Fix32.NODE.TAG.F_CV")
In the configuration environment, adding a pen will expand the chart by the height of the legend line. At
run-time, the chart does not expand. Instead, the plot area shrinks.
Deleting a Pen
Deleting a pen is easy. For example, if you have a chart with three pens and you want to delete the
second, use the following syntax:
Chart1.DeletePen(2)
84 © 2022 General Electric Company. All rights reserved.

The deletion will not work if there is a script referencing the name of the pen you are trying to delete.
For example:
Pen2.PenLineColor = 255
Chart1.DeletePen(2)
This deletion will fail because there is a script explicitly using Pen2. Instead, use the following script
sequence:
Private Sub Rect2_Click()
Dim pPen As Object
Set pPen = Chart1.Pens.Item(2)
pPen.PenLineColor = 255
Chart1.DeletePen (2)
End Sub
If you delete all your pens, you will create a blank chart. To add the pen back into the chart, open the
Chart Configuration dialog box, or use the AddPen method in VBA.
NOTE: If you are deleting a single pen, and you want to add another, change the pen source via Pen.Source =
"Fix32.Node.Tag.f_cv". This will give your chart better performance.
Changing Data Sources in a Pen
The following example shows you how to change data sources in a pen.
Suppose you have a process variable, PumpTemp1 (AI) which is also the input tag for PumpTemp1-His-
tory (ETR storing an hour of data), and you are collecting historical data from PumpTemp1. To view the dif-
ferent data associated with PumpTemp1, create three buttons to view the different data, using the
script sequence that follows:
Private Sub Rect2_Click()
Pen1.Source = "Fix32.Area1.PumpTemp1.F_CV"
End Sub
Private Sub Rect3_Click()
Pen1.Source = "Fix32.Area1.PumpTemp1-History.T_DATA2"
End Sub
Private Sub Rect4_Click()
Pen1.Source = "Hist.Area1.PumpTemp1.F_CV"
'Now set the start time and fetch
Pen1.StartTime = #10/31/98 11:30:00 AM#
Chart1.RefreshChartData
End Sub
The previous example allows you to easily switch between different types of data. This next example
changes the data source of a pen by editing an object's Click event.
To change the data source of a pen by editing an object's Click event:
1. Create an AI block and a DO block in the database.
2. Create a chart and add a pen with DO as the data source.
3. Add a rectangle. Right-click the rectangle and select Edit Script from the pop-up menu.
4. Enter the following code in the rectangle's Click event:
Dim Obj As Object
© 2022 General Electric Company. All rights reserved. 85

Dim ChartObj As Object
Dim Count As Integer
Dim ChartCount As Integer
Set Obj = Application.ActiveDocument.Page.ContainedObjects
Count = Obj.Count
While Count > 0
If Obj.Item(Count).ClassName = "Chart" Then
ChartCount = Obj.Item(Count).ContainedObjects.Count
While ChartCount > 0
Set ChartObj = _
Obj.Item(Count).ContainedObjects._
Item(ChartCount)
If ChartObj.ClassName = "Pen" Then
ChartObj.Source = "Fix32.Thisnode.AI.F_CV"
End If
ChartCount = ChartCount - 1
Wend
End If
Count = Count - 1
Wend
5. Switch to the run-time environment and click the rectangle.
In the Chart, the Pen's Source will change from DO to AI.
Passing in External Data to a Pen
If you have a real-time pen defined, and attempt to pass external (SQL) data to the pen using the
SetPenDataArray method, the time and legend values keep updating with the real-time value.
To avoid this problem, disconnect from the real-time data source before calling the SetPenDataArray
method, as show in the following sample code:
Pen1.SetSource "ChartData", True
res=Pen1.SetPenDataArray (count, vtVal, vtDate, vtQual)
where ChartData can be any string.
The SetPenDataArray Method takes arrays of parameters. One of these parameters is quality. This para-
meter holds the OPC Quality of the data as a numeric constant. When creating your own data in a rela-
tional database, you need to specify a value of 192 for this field in order for your data to plot on the chart
object.
Keep in mind that the data you pass to a pen does not have to be from a SQL query - it can consist of any
external data. To bring this data into a pen, use the call Pen.SetPenDataArray. You can also use
GetPenDataArray to extract the data from the pen. Refer to the following example:
Example: Using GetPenDataArray to Extract Data from Pen
Dim lNumPts As Long
Dim vVal As Variant
Dim vPsa As Variant
Dim vQual As Variant
Pen1.GetPenDataArray lNumPts, vVal, vPsa, vQual
86 © 2022 General Electric Company. All rights reserved.

Example: SetPenDataArray Method with Hardcoded Values
The following is sample code for the SetPenDataArray method with hardcoded values. You can use this
code to test or show the functionality of this method. For this example to complete, the Quality(x) must
be equal to 192.
Private Sub Rect2_Click()
Dim iWrkSpace As Workspace
Dim db_var_name As Database
Dim record_var As Recordset
Dim iCount As Integer
Dim dVal As Variant
Dim dtDate As Variant
Dim lQual As Variant
Dim iResult As Integer
Dim iRow As Integer
Dim iCol As Integer
Dim i As Integer
'Please note that this example can handle a maximum of 500 points.
'If you need more points, increase the size of the
'following declarations.
Dim Value(500) As Double
Dim Times(500) As Date
Dim Quality(500) As Long
'Create an object on the iFIX WorkSpace and the
'Specified SQL database
Set iWrkSpace = CreateWorkspace("", "admin", "", dbUseJet)
Set db_var_name = iWrkSpace.OpenDatabase("Chart.mdb")
Set record_var = db_var_name.OpenRecordSet("Data Query", dbOpenDynaset)
record_var.MoveLast
iCount = record_var.RecordCount
record_var.MoveFirst
'Load the array with the Recordset values
For i = 0 To iCount - 1
Value(i) = record_var.Fields("Value").Value
Times(i) = record_var.Fields("Time").Value
'If the Quality(x) is not equal to 192 the Point
'will be ignored by the chart
Quality(i) = record_var.Fields("Quality").Value
record_var.MoveNext
Next i
'Close the connection with the SQL database
db_var_name.Close
'Set up the correct array types
dVal = Value
dtDate = Times
lQual = Quality
iResult = Pen1.SetPenDataArray(iCount, dVal, dtDate, lQual)
End Sub
© 2022 General Electric Company. All rights reserved. 87

Changing the Chart Duration
The following script specifies a ten-minute chart:
Chart1.Duration = 600
You can also use the following:
Chart1.SetDuration 0, 0, 10, 0
The end time will be calculated as the start time plus the duration. If you are using historical pens, you
can fetch the data again by using:
Chart1.RefreshChartData
Changing the Start and End Times
To set the start time in your chart to Oct.31 at 12:30, enter the following script:
Chart1.StartTime = #10/31/98 12:30:00 PM#
The end time is calculated as the start time plus the duration.
Or use:
Chart1.EndTime = #10/31/98 12:30:00 PM#
The start time is calculated as the end time minus the duration.
If you are using historical pens, you can fetch the data again by using:
Chart1.RefreshChartData
Zooming
If the chart is selectable, you may use the mouse to enclose an area in the chart to zoom to in a rectangle
selector. Alternately, you can use scripts to set the pen Hi and Lo limits to zoom:
'Original limits are 0 to 100, but data is fluctuating
'between 60 and 80.
Pen1.HiLimit = 85
Pen1.LoLimit = 55
'To zoom back out:
Pen1.HiLimit = 100
Pen1.LoLimit = 0
'The following method has the same effect:
Chart.ResetToOriginal
'Or you can also call this method, which would set the
'HI limit to 80 and the LO Limit to 60:
88 © 2022 General Electric Company. All rights reserved.

Chart1.AutoScaleDisplayLimits
Pausing a Real-time Chart
If you are using real-time pens, you may want to pause the display to examine data. To do this, use the
following script:
Chart1.Pause
'Now, to Resume:
Chart1.Resume
'There is a timeout associated with the Pause/Resume such
'that if the chart is paused for longer than the timeout,
'the chart will automatically resume. For example, to
'restart the chart after a minute:
Chart1.Timeout = 60
Chart1.Pause
Keyboard Accelerators
The following keyboard accelerators are available to a selectable chart:
Keyboard Accelerator Default Purpose
Ctrl + Left Arrow Moves the time cursor one pixel to the left.
Ctrl + Right Arrow Moves the time cursor one pixel to the right.
Shift + Ctrl + Left Arrow Moves the time cursor ten pixels to the left.
Shift + Ctrl + Right Arrow Moves the time cursor ten pixels to the right.
Ctrl + Up Arrow Selects the next pen to be the current pen.
Ctrl + Down Arrow Selects the previous pen to be the current pen.
Using the Pens Collection
The pens contained in a chart are exposed in a collection called Pens. If you are constantly adding and
deleting pens, writing specific scripts which operate on those pens may become cumbersome. Another
way to write your scripts is to access Chart.Pens.Item(3) rather than access Pen3, for example. The order
of the pens in this collection is the order that they appear in the Pen list in the Chart Configuration dialog
box and in the legend.
Using the collection will also allow you to avoid any problems deleting pens that have scripts explicitly ref-
erencing them. Because of these advantages, we recommend you use the collection when you work with
pens often.
Using RefreshChartData
© 2022 General Electric Company. All rights reserved. 89

When using historical pens, if any of the time parameters change (StartTime, EndTime, Duration), you
must call the method Chart.RefreshChartData in order to fetch the new data. If you are using ScrollFor-
ward and ScrollBack, calling RefreshChartData is not necessary.
Scrolling an Enhanced Chart VBA Example
The following code examples enable scrolling in an Enhanced Chart via scripting. This scrolling works sim-
ilar to the scrolling provided with the current Historical Dynamo. The following code examples require a
reference to the general data set “iFIX GeneralDataSet Object v 1.0 Type Library” in order to work prop-
erly.
Scrolling Forward (50%)
Dim dtTime As Variant
Dim dtDate As Variant
Dim dInterval As Long
' set scroll percentage
dInterval = LineChart1.Duration
dInterval = dInterval / 2 ' 50%
'scroll time
dtTime = GeneralDataset1.FixedTime
dtTime = DateAdd("s", dInterval, dtTime)
GeneralDataset1.FixedTime = dtTime
' scroll date
dtDate = GeneralDataset1.FixedDate
dtDate = DateAdd("s", dInterval, dtDate)
GeneralDataset1.FixedDate = dtDate
'refresh chart
LineChart1.RefreshChartData
Scrolling Backward (25%)
Dim dtTime As Variant
Dim dtDate As Variant
Dim dInterval As Long
' set scroll percentage
dInterval = LineChart1.Duration
dInterval = 0 - (dInterval / 4) ' 25%
'scroll time
dtTime = GeneralDataset1.FixedTime
dtTime = DateAdd("s", dInterval, dtTime)
GeneralDataset1.FixedTime = dtTime
' scroll date
dtDate = GeneralDataset1.FixedDate
dtDate = DateAdd("s", dInterval, dtDate)
GeneralDataset1.FixedDate = dtDate
'refresh chart
LineChart1.RefreshChartData
NOTE: Launching the Configuration dialog box is accomplished via the ShowCustomPages function call.
90 © 2022 General Electric Company. All rights reserved.

These quick examples are limited in that they only operate on one data set within the Enhanced Chart
and they access this data set by name. You can easily expand upon these examples to cover all data sets
or just certain data sets within an Enhanced Chart by doing the following:
1. Retrieve the total number of data sets using the following method: GetNumberOfDataSets().
2. Iterate from 0 to the Number of Data Sets – 1.
3. Retrieve each data set via a call to the GetDataSetByPosition() method.
NOTE: There is no longer a need to check whether a data source is historical or not before setting any time
related properties. The GeneralDataSet will apply the time related properties accordingly.
4. Execute the code function calls provided in the above code examples.
Creating Custom Dynamos
This chapter provides an example for creating your own custom Dynamo object and Dynamo set. Once
you become more comfortable building Dynamo objects, you can learn quite a bit about writing VBA
scripts that work with iFIX by examining the scripts behind the Dynamo objects.
The following section, Creating a New Custom Dynamo, displays the actual example.
NOTE: In iFIX Dynamo sets, Dynamo objects are assigned their own properties with Get and Set functions and sub-
routines. This is the methodology we suggest for building complex Dynamo objects.
Creating a New Custom Dynamo
The following procedures demonstrate examples of how to create and use custom Dynamo objects in
iFIX.
To build a Dynamo object:
1. Open a new picture.
2. Insert an Oval.
3. In the Properties window, change the Name property of the Oval to dynOval.
4. For the dynOval object, animate the VerticalFillPercentage property to any tag in the process
database.
5. Insert a second Oval.
6. In the Properties window, change the Name property of the Oval to dynOval2.
7. Select both ovals.
8. Right-click the selected ovals, and select Dynamo. The Build Dynamo Wizard appears.
NOTE: You can also click the Build Dynamo button, the first button on the Dynamo toolbar to open this dialog
box.
9. In the Dynamo Name field, enter a name, if you do not want to use the default name.
10. Optionally, in the Object Description field, enter a description for the object.
© 2022 General Electric Company. All rights reserved. 91

11. In the User Prompt field, enter a prompt such as FillColor.
NOTES:
l Ensure you enter a value here. If you do not enter a value, the user will not be shown the value in a user
prompt, and as a result not have the option of changing it later. However, you can access this value
manually from the Property window.
l If you added multiple animations in this Dynamo object and you wanted them to all use the same
value, enter the same name in all User Prompt fields. This results in one user prompt that changes all
animations.
12. Click OK.
To build a Dynamo form:
1. Right-click the Dynamo object and select Edit Script from the pop-up menu.
2. In the Microsoft Visual Basic Editor, on the Insert menu, select UserForm.
3. If the Properties window is not already displayed, on the View menu, select Property Window.
4. In the Properties window, change the Name property of the form to frmDyn1.
5. On the Tools menu, click Additional Controls.
6. Select the iFIX Expression Editor Control and click OK.
7. Select the Expression Editor control on the toolbox and add it to the form.
8. Add a Command button on the form.
9. Right-click the Command button and select View Code from the pop-up menu.
10. Enter the following script:
frmDyn1.hide
11. Select "General" from the Object Drop Down List (in the upper left of the Code Window).
12. Enter the following script:
'FormVersion: 1.0
13. Select the script window for dynOval.
14. Choose Edit from the Procedure drop-down list.
15. Enter the following script:
Private Sub DynamoObjectName_Edit()
Dim FillObj As Object
frmDyn1.Show
'FindLocalObject (below) is a subroutine in
'FactoryGlobals Global Subroutines. In this case, it
'finds the animation object that you created off of the
'oval in step 4 of Building the Dynamo Object.
Set FillObj = FindLocalObject(DynamoObjectName, _
"AnimatedVerticalFillPercentage")
FillObj.Source = frmDyn1.ExpressionEditor1.EditText
End Sub
16. Save your project and close the Microsoft Visual Basic Editor.
To create a Master Dynamo and place it in a Dynamo set:
1. In the iFIX WorkSpace, in Ribbon view, on the Home tab, in the New group, click Dynamo Set.
- Or -
92 © 2022 General Electric Company. All rights reserved.

In Classic view, on the File Menu, select New Dynamo Set.
An empty Dynamo set appears.
2. Drag the Dynamo that you created earlier in this section into the new Dynamo set. The Add
Objects to Dynamo Set dialog box appears.
3. In the Add Objects to Dynamo Set dialog box, select Create a new Master Dynamo and then click
OK. The object becomes a new Master Dynamo in the Dynamo set.
4. Select Save from the File menu and name your Dynamo set.
For more information on Dynamos, refer to the Creating Pictures manual.
Working with iFIX Security
The examples in this chapter illustrate how to use VBA scripts that work in conjunction with iFIX Security.
Refer to the following sections:
l Using the Login Subroutine
l Getting User Information
You can read more about iFIX Security in the Configuring Security Features manual.
Using the Login Subroutine
The following script is an excerpt from the code for the Application Tabular's Login button. This script
opens the Login application using the VBA Shell function.
Example: Excerpt from Script which opens the Login Application
Public Sub SecurityLogin()
Dim strPath As String
On Error GoTo ErrorHandler
'Get the default iFIX directory.
strPath = System.ProjectPath
Shell strPath & "\Login.exe -m", 1
Exit Sub
ErrorHandler:
HandleError
End Sub
Getting User Information
This script uses the System object's FixGetUserInfo method to get security information about the user.
Example: Using the System Object's FixGetUserInfo Method
Public Sub SecurityGetUser()
Dim Result As Integer
Dim UserID As String
© 2022 General Electric Company. All rights reserved. 93

Dim UserName As String
Dim GroupName As String
Dim UserInfo As String
System.FixGetUserInfo UserID, UserName, GroupName
MsgBox "Login Name: " & UserID & vbCr & "Full Name: " _
& UserName & vbCr & "Clearance Level: " & GroupName
End Sub
Creating Tag Groups
The examples in this chapter illustrate how to use VBA scripts to create and use tags. It includes the fol-
lowing sections:
l Creating the Tag Group File Object
l Retrieving Tag Group Data
l Modifying Tag Group Data
l Manipulating Tag Groups
For more information on tag groups, refer to the Creating Pictures manual.
Creating the Tag Group File Object
You can create or modify a tag group file using the TagGroupDefinitionInterface. You can access the inter-
face by creating a tag group file object. The following script creates a tag group file object.
Dim TGD as Object
set TGD = _
CreateObject("TagGroupDefinitionInterfaceDll.TagGroupDefinitionInterface")
Retrieving Tag Group Data
Once you create the tag group file object, you must retrieve the data in the file before you can modify it.
To retrieve the data, use the following script.
'TokenList is an array of tag group symbols
Dim sTokenList() as String, TokenList as Variant
'ReplacementList is an array of tag group substitutions
Dim sReplacementList() as String, ReplacementList as Variant
'DescriptionList is an array of tag group descriptions
Dim sDescriptionList() as String, DescriptionList as Variant
'Create the tag group file object
Dim TGD As Object
Set TGD = _
CreateObject("TagGroupDefinitionInterfaceDll._
TagGroupDefinitionInterface")
'In order for the following method to execute without error,
'you need to have a Tag Group file named test or you replace
94 © 2022 General Electric Company. All rights reserved.

'the "test" parameter with the name of your tag group file.
TGD.RetrieveDefinition "Test", 2, TokenList, ReplacementList, _
DescriptionList
Modifying Tag Group Data
After the tag group data is retrieved, your script can modify the data. For example, you can change an ele-
ment in the sReplacementList array and then save to the tag group file with the UpdateDefinition
method.
The following script shows how to change the substitution for elements 2 and 3 and save them to the tag
group file.
Example: Modifying Tag Group Data
Dim sTokenList(4) as String, TokenList as Variant
Dim sReplacementList(4) as String, ReplacementList as Variant
Dim sDescriptionList(4) as String, DescriptionList as Variant
Dim TGD As Object
'Retrieve Tag Group data from tag group file
Set TGD = CreateObject("TagGroupDefinitionInterfaceDll._
TagGroupDefinitionInterface")
'In order for the following method to execute without error,
'you need to have a tag group file named "test1" or you will
'replace the "Test1" parameter with the name of your tag group 'file.
TGD.RetrieveDefinition "Test1", 4, TokenList, ReplacementList, _
DescriptionList
'Modify tag group data
TokenList(2) = "Tag3"
TokenList(3) = "Tag4"
ReplacementList (2) = "FIX32.NODE2.AI1.F_CV"
ReplacementList (3) = "FIX32.NODE2.AI2.F_CV"
DescriptionList (2) = "Temperature for Node 2"
DescriptionList (3) = "Pressure for Node 2"
'Create the tag group file object and save modified tag group file
Set TGD = _
CreateObject("TagGroupDefinitionInterfaceDll._
TagGroupDefinitionInterface")
TGD.UpdateDefinition "Test", 4, TokenList, ReplacementList, _
DescriptionList
Set TGD = Nothing
Manipulating Tag Groups
As a final example, we provide the following Command button script. This script iterates through all the
tag group variables in a picture and creates a substitution string based on the name of the tag group vari-
able.
This script assumes that the picture containing the Command button has retrieved the tag groups from
the Tag Group object with the RetrieveDefinition method first.
© 2022 General Electric Company. All rights reserved. 95

Example: Manipulating Tag Group Data
Private Sub CommandButton1_Click()
Dim vaSymbols As Variant
Dim vaSubstitutions As Variant
Dim vaDescriptions As Variant
Dim sSubstitutions() As String
Dim sDescriptions() As String
Dim PicPath as string
'This will contain the number of symbols in a picture
Dim Size As Integer
Dim Counter As Integer
Dim FileName As String
'Set the filename
FileName = "Test"
'Delete tag group file if it exists. Kill permanently
'deletes the specified file form the hard drive. Use with
'caution.
PicPath = System.PicturePath
If DIR(PicPath + FileName + ".TGD" <> "" Then
Kill PicPath + FileName + ".TGD"
End If
'Get the symbols from the picture
Me.RetrieveTagGroupVariables Size, vaSymbols
If Size = 0 Then
Exit Sub
End If
ReDim sSubstitutions(Size - 1) As String
ReDim sDescriptions(Size - 1) As String
'Fill in the symbols and the descriptions
For Counter = 0 To Size - 1
Temp$ = "Fix32.thisnode." + vaSymbols(count2) + ".f_cv"
sSubstitutions(Counter) = Temp$
sDescriptions(Counter) = "Generated tag"
Next Counter
'Create the tag group file object
Dim TGF As Object
vaSubstitutions = sSubstitutions
vaDescriptions = sDescriptions
Set TGF = _
CreateObject("TagGroupDefinitionInterfaceDll_
.TagGroupDefinitionInterface")
TGF.UpdateDefinition FileName, Size, vaSymbols, _
vaSubstitutions, vaDescriptions
96 © 2022 General Electric Company. All rights reserved.

Index
A
accessing56
databases61
real-time data56
ActiveX Data Object model61
adding a pen84
ADO61
alarm areas17
animations28
connecting to data sources20
Format object29
Linear object28
Lookup object29
Auto-List Members24
Auto-Quick Info24
B
BaseCount20
browsing objects27
C
charts
changing duration77
changing end time77
changing start time77
duration88
keyboard accelerators89
methods81
pausing77
properties81
scrolling80
zooming88
ClosePicture49
closing pictures49
code13
compiling13
cutting and pasting21
saving13
testing13
Code window9
collections20
compiling13
connections29
animation objects to data sources20
connecting and disconnecting object's prop-
erty33
creating direct connection to an object66
direct66
example42
making29
objects to data sources28
context-sensitive help25
creating94
tag groups94
D
DAO61
data
reading57
Data Access Object model61
data entry69
data link68
© 2022 General Electric Company. All rights reserved. 97

data sources28
changing at run-time65
changing data source of a link68
changing FIX event's data source68
connecting animation objects to20
connecting objects to28
Data System OCX56
database access61
declaring variables13
deleting pens84
direct connections29
DoEvents function71
DoEvents Function72
warning about using72
Dynamos91
E
error handling17
errors22
tracking in subroutines22
event-based entries75
Experts16
F
FactoryGlobals49
FactoryGlobals page51
file types11
in VBA11
FindReplace object69
FIX event68
FIX32 global variables in iFIX52
format animations28
forms
creating global forms69
global51
using VBA forms10
using VBA forms within iFIX10
G
global
FactoryGlobals page51
forms69
procedures55
threshold tables54
User page51
variable objects52
global pages23
global variables52
H
historical data79
switch from real-time to historical data79
host application5
I
iFIX
object model27
intErrorMode parameter22
K
keyboard accelerators
WorkSpace19
L
linear animations28
98 © 2022 General Electric Company. All rights reserved.

Login93
Login subroutine93
lookup animations28
M
manipulating tag groups95
methods82
global51
pen82
modifying tag group data95
modules5
N
naming conventions17
O
object hierarchy27
objects67
availability in the VB Editor26
browsing27
connections29
direct connections29
global51
hierarchy27
variable67
opening pictures49
OpenPicture49
operator messages17
Option Explicit14
P
pens88
adding84
changing data sources85
deleting84
methods82
properties82
setting properties83
zooming88
pens collection89
PictureAlias49
pictures
aliasing49
closing50
opening50
replacing49
procedures55
Project Explorer7
project options14
projects5
properties82
pen82
Properties window7
R
RDO61
reading data56
ReadValue17
real-time data80
accessing56
switch from real-time to historical data79
references21
RefreshChartData method89
Remote Data Object model61
replacing pictures49
© 2022 General Electric Company. All rights reserved. 99

run-time environment65
S
saving code13
Scheduler71
scripts
adding a Pen84
animating a rectangle's rotation42
automatically updating a chart81
changing a chart's duration88
changing a FIX event's data source68
changing data sources85
changing displays49
connecting animation objects to data
sources20
creating a shape20
cutting and pasting21
deleting a pen84
general tips19
getting user information93
global51
logging in93
making an animations connection31
manipulating charts78
passing external data to a pen86
reading data56
reading from database tags59
reusing21
scrolling historical data80
switching from real-time to historical
data79
using ActiveX Data Objects61
using SQL65
using subroutines and Experts16
using with event-based entries75
using with time-based entries74
writing data56
writing to database tags59
zooming a chart88
scripts that loop through documents
collection23
security93
SendOperatorMessage17
shortcuts16
single-threaded processing72
SQL65
subroutines16
T
tag groups
creating94
manipulating95
modifying95
testing code13
threshold tables54
time-based entries74
Timers72
using instead of DoEvents72
tracking22
errors in subroutines22
U
User page51
using16
100 © 2022 General Electric Company. All rights reserved.

V
variable object67
variable objects51
global51
variables14
VBA
Code window9
context-sensitive help25
Editor5
file types11
forms10
help23
modules5
naming conventions11
options13
project components5
Project Explorer7
project options14
Properties window7
references21
saving code13
testing code13
useful features23
Variables14
Visual Basic Editor5
VBA 6.04
developer add-ins5
digital signatures5
multi-threaded projects5
passwords5
unsupported features4
VBA sample script list1
Visual Basic Editor5-6
W
WriteValue17
writing data56
Z
zooming88
© 2022 General Electric Company. All rights reserved. 101
