HOW TO USE NDSU DISQUISITION TEMPLATES
A Manual
Submitted to the Graduate Students
of the
North Dakota State University
of Agriculture and Applied Science
By
NDSU Dissertation and Thesis Coordinator
In Partial Fulfillment of the Requirements
for the Degree of
[NAME OF DEGREE]
Major Department:
Graduate School
March 2023
Fargo, North Dakota
ii
TABLE OF CONTENTS
INTRODUCTION .......................................................................................................................... 1
Benefits of Using the Templates ................................................................................................. 1
Resources .................................................................................................................................... 1
OVERVIEW ................................................................................................................................... 2
ESSENTIAL FORMATTING TOOLS .......................................................................................... 3
Paragraph Markers ...................................................................................................................... 3
Line Numbers and Gridlines ....................................................................................................... 3
Format Painter ............................................................................................................................. 4
Change Case ................................................................................................................................ 5
Paste Special – Unformatted Text ............................................................................................... 5
STYLES .......................................................................................................................................... 7
The Styles Pane ........................................................................................................................... 7
Getting to Know the NDSU Template Styles .............................................................................. 8
Applying a Style .......................................................................................................................... 8
Removing a Style ........................................................................................................................ 9
Modifying a Style ........................................................................................................................ 9
Creating a New Style ................................................................................................................. 10
Notes Regarding Heading Styles ............................................................................................... 11
AUTO-NUMBERED HEADINGS .............................................................................................. 12
Summary of Headings and Where to Use Them ....................................................................... 13
PREFATORY MATERIAL (FRONT MATTER) ....................................................................... 14
Title Page ................................................................................................................................... 14
Disquisition Approval Page ...................................................................................................... 15
Abstract, Acknowledgments, etc. .............................................................................................. 16
iii
List of Abbreviations/Symbols .................................................................................................. 16
A Note on Page Breaks and Section Breaks ............................................................................. 16
TABLE OF CONTENTS AND LISTS OF TABLES AND FIGURES ....................................... 18
Table of Contents ...................................................................................................................... 18
Updating the Table of Contents ................................................................................................ 18
Lists of Tables and Figures ....................................................................................................... 18
Updating a List of Tables or Figures ......................................................................................... 19
Summary of Formatting Changes after the Update ............................................................... 20
TABLES AND FIGURES ............................................................................................................ 21
Positioning Tables and Figures ................................................................................................. 21
CONCLUSION ............................................................................................................................. 22
APPENDIX: FORMATTING TIPS and PARAGRAPH SETTINGS ......................................... 23
Dot Leaders in the Tables of Contents and Lists of Things ...................................................... 24
Other Alignment Setting Recommendations ............................................................................. 25
Aligning Equations .................................................................................................................... 26
Splitting a Table to Place a Continued Title ............................................................................. 27

1
INTRODUCTION
This manual is intended to guide NDSU graduate students in using the disquisition
formatting templates provided by the Graduate School. This manual lists essential formatting
tools, introduces the use of Styles, and provides instructions for specific pages and formatting
tasks for your disquisition. An appendix covers other useful formatting tips and settings.
Benefits of Using the Templates
We highly recommend using our templates because we believe they will help you get
your material in the right order and in an approvable format quickly and easily.
• You can choose one for numbered headings or one for non-numbered headings.
• They contain essential and optional material in the correct order and format.
• They have automated formatting features using Styles and Tabs settings
• You can auto-update your Table of Contents.
• The LAIC consultant and the Dissertation & Thesis Coordinator can help you
diagnose and fix issues more quickly if you are using the templates.
• You can modify the Styles to change your table and figure title styles to fit your
discipline’s style manual—see the Styles section of this guide.
Resources
For video tutorials on using the template and formatting your disquisition in Word, see
our Word Crash Course video series on the NDSU GPS YouTube channel.
For questions about the NDSU formatting guidelines and disquisition policies and
procedures, contact the Dissertation and Thesis Coordinator at [email protected].
For help with Word formatting functions, or to find workshops in using Word or formatting your
disquisition, visit the Learning and Applied Innovation Center (LAIC).

2
OVERVIEW
There are two disquisition templates: Auto-Numbered and Non-Numbered. If you want
numbered headings (1.1., 1.2., 1.2.1., and so on), choose the Auto-Numbered Headings template.
If you are not numbering your headings, choose the Non-Numbered Headings template.
Each template contains: a title page, disquisition approval page, abstract,
acknowledgments, dedication, table of contents, prefatory lists, chapters, references, and two
appendices. Some sections are optional and may not apply to your content, so you may delete the
pages you will not be using. If you are including sections in your disquisition that do not fall into
the above categories, then you must manually generate the new pages—this guide will help you.
The table of contents is set up so you can automatically update it. The automation is
dependent on using the Styles Pane to format your headings. With automation, if you were to
change the above heading “OVERVIEW” to “SUMMARY” and move it to a different page, the
table of contents can be updated quickly and easily in order to reflect those changes.
For your convenience, a sample table, figure, appendix table, and appendix figure have
been added, along with pre-formatted titles and notes. The prefatory lists (List of Tables, Figures,
Abbreviations, Symbols, Appendix Tables, and Appendix Figures) appear in the order required
by our format guidelines, and the table/figure lists can also be automatically updated, although
some additional formatting with be required after the update before you make a final PDF.
Each template relies heavily on Word Styles to maintain consistency and enable
automatic updates. This manual will briefly cover the styles used and how they work to provide
the automated prefatory lists. A thorough, informative overview of Word Styles can be found at
http://www.addbalance.com/usersguide/styles.htm.
Questions regarding the templates can be directed to [email protected].

3
ESSENTIAL FORMATTING TOOLS
Paragraph Markers
It can be easier to see the different paragraphs in your document if you turn the paragraph
markers on. A paragraph marker is a symbol that looks like this: ¶. It appears at the end of each
paragraph or place where you pressed the Enter key, and can be turned on and off by selecting
the icon shown below, in the “Paragraph” subset of the “Home” tab:
Line Numbers and Gridlines
Line Numbers and Gridlines are two tools that can help you identify empty lines of text at
the top margin, extra line spacing between paragraphs or around tables and figures, or page
numbers that are misaligned from one section to another.
Line Numbers will number each line of possible text. You can see if you have double-
spacing or single, and if there is a blank line of space. Find it in the Layout tab, and choose the
type of numbering you want to see. Be sure to turn the numbering off again (None) before
making your PDF for submission, because the line numbers will print in your PDF otherwise.
Gridlines place a grid over all usable space so you can see the margins and how your
content fits in relation to the margins. They can also help you align page numbers or the different

4
components of multipart figures. You can find the Gridlines in the View tab. Be sure to turn off
the Gridlines before making your PDF.
Format Painter
The“Format Painter” tool will copy formatting already in use, then deploy it onto another
part of the document. It can be found in the “Clipboard” subset of the “Home” tab:
To use Format Painter, place your cursor into a paragraph that contains the formatting
you’d like to use. Select Format Painter, then bring your cursor to an unformatted paragraph. The
unformatted paragraph will then take the same style and formatting.
Format Painter can be single-use or continuous-use. A single click (as described in the
previous paragraph) will allow you to format a single paragraph and be done. To use Format
Painter on multiple paragraphs, you would select the formatting you want to use then double-
click on Format Painter. You can now use it continuously until you turn off the painter. When
you are done with the painter, click the Format Painter one last time to turn it off.
Format Painter can be very helpful. For example, if I were to paste a block of
unformatted text into the front of my document, I could apply styles directly from the
surrounding paragraphs instead of searching through the styles pane. Format Painter is a great
tool to help provide the consistency we are looking for.

5
Change Case
Our guidelines call for major headings to appear in ALL CAPS and for subheadings to be
consistent in the use of either title case (capitalize all words except for articles, conjunctions, and
prepositions) or sentence case (capitalize only the first word and any proper nouns) across a
given level of subheading. If you need to change the case of a selection of text, you can use the
Change Case tool next to the font size controls. From a pull-down menu you can choose to
capitalize all letters, place something in sentence case, or capitalize each word.
Do not trust this tool to fix everything with heading case. For example, the “Capitalize
Each Word” option is close to title case, but not completely—you’ll have to manually change the
articles, conjunctions, and prepositions. The grammar checker is usually good about suggesting
most of those changes, but not all, so you will need to double-check. (If you are unsure what a
proper title-case heading in your style manual is, there are some online case converters you can
find to help you which allow you to set it for a particular style manual.)
Paste Special – Unformatted Text
You may have already created your disquisition, but now wish to convert it into a
template-based document. Or, you may wish to paste a quotation from another document or from
online into the template. When doing so, there is an important point to keep in mind.
Word is a computer program, and lying beneath it is code. At times, Word struggles with
incorporating outside information into a document while remaining stable. Text that is pasted in
carelessly may bring in unnecessary styles and headings, along with other code that will cause
problems as you continue to work.

6
One way to prevent issues when bringing new text into your document is to paste it
unformatted. To do this, instead of using Ctrl+V to paste in the text, type Ctrl+Alt+V and select
“Unformatted Text” from the menu that appears. This is simply a best practice to ensure a
healthy, stable document.
Once you do this, make sure to check for any in-paragraph formatting (for example, bold
and underlined text), as pasting unformatted removes this as well.
Use Ctrl + Alt + V to Paste Special as Unformatted Text
to prevent copy/paste problems.

7
STYLES
A Style is a preconfigured set of formatting characteristics that can be applied to
paragraphs to ensure consistency throughout your document. For example, this paragraph is set
to the Style “Body Double Space 0.5 First Line,” which means it is body text, double-spaced,
and has a 0.5 inch first line indent. The title above it (“STYLES”) is set to “GS1,” the Graduate
School’s style for major headings, which is pre-set to be bold and centered. Every paragraph of
standard body text in this document is also styled with “Body Double Space 0.5 First Line,” and
every major heading is styled with “GS1.” The second-level subheadings, such as “The Styles
Pane” below, is using the style “GS2”.
The majority of errors found during disquisition review are errors of inconsistency, and
Styles work to prevent this. In addition, they allow for the creation of an automated Table of
Contents.
The Styles Pane
To interact with styles in the template, open the styles pane by selecting the small arrow
button in the “Styles” subset of the “Home” tab:
If you would like the styles pane to be anchored to the right side of the window, select it
and drag it into the right side of the screen.
If you would like to see the styles as they appear in the document, select “Show Preview”
at the bottom of the pane.

8
To see ONLY the styles in use in the template, choose “Options,” and select “In Use”
from the “Select styles to show” drop-down menu:
Getting to Know the NDSU Template Styles
The styles used in each template are designed to provide the components your
disquisition will need: a basic body text paragraph, headings that will also appear in the
automated Table of Contents, and table/figure titles and notes.
When the cursor is placed into any paragraph, the style of that paragraph will be
highlighted in the Styles pane:
Placing the cursor in differing paragraphs throughout the template can give an overall
idea of its framework. The majority of the paragraphs contain a style, while some do not (they
show Word’s default “Normal” style and have been directly formatted). The paragraphs in the
template that do not contain a style have been specifically set that way, and styles should not be
applied to them.
Applying a Style
To apply a style, place your cursor into the paragraph you would like to be styled, then
left-click the style in the styles pane.

9
Removing a Style
To remove styles (and all other formatting) from a paragraph, select “Clear All” from the
styles pane. You can also choose the icon circled below in the “Font” subset of the “Home” tab:
This will set the paragraph back to the default style “Normal.”
Modifying a Style
Note: For the template with auto-numbered headings, changing the heading numbering
will be covered later in this document.
If you would like to modify a style, move your cursor to the paragraph marker icon to the
right of the style. It will change into an arrow. Select the arrow, and choose “Modify.” This will
open a dialog box which will allow you to change almost any feature of that style.
Modifying a style will change the formatting of all paragraphs containing that style in
your document.
• To change aspects of the formatting, choose the “Format” button at the bottom.
• If you would like to set a style to automatically update, select the “Automatically
Update” check box. Note: if you set a style to update automatically, then
changing the formatting of any paragraph containing that style will cause the style
(and all other paragraphs with that style) to adopt that formatting change.

10
Creating a New Style
If the template does not contain a style that you need, you can create a new style by
selecting the “New Style” button at the bottom of the styles pane:
This will open a dialog box with a wide variety of formatting options to choose. At the
top, you will find:
• “Name:” is the title of the style, and can be whatever you would like.
• “Style type:” For purposes of the templates, we will only use the “Paragraph”
style type.
• “Style based on:” Basing your style on Normal is highly recommended, as basing
a style on anything other than Normal creates unnecessary complications.
• “Style for following paragraph:” This sets what style the next paragraph will be if
you hit Enter while the cursor is at the end of a paragraph. As in the above image
(where “Style1” is followed by “Style1”), it is recommended, in most cases, that a
style be followed by itself. However, setting a heading style to be followed by a
body text paragraph can be helpful.
11
Once you have selected these features, continue to choose the remaining formatting
options for your style. Many additional formatting options can be found by clicking on the
“Format” button in the lower left corner of the style creation dialog box.
When complete, select “OK” and your new style will be created.
Notes Regarding Heading Styles
You will notice that the style pane contains five numbered headings such as Heading 1,
Heading 2, and so on. Do not use these styles—they are default heading styles in Word, but they
are not the styles of our template, so they will not match in style, and they won’t work for the
automated Table of Contents. Our template headings are GS1, GS2, GS3, GS4, and GS5 (the
numbered headings template goes to GS5).
GS1 is the style for major headings in both templates; however, the Auto-Numbered
Headings template has an additional GS1 heading—“GS – Major Heading”—which is for the
non-numbered major headings (prefatory and end-matter headings).
Note: Major headings (GS1 and GS – Major Heading) must be in ALL CAPITAL
LETTERS. While changing a selection of text’s case to UPPERCASE or ALL CAPS can be
built into the styles, text that is turned into ALL CAPS by this method will not necessarily retain
that ALL CAPS styling in the Table of Contents entry when an automatic update is applied.
Consequently, we ask at this time that you manually place major headings into ALL CAPS by
using the Caps Lock key or the UPPERCASE option from the Change Case menu. Lastly, be
sure to double-check your ALL CAPS headings for correctness—spell check will not catch typos
in ALL CAPS, so this is a common place we see proofreading errors.

12
AUTO-NUMBERED HEADINGS
The Graduate School offers a template containing auto-numbered headings, which means
that the headings contain numbers (“1. INTRODUCTION,” “1.1. First Subheading,” and so
forth), and these numbers will automatically change as headings are added to the document. This
can be very useful, as it ensures that the subheading following 1.1 is 1.2, and so forth.
However, changing the format of heading styles that use automatic numbering is not
recommended. This is because you may have to go into the list number formatting (not just the
style or paragraph formatting) to correct issues that arise, for example, from setting a heading to
be left-aligned instead of centered.
The problem is that Word offers format settings for both the text itself and the number. A
seemingly simple change to the alignment can send the heading into the left margin. To access
the number format, begin by ensuring that the cursor is in a paragraph styled with “GS1”. Then,
click on the circled item in the “Paragraph” subset of the “Home” tab:
Then choose “Define New Multi-Level List”. This will open the following dialog box:

13
To make any needed corrections, try adjusting the settings in the lower half of this box
(for example, “Number alignment”). You may have to adjust both the alignment of the text and
the number alignment in order for the heading to be aligned correctly.
Again, in the auto-numbered template, the best option is to leave the headings in their
current format. If you want to experiment with the headings, we recommend that you save a
copy of your current document before the attempt so you can go back to that one if you need to.
Summary of Headings and Where to Use Them
In the auto-numbered template, use the following styles for the following headings:
Heading Type
Style to Use
Prefatory (front matter) major headings, except the
Table of Contents heading
GS – Major Heading
Table of Contents page heading
Normal style, but manually apply the formatting (ALL
CAPS, centered, bold) in order to match the other
major headings. (Using Normal keeps it from
appearing as an entry in the Table of Contents.)
Chapter major headings
GS1
Chapter first-level subheadings
GS2
Chapter second-level subheadings
GS3
Chapter third-level subheadings
GS4
Chapter fourth-level subheadings
GS5
References and appendix (end matter) major headings
GS – Major Heading
Our template numbers subheadings to fourth-level (1.1.1.1.1. Fourth-level subheading in
style GS5). Our Table of Contents is set to pull in major headings, first-level subheadings, and
second-level subheadings. If you need to use subheadings beyond fourth-level subheadings, we
recommend numbering them manually, using the Normal Style, and applying any further
formatting manually. Be sure to check your numbering thoroughly before making your PDF for
submission.
14
PREFATORY MATERIAL (FRONT MATTER)
The templates contain most of the prefatory material that may be needed in a disquisition,
and they appear in the required order of elements. Some of the pages are optional and may be
removed if you do not need them. If you need any other material, it must be created, and should
be created using the Styles of the template in order to preserve consistency and ensure that the
Table of Contents updates properly.
The Table of Contents and Lists of Tables/Figures will be covered later in this manual.
Title Page
Do not use any bold text on the title page.
Fill out the fields marked by brackets [ ]. After filling out a field, be sure to remove the
brackets—leave no brackets on the finished page.
For the title page, replace the placeholder text [in brackets] with your document title,
document type, name, degree type, department name, and month/year of final defense. For the
portion that reads “A [Dissertation] [Thesis] [Paper]”, simply delete the options that are not
yours, along with the brackets on the word you will be using. For example,
A Thesis
Do not change any other information in the “Submitted to” section—note that “North
Dakota State University of Agriculture and Applied Science” is the official full name of our
university, and should not be altered.
Use your full name, or the preferred name that is on file in Campus Connection and
remove the brackets.
Change [NAME OF DEGREE] to the degree type (such as MASTER OF SCIENCE or
DOCTOR OF PHILOSOPHY) but do not add the department or program title to the degree.
Remove the brackets.

15
Choose either Major Department or Major Program, but not both. Use the correct name
as listed in the Graduate Bulletin or on your Program of Study. The “Option” is optional, and not
all programs have an “option”. Remove this if you are not using it.
Do not use a calendar date and do not use a comma, just the month and year of the final
defense. For example, if you defended on February 14, 2023, then enter the month and year as
below and remove the brackets:
February 2023
Ensure that the line and section spacing of the entire template page is maintained. Note
that the title page uses four blank lines of space between the major sections.
Disquisition Approval Page
This is fairly straightforward: fill in the blanks with the correct information and remove
the brackets around the fields. Do not alter the font sizes, alignment, or spacing of the form. Note
that this form is built in a table. The information fields to fill in are the Title, By, NAME OF
DEGREE, the names of the committee, the name of the department chair and the date they
signed the Copy 1 approval page. List all names the same way (for example, if you include a title
like “Dr.” on one, use a title for all, but use the correct title—some on your committee might
have professional licensure instead of a doctorate). Ensure that the disquisition title and your
name match the way it is entered on the title page.
If you have co-chairs instead of a single committee chair, you can edit the form, or you
can substitute in a template for this according to your degree type, found on our Disquisition
Formatting Guidelines page under the Disquisition Approval Page section.

16
Abstract, Acknowledgments, etc.
Continue to replace the placeholder text with your own. An Abstract is required and must
keep to the word count (350 or less for dissertations, 150 or less for theses or papers). If you do
not need the Acknowledgments or Dedication, they should be removed.
List of Abbreviations/Symbols
These pages are set up with a dotted Tab. If you place your cursor after the example and
press Enter, you can enter your new item and press Tab in order to get a dot leader up to the
center of the page where you will type the definition. Be sure to remove the placeholder entry
when done. If you do not need these pages, remove them. If you need a List of Equations, you
can alter one of these or insert a page break and copy-paste one of these onto the new blank page
and edit the name.
A Note on Page Breaks and Section Breaks
Most sections in the templates end in page breaks. However, there are two section breaks
in each template:
1.) Between the Disquisition Approval page and the Abstract.
2.) Between the List of Appendix Figures and the first page of the chapters.
Section Breaks ensure that the page numbering in each section meets our format
guidelines. When adding new material (or removing unneeded material) ensure that these section
breaks are not removed. You can see which see which types of breaks are present in your
document by using the Paragraph Marker symbol ¶ to reveal format markings (see below).

17
If you are unsure of the differences between page breaks and section breaks, please
follow the hyperlinks.
Note that if you will be inserting any landscape-oriented pages in your document to
accommodate wide figures or tables, you will need to use section breaks in order to format the
page numbers in the correct orientation for printing, as specified in our guidelines.

18
TABLE OF CONTENTS AND LISTS OF TABLES AND FIGURES
Table of Contents
The Table of Contents (TOC) in each template is automated, and tied to styles. This
means it is possible for it to update, reflecting any changes made to the document. Currently, the
TOC is programmed to follow the styles “GS1,” “GS2,” and “GS3.” This means that any
paragraph containing those styles will be added when the update occurs.
To illustrate this, consider that the major heading “TABLE OF CONTENTS” should not
be included in the TOC entries, per NDSU guidelines. So, if you place your cursor in the
“TABLE OF CONTENTS” heading, you will see that it is set to “Normal” (no style has been
applied), instead of “GS1.” This is intentional, as setting it to Normal ensures that it will not be
pulled into the TOC entries:
If you go to any other major heading and place your cursor there, the style will be “GS1”
(or “GS-Major Heading” for select headings in the auto-numbered template), as these headings
should be pulled into the TOC.
Updating the Table of Contents
The TOC is not fully automated: you will still need to tell it to update. To do this, right
click anywhere in the table, choose “Update Field,” and choose “Update entire table.” This will
ensure that all changes are reflected.
Lists of Tables and Figures
The templates contain a List of Tables, List of Figures, List of Appendix Tables, and a
List of Appendix Figures. These lists are also automated (you can update them the same as the
TOC); however, some changes to each entry must be made after updating.

19
Updating a List of Tables or Figures
There are four item title styles in the document: Table title, Figure title, Appendix Table
title, and Appendix Figure title. Each list is tied to its respective style. In other words, any text
styled with “Figure title” will appear in the List of Figures when that list is updated.
Here is what a list entry looks like before it is updated:
Here is the same entry, after the entire list is updated:
As shown, “Figure” has been pulled in, in front of “1.”, and the formatting has been
changed. You will have to apply the following manual updates to each entry:
1. Remove the “Figure” label from in front of the figure number. We want the number
alone to stand under the Figure column heading. (In the List of Tables you would be removing
the Table labels from in front of each table number.) There isn’t really a way to automate this
unless you are comfortable with “Find & Replace” functions, but that isn’t fully automated
either.
2. Apply the “List of Tables Figures entry” style on the entry. This should apply a 0.5
inch hanging indent, a 0.5 inch right indent to the text, and keep the page number at the right
margin with a dot leader.
3. You will still have the first word of the title next to the item number. Place your cursor
in front of the first word of the title and press Tab. This should place a 0.5 inch Left indent on

20
that first line of text. If you instead get a dot leader that pushes the word to the right margin, then
undo the Tab (Ctrl+Z) and make sure the entry has the “List of Tables Figures entry” style
applied before trying again. If this still isn’t working, then use the Paragraph dialog box (see the
screen snips below for the navigation and settings) to access the Tab settings and ensure that
there is a Tab set for 0.5 inch Left with no Leader. If you have to set one, be sure to click “Set”
after entering the Tab stop position, alignment, and leader options. Then click okay. You should
now be able to use Tab to indent the first line of your entry title.
Summary of Formatting Changes after the Update
After selecting “Update entire table” in the List of Tables/Figures/etc., the “Table” or
“Figure” prefix will have to be manually deleted from each entry, and the entry paragraph
will have to be formatted with a 0.5 inch hanging indent, a 0.5 inch right indent, a 0.5 inch
“Left” tab, and a 6.49 inch “Right” dotted tab. You can use the “List of Tables Figures entry”
to help with this formatting, otherwise the Paragraph dialog box navigation and settings are
shown below.
21
TABLES AND FIGURES
The formatting of tables and figures varies widely between academic disciplines. The
tables and figures used in the templates are placeholders only. If you need to change an aspect of
the table and figure titles, please remember that each table/figure title style is the basis for its
respective prefatory list, and these styles should be used with care.
While it is not necessary to use it, there is also a “Figure” style to be used as a
placeholder for images. This style will center your image on the page, and ensure that the image
itself is not pulled into the List of Figures.
Positioning Tables and Figures
We highly recommend that you do not anchor your tables and figures to the page,
because anchoring can create some issues for you when trying to format or adjust the spacing of
text above and below the item. We recommend that in the “Format > Wrap Text” options that
they be placed “In Line with Text”. Ensure that the item as a whole has no indent (you can check
this in the Paragraph Settings or in the Tab ruler), and then you can center the item or leave the
item aligned left—be sure to keep the alignment consistent throughout the document for all items
of the same type.

22
CONCLUSION
Completing your disquisition is a major achievement, and you are almost there! It is our
hope that our templates will provide you with the tools you need to quickly and easily create a
document in keeping with the NDSU Graduate School formatting guidelines. It is important to
remember, however, that a lot of our formatting guidelines cannot be replicated using a template,
so you should review our guidelines and implement them into your work. Finally, ensuring that
you meet our requested deadlines and return your corrections as soon as possible will help make
the final review process go as smoothly as possible.
We look forward to working with you.

23
APPENDIX: FORMATTING TIPS AND PARAGRAPH SETTINGS
If you get comfortable with Styles and the Paragraph dialog box, you can create and fix a
lot of formatting and alignment issues quickly. The Paragraph dialog box is accessed with the
launcher arrow in the Paragraph section of the Home tab:
Our template makes frequent use of the highlighted parts below: Indentation, Spacing,
and Tabs, and our format review notes may direct you to modify these settings.

24
Dot Leaders in the Tables of Contents and Lists of Things
Our templates have this built in, but maybe you will need to fix something that is broken
or build a new list with a dot leader. We recommended using dotted Tabs instead of repeatedly
pressing the period key, because dotted Tabs will get the alignment exact. To set dotted Tabs,
open the Paragraph dialog box and click the “Tabs…” button in the lower left. For something in
the right margin, like page numbers in the Table of Contents, set a Tab stop at 6.49”, aligned
Right, Leader 2, and click Set. For something in the center, such as the definition in the List of
Abbreviations, set a 3” Tab stop, Left alignment, Leader 2.
ABSTRACTiii
ACKNOWLEDGMENTS ............................................................................................................. iv
DEDICATION ................................................................................................................................ v
NDSU .............................................................North Dakota State University
In the examples above, the “ABSTRACT” line has the 6.49” Tab stop set, and if I placed
my cursor between “ABSTRACT” and “iii” and hit Tab, the “iii” would be aligned with the
other page numbers. The “NDSU” example has the 3” Tab stop as you would see in the List of
Abbreviations.
25
Other Alignment Setting Recommendations
In the Table of Contents and List of Tables/Figures/Etc., to set entries to be single-spaced with
one line of space (or 12 points) after each entry:
In the Table of Contents and List of Tables/Figures/Etc, to set entries to have a 0.5 inch right
indent in order to keep entries from extending into the page number column. (This tends to work
best if you use dotted Tabs to make your dot leaders rather than the period key.)
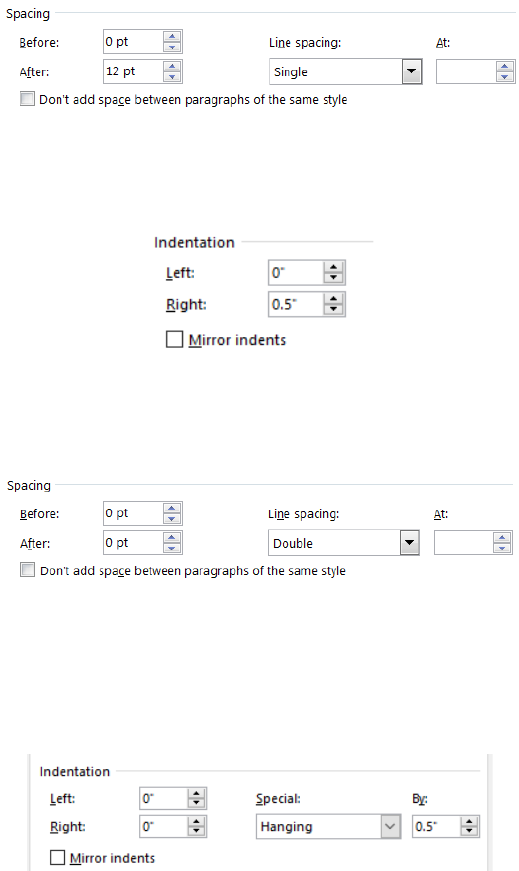
To make sure there is no extra line spacing between body text paragraphs, we recommend setting
all body paragraphs (as well as all subheadings) to be double spaced, with 0 points after:
If you are formatting your references to have a hanging indent, use the Special Indentation to set
all references to have a 0.5 inch hanging indent. Note: This is an example citation only—your
discipline’s citation style manual may have a different format; we encourage you to use your
discipline’s style manual.
Doe, John. (2022). How to Win at Document Formatting and Influence Your Review Committee.
IM Press. https://doi.org/00.000.abc000000/iamanexampleonly

26
Aligning Equations
Our formatting guidelines ask that equations be centered on the page in order to distinguish them
from paragraph text. If you number the equations, the number should be flush with the right
margin on the same line. For more information about numbering, see our formatting guidelines.
To center equations and keep the equation number flush with the right margin:
1. Keep the text left aligned as you type/insert the equation followed by the equation
number you will be marking it with.
2. Place your cursor to the left of your equation (or highlight the content you need to align)
and open the Paragraph dialog box. Click on the Tabs… button.
3. Set two tab stops:
a. Set one at 3”, aligned center, leaders none. Click set.
b. Set another at 6.5”, aligned right, leaders none. Click set.
c. Click OK.
4. With your cursor to the left of the equation, press the Tab key. This should center the
equation.
5. With your cursor to the left of the equation number, press the Tab key. This should place
your equation number flush with the right margin.
6. In the example below, Equations 1 and 2 have been formatted with the Tab settings
shown below, but Equation 2 has not had the Tab key pressed yet to apply the formatting.
a
2
+ b
2
= c
2
(1)
E=mc
2
(2)

27
Splitting a Table to Place a Continued Title
Our formatting guidelines advise:
• When a table or figure continues over multiple pages, make sure that the title of the item
appears on all pages of the item. On the subsequent pages, add the phrase “(continued)”
to the end of the first sentence of the item title. This helps the reader to remember what
information they are looking at, and that it is all part of the same item.
• When a table must extend for multiple pages, the header row of the table should appear at
the top of the table on the subsequent pages. This helps the reader remember what the
columns of data represent.
How to split a table and add the title and header rows to subsequent pages:
1. Locate a good row at which to split the table (one that gives you enough room for your
title and doesn’t cut off information awkwardly within your table).
a. To split a table: insert your cursor in the cell that you want as the last cell on that
page of your table. In the Table Tools - Layout tab, click "Split Table".
b. Your table should continue on the next page, although it is split.
2. To insert the continued title: Position your cursor to be able to type text above the table
but not inside the table, and type or copy/paste your table title, adding "(continued)." to
the end of the first sentence of the title.
a. Note: Do not format the continued titles with the Table Title Style. Use the
Normal style, and apply formatting manually to match, so that you don’t pull the
continued titles into the List of Tables.
3. Add the header row to the top of the continued table.
a. You will need to insert the header row manually (the “Repeat header row”
function may not work with the split).
i. Copy your header row from the first page of the table.
ii. Insert your cursor at the front of the first cell in the second page of the
table and paste in the header row.
4. If you need to continue to another page, look for the next spot to split the table that will
give you enough space to insert a header row and a table title on the top of the page and
not cut information off awkwardly. Split the table at that point, and again copy and paste
your continued title and the header row on the next page of the table.
Make sure that in the List of Tables, the item is listed only once, and that the entry
indicates on which page the item begins.
