
MyE911® User Guide (Windows)
Version 4.8 | July 2, 2021
No part of this publication may be reproduced, distributed, or transmitted in any form or by any means, including
photocopying, recording, or other electronic or mechanical methods, without the prior written permission of RedSky
Technologies, Inc., except in the case of brief quotations embodied in critical reviews and certain other
noncommercial uses permitted by copyright law. For permission requests, write to the RedSky Technologies, Inc.,
addressed “Attention: Permissions Coordinator,” at the address below.
RedSky Technologies, Inc.
333 North Michigan Avenue, Suite 1600
Chicago, IL 60601
www.redskye911.com
MyE911®, E911 Anywhere
®
, and Horizon Mobility
®
are registered trademarks of RedSky Technologies, Inc.
©2020 by RedSky Technologies, Inc., All rights reserved.

MyE911® v4.8 for Windows User Guide
2
Table of Contents
Revision History ..................................................................................................... 3
What’s New for MyE911 4.8 .........................................................................................................4
New Features ...............................................................................................................................4
Support Alternate Address Entry ..................................................................................................4
'User Details' Page ........................................................................................................................6
MyE911 ‘Lite’ .................................................................................................................................7
Improvements .............................................................................................................................7
Improve UI of 'Unauthorized' Page ..............................................................................................7
Issues Resolved ............................................................................................................................8
Improve UI of 'Unauthorized' Page ..............................................................................................8
1. Introduction .................................................................................................. 9
2. Scope ........................................................................................................... 9
3. Installation ................................................................................................. 10
3.1 Requirements.......................................................................................................................10
3.2 Installation Steps .................................................................................................................10
3.3 Updates ..........................................................................................................................12
4. User Guide .................................................................................................. 14
4.1 My Location ....................................................................................................................14
Setting Current Location ...........................................................................................................14
Adding a Personal Location and Setting It to Your Current Location .....................................16
Invalid Address ..........................................................................................................................17
4.2 Manage Locations ..........................................................................................................18
Setting Current Location from Manage Locations Page ..........................................................19
Edit Personal Location ..............................................................................................................19
Delete Personal Location ..........................................................................................................20
4.3 MyE911 ‘Lite’ ...................................................................................................................22
User Authentication ..................................................................................................................22

MyE911® v4.8 for Windows User Guide
3
Revision History
Date
Version
Revision
Made By
12/30/2019
4.0
Initial Draft
Chelsea Bumpus
1/13/2020
4.1
Revisions for external draft review
Chelsea Bumpus
5/4/2020
4.4
Revisions to include updates from v4.4
Chelsea Bumpus
11/09/2020
4.6
Revisions to include updates from v4.6
Chelsea Bumpus
Katrina Vlasich
07/0/2021
4.8
Revisions include updates for v4.7 and v4.8
Katrina Vlasich

MyE911® v4.8 for Windows User Guide
4
What’s New for MyE911 4.8
New Features
Support Alternate Address Entry
This release of MyE911 now provides support for alternate address entry. The design behind
MyE911 was to make entry of addresses as straightforward and simple as possible. Entry was just
a matter of entering “555 Main St., Anytown, IL 44444” as your current location. Behind the
scenes we would parse and validate the entered address to ensure it was valid for 9-1-1
purposes. If the entered address could not be validated, a message is returned to the user to
correct the address and try again.

MyE911® v4.8 for Windows User Guide
5
There are times when the address is indeed valid, but MyE911 will refuse to accept it.
Unfortunately, computers get it wrong and need some assistance to understand what has been
entered. By using the Alternate Address View, an alternate entry screen is presented that will
allow an address to be entered in its broken-up components. The user can specifically enter in
the street number, name, type, directional (N, S, E, W, NW, HE, SW, SE). This aide to the system,
greatly improves the success of adding an address that may be difficult understand
programmatically, and result in a false rejection.

MyE911® v4.8 for Windows User Guide
6
'User Details' Page
A new ‘User Details’ page has been added to this release. A MyE911 user can see their currently
used email and assigned phone number, as well as be able to edit their First and Last Names.
When MyE911 is used with the Horizon Mobility or E911 Anywhere Alternate User Identifier
feature, a Callback Number field will be available where the user can update what number
should be used by the 9-1-1 operator to call them back in the event the call becomes
disconnected.

MyE911® v4.8 for Windows User Guide
7
MyE911 ‘Lite’
This release of MyE911 includes the ability to use MyE911 functionality without needing to install
the MyE911 Client software on their laptop or workstation. In this scenario, the user will
authenticate themselves and access the MyE911 user interface. Users will access the MyE911
website directly through their web browser to initially set their address, and revisit if their
location and/or address changes.
A user will navigate to the MyE911 site in their browser and enter their email in the login screen. If
the user has previously been provisioned in the Horizon Mobility or E911 Anywhere system, they
will then receive an email with a security code they will need to enter to gain access to the
MyE911 functionality.
The significant difference between this MyE911 ‘Lite’ version and the locally installed MyE911
Client is that MyE911 Lite users must manually update their current location for 9-1-1 calls
whenever move to a new location. With the MyE911 Client installed, MyE911 will keep
automatically set the user’s location to known places the user has entered previously, or that
have been set up by their Administrator.
Improvements
Improve UI of 'Unauthorized' Page
The 4.7 version of MyE911 greatly improved the usability and presentation of the MyE911 user
interface. One screen that was missed was the ‘Session Timeout’ screen. This has been
addressed in this 4.8 release.

MyE911® v4.8 for Windows User Guide
8
Issues Resolved
Improve UI of 'Unauthorized' Page
No bugs were fixed with this release.

MyE911® v4.8 for Windows User Guide
9
1. Introduction
About Us
RedSky Technologies is the leading provider of on-premises and cloud-based E911 solutions. In
1999, we developed and patented the first automated software application to manage 911
location data. As technology has evolved, we have kept pace with emerging voice technology to
meet the requirements of modern enterprises. Our E911 enterprise-class software is used by 50
of the Fortune 500 companies. Using state-of-the-art software development languages and
frameworks, our solutions are designed to run in the most secure enterprise, government and
virtual environments.
2. Scope
Overview
This guide is intended to provide an overview of the RedSky MyE911 for Windows application.
Organization Administrators should refer to this guide for questions about basic management,
and how to provide access/installation for their employees. Device Users should refer to this
guide for questions about installation, basic management, and how to update their personal
locations.
Point of Contact
To submit recommendations for comments and changes to this manual or the MyE911
application, please contact us at:
RedSky Technologies, Inc.
333 North Michigan Avenue, Suite 1600
Chicago, IL 60601
Toll Free: 866-778-2435
Email: [email protected]

MyE911® v4.8 for Windows User Guide
10
3. Installation
3.1 Requirements
To ensure proper functionality of the MyE911 Client application, the following conditions must
be met:
• A MyE911 client user must be pre-provisioned in RedSky’s Horizon Mobility Portal by an
Organization Administrator
• Organization Administrator must send the installation link and the RedSky Horizon Mobility
Host URL to all softphone users that will be downloading MyE911 client onto their devices.
• The installer must be run on Microsoft Windows 7.1 SP1 or higher
3.2 Installation Steps
1. Organization Administrators should download the MyE911 client installer directly from
the E911 Anywhere/Horizon Mobility portal by navigating to the “Client Installers” page
and downloading the appropriate installers. Organization Administrators can also use the
“Copy link” to paste the appropriate download links into an email to softphone users.
This will allow them to download/install the MyE911 client onto their own devices. (See
image below)
2. To download the E911 application onto your own device, you click on the download link
provided via an email from your Organization Administrator and download the installer.
3. Open the installer and begin the installation process.
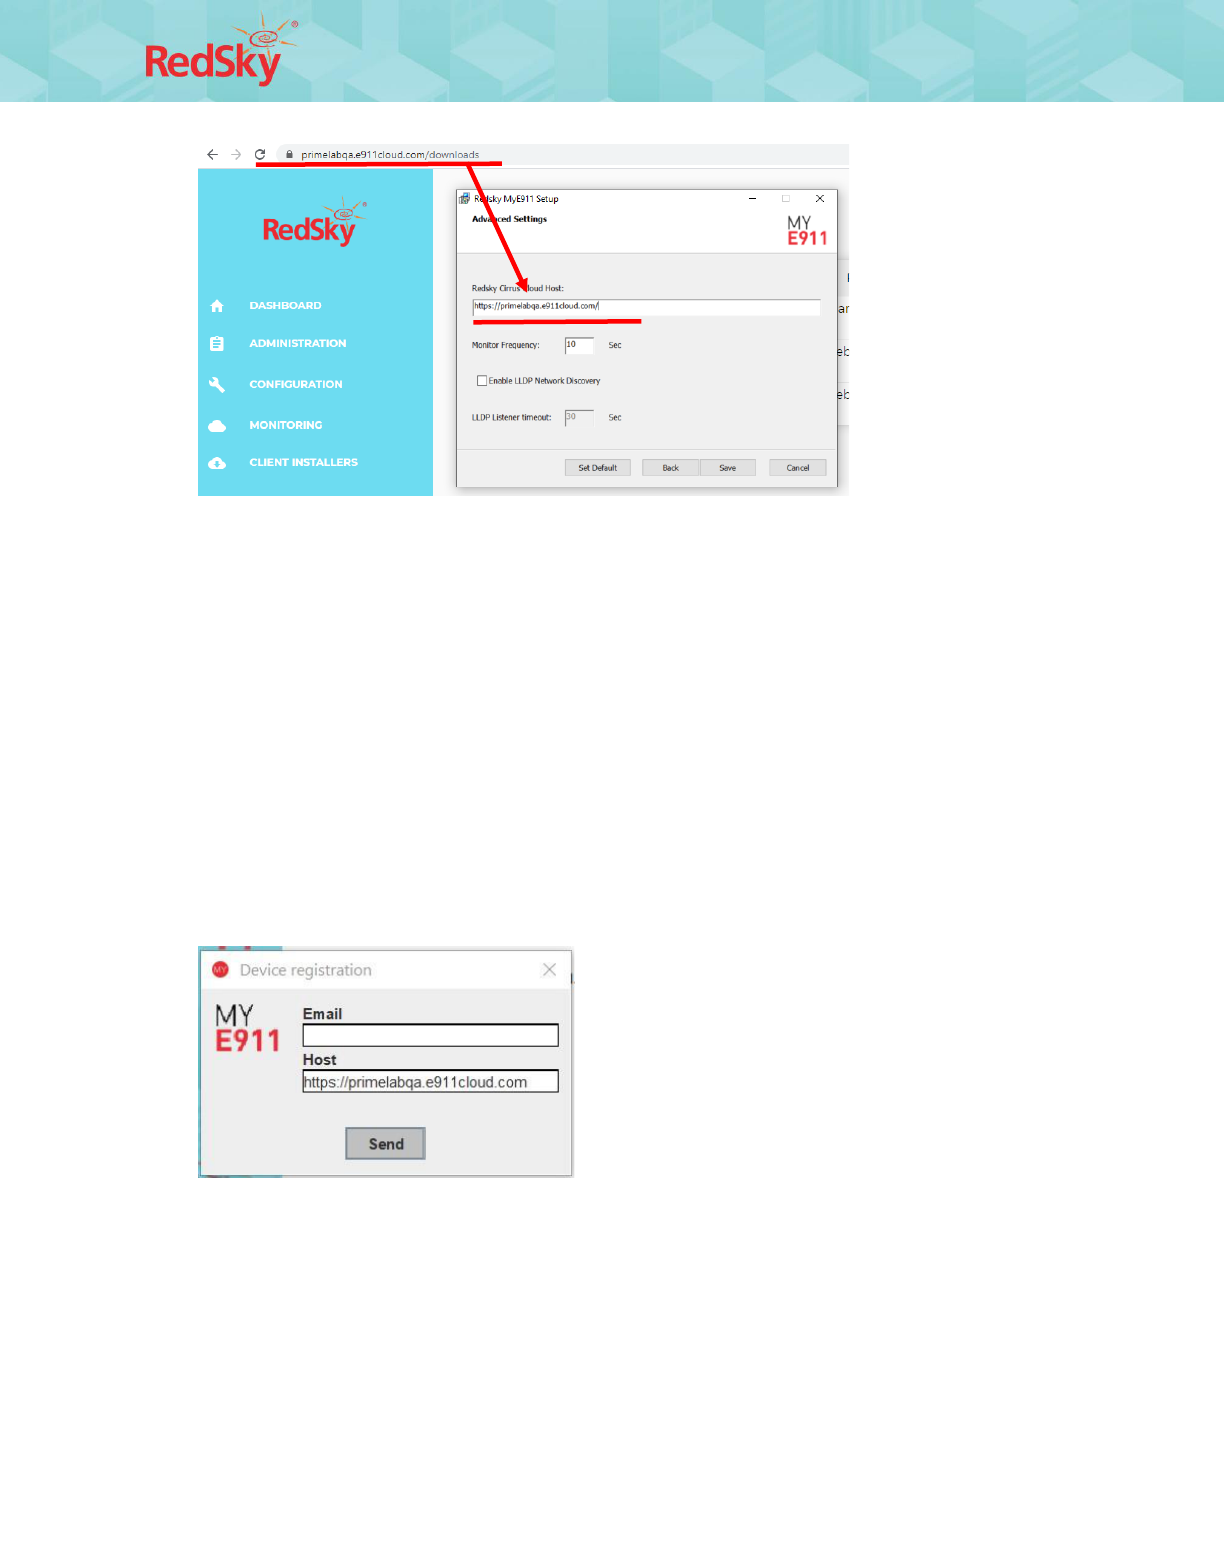
4. In the “Settings” pop-up specify the “Host” provided to you by your Organization
Administrator. If you did not receive a Host URL via email, you should contact your
Organization Administrator.
Note: The Organization Administrator should provide this information to all softphone
users that will download the MyE911 application onto their own device. (See example
image below)
MyE911® v4.8 for Windows User Guide
11
5. If you will be using a wired network connection, you should ensure that you enable LLDP
Network Discovery at the time of installation. This functionality is off by default.
Note: You may need to check with your IT department, as your organization may have a
policy against this functionality.
6. Specify a destination folder (optional) and click “Next”.
7. Click “Install”
8. After installation you will see a “Device registration” pop-up from the MyE911 Client. Enter
your email address then click “Send”.
Note: The email address with which you register your device must match the same email
address that your Organization Administrator provisioned in the Horizon Mobility portal.
9. You will then be emailed a verification code.
10. You should receive an email with a verification code. This email may arrive in your spam
folder.

MyE911® v4.8 for Windows User Guide
12
11. Enter the verification code into the “Device Registration” pop up (See image below)
12. Once your device is verified you should receive a Windows notification telling you that your
device has been activated. (See image below)
13. If user uninstalls MyE911, the below warning will appear before final uninstallation.
3.3 Updates
When the MyE911 application has available updates, a yellow bar will appear at top of “My
Locations” page of the MyE911 Web User Interface (UI), as well as alert the user via a Windows

MyE911® v4.8 for Windows User Guide
13
Notification. (See image below)

MyE911® v4.8 for Windows User Guide
14
4. User Guide
Once a user installs the MyE911 application, it should automatically begin working in the
background. If the user’s company has provisioned corporate locations, MyE911 will
automatically detect their location as they move. However, the MyE911 application will prompt
the user to input their current location if it does not recognize where they are, either because
they are off-premise or are in a non-provisioned corporate location.
4.1 My Location
Setting Current Location
1. Launch the MyE911 Client application. This can be done by right clicking the MyE911 icon
that appears in user’s task bar, or toolbar. (See image below)
Note: If the user right clicks the icon – the following options appear:
• Open – opens the MyE911 Web User Interface (UI) in your default browser
• Snooze – snooze location input prompts for up to 24 hours
• Settings – edit settings for MyE911
• About – MyE911 application information
• Exit – exit the application; however, if you exit out of MyE911 your location will no longer
be sent to an emergency response center upon dialing 9-1-1
If the MyE911 application cannot determine your location, the MyE911 application will open the
MyE911 Web UI, via your default browser, prompting you to select your ‘Current Location’. (See
image below)

MyE911® v4.8 for Windows User Guide
15
3. Enter the address or location name of your ‘Current Location’. The drop-down will auto-
populate with a list of locations or addresses that closely match the information you’ve input.
The locations can be:
a. “Corporate Locations” – locations which have been provisioned by your Administrator
for your company. These will have a building icon.
a. “Personal Locations” – locations which you have previously added via the MyE911
web UI. These will have a house icon.
2. Select the location which best describes where you are physically located at the moment,
and this will be set as your ‘Current Location’. The “My Location” page will display a green
success alert with information about your ‘Current Location’. (See image below)

MyE911® v4.8 for Windows User Guide
16
4. You can always open the MyE911 web UI and view the “My Location” page to ensure that
MyE911 has correctly detected your ‘Current Location’. You can also view this information
from the “Manage Locations” page.
Adding a Personal Location and Setting It to Your Current Location
1. You can create new ‘Personal Locations’ and set them to be your ‘Current Location’. There
are two ways to accomplish this from the “My Locations” page.
a. You can start entering an address in the available search field; preferably one that
does not already correlate to a pre-existing Corporate or Personal Location. A drop-
down will appear displaying a list of possible address matches that already exist in
the system. If you select one of these addresses you will be presented with an “Add
Location” form where you can supply a name and additional, detailed, information
about their exact location. (See image below)

MyE911® v4.8 for Windows User Guide
17
b. You can also simply click on the “Add Location and Set as Current” button and enter
the address directly via the “Add Location” form.
2. The “Add Location” form allows you to supply the needed information in order to save an
address as a Personal Location (See image below). You will need to provide the following:
a. Location Name – a name that identifies the personal location (should not be the
same name as other Personal Locations you may have)
b. Address – civic address for the location
c. Location Information – granular location information such as room, floor, suite, etc.
(This is technically they “dispatchable location” – where emergencies services will
look for you)
3. Click the “Add and Set as Current Location” button to save the location as a “Personal
Location”, for future use, and set it as your ‘Current Location’.
Invalid Address
If you attempt to add a location that contains an invalid address, or one that cannot be validated,
the below error prompt will appear in the “Add Location” form. The address should be corrected,
and the form re-submitted.

MyE911® v4.8 for Windows User Guide
18
4.2 Manage Locations
You can view all locations (Corporate or Personal) available to you from the “Manage Location”
page. Corporate Locations are notated with a building icon. Personal Locations are notated with
a house icon. (See image below)
You can filter locations to show only Corporate Locations, only Personal Locations, or both.
(See image below)

MyE911® v4.8 for Windows User Guide
19
You can set your ‘Current Location’, as well as edit and delete Personal Locations from this
page. You cannot edit or delete Corporate Locations, which is why the edit and delete icons are
not available for Corporate Locations.
Setting Current Location from Manage Locations Page
Users can set their current location to a Personal or Corporate Location from the “Manage
Locations” page by clicking on the associated radio button.
If you would like to change your ‘Current Location’ from the “Manage Locations” page, they simply
select the radio button to the left of one of the locations listed. (See image above)
You will be prompted when you have successfully updated your ‘Current Location’. (See image below)
Edit Personal Location
1. You can only edit Personal Locations. Again, Personal Locations are indicated by a house
icon next to the location’s name. To edit a Personal Location, you must click the edit icon
associated with the Personal Location in question. (See image below)

MyE911® v4.8 for Windows User Guide
20
2. An “Edit Location” form will appear. You can edit Location Name, Address, and Location
Information. (See image below)
3. Click the “Save” button to update the Personal Location.
Delete Personal Location
1. You can only delete Personal Locations. Again, Personal Locations are indicated by a
house icon next to the location’s name. To delete a Personal Location click on the
associated delete icon for the Personal Location in question. (See image below)

MyE911® v4.8 for Windows User Guide
21
2. A “Delete Location” confirmation box will appear. Select “Delete” to delete the location. See
example image below:
Note: You cannot delete a location that is set as your ‘Current Location’. (See image below)

MyE911® v4.8 for Windows User Guide
22
4.3 MyE911 ‘Lite’
Users can also authenticate themselves and access MyE911 without needing to install the
MyE911 Client. Using MyE911 without the client is considered the MyE911 ‘Lite’ version. Users will
access the MyE911 UI directly via their web browser to initially set their address, and revisit if their
location and/or address changes.
The significant difference between using the MyE911 ‘Lite’ version and the locally installed
MyE911 Client is that MyE911 ‘Lite’ users must manually update their current location for 9-1-1
calls whenever move to a new location. With the MyE911 Client installed, MyE911 will keep
automatically set the user’s location to known places the user has entered previously, or that
have been set up by their Administrator.
User Authentication
1. Navigate to the MyE911 ‘Lite’ landing page (given to you by your administrator).
2. Enter the email address that was used to create the User account.
3. Enter the one-time security code that was sent to the associated email account.

MyE911® v4.8 for Windows User Guide
23
a) NOTE: The one-time security code will expire after 24 hours.
4. Users of MyE911 ‘Lite’ will be prompted to reauthenticate after 60 minutes.
5. Users will have the ability to resend a one-time security code.
6. Once authenticated, Users will be directed to the ‘My Location’ page, like they would via the
MyE911 Client.
