
Certified course
curriculum
Sage SQL
Replicator 2.0
Setup Guide
Important Notice
This is a publication of Sage Software, Inc.
The course materials provided are the property of The Sage Group plc or its licensors (“Sage”). Please
do not copy, reproduce, modify, distribute or disburse without express consent from Sage.
This material is provided as a general guidance for informational purposes only. Accordingly, Sage
does not provide advice per the information included. The use of this material is not a substitute for
the guidance of a lawyer, tax, or compliance professional. When in doubt, please consult your lawyer,
tax, or compliance professional for counsel. This material is provided on an ”as is” basis. Sage makes
no representations or warranties of any kind, express or implied, about the completeness or
accuracy of this training materials. Whilst Sage may make changes to this training materials at any
time without notice, Sage makes no commitment to update the training materials every time Sage’s
products are updated.
The Sage product(s) described herein is/are governed by the terms and conditions per the Sage End
User License Agreement ("EULA") or other agreement that is provided with or included in the Sage
product(s). Nothing in this document supplements, modifies, or amends those terms and
conditions.
© 2020 The Sage Group plc or its licensors. All rights reserved. Sage, Sage logos, and Sage product
and service names mentioned herein are the trademarks of The Sage Group plc or its licensors. All
other trademarks are the property of their respective owners.
10/2020 USCRE-EN-nnn-10.2020-1

© 2020, The Sage Group plc or its licensors 3
Sage SQL Replicator 2.0 Table of contents
Table of contents
1 Prepare to implement Sage SQL Replicator . . . . . . . . . . . . . . . . . . . . . . . . . . . . . . . . . . . . . . . . . . 5
Overview . . . . . . . . . . . . . . . . . . . . . . . . . . . . . . . . . . . . . . . . . . . . . . . . . . . . . . . . . . . . . . . . . . . . . . . . . . . . . . .5
Prepare to implement Sage SQL Replicator . . . . . . . . . . . . . . . . . . . . . . . . . . . . . . . . . . . . . . . . . . . . . . . . . . . .6
System requirement . . . . . . . . . . . . . . . . . . . . . . . . . . . . . . . . . . . . . . . . . . . . . . . . . . . . . . . . . . . . . . . . . . . .6
Microsoft SQL Server edition . . . . . . . . . . . . . . . . . . . . . . . . . . . . . . . . . . . . . . . . . . . . . . . . . . . . . . . . . . . . .6
Permissions . . . . . . . . . . . . . . . . . . . . . . . . . . . . . . . . . . . . . . . . . . . . . . . . . . . . . . . . . . . . . . . . . . . . . . . . . .8
2 Install SQL Server . . . . . . . . . . . . . . . . . . . . . . . . . . . . . . . . . . . . . . . . . . . . . . . . . . . . . . . . . . . . . . . 9
Sage SQL Installer . . . . . . . . . . . . . . . . . . . . . . . . . . . . . . . . . . . . . . . . . . . . . . . . . . . . . . . . . . . . . . . . . . . . . . .9
Install the SQL Server instance for SQL Replicator . . . . . . . . . . . . . . . . . . . . . . . . . . . . . . . . . . . . . . . . . . .10
Install SQL Server using the Microsoft Installer . . . . . . . . . . . . . . . . . . . . . . . . . . . . . . . . . . . . . . . . . . . . . . . .12
Important information about SQL Server . . . . . . . . . . . . . . . . . . . . . . . . . . . . . . . . . . . . . . . . . . . . . . . . . . . . . .19
Install SQL Server Management Studio . . . . . . . . . . . . . . . . . . . . . . . . . . . . . . . . . . . . . . . . . . . . . . . . . . . . . .19
Create a backup system administrator . . . . . . . . . . . . . . . . . . . . . . . . . . . . . . . . . . . . . . . . . . . . . . . . . . . . . . .19
Change the SQL Server Database Engine service account . . . . . . . . . . . . . . . . . . . . . . . . . . . . . . . . . . . . . . .21
3 Install Sage SQL Replicator 2.0 . . . . . . . . . . . . . . . . . . . . . . . . . . . . . . . . . . . . . . . . . . . . . . . . . . . 23
4 Configure and replicate data . . . . . . . . . . . . . . . . . . . . . . . . . . . . . . . . . . . . . . . . . . . . . . . . . . . . . 25
Sage SQL Replicator configuration and settings . . . . . . . . . . . . . . . . . . . . . . . . . . . . . . . . . . . . . . . . . . . . . . . .25
SQL Replicator configuration database . . . . . . . . . . . . . . . . . . . . . . . . . . . . . . . . . . . . . . . . . . . . . . . . . . . .25
Company configuration database . . . . . . . . . . . . . . . . . . . . . . . . . . . . . . . . . . . . . . . . . . . . . . . . . . . . . . . .28
Specify the replication settings for each company . . . . . . . . . . . . . . . . . . . . . . . . . . . . . . . . . . . . . . . . . . . .29
Start the replication . . . . . . . . . . . . . . . . . . . . . . . . . . . . . . . . . . . . . . . . . . . . . . . . . . . . . . . . . . . . . . . . . . .31
Replicator monitor tools . . . . . . . . . . . . . . . . . . . . . . . . . . . . . . . . . . . . . . . . . . . . . . . . . . . . . . . . . . . . . . . . . . .32
Database/Table Status . . . . . . . . . . . . . . . . . . . . . . . . . . . . . . . . . . . . . . . . . . . . . . . . . . . . . . . . . . . . . . . . .33
Activity Details . . . . . . . . . . . . . . . . . . . . . . . . . . . . . . . . . . . . . . . . . . . . . . . . . . . . . . . . . . . . . . . . . . . . . . .34
Server Status . . . . . . . . . . . . . . . . . . . . . . . . . . . . . . . . . . . . . . . . . . . . . . . . . . . . . . . . . . . . . . . . . . . . . . . .35
Required Windows services . . . . . . . . . . . . . . . . . . . . . . . . . . . . . . . . . . . . . . . . . . . . . . . . . . . . . . . . . . . . . . .36
Specify the account for Sage SQL Replicator Service . . . . . . . . . . . . . . . . . . . . . . . . . . . . . . . . . . . . . . . . .36
SQL Reporting views . . . . . . . . . . . . . . . . . . . . . . . . . . . . . . . . . . . . . . . . . . . . . . . . . . . . . . . . . . . . . . . . . . . . .37
Security . . . . . . . . . . . . . . . . . . . . . . . . . . . . . . . . . . . . . . . . . . . . . . . . . . . . . . . . . . . . . . . . . . . . . . . . . . . . . . .37
Changes to the replication settings . . . . . . . . . . . . . . . . . . . . . . . . . . . . . . . . . . . . . . . . . . . . . . . . . . . . . . . . . .39
Replicate a new company . . . . . . . . . . . . . . . . . . . . . . . . . . . . . . . . . . . . . . . . . . . . . . . . . . . . . . . . . . . . . . . . .40
Schema changes in the Pervasive database . . . . . . . . . . . . . . . . . . . . . . . . . . . . . . . . . . . . . . . . . . . . . . . . . .40
Repair Sage-managed SQL system accounts . . . . . . . . . . . . . . . . . . . . . . . . . . . . . . . . . . . . . . . . . . . . . . . . .41

Table of contents Sage 300 Construction and Real Estate
4 © 2020, The Sage Group plc or its licensors

© 2020, The Sage Group plc or its licensors 5
Sage SQL Replicator 2.0 1 Prepare to implement Sage SQL Replicator
1 Prepare to implement Sage SQL Replicator
Overview
Sage SQL Replicator is a tool that copies your Sage 300 Construction and Real Estate data from the Pervasive data
management system into a SQL Server database. The replicated data includes your Purchasing, Inventory, and
Service Management data if you use those products.
Why is copying your data into SQL Server useful to you?
In many cases, using the SQL Server data for reporting results in improved processing performance. When you
generate Crystal reports in your on-premises Sage 300 Construction and Real Estate applications, you can use
the Use SQL check box to switch the data source from the Pervasive data to the SQL Server data.
Sage SQL Replicator lays the foundation for accessing your data through Sage Mobile solutions. It is required
whether you use Sage Construction Central for Mobile Intelligence (Mobile Reports and Mobile Dashboards).
The replication process works in the background and it can continuously synchronize the Pervasive and SQL Server
databases. This means you can work in the Sage on-premises and mobile solutions without interruption and always
get up-to-the-minute information.
If there are databases for which continuous synchronization is not needed, you can specify when and how often to
run the replication. In addition, you can select specific database tables to replicate.
This reference guide provides the setup and configuration needed to implement and use Sage SQL Replicator
version 2.0. The material applies to system administrators or information technology specialists who will complete
the server configuration tasks. You will follow the steps to:
1. Prepare for implementing Sage SQL Replicator.
2. Install SQL Server.
3. Install Sage SQL Replicator 2.0.
4. Configure Sage SQL Replicator and replicate the data.
If you are upgrading from an earlier version of SQL Replicator, follow the steps in these chapters:
Chapter 3, “Install Sage SQL Replicator” on page 23.
Chapter 4, “Configure and replicate data” on page 25.
In this chapter, you learn about preparing for the Sage SQL Replicator implementation.
NOTE: Sage SQL Replicator 2.0 is compatible with Sage 300 Construction and Real Estate version 20.1 and higher. If you are
implementing an earlier version of Sage SQL Replicator for Sage 300 Construction and Real Estate versions 18.4 and lower,
download the setup guide from the Product Documents web page.

1 Prepare to implement Sage SQL Replicator Sage 300 Construction and Real Estate
6 © 2020, The Sage Group plc or its licensors
Prepare to implement Sage SQL Replicator
Before implementing Sage SQL Replicator:
Verify that your server configuration meets the recommended technical specifications.
Evaluate whether you will use SQL Server Express or full SQL Server.
Upgrade to Sage 300 Construction and Real Estate version 20.1 or higher.
Ensure that the individual who will set up Sage SQL Replicator has the appropriate security permissions.
System requirement
Installing SQL Replicator to use with Sage 300 Construction and Real Estate adds to the demands on your server
resources. Review the
20.1 technical specifications documented in the Sage Knowledgebase to ensure that your
server meets the recommended configuration in terms of the operating system and hardware.
NOTE: Solid State Drive (SSD) is required for the server if it hosts both Sage 300 Construction and Real Estate and SQL Server.
Microsoft SQL Server edition
SQL Replicator requires a dedicated instance of SQL Server which can be installed on the accounting server or on
a different server. Later, in “2 Install SQL Server” on page 9, you will learn how to use the Sage SQL Installer to
install and configure the instance.
SQL Server comes in different editions.
SQL Server Express Edition is available at no additional cost—you can download it from Microsoft or let the
Sage SQL Installer download it for you.
SQL Server Standard Edition and SQL Server Enterprise Edition, both full SQL Server, are purchased
separately.
Check with your IT vendor to determine which edition best suits your organization based on the features, the size
of your database, and processing needs.
Please be aware that SQL Server Express Edition has limitations in terms of CPU and RAM usage—each database
can be no larger than 10 GB. See this Microsoft article
for more information. Even if the size of your Pervasive
company folder is under 10 GB, it does not mean that you can use SQL Server Express. This is because the
replication process adds views and indexes to the SQL Server database, increasing its size.
Is the size of your Pervasive data suitable for using SQL Server Express?
To check whether the size of your Pervasive data is suitable for using SQL Server Express, follow these steps:
1. On the accounting server, browse to the location of your Sage 300 Construction and Real Estate company
folders.
2. Open the first company folder you want to replicate, and select the POIVData, PVData, and SMData folders and
make a note of the size of these three folders.
NOTE: You might not have all of these folders. The POIVData folder will only be present if you use Purchasing and Inventory.
The SMData will only be present if you use Service Management.
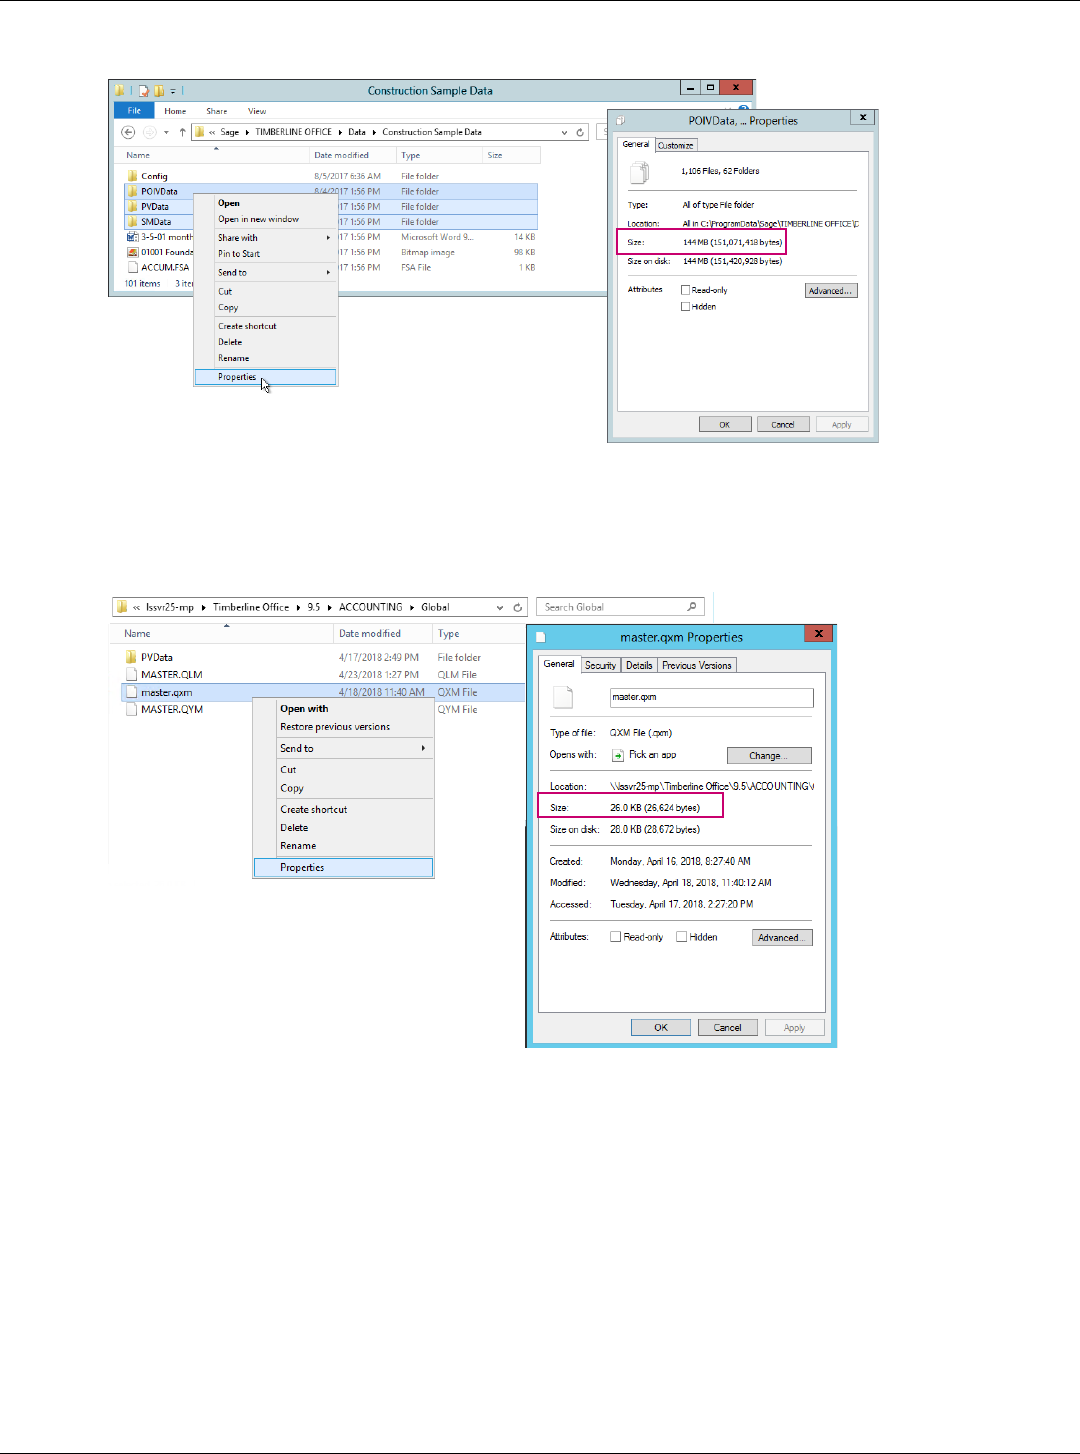
© 2020, The Sage Group plc or its licensors 7
Sage SQL Replicator 2.0 1 Prepare to implement Sage SQL Replicator
3. Right-click the selected folders and select Properties.
4. Next, browse to the location of the MASTER_QXM folder. This is in your installation directory, which is in the
following location by default:
C:\ProgramData\Sage\TIMBERLINE OFFICE\9.5\Accounting\Global\PVData
5. Right-click the MASTER_QXM folder and select Properties.
6. Make a note of the size of the folder, and add it to the others.
(POIVData) + (PVData) + (SMData) + (MASTER_QXM)
If the total sum is under 6 GB, you can use SQL Server Express.
If the total sum is greater than 6 GB, you must use full SQL Server (Standard Edition or Enterprise Edition).

1 Prepare to implement Sage SQL Replicator Sage 300 Construction and Real Estate
8 © 2020, The Sage Group plc or its licensors
Permissions
If you are the individual who will set up Sage SQL Replicator, your Windows user name must:
Have local administrative permissions on the machine where the SQL Server instance will be installed and also
on the Sage 300 CRE Accounting server.
Be associated with a Sage 300 CRE user with an Application Administrator role.
Have the sysadmin role in SQL Server.
When you install the SQL Server instance for SQL Replicator, your Windows user name is automatically
added to the sysadmin role. See “Install the SQL Server instance for SQL Replicator” on page 10.
After you install the instance, you can use SQL Server Management Studio to set up another user as the
backup system administrator. See “Create a backup system administrator” on page 19.
NOTE: If you have the Canadian or Australian edition of Sage 300 Construction and Real Estate installed, Sage SQL Replicator
requires a Windows user with the Region set to Canada or Australia. This enables the country-specific fields in Accounts Payable
and Payroll to be replicated.

© 2020, The Sage Group plc or its licensors 9
Sage SQL Replicator 2.0 2 Install SQL Server
2 Install SQL Server
SQL Replicator requires a dedicated instance of SQL Server which you can install using the Sage SQL Installer, a
tool that comes with your Sage software.
In this chapter, you learn:
How to use the Sage SQL Installer to perform a Basic and an Advanced installation.
The required configuration settings for the instance when you use the SQL Server Installation Center.
How to use SQL Server Management Studio to create a backup system administrator for your SQL Server
instance.
Before you proceed with the installation, make decisions on the following:
Whether to install the SQL Server instance on your Sage 300 Construction and Real Estate accounting server
or on a different server.
If you will use SQL Server Express or full SQL Server. (See “Microsoft SQL Server edition” on page 6.)
The file locations for the instance and the data. For improved performance, Sage recommends using solid state
drives (SSD) to store the SQL data files.
Sage SQL Installer
The Sage SQL Installer comes with Sage 300 Construction and Real Estate. If you are installing the SQL Server
instance on another server (not the accounting server), install the Sage SQL Installer tool on that server.
WARNING: The Sage SQL Installer installs the SQL Server instance to work correctly with Sage SQL Replicator. We strongly
recommend you use it to install SQL Server.
To install the Sage SQL Installer on a remote server
1. In the extracted installation files for Sage 300 Construction and Real Estate, browse to this location:
AccountingServer\Install\Prerequisites\SUSI.
2. Copy the file SUSI.exe to the server on which you will install the SQL Server instance for SQL Replicator.
3. On the computer on which you will install SQL Server, double-click SUSI.exe to install the Sage SQL Installer.
NOTES: If you are installing the SQL Server instance on a remote server, there is an additional step for changing the service
account name for running the SQL Server Database Engine service after the installation—see “Change the SQL Server Database
Engine service account” on page 21.
.

2 Install SQL Server Sage 300 Construction and Real Estate
10 © 2020, The Sage Group plc or its licensors
Install the SQL Server instance for SQL Replicator
1. Go to the computer on which the SQL Server Instance will be installed and log on as a user with local
administrative permissions. During the installation, this Windows user will be added to the SQL Server
sysadmin server role.
2. In the Windows Start menu, go to the Sage Administration group and click Sage SQL Installer.
TIP: If you are installing the SQL Server instance on your Sage 300 Construction and Real Estate accounting server, you can
also open Sage SQL Installer through System Administrator. In the Windows Start menu, go to the Sage Administration
group, click System Administrator, and click the Install SQL Express button.
3. Leave Sage 300 CRE selected and click Next. A warning appears if your server doesn’t meet the minimum
hardware requirements. We don’t recommend continuing unless your server meets all requirements.
4. Click Next if you are ready.
5. Select the Automatically download check box if you want the installer to download the latest version of
SQL Express 2016 SP1 with Advanced Tools. If you already have the installation file, browse to its location.
Alternately, if you have installation media for the Standard or Enterprise edition of SQL Server 2016 SP1, select
Microsoft SQL Server 2016 from the dropdown and browse to the installation file.

© 2020, The Sage Group plc or its licensors 11
Sage SQL Replicator 2.0 2 Install SQL Server
6. Click Next. In the next window, select the type of installation.
Basic Install installs SQL Server and the default SQL file locations on the server’s system drive (usually the
C: drive). This option does not allow you to change any of the configurations for the instance.
Advanced Install takes you to the Microsoft SQL Server’s installation interface so that you can customize
options as you move through the wizard. This is the recommended option if you use a SSD because you can
specify the location of the instance root directory.
7. Click Next, and wait for the file to be downloaded (if you selected that option). The remaining steps depend on
whether you selected the Basic Install or Advanced Install option.
8. When the installation is complete, you can install Microsoft SQL Server Management Studio as an option—see
“Install SQL Server Management Studio” on page 19.
Basic installation
1. The next window shows the name for the new instance. By default, this is SAGE300CRE, but you can change it.
2. Enter or generate a password for SQL Server’s sa (administrative) user. In addition to sa, the Windows user
name for the person currently logged in will be added to the sysadmin server role.
WARNING: Be sure to record the sa password and save it for your records.
3. Click Next, and wait while the installer creates and configures the SQL Server instance.
2 Install SQL Server Sage 300 Construction and Real Estate
12 © 2020, The Sage Group plc or its licensors
Advanced installation
You are taken to Microsoft’s SQL Server’s installation wizard where you can change the prefilled default settings a
Sage SQL Replicator instance in each of the configuration windows.
See “Install SQL Server using the Microsoft Installer,” on page 12 for detailed information about using the SQL
Server Setup wizard.
WARNING: Using the Sage SQL Installer’s Advanced installation option, the server’s default collation is set at
SQL_Latin1_General_CP1_CS_AS. Do not change this setting!
Install SQL Server using the Microsoft Installer
In some cases, you may want to install SQL Server yourself rather than allowing the Sage SQL Installer to install for
you. To install an instance compatible with Sage SQL Replicator, follow these instructions.
NOTE: If you are installing SQL Server using the Advanced option of the Sage SQL Installer, skip to step 4.
1. Log on to the computer on which you will install the SQL Server.
2. In the Windows Start menu, go to the Microsoft SQL Server 2016 group and open SQL Server 2016
Installation Center.
NOTE: If you used the Sage SQL Installer to download SQL Server Express (see step 5 of the topic Install the SQL Server
instance for SQL Replicator on page 10), locate the file called SQLEXPRADV_64_ENU.exe and double-click the file to extract
the contents. When the files are extracted, open the folder location, and double-click Setup.exe to open the SQL Server
Installation Center.
3. In the SQL Server Installation Center window, click Installation on the left, and then click the first option,
New SQL Server stand-alone ... in the list. When prompted, provide the location for the installation media.

© 2020, The Sage Group plc or its licensors 13
Sage SQL Replicator 2.0 2 Install SQL Server
4. We strongly recommend that you select the option to Use Microsoft Update to check for updates. Click Next.
5. The next window shows the results of the setup rules check. You can ignore warnings about the firewall. If any
elements of the check failed, you’ll need to fix those issues before you can continue. Click Next.
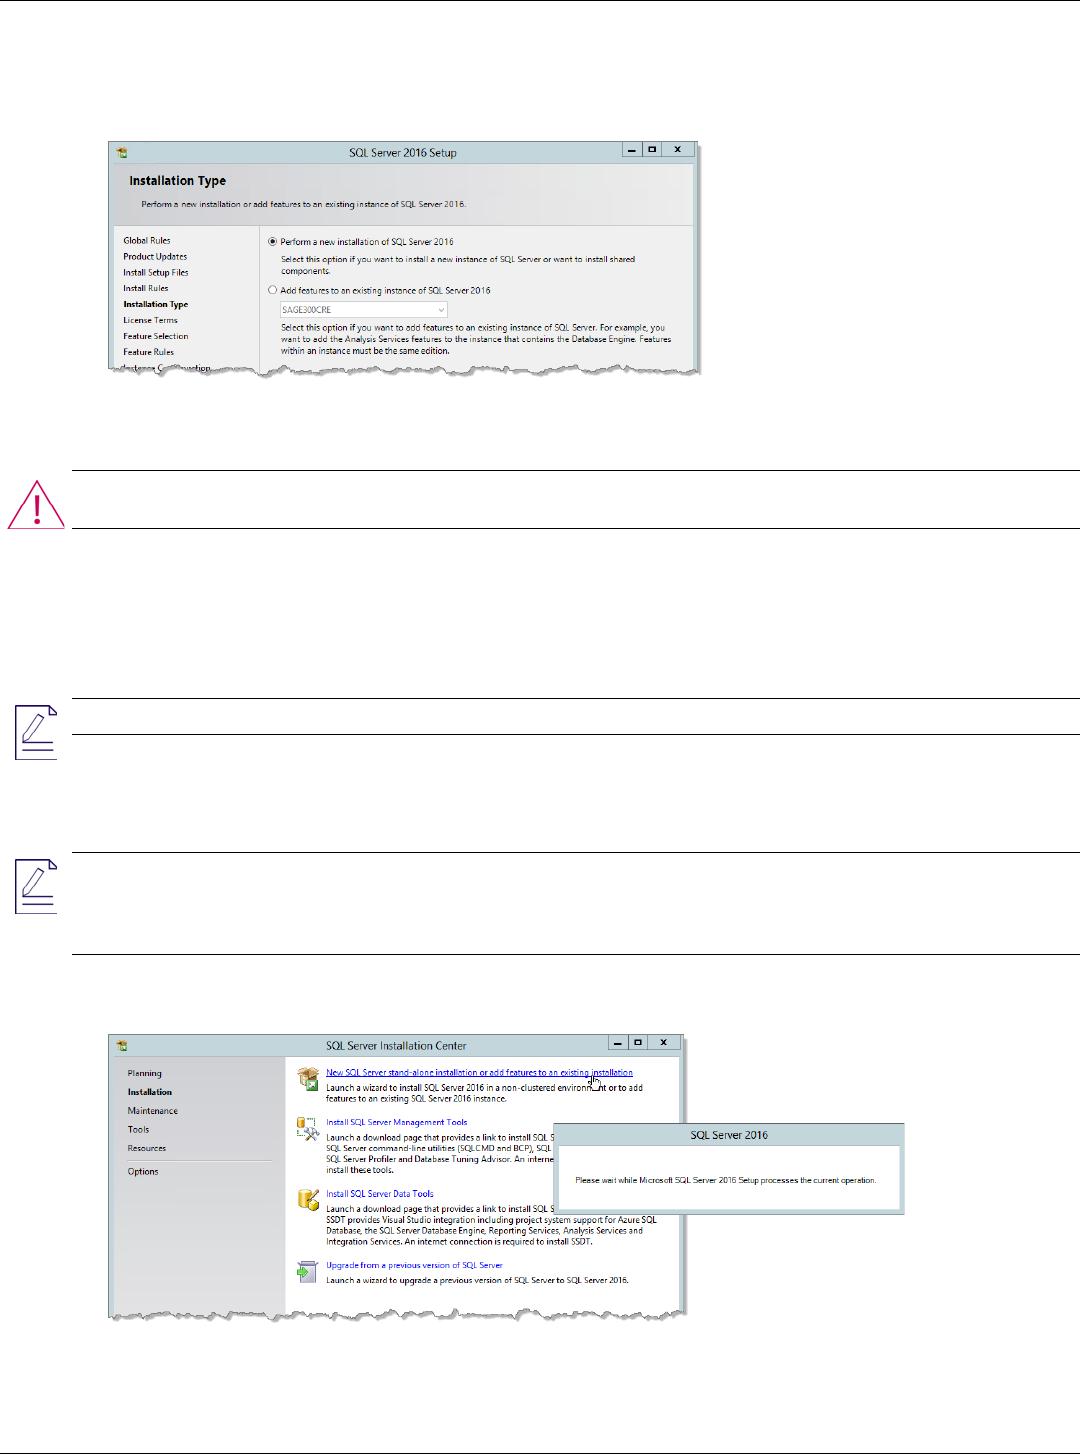
6. In the Installation Type window, select to perform a new installation of SQL Server. Click Next.

2 Install SQL Server Sage 300 Construction and Real Estate
14 © 2020, The Sage Group plc or its licensors
7. In the License Terms window, select I accept the license terms, and then click Next.
8. In the Feature Selection window, at a minimum you must select these check boxes. You can select others if
you wish.
Database Engine Services
SQL Server Replication
Full-Text and Semantic Extractions for Search.
9. You can change the Instance root directory to another local drive or location on your server if you wish. For
optimal performance, Sage recommends using your SSD drive for the root directory.
10. Click Next.
8
9

© 2020, The Sage Group plc or its licensors 15
Sage SQL Replicator 2.0 2 Install SQL Server
11. In the Instance Configuration window, we recommend that you install a Named instance using the name
SAGE300CRE but you can use a different name.
WARNING: Avoid using Default instance. Because your Sage software does not support sharing its instance with other SQL
Server based software solutions, if you use the default instance, you will need to install other SQL based solutions to different
instances.
12. Click Next.
WARNING: The settings in the next window are critical to installing a SQL Server instance that will work with SQL Replicator.
Configure this window exactly as instructed.

2 Install SQL Server Sage 300 Construction and Real Estate
16 © 2020, The Sage Group plc or its licensors
13. In the Server Configuration window:
On the Service Accounts tab, leave the default service accounts and options as they are.
NOTE: If you are installing the SQL Server instance on a dedicated server, replace the virtual account as the Account Name
for SQL Server Database Engine after completing the installation—see “Change the SQL Server Database Engine service
account” on page 21.
Click the Collation tab. The collation under Database Engine must be set to
SQL_Latin1_General_CP1_CS_AS.
If you are not using the Advanced option of the Sage SQL Installer, you must click Customize and select
the correct SQL collation.
If you are using the Advanced option of the Sage SQL Installer, the correct SQL collation is already
selected by default.
WARNING: SQL_Latin1_General_CP1_CS_AS is the required collation setting for Sage SQL Replicator. Note that the last
characters are “CS_AS” which stands for “case-sensitive, accent-sensitive.”
14. When you are finished with the Server Configuration window, click Next.
15. In the Database Engine Configuration window, you must select Mixed Mode. This mode is required for SQL
Replicator.

© 2020, The Sage Group plc or its licensors 17
Sage SQL Replicator 2.0 2 Install SQL Server
16. Enter and confirm a password for the administrator (sa) account.
17. The windows user logged in to the computer will be added automatically as an administrator. Click Add to add
additional administrators.
18. On the Data Directories tab, the default location reflects the Instance root location you selected in step 9. For
optimal performance, use your SSD drive for these directories.

2 Install SQL Server Sage 300 Construction and Real Estate
18 © 2020, The Sage Group plc or its licensors
19. On the TempDB tab, you can add and remove files to store the tempdb database on an SSD drive if available.
20. Click Next. The next window shows installation progress. When it is finished, click Close.

© 2020, The Sage Group plc or its licensors 19
Sage SQL Replicator 2.0 2 Install SQL Server
Important information about SQL Server
SQL Server is installed as a Windows service. If services related to SQL Server are stopped, SQL Replicator cannot
replicate data.
Install SQL Server Management Studio
SQL Server Management Studio is useful tool for configuring, managing, and administering all components within
SQL Server. It is not installed as part of the database engine installation. We recommend that you download and
install SQL Server Management Studio if it is not already installed on your server.
WARNING: This procedure will require you to restart your accounting server.
1. In your web browser search for “Download SQL Server Management Studio.”
2. Click the link to the Microsoft page and download the program.
3. When the download is finished, double-click the file and follow the steps in the wizard to install SQL Server
Management Studio. When the installation is finished, you’ll be required to restart your server.
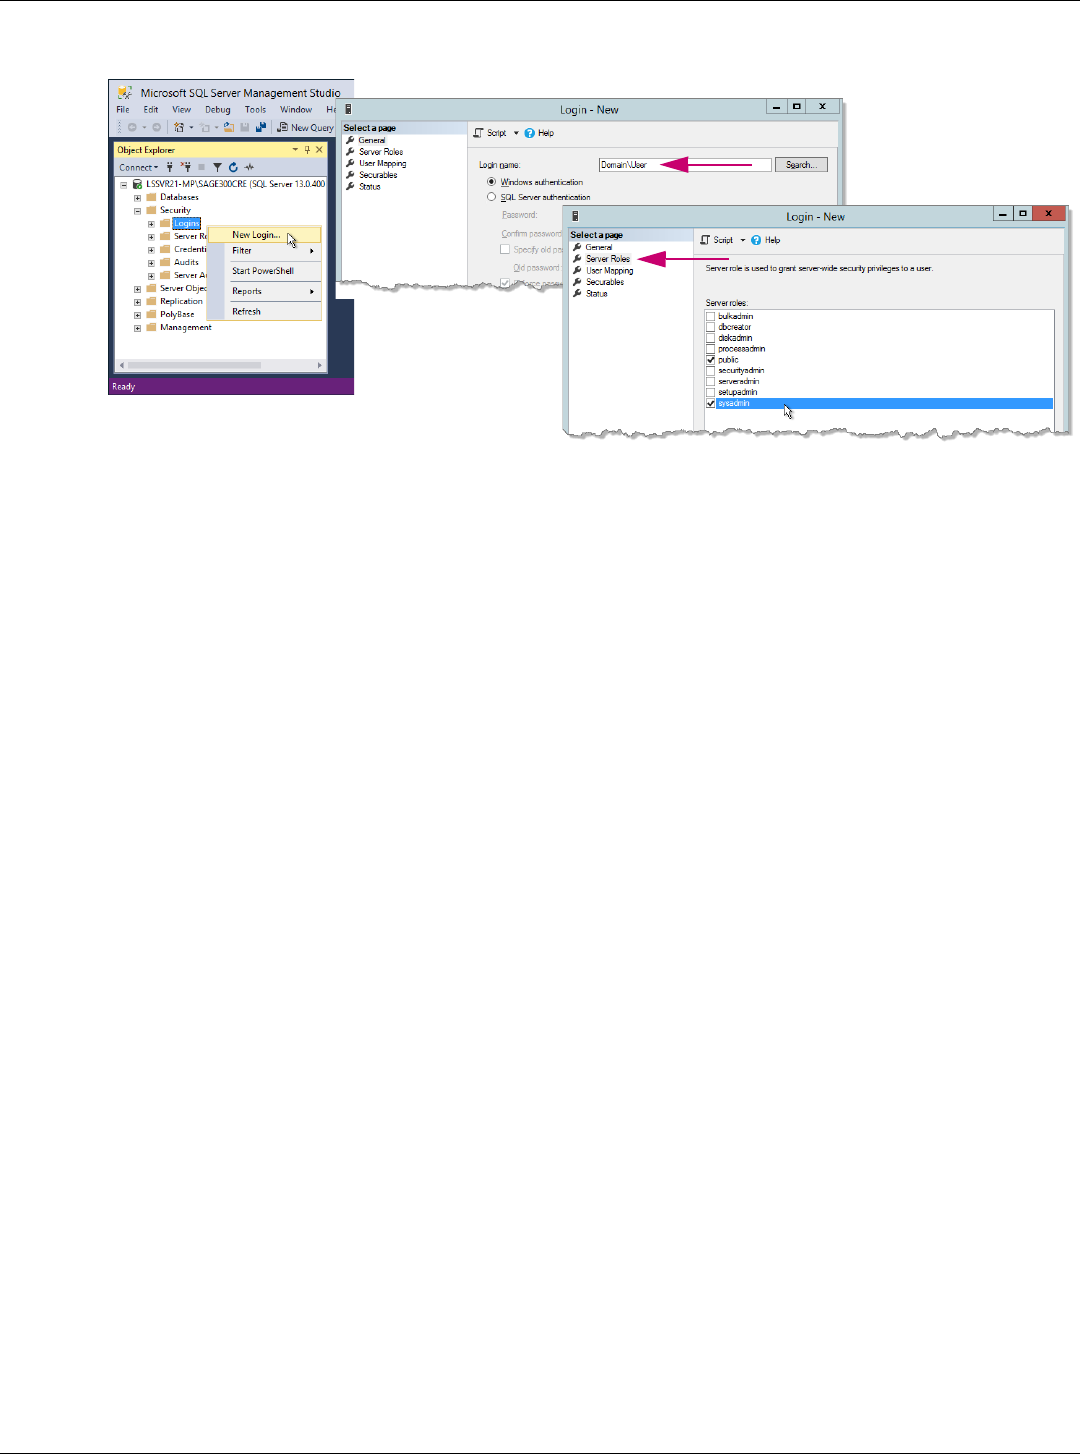
Create a backup system administrator
We recommend that you add a backup system administrator to your SQL Server instance. Your backup
administrator should be set up as a user in Sage 300 Construction and Real Estate and linked to a Windows ID. This
user should also have local administrative permissions on the accounting server.
1. When the server has re-started, open SQL Server Management Studio and log in to the Sage 300 Construction
and Real Estate instance.
2. Under Security, right-click Logins and select New Login.
3. Next to Login name, enter the domain and Windows ID of your backup system administrator.
2 Install SQL Server Sage 300 Construction and Real Estate
20 © 2020, The Sage Group plc or its licensors
4. On the Server Roles page, select the sysadmin server role.
5. Click OK to save your changes and close the Login - New window.
6. Repeat these steps if this instance is on a different machine than the accounting server and you created a new
Windows domain account as described on page 8.

© 2020, The Sage Group plc or its licensors 21
Sage SQL Replicator 2.0 2 Install SQL Server
Change the SQL Server Database Engine service account
If you installed the SQL Server instance to a dedicated server (not your Sage 300 CRE Accounting server), you
should replace the virtual account used for running the SQL Server Database Engine service.
NOTE: Both the Sage SQL Installer and the Microsoft Installer installed the instance using the default virtual account for the SQL
Server Database Engine service.
For a remote SQL Sever instance, the SQL Server Database Engine service should run with the built-in Network
Service account or a Domain Service account that:
Exists on your Sage 300 CRE Accounting server.
Has the proper permissions to the Sage 300 CRE company folders you plan to replicate and to the
TIMBERLINE OFFICE share folder (this share folder is on your Sage 300 CRE Accounting server, and installed
to ProgramData\Sage by default).
Use these steps to change the SQL Server Database Engine service account:
1. On the dedicated server where the SQL Server instance is installed, open SQL Server Configuration Manager.
2. Locate the service called SQL Server (SAGE300CRE)—the text in parenthesis is the name of your instance.
Right-click on this service and select Properties.
3. On the Log On tab, select This account, and enter the Account Name and Password for the Domain Service
account (preferably one without password expiration restrictions) or the built-in Network Service account.

2 Install SQL Server Sage 300 Construction and Real Estate
22 © 2020, The Sage Group plc or its licensors

© 2020, The Sage Group plc or its licensors 23
Sage SQL Replicator 2.0 3 Install Sage SQL Replicator 2.0
3 Install Sage SQL Replicator 2.0
Starting in Sage 300 CRE 20.1, there is an additional separate install for SQL Replicator which is required for
replicating data.
To install SQL Replicator 2.0
1. Download the file called SageSQLReplicator.exe and run the installation on your Sage 300 CRE Accounting
server. You must be logged on to the server with local administrative permissions.
2. In the Welcome screen, accept the terms of the license agreement and indicate where to install the files.
The default location is C:\Program Files (x86)\Sage\SageSQLReplicator. If you accept the default location,
click Install to begin the installation.
To specify a location to install the files, click Destination and enter the path. Click Install to begin the
installation.
3. A message appears when the installation is finished.

3 Install Sage SQL Replicator 2.0 Sage 300 Construction and Real Estate
24 © 2020, The Sage Group plc or its licensors

© 2020, The Sage Group plc or its licensors 25
Sage SQL Replicator 2.0 4 Configure and replicate data
4 Configure and replicate data
In this chapter, you learn:
How to configure the settings for data replication.
How to monitor the status and progress of the replication.
Which Windows services are required for SQL Replicator.
How to ensure that schema changes in the Pervasive database are updated in the SQL database.
Before you proceed, decide on the following:
Which company database to replicate.
Whether to replicate all the database tables for a company. If only certain tables are needed, make a note of
which ones.
Whether you want the replication to occur continuously. If using scheduled replications, make a note of when
the process starts each day.
In addition, we recommend that you complete the following preparations before replicating the data:
Use File Tools to remove any non-core transaction files (also referrred to as “dummy files”) from your company
data folder. See Sage Knowledgebase article 96052
.
Use the Sage 300 CRE utility called File Doctor to check for corrupt records in the databases that you plan to
replicate. Sage SQL Replicator does not replicate tables with corrupt records. To find out how to use File
Doctor, see Sage Knowledgebase article 20400
.
WARNING: If you are already using Sage SQL Replicator, you must stop the replication process before running File Tools or
File Doctor.
Identify all the users who need access to the SQL data, and add them to Sage 300 CRE Security
Administration with the appropriate permissions. For more information, see “Security” on page 37.
Sage SQL Replicator configuration and settings
Before you replicate data, you must configure the replication settings. These controls are in System Administrator
(in the System Administration group). The steps are explained in the next sections, and include:
1. Creating the SQL Replicator configuration database.
2. Creating a company configuration database for each company you want to replicate.
3. Using Configuration Manager to define which database tables to replicate and how often the replication
occurs.
NOTE: Even if you have replicated your data using an earlier version of Sage SQL Replicator, you must complete steps 1 and
2 to update the configuration databases.
SQL Replicator configuration database
1. Log on to the Sage 300 Construction and Real Estate accounting server as a user with local administrative
permissions. The Windows user name must also have the sysadmin role in SQL Server.
NOTE: The user who used Sage SQL Installer to install the SQL Server instance is automatically assigned the sysadmin role.
2. On the Windows Home page, go to the Sage Administration group and click System Administrator.
3. In the Log On window, you must enter the credentials for a Sage 300 Construction and Real Estate user that
has the Application Administrator role.

4 Configure and replicate data Sage 300 Construction and Real Estate
26 © 2020, The Sage Group plc or its licensors
4. If the connection window does not open, click Replicator Settings to go to that tab, and then click Connect.
In the box next to Server name, select the name of the instance that you created—see page 10.
For Authentication, select Windows Authentication. Your Windows domain and user name are
automatically entered for the User name.
Click Connect.
5. If you have never replicated your data before, you are prompted to create the SQL Replicator configuration
database. Click Yes. This creates the SageCREGlobalConfiguration and the Izenda databases in the SQL
Server instance. The Izenda database is used for Mobile Dashboards.
NOTE: The prompt to create the configuration database does not appear if these databases already exist (from using an earlier
version of SQL Replicator) and do not require any updates.

© 2020, The Sage Group plc or its licensors 27
Sage SQL Replicator 2.0 4 Configure and replicate data
6. When finished, the Replicator Settings tab shows the list of companies in your Open Company list.
7. If you will access the data through Sage Construction Central for Sage Mobile services, click Link to Mobile.
NOTE: Your mobile website will be available once the initial replication is finished.
Next, you create the company configuration database for each company that you want to replicate—continue to
the next topic to learn this.

4 Configure and replicate data Sage 300 Construction and Real Estate
28 © 2020, The Sage Group plc or its licensors
Company configuration database
1. On the Replicator Settings tab of System Administrator, locate the first company that you want to replicate
and click Configure.
2. If you have never replicated the data for this company, the Create Configuration Database Confirmation
message appears. Click Yes—this creates a database named after this company in the SQL Server instance.
NOTE: The prompt to create the company configuration database does not appear if the database already exists in the SQL
Server instance (from an earlier version of SQL Replicator).
When you click Configure, it will automatically apply upgrade scripts
if needed.
You can click View Logs to open the Sage LogViewer to view the detailed actions. If you need to print out the log
later, note the location of where these log files are stored in the title bar of the Sage LogViewer window.
3. When it finishes running the scripts, you will be prompted to connect to the SQL instance again for the
Configuration Manager.
Location of log file.
© 2020, The Sage Group plc or its licensors 29
Sage SQL Replicator 2.0 4 Configure and replicate data
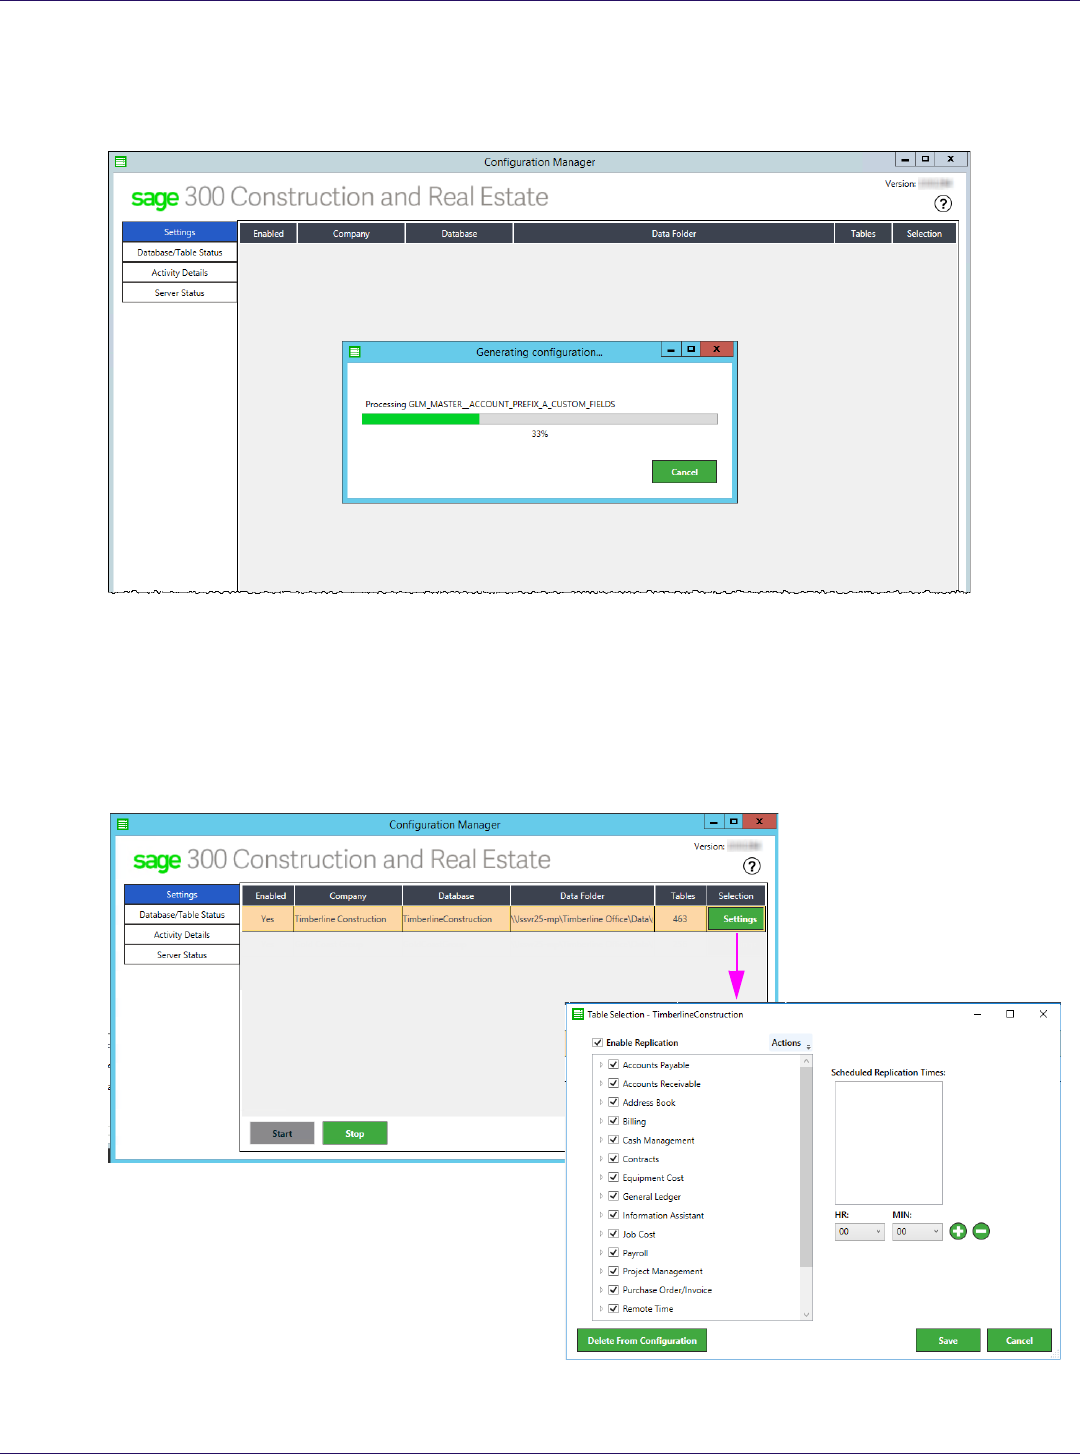
4. The Configuration Manager opens and automatically connects to the Pervasive database to read the schema
so that it can create the schema (tables, views, and objects) for the corresponding company database in SQL.
This process determines the list of tables that are available in the Table Selection window explained in the next
topic.
5. When the process is finished, remain on the Settings tab of Configuration Manager. Next. you will define the
replication settings and start the replication process—continue to the next topic to learn this.
Specify the replication settings for each company
1. On the Settings tab of Configuration Manager, click the Settings button to open the Table Selection window.
You use this to specify which tables are replicated and how often the replication occurs.

4 Configure and replicate data Sage 300 Construction and Real Estate
30 © 2020, The Sage Group plc or its licensors
2. All the Pervasive database tables are automatically included for replication.
The Enable Replication check box is automatically selected. This is required for replication to take place.
Click the arrow next to an application name to view the tables. For tables that you do not want to replicate into
SQL Server, clear the check box next to the table name. Note that certain tables are required and you are
unable clear the check boxes for these tables.
TIP: Look for “dummy files” and exclude them from replication.
WARNING: By excluding certain tables from replication, some reporting views and stored procedures will not work, affecting the
ability to return information on certain Crystal reports and in Mobile Dashboards. See “Changes to the replication settings” on
page 39.
Do not use the Select Minimal option if you use Mobile Intelligence or SQL reporting because the replication
is limited and you are not permitted to adjust the table selection. See Sage Knowledgebase article 93399
for the list of tables that are replicated with this option.
3. The replication frequency is automatically set to continuous unless you specify a scheduled time. Use HR and
MIN to select the time and click the plus symbol to add it. You can set up multiple scheduled replications per day.
4. Click Save to save your settings.

© 2020, The Sage Group plc or its licensors 31
Sage SQL Replicator 2.0 4 Configure and replicate data
5. On the Settings tab of Configuration Manager:
The Enabled column shows Yes if the Enabled Replication check box is selected in the Table Selection
window.
The Tables column shows the number of tables selected for replication.
6. If there are additional companies for which you want to replicate the data, close Configuration Manager and
return to System Administrator and repeat these steps for each company.
After you have configured the settings for all the companies, you are ready to start the replication—continue to
the next topic to learn this.
Start the replication
On the Settings tab of Configuration Manager, click Start to begin the replication for all the companies where the
Enabled column shows Yes. Do this even when all the companies are configured to use scheduled replications.
WARNING: The Start and Stop buttons on the Settings tab affect all the companies. If you later want to stop the replication for
only one company, see “To stop the replication for a company” on page 40.
The replication operation follows this order:
1. Replicates the data for the selected tables for each company.
2. Creates SQL reporting views (see page 37).
3. Copies Sage 300 CRE security settings into SQL (see page 37).
While the replication is in process, users can continue to work in Sage 300 Construction and Real Estate without
interruption. The length of time it takes to complete the initial replication depends on the size of your database and
your server hardware.
You can view the replication activity by clicking Activity Details in Configuration Manager. When the initial
replication is finished, the Message column shows Initial replication completed.
TIP: To check for warnings and errors with the replication process, click View Log.

4 Configure and replicate data Sage 300 Construction and Real Estate
32 © 2020, The Sage Group plc or its licensors
FOR MORE INFORMATION: Configuration Manager provides tools for monitoring the replication—see page 32
NOTE: If you will access the data through Sage Construction Central for Sage Mobile services, you must follow the instructions
in the Sage Construction Central Setup Guide to grant security permissions and licenses to users, and deploy your mobile
website through Microsoft Azure Cloud Services.
WARNING: For data integrity, when you back up your Pervasive data, you must also back up the corresponding SQL Server
database. You can use the Backup feature in System Administrator—see “Backing Up and Restoring” on page 35.
Replicator monitor tools
The Database/Table Status, Activity Details, and Server Status tabs in Configuration Manager let you monitor
the replication progress and server usage. See the next pages to learn how to use the information on these tabs.

© 2020, The Sage Group plc or its licensors 33
Sage SQL Replicator 2.0 4 Configure and replicate data
Database/Table Status
Use the Database/Table Status tab to check the replication progress.
The upper grid shows the companies for which you have enabled replication. It indicates:
The number of errors that occurred during replication. The individual errors are listed in the Activity Details tab.
The latest time that a table finished replicating.
The tables shown in the lower grid are based on the database that you select in the upper grid. Use this grid to learn
the replication status of each table. Once a table has finished replicating, the date and time are entered in the
LastReplicated column.
TIP: You can click any column header to sort the information in ascending or descending order.

4 Configure and replicate data Sage 300 Construction and Real Estate
34 © 2020, The Sage Group plc or its licensors
Activity Details
Use the Activity Details tab for detailed information about the replication for each table. To locate specific
information:
Use the drop-down next to Level to filter the type of information shown: all information, only warnings, or only
errors.
You can also use the Search box to locate specific entries based on text in the Message column.
When the initial replication is finished, the Message column shows Initial replication completed.
The information in the Activity Details tab is cleared out when you close Configuration Manager and is not logged
by default. For troubleshooting purposes, you can enable logs to retain this information— follow the steps in Sage
Knowledgebase article 100109.

© 2020, The Sage Group plc or its licensors 35
Sage SQL Replicator 2.0 4 Configure and replicate data
Server Status
The Server Status tab shows the load and memory usage, and the number of processes running on your server.
Make a special note of the sever information—full memory usage or a high CPU load negatively affects the
replication process.

4 Configure and replicate data Sage 300 Construction and Real Estate
36 © 2020, The Sage Group plc or its licensors
Required Windows services
In addition to the services required to run your Sage 300 CRE software program, the following services must be
running in order for Sage SQL Replicator to work properly:
Specify the account for Sage SQL Replicator Service
Instead of using a Local System account on the server to run Sage SQL Replicator Service, you can specify a
different account.
NOTE: After upgrading to Sage 300 CRE version 20.1, the Run-As Account for Sage SQL Replicator is removed from System
Administrator. If needed, use the steps outlined below to change the account for running the Sage SQL Replicator Service.
1. If the replication process is running, stop it—open Configuration Manager and click the Stop button on the
Settings tab.
2. Open Windows services (in the Windows search box type services.msc).
3. Locate the service called Sage SQL Replicator Service. Right-click on this service and select Properties.
4. Go to the Log On tab. Select This account and enter the account name and password. This account must have
the proper permissions to the Sage 300 CRE company data folders being replicated and also to the
TIMBERLINE OFFICE share folder (this share folder is on your Sage 300 CRE Accounting server, and installed
to ProgramData\Sage by default).
5. Click OK.
6. To resume replication, open Configuration Manager and click the Start button on the Settings tab.
Windows service Comment
Sage SQL Replicator Service
Installed on the Sage 300 CRE Accounting server when the company
configuration database is created in SQL.
Uses the Local System account as the default Log on account. See “Specify
the account for Sage SQL Replicator Service” for instructions on how to
change the account that runs this service.
Automatically starts when you click Start in the Configuration Manager.
Sage SQL Replicator Redis Service
Runs on the Sage 300 CRE Accounting server.
Manages change queues.
Is used for continuous replication.
Automatically starts when you click Start in the Configuration Manager.
Sage Worker Engine Runs on the Sage 300 CRE Accounting server and is required for Sage
Construction Central and Mobile Intelligence.
SQL Server (SAGE300CRE)
The text in parenthesis represents the name of your SQL instance.
These services run on the server where the SQL Server instance is installed.
SQL Server Agent (SAGE300CRE)

© 2020, The Sage Group plc or its licensors 37
Sage SQL Replicator 2.0 4 Configure and replicate data
SQL Reporting views
Sage SQL Replicator creates several views and stored procedures for reporting purposes.
When you generate Crystal reports designed with a Pervasive data source in Sage 300 CRE with the Use SQL
check box selected or in Mobile Reports, your software automatically switches to a SQL data source and uses
the appropriate views to return the information.
Certain Mobile Dashboard reports rely on reporting views and stored procedures to generate information.
WARNING: Reporting views and stored procedures rely on data replicated into SQL. If you choose not to include all database
tables for replication, certain views and stored procedures will not work.
The views created by SQL Replicator are categorized into four groups:
Std views (based on the Pervasive DSN table naming option of Standard descriptions).
Custom views ((based on the Pervasive DSN table naming option of Custom descriptions).
Dict views (based on the Pervasive DSN table naming option of Dictionary names).
Reports views—used by certain Mobile Dashboard reports. See Sage Knowledgebase article 91722 to find
out which tables are needed for the Reports views and stored procedures.
Security
In order to allow users access to the SQL Server data through reports or Mobile solutions, you must grant the
appropriate task permissions in Sage 300 Construction and Real Estate Security Administration.
The replication process enforces Sage 300 Construction and Real Estate security settings in the SQL Server data.
Any user, role, task, company, and record permissions established in Sage 300 Construction and Real Estate are
respected when users access the SQL Server data through Sage Construction Central, reports, or in any other
manner.
4 Configure and replicate data Sage 300 Construction and Real Estate
38 © 2020, The Sage Group plc or its licensors
The initial replication process copies the security settings into the SQL Server instance. When you make changes
to the security setup afterwards, such as adding new users, you must manually synchronize the changes with the
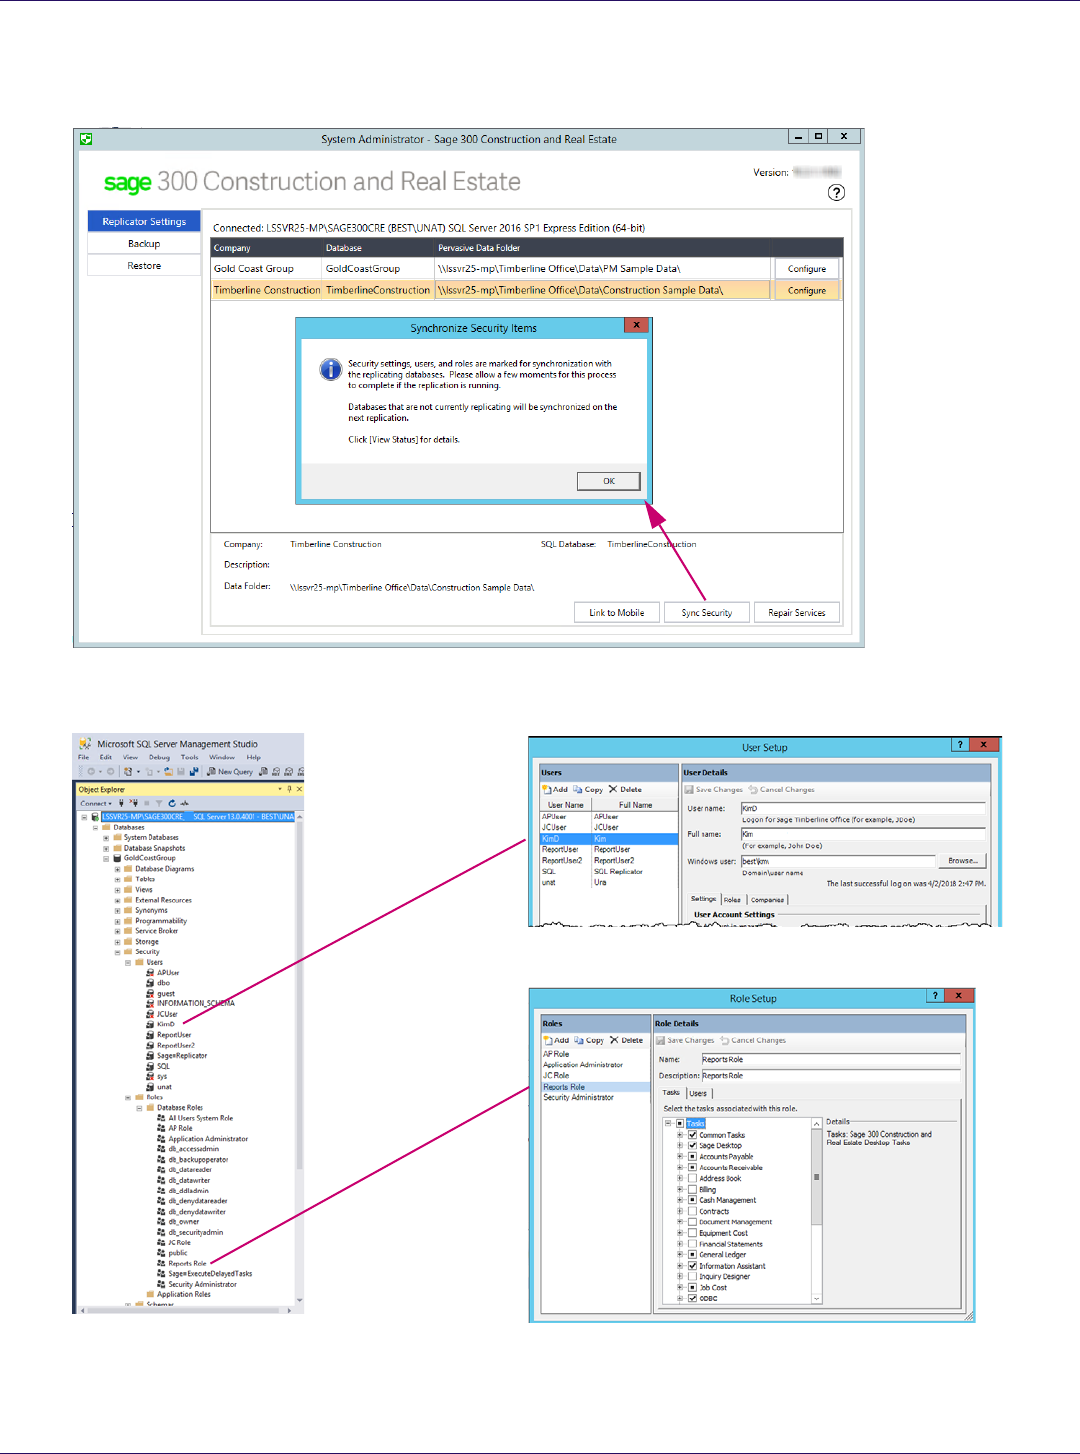
SQL Server data. In System Administrator, on the Replicator Settings tab, click Sync Security.
Sage 300 Construction and Real Estate user names and roles, along with their task and company permissions are
copied to each SQL Server database.
For each Sage 300 Construction and Real Estate user name, a SQL Server login is created with SQL Server
Authentication. The passwords (in Sage and in SQL Server) are automatically synchronized when the user logs into

© 2020, The Sage Group plc or its licensors 39
Sage SQL Replicator 2.0 4 Configure and replicate data
Sage 300 Construction and Real Estate for the first time after replication. This lets you use your Sage 300
Construction and Real Estate credentials whenever you access the SQL Server data in on-premises Sage and third
party applications such as Microsoft Excel or Access.
NOTE: User names and passwords are case-sensitive.
Anyone who accesses the SQL Server data through Sage Construction Central must have a Windows user name
associated with their Sage 300 Construction and Real Estate user setup. This is because Sage Construction Central
requires Windows authentication—you log on using your Windows credentials.
Changes to the replication settings
You may want to change the replication settings after the initial replication is finished. For example, to alter the
replication frequency, the table selection included for replication, or to stop the replication for a company. For these
types of changes, you can open Configuration Manager directly from the ConfigurationManager.exe file instead
of through System Administrator. This file is stored on your Accounting server in this default location:
C:\Program Files(x86)\Sage\SageSQLReplicator.
Any changes to the replication settings will only take effect after you restart the replication process. To restart the
replication, you must click Stop and then Start on the Settings tab of Configuration Manager.
NOTE: During each Configuration Manager session, the message to remind you to restart the replication after making a
change appears only once.
To change the replication frequency or table selection
1. Open Configuration Manager.
2. On the Settings tab, click the Settings button next to the company for which edit the replication.

4 Configure and replicate data Sage 300 Construction and Real Estate
40 © 2020, The Sage Group plc or its licensors
3. Make the necessary changes in the Table Selection window and click Save.
4. Restart the replication process—click Stop, and when the Start button becomes available, click it.
To stop the replication for a company
1. Open Configuration Manager.
2. On the Settings tab, click the Settings button next to the company for which to cease replication. The Table
Selection window opens.
3. Clear the Enable Replication check box to exclude the company from the replication process.
4. If you want to remove this company from Configuration Manager, click Delete from Configuration. Once the
configuration is deleted, the company no longer appears on the Settings tab but the database remains in SQL
Server. If you want to remove the database from SQL Server, you can do so with MS SQL Server Management
Studio.
5. Click Save.
6. Restart the replication process—click Stop, and when the Start button becomes available, click it.
Replicate a new company
In addition to the current companies you are replicating, you may want to add another company in the future. To do
so:
1. You must open System Administrator to create the configuration database for the new company first (see
page 28).
2. Next, you use Configuration Manager to specify the replication settings for the company (see page 29).
3. Last, you must restart the replication to include the new company in the operation.
Schema changes in the Pervasive database
As you learned, when SQL Replicator creates the configuration database for each company, it reads the Pervasive
schema so that it can create the schema for the corresponding database in SQL. If there are changes to the
Pervasive schema, SQL Replicator does not automatically pick them up, resulting in some columns or tables being
skipped by replication.
Examples of Pervasive schema changes include:
Upgrading to a new version of Sage 300 CRE that has database changes. Refer to the Release Notes for
database changes.
Changes to custom descriptions. For example, you change the default name for the field AP Misc Deduction.
Changes or additions of custom fields.
Creating a new file, such as an archive file.
Changes to file or record security.
When you have Pervasive schema changes, you must use Configuration Manager to regenerate the configuration
database for the company to update the schema. To do so:
1. Open System Administrator and click Configure.
2. On the Settings tab of Configuration Manager, click Stop.
3. Click Settings for the company which has schema changes to open the Table Selection window.

© 2020, The Sage Group plc or its licensors 41
Sage SQL Replicator 2.0 4 Configure and replicate data
4. Click Actions and select Regenerate Tables.
5. When the continue prompt appears, click Yes to start the process of re-reading the Pervasive schema and
updating the SQL schema.
After the Regenerate Tables process is finished, any new tables that were added to the SQL schema are
automatically selected for replication. If needed, you can make changes to the table selection.
6. Click Save.
7. Click the Start button to restart the replication.
NOTE: If there are database changes when you upgrade your Sage software, you must regenerate the tables and restart the
replication for all your companies to update the schema.
Repair Sage-managed SQL system accounts
Sage creates several different SQL system accounts to manage the functions used by SQL Replicator and Mobile
Intelligence solutions. In some cases, these Sage-managed SQL accounts may become out of sync with SQL
Replicator and the Mobile features, causing the processes to stop.

4 Configure and replicate data Sage 300 Construction and Real Estate
42 © 2020, The Sage Group plc or its licensors
If the Sage Worker Engine stops and you are unable to start it or you are directed by Sage Support, click the Repair
Services button in the System Administrator to repair the Sage-managed SQL system accounts used by SQL
Replicator, Mobile Reports, and Mobile Dashboards.
