1
Replicating Transactions on Db2 Columnar
Tables with Db2 V11.5
Keywords: Q Replication, CDE tables, Db2 Warehouse, DPF, Active-Active, Replication for
Db2 Continuous Availability, IBM Integrated Analytics System (IIAS), Always-On, Zero-
Downtime Maintenance
Authors: Serge Bourbonnais, Senthil Chandramohan, Nishant Moorthy, Joshua Cheung.
IBM Silicon Valley laboratory, San Jose, California
Version: July 7th, 2020
Summary: This whitepaper provides a step-by-step tutorial on how to use Db2 Q
Replication technology to replicate transactions that include changes to Columnar Data
Engine (CDE) tables in a source Db2 system. It demonstrates how to set up replication in
both directions between two Db2 database systems that are configured with the Db2
Database Partitioning Feature (DPF) and how to do a site switch. The instructions
provided can be easily adapted for any Db2 configuration, including row-organized tables
and non-DPF databases.
We explain the Q Replication design and go over the considerations and operations that
are specific to replicating database transactions that include changes on Db2 CDE tables.
Users of integrated systems such as Db2 Warehouse and IBM Integrated Analytics System
(IAS), where the Q Replication function is available via the system console, will also
benefit from reading this paper, by understanding what's going on ”under-the-hood.”
Executing the steps described in this paper should require about 45-60 minutes of your
time, if you skip the optional tasks. More time will be required to fully read all
explanations and considerations for different use-cases.
Table of Contents
Introduction .................................................................................................................................................. 4
Q Replication Replicates Changes to Subscribed Tables, with Transactional Integrity ............................ 5
Which SQL Operations can Q Replication Replicate? ............................................................................... 5
Can you Replicate Transactions between Systems that are Configured Differently? .............................. 5
Leveraging Q Replication for Zero-Downtime Upgrades .......................................................................... 5
Cloning an Entire Db2 Database and Re-Synchronizing the Copy with Zero-Downtime .......................... 6
Q Replication Support for Replicating Workloads that Include Changes to CDE Tables .............................. 6
Q Apply Streams Db2 Transactions that Include any Massive Statement ................................................ 7
Q Apply Uses Insert from External Table to Replay the Transactions ...................................................... 8
Can you Replicate the Same CDE Table to Multiple Target Databases? ................................................... 8
2
Each Site can be Both a Source and a Target for Replication ................................................................... 9
Step-by-Step Tutorial for using Q Replication ............................................................................................ 10
Creating Databases and Tables for the Tutorial...................................................................................... 10
Configuration Used for Generating the Samples in this Paper ........................................................... 10
Creating a Test Database on the Production Server for this Tutorial ................................................. 11
Creating a Few Tables with Data that we will later Replicate ............................................................ 11
Creating the Same Database (empty) on the Target System .............................................................. 12
Using db2look to Re-Create all Database Objects in the Target Database ......................................... 12
Part 1: Preparing the System and Databases for Replication ..................................................................... 13
1.Creating System User IDs for Running the Replication Programs ....................................................... 13
2.Setting up Database Connectivity Between the Systems .................................................................... 14
Cataloging the Database and Creating ALIASES to Unambiguously Access it from Either Site .......... 14
3. (At the source) Creating a Shared File System for Supplemental Logging on CDE Tables .................. 15
4. (At the source) Enabling Db2 Supplemental Logging on CDE Tables (DATA CAPTURE CHANGES) ..... 17
Configuring the Database for LOGRETAIN .......................................................................................... 17
Setting Db2 Environment Variables for Enabling DATA CAPTURE CHANGES on CDE Tables ............. 18
Understanding the DATA CAPTURE CHANGES (DCC) Attribute on CDE tables ................................... 18
5.(At the target) Creating a File system for Receiving the Supplemental Log Files ................................ 20
Evaluating How Much Disk Space is Needed by Q Apply for Receiving CDE Supplemental Log Files 21
Monitoring Actual Disk Usage for Receiving CDE Supplemental Log Files ......................................... 21
6.(If needed) Adding a Unique Constraint to Tables that Do Not Have Any .......................................... 22
Adding an Identity Column to be Used as the Replication Key .......................................................... 23
7.(If needed) Altering Sequence Objects to Generate Non-Overlapping Values ................................... 26
Altering Sequence Objects to Generate Non-Overlapping Values (e.g., odd/oven) .......................... 26
Resetting Next Value for Sequences as Part of Failover Instead of Using Non-Overlapping Values .. 27
Part 2: Installing and Initializing Replication ............................................................................................... 28
8.Installing the License for Using Q Replication ...................................................................................... 28
9.Installing IBM MQ and Creating MQ Objects for Replication Across a Network ................................. 29
(If needed) Downloading and Installing IBM MQ ............................................................................... 29
Creating the Q Managers .................................................................................................................... 29
Creating the MQ Objects Needed for Replication across a Network ................................................. 30
10. Setting up Q Replication: Password Files, Control Tables, and the QMAP ....................................... 34
Creating an Encrypted Password File for the Replication User to Connect to Db2 ............................ 34
3
Using an ASNCLP Script for Creating the Q Replication Control Tables .............................................. 34
Creating a QMAP, which Identifies the Queues Used for one Replication Consistency Group ......... 36
Part 3: Using Replication ............................................................................................................................. 39
11.Creating Q Subscriptions for Selected tables, Automatically Creating Tables that Do Not Already
Exist at the Target ................................................................................................................................... 39
Using ASNCLP to Create Replication Subscriptions ............................................................................ 39
Creating a Schema-Level Subscription to Automatically Replicate Create and Drop Table ............... 43
12.Starting Replication and Activating Subscriptions (optionally) Loading the Tables onto the Target 45
Starting the Q Capture and Q Apply Replication Programs ................................................................ 46
How Automatic Initial Load of the Target Table Works ...................................................................... 47
Activating a New Subscription by Sending a Command to the Already Started Capture Program .... 48
Suspending and Resuming Replication for a Queue (aka a Replication Consistency Group) ............. 49
Reloading a Single Table onto the Target by using Q Replication ...................................................... 50
Creating a New Table at the Source that will Automatically be Replicated ....................................... 51
13.Monitoring Q Replication Performance and Operations ................................................................... 53
Monitoring Performance with the Q Replication Monitor Tables ...................................................... 54
Monitoring Replication of Transactions on CDE Tables ...................................................................... 56
14. Setting up Replication for the Reverse Direction .............................................................................. 59
Using ‘Multi-Uni’ or ‘Bi-Di’ Replication Q Replication Configuration? ................................................ 59
What is Different when Setting Replication for the Reverse Direction? ............................................ 60
Creating the MQ Objects for the Reverse Replication: from Failover to Production ......................... 60
(If Not Already Done) Creating the File system for Supplemental Log Files Generated by Db2 for CDE
Tables .................................................................................................................................................. 62
(If Not Already Done) Configuring the Source Database for Replication............................................ 63
(If Not Already Done) Enabling DATA CAPTURE CHANGES on all Tables ............................................ 63
Configure the Q Capture Programs to Ignore any Transaction issued by the Q Apply USER ID ......... 64
Starting Q Capture and Q Apply for Reverse Replication ................................................................... 64
Creating the Subscriptions to All Tables for Replication from Failover (B) to Production (A) ............ 64
Creating the QMAP for Replication from Failover (B) to Production (A) ............................................ 64
15. Performing an Application Site Switch .............................................................................................. 67
Graceful Site Switch Procedure .......................................................................................................... 69
1. Stop the Application at the Production Site A ................................................................................ 70
2.Stop Replication with stopafter=data_applied ................................................................................ 70
3.Start the Workload at Site B ............................................................................................................ 70
4
4.Switching Back the Application to the Original Production Site ...................................................... 73
Appendix A. Downloading and Installing IBM MQ ...................................................................................... 74
Appendix B. Setting up SSL for Db2 connections ....................................................................................... 75
Db2 Server side ....................................................................................................................................... 75
Db2 Client Side ........................................................................................................................................ 75
Appendix C. Cron Job to Garbage Collect Db2 Supplemental Log Files ...................................................... 77
Appendix D - Q Replication Control Tables for Replicating CDE Changes .................................................. 78
Changes to existing Q Replication tables ................................................................................................ 78
IBMQREP_SENDQUEUES ..................................................................................................................... 78
IBMQREP_RECVQUEUES ..................................................................................................................... 79
IBMQREP_TARGETS ............................................................................................................................ 79
New Q Capture Control Tables for File Transfers (for Transactions on CDE tables) ............................... 79
IBMQREP_FILE_SENDERS .................................................................................................................... 79
IBMQREP_FILES_SENT ........................................................................................................................ 80
IBMQREP_FILESEND_MON ................................................................................................................. 82
New Q Apply Control Tables for File Transfers (for Transactions on CDE tables) .................................. 83
IBMQREP_FILE_RECEIVERS ................................................................................................................. 83
IBMQREP_FILES_RECEIVED ................................................................................................................. 84
IBMQREP_FILERECV_MON ................................................................................................................. 86
Appendix E. Resetting Identity Columns and Sequence Objects ................................................................ 88
Appendix F. Configuring MQ Channel Encryption with AMS Feature ........................................................ 89
Appendix G. Db2 Configuration for Controlling Supplemental Logging on CDE Tables with DATA CAPTURE
CHANGES ..................................................................................................................................................... 90
Appendix H. Db2 Parameters for Replication of CDE Tables ...................................................................... 91
Appendix I. Q Replication Capture/Apply Parameters for Replication of Transactions on CDE Tables .... 92
Q Apply Startup Parameters ................................................................................................................... 92
Q Capture Startup Parameters ............................................................................................................... 92
Introduction
IBM Q Replication technology is an asynchronous log capture, transaction replay software-based
replication technology that can be used to deploy Active-Active Db2 systems that are geographically
distant, for Continuous Availability. Q Replication can replicate transactions with end-to-end latency
that is measured in seconds, across continental distances.

5
Replication is generally established in both directions between (at least) two active systems, allowing for
immediate failover during outages, both planned and unplanned, and for going back to the initial system
after the outage is resolved.
The IBM Q Replication technology can replicate transactions between Db2 systems that support
columnar tables, aka Columnar Data Engine (CDE) table. Transactions that contain a combination of
changes to both row-organized and column-organized tables can be replicated. Q Replication can also
replicate ALTER, CREATE and DROP TABLE operations.
The function for replicating CDE tables as a replication source using Q Replication technology was first
released in December 2018 with the IBM Integrated Analytics System (IIAS) as the Replication for Db2
Continuous Availability feature, where this function can be enabled and operated from the IAS Console
graphical interface. The support for CDE tables as a replication source is available starting with Db2
V11.5 but can only be enabled via the ASNCLP scripting language. A graphical user interface is expected
later: IBM plans to integrate access to the replication function with the Db2 Unified Console. (See:
ibm.biz/Db2Console).
A license is required for using Q Replication with Db2 V11.5, IBM offers a 90-day try-and-buy license,
which can be requested from IBM by sending an email to Kaus[email protected]bm.com
.
Q Replication Replicates Changes to Subscribed Tables, with Transactional Integrity
Q replication replicates database transactions but includes only the changes to the tables that are
subscribed for replication. Specifically, if only the table T1 is subscribed for replication and a transaction
modifies both tables T1 and T2, the replicated transaction only includes the changes to T1.
Which SQL Operations can Q Replication Replicate?
Changes that may be replicated for a table include INSERT, UPDATE, DELETE, and TRUNCATE operations
as well as several ‘ALTER TABLE’ commands, such as ADD COLUMN. CREATE TABLE and DROP TABLE
operations can also be replicated.
Replication can also detect when a table is loaded at the source using a LOAD utility, such as the Db2
LOAD command and can automatically reinitialize the Q subscription for this table at the target. Note
that an External Table Load (ET Load) command is implemented in Db2 with (parallel) SQL inserts and all
rows inserted via an ET Load are replicated.
Can you Replicate Transactions between Systems that are Configured Differently?
Yes. The systems in a replication topology do not have to be identical in any way: they can have different
capacities, run on different hardware or operating system configurations and be at different version
levels. For example, you can replicate transactions on CDE tables in a Db2 Warehouse database onto a
target database that uses row-organized tables, including tables that resides in a non-Db2 database via
Db2 federation. As another example, you can replicate transactions from a Db2 for z/OS source system,
where the data is row-organized onto either CDE or row-organized tables in a Db2 Warehouse on Cloud
target.
Leveraging Q Replication for Zero-Downtime Upgrades
The flexibility provided by Q Replication allows dual version co-existence for zero-downtime system
upgrades with fallback capability. You can run a workload on a down-level system while another
6
system is being upgraded and tested, after which you simply restart replication to resynchronize the
data, before switching the applications to the upgraded system and proceeding to upgrading the second
one.
Cloning an Entire Db2 Database and Re-Synchronizing the Copy with Zero-Downtime
With Q Replication technology you can build an entire new system with zero outage of the source
system: data can be copied while it is being modified at the source system because replication captures
the changes that take place during the copy process from the source Db2 recovery log and can
resynchronize the target by applying those changes after the copy process has completed. Thereafter,
the replication process keeps the copy synchronized with the source in near real-time.
Q Replication Support for Replicating Workloads that Include Changes to
CDE Tables
The Q Replication technology is optimized to replicate very large transactions that contain changes to
CDE tables with an end-to-end replication latency that is measured in seconds, by:
asynchronously capturing transactions from the log of the source database and applying them
concurrently to the target database – before they are committed, and by applying bulk
operations using External Table operations. This process is referred to as transaction
streaming.
performing dependency analysis and then executing non-dependent transactions in parallel for
high throughput, while preserving transaction integrity. See: Q Replication education roadmap
for learning more about Q Replication’s parallel apply process.

7
Q Apply Streams Db2 Transactions that Include any Massive Statement
Figure 1 illustrates the Q Replication components and the Db2 supplemental logging that is needed for
replicating a workload that contains changes to CDE tables. Users familiar with Q Replication technology
will notice the need for at least one additional IBM MQ queue, the File Transmission Queue. Q
Replication uses the file transmission queue(s) for sending the rows that are inserted into or deleted
from CDE tables by massive statements. Logically, the file transmission queue is just an extension to
the Transaction Queue. -- Together, these two queues are used for transporting changes that are
replicated with transactional integrity.
Definitions
− Massive Statement: A single Db2 statement that modifies more rows than a (configurable)
threshold. For example, ‘INSERT FROM SELECT’ from an external table, where the external
table contains thousands of rows.
− Streamed Transaction: A Db2 transaction that contains at least one massive statement on a
CDE table and that is transmitted and applied at a target Db2 concurrently to its execution
at the source Db2. Replication starts applying the changes for a streamed transaction at the
target before it is known whether it will commit or abort.
− A streamed transaction can contain changes to both row and column-organized
tables. The entire transaction is then streamed (applied before it is committed).
− A non-streamed transaction is sent by the Capture program only after it is
committed at the source.
− A replicated workload can contain a mix of streamed and non-streamed
transactions. -- Dependency analysis ensures that dependent transactions are
applied in source commit order and that transaction integrity is preserved.

8
The target system does not require tables to be in CDE format, but the Q Replication installed at the
target must be at least at level V11.5 to support receiving files via the file transmission queues when the
source database is using CDE tables.
Figure 1 - How Q Replication Transaction Streaming Works.
Db2 identifies massive statements on CDE tables and writes the rows that are inserted, deleted or updated by such statements
into a set of files that are outside the Db2 recovery log, in External Table (ET) load format. The files are written into the directory
specified by the database configuration parameter DCC_FILE_PATH. The maximum size of each file produced by Db2 is
configurable, it is called the CHUNK size as per the Db2 DB2_DCC_FILE_CHUNKSZ environment variable. Q Capture transmits the
files using (non-persistent) MQ transmission queue(s), Q Apply applies the streamed transaction by executing a sequence of
External Table operations, concurrently to the execution of the massive Db2 statement at the source. In a Data Partitioning
environment, multiple files are provided by Q Apply to each External Table operation for parallel processing across all partitions.
Q Apply Uses Insert from External Table to Replay the Transactions
Analytics systems store large amount of data that come from external sources and are often received in
files. IBM Db2 servers are optimized to efficiently load large amount of data using a single SQL insert
statement that selects from an external table definition that can point to the input file. This is the
preferring method for loading data into CDE tables, and Q Replication replays transactions with External
Table Load operations.
Can you Replicate the Same CDE Table to Multiple Target Databases?
Yes. But, with some configuration changes. Because Q Capture by default deletes the supplemental log
files as soon as it receives the acknowledgment that Q Apply has received them, you cannot replicate
the same CDE table to two or more targets unless you turn off automatic file deletion by Q Capture and
implement your own garbage collection procedure. This restriction does not apply to row-organized
tables, because all changes to row-organized tables are available in the Db2 recovery logs.
You can you turn off Capture deletion of supplemental log files with the Q Capture startup parameter
XF_DEL_FILE=N. For garbage collecting those files, you could for example run a cron job that runs
nightly and deletes all files older than 24 hours, you must ensure that enough disk space is available for
keeping the files for that period. See: Appendix C. Cron Job to Garbage Collect Db2 Supplemental Log
Files.

9
Each Site can be Both a Source and a Target for Replication
In this paper, we refer to source and target systems in the context of capturing transactions from a
database and applying them to another database in one direction.
Because a workload can switch between sites, it is where a workload runs at a given time that
determines the replication source for this workload.
For the purpose of deploying a replication solution for the first time, the source would be your
production site and the target might be a system that you will be creating from scratch, therefore we
will show you how to build and populate a copy of your production database, without requiring any
outage at the source.
10
Step-by-Step Tutorial for using Q Replication
Replicating transactions between any two Db2 systems for continuous availability involves the following
steps:
Preparing the system and databases for replication:
1. Creating replication user IDs on each system
2. Configuring database connectivity between the Db2 servers
3. (At the source) Creating a file system for Db2 supplemental logging on CDE tables
4. (At the source) Configuring Db2 for generating supplemental logging
5. (At the target) Creating a file system for receiving the CDE table supplemental log files
transmitted by Q Replication
6. If needed, adding a unique (possibly hidden) column on tables that do not have any unique
constraint
7. If needed, altering Db2 sequence objects to generate non-overlapping values across sites
Installing and initializing replication:
8. Installing the license for using Q Replication
9. Installing IBM MQ and creating the MQ objects that are needed for Q Replication
10. Setting up Q Replication: password file, control tables, and the 'QMAP'
Using replication:
11. Creating subscriptions for selected tables, automatically creating the tables at the target if they
don’t exist
12. Starting replication, which (optionally) loads the tables at the target
13. Monitoring and operating replication
14. Setting up replication for the reverse direction
15. Doing a site switch and coming back
The rest of this paper is organized following these steps, with reference material and supplemental
information that may not be needed for your environment provided in appendices.
Creating Databases and Tables for the Tutorial
For completing the exercises in this tutorial, we create a test ”production” database with tables and
data to replicate. You can alternatively use your own database and tables and adapt the instructions
accordingly.
Configuration Used for Generating the Samples in this Paper
Our test systems were located about 1700 miles apart, in Oakland, California and Dallas, Texas. Both
systems were running Red Hat Linux and were configured with the Database Partitioning Feature (DPF),
also known as the Db2 shared nothing or Massively Parallel Processing (MPP) architecture, with two
logical nodes each. However, each system could have used a different OS and number of nodes.
The concepts and instructions provided in this paper are applicable to any Db2 environment. You can
adapt the instructions to run on a non-DPF Db2 system that supports CDE tables, by omitting the
partitioning clause (distribute by) when creating your tables. You could also test replication with two

11
databases on the same system, but this will require more modifications to the scripts and is outside the
scope of this paper. This tutorial is intended to provide enough explanations for deploying replication in
a real production environment where the systems communicate over a network and for addressing all
potential issues that may arise in a production environment.
Creating a Test Database on the Production Server for this Tutorial
For this paper, we used a database called TEAMS on our production server named ‘oakland’:
For using CDE tables, you must either set DB2_WORKLOAD=ANALYTICS or set the Database Manager
parameter INTRA_PARALLEL=Y. – Using CDE tables require query intra-parallelism to be enabled. An
alternative to setting up these configuration parameters would be for the application to call the
admin_set_intra_parallel('yes') stored procedure on connections that need to create and use CDE
tables.
Creating a Few Tables with Data that we will later Replicate
We create tables and objects that exhibit the characteristics that need considerations when deploying
replication. We will illustrate how to address special cases such as tables without any unique constraints
and applications that use Db2 sequence objects for generating unique values.
At the ‘oakland’ source system, create a table with a primary key and insert a few rows in it. Cut and
paste the following commands into a file named ‘createT1.sql’ and execute it with the command:
oakland$ db2 connect to TEAMS
oakland$ db2 -tvf createT1.sql
Still on the source ‘oakland’ source system, create a table without any unique constraint (we will later
illustrate how to add a non-enforced constraint using an identity column to guarantee uniqueness):
su – db2inst1 -- login as the Db2 administrator
db2set DB2_WORKLOAD=ANALYTICS
db2 create database TEAMS
-- createT1.sql
connect to TEAMS;
create table T1(col1 int not null primary key, col2 varchar(20)) organize
by column distribute by hash(col1);
insert into T1 values (1, 'Go Warriors!');
insert into T1 values (2, 'Go Mavericks!');
insert into T1 values (3, 'Go Lakers!');
insert into T1 values (4, 'Go Bucks!');

12
We now have a production database with two CDE tables that contain some data.
Creating the Same Database (empty) on the Target System
We will copy the TEAMS database from Oakland to Dallas and set up an Active-Active configuration
between the two sites. The source database can remain online during the copy process; no outage of
applications using the source database is ever needed for setting up replication to a new target.
On the target system named "dallas", create the same database:
It is not necessary to create any tables at the target; they will be automatically created if they don’t
already exist when we create the replication Q subscriptions.
However, not all database objects will be cloned when setting up replication and we should create them
ahead of time. A common method for deploying a new target site with Db2 for Linux, Unix, and
Windows (LUW) is to run the Db2 command db2look at the source system, which can generate the SQL
statements needed to re-create all database objects, not just the tables. We first demonstrate how to
clone a database with db2look.
Using db2look to Re-Create all Database Objects in the Target Database
This is the preferred method when creating a new target system from scratch and need the target
database to include all object definitions that exist in the source database, including stored procedures,
views, authorizations, tablespaces, and so on. The db2look commands generates a file that contains
SQL statements to define (but not load) database objects.
Let’s use db2look to recreate T1 and T2 at the target system. On the source ‘oakland’ system, run the
following command:
-- createT2.sql
connect to TEAMS;
create table T2(col1 char(2), col2 varchar(20)) organize by column
distribute by hash(col1);
insert into T2 values ('CA', 'Warriors');
insert into T2 values ('CA', '49ers');
insert into T2 values ('CA', null);
insert into T2 values ('TX', 'Cowboys');
insert into T2 values ('TX', null);
su – db2inst1 -- login as the Db2 administrator
db2set DB2_WORKLOAD=ANALYTICS
db2 create database TEAMS;

13
Transfer the file ‘db2look.sql’ that was produced on the source system and execute it on the target
system:
Now that we have our production database on the source server in Oakland and an empty database at
the target server in Dallas in which 2 empty tables have already been created, let’s proceed onto the Q
Replication tutorial.
We first address the pre-requisites for using replication, such as creating user IDs, enabling connectivity
between the systems, installing software, enabling supplemental logging on the database, and making
sure that each replicated table can be unambiguously updated from any of the sites.
Part 1: Preparing the System and Databases for Replication
1.Creating System User IDs for Running the Replication Programs
The replication programs must run under a dedicated user that will be granted database administrative
privileges. The Q Apply program will run under this user ID, which also allows the Q Capture program to
identify the changes that are applied by the Q Apply program and not replicate them back to the
originating system.
The replication users must have administrator authority: Q Capture for reading the Db2 recovery log at
the source; and Q Apply for updating all replicated user tables at the target. On each system as root
create a new user ID:
su – db2inst1 -- login as the Db2 administrator
db2look -e -d TEAMS -u db2inst1 -o db2look.sql
-- Creating DDL for table(s)
-- Output is sent to file: db2look.sql
-- Binding package automatically ...
-- Bind is successful
-- Binding package automatically ...
-- Bind is successful
sftp dallas db2inst1
db2inst1@dallas’s password:
sftp>put db2look.sql
Uploading db2look.sql to /home/db2inst1/db2look.sql
sftp> quit
ssh dallas db2inst1
db2inst1@dallas’s password:
db2 connect to TEAMS
db2 -tvf db2look.sql
exit

14
2.Setting up Database Connectivity Between the Systems
In this tutorial, we are configuring remote connectivity using server authentication. If, instead, you wish
to use Secure Sockets Layer (SSL) encryption for the connections between the two system, follow the
steps in Appendix B. Setting up SSL for Db2 connections.
To use server authentication, we first determine which port to use:
On our system, the Db2 server is listening on port 18188.
Cataloging the Database and Creating ALIASES to Unambiguously Access it from Either Site
The user applications only need to know the name ‘TEAMS’. When an application is restarted on
another site, it reconnects to the database ‘TEAMS’, unaware of which site it is running on. But for
administrating replication, we need to unambiguously access each copy of the database.
On each server, we catalog the Db2 database and create an alias for the database TEAMS. The aliases
will simplify replication configuration, by allowing the Q Replication ASNCLP scripts to run at either site
with access to both databases without ambiguity. If running at Oakland, ASNCLP can access the TEAMS
database locally as ‘OAKDB’ and if running in Dallas, replication can also correctly access this database as
‘OAKDB’, but remotely.
On the source site in Oakland:
On the target site in Dallas:
Test your remote connections. From the source system in Oakland:
useradd repluser
passwd repluser
Works4me!
su - repluser
db2 connect to TEAMS
db2 grant dbadm on database to user repluser
db2 get dbm cfg | grep SVCENAME
TCP/IP Service name (SVCENAME) = db2c_db2inst1
grep db2_db2inst1 /etc/services
db2c_db2inst1 18188/tcp
catalog tcpip node dallas remote dallas1.svl.ibm.com server 18188;
catalog database TEAMS AS DALDB AT NODE dallas authentication server;
-- Also create an alias for local database
catalog database TEAMS AS OAKDB;
catalog tcpip node oakland remote oakland1.svl.ibm.com server 18188;
catalog database TEAMS AS OAKDB at node oakland authentication server;
-- Also create an alias for local database;
catalog database TEAMS AS DALDB;

15
Repeat the above to test connecting to Oakland from Dallas with the user id repluser.
3. (At the source) Creating a Shared File System for Supplemental Logging on CDE Tables
This is needed if your source database contains column-organized tables. For a DPF SYSTEM, THE FILE
SYSTEM MUST BE SHARED ACROSS ALL NODES. This file system will be used for staging the
supplemental log files generated by Db2 from each partition. These files are processed by the single Q
Capture program which is typically started on the head or catalog node for availability but can run from
any node.
On a Red Hat system, you can create a shared file system as follows. We create a file system named,
‘/shared’.
db2 connect to DALDB user repluser
Enter current password for repluser:
Database Connection Information
Database server = DB2/AIX64 11.5.1.0
SQL authorization ID = REPLUSER
Local database alias = DALDB
db2 connect reset
* mkdir4supDb2logs.sh
ssh oakland1 root
yum install -y nfs-utils – Install the Redhat NFS utilities
mkdir /shared
systemctl enable rpcbind
systemctl enable nfs-server
systemctl start rpcbind
systemctl start nfs-server
systemctl start rpc-statd
systemctl start nfs-idmapd
chmod 777 /shared
touch /etc/exports
echo "/shared oakland2.fyre.ibm.com(rw,sync,no_root_squash)" >> /etc/exports
exportfs -r
ssh oakland2 root
yum install -y nfs-utils – Install the Redhat NFS utilities
* Start the required services to mount a nfs file system:
systemctl enable rpcbind
systemctl start rpcbind
* Verify you can see the remote directory:
showmount –e oakland1.svl.ibm.com
*Prepare the mount point and mount the nfs file system:
mkdir /shared
chmod 777 /shared
mount oakland1.svl.ibm.com:/shared /shared
mkdir /shared/db2suplogs/
chmod 777 /shared/db2suplogs -- Or set permission to user group as appropriate

16
Repeat for the other system, a file system for Db2 supplemental log files for CDE tables will be also be
needed in Dallas when we set up replication in the reverse direction.
4. (At the source) Enabling Db2 Supplemental Logging on CDE Tables (DATA CAPTURE
CHANGES)
To use log capture replication, the database must be configured for log archiving. We first turn off
circular logging, which is the default for a new database.
Configuring the Database for LOGRETAIN
To enable supplemental logging for CDE tables in the database TEAMS, terminate all connections to the
database, cut and paste the following Db2 SQL commands into a script called setdbcfg.sql and run it at
the source (oakland) with:
db2 -tvf setdbcfg.sql
Best Practice: Evaluating Disk Space Needed for Db2 Supplemental Logging on CDE Tables
By default, the files written by Db2 to the file system are deleted by the Q Capture program after
they have been transmitted to Q Apply.
Once supplemental logging is enabled on a table, Db2 produces files even if the Capture program is
not running. It is therefore important to allocate enough disk space to withstand periods when the
Capture program is stopped. For example, when upgrading software at the site in Oakland, we will
want to redirect all workloads to the Dallas site and stop replication between Dallas and Oakland for
the duration of the upgrade.
A good rule of thumb for estimating disk space requirement is ensuring there is enough space for
keeping 12 to 24 hours of captured changed data. It is advised to monitor and manage the shared
disk space usage to ensure that disk space remains available for replication’s usage and is not
gobbled up by other applications. On a Db2 Warehouse, consider using dedicated Storage Area
Network device.
The files generated by Db2 are not compressed. Account for enough disk space after data
expansion.
-- setdbcfg.sql - Enable the Database for Supplemental logging
connect to TEAMS;
-- For each partition:
update db cfg for TEAMS member 0 using LOGARCHMETH1 LOGRETAIN;
update db cfg for TEAMS member 0 using LOG_APPL_INFO YES;
update db cfg for TEAMS member 0 using LOG_DDL_STMTS YES;
update db cfg for TEAMS member 1 using LOGARCHMETH1 LOGRETAIN;
update db cfg for TEAMS member 1 using LOG_APPL_INFO YES;
update db cfg for TEAMS member 1 using LOG_DDL_STMTS YES;
backup db TEAMS on all dbpartitionnums to /dev/null;

17
The LOG_APPL_INFO Db2 database configuration parameter is mandatory to replicate CDE tables. When
set to YES, Db2 logs a ‘begin Unit-Of-Work’ log record for each transaction, which is required for Q
Replication to stream transactions. This log record also benefits workloads on row-organized tables, for
example, it allows for very efficient ‘SKIP TRANSACTION’ processing, and turning on LOG_APPL_INFO is
recommended for all replication configurations.
The LOG_DDL_STMTS YES is required for replicating CREATE and DROP table operations.
Setting Db2 Environment Variables for Enabling DATA CAPTURE CHANGES on CDE Tables
Prior to Db2 version 11.5, setting the DATA CAPTURE CHANGES (DCC) attribute on CDE tables was not
allowed. The Db2 environment variable DB2_CDE_DCC=Y was introduced to allow enabling DATA
CAPTURE CHANGES on columnar tables.
In a DPF database, the following environment variables must be set to enable and control supplemental
logging. Execute the following commands on both systems:
Figure 2 - Enabling supplemental logging for CDE tables for a Db2 instance: DB2_FILE_PATH tells Db2 where to write
supplemental log files for changes on CDE tables by massive statements. DB2_DCC_BINARY tells Db2 to write those files in text
format, instead of binary. It is configured as text so that you can inspect the contents of the file for learning but would be set
to Y (binary) in a production environment. LOG_DDL_STMTS is needed for replicating CREATE and DROP table, it instructs Db2
to log diagnostic log records that contain the statement text for DDL operations. LOG_APPL_INFO instructs Db2 to log a
diagnostic log record that provides the AUTHID at the beginning of each transaction.
Understanding the DATA CAPTURE CHANGES (DCC) Attribute on CDE tables
The supplemental logging that is produced for CDE tables with the DCC attribute differs from the logging
produced for row-organized tables:
• For row-organized tables, all supplemental logging is in the Db2 database recovery log. With DCC,
the recovery log records are expanded to contain full row-images. For example: both the before and
after values for the entire row are logged for each UPDATE statement; the entire row image is
logged for a DELETE statement.
• For column-organized tables, most of the extra data written by Db2 goes to supplemental log files
that are outside of the Db2 recovery logs. But, the Db2 recovery log also contains log records that
provide information about the supplemental log files that are produced by Db2.
Specifically, when DATA CAPTURE CHANGES is enabled on a CDE table:
• For SQL statements that modify fewer rows than the thresholds specified via
DB2_DCC_FILE_INS_THRES and DB2_DCC_FILE_DEL_THRES), Db2 write the full row images in
the Db2 recovery log. These are diagnostic log records that are not used for database recovery.
• For SQL statements that modify the number of rows of the thresholds or more, Db2 produces
files in External Table format (binary or text) and writes these files into the file system specified
by the Db2 configuration parameter DB2_DCC_FILE_PATH.
o The files are uncompressed.
db2set DB2_CDE_DCC=YES
db2set DB2_DCC_FILE_PATH=/shared/db2suplog/
db2set DB2_DCC_BINARY_FILE=N
db2set DB2_DCC_FILE_INS_THRES=10
db2set DB2_DCC_FILE_DEL_THRES=1
db2set DB2_DCC_FILE_CHUNKSZ=100000000

18
o The files for DELETE operations contain only the values of the columns that have unique
constraints and of the distribution key for DPF environments.
o A supplemental log file contains either all DELETE, or all INSERT values. An UPDATE
statement is logged as a series of DELETE and INSERT files.
The thresholds for supplemental logging on CDE tables specify the number of rows modified by a single
statement beyond which the statement is considered a massive statement and Db2 starts writing
supplemental logging into files instead of diagnostic log records in the recovery log. An example of a
statement that modifies more than 1 row is: ‘insert into T1 select * from T2’ where T2 contains multiple
rows.
Note that for an update statement, which is logged as deletes followed by inserts, it is possible for
deletes to be logged into a supplemental log file, whereas the inserts will be logged into the Db2
recovery logs. This is because DELETE and INSERT operations have different thresholds for triggering
writing into the supplemental logs.
The set of Db2 environment variables and database configuration parameters for configuring Db2
supplemental logging for CDE tables are further explained Appendix G. Db2 Parameters for Replication
of CDE Tables.
Learn More: Supplemental Logs for CDE tables are not used by Db2 for Database Recovery
The files generated when the data capture changes attribute is set on a column-organized table are
not used for database recovery and are not archived with the db2 logs, that is, a backup command
will not copy the supplemental log files.
These log files are unrelated to db2 logging for recovery and once DATA CAPTURE CHANGES is
enabled, they are generated EVEN IF REDUCED LOGGING IS IN EFFECT (as controlled by the Db2
environment variable DB2_CDE_REDUCED_LOGGING=REDUCED_REDO, which is normally set by
default on the Db2 warehouse systems.)

19
5.(At the target) Creating a File system for Receiving the Supplemental Log Files
This step is needed when the source database contains CDE tables that are replicated, even if the target
does not have CDE tables. (It is possible to replicate transactions on CDE tables at the source into row-
organized tables at the target.)
The target system requires a file system for receiving the supplemental log files that are generated by
Db2 on the source system and transmitted by Q Capture over the network using IBM MQ. These files
serve as input to Db2 External Table operations that are used by the Q Apply program to replay
transactions.
This file system must be accessible from all the nodes of the target database, because Q Apply attempts
to specify several files, one per partition, for each External Table load when streaming transaction. As
root on the target system in Dallas:
For the system where Q Apply may run:
mount dallas1:/shared/qrepcdefiles/
IMPORTANT: You need to configure Db2 to recognize this directory as the location for supplying input
files to Db2 External Table operations:
Learn More: Db2 Does Not Log the Changes Made by Q Apply to CDE Tables
By default, supplemental logging to files is not generated by Db2 for SQL statements made
by the Q Apply program on CDE tables. This prevents unnecessary logging that could
possibly fill up disk space when a database is used as a read-only target that is maintained
by Q Replication, because these files would not be garbage collected.
The generation of the supplemental log files by Db2 is disabled as follows: when Q Apply
connects to Db2, by default, it identifies itself as a replication program by calling the Db2
stored procedure SYSPROC.ADMIN_SET_MAINT_MODE, which turns off logging for the
changes on CDE tables that Q Apply makes to the database. Calling this stored procedure
also allows Q Apply to perform privileged operations on the database such as inserting
values into generated always columns, which is needed for Q Apply to replicate the values
coming from the source system for these columns. Calling this stored procedure requires
the user under which Q Apply connects to the database to have DBADMIN authorization.
One implication of suppressing logging for Q Apply operations is that the target database
cannot be used as a source database for cascading replication into a third system: A Q
Capture program running at the target will not see the changes made by Q Apply. However,
you can request Q Apply not to run in maintenance mode with the startup Q Apply
parameter INHIBIT_SUPP_LOG=N.
* mkdir4qrepfiles.sh
mkdir /shared/qrepcdefiles/
chmod 777 /shared/qrepcdefiles -- Or set permission to user group as
appropriate

20
db2 update db cfg for TEAMS using EXTBL_LOCATION /shared/qrepcdefiles
Repeat the above steps on the other system. A file system for Q Apply to receive supplemental log files
for CDE tables will be also be needed on the production site in Oakland when we setup replication in the
reverse direction.
Evaluating How Much Disk Space is Needed by Q Apply for Receiving CDE Supplemental Log Files
The CDE supplemental log files are deleted by Q Apply after each streamed transaction is committed,
therefore once all Q subscriptions are active, you only need enough disk space for holding the data
modified by concurrently executing transactions.
But disk space is also needed during initial load for holding changes made to the table until the load
completes. For example, assume a gigantic table that takes 20 hours to load over a wide-area network,
and that an additional 1TB of data is inserted during that time into the table: you must have enough disk
space at the target to stage the 1TB of new data.
Monitoring Actual Disk Usage for Receiving CDE Supplemental Log Files
Once the Q Capture and Q Apply programs are started, you will be able to monitor the actual amount of
disk space used by Q Apply at the target by issuing SQL to query DISK_USAGE from the
IBMQREP_FILERECV_MON table. See Appendix D - Q Replication Control Tables for Replicating CDE
Changes
for more details about the information that is available in the Q Replication monitor tables.
Best Practice: Improving Load Speed and Minimizing Disk Usage at the Target
It is recommended to activate replication Q subscriptions for databases with a large number of
tables a few tables at a time; and do so during periods of lower activity against those tables.
This can be controlled by setting the Q Capture parameter MAX_CAPSTARTS_INTLOAD. For
example, if you set it to 10, and activate replication for 1000 tables, no more than 10 tables will be
loaded in parallel at a given time: as soon as one table is loaded and synchronized a new one is
started until replication activation has completed for all 1000 tables.

21
6.(If needed) Adding a Unique Constraint to Tables that Do Not Have Any
Q Replication needs a unique constraint on each table to uniquely identify each row that is replicated,
this constraint is the replication key. The values for the column or set of columns that comprise the
replication key columns must be unique across all systems where this table might be replicated, not just
locally. For example, a customer id must be unique whether you are using the database in Dallas or in
Oakland, because logically it is the same database -- even if under the covers there are two physical
databases that are kept synchronized by Q Replication.
For row-organized tables, each table must have a unique index on the replication key.
For CDE tables, each table must have a unique constraint on the replication key, but it is not mandatory
to have a unique index associated with the replication key. That is, the unique constraint can be not
enforced. However, -- you must guarantee that no two rows can have the same values for the columns
under the constraint.
Be Aware: If Duplicate Rows Exist for a Non-Enforced Unique Constraint, Db2 Will Return
Unpredictable Results
Assume you have a table T1(col1, col2) where col1 has a non-enforced constraint and someone
inserts a row at site B with values (1,B) and someone else inserts row (1,A) at site A, and you have
replication between the two sites: you will end up with two rows. If col1 is used in a where clause
by an application to retrieve the row, Db2 may return either the value A or B, but it will return only
one row because a (non-enforced) constraint specifies the value for this column is unique. Having
found one row, Db2 can conclude there should be no other rows and return the first row it finds.
Be Aware: If a Table Does Not Have a Unique Index, Q Apply Cannot Detect Replication
Conflicts
A replication conflict occurs when the target table does not contain the expected data. For
example, an application might erroneously insert the same row at both sites.
If there is a unique index on the replication key for the table, Db2 will return a duplicate row error
to Q Apply, which will log an exception, and follow CONFLICT_ACTION.
Q Replication can be configured to enforce that the value for site A prevails, by setting
CONFLICT_ACTION=F from A to B, and CONFLICT_ACTION=I from B to A. It is worth repeating that
conflicts can only be detected if a unique index is defined, otherwise Db2 will allow inserting two
rows with the same value for the replication key columns.
Conflict detection is not needed if it can be guaranteed that changes can never happen
simultaneously on both sites for the same rows. Some users set the tables to READONLY mode to
all except the Q Apply program, until failover.

22
Adding an Identity Column to be Used as the Replication Key
Two approaches are recommended to guarantee that values are unique across all sites for the
replication key on tables that do not have any unique constraint:
1. Add an identity column that generates odd values at site A and even values at site B
2. Add two columns: an identity column coupled with a site identifier column
Both approaches are equally good. We demonstrate the two-column approach. We will set the site
column value to ‘A’ for Oakland and ‘B’ for Dallas.
The table T2 that we created previously does not have any unique constraint. We show you how to add
a constraint that comprises both a site and an identity column and populate all existing rows in that
table with unique values for these columns. Let’s describe the table and look at its current contents:
Adding and Populating an Identity Column with Unique Values for Existing Rows in a Table
After altering the table to add an identity column, we will need to update each existing row in the table
with a unique value for the identity column. This needs to be done only at the source (Oakland), --the
target table will be loaded with the values for all columns of the source table when we activate the
replication Q subscription. You can cut and paste the db2clp script below into a file called ‘addkeyT2.sql’
and execute with the following command:
db2 -tvf addkeyT2.sql
connect to OAKDB
db2 describe table T2
Data type Column
Column name schema Data type name Length Scale
Nulls
------------------------------- --------- ------------------- ---------- ----- ----
--
COL1 SYSIBM CHARACTER 2 0 Yes
COL2 SYSIBM VARCHAR 20 0 Yes
2 record(s) selected.
db2 "select * from T2"
COL1 COL2
---- --------------------
CA Warriors
CA 49ers
CA -
TX Cowboys
TX -
5 record(s) selected.

23
Let’s see the effect of adding the replication key to our source table:
----------------------------------------------------------------------------------------------
-- addkeyT2.sql - - Add the replication key to the SOURCE table and INITIALIZE each ROW
----------------------------------------------------------------------------------------------
connect to OAKDB;
-- Add hidden columns to be used as the replication key:
alter table T2 add column ibmrepl_site char(1) not null with default 'A' implicitly hidden;
alter table T2 add column ibmrepl_key bigint not null with default 0 implicitly hidden;
-- Make the hidden column an identity column and populate it with unique values
alter table T2 alter column ibmrepl_key drop default;
alter table T2 alter column ibmrepl_key set generated by default as identity (start with 1,
increment by 1);
update T2 set ibmrepl_key = default;
-- Create a unique constraint on the replication key
alter table T2 add constraint ibmrepl_key primary key(ibmrepl_key, ibmrepl_site) not enforced;
-- Reclaim the space
reorg table T2 reclaim extents;
----------------------------------------------------------------------------------------------
-- Add the replication key to the (empty) TARGET table
----------------------------------------------------------------------------------------------
connect to DALDB user db2inst1;
alter table T2 add column ibmrepl_site char(1) not null with default 'B' implicitly hidden;
alter table T2 add column ibmrepl_key bigint not null with default 0 implicitly hidden;
alter table T2 alter column ibmrepl_key drop default;
alter table T2 alter column ibmrepl_key set generated by default as identity (start with 1,
increment by 1);
update T2 set ibmrepl_key = default;
alter table T2 add constraint ibmrepl_key primary key(ibmrepl_key, ibmrepl_site) not enforced;
terminate;

24
You will observe that the replication key is not visible to applications using that table (it is not returned
to the ‘select *’ query), and that the key column was populated with a unique value for each row. The
site and key columns together will uniquely identity this row wherever it is replicated on the network if
the IBMREPL_SITE column has the site name as default.
Note that these columns do not have to be hidden. Some users prefer them in the clear, allowing
applications to see the globally unique values, effectively providing the provenance of each row.
Reactivate the Database if Applications were Running when the Replication Key was Added
On a DPF system, if the table was in use when you added the non-enforced primary key in the previous
section, you need to deactivate and reactivate the database for Db2 to properly log the unique
constraints columns in the supplemental log files from each partition. This requires first disconnecting all
users from the database. The re-activation is needed because Db2 caches the constraints in memory and
this cache is not refreshed until the database is reactivated. This needs to be done only on the source
system.
db2 terminate;
db2 deactivate database TEAMS;
db2 activate database TEAMS;
db2 connect to OAKDB;
db2 describe table T2;
Data type Column
Column name schema Data type name Length Scale Nulls
------------------------------- --------- ------------------- ---------- ----- ------
COL1 SYSIBM CHARACTER 2 0 Yes
COL2 SYSIBM VARCHAR 20 0 Yes
IBMREPL_SITE SYSIBM CHARACTER 1 0 No
IBMREPL_KEY SYSIBM BIGINT 8 0 No
4 record(s) selected.
db2 "select * from t2"
COL1 COL2
---- --------------------
CA Warriors
CA 49ers
CA -
TX Cowboys
TX -
5 record(s) selected.
db2 "select ibmrepl_site, ibmrepl_key,col1,col2 from T2"
IBMREPL_SITE IBMREPL_KEY COL1 COL2
------------ -------------------- ---- --------------------
A 1 CA Warriors
A 2 CA 49ers
A 3 CA -
A 4 TX Cowboys
A 5 TX -
5 record(s) selected.

25
7.(If needed) Altering Sequence Objects to Generate Non-Overlapping Values
A sequence is a database object for which Db2 automatically generates values. From a command
prompt, issue the following command on both sites to create a sequence object named ‘S1’:
db2 "CREATE SEQUENCE S1 as decimal(13,0) start with 100 increment by 1"
Values generated by Db2 for a sequence are obtained by issuing a ‘next value’ clause. For example, on
the source system in Oakland, execute the following Db2 SQL script:
db2 -tvf insT1.sql
db2 "select * from T1 order by col1"
COL1 COL2
----------- --------------------
1 Go Warriors!
2 Go Mavericks!
3 Go Lakers!
4 Go Bucks!
100 -
101 -
102 -
7 record(s) selected.
The values assigned by Db2 to col1 in table T1 will be replicated to the target database when the table
T1 is subscribed for replication. The target table will correctly contain the values 100,101, and 102.
(Right now, the target table is still empty as we have not yet started replication.)
If the application using T1 is switched to run on the target site and starts issuing ‘next value for S1’ to
insert rows into T1, the remote Db2 database will dispense the values 100, 101, and 102 again, resulting
in duplicate rows once replication is started. The sequence must be altered to generate non-overlapping
values.
Altering Sequence Objects to Generate Non-Overlapping Values (e.g., odd/oven)
The most common practice to prevent duplicate values is to alter the sequence to generate odd values
on one site and even values on the other site. At the source site in Oakland:
$ db2 "values (next value for S1)"
1
---------------
103.
Make S1 generate odd values:
$ db2 "alter sequence S1 increment by 2"
$ db2 "values (next value for s1)"
1
---------------
121.
-- insT1.sql
connect to OAKDB;
insert into T1 (col1) values(int (NEXT VALUE FOR S1));
insert into T1 (col1) values(int (NEXT VALUE FOR S1));
insert into T1 (col1) values(int (NEXT VALUE FOR S1));
26
1 record(s) selected.
At the target site in Dallas. Change the sequence S1 to start generating even values past the highest
value used at the source (121):
db2 "alter sequence S1 restart with 122 increment by 2"
db2 "values (next value for S1)"
1
---------------
122.
1 record(s) selected.
Our sequence objects are now guaranteed to generate non-overlapping values across sites.
We have now addressed the potential issues related to the database and are ready to install and use
replication.
Resetting Next Value for Sequences as Part of Failover Instead of Using Non-Overlapping Values
An alternative to using odd/even values is to modify the sequence’s next value prior to switching the
application, by setting the RESTART value to the maximum value that was used on the other site. In our
example, we know that the sequence S1 is used to generate unique values for table T1, therefore after
the application is stopped and all changes have been replicated, we could select the maximum value for
this column (col1) at the target site and use it to reset the RESTART value of the sequence.

27
Part 2: Installing and Initializing Replication
A license is required for using Q Replication with Db2 V11.5, IBM offers a 90 days try-and-buy license.
8.Installing the License for Using Q Replication
0. Obtain the trial license and upload the file to your system. The license can be obtained by
sending a request by email to IBM at Kaustu[email protected].com
. Mention ‘Q Replication
Trial License’ on the subject, specify the release of Db2 that you are using and provide your
contact information.
1. As the db2 instance-owning user, change into the directory containing the license file.
root@oakland1>su – db2inst1
db2inst1@oakland1>cd /home/db2inst1/license
db2inst1@oakland1>ls
idr4a_t90.lic
2. Apply the license file.
db2inst1@oakland1>db2licm -l
Product name: "DB2 Enterprise Server Edition"
License type: "License not registered"
Expiry date: "License not registered"
Product identifier: "db2ese"
Version information: "11.5"
db2inst1@oakland1>db2licm –a idr4a_t90.lic
LIC1402I License added successfully.
LIC1426I This product is now licensed for use as outlined in your
License Agreement. USE OF THE PRODUCT CONSTITUTES ACCEPTANCE OF THE
TERMS OF THE IBM LICENSE AGREEMENT, LOCATED IN THE FOLLOWING DIRECTORY:
"/opt/ibm/db2/V11.5/license/en_US.iso88591"
db2inst1@oakland1>db2licm -l
Product name: "InfoSphere Data Replication"
License type: "Trial"
Expiry date: "10/28/2019"
Product identifier: "iidr"
Version information: "11.5"

28
9.Installing IBM MQ and Creating MQ Objects for Replication Across a Network
IBM MQ provides reliable transport and staging of replicated data. It also provides secure encryption of
data both in transit and at rest. By using multiple queues in parallel, Q Replication can maximize
bandwidth utilization for fast data transfer across continental distance.
There is great flexibility of configuration topologies for IBM MQ, for example, it is possible to deploy a
single queue manager that is accessible over a network and have the replication programs remotely
connecting to it via the MQ client interface, instead of using a local queue manager at each site. See:
‘Running the replication programs on an MQ client’ in the IBM Knowledge Center at:
https://www.ibm.com/support/knowledgecenter/en/SSTRGZ_11.4.0/com.ibm.swg.im.iis.repl.qrepl.doc/
topics/iiyrqwmqtclients.html
For optimal performance, we recommend configuring Q Replication with a queue manager that is local
to each system (site). This is the preferred configuration for replicating high-volume workloads across
large distances. This is also the configuration that is automatically deployed in the IBM Integrated
Analytics System and IBM Data Warehouse appliances when the replication feature is enabled.
The queue managers should be dedicated to Q Replication’s usage and never use a Dead Letter Queue.
We do not set up encryption in this exercise, but the steps for using MQ channel encryption are
provided in Appendix F. Configuring MQ Channel Encryption with Advanced Message Security (AMS)
Feature.
(If needed) Downloading and Installing IBM MQ
Refer to Appendix A. Downloading and Installing MQ for details on getting IBM MQ. An IBM MQ license
is included with the replication product, its usage is restricted to replication.
Creating the Q Managers
On oakland (source system) create and start a Q Manager (Note that names are case-sensitive):
su – repluser
crtmqm QMGR1
strmqm QMGR1
On dallas (target system):
su – repluser
crtmqm QMGR2
strmqm QMGR2
At this time, we will create only the MQ objects needed for replicating from A to B. Reverse direction is
symmetrical and will be done at a later step.
Troubleshooting MQ Configuration
The Q manager writes diagnostic logs into /var/mqm/qmgrs/ <qmgr-name> / errors. This is akin to the
Db2 db2diag.log file; it contains often very useful information. The most common cause of issues with
MQ is typos in queue or channel names. If you have trouble with your setup, first double-check any
names you have manually typed and make sure they match the names specified in the Q Replication
setup.

29
Creating the MQ Objects Needed for Replication across a Network
Figure 4 - MQ objects for replicating from Site A (Oakland) to Site B (Dallas) illustrates the MQ queues
and objects that we are creating for replication from one source to one target. The entire setup will be
later duplicated after changing the queue names for the reverse direction.
An IBM MQ queue is unidirectional. Q Capture uses one or more queues for sending transactions, and
one or more queues for sending the supplemental log files (only applicable when the replicated
workload includes changes to column-organized tables on the source system). Reverse direction
queues are created for Q Capture to receive control messages from Q Apply.
MQ Objects’ Naming Conventions used in this paper
We use the naming convention A2B.objectname for the MQ objects that are used for transmitting from
Oakland to Dallas and use B2A for the reverse direction, where Oakland is ‘A’ and Dallas is ‘B’.
In configurations where you have several Capture and Apply programs, you will want to add the schema
name (CAPTURE_SCHEMA and APPLY_SCHEMA startup parameters) to uniquely identify which Capture
or Apply program uses the queues. For example, CAP1.A2B.SENDQ.
A single Capture or Apply program can also replicate transactions across several QMAPs, and some users
then make the CG part of the queue names, e.g., ‘CAP1.A2B.CG1.SENDQ’. Here CAP1 identifies the
Capture program schema name, A2B the direction of replication, CG1 the consistency group, and SENDQ
the queue’s purpose.
Local queues that are not used for data transmission and are unique to a Capture program instance are
typically prefixed with the schema name. Alternatively, if you have only one Capture program on the
system, you could use the site name for prefix, for example, ‘A.RESTARTQ’ for the Capture program that
runs on site A, and ‘B.RESTARTQ' for the Capture at site B.
Definition: The QMAP identifies a Consistency Group
− The QMAP corresponds to a Consistency Group (CG): all transactions replicated for the set
of tables assigned to a QMAP are replicated with transactional consistency.
− The QMAP identifies the SENDQ and RECVQ queues, and the Q Apply ADMINQ queue that is
used for sending messages back to the Q Capture program. When CDE tables are involved,
the QMAP also include FILE TRANSFER queues.
− A Q Capture program can replicate transactions to several targets but has only one
ADMINQ. Each target Apply program will be sending messages to the same Q Capture
ADMINQ. See: Figure 3 - MQ objects for replicating from Site A (Oakland) to Site B (Dallas) a
Workload that Includes Changes to CDE Tables illustrates a QMAP named ‘A2B’, the MQ
objects within the yellow boxes are those associated with the replication 'QMAP' in the Q
Replication control tables.

30
Figure 3 - MQ objects for replicating from Site A (Oakland) to Site B (Dallas) a Workload that Includes Changes to CDE Tables.
MQ Objects within the yellow boxes are those associated with the Replication 'QMAP' in the Q Replication Control Tables.

31
Creating the MQ Objects at SITE A for Replication from Production (A) to Failover (B)
Cut and paste the following commands into a file called createmq.A.txt
At oakland (site A):
runmqsc QMGR1 < createmq.A.txt
*************************************************************
* SOURCE (SITE A) - for A2B Replication - Filename: createmq.A.txt
*************************************************************
* Q Capture RESTART queue - Local Queue (One per Capture instance)
*************************************************************
define qlocal('A.RESTARTQ') MAXDEPTH(1) REPLACE
* Q Capture TRANSACTION SEND queues and channel - A2B Direction
*************************************************************
define qremote('A2B.SENDQ.1') rname('A2B.RECVQ') RQMNAME(QMGR2) XMITQ('A2B.XMITQ.1')
REPLACE
define qlocal('A2B.XMITQ.1') USAGE(XMITQ) DEFPSIST(YES) MAXMSGL(4914304)
MAXDEPTH(9999999) REPLACE
define channel('A2B.SENDQCH.1') CHLTYPE(SDR) TRPTYPE(TCP) XMITQ('A2B.XMITQ.1')
CONNAME('ditto12.svl.ibm.com(1414)') DISCINT(0)CONVERT(NO) MAXMSGL(4914304) REPLACE
start channel ('A2B.SENDQCH.1')
* Q Capture ADMIN RECEIVE queue and its receiver channel – Local Queue (One per
Capture)
*************************************************************
define qlocal ('A.ADMINQ') REPLACE
define channel('A2B.ADMINQCH') CHLTYPE(RCVR) TRPTYPE(TCP) REPLACE
start channel ('A2B.ADMINQCH')
* Q Capture FILE TRANSFER SEND queues and channel - A2B Direction
*************************************************************
define qremote('A2B.FSQ.1') RNAME('A2B.FRQ.1') RQMNAME(QMGR2) XMITQ('A2B.FXMITQ.1')
REPLACE
define qlocal ('A2B.FXMITQ.1') usage(XMITQ) maxdepth(99999999) maxmsgl(104857600)
NPMCLASS(HIGH) REPLACE
define channel('A2B.FSQCH.1') CHLTYPE(SDR) TRPTYPE(TCP) CONNAME('ditto12(1414)')
XMITQ('A2B.FXMITQ.1') NPMSPEED(NORMAL) REPLACE
start channel ('A2B.FSQCH.1')
* Q Capture FILE TRANSFER ACK RECEIVE queue - Local Queue
*************************************************************
define qlocal(A.FACKQ) put(enabled) get(enabled) share NPMCLASS(HIGH) REPLACE
define channel ('A2B.FACKQCH') CHLTYPE(RCVR) TRPTYPE(TCP) NPMSPEED(NORMAL) REPLACE
start channel ('A2B.FACKQCH')
* Listener for incoming TCP/IP connections
*************************************************************define listener
('QREP_LISTENER') TRPTYPE(TCP) PORT(1414) CONTROL(QMGR) REPLACE
start listener ('QREP_LISTENER')

32
Creating the MQ objects at SITE B for Replication from Production (A) to Failover (B)
Cut and paste the following commands into a file called createmq.B.txt.
At Dallas (site B):
runmqsc QMGR < createmq.B.txt
*************************************************************
* TARGET (SITE B)- For A2B Replication - createmq.B.txt
*************************************************************
* Q Apply TRANSACTION RECEIVE queues and channels
*************************************************************
define qlocal('A2B.RECVQ') put(enabled) get(enabled) defsopt(shared)
maxdepth(500000) maxmsgl(4914304) REPLACE
define channel('A2B.SENDQCH.1') chltype(RCVR) TRPTYPE(TCP) maxmsgl(4914304) REPLACE
start channel('A2B.SENDQCH.1')
* Q Apply ADMIN queue and its sender channel
*************************************************************
define qremote('A2B.ADMINQ') RNAME('A.ADMINQ') RQMNAME('QMGR1')
XMITQ('A2B.ADMINXMITQ') REPLACE
define qlocal ('A2B.ADMINXMITQ') usage(XMITQ) DEFPSIST(YES) maxdepth(1000)
maxmsgl(50000) REPLACE
define channel('A2B.ADMINQCH') chltype(SDR) TRPTYPE(TCP) XMITQ('A2B.ADMINXMITQ')
CONNAME('ditto11(1414)') CONVERT(NO) MAXMSGL(4914304) REPLACE
start channel ('A2B.ADMINQCH')
* Model for local queues dynamically created and used for holding changes
* during the initial load of a table
*************************************************************
DEFINE QMODEL('IBMQREP.SPILL.MODELQ') DEFSOPT(SHARED) MAXDEPTH(900000)
MSGDLVSQ(FIFO) DEFTYPE(PERMDYN) MAXMSGL(4914304) REPLACE
* Q Apply FILE TRANSFER RECEIVE queues and channel - A2B Direction
*************************************************************
define qlocal ('A2B.FRQ.1') MAXDEPTH(999999999) DEFPSIST(NO) MAXMSGL(104857600)
NPMCLASS(HIGH) REPLACE
define channel('A2B.FSQCH.1') CHLTYPE(RCVR) TRPTYPE(TCP) MAXMSGL(104857600)
NPMSPEED(NORMAL) REPLACE
start channel ('A2B.FSQCH.1')
* Q Apply FILE TRANSFER SEND ACK messages
*************************************************************
define qremote('A2B.FACKQ') RNAME('A.FACKQ') RQMNAME('QMGR1')
XMITQ('A2B.FACKXMITQ') REPLACE
define qlocal ('A2B.FACKXMITQ') USAGE(XMITQ) DEFPSIST(YES) MAXDEPTH(999999999)
NPMCLASS(HIGH) REPLACE
define channel('A2B.FACKQCH') CHLTYPE(SDR) TRPTYPE(TCP) CONNAME('ditto11(1414)')
XMITQ('A2B.FACKXMITQ') NPMSPEED(NORMAL) REPLACE
start channel ('A2B.FACKQCH')
* Listener for incoming TCP/IP connections
*************************************************************
define listener ('QREP_LISTENER') TRPTYPE(TCP) PORT(1414) CONTROL(QMGR) REPLACE
start listener ('QREP_LISTENER')
33
10. Setting up Q Replication: Password Files, Control Tables, and the QMAP
Creating an Encrypted Password File for the Replication User to Connect to Db2
The Db2 user password is used by the ASNCLP script processor for connecting to Db2 to update the Q
Replication control tables, and by Q Apply for connecting to the source Db2 when performing initial
table load at the target.
On the system in Dallas:
su – repluser
asnpwd init encrypt password
2020-02-27-15.56.08.902836 ASN1981I "Asnpwd" : "" : "Initial". The program completed
successfully using password file "asnpwd.aut".
asnpwd add alias OAKDB id repluser password "Works4me!"
2020-02-27-15.56.16.584718 ASN1981I "Asnpwd" : "" : "Initial". The program completed
successfully using password file "asnpwd.aut".
The password file is asnpwd.aut. On our system it is created in /home/repluser/asnpwd.aut
Repeat on the other system, specifying the remote database DALDB instead of OAKDB.
Changing the Replication User Password
To change the password:
asnpwd MODIFY ALIAS daldb ID repluser password "MyNewPassword"
Note that the password must be enclosed in quotes.
Using an ASNCLP Script for Creating the Q Replication Control Tables
We will be creating the control tables for both Capture and Apply at each site, using the Q Replication
scripting language, "ASNCLP".
In an ASNCLP script, -- comments are prefixed with the ‘#’ character. Each command is separated with
the ‘;’ character.
Note that the ASNCLP script uses the password file that we generated with the "asnpwd" command for
connecting to each database, both local and remote. The password file name is specified in an ASNCLP
script with the SET PWDFILE command.
Cut and past the lines in Figure 4 - ASNCLP script to Create the Q Replication Control Tables into a file
called qreptables.clp
Execute the following command on any of the two servers. ASNCLP will retrieve the password from
"/home/repluser/asnpwd.aut" to connect and create the tables on the remote database:
asnclp -f qreptables.clp

34
Figure 4 - ASNCLP script to Create the Q Replication Control Tables for both Capture and Apply at each Site
Running the qreptables.clp ASNCLP script generates and executes the Db2 SQL files called qreplcap.sql
which creates the Capture control tables and qreplapp.sql which creates the Apply control tables, -- in
both databases. You can inspect those two files to see the SQL that is generated.
#
# qreptables.clp - Create Replication CONTROL TABLES for
# both Capture/Apply at each site
#
ASNCLP SESSION SET TO Q REPLICATION;
#SET RUN SCRIPT LATER GENERATE SQL FOR EXISTING YES;
SET RUN SCRIPT NOW STOP ON SQL ERROR OFF;
SET PWDFILE "/home/repluser/asnpwd.aut";
#-----------------------
# Site A - oakland
#-----------------------
# Capture Control Tables
#-----------------------
SET SERVER CAPTURE TO DB OAKDB;
SET CAPTURE SCHEMA SOURCE ASN;
SET QMANAGER QMGR FOR CAPTURE SCHEMA;
#DROP CONTROL TABLES ON CAPTURE SERVER;
CREATE CONTROL TABLES FOR CAPTURE SERVER USING RESTARTQ "A.RESTARTQ" ADMINQ
"A.ADMINQ" MONITOR INTERVAL 10000;
# Apply Control Tables
#-----------------------
SET SERVER TARGET to DB DALDB;
SET APPLY SCHEMA ASN;
SET QMANAGER QMGR FOR APPLY SCHEMA;
#DROP CONTROL TABLES ON APPLY SERVER;
CREATE CONTROL TABLES FOR APPLY SERVER USING MONITOR INTERVAL 10000;
#-----------------------
# Site B - dallas
#-----------------------
# Capture Control Tables
#-----------------------
SET SERVER CAPTURE TO DB DALDB;
SET CAPTURE SCHEMA SOURCE ASN;
SET QMANAGER QMGR FOR CAPTURE SCHEMA;
#DROP CONTROL TABLES ON CAPTURE SERVER;
CREATE CONTROL TABLES FOR CAPTURE SERVER USING RESTARTQ "B.RESTARTQ" ADMINQ
"B.ADMINQ" MONITOR INTERVAL 10000;
# Apply Control Tables
#-----------------------
SET SERVER TARGET to DB OAKDB;
SET APPLY SCHEMA ASN;
SET QMANAGER QMGR FOR APPLY SCHEMA;
#DROP CONTROL TABLES ON APPLY SERVER;
CREATE CONTROL TABLES FOR APPLY SERVER USING MONITOR INTERVAL 10000;
35
Let’s look at the Q Replication control tables that were created by ASNCLP, issue the following
commands:
db2 connect to OAKDB user db2inst1
db2 list tables for schema ASN
db2 connect to DALDB user db2inst1
db2 list tables for schema ASN
You should observe 51 tables at each server for Q Replication in Db2 V11.5.
Creating a QMAP, which Identifies the Queues Used for one Replication Consistency Group
When transactions that include changes to CDE tables are replicated from a source system, Db2 writes
supplemental logs into a file system and those files are transferred from the source to the target system
by Q Replication using the file transfer queues, therefore we need to create a QMAP that has a file
transfer queue and specify where to find the Db2 supplemental log directory. It is possible to define 1
to 4 file transfer queues; we are using one for this tutorial.
The file transfer queues are associated with the Q Replication transaction queue and are treated
logically as part of the QMAP: when you start a send or receive queue with a STARTQ command, it
automatically starts the associated file transfer service if there is one associated with the QMAP.
Using an ASNCLP Script for Creating a QMAP
We create the QMAP with an ASNCLP script. ASNCLP will create 2 files containing SQL commands that
can be executed with the ‘db2 -tf’ command. qreplcap.sql to update the Capture control tables, and
qreplapp.sql to update the Apply control tables.
The RUN SCRIPT NOW statement requests ASNCLP to automatically run the commands on both systems,
by connecting with the password specified on the SET PWDFILE line.
If instead, you choose 'RUN SCRIPT LATER’, you will need to edit the generated files to uncomment the
‘CONNECT TO’ line and specify your username; you will then be prompted for your password when
executing the script file, which can be executed with ‘db2 -tf’ command.
Cut and paste into a file called createA2Bqmap.clp and execute with the following command:
asnclp -f createA2Bqmap.clp

36
Executing the ASNCLP script populates the Q Replication control tables. Experienced Q Replication users
will notice that the only difference when you have CDE tables in the IBMQREP_SENDQUEUES and
IBMQREP_RECVQUEUES control tables are the columns HAS_FILESEND=Y and HAS_FILERECV=Y, which
indicate that a file transfer service is associated with the QMAP.
Let’s verify the settings in the Q Replication control tables. Check the target system 'dallas'
connect to DALDB;
db2 "select substr(repqmapname,1,8) as QMAP,
substr(recvq,1,12) as RECVQ,
substr(sendq,1,12) as SENDQ,
substr(adminq,1,12)as ADMINQ,
state,
HAS_FILERECV
from asn.IBMQREP_RECVQUEUES"
QMAP RECVQ SENDQ ADMINQ STATE HAS_FILERECV
-------- ------------ ------------ ------------ ----- ------------
A2B A2B.RECVQ A2B.SENDQ.1 A2B.ADMINQ A Y
1 record(s) selected.
Check the QMAP on oakland, the source system:
db2 connect to OAKDB;
db2 "select substr(pubqmapname,1,12) as QMAP,
substr(sendq,1,12) as SENDQ,
substr(recvq,1,12) as RECVQ,
state,
HAS_FILESEND
#
# createA2Bqmap.clp - Creating a QMAP that includes File Transfer queues
#
ASNCLP SESSION SET TO Q REPLICATION;
# SET RUN SCRIPT LATER;
SET RUN SCRIPT NOW STOP ON SQL ERROR ON;
SET PWDFILE "/home/repluser/asnpwd.aut";
SET SERVER CAPTURE TO DBALIAS OAKDB;
SET SERVER TARGET TO DBALIAS DALDB;
SET CAPTURE SCHEMA SOURCE ASN;
SET APPLY SCHEMA ASN;
SET QMANAGER "QMGR" FOR CAPTURE SCHEMA;
SET QMANAGER "QMGR" FOR APPLY SCHEMA;
#DROP REPLQMAP A2B;
CREATE REPLQMAP A2B USING ADMINQ "A2B.ADMINQ" RECVQ "A2B.RECVQ" SENDQ
"A2B.SENDQ.1" HAS FILE TRANSFER Y;
# DROP FILETRANS FOR REPLQMAP A2B;
CREATE FILETRANS FOR REPLQMAP A2B USING ACKQ "A2B.FACKQ" FILE RECVQ
"A2B.FRECVQ" FILE SENDQ "A2B.FSENDQ.1" RECV PATH
"/nfsshare/qrepcdcfiles" SEND PATH "/nfsshare/db2suplogs/db2";
37
from asn.IBMQREP_SENDQUEUES"
QMAP SENDQ RECVQ STATE HAS_FILESEND
------------ ------------ ------------ ----- ------------
A2B A2B.SENDQ.1 A2B.RECVQ A Y
1 record(s) selected.
The CREATE FILETRANS statement in the ASNCLP script indicates that this QMAP has an associated
file transfer service. The tables IBMQREP_FILE_SENDERS for Q Capture and IBMQREP_FILE_RECEIVERS
for Q Apply are used to define and configure the MQ file transfer services that may exist for a Capture
and an Apply program. The IBMQREP_FILE_RECEIVERS table is where you can find the name of the file
system used by Q Apply to receive the files transmitted by Q Capture. Appendix E Changes to Q
Replication Control Tables for CDE Tables describes the changes that were introduced for supporting
replication of transactions that includes changes to CDE tables.
Let’s look at the File Transfer Service definition in the Q Replication Control Tables in Db2.
On the Capture side, you will notice that the File Sender Service for QMAP ‘A2B’ will be reading the files
to send from the ‘/shared/db2suplogs’ file system, which is the file system that was specified on the
DB2_DCC_PATH environment variable for telling Db2 where to write the supplemental log files.
At the source:
db2 "connect to OAKDB"
db2 "select substr(qmapname,1,8) as QMAPNAME,
substr(filesend_path,1,28) as FILESEND_PATH,
substr(filesend_queue,1,18) as FILESEND_QUEUE,
substr(filesend_ack_queue,1,12) as FILESEND_ACK_QUEUE
from asn.IBMQREP_FILE_SENDERS"
QMAPNAME FILESEND_PATH FILESEND_QUEUE FILESEND_ACK_QUEUE
-------- ---------------------------- ------------------ ------------------
A2B /shared/db2suplogs A2B.FSENDQ.1 A.FACKQ
1 record(s) selected.
At the target:
db2 "select substr(qmapname,1,8) as QMAPNAME,
substr(filerecv_path,1,30) as FILERECV_PATH,
substr( filerecv_queue,1,10) as FILERECV_QUEUE
from asn.IBMQREP_FILE_RECEIVERS"
QMAPNAME FILERECV_PATH FILERECV_QUEUE
-------- ------------------------------ --------------
A2B /shared/qrepcdefiles A2B.FRECVQ
1 record(s) selected.
The Q Apply program will start a File Receiver service and receive the files in the /shared/qrepcdefiles
directory.

38
Part 3: Using Replication
A "Q subscription" identifies a table to replicate. Q Replication replicates database transactions with
transactional integrity, including changes to all subscribed tables but omitting non-subscribed tables.
A "Schema subscription" identifies the schema or schemas for which CREATE and DROP TABLE
operations are replicated.
In this section, we demonstrate how to create and activate both types of subscriptions.
11.Creating Q Subscriptions for Selected tables, Automatically Creating Tables that Do
Not Already Exist at the Target
Let's add a new table to illustrate how ASNCLP will automatically create this table on the target system
when we create a subscription.
On oakland, the source system:
You will recall that T1 and T2 already exist at the target, they were created empty by running the SQL
commands generated by db2look. Let’s verify:
Using ASNCLP to Create Replication Subscriptions
We now create subscriptions for all our tables using ASNCLP, which will generate SQL to update the Q
Replication control tables. The SQL generated by ASNCLP inserts one row in the IBMQREP_SUBS table at
the source, and one row in the IBMQREP_TARGETS at the target for each subscription created.
The SQL scripts generated by ASNCLP also alters the source tables to set DATA CAPTURE CHANGES, and
create the tables at the target, if needed.
Cut and past the following commands into a file called ‘createsubs.clp’ and run:
asnclp -f createsubs.clp
db2 connect to OAKDB
db2 "create table T3 (col1 int not null primary key, col2 varchar(20)) organize by
column distribute by hash(col1)"
db2 "insert into T3 (select * from T1)"
db2 list tables
Table/View Schema Type Creation time
------------------------------- --------------- ----- --------------------------
T1 BOURBON T 2019-09-24-16.16.31.548915
T2 BOURBON T 2019-09-20-16.48.22.938611
T3 BOURBON T 2019-09-20-18.18.08.289509
3 record(s) selected.
db2 connect to DALDB
db2 list tables
Table/View Schema Type Creation time
------------------------------- --------------- ----- --------------------------
T1 BOURBON T 2019-09-24-16.16.31.548915
T2 BOURBON T 2019-09-20-16.48.22.938611
2 record(s) selected.

39
CREATE IF NOT EXIST will generate SQL to create the table at the target only if it does not already exist.
START AUTOMATICALLY YES creates the subscription in state ‘N’ (for new), all subscriptions in N states
are automatically started when Capture is started. For table T2, we specified START AUTOMATICALLY
NO, which is how you would be adding subscriptions to an existing replication configuration when you
do not want to stop replicating tables already being replicated, because START AUTOMATICALLY YES
requires recycling the Capture program to pick the new subscriptions. We will explicitly start the
subscription for T2 with a START command.
The HAS LOAD PHASE I (for Internal) clause will cause the table to be loaded when the subscription is
activated.
The REPLICATE ADD COLUMN clause requests ALTER TABLE ADD COLUMN operations to be applied
onto the target table, if the column does not already exist at the target, and for the new column to be
included in the replication subscription.
After running the createsubs.clp script with ASNCLP, verify that T3 was created on the target system in
Dallas:
db2 connect to DALDB
$ db2 list tables
Table/View Schema Type Creation time
-------------------------- --------------- ----- --------------------------
T1 REPLUSER T 2020-03-06-17.11.37.705466
#
# Create Replication SUBSCRIPTIONS – file createsubs.clp
#
ASNCLP SESSION SET TO Q REPLICATION;
#SET RUN SCRIPT LATER;
SET RUN SCRIPT NOW STOP ON SQL ERROR ON;
SET PWDFILE "/home/repluser/asnpwd.aut";
SET SERVER CAPTURE TO DB OAKDB;
SET SERVER TARGET TO DB DALDB;
SET QMANAGER QMGR FOR CAPTURE SCHEMA;
SET QMANAGER QMGR FOR APPLY SCHEMA;
SET CAPTURE SCHEMA SOURCE ASN;
SET APPLY SCHEMA ASN;
#DROP QSUB (SUBNAME T1SUB USING REPLQMAP A2B);
CREATE QSUB USING REPLQMAP A2B (SUBNAME T1SUB BOURBON.T1 OPTIONS HAS LOAD PHASE I
REPLICATE ADD COLUMN Y START AUTOMATICALLY YES CREATE IF NOT EXIST TARGET NAME
BOURBON.T1);
#DROP QSUB (SUBNAME T2SUB USING REPLQMAP A2B);
CREATE QSUB USING REPLQMAP A2B (SUBNAME T2SUB BOURBON.T2 OPTIONS HAS LOAD PHASE I
REPLICATE ADD COLUMN Y START AUTOMATICALLY NO CREATE IF NOT EXIST TARGET NAME
BOURBON.T2);
#DROP QSUB (SUBNAME T3SUB USING REPLQMAP A2B);
CREATE QSUB USING REPLQMAP A2B (SUBNAME T3SUB BOURBON.T3 OPTIONS HAS LOAD PHASE I
REPLICATE ADD COLUMN Y START AUTOMATICALLY YES CREATE IF NOT EXIST TARGET NAME
BOURBON.T3);
40
T2 REPLUSER T 2020-03-06-17.11.41.935279
T3 REPLUSER T 2020-03-10-17.36.30.453004
3 record(s) selected.
Let's look at the 3 subscriptions that were created on the target system in IBMQREP_TARGETS:
db2 connect to DALDB
db2 "select
substr(subname,1,8)as subname,
substr(recvq,1,10) as recvq,
substr(target_owner,1,8) as owner,
substr(target_name,1,10) as tablename
from asn.IBMQREP_TARGETS"
SUBNAME RECVQ OWNER TABLENAME
-------- ---------- -------- ----------
T1SUB A2B.RECVQ REPLUSER T1
T2SUB A2B.RECVQ REPLUSER T2
T3SUB A2B.RECVQ REPLUSER T3
1 record(s) selected.
How
ASNCLP
Picks the Replication Key for a Table
In a Database Partitioning Feature (DPF) database, the distribution key is always part of the replication
key, otherwise,
the data at the target could diverge when a row is moved across DPF partitions. For
tables distributed by random, Db2 creates an implicitly hidden column called
‘RANDOM_DISTRIBUTION_KEY’, which is automatically included in the replication key.
You can see which columns were chosen as the replication key from the Q Replication control tables at
the target database:
db2 connect to DALDB
db2 -tvf selsubs.sql
db2 "select substr(subname,1,7) as subname, substr(target_colname,1,6) as colname,
is_key from ASN.IBMQREP_TRG_COLS where subname='T1SUB'"
SUBNAME COLNAME IS_KEY
------- ------- ------
T1SUB COL1 Y
T1SUB COL2 N
2 record(s) selected.
db2 "select substr(subname,1,7) as subname, substr(target_colname,1,12) as colname,
is_key from ASN.IBMQREP_TRG_COLS where subname='T2SUB'"
SUBNAME COLNAME IS_KEY
------- ------------ ------
T2SUB COL1 Y
T2SUB COL2 N
T2SUB IBMREPL_KEY Y
T2SUB IBMREPL_SITE Y
4 record(s) selected.
Because table T1 has a primary key on col1, which is also the distribution key for this partitioned table,
ASNCLP automatically picked column ‘col1’ as the replication key. COL1 is enough to uniquely identify
41
each row in the table. Table T2 is using the distribution key combined with the site and identity columns
that were made a non-enforced primary key for this table.
42
Creating a Schema-Level Subscription to Automatically Replicate Create and Drop Table
To automatically replicate CREATE and DROP table operations, you need to create a Q Replication
schema-level subscription.
Only tables with the DATA CAPTURE CHANGES (DCC) attribute can be replicated. We ensure that newly
created tables will have data capture changes even if the user does not specify the attribute when
creating the table, by configuring Db2 to automatically set the attribute.
Making Sure New Tables will have DATA CAPTURE CHANGES Enabled by Default.
You can set DATA CAPTURE CHANGES at the schema level and any newly created tables under the
schema will have DATA CAPTURE CHANGES as follows:
db2 connect to OAKDB
db2 create schema SPORTS
db2 ALTER SCHEMA SPORTS DATA CAPTURE CHANGES
Verify that the schema is defined with DATA CAPTURE CHANGES:
db2 connect to OAKDB
db2 "select substr(schemaname,1,10) as schemaname, DATACAPTURE from
SYSCAT.SCHEMATA
where schemaname='SPORTS'"
SCHEMANAME DATACAPTURE
---------- -----------
SPORTS Y
1 record(s) selected.
Create a table and verify DCC is enabled, even though it is not explicitly specified:
$ db2 "create table SPORTS.TT (col1 int not null primary key) organize by row"
$ db2 "select substr(tabname,1,8) as tabname, DATACAPTURE from SYSCAT.TABLES
where tabname='TT'"
TABNAME DATACAPTURE
-------- -----------
TT L
1 record(s) selected.
Alternatively, you can set DATA CAPTURE CHANGES at the database level by using the
DFT_SCHEMAS_DCC database configuration parameter, for which when set, all newly created schemas
in the database will automatically have DATA CAPTURE CHANGES enabled.
Note that the database must be reactivated for this configuration parameter to take effect. You can set
and verify as follows:
db2 terminate
db2 update DB CFG for TEAMS using DFT_SCHEMAS_DCC YES
db2 deactivate db TEAMS
db2 connect to TEAMS
db2 create schema MORESPORTS

43
db2 "select substr(schemaname,1,10) as schemaname, DATACAPTURE from
SYSCAT.SCHEMATA where schemaname in ('SPORTS', 'MORESPORTS')"
SCHEMANAME DATACAPTURE
---------- -----------
SPORTS Y
MORESPORTS Y
2 record(s) selected.
If DATA CAPTURE CHANGES is not set at the schema-level, then the table must be created or altered
with data capture changes clause explicitly or it will not be replicated. For instance, the SCHEMA
named ”BOURBON” does not have DCC, so you must either ALTER the table to set DCC or create the
table with the DCC clause as follows:
db2 "create table BOURBON.TT (col1 int) DATA CAPTURE CHANGES"
db2 "select substr(tabname,1,8) as tabname, datacapture from syscat.tables
where tabname='TT'"
TABNAME DATACAPTURE
-------- -----------
TT L
1 record(s) selected.
Using an ASNCLP Script for Creating a Schema-Level Subscription
We now create a schema-level subscription for the schema ”SPORTS,” we will later create a new table
under that schema and verify that a replication subscription is automatically created, and the table is
created by Q Replication at the target site if it does not already exist there.
Copy the lines below into a file named createschemasub.clp, and run with:
asnclp -f createschemasub.clp
A single schema subscription can replicate tables for multiple schemas when using a name pattern for
the schema name, e.g., 'IBM%' or '%SPORTS%'.
#
# Create a SCHEMA subscription to replicate CREATE and DROP tables
#
ASNCLP SESSION SET TO Q REPLICATION;
SET RUN SCRIPT NOW STOP ON SQL ERROR OFF;
#SET RUN LATER;
SET PWDFILE “/nfsshare/home/repluser/asnpwd.aut”;
SET SERVER CAPTURE TO DB OAKDB;
SET SERVER TARGET TO DB DALDB;
SET CAPTURE SCHEMA SOURCE ASN;
SET APPLY SCHEMA ASN;
CREATE SCHEMASUB schemasub1 SUBTYPE U REPLQMAP A2B FOR TABLES OWNER LIKE SPORTS;
#START SCHEMASUB schemasub1 ALL;
START SCHEMASUB schemasub1 NEW ONLY;

44
The NEW ONLY keyword on START SCHEMASUB instructs ASNCLP to only replicate CREATE and DROP
table statements that will happen in the future. Therefore the table SPORTS.TT that we have created
above for this schema will not be replicated. If instead, you specify START SCHEMASUB schemasub1
ALL, then ASNCLP will also create subscriptions for all existing tables in the schema; we will leverage this
feature when setting up replication for the reverse direction.
Schema subscriptions are created in the Q Replication control table IBMQREP_SCHEMASUBS. Let’s look:
db2 "select substr(qmapname,1,5) as qmapname,
substr(schema_subname,1,10) as schema_subname,
substr( schema_name,1,8) as schema_name,
state
from asn.IBMQREP_SCHEMASUBS"
QMAPNAME SCHEMA_SUBNAME SCHEMA_NAME STATE
-------- -------------- ----------- -----
A2B SCHEMASUB1 SPORTS N
1 record(s) selected.
Note that a schema subscription has an associated state and needs to be activated. By default, the
initial state is ‘N’ for New; subscriptions in state ‘N’ are activated automatically when the Q Capture
program is started, and their state will transition to 'A' for Active. Subscriptions can be stopped and
started with a command, which we will illustrate in a later section.
12.Starting Replication and Activating Subscriptions (optionally) Loading the Tables onto
the Target
We will now start the replication programs, which will automatically start the subscriptions that were
defined with ‘
START AUTOMATICALLY YES’ via the ASNCLP CREATE QSUB command;
their initial state is ‘N’, which stands for ‘New’. Tables T1 and T3 were defined this way.
In contrast, the subscription to table T2 was created with
START AUTOMATICALLY NO, its initial state is ‘I’
for Inactive. Once the Capture program is running, we will need to issue a STARTSUB command to
activate the subscription for T2. This is the standard way of adding subscriptions to an existing
configuration: you never have to stop replication or recycle the Capture program for adding
subscriptions, you simply start them with a command instead.
You can see the state of each subscription by querying the Q Capture control table IBMQREP_SUBS. Cut
and paste the SQL below into a file called, ‘selsubs.sql’’, and execute with 'db2 -tvf selsubs.sql':
-- selsubs.sql: select replication subscriptions from IBMQREP_SUBS table
select
substr(subname,1,8)as subname,
substr(source_owner,1,8) as schema,
substr(source_name,1,10) as tablename,
substr(sendq,1,12) as sendq,
state,
has_loadphase
from asn.IBMQREP_SUBS;
45
db2 connect to OAKDB
db2 -tvf selsubs.sql
SUBNAME SCHEMA TABLENAME SENDQ STATE HAS_LOADPHASE
-------- -------- ---------- ------------ ----- -------------
T1SUB BOURBON T1 A2B.SENDQ.1 N I
T2SUB BOURBON T2 A2B.SENDQ.1 I I
T3SUB BOURBON T3 A2B.SENDQ.1 N I
3 record(s) selected.
Starting the Q Capture and Q Apply Replication Programs
We must first grant the authority to Q Apply for calling the stored procedure that will allow it to update
generated always columns in the target tables:
db2 connect to DALDB user repluser
db2 grant execute on procedure SYSPROC.ADMIN_SET_MAINT_MODE to USER repluser
db2 db2 connect to OAKDB user repluser;
db2 grant execute on procedure SYSPROC.ADMIN_SET_MAINT_MODE to USER repluser;
Q Capture and Q Apply can be started in any order.
Starting Q Apply
asnqapp TEAMS apply_schema=ASN logstdout=Y
Q Apply will run until you terminate it. To stop Q Apply:
asnqacmd TEAMS STOP;
Let’s restart Q Apply:
asnqapp TEAMS apply_schema=ASN logstdout=Y
Starting Q Capture
asnqcap TEAMS capture_schema=ASN logstdout=Y
This activates the subscriptions for T1 and T2 and load those tables onto the target. To stop Q Capture:
asnqccmd TEAMS STOP;
Let’s restart Q Capture:
asnqcap TEAMS capture_schema=ASN logstdout=Y
The logstdout=Y option ensures that all messages, including Informational messages go to the standard
output in the window where the program runs. When set to N, informational and some diagnostic
messages will only go to the capture log file, which by default is created in the directory where the
program is started. For example, on our system Capture creates the file
‘repluser.TEAMS.ASN.QCAP.log’, which contains all messages issued by Capture.
Replication is now running and the table T1 and T2 have been loaded at the target. You can verify that
your subscriptions are active at both sites with the following queries.
46
Capture side:
db2 connect to OAKDB
db2 "select substr(subname,1,8) as subname, STATE from ASN.IBMQREP_SUBS"
Apply side:
db2 connect to DALDB
db2 "select substr(subname,1,8) as subname, STATE from ASN.IBMQREP_TARGETS"
To verify that the tables were loaded at the target:
db2 connect to DALDB
db2 "select count(*) from T1"
db2 "select count(*) from T3"
How Automatic Initial Load of the Target Table Works
A target table is optionally loaded when its subscription is activated. Each subscription can have its own
load options.
With Q Replication you never have to suspend your application while the data is being copied to a new
target. Subscriptions can be activated while the tables are being updated at the source.
The automatic load process is driven by the Q Apply program, which establishes a database connection
back to the source database to read the data from the source table and insert this data into the target
table. While the table is being loaded, changes to the source table are captured and staged into an MQ
queue at the target. Once the load has completed, the backlog of changes is applied.
HAS_LOADPHASE=’I’ in the Q Capture IBMQREP_SUBS control table indicates that the target table
needs to be loaded when the subscription is activated. (You do not want a load phase when setting up
replication for the reverse direction, because the data is already loaded.)
The actual initial load method used is specified in the LOAD_TYPE column of the Q Apply control table
IBMQREP_TARGETS, several methods are available, depending on the type of tables. Specifying
LOAD_TYPE=0 (the default) lets Q Apply chose the best available method for the type of table being
loaded.
When the source table is a row organized table. By default, Q Apply loads the table by invoking the Db2
LOAD utility over a remote database connection. This function is also referred to as Db2 cross loader. It
can be explicitly requested with LOAD_TYPE=1.
When the source table is a CDE table. By default, Q Apply loads the table using an external table load
with remote source Db2 command. This is Q Apply LOAD_TYPE=7.
When loading CDE tables with LOAD_TYPE=7:
• the data is transmitted over the database connection in compressed format.
• no disk space is needed for staging data at the target during load, because the data is directly
piped into the target table.
Figure 5 - Automatic load of source CDE tables – Q Apply LOAD_TYPE=7 illustrates the data flow during
load. Q Apply starts an UNLOAD thread that defines a REMOTESOURCE external table, selects the data
from this external table into a pipe that is read by a LOAD thread for insertion into the target table.
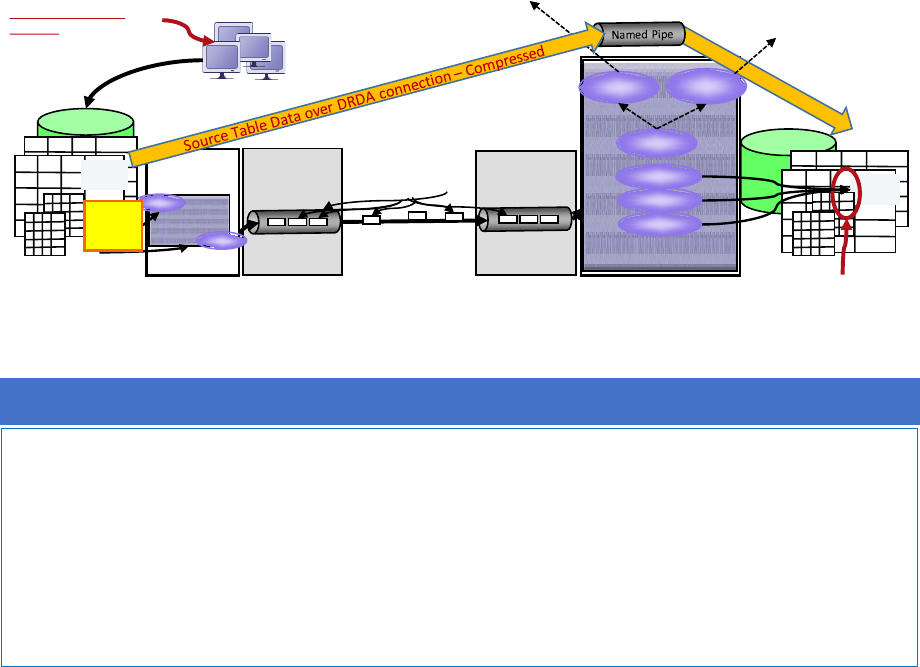
47
Figure 5 - Automatic load of source CDE tables – Q Apply LOAD_TYPE=7
Activating a New Subscription by Sending a Command to the Already Started Capture Program
The subscription to table T3 was not defined to be activated automatically when the Q Capture was
started (its initial sate was not ‘N’), we need to start it with a CAPSTART command.
Starting a subscription with a command is the recommended method for adding tables to an existing
replication configuration. You never have to stop the replication programs or suspend subscriptions
already active for adding new subscriptions. Instead, you create a subscription and then activate it.
We demonstrate starting a subscription using the signal method: a subscription is activated by inserting
a row with a CAPSTART command into the Q Capture control table IBMQREP_SIGNAL. When Q Capture
reads the Db2 log record for this inserted row, it immediately executes the command.
Connect to the source database and activate the subscription to table T3, which we had named ‘T3SUB’:
db2 connect to OAKDB
db2 "insert into ASN.IBMQREP_SIGNAL( signal_time,
signal_type,
signal_subtype,
signal_input_in)
DBMS
User
tables
Q Rep Control tables
IBM MQ
queue manager
IBM MQ
queue manager
Site A
DB2
Q Capture
Apply agent
Apply agent
Apply agent
Network
Site B
Send queue(s)
Receive queue()
Captured
Transactions
from the LOG
logrdr
publish
Applications continue
updating the tables
CREATE EXTERNAL TABLE
‘/home/czentgr/customer_pipe’
USING (DELIMITER ‘|’
REMOTESOURCE YES) AS
SELECT * FROM CUSTOMERS
IBMQREP_CAPPARMS(MAX_CAPSTARTS_INTLOAD)
for concurrent subscription starts
IBMQREP_APPLYPARMS( MAX_PARALLEL_LOADS)
for concurrent load invocations
Unload
User
tables
database
recovery
log
All tables already active continue
to be replicated
Q Rep Control tables
Load agent
Q Apply
Load
INSERT INTO
CUSTOMER
SELECT * FROM EXTERNAL
‘/home/czentgr/customer_pipe’
USING DELIMITER ‘|’)
Noted: Applications Do Not Need to be Suspended During Initial Load
• Replication can load tables onto a target without the need to suspend applications using
the source table.
• The copy at the target is ‘fuzzy’ because the data is read from the source table while
changes are made to it.
• Q Replication captures those changes made during the load phase from the Db2 recovery
log and applies them with conflict resolution to make the copy consistent with the source,
after the load completes.
48
values
(CURRENT TIMESTAMP, ‘CMD’, ‘CAPSTART’, ‘T3SUB’)"
Verify that the subscription for T3 is active and the table has been loaded at the target:
db2 connect to OAKDB
db2 -tvf selsubs.sql
SUBNAME SCHEMA TABLENAME SENDQ STATE HAS_LOADPHASE
-------- -------- ---------- ------------ ----- -------------
T3SUB BOURBON T3 A2B.SENDQ.1 A I
T1SUB BOURBON T1 A2B.SENDQ.1 A I
T2SUB BOURBON T2 A2B.SENDQ.1 A I
3 record(s) selected.
db2 "connect to DALDB"
db2 "select count as NUM_ROWS from T3"
NUM_ROWS
-----------
98
1 record(s) selected.
Replication is now running; all our subscriptions are active, and tables are loaded at the target.
Suspending and Resuming Replication for a Queue (aka a Replication Consistency Group)
We will stop the replication for a queue by issuing a STOPQ command with the condition CAPTUREUPTO
STOPAFTER at the source server. When you stop a queue, it does not deactivate the subscriptions for
the tables replicated on this queue, the state of the subscriptions on that queue remains unchanged.
Stopping a queue suspends replication for that queue until you resume it.
Technically speaking, on a STOPQ the Q Capture program stops reading log records for the subscriptions
assigned to the queue and remembers the Log Sequence Number (LSN) of the stop point in the MQ
RESTARTQ. On a STARTQ command, the Q Capture program goes back to that LSN in the Db2 log and
restart reading log records for the queue.
STOPQ command
$ asnqccmd teams STOPQ=A2B.SENDQ.1 captureupto=current_timestamp
stopafter=data_applied
2020-03-30-17.00.18.597865 <qConnMgr::check4ConsGroupsWith> ASN7223I "Q
Capture" : "ASN" : "WorkerThread" : In response to a stop or stopq command with
the stopafter option, the program will wait for all transactions that are
published to send queue or mapping group "A2B.SENDQ.1" to be applied at the
target.
You can now see that the send queue is inactive:
$ db2 -tvf selsendqueues.sql
select substr(pubqmapname,1,12) as QMAP, substr(sendq,1,12) as SENDQ,
substr(recvq,1,12) as RECVQ, state, HAS_FILESEND from asn.IBMQREP_SENDQUEUES
QMAP SENDQ RECVQ STATE HAS_FILESEND
------------ ------------ ------------ ----- ------------
A2B A2B.SENDQ.1 A2B.RECVQ I Y
49
1 record(s) selected.
and that it does not affect the state of the subscriptions for the tables defined for that queue:
$ db2 -tvf selsubs.sql
select substr(subname,1,8)as subname, substr(source_owner,1,8) as schema,
substr(source_name,1,10) as tablename, substr(sendq,1,12) as sendq, state,
has_loadphase from asn.IBMQREP_SUBS
SUBNAME SCHEMA TABLENAME SENDQ STATE HAS_LOADPHASE
-------- -------- ---------- ------------ ----- -------------
T3SUB BOURBON T3 A2B.SENDQ.1 A I
T40001 SPORTS T4 A2B.SENDQ.1 A I
T1SUB BOURBON T1 A2B.SENDQ.1 A I
T2SUB BOURBON T2 A2B.SENDQ.1 A I
4 record(s) selected.
STARTQ command
We now use a STARTQ command to resume replication for all active table subscriptions replicated on
that queue.
$ asnqccmd teams STARTQ=A2B.SENDQ.1
2020-03-30-17.08.37.722772 <subMgr:initAllSubs> ASN7008I "Q Capture" : "ASN" :
"WorkerThread" : The program was successfully reinitialized. "4" subscriptions
are active. "0" subscriptions are inactive. "0" subscriptions that were new
were successfully activated. "0" subscriptions that were new could not be
activated and are now inactive.
Reloading a Single Table onto the Target by using Q Replication
Let’s assume something went terribly wrong at the target system in Dallas. A distracted administrator
ran the wrong script and the table is corrupted!
We decide to reload this table by using Q Replication to avoid any impact on the source production
system.
A table can be reloaded by stopping and restarting its replication subscription if it is defined with
HAS_LOADPHASE. Let’s do it for table T1. We use the SIGNAL table method to send the commands to Q
Capture. First, stop the subscription:
db2 connect to OAKDB
db2 insert into ASN.IBMQREP_SIGNAL( signal_time,
signal_type,
signal_subtype,
signal_input_in)
values
(CURRENT TIMESTAMP, 'CMD', 'CAPSTOP', 'T3SUB')"
You can observe that the subscription has fully stopped at both the source and target, its state is now ‘I’
for Inactive:
db2 connect to DALDB
db2 select subname, state from ASN.IBMQREP_TARGETS
db2 connect to OAKDB
db2 select subname, state from ASN.IBMQREP_SUBS
50
Let’s now restart the subscription. Because it is defined with HAS_LOADPHASE='I' for 'Internal', it will be
automatically reloaded onto the target and resynchronized with the source table by applying the
changes that happened at the source while it was being loaded:
db2 connect to OAKDB
db2 insert into ASN.IBMQREP_SIGNAL( signal_time,
signal_type,
signal_subtype,
signal_input_in)
values
(CURRENT TIMESTAMP, 'CMD', 'CAPSTART', 'T3SUB')"
Creating a New Table at the Source that will Automatically be Replicated
Previously, in the section, ‘Creating a Schema-Level Subscription to Automatically Replicate Create/Drop
table’, we created and activated a schema subscription for the schema named ‘SPORTS’. Therefore any
table created with the schema SPORTS will be automatically created at the target if it does not already
exist, loaded if needed, and changes to this table will be replicated.
When Q Capture detects a CREATE TABLE in the Db2 recovery log, it creates a Q Subscription; inserting a
row for this subscription in the IBMQREP_SUBS table.
The subscription for a newly created table is finalized and activated on the first insert or load into the
table; before which all alter operations on the table are replicated by replaying the actual SQL
statements.
Let’s create a new table on the source system:
connect to OAKDB;
create table SPORTS.T4 (col1 int, col2 varchar(20)) organize by column
distribute by random;
alter table SPORTS.T4 add column col3 int not null default 0;
alter table SPORTS.T4 add constraint replkey unique(col3) not enforced;
insert into SPORTS.T4 select col1,col2,col1 from T1;
select * from SPORTS.T4;
…
98 record(s) selected.
verify that the subscription was created, the table created and loaded at the target system:
connect to DALDB;
list tables for schema SPORTS;
select * from SPORTS.T4;
…
98 record(s) selected.
db2 -tvf selsubs.sql
SUBNAME SCHEMA TABLENAME SENDQ STATE HAS_LOADPHASE
-------- -------- ---------- ------------ ----- -------------
T3SUB BOURBON T3 A2B.SENDQ.1 A I
T40001 SPORTS T4 A2B.SENDQ.1 A I
T1SUB BOURBON T1 A2B.SENDQ.1 A I
T2SUB BOURBON T2 A2B.SENDQ.1 A I
4 record(s) selected.

51
We observe that Q Replication used the table with a number suffix for the subscription name, T40001.
By default, a subscription is created with HAS_LOADPHASE and it was automatically loaded onto the
target.
To Consider: The Tablespace Must Exist at the Target for CREATE TABLE Replication
When a CREATE TABLE is replicated, the tablespace for the table is not automatically created by Q
Replication in the target database. Specifically, if you do, ‘create table T in TBSPACE1’, then
TBSPACE1 must exist at the target, otherwise the create table will fail. For this reason, you may
want to initially build the target database using the db2look command or backup/restore, so that
the target database contains all tablespaces needed for replicating create table operations.
If you create a new tablespace for each new table, as is common on Db2 for z/OS, consider creating
the table and its tablespace by running the DDL script on both sites as part of upgrades that include
the creation of new tables. You can still use a schema Subscription: Q Replication will detect the
creation of the new table, automatically create a subscription to replicate it, and tolerate that it
already exists at the target.

52
13.Monitoring Q Replication Performance and Operations
All things Q Replication are in Db2 tables. The Q Replication Control Tables contain information about
configuration, operations, performance, and health of the replication process. Figure 6 illustrates the
most important tables for using replication.
Figure 6 - All Things Q Replication are in Relational Tables
The Q Replication Control Tables consist of both input and output tables. They contain information about configuration,
operations, performance and health of the replication process.

53
Monitoring Performance with the Q Replication Monitor Tables
A set of Q Replication Monitor Tables contain performance information that is updated by Q Capture
and Q Apply at every MONITOR_INTERVAL, which is set in the IBMQREP_CAPPARMS and
IBMQREP_APPLYPARMS tables).
We have set the MONITOR_INTERVAL to 10 seconds when creating the control tables with the ASNCLP
command CREATE CONTROL TABLE, by specifying the MONITOR INTERVAL clause. This value is in
milliseconds (specify 10000 for 10 seconds) and the default of 30 seconds.
Figure 7 and Figure 8 illustrate the monitor tables for Capture and Apply and some of the most
important metrics that are available for performance monitoring and analysis.
Figure 7 – Capture Performance Monitor Tables - Some of the Most Useful Counters. The IBMQREP_FILES_SENT provides a
complete history of all files sent. By default, data in these tables is kept for 7 days.
Figure 8 - Q Apply Performance Monitor Tables - Some of the Most Useful Counters. The IBMQREP_FILES_RECEIVED contains a
complete history of all files received. By default, data in these tables is kept for 7 days.

54
The single most important performance metric is END2END_LATENCY, which is reported by Q Apply in
the IBMQREP_APPLYMON table.
END2END_LATENCY is the average time it takes to replicate a Db2 transaction from the time
the transaction is committed at the source by the application to the time it is committed by Q
apply at the target. (Clocks should be reasonably synchronized between systems, as a
difference will generate a bias, if the calculation gives a negative value, it is rounded to 0.) The
latency is reported as the average elapsed execution time for all transactions committed during
the monitor interval. It is a good indication of how current the data at the target is.
An associated metric is the timestamp of the oldest transaction applied at the target, OLDEST_TRANS,
which is also reported in IBMQREP_APPLYMON.
OLDEST_TRANS represents the point-in-time consistency reached at the target. This is the
source system timestamp for which all data is consistently applied at the target, converted to
local time. It moves up even if there are no replicated transactions when Q Capture is
configured for sending heartbeat messages (see the HEARTBEAT_INTERVAL parameter, which is
set in the IBMQREP_SENDQUEUES table). This parameter is useful to determine when all data
has been replicated before performing a site switch.
Let’s run a workload on the source system in Oakland:
db2 connect to OAKDB
db2 "insert into T3 select * from T1"
DB20000I The SQL command completed successfully.
The newly inserted rows in T3 in Oakland were replicated to T3 in Dallas. Let’s look at the replication
monitor tables at the target:
db2 connect to DALDB
db2 "select MONITOR_TIME,
END2END_LATENCY,
ROWS_APPLIED,
OLDEST_TRANS
from ASN.IBMQREP_APPLYMON
order by MONITOR_TIME DESC
fetch first 3 rows only with ur"
MONITOR_TIME END2END_LATENCY ROWS_APPLIED OLDEST_TRANS
-------------------------- --------------- ------------ ------------
2020-03-30-14.46.40.448891 1823 98 14.46.40
2020-03-30-14.46.30.448346 0 0 14.42.10
2020-03-30-14.46.20.447769 0 0 14.42.10
3 record(s) selected.
The latency was 1.823 second and 98 rows were replicated during the most recent 10 second interval.
OLDEST_TRANS reflects that all data committed at the source system as-of 14.46.40 has also been
committed at the target.

55
Monitoring Replication of Transactions on CDE Tables
When replicating transactions that include changes to CDE tables, external table files are created by
Db2, streamed by Q Capture over the FILE TRANSFER queues, and applied by Q Apply using external
table load as was illustrated and explained in Figure 1.
Looking at the Files Created by Db2 for Replicating Transactions Containing Changes to CDE Tables
The Db2 environment variable DB2_DCC_FILE_PATH specifies the path where Db2 writes the External
Table input files. Let’s observe what happens when we do a massive delete:
db2set DB2_DCC_FILE_PATH
DB2_DCC_FILE_PATH=/shared/db2suplogs
db2 connect to OAKDB;
db2 +c delete from T1; // +c option tells db2 DO NOT COMMIT the transaction
DB20000I The SQL command completed successfully.
cd /shared/qrepcdefiles
ls
TEAMS.BOURBON.T1.0000.000000000001b4f4.1.txt
TEAMS.BOURBON.T1.0001.0000000000000115.1.txt
Our system has two partitions. One file per partition was created by Db2, the partition number is
included in the file name, ‘0000’ for partition 0, and ‘0001’ for partition 1. The naming convention is as
follows:
<DBNAME>.<SCHEMA>.<TABLENAME>.<PARTITION>.<FILENAME>.<Format: txt or bin>
With an editor, look inside the files, which are readable because we had selected the text format by
setting the Db2 environment variable DB2_DCC_BINARY_FILE=N. Each file contains the replication key
column values for the rows that were deleted on a partition. When Db2 writes a file, it also writes a log
record with the location of the file. When Q Capture reads that log record, it knows where to find the
file and transmits the file using the MQ queues defined in IBMQREP_FILE_SENDERS for the QMAP, ‘A2B’
in our configuration. See Appendix D - Q Replication Control Tables for Replicating CDE Changes for the
IBMQREP_FILE_SENDER table details.
Monitoring Files Received by Q Apply for Replicating Transactions Containing Changes to CDE Tables
Let’s look at what is happening with our files. At the target, Q Apply receives them in the directory
specified as FILERECV_PATH in the IBMQREP_FILE_RECEIVERS control table.
db2 connect to DALDB
db2 "select substr(FILERECV_PATH,1,30) as filerecv_path from
ASN.IBMQREP_FILE_RECEIVERS"
FILERECV_PATH
------------------------------
/shared/qrepcdefiles
1 record(s) selected.
cd /shared/qrepcdefiles
ls *.txt
TEAMS.BOURBON.T1.0000.000000000001b4f4.1.txt
TEAMS.BOURBON.T1.0001.0000000000000115.1.txt

56
You will see that two subdirectories are created by Q Apply in FILERECV_PATH:
/shared/qrepcdefiles/logs
/shared/qrepcdefiles/errors
The /logs directory contains the log created by Db2 when Q Apply invokes an internal table load. The log
files are pruned automatically by Q Apply if the load is successful. But, if the load fails, the log and
associated external load input files are moved to the /errors directory.
Monitoring the Files Sent by Q Capture for Transactions Containing Changes to CDE Tables
Let’s now look at the information in the file sender control tables corresponding to these files. The files
sent by Capture can be seen in IBMQREP_FILES_SENT. Issue the following query:
db2 +c -tvf selfilessent.sql
FILENAME STATUS LAST_MSG_TIME
-------------------------------------------- ------ --------------------------
TEAMS.BOURBON.T1.0000.000000000007d1d9.1.bin S 2020-03-26-14.43.33.152029
TEAMS.BOURBON.T1.0001.0000000000003199.1.bin S 2020-03-26-14.43.33.179903
TEAMS.BOURBON.T3.0000.000000000007d263.1.bin S 2020-03-26-14.43.33.179918
3 record(s) selected.
The status ‘S’ indicates that the files were sent. After Q Apply successfully receives the files and commits
the transaction at the target, it will send an Acknowledgment message back to Q Capture and the state
will move to ‘A’ for acknowledged, the file will then become eligible for deletion by Q Capture.
Note that we execute the monitor table query with +c (do not commit) because the previous delete
transaction was executed on the same connection, and we want to keep it in-inflight so we can observe
the state change.
We can verify that the files were received by selecting from the IBMQREP_FILES_RECEIVED table:
db2 "select TARGET_FILENAME,
status,
last_msg_time
from ASN.IBMQREP_FILES_RECEIVED
order by LAST_MSG_TIME ASC fetch first 10 rows only with UR"
--------------------------------------------------------------------------
-- selfilessent.sql: select files sent by Q Capture for CDE table changes
--------------------------------------------------------------------------
select substr(FILENAME, 27, 43) as filename,
STATUS,
LAST_MSG_TIME
from asn.IBMQREP_FILES_SENT
order by LAST_MSG_ID ASC fetch first 3 rows only;

57
You will observe that the file states are ‘R’ for received. Our transaction is being streamed by Q
Replication, it will be completed when the source either commits or rolls back. Let’s commit the
connection where we did the deletes at the source system in Oakland:
db2 commit
At the target in Dallas:
db2 "select monitor_time,
end2end_latency,
rows_applied,
STREAM_CHUNKS_APPLIED
from asn.IBMQREP_APPLYMON
where rows_applied > 0
order by monitor_time desc
fetch first 10 rows only with ur"
MONITOR_TIME END2END_LATENCY ROWS_APPLIED STREAM_CHUNKS_APPLIED
-------------------------- --------------- ------------ ---------------------
2020-03-30-16.30.00.838544 1494 8 2
2020-03-30-16.06.10.761530 950 16 2
For the latest interval with completed transactions (where rows_applied > 0) we see that the latency
was 1.494 second, and 8 rows were applied using 2 external table load files (stream_chunks_applied
being 2).
If we now look at the IBMQREP_FILES_SENT you will see that the status at the source becomes ‘A’ and
the files have been deleted.
If you look at the target in IBMQREP_FILES_RECEIVED you will see the status was changed to ‘D’ and the
files have also been deleted.
Monitoring the File Transfer Process
The File Sender and File Receiver Monitor Tables help understand the flow of data and troubleshoot any
issue with file transmission. Let's look at some important metrics:
----------------------------------------------------
-- selfilerecvmon.sql
----------------------------------------------------
select monitor_time, qdepth, mq_messages, files_completed, disk_usage
from ASN.IBMQREP_FILERECV_MON
--where mq_messages > 0
order by monitor_time desc
fetch first 10 rows only with UR;

58
14. Setting up Replication for the Reverse Direction
At this point, we have unidirectional replication active from our production server in Oakland to our
failover server in Dallas. Should a disaster occur, we could restart the application at the failover site with
minimal data loss, or no data loss if all messages could be sent from the source prior to the disaster. The
failover site then becomes the new production site.
With replicating in one direction only, from the Production to the DR site, failover is only for a complete
loss of the production site. Restoring the initial production system after a disaster requires rebuilding
the production site and its database from the ground up, recopying all the data.
But not all outages are unrecoverable disasters; we want the ability to failover for the duration of
controlled outage of the production system and fallback after the production system is available again,
without requiring a full refresh of the data. To achieve this goal, we must setup and activate replication
in the reverse direction before using the failover site for running workloads.
Setting up the reverse direction is much faster and simpler because we already have addressed all
database prerequisites, installed Q Replication and created its control tables at both sites, and the data
is already loaded. We only need to create MQ objects and replication subscriptions and activate them.
Using ‘Multi-Uni’ or ‘Bi-Di’ Replication Q Replication Configuration?
For achieving Continuous Availability with Active-Active Db2 systems, we recommend the so called
‘multi-uni-directional’ Q Replication configuration, which consists of unidirectional replication
established in each direction, rather than the so-called ‘bi-directional’ configuration. With multi-uni it is
easier to independently start and stop replication in each direction, whereas in bi-di mode, starting a
subscription automatically starts it in both directions and always assume one site is the master for
conflict resolution.
In the configuration we recommend, each site is alternatively the production server and defined as a
master; we setup replication one leg at a time and rely on the replication user ID to avoid recursive
replication (i.e., preventing changes applied at the target from being replicated back to the source).
What is Different when Setting Replication for the Reverse Direction?
The differences for replication in the reverse direction compared to the forward direction are:
1. Preventing Recursive Replication: An entry must be added to the IBMQREP_ IGNTRAN table
with the Q Apply user id so that changes made by Q Apply are not replicated back to the system
from where they came. We will have to add this on both systems for each direction
2. Not Using Initial Load: subscriptions must be created with NO LOAD PHASE, because the tables
are already complete at both sites
----------------------------------------------------
-- selfilesendmon.sql
----------------------------------------------------
select monitor_time, qdxmitqdepth, mq_messages, files_completed,
files_bytes_sent
from ASN.IBMQREP_FILESENMD_MON
-- where mq_messages > 0
order by monitor_time desc
fetch first 10 rows only with UR;

59
3. Making Sure All Tables, Including New Ones are Subscribed: You can create the table
subscriptions using an ASNCLP script as was illustrated in section, '11.Creating Subscriptions for
Selected tables, Automatically Creating Those Not Existing at the Target', -- making sure to
specify
HAS LOAD PHASE N on the CREATE QSUB commands.
Alternatively, you can create a SCHEMA subscription right before a failover takes place. This
ensures that any CREATE TABLE that was replicated since the last site switch is subscribed for
the reverse direction. Subscriptions are created for all tables every time a schema subscription
is created using ASNCLP with the ALL option. We will illustrate the schema subscription
method.
Creating the MQ Objects for the Reverse Replication: from Failover to Production
The scripts are almost identical, except that target and source are now reversed. We use ‘B2A’ instead
of ‘A2B’ as prefix for the queue and channel names. We also use ‘B2A’ for the name of the QMAP. Each
Capture or Apply can have its own dedicated queue manager for workload isolation and scalability, but
it is generally not necessary. A single queue manager per system is adequate because the replication
workload flows in only one direction most of the time: from the site currently running production to the
failover site, so we simply define new queues on the queue managers created for the forward direction.
The updated scripts do not need to create a MQ listener, because only one listener per queue manager
is required.
Creating the MQ Objects at SITE B for Replication from Failover (B) to Production (A)
In Dallas (the source for reverse direction replication), cut and paste the following commands into a file
called createmq.B.reverse.txt and run it:
runmqsc QMGR2 < createmq.B.reverse.txt

60
Creating the MQ Objects at SITE A for Reverse Direction from Failover (B) to Production (A)
At oakland (the target for reverse direction replication), cut and paste the following commands into a
file called createmq.B.reverse.txt and run it with the following command:
runmqsc QMGR1 < createmq.B.reverse.txt
*************************************************************
* File: createmq.B.reverse.txt - RUN ON SITE B with runqmsc QMGR2
* SOURCE (SITE B) 'dallas' - QMGR2
* TARGET (SITE A) 'oakland' - QMGR1
*************************************************************
* Q Capture RESTART queue - Local Queue (One per Capture instance)
*************************************************************
define qlocal('B.RESTARTQ') MAXDEPTH(1) REPLACE
* Q Capture TRANSACTION SEND queues and channel - B2A Direction
*************************************************************
define qremote(B2A.SENDQ.1) rname('B2A.RECVQ') RQMNAME(QMGR1) XMITQ('B2A.XMITQ.1')
REPLACE
define qlocal('B2A.XMITQ.1') USAGE(XMITQ) DEFPSIST(YES) MAXMSGL(4914304)
MAXDEPTH(9999999) REPLACE
define channel('B2A.SENDQCH.1') CHLTYPE(SDR) TRPTYPE(TCP) XMITQ('B2A.XMITQ.1')
CONNAME('ditto11.svl.ibm.com(1414)') DISCINT(0) CONVERT(NO) MAXMSGL(4914304)
REPLACE
start channel ('B2A.SENDQCH.1')
* Q Capture ADMIN RECEIVE queue and its receiver channel
*************************************************************
define qlocal ('B.ADMINQ') REPLACE
define channel('B2A.ADMINQCH') CHLTYPE(RCVR) TRPTYPE(TCP) REPLACE
start channel ('B2A.ADMINQCH')
* Q Capture FILE TRANSFER SEND queues and channel - B2A Direction
*************************************************************
define qremote('B2A.FSQ.1') RNAME('B2A.FRQ.1') RQMNAME(QMGR1) XMITQ('B2A.FXMITQ.1')
REPLACE
define qlocal ('B2A.FXMITQ.1') usage(XMITQ) maxdepth(99999999) maxmsgl(104857600)
NPMCLASS(HIGH) REPLACE
define channel('B2A.FSQCH.1') CHLTYPE(SDR) TRPTYPE(TCP)
CONNAME('ditto11.svl.ibm.com(1414)') XMITQ('B2A.FXMITQ.1') NPMSPEED(NORMAL) REPLACE
start channel ('B2A.FSQCH.1')
* Q Capture FILE TRANSFER ACK RECEIVE queue - Local Queue
*************************************************************
define qlocal(B.FACKQ) put(enabled) get(enabled) share NPMCLASS(HIGH) REPLACE
define channel ('B2A.FACKQCH') CHLTYPE(RCVR) TRPTYPE(TCP) NPMSPEED(NORMAL) REPLACE
start channel ('B2A.FACKQCH')

61
(If Not Already Done) Creating the File system for Supplemental Log Files Generated by Db2 for
CDE Tables
Refer to Section 3. (At the source) Creating a Shared File system for Supplemental Logging on CDE tables
for instructions if you have not already created the file systems on both servers.
You can use the same file system both for the source Db2 supplemental log files and for Q Apply to
receive them from the remote system. Q Apply creates a sub-directory in the file system, so there can
be no conflicts.
*************************************************************
* File: createmq.A.reverse.txt – RUN ON SITE A with runmqsc QMGR1
* SOURCE (SITE B) 'dallas' - QMGR2
* TARGET (SITE A) 'oakland' - QMGR1
*************************************************************
* Q Apply TRANSACTION RECEIVE queues and channels
*************************************************************
define qlocal('B2A.RECVQ') put(enabled) get(enabled) defsopt(shared)
maxdepth(500000) maxmsgl(4914304) REPLACE
define channel('B2A.SENDQCH.1') chltype(RCVR) TRPTYPE(TCP) maxmsgl(4914304) REPLACE
start channel('B2A.SENDQCH.1')
* Q Apply ADMIN queue and its sender channel
*************************************************************
define qremote('B2A.ADMINQ') RNAME('B.ADMINQ') RQMNAME('QMGR2')
XMITQ('B2A.ADMINXMITQ') REPLACE
define qlocal ('B2A.ADMINXMITQ') usage(XMITQ) DEFPSIST(YES) maxdepth(1000)
maxmsgl(50000) REPLACE
define channel('B2A.ADMINQCH') chltype(SDR) TRPTYPE(TCP) XMITQ('B2A.ADMINXMITQ')
CONNAME('ditto12.svl.ibm.com (1414)') CONVERT(NO) MAXMSGL(4914304) REPLACE
start channel ('B2A.ADMINQCH')
* Model for local queues dynamically created and used for holding changes
* during the initial load of a table
*************************************************************
DEFINE QMODEL('IBMQREP.SPILL.MODELQ') DEFSOPT(SHARED) MAXDEPTH(900000)
MSGDLVSQ(FIFO) DEFTYPE(PERMDYN) MAXMSGL(4914304) REPLACE
* Q Apply FILE TRANSFER RECEIVE queues and channel - B2A Direction
*************************************************************
define qlocal ('B2A.FRQ.1') MAXDEPTH(999999999) DEFPSIST(NO) MAXMSGL(104857600)
NPMCLASS(HIGH) REPLACE
define channel('B2A.FSQCH.1') CHLTYPE(RCVR) TRPTYPE(TCP) MAXMSGL(104857600)
NPMSPEED(NORMAL) REPLACE
start channel ('B2A.FSQCH.1')
* Q Apply FILE TRANSFER SEND ACK messages
*************************************************************
define qremote('B2A.FACKQ') RNAME('B.FACKQ') RQMNAME('QMGR2')
XMITQ('B2A.FACKXMITQ') REPLACE
define qlocal ('B2A.FACKXMITQ') USAGE(XMITQ) DEFPSIST(YES) MAXDEPTH(999999999)
NPMCLASS(HIGH) REPLACE
define channel('B2A.FACKQCH') CHLTYPE(SDR) TRPTYPE(TCP)
CONNAME('ditto12.svl.ibm.com(1414)') XMITQ('B2A.FACKXMITQ') NPMSPEED(NORMAL)
REPLACE

62
(If Not Already Done) Configuring the Source Database for Replication
We did these steps on the production database when establishing the forward replication. Now that the
failover is also a source for replication, we need to make sure the database configuration is properly set
for capturing transactions from the Db2 logs.
If not already done, execute the script that was created in section 4. (At the source) Enabling Db2
Supplemental Logging on CDE Tables (DATA CAPTURE CHANGES), which sets the database configuration
parameter LOGARCHMETH1 for all partitions and enables supplemental logging for CDE tables:
db2 -tvf setdbcfg.sql
Verify the Db2 environment variables for replication and set if needed:
(If Not Already Done) Enabling DATA CAPTURE CHANGES on all Tables
Verify that all tables at the failover that we want to replicate back have DATA CAPTURE CHANGES:
$ db2 "select substr(tabname,1,18) as tabname, DATACAPTURE from SYSCAT.TABLES
where TABSCHEMA in ('BOURBON','SPORTS')"
TABSCHEMA TABNAME DATACAPTURE
---------- ------------------ -----------
BOURBON T1 Y
BOURBON T2 Y
BOURBON T3 Y
SPORTS T4 N
4 record(s) selected.
Alter tables for DATA CAPTURE CHANGES if needed.
db2 "alter table SPORTS.T4 DATA CAPTURE CHANGES"
Ensure that the database is configured with DATA CAPTURE CHANGES, so that all future tables will be
enabled for replication. This is needed only because we will be creating a schema subscription to
replicate create/drop tables in the reverse direction, otherwise it is not needed because when you
create a subscription with ASNCLP CREATE QSUB, ASNCLP automatically sets DATA CAPTURE CHANGES,
if needed.
db2set DB2_CDE_DCC=YES
db2set DB2_DCC_FILE_PATH=/shared/db2suplog/
db2set DB2_DCC_BINARY_FILE=N
db2set DB2_DCC_FILE_INS_THRES=10
db2set DB2_DCC_FILE_DEL_THRES=1
db2set DB2_DCC_FILE_CHUNKSZ=100000000
db2 update db cfg for TEAMS using DFT_SCHEMAS_DCC YES
db2 alter schema SPORTS DATA CAPTURE CHANGES

63
Configure the Q Capture Programs to Ignore any Transaction issued by the Q Apply USER ID
We are updating the IGNTRAN table to specify the Q Apply USER ID:
db2 connect to DALDB
db2 "insert into ASN.IBMQREP_IGNTRAN (AUTHID) values('REPLUSER')"
db2 connect to OAKDB
db2 "insert into ASN.IBMQREP_IGNTRAN (AUTHID) values ('REPLUSER')"
ATTENTION: The username will be FOLDED TO UPPERCASE. If you enter ‘repluser’, the transactions
will not be ignored, and you will have recursive replication.
Any Db2 transaction issued by the user, ‘repluser’ will be ignored by the Q Capture program. This
requires restarting or issue a REINIT command to Q Capture if it is already running. On oakland, the
source system:
asnqccmd TEAMS REINIT
Starting Q Capture and Q Apply for Reverse Replication
We don’t have any subscriptions defined for the reverse direction yet, but we can start the replication
programs. You can start/stop/restart the replication programs in any order and at any time and add
subscriptions even when they are not running, because the subscription information is recorded in the
Db2 recovery log and the Q Replication control tables. We decide to start both programs now:
At site B in Dallas:
asnqcap TEAMS capture_schema=ASN logstdout=Y &
At site A in Oakland:
asnqapp TEAMS apply_schema=ASN logstdout=Y &
Creating the Subscriptions to All Tables for Replication from Failover (B) to Production (A)
Replication is already running from A to B, keeping B synchronized with the source.
Because we had defined and activated a schema subscription from A to B, whenever a new table was
created on site A, it was also created by Q Replication at site B. However, when a table is created by Q
Apply, it is not automatically subscribed for replication in the reverse direction.
We must ensure that all tables at site B are subscribed for the reverse direction before we start the
workload on the failover site. We will use a schema subscription with the CREATE ALL option to create
any subscription that may be missing.
Creating the QMAP for Replication from Failover (B) to Production (A)
Note that source and target are now reversed in the script. Run with:
asnclp -f createB2Aqmap.clp

64
Verify the that the file senders and receivers were properly created, by running queries against the
IBMQREP_FILE_SENDERS and IBMQREP_FILE_RECEIVERS tables:
db2 connect to DALDB
$ db2 -tvf selfilesenders.sql
select substr(qmapname,1,5) as qmapname, substr(FILESEND_PATH, 1,25) as
filesend_path, substr(filesend_queue,1,15) as filesend_queue,
substr(filesend_ack_queue,1,15) as filesend_ack_queue from
asn.IBMQREP_FILE_SENDERS
QMAPNAME FILESEND_PATH FILESEND_QUEUE FILESEND_ACK_QUEUE
-------- ------------------------- --------------- ------------------
B2A /shared/db2suplogs/ B2A.FSQ.1 B.FACKQ
1 record(s) selected.
Using a Schema Subscription for Creating Subscriptions for All Existing Tables
When you activate a schema-level subscription using the ASNCLP command START SCHEMASUB <sub-
name> ALL, ASNCLP automatically creates subscriptions for all existing tables for the schema that have
DATA CAPTURE CHANGES.
Before activating the schema subscription, first modify the schema subscription profile to turn off LOAD
PHASE.
db2 connect to DALDB
db2 "update ASN.IBMQREP_SUBS_PROF set HAS_LOADPHASE='N'"
Copy the lines below into a file named createschemasub.B2A.clp, and run with:
#
# File: createB2Aqmap.clp
#
# Creating a QMAP that includes File Transfer queues from B to A
#
ASNCLP SESSION SET TO Q REPLICATION;
# SET RUN SCRIPT LATER;
SET RUN SCRIPT NOW STOP ON SQL ERROR ON;
SET PWDFILE "/nfsshare/home/repluser/asnpwd.aut"
SET SERVER CAPTURE TO DBALIAS DALDB;
SET CAPTURE SCHEMA SOURCE ASN;
SET SERVER TARGET TO DBALIAS OAKDB;
SET APPLY SCHEMA ASN;
SET QMANAGER "QMGR2" FOR CAPTURE SCHEMA;
SET QMANAGER "QMGR1" FOR APPLY SCHEMA;
#DROP REPLQMAP B2A
CREATE REPLQMAP B2A USING ADMINQ "B2A.ADMINQ" RECVQ "B2A.RECVQ" SENDQ
"B2A.SENDQ.1" HAS FILE TRANSFER Y;
CREATE FILETRANS FOR REPLQMAP B2A USING ACKQ "B2A.FACKQ" FILE RECVQ
"B2A.FRQ.1" FILE SENDQ "B2A.FSENDQ.1" RECV PATH "/nfsshare/db2suplogs/repl"
SEND PATH "/nfsshare/db2suplogs/db2";

65
asnclp -f createschemasub.B2A.clp
See the paper, "Continuous availability and disaster recovery using Q Replication – Best practices for
application upgrades with DDL changes" for considerations on schema subscriptions and handling
application upgrades with schema changes in an Active-Active configuration that is maintained using Q
Replication technology at: https://www.ibm.com/support/pages/node/1285564
When processing the CREATE SCHEMASUB command, ASNCLP inserts a schema subscription definition
into IBMQREP_SCHEMASUBS with an initial state of ‘N’, and for each table that has DATA CAPTURE
CHANGES under the matching schema, it also creates a subscription with an initial state of 'N' (for New).
Verify the subscriptions were created:
db2 connect to DALDB
db2 "select
substr(subname,1,8)as subname,
substr(source_owner,1,8) as schema,
substr(source_name,1,10) as tablename,
substr(sendq,1,12) as sendq,
state,
has_loadphase
from asn.IBMQREP_SUBS"
SUBNAME SCHEMA TABLENAME SENDQ STATE HAS_LOADPHASE
-------- -------- ---------- ------------ ----- -------------
T20001 BOURBON T2 B2A.SENDQ.1 N N
T30001 BOURBON T3 B2A.SENDQ.1 N N
T40001 SPORTS T4 B2A.SENDQ.1 N N
T10001 BOURBON T1 B2A.SENDQ.1 N N
4 record(s) selected.
#
# Create a SCHEMA subscription for B2A
#
ASNCLP SESSION SET TO Q REPLICATION;
SET RUN SCRIPT NOW STOP ON SQL ERROR OFF;
#SET RUN LATER;
SET PWDFILE "/nfsshare/home/repluser/asnpwd.aut"
SET SERVER CAPTURE TO DB DALDB;
SET SERVER TARGET TO DB OAKDB;
SET CAPTURE SCHEMA SOURCE ASN;
SET APPLY SCHEMA ASN;
#STOP SCHEMASUB schemasub2 ALL;
#DROP SCHEMASUB schemasub2 ALL;
#CREATE SCHEMASUB schemasub2 SUBTYPE U REPLQMAP B2A FOR TABLES OWNER LIKE
SPORTS;
CREATE SCHEMASUB schemasub2 SUBTYPE U REPLQMAP B2A FOR TABLES ALL;
#START SCHEMASUB schemasub2 ALL;

66
The subscriptions to our existing four tables were successfully created, they are not active because we
have not yet activated the schema subscription. Uncomment the START SCHEMASUB command in the
script above, comment out CREATE SCHEMASUB and rerun the script:
asnclp -f createschemasub.B2A.clp
When processing the START SCHEMASUB command, ASNCLP inserts a row with a START_SCHEMASUB
and a row with a CAPSTART command for each qualifying table into the IBMQREP_SIGNAL table, .
When Q Capture reads the log records for these inserts, it activates the schema subscription and starts
the activation process for the table subscriptions. It is because signal commands are recorded in the Db2
recovery logs that subscription activation can be done while the Q Capture program is stopped; when
re-started, Capture reads the log records and performs the actions.
Let’s verify that all our subscriptions are active. This time we check at the target side:
$ db2 connect to OAKDB
$ db2 -tvf seltargets.sql
select substr(subname,1,8)as subname, substr(recvq,1,10) as recvq,
substr(target_owner,1,8) as owner, substr(target_name,1,10) as
tablename, has_loadphase, state from asn.ibmqrep_targets
SUBNAME RECVQ OWNER TABLENAME HAS_LOADPHASE STATE
-------- ---------- -------- ---------- ------------- -----
T20001 B2A.RECVQ BOURBON T2 N A
T30001 B2A.RECVQ BOURBON T3 N A
T40001 B2A.RECVQ SPORTS T4 N A
T10001 B2A.RECVQ BOURBON T1 N A
4 record(s) selected.
At this point, replication is running in both directions for all tables, but no workload is running at site B.
If new tables are created on the production site before the next site switch, they will be created at the
failover server, but will not be subscribed for replication in the reverse direction. That’s because table
subscriptions are created by ASNCLP only when you create the schema subscription (with the ALL
keyword). To guarantee no table subscription is missing for the reverse direction when you do a site
switch, we will re-create the schema as part of the site switch operation, right before the workload is
failed over. If you know that no new tables are created, this step will be unnecessary.
We are ready to do our first site switch!
15. Performing an Application Site Switch
Now that replication is configured and running in both directions. Let’s run a workload on the
production site, we will verify that it is fully replicated, then move the workload to the failover site, run
it for a while, and move it back onto the production site.
#CREATE SCHEMASUB schemasub2 SUBTYPE U REPLQMAP B2A FOR TABLES ALL;
START SCHEMASUB schemasub2 ALL;

67
To illustrate the impact of application upgrades, we will be issuing DDL operations and a CREATE TABLE
that will be automatically replicated to site B. We will ensure the table is subscribed for the reverse
direction as part of the site switch procedure.
Copy the following lines a file called ‘workload.sh’:
At the production site in Oakland, run the workload:
oakland$ chmod +x workload.sh
oakland$ workload.sh
We now also simulate doing maintenance on the production site; a new table is added and altered:
db2 connect to OAKDB
db2 -tvf createT5.sql
The new table, ‘T5’ should now have been created on the target system. Let’s verify:
$ db2 connect to daldb
db2 list tables for schema SPORTS
$ db2 list tables for schema sports
Table/View Schema Type Creation time
------------------------------- --------------- ----- -------------------------
T4 SPORTS T 2020-03-25-5.47.52.784923
T5 SPORTS T 2020-04-07-5.22.40.844677
2 record(s) selected.
#!/bin/ksh
db2 connect to OAKDB
while [ 1 ]
do
db2 delete from T1
db2 +c "insert into T1 (select * from T3)"
db2 commit
sleep 30
done
------------------------------------------------------------------
-- createT5.sql
------------------------------------------------------------------
connect to OAKDB;
create table SPORTS.T5 (col1 int not null primary key) distribute by
random organize by row;
alter table SPORTS.T5 add column col2 int;
alter table SPORTS.T5 alter column col2 set not null;
alter table SPORTS.T5 alter column col2 set data type char(10);
reorg table SPORTS.T5;
insert into SPORTS.T5 values(1,'I am New!');
insert into SPORTS.T5 values(2,'I am New2!');
68
We further verify that the table is identical to the source table by doing a Db2 DESCRIBE:
db2 connect to DALDB
db2 describe table SPORTS.T5
Data type Column
Column name schema Data type name Length Scale Nulls
------------------------- --------- ------------------- ---------- ----- ------
COL1 SYSIBM INTEGER 4 0 No
COL2 SYSIBM CHARACTER 10 0 No
2 record(s) selected.
db2 select \* from sports.t5
COL1 COL2
----------- ----------
1 I am New!
2 I am New2!
2 record(s) selected.
The workload has now been running for some time on the production site. Let’s do the site switch. We
will stop replication after data is applied to the target, and re-start the workload on site B.
The entire switch process, even for large production systems where external load balancers many need
to be modified to reroute connections, can normally be done in less than one minute, which is the
maximum end user application impact, generally affecting only a small subset of users. During a site
switch, there is a short period during which applications may be unable to connect or lose their
connection and must reconnect. In general, the routing procedure for site switch is: 1) disallow new
connections, 2) terminate existing connections after a timeout period, e.g., 15 seconds, giving enough
time for a majority to complete, 3) redirecting routing to the failover site, and 4) re-allowing
connections.
You can stop/start replication in any direction at any time. For example, if you are replicating from A->B
where B is read-only, you may want to restart replication from B->A only after you switch over a
production workload to B. When replication is re-started, it picks up from where it left so there is no
need to let it run all the time, but enough disk space must be available for staging all the changes that
take place while replication is not running. Should Db2 run out of space for writing supplemental log
data, you would have to restart the subscriptions for the affected tables, which will reload those tables
at the target.
Graceful Site Switch Procedure
A ‘graceful’ site switch ensures that the data at the failover site is complete and transaction-consistent
before the workload is restarted on that site. A graceful switch allows zero-downtime upgrades as
illustrated in Figure 6 - Eliminating Outages for Maintenance with an Active-Active Configuration.
Zero downtime maintenance with failover and fallback can be done as follows:
1. Stop the workload on the production site.
2. Ensure all transactions from the workload are applied at the failover site, by stopping replication
with the ‘after data applied’ option.

69
3. Restart the workload at the failover site -- and run it for as long as desired.
a. (Optionally) Run a script at Site B to fixup sequence restart values
b. (Optionally) Start a schema subscription to guarantee that all tables are subscribed for
the reverse direction or write a script to identify and create missing subscriptions.
c. Start the workload
4. Do the maintenance on the production site.
5. Restart replication (reverse direction) to resynchronize the original production site
6. Switch the workload back to the original production site, ensuring all transactions are applied
7. (Optionally) Upgrade the failover site
8. Restart replication (forward direction) to resynchronize the failover site
Figure 9 - Eliminating Outages for Maintenance with an Active-Active Configuration
1. Stop the Application at the Production Site A
We will take a timestamp to later measure the total outage for performing this site switch:
At the site in Oakland. Stop the workload by cancelling the shell script:
$ date
Tue Feb 25 17:53:03 PST 2020
$ [Control] C workload.sh
2.Stop Replication with stopafter=data_applied
On the production site in Oakland:
asnqccmd TEAMS CAPTUREUPTO=EOL STOPAFTER=DATA_APPLIED
3.Start the Workload at Site B
We first run any scripts that may be needed to adjust the target database for replication.
(If needed) Adjust Db2 Sequence Object RESTART Values
If you have defined your sequence objects to generate non-overlapping values among site sites, for
example odd values at site A and even values at site B, then this step is not needed.
70
Usage of sequence objects is application dependent, without application knowledge, we can only ensure
that values dispensed at the source are not dispensed again at the target. If the source is available,
which it is during a graceful switch, you can select the max value from the source database Db2 catalog:
db2 connect to OAKDB;
db2 "select substr(seqschema,1,10) as seqschema,
substr(seqname,1,10) as seqname,
datatypeid,
precision,
LASTASSIGNEDVAL,
INCREMENT
from SYSIBM.SYSSEQUENCES
where definer = 'REPLUSER' and
seqtype = 'S'"
SEQSCHEMA SEQNAME DATATYPEID PRECISION LASTASSIGNEDVAL INCREMENT
---------- ---------- ----------- --------- ------------------- -----------------
REPLUSER S1 16 13 138. 2.
1 record(s) selected.
The last assigned value on site A for sequence S1 was 138.0, we also see that the increment is positive
value 2, which means the sequence intends to generate even numbers. We must alter the sequence
object to generate values greater than 138, while preserving the increment, at least the value 140 in this
case. If the increment were -2, you would set the next value to 136.
If the source database is not reachable, then you can only reset the sequence number to an arbitrary
value that you know will be greater than the maximum ever used at the source, based on knowledge of
the applications using the sequence.
See Appendix E. Resetting Identity Columns and Sequence Objects for more details.
(If needed) Ensure that all New Tables are Subscribed for the Reverse Direction
This is needed if new tables have been created since the last site switch.
You can recreate and activate the schema subscription to subscribe all tables for the reverse direction.
Currently, a caveat in using ASNCLP to create a schema subscription with the ALL option is that it creates
subscriptions to all tables in the schema, even if some tables are already subscribed. You end up with
duplicate subscriptions. Therefore, for using this method, you must first DROP the SCHEMASUB, which
drops all table subscriptions, and then re-create the SCHEMASUB. When 1000s of tables are replicated,
and you have only a handful of new tables, this is a rather heavy-handed approach. But, it works.

71
An alternative is to write a script to identify missing subscriptions by selecting from IBMQREP_SUB table.
A subscription should be created for any table that is required by the application but does not have a
subscription defined in IBMQREP_SUBS.
Start the workload
In Dallas, restart the workload:
workload.sh
$ date
Tue Feb 25 17:54:40 PST 2020
As you can see, the total application down time for the site switch was 1 minute and 37 seconds,
somewhat slow because we did all operations manually. In general, even for full-size production
systems, a site switch can be completed in less than a minute.
Site B in Dallas is now your main production site for the selected workload, and site A in Oakland is the
hot failover site. As an exercise, you can verify that your data is properly replicated back to oakland.
#
# createschemasub.B2A.4all.clp: Use a SCHEMASUB to ensure all tables
# are replicated
#
# run this file with: snclp -f createschemasub.B2A.4all.clp
#
ASNCLP SESSION SET TO Q REPLICATION;
SET RUN SCRIPT NOW STOP ON SQL ERROR OFF;
#SET RUN LATER;
SET PWDFILE "/home/repluser/asnpwd.aut";
SET SERVER CAPTURE TO DBALIAS DALDB;
SET CAPTURE SCHEMA SOURCE ASN;
SET SERVER TARGET TO DBALIAS OAKDB;
SET APPLY SCHEMA ASN;
# Destroy all existing subscriptions from B to A
STOP SCHEMASUB schemasub2 FOR TABLES ALL;
DROP SCHEMASUB schemasub2 ALL;
# Re-subscribe to all the tables. Note there is no load phase, so this is
# only re-creating the meta-data and triggering the initialization protocol
# between Capture and Apply for all tables under the schema
CREATE SCHEMASUB schemasub2 SUBTYPE U REPLQMAP B2A FOR TABLES OWNER LIKE REPLUSER;
START SCHEMASUB schemasub2 ALL;
-- selsubs.sql: select replication subscriptions from IBMQREP_SUBS table
-- run this file with: db2 -tvf selsubs.sql
select
substr(subname,1,8)as subname,
substr(source_owner,1,8) as schema,
substr(source_name,1,10) as tablename,
substr(sendq,1,12) as sendq,
state,
has_loadphase
from asn.IBMQREP_SUBS;
72
4.Switching Back the Application to the Original Production Site
Now that you have completed your maintenance on the original production site and have been running
at the failover site for a while, which is effectively the "current production site", it may be time to switch
the workload back to the original production site, perhaps because it provides proximity to the majority
of your users.
In Dallas, which is the current production site, stop the workload, and replication with the option to stop
after all data is replicated:
[Control] C workload.sh
asnqccmd TEAMS CAPTUREUPTO=EOL STOPAFTER=DATA_APPLIED
After Q Capture has stopped, restart the workload in Oakland:
workload.sh
You can restart Q Capture for the reverse direction now or at any time before you decide to switch the
workload again to Dallas.
At the Dallas site:
asnqcap TEAMS logstdout=Y

73
Appendix A. Downloading and Installing IBM MQ
Download WebSphere MQ 9.1 from Passport Advantage, at:
https://www.ibm.com/support/knowledgecenter/SSFKSJ_9.1.0/com.ibm.mq.ins.doc/q008250_.htm
You might need to create an IBM user ID.
Select MQ 9.1.0 for Linux on x86 64-bit and download using Secure FTP, ‘ ftps’. You will obtain a user ID
and password from which to download.
For the system where you need to install MQ, such as "oakland", use Secure FTP to retrieve the files:
oakland> sftp userid@hostname
oakland> sftp> mget *
We download the Long Term Support (LTS) release from
http://www.ibm.com/developerworks/downloads/ws/wmq/ . You might need to register at the site to
obtain a user ID.
Please note that the following commands are for a Linux system. For installing on other operating
systems, refer to "Installing and uninstalling IBM MQ" in the above link in the IBM Knowledge Center.
Unzip the package by running the following command:
gzip –d CZJ3ZML.tar.gz 3.
Untar the tar file by running the following command
tar xvf CZJ3ZML.tar 4.
Accept the license:
mqlicense.sh -accept 5.
Run the rpm installer to install WebSphere MQ 7.0.1.3 on the first member (as root):
rpm -ivh MQSeriesRuntime-7.0.1-3.x86_64.rpm MQSeriesServer-7.0.13.x86_64.rpm
MQSeriesSamples-7.0.1-3.x86_64.rpm

74
Appendix B. Setting up SSL for Db2 connections
Refer to the following link for step-by-step instructions:
https://www.ibm.com/developerworks/data/library/techarticle/dm-1306securesocketlayers/
Repeat the following setsup for each direction.
Db2 Server side
Make sure gskit is in the LD_LIBRARY_PATH and PATH environment variables.
$ echo $LD_LIBRARY_PATH
/nfsshare/home/db2inst1/sqllib/lib64:/nfsshare/home/db2inst1/sqllib/lib64/gskit:/nfsshare/home/db2i
nst1/sqllib/lib32
$ echo $PATH
/usr/lib64/qt-
3.3/bin:/usr/local/bin:/bin:/usr/bin:/usr/local/sbin:/usr/sbin:/nfsshare/home/db2inst1/sqllib/bin:/nfssh
are/home/db2inst1/sqllib/adm:/nfsshare/home/db2inst1/sqllib/misc:/nfsshare/home/db2inst1/sqllib/g
skit/bin:/nfsshare/home/db2inst1/sqllib/db2tss/bin
Make a separate directory SSL under instance home directory to keep all SSL files separately:
/nfsshare/home/db2inst1> mkdir SSL
/nfsshare/home/db2inst1> cd SSL
Create a server key database and set up digital certificates:
gsk8capicmd_64 -keydb -create -db "key.kdb" -pw "ibm123456" -stash
gsk8capicmd_64 -cert -create -db "key.kdb" -pw "ibm123456" -label "SSLLabel" -dn
"CN=oakland1.svl.ibm.com,O=IBM,OU=Analytics,L=Oakland,ST=CA,C=USA"
gsk8capicmd_64 -cert -extract -db "key.kdb" -pw "ibm123456" -label "SSLLabel" -target "key.arm" -
format ascii -fips
db2 update dbm cfg using SSL_SVR_KEYDB /nfsshare/home/db2inst1/SSL/key.kdb
db2 update dbm cfg using SSL_SVR_STASH /nfsshare/home/db2inst1/SSL/key.sth
db2 update dbm cfg using SSL_SVR_LABEL SSLLabel
db2 update dbm cfg using SSL_SVCENAME 50602
db2set DB2COMM=SSL,TCPIP
db2stop force
db2start
Db2 Client Side
Make a separate directory SSL under instance home directory to keep all SSL files separately
/nfsshare/home/db2inst1> mkdir SSL
/nfsshare/home/db2inst1> cd SSL
FTP the key.arm from the server and place it in the client inside /nfsshare/home/db2inst1/SSL.
gsk8capicmd_64 -keydb -create -db "keyclient.kdb" -pw "ibm654321" -stash
gsk8capicmd_64 -cert -add -db "keyclient.kdb" -pw "ibm654321" -label "SSLLableClt" -file key.arm -
format ascii -fips
db2 update dbm cfg using SSL_CLNT_KEYDB /nfsshare/home/db2inst1/SSL/keyclient.kdb
75
db2 update dbm cfg using SSL_CLNT_STASH /nfsshare/home/db2inst1/SSL/keyclient.sth
db2 catalog tcpip node oakland remote oakland1.svl.ibm.com server 50602 security ssl
db2 catalog db TEAMS as OAKDB at node oakland
db2 catalog db TEAMS as DALDB
db2 terminate

76
Appendix C. Cron Job to Garbage Collect Db2 Supplemental Log Files
The following script sketches a possible approach for deletion of the Db2 supplemental log files when
they are no longer needed. This is to be used if turning off automatic garbage collection by Q Capture
by starting with XF_DEL_FILE=N. Adapt it for your environment. Invoke as: pruneDCCFiles.sh
#!/bin/bash -l
###########################################################################################
# pruneDCCFiles.sh: Delete Supplemental Log files in DB2_DCC_FILE_PATH older than n minutes
###########################################################################################
# Arguments:
# -t = Retention Time in minutes. Will delete files older than this value.
# Default is 720 minutes (12 hours)
# -d = Delete files. If not specified, only returns the list of files eligible for deletion
# Examples:
# pruneDCCFiles.sh Returns the list of ET files older than 720 minutes
# pruneDCCFiles.sh -t 60; Returns the list of ET files older than 60 minutes
# pruneDCCFiles.sh -t 120 -d DELETES ET files older than 120 minutes
TIME=720
DEL_FILES=0
while getopts "t:d" opt; do
case ${opt} in
t )
TIME=${OPTARG}
;;
d )
DEL_FILES=1
;;
\? )
echo "Usage delete [-t] [-d]"
echo "Example: prune-et-files.sh -t 720 -d"
exit 1
;;
esac
done
# Get the DB2_DCC_FILE_PATH from db2set variable. This is where db2 writes ET files
# for CDE tables with DATA CAPTURE CHANGES when DC2_CDE_DCC=YES
DCCPATH=`db2set DB2_DCC_FILE_PATH | cut -d '=' -f 2`
if [ $DEL_FILES = 0 ]
then
# Dry run. IF no -d flag is passed, will only list files to be deleted
find $DCCPATH -type f \( -name "BLUDB.*.bin" -o -name "BLUDB.*.txt" \) -mmin +$TIME -
exec echo {} \;
echo "Invoke with -d to delete the files"
else
# Get file count and disk usage before deleting files
COUNT_FILES_BEFORE=`ls $DCCPATH | wc -l`
DISK_USAGE_BEFORE=`du $DCCPATH | cut -d $'\t' -f 1`
# Delete files matching pattern BLUDB.*.bin or BLUDB.*.txt
find $DCCPATH -type f \( -name "BLUDB.*.bin" -o -name "BLUDB.*.txt" \) -mmin +$TIME -
exec rm {} \;
# Get file count after deleting files to find how many files were deleted
COUNT_FILES_AFTER=`ls $DCCPATH | wc -l`
FILES_DIFFERENCE=$(($COUNT_FILES_BEFORE - $COUNT_FILES_AFTER))
echo "Deleted $FILES_DIFFERENCE files"
# Get disk usage after deleting files to find how much space was freed
DISK_USAGE_AFTER=`du $DCCPATH | cut -d $'\t' -f 1`
DISK_SPACE_FREED=`echo "scale=2; ($DISK_USAGE_BEFORE - $DISK_USAGE_AFTER)/1048576" |
bc`
echo "Freed $DISK_SPACE_FREED GB in disk space"
df -h $DCCPATH
fi

77
Appendix D - Q Replication Control Tables for Replicating CDE Changes
When replicated transactions include changes to CDE tables, Q Replication collects supplemental log
files produced by Db2 for CDE tables with CHANGE DATA CAPTURE and transports them using a FILE
TRANSFER queue.
Existing Q Replication control tables for a consistency group, aka ‘QMAP’, namely the
IBMQREP_SENDQUEUS and IBMQREP_RECVQUEUES tables indicate whether a FILE TRANSFER service is
associated with the QMAP.
If the QMAP has a FILE TRANSFER service, it is defined in the IBMQREP_FILE_SENDERS and IBMQREP
_FILE_RECEIVERS tables. The following Control Tables are used for File Transfers between Capture and
Apply:
Q Replication Control Tables for File Transfers
Q Capture
Q Apply
IBMQREP_FILE_SENDERS
-- Identifies the File Send queues
• FILESEND_QUEUE <mq-queue-name>
• FILESEND_PARALLEL_DEGREE <n>
IBMQREP_FILE_RECEIVERS
-- Identifies the File Receive queues
• FILERECV_QUEUE <mq-queue-name>
• FILERECV_PARALLEL_DEGREE <n>
IBMQREP_FILE_SENT
-- Keeps track of files sent
• FILE_ID, FILENAME
• TOTAL_FILE_SIZE
•
STATUS, …
IBMQREP_FILE_RECEIVED
-- Keeps track of files received
• FILE_ID, FILENAME
• TOTAL_FILE_SIZE
•
STATUS,..
IBMQREP_FILESEND_MON
-- For performance monitoring and diagnostic
• MONITOR_TIME
• FILES_COMPLETED
• BYTES
• MESSAGES
•
XMITQDEPTH, …
IBMQREP_FILESEND_MON
-- For performance monitoring and diagnostic
• MONITOR_TIME
• FILES_COMPLETED
• BYTES
• MESSAGES
•
DISK_USAGE,…
Changes to existing Q Replication tables
IBMQREP_SENDQUEUES
Column
Type
Description
HAS_FILESEND
char (1) null with default ‘N’
This queue has an associated file transfer queue that
is used for sending large files when replicating load
or massive insert statements. Required for
replicating column-organized tables.

78
IBMQREP_RECVQUEUES
Column
Type
Description
HAS_FILERECV
char (1) null with default ‘N’
This queue has an associated file transfer queue
that is used for receiving large files when
replicating load or massive insert statements.
Required for replicating column-organized tables.
IBMQREP_TARGETS
Column
Type
Description
LOAD_TYPE
Smallint; not null with default 0
Type 7 – Q Apply uses External Table from
REMOTESOURCE and starts two threads to select
the data from that external table into a pipe that is
read by the second thread for insertion into the
target table.
Type 0 (default) – ‘Best Available Method’
chooses External Table from REMOTESOURCE if
the source is a CDE table. This is chosen even if
the target is a row-organized table.
New Q Capture Control Tables for File Transfers (for Transactions on CDE tables)
IBMQREP_FILE_SENDERS
Each row in this table represents a File Sender that is associated with a QMAP. There can only be one
sender per QMAP. Parallel file transmission can be achieved by defining multiple send and transmission
queues for each sender as well as multiple receive queues for the receiver and setting the
FILESEND_PARALLEL_DEGREE to a value greater than 1.
Column
Type
Description
QMAPNAME
varchar(128)
not null
primary key.
QMAP for which this file sender service is
used. One QMAP can have only one file
transfer service.
FILESEND_PATH
varchar(1040)
NULLABLE
Directory where Q Capture writes the files for
transmission to Q Apply.
UNUSED for Column-organized table
replication.
By default the filesend_path is the directory
from where Capture is started.
This directory will only be used for initial
load using ET Load method. It is NOT
USED for streaming transactions that contain
massive statements.

79
filename=<timestamp.schema.tbname
For massive statements, Db2 provides the
directory and filename of the files it generated
into a log record. That directory to use by
Db2 is specified via a Db2 database
configuration parameter.
FILESEND_QUEUE
varchar(48) not
null no default
valid-IBM-MQ-queue-name prefix.
If FILESEND_PARALLEL_DEGREE is
greater than 1, then the file sender is looking
for queues with the suffix ‘.n’ where is from 1
to the degree specified.
If degree is 1, then the suffix is optional.
FILESEND_ACK_QUEUE
varchar(48) not
null no default
valid-IBM-MQ-queue-name
Queue that is used for receiving messages
from the file receiver .
FILESEND_PARALLEL_DEGREE
smallint not null
default 1
If greater than 1, the file transfer services will
look for n queues named
FILESEND_QUEUE_NAME.number, where
number is 1 to n and transmit files in parallel
over those queues.
FILESEND_PRUNE_LIMIT
integer not null
default 1440
How long in minutes to keep rows for
completed file transfers, in minutes. Default
is 24 hours.
0 means no pruning
FILESEND_HEARTBEAT_SECONDS
integer not null
default 10
The file sender sends a heartbeat message
when there is no file transfer message sent on
a queue for longer than n seconds. The value
is in seconds. Default is 10 seconds.
A value of 0 indicates no heartbeat messages
are sent by this file sender.
Heartbeat messages are required when
FILESEND_PARALLEL_DEGREE is
greater than 1.
IBMQREP_FILES_SENT
An entry is created by Q Capture into this table for each file transfer that it initiates. Rows are pruned at
PRUNE_INTERVAL for completed transfers.
Column
Type
Description

80
FILE_ID
VARBINARY(16) NOT
NULL
Unique identifier for the file.
For files that are transferred when replicating
columnar tables, this is the LSN of the Db2 log record
at the source that provided the name of the file
containing the rows modified by the Db2 statement
to be replicated.
The file produced by Db2 for a statement might be
sent by the file transfer service using multiple MQ
messages. But they are reconstructed into a single
file before being delivered to the File Receiver.
QMAPNAME
varchar(128); not null
QMAP for which this file is sent.
SUB_ID
INTEGER; not null
The subscription associated with this file transfer, if
any.
FILENAME
VARCHAR(1040); NOT
NULL
Full path name of the file being transmitted. For
replication of columnar tables, this name is generated
by Db2 for streaming transactions
STATUS
CHAR(1) NOT NULL
STATUSES:
‘T’ Initiated - transfer is in progress
‘F’ File transfer failed.
‘S’ File successfully sent
‘A’ File ACK received from the File Receiver
Entries are pruned when status is ‘A’ or ‘F’ and the
FILESEND_PRUNE_LIMIT is reached.
RC
INTEGER; NULLABLE
0 = File transfer completed successfully
Non-zero = File transfer failed.
RC_TEXT
VARCHAR(128);
NULLABLE
Message explaining the reason for the result code.
E.g., OUT OF SPACE at target or source, etc.
TOTAL_FILE_SIZE
BIGINT
Size of the file in bytes. Once last_byte_sent =
total_file_size. The transmission is complete.
LAST_BYTE_SENT
BIGINT
Offset of the last byte successfully sent for this file.
FIRST_MSG_TIME
TIMESTAMP (6); NOT
NULL
Time when file transfer started for the file. This is a
timestamp taken before sending the very first
message sent for transmitting this file.
LAST_MSG_TIME
TIMESTAMP
Timestamp of the last PUT to the file send queue for
sending this file. Updated even if the put failed.

81
LAST_MSG_SIZE
BIGINT
Number of bytes in the last MQ message.
LAST_MSG_ID
BINARY(24) NULLABLE
IBM MQ message ID of the last message read by the
File Receiver service. Note: this value can go up and
down, if messages arrive out of order.
COORD_MSG_ID
BINARY(24) null
IBM MQ message ID of the transaction message sent
over the transaction queue for which this file is
transmitted.
FILE_SENDQ_NUM
SMALLINT null
The number that identifies the file transfer send
queue that was used for sending this file. Value is 1
when the file sender is configured with
FILESEND_PARALLEL_DEGREE 1. Otherwise it is the
numeric suffix of the queue name.
IBMQREP_FILESEND_MON
A row is written into this table at each MONITOR_INTERVAL for each QMAP for which a HAS_FILESEND.
All counters in this table are aggregate across all transmit queue. Rows are pruned at PRUNE_INTERVAL.
Column
Type
Description
MONITOR_TIME
timestamp (6) not null
Timestamp when the row was inserted
QMAPNAME
varchar(128) not null
QMAP for which files are transferred.
MQ_BYTES
BIGINT
Number of bytes transmitted over the file
transfer queue during the monitor interval.
This includes message headers and control
messages such as heartbeat messages.
MQ_MESSAGES
INT not null
Number of MQ messages sent over the file
transfer queue during the monitor interval,
including heartbeat messages.
ERRORS
INT not null
Number of failed file sends.
XMITQDEPTH
INT not null
Aggregate depth (number of messages in the
transmit queues used for file transfers.
FILES_STARTED
INT not null
Number of file transfers initiated.
FILES_COMPLETED
INT not null
Number of file transfer completed.
FILES_DELETED
INT not null
Number of files deleted by the File Sender
FILES_FAILED
INT not null
Number of file failed sends
FILES_ACKS
INT not null
Number of files for which ACK messages were
received from the File Receiver during the
monitor interval.

82
FILES_BYTES_SENT
BIGINT NOT NULL
Total number of bytes for files sent during
this monitor intervals.
MQPUT_TIME
int not null
Total time in milliseconds for all messages
put during the monitor interval across all
transmit queues.
New Q Apply Control Tables for File Transfers (for Transactions on CDE tables)
IBMQREP_FILE_RECEIVERS
This table contains the configuration for the file receivers that are used by a Q Apply instance. There is
one row in this table per receiver. A receiver is associated with a QMAP, there can be only receiver per
QMAP. Underscored columns are part of the primary key.
Column
Type
Description
QMAPNAME
varchar(128); not
null primary key
QMAP for which this file receive queue is
used.
FILERECV_PATH
varchar(1040) not
null no default
Directory where Q Apply receives files from Q
Capture over the file receive queue supplied in
FILERECV_QUEUE
This directory should be secure and readable
only by Q Apply, because it may contain
sensitive user data. Q Apply will create sub-
directories and files within that directory.
MAX_DISK_SPACE
BIGINT not null
Maximum amount of disk space that this
receiver service is allowed to use for receiving
files, in MEGABYTES. Once the maximum is
reached or Q Apply physically out of space
(there could less physical disk space available
than the value for this parameter), it notifies
its client and stops reading from the receive
queue, until enough disk space frees up to
write more messages.
Value 0 – Unlimited. Q Apply will not check for
disk space availability. This can lead to
replication coming to a halt if disk space fills
up, possibly causing the need for a full refresh
of the tables affected.
Default: 0
SEQREAD_THRES_DISK_SPACE
smallint not null
with default 50
parameter is a percentage of
IBMQREP_FILE_RECEIVERS(MAX_DISK_SPACE).
Default is 50%. Once disk space exceeds the

83
threshold, the file receive service must start
reading messages in order, otherwise it might
end up clogging disk space with messages that
cannot be applied because of dependencies,
preventing older messages that would allow
things to proceed from being delivered.
If MAX_DISK_SPACE is 0, then this parameter
is ignored.
FILERECV_QUEUE
varchar(48) not null
no default
valid-IBM-MQ-queue-name
FILERECV_ACK_QUEUE
varchar(48) not null
no default
valid-IBM-MQ-queue-name
Queue used by the file receiver for sending
messages back to the file sender
FILERECV_PRUNE_LIMIT
integer not null
default 1440
How long to keep rows for completed file
transfers, in minutes. Default is 24 hours.
0 means no pruning
FILERECV_PARALLEL_DEGREE
smallint not null
default 1
If greater than 1, the file transfer services will
look for n queues named
FILERECV_QUEUE_NAME.number, where
number is 1 to n and transmit files in parallel
over those queues.
FILERECV_DELETE_IMMED
Boolean not null
default 0
Q Apply deletes files received over the receive
queues immediately after they have been
applied. In this mode, recovery is not possible
if the transaction that requires this file is rolled
back or hits an error, because it cannot be
retried after that file has been deleted.
Consider this option only if there is not
enough disk space for holding all the files
needed for transient workloads. To evaluate
the space needed, check
IBMQREP_FILERECV_MON(DISK_USAGE).
IBMQREP_FILES_RECEIVED
A row is created by Q Apply in this table for each file that it receives. Rows are pruned at
PRUNE_INTERVAL for completed transfers.
Column
Type
Description

84
FILE_ID
VARBINARY(16) NOT NULL
Unique identifier for the file. For CDE table
replication, this is the LSN of the log record
written by Db2 when it produced the file to
be transmitted.
QMAPNAME
varchar(128); not null
QMAP for which this file is sent.
SUB_ID
INTEGER; not null
The subscription associated with this file
transfer.
UOW
VARBINARY(12) NULLABLE
Transaction identifier for which this file is
being transmitted. Optional.
TARGET_FILENAME
VARCHAR(1024) NOT NULL
Full path name of the file received.
SOURCE_FILENAME
VARCHAR(1024); NOT NULL
Full path name of the file at the source.
STATUS
CHAR(1) NOT NULL
Status of the file transfer.
‘T’ File transfer in progress. This means
there was one or more messages received
for delivering this file.
‘F’ File received failed.
‘R’ File successfully received
‘D’ File delivered –Acknowledged by the File
Receiver client (browser).
‘H’ Hold – Acknowledged by the client who
wants to hold the file because it may need
it.
(Note: On restart, the File Receiver resends
file receive notifications for all files in R
states.)
RC
INTEGER; NULLABLE
Result of file transfer.
0 = SUCCES
Non-Zero = error
RC_TEXT
VARCHAR(128); NULLABLE
Message explaining the reason for the error
code.
TOTAL_FILE_SIZE
BIGINT null
Size of the file. Once last_byte_received =
total_file_size. The transmission is
complete.
LAST_BYTE_RECEIVED
BIGINT null
Offset of the last byte successfully received
for this file.

85
LAST_MSG_TIME
TIMESTAMP null
Time of last GET from the receive queue
LAST_MSG_SIZE
BIGINT null
Number of bytes in the last MQ message
LAST_MSG_ID
BINARY(24) null
IBM MQ message ID of the last message
successfully received for transmitting this
file
COORD_MSG_ID
BINARY(24) null
IBM MQ message ID of the transaction
message sent over the transaction queue for
which this file is transmitted.
FILE_RECVQ_NUM
SMALLINT null
The number that identifies the file transfer
receive queue from which this file ware
received. Value is 1 when the file receiver is
configured with
FILERECV_PARALLEL_DEGREE 1. Otherwise,
it is the numeric suffix of the queue name.
IBMQREP_FILERECV_MON
A row is written into this table at each MONITOR_INTERVAL for each QMAP for which a HAS_FILERECV.
Rows are pruned at PRUNE_INTERVAL.
Column
Type
Description
MONITOR_TIME
timestamp (6) not null
Timestamp when the row was inserted
QMAPNAME
varchar(128) not null
QMAP for which files are received.
MQ_BYTES
BIGINT not null
Total number of bytes received during the
monitor interval. This includes message
headers and control messages such as
heartbeat messages.
DISK_USAGE
BIGINT not null
Total amount of disk space currently used for
holding files, in MEGABYTES.
MQ_MESSAGES
INT not null
Total number of messages received for this
monitor interval. Aggregate across all
queues. This may include control and
heartbeat messages.
QDEPTH
INT not null
Aggregate over all queues used for this file
receiver.
FILES_STARTED
INT not null
Number of file receive completed during the
monitor interval.
FILES_COMPLETED
INT not null
Number of file receive completed during the
monitor interval.
FILES_DELETED
INT not null

86
FILES_HOLD
INT not null
FILES_BYTES_RECEIVED
BIGINT NOT NULL
Total number of bytes for all the files
received during this monitor interval.
MQGET_TIME
INT not null
Total time for all messages put during the
monitor interval across all received queues.
87
Appendix E. Resetting Identity Columns and Sequence Objects
When switching the application to run on the failover site, you might have to reset START value for
identity columns and sequence objects if there is the possibility of generating conflicting values. If you
are using odd values on one site and even values on the other site, there is no need to reset the next
values generated by Db2.
Assume you are rerouting the workload from Oakland to Dallas:
1. Stop the workload at oakland:
db2inst1@oakland> db2stop list application
application-handle 3330
db2inst1@oakland> db2stop force application (3330) // brute force approach…
DB20000I The FORCE APPLICATION command completed successfully.
DB21024I This command is asynchronous and may not be effective immediately.
2.Stop replication from Oakland to Dallas after data is applied:
db2inst1@oakland> asnqccmd capture_server=TEAMS captureupto=EOL
stopafter=data_applied
3.Run a script that resets the values generated for identity columns and sequences:
// for each table that contains an identity column than can generated values already in-use:
db2inst1@dallas> db2 select max(ibmrepl_key) as MAX_REPLKEY from T2;
MAX_REPLKEY
--------------------
82008
1 record(s) selected.
db2inst1@dallas> db2 alter table T2 alter column IBMREPL_KEY RESTART with 82008 + 1
3. For each sequence object
Your goal is to guarantee that sequence objects will not generate any value that was used on the original
site.
3.1. If the source Db2 is reachable, you can select the maximum value dispensed for the sequence
objects at the source, for example:
Dallas:
db2 connect to oakland
db2 select substr(seqname,1,8) as seqname, NEXTCACHEFIRSTVALUE from syscat.sequences
where seqname='S1'
SEQNAME NEXTCACHEFIRSTVALUE
-------- ---------------------------------
S1 88057975.
1 record(s) selected.
db2 connect to dallas
db2 alter sequence S1 restart with 88057975
DB20000I The SQL command completed successfully.
You can now restart the workload in dallas

88
Appendix F. Configuring MQ Channel Encryption with AMS Feature
The encryption method used is transparent to the replication programs. We recommend leveraging the
IBM MQ Advanced Message Security (AMS) function to securely transmit the replication messages over
a non-secure network. Note that Replication Messages contain binary data values that are generally not
usable outside of context, including knowledge of the database schema, but they may contain readable
character strings that could have business value should the messages be intercepted while in transit
over a network.
Refer to IBM MQ documentation for learning about the security options available with IBM MQ
Advanced Message Security:
https://www.ibm.com/support/knowledgecenter/en/SSFKSJ_9.1.0/com.ibm.mq.sec.doc/q014580_.htm
We recommend using the AMS Confidentiality policy with a key reuse count of 32.
Changing MQ security level for an existing Q Replication configuration requires making sure the queues
are empty. You can either stop the Capture and Apply programs and restart them after the change is
made, but you can also stop only the queue for which you want to change attributes -- it is not
necessary to stop the replication programs. This needs to be done for both queue managers.
asnqccmd TEAMS STOPQ=A2B STOPAFTER=DATA_APPLIED or
asnqccmd TEAMS STOP STOPAFTER=DATA_APPLIED
setmqspl -m QMGR -p A2B -e AES256 -r "CN=63be7195-9e95-4e95-8653-
f082aff6b0b6,O=IBM,C=US" -c 32
asnqcap TEAMS
asnqacmd TEAMS
setmqspl -m QMGR -p A2B -e AES256 -r "CN=63be7195-9e95-4e95-8653-
f082aff6b0b6,O=IBM,C=US" -c 32
asnqapp TEAMS

89
Appendix G. Db2 Configuration for Controlling Supplemental Logging on
CDE Tables with DATA CAPTURE CHANGES
The following is a sample Db2 configuration for a DPF Db2 instance that is used for analytics workloads.
They are set with the db2set command.
DB2_DCC_FILE_DEL_THRES=1
DB2_DCC_FILE_INS_THRES=10
DB2_DCC_FILE_CHUNKSZ=100000000
DB2_DCC_FILE_PATH=/cderepldata/
DB2_CDE_DCC=true
DB2_WORKLOAD=ANALYTICS
DCC_FILE_PATH=/directory-path-name/
DCC_FILE_PATH specifies the directory where Db2 writes the files that contains the rows modified by
massive statements, these files are processed and deleted (by default) by Q Capture after the
transaction data they contain have been replicated. This database configuration parameter can be
changed dynamically: Db2 does not have to be restarted for this parameter to take effect.
IMPORTANT: The directory must be on shared disk that is accessible to all nodes in a Db2 environment.
By default, for the IBM Db2 Warehouse and the IBM Analytics System this is in the /scratch space, but it
can be changed to any file system, including external storage.
DB2_DCC_FILE_INS_THRES = 10 (default)
This is the threshold for writing changed data to files rather than into the recovery logs, for insert
statements. A single statement that inserts this number of rows or less is logged as distinct insert
diagnostic log records into the Db2 recovery logs. A statement that inserts more rows than this
threshold is logged into files into the directory specified by the Db2 database configuration parameter
DCC_FILE_PATH.
DB2_DCC_FILE_DEL_THRES = 1 row (default)
The threshold for writing changed data to files rather than the recovery logs for deletes. If the number
of rows modified by a single SQL statement is larger than n, Db2 writes the deleted rows into files in the
directory specified by DCC_FILE_PATH. If the number of rows is smaller or equal to n, Db2 write
diagnostic log records with the full row into the recovery log.
DB2_DCC_FILE_CHUNKSZ = 100000000 bytes (default)
This is the maximum size in bytes of the files into which Db2 writes the rows changed by massive
statements. Db2 writes as many files as required to contain all the rows modified by a statement. There
is no maximum file size, but larger files take longer to be written by Db2, and to be transmitted and
applied at the target by Q Replication.

90
Appendix H. Db2 Parameters for Replication of CDE Tables
ADMIN_SET_MAINT_MODE(ALLOW_GENERATED) Stored Procedure – This stored procedure is called
by Q Apply so that Db2 allows it to update generated always columns. It also identifies Q Apply as a
replication program. – When called, Db2 WILL NOT CREATE SUPPLEMENTAL LOG FILES FOR
TRANSACTIONS ON CDE TABLES THAT COME FROM Q Apply.
By starting Q Apply with the ALLOW_GENERATED=N parameter, you can instruct Q Apply not to call the
stored procedure.
91
Appendix I. Q Replication Capture/Apply Parameters for Replication of
Transactions on CDE Tables
Q Apply Startup Parameters
CDE_CHKDEP_FULL – Dependency checks to include like operations, e.g., serialize two transactions that
do massive DELETE on the same table, because each one might cause table-level lock escalation; they
should be executed serially, or they could end up in a deadlock.
AGENTS_CONNECT_ALL_DPF_NODES - Agents connect to different partitions
MULTI_PARTITION_ET – Use multi partition external table to batch massive statement in parallel
ALLOW_GENERATED – When set to Yes, Q Apply calls the Db2 SYSPROC.ADMIN_SET_MAINT_MODE
stored procedure with ALLOWGENERATED so it can update the values for generated always columns in
Db2 tables.
INHIBIT_SUPP_LOG. Setting this parameter to N requests Q Apply to turn off Db2 maintenance mode,
so that Db2 produces supplemental logs for the transactions applied by Q Apply. This is necessary if you
want to setup a cascading replication configuration where the target system maintained by Q Apply is
further replicated to another database.
These parameters are ‘Y’ by default when there is a file transfer queue defined for the receive queue (in
IBMQREP_RECVQUEUES). ‘N’ otherwise.
Q Capture Startup Parameters
XF_DEL_FILE=Y - Capture deletes the supplemental log files for CDE table when it receives the ACK message
from Q Apply. Capture also deletes files for inactive subscriptions (error or stopped by user) when
reading coordination log records for those files.
