
Revised: November 20, 2017 Page 1
Discontinuing NEFs/Adding a Secondary Email
Address/Adding a Secondary Email Address for a Specific
Case/Removing a Secondary Email Address
Introduction
This document gives you step-by-step instructions for discontinuing receipt of
Notices of Electronic Filing (NEFs), for adding a secondary e-mail address to
your cases, adding a secondary e-mail for a specific case, and removing a
secondary email address.
The clerk’s office suggests that you add at least one secondary email address
to all of your cases. The secondary e-mail addresses will receive Notices of
Electronic Filing (NEFs) for every document filed in your cases and will also
receive a free look – within the 15-day window – at the documents via the
hyperlink in the e-mail NEF.
Topic
See Page
Notice to Discontinue NEFs
1
Adding a Secondary Email Address
2
Adding a Secondary Email Address for a Specific Case
3
Configuration Options for Email Addresses
5
Removing a Secondary Email Address
6
Notice to
Discontinue
NEFs
If you wish to discontinue receiving NEFs for cases in which the party you
represent is no longer an active participant, then you would need to file a
Notice to Discontinue NEFs.
Once the Notice to Discontinue NEFs, is filed, the clerk’s office will
terminate your receipt of the NEF in that particular case. If you, as the
primary e-mail address is not receiving NEFs, nor will any secondary e-mail
addresses receive NEFs.
Continued on next page
Revised: November 20, 2017 Page 2
Discontinuing NEFs/Adding a Secondary Email
Address/Adding a Secondary Email Address for a Specific
Case/Removing a Secondary Email Address,
Continued
Adding a
Secondary
Email Address
To add a secondary email address to receive NEFs in all of your cases, take
the following steps:
Step
Action
1
Log into CM/ECF for filing using your court issued EDVA ECF login and
password.
2
Click on Utilities on the blue menu bar.
3
Click on Maintain Your Email link.
4
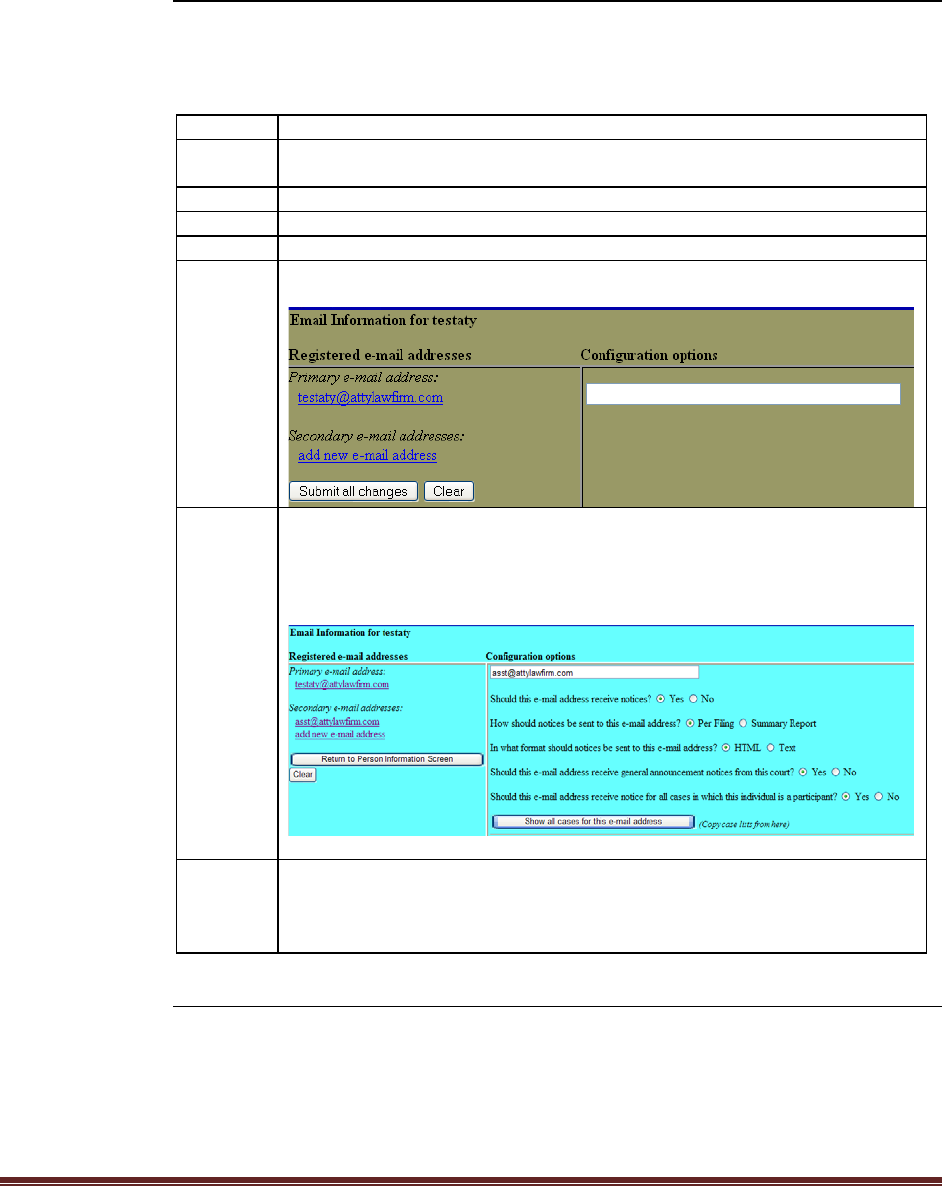
Click on the add new e-mail address link on the left of the screen.
5
Type in the secondary e-mail address in the white box on the right of the
screen.
6
• Select a radio button for each of the configuration option questions that
appear.
• Select the Yes radio button for the question “Should this e-mail address
receive notice for all cases in which this individual is a participant?”
Note: See page 6 for an explanation of each configuration option.
7
Click on the Submit all changes button on the left of the screen.
Note: You may need to click additional Submit buttons to apply this change
to all of your cases.
Continued on next page

Revised: November 20, 2017 Page 3
Discontinuing NEFs/Adding a Secondary Email
Address/Adding a Secondary Email Address for a Specific
Case/Removing a Secondary Email Address,
Continued
Adding a
Secondary E-
mail Address
for a Specific
Case
To add a secondary e-mail address to receive NEFs for a specific case, take
the following steps:
Step
Action
1
Log into CM/ECF for filing using your court issued EDVA ECF login and
password.
2
Click Utilities on the blue menu bar.
3
Click Maintain Your Email link.
4
Click the add new e-mail address link on the left of the screen.
5
Type in the secondary e-mail address in the white box on the right of the
screen.
6
• Select a radio button for each of the configuration questions that appear.
• Select the radio button No for the last question “Should this e-mail address
receive notice for all cases in which this individual is a participant?” (This
question only appears for secondary e-mail addresses.)
Note: See page 6 for an explanation of each configuration option. If the
attorney is associated with cases, those cases will automatically populate the
per filing method or summary report method for noticing depending on the
answer to the configuration option chosen as shown above.
Continued on next page

Revised: November 20, 2017 Page 4
Discontinuing NEFs/Adding a Secondary Email
Address/Adding a Secondary Email Address for a Specific
Case/Removing a Secondary Email Address,
Continued
Adding a
Secondary E-
mail Address
for a Specific
Case
(continued)
Step
Action
7
Remove all the cases in the list except for the case in which the secondary e-
mail addressee is to receive NEFs by selecting those cases. To select the
cases click on the one case and then press and hold the “Ctrl” button on your
keyboard while selecting all of the cases that you want to remove. Once all
the cases have been highlighted, click the Remove selected cases button.
If the case is does not appear in the list, then type in the case number in the
white box to select a case that is not associated with the primary e-mail
addressee:
If you typed the case number…
Then…
To include the divisional office
number and two letter case type
designation (i.e., 1:08-cv-113)
• Click the Find This Case button.
• Click the Add case(s) button.
Without the divisional office
number and two letter case type
designation (i.e., 08-113)
• Click the Find This Case button.
• Click the white box next to the
case number you want.
• Click the Add case(s) button
Note: The case number/name appears in the first box titled These cases will
send notice per filing. To change the receipt of notices to a summary report,
click on the case number/name in the box and then click the Change selected
cases to notice as a summary report. To remove the case, click on the case
number/name and then click the Remove selected cases button.
8
Click the Submit all changes button.
Continued on next page

Revised: November 20, 2017 Page 5
Discontinuing NEFs/Adding a Secondary Email
Address/Adding a Secondary Email Address for a Specific
Case/Removing a Secondary Email Address,
Continued
Configuration
Options for E-
Mail Addresses
The following chart explains the configuration options for E-Mail addresses:
Option
Description
Should this e-mail
address receive
notices?
For the primary e-mail address, the default is Yes. It is not
recommended that you change this response to No. If you
change this response to No, then the primary e-mail address will
not receive notices of electronic filing (NEFs).
How should notices be
sent to this e-mail
address?
Sets the default delivery method for notices sent to this address.
If Per Filing, an e-mail will be sent for each individual NEF. If
Summary Report, one daily summary email notice that lists all
the filings for that day will be sent; if this option is selected, an
additional option is added to the screen: Should this e-mail
address receive a “no activity” notice when no summary
noticing occurs? If Yes, the Daily Summary Report email will
include the message “no transactions found for this time
period” when no activity occurs in the cases for which the user
is configured to receive summary notices. If No, then no email
will be generated when there is no activity in the cases.
In what format should
notices be sent to this
e-mail address?
Controls the format of the e-mails – either HTML or Text.
Should this e-mail
address receive general
announcement notices
from this court?
If No, the user will not receive general court announcement e-
mail message unless the court overrides the user’s preference
(e.g., the message is urgent and must be sent to all users).
Show all cases for this
e-mail address button.
Displays a list of all of the cases for which the user is
configured to receive NEFs.
Should this e-mail
address receive notice
for all cases in which
this individual is a
participant?
This question only appears for secondary e-mail addresses. If
Yes is selected, the secondary e-mail addressee will receive
NEFs for all of the cases in which the primary e-mail addressee
is a participant. If No is selected, the secondary e-mail
addressee will receive NEFs for only those cases that are
selected.
Continued on next page
Revised: November 20, 2017 Page 6
Discontinuing NEFs/Adding a Secondary Email
Address/Adding a Secondary Email Address for a Specific
Case/Removing a Secondary Email Address,
Continued
Removing a
Secondary
Email Address
To remove a secondary email address, take the following steps:
Step
Action
1
Log into CM/ECF for filing using your court issued EDVA ECF login and
password.
2
Click on Utilities on the blue menu bar.
3
Click on Maintain Your Email link.
4
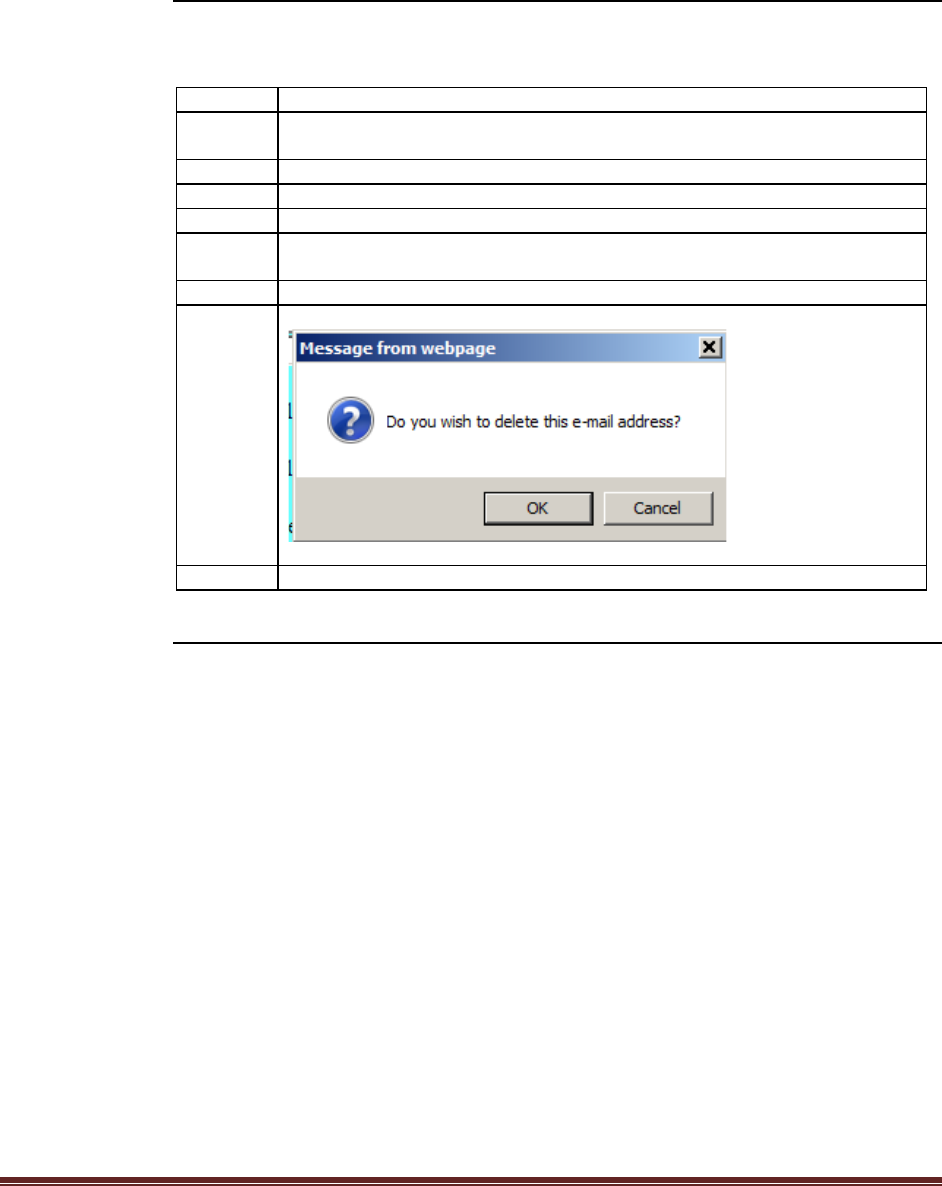
Click on the email address you wish to delete.
5
Remove the email address from the white box that appear s on the right of the
screen.
6
Click on the Submit all changes button.
7
Click OK on the pop up box.
8
Click on the Submit all changes button.
