
30
Customising
FrameMaker ≥14
Overview
Introduction ......................................................................... 2
Terminology.................................................................... 3
General procedure for customisation............................... 5
UI properties ........................................................................ 6
Session ........................................................................... 6
Workspaces..................................................................... 6
Toolbars ......................................................................... 7
Files for the UI................................................................. 8
Relationship between the UI files..................................... 9
Menus ................................................................................ 10
Customising menus ...................................................... 11
Menu customisation, examples ..................................... 12
Toolbars............................................................................. 14
Customising Toolbars ................................................... 14
Example toolbar............................................................ 14
Configuration files.............................................................. 18
Statements in configuration files ................................... 19
Debugging customisation files ...................................... 21
Tags in toolbar files............................................................ 22
Tool tags....................................................................... 23
Detail tag ...................................................................... 24
Toolbar commands ....................................................... 25
Toolbar icons ................................................................ 26
Extract icons ................................................................. 29
Commands......................................................................... 30
Command examples ..................................................... 30
Command statements ................................................... 31
Modify statement .......................................................... 32
Command details .......................................................... 33
Some particularities of commands................................. 37
Command names from plugins and scripts ................... 41
Menu statements .......................................................... 44
Workspace definition.......................................................... 47
Problems and pitfalls.......................................................... 49
Initialisation files maker.ini and others ............................... 50
Synopsis of FM hypertext commands.................................. 52

Customising FrameMaker ≥14
2
Introduction
From the beginning FrameMaker could be customised.
Menus can be switched from complete to quick. This is a standard fea-
ture.
Menus can be modified.
Commands can be created and referenced in menus and toolbars.
Until the arrival of the new user interface with FM-9 the process was
described in an Adobe file, which was lastly issued for FM-7. The text
provided by this file was grosso modo still valid for FM ≥9. However, the
new interface requires significantly more information, which is not availa-
ble from Adobe until now.
Document history 2013-02 Use FM-11 version of document as a base.
FM-12 introduces two button sizes and colours. Image refer-
ence in toolbar.xml files can use a base-name. The addi-
tional product interface XMLAuthor has no influence on this
document.
2014-09 Check the situation with FM-13-M1. It seems that nothing
related to the customisation has changed.
2015-12 Add text concerning scripts as commands. Amend the exam-
ple toolbar with this.
2016-01 Change the document title to reflect scope of document;
rework structure; add scheme and examples.
2016-12 Clarifications concerning command names from scripts and
plugins, clean up the example files. Add “short-cuts in
ExtendScript”.
2017-04 FM-14 requires significant changes for three icon sizes.
Additional menu customisation example; better explanation
for hypertext commands and scripts. XMLAuthor is no more
integrated.
2018-07 No logical changes required for FM-15.
2022-04-13 Some clarifications for session and workspace
2022-12-20 Update for the location of customui.cfg
Sources Experiments and beta testing activities.
FrameMaker related forums as well as personal communication.
(Very sparse) communication with Adobe developers.
User guides for FrameMaker.
Useful videos have disappeared since I started to write this for FM-14
aka Edition 2017.
Document conventions Menus and names from the user interface are in > this > font.
Variables (place holders) use italic script.
Keywords and the like are in fixed pitch font.
This is sample code

3
Introduction
E:\_DDDprojects\ETB-14up\Sources\etb-customising.fm 2022-12-20
Terminology
Note: IMHO the terminology of FM has not yet settled. The term pod should be
eliminated - but is used since FM-9 and confuses more than it clarifies.
Panel, palette and dialogue are somewhat synonymous. Terminology is not
coherent between the workspace files, the tool tips and context menus.
For better understanding of some terms look at the picture Elements of the
workspace on page 4
$HOME The FM installation directory. In my case this is
H:\Adobe\FrameMaker.14en\AdobeFrameMaker 2017
1)
.
Access character An access character
2)
in a menu item is preceded by the ‘&’ symbol (e.g.
E&xit).
In Windows 7 and beyond these access characters are visible at the menu
items only when pressing the left ALT key. To use the short cut for Exit,
you type left ALT f x.
Dialogue Prior to FM-9 a dialogue was either modal or non modal. Some of these
have been replaced by dockable panels which can be grouped into panel
groups and minimised to icons.
Even in FM-16 there are still many of the old dialogues active.
Dock A dock is an area on the application window to which UI elements can be
docked (anchored) and aligned.
FCode The function code is the connection between the command (as defined in a
configuration file such as cmd.cfg) and the routine in the application
which performs the function.
Menus and commands The UI information basically is split into 2 groups:
Command sets assembled according to views.
Menus and tool bars assemble according to views.
modal vs. non-modal A modal dialogue must be closed before work can continue on the doc-
ument.
A non-modal dialogue could stay open like a palette.
Panel A docked or undocked dialogue, which need not be closed to work on the
document. The automatic behaviour depends on Preferences >
General > Interface > Pods.
Panel group A collection of panels which can be handled as a whole.
Pod Outdated term for panel; first used in RoboHelp.
UI User interface. The elements of user interaction: windows, panes, menus
and dialogues. Also keyboard short-cuts belong into this category.
Palette This term was first used in FM for the read-only FM-documents which
behave as non modal dialogues (Equation palette, Vertical toolbar, Tem-
1 The installation program does not allow to modify the last level. This is due to new
mechanism (introduced with FM-10) using a data base for installation/de-installation.
2 The Adobe document calls this a mnemonic short-cut. The access character must be care-
fully chosen to avoid duplicates within a menu.
Dock content What can be in
palatte toolbar Iconised or expanded dialogs/pds, the graphics palette
multi-controlbar Horizontal groups of toolbars on top of the application
window
palette Special tab panes such as the bottom pod (palette-kit data)

Customising FrameMaker ≥14
4
plate browser, Element catalogue …). This term is used in the workspace
files.
Product interface FM≥12 contains three product interfaces (also known as modes):
Structured, and UnStructured.
Toolbars Toolbars are an alternative to menus for a specific function.
User-area In Windows this is %appdaa%\Adobe\FrameMaker\##\ (## is the inter-
nal FrameMaker version
3)
, e.g. 13. With this version Adobe started mar-
keting versions, e.g. Edition 2015 or 2019 Release)
View Views were introduced with FM-11. A view groups elements of a work-
space. Hence there are more menus and toolbar groups than before FM-11.
In Structured mode there are three views: XMLView, AuthorView, and
WYSIWYGView. See Relationship between the UI files on page 9. These are
represented as icons in the top right hand corner before the Workspace
selection:
Unstructured mode knows only the WYSIWYGView. In the above picture
this is the rightmost icon (active).
This has consequences for the customisation: it is no more sufficient to
have a $HOME\fminit\configui\cstomui.cfg file. The contents of
such a file must also be appended to a menu file.
Workspace A workspace is a saved set of frequently used panels/toolbars in a desired
arrangement for repeated use.
Elements of the
workspace
The workspace contains various elements, which are demonstrated on the
following screen shot:
1 Menu bar
3 This version is reported in Help > About FrameMaker
FM-12/13 FM-14
1 2
5
3
4
2
7
6
8
9

5
Introduction
E:\_DDDprojects\ETB-14up\Sources\etb-customising.fm 2022-12-20
2 Arrangement panel. A chosen arrangement (e.g. 2 document panes side
by side) is not saved in the workspace file.
3 Multi control bar (dock) spanning multiple rows of tool bars. In the
workspace file a row of this is a Control Bar Pane.
4 Toolbar, docked. In the workspace file this is a Control Bar.
5 Toolbar, undocked = floating
6 Graphic toolbar (undocked, horizontal arrangement)
7 Tab group (docked ) with minimised panels.
8 Tab group (undocked)
9 Bottom pod - a special palette.
If used, work space information (workspace, tool bars, menus), are copied
from $HOME to the user area. Any modifications are only kept there.
For details see Relationship between the UI files on page 9.
General procedure for customisation
If a requirement can not be satisfied with entries in the Initialisation files
maker.ini and others on page 50, consider setting up a custom workspace:
1 For special menu entries set up a custom menu file by means of
customui.cfg and append it to the relevant menus. See
2 A custom toolbar requires creation of a custom-toolbar.xml file and
a modification of the toolbar set file fmtoolbar.xml. It may require
the creation of button images.
3 For both cases it may be necessary to define new commands in
customui.cfg (which must be appended to the relevant menus).
4 To define a custom workspace copy an existing workspace file
(xxx.fws) to a custom named file and modify the references to menu
and toolbar set.
Download example
customisation
You can download the example customisation files from my website.
You may also study the process by analysing the files provided by the
Enhanced Tool Bars.

Customising FrameMaker ≥14
6
UI properties
Session
When a FrameMaker session is closed, the following properties are saved
in the user area in RestoreSession.txt and can be restored at the next start
of FM (Restore Last Session):
Whether the session was closed in Maker or Structured FrameMaker
(it can be restored only in the same type).
Last used View (also noted in maker.ini: LastActiveView)
Used Workspace (also noted in maker.ini:
LastUsedWorkSpaceInStructuredMode |
LastUsedWorkSpaceInUnStructuredMode)
Paths of currently opened books and documents
Which of these is the current document or book
Some other not decipherable information
Workspaces
A workspace is a saved set of panels/toolbars in a desired arrangement for
repeated use. It also offers flexibility of screen usage, by allowing a user
to place panels in numerous possible forms/arrangements: default, iconic,
minimized, docked (left, right, bottom, top), floating, grouped. A Work-
space saves these properties of the FM session:
Menu file (menus.xml) and Tool bar file (toolbars.xml)
Tool bars: location, size and state (docked, undocked)
Panels: location, size and state (minimised, docked, undocked)
The workspace is loaded with the first document to open. This open may
be considered slow. No workspace is loaded with a book file.
FrameMaker ships with a set of standard Workspaces tailored for different
tasks. They can be modified and then saved with a new name. FM also
provides an empty workspace to start with.
Modifications to a workspace are temporary (until saved) and can be
reversed by Reset.
}
}
Custom workspaces
Initial workspaces

7
UI properties
E:\_DDDprojects\ETB-14up\Sources\etb-customising.fm 2022-12-20
The drop down list for the arrangement of document windows – located to
the right of the menu items – no more exists in FM-14 and higher. The
function is ‘integrated’ into Window > Tile (with less choices)
Workspaces are saved in the user-area. The current workspace is in
xxx.cfws, while the last saved is in xxx.fws. See Relationship between the
UI files on page 9.
At the first use of workspaces the necessary files (workspace definition,
toolbars, menus) are taken from $HOME and copied to the user-area.
To design a new workspace for a specific task, open all the required panels
and save the Workspace using Save Workspace. The names are case
sensitive.
Toolbars
Tool-set The toolbars available for the UI are listed in an xml file which is refer-
enced in the workspace file (see Relationship between the UI files on
page 9). The standard name is fmtoolbar.xml
4)
. There may be more
toolbar files, but only those listed in this file are visible in the menu.
Toolbar The toolbars themselves are defined in xml files The only toolbar which
can not be customised is the graphics tool palette.
Toolbars can be docked in the top toolbar pane, to the right or left of the
application window or undocked (floating).
Note: Toolbars containing a drop-down list can not be docked to the left or
right!
4 A much clearer term would be toolbar-set.xml
fmtoolbar.xml
<?xml version="1.0" encoding="UTF-8"?>
<FMTOOLBARLIST version="1">
<TOOLBAR file="graphics.xml"/>
<SEPARATOR sep_id="0"/>
<TOOLBAR file="quick_access.xml"/>
<TOOLBAR file="structured.xml"/>
<SEPARATOR sep_id="1"/>
<TOOLBAR file="text_format.xml"/>
<TOOLBAR file="table_format.xml"/>
<TOOLBAR file="para_format.xml"/>
<SEPARATOR sep_id="2"/>
<TOOLBAR file="align_object.xml"/>
<TOOLBAR file="object_properties.xml"/>
<SEPARATOR sep_id="3"/>
<TOOLBAR file="trackchanges.xml"/>
<SEPARATOR sep_id="4"/>
<TOOLBAR file="direction.xml"/>
</FMTOOLBARLIST>
Customising FrameMaker ≥14
8
Files for the UI
If used, work spaces are copied to the user area. Any modifications are
kept only there.
FM-14 and later contains two interfaces: Structured and
UnStructured. XMLAuthor is no more an option.
The UI information basically is split into 2 groups:
Command sets assembled according to views
Menus and tool bars assembles according to views.
Product interface Structured
a
Unstructured
View AuthorView CodeView (XML) WYSIWYG WYSIWYG
Standard commands Commands independent of views are located in $HOME\fminit\configui: cmds.cfg
Commands
b
mathcmds.cfg
wincmds.cfg
wincmds.cfg mathcmds.cfg
wincmds.cfg
mathcmds.cfg
wincmds.cfg
Work spaces
c
Authoring.fws
none.fws
d
Authoring.fws
none.fws
Authoring.fws
Blank.fws
Design.fws
Manage Graphics.fws
none.fws
Review.fws
Structured Authoring…
Authoring.fws
Blank.fws
Design.fws
Manage Graphics.fws
none.fwsReview.fws
Menus menus.cfg menus.cfg menus.cfg
menus_review.cfg
menus_structured_au-
thoring.cfg
menus_ts.cfg
e
menus.cfg
menus_review.cfg
menus_ts.cfg
Tool bars direction.xml
fmtoolbar.xml
f
graphics.xml
quick_access.xml
quick_element.xml
structured.xml
trackchanges.xml
fmtoolbar.xml
quick_access.xml
xpathtoolbar.xml
xslttoolbar.xml
align_object.xml
direction.xml
fmtoolbar.xml
graphics.xml
object_properties.xml
para_format.xml
quick_access.xml
structured.xml
table_format.xml
tag-description.xml
text_format.xml
trackchanges.xml
align_object.xml
direction.xml
fmtoolbar.xml
graphics.xml
object_properties.xml
para_format.xml
quick_access.xml
structured.xml
table_format.xml
tag-description.xml
text_format.xml
trackchanges.xml
Customisation $HOME\ fminit\configue\cusomui.cfg
This file contains both menu definitions and (hypertext) command definitions.
a. FM-13 introduced an additional view: FormView, which is a user friendly Code View (guided by forms).
b. Commands are located in fminit\configui\interface\view\
c. Work spaces are located in fminit\WorkSpaces\interface\view\
d. none.fws is an empty workspace used if no document or book is open. It can be used to build a custom work
space from scratch. It can refer to a custom menu, but does not honour the definition of a custom toolbar
set — IMHO this is an error.
e. The purpose of menus named menus_ts.cfg is IMHO unclear.
f. fmtoolbar.xml does not define commands and icons for a tool bar, but lists all the tool bars available in this
work space.

9
UI properties
E:\_DDDprojects\ETB-14up\Sources\etb-customising.fm 2022-12-20
Relationship between the UI files
example_tb.xml
tb-icon.png
tb-icon_2X.png
tb-icon_3TO2X.png
tb-icon_D.png
tb-icon_D_2X.png
tb-icon_D_3TO2.png
%appdata%\Adobe\FrameMaker\14
Structured
UnStructured
AuthorView
CodeView
FormView
WYSIWYGView
menus
toolbars
Authoring.fws
Blank.fws
Custom.fws
Design.fws
Manage Graphics.fws
none.fws
Review.fws
Structured Auth.fws
align_object.xml
custom_toolset.xml
direction.xml
example-tb.xml
fmtoolbar.xml
fmtoolbar_review…
graphics.xml
object_properties…
para_format.xml
quick_access.xml
quick_access_rev…
quick_element.xml
structured.xml
table_format.xml
tag-description.xml
text_format.xml
trackchanges.xml
menus.cfg
custom_menus.cfg
menus_review.cfg
menus_struc-
tured_authoring.cfg
menus_ts.cfg
resources
Startup
WorkSpaces
MyIcons
For documentation on this file, see "Customizing Frame Products" Online Manual
MS Windows FrameMaker Menu Configurations
*** Document Window Main Menu ***
<ReservedMenu !MakerMainMenu<Label Adobe FrameMaker>>
<Menu FileMenu <Label File>>
<Menu EditMenu <Label Edit>>
…
[etb Addenda]====================================================
*** The [label] constructs provide file navigation in EditPad
File is harmonised with all the other etb-customui.cfg files
*** Remarks
- This file (customui.cfg) can not be UTF-8, it must be in Windows CP 1252
using FrameRoman coding for Label statements.
…
[etb Documentation]
<Command ETBfmConsole <Label Console Log File>
<Hypertext message openfile H:/Adobe/…/fminit/configui/etb-GetLogFile.exe>>
…
[etb Menu]
<Add ETBmenu <Menu !HelpMenu>>
<Order !HelpMenu.ETBmenu <Before !HelpMenu.AdobeOnlineSupport>>
<Add ETBfmConsole <Menu ETBmenu>>
…
<?xml version="1.0" encoding="UTF-8"?>
<FMTOOLBARLIST version="1">
<TOOLBAR file="graphics.xml"/>
<SEPARATOR sep_id="0"/>
<TOOLBAR file="quick_access.xml"/>
<TOOLBAR file="structured.xml"/>
<SEPARATOR sep_id="1"/>
…
<TOOLBAR file="example-tb.xml"/>
</FMTOOLBARLIST>
custom_toolset.xml
<?xml version="1.0" encoding="UTF-8"?>
<FMTOOLBARLIST version="1">
<TOOLBAR id="custom_tb" name="Custom Toolbar" kbd-short-cut="\!Vzz"
orientation="horizontal" readOnDocChange="true">
<!-- Standard commands -->
<ACTION command="RepeatLastParaCommand" tooltip="Repeat…]">
<images base="MyIcons\tb-icon" />
</ACTION>
<!-- See Location of icons files on page 27 for icon-path definition details-->
...
<DROPDOWN command="!RulerParaMenu" tooltip="Paragraph …"/>
<FLYOUT command="!RulerAlignMenu" tooltip="Text alignment">
<images base="P_TextAlignLeft_Md" />
</FLYOUT>
...
</TOOLBAR>
</FMTOOLBARLIST>
custom_menus.cfg
For documentation on this file, see "Customizing Frame Products" Online Manual
MS Windows FrameMaker Menu Configurations
*** Document Window Main Menu ***
<ReservedMenu !MakerMainMenu<Label Adobe FrameMaker>>
<Menu FileMenu <Label File>>
<Menu EditMenu <Label Edit>>
…
[Customisation] ==================================================
*** Example menu customisation
*** KLD 2017-06-18
*** Place a new menu item after the first one in the Help menu
*** Define a new command with a name not yet kwnown to FM
<Command CustomOfflinePDF <Label Local User guide (PDF)>
<Hypertext message openfile H:/Adobe/AdobeFrameMaker12/fminit/configui/
FM12-help.pdf>>
*** Define menu entry with the command
<Add CustomOfflinePDF <Menu !HelpMenu>>
*** Place the menu item to the desired place
<Order !HelpMenu.CustomOfflinePDF <After !HelpMenu.Help>>
<FrameUI version="1">
<data type="all" menuFile="custom_menu.cfg" toolbarFile="custom_toolset.xml"/>
<fm-workspace>
<workspace version="1">
<dock anchor="top" content="multi-control-bar" is-closed="false">
…
</dock>
<control-bar id="00070CEA" origin="-16 -2" size="558 26" is-closed="true"
app-data="#lt;control-bar cb-data=#quot;custom_tb#quot;
minimum-size=#quot;454 26#quot; maximum-size=#quot;1868 26#quot;
preferred-size=#quot;558 26#quot;/>"/>
</workspace>
</fm-workspace>
</FrameUI>
Custom.fws
same as customui.cfg
original menu contents

Customising FrameMaker ≥14
10
Menus
customui.cfg For FM versions prior to FM-11 all customisation was established in the
file $HOME\fminit\configui\customui.cfg
The possibilities in this file are explained extensively in the Adobe docu-
ment Customisation of Frame Products (FM-7).
This file is still required if the menu modifications are to be visible from
the beginning.
5)
However, the contents of this file must also be appended to the relevant
menu file. It is good practice to copy a menu file to a new file, e.g.
custom-menu.cfg and then append the contents of customui.cfg to it.
Views
Since FM-11 the contents of menus depend on a view. Hence there are
several menu files. See Files for the UI on page 8. As an example the
WYSIWYG view of the unstructured interface of FM-12/13 is listed:
$HOME
\fminit\configui\
cmds.cfg
sample.cfg
UnStructured\
WYSIWYGView
mathcmds.cfg
wincmds.cfg
$HOME\fminit\WorkSpaces
UnStructured
WYSIWYGView\
Authoring.fws
Blank.fws
Design.fws
Manage Graphics.fws
None.fws
Review.fws
menus\
menus.cfg
menus_review.cfg
toolbars\
align_object.xml
fmtoolbar.xml
fmtoolbar_review.xml
graphics.xml
object_properties.xml
para_format.xml
quick_access.xml
quick_access_review.xml
structured.xml
table_format.xml
tag-description.xml
text_format.xml
trackchanges.xml
5 customui.cfg in FM-12 and later is only relevant before a workspace is selected - that
is, before any book or documents have been opened. After closing all documents or
books no customisation is active.
none.fws is an empty workspace. It can be used to build a custom work space from
scratch. It can refer to a custom menu, but does not honour the definition of a custom
toolbar set — IMHO this is an error.

11
Menus
E:\_DDDprojects\ETB-14up\Sources\etb-customising.fm 2022-12-20
Customising menus
Note: Some menu entries are not reflected in the *.cfg files. They are created
during initialisation of FM based on FM’s environment. For example File
> Script and File > Launch.
Customisation To create your custom menu, take the appropriate standard menu and copy
it to a new file. Name this file with a prefix of your customisation project.
For example custom-menus.cfg.
You develop the customisation in a file customui.cfg . As long as you
have not a customised menu assigned to a workspace, the menu customi-
sation is only visible during the display of the splash screen (before you
have opened a document or book).
To be available regularly the contents of customui.cfg must also be
appended to a menu file, which is referenced in the workspace (see
Relationship between the UI files on page 9).
To be available also with no document or book open, workspace
$HOME\fminit\WorkSpaces\UnStructured\none.cws must point to
the modified menu file (see table footnote c on page 8):
<FrameUI version="1">
<data type="all" menuFile="custom-menus.cfg" toolbarFile="fmtoolbar.xml"/>
<fm-workspace>
Testing menus You do not need to restart FM to test a modified menu. With View >
Menus > Modify… it can be read into the current workspace.
Errors in the customisation file are reported in the FM console window.
Even if an error is found, reading and interpreting the file continues.
Commands in menus In the various existing menus you can find a desired command for your
special menu entry. You may however need to set up a new command:
See Hypertext commands on page 37.
See Command names from plugins and scripts on page 41
Open a file
Hypertext message openfile H:/Adobe/AdobeFrameMaker12/fminit/
configui/FM12-help.pdf
Execute a program <Command ETBfmConsole <Label Console Log File>
<Hypertext message openfile H:/Adobe/AdobeFrameMaker12/
fminit/configui/GetLogFile.exe>>
Hyper-links with relative paths always point to files in the same directory
as the parent file. While for documents this can be interpreted, it is not
clear what it means for menus.
Relative paths do not start in $HOME as in pre-FM9. They start in the cur-
rent document folder: $path[initdir]/fminit does not work (neither
upper/lower/mixed case, nor with path in quotes or double quotes).
For addressing scripts see Note concerning scripts on page 25.
Execute a FrameScript
<Add iFrameMultiCatalog <Menu FormatMenu>>
Execute an ExtendScript <Add ImportFormatsSpecial <Menu FormatMenu>>

Customising FrameMaker ≥14
12
Menu customisation, examples
Example 1 You are tired of searching for the offline user guide (pdf). Once you have
downloaded it via Help > Help Topics > Getting Started >
General Resources. You placed it in $HOME\fminit\configui\ with
the name FM-12-help.pdf.
You want to open this file with Help > User Guide PDF.
Note: This example establishes a customisation only for the unstructured inter-
face in the WYSIWYGView:
Create/update customui.cfg in an appropriate location.
Modify the relevant menu in %appdata%\Adobe\FrameMaker\##\
(## is the number of the involved FM version, e.g. 14).
customui.cfg In a plain vanilla FM installation this file does not exist. Hence you need
to create it. This file must be in Windows code page (cp 1252), not in
UTF-8
6)
!
«-- Example menu customisation [KLD 2017-04-07]
7)
<Command CustomOfflinePDF> «-- Define a new command (name not yet kwnown to FM)
<Label Local User guide (PDF)>
<Hypertext message openfile H:/Adobe/AdobeFrameMaker12/fminit/configui/FM12-help.pdf>>
<Add CustomOfflinePDF <Menu !HelpMenu>> «-- Define menu entry with the command
<Order !HelpMenu.CustomOfflinePDF «-- Place the menu item to the desired place
<After !HelpMenu.Help>>
Note: For test purposes you may reference any pdf file in the command. Adjust
the file location - use forward slash (/) in place of backslash (\). Only
absolute paths work!
Modify the relevant menu The customisation by customui.cfg is only active when no document or
book is open. Hence we need to do more:
The menu to be modified is
%appdata%\Adobe\FrameMaker\##\WorkSpaces\UnStructured\W
YSIWYGView\menus\menus.cfg.
Create a backup of the original menu file: menus_ori.cfg.
Append the contents of customui.cfg to the relevant menu of the
workspace to be available for open documents or books.
After starting FM and selecting the WYSIWYG view, the menu modifica-
tion is active.
Example 2 You want to have a context menu for inserting special characters. The
existing flyout is not touched.
Note: This example establishes a customisation only for the unstructured inter-
face in the WYSIWYGView:
Create/update customui.cfg in an appropriate location.
Modify the relevant menu in %appdata%\Adobe\FrameMaker\##\
(## is the number of the involved FM version, e.g. 14).
6 The file coding is not at all consistent:
cp 1252: *.cfg (customui.cfg, cmd.cfg, mathcmd.cfg, menu.cfg etc.)
UTF_8: *.xml (toolbars), *.fws, *.cfws (work space), maker.ini.
7 Relevant information starts with < and ends with >. This may be nested. Hence there is
no special notation for comments. I use the guillemets.

13
Menus
E:\_DDDprojects\ETB-14up\Sources\etb-customising.fm 2022-12-20
customui.cfg In a plain vanilla FM installation this file does not exist. Hence you need
to create it. This file must be in Windows code page (cp 1252), not in
UTF-8
8)
!
«-- SpecialChars Context menu [KLD 2017-04-07]
<Menu SpecialCharsContext «-- define a new context menu
<Label Insert Special Character >>
<Command MyCharEllipsis «-- for each entry you specify these parameters:
<Definition \xC9>
<Label \xc9 &ellipsis> «-- the menu label starts with symbol
<KeySeqLabel \e> >
<Add MyCharEllipsis <Menu SpecialCharsContext>>
<Command MyCharOneQuarter «-- another symbol to be in my list
9)
<Definition \xB9>
<Label \xb9 quarter &1>
<KeySeqLabel \\xb9> >
<Add MyCharOneQuarter <Menu SpecialCharsContext>>
«-- Add the new menu to various contexts:
<Add SpecialCharsContext <Menu !TextContextMenu>>
<Order !TextContextMenu.SpecialCharsContext <Before !TextContextMenu.Undo>>
<Add SpecialCharsContext <Menu !TableTextContextMenu>>
<Order !TableTextContextMenu.SpecialCharsContext <Before !TableTextContextMenu.Undo>>
<Add SpecialCharsContext <Menu !TextLineContextMenu>>
<Order !TextLineContextMenu.SpecialCharsContext <Before !TextLineContextMenu.Undo>>
If you need characters which are not in the FrameRoman code page (arbi-
trary Unicode symbols) you need to set up a script for this (ETB-14 con-
tains such a script).
Modify the relevant menu The customisation by customui.cfg is only active when no document or
book is open. Hence we need to do more:
The menu to be modified is
%appdata%\Adobe\FrameMaker\vv\WorkSpaces\UnStructured\W
YSIWYGView\menus\menus.cfg.
Create a backup of the original menu file: menus_ori.cfg.
Append the contents of customui.cfg to the relevant menu of the
workspace to be available for open documents or books.
After starting FM and selecting the WYSIWYG view, the menu modifica-
tion is active.
8 The file coding is not at all consistent:
cp 1252: *.cfg (customui.cfg, cmd.cfg, mathcmd.cfg, menu.cfg etc.)
UTF_8: *.xml (toolbars), *.fws, *.cfws (work space), maker.ini.
9 Command names must not contain figures (My1Quarter is invalid).
Customising FrameMaker ≥14
14
Toolbars
Customising Toolbars
Customising toolbars or creating new toolbars is more elaborate then cus-
tomising menus, because more files are involved (See Relationship between
the UI files on page 9):
The toolbar file itself (e.g. custom-tb.xml).
The list of toolbars in fmtoolbars.xml.
The icons needed for the toolbar.
You may also have the need to implement scripts.
You may save the modified workspace with a new name.
Note: Toolbars containing a drop-down list can not be docked at left or at right
to become vertically oriented!
Toolbar commands When setting up a toolbar you need to have an idea which commands to
use. Get the exact names from the appropriate menus (see Commands on
page 18) or from a command list. See for example www.daube.ch.
For more details see Commands on page 30.
There are some not so well known things about commands. Hence see also
Some particularities of commands on page 37.
Using ExtendScripts in a toolbar can be done in two ways:
The script defines its command name internally. See the red names in
File simple.jsx on page 16. Such scripts can be compiled to jsxbin for
hiding its innards.
An ExtendScript can also be invoked by a hypertext command. In this
case the script must reside in %userprofile%\Documents\Adobe
Scripts\ and it can only by of file type jsx
10)
:
<Command ETBnudge <Label Nudge object info>
<Hypertext message openfile C:/Users/Klaus/Documents/Adobe
Scripts/ETBnudge.jsx>>
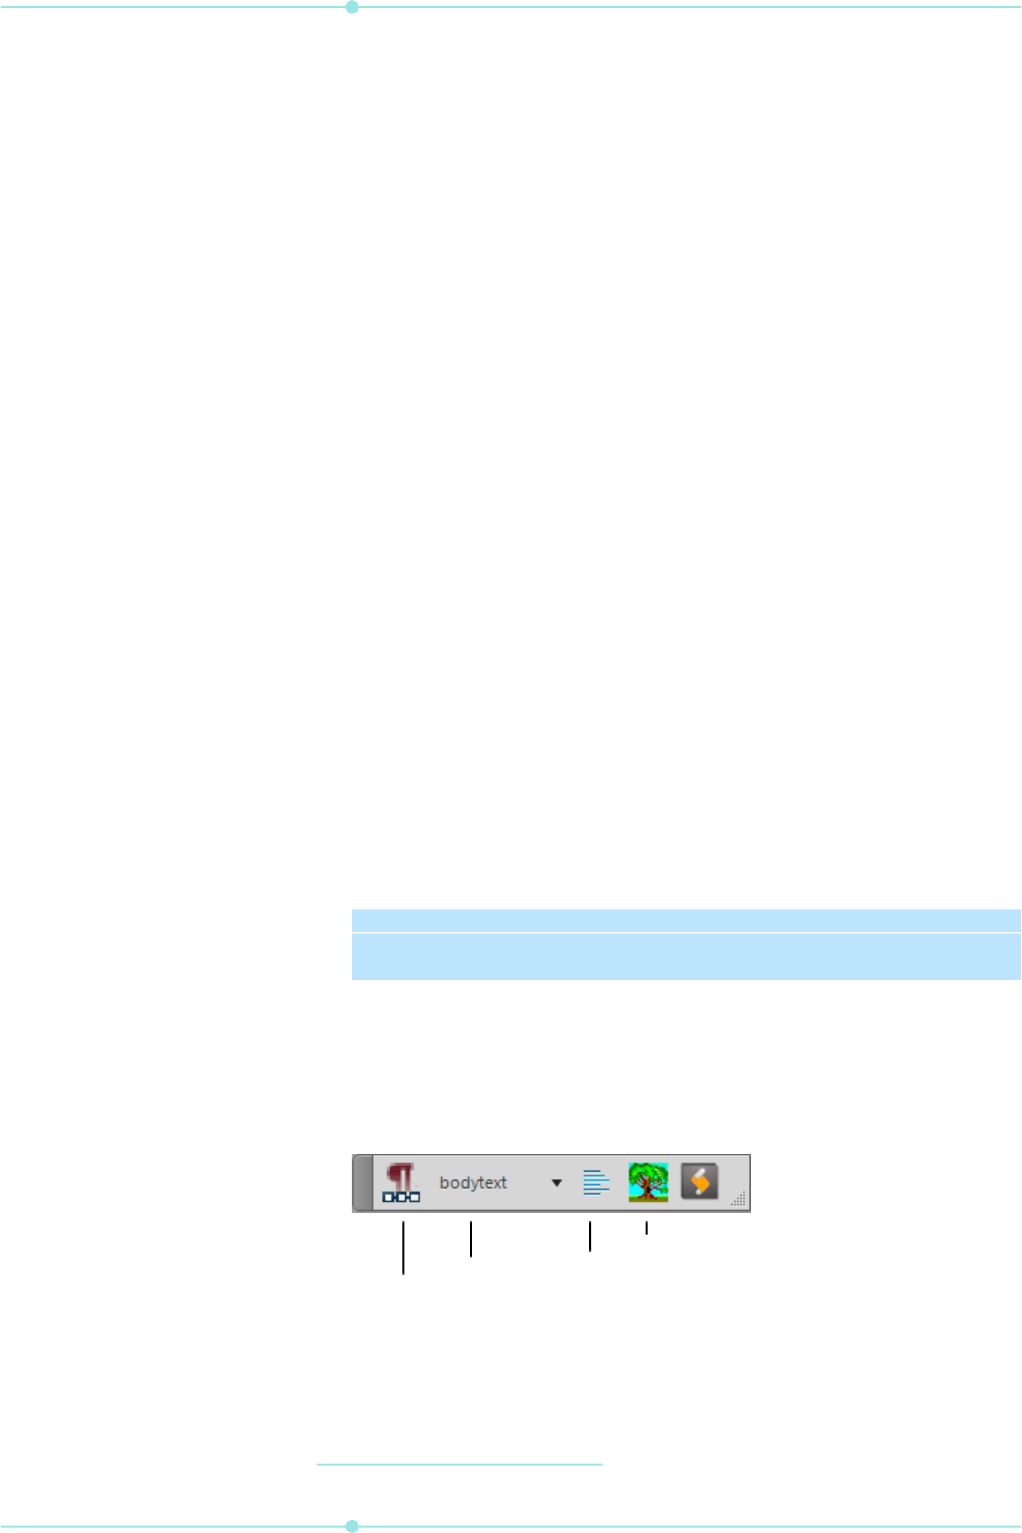
Example toolbar
Task The following is an example toolbar with all types of widgets. We will add
it to the common toolbar list.
This tool bar shall be available in the unstructured interface, in the
WYSIWYG View.
You can find all files for this example toolbar on my website.
10 An xxx.jsxbin file would just be opened in Notepad and of course presents gibberish.
Invoke ExtendScript
Invoke FrameScript
Command
Drop-down list
Command

15
Toolbars
E:\_DDDprojects\ETB-14up\Sources\etb-customising.fm 2022-12-20
Note: If not specially noted, the file locations start with
%appdata%\Adobe\FrameMaker\vv\ (vv is 14).
Create the example tool
bar
The following steps are required:
Create file
…\Workspaces\UnStructured\WYSIWYGView\toolbars\example-
toolbar.xml defining the buttons and their commands as well as key-
board-short cuts. See File example-tb.xml on page 15.
Save a copy of
…\Workspaces\UnStructured\WYSIWYGView\toolbars\fmtoolba
r.xml as fmtoolbar-ori.xml before inserting the following just
before the last line:
<SEPARATOR sep_id="5"/>
<TOOLBAR file="example_tb.xml"/>
Save the FrameScript file primitive.fsl to any location you want,
for example to $HOME\fminit\configui\
Save the ExtendScript simple.jsx to …\StartuUp\
Since we need custom icons, you can create them according to Toolbar
icons on page 26. You can find three icons for this example toolbar
After start of FrameMaker select the WYSIWYG View, for which we
have set up the two files custom_toolset.xml and example_tb.xml.
In menu View > Toolbars you will find the new toolbar and can acti-
vate it.
Integrating toolbar into
workspace
The toolbar will appear in menu View > Toolbars. There you activate
it and it will initially float around.
The workspace mechanism has assumed a certain width of the toolbar
which can be adjusted with the lower resize handle:
As usual the toolbar is docked to the other toolbars with the docking han-
dle.
You can now save the current workspace, with or without a different
name.
File example-tb.xml This file describes the contents of the toolbar. This example references
standard commands as well as a FrameScript and an ExtendScript.
<?xml version="1.0" encoding="UTF-8"?>
<FMTOOLBARLIST version="1">
<TOOLBAR id="custom_tb" name="Custom Toolbar" kbd-short-cut="\!Vzz"
orientation="horizontal">
<!-- Standard command -->
<ACTION command="RepeatLastParaCommand" tooltip="Repeat last ¶ command [Esc j j]">
<images base="etb-para-repeat" />
</ACTION>
<!-- Drop-down list -->
<DROPDOWN command="!RulerParaMenu" tooltip="Paragraph formats"/>
<!-- Fly-out menue -->
<FLYOUT command="ETBPgfAlignPopup" tooltip="Text alignment">
<images base="P_TextAlignLeft_Md" />
</FLYOUT>
<!-- simple FrameScript -->
<ACTION command="MyCommand1" tooltip="This FrameScript just provides a message">
Docking handle
Resize handle

Customising FrameMaker ≥14
16
<images base="tst-fs" />
</ACTION>
<!-- simple ExtendScript -->
<ACTION command="msgJS" tooltip="This ExtendScript just provides a message">
<images base="tst-estk" />
</ACTION>
</TOOLBAR>
</FMTOOLBARLIST>
The ID of the toolbar need not be the same as the file name. I choose
custom_tb for the ID, although the file names is example_tb.xml. The
ID is used in the workspace files only.
For each tool button a type is defined:
ACTION Button for standard command.
DROPDOWN Open a drop down list of commands.
FLYOUT Open a sub menu of commands. The corresponding command
uses a special code and a parameter. See Command for FlyOut
in tool bar on page 31.
See Tags in toolbar files on page 22 for more details.
File simple.jsx This ExtendScript shall be placed into …\Startup\
// simple.jsx
#target framemaker
var msg1 = "JavaScript alert message\nYou always get an information icon"
var msg2 = "FrameMaker Alert dialogue\nIcon/Buttons depend on second parameter"
// set up menu with just two items
var mMenu = app.GetNamedMenu("!MakerMainMenu");
var simpleMenu = mMenu.DefineAndAddMenu("Simple", "Alerts");
simpleMenu.DefineAndAddCommand(1,"msgJS","JS alert","");
simpleMenu.DefineAndAddCommand(2,"msgFM","FM Alert","");
UpdateMenus();
// watch the suptle difference in syntax: alert | Alert
function Command(cmd){
switch(cmd) {
case 1:
alert (msg1, "Message title");
break;
case 2:
Alert(msg2, Constants.FF_ALERT_CONTINUE_NOTE);
break;
}
}
File primitive.fsl This FrameScript can be placed wherever you want, for example to
$HOME\fminit\configui\
In FrameScript this script must be installed to start with FM. Only after
the next start of FM the function will be available.
// A primitive Event FrameScript: just some messages
// [2016 Klaus Müller, itl]
// An event script is necessary if a static command name is required,
// e.g. to be used in a tool bar or menu (and be distributable)
// Ordinary FrameScripts get generic command names which my be
// different at each start and are hence not distributable
17
Toolbars
E:\_DDDprojects\ETB-14up\Sources\etb-customising.fm 2022-12-20
// Event FrameScripts must be installed, not just run
//
// In an EventScript commands must reside within Events
// Menus and commands are defined within the Event Initialize
// It is good practice to remove the menu with Event Terminate
// A menu item is not necessary, for example if the command is used in a toolbar
// --- Set up a command name and the event trigger
Event Initialize
// Get Object Type(Menu) Name('!MakerMainMenu') NewVar(gvMainMenu);
// New Menu Label('My Menu') NewVar(gvMyMenu) AddTo(gvMainMenu);
New Command Name('MyCommand1') Label('My Command 1')
EventProc(evtCmdEvent) NewVar(gvMyCmd1) // AddTo(gvMyMenu)
EnabledWhen(EnableAlwaysEnable)
EndEvent
// --- Remove command and menu at de-installtion time
Event Terminate
// Remove CommandObject(gvMyCmd1) From(gvMyMenu);
// Remove MenuObject(gvMyMenu) From(gvMainMenu);
EndEvent // Terminate
// --- The event procedure is the real task
Event evtCmdEvent
If ActiveDoc = 0
MsgBox 'No active document --- Nevertheless: Welcome to the club.';
Else
MsgBox 'We have a document open --- Eventhough: Welcome to the club.';
EndIf
EndEvent // evtCmdEvent

Customising FrameMaker ≥14
18
Configuration files
Configuration files define both commands and menus. These files still
have the format as in previous FM versions. That is, they are named
xxx.cfg and use the well-known MIF syntax (not real xml).
The names of these configuration files are specified in the initialisation
file for FrameMaker (see [Files] in maker.ini).
customui.cfg This is a special configuration file which normally is located in
$HOME\fminit\configui\
11)
. It is called customisation file, because
with this file commands and menus are customised.
If this file does not exist or does not have the path defined in maker.ini
(see [Files] in maker.ini) then no customisation is performed.
Note: To be able to customise commands and menus in a company environment
(where only IT has access to the application installation folder $HOME),
you must define a location in your user’s area:
In %appdata%\Adobe\FrameMaker\##\maker.ini look for section
[Files]
If this section does not exist, create it, probably before the section
[Preference]
Modify or create the entry ConfigCustomUIFile to a location in your
%appdata% where you will store customui.cfg, for example:
ConfigCustomUIFile =
C:\Users\user\AppData\Roaming\MyFMcustomisation\customui.cfg
Commands Existing commands are defined in three files located in
$HOME\fminit\configui:
With the introduction of views, multiple files cmds.cfg and
wincmds.cfg exist.
Menus Until FM-10 menus were located in $HOME\fminit\maker. FM-11 intro-
duced the concept of views which requires a multitude of menus. See
Relationship between the UI files on page 9.
Note: While standard menus are in their own files (separated from commands)
the customisation file customui.cfg may contain both commands and
menus. Also a custom menu may contain both kinds of definitions.
Configuration file
statements
A configuration file consists of a series of statements that define menus,
menu items, and the order of those items. Commands are also defined in
configuration files and may contain definitions for details which may also
be present in menu files.
Properties of statements Statements are case-sensitive.
Each statement is enclosed in angle brackets (< and >).
Statements must appear in a particular order.
A statement begins with a keyword defining its function.
A statement may span several lines.
11 This is by the definition of the location in the maker.ini file in $HOME.
File Contents
cmds.cfg
General commands, Escape sequences
mathcmds.cfg
Commands for the Equation Editor
wincmds.cfg
Platform dependent commands, definition of short-cuts

19
Configuration files
E:\_DDDprojects\ETB-14up\Sources\etb-customising.fm 2022-12-20
Text outside angle bracket-pairs is treated as comment. Don’t include
angle brackets in comments. Personally I replace < > by « » and start (a
group of) comment lines by «--.
comment examples
[etb --- ETB addenda] ======================================
«-- The [label] supports file navigation in EditPad
- This file (customui.cfg) can not be UTF-8, it must
use Windows encoding and FrameRoman coding for Labels
- Defaulit path (
$HOME) is named here + fm-root+
(no blank after first +). This is exchanged by the
installation pgm with the real
$HOME directory.
Initialisation sequence When FrameMaker starts, it first reads the standard menu and command
configuration files and then a customisation file
12)
. The information in
each file overrides the information in files read previously. Hence the fol-
lowing order is necessary:
1 Definition of the commands.
2 Modification of labels, short-cuts.
3 Definition of a menu item referring to a command.
4 Order of the menu item or sub menu within parent menu.
Statements in configuration files
12 This process is called Localisation in the progress indication during the start. This is due
to the fact that the menu files are different for each UI language. In FM the UI language
is defined at installation - it can not be changed afterwards.
Purpose Statement, statement detail
Define a command Command on page 31
Define a command for a menu item that
is chosen while the Shift key is held down
ShiftCommand on page 31
Define a new label for a command or
menu item
Modify on page 32
Define the test for Command Search Description on page 33
Define the function to be called when a
command is chosen
Definition on page 33
Define a label for a menu or command
that is visible in the user interface
Label on page 33
Define a context-sensitive label for a
menu or menu item.
ReservedLabel on page 33
Define a keyboard short-cut for a com-
mand
KeySequence on page 35
Define a label for the short-cut which ap-
pears next to the command name on the
menu
KeySeqLabel on page 35
Define whether a command is a general
command, a FrameMath command (for
the Equation Editor), or both
Mode on page 36
Define an Asian typography command AsianFonts on page 36
Define entry in Search Command Description on page 33
Define a new menu Menu on page 44
Define a new reserved menu Reserved menu on page 44
Add a menu item to a menu Add on page 45


21
Configuration files
E:\_DDDprojects\ETB-14up\Sources\etb-customising.fm 2022-12-20
Debugging customisation files
If you’re writing a lengthy menu customisation file, consider writing and
testing the customisations a few at a time. This will make it much easier to
locate problems in the statements you write. As you create the file, you
can save the file and then read it into FrameMaker to test your statements.
With View > Menu > Modify… the modified menu can be read.
To display error messages when you load a menu customisation file, set
ShowErrors in maker.ini to On. You can also turn On the keyboard
short-cut alerts (ConfigWarnKbdOverride, ConfigWarnKbdOverride)
to see error messages in the console window
13)
. If you find errors, you can
fix them immediately and continue writing.
When you read the same menu customisation file again, you’ll see error
messages about redefining a command (because the same statements are
being read again). Ignore these messages. Use comments throughout the
menu customisation file to document your work. Others may need to edit
the file later.
13 Please note that even a plain vanilla FrameMaker installation will create a huge number
of such messages, because definitions are ‘overloaded’. It may be difficult to find real
errors this way …

Customising FrameMaker ≥14
22
Tags in toolbar files
Note: Be aware that in strings (e.g. defining the tool tip) no & must be used.
Character entities (e.g. #amp;) are not resolved. Use the word ‘and’ or
the ‘+’ sign in place of the ‘&’.
First line of toolbar file
<?xml version="1.0" encoding="UTF-8"?>
Comments Comments are in the standard XML/HTML format:
<!-- One line comment -->
<!-- Multiline comment
intermediate line
last line -->
Note: XML comments must not appear before the FMTOOLBARLIST statement!
Example See File example-tb.xml on page 15. It displays most of the following tags.
FMTOOLBARLIST This is the root tag in a toolbar file.
Syntax
<FMTOOLBARLIST attributes />
TOOLBAR statement with details
</FMTOOLBARLIST>
Attributes version="1" Parser version for which this toolbar file was written.
Value needs to be compatible with the current parser version.
TOOLBAR This tag defines the toolbar and is a wrapper for the items on the toolbar.
Syntax
<TOOLBAR attributes />
tool tags (ACTION, DROPDOWN, …)
</TOOLBAR>
Attributes file File name of the toolbar, if the description is to be picked
from somewhere else. If this attribute exists no other attrib-
utes are parsed here.
This attribute is not present in any of the Adobe toolbars up
to FM-13.
id Unique identifier for the toolbar, for workspace identifica-
tion, FDK access and API notifications
name Name of the toolbar as visible in the menu.
This may contain character entities, for example name =
"Paragraphs #amp; Characters"
orientation Keyword defining the default orientation of the toolbar:
horizontal: Default orientation is horizontal.
vertical-narrow: Default orientation is vertical and the
items are arranged in a single column.
vertical-wide: Default orientation is vertical and the items
are arranged in two columns.
dock Keyword defining the preferred/default dock (currently hori-
zontal toolbars can be docked only at the top):
left: Toolbar will be docked at the left anchor
right: Toolbar will be docked at the left anchor
top: Toolbar will be docked at the top anchor
none: Toolbar will be floating
kbd-short-cut Key-sequence to activate the toolbar (default = none)

23
Tags in toolbar files
E:\_DDDprojects\ETB-14up\Sources\etb-customising.fm 2022-12-20
readOnDocChange I have no idea, what this is good for. Found only in
quick_element.xm.
Tool tags
ACTION The action tag defines the command assigned to an UI button.
Syntax
<ACTION attribute/>
<IMAGES ...>
</ACTION>
Attributes command Identifier of an already defined FM action - a required attrib-
ute.
name Name of the action (default is the tag defined for the com-
mand)
tooltip Tool tip displayed on mouse hover (default is the name of the
action)
help Help String for the action command (default= none)
image An image-name for the action (default= None)
14)
.
TOGGLE A toggle tag is used to define two (logically alternating) actions to be per-
formed from a single widget.
Note: I have not managed to get this working. I have also not seen this tag in any
Adobe tool bar yet.
Syntax
<TOGGLE attributes1 />
<command attributes2 />
</TOGGLE>
Attributes1 name Name of the toggle (default= None)
tooltip Tool-tip that is displayed on mouse hover (default= name of
the toggle)
help Help String for the toggle command (default= None)
image An image-name for the toggle (default= None)
14)
.
Attributes2 on Required identifier of an already defined FM action (non-tog-
gle type).
off Required identifier of an already defined FM action (non-tog-
gle type).
FLYOUT This is used to define a popup menu.
Syntax
<FLYOUT attributes />
Attributes command The corresponding command uses a special code and a
parameter. See Command for FlyOut in tool bar on page 31..
name Name of the flyout (default= the tag defined for the com-
mand)
tooltip Tool tip that is displayed on mouse hover (default= name of
the flyout)
help Help string for the flyout command (default= none)
image An image-name for the flyout (default= none)
14)
.
14 This tag attribute may be replaced by images = list of images (see IMAGES on
page 24)

Customising FrameMaker ≥14
24
DROPDOWN This is used to (generally) define a menu whose sub items are a list of
options that can be chosen one at a time, for example, fonts.
Syntax
<DROPDOWN attributes />
Attributes command Identifier of an already defined FM Menu - required field"
tooltip Tool tip that is displayed on mouse hover (default= name of
the drop-down)
help Help String for the drop-down command (default= none)
Note: There is no width indication for this widget. The width is assumed by the
workspace mechanism. If more than one drop-down list appears in a tool
bar then resizing ins applied to all proportionally.
SEPARATOR This tag places a separator between two items
<SEPARATOR/>
Detail tag
Detail tags are optional. Currently only the IMAGE tag is in this category.
IMAGES This tag describes the images displayed on an ACTION, FLYOUT and
TOGGLE. Alternatively only one image can be defined (see ACTION on
page 23).
Syntax
<images attributes />
Attributes normal Default image displayed when the UI is bright
(default= none)
rollover Image displayed on mouse hover when the UI is
bright (default= normal image)
dark_normal Default image displayed when the UI is dark
(default= normal image)
dark_rollover Image displayed on mouse hover when the UI is
dark (default= dark_normal image)
Example See Using icon-images on page 27.

25
Tags in toolbar files
E:\_DDDprojects\ETB-14up\Sources\etb-customising.fm 2022-12-20
Toolbar commands
See also section Commands on page 30.
All the menu items/commands that end up executing an FCode can be used
here. Hence hypertext commands can not be used. However, scripts (Fra-
meScript, ExtendScript) can be referenced. See Example toolbar on
page 14.
Note concerning scripts Scripts must be loaded during the start of FrameMaker. This action
generates a command name and an FCode for the script.
The FCode assigned to a script may differ from FM session to FM ses-
sion. Hence it is useless.
ExtendScripts are located in
%appdata%\Adobe\FrameMaker\vv\Startup\
The name of the script name (without the file extension) provides the
command name. Installed ExtendScripts get command names from
their internal command definitions.
FrameScripts may be located anywhere. However it must be assured
that they are loaded at start of FrameMaker. See FrameScript options.
The name for the command may not be identical to the script file name
(excluding the file extension) due to an initial script. You may get the
proper command name by the free FrameScript Report FM Commands
from itl.
For details see Command names from plugins and scripts on page 41.
File name of script Command name
ImportFormatsSpecial.jsx ImportFormatsSpecial
MultiCatalog.fso iFrameMultiCatalog
RemoveUnusedFormats.fsl ESLSSRUN305
a
a. This is an automatically generated command name.

Customising FrameMaker ≥14
26
Toolbar icons
FM-14 introduces three icon sizes to be able to accommodate to high reso-
lution screens which are normally used with Windows scaling > 100%.
FM-14 supports only grey icons, FM-15 also coloured ones.
Standard icons Icons for toolbars and for the dialogues are located in resource files:
fmcustom.dll, fmres.dll, owlres.dll, fmdlg.dll.
If one or more of these fits the purpose, they can be referenced in custom
tool bars. Names of such icons can be deducted from existing tool bars or
by inspecting the dll with an appropriate application, for example
ResHacker.
Custom icon files If images are needed, which are not in the dll — for example to have
coloured icons in FM-14 — custom icon files must be defined
15)
16)
:
Per icon 6 images must be provided. The image files must be type png
(Portable Network Graphic) and the background must be transparent.
To avoid 6 additional files for coloured icons in FM-15 I recommend to
use grey icons for the dimmed version.
The image base name can be anything, for example ALIGNMIDDLE,
OBJ_ALIGN_MIDDLE, AlignMiddle or Align_Middle. There is no
need to start the name with S_ as in the icons from the dll.
The image base name must not bear the file extension
17)
:
<images base="etb_icons\Align_Middle.png"/>
will create the default icon on the tool bar.
Since Windows file names are not case sensitive, the casing in the tool
bar file may be different to that of the file name. But for the sake of
clarity keep the case identical.
If you don’t care about colour or b/w and dimming as well as various
sizes supporting higher resolution screens: one icon file (colour or
grey) is sufficient:
<images base="etb_icons\Align_Middle"/>
and one file Align_Middle.png
To get the 6 variants the following suffixes (Caps!) must be added to
the base name:
Icon size FM-14 has only these (S_xyz_SM...) FM-15 adds these coloured icons (S_xyz_SM...)
Normal Dimmed (inactive) Normal Dimmed (inactive)
Normal (18×18) …_N.png …_N_D.png …_N_C.png …_N_C_D.png
Larger (27×27) …_N_3TO2X.png …_N_3TO2X_D.png …_N_C_3TO2X.png …_N_C_D_3TO2X_D.png
Double (36×36) …_N_2X.png …_N_2X_D.png …_N_C_2X.png …_N_C_D_2X_D.png
Example dou-
ble size
S_OPEN_SM_N_2X.png S_OPEN_SM_N_2X_D.png S_OPEN_SM_N_C_2X.png S_OPEN_SM_N_2X_D.png
Reference in
the tool bar file
<images base="S_OPEN"/>
15 For FM-14 correct handling of custom icons is only available since update 2.425.
16 In this section etb_icons is just an example of the subdirectory containing icon files.
Also ANCHORED_FRAME is just an example of the base name.
17 In FM-13 (2015) this extension was accepted.

27
Tags in toolbar files
E:\_DDDprojects\ETB-14up\Sources\etb-customising.fm 2022-12-20
Location of icons files For a relative path definition the icon files can be located either in
%appdata%\Adobe\FrameMaker\14\ or in $HOME.
For an absolute path definition the files can be located anywhere.
Relative path Do not bloat %appdata%\Adobe\FrameMaker\14\ or $HOME directly
with the icon files. Specify a subdirectory. The detail definition depends
on the location of this directory.
Absolute path
In this case you must specify only the base name in the tool bar file. The
path must be defined in the maker.ini setting:
[Directories]
ToolbarCustomImageDir = D:\System_ddd\etb_icons
Directory structure For an absolute path you may set up a hierarchy of directories. Example
structure on E:
custom
icons
feature-a
gugus-icon.png
kukolores-icon.png
feature-b
…
Then you can define this path in maker.ini [Directories] as
ToolbarCustomImageDir = E:\custom\icons\feature-a
And in the toolbar you reference the icons as
<ACTION command = "gugus">
<images base = "gugus-icon"
</ACTION>
<ACTION command = "kukolores">
<images base = "kukolores-icon"
</ACTION>
If you have a similar set of icons in sub directory feature-b you can
switch them by changing the setting in maker.ini.
Using icon-images 1 Add the base name of the icon in the base attribute of the image ele-
ment.
Icon size Icon file names
Normal Dimmed (inactive)
Normal (18×18) basename.png basename_D.png
Larger (27×27) basename_3TO2X.png basename_D_3TO2X.png
Double (36×36) basename_2X.png basename_D_2X.png
Example for dou-
ble size
ANCHORED_FRAME_2X.png ANCHORED_FRAME_D_2X.png
Location of subdirectory icon reference with sub directory plain icon reference
images base=
"etb_icons\ANCHORED_FRAME"
images base= "ANCHORED_FRAME"
%appdata%\Adobe\FrameMaker\14\
or …\15\
No item in maker.ini Subdirectory not possible. Icon files must
be in appdata ‘root’.
$HOME not possible
ToolbarCustomImageDir=etb_icons
This setting must be in section
[Directories]
Customising FrameMaker ≥14
28
<ACTION command="RepeatLastParaCommand"
tooltip="Repeat last ¶ command [F4]">
<images base="para_repeat" />
<!-- <images base="etb_icons\para_repeat" /> in subdir -->
</ACTION>
2 Create a custom icon. I prefer to create the image as 256×256 pixel
image and deduct from this the required sizes and variants
18)
.
3 For each icon derive the necessary variants with correct naming (suf-
fix):
para_repeat_2X, etc.
4 Place the icon files according to Location of icons files on page 27.
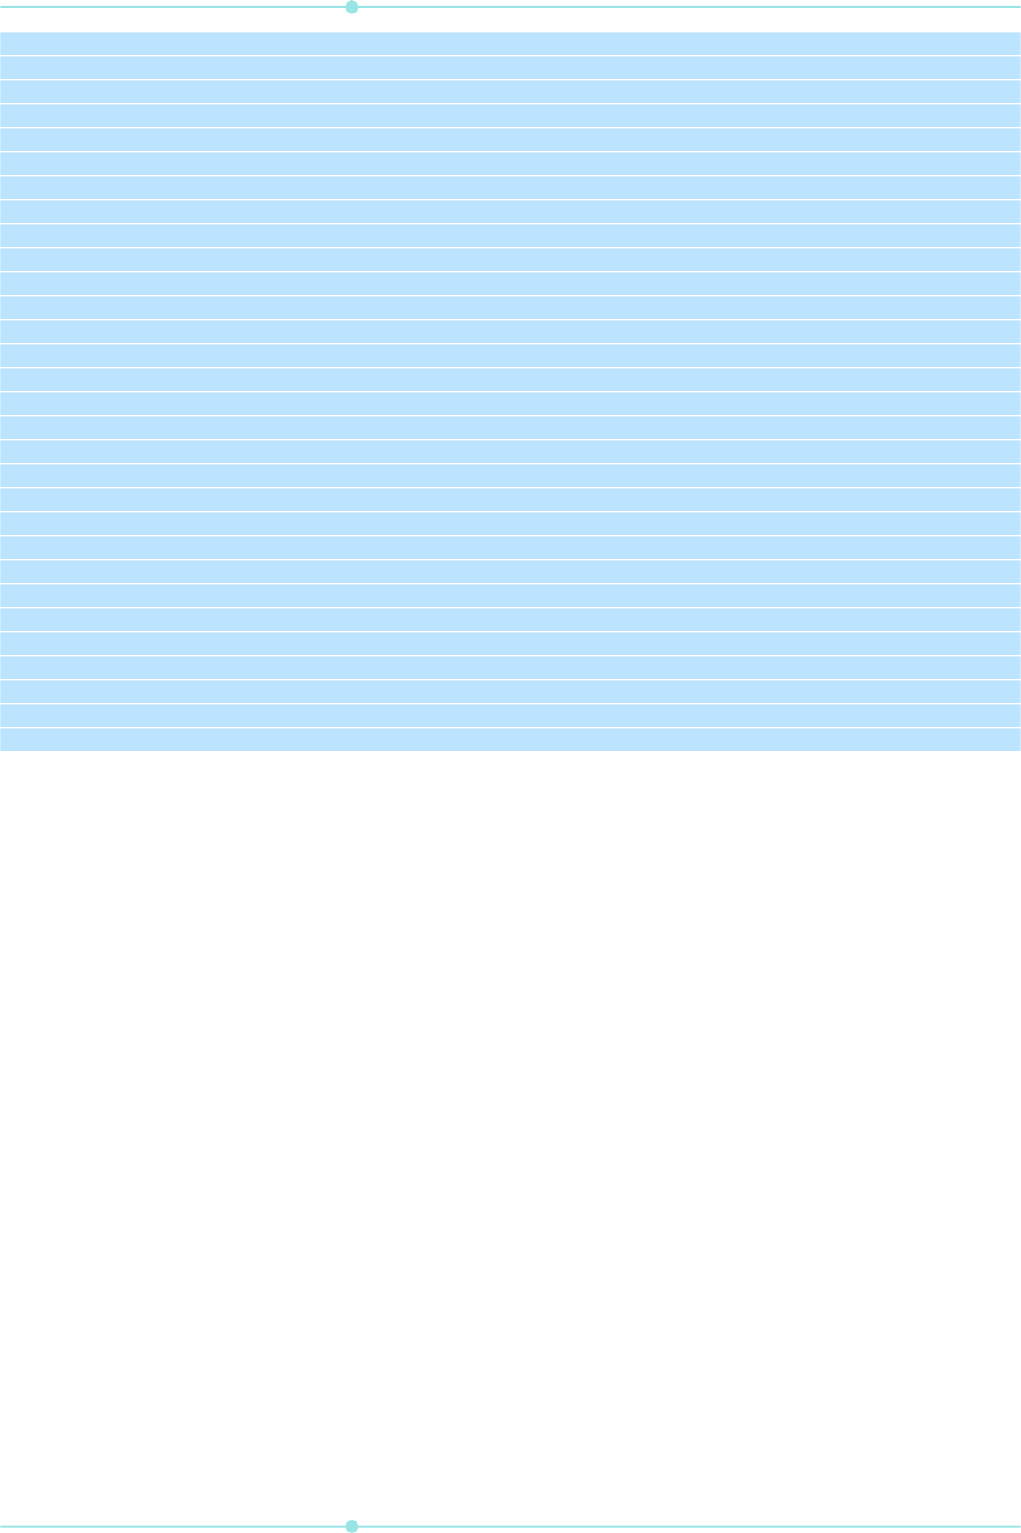
Example icons These are all from fmcustom.dll, base name = S_ADDCOLS
Note: When hovering over active buttons, they get a border. Inactive buttons do
not get this border on hovering.
Default icons Missing (not found) images are displayed with a default icon:
Tool bar icons and
workspaces
A workspace defines the toolbars to be active in it.
There is no setting in Preferences to define the default size of the
tool bar icons (as it was in FM-13). FM takes the information from the
Windows scaling factor.
On a high resolution monitor this factor is at least set to 150% to get a
reasonable appearance of the icons. This will take the icons names
…_3TO2X. A zoom factor ≥200% will take the icons named …_2X.
On standard monitors with bout 100dpi resolution you will have this
factor set to 100% which takes the icons named without a scaling suf-
fix.
Contents of the resource
files in fminit
FM-9 introduced the new UI with an additional resource file: owlres.dll
(owlres.res). These contain png images which are not handled by
known resource editors. Also fmcustom.dll now contains png images,
no more bit maps (bmp).
18 For batch modification of images (resize, convert to greyscale, etc. I use the tool
ImBatch).
Small Medium Large
Active Inactive Active Inactive Active Inactive
…_SM_N …_SM_N_D …_SM_N_3To2X …_SM_N_D_3TO2X …_SM_N_2X …_SM_N_D_2X
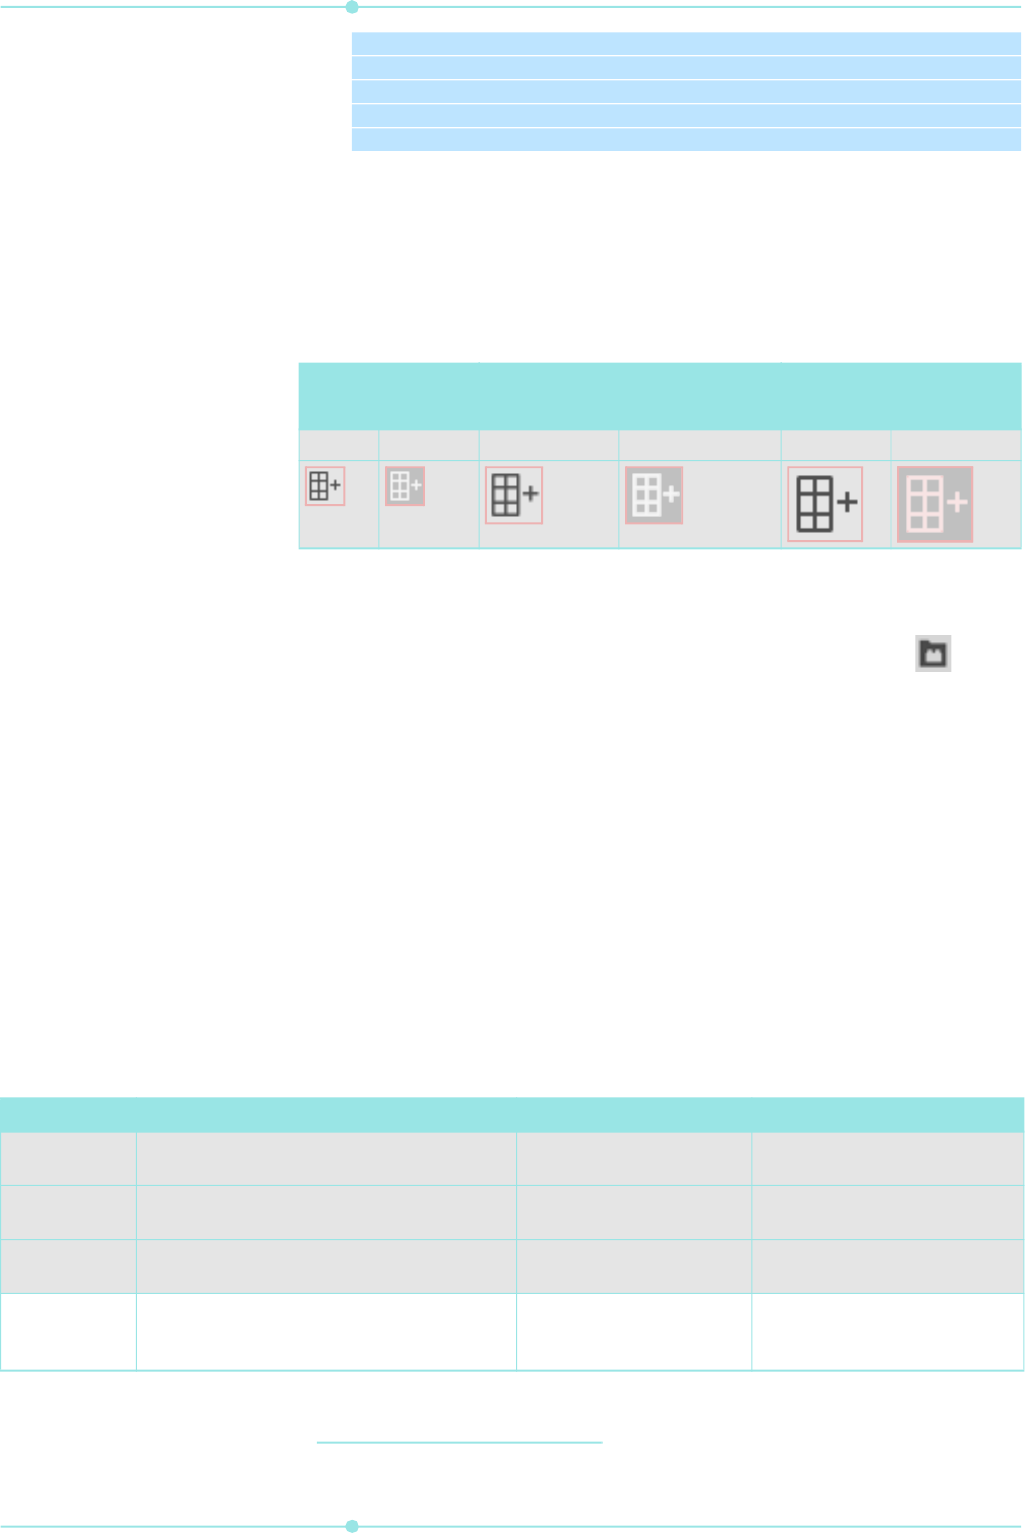
File Icons, pictures Dialogues Other
fmcustom.dll
Images for toolbar also icons for the panels
and graphic toolbar. 2 to 8 variants per image.
none version info
fmdlg.dll
Rubi-bit maps [bmp]. Many new items (panels) classic dialogues, panels,
panel-lists
Icongroup (icons for the dia-
logues) version info; 500 (?)
fmres.dll
Button images for dialogues, palettes and pan-
els (16x16), [bmp]. Some items no more used
none Cursor group (32x32 cursors);
Icongroup (icons in panels etc.)
owlres.dll
Images for the new toolbars [png]. 2 to 4 vari-
ants per image. This file is new with FM-9
C-like definitions for appli-
cation bar, grafix bar, UI
preference dialogue etc.
Xstr (strings with all text in xml
notation); version info (correct)

29
Tags in toolbar files
E:\_DDDprojects\ETB-14up\Sources\etb-customising.fm 2022-12-20
Extract icons
To get the icons out of the DLLs – to have individual files to work on for
the tool bar buttons – my procedure is the following:
Extract and rename 1 Open the dll in ResHacker.
- Select the appropriate resource type (e.g. bitmap).
- Save the resources with Action > Save [...] resources.
- Use an rc name such as fmres-bmp.rc .
2 Open the rc file in EditPad.
- Convert double to single line spacing
- Use the REGEX to exchange the 'columns':
fmcustom
binaries (.+) png "(.+)" \2\t\1
fmres bitmaps (.+) bitmap "(.+)" \2\t\1
cursors (.+) cursor "(.+)" \2\t\1
icons (.+) icon "(.+)" \2\t\1
owlres binaries (.+) png "(.+)" \2\t\1
- Remove blanks at start of line
- Save the table as fmres-rename-table-bmp.txt
3 Start RenameByTable.ahk
- Attention: the table file must be in Windows code page 1252, or
UTF-8, not UTF-16.
- Fill in all fields, including the target file extension.
PDF of all icons 1 Open the directory (e.g. E:\FM-specials\FM-12-
tests\Resources-owlres\renamed-png) in Thumbs+.
2 In Image > Print Catalog set up a layout (or use icon-overview)
with the following properties:
- Printer = Adobe PDF
- Print Thumbnail borders OFF
- Colour output
- Margins all: 0.5cm
- Thumbs width 4.5cm, height 2.2cm
- Header: Resource icons xxx
- Header font 12 pt, Caption font 8pt
- Items for caption: only File name
- Files to process: Current folder
- Print Heading for each folder: OFF
- FINISH: provide file path for PDF file
Be aware that with FM-14 most file names are to long for complete dis-
play. In the tabular arrangement of the icons; the names may overlap.

Customising FrameMaker ≥14
30
Commands
There are three command files in $HOME\fminit\configui:
cmds.cfg
mathcmds.cfg
wincmds.cfg
In the various views there are different versions of these files, since not all
commands are relevant in a particular view.
For customisation it is not necessary to modify any of the standard com-
mand files. All customisation of commands is done in customui.cfg. and
one or more menu files.
Note: A complete list of FM-14 commands can be found on www.daube.ch. These
command lists are created with the free FrameScript Report FM
Commands from itl.
Syntax peculiarity Inside a main definition (such as Command, Add, Order …) a blank must
precede a nested option:
Invalid
<Add MyCharOneQuarter<Menu SpecialCharsContext>>
This definition will not become active.
Valid
<Add MyCharOneQuarter <Menu SpecialCharsContext>>
Command examples
For explanation of the keywords see Command statements on page 31.
Normal command
<Command NewDocument Name of the command
<Label Document...> What you see in the menu
<KeySequence \!fn> short-cut (ESC sequence)
<Definition \x300> FCODE, the command definition
<Mode All>> Valid contexts for this command
Command with restricted
context
<Command SelectAll
<ReservedLabel Flow Select All in Flow>
<ReservedLabel Frame Select All in Frame>
<ReservedLabel Page Select All on Page>
<KeySequence \!ea>
<Definition \x327>
<Mode All>>
Modify the short-cut <Modify SelectAll
<KeySequence ^a> >
… and indicate it in the menu <Modify SelectAll
<KeySequenceLabel CTRL+A> >
Combine these two
modifications
<Modify SelectAll
<KeySequence ^a>
<KeySequenceLabel CTRL+A >>

31
Commands
E:\_DDDprojects\ETB-14up\Sources\etb-customising.fm 2022-12-20
Command statements
Command The command statement is the wrapper definition for the command:
Syntax
<Command cmd-name <detail1> <detail2> <detailn>>
Details may be added to a command also by the Modify statement on
page 32.
Cmd-name A unique name of the command. This serves as a reference between the
various statement types.
Details For the detail specifications see Command details on page 33.
Examples
See also Command examples on page 30.
<Command PrintingDisplay
<ReservedLabel Document &Printing Display>
<KeySequence \!qqp >
<KeySeqLabel Esc q q p>
<Definition \x4F1 \x4F2 \x4F3 \x3F8>
<Mode All>>
Note: This command is defined by 4 function codes which imposes some prob-
lems. See the remark at Multi-code commands on page 39.
Custom command
A custom command must not use an already existing name. Hence it is
good practice to prefix the name with an indicator, for example:
<Command ETBVertToolBar …> Enhanced Toolbar
<Command _MTCharSet …> Microtype’s Customisation
ShiftCommand This statement defines a command for a menu item that is chosen while
the Shift key is held down. This statement normally appears in a menu file
(not a command file).
Syntax
<ShiftCommand cmd-unshifted cmd-shifted>>
Cmd-unshifted This is the identifier of the command as it normally appears.
Cmd-shifted This is the identifier of the command you want to appear when you hold
down the Shift key.
Examples
<ShiftCommand Save SaveAll>
<ShiftCommand FindNext FindPrevious>
Note: Commands defined by ShiftCommand can not be placed in context menus
19)
. The insertion of the command (by Add) does not create an error,
although the command is not inserted. A further Order command will not
find the (not) inserted command and creates an error.
Example creating the error:
<ShiftCommand GraphicsObjProps GraphicsPickObjProps> ...
<Add GraphicsPickObjProps <Menu !GraphicsContextMenu>>
<Order !GraphicsContextMenu.GraphicsPickObjProps
<After !GraphicsContextMenu.GraphicsObjProps>>
Remove You can not remove commands. Only the menu entry is removed.
Syntax
<Remove cmd-name <Menu menu-id>>
Examples <Remove GraphicsReshape <Menu GraphicsMenu>>
<Remove GraphicsReshape <Menu QuickGraphicsMenu>>
Command for FlyOut in
tool bar
Command which is used in a flyout action in a tool bar must use this
scheme. The code is always the same. The parameter defines which menu
to display:
<Command ETBPgfAlignPopup <Label ETB paragraph alignment>
19 I have reported this as bug # 3494702 as of 2013-02-01.

Customising FrameMaker ≥14
32
<Definition \x914>
<Param ETBPgfAlignMenu>>
ETBPgfAlignMenu <Menu ETBPgfAlignMenu <Label Alignment>>
<Add LeftPara <Menu ETBPgfAlignMenu>>
<Add CenterPara <Menu ETBPgfAlignMenu>>
<Add RightPara <Menu ETBPgfAlignMenu>>
<Add FullyJustifyPara <Menu ETBPgfAlignMenu>>
Modify statement
Modify The Modify statement is used to change details of a command. This com-
mand must be defined already. The change may affect:
the label(s)
the key sequence aka short-cut(s)
the key sequence label(s)
The description used in the Search Command function.
Syntax
<Modify cmd-name <new-detail1> … <new-detailn>>
<Modify cmd-name [context-id] <new detail>>
Cmd name This is the name (ID) of the command whose properties shall be modified
Details In the Modify statement the same details can be defined as in a Command
statement. See Command details on page 33.
Modifications are cumulative for key sequences (short-cuts)
20)
. The other
details are overwritten by the newest one.
Examples
<Modify NewDocument
<KeySeqLabel Ctrl+N>>
<Modify TerminateMaker
<Label E&xit>>
Define Label with access character
Renaming a context sensitive
command
To rename the label of a context sensitive command, both the command-
name and the context-identifier (here: Frame) must be given:
<Modify SelectAll <ReservedLabel Frame Select Everything in
Frame>>
Various labels for same
command
To get a different label for a command in only one place, define a new
command that duplicates the function of the old one (using the same key
sequence, definition, and mode), but use a different label. Then put the
new command on the menu in place of the old one.
20 If a customisation file contains short-cut definitions for commands that already have
short-cuts defined for them, warning messages may be written to he console log file.
This happens with ConfigWarnKbdRedundant = On in maker.ini
(see
[Preferences] in maker.ini)
.

33
Commands
E:\_DDDprojects\ETB-14up\Sources\etb-customising.fm 2022-12-20
Command details
Definition This defines the function of the command.
Syntax
<Definition Fcode1 [Fcode2 … Fcoden]>
Fcode The function code is the connection between the command and the routine
in the application which performs the function. A command may issue
several functions, although most commands have only one Fcode associ-
ated.
The Fcode is noted as \xnnn with nnn being a hexadecimal number. You
can find relevant Fcodes in the FDK
21)
documentation or in the command
files or in special lists derived from these files.
Examples
<Definition \x300> Create new document
<Definition \x302> Command Help
<Definition \x3F1 \x3F2 > Borders and Text symbols On
Label The label defines the entry in a menu. It also provides a default for tool
tips on buttons using this command.
Syntax
<Label label-string defining the menu entry>
Label string If an ampersand character (&) is needed in the label-string, it must be
doubled. This is due to the fact that the & precedes an access character.
This will be underlined in the menu.
Example
<Label P&rint Setup…>
This will display in a menu as Print Setup…
Description A string used in the function Search Command feature.
22)
Syntax <Description description-string>
Example <Description Save book as old FM version [ETB] >
ReservedLabel Some commands have a different label, and a different effect, depending
on the context – where the insertion point is, what is selected, and so on.
In these cases, the command gets a context-id defining the condition in
which it can be chosen. Each of the conditions has a ReservedLabel
statement.
Syntax
<ReservedLabel context-id label-string>
21 In the FrameMaker Developer Kit (FDK) see include\fcodes.h
Access character definition
}
}
Label KeySequenceLabel
22 Do not append the KeySeqLabel string. This is automatically appended from the
KeySequence definitions.

Customising FrameMaker ≥14
34
Context-id The following context-ids are used in commands
23)
:
Label string The same rules as with the Label detail apply. See Label on page 33
Example
<Command SelectAll
<ReservedLabel Flow Select All in Flow>
<ReservedLabel Frame Select All in Frame>
<ReservedLabel Page Select All on Page>
Context-id Condition
Body
Body pages are displayed
Book
Book window is active
CMTOC
Mini TOC can be created here
Ditamap
Ditamap is active
Document
Document is active
Flow
Flow is selected
Frame
Frame is selected
Generic
Set up any generated file
History
History window
Long, Long2
Complete (Long) menus is active
LongMultiple
Multiple book components are selected
LongSingle
Single book component is selected
MacEdition…
Depreciated, since Macintosh is no more supported.
Master
Master pages are displayed
MultiGraphics
More than one object is selected
NoDelete
This page can not be deleted (e.g. Left/Right master page)
NoName
This page has no name (not yet saved)
NotRegistered
Product not yet registered
Other
Other than body pages are displayed
Page
A document page is active
Project
Project pane is active
Redo
Undo command list
Reference
Reference pages are displayed
Repeat
Repeat xxx
Scratch
Probably a left-over from program development
Search
AFAIK only used to search references.
Short, Short2
Short (Quick) menus is active
Straddle
Selected cells are not straddled
Table
Table is selected
TextInset
Text inset is active
TOC, LOF, …
Set up the respective generated file TOC, LOF, LOT, LOP,
LOE, APL, AEL, LOM, AML, LOR, IX, AIX, SIX, IOM, IOR)
ToTable
Selection is paragraph(s)
ToText
Selection is a table
UMTOC
MiniTOC is selected
Undo
Redo command list
Unstraddle
Selected cells are straddled
23 This table is deducted from the various cmdxxx.cfg files of FM-13. See also FP_Ena-
bledWhen value in the FDK reference.

35
Commands
E:\_DDDprojects\ETB-14up\Sources\etb-customising.fm 2022-12-20
... >>
The SelectAll command acts as a place holder on the menu for the group
of commands: Flow, Frame, and Page, all of which have the same com-
mand definition.
KeySequence The key sequence defines a keyboard short-cut for the command.
Syntax
<KeySequence sequence>
Sequence This defines the sequence of keystrokes. Two cases must be distinguished:
Keys to be pressed together (key group) and keys to be pressed one after
the other (key sequence).
If you need the modifier key symbols literally in a sequence, the symbol
must be preceded by a solidus (/). For example to use the ‘+’ in a key
sequence literally, you provide ‘/+’.
Key group A base key is pressed together with modifier keys.
These modifier keys are defined with special sym-
bols:
Escape key: \!
Shift key: +
Control key: ^
Alt key
24)
: ~
FM supports only two modifier keys for a key
broup.(and:, humans have only two hands …)
Key Sequence These sequences mostly start with the Escape key.
Non-alphanumeric keys need a special notation
25)
:
Escape key: \!
Function keys: /F1 … /F12
Insert key: /Insert
Note: Defining a key sequence must consider existing key sequences. If a key
sequence ESC,q,q is already defined, ESC,q can no more be defied,
because the input process waits for the next q. If You then enter just any
other character (e.g. z), nothing will happen.
Existing key sequences mostly mimic the menu entries they support. They
depend on the UI language. For example the sequence for Repeat last
character modification is Esc,c,c in the English, and Esc,z,w in
the German FrameMaker.
Examples
<KeySequence +^b > Shift+CTRL+B (one key stroke)
<KeySequence \!/+c > Escape, Plus, c (three key strokes)
short-cuts on the Equations
palette
The short-cuts that appear on the Equations palette can not be customised.
This palette is actually a special view-only document containing hypertext
commands. The same is true for the Vertical Toolbar.
KeySeqLabel The key sequence label is added to the right side of a menu entry.
Syntax
<KeySeqLabel descriptive-string>
24 On European keyboards the right Alt key is engraved AltGr (Alternate Graphic).
Pressing this key together with another key types the special graphic engraved at lower
right of the symbol key.
AltGr is equivalent to Alt+Ctrl.
25 Since Windows 95 the following keys available only on Windows Keyboards can no
more be used for short cuts in FrameMaker:
Application Key – also called Menu Key (/Apps) right of the space bar. Its standard
function is to open the context menu of an application.
The Windows logo key (/Win) left of the space bar is used for various Windows func-
tions, for example, to open the Start Menu. See Wikipedia.

Customising FrameMaker ≥14
36
Descriptive string This echoes the key sequence of the command. You should distinguish the
two cases of key sequences by different notation:
Key group Key names concatenated with a ‘+’ sign.
Key sequence A list of key-names (separated by blank or comma).
Examples
<KeySeqLabel CTRL+A> Key group
<KeySeqLabel Escape, q, q, e> Key sequence
<KeySeqLabel Esc q q p> Key sequence
<KeySeqLabel ALT+Shift+F9> Key group
Note: FM-14 has a mechanism to derive the
KeySeqLabel from the key
sequence. Only if a command does not have a KeySequence detail, the
command will be displayed on the menu with no short-cut.
Mode The Mode defines the validity of a command for a particular environment.
Syntax
<Mode mode >
Mode Defined modes (used in commands) are:
Example
<Mode NonMath >
AsianFonts To define a command that appears in menus only if your system supports
typing Asian text in documents and dialogue boxes, use this detail:
Syntax
<AsianFonts Yes>
Note: AsianFonts No has the same effect as omitting the statement. In this case
the command applies to all configurations.
Mode
All The default
Math During Equation editor
NonMath Anything but Math

37
Commands
E:\_DDDprojects\ETB-14up\Sources\etb-customising.fm 2022-12-20
Some particularities of commands
Hypertext commands The following hypertext commands can not be used in menu or tool
bar: newlink, gotolink, gotolinkfitwin, previouslink and
previouslinkfitwin.
See a synopsis of the hypertext commands at Synopsis of FM hypertext
commands on page 52.
It is not possible to define short-cuts for hypertext commands. For
example, the short-cut defined in the Modify statement is not executed:
<Command Test1 <Label Using FrameMaker 11>
<Hypertext message openfile H:/…/etbfm11-help.pdf>>
<Modify Test1 <KeySequence \!qqq>
<KeySeqLabel Escape q q q>>
Hypertext commands do not work in books, neither do short-cuts to
hypertext commands in a book window.
Although it is possible to define an entry in a book menu for such com-
mands , they are inactive (greyed out).
It is possible to define FM read only documents containing buttons
with hypertext commands. Examples are the Equations palette and the
Vertical tool bar. See more on this method on www.daube.ch.
Hypertext commands in
tool bars
In tool bars the same hypertext commands as in menus are possible. How-
ever, they do not work, if the command is only used in the toolbar. Hence
it is necessary to at least define a dummy menu entry. See Menu and tool
bar files on page 54.
Note on drop-down lists More than one drop-down list can appear in a tool bar
26)
:
Scripts as commands
Binary scripts Binary scripts (*.jsxbin) must reside in the Startup folder of the user
area. They define the command name and a menu where used (See Menu
and tool bar files on page 54).
Binary scripts can not be addresses by a hypertext command
27)
.
The general procedure is this [Ric Quatro]:
1 Create a new custom command in your script.
2 Use the built in Command function to wait for the custom command to
be invoked and have it call a function with your simple code in it.
3 Optionally compile the script to a jsxbin and install it in the Startup
folder.
Note: See File simple.jsx on page 16 for an example. This will, however run at
start of FM also, not just on demand by a button or menu. To avoid run-
ning at start of FM you need to add a Notify function:
function SetupNotifications () { // Watch for the following notifications ==================
Notification (Constants.FA_Note_PostActiveDocChange, true);
} // --- end SetupNotifications
26 Example provided by Shmuel Wolfson.
27 This is, because no program association can be defined for such files. A xxx.jsxbin
file would just be opened in Notepad and of course presents gibberish.

Customising FrameMaker ≥14
38
function Notify (note, object, sparam, iparam) { // Handle triggered events ===============
if (typeof wSaveOld == "undefined") {return;} // just started in StartUp folder
switch (note) {
...
} // --- end Notify
The item in red is the name of the window (dialogue, panel) object.
Source scripts Source scripts (*.jsx) can reside in the Startup folder of the user area,
but also in the general script folder at
%userprofile%\Documents\Adobe Scripts.
Simulating alert and
alerttitle
The following ExtendScript is a replacement for the alert/alerttitle
hypertext commands:
// ETBnudge.jsx
// to be placed in C:/Users/Klaus/Documents/Adobe Scripts/
#target framemaker
var msgtitle = "Nudging objects";
var msg = "At zoom 100% unit is 1pt; at zoom 353% unit is 0.1mm"
+ "\n• Use ALT+arrow to nudge 1 unit"
+ "\n• Use SHIFT+ALT+arrow to nudge 6 units"
+ "\n\nATTENTION: SHIFT+ALT (without arrow) changes the system locale."
+ "Check your system tray, if keyboard behaves strangely!";
alert(msg, msgtitle);
Keyboard short-cuts For ordinary commands (not hypertext commands) keyboard short-cuts
can be redefined. However, this will provoke a log message if
ConfigWarnKbdOverride = On is set in maker.ini. Even an unmodi-
fied FM-UI will issue such messages
28)
.
If the same short cut is given more than once to a command, another mes-
sage is issued if ConfigWarnKbdRedundant = On is set in maker.ini
29)
. This happens in particular for settings both in customui.cfg and in
the menu file in %appdata% – which is common for many UI modifica-
tions.
Command overloading A command (name) can be redefined
30)
. Initial definition:
<Command Test2
<Label Using FrameMaker 11>
<Hypertext message URL http://help.adobe.com/en_US/.../11.0/Using/index.html>
<KeySequence \!qqq>
<KeySeqLabel Escape q q q>>
Later definition <Command Test2
<Hypertext alert Test2 is testing hypertext> >
<Add Test2 <Menu ViewMenu>>
Result The short-cut ESCqqq brings up an alert that says “Test2 is testing
hypertext”.
28 For example: The short-cut !ph in file FMPublisher overrides one or more previous
short-cuts.
29 For example The short-cut !SFL in file
$HOME\fminit\configui\structured\wysiwygview\wincmds.cfg is a duplicate
of an existing short-cut.
30 Lynne Price, 2014-10-23

39
Commands
E:\_DDDprojects\ETB-14up\Sources\etb-customising.fm 2022-12-20
Multi-code commands For multi-code commands only two of the three UI elements may be
defined: button, menu item, short-cut. If all three are defined, then only
the first code will be executed.
31)
For the following no menu item will be defined:
<Command EditingDisplay
<ReservedLabel Document &Editing Display>
<KeySequence \!qqe >
<KeySeqLabel Esc q q e>
<Definition \x3F1 \x3F2 >
<Mode All>>
And for the following only a menu item (and no short-cut or button) will
be defined:
<Command ETBGoToMasterPage
<Definition \x343 \x345 >
<Label Go to a Specific Master Page... >>
<Add ETBGoToMasterPage <Menu ViewMenu>>
<Order ViewMenu.ETBGoToMasterPage
<Before ViewMenu.ViewMasterPages>>
OWL commands The new interface requires special commands:
Show next tab in panel group
<Command ShowNextKit <Label Show Next>
<KeySequence ^ /F6>
<Definition \x971>
<Mode All>>
Show previous tab in panel
group
<Command ShowPrevKit <Label Show Previous>
<KeySequence ^ +/F6>
<Definition \x972>
<Mode All>>
??? <Command ThemeLoad <Label LoadTheme...>
<KeySequence \!LT>
<Definition \x974>
<Mode All>>
??? <Command ThemeSave <Label SaveTheme...>
<KeySequence \!ST>
<Definition \x975>
<Mode All>>
Toggle between the
following 3 screen modes
<Command ToggleScreenMode <Label Toggle Screen Mode>
<KeySequence ~+/Return>
<KeySequence \!SMt>
<Definition \x978>
<Mode All>>
Standard mode (UI, normal
size)
<Command SceenModeStandard <Label Standard Screen Mode>
<KeySequence \!SMs>
<Definition \x979>
<Mode All>>
Full width with UI <Command ScreenModeFullWithUi <Label Full Screen Mode with UI>
<KeySequence \!SMu>
<Definition \x97A>
<Mode All>>
Full screen, no UI <Command ScreenModeFullScreen <Label Full Screen Mode>
<KeySequence \!SMf>
<Definition \x97B>
<Mode All>>
Peferences > Interface <Command UiPreferences <Label Interface...>
<KeySequence \!ip>
31 This is a problem since FM-9 and is most likely a consequence of the new user interface.
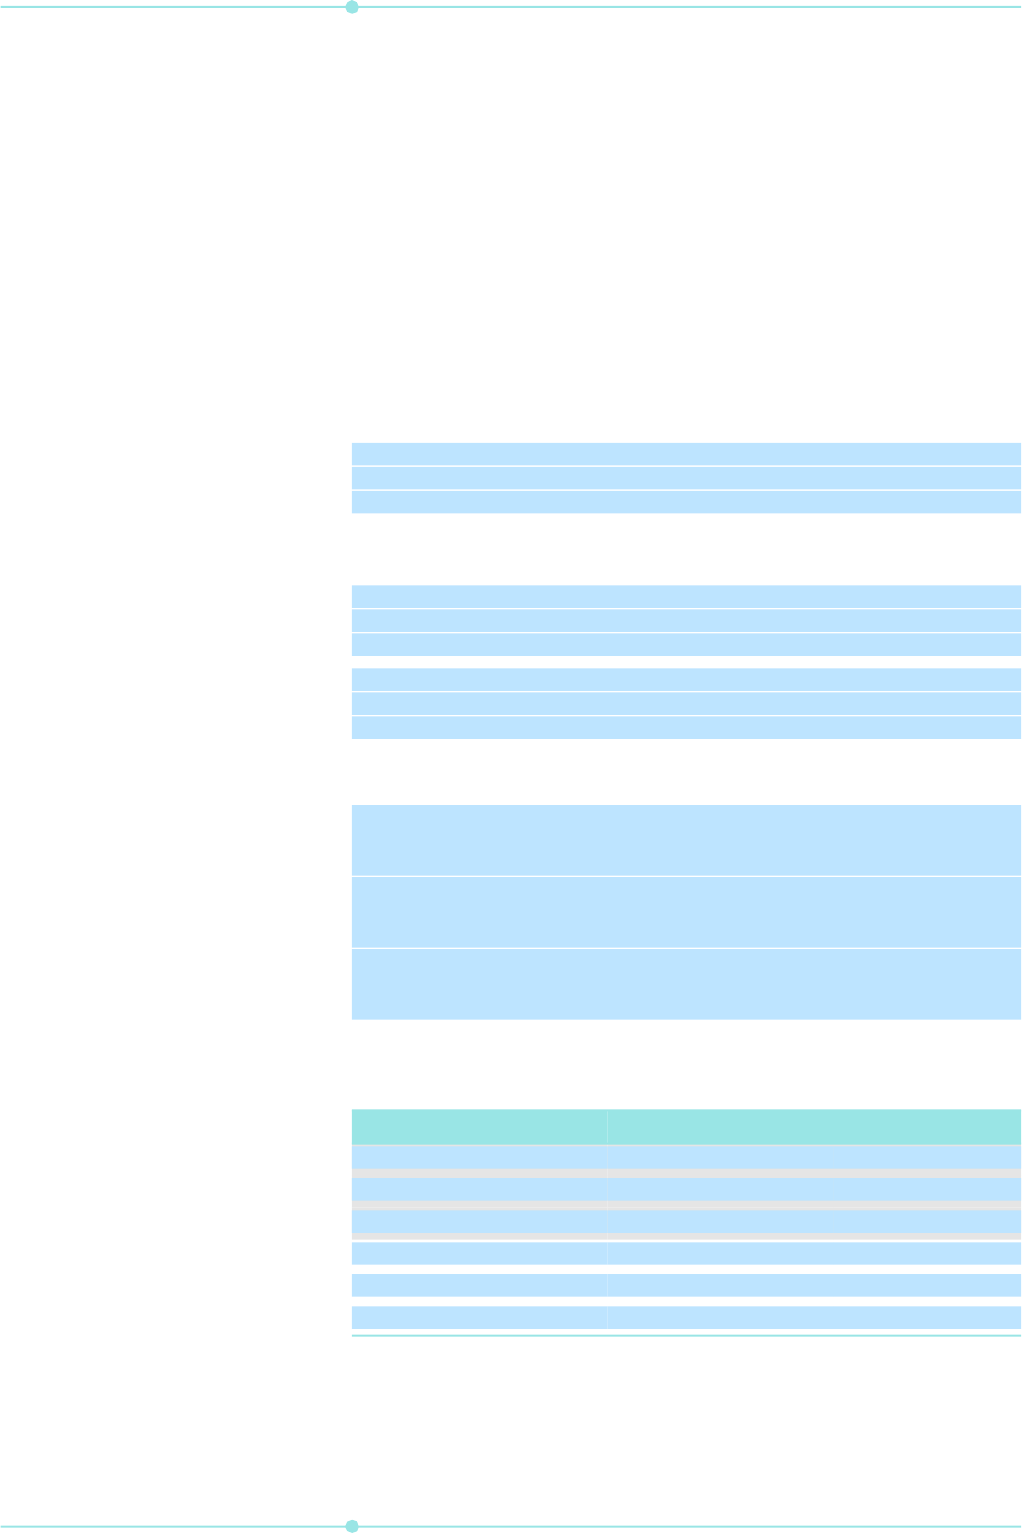
Customising FrameMaker ≥14
40
<Definition \x980>
<Mode All>>
Preferences > Alert Strings <Command UiAlertStringsPreferences <Label Alert Strings...>
<KeySequence \!asp>
<Definition \x981>
<Mode All>>
Show all tool bars <Command ToolBarShowAll <Label Show All>
<KeySequence \!TSA>
<Definition \x989>
<Mode All>>
Hide all tool bars <Command ToolBarHideAll <Label Hide All>
<KeySequence \!THA>
<Definition \x98A>
<Mode All>>
Some graphic commands
Keep next selected graphic
tool active
<Command GraphicsKeepTool
<Label Keep Tool>
<KeySequence \!gk>
This keeps the next selected graphic tool active until
SmartSelectionTool is activated.
Operate on hot spot graphic
<Command GraphicsCreateLink
<Label Create Link to graphic...>
<KeySequence \!gcl>
Operate on hot spot graphic <Command GraphicsCreateLinkTable
<Label Create link table for graphic...>
<KeySequence \!gct>
Dead commands Following commands do nothing since FM-9:
<Command !WindowOpen** Not supported on all platforms **
<Label Open>
<KeySequence \!wo>
<Command ViewPublisherBoundaries
<Label Publisher Boundaries>
<KeySequence \!vl> (lowercase L)
<Command ReportCmds_byShortcut
<Label Report Commands by short-cuts>
<KeySequence \!SCR2>
Viewer popup command The commands for the viewer (and a locked document) also work in the
ordinary edit window:
Command KeySequence Definiiton
GotoNextPage \!pn \x34D
GotoPreviousPage \!pp \x34C
GotoFirstPage \!pf \x340
GotoLastPage \!pl \x341
GotoPreviousScreen \!vsp \xD40
GotoNextScreen \!vsn \xD41
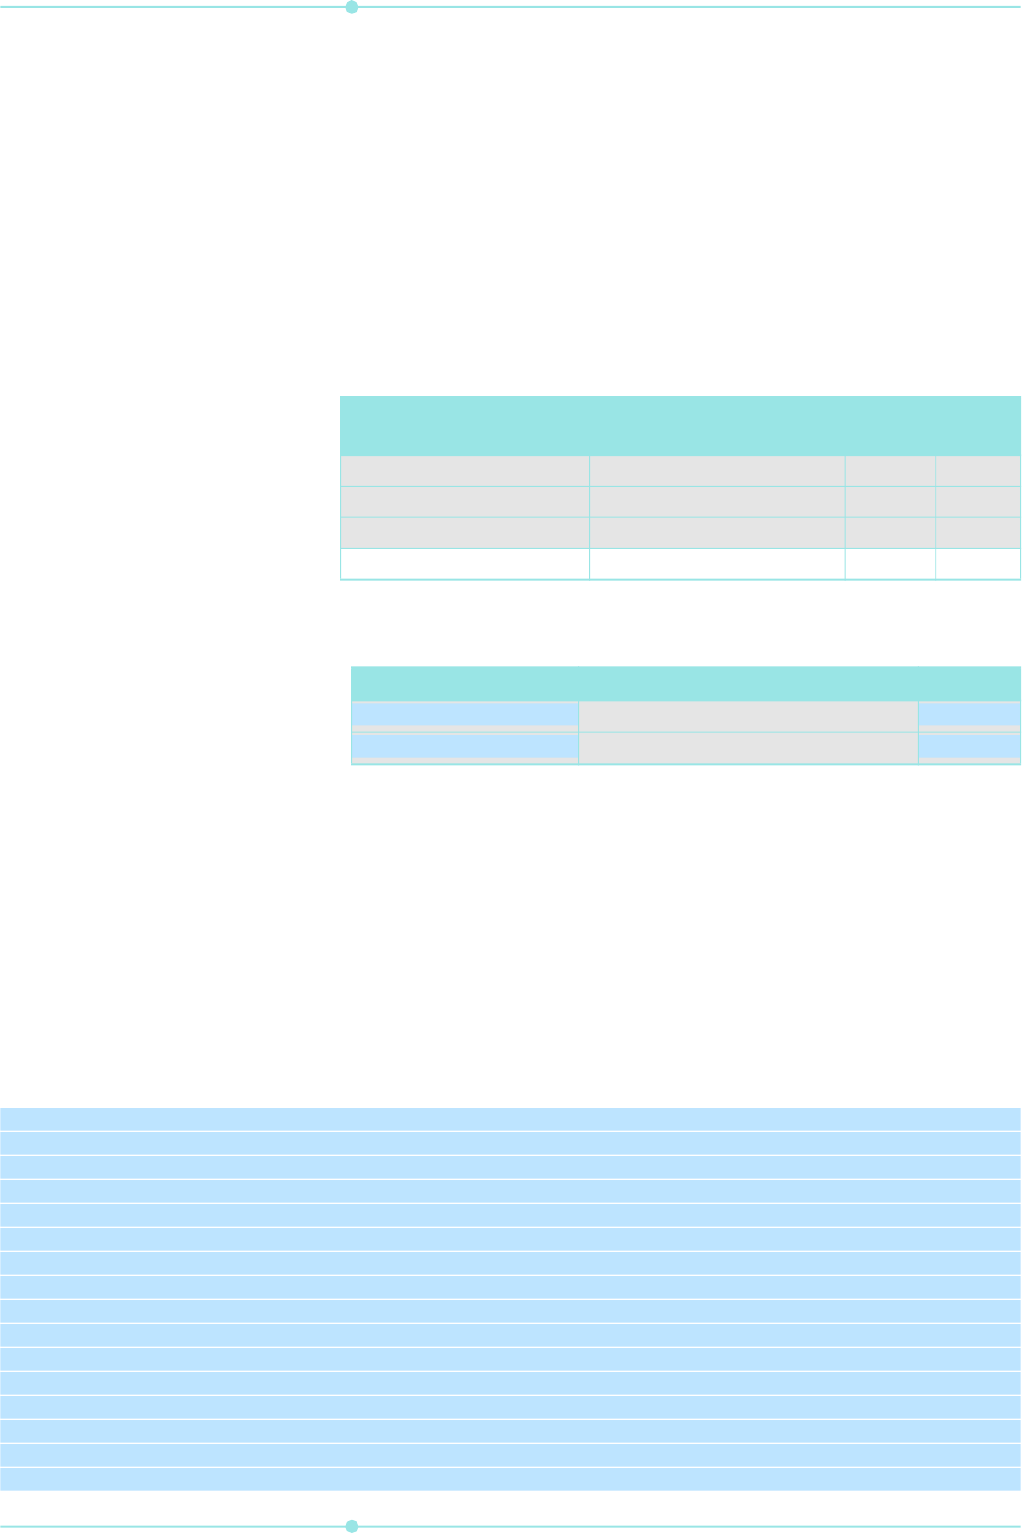
41
Commands
E:\_DDDprojects\ETB-14up\Sources\etb-customising.fm 2022-12-20
Command names from plugins and scripts
Available commands have various sources. Even native FrameMaker
comes with plugins: mapper.dll, masterpages.dll etc. Most installa-
tions add scripts, both started automatically or on demand.
To be able to set up custom menus and tool bars it is necessary to get the
command names from these sources. The best method is to use the free
FrameScript Report FM-commands from itl.
Plugins For example, the plugin AutoText.dll from Silicon Prairie Software cre-
ates commands which depend on a table in the related document
AutoText.fm. This is an excerpt of these commands from my personal
settings in the table:
ExtendScript ExtendScript simple.jsx (see File simple.jsx on page 16) creates the fol-
lowing commands:
You see that there is no relation between the script file name and the com-
mand names.
Keyboard short-cuts for
ExtendScripts
The above example does not define keyboard short-cuts for the menu
entries, because at that time I did not know how to do it.
Define short cuts To define a short cut the last parameter in DefineAndAddComand gets the
key-sequence. Be aware to double the \ for the ESC notation (ESC,q,j
and ESC,q,f). See KeySequence on page 35.
You also want to indicate these short cuts in the menu entries. There are
two methods:
Short cut label by TAB As known from the example (ExtendScript on page 41) the following actu-
ally precedes the Define Short cut section in the script:
var oMenus = {}, menuLocation, simpleMenu;
oMenus.MenuMain = "Test Alerts";
oMenus.MenuJS = "Alert by JS\tESC,q,j";
oMenus.MenuFM = "Alert by FM\tESC,q,f";
menuLocation = app.GetNamedMenu("!MakerMainMenu");
simpleMenu = menuLocation.DefineAndAddMenu("Simple", oMenus.MenuMain);
simpleMenu.DefineAndAddCommand(1,"msgJS","JS alert","\\!qj");
simpleMenu.DefineAndAddCommand(2,"msgFM","FM Alert","\\!qf");
UpdateMenus();
function Command(cmd){
switch(cmd) {
case 1:
alert (msg1, "Message title");
break;
case 2:
Command name Command label short-
cut
FCode
Editors note in frame [ctrl+3] Editors note in frame [ctrl+3] Ctrl+3 1400DF0
Callout figure [ctrl+4] Callout figure [ctrl+4] Ctrl+4 1410DF0
Frame outside column [ctrl+4] Frame outside column [ctrl+4] Ctrl+5 1420DF0
Icon frame [ctrl+6] Icon frame [ctrl+6] Ctrl+6 1430DF0
Command name Command label FCode
msgJS
JS alert
18B0DF0
msgFM
FM Alert
18C0DF0

Customising FrameMaker ≥14
42
Alert(msg2, Constants.FF_ALERT_CONTINUE_NOTE);
break;
}
}
Explicit definition
of short-cut label
The command property KeyboardShortcutLabel is used for this method.
To me it is not clear why this is a property of the command and not of the
menu item.
var oMenus = {}, menuLocation, simpleMenu, commandJS, commandFM;
oMenus.MenuMain = "Test Alerts";
oMenus.MenuJS = "Alert by JS";
oMenus.MenuFM = "Alert by FM";
commandJS = 1,"msgJS","JS alert","\\!qj");
commandJS.KeyboardShortcutLabel = "ESC,q,j";
commandFM = 2,"msgFM","FM Alert","\\!qf"
commandFM.KeyboardShortcutLabel = "ESC,q,f";
menuLocation = app.GetNamedMenu("!MakerMainMenu");
simpleMenu = menuLocation.DefineAndAddMenu("Simple", oMenus.MenuMain);
simpleMenu.DefineAndAddCommand(commandJS);
simpleMenu.DefineAndAddCommand(commandFM);
UpdateMenus();
function Command(cmd){
switch(cmd) {
case 1:
alert (msg1, "Message title");
break;
case 2:
Alert(msg2, Constants.FF_ALERT_CONTINUE_NOTE);
break;
}
}

43
Commands
E:\_DDDprojects\ETB-14up\Sources\etb-customising.fm 2022-12-20
FrameScript
Note: This example is part of the download of FM-customisation-example.zip.
Ordinary scripts get generic names (ESLRUNxxx) which may change form
FrameMaker start to start. Hence a menu or tool bar using these can not be
distributed to other installations.
To get a static command name to be used in a menu or tool bar the script
must be set up as an EventScript.
EventScripts must be installed, not just run.
In an EventScript commands must reside within Events.
Menus and commands are defined within the Event Initialize.
It is good practice to remove the menu with Event Terminate.
A menu item is not necessary, if the command is used in a toolbar only.
The installed script FrameScript primitive.fsl (see File primitive.fsl on
page 16) gets the following properties:
Note: Be aware that the FCodes generated for the script may differ from FM ses-
sion to FM session! Hence do not use them.
Installing the example script
Since this example script has no menu entry, you do not see an action of it
as long as you do not have a toolbar with a button …
Command name Command label FCode
ESLSSRUN306
Primitive
18E0DF0
ESLSSRUN307
Something Else
18F0DF0
Command name Command label FCode
MyCommand1 My Command 1 A0DF0

Customising FrameMaker ≥14
44
Menu statements
Note: Commands do not need a corresponding menu entry. They may be invoked
by a keyboard short cut or a button only.
Menu A new menu or sub menu is defined with this statement:
Syntax
<Menu menu-name <Label menu-label>>
Examples <Menu ETBmenu <Label Enhanced Toolbar (ETB)>>
<Menu ETBlocalDocuments <Label Local documentation (pdf)>>
Reserved menu Many of the menus defined in the standard menu files for FrameMaker are
reserved menus. FrameMaker has intrinsic knowledge about reserved
menus; it can refer to these menus directly by name.
Syntax
<ReservedMenu !menu-name <Label menu-label>>
Menu-name FrameMaker relies on Permanent menus and also on Context menus. Both
are defined with the
ReservedMenu statement in the standard menu files.
Custom menus must not use names of these reserved menus. It is a good
idea to prefix custom menu names by a project abbreviation. For example,
ETBmenu or !_MTmenu.
Menu-label The Label detail is the same as for commands, because the command is
represented in the menu item. See Label on page 33.
Reserved menus By convention, the names of reserved menus begin with an exclamation
point (!). The highlighted items in the table are permanent menus
32)
.
Permanent menus FrameMaker relies on some menus existing. In the table of Reserved
Menus their ID is bold. You cannot remove these menus from a menu con-
figuration file. FrameMaker will not work properly without them.
32 This table is deducted from the various cmdxxx.cfg files of FM-13.
Menu ID Description
!BookMainMenu
Menu bar for complete menus (book window active)
!CustomMakerMainMenu
Menu bar for custom menus (document window active)
!EmbeddedObjectMenu
Submenu Edit > Object
!HelpMenu
Menu Help
!MakerMainMenu
Menu bar for complete menus (document window active)
!MenusMenu
Submenu View > Menus
!MSWindowMenu
Menu Window
!QuickBookMainMenu
Menu bar for quick menus (book window active)
!QuickMakerMainMenu
Menu bar for quick menus (document window active)
!RulerAlignMenu
¶-alignment pop-up menu in the formatting bar
!RulerAlignMenu
¶-alignment pop-up menu in the formatting bar
!RulerControlMenu
Formatting bar: commands !ShowRulerToggle,
!ShowRulerAlignmentSpacingAndTabs and !ShowRulerParagraphTags –
all with an empty defintion (\x0).
!RulerParaMenu
¶-formats pop-up menu in the formatting tool bar
!RulerSpaceMenu
Line-spacing pop-up menu in the formatting tool bar
!StructureViewMainMenu
a
Structure menu bar (structured product interface only)
!ViewOnlyMainMenu
a
View-only menu bar
a. Not used in any of the FM-14 *cfg files - depreciated?

45
Commands
E:\_DDDprojects\ETB-14up\Sources\etb-customising.fm 2022-12-20
Context menus The default context menu for a particular selection does not contain every
possible command. If a menu item is not applicable to the selection and
the current state of FM, he menu item will be dimmed.
Context menus can not contain shifted commands. See ShiftCommand on
page 31).
Context menus can also be displayed by pressing Shift+F10. In this case,
the appearing menu depends on whether there exists a selected object, an
insertion point, or neither.
33)
Add This statement adds an item to a menu at the end of the already existing
entries. Hence normally a corresponding Order statement exists in a custo-
misation file.
Syntax
<Add command <Menu menu-name>>
<Add submenu-name <Menu menu-name>>
<Add Separtorn <Menu menu-name>>
33 This table is deducted from the various cmdxxx.cfg files of FM-13. See also FP_Ena-
bledWhen value in the FDK reference.
Context menu id Object providing the context
!AnchoredFrameContextMenu
an anchored frame
!AutoSpellCheckContextMenu
!BookContextMenu
!BookContextMenuContainer
a book window
!DitamapContextMenu
!DitamapContextMenuContainer
!DocumentContextMenu
the document as a whole (no active insertion point and nothing selected)
!EmbeddedObjectContextMenu
an OLE object
!GraphicsContextMenu
all graphic objects except an anchored frame
!MathContextMenu
an equation
!MiniTOCContextMenu
Mini TOC
!MultiGraphicsContextMenu
any grouped graphic object
!ProjectContextMen
!ProjectContextMenuContainer
!QuickBookContextMenu
!QuickBookContextMenuContainer
a book window when Quick Menus is the current menu set up
!StructureContextMenu
the Structure View in FrameMaker+SGML
!StructuredTextContextMenu
text in a structured text flow in FrameMaker+SGML
!TableContextMenu
a table
!TableTextContextMenu
text in a table
!TextContextMenu
text
!TextLineContextMenu
text line selected as text
!TextLineGraphicContextMenu
text lines selected as graphic objects
!ViewerPopup
a View-only document window
!ViewOnlyBookContextMenu
a View-only book window
!ViewOnlyBookContextMenuContainer
!ViewOnlyDitamapContextMenu
!ViewOnlyDitamapContextMenuContainer
DitaMap
!ViewOnlyDitamapContextMenuUnsupp
!TableMenuInTextContextMenu
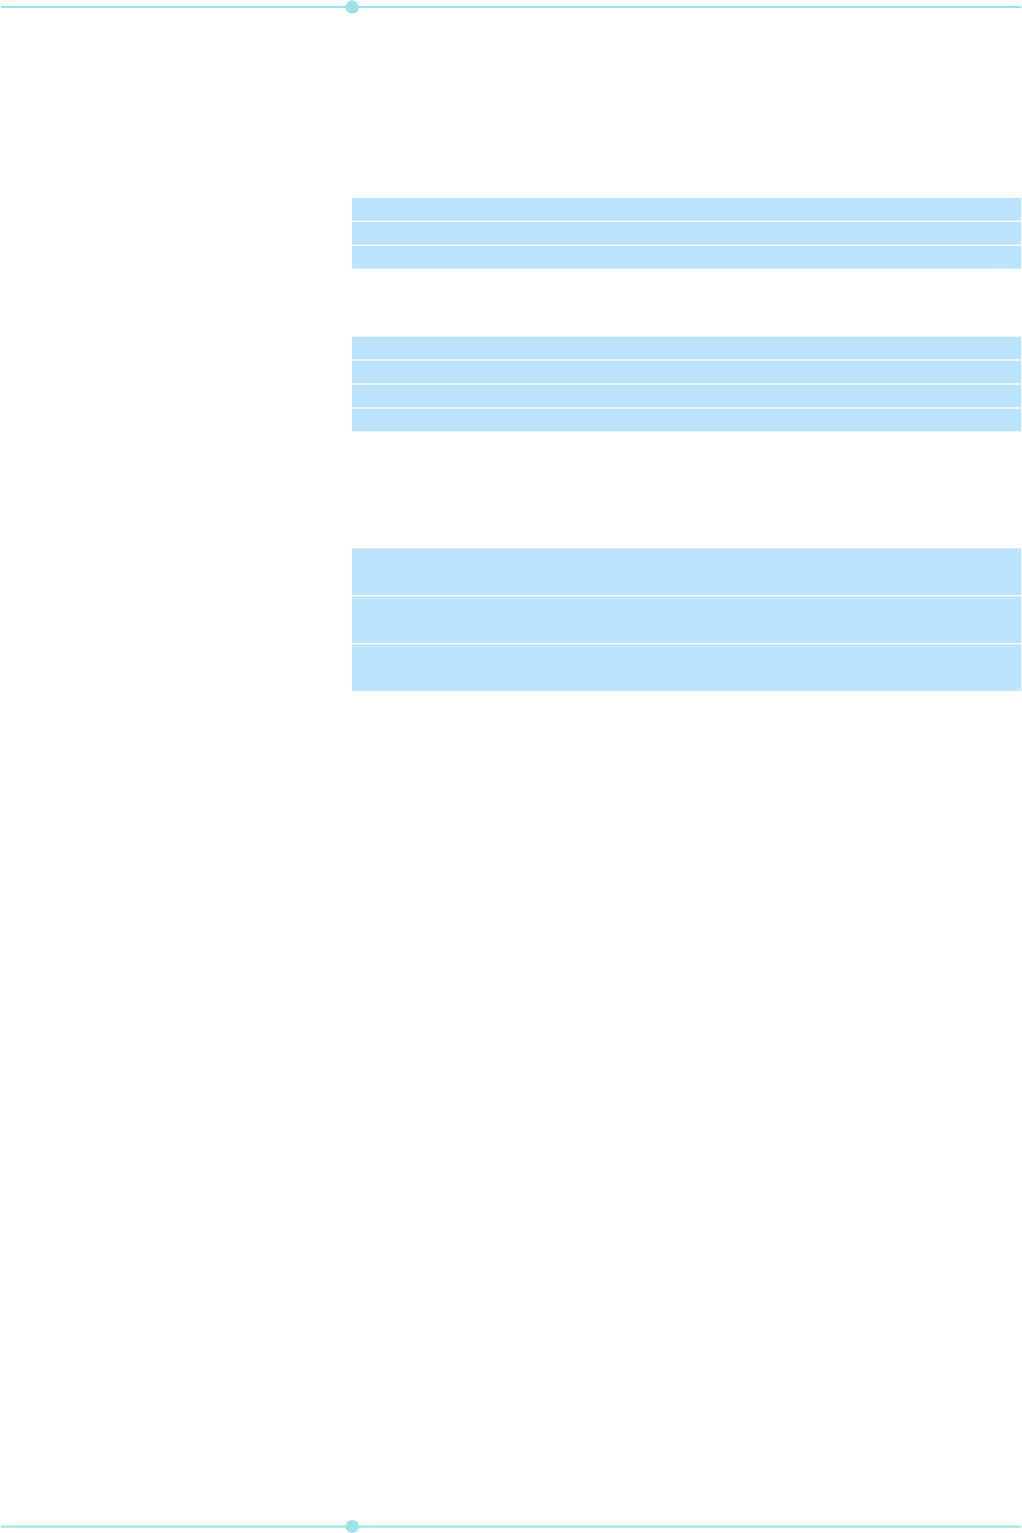
Customising FrameMaker ≥14
46
Command This identifies an already defined command.
Submenu-name This identifies an already defined menu.
Menu-name Name of the menu to which the command or sub-menu shall be added.
Separatorn Within a menu the separators must be numbered to get unique names for
an Order statement.
Examples
<Add Open <Menu FileMenu>>
<Add ETBspecial <Menu ETBmenu>>
<Add Seaprator5 <Menu ETBmenu>>
Order This statement defines where a menu entry shall be placed in the menu.
Syntax
<Order menu.new-item <First menu>>
<Order menu.new-item <Last menu>>
<Order menu.new-item <Before menu.ref-item>>
<Order menu.new-item <After menu.ref-item>>
Menu The menu we are talking about, defined by a Menu statement.
New-item The item to be placed. It has been defined in the menu.
Ref-item The reference item in menu relative to which the new item is inserted.
Examples
<Order !TextLineContextMenu.SpecialCharsContext
<Before !TextLineContextMenu.Undo>>
<Order !TextLineContextMenu.Separator1
<Before !TextLineContextMenu.Undo>>
<Order ViewMenu.ViewGraphicsOn
<Before ViewMenu.Separator3>>

47
Workspace definition
E:\_DDDprojects\ETB-14up\Sources\etb-customising.fm 2022-12-20
Workspace definition
Workspaces are defined in files xxx.cfws (current) and xxx.fws (last
saved). In most cases we need not create or modify (besides line 2) such a
file.
Modify or create
workspace
Menus and toolbars appear in a view due to the file location of them. Mul-
tiple workspaces can be defined for a particular view. Activating a newly
introduced toolbar (docked or undocked) modifies the current workspace,
which can be saved to a new name.
workspace file The following is the definition of custom workspace Custom.cfws which
refers to a custom menu file and a custom tool-set file (long lines are trun-
cated to display the structure):
Key in the workspace file are the
palette and control-bar statements,
which hold various information about the panels and toolbars.
Note: For customisation we are normally only dealing with the second line
which defines the menu set and the toolbar set.
Be aware that xml comments are removed from workspace files!
Size of toolbar Only if a drop down box appears in the toolbar you may need to adjust the
size parameters in the control-bar statement. You do this after the
workspace file has been created. Normally you adjust the parameters size
= preferred-size and then minimum and maximum.
<control-bar id="004C0966" origin="874 31" size="255 34" is-closed="false" app-
data="#lt;control-bar cb-data=#quot;custom_tb#quot; minimum-size=#quot;240 34#quot; maximum-
size=#quot;300 34#quot; preferred-size=#quot;255 34#quot;/>"/>
<FrameUI version="1">
<data type="all" menuFile="custom_menus.cfg" toolbarFile="custom_toolset.xml"/>
<fm-workspace>
<workspace version="1">
<dock anchor="left" content= "palette toolbar" is-closed="false"/>
<dock anchor="right" content="palette toolbar" is-closed="false">
<tab-pane mode="expanded" preferred-iconic-length="0" layout-mode="auto-flow">
<tab-group active-palette="00070CB2" is-closed="false">
<palette id="00070CB2" is-closed="false" preferred-unconstrained-size="135
<palette id="00060F46" is-closed="false" preferred-unconstrained-size="135
<palette id="000A10CE" is-closed="false" preferred-unconstrained-size="135
<palette id="00060BAA" is-closed="false" preferred-unconstrained-size="135
</tab-group>
<tab-group active-palette="00060DD6" is-closed="false">
<palette id="000C1118" is-closed="false" preferred-unconstrained-size="317
<palette id="00060DD6" is-closed="false" preferred-unconstrained-size="359
</tab-group>
</tab-pane>
</dock>
<dock anchor="top" content="multi-control-bar" is-closed="false">
<control-bar-pane >
<control-bar id="00060B9A" origin="4 35" size="858 34" is-closed="false" app-
</control-bar-pane>
</dock>
<dock anchor="bottom" content="palette" is-closed="false"/>
</workspace>
</fm-workspace>
</FrameUI>
1
2
3
4
5
6
7
8
9
10
11
12
13
14
15
16
17
18
19
20
21
22
23
24
25
26
27
28

Customising FrameMaker ≥14
48
Custom menu If you want to refer to a custom menu you will change the references in
line 2, for example
from
<data type="all" menuFile="menus.cfg" toolbarFile="fmtoolbar.xml"/>
to
<data type="all" menuFile="custom_menus.cfg" toolbarFile="fmtoolbar.xml"/>
You also need to set up a menu file custom-menus.cfg. and place it in
appropriate directory.
Custom toolbar set If you want to refer to a custom toolbar set, you will change the references
in line 2, for example
from
<data type="all" menuFile="menus.cfg" toolbarFile="fmtoolbar.xml"/>
to
<data type="all" menuFile="menus.cfg" toolbarFile="custom_toolbar.xml"/>
You will set up a corresponding list of toolbars in custom_toolset.xml.
This list refers to the individual tool bar files.
Note: Toolbars containing a drop-down list can not be docked left or right to
become oriented vertically!

49
Problems and pitfalls
E:\_DDDprojects\ETB-14up\Sources\etb-customising.fm 2022-12-20
Problems and pitfalls
You have set up the menu and tool bar modification carefully, but you still
have issues….
Button is not active Although the cursor is in the proper environment, the button may not
become active. The following cause is particularly prone to Popup drop-
down menus:
Switch to another work space and then back to the one in which you have
modified the tool bar. After switching back to that workspace the tool bar
icon is active and I can select the proper function and everything works as
expected!
Menu file
<Command ETBCellAlignPopup
<Label Cell Alignment… [ETB]>
<Definition \x914>
<Param ETBCellAlignMenu>>
<Menu ETBCellAlignMenu <Label Cell Alignment… [ETB]>>
<Add AlignTop <Menu ETBCellAlignMenu>>
<Add AlignMiddle <Menu ETBCellAlignMenu>>
<Add AlignBottom <Menu ETBCellAlignMenu>>
Toolbar <FLYOUT command="ETBCellAlignPopup" tooltip="Cell
Alignment…">
<images base="etb_icons\table_cell_align"/>
</FLYOUT>
Multi-code command
does not work
Since FM-9 (the new interface) multi-code commands work only cor-
rectly, if only two of the three UI elements may be defined: button, menu
item, short cut. If all three are defined, then only the first code will be exe-
cuted.
Hence it is possible to have multi-code commands, as long as they - for
example - only serve a tool bar button:
Menu file
<Command ETBPrintingDisplay
<Label Document &Printing Display>
<Definition \x4F1 \x4F2 \x4F3 \x3F8>>
Toolbar <ACTION command="ETBPrintingDisplay"
tooltip="Hide frames and text symbols">
<images base="etb_icons\display_print"/>
</ACTION>
Strange button image If the image can not be found in the given location (see Location of icons
files on page 27) you get only a default image:

Customising FrameMaker ≥14
50
Initialisation files maker.ini and others
The *.ini files are a standard Windows initialisation files
which are divided into sections. Section names are enclosed
in brackets. The equal sign may be surrounded by spaces:
[Frame]
ProductInterface=FrameMaker
; Comment lines start with a semicolon.
The coding of these files vary. Most use the Windows cp
1252, maker.ini uses UTF-8.
When opening an initialisation file in FrameMaker, assure to
open it as Text. When you’re finished editing the file, use
the Save As command to save it as Text Only.
For FM-13 the maker.ini file comprises about 350 entries.
Some of them are necessary to get back the behaviour of pre-
vious FM-versions , for example
SymbolSortingBeforeAlphaNumeric = On
Since FM-7.1 the file in $HOME is considered the master file
and only the file in the user-area should be modified. These
files are now coded in UTF-8. Special characters can still be
defined in the traditional way:
FindSpaceBefore=On
!%),.:;?]}\u00bb\u201d\u2019\u203a
;SmartQuotes \xd4\xd5\xd2\xd3 ) English curved
quotes
SmartQuotes=‘’“”
The last line shown above uses the Unicode of the characters,
while the comment line uses the traditional FrameRoman
notation.
Of course it is possible to establish a complete copy of the
$HOME file in the user-area and then open FrameMaker.
However, some entries, such as ProductInterface are not
present in the main file. They describe items which might
differ between users of the same system.
Other ini files Special features are supported by additional ini files
34)
:
34 List according to FM-13 installation.
Initialisation file Purpose, used by
AuthorView.ini Set-up of the Author View
ditafm-output.ini Set-up for DITA output processing
ditafm.ini Set-up for DITA processing
DynaHelpPreview.ini Publisher: Dynamic Help extension
MathFlowPlugin.ini Set-up of the none-Adobe plug-in MathFlow
ModalDialogPosition.ini Save the current positions of the modal dialogues
pdfsize.ini Settings from Format > Document > Optimise PDF Size > Options
SkinGallery.ini Publisher: skins (WebHelp, WildFire, AirHelp)
sqSkin.ini Publisher: sqSkin extension
WHATSTHS.INI Set-up for the What’s This function of Publisher
XmlCodeView.ini Set-up of the XML Code View

51
Initialisation files maker.ini and others
E:\_DDDprojects\ETB-14up\Sources\etb-customising.fm 2022-12-20
Entries in ini files To a void redundancy I do not list the entries of maker.ini
and other ini files here. Look at www.daube.ch for a main-
tained list. The list by Adobe ( Help > Help Topics >
5
th
icon (FrameMaker Help Center) >
FrameMaker Resources) is not well maintained.

Customising FrameMaker ≥14
52
Synopsis of FM hypertext commands
Notes d Be aware that not all examples will work on your system.
e M: equivalent function from Acrobat menu available.
Command
(drop down list in FM)
Syntax Example
d)
Alert
h)
alert text alert Time for lunch now!
i)
Alert with title
h)
alerttitle title:text alerttitle Hello - I’m the title:This is in
the first line\x0dand this is in the next.
Specify named destination
newlink name newlink here_we_go
Jump to named destination
Jump to … and fit to page
gotolink name
gotolinkfitwin path:link
gotolink hereafter
gotolinkfitwin hereafter
Jump to first page in file
j)
Jump to last page in file
gotolink path:firstpage
gotolink path:lastpage
gotolink dummy.fm:firstpage
gotolink dummy.fm:lastpage
Jump to page number
gotopage path:pagenumber gotopage dummy.fm:2
k)
Jump to previous page / next
page of current document
previouspage
nextpage
previouspage
nextpage
Jump back (to last view)
Jump Back & Fit To Page
previouslink
previouslinkfitwin
previouslink
previouslinkfitwin
Open document
Open document … and fit to page
(same type as source: fm or pdf)
i)
openlink path
openlinkfitwin path
openlink dummy.fm
openlinkfitwin dummy.fm
Open Document As New
opennew path opennew H:/Adobe/framemaker.13en/
AdobeFrameMaker2015/Templates/Book/Chapter.fm
Open document at first/last
page
j)
openlink path:firstpage
openlink path:lastpage
openlink dummy.fm:firstpage
openlink dummy.fm:lastpage
Open document at page number
openpage path:pagenumber openpage dummy.fm:2
Go to URL
message URL url message URL http://www.daube.ch/docu/
fmaker00.html
Message client: Open document
with associated application
message openfile path
l)
message openfile C:\Windows\win.ini
Launch Windows application
message winexec application
path[,windowstate]
n)
Start the Windows calculator
(C:\WINDOWS\System32\calc.exe)
Popup menu
(works only in FrameMakerView
mode)
popup textflow_on_refpage popup popup1
The marker in the text flow contains a hypertext com-
mand gotolink xxx with xxx being the name in a
hypertext marker newlink xxx at the location to be
jumped to with the menu.
Button matrix
matrix nrows ncolumns flowname
Equation palette, Vertical toolbar
Close current window
quit quit
Close all hypertext windows
quitall quitall
Exit Framemakter application
exit exit
Popup Menu Sample
Variables
Cross references
Update references
Footnotes
Hyperlinks
Bibliographies

53
Synopsis of FM hypertext commands
E:\_DDDprojects\ETB-14up\Sources\etb-customising.fm 2022-12-20
f Y = works in principle, but certain restrictions apply.
g
Hypertext commands indicated with Y work in menus.cfg files. The same com-
mands work in toolbar files (e.g.
quick-access.xml) only, if also used in a
menu! This can be a menu which is not inserted in an existing menu (I call this an
orcus-menu). See Menu and tool bar files
on page 54.
h In PDF this will be a text note, the title will not be presented as such,
but stay within the text. See also Difference in presentation on page 53.
i To get line breaks in the alert and alerttile display, use \x0d in
the FM-document and \x09 in command config files. Inspecting the
hypertext marker later will display the \x0d as blank.
A tab may be inserted as \r in the FM document and as \x08 in
config files.
j FrameMaker hyperlinks have two variations: goto and open.The goto
variation displays the target document in the current window (closing
the currently-displayed file); the open variation displays the target
document in a new window, leaving the current document open. If you
hold the Shift key when activating a link/cross-ref with Ctrl+Alt/
link (that is, Ctrl+Alt+Shift+click), the goto... is interpreted as
an open... action (and vice versa).
k The current document will be closed (user prompt, if edited), before
the linked document is opened. “Jump Back” opens the current docu-
ment again.
l For this command both the backslash and the solidus are allowed in
path names.
m If the file is a binary script, it will be opened in Notepad rather than
executed.
n The window state is a string constant such as SW_SHOWMAXIMIZED (see
help for more).
o To test a popup switch the document to View only by locking it. The
flow with same name as the popup must be located on a reference page.
File paths In file paths or URLs the backslash is not valid. The solidus (normal slash)
must be used. Both absolute and relative paths (relative to current docu-
ment) are possible.
same folder message URL file.ext
sub-folder message URL subfolder/file.ext
parallel folder message URL ../folder/file.ext
one level above message URL ../../upperfolder/file.ext
Target of gotolink This destination is used in the example hyperlinks above.
Difference in
presentation
Both in the FM document and in the cfg files the carriage return and the
TAB need unusual coding.
In FM document
alerttitle The title line:Some text in line one\r\x09Just
after a tab\r•\x09Bullet, then TAB\rSome bullet characters:•
¤ » …

Customising FrameMaker ≥14
54
In the document the hypertext command uses Unicode which gives a rich
set of special characters. The contents of the hypertext statement is listed
hereafter.
In cfg file
The cfg files must be in Windows 1252 code page and use the
FrameRoman coding for special characters.
<Command Test01 <KeySequence \!991>
<Hypertext alerttitle The title line:Some text in line
one\x09\x08Just after a tab\x09\xe2\x08Bullet, then
TAB\x09Some bullet characters:\x09\xdb (db) \xe2 (e2) \xc8
(c8) \xc9 (c9) >>
Menu and tool bar files
menus.cfg
Command definition
<Command ETBtest1 <Label ETB test hypertext commands>
<Hypertext alerttitle Test Hypertext Commands: Just a simple text to test the West\x09And
this is on the next line>>
<Command ETBtest2 <Label ETB test hypertext commands>
<Hypertext message openfile C:/Users/Klaus/Documents/Adobe Scripts/ETB/ETBnudge.jsx>>
Use in orcus-menu An orcus menu (my personal naming) is a dead end. It is not connected to
any existing menu, hence not visible.
<Menu ETBDummy <Label Orcus for toolbar commands only>>
<Add ETBtest1 <Menu ETBDummy>>
<Add ETBtest2 <Menu ETBDummy>>
quick-acess.xml <ACTION command="ETBtest1">
<images base="etb_icons\testing"/>
</ACTION>
<ACTION command="ETBtest2">
<images base="etb_icons\testing"/>
</ACTION>
