
Speaker Handouts
Day 2

Sign up now at CreativePro.com/become-a-member
— BECOME A MEMBER —
CreativePro membership helps you build your expertise to stay ahead of the curve.
» 12 monthly issues of
CreativePro Magazine
» CreativePro Weekly and
InDesign Tip of the Week
email newsletters
» Thousands of how-to tip
and tutorial articles
» Top Tips for InDesign, Top
Tips for Photoshop, and Top
Tips for Illustrator ebooks
» Downloadable resources such
as templates, scripts, design
assets, guides, and more
» Discounts on events and books
» And more!
BENEFITS INCLUDE:


For over 30 years, Noble Desktop’s
project-based classes and certificate
programs have given professionals
the tools to pursue creative careers in
design, coding, and beyond.
Motion Graphics & Video Editing
Do you want to animate Photoshop and Illustrator files? Want to edit
videos for websites, social media, and more?
• Learn After Effects for animation and motion graphics
• Premiere Pro for video editing
• Audition for working with audio
• Cinema 4D in After Effects for animating 3D graphics
Social Media & Digital Marketing
Want to learn how to better market your business (or others) through
social media? Create a well-rounded digital marketing campaign.
• Learn how to effectively leverage platforms like Instagram, Facebook,
LinkedIn, YouTube, TikTok, and Twitter to reach audiences with video,
images, and writing.
• Organic search marketing with search engine optimization (SEO) and
Google Ads
• Track marketing data with Google Analytics
• Review strategies for content marketing, email marketing,
weboptimization, and more
UX & UI Design
Learn to design attractive, user-friendly mobile apps and websites.
• Learn Figma for designing digital products
• Conduct user research, wireframe, prototype, write case studies, and
build a portfolio to start a career in UX & UI Design
Digital Design
Create designs for a variety of media: websites, apps, social media,
brochures, and more.
• Learn Figma for UI and UX design
• Earn a certificate as you learn InDesign, Photoshop, Illustrator, Figma,
Graphic Design and UI design concepts, and build your portfolio
Web Design & Development
Ready to dive into coding and web development? Start building websites
and mobile apps with hands-on coding and web design projects.
• Learn to create responsive websites, blogs, and emails with HTML, CSS,
JavaScript, and WordPress
• Prepare for a career as a Web Designer, Front-End Web Developer,
Full-Stack Web Developer, or Software Engineer
Data Science & Analytics
Thinking about switching to a data career? Learn how to draw insights from
data and present your findings.
• Learn how to work with data and machine learning with Python
• Extract info in databases and turn them into actionable insights with SQL
• Create interactive data visualizations with Tableau
Visit nobledesktop.com to learn more
Add Tech & Design Skills
With Classes & Certificate Programs

LinkrUI connects your favorite Adobe and Microsoft
applications to your team’s cloud storage.
New feature SmartLinkr automatically detects
broken asset links and relinks, all with
a single click.
DOWNLOAD LINKRUI
SOLVE
BROKEN LINKS
PERMANENTLY
NOW COMPATIBLE WITH
MICROSOFT POWERPOINT


Keyboard shortcuts for Windows
Group
Ungroup
Decrease/Increase font size
Change type casing
Find and replace text
Duplicate objects
Cycle through layers/objects
Run slideshow
Run slideshow from current slide
Jump to specific slide (slideshow mode)
Copy style formatting
Paste style formatting
Move on a straight axis
Keep aspect when resizing
Ctrl
G
Ctrl
Shift
G
Ctrl
[
]
Shift
F3
Ctrl
H
Ctrl
Tab
F5
F5
Shift
Enter
<#>
Slide
number
Ctrl
Shift
C
Ctrl
Shift
V
Shift
Shift
+
+
+
+
+
+
+
+
+
+
+
+
+
+
Be a PowerPoint productivity superhero with the top shortcuts that will have you
creating amazing slides in seconds.
+
+
View full
list here

BrightSlide
Created by PowerPoint experts the BrightSlide add-in will help you create, polish,
and edit presentations at speed. It draws on industry-standard shortcuts to boost
your workflow and provides amazing, extra functionality PowerPoint users have
only dreamed of. And it’s all yours, for free!
View video
tutorial
Align with
precision
Save animation
combinations
Easy custom
grids
Update slides in
seconds
Advanced
typography
Swap objects
with ease
‘So long’ to the
Selection Pane
Super shortcuts
Tidy and tame
tables
Download
here
We developed BrightSlide as the ultimate
productivity add-in to tackle the pitfalls of
PowerPoint. And, because we love the
presentation community almost as much as
we love PowerPoint, we are sharing
BrightSlide with you for free!

Download BrightCarbon’s most
used PowerPoint functions in
our own customized toolbar
www.brightcarbon.com
Search:
Quick Access Toolbar
or
Click this box
A
Add to Quick Access Toolbar
File > Options > Quick Access Toolbar
Right-click on anything in the
menus to add to the Quick
Access Toolbar
or
Quick Access Toolbar
Add shortcuts to your Quick Access Toolbar to access the things you use more
quickly.
View video
tutorial

Animation painter
Copy and paste animations using this neat tool, so that you don’t have to recreate
everything from scratch each time.
View video
tutorial
Select an object with animations you want to re-use, click Animation
Painter to copy the animations, and then click on another object to
paste the animations to.
It only works once each time it’s selected.
Static
Box
Animating Box
Animations > Animation Painter
Also note that any existing animations on the second object will be
removed, and that the new, pasted animations will all appear at the
bottom of the animation timeline.

The Selection pane lets you see every object, control the layers, and hide/show
objects on layered slides.
View video
tutorial
Selection pane
Home > Arrange > Selection Pane
Click on any of the eye icons to remove the object
from view to work on other objects behind it.
Moving objects up the list brings them forward in
the layers. Moving objects down sends them back.
Arrow buttons or left click > Drag
Selection
Bones
X-Ray Machine
Power Ranger
Background
Show all Hide all

Animate in a second blurred version of an image over the top of the first to shift
focus.
View video
tutorial
Focus shift
Group Objects > Copy Paste as Picture > Picture Tools Format >
Artistic Effects > Blur
Create an invisible box over your objects and group. Select the group
then copy and paste as picture. The invisible box ensures your
blurred image won’t have sharp edges.
Animations > Add Animation > Entrance Fade
Add animation to blurred image. Add your object of focus on top of
the blurred image to make it stand out.

PowerPoint animations, when used correctly, are a key part of an effective
presentation. These seven techniques are quick and easy to implement, but can
make a big difference to your presentation.
View video
tutorial
How to be a PowerPoint animation ninja
Directions
If you have things like arrows, timelines (in
fact anything with a direction), or if you’re
using a Wipe, Fly in, Peek in, make sure you
change the direction of the animation to
match!
Overlap
If you have content flying in, try not to have
it overlap other content: this makes your
slide look messy and will distract your
audience.
Smooth ends
On motion paths and Fly ins you can have
your animations finish with a smooth end.
Opening up your Effect Options and
dragging the slider fully to ‘smooth end’ will
make your animation look a lot more natural.
When you can’t fly, peek
Bearing this in mind, if having content Fly in
would mean it overlaps something else, use a
Peek in animation instead.
Duration
Some animations default to 0.5 of a second,
others default to 2 seconds. It’s rare that you
will need the full 2 seconds to make your
point. You can normally get away with
making these effects 0.5 of a second too. On
the whole try and keep your animation
sequences to 6 seconds maximum.
Delays and disappearing acts
Delays are a really bad idea because even if
you rehearse your content perfectly, there’s
always a chance something will happen to
make you miss your cue. But you can pace
the flow of information with clicks instead.
Use the Quick Access Toolbar
Don’t be afraid of animations, keep them in a
nice, handy place in PowerPoint – the
Quick
Access Toolbar
and use them to tell your
story, but good watch-words are: if a fade
will do, then that’s good enough!

Animate graphs piece by piece using the Chart Animation function, making them
easier to understand.
View video
tutorial
Graph animation
1) Animate chart using Add
Animation on the
Animations tab.
2) Double click on the
animation event in the
Animation Pane and select
Chart Animation.
3) Animate the chart by series,
category, or individual
element for greater control.
Animations > Add Animation >Entrance > Double Click
>Animation Event > Chart Animation

Create duplicates of bar chart columns and group them to get grow/shrink
animations to work effectively.
View video
tutorial
Growing & shrinking bar charts
Duplicate your bar, making the second
invisible. Duplicating and grouping your
shape means it will appear to grow or shrink
from the axis.
Position second bar directly below the axis
and group together with the first (Ctrl +
G). Bars below axis should be completely
invisible (select ‘No Fill’)
Animations > Add Animation >
Emphasis > Grow/Shrink
Effect Options > Vertical
Ctrl + D
Draw large shapes over objects and group to enable you to rotate around a false
central point.
View video
tutorial
Rotating objects
Animations > Add Animation >
Emphasis > Spin
Create a shape starting at the center point of
rotation, using the Ctrl key to make that
point the center, and make sure it’s larger
than anything else.
Make the large shape invisible (select ‘No
Fill’) and group it with any objects that need
to rotate.
Use a Spin animation on the group. The
entire group will rotate around it’s center
point, which is controlled by the large
invisible shape, making it look like other
objects are rotating around their end point.

Duplicate your shape and use motion paths on both objects
as a guide to get them to line up precisely.
View video
tutorial
Precise motion
Animations > Add Animation >
Motion Paths > Lines
Add a motion path to your object.
Copy > Paste
Adjust your original motion path so that the
end matches up with the start of your second
path. Then delete your duplicate shape.
Duplicate your shape, so that now both have
an identical motion path.

Masking combined with animation gives you the ability to completely control how
content will appear on a slide, where it will appear, and how it will behave relative
to other content. Plus, it’s fun to do!
View video
tutorial
Masking effects in PowerPoint
Duplicate the base image and find an area on
your image that you’d like to be in a ‘front’
layer, that content will appear from.
Either create a simple crop over that area, or
draw a custom shape using the Freeform
tool, and then use the Merge Shapes tools to
create a custom crop cutout of the image.
Ensure that this front layer in above the
content in the layer order.
Add a Peek In or Fly In animation to the
content and change the direction to come
from the custom crop image.
Use the same technique for background solid
fill colours, or use ‘Background Fill’ from the
Format Shape menu.

Use Entrance animations to make content appear on
the slide to provide pacing and help focus attention on
new content.
Use Emphasis animations to change content. Use the
Fill Color to alter the color and Grow/Shrink to change
the size. Click the Effect Options button to change the
color or size of the object for each.
Use Exit animations to remove unnecessary content
from the slide so that it doesn’t distract or clutter up
the slide.
Use Motion Paths to move objects around a slide. The
green arrow indicates the start point and the red
arrow is the end point, with the shape moving along
the black dotted line. Select either end point to resize,
position, and shape the motion path.
All animations are in the Animations tab on the ribbon. Choose
Add Animation to find the four categories and different types of
animation.
Far from being a luxury, animations in PowerPoint are incredibly useful for telling
stories. Learn how to master the different types of animations to create a dynamic
visual sequence that communicates elegantly and effectively.
View video
tutorial
Storytelling with animations

Most transitions in PowerPoint are pretty terrible, but you can create your own
custom ones by using some funky animations, shapes, and timings.
How to make sensational slide transitions in PowerPoint
Create a duplicate slide (Ctrl + D) to use as the base layer for your transition
and group all the elements on it together (Ctrl + A > Ctrl +G).
Draw several rectangles the width of the slide, perhaps with different heights
for a distinct look.
Recolor the rectangles as you want and remove any outlines.
Apply the Fly in animation to each rectangle – Animation tab > Add
Animation > Fly In. Use Effect Options to have them come in from the left.
Open the Animation Pane tab, select all the animations, then Right-click >
Effect Options > Smooth End slider all the way to the right > click OK.
Use Animations tab > Timing > Delay to stagger the point at which the
animations start, or use the Waterfall Delay in BrightSlide to make it quicker.
Duplicate the process for a set of white rectangles which then form the base
of the next slide, and add your content on top.
View video
tutorial

View video
tutorial
Morph is a stunning way to seamlessly transition between slides, but also to
create motion, emphasis and tell stories. Note that it only works with Office 365 or
PowerPoint 2019. Earlier versions of PowerPoint will simply use a Fade transition.
Morph magic
Transitions > Morph
Morph recognizes objects across slides and will seamlessly move,
resize, recolour, and rotate objects. You can use this to change
content on your slide. Objects have to be on both slides to create any
change using morph, otherwise, the transition appears like a fade.
Introduce objects by having them off the edge of the first slide
canvass and on the second slide, or remove them by having them on
the first slide and off the edge of the second slide canvass.
Give the effect of moving around a more complex diagram with
content moving off and onto the slide, by creating a diagram that
only partly fits on the slide canvass. On the second slide, move the
diagram so that a different part is on the slide canvass, and morph
will pan around the diagram. Zoom into particular elements by
making the diagram larger on the second slide.

Morph isn’t just for transitioning between slides, it can be used for interesting
effects to tell stories, such as creating a magnifying lens to highlight content. Note
that it only works with Office 365 or PowerPoint 2019. Earlier versions of
PowerPoint will simply use a Fade transition.
Morph magnify
Transitions > Morph
Insert an image on the slide, copy, paste, and align the new
image on top of the original.
View video
tutorial
Crop the top image to a rough square focusing on a specific
area, set the Crop to Shape (Oval), and set the Aspect Ratio
to 1:1 (Picture Tools Format > Crop).
Add a shadow or outline to the new cropped circle image and
make it larger (use Shift and Ctrl to expand in proportion and
the correct position).
Duplicate the slide (Ctrl + D) and on the new slide, move the
circle image to a different position.
Select Crop on the circle image, but now move the image
within the circle placeholder, so that it matches the image
behind in the new position.

Morph allows you to create some amazing effects for beautiful, impressive, and
professional slides. Especially when you consider niche techniques.
Morph | Off-slide content
Transitions > Morph
Content must be on both slides
for morph to take effect. But,
content can be off-slide to make
it move onto (or off) the slide
during the transition.
The off-slide position is
important as the object will move
in a straight line to the new
position, so it impacts the
direction of motion.
The off-slide position also affects
the speed of movement – the
longer the distance, the faster
the movement.
View video
tutorial

Morph allows you to create some amazing effects for beautiful, impressive, and
professional slides. Especially when you consider niche techniques.
Morph | Layers to reveal content
Transitions > Morph
Use layers to hide/reveal content
hidden underneath.
Combine with off-slide content
to create seamless and
impressive content.
Masking layers can create both a
reveal and movement of content
at the same time, as content
moves out from behind it.
View video
tutorial
Mask (white shape) covers South America with
content over the top.
Mask (white shape) moves up to reveal South
America and cover North America, with content
over the top.

Morph allows you to create some amazing effects for beautiful, impressive, and
professional slides. Especially when you consider niche techniques.
Morph | Dynamic detail reveal to highlight content
View video
tutorial
Use a sequence of slides to create a dynamic reveal of content.
Combining off-slide content, masks, and changing content, you can
cycle through various elements in an elegant way.
Multiple slides allows you to focus on each element in turn, rather
than all at once.

Morph allows you to create some amazing effects for beautiful, impressive, and
professional slides. Especially when you consider niche techniques.
Morph | Dynamic photography
View video
tutorial
With morph you can create interesting and dynamic
photography effects. The trick is to morph between
two different crops of the same photo
Picture Format > Crop
Crop an image to focus on a particular part of it.
Duplicate the slide (Ctrl + D) and crop the image on
the second slide in a different way. Either a different
focus, or different magnification, or both.
Transitions > Morph
Apply the morph transition to the second slide and
see how the image changes seamlessly. Create even
more interesting effects with several images all
changing their crop focus at the same time.

Morph allows you to create some amazing effects for beautiful, impressive, and
professional slides. Especially when you consider niche techniques.
Morph | Automatic transition slides
Transitions > Morph
As morph is a transition between slides,
sometimes you need an additional slide purely
to achieve the effect you want during the
transition.
Use an initial setup slide to position everything
correctly, ready for the morph transition.
Transitions > Advance Slide > After 0
seconds
This means that when in slide show mode,
PowerPoint will automatically and immediately
transition to the next slide, giving the effect you
want.
View video
tutorial


Tell a Compelling Story with Data
Sheila B. Robinson, Ed.D.
Custom Professional Learning, LLC
@SheilaBRobinson
Sheila B Robinson
sheilabrobinson.com
sbr@sheilabrobinson.com
One key to effective data visualization is knowing what questions your audience has and which chart or graph will best
answer them. Sure, PowerPoint offers default options, but with a few easy-to-learn tricks, you can design charts and
graphs that are compelling, easy to comprehend, tell an important story, and most importantly, answer readers’
questions.
Participants will learn:
• To approach data visualization by anticipating reader questions
• To examine graphs and charts with an eye on the story
• To create and customize new chart types inside PowerPoint
THE DESIGN + POWERPOINT SUMMIT 2023

WHAT IS THE QUESTION?
WHAT IS THE STORY WE NEED TO TELL?

SheilaBRobinson Sheilabrob ins o n.comsbr@sheilabro b in s o n .co m
0%
10%
20%
30%
40%
50%
60%
70%
80%
Program A Program B Program C
Chart Title
2019 2020 2021
QUESTION: How are the
programs doing compared to
one another?
Clustered columns don’t tell the
right story.
Right click on chart area >
Change Chart Type to line.

SheilaBRobinson Sheilabrob ins o n.comsbr@sheilabro b in s o n .co m
0%
10%
20%
30%
40%
50%
60%
70%
80%
Program A Program B Program C
Chart Title
2019 2020 2021
Programs on x-axis doesn’t
make sense.
Click on chart area then Chart
Design (in ribbon) > Switch
Row/Column.

SheilaBRobinson Sheilabrob ins o n.comsbr@sheilabro b in s o n .co m
0%
10%
20%
30%
40%
50%
60%
70%
80%
2019 2020 2021
Chart Title
Program A Program B Program C
Right click on y-axis > Format
Axis.
Under Axis Options, change axis
bounds to better contain the
data.

SheilaBRobinson Sheilabrob ins o n.comsbr@sheilabro b in s o n .co m
45%
50%
55%
60%
65%
70%
75%
2019 2020 2021
Chart Title
Program A Program B Program C
Click chart area and increase text
size (under the Home tab).
Right click on a line > Format Data
Series.
Click paint bucket > line, then
increase line width.
Right click on a line, click on end
point (to isolate just that data
point) > Add Data Label.
Click on data label (twice to isolate
it) > Format Data Label.
Check Series Name; uncheck
Value, uncheck Show Leader Line
Recolor label text to match line.
SheilaBRobinson Sheilabrob ins o n.comsbr@sheilabro b in s o n .co m
Program A
Program B
Program C
45%
50%
55%
60%
65%
70%
75%
2019 2020 2021
Chart Title
Program A Program B Program C
Delete legend.
Delete chart title placeholder.
Add story title in title
placeholder.

SheilaBRobinson Sheilabrob ins o n.comsbr@sheilabro b in s o n .co m
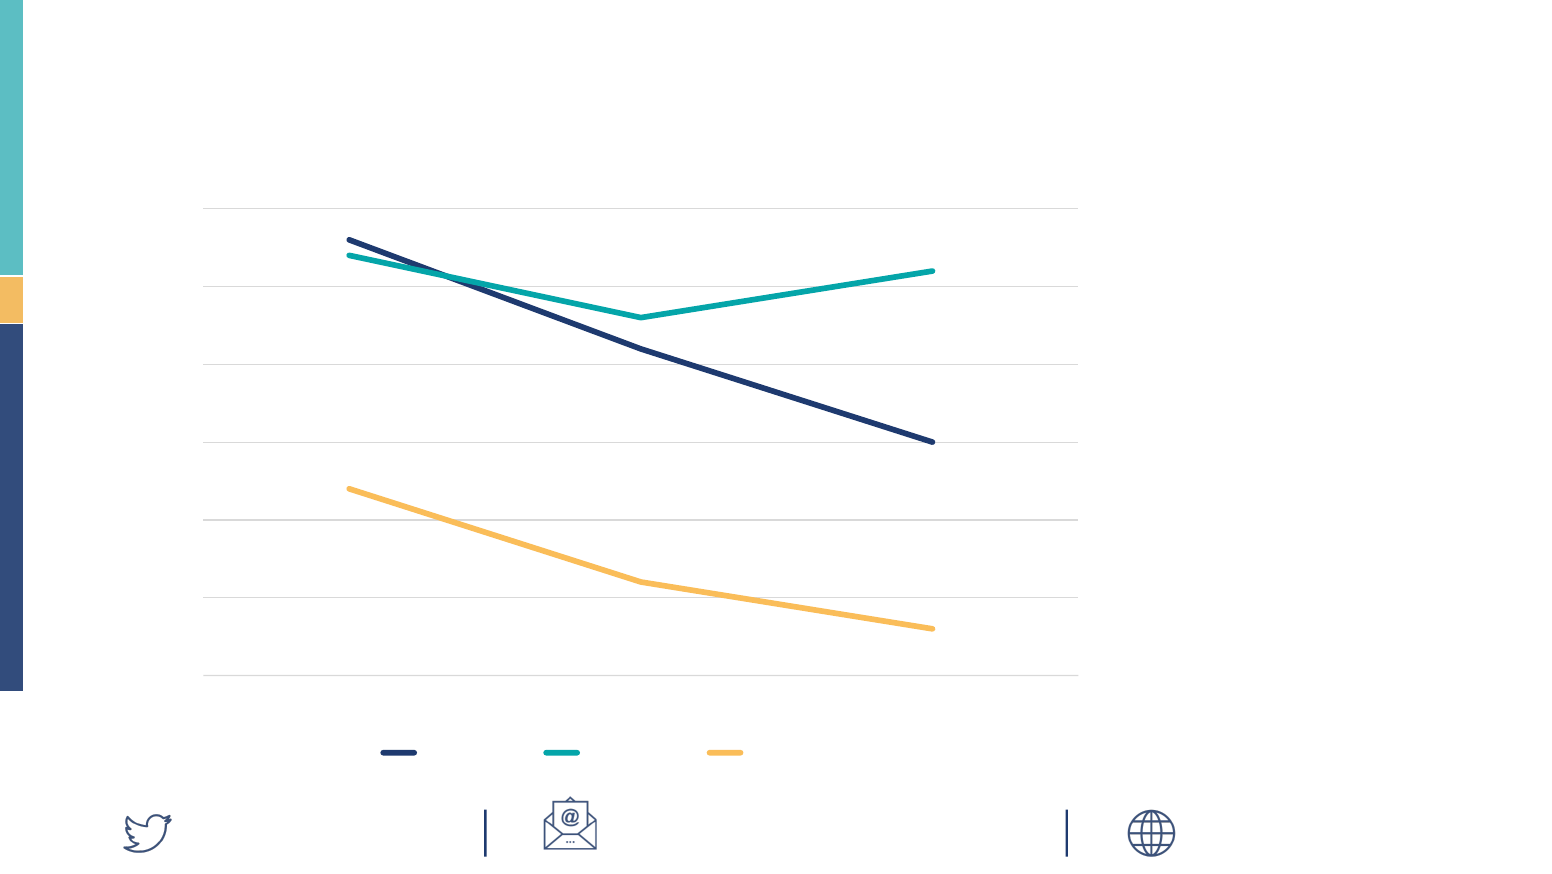
All programs declined since the pandemic,
but Program B is recovering.
Program A
Program B
Program C
45%
50%
55%
60%
65%
70%
75%
2019 2020 2021

SheilaBRobinso n Sh eilabrobinson.comsbr@sheilabrobinson.com
0%
10%
20%
30%
40%
50%
60%
70%
80%
Program A Program B Program C
Chart Title
2019 2020 2021
Program A
Program B
Program C
45%
50%
55%
60%
65%
70%
75%
2019 2020 2021
All programs declined since the pandemic,
but Program B is recovering.

SheilaBRobinson Sheilabrob ins o n.comsbr@sheilabro b in s o n .co m
0%
10%
20%
30%
40%
50%
60%
70%
80%
90%
100%
During the school
day
After school 2-
4pm
After school 3-
5pm
After school 4-
6pm
Saturdays Summer
weekdays
Chart Title
Preferred OK Doesn't work for me
QUESTION: What are the best
days and times for PD? Which
are the second and third best,
etc.?
Stacked columns don’t tell the
right story.
Click anywhere in chart; right
click on Edit data in Excel.
Add columns for buffer data and
label holders and add that data.
Sort data on PREFERRED.
Change chart type to horizontal
100% stacked.

SheilaBRobinson Sheilabrob ins o n.comsbr@sheilabro b in s o n .co m
0% 10% 20% 30% 40% 50% 60% 70% 80% 90% 100%
Saturdays
After school 4-6pm
After school 3-5pm
Summer weekdays
After school 2-4pm
During the school day
Chart Title
BUFFER Preferred OK LABELS Doesn't work for me BUFFER2
Delete x-axis labels.
Delete gridlines.
Right click on any bar > Format
Data Series > Adjust Gap Width
to make bars wider.

SheilaBRobinson Sheilabrob ins o n.comsbr@sheilabro b in s o n .co m
Saturdays
After school 4-6pm
After school 3-5pm
Summer weekdays
After school 2-4pm
During the school day
Chart Title
BUFFER Preferred OK LABELS Doesn't work for me BUFFER2
Right click on buffer data bar
segment > Format Data Series >
and set to no fill (do this for both
buffer data segments).
Add data labels to label holders,
then make them no fill.
Right click on data labels >
Format data labels > check
category name, uncheck value,
uncheck leader lines.

SheilaBRobinson Sheilabrob ins o n.comsbr@sheilabro b in s o n .co m
Saturdays
After school 4-6pm
After school 3-5pm
Summer weekdays
After school 2-4pm
During the school day
Saturdays
After school 4-6pm
After school 3-5pm
Summer weekdays
After school 2-4pm
During the school day
Chart Title
BUFFER Preferred OK LABELS Doesn't work for me BUFFER2
Delete y-axis.
Adjust text size of labels.
Adjust chart size OR adjust label
holder size to accommodate
labels without wrapping.

SheilaBRobinson Sheilabrob ins o n.comsbr@sheilabro b in s o n .co m
Saturdays
After school 4-6pm
After school 3-5pm
Summer weekdays
After school 2-4pm
During the school day
Chart Title
BUFFER Preferred OK LABELS Doesn't work for me BUFFER2
Delete unneeded legend labels
(click on legend; second click on
a specific label to delete from
the legend).
Format legend > Legend
Position > Top.

SheilaBRobinson Sheilabrob ins o n.comsbr@sheilabro b in s o n .co m
Saturdays
After school 4-6pm
After school 3-5pm
Summer weekdays
After school 2-4pm
During the school day
Chart Title
Preferred OK Doesn't work for me
Right click on Preferred bars >
Add Data Labels.
Right click data labels > Format
Data Labels > Label Position >
Inside end
(repeat for other bars)
Right click on Preferred bars >
Format Data Series > click paint
bucket > Fill with sold color
(repeat for OK bars).
Adjust data labels where needed
(click a second time on a label to
isolate it, then drag).

SheilaBRobinson Sheilabrob ins o n.comsbr@sheilabro b in s o n .co m
1%
4%
7%
9%
11%
66%
9%
19%
29%
40%
41%
26%
Saturdays
After school 4-6pm
After school 3-5pm
Summer weekdays
After school 2-4pm
During the school day
90%
76%
64%
51%
48%
7%
Chart Title
Preferred OK Doesn't work for me
Delete chart title placeholder.
Add story title in title
placeholder.
Increase text sizes for legend
and labels.

SheilaBRobinson Sheilabrob ins o n.comsbr@sheilabro b in s o n .co m
During the school day is the best time for
PD, followed by after school 2-4pm.
1%
4%
7%
9%
11%
66%
9%
19%
29%
40%
41%
26%
Saturdays
After school 4-6pm
After school 3-5pm
Summer weekdays
After school 2-4pm
During the school day
90%
76%
64%
51%
48%
7%
Preferred OK Doesn't work for me

SheilaBRobinson Sheilabrob ins o n.comsbr@sheilabro b in s o n .co m
During the school day is the best time
for PD, followed by after school 2-4pm.
1%
4%
7%
9%
11%
66%
9%
19%
29%
40%
41%
26%
Saturdays
After school 4-6pm
After school 3-5pm
Summer weekdays
After school 2-4pm
During the school day
90%
76%
64%
51%
48%
7%
Preferred OK Doesn't work for me
0%
10%
20%
30%
40%
50%
60%
70%
80%
90%
100%
During the
school day
After
school 2-
4pm
After
school 3-
5pm
After
school 4-
6pm
Saturdays Summer
weekdays
Chart Title
Preferred OK Doesn't work for me

SheilaBRobinson Sheilabrob ins o n.comsbr@sheilabro b in s o n .co m
$-
$5,000
$10,000
$15,000
$20,000
$25,000
$30,000
Budgeted Actual
Chart Title
2018 2019 2020 2021 2022
QUESTION: In which years did
we exceed our budget?
These lines don’t tell the right
story.
Years on x-axis doesn’t make
sense.
Click on chart area then Chart
Design (in ribbon) > Switch
Row/Column.

SheilaBRobinson Sheilabrob ins o n.comsbr@sheilabro b in s o n .co m
$-
$5,000
$10,000
$15,000
$20,000
$25,000
$30,000
2018 2019 2020 2021 2022
Chart Title
Budgeted Actual
We could get info from the line
chart, but it isn’t easy.
Right click on chart area >
Change Chart Type > Clustered
Column.

SheilaBRobinson Sheilabrob ins o n.comsbr@sheilabro b in s o n .co m
$-
$5,000
$10,000
$15,000
$20,000
$25,000
$30,000
2018 2019 2020 2021 2022
Chart Title
Budgeted Actual
Clustered columns are better,
but we can still improve.
Right click on bars for Actual >
Format Data Series.
Click to Plot Series On >
Secondary Axis.

SheilaBRobinson Sheilabrob ins o n.comsbr@sheilabro b in s o n .co m
$-
$5,000
$10,000
$15,000
$20,000
$25,000
$30,000
$-
$5,000
$10,000
$15,000
$20,000
$25,000
$30,000
2018 2019 2020 2021 2022
Chart Title
Budgeted Actual
This will create an overlapping
look.
Check to see that secondary
axis matches primary axis scale
(If not, right click > Format Axis
> adjust axis bounds), then
delete secondary axis.
Right click bars for Budgeted >
Format Data Series > adjust Gap
Width down to make bars wider.

SheilaBRobinson Sheilabrob ins o n.comsbr@sheilabro b in s o n .co m
$-
$5,000
$10,000
$15,000
$20,000
$25,000
$30,000
2018 2019 2020 2021 2022
Chart Title
Budgeted Actual
Right click on Budgeted bars >
Format Data Series > click on
paint bucket > recolor bars with
solid fill (usually we color back
bars in greyscale).
Optional: Recolor individual
Actual bars that exceed Budget
(click a second time on bars to
isolate one bar).
Increase text size of x-axis and
legend.
Right click on legend > Format
Legend > Legend Position >
Right (or Top).

SheilaBRobinson Sheilabrob ins o n.comsbr@sheilabro b in s o n .co m
$-
$5,000
$10,000
$15,000
$20,000
$25,000
$30,000
2018 2019 2020 2021 2022
Chart Title
Budgeted
Actual
Delete chart title placeholder.
Add story title in title
placeholder.

SheilaBRobinson Sheilabrob ins o n.comsbr@sheilabro b in s o n .co m
We exceeded our budget in two of the last
five years.
$-
$5,000
$10,000
$15,000
$20,000
$25,000
$30,000
2018 2019 2020 2021 2022
Budgeted
Actual

SheilaBRobinson Sheilabrob ins o n.comsbr@sheilabro b in s o n .co m
We exceeded our budget in two
of the last five years.
$-
$5,000
$10,000
$15,000
$20,000
$25,000
$30,000
2018 2019 2020 2021 2022
Budgeted
Actual
$-
$5,000
$10,000
$15,000
$20,000
$25,000
$30,000
Budgeted Actual
Chart Title
2018 2019 2020 2021 2022

SheilaBRobinson Sheilabrob ins o n.comsbr@sheilabro b in s o n .co m
0%
10%
20%
30%
40%
50%
60%
70%
80%
90%
100%
Session 1 Session 2 Session 3 Session 4 Session 5 Session 6
Chart Title
Excellent Very Good Good Fai r Poor
QUESTION: How did people rate
each session? Which sessions
were most highly rated?
Stacked columns don’t tell the
right story.

SheilaBRobinson Sheilabrob ins o n.comsbr@sheilabro b in s o n .co m
Sessions 4, 5, & 6 received the highest
participant ratings.
No participants rated Session 4 as fair or poor.
18%
25%
26%
41%
52%
70%
39%
37%
28%
42%
30%
19%
26%
23%
23%
17%
12%
6%
12%
15%
18%
6%
5%
5%
0%
5%
0%
0%
0%
Session 1
Session 2
Session 3
Session 4
Session 5
Session 6
Excellent Very Good Good Fair Poor
Directions for diverging stacked
bars:
1. Add buffer data to dataset. One
column to the left of Excellent, Very
Good, and Good, and one column to
the right of Fair and Poor.
2. Insert horizonal 100% stacked bar.
3. Recolor buffer data as no fill.
4. Add data labels to remaining bars and
format as preferred.
5. Recolor bars using a set of sequential
colors for the positive side, and an
opposite set of sequential colors for
the negative side.
6. Click legend, then second click on
each buffer label to isolate, then
delete.
7. Place legend on top and adjust
placement as preferred.
8. Adjust text size and chart size as
needed
9. (optional) Draw a vertical line and
place on chart to draw attention to
the separation of positive and
negative.

SheilaBRobinso n Sh eilabrobinson.comsbr@sheilabrobinson.com
0%
10%
20%
30%
40%
50%
60%
70%
80%
90%
100%
Session 1 Session 2 Session 3 Session 4 Session 5 Session 6
Chart Title
Excellent Ver y Goo d Good Fair Poor
Sessions 4,5, & 6 received the highest participant
ratings.
No participants rated Session 4 as fair or poor.
18%
25%
26%
41%
52%
70%
39%
37%
28%
42%
30%
19%
26%
23%
23%
17%
12%
6%
12%
15%
18%
6%
5%
5%
0%
5%
0%
0%
0%
Session 1
Session 2
Session 3
Session 4
Session 5
Session 6
Excellent Very Good Good Fair Poor

SheilaBRobinson Sheilabrob ins o n.comsbr@sheilabro b in s o n .co m
0
10
20
30
40
50
60
70
80
Snapchat
Yo utu be
Instagram
Wh ats App
Skype
Reddit
Face ti me
Face book
Twitter
Tumblr
Messenger
Pinterest
Tinder
Mail
Slack
Li nkedl n
Chart Title
Happy with screen time Unhappy with screen time
QUESTION: Which platforms
have the greatest discrepancy
between users happy or
unhappy with their screen time?
Clustered columns don’t tell the
right story.

SheilaBRobinson Sheilabrob ins o n.comsbr@sheilabro b in s o n .co m
People who are unhappy with their screen time
spend more time on Reddit, YouTube, and Snapchat
than other platforms.
0 10 20 30 40 50 60 70
Linkedln
Skype
Mail
Slack
Tind er
Pinterest
Tu mblr
Messenger
Facetime
Twitter
Snapchat
Instagram
Faceboo k
WhatsApp
Youtube
Reddit
Happy with screen time Unhappy with screen time
Minutes spent
Directions for horizontal dumbbell
dot plot:
1. Calculate difference between “happy”
and “unhappy”
2. Insert horizontal stacked bar chart
for “happy” and “difference” data
3. Click on “happy” bar segment, recolor
to no fill
4. (while still clicked on bars) Go to
Chart Design > Add Chart Element >
Error Bars > More Error Bars
5. Right click error bars > Format Error
Bars > Both > No cap > Percentage
.05%
6. (while still clicked on error bars) Go to
paint bucket > Begin Arrow Type >
Circle, then Begin Arrow Size >
Largest.
7. Adjust line width to make dot larger,
and recolor
8. Repeat steps 4-7 while clicked on
difference bars to create “unhappy”
dots.
9. Recolor bar to light grey and adjust
gap with as preferred.


WHAT IS THE QUESTION?
WHAT IS THE STORY WE NEED TO TELL?

Engage Audiences With Effective
PRESENTATION
STRATEGIES
FOUNDATIONS OF
FOUNDATIONS OF

Keep in touch!
Sheila B Robinson
@SheilaBRobinson
sheilabrobinson.com
sbr@sheilabrobinson.com
THE DESIGN + POWERPOINT SUMMIT 2023

Learning to Live with Google Slides
Lisa Marie Grillos
Lisa Marie’s LinkedIn
Description
Do you have an aversion to working in Google Slides, but nd that you sometimes have to dip your toes into those waters?
Learn some tips and tricks not just to get by but to thrive within this web-based presentation program.
Topics Covered
• How to work in Google Slides while staying grounded in PowerPoint
• Save your sanity by staying on top of version control
• Collaborating tips
• Animation in Google Slides
Useful Links
Lisa Marie’s Google animation deck
WCAG color accessibility:
aremycolorsaccessible
webaim contrast checker
Remove photo backgrounds
remove.bg
Free GIFs
giphy.com/stickers
Color picker
sip app
1 of 2
THE DESIGN + POWERPOINT SUMMIT 2023

Internet Clicker
Internet clicker has a Chrome extension! If
you don’t know what this is, it allows multiple
speakers to click to the next slide from their own
device.
$45/year to never again hear “next slide please”!
Once you’re logged in and give your speakers
the code to plug into internet clicker.com, they’ll
be able to click through on either their phone or
a browser. Just make sure if they’re on a mobile
device it can be set to not go to sleep otherwise
they’ll have to log in again. I like to counsel my
speakers to set up their monitor that has the
camera on it to have
the internet clicker in
a browser up near the
top of the monitor so it
appears they’re main-
taining eye contact with
the camera. The chrome
extension gives you a
button “present with
internet clicker” in the
top right of google slides
next to slideshow which
will be what you click
from the browser that’s
hosting the slides.
Accessibility Tips
Alternative, or alt, text is helpful if an image
doesn’t load, is confusing to interpret, or if a user
has vision disabilities. They’ll get a verbal or text
description of the image conveying the meaning.
Add your alt text in google slides by right-clicking
on the image and choosing the alt text option, or
using the shortcut command+option+Y.
Tips for writing alt text:
Keep alt text short and descriptive
Don’t include the words “image of”- the screen
reader will announce it is an image
Answer the question, “what is the information this
image is conveying?”
If the image doesn’t convey useful information
and is purely decorative, leave the alt text blank.
Use accessible color combinations
Check your colors by consulting the two links
shared to the left. Make sure everyone can
see your content by ensuring there is enough
contrast.
Write descriptive, unique slide titles
Unique slide titles allows people using assistive
technology like screen readers to determine
where they are in the presentation. If you have 3
slides on one topic consider naming them
“Slide Title: slide 1 of 3”
Keyboard Shortcuts
Slides
Ctrl + h / i = Slide up / Slide down
Control + M = Create New Slide
Command + D = Duplicate Slide
Command + option + M = add comment
Command + Option + Shift + H =
version history
Command + Option + 1 = Grid view
Text
Shift + Opt. + Cmd. + V =
Paste unformatted text
Ctrl + Shift + 8 + Bullet list
Ctrl + Shift + 7 =Numbered list
Ctrl + Shift + E = Center align
Ctrl + Shift + R = Right
Ctrl + Shift + L = Left
Ctrl + Shift + > = Increase font size
Ctrl + Shift + < = Decrease font size
The complete shortcut list
Command + / = MAC
Control + / = PC)
2 of 2
Learning to Live with Google Slides
Lisa Marie Grillos
THE DESIGN + POWERPOINT SUMMIT 2023

Choose Your Own Adventure: Stand Alone
PowerPoint Presos
Cass Taylor
cataylor@adobe.com
https://www.instagram.com/cass_taylor/, https://www.linkedin.com/in/cass-taylor-a19593/.
One of the biggest things today in presentations is trying to convey an impactful story or articulate an idea that gives an
audience a reason to take action. This session is a very important way to ensure you are not giving a
“typical” PPT presentation, but you are actually taking your audience on a journey that you control. Taking the perception of
traditional visual presentation delivery and transporting an audience to a more in depth and organic feeling experience.
What was covered in the session
Conversation is YOURS
• How to take your typical cluttered slide full of data and information and compartmentalize into digestible section for a focused storyline.
• A strategy to take dense information and segment it to make it easy to comprehend.
• Control the story narrative to make sure your audience does not read your content before you can speak to it.
• Take a regular bar chart and have the ability dive deeper into the data that makes up each bar within the chart.
• Organizing your presentation to perform in a presenter-controlled environment with the ability to dive deeper into data if asked by the
audience.
1 of 2
THE DESIGN + POWERPOINT SUMMIT 2023

Control the Conversation
• Send a self-driven presentation with multiple stakeholders with varying interest in
the information in one presentation.
• Create an interactive “dashboard” to give your audience a dierent user experience
than clicking through slides to nd their relevant data.
• Use the PowerPoint Show (.ppsx) le type to have the audience to open directly to
the interactive screen.
• Selecting the most applicable information with in a section and apply it to the “dash-
board” to give a preview to the content within the selected section.
• Learn to arrange your “dashboard” presentation to ow accordingly to your interface.
Control the Story
• Take a common PPT story slide and turn it into a more compelling story that can reso-
nate with an audience and showcase a product journey mapping within that story.
• Use simple animations to create realistic actions of an app example to describe the
user experience.
• Create a character driven storyline that gives the presentation a humanized and pur-
pose driven emotion.
Links to two of the presentations from the session
Conversation is YOURS_PPTX
Control the Story_PPTX
Control the Story_PPSX
PPT Keyboard Shortcuts used in the session
2 of 2
Choose Your Own Adventure: Stand Alone PowerPoint Presos
Cass Taylor
THE DESIGN + POWERPOINT SUMMIT 2023
