
1
SMARTLINK
6.1 APP USER GUIDE

2
WELCOME TO SMARTLINK
This document will guide you through using your new
Smartlink Security System for the rst time.
To begin, download the Smartlink app from the App Store or Google Play.
Search for “Smartlink+” or visit one of the following URLs:
App Store:
https://itunes.apple.com/us/app/smartlink/id1266830174?mt=8
Google Play:
https://play.google.com/store/apps/details?id=com.securenettech.smartlink6production&hl=en
Once you have downloaded the app, sign in using the
Username and Password you were provided.
Your Username and Password are different to the security PIN code
you enter into your physical security panel.
TABLE OF CONTENTS
Navigating the App 3
Arming & Disarming 4
Sensors and Bypassing 5
Controlling Lights, Switches, Locks & Doors 6
Run Scenes and Set All 7
Setting Thermostats 8
Viewing Live Video 9
Playing Back Recordings 10
Viewing Activity 11
Manage Users 12
Setting Preferences 13
Security Settings 14
Control and Locks & Doors Settings 15
Climate Settings 16
Adding and Removing Devices 17
Video Settings 18
Adding a Camera 19
1709_User_Guide_6.1_v09 | Modied: September 10, 2017 2:04 PM

3
NAVIGATING THE APP
Once signed into the app, you will rst see the Security page.
The Footer Navigation can be used to switch between the core pages of
the app; Security, Video, Control (connected devices such as lights and
switches), Climate (thermostats) and Doors & Locks.
The Side Menu lists additional functionality available within the app. You
can access the Side Menu by tapping the menu icon in the top left corner
of the screen, or by sliding right from any of the core pages.
The build version number of your app is located at the bottom of the Side Menu.
If the available features in the menu do not match the adjacent image, please
conrm that you are viewing the corresponding version of this document.
Depending on your service plan, some pages may not be available.
FOOTER NAVIGATION
Quickly switch between Security,
Video, Control, Climate and
Doors & Locks pages
SIDE MENU
Additional functionality such
as Activity and Settings can be
found in the side menu
4
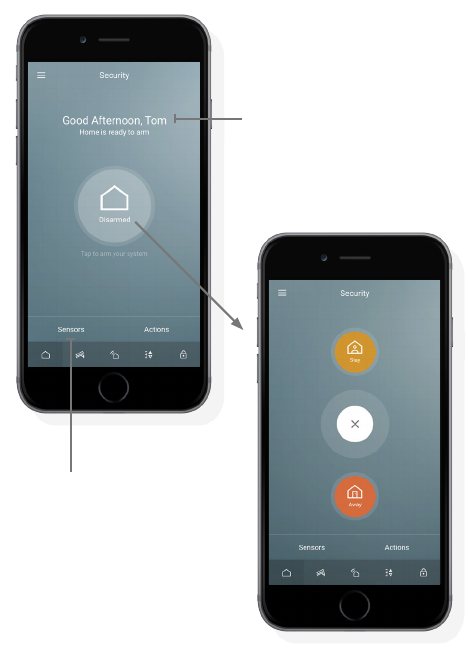
ARMING & DISARMING
From the Security page you can monitor and control your security system
and sensors. Tap the large circle in the center of the screen to arm or
disarm your system. When arming, you will be prompted to choose
between Arm Stay and Arm Away.
Set your system to Arm Away mode when nobody is home.
This will arm all sensors including internal motion sensors.
Set your system to Arm Stay mode when you are home.
Arm Stay will arm perimeter doors and windows, but not motion
sensors, allowing you to move freely within your home.
Upon pressing an arming option, the alarm system will begin the exit
delay. If supported by your security system, the app will countdown,
indicating the time left before you must exit.
To Disarm your alarm system, tap the circle in the center of the Security
page, then enter your 4-digit panel access code (pin) or use Touch ID.
Touch ID is available on supported devices and will use your ngerprint to identify you.
You can turn on Touch ID to Disarm in the Security page within Settings.
Some systems have a third arming option called Night Arm. Night Arm allows homes
with multiple motion sensors to arm the motion detection on some areas, while
allowing occupants to move freely in other areas such as upstairs or bedroom areas.
SYSTEM STATUS
The welcome message will update
with the status of your system and will
display any warnings or errors
QUICK LINKS
Refer to Sensors and Bypassing as
well as Running Scenes and Set All
sections of this document for details
5
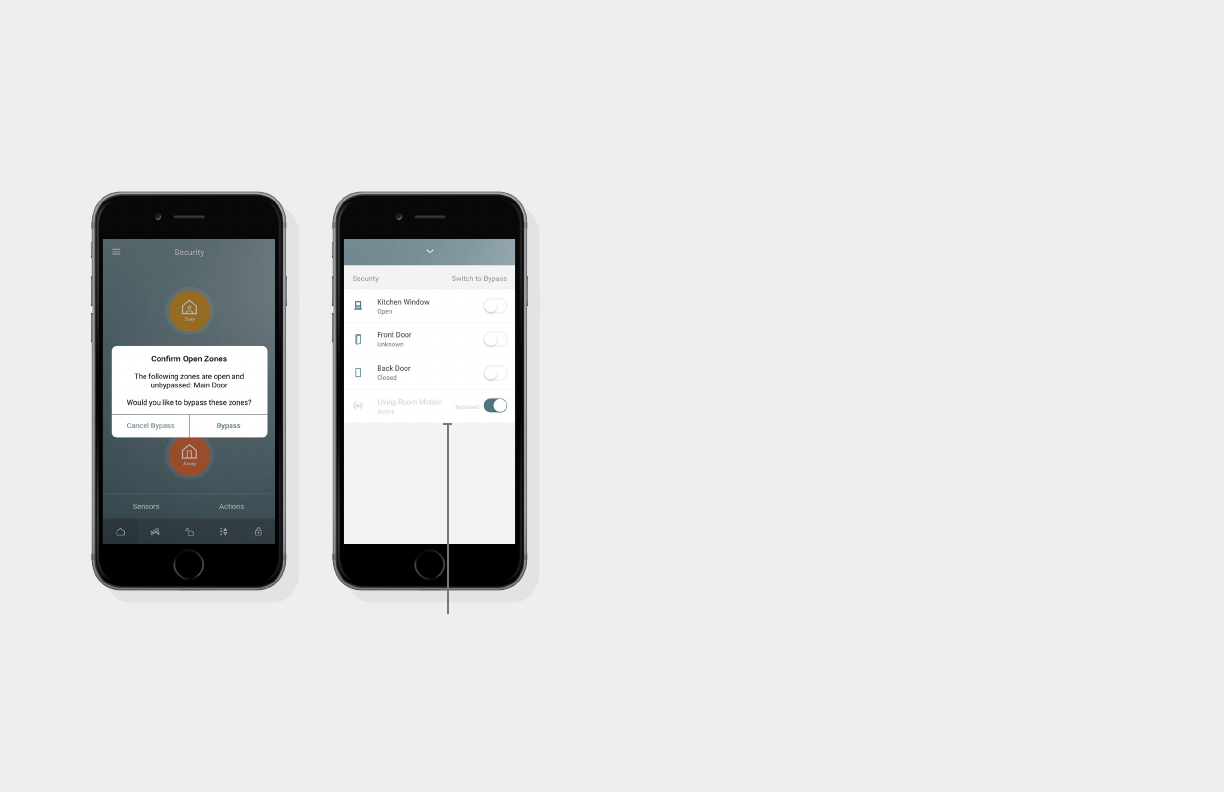
SENSORS AND BYPASSING
If any sensors are open while arming, you will be prompted to bypass
those sensors or cancel arming.
Bypassing a sensor instructs your security system to ignore that sensor
and continue arming as normal. This is helpful if you wish to leave a
specic window open, however that window sensor will not be monitored.
You can also Bypass Sensors by tapping the Sensors button at the
bottom of the Security page. A modal will slide up with a list of all
sensors. From there you can bypass or view the live status of all sensors.
Sensor warnings or errors will display within the sensor list. If you have non-security
sensors such as re or ood, they will be listed below the security sensors.
If you use keywords such as “door”, “window”, “motion” or “re” in the sensor name,
the icon for that device will change to suit. You can rename sensors from the
Security page in Settings.
BYPASSED SENSOR
Bypassed sensors appear gray
and will not be monitored

6
CONTROLLING LIGHTS,
SWITCHES, LOCKS & DOORS
Devices such as lights, switches and appliances are listed
on the Control page. Locks and doors are listed in the
Locks & Doors page and have similar functionality.
To turn devices on and off, locked and unlocked or
open and closed, tap the device icon. The device status will
change while sending the command, then again once the
command has been conrmed.
If supported by the light/switch, you can dim the light/
switch by holding down on the device icon, then adjusting the
percentage slider.
By default, all devices with dimmer functionality are considered lights. Devices with
basic on and off capability, such as a smart switch are considered switches.
If you use keywords such as “light”, “lamp”, “fan” or “switch” in the device name, the
icon for that device will change to suit. You can rename devices in settings.
DIMMABLE LIGHTS
Hold down on the icon to adjust the
brightness of dimmable lights.
Tapping the icon will toggle between
off and the last set brightness level.

7
RUN SCENES AND SET ALL
A Scene is a group of device actions you can set to run
collectively. A Scene can be run on demand by tapping the
Scene name in the Run Scene slide-up modal.
Similar to scenes, you can collectively set All Lights or All
Switches to on or off from the Set All modal.
Scenes and devices can also be automatically triggered by Event Schedules based
on time, security or device events. Scenes and Event Schedules can be created in
the web portal from the Personalize Scenes and Event Schedules menus.
QUICK LINKS
The control modal will slide up
when pressing Run Scene or Set All

8
SETTING THERMOSTATS
Tap the up or down arrow to adjust the set temperature of your
thermostat. The currently set temperature is displayed in the
center of the circle, with an icon indicating the mode below it.
The current room temperature is displayed on the outside edge
of the circle.
The background will change colors when the thermostat is set
lower than the current temperature on Cool Mode, or higher
than the current temperature on Heat mode. The background
color will not change when the thermostat is idle.
By default, setting the thermostat higher or lower than the current room temperature
will not cause the mode to automatically change. This matches the default
functionality of most thermostats. In the Settings Climate page you can turn this
functionality on if desired.
QUICK CONTROLS
Switch the Mode between
Cool, Heat and Off and set
Fan between On and Auto
SWITCHING THERMOSTATS
If you have multiple thermostats, you can
switch them by tapping the thermostat
name in the page title

9
VIEWING LIVE VIDEO
The main Video page in the app displays a list all cameras
installed on your system. Tap the preview image to view the live
footage from that camera.
Once the video displays, rotate your device horizontally to
switch to full screen viewing. If supported by your camera,
you will have options for toggling the volume and microphone
functionality.
The Snapshot button (camera icon at the bottom of the screen)
will take a screen snapshot and save it to your smart device
image gallery.
Pan/Tilt, volume and microphone (2-way audio) features are only available on
supported camera models.
PAN / TILT
Swipe left to right or up and down
to control pan/tilt cameras
VOLUME AND MICROPHONE
Toggle the Volume (speaker) icon to listen to
audio captured through the camera.
Tap the Microphone icon to display the red
overlay Push to Talk button. Hold the Push to
Talk button to talk through the camera.
MAIN VIDEO PAGE
Select a camera to launch the
live view and recordings list
ROTATE THE SCREEN
Hold the screen horizontally to view
full screen live video

10
PLAYING BACK RECORDINGS
When viewing playback vertically you will see tabs for Constant
and Event recordings below the footage (on supported cameras).
Constant Recordings are stored locally on the Camera
MicroSD™ card (on supported cameras). The continuous
recordings are saved into sequential 2 minute clips.
Event recordings are recordings triggered by a security event
such as an alarm, arming, and disarming your system or via an
Event Schedule. An Event Schedule can incorporate other event
types such as device or schedule-based triggers.
To playback recordings, select a recording from either the
Constant or Events list. Recordings are always listed with most
recent rst. Tap the Calendar icon to select a time in history.
You can adjust the time or swipe left or right to change months.
When selecting Done, the results will list recordings with most
recent rst, starting before your selected date/time.
The total Constant Recording time can be up to 2 weeks depending on the
storage card capacity, camera conguration and environment. We recommend a
64GB or 128GB MicroSD card.
Event Recordings are stored securely in the cloud and can be congured in the
web portal. Depending on your service package, you can store either 250 or 500
recordings. The length of each recording does not count towards storage limit
and can vary based on event.
Both Constant and Event recordings use “rst in, rst out” DVR-style storage
where the oldest recordings will be deleted to make way for new recordings.
CALENDAR
Select a date/time to display all
recordings before that time.
If searching for constant recordings,
the days encompassing the recording
range are highlighted within the
calendar.

11
VIEWING ACTIVITY
The Activity page lists all recent activity with your system.
To lter activity results, tap the Filter icon in the top right hand corner of
the screen. You can select or deselect categories to display, tapping the
checkmark in the top right hand corner of the screen to conrm.
Motion sensors and frequently used door sensors will create a lot of events in the
activity list. De-selecting Sensors from the Activity Filter will hide these items from
the list, allowing you to focus on other activity types.
FILTER
Select category types to
lter your activity feed.

12
MANAGE USERS
The Users page allows you to manage the users on your account. Select
a user to edit that user’s settings.
From a user page, you can set the user’s basic information such as Full
Name, Username, Password, Phone Number and Email Address. The
Username and Password will be used to access the app and web portal.
The Alarm User Pin eld is the pin code that the user will enter when
accessing the security panel.
Notication settings can be set below by turning on the Push Notication,
Email or Text notication methods. Text and Email notications will be
sent to the Phone Number and Email Address entered for that user.
EDIT USER
Select user name to edit
the user’s settings.

13
SETTING PREFERENCES
From the Settings page, under Preferences, you can manage how you
sign into the app or switch which language the app is displayed in.
If Auto Sign In is turned on, the app will not require you to enter your
password each time you open it.
If you select Touch ID, the app will allow you to log in using the Touch ID
ngerprint scanning functionality on your device (where supported).
When Auto Sign In is selected, Touch ID is disabled. Touch ID is recommended as it
provides the most security and convenience. You can also use Touch ID for disarming your
security system (activate Touch ID for disarming within the Security Settings).
SWITCH LANGUAGES
The app supports multiple languages.

14
SECURITY SETTINGS
From the Security page in Settings you can manage your security system,
gateway/radio and sensors. The available options will vary depending on
your security system.
In the Gateway Settings section you can view the connection status
of your Security System. It will display as Online if connected to the
interactive server. If using cellular connection, the signal strength will be
displayed.
A list of your installed sensors will appear under the Sensors section. To
edit the name of a sensor, swipe inward from the right edge of the sensor
list item, revealing the Edit button.
The Gateway (called a Radio in some security systems) is the IP/Ethernet/Wi-Fi®
or Cellular communication device built into your security system. The Gateway is
what enables your security system and connected devices to communicate to the
interactive cloud and monitoring service.
EDIT SENSORS
Swipe left from the right edge
of the screen to reveal the edit
button.
DISARM WITH TOUCH ID
Touch ID enables disarming your security
system without having to enter the pin code
(available on Touch ID supported devices)

15
CONTROL AND LOCKS &
DOORS SETTINGS
From Settings, the Control page lets you manage your connected devices
such as lights and switches, while the Locks & Doors page allows you to
manage connected door locks and garage doors.
From either page, swipe left from the right edge of any listed device to
edit it. All devices have options to rename and delete the device.
Tap the + button below the device list to launch the add device wizard.
You can also add or remove Z-Wave devices from the Tools page in Settings.
See Adding Devices for more information.
EDIT DEVICE
Swipe from the right edge
of the screen to reveal the
edit and delete buttons.

16
CLIMATE SETTINGS
From the Climate page in Settings you can manage your thermostats.
Automatic Mode Switching sets your thermostats to automatically switch
between heat and cool when you adjust the temperature above or below
the current room temperature.
If you have multiple thermostats, Primary Display allows you to choose
which thermostat will display rst when opening the app Climate page.
Swipe left from the right edge of any listed thermostat to rename or
delete it, or tap the + button below the device list to launch the add device
wizard where you can learn in a new thermostat.
TEMPERATURE SCALE
Switch between Fahrenheit and Celsius

17
ADDING AND REMOVING DEVICES
The Add Device wizard can be launched from the Control, Locks & Doors,
Climate or Tools page in Settings. The process is similar for all Z-Wave
connected devices.
After the wizard initiates, it will go into Learn Mode. While in Learn Mode,
make sure the device you are connecting is powered up, then locate and
press the Bind Button (see manufacturer instructions if needed). Once
pressed, the device will learn into your system automatically.
Once learned in, you can name your device to complete the process.
Depending on the type of device, it will appear in the corresponding
Settings and main app pages.
The Delete or Remove Device wizard is similar and will prompt you to
press the Bind Button on your device to remove it.
If using a Z-Wave switch, simply plug in a lamp or appliance such as a fan to control remotely
via the app. If your switch has a dimmer functionality, be sure to use this only on a supported
appliance to prevent damage.
Sometimes devices may be physically lost, malfunctioning or already belonging to another
Z-Wave network. In this case, use the Remove Device option under Tools in Settings, which will
forcefully remove an erroneous device.
ADD DEVICE
While Learn Mode is initiated
press the Bind Button on your
Z-Wave device

18
VIDEO SETTINGS
From the Video page in Settings you can manage your cameras.
Swipe left from the right edge of any listed camera to rename, delete or
update the Wi-Fi® network connection settings.
Tap the + button below the camera list to launch the add camera wizard.
See Adding Cameras for more information.
Only supported cameras can be added within the app.
UPDATE NETWORK
You can update your network settings if
you need to reconnect the camera

19
ADD WI-FI®
Enter a 2.4Ghz Wi-Fi network to
connect the camera wirelessly.
ADDING A CAMERA
Launch the Add Camera wizard from the Video page in Settings,
and follow the on-screen instructions. First, select the image
that matches your camera. Only the listed camera types are
supported.
From the Connect Your Camera page, plug the camera into a power
outlet using the included AC Power cable, then plug it into your
router using the included Ethernet cable.
Continue to name your camera and enter the camera DID number
(SNP-XXXXXX-XXXXX), located on either the back or bottom of
the camera.
The camera will then register. Next, unplug and replug the AC
power to power-cycle the camera and wait 90 seconds. Your
camera should now be working successfully over IP/Ethernet.
To connect the camera over Wi-Fi®, enter your network credentials.
Once successful, you can unplug the Ethernet cable.
For more details and troubleshooting adding cameras, please refer to the camera installation
guide. Most installation issues relate to connecting Wi-Fi. Cameras only support 2.4Ghz networks
(not the 5Ghz option on dual band routers). You can edit the network settings for each camera
from the Video page in Settings.
