
Microsoft Excel 2016
INFOCUS COURSEWARE
Designed to fast-track you through the process of learning
about computers and information technology, the In Focus
range is a unique and innovative concept in learning.
A quick reference summary of key procedures is provided at
the bottom of each page together with handy tips and
additional information.
Each title in the In Focus series can be used as:
a classroom workbook for instructor-led teaching and
training;
a self-study guide for self-paced learning;
a tutorial guide for distance education programs;
a resource collection of just-in-time support and
information for help desk users and support staff;
a handy, desk-side reference for computer users.
This publication has been created using EngineRoom
Desktop™ document management and publishing software
developed by Watsonia Publishing.
Microsoft Excel 2016
Recording Simple Macros
© 2017 The University of Nottingham
Recording Simple Macros

MICROSOFT EXCEL 2016
RECORDING SIMPLE MACROS
. . . . . . . . . . . . . . . . . . . . . . . . . . . . . . . . . . . . . . . .
Copyright 2017 Melbourne
by Watsonia Software Pty Ltd (ABN 64 060 335 748)
Published by Watsonia Publishing
47 Greenaway Street
Bulleen Vic Australia 3105
Telephone: (61 3) 9851 4000
Facsimile: (61 3) 9851 4001
Web site: www.watsoniapublishing.com
Product Code ExcRecSimMacros
Build: 29/06/17
. . . . . . . . . . . . . . . . . . . . . . . . . . . . . . . . . . . . . . . .
Trademark Acknowledgments
All terms mentioned in this manual that are known to be trademarks or service marks
have been appropriately acknowledged or capitalised. Watsonia Software cannot
attest to the accuracy of this information. Use of a term in this manual should not be
regarded as affecting the validity of any trademark or service mark.
Screen Shots © 1983-2017 Microsoft. All rights reserved.
Disclaimer
Every effort has been made to provide accurate and complete information. However,
Watsonia Software assumes no responsibility for any direct, indirect, incidental, or
consequential damages arising from the use of information in this document. Data
and case study examples are intended to be fictional. Any resemblance to real
persons or companies is coincidental.
Copyright Notice
This publication is protected in accordance with the provisions of the Copyright Act.
Apart from permissions expressed in the Copyright Act pertaining to copying for
study, review, or research, no part of this publication may be reproduced in any form,
or stored in a database or retrieval system, or transmitted or distributed in any form
by any means, electronic, mechanical photocopying, recording, or otherwise without
written permission from Watsonia Software Pty Ltd.

© 2017 The University of Nottingham The University of Nottingham - i -
Preface
READ ME FIRST
1
4
In case you're not familiar with the terminology,
Read Me First is quite often the name given to a
computer file that contains important information
for people to know prior to using an application.
This section contains some important information to
help you use this book so we thought we'd start
with a Read Me First section.
What skills and knowledge
you will acquire...
The skills and knowledge acquired in Microsoft Excel 2016 - Recording
Simple Macros are sufficient to be able to use and operate the software
effectively.
What you'll need to know
before beginning this
course...
Microsoft Excel 2016 - Recording Simple Macros assumes little or no
knowledge of the software. However, it would be beneficial to have a
general understanding of personal computers and the Windows operating
system environment.
The objectives of this guide…
At the completion of this course you should be able to:
create recorded macros in Excel
use the macro recorder to create a variety of macros
What you get in a chapter...
Each chapter begins with a summary page listing the topics covered in
that chapter. The chapter then consists of single-page topic sheets
pertaining to the theme of the chapter.
What you'll need to have
before commencing this
course...
Many of the topics in this learning guide require you to open an existing
file with data in it. These files can be obtained from your instructor and
need the product code for this course which is ExcRecSimMacros.
As you work through this
guide…
It is strongly recommended that you close all open files, if any, prior to
commencing each new chapter in this learning guide. Each chapter,
where relevant, has its own set of exercise files and any from a previous
chapter are no longer required.
Where to from here...
Have a look at the next page which explains how a topic page works,
ensure that you have access to the exercise files (see above), and you're
ready to make a start.

© 2017 The University of Nottingham The University of Nottingham - ii -
Preface
The majority of this book comprises single-page
topic sheets. There are two types of topic sheets:
task and reference. The layout of both is similar
– an overview at the top, detail in the centre and
additional reference (optional) material at the
bottom. Task sheets contain a Try This Yourself
step-by-step exercise panel in the detail area as
shown below.
Topic name
General topic overview provides an introduction to the topic
Try This Yourself
(Task-based topic sheets) is a detailed step-by-step practice
exercise for you to work through. In
Reference
topic sheets this is usually replaced
by a box with reference information.
In
Task topic sheets screen shots and graphics provide a visual clue as to what
will happen when you work through the
Try This Yourself practice exercise. In
Reference
topic sheets the screen shots and graphics are used to visually
represent information and concepts.
The
For Your Reference
(optional) element provides a quick summary of the steps
required to perform a task. These usually only appear in Task-based topic sheets.
The
Handy To Know (optional) element provides additional information such as
alternate ways of accomplishing a task or further information providing handy tips.
1
2
3
4
5
6
WORKING WITH TOPIC SHEETS

© 2017 The University of Nottingham The University of Nottingham - iii -
Preface
CONTENTS
Chapter 1 Recorded Macros......................................................................................................... 1
Understanding Excel Macros ................................................................................................... 2
Setting Macro Security ............................................................................................................. 3
Saving A Document As Macro Enabled ................................................................................... 4
Recording A Simple Macro ...................................................................................................... 5
Running A Recorded Macro ..................................................................................................... 6
Relative Cell References ......................................................................................................... 7
Running A Macro With Relative References ........................................................................... 8
Viewing A Macro ...................................................................................................................... 9
Editing A Macro ...................................................................................................................... 10
Assigning A Macro To The Toolbar ....................................................................................... 11
Running A Macro From The Toolbar ..................................................................................... 12
Assigning A Macro To The Ribbon ........................................................................................ 13
Assigning A Keyboard Shortcut To A Macro ......................................................................... 14
Deleting A Macro.................................................................................................................... 15
Copying A Macro.................................................................................................................... 16
Chapter 2 Recorder Workshop .................................................................................................. 17
Preparing Data For An Application ........................................................................................ 18
Recording A Summation Macro ............................................................................................. 19
Recording Consolidations ...................................................................................................... 20
Recording Divisional Macros ................................................................................................. 21
Testing Macros....................................................................................................................... 22
Creating Objects To Run Macros........................................................................................... 23
Assigning A Macro To An Object ........................................................................................... 24

© 2017 The University of Nottingham The University of Nottingham - iv -
Preface
NOTES:

Microsoft Excel 2016 - Recording Simple Macros
© 2017 The University of Nottingham Page 1 Chapter 1 - Recorded Macros
CHAPTER 1 RECORDED MACROS
In this session you will:
gain an understanding of macros in Excel
learn how to set macro security
learn how to save a document as macro enabled
learn how to record a simple macro
learn how to run a recorded macro
learn how to record relative cell references
learn how to run a macro with relative references
learn how to view a macro
learn how to edit a macro
learn how to assign a macro to the toolbar
learn how to run a macro from the toolbar
learn how to assign a macro to the ribbon
learn how to assign a keyboard shortcut to a macro
learn how to delete a macro
learn how to copy a macro.
Macros provide a way of automating operations in Microsoft Excel.
One of the easiest ways to create a macro is to use the macro
recorder.
The macro recorder records the actions that you perform through
the keyboard and mouse. It creates a program from these steps that
you can run any time you need to repeat the actions.
In this way, macros enable you to work more efficiently.
INFOCUS

Microsoft Excel 2016 - Recording Simple Macros
© 2017 The University of Nottingham Page 2 Chapter 1 - Recorded Macros
UNDERSTANDING EXCEL MACROS
Macros were added to Excel many years ago to
provide a way to automate routine operations. In
earlier versions, macros enabled you to record
the keystrokes used to perform an operation.
These days, macros have evolved into a full
programming language, allowing you to fully
automate virtually every facet of workbook
production.
What Is A Macro?
A macro is simply a programmed set of instructions that tell Microsoft Excel (very specifically) what it
should do. Macros are written or recorded in a procedure.
How Are Macros Created?
Excel offers two main ways of creating macros. Macros can be recorded using the built-in macro
recorder, which records what you do and then converts this into a macro program. This is a great way of
creating macros for performing routine, complex or boring repetitious tasks. Once recorded, these tasks
can be performed quickly and accurately over and over again using the macro.
Macros can also be developed from scratch. In other words, you can type the programming steps
yourself rather than recording them using the built-in macro recorder.
You can also use a combination of the two techniques to fine tune or change the functionality of a
macro.
What Types Of Macros Are There?
As a very broad generalisation, there are two types of macros – global and local.
A global macro is available to all of the workbooks that you create. For example, you might have a
macro that adds your company name and details to the footer of a workbook. Since you want all
workbooks to have this, the macro to add the footer should be available to all workbooks and would
therefore need to be global.
A local macro is one that is available only to one particular workbook. For example, you might have a
monthly report workbook that needs to have information imported into it from other sources. You can set
up a macro that will conduct the importation for you so that you don’t have to remember or perform the
steps each time.
Where Are Macros Located?
Macros are either attached to the current document or located in a Personal Macro Workbook which
makes them available to all workbooks (i.e. global). When you create a macro, if you select Personal
Macro Workbook as the location in which to store it, a hidden personal macro workbook called
Personal.xlsb is created and the macro is stored within it. This then makes it available each time you
open Excel.
How Do You Access Macro Code?
Macros can only be viewed using the Visual Basic Editor which is accessed via the tool of the same
name on the Developer tab. You can also press + to access the Visual Basic Editor.
What Is VBA?
VBA (Visual Basic for Applications) is the programming language used to create macros. Earlier
versions of Excel used more primitive versions of this language. VBA is a common programming
language found in virtually all Microsoft Office applications. Once you have learned it for one product,
you can easily adapt what you’ve learned to the other products.
Do I Need To Be A Programmer To Create Macros?
Absolutely not! While macros may appear cryptic and difficult to understand at first, tools such as the
macro recorder make creating macros easy and effortless.

Microsoft Excel 2016 - Recording Simple Macros
© 2017 The University of Nottingham Page 3 Chapter 1 - Recorded Macros
SETTING MACRO SECURITY
Recording or writing macros allows you to hack
into Excel and manipulate the application. One of
the consequences of this is that macros become
a potential source of viruses. To reduce the risk
of viruses, Microsoft has a Trust Centre that allows
you to enable or disable macros based on whether
or not they are stored in a trusted location or have
a digital signature.
Try This Yourself:
Before starting this exercise
open a new, blank workbook...
If the
Developer tab is not
visible, click on the
File tab,
click on
Options, click on
Customise Ribbon
, click on
Developer
in Customise the
Ribbon
so it is ticked, then
click on [OK]
Click on the
Developer tab
Click on
Macro Security in
the
Code group to display the
Trust Centre
dialog box
By default, all macros are
currently disabled unless they
are in a trusted location...
Click on
Trusted Locations
to see the list of trusted
folders
Click on
[Add new location]
to display the
Microsoft
Office Trusted Location
dialog box
Click on
[Browse], locate the
course files folder, click on
[OK]
then click on [OK]
again
The course files folder will be
added to the list of Trusted
Locations...
Click on
[OK] to close the
dialog box
For Your Reference…
To set the level of macro security:
1. Click on the Developer tab
2. Click on Macro Security in the Code group
3. Click on the required level of security
4. Click on [OK]
2
Handy to Know…
A digital signature is an encrypted
electronic stamp used to authenticate a
macro or document. This signature confirms
that the macro or document originated from
the signer and has not been altered.
3

Microsoft Excel 2016 - Recording Simple Macros
© 2017 The University of Nottingham Page 4 Chapter 1 - Recorded Macros
SAVING A DOCUMENT AS MACRO ENABLED
Microsoft Excel has several different file formats
that control whether or not macros can be saved
with the file. The default workbook format of .xlsx
does not allow macros to be saved with the
workbook. To ensure that macro code can be
saved, you must change the workbook type to
.xlsm which is known as an Excel Macro-Enabled
Workbook.
Try This Yourself:
Same
File
Continue using the
previous file with this
exercise, or open the file
Macros_1.xlsx...
Click on the
File
tab, then
click on
Save As to
display the
Save As
place
Click on
This PC in the
middle pane, then click
on
Browse
to display the
Save As dialog box
Click on the drop arrow
for
Save as type, then
select
Excel Macro-
Enabled Workbook
(*.xlsm)
Ensure the course files
folder is selected, then
click on
[Save]
The filename, shown in
the title bar, will reflect
the file type
2
For Your Reference…
To save a workbook as macro-enabled:
1. Click on the File tab, then click on Save As
2. Open the Save As dialog box
3. Click on the drop arrow for Save as type
and
select Excel Macro-Enabled Workbook
(*.xlsm)
4. Click on [OK]
Handy to Know…
Excel files saved as either .xlsx or xltx
cannot be used to store macros, while those
saved as either .xlsm or .xltm can be used
to store macros. You can create a macro in a
workbook that is not macro-enabled, but you
won’t be able to save it.
4

Microsoft Excel 2016 - Recording Simple Macros
© 2017 The University of Nottingham Page 5 Chapter 1 - Recorded Macros
RECORDING A SIMPLE MACRO
7
Simple macros can be recorded to perform steps
that you need to repeat often. For example, you
might need to enter the names of your company’s
departments in each workbook you create. When
you create a macro, you need to assign it a unique
name and a location to store it. When you record
the steps required, the recorder takes care of
writing the macro commands.
Try This Yourself:
Same
File
Continue using the
previous file with this
exercise, or open the file
Macros_2.xlsm...
Click on the
Developer
tab,
then click on
Record
Macro
in the Code group
to display the
Record
Macro dialog box
Type
DepartmentNames
(no spaces) in
Macro
name
Ensure that
Store macro
in
is set to This
Workbook
, click in
Description
, then type
Enter the names of the
company departments
Click on
[OK] to begin
recording
The Stop Recording tool
appears in the Code group
on the Developer tab and
also in the status bar,
indicating that recording is
in progress...
Click in cell
A5, then enter
the text as shown, pressing
after each entry,
including the last one
Click on
Stop Recording
in the Code group
2
3
For Your Reference…
To record a macro:
1. Click on the Developer tab, then click on
Record Macro in the Code group
2. Type a Macro name, then select a location
3. Click on [OK], then perform the steps
4. Click on Stop Recording in the Code group
5
Handy to Know…
If you want to be able to access a macro
from more than one workbook, store it in the
Personal Macro Workbook.
The shortcut key combination option in the
Record Macro
dialog box enables you to run
a macro without having to access the ribbon.
6

Microsoft Excel 2016 - Recording Simple Macros
© 2017 The University of Nottingham Page 6 Chapter 1 - Recorded Macros
RUNNING A RECORDED MACRO
Once a macro has been recorded, it can be
played or run as often as you need it. All you
need to know is which macros are available and
what they do. The description is very important at
this stage, especially if you haven’t used your
macros for a while. The description of a macro can
be viewed in the Macro dialog box, displayed when
you want to run a recorded macro.
Try This Yourself:
Same
File
Continue using the previous
file with this exercise, or open
the file Macros_3.xlsm...
Select the range
A5:A8
Press to remove the
department name labels
Click on the
Developer tab,
then click on
Macros in the
Code
group to display the
Macros dialog box
Click on
DepartmentNames if
it is not already selected, then
click on
[Run]
The macro will run and the
department names will be
inserted in the correct cells...
Add the rest of the data as
shown, then resize the
columns to fit the data
3
4
For Your Reference…
To run a recorded macro:
1. Click on the Developer tab
2. Click on Macros in the Code group
3. Click on the Macro name
4. Click on [Run]
Handy to Know…
You can display the Macros dialog box by
using the keyboard shortcut
+ .
You can press the keyboard shortcut
assigned to the macro to run it.
5

Microsoft Excel 2016 - Recording Simple Macros
© 2017 The University of Nottingham Page 7 Chapter 1 - Recorded Macros
RELATIVE CELL REFERENCES
Unlike absolute cell references that identify
specific cells such as A5, relative cell references
are an offset from the current active cell. For
example RC[-1] refers to the cell one column to
the left of the currently active cell. You can force
Excel to record relative cell references so that your
macros can be used in any cell in a workbook.
Try This Yourself:
Same
File
Continue using the previous
file with this exercise, or
open the file
Macros_4.xlsm...
Click in cell
C5
This is where we want the
macro to place the new
value...
Click on the
Developer
tab,
then click on
Use Relative
References
in the Code
group to activate the option
Click on
Record Macro in
the
Code group, complete
the macro information as
shown, then click on
[OK]
to start recording
Type
=TRUNC(B5*1.15),
as shown, and press
The calculated value will
appear in cell C5...
Click on
Stop Recording
in
the Code group
Click on
Use Relative
References
to turn off the
option
3
4
For Your Reference…
To record a macro with relative references:
1. Click on the Developer tab, click on Use
Relative References in the Code group,
click on Record Macro in the Code group,
fill in the macro details, then click on [OK]
2. Perform the steps, then click on Stop
Recording in the Code group
Handy to Know…
To change a relative cell reference within a
formula to a different kind of reference (such
as absolute or mixed), select the reference in
the formula bar and press
to cycle
through the options.

Microsoft Excel 2016 - Recording Simple Macros
© 2017 The University of Nottingham Page 8 Chapter 1 - Recorded Macros
RUNNING A MACRO WITH RELATIVE REFERENCES
When you record a macro with absolute cell
references, it records the exact cell references.
No matter which cell is active, when you run the
macro, the actions will be performed on the cells
that you used when recording the steps. With
relative cell references, the macro will run relative
to the currently active cell, so you need to take care
with positioning.
Try This Yourself:
Same
File
Continue using the previous
file with this exercise, or
open the file
Macros_5.xlsm...
Ensure that cell
C6
is active
This is where we want the
macro to perform the
recorded steps...
Click on the
Developer
tab,
then click on
Macros in the
Code
group to display the
Macro dialog box
Click on
Escalate, then
click on
[Run]
The formula is entered into
the cell and the value
resulting from the
calculation is displayed.
You can also run the macro
using the shortcut key you
set...
Ensure that cell
C7 is
selected, then press +
to run the macro again
The value is entered...
Ensure that cell
C8 is
selected then press +
to complete the column
2
3
For Your Reference…
To run a macro with relative cell referencing:
1. Click on the cell where you want the macro
to perform
2. Click on the Developer tab, then click on
Macros in the Code group
3. Select the macro and click on [Run] or,
Press the shortcut key combination
5
Handy to Know…
By holding down when you assign a
shortcut key combination in the Record
Macro dialog box, you have access to at
least another 26 possible combinations. Just
be careful that you are not overriding built-in
shortcuts already in place in Excel.

Microsoft Excel 2016 - Recording Simple Macros
© 2017 The University of Nottingham Page 9 Chapter 1 - Recorded Macros
VIEWING A MACRO
When you record a macro, you actually create a
series of commands in a programming language
called Visual Basic for Applications (VBA).
Each time you run the macro, the code is
executed. VBA can be viewed and edited using the
Visual Basic Editor. The advantage of using the
editor is that you can easily change, copy or delete
macro code.
Try This Yourself:
Same
File
Continue using the
previous file with this
exercise, or open the file
Macros_6.xlsm...
Click on the
Developer
tab, then click on
Macros
to display the
Macro
dialog box
Click on
DepartmentNames
, then
click on
[Edit]
The Visual Basic Editor
will be displayed. The
code for the selected
macro is shown in the
Module window...
Spend a few moments
reading through each line
of code – see if you can
work out what each line
does
Scroll down the Module
window to display the
Escalate
code
Excel has placed both
programs into the same
Module...
Click on
File, then select
Close and Return to
Microsoft Excel
to close
the Visual Basic Editor
2
4
For Your Reference…
To view a macro:
1. Click on the Developer tab, then click on
Macros in the Code group
2. Select a macro
3. Click on [Edit]
Handy to Know…
When viewing macros in the Visual Basic
Editor, you will notice that some of the code
is in green. These are known as comments
and are used to explain the what, why and
who of code. This information is ignored by
the macro, but can be invaluable to a
programmer in understanding the code.

Microsoft Excel 2016 - Recording Simple Macros
© 2017 The University of Nottingham Page 10 Chapter 1 - Recorded Macros
EDITING A MACRO
You might find that you want to make a minor
change to your macro or insert additional code to
improve the macro’s functionality. Macro
instructions can be edited in the Visual Basic
Editor. You need to have a reasonable grasp of
the programming language before you can
confidently make changes, and the Help system
found through the Visual Basic Editor is useful.
Try This Yourself:
Same
File
Continue using the previous
file with this exercise, or open
the file Macros_7.xlsm...
Click on the
Developer tab,
then click on
Macros in the
Code
group to display the
Macro dialog box
Click on
Escalate
then click on
[Edit]
to display the code in
the
Visual Basic Editor
window
Type the additional lines as
shown, using to indent
lines and for new lines
Modify the formula line as
shown
Click on
File, then select
Save
Macros_7.xlsm
or Save
Book1.xlsm
Click on
File > Close and
Return to Microsoft Excel
Click in cell
D5 and press
+ to see a dialog box
The edited macro enables you
to now specify an escalation %
at the time it is run…
Type
50 and click on [OK]
Here, the macro increases the
value 287 by 50% and
truncates the result
3
4
For Your Reference…
To edit a macro:
1. Click on the Developer tab, then click on
Macros in the Code group, select a macro
and click on [Edit]
2. Make the changes as required
3. Click on File and select Save…
4. Click on File and select Close…
Handy to Know…
The Dim statement in macro code declares
(creates) a variable (temporary holder) by
the name given. InputBox displays a dialog
box and the assigned question. The user’s
response is then placed in the variable.
You can press + to display the
Visual
Basic Editor.
7
8

Microsoft Excel 2016 - Recording Simple Macros
© 2017 The University of Nottingham Page 11 Chapter 1 - Recorded Macros
ASSIGNING A MACRO TO THE TOOLBAR
Running a macro from the Macros dialog box is
not necessarily the most practical way to do it.
However, you can create a custom button to
place on the Quick Access Toolbar (QAT) and
attach the macro to this button. As the QAT is
always visible, the macro is easily accessible. You
can also change the name and icon associated
with the button.
Try This Yourself:
Same
File
Continue using the
previous file with this
exercise, or open the file
Macros_8.xlsm...
Click on the drop arrow of
the
Quick Access
Toolbar
and select More
Commands
to display the
Excel Options dialog box
Click on the drop arrow for
Choose commands from
and select
Macros to list
the available macros
Click on
Escalate, then
click on
[Add] to add the
macro to the
QAT list on
the right
Click on
[Modify] to
display the
Modify Button
dialog box
Click on an icon of your
choice, then type Escalate
Value in Display name
Click on
[OK]
then click on
[OK]
again
The new button will display
in the QAT...
Point to the button in the
QAT to display the name
2
5
For Your Reference…
To assign a macro to a toolbar button:
1. Click on the drop arrow for the Quick
Access Toolbar and select More
Commands
2. Click on the drop arrow for Choose
commands from and select Macros
For Your Reference (cont’d)…
3. Click on the macro and click on [Add]
4. Click on [Modify] to change the name
and/or icon
5. Click on [OK]
6. Click on [OK] again
7

Microsoft Excel 2016 - Recording Simple Macros
© 2017 The University of Nottingham Page 12 Chapter 1 - Recorded Macros
RUNNING A MACRO FROM THE TOOLBAR
If you have created a custom button on the
Quick Access Toolbar for one of your macros,
you can quickly run the macro by clicking on the
button. The only consideration you need to make
is whether or not the position of the cell pointer is
important – this is relevant when relative cell
references are used in the macro. In this example,
the active cell determines which value is escalated.
Try This Yourself:
Same
File
Continue using the previous
file with this exercise, or open
the file Macros_9.xlsm...
Click on cell
D6 to position the
cell pointer
Click on
Escalate Value
in the
Quick Access Toolbar
The dialog box will appear
asking for the escalation value.
The calculation will be
performed on the cell to the left
of the cell pointer…
Type
50 and click on [OK]
You can also press after
typing the value. The figure will
be calculated and placed in the
cell...
Repeat steps
1 to 3 for the
following cells, using the
values as shown:
D7 30
D8 45
As you can see, the custom
button makes running and
re-running the macro very
easy
2
3
4
For Your Reference…
To run a macro assigned to a toolbar button:
1. Position the cell pointer
2. Click on the button in the Quick Access
Toolbar
Handy to Know…
You can remove a button from the Quick
Access Toolbar by right-clicking on the
button and selecting Remove from Quick
Access Toolbar.

Microsoft Excel 2016 - Recording Simple Macros
© 2017 The University of Nottingham Page 13 Chapter 1 - Recorded Macros
ASSIGNING A MACRO TO THE RIBBON
As well as assigning a macro to the Quick
Access Toolbar, for easy access, you can also
assign it to a tab on the ribbon. The initial step in
customising a tab of the ribbon is to add a
custom group which you can then add tools into.
This group can be added to an existing tab of the
ribbon, or you can create a new, custom tab,
perhaps to contain all of your custom tools.
Try This Yourself:
Same
File
Continue using the
previous file with this
exercise, or open the file
Macros_10.xlsm...
Click on the
File tab and
click on
Options
, then click
on Customise Ribbon
In the
Main Tabs
list on the
right, ensure
Developer is
selected, then click on
[New Group]
Click on
New Group
(Custom)
to select it, then
click on [Rename]
Type
My Macros in
Display Name
, select an
icon, then click on [OK]
Click on the drop arrow for
Choose commands from
and click on Macros
Click on
Escalate
and click
on
[Add] to add it to the
custom group
Click on
[Rename], select
an icon and click on
[OK],
then click on
[OK] again to
return to the worksheet
Click on the Developer tab
The macro now appears in
the My Macros group, on
the Developer tab
For Your Reference…
To add a macro to the ribbon:
1. Click on the File tab and click on Options
2. Click on Customise Ribbon
3. Select or create a tab, then click on [New
Group]
4. Rename the group
For Your Reference (cont’d)…
5. Click on the drop arrow for Choose
commands from and click on Macros
6. Select a macro and click on [Add]
7. Click on [OK]
8. Click on [OK]
6
8

Microsoft Excel 2016 - Recording Simple Macros
© 2017 The University of Nottingham Page 14 Chapter 1 - Recorded Macros
ASSIGNING A KEYBOARD SHORTCUT TO A MACRO
Running a macro from the Macros dialog box,
the Quick Access Toolbar
or the ribbon may still
take unnecessary time if you tend to work with
your hands on the keyboard rather than on the
mouse. To assist keyboard-oriented people, you
can assign a keyboard shortcut to a macro, so that
you can simply run it straight from the keyboard –
saving you time.
Try This Yourself:
Same
File
Continue using the previous
file with this exercise, or open
the file Macros_11.xlsm...
Click on the
Developer tab,
then click on
Macros in the
Code
group to display the
Macro dialog box
Click on
DepartmentNames
in
Macro name
and click on
[Options]
to display the
Macro Options
dialog box
The insertion point is currently
positioned in the Shortcut key
field...
Press +
This will create the keyboard
shortcut + + …
Click on
[OK], then click on
[Cancel]
to close the dialog
box
Let’s test the shortcut...
Select
A5:A8
and press to
delete the company
department names
Press + +
The macro is run and the
company department names
reappear in the cells
3
5
6
For Your Reference…
To assign a keyboard shortcut to a macro:
1. Click on the Developer tab, then click on
Macros in the Code group
2. Select a Macro name and click on [Options]
3. Press the keyboard shortcut
4. Click on [OK]
Handy to Know…
You can create a keyboard shortcut for a
macro at the time you create the macro or
retrospectively.
Microsoft Excel 2016 - Recording Simple Macros
© 2017 The University of Nottingham Page 15 Chapter 1 - Recorded Macros
DELETING A MACRO
Macros can tend to accumulate, so it is a good
idea to delete any macros that you don’t need to
avoid getting them confused with the macros you
actually use. Macros should be deleted from the
Macro dialog box. If you remove a macro button
from the toolbar, all that happens is that the button
is removed. Once a macro is deleted, it cannot be
recovered using Undo.
Try This Yourself:
Same
File
Continue using the previous
file with this exercise, or
open the file
Macros_12.xlsm...
Click on the
Developer tab,
click on
Macros in the
Code
group then click on
Escalate
and click on
[Delete]
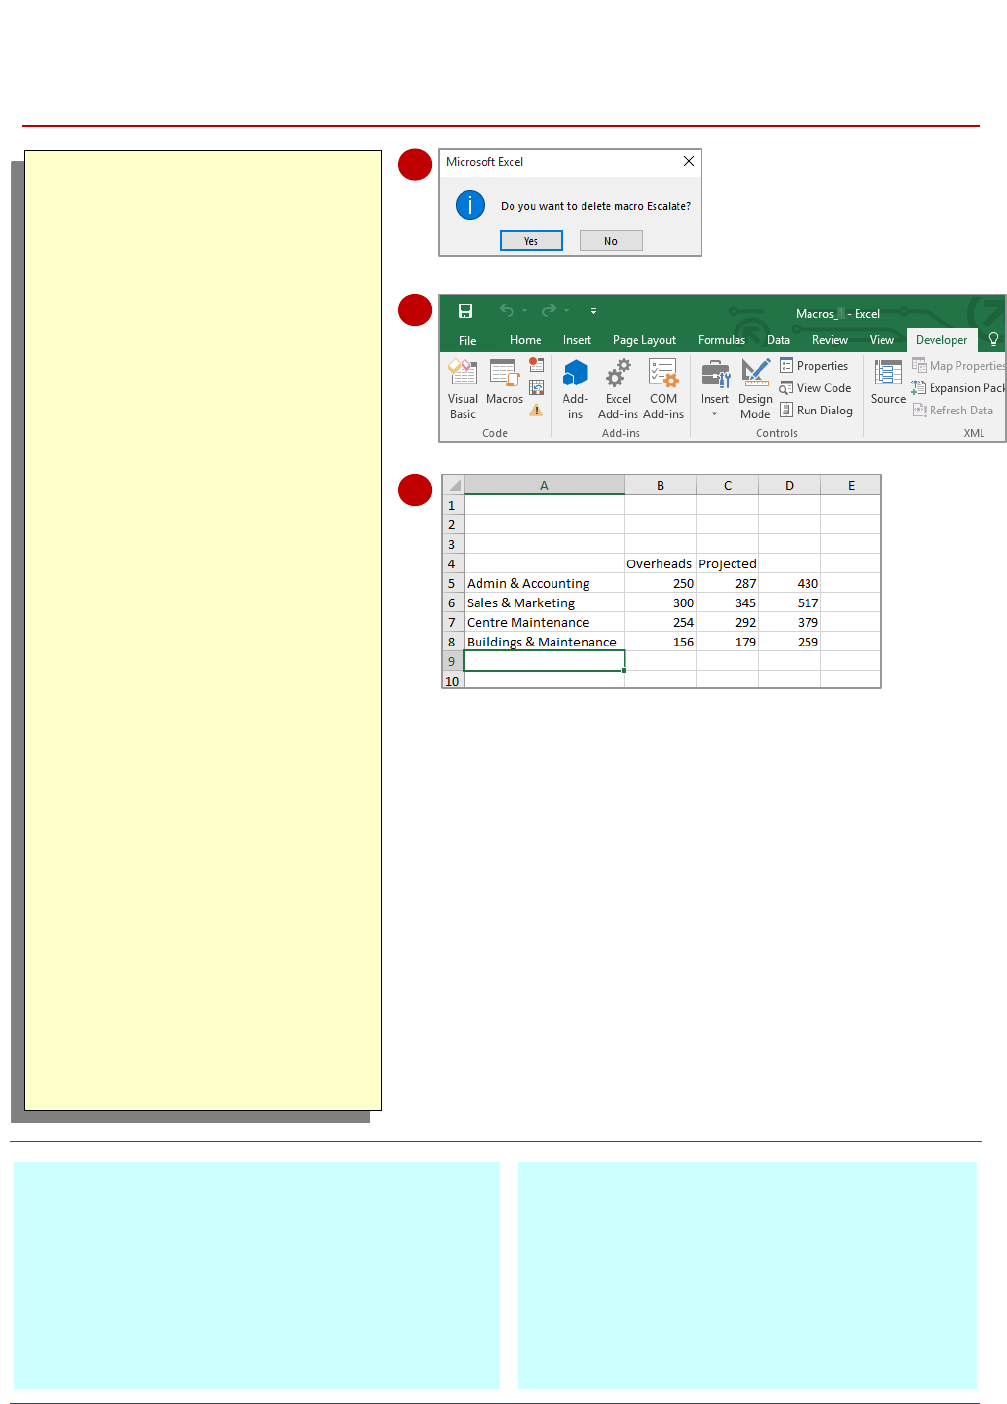
A confirmation dialog box
will appear…
Click on
[Yes]
The macro is removed, but
the button is still on the
Quick Access Toolbar and
ribbon...
Right-click on
Escalate
Value
in the QAT
and select
Remove from Quick
Access Toolbar
Right-click on
Escalate on
the ribbon and select
Customise the Ribbon
Expand
My Macros
(Custom)
to display the
tools, then right-click on
Escalate
and select
Remove
Right-click on
My Macros
(Custom)
and select
Remove to delete the group,
then click on
[OK]
The group and the tool are
now removed
1
3
6
For Your Reference…
To delete a macro:
1. Click on the Developer tab, then click on
Macros in the Code group
2. Click on the macro
3. Click on [Delete]
4. Click on [Yes]
Handy to Know…
Removing all traces of a macro effectively
requires two steps – one to remove the
actual macro code via the Macro dialog box
and one to remove the button from the
Quick
Access Toolbar and/or ribbon (if one
exists).

Microsoft Excel 2016 - Recording Simple Macros
© 2017 The University of Nottingham Page 16 Chapter 1 - Recorded Macros
COPYING A MACRO
If you have recorded a macro and saved it in a
particular document or template, you might like to
copy the macro to another document or
template so that it can be used elsewhere.
Microsoft Excel enables you to copy macro project
items between workbooks, using the Visual Basic
Editor.
Try This Yourself:
Open
File
Before starting this exercise
you MUST open the file
Macros_13.xlsm...
Open a new blank workbook
Let’s copy a macro to this
new workbook...
On the
Developer tab click
on
Visual Basic in the
Code
group to display the
Visual Basic Editor
In the Project Explorer pane,
you can see both workbooks
and their Objects and
Modules...
Ensure that
Modules is
expanded for
VBAProject
(Macros_13.xlsm)
, then
click on Module1 to select it
Drag the
Module1
icon over
the unnamed project
VBAProject (Book1)
(or
(Book2 or 3)
if using
continuing files)
Release the mouse to copy
Module1
to the unnamed
project
This project now displays a
Modules folder…
Double-click on
Modules
for
VBAProject (Book2)
then
double-click on
Module1 to
see the copied macro
3
For Your Reference…
To copy a macro:
1. Open the source and destination workbooks
2. Click on the Developer tab, then click on
Visual Basic in the Code group
3. Drag the module from one workbook to
another
Handy to Know…
You can’t copy a macro project item if the
destination workbook has one with the same
name already. If this happens you need to
rename the item and then copy it.
6

Microsoft Excel 2016 - Recording Simple Macros
© 2017 The University of Nottingham Page 17 Chapter 2 - Recorder Workshop
CHAPTER 2 RECORDER WORKSHOP
In this session you will:
learn how to prepare data for an application
learn how to record a summation macro
learn how to record consolidations
learn how to record macros for specific divisions
learn how to test macros
learn how to create objects to run macros
learn how to assign a macro to an object.
The Macro Recorder can be used to create macros to automate
your work or to make a worksheet more user-friendly for colleagues.
Complex calculations can be recorded by an experienced Excel
operator and then linked to objects on the worksheet to make them
available to anyone.
INFOCUS

Microsoft Excel 2016 - Recording Simple Macros
© 2017 The University of Nottingham Page 18 Chapter 2 - Recorder Workshop
PREPARING DATA FOR AN APPLICATION
Try This Yourself:
Before starting this exercise
ensure Excel has started…
Navigate to the course files
folder, then double-click on
Expenses East.xlsx
to open
the workbook
Repeat step
1 for the following
workbooks:
Expenses North.xlsx
Expenses South.xlsx
Expenses West.xlsx
Spend a few moments
examining the workbooks
Notice that the layout for each
of the workbooks is the same –
column and row headings are
the same, totals exist in the
same cells in each workbook,
and the format applied to each
total cell is the same.
Leave the four
Expenses
workbooks open for the next
exercise
For Your Reference…
To prepare data for an application:
1. Review the workbooks to be included so that
you are familiar with the data
2. If preparing for a consolidation, check that
the layout of each source workbook is
identical
A series of macros can be put together in a
workbook to perform related functions. This type
of workbook is called an application. Before you
start creating macros for an application, you need
to check that the data is suitable. For our example,
a consolidation of the budget figures for four
divisions, we need to ensure that the layout of each
source worksheet is identical.
1
Handy to Know…
A data consolidation combines the figures
from different worksheets/workbooks into a
summary. For this we need the layout of
each source workbook to be identical. We
can write macros to consolidate the data in
different ways such as a total, an average, or
maximum and minimum figures.
2

Microsoft Excel 2016 - Recording Simple Macros
© 2017 The University of Nottingham Page 19 Chapter 2 - Recorder Workshop
RECORDING A SUMMATION MACRO
Try This Yourself:
Open
File
Before starting this exercise you
MUST open the file Recorder
Workshop_1.xlsm…
Click on the
Developer tab, then
click on
Record Macro in the
Code group
Type
SumConsolidation in
Macro name:
, type S in
Shortcut
key, as shown, then click on [OK]
Click in cell
B5, click on the Data
tab, then click on
Consolidate in
the
Data Tools group to display
the Consolidate dialog box
Click on the
View tab, click on
Switch Windows
in the Window
group, then click on
Expenses
East.xlsx
Select the range
B5:D8, then
click on
[Add] in the Consolidate
dialog box
Repeat steps
4 and 5 for
Expenses North.xlsx
,
Expenses South.xlsx
and
Expenses West.xlsx
Click on
[OK] to consolidate the
figures, click in cell
A1 in
Recorder Workshop_1.xslm
,
type
Sum of All Divisions, then
press
Click on the
Developer tab, then
click on
Stop Recording in the
Code group
Any options available on Excel’s ribbon can be
turned into macros to avoid the need for
repetition. In this example, we will record a macro
that uses the Consolidate option on the DATA
tab of the ribbon to reference the figures in four
worksheets and present the total in a fifth
worksheet. By recording these steps, we can
recreate the figures instantly in the future.
2
6
For Your Reference…
To record a summation macro:
1. Click on the Developer tab, then click on
Record Macro in the Code group
2. Click on the first cell of the target range and
perform the consolidation steps
3. Click on Stop Recording in the Code group
Handy to Know…
If you wish to view a list of created macros,
you can do so by navigating to the
Developer tab and clicking on Macros in the
Code group to open the Macro dialog box. If
you make a mistake when recording a
macro, you can use the Macro dialog box to
delete it.
7
Microsoft Excel 2016 - Recording Simple Macros
© 2017 The University of Nottingham Page 20 Chapter 2 - Recorder Workshop
RECORDING CONSOLIDATIONS
Try This Yourself:
Same
File
Continue using the previous
file with this exercise, or
open the file Recorder
Workshop_2.xlsm...
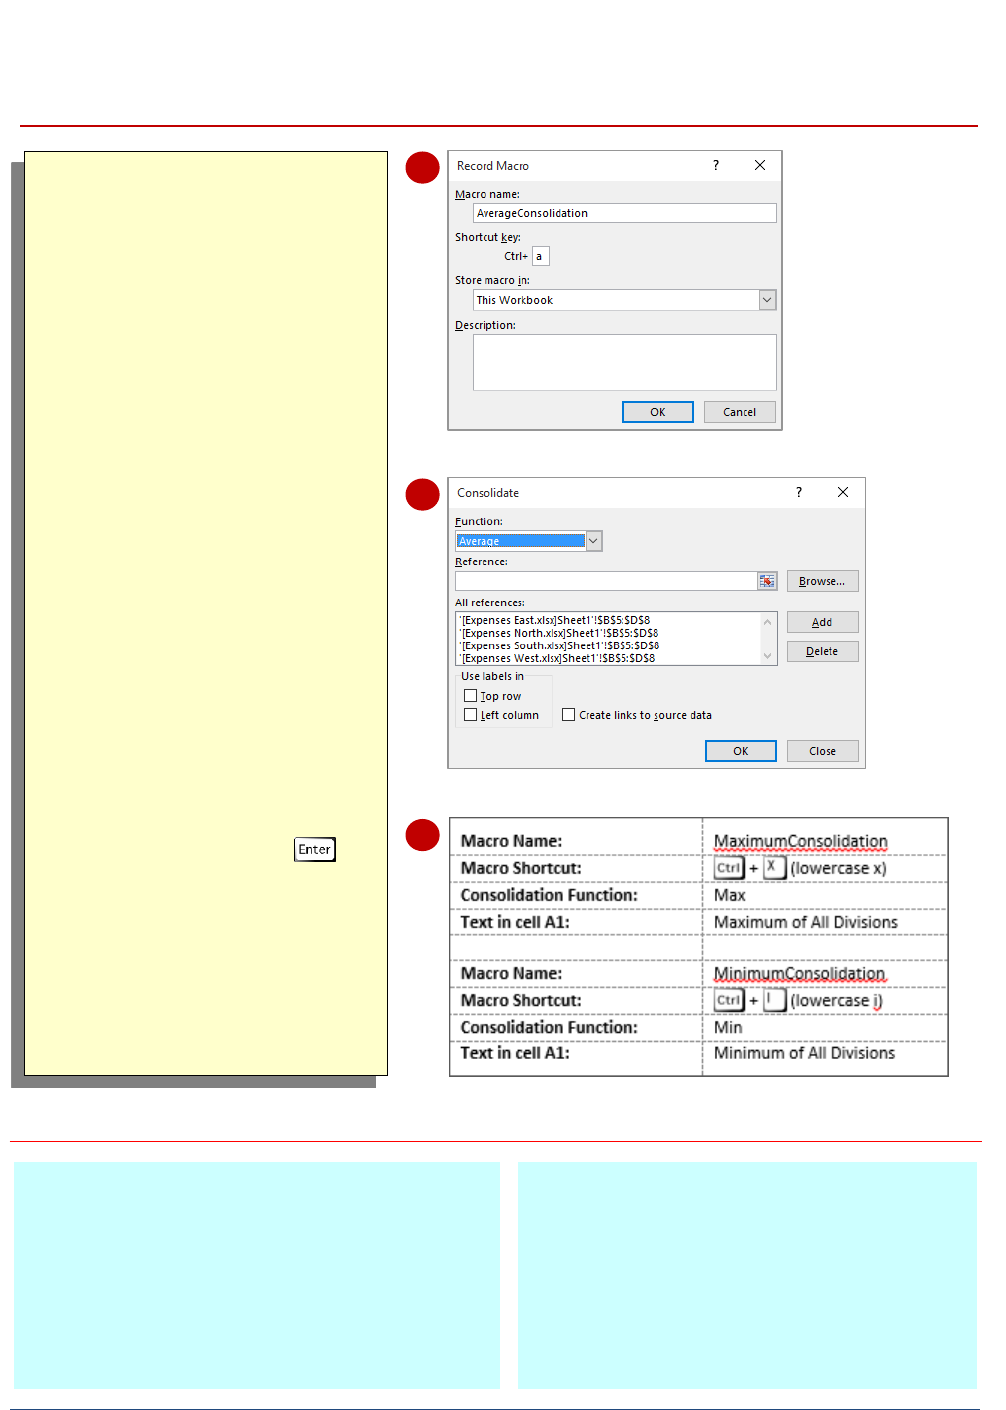
On the
Developer tab, click
on
Record Macro in the
Code
group, then fill the
Record Macro dialog box as
shown and click on [OK]
Click in cell
B5, click on the
Data
tab, then click on
Consolidate
in the Data
Tools
group to display the
Consolidate dialog box
Click on the drop arrow for
Function
, then select
Average
As the References are
already in place from the
previous macro, we can
simply accept the rest of the
settings...
Click on
[OK], click in cell
A1
, type Average of All
Divisions, then press
Click on the
Developer tab,
then click on
Stop
Recording
in the Code
group
Repeat steps
1 to 5 for the
other macros, as shown in
the table
Once a consolidation has been recorded, it can
be reused to consolidate the figures in different
ways. Some of the other options for summarising
the data are to show average, maximum,
minimum, count, product (multiplied) and standard
deviation. For our case study in this workshop we
will build additional macros that perform the first
three of these functions on the same set of data.
1
3
For Your Reference…
To apply different consolidation functions:
1. Click where you want the data to appear
2. Click on the Data tab, click on Consolidate
3. Click on the drop arrow for Function and
select the function required
4. Click on [OK]
Handy to Know…
After performing a consolidation, you have
no way of knowing how the figures have
been combined without referring to the
Consolidate dialog box. By placing a
heading in cell A1 we ensure that, at any
time, we know which function was the most
recently applied.
6

Microsoft Excel 2016 - Recording Simple Macros
© 2017 The University of Nottingham Page 21 Chapter 2 - Recorder Workshop
RECORDING DIVISIONAL MACROS
7
Try This Yourself:
Same
File
Continue using the previous file with
this exercise, or open the file Recorder
Workshop_3.xlsm...
On the
Developer tab, click on
Record Macro
in the Code group, fill
the
Record Macro dialog box as
shown, then click on [OK]
Click in cell
B5, click on the Data tab,
then click on
Consolidate in the Data
Tools
group to display the
Consolidate dialog box
Click on the drop arrow for
Function
and select Sum
Click on the
Expenses North.xlsx
entry in
All references, click on
[Delete]
, then repeat with the
Expenses South.xlsx
and Expenses
West.xslx entries
Click on
[OK], click in cell A1, then
type
Eastern Division Only
and press
Click on the
Developer tab, then click
on Stop Recording in the Code group
Repeat step
1 to create the macro, as
shown, then repeat step
2, click on
Expenses East.xlsx
under All
References
, replace the text East
under
Reference with West
, then click
on [Add]
Delete
Expenses East under All
References, then repeat steps 5 and 6
Repeat steps
7 and 8 for the macros
as shown
We have used the data consolidation process to
combine the data from four source workbooks. If
you wanted to examine these individually, you
would need to open them one by one.
Alternatively, you can write macros that transfer the
data from one division only into the consolidated
worksheet. Add a heading at the same time and
you’ve created one viewing point for all workbooks.
1
4
For Your Reference…
To display a single workbook using consolidate
:
1. Click where you want the data to appear
2. On the Data tab, click on Consolidate
3. Ensure that Sum is selected in Function
4. Remove all references except the one you
require, then click on [OK]
Handy to Know…
You can consolidate data by category. This
uses the labels to the left or above the
values to determine the category. Using this,
you can have a list of labels that varies, such
as expense categories. Values with identical
labels are consolidated and the others are
reported individually.
9

Microsoft Excel 2016 - Recording Simple Macros
© 2017 The University of Nottingham Page 22 Chapter 2 - Recorder Workshop
TESTING MACROS
Try This Yourself:
Same
File
Continue using the previous
file with this exercise, or
open the file Recorder
Workshop_4.xlsm....
Press + + to
see the Sum consolidation
Press + to see the
Average consolidation
Press + to see the
Minimum consolidation
Press + to see the
Maximum consolidation
Press + + to
see the
Eastern Division
data
Press + + to
see the
Western Division
data
Press + + to
see the
Northern Division
data
Press + + to
see the
Southern Division
data
For Your Reference…
To test a macro:
Press the corresponding shortcut key, or
1. Click on Macros on the Developer tab
2. Select the macro
3. Click on [Run]
Handy to Know…
Ideally, you should manually calculate a
sample of the figures to ensure that the
consolidations are working correctly. Open
each workbook and compare the figures.
You’d be surprised at the proportion of
spreadsheets that have errors – automated
and all!
We have developed eight macros for our case
study. Four of them provide a summary of the
data as a total, average, maximum or minimum.
The other four macros display the source data,
enabling you to drill down a level and review the
original data, should you want to examine it more
thoroughly. It is important to test each macro before
you pass the workbook on to other users.
1
4
8

Microsoft Excel 2016 - Recording Simple Macros
© 2017 The University of Nottingham Page 23 Chapter 2 - Recorder Workshop
CREATING OBJECTS TO RUN MACROS
Macros make using workbooks easier – as long
as you know that they exist! You could show
someone how to use the shortcut keys or ribbon
to run macros, but a more user-friendly approach
is to create an object and link the macro to that
object. An object can be anything that you can
place on a workbook, such as a drawn circle, a
box, a line or even an inserted picture.
Try This Yourself:
Same File
Continue using the
previous file with this
exercise, or open the
file Recorder
Workshop_5.xlsm...
Click on the
Insert
tab,
then click on
Shapes
in the
Illustrations
group to display a
gallery of shapes
Click on the
Bevel
shape under
Basic
Shapes
to select it
The cursor will change
to a cross-hair
Starting at the top left
of cell
G2, click and
drag to draw a
bevelled rectangle as
shown, then type Sum
Divisions
Repeat steps
2 and 3
to create a column of
the bevel objects with
text, as shown
The Bevel tool now
appears under recently
Used Shapes in the
Shapes gallery
3
For Your Reference…
To create an object:
1. Click on the Insert tab, then click on Shapes
in the Illustrations group
2. Select a shape from the menu
3. Draw a shape on the worksheet
4. Type a name in the shape
Handy to Know…
Click on Shape Fill to change the fill colour
of a shape.
Click on Shape Outline to change the
outline of a shape.
If the shapes appear as if they are not aligned, hold down , click on
each object to select them, then click on the Drawing Tools: Format
tab, click on Align Objects in the Arrange group and select Align Left.
On the Drawing Tools: Format tab, you can also click on Align
Objects in the Arrange group and select Distribute Vertically to make
the distance between each shape even.
4

Microsoft Excel 2016 - Recording Simple Macros
© 2017 The University of Nottingham Page 24 Chapter 2 - Recorder Workshop
ASSIGNING A MACRO TO AN OBJECT
Try This Yourself:
Same File
Continue using the
previous file with this
exercise, or open the
file Recorder
Workshop_6.xlsm...
Click on the
Sum
Divisions
shape to
select it
Right-click on the
shape to display the
shortcut menu, then
select Assign Macro
The Assign Macro
dialog box will be
displayed...
Click on
SumConsolidation
and click on [OK]
Press to deselect
the shape, then point
to the
Sum
Divisions
shape to
show that the cursor
will display as a hand
Click on the shape to
run the macro
Repeat steps
1 to 5
to assign the macros
as shown in the table
Test each of the
macro objects
For Your Reference…
To assign a macro to an object:
1. Right-click on the object and select Assign
Macro
2. Click on the macro name
3. Click on [OK]
Handy to Know…
You can assign macros to the
Quick Access
Toolbar. Click on the drop arrow for the QAT
and select More Commands. Click on the
drop arrow for Choose commands from
and click on Macros. Click on the macro,
then click on [Add].
Once you have created your macros and the
objects that you want to link them to, all you need
to do is assign the macros to the objects. This is
done via a shortcut menu. When you assign a
macro to an object, the object becomes ‘live’. The
cursor will change to a hand as you point to the
object. This is to clearly indicate that clicking on the
object will start an action.
2
4
6

Microsoft Excel 2016 - Recording Simple Macros
© 2017 The University of Nottingham The University of Nottingham
Concluding Remarks
CONCLUDING REMARKS
Congratulations!
You have now completed Microsoft Excel 2016 - Recording Simple Macros. Microsoft Excel 2016
- Recording Simple Macros was designed to get you to the point where you can competently
perform a variety of operations.
We have tried to build up your skills and knowledge by having you work through specific tasks.
The step by step approach will serve as a reference for you when you need to repeat a task.
Where To From Here?
The following is a little advice about what to do next:
Spend some time playing with what you have learnt. You should reinforce the skills that you
have acquired and use some of the application's commands. This will test just how much of
the concepts and features have stuck! Don't try a big task just yet if you can avoid it - small
is a good way to start.
Some aspects of the course may now be a little vague. Go over some of the points that you
may be unclear about. Use the examples and exercises in these notes and have another go
- these step-by-step notes were designed to help you in the classroom and in the work
place!
Here are a few techniques and strategies that we've found handy for learning more about
technology:
read computer magazines - there are often useful articles about specific techniques
if you have the skills and facilities browse the Internet, specifically the technical pages of
the application that you have just learnt
take an interest in what your work colleagues have done and how they did it - we don't
suggest that you plagiarise but you can certainly learn from the techniques of others
if your software came with a manual (which is rare nowadays) spend a bit of time each day
reading a few pages. Then try the techniques out straight away - over a period of time
you'll learn a lot this way
and of course, there are also more courses and books for you to work through.
Hungry for More?
We live in an ever-changing world where we all need to review and upgrade our
skills.
If you have received this course book on a training course why not ask the tutor or
trainer for other courses that may be of benefit to you. If you are attending a
college ask for one of their brochures.
Alternatively, if you’ve enjoyed using this course book you can find others that
cover a wide range of topics at our web site www.watsoniapublishing.com.

INDEX
.
.xlsm ................................................ 4
.xltm ................................................. 4
A
application ..................................... 18
assign macro to button .................. 11
assigning macros to objects ........... 24
average .......................................... 20
C
cell references ................................. 8
comments ........................................ 9
consolidation ................................. 19
copying macros .............................. 16
customise buttons ......................... 11
customise ribbon ........................... 13
D
data consolidation ......................... 20
deleting a macro ............................ 15
deleting macros ............................. 19
DEVELOPER tab ................................ 3
drawing .......................................... 23
E
editing a macro .............................. 10
F
file types .......................................... 4
G
global ............................................... 2
L
local ................................................. 2
M
macro keyboard shortcut .............. 14
macro recording............................... 5
macro security ................................. 3
macro, add to ribbon ..................... 13
macro-enabled ................................. 4
macros ... 2, 4, 7, 8, 10, 15, 16, 18, 20,
21, 22, 23, 24
Macros dialog box ............................ 6
macros viewing ................................ 9
macros, deleting ............................ 19
macros, recording .......................... 19
macros, running ............................. 23
macros, viewing ............................. 19
maximum ....................................... 20
minimum........................................ 20
O
objects ..................................... 23, 24
P
personal macro workbook ............... 2
Personal Macro Workbook .............. 5
prepare data .................................. 18
Q
QAT ................................................ 15
Quick Access Toolbar ......... 11, 12, 15
R
recorded macro ................................ 6
recording a macro ............................ 5
recording macros . 4, 7, 18, 19, 20, 21
relative cell references ..................... 7
relative references ........................... 8
ribbon ............................................. 15
ribbon, customise .......................... 13
run a macro ...................................... 6
run macro from QAT ...................... 12
running macros .......................... 8, 23
S
shapes ............................................ 23
summation ..................................... 19
T
test macros .................................... 22
toolbar buttons .............................. 11
trust centre ...................................... 3
V
VBA......................................... 2, 9, 10
VBA Editor ...................................... 10
viewing macros .......................... 9, 19
Visual Basic Editor ...................... 9, 16
Visual Basic for Applications ............ 9
