
Citrix Workspace app for
Windows
Citrix Product Documentation | https://docs.citrix.com December 4, 2023

Citrix Workspace app for Windows
Contents
About this release 3
Features in Technical Preview 75
System requirements and compatibility 86
Install and uninstall 92
Deploy 113
Store configuration 121
Updates and plugins management 131
Update 132
Plugins management 144
App experience 155
Application delivery 155
Improved virtual apps and desktops launch experience 167
App preferences 168
SaaS apps 174
Data collection and monitoring 175
Security and authentication 178
Security 178
Secure communications 181
Authentication 197
Domain pass‑through access matrix 220
Domain pass‑through to Citrix Workspace using on‑premises Citrix Gateway as the iden‑
tity provider 227
Domain pass‑through to Citrix Workspace using Azure Active Directory as the identity
provider 242
© 1999–2023 Cloud Soware Group, Inc. All rights reserved. 2

Citrix Workspace app for Windows
Domain pass‑through to Citrix Workspace using Okta as identity provider 246
HDX 248
Graphics and display 249
Optimized Microso Teams 256
HDX transport 263
Browser content redirection 264
Bidirectional content redirection 265
ICA Settings Reference 270
Devices 270
Mouse 270
Keyboard 272
Printing 288
USB 290
Client drive‑mapping 308
Microphone 310
Group Policy 311
Session experience 313
Citrix Workspace app Desktop Lock 321
Soware Development Kit (SDK) and API 326
Storebrowse 328
Storebrowse for Workspace 338
Troubleshoot 340
© 1999–2023 Cloud Soware Group, Inc. All rights reserved. 3

Citrix Workspace app for Windows
About this release
November 29, 2023
Learn about new features, enhancements, fixed issues, and known issues for Citrix Workspace app for
Windows.
Note:
Looking for features in Technical Preview? We have curated a list so that you can find them in
one place. Explore our Features in Technical Preview page and share your feedback using the
attached Podio form link.
What’s new in 2309.1
This release addresses issues that help to improve overall performance and stability.
Citrix Enterprise Browser
This release includes Citrix Enterprise Browser version 117.1.1.13, based on Chromium version 117.
For more information about the Citrix Enterprise Browser, see the Citrix Enterprise Browser documen‑
tation.
Fixed issues in 2309.1
• You might fail to start sessions if the ICA file or the folder where the ICA file is downloaded is
named with Unicode or non‑English characters. This issue occurs only when you access and
authenticate a store using a browser and then start any app or desktop using native Citrix
Workspace app. [HDX‑55649]
• You might get errors with the following parameters, while installing the Citrix Workspace app
for Windows version 2009 using the command line:
– STORE0 parameter ‑ An error message appears when a space character is included in the
store name mentioning to use the correct format for the store.
– STARTMENUDIR and DESKTOPDIR ‑ Ignores the name aer space and creates the directory
with the name before the space.
[RFWIN‑31704]
• If .NET Runtime 6.0.20 or later version is installed on the system and .NET Desktop Runtime
6.0.20 or later version isn’t installed, you get an error message during Citrix Workspace app in‑
stallation. [RFWIN‑31817]
© 1999–2023 Cloud Soware Group, Inc. All rights reserved. 4

Citrix Workspace app for Windows
• The anti‑screen capture feature doesn’t function as intended on Citrix Enterprise Browser ver‑
sion 117.1.1.9, when running on Windows 11. [CTXBR‑6181]
• You might notice visual artifacts on playing a video in a published application. The issue oc‑
curs when the system where Citrix Workspace app is installed has a GPU that doesn’t support
hardware decoding. [HDX‑57621]
• When you’re using a virtual desktop session, the Ctrl+Alt+Break keyboard shortcut doesn’t
work as expected. This keyboard shortcut is used to access the menu options of the Desktop
Viewer toolbar and to toggle between the windowed and the full‑screen modes. [RFWIN‑31815]
Known issues in 2309.1
• There are no known issues in this release.
Note:
For a complete list of issues in the earlier releases, see Known issues.
Earlier releases
This section provides information about the new features and fixed issues in the previous releases
that we support as per the Lifecycle Milestones for Citrix Workspace app.
2309
What’s new
Note:
From this release onwards, ensure that the Microso Edge WebView2 Runtime version is 117 or
later. We recommend you to install the latest version to get newer functionalities and security‑
related fixes.
The following features are added in this release:
• Additional .NET prerequisite
• Improved virtual apps and desktops launch experience
• Addition of the Troubleshooting option in the system tray of Citrix Workspace app
– Send feedback on Citrix Workspace app
• Sustainability initiative from Citrix Workspace app
• Configure keyboard layout synchronization using command‑line interface
• Command to cleanup and install Citrix Workspace app
• Enhanced domain pass‑through for single sign‑on
• Introducing new installer for Citrix Workspace app [Technical Preview]
© 1999–2023 Cloud Soware Group, Inc. All rights reserved. 5

Citrix Workspace app for Windows
• Support for EDT Lossy protocol [Technical Preview]
• Optimized Microso Teams updates
• App Protection
– Important update on file names
– Policy tampering detection
– Full desktop sharing capability from the VDA with Optimized Microso Teams
– App Protection with DoubleHop scenario
• Citrix Enterprise Browser
– Authentication through Citrix Enterprise Browser
Additional .NET prerequisite
In addition to .NET Framework 4.8, Citrix Workspace app requires the x86 version of.NET Desktop Run‑
time 6.0 for both x86 and x64 systems with admin privileges. For more information, see .NET require‑
ments.
Improved virtual apps and desktops launch experience
Note:
From Citrix Workspace app version 2305.1 and later, this feature is generally available for cloud
stores and from 2309 for on‑premises stores.
Previously, the launch progress dialog box wasn’t intuitive to the users. It made the users assume
that the launch process isn’t responding and they closed the dialog box, as the notification messages
were static.
The improved app and desktop launch experience is more informative, modern, and provides a user‑
friendly experience on Citrix Workspace app for Windows. This feature helps to keep the users en‑
gaged with timely and relevant information about the launch status.
For more information, see Improved virtual apps and desktops launch experience.
Addition of the Troubleshooting option in the system tray of Citrix Workspace app
The Troubleshooting option is introduced to improve the user experience and to easily proceed with
the troubleshooting. You can right‑click on the Citrix Workspace app icon in the system tray that is
placed in the bottom‑right corner of your screen and then select Troubleshooting to access it.
The options available under Troubleshooting are:
• Send Feedback
• Collect Logs
• Check Configuration
© 1999–2023 Cloud Soware Group, Inc. All rights reserved. 6

Citrix Workspace app for Windows
• Reset App Data
• Help
Send feedback on Citrix Workspace app
The Send feedback option allows you to inform Citrix about any issues that you might run into while
using Citrix Workspace app. You can also send suggestions to help us improve your Citrix Workspace
app experience.
For more information, see Addition of the Troubleshooting option in the system tray of Citrix
Workspace app.
Sustainability initiative from Citrix Workspace app
When this feature is enabled, a prompt is displayed to sign out from the desktop session when a user
closes a virtual desktop. This feature might help conserve energy if there are Windows OS policies
that are used to shut down VMs when no users are logged in.
For more information, see Sustainability initiative from Citrix Workspace app.
Commands to configure keyboard layout synchronization using command‑line interface
Previously, you could configure keyboard layout synchronization using the GUI or by updating the
configuration file only. With this release, the new commands are introduced to configure keyboard
layout synchronization using the command‑line‑interface.
For more information, see Configure keyboard layout synchronization using command‑line interface.
Command to cleanup and install Citrix Workspace app
Use the CleanInstall command to cleanup any leover traces such as files and registry values from
a previous uninstall and then freshly install the new version of the Citrix Workspace app.
For example:
1 CitrixWorkspaceApp.exe /CleanInstall
2 <!--NeedCopy-->
Optimized Microso Teams updates
© 1999–2023 Cloud Soware Group, Inc. All rights reserved. 7

Citrix Workspace app for Windows
Upcoming Microso Teams Single‑Window EOL
On January 31, 2024, Microso will retire the Microso Teams support for Single‑window UI when
using VDI Microso Teams optimization and support only the Multi‑Window experience. You must use
a version of Citrix Virtual Apps and Desktops and Citrix Workspace app that support the Multi‑Window
feature to continue using certain optimized Microso Teams functionalities. For more information,
see Upcoming Microso Teams Single‑Window EOL.
Deprecation announcement of the SDP format (Plan B) from WebRTC
Citrix is planning to deprecate the current SDP format (Plan B) support from WebRTC in future re‑
leases. You must use a version of Citrix Workspace app that supports the Unified Plan to continue
using certain optimized Microso Teams functionalities. For more information, see Deprecation an‑
nouncement of the SDP format (Plan B) from WebRTC.
App Protection
Important update on file names
In a future release for Citrix Workspace app for Windows, the following file names will be updated as
follows:
Existing file name New file name
EntryProtect.dll ctxapdotnet.dll
entryprotect.sys ctxapdriver.sys
epclient32.dll ctxapclient32.dll
epclient64.dll ctxapclient64.dll
epinject.sys ctxapinject.sys
epusbfilter.sys ctxapusbfilter.sys
entryprotectdrv ctxapdriver
epinject6 ctxapinject
These files are installed at %ProgramFiles(x86)%\Citrix\ICA Client by default.
If you’ve added any of the preceding file names to the allow list in your environment, update the allow
list.
© 1999–2023 Cloud Soware Group, Inc. All rights reserved. 8

Citrix Workspace app for Windows
Policy tampering detection
Policy tampering detection feature prevents the user from accessing the Virtual App or Desktop ses‑
sion if the App Protection anti‑screen capture and anti‑keylogging policies are tampered. If policy
tampering is detected, the virtual app or desktop session will be terminated displaying the following
error message:
Note:
This feature will be available only aer the release of the upcoming version of Citrix Virtual Apps
and Desktops.
For more information about the policy tampering detection feature, see Policy tampering detection.
Full desktop sharing capability from the VDA with Citrix Workspace app
Previously whenApp Protection is enabled, desktop sharing is disabled forOptimizedMicrosoTeams
as App Protection doesn’t allow you to capture the screen.
From Citrix Workspace app for Windows 2309 version and later, desktop sharing is enabled for Opti‑
mized Microso Teams even if App Protection is enabled.
For more information, see Compatibility with HDX optimization for Microso Teams.
App Protection with DoubleHop scenario
App Protection features are not supported in a double hop scenario. Double hop means a Citrix Virtual
Apps or Virtual Desktops session running within a Citrix Virtual Desktops session. You were allowed
to launch virtual apps and desktops enabled with App Protection policies in a double hop scenario.
However, the App Protection features were not applied.
Now, a Windows Group Policy is introduced which allows you to block opening virtual apps and desk‑
tops enabled with App Protection policies in a double hop scenario. For more information about en‑
abling the
Block DoubleHop Launch
setting, see Enable Block DoubleHop Launch setting.
Citrix Enterprise Browser
This release includes Citrix Enterprise Browser version 117.1.1.9, based on Chromium version 117. For
more information about the Citrix Enterprise Browser, see the Citrix Enterprise Browser documenta‑
tion.
© 1999–2023 Cloud Soware Group, Inc. All rights reserved. 9

Citrix Workspace app for Windows
Authentication through Citrix Enterprise Browser
Previously, if the authentication token for Citrix Workspace app expired, you weren’t able to use the
Enterprise Browser. You had to switch to Citrix Workspace app and reauthenticate to continue using
the Enterprise Browser.
Starting with Citrix Workspace app for Windows 2309 version (which corresponds to the Chromium
version 117.1.1.9), you can authenticate within the Enterprise Browser itself only when the store re‑
mains the same. It ensures authentication to Citrix Workspace app as well. In addition, this feature
provides a seamless login experience.
Note:
• This feature applies to Workspace stores.
Technical Preview
• Introducing new installer for Citrix Workspace app
• Support for EDT Lossy protocol
• Enhanced domain pass‑through for single sign‑on
For the complete list of Technical Preview features, see the Features in Technical Preview page.
© 1999–2023 Cloud Soware Group, Inc. All rights reserved. 10

Citrix Workspace app for Windows
Fixed issues
Session/Connection
• The SelfService executable might run even though no account is added in the Citrix Workspace
app.
[CVADHELP‑23124]
• Attempts to start a published application through Citrix Workspace app on an endpoint with
more than eight monitors might fail with the following error message:
This version of Workspace doesn’t support the selected encryption. Please contact your
administrator.
[CVADHELP‑20555]
• When connecting through Citrix Gateway, if there is high latency, sessions might fail to connect
using EDT and fallback to TCP. If HDX Adaptive Transport policy is set to Diagnostic mode, the
sessions might fail to start. [HDX‑49878]
• When using Host to Client URL Redirection a specific URL might fail to open on the client as ex‑
pected and might open on the VDA. This issue occurs because the Host to Client Content Redi‑
rection feature includes a ping check to ensure that the client can actually reach the URL being
redirected. If the ping checks fail, it rejects the URL redirection request and the URL opens on
the VDA. With the fix, you can prevent ping check in host to client redirection.
To prevent ping check‑in host to client redirection, set the following registry key.
HKEY_LOCAL_MACHINE/SOFTWARE/Wow6432Node/Citrix/ICA Client/SFTA
Name: OverridePingCheck
Type: REG_DWORD
Value: 1
[CVADHELP‑22824]
• The session might disconnect if you click the Desktop Viewer and resize a published desktop
continuously. [CVADHELP‑22063]
• Aer Citrix Workspace app installation completes, when you configure a store using GPO or com‑
mand line, you might get a fatal error prompt. [CVADHELP‑23345]
• Attempts to reconnect to certain non‑English language desktop versions using Auto Client Re‑
connect might fail with an error message. [CVADHELP‑22507]
• When the SelfService mode is set to False and the desktop lock feature is enabled, you might
fail to add a store and might fail to start a desktop. [CVADHELP‑23052]
• When the Global App Config server isn’t reachable, the account addition might be timed out
and you might fail to add an account. [CVADHELP‑22999]
© 1999–2023 Cloud Soware Group, Inc. All rights reserved. 11

Citrix Workspace app for Windows
• You might fail to start apps or desktops session using the API from ICO SDK aer upgrading to
Citrix Workspace app version 2112 or later. [CVADHELP‑22940]
• You might fail to start apps or desktops from Citrix Workspace when cloud store is integrated
with StoreFront. [CVADHELP‑23606]
User experience
• Attempts to copy and paste .msg files from local Microso Outlook to a published explorer might
fail. [CVADHELP‑22542]
• You might not be able to the sign in to Citrix Workspace app using single sign‑on or might not
see the authentication prompt in cloud stores. This issue occurs when the account is configured
through the GPO or command line for the first time and when the SelfService mode is set to false
and the Silent authentication to Citrix Workspace policy is enabled. [CVADHELP‑22641]
• When you sign out from Citrix Workspace app, you might not be signed out from the store. This
issue occurs if you have set the disableiconhide registry value to ‘true’. [CVADHELP‑22916]
• When you try to open Citrix Workspace app, SelfService UI might be closed unexpectedly and
you might fail to open Citrix Workspace app. This issue occurs only when some files are missing
in the install location. [CVADHELP‑22683]
• When you open a desktop, the Desktop Viewer name might appear garbled. [CVADHELP‑22925]
• When you connect to a desktop using Cache Redirection mode, if ADC High Availability fails, you
might not be able to reconnect to a desktop using Cache Redirection mode. [CVADHELP‑22881]
• Aer you upgrade from Citrix Workspace app version 2305–2307, you might fail to create desk‑
top shortcuts. [CVADHELP‑23429], [CVADHELP‑15550]
• When accessing a webserver using Integrated Windows authentication, the website content
might not render on the client and might fall back to the server side. This issue occurs when
the BCR proxy configuration is set to DIRECT mode. [HDX‑51739]
• When you sign out from the Citrix Workspace app and sign in again, Citrix Workspace app
starts without entering the sign‑in credentials. This issue occurs only when you sign in to Citrix
Workspace app using custom domain. [RFWIN‑31415]
System exceptions
• The wfica32.exe process might exit unexpectedly during a user session. [CVADHELP‑22249],
[CVADHELP‑22234]
• Citrix Workspace app for Windows 2212 version might fail to follow the conditions set in the
proxy PAC file. [CVADHELP‑22503]
App Protection
© 1999–2023 Cloud Soware Group, Inc. All rights reserved. 12

Citrix Workspace app for Windows
• When you are using Corsair K70 Keyboard with Citrix Workspace app versions 2212 or later, then
incorrect keystrokes might be sent to Anti‑Keylogging enabled windows. [CVADHELP‑23157]
2307.1
What’s new
This release addresses issues that help to improve overall performance and stability.
Fixed issues
• In Microso Teams, while you share a screen or app and resize it, the aspect ratios displayed
might not be correct on the recipient’s (other meeting participants) side. This issue also occurs
when you share screen or apps that are ordered using the Snap Windows feature option. [HDX‑
54395]
2307
What’s new
Added support for playing short tones in optimized Microso Teams
Earlier, with the secondary ringtone feature enabled, short tones such as beeps or notifications were
playing repeatedly. For example, the tone that was played when a guest joins the Microso Teams
meeting was repeated. The only workaround was to quit and restart Microso Teams. This issue re‑
sulted in a poor end‑user experience.
With this release, Citrix Workspace app supports playing the short tones as desired. This support also
enables the secondary ringtone feature.
Prerequisites:
Update to the latest version of Microso Teams.
Note:
The preceding feature is available only aer the roll‑out of a corresponding update from Mi‑
croso Teams. Check the documentation update and the announcement in CTX253754.
Citrix Enterprise Browser
This release includes Citrix Enterprise Browser version 112.1.1.24, based on Chromium version 112.
For more information about the Citrix Enterprise Browser, see the Citrix Enterprise Browser documen‑
tation.
© 1999–2023 Cloud Soware Group, Inc. All rights reserved. 13

Citrix Workspace app for Windows
Citrix Enterprise Browser shortcut
Starting with the Citrix Workspace app for Windows 2307 version, an administrator can configure and
control the presence of the Citrix Enterprise Browser shortcut on the Start menu.
Note:
By default, this setting is enabled for Workspace stores.
Configuration
An IT administrator can configure the presence of the Citrix Enterprise Browser shortcut in one of the
following ways:
• Group Policy Object (GPO)
• Global App Configuration Service (GACS)
• web.config.file.
Notes:
• All the configuration methods have equal priority. Enabling any one of them enables the
shortcut.
• If you haven’t configured the shortcut but have one or more Workspace stores, the shortcut
gets automatically enabled.
• For end users, the Citrix Enterprise Browser shortcut appears if the user makes it as a fa‑
vorite app irrespective of the configuration.
• To disable this feature for Workspace stores, administrators must apply the following set‑
tings in any one of the following:
– set the CEBShortcutEnabled attribute to false in the web.config file.
– disable the Enable Citrix Enterprise Browser shortcut property in GPO and GACS.
Using Group Policy Object
Administrators can use the Enable Citrix Enterprise Browser shortcut property to control the dis‑
play of the Citrix Enterprise Browser shortcut on the Start menu.
Note:
Configuration through GPO is applicable on Workspace and StoreFront.
To enable the Citrix Enterprise Browser shortcut, do the following:
1. Open the Citrix Workspace app Group Policy Object administrative template by running gpedit
.msc.
2. Under the Computer Configuration node, go to Administrative Templates > Citrix Compo‑
nents > Citrix Workspace > Citrix Enterprise Browser.
© 1999–2023 Cloud Soware Group, Inc. All rights reserved. 14

Citrix Workspace app for Windows
3. Select the Enable Citrix Enterprise Browser shortcut option.
For more information on how to use the GPO, see the Group Policy Object administrative template
page.
Global App Configuration service (GACS)
Navigate to Workspace Configuration > App Configuration > Citrix Enterprise Browser and enable
Enable Citrix Enterprise Browser shortcut.
For more information on how to use the GACS UI, see the User interface article in the Citrix Enterprise
Browser documentation.
Note:
This way of configuration is applicable on Workspace and StoreFront.
web.config file:
Enable the attribute CEBShortcutEnabled under the properties.
1 <properties>
2
3 <property name="CEBShortcutEnabled" value="True" />
4
5 </properties>
6 <!--NeedCopy-->
© 1999–2023 Cloud Soware Group, Inc. All rights reserved. 15

Citrix Workspace app for Windows
Note:
Configuration through web.config is applicable on StoreFront.
Using web.config:
To enable the Citrix Enterprise Browser shortcut, do the following:
1. Use a text editor to open the web.config file, which is typically at C:\inetpub\wwwroot\
Citrix\Roaming directory.
2. Locate the user account element in the file (Store is the account name of your deployment)
For example: <account id=... name="Store">
3. Before the </account> tag, navigate to the properties of that user account and add the follow‑
ing:
1 <properties>
2
3 <property name="CEBShortcutEnabled" value="True" />
4
5 </properties>
6 <!--NeedCopy-->
Following is an example of the web.config file:
1 <account>
2
3 <clear />
4
5 <account id="d1197d2c-ac82-4f13-9346-2ee14d4b0202" name="
F84Store"
6
7 description="" published="true" updaterType="Citrix"
remoteAccessType="None">
8 <annotatedServices>
9 <clear />
10 <annotatedServiceRecord serviceRef="1__Citrix_F84Store">
11 <metadata>
12 <plugins>
13 <clear />
14 </plugins>
15 <trustSettings>
16 <clear />
17 </trustSettings>
18 <properties>
© 1999–2023 Cloud Soware Group, Inc. All rights reserved. 16

Citrix Workspace app for Windows
19 <property name="CEBShortcutEnabled" value="True
" />
20 </properties>
21 </metadata>
22 </annotatedServiceRecord>
23 </annotatedServices>
24 <metadata>
25 <plugins>
26 <clear />
27 </plugins>
28 <trustSettings>
29 <clear />
30 </trustSettings>
31 <properties>
32 <clear />
33 </properties>
34 </metadata>
35 </account>
36
37 <!--NeedCopy-->
Fixed issues
• On Citrix Workspace app for Windows version 2212 and later, the first launch of the anti‑screen
capture enabled virtual desktop in a custom web store is not protected in the following case:
If you haven’t selected the Start App Protection aer installation checkbox, and launch the
virtual desktop. The desktop is protected from the subsequent launches. [CVADHELP‑23189]
• Citrix Workspace app sessions might get disconnected due to a possible failure in wfica32.exe.
This issue occurs rarely and you might get an error message with event ID 1000. [CVADHELP‑
23341]
• When you access Linux VDA from the Citrix Workspace app for Windows version 2303 or later,
the Wfica32.exe might fail. This issue occurs when the session is le opened for a long time.
[CVADHELP‑23037]
• If you use the Citrix Workspace app version 2305.1 or earlier to personalize the app as per your
organization, the brand personalization might not be reflected. This issue occurs due to certifi‑
cate update in Citrix Workspace app done recently. [RFWIN‑30798]
2305.1
What’s new
Improved virtual apps and desktops launch experience
© 1999–2023 Cloud Soware Group, Inc. All rights reserved. 17

Citrix Workspace app for Windows
Note:
This feature is generally available for cloud stores and it is in technical preview for on‑premises
stores.
Previously, the launch progress dialog box wasn’t intuitive to the users. It made the users assume
that the launch process is not responding and they closed the dialog box, as the notification messages
were static.
The improved app and desktop launch experience is more informative, modern, and provides a user‑
friendly experience on Citrix Workspace app for Windows. This feature helps to keep the users en‑
gaged with timely and relevant information about the launch status. The notification appears in the
bottom‑right corner of your screen.
Users can view meaningful notifications about the launch progress, instead of just a spinner. If a
launch is in progress and the user attempts to close the browser, a warning message is shown.
Starting with Citrix Workspace app for Windows 2305.1, this feature is enabled by default in cloud
sessions.
You can enable this feature using the registry key for the StoreFront (on‑premises) session. For more
© 1999–2023 Cloud Soware Group, Inc. All rights reserved. 18

Citrix Workspace app for Windows
information, see Improved virtual apps and desktops launch experience.
Note:
Technical previews are available for customers to test in their non‑production or limited produc‑
tion environments, and to give customers an opportunity to share feedback. Citrix does not ac‑
cept support cases for feature previews but welcomes feedback for improving them. Citrix might
or might not act on feedback based on its severity, criticality, and importance. It is advised that
Beta builds aren’t deployed in production environments.
You can provide feedback on this feature via the Podio.
Tracking Storebrowse command status
You can track the execution status of a Storebrowse command in a file. To track the success status,
provide a unique file name with the -f launch command. This command generates a file with the
name that you have provided. The failure status is present in the ica.error file, which is created
automatically.
Note:
Ensure that you add an .ica extension to the file name with -f launch command. Otherwise,
the file isn’t generated.
The files to track both success and failure are present at %LOCALAPPDATA%\citrix\selfservice
\cache and you can monitor these files as needed.
This enhancement is enabled by default.
Following is an example to use the launch command with -f option:
1 -launch -f <uniqueFileName.ica> "launchcommandline"
2 For example:
3 SelfService.exe storebrowse -launch -f uniqueFileName.ica -s store0-5
c3ec017 -CitrixID store0-5c3ec017@@a9a8e3ac-099d-4577-b84e-
e33d0695df39.Notepad -ica "https://cwawiniwstest.cloudburrito.com/
Citrix/Store/resources/v2/
YTlhOGUzYWMtMDk5ZC00NTc3LWI4NGUtZTMzZDA2OTVkZjM5Lk5vdGVwYWQ-/launch/
ica" -cmdline
4
5 <!--NeedCopy-->
Support for modern authentication methods for StoreFront stores
Citrix Workspace app 2305.1 for Windows support modern authentication methods for StoreFront
stores. You can authenticate to Citrix StoreFront stores using any of the following ways:
© 1999–2023 Cloud Soware Group, Inc. All rights reserved. 19

Citrix Workspace app for Windows
• Using Windows Hello and FIDO2 security keys. For more information, see Other ways to authen‑
ticate.
• Single sign‑on to Citrix StoreFront stores from AzureActiveDirectory (AAD) joined machines with
AAD as the identity provider. For more information, see Other ways to authenticate.
• Workspace administrators can configure and enforce Azure Active Directory conditional access
policies for users authenticating to Citrix StoreFront stores. For more information, see Support
for Conditional access with Azure AD.
To enable this feature, you must use Microso Edge WebView2 as the underlying browser for direct
StoreFront and gateway authentication.
Note:
Ensure that the Microso Edge WebView2 Runtime version is 102 or later.
You can enable modern authentication methods for StoreFront stores using the Global App Config
service and Group Policy Object (GPO) template. For more information, see Support for modern au‑
thentication methods for StoreFront stores section.
Support for more than 200 groups in Azure AD
With this release, an Azure AD user who is part of more than 200 groups can view apps and desktops
assigned to the user. Previously, the same user wasn’t able to view these apps and desktops.
Note:
Users must sign out from Citrix Workspace app and sign in back to enable this feature.
App Protection
Enhancement on anti‑keylogging
With this enhancement, anti‑keylogging is enabled on the authentication and self‑service plug‑in
(SSP) screens if one of the following criteria is met:
• You have enabled App Protection using one of the following:
– Select the Start App Protection checkbox during installation.
– Start the App Protection component using the /startappprotection command line pa‑
rameter.
• If you haven’t selected the Start App Protection checkbox or used the /startappprotection
command line parameterduring the installation, then the anti‑keylogging protection is enabled
aer launching the first protected resource.
© 1999–2023 Cloud Soware Group, Inc. All rights reserved. 20

Citrix Workspace app for Windows
Note:
The Global App Configuration service (GACS) and Group policy objects (GPO) settings override
the preceding behavior. Forexample, if you’ve disabled the GACS or GPO policy for these screens,
the anti‑keylogging is not enabled on the authentication and SSP screens.
Important update on file names
In a future release for Citrix Workspace app for Windows, the following file names will be updated:
• EntryProtect.dll
• entryprotect.sys
• epclient32.dll
• epclient64.dll
• epinject.sys
• epusbfilter.sys
• entryprotectdrv
• epinject6
These files are installed at %ProgramFiles(x86)%\Citrix\ICA Client\.
If you’ve added any of these file names to the allow list in your environment, update the allow list
when the new file names are announced.
Citrix Enterprise Browser
This release includes Citrix Enterprise Browser version 105.1.1.27, based on Chromium version 105.
For more information about the Citrix Enterprise Browser, see the Citrix Enterprise Browser documen‑
tation.
Support for browser extensions
You can add extensions that are provided by your administrator to the Citrix Enterprise Browser in a
secure way. An administrator can deploy, manage, and control the extensions. End users can view
and use the extension under citrixbrowser://extensions as required. For more settings, see
Global App Configuration Service.
For more information on how to configure, see Support for browser extensions.
Modification in SPA policy implementation on internal Web and SaaS apps
This feature enhances the security policies implementation on Web and SaaS apps. When a webpage
and iframes within the webpage have dierent policies, we now have a stricter policy implementation
© 1999–2023 Cloud Soware Group, Inc. All rights reserved. 21

Citrix Workspace app for Windows
where a union of all policies is applied on the entire webpage, including the iframes. However, the
watermark is applied to the webpage only.
Use Global App Config service to manage Citrix Enterprise Browser
The administrator can use the Global App Configuration service (GACS) for Citrix Workspace to deliver
Citrix Enterprise Browser settings through a centrally managed service.
The Global App Configuration service is designed for administrators to easily configure Citrix
Workspace and manage the Citrix Workspace app settings. This feature allows admins to use the
Global App Configuration Service to apply various settings or system policies to the Citrix Enterprise
Browser on a particular store. The administrator can now configure and manage the following Citrix
Enterprise Browser settings using APIs or the GACS Admin UI:
• “Enable CEB for all apps” ‑ Makes the Citrix Enterprise Browser the default browser for opening
web and SaaS apps from the Citrix Workspace app.
• “Enable save passwords” ‑ Allow or deny end users the ability to save passwords.
• “Enable incognito mode” ‑ Enable or disable incognito mode.
• “Managed Bookmarks” ‑ Allow an administrator to push bookmarks to the Citrix Enterprise
Browser.
• “Enable developer tools” ‑ Enable or disable developer tools within the Enterprise Browser.
• “Delete browsing data on exit” ‑ Allow the administrator to configure what data the Citrix Enter‑
prise Browser deletes on exit.
• “Extension Install Forcelist”‑ Allow the administrator to install extensionsin the Citrix Enterprise
Browser.
• “Extension Install Allow list” ‑ Allow the administrator to configure an allowed list of extensions
that users can add to the Citrix Enterprise Browser. This list uses the Chrome Web Store.
For more information, see Use Global App Configuration service to manage Citrix Enterprise Browser.
Notes:
• The name and value pair are case‑sensitive.
• All the browser settings in Global App Configuration Service are under the following cate‑
gories:
1 {
2
3 "category": "browser",
4 "userOverride": false,
5 "assignedTo": [
6 "AllUsersNoAuthentication"
7 ]
8 }
© 1999–2023 Cloud Soware Group, Inc. All rights reserved. 22

Citrix Workspace app for Windows
9
10
11 <!--NeedCopy-->
• The administrator can apply the settings to unmanaged devices as well. For more informa‑
tion, see the Global App Configuration Service documentation.
User interface
To configure Citrix Enterprise Browser through the GACS Admin UI, do the following:
1. Sign in to citrix.cloud.com with your credentials.
Note:
Refer to the Sign Up for Citrix Cloud article for step‑by‑step instructions to create a Citrix
Cloud account.
2. Upon authentication, click the menu button in the top le corner and select Workspace Con‑
figuration.
The Workspace Configuration screen appears.
3. Click App Configuration > Citrix Enterprise Browser.
You can now configure, modify, and publish Citrix Enterprise Browser feature settings.
For more information, see Use Global App Configuration service to manage Citrix Enterprise Browser.
Technical Preview
• Sustainability initiative from Citrix Workspace app
© 1999–2023 Cloud Soware Group, Inc. All rights reserved. 23

Citrix Workspace app for Windows
For the complete list of Technical Preview features, see the Features in Technical Preview page.
Fixed issues
• You might get the following error messagewhen the AllowAddStore parameter is setto N value
and an HTTP store is added using the Group Policy Object (GPO) or command line interface:
“Unable to connect to the server” [CVADHELP‑22184]
• When you use the Workspace Environment Management (WEM) transformer with desktops, in‑
stead of automatically opening the desktop, you might be askedto download, run, and open the
ICA file. This issue occurs with Citrix Workspace app versions 2209, 2212, and 2302. [CVADHELP‑
22318]
• The icons created on the desktop might be enabled even aer setting the value of
PutShortcutsOnDesktop to False under the registry key HKEY_LOCAL_MACHINE\
SOFTWARE\Policies\Citrix\Dazzle\. [CVADHELP‑15550]
• You might not be able to use Pega Robot Studio, a third party app, even if you don’t have any
protected apps or desktops opened. This issue occurs when Citrix Workspace app is installed
with App Protection enabled. [CVADHELP‑21146]
• If the Windows 10 OS is installed in a language other than English, Citrix Workspace app might
fail to access the local apps of the OS. [CVADHELP‑21986]
• When Citrix Workspace app that is opened on a published desktop freezes, the published apps
running on the published desktop might fail to start. The issue occurs when there is a deadlock
within the receiver.exe file. [CVADHELP‑21604]
• When you sign in to the Citrix Workspace app, apps and desktops corresponding to mul‑
tiple accounts configured through GPO or command line might not be displayed. This
issue occurs when the registry key value of CurrentAccount is set to AllAccount at
‘Computer\HKLM\Soware\wow6432Node\Citrix\Dazzle” [CVADHELP‑21124]
• You might not be able to take screenshots using the Print Screen key (PrtSc) when there are no
protected apps on screen. This issue occurs when App Protection is enabled for self‑service on
Citrix Workspace app. [CVADHELP‑21979]
• For cloud stores, you might fail to add an account using redirected URLs. [CVADHELP‑22438]
• Aer upgrading to Citrix Workspace app for Windows 2203 LTSR, you might see a white screen.
This issue occurs when you add and configure a store for the first time and simultaneously re‑
fresh and open the SelfService UI. [CVADHELP‑22696]
• Sometimes, you might fail to start a virtual desktop from Citrix Workspace app version 2305.
You might also notice that the session quits silently, the session disconnects with a gray screen,
© 1999–2023 Cloud Soware Group, Inc. All rights reserved. 24

Citrix Workspace app for Windows
or the session fails with an error message: ‘SSL Error 27: No local security certificates could be
loaded.’ [CVADHELP‑23095]
• When you install either Citrix Workspace app for Windows 2212, 2202, or 2303 version with App
Protection enabled, the installation might fail intermittently with the following error message:
“Service ‘@C:\Program Files (x86)\Citrix\ICA Client esources.dll, ‑104’ (appprotectionsvc) could
not be installed. Verify that you have suicient privileges to install system services.”
[CVADHELP‑21995]
• The Citrix Workspace app might stop responding if you have any mouse interaction (mouse ac‑
tion or movements) on the Restore session dialog box. This issue occurs when you start a ses‑
sion aer upgrading from the Citrix Workspace app version 2302–2303 and if there are discon‑
nected sessions previously. [RFWIN‑29663]
• You might notice that the HTTP requests during auto‑update are sent to the Content Delivery
Network (CDN) even when a proxy is configured using the proxy auto‑configuration (PAC) file.
[RFWIN‑29203]
• When the Microso Edge WebView for StoreFront authentication policy is enabled and if the
sign‑in needs HTTP authentication (basic or proxy), instead of asking for user credentials, the
Edge WebView browser authentication window might close. [RFWIN‑30061]
• You might not be able to see the name of an opened virtual desktop on the connecting screen
in the Desktop Viewer when the desktop is opened in full screen. [RFWIN‑29875]
• An extra entry for Citrix Workspace without the default Citrix Workspace app icon appears on
the Windows 11 control panel. [APPP‑1263]
• The names in the Properties of Network Connections (in the control panel) might be corrupted
when Citrix Workspace app is installed with App Protection enabled. [APPP‑1242]
2303
What’s new
Configure path for Browser Content Redirection overlay Browser temp data storage
Starting with Citrix Workspace app 2303 version, you are requested to configure temp data storage
path for Chromium Embedded Framework (CEF) based browser.
For more information, see Configure path for Browser Content Redirection overlay Browser temp data
storage.
Support for modern authentication methods for StoreFront stores
© 1999–2023 Cloud Soware Group, Inc. All rights reserved. 25

Citrix Workspace app for Windows
Citrix Workspace app 2303 for Windows support modern authentication methods for StoreFront
stores. You can authenticate to Citrix StoreFront stores using any of the following ways:
• Using Windows Hello and FIDO2 security keys. For more information, see Other ways to authen‑
ticate.
• Single sign‑on to Citrix StoreFront stores from AzureActiveDirectory (AAD) joined machines with
AAD as the identity provider. For more information, see Other ways to authenticate.
• Workspace administrators can configure and enforce Azure Active Directory conditional access
policies for users authenticating to Citrix StoreFront stores. For more information, see Support
for Conditional access with Azure AD.
To enable this feature, you must use Microso Edge WebView2 as the underlying browser for direct
StoreFront and gateway authentication.
Note:
Ensure that the Microso Edge WebView2 Runtime version is 102 or later.
You can enable modern authentication methods for StoreFront stores using the GPO template. For
more information, see Support for modern authentication methods for StoreFront stores section.
Improved experience for optimized Microso Teams video conference calls
Starting with this release, by default simulcast support is enabled for optimized Microso Teamsvideo
conference calls. With this support, the quality and experience of video conference calls across dier‑
ent endpoints are improved by adapting to the proper resolution for the best call experience for all
callers.
With this improved experience, each user might deliver multiple video streams in dierent resolutions
(for example, 720p, 360p, and so on) depending on several factors including endpoint capability, net‑
work conditions, and so on The receiving endpoint then requests the maximum quality resolution
that it can handle thereby giving all users the optimum video experience.
Note:
This feature is available only aer the roll‑out of an update from Microso Teams. For informa‑
tion on ETA, go to https://www.microsoft.com/ and search for the Microso 365 roadmap. When
the update is rolled‑out by Microso, you can check CTX253754 for the documentation update
and the announcement.
Enhancement to App Protection: Anti‑DLL Injection
As part of App Protection, we now have a security enhancement that helps to protect the Citrix
Workspace app from certain unauthorized dynamic‑link libraries (DLL) or untrusted modules. If such
© 1999–2023 Cloud Soware Group, Inc. All rights reserved. 26

Citrix Workspace app for Windows
untrusted modules are injected, the Citrix Workspace app detects these interventions and stops the
modules from loading.
The anti‑DLL injection can be enabled for the following components:
• Citrix Auth Manager
• Citrix Workspace app UI
• Citrix Virtual Apps and Desktops
For more information, see the App Protection documentation.
Disclaimer:
This capability works by filtering access to required functions of the underlying operating system
(specific API calls required to load DLLs). Doing so means that it can provide protection even
against certain custom and purpose‑built hacker tools. However, as operating systems evolve,
new ways of loading DLLs can emerge. While we continue to identify and address them, we can‑
not guarantee full protection in specific configurations and deployments.
Citrix Enterprise Browser
This release includes Citrix Enterprise Browser version 109.1.1.29, based on Chromium version 109.
For more information about the Citrix Enterprise Browser, see the Citrix Enterprise Browser documen‑
tation.
Secure Private Access support for StoreFront
As an administrator, you can now configure Web and SaaS apps in StoreFront using a Secure Private
Access solution. Aer the administrator configures the app, end users can open the Web and SaaS
apps using Citrix Enterprise Browser with enhanced security.
For more information, see Secure Private Access for on‑premises in the Citrix Secure Private Access
documentation.
Technical Preview
• Client App Management for WebEx plug‑in
For the complete list of Technical Preview features, see the Features in Technical Preview page.
Fixed issues
• The published URLs open through the Citrix Enterprise Browser instead of the device’s default
browser. [CTXBR‑4718]
© 1999–2023 Cloud Soware Group, Inc. All rights reserved. 27

Citrix Workspace app for Windows
• You might experience delay in enumerating apps and starting apps or desktops when using
SSON in an environment that has no active access to external sites. This issue occurs from the
Citrix Workspace app version 2210.5 onwards and from the Citrix Workspace app version 2203
CU2 onwards. [CVADHELP‑21786]
• The wfica32.exe process might stop unexpectedly and get an error when you open an app from
the Citrix Workspace. This issue occurs only when you have the adaptive audio feature enabled.
[CVADHELP‑20999]
• When you install Citrix Workspace app 2212 on remote machines using a PowerShell script, the
Citrix Workspace app installer might stop. This issue occurs before the installation begins on
the remote machine. [CVADHELP‑22278]
• When you attempt to configure multiple stores through a Group Policy Object (GPO) or com‑
mand line, one of the stores might not be fully configured. [CVADHELP‑22034]
• The screen might display the authentication pop‑up window on the upper le corner instead of
displaying on the center. [CVADHELP‑21835]
• Aer a store is added with the store authentication token set to true, Citrix Workspace might
become unresponsive at the white screen and the store authentication token is set to false.
[CVADHELP‑21582]
• Attempts to access Citrix Workspace app for Windows might fail when the VPN disconnects or
reconnects. [CVADHELP‑21662]
• When you share a screen using Microso Teams from the HP EliteBook G6 endpoint, you might
see a red window instead of a red border. [CVADHELP‑20763]
• You might not be able to use the Bloomberg Terminal application with the Bloomberg Keyboard
5 or Bloomberg Keyboard 2013. This issue occurs when Citrix Workspace app version 2302 is
installed on your system with the App Protection feature enabled. [CVADHELP‑22221]
• A published application might open in a non‑visible state when you start the application.
[CVADHELP‑21618]
• The msedgewebview2.exe‘ process can cause high CPU usage when selfservice is running.
[CVADHELP‑21610]
• There might be a delay in adding a store due to certificate revocation check requests for the
store’s certificate. As a workaround, you can skip checking certificate revocation using the fol‑
lowing registry:
Path : HKLM/Soware/wow6432node/Citrix/Receiver
Name : SkipStoreCertificateRevocationCheck
Type : DWORD
Value : 1
© 1999–2023 Cloud Soware Group, Inc. All rights reserved. 28

Citrix Workspace app for Windows
or
Path : HKCU/Soware/Citrix/Receiver
Name : SkipStoreCertificateRevocationCheck
Type : DWORD
Value : 1
[CVADHELP‑21931]
• The position of the window and size might not be persistent when you reconnect the desktop.
This issue occurswhen the desktopis in a window mode and using a non‑primary monitor. [HDX‑
44997]
• Desktop Viewer toolbar might cover the screen when the desktop is in normal resolution and
DPI. [HDX‑45206]
• In a multi‑session scenario, when you open a second session, the session might be hidden be‑
hind the first session. Also, the Citrix Workspace app icon for the second session might not be
present on the taskbar. [RFWIN‑29773]
2302
What’s new
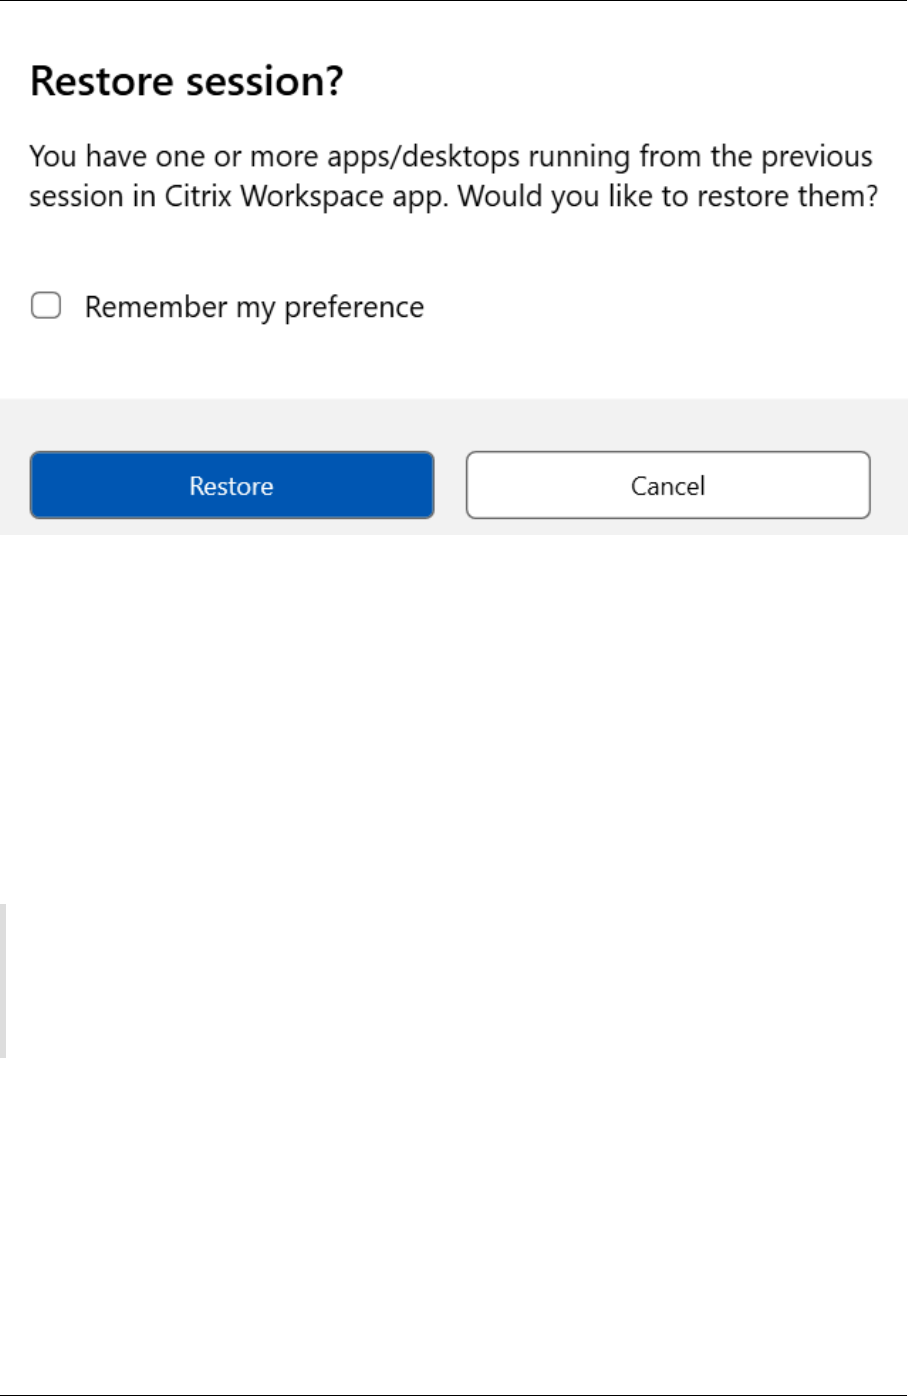
Improved virtual apps and desktops reconnection experience
This release provides an enhanced user experience while reconnecting to virtual apps and desktops
from which you got disconnected.
When Citrix Workspace app attempts to refresh the disconnected Citrix Workspace app or start new
virtual apps or desktops as a part of the Workspace Control feature, the following prompt appears:
© 1999–2023 Cloud Soware Group, Inc. All rights reserved. 29
Citrix Workspace app for Windows
This prompt appears only when the show reconnection prompt to reconnect sessions is set to true
in the Global App Configuration service.
Click Restore to reconnect to open new and disconnected virtual apps and desktops. If you want to
start only newly selected apps and desktops, click Cancel.
You can also select Remember my preference to apply the selected preference for the next login.
The preceding new Restore session? prompt appears only if:
• the user tries to start an app belonging to a workspace store,
• admin policies or app config settings are not configured for the Workspace Control feature,
• Workspace Control Reconnect options are set to default on the client.
Note:
Reconnect settings in the Reconnect Options takes precedence over the preferences set in the
dialog box. For more information, see Configure reconnect options using Advanced Preferences
dialog.
Client App Management for Zoom plug‑in
You can now manage the Zoom plug‑in using Client App Management capability.
For more information, see Client App Management for Zoom plug‑in.
Support for modern authentication methods for StoreFront stores [Technical Preview]
© 1999–2023 Cloud Soware Group, Inc. All rights reserved. 30

Citrix Workspace app for Windows
Starting with this release, Citrix Workspace app for Windows support modern authentication methods
for StoreFront stores. You can authenticate to Citrix StoreFront stores using any of the following ways:
• Using Windows Hello and FIDO2 security keys. For more information, see Other ways to authen‑
ticate.
• Single sign‑on to Citrix StoreFront stores from AzureActiveDirectory (AAD) joined machines with
AAD as the identity provider. For more information, see Other ways to authenticate.
• Workspace administrators can configure and enforce Azure Active Directory conditional access
policies for users authenticating to Citrix StoreFront stores. For more information, see Support
for Conditional access with Azure AD.
To enable this feature, you must use Microso Edge WebView2 as the underlying browser for direct
StoreFront and gateway authentication.
Note:
Ensure that the Microso Edge WebView2 Runtime version is 102 or later.
You can enable modern authentication methods for StoreFront stores using the GPO template. For
more information, see Support for modern authentication methods for StoreFront stores section.
Note:
Technical previews are available for customers to test in their non‑production or limited produc‑
tion environments, and to give customers an opportunity to share feedback. Citrix does not ac‑
cept support cases for feature previews but welcomes feedback for improving them. Citrix might
or might not act on feedback based on its severity, criticality, and importance. It is advised that
Beta builds aren’t deployed in production environments.
You can provide feedback on this feature via the Podio form.
Updated audio device selection behavior for optimized Microso Teams
Starting with this release, when you change the default audio devices in the sound settings on the
endpoint, the optimized Microso Teams in the Citrix VDI changes the current audio devices selection
to match the endpoint defaults.
However, if you make an explicit device selection in Microso Teams, your selection takes precedence
and does not follow the endpoint defaults. Your selection is persistent until you clear the Microso
Teams cache.
App Protection enhancement
Starting with this release, Citrix Workspace app for Windows allows you to configure App Protection
for Authentication and Self‑Service plug‑in using the Global App Configuration. Previously, you were
able to configure these components only using the Group Policy Object.
© 1999–2023 Cloud Soware Group, Inc. All rights reserved. 31

Citrix Workspace app for Windows
If you enable the anti‑keylogging and the anti‑screen capturing functionality using the Global App
Configuration service, they are applicable to both Authentication and Self‑Service plug‑in.
Note:
The Global App Configuration service configurations don’t apply for virtual apps, virtual desk‑
tops, web apps, and SaaS apps. These resources continue to be controlled using the Delivery
Controller and Citrix Secure Private Access. For more information, see the configure section in
the App Protection documentation.
For more information, see the App Protection enhancement section.
Citrix Enterprise Browser
This release includes Citrix Enterprise Browser version 108.1.1.97, based on Chromium version 108.
For more information about the Citrix Enterprise Browser, see the Citrix Enterprise Browser documen‑
tation.
Open all web and SaaS apps through the Citrix Enterprise Browser
In this release of the Enterprise Browser (in Citrix Workspace app for Windows), all internal web apps
and external SaaS apps available in the Citrix Workspace app open in Citrix Enterprise Browser.
Option to start Citrix Enterprise Browser from within Citrix Workspace app
Previously, you can open the Citrix Enterprise Browser from the Citrix Workspace app aer opening a
web or SaaS app.
Starting with this release, you can open the Citrix Enterprise Browser from the Citrix Workspace app
directly without requiring you to open a web or SaaS app. This feature provides easy access to the
Citrix Enterprise Browser and doesn’t require any configurations from administrators. This feature is
available by default.
© 1999–2023 Cloud Soware Group, Inc. All rights reserved. 32

Citrix Workspace app for Windows
Note:
The end user must have entitlement to at least one web or SaaS app through Secure Private
Access.
Fixed issues
• Some SaaS apps which have enhanced security set to OFF fail to open in Citrix Enterprise
Browser if Citrix Enterprise Browser is the default browser. [CTXBR‑4106] [CTXBR‑4405]
• Attempts to start apps or desktops from custom web stores might fail when using Microso Edge
WebView2 Runtime version 109 and later. [RFWIN‑29200].
• You might fail to add a hidden store to the Citrix Workspace app. This issue occurs when you
try to add Citrix Gateway FQDN that requires smartcard authentication or when the StoreFront
store name has spaces, for example, https://servername.company.com?Store Service.
[CVADHELP‑21516]
• The inactivity timeout value might not expire if you exit from the Citrix Workspace app before
reaching the set time‑out value. As a result, you might later be able to start Citrix Workspace
app without entering any credentials. [CVADHELP‑20912]
• You might fail to see the authentication pop‑up page automatically aer installing the Citrix
Workspace app. [CVADHELP‑20593]
© 1999–2023 Cloud Soware Group, Inc. All rights reserved. 33

Citrix Workspace app for Windows
• On a multi‑monitor setup, the application windows move to a dierent monitor whenever the
user disconnects and reconnects to the session. [HDX‑45043]
• With certain older AMD GPU series, purple video content or flashing screens might be seen with
Citrix Workspace app 2206 or newer. [HDX‑46264]
• Unable to repair BCRClient.msi and the following error appears during the Citrix Workspace app
installation:
[HDX‑46964]
2212
What’s new
Note:
From this release onward, ensure that the Microso Edge WebView2 Runtime version is 102 or
later. For more information, see System requirements and compatibility.
Client App Management
Citrix Workspace app 2212 for Windows now oers Client App Management capability that makes the
Citrix Workspace app a single client app required on the end point to install and manage agents such
as Secure Access Agent and End Point Analysis (EPA) plug‑in.
With this capability, administrators can easily deploy and manage required agents from a single man‑
agement console.
For more information, see Client App Management.
Client App Management for Zoom plug‑in [Technical Preview]
Starting from Citrix Workspace app 2212 for Windows, you can now manage Zoom plug‑in using Client
App Management capability.
For more information, see Client App Management.
You can record your feedback for this technical preview by using this Podio form.
© 1999–2023 Cloud Soware Group, Inc. All rights reserved. 34

Citrix Workspace app for Windows
Note:
Technical previews are available for customers to test in their non‑production or limited produc‑
tion environments, and to give customers an opportunity to share feedback. Citrix does not ac‑
cept support cases for feature previews but welcomes feedback for improving them. Citrix might
or might not act on feedback based on its severity, criticality, and importance. It is advised that
Beta builds aren’t deployed in production environments.
Auto‑update version control
Administrators can now manage the auto‑update version for the devices in the organization.
Administratorscan control the version by settingthe version in the maximumAllowedVersionproperty
in the Global App Config Service.
Example JSON file in Global App Config Service:
1 {
2
3 "category": "AutoUpdate",
4 "userOverride": false,
5 "assignedTo": [
6 "AllUsersNoAuthentication"
7 ],
8 "settings": [
9 {
10
11 "name": "Auto Update plugins settings",
12 "value": [
13 {
14
15 "pluginSettings": {
16
17 "upgradeToLatest": false,
18 "deploymentMode": "InstallAndUpdate",
19 "stream": "Current",
20 "maximumAllowedVersion": "23.03.0.49",
21 "minimumAllowedVersion": "0.0.0.0",
22 "delayGroup": "Fast"
23 }
24 ,
25 "pluginName": "WorkspaceApp",
26 "pluginId": "1CDF566D-B2C7-47CA-802F-6283C862E1D6"
27 }
28
© 1999–2023 Cloud Soware Group, Inc. All rights reserved. 35

Citrix Workspace app for Windows
29 ]
30 }
31
32 ]
33 }
34
35
36 <!--NeedCopy-->
When the version is set, Citrix Workspace app on the user’s device is automatically updated to the
version specified in the maximumAllowedVersion property.
Notes:
• Currently all the parameters mentioned in the preceding JSON file are mandatory. You
must provide values for upgradeToLatest setting and the maximumAllowedVersion
setting based on the requirement of your organization. However, for the remaining param‑
eters, you can use values similar to the example JSON file.
• To achieve auto‑update version control, upgradeToLatest setting in the Global App Con‑
fig Service must be set to false. If this setting is true, maximumAllowedVersion is ignored.
• Do not modify the pluginId as this ID is mapped to Citrix Workspace app.
• If the administrator hasn’t configured the version in the Global App Config Service, Citrix
Workspace app is updated to the latest available version by default.
Force login prompt for Federated identity provider
Citrix Workspace app now honors Federated Identity Provider Sessions setting. For more information,
see Knowledge Center article CTX253779.
You no longer need to use the Store authentication tokens policy to force the login prompt.
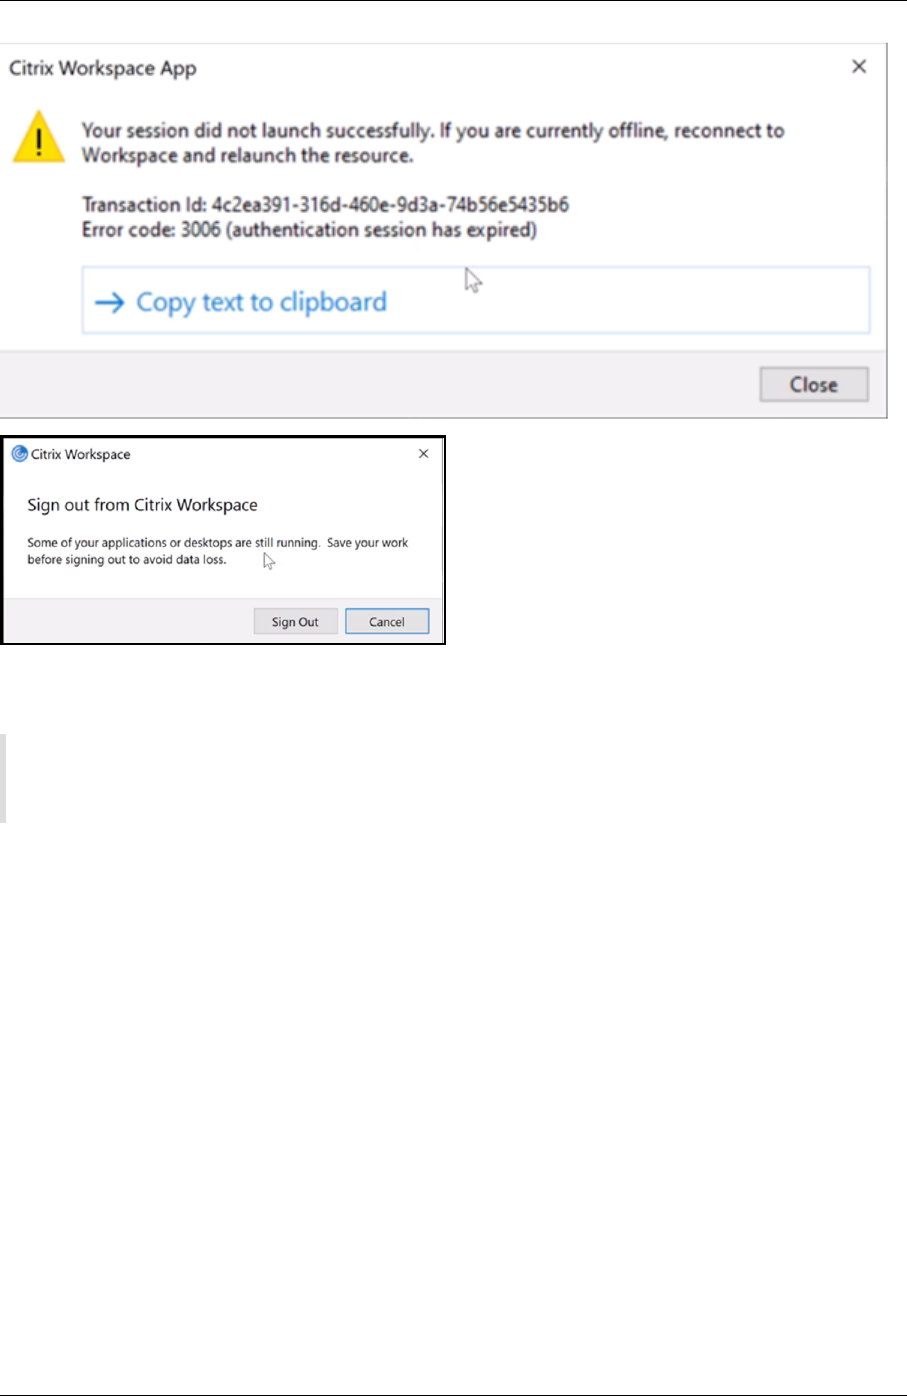
Improved reconnection experience aer connection lease file expiry
Previously, there was no notification to the end user when the connectionleasefile and authentication
token expired.
Starting from this release, you are prompted with an error message and a consent dialog box. The
consent dialog box appears only when you have resources running in the session. If there are no
resources running, only an error dialog box appears. You are signed out without being prompted with
the consent dialog box.
© 1999–2023 Cloud Soware Group, Inc. All rights reserved. 36
Citrix Workspace app for Windows
You can click Sign Out to sign out from the current Citrix Workspace app session or click Cancel to
continue with the session.
Note:
Save your data before clicking Sign Out.
Enhancement to App Protection: Anti‑DLL Injection [Technical Preview]
As part of App Protection, we now have a security enhancement that helps protect the Citrix
Workspace app from certain unauthorized dynamic‑link libraries (DLL) or untrusted modules. If such
untrusted modules are injected, the Citrix Workspace app detects these interventions and stops the
modules from loading.
Previously, this technical preview feature was applicable only for protected virtual apps and desktops.
With this release, we have enhanced its scope to now include:
• all virtual apps and desktop sessions
• the Citrix Workspace app authentication window (on‑premises deployment/StoreFront)
Additionally, this enhancement now:
• exits the session immediately when certain untrusted or malicious DLLs exist on the protected
component
© 1999–2023 Cloud Soware Group, Inc. All rights reserved. 37

Citrix Workspace app for Windows
• displays a notification when an untrusted or malicious DLL is blocked.
Disclaimer:
This capability works by filtering access to required functions of the underlying operating system (spe‑
cific API calls required to load DLLs). Doing so means that it can provide protection even against
certain custom and purpose‑built hacker tools. However, as operating systems evolve, new ways of
loading DLLs can emerge. While we continue to identify and address them, we cannot guarantee full
protection in specific configurations and deployments.
You can register for this technical preview by using this Podio form.
Note:
Technical previews are available for customers to test in their non‑production or limited produc‑
tion environments, and to give customers an opportunity to share feedback. Citrix does not ac‑
cept support cases for feature previews but welcomes feedback for improving them. Citrix might
or might not act on feedback based on its severity, criticality, and importance. It is advised that
Beta builds aren’t deployed in production environments.
Support for default installation of App Protection
App Protection component is now installed by default during the Citrix Workspace app installation.
The Enable app protection check box that appears during the installation is replaced with Start App
Protection aer installation.
© 1999–2023 Cloud Soware Group, Inc. All rights reserved. 38

Citrix Workspace app for Windows
When you select this check box, App Protection starts immediately aer the installation.
Note:
If you do not enable this check box, App Protection automatically starts upon the first start of a
protected resource or component for customers who have entitled to App Protection.
You can also start the App Protection component using the /startappprotection command line
parameter. However, the previous /includeappprotection switch is deprecated.
Note:
Previously, anti‑screen capture and anti‑keylogging capabilities were enforced by default for Cit‑
rix authentication and Citrix Workspace app screens. However, starting from 2212, these capa‑
bilities are disabled by default and need to be configured using the Group Policy Object. For
information on the GPO configuration, see Enhancement to App Protection configuration.
App Protection enhancement: Screen capture detection and notification
Starting from this release, you can view a notification when a possible attempt of screen capture is
made on any protected resources. For information on the resources protected by App Protection, see
What does App Protection protect?.
The notification appears when there is an:
© 1999–2023 Cloud Soware Group, Inc. All rights reserved. 39

Citrix Workspace app for Windows
• attempt to take a screenshot or record video through a screen‑capturing tool.
• attempt to take a screenshot through the Print Screen key.
Note:
The notification appears only once per running instance of the screen capture tool. The notifica‑
tion appears again if you relaunch the tool and attempt screen capture.
Desktop Viewer optimization
This release optimizes the Desktop Viewer experience by reducing the launch time by 5 seconds. The
Desktop Viewer toolbar opens quickly and might display the default Windows session sign‑in screen.
Administrators can hide this experience by configuring the following registry to introduce some delay
in milliseconds:
• Location: HKEY_CURRENT_USER\SOFTWARE\Citrix\XenDesktop\DesktopViewer
• Name: ExtendConnectScreenMS
• Type: DWORD
• Value: 00000000 (Delay in Milliseconds)
Note:
The registry configuration is optional.
Citrix Enterprise Browser
Note:
From Citrix Workspace app for Windows version 2210, Open all web and SaaS apps through
the Citrix Enterprise Browser feature is disabled.
This release includes Citrix Enterprise Browser version 107.1.1.13, based on Chromium version 107.
For more information about the Citrix Enterprise Browser, see the Citrix Enterprise Browser documen‑
tation.
• Set Citrix Enterprise Browser as the work browser
You can now configure Citrix Enterprise Browser as a work browser to open all work links. You
can select an alternate browser to open non‑work links.
A work link is a link that is associated with the web or SaaS apps that are configured by the
administrator for the end user. When a user clicks any link within a native application, if it’s a
work link, it’s opened through the Enterprise Browser. If not, it’s opened through the alternate
browser that the end‑user selects.
For more information, see Set Citrix Enterprise Browser as the work browser.
© 1999–2023 Cloud Soware Group, Inc. All rights reserved. 40

Citrix Workspace app for Windows
Fixed issues
• Citrix Workspace app prompts you to select a certificate even when only one certificate exists.
This issue occurs while authenticating to the Workspace (cloud) store.
You can suppress this certificate prompt by adding the following registry:
On 32‑bit systems:
– Location: HKEY_LOCAL_MACHINE\Soware\Citrix\Dazzle or HKEY_CURRENT_USER\Soware\Citrix\Dazzle
– Name: SuppressCertSelectionPrompt
– Type: String
– Value: True
On 64‑bit systems
– Location: HKEY_LOCAL_MACHINE\Soware\Wow6432Node\Citrix\Dazzleor HKEY_CURRENT_USER\Soware\Citrix\Dazzle
– Name: SuppressCertSelectionPrompt
– Type: String
– Value: True
[CVADHELP‑20844]
• Attempts to access Citrix Workspace app for Windows might fail when the VPN disconnects or
reconnects [CVADHELP‑20376]
• Unable to detect End Point Analysis (EPA) while authenticating to the store configured with EPA.
This issue occurs when you update Citrix Workspace app from the previous version to 2210 or
later. [CVADHELP‑21387]
• During an optimized Microso Teams calls, the endpoint might go into Sleep state. [HDX‑44438]
• Citrix Analytics is unable to receive network related metrics from end users. This issue occurs
even when these prerequisites are met:
– App or desktop sessions are in running state for more than 15 minutes using Citrix
Workspace app.
– Store or account used is CAS enabled.
Note:
Network related CAS events are not sent for browser‑based launch of apps or desktops. It
is sent only when you open app or desktop via web and from the same store that is added
via native Citrix Workspace app.
[CVADHELP‑21448]
• When you open a published app in seamless mode, other local or seamless apps might appear
in the foreground and cover the published app. [CVADHELP‑20742, CVADHELP‑21277]
© 1999–2023 Cloud Soware Group, Inc. All rights reserved. 41

Citrix Workspace app for Windows
2210.5
What’s new
This release addresses issues that help to improve overall performance, security, and stability.
Client App Management [Technical Preview]
Citrix Workspace app 2210.5 for Windows now oers Client App Management capability that makes
the Citrix Workspace app a single client app required on the end point to install and manage agents
such as Secure Access Agent and End Point Analysis (EPA) plug‑in.
With this capability, administrators can easily deploy and manage required agents from a single man‑
agement console.
Client App Management includes the following steps:
• Administrators must specify the agents required on end users’ devices in the Global App Con‑
figuration Service. With this technical preview, administrators can specify Secure Access Agent
and Endpoint Analysis (EPA) agent.
• Citrix Workspace app fetches the list of agents from Global App Configuration Service.
• Based on the list fetched from Global App Configuration service, Citrix Workspace app down‑
loads the agent packages through the auto‑update service. If the agent is not previously in‑
stalled on the end point, Citrix Workspace app triggers the installation of the agent. If the agent
is already installed, Citrix Workspace app triggers an update to the agent (if the version of the
downloaded agent is higher than the installed version.)
Citrix Workspace app ensures to automatically update the agents whenever an update is available in
the future.
Citrix Workspace app automatically signs in to the agents with the Citrix Workspace credentials.
The following diagram illustrates the workflow:
© 1999–2023 Cloud Soware Group, Inc. All rights reserved. 42

Citrix Workspace app for Windows
You can register for this technical preview by using the Podio form. Submit a request and we reach
out to you with more details.
Note:
Technical previews are available for customers to test in their non‑production or limited produc‑
tion environments, and to give customers an opportunity to share feedback. Citrix does not ac‑
cept support cases for feature previews but welcomes feedback for improving them. Citrix might
or might not act on feedback based on its severity, criticality, and importance. It is advised that
Beta builds aren’t deployed in production environments.
Enhancement to auto‑update
Citrix Workspace app now supports auto‑update when Proxy auto‑configuration (PAC) and Web Proxy
Auto‑Discovery Protocol (WPAD) detection is enabled.
Citrix Enterprise Browser
This release includes Citrix Enterprise Browser version 105.2.1.40, based on Chromium version 105.
For more information about the Citrix Enterprise Browser, see the Citrix Enterprise Browser documen‑
tation.
© 1999–2023 Cloud Soware Group, Inc. All rights reserved. 43

Citrix Workspace app for Windows
Fixed issues
This release addresses issues that help to improve overall performance, security, and stability.
2210
What’s new
Background blurring for webcam redirection
Citrix Workspace app for Windows now supports background blurring for webcam redirection. You
can enable this feature by selecting Preferences > Connections > Enable background blur check
box.
App Protection enhancements for web and SaaS apps on Windows 11
This App Protection enhancement optimizes the experience and security capabilities for web and
SaaS app users on Windows 11. This enhancement is available via the Citrix Enterprise Browser for
Secure Private Access customers.
Limiting video resolutions
Administrators who have users on lower‑performance client endpoints can choose to limit incoming
or outgoing video resolutions to decrease the impacts of encoding and decoding video on those end‑
points. Starting from Citrix Workspace app 2010 for Windows, you can limit these resolutions using
client configuration options.
Note:
Users running with restricted resolutions impact the overall video quality of the conference be‑
cause the Microso Teams server will be forced to use the lowest‑common‑denominator resolu‑
tion for all conference participants.
Call constraints are disabled by default on the client with Citrix Workspace app 2210. To enable, ad‑
ministratorsmust set the following client‑sideconfigurations in the HKEY_CURRENT_USER\SOFTWARE\Citrix\HDXMediaStream:
Name Type Mandatory Accepted Values
EnableSimulcast Int YES 1–3 (Set it to 1)
MaxOutgoingResolution Int YES 180,240,360,540,720,1080
(Microso Teams
supported
Resolutions)
© 1999–2023 Cloud Soware Group, Inc. All rights reserved. 44

Citrix Workspace app for Windows
Name Type Mandatory Accepted Values
MaxIncomingResolution Int YES 180,240,360,540,720,1080
(Microso Teams
supported
Resolutions)
MaxIncomingStreams Int YES 1–8
MaxSimulcastLayers Int YES 1–3 (set it to 1)
MaxVideoFrameRate Int NO 1–30
MaxScreenshareFrameRateInt NO 1–15
All keys are DWORDs.
Citrix Enterprise Browser
This release includes Citrix Enterprise Browser version 105.1.1.27, based on Chromium version 105.
For more information about the Citrix Enterprise Browser, see the Citrix Enterprise Browser documen‑
tation.
Rebranding Citrix Workspace Browser
Citrix Workspace Browser is now Citrix Enterprise Browser. The custom scheme is now changed from
citrixworkspace:// to citrixbrowser://.
Implementing this transition in our products and their documentation is an ongoing process. Your
patience during this transition is appreciated.
• The product UI, in‑product content, and the images and instructions in the product documen‑
tation will be updated in the coming weeks.
• It is possible that some items (such as commands and MSIs) might continue to retain their for‑
mer names to prevent breaking existing customer scripts.
• Related product documentation and other resources (such as videos and blog posts) that are
linked from this product documentation might still contain former names.
Make Citrix Enterprise Browser the work browser [Technical Preview]
You can now configure Citrix Enterprise Browser to open all work or enterprise links and apps config‑
ured by your administrator in the Citrix Workspace app. This feature provides a way for you to open
only work links or web and SaaS apps in the Citrix Enterprise Browser. You can select an alternate
browser to open any other non‑work links or apps.
© 1999–2023 Cloud Soware Group, Inc. All rights reserved. 45

Citrix Workspace app for Windows
Open all web and SaaS apps through the Citrix Enterprise Browser
From this release, all internal web apps and external SaaS apps available in the Citrix Workspace app
open in Citrix Enterprise Browser.
Note:
From Citrix Workspace app for Windows version 2210, Open all web and SaaS apps through
the Citrix Enterprise Browser feature is disabled.
Support for browser extensions [Technical Preview]
You can add extensions that are provided by your administrator to the Citrix Enterprise Browser in
a secure way. An administrator can deploy, manage, and control the extensions. End users can view
and use the extension under citrixbrowser://extensions as required. For more settings, see Global App
Configuration Service.
Note:
This feature is a request‑only preview. To get it enabled in your environment, fill out the Podio
form.
For information on how to configure, see Citrix Enterprise Browser documentation.
Use Global App Config service to manage Citrix Enterprise Browser [Technical Preview]
The administrator can use the Global App Configuration service for Citrix Workspace to deliver Citrix
Enterprise Browser settings through a centrally managed service.
The Global App Configuration service is designed for administrators to easily configure Citrix
Workspace and manage the Citrix Workspace app settings. This feature allows admins to use the
Global App Configuration Service to apply various settings or system policies to the Citrix Enterprise
Browser on a particular store. The administrator can now configure and manage the following Citrix
Enterprise Browser settings using the Global App Configuration service:
• “Enable CWB for all apps” ‑ Makes the Citrix Enterprise Browser the default browser for opening
web and SaaS apps from the Citrix Workspace app.
• “Enable save passwords” ‑ Allow or deny end users the ability to save passwords.
• “Enable incognito mode” ‑ Enable or disable incognito mode.
• “Managed Bookmarks” ‑ Allow administrator to push bookmarks to the Citrix Enterprise
Browser.
• “Enable developer tools” ‑ Enable or disable developer tools within the Enterprise Browser.
• “Delete browsing data on exit” ‑ Allow the administrator to configure what data the Citrix Enter‑
prise Browser deletes on exit.
© 1999–2023 Cloud Soware Group, Inc. All rights reserved. 46

Citrix Workspace app for Windows
• “Extension Install Forcelist”‑ Allow the administrator to install extensionsin the Citrix Enterprise
Browser.
• “Extension Install Allow list” ‑ Allow the administrator to configure an allowed list of extensions
that users can add to the Citrix Enterprise Browser. This list leverages the Chrome Web Store.
Notes:
• This feature is a request‑only preview. To get it enabled in your environment, fill out the
Podio form.
• Technical previews are available for customers to test in their non‑production or limited
production environments, and to give customers an opportunity to share feedback. Citrix
does not accept support cases for feature previews but welcomes feedback for improving
them. Citrix might or might not act on feedback based on its severity, criticality, and impor‑
tance. It’s advised that Beta builds aren’t deployed in production environments.
• The name and value pair are case‑sensitive.
• All the browser settings in Global App Configuration Service are under the following cate‑
gory:
1 {
2
3 "category": "browser",
4 "userOverride": false,
5 "assignedTo": [
6 "AllUsersNoAuthentication"
7 ]
8 }
9
10
11 <!--NeedCopy-->
• The administrator can apply the settings to unmanaged devices as well. For more informa‑
tion, see the Global App Configuration Service documentation.
Technical Preview
• Local App Protection
For the complete list of Technical Preview features, see the Features in Technical Preview page.
Fixed issues
• The High DPI menu under Advanced Preferences is reintroduced.
– The default new value is No, use the native resolution, also known as DPI matching.
© 1999–2023 Cloud Soware Group, Inc. All rights reserved. 47

Citrix Workspace app for Windows
When you select this option, Citrix Workspace app attempts to match display resolution
and DPI scale settings of the local Windows client to the HDX session automatically. DPI
matching is recommended in all cases, especially when high‑resolution monitors (above
1920x1080) are in use.
– The Yes option, also known as Client‑side scaling or compatibility mode is only recom‑
mended for legacy applications that are not DPI‑aware and should only be used in special
circumstances. This option might introduce some side eects while displaying the legacy
apps, like blurry text because of the upscaling or stretching of the HDX session.
It is also a viable option when two monitors with dierent DPI settings (or mixed DPI) are
connected to the local Windows client.
Note:
This option is not compatible with HDX optimization for Microso Teams.
– With the third option Let the operating system scale the resolution also known as DPI
unaware, Citrix Workspace app for Windows ignores the DPI scale settings on the local
Windows client. In this mode, Windows OS need to manage scaling of Citrix Workspace
app and the HDX session, same as for any other application that is not DPI‑aware. This
mode is not recommended for use with DPI scales over 100%.
[HDX‑43720]
• When you add a disabled store via GPO and a dierent store from the same StoreFront server
via GUI, a loading screen might appear and adding an account might fail. [CVADHELP‑20776]
• When you add two storesfrom the same StoreFront server via GPO, configuring the second store
might fail intermittently. [CVADHELP‑20655]
• Citrix Workspace app tries to connect to Global App Config server even when the Global App
Config Service policy is disabled via GPO. [CVADHELP‑20775]
• When using Citrix Workspace app for Windows 2106 or later, Outbound ICA Proxy feature might
not work. [CVADHELP‑20824]
• For domain users, receiver.exe process might fail unexpectedly. You might see this issue on the
Citrix Workspace app for Windows 2206 or later. [CVADHELP‑20986]
• In the optimized Microso Teams video meeting, call joined with video ON, you might observe
a call drop. This issue occurs sporadically and when the HdxRtcEngine.exe process fails on the
client side. [CVADHELP‑21095]
© 1999–2023 Cloud Soware Group, Inc. All rights reserved. 48

Citrix Workspace app for Windows
2209
What’s new
Auto‑update version control [Technical Preview]
Administrators can now manage the auto‑update version for the devices in the organization.
Administrators can control the version by setting the range in the maximumAllowedVersion and min‑
imumAllowedVersion properties in the Global App Config Service.
Example JSON file in Global App Config Service:
1 {
2
3 "category": "AutoUpdate",
4 "userOverride": false,
5 "assignedTo": [
6 "AllUsersNoAuthentication"
7 ],
8 "settings": [
9 {
10
11 "name": "Auto Update plugins settings",
12 "value": [
13 {
14
15 "pluginSettings": {
16
17 "upgradeToLatest": false,
18 "deploymentMode": "InstallAndUpdate",
19 "stream": "Current",
20 "maximumAllowedVersion": "23.03.0.49",
21 "minimumAllowedVersion": "0.0.0.0",
22 "delayGroup": "Fast"
23 }
24 ,
25 "pluginName": "WorkspaceApp",
26 "pluginId": "1CDF566D-B2C7-47CA-802F-6283C862E1D6"
27 }
28
29 ]
30 }
31
32 ]
33 }
34
© 1999–2023 Cloud Soware Group, Inc. All rights reserved. 49

Citrix Workspace app for Windows
35
36 <!--NeedCopy-->
When the range is set, Citrix Workspace app on the user’s device is automatically updated to the high‑
est available version that falls between the mentioned range.
If you want to auto‑update Citrix Workspace app to a specific version, enter the same version in the
maximumAllowedVersion and minimumAllowedVersion properties in the Global App Config Service.
Note:
• Currently all the parameters mentioned in the preceding JSON file are mandatory. You
must provide values for upgradeToLatest setting and the maximumAllowedVersion
setting based on the requirement of your organization. However, for the remaining param‑
eters, you can use values similar to the example JSON file.
• To achieve auto‑update version control, upgradeToLatest setting in the Global App Config
Service must be set to false. If this is true, maximumAllowedVersion and minimumAllowed‑
Version will be ignored.
• Do not modify the pluginId as this is mapped to Citrix Workspace app.
• If the administrator hasn’t configured the version in the Global App Config Service, Citrix
Workspace app is updated to the latest available version by default.
To enable this feature:
1. Launch the registry editor.
2. Navigate to the Computer\HKEY_LOCAL_MACHINE\SOFTWARE\WOW6432Node\Citrix\
Dazzle registry path.
3. Create a registry value with the following attributes:
• Registry key name: Test‑EnableAUVersionControl
• Type: DWORD
• Value: 0 is disabled and greater than 0 is enabled
4. Restart the Citrix Workspace app for the changes to take eect.
You can provide feedback on this feature via the Podio form.
Note:
Technical previews are available for customers to test in their non‑production or limited produc‑
tion environments, and to give customers an opportunity to share feedback. Citrix does not ac‑
cept support cases for feature previews but welcomes feedback for improving them. Citrix might
or might not act on feedback based on its severity, criticality, and importance. It is advised that
Beta builds aren’t deployed in production environments.
© 1999–2023 Cloud Soware Group, Inc. All rights reserved. 50

Citrix Workspace app for Windows
Upgraded version of WebRTC for the optimized Microso Teams
The version of WebRTC that is used for the optimized Microso Teams is upgraded to version M98.
Supporting auto‑update of Citrix Workspace app on VDA
You can now enable auto‑update feature on VDA by creating the following registry value:
On 32‑bit machine:
• Registry Key: HKEY_LOCAL_MACHINE\SOFTWARE\Citrix\ICA Client\AutoUpdate
• Registry Value: AllowAutoUpdateOnVDA
• Registry Type: REG_SZ
• Registry Data: True
On 64‑bit machine:
• Registry Key: HKEY_LOCAL_MACHINE\SOFTWARE\WOW6432Node\Citrix\ICAClient\AutoUpdate
• Registry Value: AllowAutoUpdateOnVDA
• Registry Type: REG_SZ
• Registry Data: True
Improved virtual apps and desktops launch experience [Technical Preview]
Previously, the launch progress dialog box wasn’t intuitive to the users. It made the users assume
that the launch process is not responding and they closed the dialog box, as the notification messages
were static.
The improved app and desktop launch experience is more informative, modern, and provides a user‑
friendly experience on Citrix Workspace app for Windows. This helps to keep the users engaged with
timely and relevant information about the launch status. The notification appears in the bottom‑right
corner of your screen.
© 1999–2023 Cloud Soware Group, Inc. All rights reserved. 51

Citrix Workspace app for Windows
This feature is also supported on Workspace for Web. Users can view meaningful notifications about
the launch progress, instead of just a spinner. If a launch is in progress and the user attempts to close
the browser, a warning message is shown.
You can enable this feature using the registry.
1. Open the registry editor.
2. Navigate to HKLM\SOFTWARE\WOW6432Node\Citrix\Dazzle.
© 1999–2023 Cloud Soware Group, Inc. All rights reserved. 52

Citrix Workspace app for Windows
3. Create and add a registry string with the name as NewLaunchExpSupport and set its value as
True.
4. Restart Citrix Workspace app for the changes to take eect.
Note:
This is applicable to Workspace (cloud) sessions only.
Known issues:
• On a multi‑monitor setup, the application windows in a desktop session of the Citrix Workspace
app move to a dierent monitor. This issue occurs when you disconnect and reconnect a ses‑
sion.
• This feature is not supported for browser‑based launch.
You can provide feedback on this feature via the Podio form.
Note:
Technical previews are available for customers to test in their non‑production or limited produc‑
tion environments, and to give customers an opportunity to share feedback. Citrix does not ac‑
cept support cases for feature previews but welcomes feedback for improving them. Citrix might
or might not act on feedback based on its severity, criticality, and importance. It is advised that
Beta builds aren’t deployed in production environments.
Citrix Enterprise Browser (formerly Citrix Workspace Browser)
This release includes Citrix Enterprise Browser version 103.2.1.10, based on Chromium version 103.
For more information about the Citrix Enterprise Browser, see the Citrix Enterprise Browser documen‑
tation.
• Citrix Enterprise Browser Profiles
Profiles help you keep personal information such as history, bookmarks, passwords, and other
settings separate for each of your Citrix Workspace accounts. Based on your Workspace store,
a profile is created, allowing you to have a unique and personalized browsing experience.
Note:
Aer you upgrade to version 103.2.1.10 and sign in to the device for the first time, only your
previously saved passwords are removed. When you sign in to the device using a dierent
store for the first time, all your previously saved data is lost.
Technical Preview
• Quick Launch of Disconnected Desktops
For the complete list of Technical Preview features, see the Features in Technical Preview page.
© 1999–2023 Cloud Soware Group, Inc. All rights reserved. 53

Citrix Workspace app for Windows
Fixed issues
• With this fix, a sign‑in page appears when you sign out from Citrix Workspace app for Windows,
specific to on‑premises stores.
To enable the fix, set the following registry values:
On 32‑bit systems:
– HKEY_LOCAL_MACHINE/Soware/Citrix/Dazzle
– Name: ShowSignInPageOnLogO
– Type: REG_SZ
– Value: True
On 64‑bit systems:
– HKEY_LOCAL_MACHINE/Soware/Wow6432Node/Citrix/Dazzle
– Name: ShowSignInPageOnLogO
– Type: REG_SZ
– Value: True
[CVADHELP‑19967]
• The Applocker rule in Group Policy Object blocks the integration of the Citrix Gateway
plug‑in with Citrix Workspace. As a result, several temporary files of the format VP‑
NXXXX.tmp are created in the temp folder. The files are created even when the registry
key, HKEY_LOCAL_MACHINE\SOFTWARE\Citrix\Secure Access Client has DisableIconHide
value. [CVADHELP‑19709]
• When you start a published app through a PNAgent site, Citrix Workspace app for Windows dis‑
plays the following message:
A fatal error occurred.
[RFWIN‑28208]
• Citrix Workspace app might not be responsive aer the launch. {CVADHELP‑20317]
2207
What’s new
Background blurring and eects for Microso Teams optimization with HDX
Citrix Workspace app for Windows now supports background blurring and eects in Microso Teams
optimization with HDX.
You can either blur or replace the background with a custom image and avoid unexpected distractions
by helping the conversation stay focused on the silhouette (body and face). The feature can be used
with either P2P or conference calls.
© 1999–2023 Cloud Soware Group, Inc. All rights reserved. 54

Citrix Workspace app for Windows
Note:
This feature is now integrated with the Microso Teams UI/buttons. MultiWindow support is
a prerequisite that requires a VDA update to 2112 or higher. For more information, see Multi‑
window meetings and chat.
Limitations:
• Admin and user‑defined background replacement isn’t supported.
• The background eect doesn’t persist between sessions. When you close and relaunch
Microso Teams or VDA is reconnected, the background eect is reset to o.
• Aer the ICA session is reconnected, the eect is o. However, the Microso Teams UI shows
that the previous eect is still On by a tick mark. Citrix and Microso are working together to
resolve this issue.
• The device must be connected to the internet while replacing the background image.
Note:
This feature is available only aer the future update roll‑out from Microso Teams. When the
update is rolled‑out by Microso, you can check Knowledge Center articleCTX253754 and the
Microso 365 Public roadmap for the documentation update and the announcement.
Background blurring for webcam redirection [Technical Preview]
Citrix Workspace app for Windows now supports background blurring for webcam redirection. You
can enable this feature using the registry:
• Location HKCU\Soware\Citrix\HdxRealTime.
• Name: EnableBackgroundEectFilter.
• Type: DWORD.
• Value: 0 is disabled. Any other value is enabled. If the value doesn’t exist or is 0, all background
blur settings are ignored, and the Preferences > Connections > Enable background blur check
box that handles the blur eect is disabled.
Recommendation:
Close the webcam application on VDA before closing the ICA session.
You can provide feedback on this feature via the Podio form.
Improved auto‑update experience
The auto‑update feature automatically updates the Citrix Workspace app to the latest version without
the need for any user intervention.
© 1999–2023 Cloud Soware Group, Inc. All rights reserved. 55

Citrix Workspace app for Windows
Citrix Workspace app periodically checks and downloads the latest available version of the app. Citrix
Workspace app determines the best time to install based on user activity not to cause any disruptions.
When the installation is complete, the following notification appears:
If the Citrix Workspace app can’t find the right time to install the updates in the background, a notifi‑
cation prompt appears.
Enhancement to auto‑update [Technical Preview]
Citrix Workspace app now supports auto‑update when Proxy auto‑configuration (PAC) and Web Proxy
Auto‑Discovery Protocol (WPAD) detection is enabled.
Note:
Technical previews are available for customers to test in their non‑production or limited produc‑
tion environments, and to give customers an opportunity to share feedback. Citrix does not ac‑
cept support cases for feature previews but welcomes feedback for improving them. Citrix might
or might not act on feedback based on its severity, criticality, and importance. It’s advised that
Beta builds aren’t deployed in production environments.
You can provide feedback on this feature via the Podio form.
Citrix Enterprise Browser
This release includes Citrix Enterprise Browser version 102.1.1.14, based on Chromium version 102.
• Open all web and SaaS apps through the Citrix Enterprise Browser [Technical Preview]
From this release, all internal web apps and external SaaS apps available in the Citrix Workspace
app, open in the Citrix Enterprise Browser. You can register for this technical preview by using
the Podio form.
© 1999–2023 Cloud Soware Group, Inc. All rights reserved. 56

Citrix Workspace app for Windows
Note:
Technical previews are available for customers to test in their non‑production or limited
production environments, and to give customers an opportunity to share feedback. Citrix
does not accept support cases for feature previews but welcomes feedback for improving
them. Citrix might or might not act on feedback based on its severity, criticality, and im‑
portance. It’s advised that Beta builds aren’t deployed in production environments.
Note on Citrix Workspace app update
While updating Citrix Workspace app for Windows from the previous version to 2207, user is prompted
to sign in. The sign‑in is prompted only for the workspace store.
Fixed issues
Session/Connection
• Optimized Microso Teams might not select a new default audio device connected to the end‑
point. [CVADHELP‑20528]
Note:
This fix is available only aer the future update roll‑out from Microso Teams.
• Configuring stores with geo DNS URL via Group Policy Object or command line might fail if you
have set AllowAddStore=N during the Citrix Workspace app installation. [CVADPHELP‑19853]
• Citrix Authentication Manager (AuthManSvr.exe) might exit unexpectedly during logon.
[CVADHELP‑18901]
User Interface
• When you’re using custom web stores, links in the Citrix Workspace app opens in the system
browser. [RFWIN‑27855]
2206
What’s new
Background blurring and eects for Microso Teams optimization with HDX [Technical Preview]
In Citrix Workspace app 2206 for Windows, Citrix is introducing a technical preview for background
blurring and eects in Microso Teams optimization with HDX.
© 1999–2023 Cloud Soware Group, Inc. All rights reserved. 57

Citrix Workspace app for Windows
Now, you can either blur or replace the background with a custom image and avoid unexpected dis‑
tractions by helping the conversation stay focused on the silhouette (body and face). The feature can
be used with either P2P or conference calls.
Note:
• In this technical preview, the feature can only be controlled via the registry keys and it isn’t
integrated with the Microso Teams UI/buttons.
• The new background persists in all Microso Teams meetings and calls until you change it
againvia a registry key. Forthe change to take eect, you only mustrestartMicroso Teams.
This limitation is removed once the feature is GA, and for that it requires Multi‑window sup‑
port (VDA 2112 or higher).
To activate or deactivate background blurring and eects, administrators or users must con‑
figure the following registry key on the client/endpoint:
Location: HKEY_CURRENT_USER\SOFTWARE\Citrix\HDXMediaStream
• Name: VideoBackgroundEect
• Type: DWORD
• Value: 0 (disabled), 1 (enabled), 2 (background image replacement, which requires the
VideoBackgroundImage key to be present as well)
The following key is required only if you want to replace the background image and not for blurring:
• Name: VideoBackgroundImage
• Type: REG_SZ
• Value: my_image_name.jpeg
Note:
The file name, for example, my_image_name.jpg (or name you provide for the file) must be
placed in the user’s device, Citrix Workspace app install directory, C:\Program Files (x86
)\Citrix\ICA Client.
Improved graphics performance
Citrix Workspace app 2206 introduces significant performance improvements for Intel integrated
GPUs:
• Graphics GPU consumption has been reduced, improving overall performance.
The following issues are fixed:
• Low frames per second aer playing a video on the Intel 10th Generation GPU or higher.
• Brightness dierence in Build‑To‑Lossless or for Actively Changing Regions on Intel and AMD
GPUs.
© 1999–2023 Cloud Soware Group, Inc. All rights reserved. 58

Citrix Workspace app for Windows
Enhancement to App Protection: Anti‑code Injection [Technical Preview]
Citrix Workspace app now ensures that no unauthorized dynamic‑link libraries (DLL) or untrusted
modules get access to the session.
If any untrusted module gets injected during a session, the Citrix Workspace app detects such inter‑
vention and stops the module from loading.
Also, if any untrusted or malicious DLL is detected before the session launch, App Protection blocks
the session launch and displays an error message. Closing the error message exits the virtual app and
desktop session.
You can register for this technical preview by using this Podio form.
Note:
Technical previews are available for customers to test in their non‑production or limited produc‑
tion environments, and to give customers an opportunity to share feedback. Citrix does not ac‑
cept support cases for feature previews but welcomes feedback for improving them. Citrix might
or might not act on feedback based on its severity, criticality, and importance. It is advised that
Beta builds aren’t deployed in production environments.
App Protection enhancements for web and SaaS apps on Windows 11 [Technical Preview]
This App Protection enhancement optimizes the experience and security capabilities for web and
SaaS app users on Windows 11. This enhancement is available via the Citrix Enterprise Browser for
Secure Private Access customers. You can register for the Technical Preview via the Podio form. For
more information, see App Protection documentation.
Note:
Technical previews are available for customers to test in their non‑production or limited produc‑
tion environments, and to give customers an opportunity to share feedback. Citrix does not ac‑
cept support cases for feature previews but welcomes feedback for improving them. Citrix might
or might not act on feedback based on its severity, criticality, and importance. It is advised that
Beta builds aren’t deployed in production environments.
Improved auto‑update experience [Technical Preview]
The auto‑update feature automatically updates the Citrix Workspace app to the latest version without
the need for any user intervention.
Citrix Workspace app periodically checks and downloads the latest available version of the app. Citrix
Workspace app determines the best time to install based on user activity to not cause any disruptions.
When the installation is complete, the following notification appears:
© 1999–2023 Cloud Soware Group, Inc. All rights reserved. 59
Citrix Workspace app for Windows
If the Citrix Workspace app can’t find the right time to install the updates in the background, a notifi‑
cation prompt appears.
You can register for the Technical Preview via the Podio form.
Note:
Technical previews are available for customers to test in their non‑production or limited produc‑
tion environments, and to give customers an opportunity to share feedback. Citrix does not ac‑
cept support cases for feature previews but welcomes feedback for improving them. Citrix might
or might not act on feedback based on its severity, criticality, and importance. It is advised that
Beta builds aren’t deployed in production environments.
Enabling DPI matching
Starting with Citrix Workspace app 2206 for Windows, DPI matching is enabled by default. This means
Citrix Workspace app attempts to match display resolution and DPI scale settings of the local Windows
client to the Citrix session automatically. As part of this change, the High DPI option available under
Advance Preferences in Citrix Workspace app is no longer available. For more information, see Knowl‑
edge Center article CTX460068.
Citrix Enterprise Browser
This release includes Citrix Enterprise Browser version 101.1.1.12, based on Chromium version 101.
For features or bugs fixes in the Citrix Enterprise Browser, see What’s new in the Citrix Enterprise
Browser documentation.
Fixed issues
Install, Uninstall, Upgrade
• Citrix Workspace Updater service might fail to start resulting in installation failure. This issue
occurs when the client is not connected to the internet. [CVADHELP‑19613]
© 1999–2023 Cloud Soware Group, Inc. All rights reserved. 60

Citrix Workspace app for Windows
Session/Connection
• When using Citrix Workspace app 2204.1 or later, the session might disconnect. This issue oc‑
curs if there’s a restriction to run unsigned binaries, for example, wfica.ocx. [CVADHELP‑20053]
• When you start Citrix Workspace app for the first time aer adding the store URL, the following
error message appears:
“Your Citrix Workspace app encountered an error while initializing Microso Edge WebView2.
Restart your app.”
This issue occurs when you add the store URL through the GPO or command line and includes
‘/’ aer discovery, for example, https://sales.example.com/Citrix/Store/discovery
/;On;Store.
[CVADHELP‑20214]
• On Citrix Workspace app for Windows, when you add store URLs using Group Policy Object, the
following error message might appear:
“Cannot connect to server.”
This issue occurs if one of the stores is disabled and isn’t reachable.
[CVADHELP‑19751]
• When you update the Citrix Workspace app from version 2006 or earlier, the gateway and bea‑
con configurations of the existing stores might get deleted and the same configurations are
added again even when the store configurations aren’t changed in the Group Policy Object.
[CVADHELP‑19839]
• Attempts to launch applications or desktops from a tablet using Citrix Workspace app might fail.
The issue occurs when the client IP address can’t be retrieved. [CVADHELP‑19703]
• While sharing the screen or app during the Microso Teams call, your peer might see visual
artifacts. This issue occurs because of unstable frame rates, such as incorrect video playback
(frozen or transient black frames). This release includes improved frame rates or sampling rates
that help to reduce visual artifacts. [HDX‑38032]
User Interface
• The Desktop Viewer toolbar might not be visible when you open the virtual desktop from cus‑
tom portal stores. [CVADHELP‑20253]
• When using Citrix Workspace app for Windows with Browser Content Redirection, resizing the
browser window continues even when you release the mouse button. [HDX‑38024]
• Battery status notification and automatic keyboard pop‑up dialog might not appear during the
session when the Automatic keyboard display policy is enabled on the DDC. [HDX‑39558]
• When you plug‑in aa USB device or access files, Citrix Workspace app might show legacy Citrix
Workspace ‑ Security Warning dialog. [LCM‑10369]
© 1999–2023 Cloud Soware Group, Inc. All rights reserved. 61

Citrix Workspace app for Windows
Service Continuity
• Citrix Workspace app launch might fail due to missing lease files resulting in 3002 error. This
release includes the improvement where lease sync completes only when the client syncs all
the lease files present on the server. [RFWIN‑26540]
2205
What’s new
Note:
From this release onward, ensure that the Microso Edge WebView2 Runtime version is 99 or
later. For more information, see System requirements and compatibility.
Change to Citrix Casting
Previously, Citrix Casting was enabled by default during the Citrix Workspace app installation. Start‑
ing from this release, Citrix Casting is enabled only if you run Citrix Workspace app installer with the
/IncludeCitrixCasting command during installation.
When you update Citrix Workspace app, the Citrix Casting gets updated automatically. For more infor‑
mation on Citrix Casting, see Citrix Casting.
Quick access to resources
Starting from this release, you can get quick access to your recently used apps and desktops. Right‑
click on the Citrix Workspace app icon in the taskbar to view and open the recently used resources
from the pop‑up menu.
© 1999–2023 Cloud Soware Group, Inc. All rights reserved. 62

Citrix Workspace app for Windows
Sign out custom web store upon Citrix Workspace app exit
When the signoutCustomWebstoreOnExit attribute is set to True, closing the Citrix Workspace
app signs you out of custom webstores. You can configure the signoutCustomWebstoreOnExit
attribute in Global App Configuration Service.
For more information, see Global App Configuration Service documentation.
Support to open Citrix Workspace app in maximized mode
Starting from this release, you can choose to open the Citrix Workspace app in maximized mode.
Instead of maximizing the Citrix Workspace app manually every time, you can set the maximise
workspace window property in the Global App Configuration Service to enable the Citrix Workspace
app to open in the maximized mode by default.
For more information about the Global App Configuration Service, see Getting Started.
Storebrowse support for Workspace
Citrix Workspace app for Windows now provides Storebrowse support to self‑service that enables
Storebrowse users to access Cloud and Workspace features.
© 1999–2023 Cloud Soware Group, Inc. All rights reserved. 63

Citrix Workspace app for Windows
Note:
• This feature provides Storebrowse support with single sign‑on only.
• The prerequisites mentioned in System requirements and compatibility must be available
to use this feature.
For more information, see Storebrowse for Workspace.
Citrix Enterprise Browser
• This release includes Citrix Enterprise Browser version 99.1.1.8, based on Chromium version 99.
For features or bugs fixes in the Citrix Enterprise Browser, see What’s new in the Citrix Enterprise
Browser documentation.
• Citrix Workspace app now alerts you about closing active browser windows, when you do any
of the following in the Citrix Workspace app:
– Sign out from a store
– Switch to a dierent store
– Add a new store
– Delete the current store
Fixed issues
User interface
• In Citrix Workspace app for Windows, non‑admin users might not be able to disable the Data
Collection setting through the Advanced Preferences dialog. [RFWIN‑26795]
Session/Connection
• When you restart Microso Teams, the existing HdxRtcEngine.exe process might not close and
might start a new process. [HDX‑40006]
• During a peer‑to‑peer call with Microso Teams HDX optimization, app window sharing might
fail to stop aer a high number of start/stop sharing repetitions, and you might not be able to
share desktop screen or app window, call, or receive an incoming call until you restart Citrix
Workspace app. [HDX‑39549]
• During Give Control session with Microso Teams HDX optimization, the remote cursor is drawn
slightly oset from its actual position. [HDX‑36376]
• When you access a VDA for the first‑time using Citrix Workspace app for Windows version 2112
or later, the following security message might appear:
© 1999–2023 Cloud Soware Group, Inc. All rights reserved. 64

Citrix Workspace app for Windows
An Online Application is attempting to access information on a device attached to your
computer HDX File Access.
In previous versions, this message was present only during the first access to each published
resource in a Delivery Group and not every VDA.
[CVADHELP‑19636]
Install, Uninstall, Upgrade
• When you upgrade Citrix Workspace app for Windows, the following extra registry key might be
created:
HKEY_LOCAL_MACHINE\SOFTWARE\WOW6432Node\WOW6432Node\Citrix
The issue occurs when the auto‑update command‑line policy is configured.
The TransparentKeyPassthrough registry value in HKEY_LOCAL_MACHINE\SOFTWARE\
Citrix\ICA Client\Engine\Lockdown Profiles\All Regions\Lockdown\Virtual
Channels\Keyboard isn’t preserved on a 32‑bit machine.
[CVADHELP‑19625]
2204.1
What’s new
Audio redirection enhancement
Improvedaudio echo cancellation support for all audio codecs including Adaptive audio and all legacy
audio codecs.
Citrix Enterprise Browser
This release includes Citrix Enterprise Browser version 98.1.2.20, based on Chromium version 98. For
features or bugs fixes in the Citrix Enterprise Browser, see What’s new in the Citrix Enterprise browser
documentation.
Microso Teams optimization
• App Protection and Microso Teams enhancement: Microso Teams supports incoming
video and screen sharing when Citrix Workspace app for Windows with App Protection enabled
is on Desktop Viewer mode only. Published apps in seamless mode don’t render incoming
video and screen sharing.
© 1999–2023 Cloud Soware Group, Inc. All rights reserved. 65

Citrix Workspace app for Windows
Technical Preview
• Support for an enhanced single sign‑on (SSO) experience for web and SaaS apps
For the complete list of Technical Preview features, see the Features in Technical Preview page.
Fixed issues
Session/Connection
• Citrix ADC appliance might crash when certain conditions are triggered from Citrix Workspace
app for Windows. [HDX‑39683]
• In Citrix Workspace app, you might experience intermittent failures when answering or making
a Microso Teams call. The following error message appears:
Call could not be established.
[HDX‑38819]
• When you try to redirect to the preferred webcam as set in the Citrix Workspace app for Win‑
dows, the setting might not be executed as configured.
With this fix, the preferred webcam will be the only available webcam in the user session. This
provides better control when multiple webcams are available in the user session.
[HDX‑38214]
• If Citrix Workspace app is configured to show apps in Desktop and Start menu shortcut
folder, then launching apps and desktop session from the Desktop or Start menu post Citrix
Workspace app exit might result in failure. [RFWIN‑26508]
• Attempts to add the Citrix Gateway URL might fail intermittently with the following error mes‑
sage:
Authentication Service cannot be contacted.
[CVADHELP‑19415]
• With this fix, you cansetTWITaskbarGroupingModetoGroupNoneeither in HKEY_CURRENT_USER
or HKEY_LOCAL_MACHINE. The TWITaskbarGroupingMode key is available under, for
example, HKEY_LOCAL_MACHINE\SOFTWARE\Citrix\ICA Client\Engine\Lockdown Profiles\All
Regions\Lockdown\Virtual Channels\Seamless Windows. [CVADHELP‑19106]
Install, Uninstall, Upgrade
• When customers use the app personalization service, the Workspace installer might hang while
validating the certificate. [RFWIN‑21122]
© 1999–2023 Cloud Soware Group, Inc. All rights reserved. 66

Citrix Workspace app for Windows
2202
What’s new
Storebrowse support for Workspace [Technical Preview]
Starting from this release, Citrix Workspace app for Windows provides Storebrowse support to Self‑
Service. This enables Storebrowse users to access Cloud and Workspace features.
Note:
• This feature provides Storebrowse support with single sign‑on only.
• The prerequisites mentioned in System requirements and compatibility must be available
to use this feature.
For more information, see Storebrowse for Workspace.
Note:
Technical previews are available for customers to test in their non‑production or limited produc‑
tion environments, and share feedback. Citrix does not accept support cases for feature previews
but welcomes feedback for improving them. Citrix might or might not act on feedback based on
its severity, criticality, and importance. It is advised not to deploy Beta builds in production en‑
vironments.
Citrix Enterprise Browser
For features or bugs fixes in the Citrix Enterprise browser, see What’s new in the Citrix Enterprise
browser documentation.
Note:
The system requirements for Citrix Workspace 2202 for Windows have changed as follows:
• Minimum .NET version required is 4.8.
• Minimum VCRedist version required is 14.30.30704.0.
Fixed issues
Install, Uninstall, Upgrade
• When you upgrade Citrix Workspace app for Windows from Version CU4 to CU5 without
installing self‑service, the following prompt might appear:
Upgrading from Unsupported Version
Citrix Workspace will automatically uninstall your old version and delete all your settings,
which you can restore later. Otherwise you will have to delete everything manually. Click
OK to continue.
© 1999–2023 Cloud Soware Group, Inc. All rights reserved. 67

Citrix Workspace app for Windows
[CVADHELP‑18790]
• Attempt to refresh or launch an app results in the cannot contact store error message. This
issue happens when the retrieval of shortcut description for specific subscribed apps fails.
Your apps are not available at this time. Please try again in a few minutes or contact your help
desk with this information: cannot contact store.
[CVADHELP‑18736]
Session/Connection
• The Print Screen key might not capture screenshots when Citrix Workspace app for Windows
with App Protection enabled starts in the background. [RFWIN‑25835]
• Starting a published application through a PNAgent site on StoreFront using Citrix Workspace
app for Windows might fail with the following error message:
Cannot start app. Please contact your help desk.
[CVADHELP‑19209]
• Launching sessions from Delivery Groups with an access policy rule specifying the client IP ad‑
dress might fail if the client has multiple NICs.
Rule: Set-BrokerAccessPolicyRule -Name <rulename> -includedClientIPs <
Client ip address>
[CVADHELP‑18783]
• Shortcuts for published applications through Citrix Workspace app cannot be created without
appropriate permissions. As a result, the icons might be downloaded in the user profile at every
refresh, increasing the cache size on the endpoints and the CPU consumption in the StoreFront
side. [CVADHELP‑18609]
• Aer you configure a store through Group Policy Object or the command, refreshing the self‑
service UI opened from the notification area or the Start menu might fail. A Cannot contact
server message appears. [CVADHELP‑19242]
• Virtual Desktop prompts you to enter credentials although domain pass‑through is configured.
This issue occurs when you launch a virtual desktop from the Citrix Workspace app. [RFWIN‑
26111]
• In Citrix Workspace app 2112.1, you might experience high CPU utilization on endpoint when
webcam is turned on in an optimized Microso Teams video call. [HDX‑37168]
© 1999–2023 Cloud Soware Group, Inc. All rights reserved. 68

Citrix Workspace app for Windows
Known issues
Known issues in 2309
• You might fail to start sessions if the ICA file or the folder where the ICA file is downloaded
is named with Unicode or non‑English characters. This issue occurs only when you access
and authenticate a store using a browser and then start any app or desktop using native
Citrix Workspace app. To mitigate this issue, we recommend that you continue on the Citrix
Workspace app for Windows for 2307.1 version until a new version is released. [HDX‑55649]
• A jittery movement might be observed in the mouse cursor on Citrix Workspace app when the
Use relative mouse setting is enabled. [CVADHELP‑21829]
• In certain scenarios, when Citrix Workspace app fails to start apps or desktops, you might get
two error messages, where one message appears in a dialog box and the other is a toast notifi‑
cation. [RFWIN‑31561]
• Installation of Citrix Workspace app for Windows version 2309 using the command line might
fail if you’ve included a space character in the store name for the STORE0 parameter. As a
workaround, use the store name without spaces while installation as shown in the following
example:
1 CitrixWorkspaceApp.exe STORE0= “ AppStore;https://sales.example.
com/Citrix/Store/discovery;on;HR AppStore ”
2 <!--NeedCopy-->
[RFWIN‑31704]
Known issues in 2305.1
• You might be prompted to enter proxy credentials each time when you start Citrix Workspace
app. [RFWIN‑26399]
• When you switch from external monitors to a single monitor (for example laptop), the size of
Citrix Workspace app menu options, UI text, and dialog boxes might appear smaller than the
normal display size. [HDX‑47575]
• You might notice a gray screen for a few seconds before the sessions are opened successfully.
This issue occurs for cloud stores. It also occurs for on‑premises stores when the improved vir‑
tual apps desktops launch experience for StoreFront feature, which is in technical preview, is
enabled. [RFWIN‑30327]
• When connecting through Citrix Gateway, if there is high latency, sessions might fail to connect
using EDT and fallback to TCP. If HDX Adaptive Transport policy is set to Diagnostic mode, the
sessions might fail to start. [HDX‑49878]
© 1999–2023 Cloud Soware Group, Inc. All rights reserved. 69

Citrix Workspace app for Windows
Known issues in 2303
• The Citrix Workspace app might stop responding if you have any mouse interaction (mouse ac‑
tion or movements) on the Restore session dialog box. This issue occurs when you start a ses‑
sion aer upgrading from the Citrix Workspace app version 2302–2303 and if there are discon‑
nected sessions previously. [RFWIN‑29663]
Known issues in 2302
• You might not be able to use the Bloomberg Terminal application with the Bloomberg Keyboard
5 or Bloomberg Keyboard 2013. This issue occurs when Citrix Workspace app version 2302 is
installed on your system with the App Protection feature enabled. As a workaround, upgrade to
Citrix Workspace app version 2303 or create the following registry key and reboot the machine:
– Key: HKEY_LOCAL_MACHINE\SYSTEM\CurrentControlSet\Services\epusbfilter
– Value: [DWORD]
– DisableUSBFiltering= 1
[CVADHELP‑22221]
Known issues in 2212
• When the BCRClient.msi cannot be repaired, the following error appears during the Citrix
Workspace app installation:
[HDX‑46964]
• Some SaaS apps which have enhanced security OFF fail to open in Citrix Enterprise Browser if
Citrix Enterprise Browser is the default browser. [CTXBR‑4106]
Known issues in 2210.5
• When you open a published app in seamless mode, other local or seamless apps might appear
in the foreground and cover the published app. [CVADHELP‑20742]
© 1999–2023 Cloud Soware Group, Inc. All rights reserved. 70

Citrix Workspace app for Windows
• With certain older AMD GPU series, purple video content or flashing screens might be seen with
Citrix Workspace app 2206 or newer.
As a workaround, modify the following registry:
– Key: HKLM\SOFTWARE\WOW6432Node\Citrix\ICAClient\Engine\Configuration\Advanced\Modules\GfxRender
– Value: [DWORD]
– ForceVP= 1
[HDX‑46264]
Known issues in 2210
• Desktop Viewer toolbar might cover the screen when the desktop is in normal resolution and
DPI. [HDX‑45206]
• Desktop Viewer toolbar might not appear correctly in the full‑screen mode and displays the
options in an incorrect order. [HDX‑45189]
• The position of the window and size might not be persistent when you reconnect the desktop.
[HDX‑44997]
Known issues in 2209
No new issues have been observed in this release.
Known issues in 2207
No new issues have been observed in this release.
Known issues in 2206
No new issues have been observed in this release.
Known issues in 2205
• In Citrix Workspace app for Windows, the Advanced Audio Coding (AAC) supports only a maxi‑
mum of 6 channels. [CTXBR‑2941]
• When you plug‑in an USB device or access files, Citrix Workspace app might show legacy Citrix
Workspace ‑ Security Warning dialog. [LCM‑10369]
• Battery status notification and automatic keyboard pop‑up dialog might not appear during the
session when Automatic keyboard display policy is enabled on the DDC. [HDX‑39558]
© 1999–2023 Cloud Soware Group, Inc. All rights reserved. 71

Citrix Workspace app for Windows
Known issues in 2204.1
• Citrix Workspace app for Windows installation in oline mode might fail when installer can’t
find Microso Edge WebView2 on your system.
As a workaround, install MicrosoEdgeWebView2RuntimeInstallerX86.exe as an administra‑
tor and then try to install Citrix Workspace app for Windows.
[RFWIN‑26329]
Known issues in 2202
• Fresh install or update operation of Citrix Workspace app might result in delay for about 10–30
mins. For more information, see Knowledge Center article CTX335639. [RFWIN‑25752]
Known issues in 2112.1
• The Print Screen key might not capture screenshots when Citrix Workspace app for Windows
with App Protection enabled starts in the background. [RFWIN‑25835]
• Fresh install or update operation of Citrix Workspace app might result in delay for about 10–30
mins. For more information, see Knowledge Center article CTX335639. [RFWIN‑25752]
• Sign out from Citrix Workspace app for Windows might not succeed when proxy authentication
is enabled. [RFWIN‑24813]
• If you are using Citrix Workspace app on Microso Windows 11 machines, Activity Feed and
Actions tabs might be missing. [WSP‑13311]
• While using the Citrix Enterprise Browser, you can’t take screenshots of unprotected URL win‑
dows even when protected windows are minimized. [CTXBR‑1925]
• If you have enabled Browser Content Redirection, you cannot sign into Google Meet. [HDX‑
34649]
As a workaround:
1. Ensure that https://www.youtube.com/* is available in the Access Control List.
2. Ensure that https://accounts.google.com/* is in the authentication sites list.
3. Sign in to your Google account on any intermediary Google site, for example, YouTube.
4. From the same instance of Google Chrome, launch Google Meet.
• In Citrix Workspace app 2112.1, you might experience high CPU utilization on endpoint when
webcam is turned on in an optimized Microso Teams video call.
As a workaround, create the following registry value on your endpoint:
Computer\HKEY_CURRENT_USER\SOFTWARE\Citrix\HDXMediaStream
Name: UseDefaultCameraConfig
© 1999–2023 Cloud Soware Group, Inc. All rights reserved. 72

Citrix Workspace app for Windows
Type: REG_DWORD
Value: 0
[HDX‑37168]
• In Citrix Workspace app, you might experience intermittent failures when answering or making
a Microso Teams call. The following error message appears:
Call could not be established.
As a workaround, try to re‑establish the Microso Teams call.
[HDX‑38819]
Known issues in 2109.1
No new issues have been observed in this release.
Known issues in 2109
If you’ve installed the Citrix Workspace app with a version earlier than 2109 as a user and the admin
installs version 2109, the Entry point not found error message appears if you log back into the device
as a user. When you click OK, the message disappears and the Citrix Workspace app is updated to
version 2109. [RFWIN‑25008]
If your admin has installed external extensions in Google Chrome, the Citrix Enterprise Browser
crashes when you open it. [CTXBR‑2135]
Known issues in 2108
Sessions fail to launch in the oline mode (Service continuity)on client machines, when the user name
has Cyrillic or in east Asian characters. [RFWIN‑23906]
Known issues in 2107
No new issues have been observed in this release.
Known issues in 2106
• On stores where the Service Continuity feature is enabled, you might not be able to launch re‑
sources. The issue occurs with Unicode users. [RFWIN‑23439]
• Attempt to redirect a webcam using Citrix Workspace app for Windows that is installed on a VDA,
the webcam might fail. [HDX‑28691]
© 1999–2023 Cloud Soware Group, Inc. All rights reserved. 73

Citrix Workspace app for Windows
Known issues in 2105
• During a session, when you click Check for Updates and updates are downloaded successfully,
current sessions aren’t listed in the Download successful dialog. [RFWIN‑23152]
Known issues in 2103.1
• The Self‑Service plug‑in window is blank and no apps are displayed at session launch. The issue
occurs when using the Intel Xe Graphics card and because of limitation from the third‑party.
[CVADHELP‑17005]
• Attempts to compose characters in Japanese, Chinese, or Korean IME might not work properly.
The composition window appears misplaced and isn’t seamless. This issue doesn’t occur when
using virtual apps and desktops sessions and SaaS apps. [RFWIN‑21158]
• Attempts to exit Citrix Workspace app might fail. The issue occurs when the user credentials
prompt appears repeatedly. [RFWIN‑22491]
• Aer creating a desktop shortcut for an app and restarting the client device, the first attempt
to launch the app from the shortcut might fail. The issue occurs when you do not specify the
storedescription when installing Citrix Workspace app using the command‑line interface.
[RFWIN‑22510]
• When you try a peer‑to‑peer call with Microso Teams HDX optimization, calls might fail. This
issue occurs if the VDA version is 2103 or lower and the Citrix Workspace app for Windows is
2103 or higher. This issue is fixed in Virtual Delivery Agent (VDA) 2106.
Known issues in 2102
• Attempts to launch an ICA session might fail. The issue occurs when the proxy server uses port
8080 instead of a custom port. [CVADHELP‑15977]
• In an application session, when you open an image to scan in Microso Paint, both the Microso
Paint applicationand the scanning processmight becomeunresponsive. The issue occurs when
you launch the session in windowed mode. [RFWIN‑21413]
• On machines configured for Azure Active Directory Multifactor Authentication (MFA), the login
prompt appears even when the Keep me signed in and Don’t ask again for 60 days options
are selected. [RFWIN‑21623]
• Attempts to log in to Citrix Workspace app on Azure Active Directory‑joined machines might fail.
The issue occurs when the authentication prompt doesn’t appear. [RFWIN‑21624]
• When you launch a published desktop session, the Self‑Service plug‑in dialog appears in the
foreground. The issue occurs when the Local App Access policy is enabled on the Delivery Con‑
troller. [RFWIN‑21629]
• Attempts to switch windows using the ALT + Tab keys might result in a blank Citrix Workspace
app screen. The issue occurs when you launch the session in windowed mode. [RFWIN‑21828]
© 1999–2023 Cloud Soware Group, Inc. All rights reserved. 74

Citrix Workspace app for Windows
• If you’re using a webcam or a video in a Microso Teams call, the HDXrtcengine.exe might
turn unresponsive. For a workaround, see Knowledge Center article CTX296639. [HDX‑29122]
Known issues in 2012.1
No new issues have been observed in this release.
Known issues in 2012
• If you try to add a protectedapp toyour Favorites, this message might appear, “Your apps aren’t
available at this time” When you then click OK, this message appears, “Cannot add app.” Aer
you switch to the Favorites screen, the protected app is listed there, but you can’t remove it
from Favorites. [WSP‑5497]
• In the Chrome browser with browser content redirection, when you click a link that opens a new
tab, the tab might not open. As a workaround, select Always allow pop‑ups and redirects in
the Pop‑ups blocked message. [HDX‑23950]
• Automatic update of Citrix Workspace app from version 2012 to a later version fails with the
following error message:
Could not load file or assemble Newtonso.Json
The issue occurs only when automatic update is enabled on an admin‑installed instance of the
Citrix Workspace app.
As a workaround, download Citrix Workspace app Version 2012.1 or later from the Citrix Down‑
loads page and install it manually.
[RFWIN‑21715]
• If you launch the app bar and then open the Connection Center menu in Citrix Workspace app
for Windows, the app bar doesn’t appear under the server that hosts it. [HDX‑27504]
• If you use Citrix Workspace app for Windows and launch the app bar in a vertical position, the
bar covers the Start menu or the system tray clock. [HDX‑27505]
Legacy documentation
For product releases that have reached End of Life (EOL), see Legacy documentation.
Third‑party notices
Citrix Workspace app for Windows might include third‑party soware licensed under the terms de‑
fined in the following document:
© 1999–2023 Cloud Soware Group, Inc. All rights reserved. 75

Citrix Workspace app for Windows
Citrix Workspace app for Windows Third‑Party Notices (PDF download)
Features in Technical Preview
November 28, 2023
Features in Technical Preview are available to use in non‑production or limited production environ‑
ments, and to give customers an opportunity to share feedback. Citrix does not accept support cases
for features in technical preview but welcomes feedback for improving them. Citrix might act on feed‑
back based on its severity, criticality, and importance.
Enhanced domain pass‑through for single sign‑on
This feature is in technical preview from 2309 release.
Previously, Citrix Workspace app for Windows supported only SSON or domain pass‑through authen‑
tication for single sign‑on to Citrix Virtual Apps and Desktops environments using user credentials.
This authentication enables the user to authenticate to the domain on their device and use their vir‑
tual apps and desktops without having to reauthenticate again.
For more information on this feature, see
Introducing enhanced domain pass‑through for single sign‑
on – Technical Preview.
This approach of domain pass‑through using user credentials has the following limitations:
• Doesn’t support passwordless authentication with modern authentication methods such as
Windows Hello or FIDO2. An additional component called the Federated Authentication Service
(FAS) is required for single sign‑on (SSO).
• Installation or upgrade of Citrix Workspace app with SSON enabled requires a reboot of the de‑
vice.
• Requires Multi Provider Router (MPR) notifications to be enabled on Windows 11 machines.
• Must be on the top of the list of network providers order.
• With this release, Citrix Workspace app supports enhanced domain pass‑through which is a new
method of SSO. It leverages Kerberos authentication instead of user credentials and helps to
overcome the previously mentioned limitations. Now user can sign in to Citrix Virtual Apps and
Desktops and to StoreFront using integrated windows authentication.
Note: This feature isn’t supported on 32‑bit Windows 10 and on Windows Server 2016.
System requirements:
• Citrix Workspace app 2309 or later
• Citrix Virtual Apps and Desktops 2308 or later
© 1999–2023 Cloud Soware Group, Inc. All rights reserved. 76

Citrix Workspace app for Windows
Supported VDA OS versions:
• For multi‑session:
– Windows Server 2019
– Windows Server 2022
• For single‑session:
– Windows 10 version 22H2
– Windows 11 version 22H2
Prerequisites:
• The client or endpoint must be connected to the domain.
• Requires a direct line of sight of Active Directory.
StoreFront and DDC settings
Setup domain pass‑through environment using the following settings:
Note:
You can skip this step if you have already configured domain pass‑through in your environment.
1. When Citrix Workspace app is configured on the StoreFront:
a) Open StoreFront Studio.
b) Go to Store > *Manage Authentication methods.
c) Enable Domain pass‑through.
Or,
1. When using Citrix Workspace app through the browser:
a) Open StoreFront.
b) Open Stores > Receiver for Websites > Manage Authentication methods.
c) Enable Domain pass‑through.
© 1999–2023 Cloud Soware Group, Inc. All rights reserved. 77

Citrix Workspace app for Windows
2. Enable Remote Credential Guard mode policy on DDC.
3. Click OK.
VDA settings
1. Navigate to Computer Configuration\Administrative Templates\System\Credentials Dele‑
gation on VDA.
© 1999–2023 Cloud Soware Group, Inc. All rights reserved. 78

Citrix Workspace app for Windows
2. Enable Remote host allows delegation of non‑exportable credentials windows policy on
VDA.
3. Reboot the VDA machine.
Client settings
1. Ensure that the client machine is domain joined.
2. Ensue that the client machine is 64‑bit.
3. Open Group Policy Editor.
4. Navigate to Computer Configuration\Administrative Templates\Citrix Components\Citrix
Workspace\User Authentication.
5. Configure the Enable Remote Credential Guard group policy.
© 1999–2023 Cloud Soware Group, Inc. All rights reserved. 79

Citrix Workspace app for Windows
6. Modify the Internet Options settings on the client.
Note:
You can skip this step if you have already configured the domain pass‑through in your environ‑
ment.
1. Add the StoreFront server to the list of trusted sites using Internet Options. To add:
a) Open Internet Options from the Control Panel > Network and Internet.
b) Click Security > Local Intranet and click Sites.
c) The Local Intranet window appears.
d) Click the Advanced tab.
e) Add the URL of the StoreFront FQDN with the appropriate HTTP or HTTPS protocols.
f) Click Close and OK.
2. Modify the User Authentication settings in Internet Explorer. To modify:
3. Open Internet Options from the Control Panel > Network and Internet.
© 1999–2023 Cloud Soware Group, Inc. All rights reserved. 80

Citrix Workspace app for Windows
4. Click Security tab > Local Intranet.
5. Click Custom level. The Security Settings – Local Intranet Zone window appears.
6. In the User Authentication pane, select Automatic logon with current user name and pass‑
word.
7. Click OK.
You can provide feedback on this feature via the Podio form.
Introducing new installer for Citrix Workspace app
This feature is in technical preview from 2309 release.
The user interface of the Citrix Workspace app installer is revamped to give a modern, easy outlook,
and a better user experience. By default, the new installer is disabled.
Prerequisites
• .Net 6. For more information, see .NET requirements.
• Minimum 2 GB RAM
The following table provides details on the required disk space to install the Citrix Workspace app.
Installation type Required disk space
Fresh installation 1 GB
Upgrade 1 GB
To use the new installer, enable it using Registry Editor or Command Line before Citrix Workspace app
installation.
Using Registry Editor:
1. Launch the registry editor.
2. Navigate to the following:
© 1999–2023 Cloud Soware Group, Inc. All rights reserved. 81

Citrix Workspace app for Windows
In a 64‑bit machine:
Computer\HKEY_LOCAL_MACHINE\SOFTWARE\WOW6432Node\Citrix
Or
In a 32‑bit machine:
Computer\HKEY_LOCAL_MACHINE\SOFTWARE\Citrix
3. Create a String Value key newInstallFlow and set it to “TRUE”.
Using command line:
Open the command prompt and type:
1 Citrixworkspaceapp.exe /NewInstaller
2 <!--NeedCopy-->
User interface based installation
You can install Citrix Workspace app for Windows by manually running the CitrixWorkspaceApp.exe
installer package.
1. Launch the CitrixWorkspaceApp.exe file.
The system verifies the prerequisites required for Citrix Workspace app and if requires, installs
it automatically.
Aer installing the prerequisites, the Welcome to Citrix Workspace Installer screen appears.
2. Click Continue. The Citrix License Agreement page appears.
3. Read and accept the Citrix License Agreement and continue with the installation. Citrix
Workspace app installation continues and successfully completes.
© 1999–2023 Cloud Soware Group, Inc. All rights reserved. 82

Citrix Workspace app for Windows
Important:
In the new Citrix Workspace app for Windows installer UI, users don’t have the options to Enable
single sign‑on and to Start the App Protection aer installation. However, admins can con‑
figure these features by passing command‑line options to the installer. For more information on
command line options, see the following links:
• Single sign‑on
• App Protection
You can provide feedback on this feature via the Podio form.
Support for EDT Lossy protocol
This feature is in technical preview from 2309 release.
The audio redirection is supported over the EDT Lossy protocol. This feature increases the user expe‑
rience for real‑time streaming.
You need to use VDA version 2308 or later version.
By default this feature is disabled.
To enable EDT Lossy, configure the following registry value and restart the machine.
For Citrix Workspace app for Windows:
• Key: HKEY_LOCAL_MACHINE\SOFTWARE\WOW6432Node\Citrix\ICA Client\Engine\Configuration\Advanced\Modules\ClientAudio
• Value name: EdtUnreliableAllowed
© 1999–2023 Cloud Soware Group, Inc. All rights reserved. 83

Citrix Workspace app for Windows
• Value type: REG_SZ
• Value data: 1
For Multi‑session VDA:
• Key: HKEY_LOCAL_MACHINE\SOFTWARE\WOW6432Node\Citrix\Audio
• Value name: EdtUnreliableAllowed
• Value type: DWORD
• Value data: 1
For Workstation VDA,
• Key: HKEY_LOCAL_MACHINE\SOFTWARE\Citrix\Audio
• Value name: EdtUnreliableAllowed
• Value type: DWORD
• Value data: 1
You can provide feedback on this feature via the Podio form.
Client App Management for WebEx plug‑in
This feature is in technical preview from 2303 release.
Starting with the 2303 version, download, install, and auto‑update of the WebEx plug‑in is supported
and handled the same way as the Zoom plug‑ins. The following Global App Configuration setting
needs to be onboarded for the store/account to use this feature:
1 {
2
3 "serviceURL":
4 {
5
6 "url": "https://storefront.acme.com:443"
7 }
8 ,
9 "settings":
10 {
11
12 "description": "Install and update plugins",
13 "name": "Install and update plugins",
14 "useForAppConfig": true,
15 "appSettings":
16 {
17
18 "windows":
19 [
© 1999–2023 Cloud Soware Group, Inc. All rights reserved. 84

Citrix Workspace app for Windows
20 {
21
22 "assignedTo":
23 [
24 "AllUsersNoAuthentication"
25 ],
26 "category": "AutoUpdate",
27 "settings":
28 [
29 {
30
31 "name": "Auto Update plugins settings",
32 "value":
33 [
34 {
35
36 "pluginId": "C03BAE37-F3AC-4D63-8
BC1-3C9CD2BC9E8D",
37 "pluginName": "WebEx VDI
AutoUpgrade Plugin",
38 "pluginSettings":
39 {
40
41 "delayGroup": "Fast",
42 "deploymentMode": "
InstallAndUpdate",
43 "detectRule": "UpgradeCode:{
44 AA2AACDC-D30B-433F-A602-3E25975010A6 }
45 ",
46 "isBlocking": false,
47 "isFTU": false,
48 "maximumAllowedVersion": "
3.1.0.24263",
49 "minimumAllowedVersion": "0.0.0
",
50 "stream": "Current",
51 "upgradeToLatest": true
52 }
53
54 }
55
56 ]
57 }
58
59 ],
© 1999–2023 Cloud Soware Group, Inc. All rights reserved. 85

Citrix Workspace app for Windows
60 "userOverride": false
61 }
62
63 ]
64 }
65
66 }
67
68 }
69
70
71 <!--NeedCopy-->
You can provide feedback on this feature via the Podio form.
Quick Launch of Disconnected Desktops
This feature is in technical preview from 2209 release.
By enabling this feature, you can open your previously disconnected desktops instantly. Once this
feature is enabled, Citrix Workspace app launches the disconnected sessions in hidden mode. The
session is instantly presented as soon as you launch the desktop.
You can register for this technical preview by using the Podio form.
© 1999–2023 Cloud Soware Group, Inc. All rights reserved. 86

Citrix Workspace app for Windows
Local App Protection
This feature is in technical preview from 2210 release.
App Protection oers enhanced security to defend our customers against Keyloggers, accidental and
malicious screen capture at endpoints. Currently, App Protection capabilities are only oered for
Workspace resources. With Local App Protection, App Protection capabilities are extended to local
apps on endpoints. Starting with Citrix Workspace app 2210 for Windows, App Protection can be ap‑
plied to local apps on Windows devices.
You can register for this technical preview by using this Podio form.
Support for an enhanced single sign‑on (SSO) experience for web and SaaS apps
This feature is in technical preview from 2204.1 release.
This feature simplifies the configuration of SSO for internal web apps and SaaS apps while using third‑
party identity providers (IdPs). The enhanced SSO experience reduces the entire process to a few
commands. It eliminates the mandatory prerequisite to configure Citrix Secure Private Access in the
IdP chain to set up SSO. It also improves the user experience, provided the same IdP is used for au‑
thentication to both the Citrix Workspace app and the particular web or SaaS app being launched.
You can register for this technical preview by using this Podio form.
Technical Preview to General Availability (GA)
Service or feature General availability version
Improved virtual apps and desktops launch
experience
2309
Sustainability initiative from Citrix Workspace
app
2309
System requirements and compatibility
October 7, 2023
© 1999–2023 Cloud Soware Group, Inc. All rights reserved. 87

Citrix Workspace app for Windows
Requirements
Hardware requirements
• Minimum 2 GB RAM.
• The following table provides details on the required disk space to install the Citrix Workspace
app.
Installation type Required disk space
Fresh installation 1 GB
Upgrade 1 GB
Note:
– The installer does the check on the disk space only aer extracting the installation
package.
– When the system is low on disk space during a silent installation, the dialog does not
appear but the error message is recorded in the CTXInstall\\_TrolleyExpress
-\*.log.
Soware requirements
• Microso Edge WebView2 Runtime version 117 or later
• .NET Framework 4.8 and .NET Desktop Runtime 6.0.20
• Latest version of Microso Visual C++ Redistributable
Microso Edge WebView2 requirements
• Citrix Workspace app is packaged with the Evergreen Bootstrapper version of Microso Edge
WebView2 Runtime.
• Citrix Workspace app installer can install Microso Edge WebView2 Runtime during the Citrix
Workspace app installation. However, for this installation, you must be connected to internet.
Alternatively, you can install the suitable oline Microso Edge WebView2 Runtime Evergreen
Standalone Installer package before installing Citrix Workspace app.
• The device must have access to the following URLs:
– https://*.dl.delivery.mp.microsoft.com to download Microso Edge WebView2
Runtime during the Citrix Workspace app installation. For more information, see Allow list
for Microso Edge endpoints.
© 1999–2023 Cloud Soware Group, Inc. All rights reserved. 88

Citrix Workspace app for Windows
– https://msedge.api.cdp.microsoft.com to check for Microso Edge WebView2
Runtime update
– Internet connection
– The device must have access to the following URLs:
Note:
When you try to install or upgrade Citrix Workspace app with non‑administrator privileges and
Microso Edge WebView2 Runtime isn’t present, the installation stops with the following mes‑
sage:
‘You must be logged on as an administrator to install the following prerequisite packages:
Edge Webview 2 Runtime’
.NET requirements
Prerequisites
• .NET Framework 4.8 and x86 version of.NET Desktop Runtime 6.0.20. You must install the x86
version even on x64 system.
• In case of installing .NET as part of Citrix Workspace app installation, ensure internet connec‑
tion.
• Administrator privileges
Note:
The installation fails when you try to install or upgrade Citrix Workspace app with non‑
administrator privileges and .NET Framework 4.8 and .NET Desktop Runtime 6.0.20 aren’t
present on the system.
Installation methods
© 1999–2023 Cloud Soware Group, Inc. All rights reserved. 89

Citrix Workspace app for Windows
.NET version How to deploy it?
Citrix Workspace app 1904 or later requires
.NET Framework 4.8. Along with .NET
Framework 4.8, Citrix Workspace app 2309 or
later requires the x86 version of.NET Desktop
Runtime 6.0 for both x86 and x64 systems.
Method 1: Citrix Workspace app installs .NET
Framework 4.8 and the latest version of.NET
Desktop Runtime 6.0 along with the app
installation. This installation is an online install
and requires internet connectivity. The device
must have access to the
downloadplugins.citrix.com domain
URL.
Method 2: For Devices that don’t have internet
connectivity, admins have an option to
download an oline installer for Citrix
Workspace app available at the Downloads
page. Also, the administrator can install this
requirements using a deployment method, for
example, SCCM.
Method 3: Admins can install .NET Framework
4.8 and .NET Desktop Runtime 6.0 from the
Microso site separately before installing Citrix
Workspace app. It is recommended to
download the latest version of .NET Desktop
Runtime 6.0 (6.0.20 or later).
Microso Visual C++ Redistributable requirements
Citrix Workspace app requires the latest version of Microso Visual C++ Redistributable.
Note:
Citrix recommends that you use the latest version of Microso Visual C++ Redistributable. Oth‑
erwise, a restart prompt might appear during an upgrade.
Starting with Version 1904, Microso Visual C++ Redistributable installer is packaged with the Citrix
Workspace app installer. During Citrix Workspace app installation, the installer checks whether the
Microso Visual C++ Redistributable package is present on the system and installs it if necessary.
Note:
If Microso Visual C++ Redistributable package doesn’t exist on your system, Citrix Workspace
app installation with non‑administrator privileges might fail.
© 1999–2023 Cloud Soware Group, Inc. All rights reserved. 90

Citrix Workspace app for Windows
Only an administrator can install the Microso Visual C++ Redistributable package.
For troubleshooting issues with the .NET Framework or the Microso Visual C++ Redistributable in‑
stallation, see Citrix Knowledge Center article CTX250044.
Connectivity requirements
Feature flag management
If an issue occurs with Citrix Workspace app in production, use feature flags and a third‑party service
called LaunchDarkly to disable an aected feature dynamically in Citrix Workspace app even aer the
feature is shipped.
You do not need to make any configurations to enable traic to LaunchDarkly, except when you have a
firewall or proxy blocking outbound traic. In that case, you enable traic to LaunchDarkly via specific
URLs or IP addresses, depending on your policy requirements.
You can enable traic to the following URLs:
• events.launchdarkly.com
• stream.launchdarkly.com
• clientstream.launchdarkly.com
• Firehose.launchdarkly.com
• mobile.launchdarkly.com
If you must list IP addresses in an allow list, for a list of all current IP address ranges, see LaunchDarkly
public IP list. You can use this list to know that your firewall configurations are updated automatically
in keeping with the infrastructure updates. For details about the status of the infrastructure changes,
see the LaunchDarkly Status page.
LaunchDarkly system requirements
Verify if the apps can communicate with the following services if you have split tunneling on the Citrix
ADC set to OFF for the following services:
• LaunchDarkly service
• APNs listener service
Disabling LaunchDarkly service
You can disable the LaunchDarkly service by using a Group Policy Object (GPO) policy.
1. Open the Citrix Workspace app Group Policy Object administrative template by running
gpedit.msc.
2. Under the Computer Configuration node, go to Administrative Templates > Citrix Compo‑
nents > Citrix Workspace > Compliance.
© 1999–2023 Cloud Soware Group, Inc. All rights reserved. 91

Citrix Workspace app for Windows
3. Select Disable sending data to 3rd party policy and set it to Enabled.
4. Click Apply and OK.
Ports
For information on the required ports, see Common Citrix Communication Ports.
Compatibility matrix
Citrix Workspace app is compatible with all the currently supported versions of Citrix Virtual Apps and
Desktops, Citrix DaaS (formerly Citrix Virtual Apps and Desktops service), and Citrix Gateway as listed
in the Citrix Product Lifecycle Matrix.
Note:
• The Citrix Gateway End‑Point Analysis Plug‑in (EPA) is supported on Citrix Workspace. On
the native Citrix Workspace app, it’s supported only when using nFactor authentication.
For more information, see Configure pre‑auth and post‑auth EPA scan as a factor in nFactor
authentication in the Citrix ADC documentation.
• Citrix Workspace app installation on Windows is supported only when the customers have
mainstream or extended support from Microso.
• Citrix Workspace app for Windows is supported only in emulator mode on the Windows
ARM64 operating system.
• Once a Windows 10 version reaches End of Service that version is no longer serviced or sup‑
ported by the Microso. Citrix supports running its soware only on an operating system
that its manufacturer supports. For information about Windows 10 End of Service, see Mi‑
croso’s Windows Lifecycle Fact Sheet.
Citrix Workspace app for Windows is compatible with the following Windows Operating Systems:
Operating system
Windows 11
Windows 10 Enterprise (32‑bit and 64‑bit Editions). For more information about compatible
Windows 10 versions, see Windows 10 Compatibility with Citrix Workspace app for Windows.
Windows 10 Enterprise (2016 LTSB 1607, LTSC 2019)
Windows 10 (Home edition*, Pro)
Windows Server 2022
Windows Server 2019
Windows Server 2016
© 1999–2023 Cloud Soware Group, Inc. All rights reserved. 92

Citrix Workspace app for Windows
*No support for domain pass‑through authentication, Desktop Lock, FastConnect API, and configura‑
tions that require domain‑joined Windows machine.
Windows 10 or 11 Compatibility with Citrix Workspace app for Windows
The following table lists the Windows 10 version number and the corresponding compatible Citrix
Workspace app for Windows release/s.
Windows 10 Version number Build number Citrix Workspace app Version
22H2 19045 2206 and later
21H2 19044 2112.1 and later
21H1 19043.928 2106 and later
20H2 19042.508 2012 and later
2004 19041.113 2006.1 and later
1909 18363.418 1911 and later
1903 18362.116 1909 and later
1809 17763.107 1812 and later
1803 17134.376 1808 and later
Note:
Windows 10 versions are compatible with mentioned Citrix Workspace app versions only. For
example, Windows 10 Version 21H1 isn’t compatible with the version earlier than 2106.
The following table lists the Windows 11 version number and the corresponding compatible Citrix
Workspace app for Windows releases.
Windows 11 Version number Build number Citrix Workspace app Version
22H2 22621 2209 and later
21H2 22000 2109.1 and later
Install and uninstall
December 4, 2023
© 1999–2023 Cloud Soware Group, Inc. All rights reserved. 93

Citrix Workspace app for Windows
You can download Citrix Workspace app from the Download page of Citrix or from your company’s
download page (if available).
You can install the package by:
• Running an interactive Windows‑based installation wizard.
Or
• Typing the installer file name, installation commands, and installation properties using
the command‑line interface. For information about installing Citrix Workspace app using
command‑line interface, see Using command‑line parameters.
Note:
Verify that you have installed all the required system requirements, as mentioned at System re‑
quirements section.
Installation with administrator and non‑administrator privileges:
Both users and administrators can install Citrix Workspace app. Administrator privileges are required
only when using pass‑through authentication, single sign‑on, App Protection, and Citrix Ready
workspace hub with Citrix Workspace app for Windows..
The following table describes the dierences when Citrix Workspace app is installed as an administra‑
tor or a user:
Installation folder Installation type
Administrator For 64‑bit: C:\Program Files
(x86)\Citrix\ICA Client and for
32‑bit: C:\Program
Files\Citrix\ICA Client
Per‑system installation
User %USERPROFILE%\AppData\Local\Citrix\ICA
Client
Per‑user installation
Note:
Administrators can override the user‑installed instance of Citrix Workspace app and continue
with the installation successfully.
Command to cleanup and install Citrix Workspace app
Use the CleanInstall command to cleanup any leover traces such as files and registry values from
a previous uninstall and then freshly install the new version of the Citrix Workspace app.
© 1999–2023 Cloud Soware Group, Inc. All rights reserved. 94

Citrix Workspace app for Windows
For example:
1 CitrixWorkspaceApp.exe /CleanInstall
2 <!--NeedCopy-->
User interface based installation
You can install Citrix Workspace app for Windows by manually running the CitrixWorkspaceApp.
exe installer package.
1. Launch the CitrixWorkspaceApp.exe file and click Start.
2. Read and accept the EULA and continue with the installation.
3. When installing on a domain‑joined machine with administrator privileges, a single sign‑on di‑
alog appears. For more information, see Domain pass‑through authentication.
4. When installing with administrator privileges, if required to enable the App Protection feature
immediately aer the installation, select the Start App Protection aer installation check box.
5. Follow the Windows‑based installer to complete the installation.
© 1999–2023 Cloud Soware Group, Inc. All rights reserved. 95
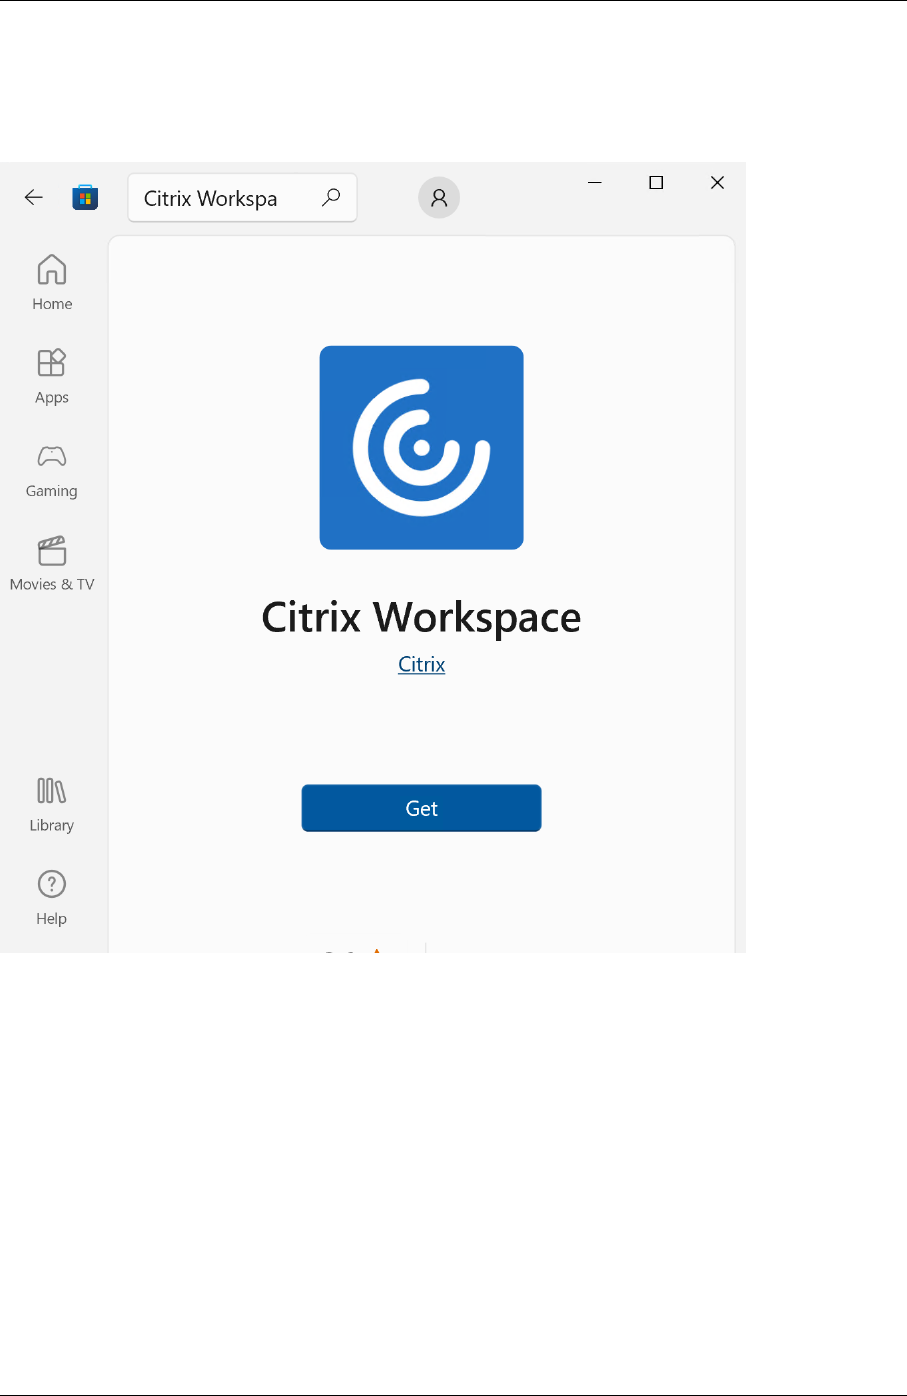
Citrix Workspace app for Windows
Using Windows Store
1. Navigate to Microso Store.
2. Search for Citrix Workspace.
1. Click Get. Citrix Workspace app is installed.
Command‑line based installation
You can customize the Citrix Workspace app installer by specifying dierent command‑line options.
The installer package self‑extracts to the system temp directory before launching the setup program.
The space requirement includes program files, user data, and temp directories aer launching several
applications.
To install the Citrix Workspace app using the Windows command line, launch the command prompt
and type the following on a single line:
© 1999–2023 Cloud Soware Group, Inc. All rights reserved. 96

Citrix Workspace app for Windows
• installer file name,
• installation commands, and
• installation properties
The available installation commands and properties are as follows:
CitrixWorkspaceApp.exe [commands] [properties]
List of command‑line parameters
The parameters are broadly classified as follows:
• Common parameters
• Update parameters
• Install parameters
• HDX features parameters
• Preferences and user interface parameters
• Authentication parameters
Common parameters
Command
Description
? Or help Lists all the installation commands and
properties.
/silent Disables installation dialogs and prompts
during installation.
noreboot Suppresses the prompts to reboot during
installation. When you suppress the reboot
prompt, USB devices that are in a suspended
state aren’t recognized. The USB devices are
activated only aer the device is restarted.
forceinstall This switch is eective when cleaning up any
existing configuration or entries of Citrix
Workspace app in the system. Use this switch
when upgrading from an unsupported version
of Citrix Workspace app version and when the
installation or upgrade is unsuccessful.
© 1999–2023 Cloud Soware Group, Inc. All rights reserved. 97

Citrix Workspace app for Windows
Note:
The forceinstall switch is the replacement for the rcu switch. The rcu switch is deprecated
as of Version 1909. For more information, see Deprecation.
Auto‑update parameters
Detect available update
• Command: AutoUpdateCheck
• Description: This command indicates that Citrix Workspace app detectswhen an update is avail‑
able.
The possible values are the following:
AutoUpdateCheck command
values Description Example
Auto (default) You’re notified when an
update is available.
CitrixWorkspaceApp.exe
AutoUpdateCheck=auto.
Manual You aren’t notified when an
update is available. Check for
updates manually.
CitrixWorkspaceApp.exe
AutoUpdateCheck=
manual
Disabled Disables auto‑updates. CitrixWorkspaceApp.exe
AutoUpdateCheck=
disabled.
Note:
The AutoUpdateCheck is a mandatory parameter that you must set to configure other parame‑
ters like AutoUpdateStream, DeferUpdateCount, AURolloutPriority.
Select the version for update
• CommandAutoUpdateStream
• Description ‑ If you have enabled auto‑update, you can choose the version you want to update.
See Lifecycle Milestones for more information.
The possible values are the following:
© 1999–2023 Cloud Soware Group, Inc. All rights reserved. 98

Citrix Workspace app for Windows
AutoUpdateStream command
value Description Example
LTSR Auto‑updates to Long Term
Service Release cumulative
updates only.
CitrixWorkspaceApp.exe
AutoUpdateStream=LTSR.
Current Auto‑updates to the latest
version of Citrix Workspace
app.
CitrixWorkspaceApp.exe
AutoUpdateStream=
Current
Defer notifications for update
• Command: DeferUpdateCount
• Description: Indicates the number of times that you can defer notifications when an update is
available. For more information, see Citrix Workspace Updates.
The possible values are the following:
DeferUpdateCount command
value Description Example
‑1(default) Allows deferring notifications
any number of times
CitrixWorkspaceApp.exe
DeferUpdateCount=-1
0 Indicates that you receive one
notification (only) for every
available update. Doesn’t
remind you again about the
update.
CitrixWorkspaceApp.exe
DeferUpdateCount=0
Any other number ‘n’ ‑ Allows deferring notification
‘n’ number of times. The
Remind me later option is
displayed in the ‘n’ count.
CitrixWorkspaceApp.exe
DeferUpdateCount=<n>
Note:
Starting with Citrix Workspace app for Windows version 2207, the auto‑update feature is im‑
proved and the DeferUpdatCount parameter in not applicable.
Set rollout priority
• Command: AURolloutPriority
© 1999–2023 Cloud Soware Group, Inc. All rights reserved. 99

Citrix Workspace app for Windows
• Description: When a new version of the app is available, Citrix rolls out the update for a specific
delivery period. With this parameter, you can control at what time during the delivery period
you can receive the update.
The possible values are the following:
AURolloutPriority command
value Description Example
Auto (default) You receive the updates
during the delivery period as
configured by Citrix.
CitrixWorkspaceApp.exe
AURolloutPriority=
Auto
Fast You receive the updates at the
beginning of the delivery
period.
CitrixWorkspaceApp.exe
AURolloutPriority=
Fast
Medium You receive the updates at the
mid‑delivery period.
CitrixWorkspaceApp.exe
AURolloutPriority=
Medium
Slow You receive the updates at the
end of the delivery period.
CitrixWorkspaceApp.exe
AURolloutPriority=
Slow
Store configuration parameters
Configure store
• Command: ALLOWADDSTORE
• Description: Allows you to configure the stores (HTTP or https) based on the specified parame‑
ter.
The possible values are the following:
ALLOWADDSTORE command
value Description Example
S(default) Allows you to add or remove
secure stores only (configured
with HTTPS).
CitrixWorkspaceApp.exe
ALLOWADDSTORE=S
© 1999–2023 Cloud Soware Group, Inc. All rights reserved. 100

Citrix Workspace app for Windows
ALLOWADDSTORE command
value Description Example
A Allows you to add or remove
both secure stores (HTTPS)
and non‑secure stores
(HTTP). Not applicable if
Citrix Workspace app is
per‑user installed.
CitrixWorkspaceApp.exe
ALLOWADDSTORE=A
N Never allow users to add or
remove their own store.
CitrixWorkspaceApp.exe
ALLOWADDSTORE=N
Save the store credentials locally
• Command: ALLOWSAVEPWD
• Description: Allows you to save the store credentials locally. This parameter applies only to
stores using the Citrix Workspace app protocol.
The possible values are the following:
ALLOWSAVEPWD command
value Description Example
‑ S(default) Allows saving the password
for secure stores only
(configured with HTTPS).
CitrixWorkspaceApp.exe
ALLOWSAVEPWD=S
N Does not allow saving the
password.
CitrixWorkspaceApp.exe
ALLOWSAVEPWD=N
A Allows saving the password
for both secure stores
(HTTPS) and non‑secure
stores (HTTP).
CitrixWorkspaceApp.exe
ALLOWSAVEPWD=A
Examples of store configuration using command‑line installation
To specify the StoreFront store URL:
1 CitrixWorkspaceApp.exe /silent
2 STORE0="AppStore;https://testserver.net/Citrix/MyStore/discovery;on;HR
App Store
3
© 1999–2023 Cloud Soware Group, Inc. All rights reserved. 101

Citrix Workspace app for Windows
4 <!--NeedCopy-->
To specify the Citrix Gateway store URL:
1 CitrixWorkspaceApp.exe STORE0= HRStore;https://ag.mycompany.com#
Storename;On;Store
2 <!--NeedCopy-->
Where, Storename indicates the name of the store that needs to be configured.
Note:
• In a multi‑store setup, only one Citrix Gateway store URL configuration is allowed and that
must be first in the list (parameter STORE0).
• The Citrix Gateway store URL configured using this method does not support the PNA Ser‑
vices Sites that are using Citrix Gateway.
• The “Discovery” parameter is not required when specifying a Citrix Gateway store URL.
To configure multiple stores:
1 CitrixWorkspaceApp.exe STORE0= NetScaler Store;https://ag.mycompany.
com#Storename;On;NetScaler Store
2 STORE1="StoreFront Store;https://testserver.net/Citrix/MyBackupStore/
discovery;on; StoreFrontStore
3 <!--NeedCopy-->
Note:
• It’s mandatory to include discovery in the store URL for successful pass‑through authen‑
tication.
• The Citrix Gateway store URL must be the first entry in the list of configured store URLs.
Install parameters
Start App Protection
• Command: startAppProtection
• Description: Start App Protection component and provides enhanced security by restricting the
ability of clients to be compromised by keylogging and screen‑capturing malware.
• Example: CitrixWorkspaceApp.exe startAppProtection
For more information, see App Protection.
Note:
The startAppProtection switch is the replacement for the includeAppProtection switch.
© 1999–2023 Cloud Soware Group, Inc. All rights reserved. 102

Citrix Workspace app for Windows
The includeAppProtection switch is deprecated as of Version 2212. For more information,
see Deprecation.
Exclude Citrix Enterprise Browser binaries
• Command: InstallEmbeddedBrowser
• Description: Excludes the Citrix Enterprise Browser binaries.
• Example: Run the InstallEmbeddedBrowser=N switch to exclude the embedded browser fea‑
ture.
You can exclude the Citrix Enterprise Browser binaries only in the following cases:
• Fresh install
• Upgrade from a version that doesn’t include the Citrix Enterprise Browserbinaries.
If your version of Citrix Workspace app includes the Citrix Enterprise Browser binaries and you are
upgrading to Version 2002, the Citrix Enterprise Browser binaries are automatically updated during
the upgrade.
Specify custom installation directory
• Command: INSTALLDIR
• Description: Specifies the custom installation directory for Citrix Workspace app installation.
The default path is C:\Program Files\Citrix.
• Example: CitrixWorkspaceApp.exe INSTALLDIR=C:\custom path\Citrix.
Note:
The Program Files folder is protected by the operating system. If you want to use a custom folder
other than Program Files, ensure that the folder has the right permission and it is protected.
Install one or more of the specific components
• Command: ADDLOCAL
• Description: Use the ADDLOCAL key to install one or more of the specific components of the Cit‑
rix Workspace app. Using this key, if you install any specific components, the Citrix Workspace
app installs all the mandatory components by default.
Note:
We recommended you to use the ADDLOCAL key only if you want to install any of the specific
components of Citrix Workspace app. By default, if no ADDLOCAL parameter is specified, all the
supported components are installed while installing the Citrix Workspace app.
The following table lists the components that the ADDLOCAL key supports:
© 1999–2023 Cloud Soware Group, Inc. All rights reserved. 103

Citrix Workspace app for Windows
ADDLOCAL key Component Name Description
ReceiverInside Receiver Provides workspace SDK
services to the Self‑service
plug‑in.
ICA_Client HDX Engine This component handles the
ICA file or session launch
process.
BCR_Client BCR client Plug‑in to handle browse
content redirection.
USB USB Client Plug‑in to take care of the
USB redirection.
DesktopViewer Desktop Viewer Client UI framework for virtual
desktop.
AM AuthManager Authentication Manager ‑
Authorizes user to Citrix
Workspace app.
SSON SSON ingle sign‑on component –
Supports single sign‑on.
SELFSERVICE Self‑service Plug‑in for the Citrix
Workspace for native launch.
WebHelper Web Helper Helper to connect browser
with native workspace app.
WorkspaceHub Win Docker Provides a way to expand a
user’s workspace, making
mirroring or extending local
display wirelessly.
CitrixEnterpriseBrowser Browser Native browser that enables
users to open web or SaaS
apps from Citrix Workspace
app in a secure manner.
For example, using the following command, you can install the components mentioned in the com‑
mand:
1 CitrixWorkspaceapp.exe ADDLOCAL=ReceiverInside,ICA_Client,BCR_Client,
USB,DesktopViewer,AM,SSON,SelfService,WebHelper,WorkspaceHub,
CitrixEnterpriseBrowser
© 1999–2023 Cloud Soware Group, Inc. All rights reserved. 104

Citrix Workspace app for Windows
2 <!--NeedCopy-->
Note:
Starting with version 2212, the App Protection feature is installed by default. As a result,
AppProtection is no longer a valid option for ADDLOCAL.
Install Citrix Casting
• Command: IncludeCitrixCasting
• Description: Installs Citrix Casting during installation.
For more information on Citrix Casting, see Citrix Casting.
HDX features parameters
Set bidirectional content redirection
• Command: ALLOW_BIDIRCONTENTREDIRECTION
• Description: Indicates if bidirectional content redirection between the client and the host is
enabled. For more information, see the Bidirectional content redirection policy settings section
in the Citrix Virtual Apps and Desktops documentation.
The possible values are the following:
ALLOW_BIDIRCONTENTREDIRECTION
command value Description Example
0 (default) Indicates that the
bidirectional content
redirection is disabled.
CitrixWorkspaceApp.exe
ALLOW_BIDIRCONTENTREDIRECTION
=0
1 Indicates that the
bidirectional content
redirection is enabled.
CitrixWorkspaceApp.exe
ALLOW_BIDIRCONTENTREDIRECTION
=1
Set local app access
• Command: FORCE_LAA
• Description: Indicates that Citrix Workspace app is installed with the client‑side Local App Ac‑
cess component. Install the workspace app with administrator privileges for this component
to work. For more information, see the Local App Access section in the Citrix Virtual Apps and
© 1999–2023 Cloud Soware Group, Inc. All rights reserved. 105

Citrix Workspace app for Windows
Desktops documentation.
The possible values are the following:
FORCE_LAA command value Description Example
0 (default) Indicates that the Local App
Access component isn’t
installed.
CitrixWorkspaceApp.exe
FORCE_LAA =0
1 Indicates that the client‑end
Local App Access component
is installed.
CitrixWorkspaceApp.exe
FORCE_LAA =1
Set URL redirection feature on the user device
• Command: ALLOW_CLIENTHOSTEDAPPSURL
• Description: Enables the URL redirection feature on the user device. For more information, see
the Local App Access section in the Citrix Virtual Apps and Desktops documentation.
The possible values are the following:
ALLOW_CLIENTHOSTEDAPPSURL
command value Description Example
0 (default) Disables the URL redirection
feature on the user device.
CitrixWorkspaceApp.exe
ALLOW_CLIENTHOSTEDAPPSURL
=0
1 Enables the URL redirection
feature on the user devices.
CitrixWorkspaceApp.exe
ALLOW_CLIENTHOSTEDAPPSURL
=1
Display icons for documents or files
• Command: LEGACYFTAICONS
• Description: Specifies if you want to display icons for documents or files that have file type as‑
sociation with subscribed applications.
The possible values are the following:
© 1999–2023 Cloud Soware Group, Inc. All rights reserved. 106

Citrix Workspace app for Windows
LEGACYFTAICONS command
value Description Example
False (default) Display icons for documents
or files that have file type
associations with subscribed
applications. When set to
false, the operation system
generates an icon for the
document that doesn’t have a
specific icon assigned to it.
The icon generated by the
operation system is a generic
icon overlaid with a smaller
version of the application
icon.
CitrixWorkspaceApp.exe
LEGACYFTAICONS=False
True Doesn’t display icons for
documents or files that have
file type associations with
subscribed applications.
CitrixWorkspaceApp.exe
LEGACYFTAICONS=True
Preference and user interface parameters
Specify the directory for the shortcuts on the Start menu and desktop
command value Description Directory name Example
CitrixWorkspaceApp
.exe
STARTMENUDIR
Specifies the
directory for the
shortcuts in the Start
menu.
By default,
applications appear
under Start > All
Programs. You can
specify the relative
path of the shortcuts
in the Programs
folder.
To place shortcuts
under Start > All
Programs >
Workspace, specify
STARTMENUDIR=
Workspace.
© 1999–2023 Cloud Soware Group, Inc. All rights reserved. 107

Citrix Workspace app for Windows
command value Description Directory name Example
CitrixWorkspaceApp
.exe DESKTOPDIR
Specifies the
directory for
shortcuts on the
Desktop.
You can specify the
relative path of the
shortcuts.
To place shortcuts
under Start > All
Programs >
Workspace, specify
DESKTOPDIR=
Workspace.
Note:
When using the DESKTOPDIR option, set the PutShortcutsOnDesktop key to True.
Control access to the self‑service
• Command: SELFSERVICEMODE
• Description: Controls access to the self‑service Citrix Workspace app user interface.
The possible values are the following:
SELFSERVICEMODE
command value Description Example
True Indicates that the user has
access to the self‑service user
interface.
CitrixWorkspaceApp.exe
SELFSERVICEMODE=True
False Indicates that the user does
not have access to the
self‑service user interface.
CitrixWorkspaceApp.exe
SELFSERVICEMODE=False
Control session pre‑launch
• Command: ENABLEPRELAUNCH
• Description: Controls session pre‑launch. For more information, see Application launch time.
The possible values are the following:
© 1999–2023 Cloud Soware Group, Inc. All rights reserved. 108

Citrix Workspace app for Windows
ENABLEPRELAUNCH
command value Description Example
True Indicates that session
pre‑launch is enabled.
CitrixWorkspaceApp.exe
ENABLEPRELAUNCH=True
False Indicates that session
pre‑launch is disabled.
CitrixWorkspaceApp.exe
ENABLEPRELAUNCH=False
Hide Shortcuts and Reconnect option
• Command: DisableSetting
• Description: Hides the Shortcuts and Reconnect option from being displayed in the Advanced
Preferences sheet. For more information, see Hiding specific settings from the Advanced Pref‑
erences sheet.
The possible values are the following:
DisableSetting command
value Description Example
0 (default) Displays both Shortcuts and
Reconnect options in the
Advanced Preferences sheet.
CitrixWorkspaceApp.exe
DisableSetting=0
1 Displays only the Reconnect
option in the Advanced
Preferences sheet.
CitrixWorkspaceApp.exe
DisableSetting=1
2 Displays only the Shortcuts
option in the Advanced
Preferences sheet.
CitrixWorkspaceApp.exe
DisableSetting=2
3 Both Shortcuts and
Reconnect options are
hidden from the Advanced
Preferences sheet.
CitrixWorkspaceApp.exe
DisableSetting=3
Enable Customer Experience Improvement Program
• Command: EnableCEIP
• Description: Indicates your participation in the Customer Experience Improvement Program
(CEIP). For more information, see CEIP.
© 1999–2023 Cloud Soware Group, Inc. All rights reserved. 109

Citrix Workspace app for Windows
The possible values are the following:
EnableCEIPcommand value Description Example
True (default) Opt in to the Citrix Customer
Improvement Program (CEIP)
CitrixWorkspaceApp.exe
EnableCEIP=True
False Opt out of the Citrix Customer
Improvement Program
CitrixWorkspaceApp.exe
EnableCEIP=False
Enable always‑on tracing
• Command: EnableTracing
• Description: Controls the Always‑on tracing feature.
The possible values are the following:
EnableTracing command
value Description Example
True (default) Enables the Always‑on
tracing feature.
CitrixWorkspaceApp.exe
EnableTracing=true
False Disables the Always‑on
tracing feature.
CitrixWorkspaceApp.exe
EnableTracing=false
Specify the name to identify the user device
• Command: CLIENT_NAME
• Description: Specifies the name used to identify the user device to the server.
• <ClientName> ‑ Specifies the name used identify the user device on the server. The default
name is %COMPUTERNAME%.
• Example: CitrixReceiver.exe CLIENT_NAME=%COMPUTERNAME%.
Set client name same as the computer name
• Command: ENABLE_DYNAMIC_CLIENT_NAME
• Description: Allows the client name to be the same as the computer name. When you change
the computer name, the client name changes too.
The possible values are the following:
© 1999–2023 Cloud Soware Group, Inc. All rights reserved. 110

Citrix Workspace app for Windows
ENABLE_DYNAMIC_CLIENT_NAME
command value Description Example
Yes (default) Allows the client name to be
the same as the computer
name.
CitrixWorkspaceApp.exe
ENABLE_DYNAMIC_CLIENT_NAME
=Yes
No Does not allow the client
name to be the same as the
computer name. Specify a
value for the CLIENT_NAME
property.
CitrixWorkspaceApp.exe
ENABLE_DYNAMIC_CLIENT_NAME
=No
Authentication parameters
Include single sign‑on
• Command: /includeSSON
• Description: Requires you to install as an administrator. Indicates that the Citrix Workspace
app is installed with the single sign‑on component. See Domain pass‑through authentication
for more information.
• Example: CitrixWorkspaceApp.exe /includeSSON
Note:
The includeSSON command supports only fresh installation of Citrix Workspace app.
Enable single sign‑on
• Command: ENABLE_SSON
• Description: Enables single sign‑on when the Citrix Workspace app is installed with the
/includeSSON command. For more information, see Domain pass‑through authentication.
The possible values are the following:
ENABLE_SSON command
value Description Example
Yes (default) Indicates that single sign‑on
is enabled.
CitrixWorkspaceApp.exe
ENABLE_SSON=Yes
No Indicates that a single sign‑on
is disabled.
CitrixWorkspaceApp.exe
ENABLE_SSON=No
© 1999–2023 Cloud Soware Group, Inc. All rights reserved. 111

Citrix Workspace app for Windows
Uninstall Citrix Workspace app
Uninstall using Windows‑based uninstaller
You can uninstall Citrix Workspace app for Windows from the Control Panel. For more information,
see the Uninstall Citrix Workspace app for Windows section.
Note:
During Citrix Workspace app installation, you get a prompt to uninstall the Citrix HDX RTME pack‑
age. Click OK to continue the uninstallation.
Uninstall using the command‑line interface
You can uninstall Citrix Workspace app, from a command line by typing the following command:
1 CitrixWorkspaceApp.exe uninstall
2 <!--NeedCopy-->
For silent uninstallation of Citrix Workspace app, run the following switch:
1 CitrixWorkspaceApp.exe /silent uninstall
2 <!--NeedCopy-->
Note:
Citrix Workspace app installer doesn’t control GPO related registry keys, so they are kept aer
uninstallation. If you find any entries, update them using gpedit or delete them manually.
Troubleshooting
Error codes
• For installer related error codes, see MsiExec.exe and InstMsi.exe error messages.
• For system related error codes, see System error codes.
Installer log location
By default, the installer logs are located at the following location:
© 1999–2023 Cloud Soware Group, Inc. All rights reserved. 112

Citrix Workspace app for Windows
Installation log folder Installation type
Administrator For 64‑bit: C:\Program Files
(x86)\Citrix\Logs and for
32‑bit: C:\Program
Files\Citrix\ICA Client
Per‑system installation
User %USERPROFILE%\AppData\Local\Citrix\LogsPer‑user installation
Troubleshooting
Error codes
• For installer related error codes, see MsiExec.exe and InstMsi.exe error messages.
• For system related error codes, see System error codes.
Installer log location
By default, the installer logs are located at the following location:
Installation log folder Installation type
Administrator For 64‑bit: C:\Program Files
(x86)\Citrix\Logs and for
32‑bit: C:\Program
Files\Citrix\ICA Client
Per‑system installation
User %USERPROFILE%\AppData\Local\Citrix\LogsPer‑user installation
Reset Citrix Workspace app
Resetting Citrix Workspace app restores the default settings.
The following items are reset when you reset Citrix Workspace app:
• All the configured accounts and stores.
• Apps delivered by the self‑service plug‑in, their icons, and registry keys.
• File type associations created by the self‑service plug‑in.
• Cached files and saved passwords.
• Per‑user registry settings.
• Per‑machine installations, and their registry settings.
• Citrix Gateway registry settings for Citrix Workspace app.
© 1999–2023 Cloud Soware Group, Inc. All rights reserved. 113

Citrix Workspace app for Windows
Run the following command from the command line interface to reset the Citrix Workspace app:
1 "C:\Program Files (x86)\Citrix\ICA Client\SelfServicePlugin\CleanUp.exe
" -cleanUser
2 <!--NeedCopy-->
For silent reset, use the following command:
1 "C:\Program Files (x86)\Citrix\ICA Client\SelfServicePlugin\CleanUp.exe
" /silent -cleanUser
2 <!--NeedCopy-->
Note:
Use uppercase U in the parameter.
Resetting Citrix Workspace app does not impact the following:
• Citrix Workspace app or plug‑in installation.
• Per‑machine ICA lockdown settings.
• Group policy object (GPO) administrative template configurations for Citrix Workspace app.
Deploy
October 7, 2023
You can deploy the Citrix Workspace app in the following methods:
• Use ActiveDirectory and sample startup scriptsto deploy the Citrix Workspace app for Windows.
For information about Active Directory, see Using Active Directory and sample scripts.
• Before launching workspace for web, install the Citrix Workspace app for Windows. For more
information, see Using workspace for web.
• Use an Electronic Soware Distribution (ESD) tool like the Microso System Center Configura‑
tion Manager 2012 R2. For more information, see Using System Center Configuration Manager
2012 R2.
• Use Microso Endpoint Manager (Intune). For more information, see Deploy Citrix Workspace
app in Microso Endpoint Manager (Intune).
Using Active Directory and sample scripts
You can use Active Directory Group Policy scripts to deploy Citrix Workspace app based on your or‑
ganizational structure. Citrix recommends using the scripts rather than extracting the .msi files. For
general information about startup scripts, see the Microso documentation.
© 1999–2023 Cloud Soware Group, Inc. All rights reserved. 114

Citrix Workspace app for Windows
To use the scripts with Active Directory:
1. Create the Organizational Unit (OU) for each script.
2. Create a Group Policy Object (GPO) for the newly created OU.
For information on creating OU in an Azure Active Directory, see Create an Organizational Unit (OU) in
an Azure Active Directory Domain Services managed domain.
Edit scripts
Edit the scripts with the following parameters in the header section of each file:
• Current Version of package ‑ The specified version number is validated and if it isn’tpresented,
the deployment proceeds. For example, set DesiredVersion= 3.3.0.XXXX toexactlymatch
the version specified. If you specify a partial version, for example, 3.3.0, it matches any version
with that prefix (3.3.0.1111, 3.3.0.7777, and so on).
• Package Location/Deployment directory ‑ This specifies the network share containing the Cit‑
rix Workspace app installer packages and is not authenticated by the script. The shared folder
must have Read permission set to EVERYONE.
• Script Logging Directory ‑ The network share where the install logs are copied and the ones
that script didn’t authenticate. The shared folder must have Read and Write permissions for
EVERYONE.
• Package Installer Command Line Options‑ These command‑line options are passed to the
installer. For the command‑line syntax, see Using command‑line parameters.
Scripts
Citrix Workspace app installer includes the sample of both per‑computer and per‑userscripts to install
and uninstall Citrix Workspace app. The scripts are present in the Citrix Workspace app for Windows
Downloads page.
Deployment type To deploy To remove
Per‑computer CheckAndDeployWorkspacePerMachineStartupScript
.bat
CheckAndRemoveWorkspacePerMachineStartupScript
.bat
Per‑user CheckAndDeployWorkspacePerUserLogonScript
.bat
CheckAndRemoveWorkspacePerUserLogonScript
.bat
To add the startup scripts:
1. Open the Group Policy Management Console.
2. Select Computer Configuration or User Configuration > Policies > Windows Settings >
© 1999–2023 Cloud Soware Group, Inc. All rights reserved. 115

Citrix Workspace app for Windows
Scripts.
3. In the right‑hand pane of the Group Policy Management Console, select Logon.
4. Select Show Files, copy the appropriate script to the folder displayed, and close the dialog.
5. In the Properties menu, click Add and Browse to find and add the newly created script.
To deploy Citrix Workspace app for Windows:
1. Move the user devices assigned to receive this deployment to the OU that you created.
2. Reboot the user device and log on.
3. Verify that the newly installed package is listed in the Program and Features.
To remove Citrix Workspace app for Windows:
1. Move the user devices chosen for removal to the OU you created.
2. Reboot the user device and log on.
3. Verify that the newly installed package isn’t listed in the Program and Features.
Using workspace for web
The workspace for a web enables you to access StoreFront stores through a browser using a webpage.
Before connecting to an app from a browser, do the following:
1. Install the Citrix Workspace app for Windows.
2. Deploy the Citrix Workspace app from workspace for web
If workspace for web detects that a compatible version of Citrix Workspace app isn’t present, a prompt
appears. The prompt shows that you must download and install Citrix Workspace app for Windows.
Note:
The workspace for the web does not support email‑based account discovery.
Use the following configuration to prompt for the server address only.
1. Download CitrixWorkspaceApp.exe to your local computer.
2. Rename CitrixWorkspaceApp.exeto CitrixWorkspaceAppWeb.exe.
3. Deploy the renamed executable using your regular deployment method. If you use StoreFront,
see Configure StoreFront using the configuration files in the StoreFront documentation.
Using System Center Configuration Manager 2012 R2
You can use Microso System Center Configuration Manager (SCCM) to deploy Citrix Workspace app.
You can deploy the Citrix Workspace app using the SCCM using the following four parts:
1. Adding Citrix Workspace app to the SCCM deployment
2. Adding distribution points
© 1999–2023 Cloud Soware Group, Inc. All rights reserved. 116

Citrix Workspace app for Windows
3. Deploying the Citrix Workspace app to the soware center
4. Creating Device Collections
Adding Citrix Workspace app to the SCCM deployment
1. Copy the downloaded Citrix Workspace app installation folder to a folder on the Configuration
Manager server and launch the Configuration Manager console.
2. Select Soware Library > Application Management. Right‑click Application and click Create
Application.
The Create Application wizard appears.
3. In the General pane, select Manually specify the application information and click Next.
4. In the General Information pane, specify the application information, such as Name, Manu‑
facturer, Soware version.
5. In the Application Catalog wizard, specify additional information such as Language, Applica‑
tion name, User category and so on and click Next.
Note:
Users can see the information that you specify here.
6. In the Deployment Type pane, click Add to configure the deployment type for Citrix Workspace
app setup.
The Create Deployment Type wizard appears.
7. In the General pane: Set the deployment type to Windows Installer (*.msi file), select Manually
specify the deployment type information, and click Next.
8. In the General Information pane: Specify deployment type details (For example: Workspace
Deployment) and click Next.
9. In the Content pane:
a) Provide the path where the Citrix Workspace app setup file is present. For example: Tools
on SCCM server.
b) Specify Installation program as one of the following:
• CitrixWorkspaceApp.exe /silent for default silent installation.
• CitrixWorkspaceApp.exe /silent /includeSSON to enable domain pass‑
through.
• CitrixWorkspaceApp.exe /silent SELFSERVICEMODE=false to install Citrix
Workspace app in non‑Self Service Mode.
c) Specify Uninstall program as CitrixWorkspaceApp.exe /silent /uninstall (to
enable uninstallation through SCCM).
© 1999–2023 Cloud Soware Group, Inc. All rights reserved. 117

Citrix Workspace app for Windows
10. In the Detection Method pane: Select Configure rules to detect the presence of this deploy‑
ment type and click Add Clause.
The Detection Rule dialog appears.
• Set Setting Type to File System.
• Under Specify the file or folder to detect the application, set the following:
– Type – From the drop‑down menu, select File.
– Path – %ProgramFiles(x86)%\Citrix\ICA Client\Receiver\
– File or folder name – receiver.exe
– Property – From the drop‑down menu, select Version
– Operator ‑ From the drop‑down menu, select Greater than or equal to
– Value ‑ Type version number of the current Citrix Workspace app
Note:
This rule combination applies to Citrix Workspace app for Windows upgrades as well.
11. In the User Experience pane, set:
• Installation behavior ‑ Install for system
• Logon requirement ‑ Whether a user is logged on
• Installation program visibility ‑ Normal
Click Next.
Note:
Do not specify any requirements and dependencies for this deployment type.
12. In the Summary pane, verify the settings for this deployment type. Click Next.
A success message appears.
13. In the Completion pane, a new deployment type (Workspace Deployment) is listed under the
Deployment types.
14. Click Next and click Close.
Add distribution points
1. Right‑click Citrix Workspace app in the Configuration Manager console and select Distribute
Content.
The Distribute Content wizard appears.
2. In the Content Distribution pane, click Add > Distribution Points.
The Add Distribution Points dialog appears.
3. Browse to the SCCM server where the content is available and clicks OK.
© 1999–2023 Cloud Soware Group, Inc. All rights reserved. 118

Citrix Workspace app for Windows
In the Completion pane, a success message appears
4. Click Close.
Deploy Citrix Workspace app to the soware center
1. Right‑click Citrix Workspace app in the Configuration Manager console select Deploy.
The Deploy Soware wizard appears.
2. Select Browse against Collection (can be Device Collection or User Collection) where the appli‑
cation is to be deployed and click Next.
3. In the Deployment Settings pane, set Action to Install and Purpose to Required (enables unat‑
tended installation). Click Next.
4. In the Scheduling pane, specify the schedule to deploy the soware on target devices.
5. In the User Experience pane, set the User notifications behavior; select Commit changes at
deadline or during a maintenance window (requires restart) and click Next to complete the
Deploy Soware wizard.
In the Completion pane, a success message appears.
Reboot the target endpoint devices (required only to start installation immediately).
On endpoint devices, Citrix Workspace app is visible in the SowareCenterunder AvailableSoware.
Installation is triggered automatically based on the configured schedule. You can also schedule or
install on demand. The installation status is displayed in the Soware Center aer the installation
starts.
Creating device collections
1. Launch the Configuration Manager console and click Assets and Compliance > Overview >
Devices.
2. Right‑click Device Collections and select Create Device Collection.
The Create Device Collection wizard appears.
3. In the General pane, type the Name for the device and click Browse to select the limiting col‑
lection.
This determines the scope of devices, which can be one the default Device Collections created
by SCCM.
Click Next.
4. In the Membership Rules pane, click Add Rule for filtering the devices.
The Create Direct Membership Rule wizard appears.
© 1999–2023 Cloud Soware Group, Inc. All rights reserved. 119

Citrix Workspace app for Windows
• In the Search for Resources pane, select the Attribute name based on the devices you
want to filter and provide the Value for Attribute name to select the devices.
5. Click Next. In the Select Resources pane, select the devices that are required to be part of the
device collection.
In the Completion pane, a success message appears.
6. Click Close.
7. In the Membership rules pane, a new rule is listed under Click Next.
8. In the Completion pane, a success message appears. Click Close to complete the Create Device
Collection wizard.
The new device collection is listed in Device Collections. The new device collection is a part of
the Device Collections while browsing in the
Deploy Soware
wizard.
Note:
Configuring Citrix Workspace app using SCCM might fail when the MSIRESTARTMANAGERCON‑
TROL attribute is set to False.
As per our analysis, Citrix Workspace app for Windows is not the cause of this failure. Also, retry‑
ing might yield successful deployment.
Deploy Citrix Workspace app in Microso Endpoint Manager (Intune)
To deploy Citrix Workspace app – native Win 32 app in Microso Endpoint Manager (Intune), do the
following:
1. Create the following folders:
• A folder to store all the source files required for the installation, for example, C:\
CitrixWorkspace_Executable.
• A folder for the output file. Output files are in .intunewin file, for example, C:\
Intune_CitrixWorkspaceApp.
• A folderfor the Microso Win32 Content Prep Tool, for example, C:\Intune_WinAppTool
. This tool helps to convert the installation files into the .intunewin format. You can
download the packaging tool from Microso‑Win32‑Content‑Prep‑Tool.
2. Convert all the source files that are needed for the installation to a .intunewin file:
a) Launch the command prompt and go to the folder, where the Microso Win32 Content
Prep Tool exists, for example, C:\Intune_WinAppTool.
b) Run the IntuneWinAppUtil.exe command.
c) On the prompt, enter the following information:
© 1999–2023 Cloud Soware Group, Inc. All rights reserved. 120

Citrix Workspace app for Windows
• Source folder: C:\CitrixWorkspace_Executable
• Setup file: CitrixWorkspaceApp.exe
• Output folder: C:\Intune_CitrixWorkspaceApp
The .intunewin file is created.
3. Add the package to Microso Endpoint Manager (Intune):
a) Open the Microso Endpoint Manager (Intune) console: https://endpoint.
microsoft.com/##home.
Note:
The following instruction can be performed only on https://endpoint.
microsoft.com/##home. You can also add the package through https://
portal.azure.com.
b) Click Apps > Windows app and then click +Add.
c) Select Windows app (Win 32) from the App type drop‑down list.
d) Click App package file, locate the CitrixWorkspaceApp.intunewin file, and then click OK.
e) Click App information and fill in the mandatory information, Name, Description, and Pub‑
lisher and then click OK.
f) Click Program, enter the following information, and click OK:
• Install command: CitrixWorkspaceApp.exe /silent
• Uninstall command: CitrixWorkspaceApp.exe /uninstall
• Install behavior: System
g) Click Requirement, enter the required information, and then click OK.
Note:
Select both x64 and x32 from the Operating System Architecture list. Operating Sys‑
tem version can be anything with Win 1607 and later.
h) Click Detection rules, select Manually configure detection rules as the Rules format,
and then click OK.
i) Click Add, select the required Rule type, and then click OK.
• If Rule type is File then the path can be, for example, C:\Program Files (x86)\
Citrix\ICA Client\wfica32.exe.
• If Rule type is Registry, then enter HKEY_CURRENT_USER\Software\Citrix as
Path and Key exists as the Detection method.
j) Click Return codes, check if the default return codes are valid and then click OK.
k) Click Add to add the app to Intune.
© 1999–2023 Cloud Soware Group, Inc. All rights reserved. 121

Citrix Workspace app for Windows
4. Verify if the deployment is successful:
a) Click Home > Apps > Windows.
b) Click Device install status.
Device status displays the number of devices where Citrix Workspace app is installed.
Store configuration
November 16, 2023
Store
This article is a reference document to help you set up your environment aer you install Citrix
Workspace app.
A store aggregates available applications and desktops for a user into a single place. A user can
have multiple stores and switch across stores as needed. An admin delivers the store url that has
pre‑configured resources and settings. You can access these stores through the Citrix Workspace app.
Types of stores
You can add the following store types in the Citrix Workspace app: Workspace, StoreFront, Citrix Gate‑
way Store, and Custom web store.
Workspace
Citrix Workspaceis a cloud‑basedenterpriseapp store that provides secureand unified access toapps,
desktops, and content (resources) from anywhere, on any device. These resources can be Citrix DaaS,
content apps, local and mobile apps, SaaS and Web apps, and browser apps. For more information,
see Citrix Workspace Overview.
StoreFront
StoreFront is an on‑premises enterprise app store that aggregates applications and desktops from
Citrix Virtual Apps and Desktops sites into a single easy‑to‑use store for users.
For more information, see StoreFront documentation.
© 1999–2023 Cloud Soware Group, Inc. All rights reserved. 122

Citrix Workspace app for Windows
Citrix Gateway Store
Configure Citrix Gateway to enable users to connect from outside the internal network. For example,
users who connect from the Internet or from remote locations.
Custom web stores
This feature provides access to your organization’s custom web store from the Citrix Workspace app
for Windows. To use this feature, the admin must add the domain or custom web store to the Global
App Configuration Service allowed URLs.
For more information about configuring web store URLs for end‑users, see Global App Configuration
Service.
You can provide the custom web store URL in the Add Account screen in Citrix Workspace app. The
custom web store opens in the native Citrix Workspace app window.
To remove the custom web store, go to Accounts > Add or Remove accounts, select the custom web
store URL, and click Remove.
Adding store URL to Citrix Workspace app
You can provide users with the account information that they need to access virtual desktops and
applications using the following:
• Providing users with account information to enter manually
• Configuring email‑based account discovery
• Adding store through CLI
• Provisioning file
• Using the Group Policy Object administrative template
Provide users with account information to enter manually
Upon successful installation of Citrix Workspace app, the following screen appears. Users are required
to enter an email or server address to access the apps and desktops. When a user enters the details
for a new account, Citrix Workspace app tries to verify the connection. If successful, Citrix Workspace
app prompts the user to log on to the account.
© 1999–2023 Cloud Soware Group, Inc. All rights reserved. 123
Citrix Workspace app for Windows
To enable users to set up accounts manually, be sure to distribute the information required to connect
to their virtual desktops and applications.
• To connect to a Workspace store, provide the Workspace URL.
• To connect to a StoreFront store, provide the URL for that server. For example:https://
servername.company.com.
• To connect through Citrix Gateway, firstdetermine whether a user must see all configured stores
or just the store with remote access enabled for a particular Citrix Gateway.
– To present all configured stores: Provide users with the Citrix Gateway fully qualified do‑
main name.
– To limit access to a particular store: Provide users with the Citrix Gateway fully qualified
domain name and the store name in the form:
CitrixGatewayFQDN?MyStoreName:
For example, if a store named “SalesApps” has remote access enabled for server1.com and
a store named HRApps has remote access enabled for server2.com, a user must enter:
*
server1.com?SalesApps to access SalesApps or
*
server2.com?HRApps to access HRApps.
© 1999–2023 Cloud Soware Group, Inc. All rights reserved. 124

Citrix Workspace app for Windows
CitrixGatewayFQDN?MyStoreName feature requires a new user to create an account by
entering a URL and isn’t available for email‑based discovery.
Once the Citrix Workspace app is configured with the Store URL, the account can be managed from
the Accounts option in the profile menu.
On client machines configured for proxy authentication, if the proxy credentials aren’t stored in the
Windows Credential Manager, an authentication prompt appears, asking you to enter the proxy cre‑
dentials. Citrix Workspace app then saves the proxy server credentials in Windows Credential Man‑
ager
. This results in a seamless login experience because you don’t need to manually save your cre‑
dentials in Windows Credential Manager before accessing Citrix Workspace app.
Configure email‑based account discovery
When you configure Citrix Workspace app for email‑based account discovery, users enter their email
address rather than a server URL during initial Citrix Workspace app installation and configuration.
Citrix Workspace app determines the Citrix Gateway or StoreFront Server associated with the email
address based on Domain Name System (DNS) Service (SRV) records. The app then prompts the user
to log on to access virtual desktops and applications.
To configure email‑based account discovery for Citrix Workspace stores, see Getting started in the
Global App Configuration Service documentation.
To configure email‑based account discovery for Citrix StoreFront or Citrix Gateway stores, see Config‑
uring email‑based account discovery.
Adding store through CLI
Install Citrix Workspace app for Windows as an administrator using the command‑line interface.
© 1999–2023 Cloud Soware Group, Inc. All rights reserved. 125

Citrix Workspace app for Windows
For more information, see List of command‑line parameters.
Provide users with provisioning files
StoreFront provides provisioning files that users can open to connect to stores.
You can use StoreFront to create provisioning files that include connection details for accounts. Make
these files available to your users to enable them to configure Citrix Workspace app automatically.
Aer installing Citrix Workspace app, users simply open the file to configure Citrix Workspace app.
If you configure workspace for web, users can also get Citrix Workspace app provisioning files from
those sites.
Formore information, see To export store provisioningfiles for users in the StoreFront documentation.
Using the Group Policy Object Administrative Template
To add or specify a Citrix StoreFront or Gateway using the Group Policy Object administrative tem‑
plate:
1. Open the Citrix Workspace app Group Policy Object administrative template by running gpedit
.msc.
2. Under the Computer Configuration node, go to Administrative Templates > Classic Admin‑
istrative Templates (ADM) > Citrix Components > Citrix Workspace > StoreFront.
3. Select Citrix Gateway URL/StoreFront Accounts List.
4. Select Enabled option and click Show. If you enable this policy setting, you can enter a list of
StoreFront Accounts and NetScaler Gateway URL.
5. Enter the URL in the Value field.
6. Specify the store URL that is used with the Citrix Workspace app:
STOREx="storename;http[s]://servername.domain/IISLocation/discovery;[On
, Off]; [storedescription]"
Values:
• x ‑ Integers 0 through 9 used to identify a store.
• storename ‑ Name of the store. This value must match the name configured on the Store‑
Front server.
• servername.domain ‑ The fully qualified domain name of the server hosting the store.
• IISLocation ‑ the path to the store within IIS. The store URL must match the URL in the
StoreFront provision file. The store URL is in the following format /Citrix/store/discovery.
To get the URL, export a provisioning file from StoreFront, launch it in Notepad and copy
the URL from the Address element.
© 1999–2023 Cloud Soware Group, Inc. All rights reserved. 126

Citrix Workspace app for Windows
• [On, O] ‑ The O option lets you deliver disabled stores, giving users the choice of whether
they access them. When the store status isn’t specified, the default setting is On.
• storedescription ‑ Description of the store, such as HR App Store.
7. Add or specify the Citrix Gateway URL. Enter the name of the URL, delimited by a semi‑colon:
Example: STORE0= HRStore;https://ag.mycompany.com##Storename;On;Store
Where #Store name is the name of the store behind Citrix Gateway.
Note:
• The Citrix Gateway store URL must be first in the list (parameter STORE0).
• In a multi‑store setup, only one Citrix Gateway store URL configuration is allowed.
• The Citrix Gateway store URL configured using this method does not support the PNA Ser‑
vices Sites that are using Citrix Gateway.
• The /Discovery parameter is not required when specifying a Citrix Gateway store URL.
Starting with Version 1808, changes made to the Citrix Gateway URL/StoreFront Account List policy
are applied in a session aer app restart. A reset isn’t required.
Note:
Citrix Workspace app Version 1808 and later doesn’t require resetting on a fresh installation. If
there’s an upgrade to 1808 or later, you must reset the Citrix Workspace app for the changes to
take eect.
Limitations:
• Citrix Gateway URL must be listed first followed by StoreFront URLs.
• No support for Multiple Citrix Gateway URLs.
Note:
Users can also access the store via a web browser. Users can log in to the Citrix Store from a web
browser and launch a virtual app or desktop from the web. The virtual app or desktop launch
leverages the capabilities of the natively installed Citrix Workspace app.
In this case, it may be desirable to hide the Add Account prompt from users. This can be achieved
via the following setting:
• Renaming Citrix execution file: Rename the CitrixWorkspaceApp.exe to Citrix‑
WorkspaceAppWeb.exe to alter the behavior of Add Account dialog. When you rename
the file, the Add Account dialog is not displayed from the Start menu.
• Group Policy Object administrative template: To hide the Add Account option from
the Citrix Workspace app installation wizard, disable EnableFTUpolicy under Self‑Service
node in Local Group Policy Object administrative template as shown below. This is a
per‑machine setting, hence the behavior is applicable for all users.
© 1999–2023 Cloud Soware Group, Inc. All rights reserved. 127

Citrix Workspace app for Windows
Domain Name Service name resolution
You can configure Citrix Workspace app for Windows that uses the Citrix XML Service to request a
Domain Name Service (DNS) name for a server instead of an IP address.
Important:
Unless your DNS environment is configured specifically to use this feature, Citrix recommends
that you do not enable DNS name resolution on the server.
By default, DNS name resolution is disabled on the server and enabled on the Citrix Workspace app.
When DNS name resolution is disabled on the server, any Citrix Workspaceapp request for a DNS name
returns an IP address. There’s no need to disable DNS name resolution on Citrix Workspace app.
To disable DNS name resolution for specific user devices:
If your server deployment uses DNS name resolution and you experience issues with specific user
© 1999–2023 Cloud Soware Group, Inc. All rights reserved. 128

Citrix Workspace app for Windows
devices, you can disable DNS name resolution for those devices.
Caution:
Using the Registry Editor incorrectly might cause serious problems that require you to reinstall
the operating system. We do not guarantee that problems resulting from the incorrect use of
the Registry Editor can be solved. Use the Registry Editor at your own risk. Back up the registry
before you edit it.
1. Add a string registry key xmlAddressResolutionType to HKEY\\_LOCAL\\_MACHINE\
Software\Wow6432Node\Citrix\ICA Client\Engine\Lockdown Profiles\All
Regions\Lockdown\Application Browsing.
2. Set the value to IPv4‑Port.
3. Repeat for each user of the user devices.
Connect
Citrix Workspace app provides users with secure, self‑service access to virtual desktops and applica‑
tions, and on‑demand access to Windows, web, and Soware as a Service (SaaS) applications. Citrix
StoreFront or legacy webpages created with Web Interface manage the user access.
To connect to resources using the Citrix Workspace UI
The Citrix Workspace app home page displays virtual desktops and applications that are available to
the users based on their account settings (that is, the server they connect to) and settings configured
by Citrix Virtual Apps and Desktops or Citrix DaaS administrators. Using the Preferences > Accounts
page, you can configure the URL of a StoreFront server or, if email‑based account discovery is config‑
ured, by entering the email address.
Aer connecting to a store, the self‑service shows the tabs: Favorites, Desktops, and Apps. To launch
a session, click the appropriate icon. To add an icon to Favorites, click the … icon and select Add to
favorites.
StoreFront to Workspace URL Migration
StoreFront to Workspace URL migration enables you to seamlessly migrate your end users from a
StoreFront store to Workspace store with minimal user interaction.
Consider, all your end users have a StoreFront store storefront.com added totheir Citrix Workspace
app. As an administrator, you can configure a StoreFront URL to Workspace URL Mapping {‘store‑
front.com’:’xyz.cloud.com’} in the Global App Configuration Service. The Global App Config Service
© 1999–2023 Cloud Soware Group, Inc. All rights reserved. 129

Citrix Workspace app for Windows
pushes the setting to all Citrix Workspace app instances, on both managed and unmanaged devices,
that have the StoreFront URL storefront.com added.
Once the setting is detected, Citrix Workspace app adds the mapped Workspace URL xyz.cloud.
com as another store. When the end user launches the Citrix Workspace app, the Citrix Workspace
store opens. The previously added StoreFront store storefront.com remains added to the Citrix
Workspace app. Users can always switch back to the StoreFront store storefront.com using the
Switch Accounts option in the Citrix Workspace app. Admins can control the removal of the Store‑
Front store storefront.com from the Citrix Workspace app at the users’ end points. The removal
can be done through the global app config service.
To enable the feature, do the following steps:
1. Configure StoreFront to Workspace mapping using the Global App Config Service. For more
information on Global App config service, see Global App Configuration Service.
2. Edit the payload in the app config service:
1 {
2
3 "serviceURL": {
4
5 "url": "https://storefront.acme.com:443",
6 "migrationUrl": [
7 {
8
9 "url": "https://sampleworkspace.cloud.com:443",
10 "storeFrontValidUntil": "2023-05-01"
11 }
12
13 ]
14 }
15 ,
16 "settings": {
17
18 "name": "Productivity Apps",
19 "description": "Provides access StoreFront to Workspace Migration"
,
20 "useForAppConfig": true,
21 "appSettings": {
22
23 "windows": [
24 {
25
26 "category": "root",
27 "userOverride": false,
© 1999–2023 Cloud Soware Group, Inc. All rights reserved. 130

Citrix Workspace app for Windows
28 "assignmentPriority": 0,
29 "assignedTo": [
30 "AllUsersNoAuthentication"
31 ],
32 "settings": [
33 {
34
35 "name": "Hide advanced preferences",
36 "value": false
37 }
38
39 ]
40 }
41
42 ]
43 }
44
45 }
46
47 }
48
49
50 <!--NeedCopy-->
Note:
If you’re configuring the payload for the first time, use POST.
If you’re editing the existing payload configuration, use PUT and check that you have the
payload that consists of all the supported settings.
3. Specify the StoreFront URL storefront.com as the value for URL in the serviceURL section.
4. Configure the Workspace URL xyz.cloud.com inside the section migrationUrl.
5. Use storeFrontValidUntil to set the timeline for the removal of the StoreFront store from the
Citrix Workspace app. This field is optional. You can set the following value based on your re‑
quirement:
• Valid date in the format (YYYY‑MM‑DD)
Note:
If you have provided a past date, then the StoreFront store is removed immediately
upon URL migration. If you have provided a future date, then the StoreFront store is
removed on the set date.
Aer the app config service settings are pushed, the following screen appears:
© 1999–2023 Cloud Soware Group, Inc. All rights reserved. 131

Citrix Workspace app for Windows
When the user clicks Switch to Citrix Workspace now, the Workspace URL is added to Citrix
Workspace app and the authentication prompt appears. Users have a limited option to delay the
transition up to three times.
Support for local app discovery within the Citrix Workspace app
Starting with 2112.1 release, admins can configure the discovery and enumeration of locally installed
applications within the Citrix Workspace app. You can configure this feature by using the Global App
Configuration Service. For more information about configuring this feature, see Global App Configu‑
ration Service.
This feature is ideal for devices that runs in the kiosk mode and for those applications that can’t be
virtualized within the Citrix Workspace.
Updates and plugins management
September 26, 2023
This section describes the following:
© 1999–2023 Cloud Soware Group, Inc. All rights reserved. 132

Citrix Workspace app for Windows
• Updates
• Plugins management
Update
November 30, 2023
Manual update
If you have already installed Citrix Workspace app for Windows, download and install the latest ver‑
sion of the app from the Citrix Downloads page. For information on the installation, see Install and
Uninstall.
Automatic update
When a new version of the Citrix Workspace app is available, Citrix pushes the update on the system
that has the Citrix Workspace app installed.
Note:
• If you’ve configured an SSL intercepting outbound proxy, add an exception to the
Workspace auto‑update server https://downloadplugins.citrix.com/ to receive
updates from Citrix.
• Auto‑update is not available for verisons prior to Citrix Workspace app 2104 and Citrix
Workspace app 1912 LTSR CU4.
• Your system must have an internet connection to receive updates.
• By default, Citrix Workspace updates are disabled on the VDA. This includes RDS multi‑user
server machines, VDI, and Remote PC Access machines.
• Citrix Workspace updates are disabled on machines where Desktop Lock is installed.
• Workspace for web users can’t download the StoreFront policy automatically.
• Citrix Workspace updates can be limited to LTSR updates only.
• Citrix HDX RTME for Windows is included in Citrix Workspace Updates. A notification
appears when updates to the HDX RTME on both LTSR and current release of the Citrix
Workspace app are available.
• Starting with Version 2105, Citrix Workspace Updates log paths are modified. The
Workspace Updates logs are present at C:\Program Files (x86)\Citrix\Logs. For information
© 1999–2023 Cloud Soware Group, Inc. All rights reserved. 133

Citrix Workspace app for Windows
on logging, see Log collection section.
• A non‑administrator can update Citrix Workspace app on an admin‑installed instance. You
can do that by right‑clicking the Citrix Workspace app icon in the notification area and se‑
lecting Check for Updates. The Check for Updates option is available on both the user‑
installed and the admin‑installed instances of Citrix Workspace app.
• You can also perform auto‑update when Proxy auto‑configuration (PAC) and Web Proxy
Auto‑Discovery Protocol (WPAD) detection is enabled. This is not supported when proxy
require credentials for authentication.
• If Non‑EDCHE cipher suite is added, Citrix Workspace can’t reach Citrix auto‑update server
and the following error appears during the auto‑update:
Unable to connect to server
Restart the Citrix Workspace app for Windows aer a manual or automatic update.
You can check the current version of Citrix Workspace app installed on your device either through
Advanced Preferences or query the DisplayVersion registry from the HKEY_LOCAL_MACHINE\
SOFTWARE\WOW6432Node\Microsoft\Windows\CurrentVersion\Uninstall\CitrixOnlinePluginPackWeb
location.
To view the version in the Advanced Preferences:
1. Right‑click Citrix Workspace app icon from the notification area.
2. Select Advanced Preferences.
Citrix Workspace app version is displayed in the About section.
Installing Citrix Workspace app Beta program
You receive an update notification when the Citrix Workspace app is configured for automatic updates.
To install the Beta build on your system, do the following steps:
1. Open Citrix Workspace app from the system tray.
2. Navigate to Advanced Preferences > Citrix Workspace updates.
3. Select Beta from the drop‑down list, when the Beta build is available, and click Save.
A notification window appears.
© 1999–2023 Cloud Soware Group, Inc. All rights reserved. 134

Citrix Workspace app for Windows
4. Click OK to update to Beta build.
To switch from a Beta build to a Release build, do the following steps:
1. Open Citrix Workspace app from the system tray.
2. Navigate to Advanced Preferences > Citrix Workspace updates.
3. In the Update Settings screen, select Release from the Update channel drop‑down list and
click Save.
Note:
• If any new updates are available, an auto‑update notification appears.
• Beta builds are available for customers to test in their non‑production or limited produc‑
tion environments, and to share feedback. Citrix does not accept support cases for beta
builds but welcomes feedback for improving them. Citrix might or might not act on feed‑
back based on its severity, criticality, and importance. It’s advised that Beta builds aren’t
deployed in the production environments.
© 1999–2023 Cloud Soware Group, Inc. All rights reserved. 135

Citrix Workspace app for Windows
Supporting auto‑update of Citrix Workspace app on VDA
Starting with Citrix Workspace app for Windows version 2209, you can enable auto‑update feature on
VDA. To enable this feature, you must create the following registry value:
On 32‑bit machine:
• Registry Key: HKEY_LOCAL_MACHINE\SOFTWARE\Citrix\ICA Client\AutoUpdate
• Registry Value: AllowAutoUpdateOnVDA
• Registry Type: REG_SZ
• Registry Data: True
On 64‑bit machine:
• Registry Key: HKEY_LOCAL_MACHINE\SOFTWARE\WOW6432Node\Citrix\ICAClient\AutoUpdate
• Registry Value: AllowAutoUpdateOnVDA
• Registry Type: REG_SZ
• Registry Data: True
Auto‑update version control
Administrators can now manage the auto‑update version for the devices in the organization.
Administratorscan control the version by settingthe version in the maximumAllowedVersionproperty
in the Global App Config Service.
Example JSON file in Global App Config Service:
1 {
2
3 "category": "AutoUpdate",
4 "userOverride": false,
5 "assignedTo": [
6 "AllUsersNoAuthentication"
7 ],
8 "settings": [
9 {
10
11 "name": "Auto Update plugins settings",
12 "value": [
13 {
14
15 "pluginSettings": {
16
17 "upgradeToLatest": false,
18 "deploymentMode": "InstallAndUpdate",
19 "stream": "Current",
© 1999–2023 Cloud Soware Group, Inc. All rights reserved. 136

Citrix Workspace app for Windows
20 "maximumAllowedVersion": "23.03.0.49",
21 "minimumAllowedVersion": "0.0.0.0",
22 "delayGroup": "Fast"
23 }
24 ,
25 "pluginName": "WorkspaceApp",
26 "pluginId": "1CDF566D-B2C7-47CA-802F-6283C862E1D6"
27 }
28
29 ]
30 }
31
32 ]
33 }
34
35
36 <!--NeedCopy-->
When the version is set, Citrix Workspace app on the user’s device is automatically updated to the
version specified in the maximumAllowedVersion property.
Notes:
• Currently all the parameters mentioned in the preceding JSON file are mandatory. You
must provide values for upgradeToLatest setting and the maximumAllowedVersion
setting based on the requirement of your organization. However, for the remaining param‑
eters, you can use values similiar to the example JSON file.
• To achieve auto‑update version control, upgradeToLatest setting in the Global App Con‑
fig Service must be set to false. If this is true, maximumAllowedVersion will be ignored.
• Do not modify the pluginId as this is mapped to Citrix Workspace app.
• If the administrator hasn’t configured the version in the Global App Config Service, Citrix
Workspace app is updated to the latest available version by default.
Advanced configuration for automatic updates (Citrix Workspace Updates)
You can configure Citrix Workspace Updates using the following methods:
1. Group Policy Object (GPO) administrative template
2. Command‑line interface
3. GUI
4. StoreFront
© 1999–2023 Cloud Soware Group, Inc. All rights reserved. 137
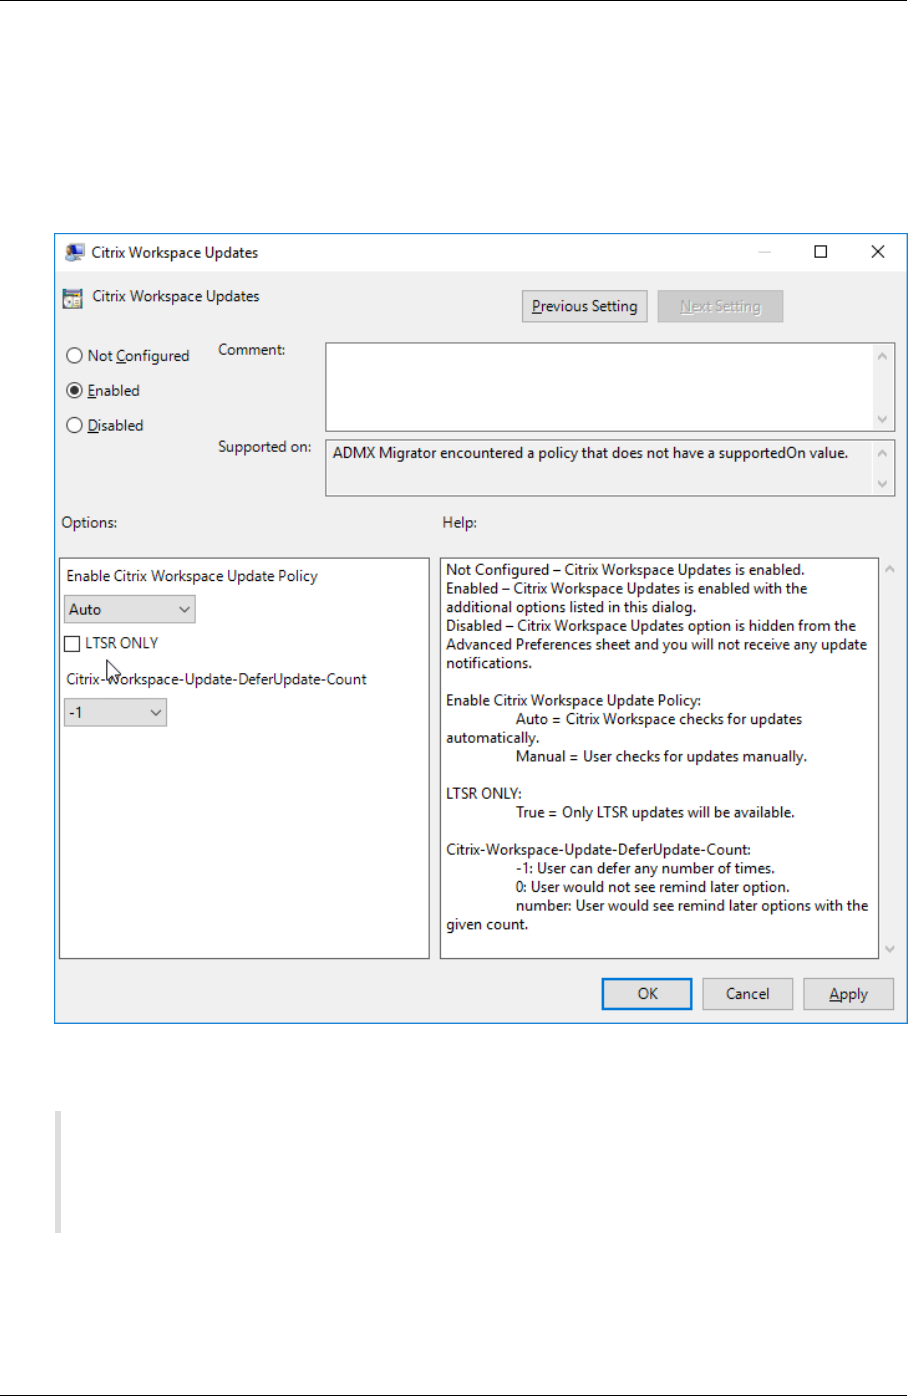
Citrix Workspace app for Windows
Configure Citrix Workspace Updates using the Group Policy Object administrative template
1. Open the Citrix Workspace app Group Policy Object administrative template by running
gpedit.msc and navigate to the Computer Configuration node.
2. Go to Administrative Templates > Citrix Components > Citrix Workspace > Workspace Up‑
dates.
3. Enable or disable updates – Select Enabled or Disabled to enable or disable Workspace Up‑
dates.
Note:
When you select Disabled, you aren’t notified of new updates. Disabled option also hides
the Workspace Updates option from the Advanced Preferences sheet.
4. Update notification – When an update is available, you can choose to be automatically noti‑
fied or check for them manually. Aer you have enabled Workspace updates, select one of the
following options from the Enable Citrix Workspace Update Policy drop‑down list:
© 1999–2023 Cloud Soware Group, Inc. All rights reserved. 138

Citrix Workspace app for Windows
• Auto ‑ You’re notified when an update is available (default). This is applicable only for
versions prior to Citrix Workspace app 2207. In 2207 or later versions, Citrix Workspace
app update is automatic and you aren’t notified when an update is available.
• Manual ‑ You aren’t notified when an update is available. Check for updates manually.
5. Select LTSR ONLY to get updates for LTSR only.
6. From the Citrix‑Workspace‑Update‑DeferUpdate‑Count drop‑down list, select a value
between ‑1 and 30:
• If the value is 0, the Remind Me Later option doesn’t appear. Update available prompt is
shown on every periodic automatic check for update.
• If the value is ‑1, the Remind Me Later option appears with the Update available prompt.
You can defer the update notification any number of times.
• A value between 1‑30 defines the number of times the Remind Me Later option with the
Update available promptmust appear. You can defer the updatenotification based on the
valuedefined in this field. However, the Update available promptcontinues to appear but
without the Remind Me Later option.
Note:
Starting with Citrix Workspace app for Windows version 2207, the auto‑update feature is
improved and the Citrix‑Workspace‑Update‑DeferUpdate‑Count field is not required.
Configure the delay in checking for updates
When a new versionof the Citrix Workspace app is available, Citrix rolls out the update during a specific
delivery period. With this property, you can control at what stage during the delivery period you can
receive the update.
To configure the delivery period, run gpedit.msc to launch the Group Policy Object administrative
template. Under Computer Configuration node, go to Administrative Templates > Citrix Compo‑
nents > Citrix Workspace > Set the Delay in Checking for Update.
© 1999–2023 Cloud Soware Group, Inc. All rights reserved. 139

Citrix Workspace app for Windows
Select Enabled, and from the Delay Group drop‑down list, select one of the following:
• Fast – Update rollout happens at the beginning of the delivery period.
• Medium – Update rollout happens at the mid‑delivery period.
• Slow – Update rollout happens at the end of the delivery period.
Note:
When you select Disabled, you aren’t notified of available updates. Disabled also hides the
Workspace Updates option from the Advanced Preferences sheet.
Configure Citrix Workspace Updates using the command‑line interface
By specifying command‑line parameters while installing Citrix Workspace app:
© 1999–2023 Cloud Soware Group, Inc. All rights reserved. 140

Citrix Workspace app for Windows
You can configure Workspace updates by specifying command‑line parameters during the Citrix
Workspace app installation. See Install parameters for more information.
By using command‑line parameters aer Citrix Workspace app has been installed:
Citrix Workspace Updates can also be configured aer installing the Citrix Workspace app for Win‑
dows. Navigate to the location of CitrixReceiverUpdater.exe using the Windows command line.
Typically, CitrixReceiverUpdater.exe is at CitrixWorkspaceInstallLocation\Citrix\Ica
Client\Receiver. You might run the CitrixReceiverUpdater.exe binary along with the
command‑line parameters listed in the Install parameters section.
For example,
CitrixReceiverUpdater.exe /AutoUpdateCheck=auto /AutoUpdateStream=Current /
DeferUpdateCount=-1 /AURolloutPriority=fast
Note:
The /AutoUpdateCheck is a mandatory parameter that you must set to configure other param‑
eters like /AutoUpdateStream, /DeferUpdateCount, /AURolloutPriority.
Configure Citrix Workspace Updates using the graphical user interface
Individual user can override the Citrix Workspace Updates setting using the Advanced Preferences
dialog. This is a per‑user configuration and the settings apply only to the current user.
1. Right‑click Citrix Workspace app icon from the notification area.
2. Select Advanced Preferences > Citrix Workspace Updates.
3. Select one of the following notification preference options:
• Yes, notify me ‑ You’re notified when an update is available for Citrix Workspace app.
• No, don’t notify me ‑ You aren’t notified when an update is available for Citrix Workspace
app. Check for updates manually.
• Use administrator specified settings ‑ Uses the settings configured on StoreFront server.
© 1999–2023 Cloud Soware Group, Inc. All rights reserved. 141

Citrix Workspace app for Windows
4. Click Save.
Note:
• The Yes, notify me and the No, don’t notify me options are applicable only for versions
prior to Citrix Workspace app 2207. In 2207 or later versions, the Citrix Workspace app up‑
date is automatic and you aren’t notified when an update is available. If you select the No,
don’t notify me option, check for updates manually.
• You can hide all or part of the Advanced Preferences sheet available from the Citrix
Workspace app icon. For more information, see the Advanced Preferences sheet section.
Configure Citrix Workspace Updates using StoreFront
1. Use a text editor to open the web.config file, which is typically at C:\inetpub\wwwroot\
Citrix\Roaming directory.
2. Locate the user account element in the file (Store is the account name of your deployment)
For example: <account id=... name="Store">
Before the </account> tag, navigate to the properties of that user account:
1 <properties>
2 <clear/>
3 </properties>
4 <!--NeedCopy-->
3. Add the auto‑update tag aer the <clear /> tag.
1 <account>
2
© 1999–2023 Cloud Soware Group, Inc. All rights reserved. 142

Citrix Workspace app for Windows
3 <clear />
4
5 <account id="d1197d2c-ac82-4f13-9346-2ee14d4b0202" name="
F84Store"
6
7 description="" published="true" updaterType="Citrix"
remoteAccessType="None">
8
9 <annotatedServices>
10
11 <clear />
12
13 <annotatedServiceRecord serviceRef="1__Citrix_F84Store">
14
15 <metadata>
16
17 <plugins>
18
19 <clear />
20
21 </plugins>
22
23 <trustSettings>
24
25 <clear />
26
27 </trustSettings>
28
29 <properties>
30
31 <property name="Auto-Update-Check" value="auto" />
32
33 <property name="Auto-Update-DeferUpdate-Count" value
="1" />
34
35 <property name="Auto-Update-LTSR-Only" value
="FALSE" />
36
37 <property name="Auto-Update-Rollout-Priority" value=
"fast" />
38
39 </properties>
40
41 </metadata>
42
© 1999–2023 Cloud Soware Group, Inc. All rights reserved. 143

Citrix Workspace app for Windows
43 </annotatedServiceRecord>
44
45 </annotatedServices>
46
47 <metadata>
48
49 <plugins>
50
51 <clear />
52
53 </plugins>
54
55 <trustSettings>
56
57 <clear />
58
59 </trustSettings>
60
61 <properties>
62
63 <clear />
64
65 </properties>
66
67 </metadata>
68
69 </account>
70
71 <!--NeedCopy-->
The meaning of the properties and their possible values are detailed as follows:
• Auto‑update‑Check: Indicates that Citrix Workspace app detects an update automatically
when available.
– Auto (default) – Checks and performs updates automatically
– Manual – updates are only fetched when the user makes a check request from the Citrix
Workspace app system tray menu,
– Disabled – Updates checks are not performed.
• Auto‑update‑LTSR‑Only: Indicates that the update is for LTSR only.
– True – the updater ignores any updates that are not marked as LTSR valid. Only LTSR up‑
dates are considered.
– False (default) ‑ Updater considers only current stream updates.
© 1999–2023 Cloud Soware Group, Inc. All rights reserved. 144

Citrix Workspace app for Windows
• Auto‑update‑Rollout‑Priority: Indicates the delivery period in which you can receive the up‑
date.
– Fast – updates are rolled‑out to the users towards the beginning of the delivery period.
– Medium – updates are rolled‑out towards the middle of the delivery period.
– Slow– updates are rolled‑out towards the end of the delivery period.
• Auto‑update‑DeferUpdate‑Count: Indicates the number of counts that you can defer the no‑
tifications for the updates.
Note:
This configuration is applicable only for interactive updates and not when the silent auto‑
update feature is enabled, as the user doesn’t get any option to defer the updates.
– ‑1: User can defer the auto‑update any number of times.
– 0: User cannot view remind me later option.
– number: User can view remind later options with the given count.
Plugins management
October 7, 2023
Citrix Workspace app for Windows oers Plugins management capability that makes the Citrix
Workspace app a single client app required on the end point to install and manage agents such as
Secure Access Agent and End Point Analysis (EPA) plug‑in.
With this capability, administrators can easily deploy and manage required agents from a single man‑
agement console.
Plugins management includes the following steps:
• Administrators must specify the agents required on end users’ devices in the Global App Con‑
figuration Service. Administrators can specify Secure Access Agent and Endpoint Analysis (EPA)
agent.
• Citrix Workspace app fetches the list of agents from Global App Configuration Service.
• Based on the list fetched from Global App Configuration service, Citrix Workspace app down‑
loads the agent packages through the auto‑update service. If the agent is not previously in‑
stalled on the end point, Citrix Workspace app triggers the installation of the agent. If the agent
is already installed, Citrix Workspace app triggers an update to the agent (if the version of the
downloaded agent is higher than the installed version.)
Citrix Workspace app ensures to automatically update the agents whenever an update is available in
the future.
© 1999–2023 Cloud Soware Group, Inc. All rights reserved. 145

Citrix Workspace app for Windows
Citrix Workspace app automatically signs in to the agents with the Citrix Workspace credentials.
Notes:
• If the EPA and ZTNA plugins doesn’t exists, the plugins are downloaded and installed while
adding the store or account for the first time.
• If the store or account and plug‑ins already exists and the installer contains a higher version,
plug‑ins are updated during the auto‑update cycle.
The following diagram illustrates the workflow:
Important:
Global App configuration service is required to enable the Plugins management feature.
• For the cloud stores, Global app configuration service UI can be accessed in the Workspace
Configuration section on the Citrix Cloud admin portal. For more information, see Config‑
ure Citrix Workspace app.
• To onboard on‑premises stores or for customers need to setup Email based discovery for
cloud stores, see Global App Configuration service documentation.
You can enable the Plugins management feature using the following methods:
• Using Global App Configuration service UI ‑ Use this method to deploy the latest version of the
client.
• Using Global App Configuration service API ‑ Use this method to customize installation with pa‑
rameters to control version, deployment modes, auto update intervals etc.
© 1999–2023 Cloud Soware Group, Inc. All rights reserved. 146

Citrix Workspace app for Windows
Enable Plugins management using Global App Configuration service UI
This method is applicable for cloud stores only, agents (EPA / Secure Access , Zoom plug‑in, or WebEx
plug‑in) can be deployed by the admins using the UI.
1. Sign in to Citrix Cloud.
2. From the menu in the top‑le of the screen, select Workspace Configuration.
The Workspace Configuration page appears.
3. Click App Configuration tab.
4. Click Updates.
5. Ensure Windows check box is selected.
6. Select the required agents next to Windows from the Client App Management Agent Settings
drop‑down list.
© 1999–2023 Cloud Soware Group, Inc. All rights reserved. 147

Citrix Workspace app for Windows
Enable Plugins management using Gobal App Configuration service API
1. Configure and onboard settings in the Global app config service using API. For more informa‑
tion, see Map service URLs and configure settings.
2. Following Global App Configuration setting need to be onboarded for the store/account to on‑
board EPA and ZTNA/Secure Access Client:
1 {
2
3 "serviceURL":
4 {
5
6 "url": "https://storefront.acme.com:443"
7 }
8 ,
9 "settings":
10 {
11
12 "description": "Install and update plugins",
13 "name": "Install and update plugins",
14 "useForAppConfig": true,
15 "appSettings":
16 {
17
18 "windows":
19 [
© 1999–2023 Cloud Soware Group, Inc. All rights reserved. 148

Citrix Workspace app for Windows
20 {
21
22 "assignedTo":
23 [
24 "AllUsersNoAuthentication"
25 ],
26 "category": "AutoUpdate",
27 "settings":
28 [
29 {
30
31 "name": "Auto Update plugins settings",
32 "value":
33 [
34 {
35
36 "pluginId": "8A8AF6C0-11F6-4343-
BA2D-A85A766170D4",
37 "pluginName": "Citrix EPA Client",
38 "pluginSettings":
39 {
40
41 "delayGroup": "Fast",
42 "deploymentMode": "
InstallAndUpdate",
43 "detectRule": "UpgradeCode:{
44 37A181F7-870E-4BDF-B0EA-E3B4766119FE }
45 ",
46 "isBlocking": true,
47 "isFTU": true,
48 "maximumAllowedVersion": "
23.8.1.24",
49 "minimumAllowedVersion": "
0.0.0.0",
50 "stream": "Current",
51 "upgradeToLatest": true
52 }
53
54 }
55 ,
56 {
57
58 "pluginId": "9A8AF6C0-11F6-4343-
BA2D-A85A766170D5",
59 "pluginName": "Citrix Secure Access
© 1999–2023 Cloud Soware Group, Inc. All rights reserved. 149

Citrix Workspace app for Windows
Client",
60 "pluginSettings":
61 {
62
63 "delayGroup": "Fast",
64 "deploymentMode": "
InstallAndUpdate",
65 "detectRule": "UpgradeCode:{
66 F0ED53AB-11BE-4E9C-87E5-CD4A81DA2A4D }
67 ",
68 "isBlocking": false,
69 "isFTU": true,
70 "maximumAllowedVersion": "
21.8.0.0",
71 "minimumAllowedVersion": "
0.0.0.0",
72 "stream": "Current",
73 "upgradeToLatest": true
74 }
75
76 }
77 ,
78 {
79
80 "pluginId": "C03BAE37-F3AC-4D63-8
BC1-3C9CD2BC9E8D",
81 "pluginName": "WebEx VDI
AutoUpgrade Plugin",
82 "pluginSettings":
83 {
84
85 "delayGroup": "Fast",
86 "deploymentMode": "
InstallAndUpdate",
87 "detectRule": "UpgradeCode:{
88 AA2AACDC-D30B-433F-A602-3E25975010A6 }
89 ",
90 "isBlocking": false,
91 "isFTU": false,
92 "maximumAllowedVersion": "
3.1.0.24263",
93 "minimumAllowedVersion": "0.0.0
",
94 "stream": "Current",
95 "upgradeToLatest": true
© 1999–2023 Cloud Soware Group, Inc. All rights reserved. 150

Citrix Workspace app for Windows
96 }
97
98 }
99
100 ]
101 }
102
103 ],
104 "userOverride": false
105 }
106
107 ]
108 }
109
110 }
111
112 }
113
114
115 <!--NeedCopy-->
The following table lists the Plugins management settings schema, values, and description.
Schema setting Value Description
isBlocking True or False When the isBlocking
parameter is set to true, the
plug‑in is considered
mandatory, and the sign‑in
page appears only when the
required plug‑in is installed.
Citrix recommends you set
EPA as the mandatory plug‑in.
pluginName Friendly name for the plug‑in.
The pluginName can be
modified.
pluginId ID of the plug‑in and must not
be modified.
delayGroup Fast, Medium, Slow
Auto‑update interval at which
the plug‑ins must be updated.
© 1999–2023 Cloud Soware Group, Inc. All rights reserved. 151

Citrix Workspace app for Windows
Schema setting Value Description
deploymentMode InstallAndUpdate/Update InstallAndUpdate: Plugin can
be freshly installed and
updated with the new
version.Update: Only update
should be allowed, no fresh
install.
None No action is needed for this
plug‑in.
detectRule Value must not be modified. Checks if plug‑in is already
installed or not.
maximumAllowedVersion Maximum allowed version of
the plug‑in.
minimumAllowedVersion Minimum allowed version of
the plug‑in.
upgradeToLatest True or False
Must be set to false to support
maximumAllowedVersion and
minimumAllowedVersion.
True: Latest version of the
plug‑in is considered during
the update.
Stream Current Must be set to Current to
receive install or auto‑update
the plug‑ins
User workflow
1. Download and install the Citrix Workspace app for Windows version 2212.
2. Click Add Account at the end of the installation.
3. Add the store/account where the app config settings are onboarded.
The following message appears while installing the mandatory plug‑ins:
© 1999–2023 Cloud Soware Group, Inc. All rights reserved. 152

Citrix Workspace app for Windows
4. When the installation is complete, the following toast notification appears:
5. Click Know more to know the plug‑ins installed.
© 1999–2023 Cloud Soware Group, Inc. All rights reserved. 153

Citrix Workspace app for Windows
Plugins management for Zoom plug‑in
Download, install, and auto‑update of Zoom plug‑in is also supported and handled same way as EPA
and ZTNA plug‑ins.
The following Global App Configuration setting needs to be onboarded for the store/account to lever‑
age this feature:
1 {
2
3 "serviceURL":
4 {
5
6 "url": "https://storefront.acme.com:443"
7 }
8 ,
9 "settings":
10 {
11
12 "description": "Install and update plugins",
13 "name": "Install and update plugins",
14 "useForAppConfig": true,
15 "appSettings":
16 {
17
18 "windows":
19 [
© 1999–2023 Cloud Soware Group, Inc. All rights reserved. 154

Citrix Workspace app for Windows
20 {
21
22 "assignedTo":
23 [
24 "AllUsersNoAuthentication"
25 ],
26 "category": "AutoUpdate",
27 "settings":
28 [
29 {
30
31 "name": "Auto Update plugins settings",
32 "value":
33 [
34 {
35
36 "pluginId": "1A4BB471-022C-4C87-
BDCD-0B64FB42869C",
37 "pluginName": "Zoom VDI AutoUpgrade
Plugin",
38 "pluginSettings":
39 {
40
41 "delayGroup": "Fast",
42 "deploymentMode": "
InstallAndUpdate",
43 "detectRule": "UpgradeCode:{
44 34225638-14F3-4059-BE34-175AC9B35435 }
45 ",
46 "isBlocking": false,
47 "isFTU": false,
48 "maximumAllowedVersion": "
5.11.2872",
49 "minimumAllowedVersion": "0.0.0
",
50 "stream": "Current",
51 "upgradeToLatest": true
52 }
53
54 }
55
56 ]
57 }
58
59 ],
© 1999–2023 Cloud Soware Group, Inc. All rights reserved. 155

Citrix Workspace app for Windows
60 "userOverride": false
61 }
62
63 ]
64 }
65
66 }
67
68 }
69
70
71 <!--NeedCopy-->
App experience
September 27, 2023
This section describes the following:
• Application delivery
• Improved virtual apps and desktops launch experience
• App preferences
• SaaS apps
• Data collection and monitoring
Application delivery
October 7, 2023
When delivering applications with Citrix Virtual Apps and Desktops and Citrix DaaS, consider the fol‑
lowing options to enhance the user experience:
• Web Access Mode ‑ Without any configuration, Citrix Workspace app provides browser‑based
access to applications and desktops. You can open a browser to a workspace for web to select
and use the applications you want. In this mode, no shortcuts are placed on the user’s desktop.
• Self‑Service Mode ‑ By adding a StoreFront account to Citrix Workspace app or configuring Cit‑
rix Workspace app to point to a StoreFront website, you can configure self‑service mode. Self‑
Service mode allows you to subscribe to applications from the Citrix Workspace app user inter‑
face. The enhanced user experience is similar to that of a mobile app store. In a self‑service
© 1999–2023 Cloud Soware Group, Inc. All rights reserved. 156

Citrix Workspace app for Windows
mode, you can configure mandatory, auto‑provisioned, and featured app keyword settings as
required.
Note:
By default, Citrix Workspaces app allows you to select the applications to display in the Start
menu.
• App shortcut‑only mode ‑ Administrators can configure Citrix Workspace app to automatically
place application and desktop shortcuts directly in the Start menu or on the desktop. The place‑
ment is similar to Citrix Workspace app Enterprise. The new shortcut only mode allows you to
find all the published apps within the familiar Windows navigation schema where you would
expect to find them.
For more information, see the Create Delivery Groups section in the Citrix Virtual Apps and Desktops
documentation.
Configure self‑service mode
By simply adding a StoreFront account to Citrix Workspace app or configuring Citrix Workspace app
to point to a StoreFront site, you can configure self‑service mode. The configuration allows users to
subscribe to applications from the Citrix Workspace user interface. The enhanced user experience is
similar to that of a mobile app store.
Note:
By default, Citrix Workspace app allows users to select the applications they want to display in
their Start menu.
In self‑service mode, you can configure mandatory, auto‑provisioned, and featured app keyword set‑
tings as needed.
Append keywords to the descriptions you provide for delivery group applications:
• To make an individual app mandatory, so that it cannot be removed from Citrix Workspace app,
append the string KEYWORDS: Mandatory to the application description. There is no Remove
option for users to unsubscribe to mandatory apps.
• To automatically subscribe all users of a store to an application, append the string KEYWORDS:
Auto to the description. When users log on to the store, the application is automatically provi‑
sioned without users needing to manually subscribe to the application.
• To advertise applications to users or to make commonly used applications easier to find by list‑
ing them in the Citrix Workspace Featured list, append the string KEYWORDS: Featured to the
application description.
© 1999–2023 Cloud Soware Group, Inc. All rights reserved. 157

Citrix Workspace app for Windows
Customize the app shortcut location using the Group Policy Object template
1. Open the Citrix Workspace app Group Policy Object administrative template by running
gpedit.msc.
2. Under the Computer Configuration node, go to Administrative Templates > Citrix Compo‑
nents > Citrix Workspace > Self Service.
3. Select Manage SelfServiceMode policy.
a) Select Enabled to view the Self‑service user interface.
b) Select Disabled to subscribe to the apps manually. This option hides the Self‑service user
interface.
4. Select Manage App Shortcut policy.
5. Select the options as required.
6. Click Apply and OK.
7. Restart Citrix Workspace app for the changes to take eect.
Using StoreFront account settings to customize app shortcut locations
You can set up shortcuts in the Start menu and on the desktop from the StoreFront site. The follow‑
ing settings can be added in the web.config file in C:\inetpub\wwwroot\Citrix\Roamingin the
<annotatedServices> section:
• To put shortcuts on the desktop, use PutShortcutsOnDesktop. Settings: “true” or “false” (de‑
fault is false).
• To put shortcuts in the Start menu, use PutShortcutsInStartMenu. Settings: “true” or “false”
(default is true).
• To use the category path in the Start menu, use UseCategoryAsStartMenuPath. Settings: “true”
or “false” (default is true).
Note:
Windows 8, 8.1 and Windows 10 do not allow the creation of nested folders within the Start menu.
Instead, display the applications individually or under the root folder. Applications are not within
the Category sub folders defined with Citrix Virtual Apps and Desktops and Citrix DaaS.
• To set a single directory for all shortcuts in the Start menu, use StartMenuDir. Setting: String
value, being the name of the folder into which shortcuts are written.
• To reinstall modified apps, use AutoReinstallModifiedApps. Settings: “true” or “false” (default
is true).
• To show a single directory for all shortcuts on the desktop, use DesktopDir. Setting: String
value, being the name of the folder into which shortcuts are written.
• To notcreatean entry on the clients ‘add/remove programs’, use DontCreateAddRemoveEntry
. Settings: “true” or “false” (default is false).
© 1999–2023 Cloud Soware Group, Inc. All rights reserved. 158

Citrix Workspace app for Windows
• To remove shortcuts and Citrix Workspace icon for an application that was previously available
from the Store but now is not available, use SilentlyUninstallRemovedResources. Set‑
tings: “true” or “false” (default is false).
In the web.config file, add the changes in the XML section for the account. Find this section by locating
the opening tab:
<account id=... name="Store"
The section ends with the </account> tag.
Before the end of the account section, in the first properties section:
<properties> <clear> <properties>
Properties can be added into this section aer the <clear /> tag, one per line, giving the name and
value. For example:
<property name="PutShortcutsOnDesktop"value="True"/>
Note:
Property elements added before the <clear /> tag might invalidate them. Removing the <clear />
tag when adding a property name and value is optional.
An extended example for this section is:
<properties <property name="PutShortcutsOnDesktop"value="True"<property
name="DesktopDir"value="Citrix Applications">
Important
In multiple server deployments, use only one server at a time to change the configuration of the
server group. Ensure that the Citrix StoreFront management console is not running on any of the
other servers in the deployment. Once complete, propagate your configuration changes to the
server group, so that the other servers in the deployment are updated. For more information,
see StoreFront documentation.
Using per‑app settings in Citrix Virtual Apps and Desktops 7.x to customize app
shortcut locations
Citrix Workspace app can be configured to automatically place application and desktop shortcuts
directly in the Start menu or on the desktop. However, this configuration is similar to the previous
Workspace for Windows versions. However, release 4.2.100 introduced the ability to control the place‑
ment of the app shortcut using Citrix Virtual Apps per app settings. The functionality is useful in envi‑
ronments with a handful of applications that need to be displayed in consistent locations.
© 1999–2023 Cloud Soware Group, Inc. All rights reserved. 159

Citrix Workspace app for Windows
Using per app settings in XenApp 7.6 to customize app shortcut locations
To configure a per app publishing shortcut in XenApp 7.6:
1. In Citrix Studio, locate the Application Settings screen.
2. In the Application Settings screen, select Delivery. Using this screen, you can specify how
applications are delivered to users.
3. Select the appropriate icon for the application. Click Change to browse to the location of the
required icon.
4. In the Application category field, optionally specify the category in Citrix Workspace app where
the application appears. For example, if you are adding shortcuts to Microso Oice applica‑
tions, enter Microso Oice.
5. Select the Add shortcut to user’s desktop check box.
6. Click OK.
Reducing enumeration delays or digitally signing application stubs
Citrix Workspace app provides functionality to copy the .EXE stubs from a network share, if:
• there is a delay in app enumeration at each sign‑in, or
• there is a need to sign application stubs digitally.
This functionality involves several steps:
1. Create the application stubs on the client machine.
2. Copy the application stubs to a common location accessible from a network share.
3. If necessary, prepare an allow list (or, sign the stubs with an Enterprise certificate.
4. Add a registry key to enable Workspace for Windows to create the stubs by copying them from
the network share.
If RemoveappsOnLogo and RemoveAppsonExit are enabled, and users are experiencing delays in
app enumeration at every logon, use the following workaround to reduce the delays:
1. Use regedit to add HKEY_CURRENT_USER\Software\Citrix\Dazzle /v ReuseStubs /t
REG_SZ /d “true”.
© 1999–2023 Cloud Soware Group, Inc. All rights reserved. 160

Citrix Workspace app for Windows
2. Use regedit to add HKEY_LOCAL_MACHINE\Software\Citrix\Dazzle /v ReuseStubs /t
REG_SZ /d “true”. HKEY_CURRENT_USER has preference over HKEY_LOCAL_MACHINE.
Caution
Editing the registry incorrectly can cause serious problems that might require you to reinstall
your operating system. Citrix cannot guarantee that problems resulting from the incorrect use
of the Registry Editor can be solved. Use the Registry Editor at your own risk. Be sure to back up
the registry before you edit it.
Enable a machine to use pre‑created stub executables that are stored on a network share:
1. On a client machine, create stub executables for all apps. To accomplish create stub executa‑
bles, add all the applications to the machine using Citrix Workspace app. Citrix Workspace app
generates the executables.
2. Harvest the stub executables from %APPDATA%\Citrix\SelfService. You only need the .exe
files.
3. Copy the executables to a network share.
4. For each client machine that is locked down, set the following registry keys:
a) Reg add HKEY_LOCAL_MACHINE\Software\Citrix\Dazzle /v CommonStubDirectory
/t REG_SZ /d “\\ShareOne\WorkspaceStubs”
b) Reg add HKEY_LOCAL_MACHINE\Software\Citrix\Dazzle /v
c) CopyStubsFromCommonStubDirectory /t REG_SZ /d “true”. It’s also possible to con‑
figure these settings on HKEY_CURRENT_USER if you prefer. HKEY_CURRENT_USER has
preference over HKEY_LOCAL_MACHINE.
d) Exit and restart Citrix Workspace app for the changes to take eect.
Example use cases:
This topic provides use cases for app shortcuts.
Allowing users to choose what they want in the Start menu (Self‑Service)
If you have dozens or even hundreds of apps, allow users to select the applications to add to Favorite
and Start menu:
If you want the user to choose the applications,
they want in their Start menu.
configure Citrix Workspace app in self‑service
mode. In this mode, you also configure
auto‑provisioned and mandatory app keyword
settings as needed.
© 1999–2023 Cloud Soware Group, Inc. All rights reserved. 161

Citrix Workspace app for Windows
If you want the user to choose the applications,
they want in their Start menu but also want
specific app shortcuts on the desktop.
configure Citrix Workspace app without any
options and then use per app settings for the
few apps that you want on the desktop. Use
auto provisioned
and
mandatory
apps as
needed.
No app shortcuts in the Start menu
If a user has a family computer, you might not need or want app shortcuts at all. In such scenarios,
the simplest approach is browser access; install Citrix Workspace app without any configuration and
browse to workspace for web. You can also configure Citrix Workspace app for self‑service access
without putting shortcuts anywhere.
If you want to prevent Citrix Workspace app
from putting application shortcuts in the Start
menu automatically.
configure Citrix Workspace app with
PutShortcutsInStartMenu=False. Citrix
Workspace app doesn’t put apps in the Start
menu even in self‑service mode unless you put
them using per app settings.
All app shortcuts in the Start menu or on the Desktop
If the user has only a few apps, put them all in the Start menu or on the desktop, or in a folder on the
desktop.
If you want Citrix Workspace app to put all
application shortcuts in the start menu
automatically.
configure Citrix Workspace app with
SelfServiceMode =False. All available apps
appear in the Start menu.
If you want all application shortcuts to put on
the desktop.
configure Citrix Workspace app with
PutShortcutsOnDesktop = true. All available
apps appear in the desktop.
© 1999–2023 Cloud Soware Group, Inc. All rights reserved. 162

Citrix Workspace app for Windows
If you want all shortcuts to be, put on the
desktop in a folder.
configure Citrix Workspace app with
DesktopDir=Name of the desktop folder where
you want applications.
Per app settings in XenApp 6.5 or 7.x
If you want to set the location of shortcuts so every user finds them in the same place use XenApp per
App Settings:
If you want per‑app settings to determine
where applications are placed independently
of whether in self‑service mode or Start menu
mode.
configure Citrix Workspace app with
PutShortcutsInStartMenu=false and enable per
app settings.
Apps in category folders or in specific folders
If you want applications displayed in specific folders use the following options:
If you want the application shortcuts Citrix
Workspace app places in the start menu to be
shown in their associated category (folder).
configure Citrix Workspace app with
UseCategoryAsStartMenuPath=True.
If you want the applications that Citrix
Workspace app puts in the Start menu to be in
a specific folder.
configure Citrix Workspace app with
StartMenuDir=the name of the Start menu
folder name.
Remove apps on logo or exit
If you don’t want users to see apps while another user share the end point, you can remove the apps
when the user logs o and exits.
© 1999–2023 Cloud Soware Group, Inc. All rights reserved. 163

Citrix Workspace app for Windows
If you want Citrix Workspace app to remove all
apps on logo.
configure Citrix Workspace app with
RemoveAppsOnLogo=True.
If you want Citrix Workspace app to remove
apps on exit.
configure Citrix Workspace app with
RemoveAppsOnExit=True.
Configuring Local App Access applications
When configuring Local App Access applications:
• To specify that a locally installed application must be used instead of an application available
in Citrix Workspace app, append the text string KEYWORDS:prefer=”pattern.” This feature is re‑
ferred to as Local App Access.
Before you install an application on a user’s computer, Citrix Workspace app searches for the
specified patterns to determine if the application is installed locally. If it is, Citrix Workspace
app subscribes the application and does not create a shortcut. When the user starts the appli‑
cation from the Citrix Workspace app window, Citrix Workspace app starts the locally installed
(preferred) application.
If a user uninstalls a preferred application outside of Citrix Workspace app, the application is un‑
subscribed during the next Citrix Workspace app refresh. If a user uninstalls a preferred applica‑
tion from the Citrix Workspace app dialog, Citrix Workspace app unsubscribes the application
but does not uninstall it.
Note:
The keyword prefer is applied when Citrix Workspace app subscribes an application. Adding the
keyword aer the application is subscribed has no eect.
You can specify the prefer keyword multiple times for an application. Only one match is needed to
apply the keyword to an application. The following patterns can be used in any combination:
• To specify that a locally installed application must be used instead of an application available
in Citrix Workspace app, append the text string KEYWORDS:prefer=”pattern”. This feature is re‑
ferred to as Local App Access.
Before you install an application on a user’s computer, Citrix Workspace app searches for the
specified patterns to determine if the application is installed locally. If it is, Citrix Workspace
app subscribes the application and does not create a shortcut. When the user starts the appli‑
cation from the Citrix Workspace app dialog, Citrix Workspace app starts the locally installed
(preferred) application.
© 1999–2023 Cloud Soware Group, Inc. All rights reserved. 164

Citrix Workspace app for Windows
If a user uninstalls a preferred application outside of Citrix Workspace app, the application is
unsubscribed during the next Citrix Workspace app refresh. If a user uninstalls a preferred ap‑
plication from the Citrix Workspace app, Citrix Workspace app unsubscribes the application but
does not uninstall it.
Note:
The keyword prefer is applied when Citrix Workspace app subscribes an application. Adding the
keyword aer the application is subscribed has no eect.
You can specify the prefer keyword multiple times for an application. Only one match is needed to
apply the keyword to an application. The following patterns can be used in any combination:
• prefer=”ApplicationName”
The application name pattern matches any application with the specified application name in
the shortcut file name. The application name can be a word or a phrase. Quotation marks are re‑
quired for phrases. Matching is not allowed on partial words or file paths and is case‑insensitive.
The application name matching pattern is useful for overrides performed manually by an admin‑
istrator.
KEYWORDS:prefer= Shortcut under Programs Matches?
Word \Microso Oice\Microso
Word 2010
Yes
Microso Word \Microso Oice\Microso
Word 2010
Yes
Console McAfee\VirusScan Console Yes
Virus McAfee\VirusScan Console No
Console McAfee\VirusScan Console Yes
• prefer=”\\Folder1\Folder2\…\ApplicationName”
The absolute path pattern matches the entire shortcut file path plus the entire application name
under the Start menu. The Programs folder is a sub folder of the Start menu directory, so you
must include it in the absolute path to target an application in that folder. Quotation marks
are required if the path contains spaces. The matching is case‑sensitive. The absolute path
matching pattern is useful for overrides implemented programmatically in Citrix Virtual Apps
and Desktops and Citrix DaaS.
© 1999–2023 Cloud Soware Group, Inc. All rights reserved. 165

Citrix Workspace app for Windows
KEYWORDS:prefer= Shortcut under Programs Matches?
\Programs\Microso
Oice\Microso Word 2010
\Programs\Microso
Oice\Microso Word 2010
Yes
\Microso Oice \Programs\Microso
Oice\Microso Word 2010
No
\Microso Word 2010 \Programs\Microso
Oice\Microso Word 2010
No
\Programs\Microso Word
2010
\Programs\Microso Word
2010
Yes
• prefer=”\Folder1\Folder2\…\ApplicationName”
The relative path pattern matches the relative shortcut file path under the Start menu. The rel‑
ative path provided must contain the application name and can optionally include the folders
where the shortcut resides. Matching is successful if the shortcut file path ends with the rela‑
tive path provided. Quotation marks are required if the path contains spaces. The matching
is case‑sensitive. The relative path matching pattern is useful for overrides implemented pro‑
grammatically.
KEYWORDS:prefer= Shortcut under Programs Matches?
\Microso Oice\Microso
Word 2010
\Microso Oice\Microso
Word 2010
Yes
\Microso Oice \Microso Oice\Microso
Word 2010
No
\Microso Word 2010 \Microso Oice\Microso
Word 2010
Yes
\Microso Word \Microso Word 2010 No
For information about other keywords, see “Additional recommendations” in Optimize the user expe‑
rience section in the StoreFront documentation.
vPrefer launch
In earlier releases, you can specify that the instance of an app installed on the VDA (referred to as local
instance in this document) must be launched in preference to the published application by setting the
KEYWORDS:prefer=”application” attribute in Citrix Studio.
© 1999–2023 Cloud Soware Group, Inc. All rights reserved. 166

Citrix Workspace app for Windows
Starting with Version 4.11, in a double‑hop scenario (where Citrix Workspace app is running on the
VDA that hosts your session), you can now control whether Citrix Workspace app launches:
• the local instance of an application installed on the VDA (if available as a local app) or
• a hosted instance of the application.
vPrefer is available on StoreFront Version 3.14 and Citrix Virtual Desktops 7.17 and later.
When you launch the application, Citrix Workspace app reads the resource data present on the Store‑
Front server and applies the settings based on the vprefer flag at the time of enumeration. Citrix
Workspace app searches for the application’s installation path in the Windows registry of the VDA. If
present, launches the local instance of the application. Otherwise, a hosted instance of the applica‑
tion is launched.
If you launch an application that is not on the VDA, Citrix Workspace app launches the hosted applica‑
tion. For more information on how StoreFront handled the local launch, see Control of local applica‑
tion launch on published desktops in the Citrix Virtual Apps and Desktops documentation.
If you do not want the local instance of the application to be launched on the VDA, set the Lo‑
calLaunchDisabled to True using the PowerShell on the Delivery Controller. For more information,
see the Citrix Virtual Apps and Desktops documentation.
This feature helps to launch applications faster, thereby providing a better user experience. You can
configure it by using the Group Policy Object (GPO) administrative template. By default, vPrefer is
enabled only in a double‑hop scenario.
Note:
When you upgrade or install Citrix Workspace app for the first time, add the latest template files
to the local GPO. For more information on adding template files to the local GPO, see Group
Policy Object administrative template. For an upgrade, the existing settings are retained while
importing the latest files.
1. Open the Citrix Workspace app GPO administrative template by running gpedit.msc.
2. Under the Computer Configuration node, go to Administrative Template > Citrix Compo‑
nent > Citrix Workspace > SelfService.
3. Select the vPrefer policy.
4. Select Enabled.
5. From the Allow apps drop‑down list, select one of the following options:
• Allow all apps: This option launches the local instance of all apps on the VDA. Citrix
Workspace app searches for the installed application, including the native Windows
apps such as Notepad, Calculator, WordPad, Command prompt. It then launches the
application on the VDA instead of the hosted app.
• Allow installed apps: This option launches the local instance of the installed app on the
VDA. If the app is not installed on the VDA, it launches the hosted app. By default, Allow
© 1999–2023 Cloud Soware Group, Inc. All rights reserved. 167
Citrix Workspace app for Windows
installed apps is selected when the vPrefer policy is set to Enabled. This option excludes
the native Windows operating system applications like Notepad, Calculator, and so on.
• Allow network apps: This option launches the instance of an app that is published on a
shared network.
6. Click Apply and OK.
7. Restart the session for the changes to take eect.
Limitation:
• Workspace for web does not support this feature.
Improved virtual apps and desktops launch experience
October 7, 2023
Note:
From Citrix Workspace app version 2305.1 onwards, this feature is generally available for cloud
stores and from 2309 for on‑premises stores.
Previously, the launch progress dialog box wasn’t intuitive to the users. It made the users assume
that the launch process is not responding and they closed the dialog box, as the notification messages
were static.
The improved app and desktop launch experience is more informative, modern, and provides a user‑
friendly experience on Citrix Workspace app for Windows. This helps to keep the users engaged with
timely and relevant information about the launch status. The notification appears in the bottom‑right
corner of your screen.
© 1999–2023 Cloud Soware Group, Inc. All rights reserved. 168

Citrix Workspace app for Windows
Users can view meaningful notifications about the launch progress, instead of just a spinner. If a
launch is in progress and the user attempts to close the browser, a warning message is shown.
Starting with Citrix Workspace app for Windows 2305.1, this feature is enabled by default in cloud
stores.
This feature is enabled by default in cloud and in StoreFront (on‑premises) session.
App preferences
October 7, 2023
Advanced Preferences sheet
You can customize Advanced Preferences sheet’s availability and contents present in the right‑click
menu of the Citrix Workspace app icon in the notification area. Doing so ensures that users can apply
only administrator‑specified settings on their systems. Specifically, you can:
• Hide the Advanced Preferences sheet altogether
• Hide the following, specific settings from the sheet:
– Data collection
– Connection Center
– Configuration checker
– Keyboard and Language bar
© 1999–2023 Cloud Soware Group, Inc. All rights reserved. 169

Citrix Workspace app for Windows
– High DPI
– Support information
– Shortcuts and Reconnect
– Citrix Casting
Hiding Advanced Preferences option from the right‑click menu
You can hide the Advanced Preferences sheet by using the Citrix Workspace app Group Policy Object
(GPO) administrative template:
1. Open the Citrix Workspace app Group Policy Object administrative template by running
gpedit.msc.
2. Under the Computer Configuration node, go to Administrative Templates > Citrix
Workspace > Self Service > Advanced Preferences Options.
3. Select the Disable Advance Preferences policy.
4. Select Enabled to hide the Advanced Preferences option from the right‑click menu of the Citrix
Workspace app icon in the notification area.
Note:
By default, the Not Configured option is selected.
Hiding specific settings from the Advanced Preferences sheet
You can hide specific user‑configurable settings from the Advanced Preferences sheet by using the
Citrix Workspace app Group Policy Object administrative template. To hide the settings:
1. Open the Citrix Workspace app Group Policy Object administrative template by running
gpedit.msc.
2. Under the
Computer Configuration
node, go to
Administrative Templates
>
Citrix
Workspace > Self Service > Advanced Preferences Options.
3. Select the policy for the setting you want to hide.
The following table lists the options that you can select and the eect of each:
Options Action
Not Configured Displays the setting
Enabled Hides the setting
Disabled Displays the setting
You can hide the following specific settings from the Advanced Preferences sheet:
© 1999–2023 Cloud Soware Group, Inc. All rights reserved. 170

Citrix Workspace app for Windows
• Configuration checker
• Connection Center
• High DPI
• Data collection
• Delete saved passwords
• Keyboard and Language bar
• Shortcuts and Reconnect
• Support information
• Citrix Casting
Hiding the Reset Workspace option from the Advanced Preferences sheet using the Registry
editor
You can hide the Reset Workspace option from the Advanced Preferences sheet only using the Reg‑
istry editor.
1. Launch the registry editor.
2. Navigate to HKEY_LOCAL_MACHINE\SOFTWARE\Citrix\Dazzle.
3. Create a String Value key EnableFactoryReset and set it to any of the following options:
• True ‑ Displays the Reset Workspace option in the Advanced Preferences sheet.
• False ‑ Hides the Reset Workspace option in the Advanced Preferences sheet.
Hiding Citrix Workspace Updates option from the Advanced Preferences sheet
Note:
The policy path for the Citrix Workspace Updates option is dierent from the other options
present in the Advanced Preferences sheet.
1. Open the Citrix Workspace app Group Policy Object administrative template by running
gpedit.msc.
2. Under the Computer Configuration node, go to Administrative Templates > Citrix Compo‑
nents > Citrix Workspace > Workspace Updates.
3. Select the Workspace Updates policy.
4. Select Disabled to hide the Workspace Updates settings from the Advanced Preferences sheet.
Citrix Casting
The Citrix Ready workspace hub combines digital and physical environments to deliver apps and data
within a secure smart space. The complete system connects devices (or things), like mobile apps and
sensors, to create an intelligent and responsive environment.
© 1999–2023 Cloud Soware Group, Inc. All rights reserved. 171

Citrix Workspace app for Windows
Citrix Ready workspace hub is built on the Raspberry Pi 3 platform. The device running Citrix
Workspace app connects to the Citrix Ready workspace hub and casts the apps or desktops on a
larger display. Citrix Casting is supported only on Microso Windows 10 Version 1607 and later or
Windows Server 2016.
Citrix Casting feature allows instant and secure access of any app from a mobile device and display
on a large screen.
Note:
• Citrix Casting for Windows supports Citrix Ready workspace hub Version 2.40.3839 and
later. Workspace hub with earlier versions might not get detected or cause a casting error.
• The Citrix Casting feature is not supported on Citrix Workspace app for Windows (Store).
Prerequisites:
• Bluetooth enabled on the device for hub discovery.
• Both Citrix Ready workspace hub and Citrix Workspace app must be on the same network.
• Port 55555 is allowed between the device running Citrix Workspace app and the Citrix Ready
workspace hub.
• For Citrix Casting, port 1494 must not be blocked.
• Port 55556 is the default port for SSL connections between mobile devices and the Citrix Ready
workspace hub. You can configure a dierent SSL port on the Raspberry Pi’s settings page. If
the SSL port is blocked, users cannot establish SSL connections to the workspace hub.
• Citrix Casting is supported only on Microso Windows 10 Version 1607 and later or Windows
Server 2016.
• Run /IncludeCitrixCasting command during installation to enable Citrix Casting.
Configure Citrix Casting launch
Note:
You can hide all or part of the Advanced Preferences sheet. For more information, see Advanced
Preferences sheet.
1. Right‑click the Citrix Workspace app icon from the notification area and select Advanced Pref‑
erences.
The Advanced Preferences dialog appears.
2. Select Citrix Casting.
The Citrix Casting dialog appears.
© 1999–2023 Cloud Soware Group, Inc. All rights reserved. 172

Citrix Workspace app for Windows
3. Select one of the options:
• Yes – Indicates that Citrix Casting is launched when Citrix Workspace app starts.
• No, do not launch the Citrix Casting on startup – Indicates that Citrix Casting does not
launch when Citrix Workspace app starts.
Note:
Selecting the option No does not terminate the current screen casting session. The setting
is applied only at the next Citrix Workspace app launch.
4. Click Save to apply the changes.
How to use Citrix Casting with Citrix Workspace app
1. Log on to Citrix Workspace app and enable Bluetooth on your device.
The list of available hubs is displayed. The list is sorted by the RSSI value of the workspace hub
beacon package.
2. Select the workspace hub to cast your screen and choose one of the following:
• Mirror to duplicate the primary screen and cast the display to the connected workspace
hub device.
• Extend to use the workspace hub device screen as your secondary screen.
Note:
Exiting Citrix Workspace app does not exit Citrix Casting.
In the Citrix Casting notification dialog, the following options are available:
© 1999–2023 Cloud Soware Group, Inc. All rights reserved. 173

Citrix Workspace app for Windows
1. The current screen casting session displayed at the top.
2. Refresh icon.
3. Disconnect to stop the current screen casting session.
4. Star icon to add the workspace hub to Favorites.
5. Right‑click the workspace hub icon in the notification area and select Exit to disconnect the
screen casting session and to exit Citrix Ready workspace hub.
Self‑check list
If Citrix Workspace app cannot detect and communicate with any available workspace hubs in range,
ensure that you do the following as part of self‑check:
1. Citrix Workspace app and Citrix Ready workspace hub are connected to the same network.
2. Bluetooth is enabled and working properly on the device where Citrix Workspace app is
launched.
3. The device where Citrix Workspace app is launched is within range (less than 10 meters and
without any obstructing objects such as walls) of Citrix Ready workspace hub.
4. Launch a browser in Citrix Workspace app and type http://<hub_ip>:55555/device-
details.xml to check whether it displays the details of workspace hub device.
5. Click Refresh in Citrix Ready workspace hub and try reconnecting to the workspace hub.
Known issues and limitations
1. Citrix Casting does not work unless the device is connected to the same network as the Citrix
Ready workspace hub.
© 1999–2023 Cloud Soware Group, Inc. All rights reserved. 174

Citrix Workspace app for Windows
2. If there are network issues, there might be a lag in display on the workspace hub device.
3. When you select Extend, the primary screen where Citrix Ready workspace app is launched
flashes multiple times.
4. In Extend mode, you cannot set the secondary display as the primary display.
5. The screen casting session automatically disconnects when there is any change in the display
settings on the device. For example, change in screen resolution, change in screen orientation.
6. During the screen casting session, if the device running Citrix Workspace app locks, sleeps or
hibernates, an error appears at login.
7. Multiple screen casting sessions are not supported.
8. The maximum screen resolution supported by Citrix Casting is 1920 x 1440.
9. Citrix Casting supports Citrix Ready workspace hub Version 2.40.3839 and later. Workspace hub
with earlier versions might not get detected or cause a casting error.
10. This feature is not supported on Citrix Workspace app for Windows (Store).
11. On Windows 10, Build 1607, Citrix Casting in Extend mode might not be properly positioned.
For more information about Citrix Ready workspace hub, see the Citrix Ready workspace hub section
in the Citrix Virtual Apps and Desktops documentation.
SaaS apps
October 7, 2023
Secure access to SaaS applications provides a unified user experience that delivers published SaaS
applications to the users. SaaS apps are available with single sign‑on. Administrators can now protect
the organization’s network and end‑user devices from malware and data leaks. Administrators can
achieve this by filtering access to specific websites and website categories.
Citrix Workspace app for Windows support the use of SaaS apps using the Citrix Secure Private Access.
The service enables administrators to provide a cohesive experience, integrating single sign‑on, and
content inspection.
Delivering SaaS apps from the cloud has the following benefits:
• Simple configuration – Easy to operate, update, and consume.
• Single sign‑on – Hassle‑free log on with single sign‑on.
• Standard template for dierent apps – Template‑based configuration of popular apps.
Citrix Workspace app launches the SaaS apps on Citrix Enterprise Browser (formerly Citrix Workspace
Browser). For information, see Citrix Enterprise Browser documentation.
Limitations:
• When you launch a published app with the print option enabled and download disabled, and
© 1999–2023 Cloud Soware Group, Inc. All rights reserved. 175

Citrix Workspace app for Windows
give a print command on a launched app, you can still save the PDF. As a workaround, to strictly
disable the download functionality, disable the print option.
• Videos embedded in an app might not work.
• You can’t open SaaS apps using Storebrowse commands.
For more information about Workspace configuration, see Workspace configuration in Citrix Cloud.
Data collection and monitoring
October 7, 2023
Citrix Analytics
Citrix Workspace app is instrumented to securely transmit logs to Citrix Analytics. The logs are ana‑
lyzed and stored on Citrix Analytics servers when enabled. For more information about Citrix Analyt‑
ics, see Citrix Analytics.
Enhancement to Citrix Analytics Service
With this release, Citrix Workspace app is instrumented to securely transmit the public IP address of
the most recent network hop to Citrix Analytics Service. This data is collected per session launch.
It helps the Citrix Analytics Service to analyze whether poor performance issues are tied to specific
geographic areas.
By default, the IP address logs are sent to the Citrix Analytics Service. However, you can disable this
option on the Citrix Workspace app using the Registry editor.
To disable IP address log transmissions, navigate to the following registry path and set the
SendPublicIPAddress key to O.
• On 64‑bit Windows machines, navigate to: HKEY_LOCAL_MACHINE\SOFTWARE\Wow6432Node
\Citrix\Dazzle.
• On 32‑bit Windows machines, navigate to: HKEY_LOCAL_MACHINE\SOFTWARE\Citrix\
Dazzle.
Note:
• IP address transmissions are a best‑case eort. Although Citrix Workspace app transmits
every IP address that it is launched on, some of the addresses might not be accurate.
• In closed customer environments, where the endpoints are operating within an intranet,
ensure that the URL https://locus.analytics.cloud.com/api/locateip is
© 1999–2023 Cloud Soware Group, Inc. All rights reserved. 176

Citrix Workspace app for Windows
whitelisted on the endpoint.
Citrix Workspace app is instrumented to securely transmit data to Citrix Analytics Service from ICA
sessions that you launch from a browser.
For more information on how Performance Analytics uses this information, see Self‑Service Search
for Performance.
Customer Experience Improvement Program (CEIP)
Data collected Description What we use it for
Configuration and usage data The Citrix Customer
Experience Improvement
Program (CEIP) gathers
configuration and usage data
from Citrix Workspace app for
Windows and automatically
sends the data to Citrix and
Google Analytics.
This data helps Citrix improve
the quality, functionality, and
performance of the Citrix
Workspace app, appropriately
allocate resources for product
development purposes, and
maintain service levels and
manage staing and
infrastructure investment.
Data collected
As noted above, Citrix collects Citrix Workspace app configuration and usage data to improve the qual‑
ity, functionality, and performance of Workspace App, and to allow Citrix to appropriately allocate re‑
sources for product development purposes, as well as to maintain service levels and manage staing
and infrastructure investment. The data is used and analyzed in aggregated form only. No user or
their machine is singled‑out and no analysis is performed on specific end users based on the CEIP
data.
The specific CEIP data elements collected by Google Analytics are:
Operating system
version*
Citrix Workspace app
version*
Authentication
configuration
Citrix Workspace app
language
Session launch
method
Connection error Connection protocol VDA information
Installer
configuration
Installer state Client keyboard
layout
Store configuration
© 1999–2023 Cloud Soware Group, Inc. All rights reserved. 177

Citrix Workspace app for Windows
Auto‑update
preference
Connection Center
usage
App Protection
configuration
Reason for the oline
banner
Device
Model/Properties
Citrix Virtual Apps
and Desktops Session
Launch Status
Virtual app/desktop
name
Auto‑update Status
Connection Lease
Details
StoreFront to
Workspace URL
Migration Feature
Usage
Citrix Enterprise
Browser Usage
Auto‑update channel
Inactivity Timeout
Details
Citrix Enterprise
Browser Version
Note:
Starting with version 2206, the Citrix Workspace app doesn’t collect any CEIP data from users
located in the European Union (EU), European Economic Area (EEA), Switzerland, and United
Kingdom (UK). Update your Citrix Workspace app if you wish to take advantage of this function‑
ality.
Data Collection Preferences
Starting with version 2205, both users and administrators can stop sending CEIP data (except for the
two data elements which can be blocked as specified in the Note below) by following the below steps.
1. Right‑click the Citrix Workspace app icon from the notification area.
2. Select Advanced Preferences.
The Advanced Preferences dialog appears.
3. Select Data Collection.
4. Select No, Thanks to disable CEIP or to forego participation.
5. Click Save.
You can also navigate to the following registry entry as an administrator and set the value as sug‑
gested:
Path: HKEY_LOCAL_MACHINE\ SOFTWARE\Citrix\ICA Client\CEIP
Key: Enable_CEIP
Value: False
© 1999–2023 Cloud Soware Group, Inc. All rights reserved. 178

Citrix Workspace app for Windows
Note:
Once you select No Thanks or set the Enable_CEIP key to False, you can also stop sending
the final two CEIP data elements, that is, Operating System and Citrix Workspace app version, by
navigating to the following registry entry and set the value:
Path: HKEY_LOCAL_MACHINE\ SOFTWARE\Citrix\ICA Client\CEIP
Key: DisableHeartbeat
Value: True
Additional information
Citrix handles your data according to the terms of your contract with Citrix, and protect it as specified
in the Citrix Services Security Exhibit. Citrix Services Security Exhibit is available on the Citrix Trust
Center.
Security and authentication
October 7, 2023
This section describes the following:
• Security
• Secure communications
• Authentication
– Domain pass‑through access matrix
– Domain pass‑through to Citrix Workspaceusing on‑premises Citrix Gateway as the identity
provider
– Domain pass‑through to Citrix Workspace using Azure Active Directory as the identity
provider
– Domain pass‑through to Citrix Workspace using Okta as identity provider
Security
October 7, 2023
© 1999–2023 Cloud Soware Group, Inc. All rights reserved. 179

Citrix Workspace app for Windows
App Protection
App Protection feature is an add‑on feature that provides enhanced security when using Citrix Virtual
Apps and Desktops and Citrix DaaS (formerly Citrix Virtual Apps and Desktops service). The feature
restricts the ability of clients to compromise with keylogging and screen capturing malware. App Pro‑
tection prevents exfiltration of confidential information such as user credentials and sensitive infor‑
mation on the screen. The feature prevents users and attackers from taking screenshots and from
using keyloggers to glean and exploit sensitive information. For more information, see App Protec‑
tion
Disclaimer
App Protection policies filter the access to required functions of the underlying operating system
(specific API calls required to capture screens or keyboard presses). App Protection policies pro‑
vide protection even against custom and purpose‑built hacker tools. However, as operating sys‑
tems evolve, new ways of capturing screens and logging keys might emerge. While we continue
to identify and address them, we cannot guarantee full protection in specific configurations and
deployments.
To configure App Protection on Citrix Workspace app for Windows, see the Citrix Workspace app for
Windows section in the Configuration article.
Note:
App Protection is supported only on upgrade from Version 1912 onwards.
Improved ICA file security
This feature provides enhanced security while handling ICA files during a virtual apps and desktops
session launch.
Citrix Workspace app lets you store the ICA file in the system memory instead of the local disk when
you launch a virtual apps and desktops session.
This feature aims to eliminate surface attacks and any malware that might misuse the ICA file when
stored locally. This feature is also applicable on virtual apps and desktops sessions that are launched
on workspace for Web
Configuration
ICA file security is also supported when Citrix Workspace or StoreFront is accessed through the web.
Client detection is a prerequisite for the feature to work if it’s accessed through the web. If you’re
accessing StoreFront using a browser, enable the following attributes in the web.config file on Store‑
Front deployments:
© 1999–2023 Cloud Soware Group, Inc. All rights reserved. 180

Citrix Workspace app for Windows
StoreFront Version Attribute
2.x pluginassistant
3.x protocolHandler
When you sign in to the store through the browser, click Detect Workspace App. If the prompt doesn’t
appear, clear the browser cookies and try again.
If it’s a Workspace deployment, you can find the client detection settings by navigating to Accounts
settings > Advanced > Apps and Desktops Launch Preference.
You can take extra measures so that sessions are launched only using the ICA file stored on system
memory. Use any of the following methods:
• Group Policy Object (GPO) Administrative template on the client.
• Global App Config Service.
• Workspace for web.
Using the GPO:
To block session launches from ICA files that are stored on the local disk, do the following:
1. Open the Citrix Workspace app Group Policy Object administrative template by running gpedit
.msc.
2. Under the Computer Configuration node, go to Administrative Templates > Citrix Compo‑
nents > Citrix Workspace > Client Engine.
3. Select the Secure ICA file session launch policy and set it to Enabled.
4. Click Apply and OK.
Using the Global App Config Service:
You can use Global App Config Service from Citrix Workspace app 2106.
To block session launches from ICA files that are stored on the local disk, do the following:
Set the Block Direct ICA File Launches attribute to True.
For more information about Global App Config Service, see Global App Config Service documentation.
Using workspace for web:
To disallow ICA file download on the local disk when using workspace for Web, do the following:
Run the PowerShell module. See Configure DisallowICADownload.
Note:
The DisallowICADownload policy isn’t available for StoreFront deployments.
© 1999–2023 Cloud Soware Group, Inc. All rights reserved. 181

Citrix Workspace app for Windows
Inactivity Timeout for Workspace Sessions
Admins can configure the inactivity timeout value to specify the amount of idle time allowed before
the users automatically sign out of the Citrix Workspace session. You’re automatically signed out of
Workspace if the mouse, keyboard, or touch is idle for the specified interval of time. The inactivity
timeout doesn’t aect the active virtual apps and desktops sessions or Citrix StoreFront stores.
The inactivity timeout value can be set starting from a 1 minute to 1,440 minutes. By default, the
inactivity timeout isn’t configured. Admins can configure the inactivityTimeoutInMinutes property
by using a PowerShell module. Click here to download the PowerShell modules for Citrix Workspace
Configuration.
The end‑user experience is as follows:
• A notification appears in your session window three minutes before you’re signed out, with an
option to stay signed in, or sign out.
• The notification appears only if the configured inactivity timeout value is greater than or equal
to five minutes.
• Users can click Stay signed in to dismiss the notification and continue using the app, in which
case the inactivity timer is reset to its configured value. You can also click Sign out to end the
session for the current store.
Note:
Admins can configure the inactivity timeout only for Workspace (cloud) sessions.
Secure communications
October 11, 2023
To secure the communication between Citrix Virtual Apps and Desktops server and Citrix Workspace
app, you can integrate your Citrix Workspace app connections using a range of secure technologies
such as the following:
• Citrix Gateway: For information, see the topics in this section and the Citrix Gateway, and Store‑
Front documentation.
• A firewall: Network firewalls can allow or block packets based on the destination address and
port.
• Transport Layer Security (TLS) versions 1.0 through 1.3 are supported.
• Trusted server to establish trust relations in Citrix Workspace app connections.
• ICA file signing
• Local Security Authority (LSA) protection
© 1999–2023 Cloud Soware Group, Inc. All rights reserved. 182

Citrix Workspace app for Windows
• Proxy server for Citrix Virtual Apps deployments only: A SOCKS proxy server or secure proxy
server. Proxy servers help to limit access to and from the network. They also handle the con‑
nections between Citrix Workspace app and the server. Citrix Workspace app supports SOCKS
and secure proxy protocols.
• Outbound proxy
Citrix Gateway
Citrix Gateway (formerly Access Gateway) secures connections to StoreFront stores. Also, lets admin‑
istrators control user access to desktops and applications in a detailed way.
To connect to desktops and applications through Citrix Gateway:
1. Specify the Citrix Gateway URL that your administratorprovidesusing one of the followingways:
• The first time you use the self‑service user interface, you are prompted to enter the URL in
the Add Account dialog box.
• When you later use the self‑service user interface, enter the URL by clicking Preferences >
Accounts > Add.
• If you’re establishing a connection with the storebrowse command, enter the URL at the
command line
The URL specifies the gateway and, optionally, a specific store:
• To connect to the first store that Citrix Workspace app finds, use a URL in the following format:
– https://gateway.company.com
• To connect to a specific store, use a URL of the form, for example: https://gateway.company.
com?<storename>. This dynamic URL is in a non‑standard form; do not include “=” (the
“equals” sign character) in the URL. If you’re establishing a connection to a specific store with
storebrowse, you might need quotation marks around the URL in the storebrowse command.
1. When prompted, connect to the store (through the gateway) using your user name, password,
and security token. For more information about this step, see the Citrix Gateway documenta‑
tion.
When authentication is complete, your desktops and applications are displayed.
Connecting through firewall
Network firewalls can allow or block packets based on the destination address and port. If you’re
using a firewall, Citrix Workspace app for Windows can communicate through the firewall with both
the Web server and the Citrix server.
© 1999–2023 Cloud Soware Group, Inc. All rights reserved. 183

Citrix Workspace app for Windows
Common Citrix Communication Ports
© 1999–2023 Cloud Soware Group, Inc. All rights reserved. 184

Citrix Workspace app for Windows
Source Type Port Details
Citrix Workspace app TCP 80/443 Communication with
StoreFront
ICA or HDX TCP/UDP 1494 Access to applications
and virtual desktops
ICA or HDX with
Session Reliability
TCP/UDP 2598 Access to applications
and virtual desktops
ICA or HDX over TLS TCP/UDP 443 Access to applications
and virtual desktops
For more information about the ports, see the Knowledge Center article CTX101810.
Transport Layer Security
Transport Layer Security (TLS) is the replacement for the SSL (Secure Sockets Layer) protocol. The
Internet Engineering Taskforce (IETF) renamed it TLS when it took over responsibility for the develop‑
ment of TLS as an open standard.
TLS secures data communications by providing server authentication, encryption of the data stream,
and message integrity checks. Some organizations, including U.S. government organizations, require
the use of TLS to secure data communications. These organizations might also require the use of
validated cryptography, such as Federal Information Processing Standard (FIPS) 140. FIPS 140 is a
standard for cryptography.
To use TLS encryption as the communication medium, you must configure the user device and the
Citrix Workspace app. For information about securing StoreFront communications, see the Secure
section in the StoreFront documentation. For information about securing VDA, see Transport Layer
Security (TLS) in the Citrix Virtual Apps and Desktops documentation.
You can use the following policies to:
• Enforce use of TLS: We recommend that you use TLS for connections using untrusted networks,
including the Internet.
• Enforce use of FIPS (Federal Information Processing Standards): Approved cryptography and
follow the recommendations in NIST SP 800‑52. These options are disabled by default.
• Enforce use of a specific version of TLS and specific TLS cipher suites: Citrix supports the TLS
1.0, TLS 1.1, and TLS 1.2 protocols.
• Connect only to specific servers.
• Check for revocation of the server certificate.
• Check for a specific server‑certificate issuance policy.
© 1999–2023 Cloud Soware Group, Inc. All rights reserved. 185

Citrix Workspace app for Windows
• Select a particular client certificate, if the server is configured to request one.
Citrix Workspace app for Windows supports the following cipher suites for TLS 1.2 protocol:
• TLS_ECDHE_RSA_WITH_AES_256_GCM_SHA384
• TLS_ECDHE_RSA_WITH_AES_256_CBC_SHA384
• TLS_ECDHE_RSA_WITH_AES_128_CBC_SHA
For information on the supported cipher suites, see the Knowledge Center article CTX250104.
Important:
The following cipher suites are deprecated for enhanced security:
• Cipher suites RC4 and 3DES
• Cipher suites with prefix “TLS_RSA_*”
• TLS_RSA_WITH_AES_256_GCM_SHA384 (0x009d)
• TLS_RSA_WITH_AES_128_GCM_SHA256 (0x009c)
• TLS_RSA_WITH_AES_256_CBC_SHA256 (0x003d)
• TLS_RSA_WITH_AES_256_CBC_SHA (0x0035)
• TLS_RSA_WITH_AES_128_CBC_SHA (0x002f)
• TLS_RSA_WITH_RC4_128_SHA (0x0005)
• TLS_RSA_WITH_3DES_EDE_CBC_SHA (0x000a)
TLS support
1. Open the Citrix Workspace app GPO administrative template by running gpedit.msc.
2. Under the Computer Configuration node, go to Administrative Templates > Citrix
Workspace > Network routing, and select the TLS and Compliance Mode Configura‑
tion policy.
© 1999–2023 Cloud Soware Group, Inc. All rights reserved. 186

Citrix Workspace app for Windows
3. Select Enabled to enable secure connections and to encrypt communication on the server. Set
the following options:
Note:
Citrix recommends TLS for secure connections.
a) Select Require TLS for all connections to force Citrix Workspace app to use TLS for con‑
nections to published applications and desktops.
b) From the Security Compliance Mode menu, select the appropriate option:
i. None ‑ No compliance mode is enforced.
ii. SP800‑52 ‑ Select SP800‑52 for compliance with NIST SP 800‑52. Select this option
only if the servers or gateway follow NIST SP 800‑52 recommendations.
Note:
If you select SP800‑52, FIPS Approved cryptography is automatically used, even if
© 1999–2023 Cloud Soware Group, Inc. All rights reserved. 187

Citrix Workspace app for Windows
Enable FIPS isn’t selected. Also, enable the Windows security option, System Cryp‑
tography: Use FIPS‑compliant algorithms for encryption, hashing, and signing.
Otherwise, Citrix Workspace app might fail to connect to the published applications
and desktops.
If you select SP800‑52, set the Certificate Revocation Check Policy setting to Full access
check and CRL required.
When you select SP800‑52, Citrix Workspace app verifies that the server certificate follows
the recommendations in NIST SP 800‑52. If the server certificate does not comply, Citrix
Workspace app might fail to connect.
i. Enable FIPS ‑ Select this option to enforce the use of FIPS approved cryptography.
Also, enable the Windows security option from the operating system group policy,
System Cryptography: Use FIPS‑compliant algorithms for encryption, hashing,
and signing. Otherwise, Citrix Workspace app might fail to connect to published ap‑
plications and desktops.
c) From the Allowed TLS servers drop‑down menu, select the port number. Use a comma‑
separated list to ensure that the Citrix Workspace app connects only to a specified server.
You can specify wildcards and port numbers. For example, *.citrix.com: 4433 allows con‑
nections to any server whose common name ends with .citrix.com on port 4433. The issuer
of the certificate asserts the accuracy of the information in a security certificate. If Citrix
Workspace does not recognize or trust the issuer, the connection is rejected.
d) From the TLS version menu, select one of the following options:
• TLS 1.0, TLS 1.1, or TLS 1.2 ‑ This is the default setting. This option is recommended only
if there is a business requirement for TLS 1.0 for compatibility.
• TLS 1.1 or TLS 1.2 ‑ Use this option to ensure that the connections use either TLS 1.1 or
TLS 1.2.
• TLS 1.2 ‑ This option is recommended if TLS 1.2 is a business requirement.
a) TLS cipher set ‑ To enforce use of a specific TLS cipher set, select Government (GOV),
Commercial (COM), or All (ALL). For more information, see Knowledge Center article
CTX250104.
b) From the Certificate Revocation Check Policy menu, select any of the following:
• Check with No Network Access ‑ Certificate Revocation list check is done. Only local cer‑
tificate revocation list stores are used. All distribution points are ignored. A Certificate
Revocation List check that verifies the server certificate available from the target SSL Re‑
lay/Citrix Secure Web Gateway server isn’t mandatory.
• Full Access Check ‑ Certificate Revocation List check is done. Local Certificate Revocation
List stores and all distribution points are used. If revocation information for a certificate is
© 1999–2023 Cloud Soware Group, Inc. All rights reserved. 188

Citrix Workspace app for Windows
found, the connection is rejected. Certificate Revocation List check for verifying the server
certificate available from the target server isn’t critical.
• Full Access Check and CRL Required ‑ Certificate Revocation List check is done, except
for the root Certificate Authority. Local Certificate Revocation List stores and all distribu‑
tion points are used. If revocation information for a certificate is found, the connection is
rejected. Finding all required Certificate Revocation Lists is critical for verification.
• Full Access Check and CRL Required All ‑ Certificate RevocationList check is done, includ‑
ing the root CA. Local Certificate Revocation List stores and all distribution points are used.
If revocation information for a certificate is found, the connection is rejected. Finding all
required Certificate Revocation Lists is critical for verification.
• No Check ‑ No Certificate Revocation List check is done.
a) Using the Policy Extension OID, you can limit Citrix Workspace app to connect only to
servers with a specific certificate issuance policy. When you select Policy Extension OID,
Citrix Workspace app accepts only server certificates that contain the Policy Extension OID.
b) From the Client Authentication menu, select any of the following:
• Disabled ‑ Client Authentication is disabled.
• Display certificate selector ‑ Always prompt the user to select a certificate.
• Select automatically if possible ‑ Prompt the user only if there a choice of the certificate
to identify.
• Not configured ‑ Indicates that client authentication isn’t configured.
• Use specified certificate ‑ Use the client certificate as set in the Client Certificate option.
a) Use the Client Certificate setting to specify the identifying certificate’s thumbprint to
avoid prompting the user unnecessarily.
b) Click Apply and OK to save the policy.
For information on the internal and external network connections matrix, see the Knowledge Center
article CTX250104.
Trusted server
Enforce trusted server connections
Trusted server configuration policy identifies and enforces trust relations in Citrix Workspace app con‑
nections.
Using this policy, administrators can control how the client identifies the published application or
desktop it is connecting to. The client determines a trust level, called a trust region with a connection.
The trust region then determines how the client is configured for the connection.
© 1999–2023 Cloud Soware Group, Inc. All rights reserved. 189

Citrix Workspace app for Windows
Enabling this policy prevents connections to the servers that are not in the trusted regions.
By default, region identification is based on the address of the server the client is connecting to. To
be a member of the trusted region, the server must be a member of the Windows Trusted Sites zone.
You can configure this using the Windows Internet zone setting.
Alternatively, the server address can be specifically trusted using the Address setting. The server
address must be comma‑separated list of servers supporting the use of wildcards, for example, cps
*.citrix.com.
To enable trusted server configuration using Group Policy Object administrative template
Prerequisite:
Exit from the Citrix Workspace app components including the Connection Center.
1. Open the Citrix Workspace app GPO administrative template by running gpedit.msc.
2. Under the
Computer Configuration
node, go to
Administrative Templates
>
Citrix Compo‑
nents > Citrix Workspace > Network Routing > Configure trusted server configuration.
3. Select Enabled to force Citrix Workspace app for region identification.
4. Select Enforce trusted server configuration. This option forces the client to perform the iden‑
tification using a trusted server.
5. From the Windows internet zone drop‑down menu, select the client‑server address. This set‑
ting is applicable only to the Windows Trusted Site zone.
6. In the Address field, set the client‑server address for the trusted site zone other than the Win‑
dows. You can use a comma‑separated list.
7. Click OK and Apply.
When this policy is enabled and the server is not in the trusted region, the connection is prevented,
and an error message is displayed.
The identified server must be added to the Windows Trusted Sites zone for the connection to suc‑
ceed. For example, add the server as either, http:// or https:// for SSL connections.
Note:
For SSL connections, the certificate common name must be trusted. For non‑SSL connections
all servers that are contacted must be individually trusted.
Also, ensure that the internal StoreFront FQDN is added to the Local Intranet zone or Trusted sites
zones. For information, see Modify the Internet Explorer settings in Authenticate section.
Client selective trust
In addition to allowing or preventing connections to the servers, the client also uses the regions to
identify file, microphone, or webcam, SSO access.
© 1999–2023 Cloud Soware Group, Inc. All rights reserved. 190

Citrix Workspace app for Windows
Regions Resources Access level
Internet File, Microphone, Web Prompt user for access, SSO is
not allowed
Intranet Microphone, Web Prompt user for access, SSO is
allowed
Restricted Sites All No access and connection
might be prevented
Trusted Microphone, Web Read or write, SSO is allowed
When the user has selected the default value for a region then the following dialog box might appear:
© 1999–2023 Cloud Soware Group, Inc. All rights reserved. 191

Citrix Workspace app for Windows
Administrators can modify this default behavior by creating and configuring the Client Selective
Trust registry keys either using the Group Policy or in the registry. For more information on how to
configure Client Selective Trust registry keys, see Knowledge Center article CTX133565.
ICA file signing
The ICA file signing helps protect you from an unauthorized application or desktop launch. Citrix
Workspace app verifies that a trusted source generated the application or desktop launch based on
an administrative policy and protects against launches from untrusted servers. You can configure ICA
© 1999–2023 Cloud Soware Group, Inc. All rights reserved. 192

Citrix Workspace app for Windows
file signing using the Group policy objects administrative template or StoreFront. The ICA file signing
feature isn’t enabled by default.
For information about enabling ICA file signing for StoreFront, see Enable ICA file signing in StoreFront
documentation.
Configure ICA file signature
Note:
If the CitrixBase.admx\adml isn’t added to the local GPO, the Enable ICA File Signing policy
might not be present.
1. Open the Citrix Workspace app Group Policy Object administrative template by running
gpedit.msc
2. Under the Computer Configuration node, go to Administrative Templates > Citrix Compo‑
nents.
3. Select Enable ICA File Signing policy and select one of the options as required:
a) Enabled ‑ Indicates that you can add the signing certificate thumbprint to the allow list of
trusted certificate thumbprints.
b) Trust Certificates ‑ Click Show to remove the existing signing certificate thumbprint from
the allow list. You can copy and paste the signing certificate thumbprints from the signing
certificate properties.
c) Security policy ‑ Select one of the following options from the menu.
i. Only allow signed launches (more secure): Allows only signed application and desk‑
top launches from a trusted server. A security warning appears when there’s an in‑
valid signature. The session launch fails because of non‑authorization.
ii. Prompt user on unsigned launches (less secure) ‑ A message prompt appears when an
unsigned or invalidly signed session is launched. You can choose to either continue
the launch or cancel the launch (default).
4. Click Apply and OK to save the policy.
5. Restart the Citrix Workspace app session for the changes to take eect.
To select and distribute a digital signature certificate:
When selecting a digital signature certificate, we recommend you choose from the following priority
list:
1. Buy a code‑signing certificate or SSL signing certificate from a public Certificate Authority (CA).
2. If your enterprise has a private CA, create a code‑signing certificate or SSL signing certificate
using the private CA.
3. Use an existing SSL certificate.
4. Create a root CA certificate and distribute it to user devices using GPO or manual installation.
© 1999–2023 Cloud Soware Group, Inc. All rights reserved. 193

Citrix Workspace app for Windows
Local Security Authority (LSA) protection
Citrix Workspace app supports Windows Local Security Authority (LSA) protection, which maintains
information about all aspects of local security on a system. This support provides the LSA level of
system protection to hosted desktops.
Connecting through proxy server
Proxy servers are used to limit access to and from your network, and to handle connections between
Citrix Workspace app for Windows and servers. Citrix Workspace app supports SOCKS and secure
proxy protocols.
When communicating with the server, Citrix Workspace app uses proxy server settings that are con‑
figured remotely on the server running workspace for web.
When communicating with the web server, Citrix Workspace app uses the proxy server settings con‑
figured through the Internet settings of the default web browser on the user device. Configure the
Internet settings of the default web browser on the user device accordingly.
To enforce proxy settings through the ICA file on StoreFront, see Knowledge Center article CTX136516.
Outbound proxy support
SmartControl allows administrators to configure and enforce policies that aect the environment.
For instance, you might want to prohibit users from mapping drives to their remote desktops. You
can achieve the granularity using the SmartControl feature on the Citrix Gateway.
The scenario changes when the Citrix Workspace app and the Citrix Gateway belong to separate en‑
terprise accounts. In such cases, the client domain can’t apply the SmartControl feature because the
gateway doesn’t exist on the domain. You can then use the Outbound ICA Proxy. The Outbound ICA
Proxy feature lets you use the SmartControl feature even when Citrix Workspace app and Citrix Gate‑
way are deployed in dierent organizations.
Citrix Workspace app supports session launches using the NetScaler LAN proxy. Use the outbound
proxy plug‑in to configure a single static proxy or select a proxy server at runtime.
You can configure outbound proxies using the following methods:
• Static proxy: Proxy server is configured by giving a proxy host name and port number.
• Dynamic proxy: A single proxy server can be selected among one or more proxy servers using
the proxy plug‑in DLL.
You can configure the outbound proxy using the Group Policy Object administrative template or the
Registry editor.
For more information about outbound proxy, see Outbound ICA Proxy support in the Citrix Gateway
documentation.
© 1999–2023 Cloud Soware Group, Inc. All rights reserved. 194

Citrix Workspace app for Windows
Outbound proxy support ‑ Configuration
Note:
If both static proxy and dynamic proxies are configured, the dynamic proxy configuration takes
precedence.
Configuring the outbound proxy using the GPO administrative template:
1. Open the Citrix Workspace app Group Policy Object administrative template by running
gpedit.msc.
2. Under the Computer Configuration node, go to Administrative Templates > Citrix
Workspace > Network routing.
3. Select one of the following options:
• For static proxy: Select the Configure NetScaler LAN proxy manually policy. Select En‑
abled and then provide the host name and port number.
• For dynamic proxy: Select the Configure NetScaler LAN proxy using DLL policy. Select
Enabled and then provide the full path to the DLL file. For example, C:\Workspace\
Proxy\ProxyChooser.dll.
4. Click Apply and OK.
Configuring the outbound proxy using the Registry editor:
• For static proxy:
– Launch the Registry editor and navigate to HKEY_LOCAL_MACHINE\SOFTWARE\
Policies\Citrix\ICA Client\Engine\Network Routing\Proxy\NetScaler.
– Create DWORD value keys as follows:
"StaticProxyEnabled"=dword:00000001
"ProxyHost"="testproxy1.testdomain.com
"ProxyPort"=dword:000001bb
• For dynamic proxy:
– Launch the Registry editor and navigate to HKEY_LOCAL_MACHINE\SOFTWARE\
Policies\Citrix\ICA Client\Engine\Network Routing\Proxy\NetScaler
LAN Proxy.
– Create DWORD value keys as follows:
"DynamicProxyEnabled"=dword:00000001
"ProxyChooserDLL"="c:\\Workspace\\Proxy\\ProxyChooser.dll"
Connections and certificates
Connections
• HTTP store
© 1999–2023 Cloud Soware Group, Inc. All rights reserved. 195

Citrix Workspace app for Windows
• HTTPS store
• Citrix Gateway 10.5 and later
Certificates
Note:
Citrix Workspace app for Windows is digitally signed. The digital signature is time‑stamped. So,
the certificate is valid even aer the certificate is expired.
• Private (self‑signed)
• Root
• Wildcard
• Intermediate
Private (self‑signed) certificates
If a private certificate exists on the remote gateway, install the root certificate of the organization’s
certificate authority on the user device that’s accessing the Citrix resources.
Note:
If the remote gateway’s certificate cannot be verified upon connection, an untrusted certificate
warning appears. This warning appears when the root certificate is missing in the local Keystore.
When a user chooses to continue through the warning, the apps are displayed but cannot be
launched.
Root certificates
For domain‑joined computers, you can use a Group Policy Object administrative template to
distribute and trust CA certificates.
For non‑domain joined computers, the organization can create a custom install package to distribute
and install the CA certificate. Contact your system administrator for assistance.
Wildcard certificates
Wildcard certificates are used on a server within the same domain.
Citrix Workspace app supports wildcard certificates. Use wildcard certificates by following your orga‑
nization’s security policy. An alternative to wildcard certificates is a certificate with the list of server
names and the Subject Alternative Name (SAN) extension. Private and public certificate authorities
issue these certificates.
© 1999–2023 Cloud Soware Group, Inc. All rights reserved. 196

Citrix Workspace app for Windows
Intermediate certificates
If your certificate chain includes an intermediate certificate, the intermediate certificate must be ap‑
pended to the Citrix Gateway server certificate. For information, see Configuring Intermediate Certifi‑
cates.
Certificate revocation list
Certificate revocation list (CRL) allows Citrix Workspace app to check if the server’s certificate is re‑
voked. The certificate check improves the server’s cryptographic authentication and the overall secu‑
rity of the TLS connection between the user device and a server.
You can enable CRL checking at several levels. For example, it’s possible to configure Citrix Workspace
app to check only its local certificate list or to check the local and network certificate lists. You can also
configure certificate checking to allow users to log on only if all the CRLs are verified.
If you’re configuring certificate checking on your local computer, exit Citrix Workspace app. Check if
all the Citrix Workspace components, including the Connection Center, are closed.
For more information, see the Transport Layer Security section.
Support to mitigate man‑in‑the‑middle attacks
Citrix Workspace app for Windows helps you to reduce the risk of a man‑in‑the‑middle attack using
the Enterprise Certificate Pinning feature of Microso Windows. A man‑in‑the‑middle attack is a
type of cyber‑attack where the attacker secretly intercepts and relays messages between two parties
who believe they are communicating directly with each other.
Previously, when you contact the store server, there was no way to verify whether the response re‑
ceived is from the server you intended to contact or not. Using the Enterprise Certificate Pinning
feature of Microso Windows, you can verify the validity and integrity of the server by pinning its cer‑
tificate.
Citrix Workspace app for Windows is pre‑configured to know what server certificate it must expect for
a particular domain or site using the Certificate pinning rules. If the server certificate does not match
the pre‑configured server certificate, the Citrix Workspace app for Windows prevents the session from
taking place.
For information on how to deploy the Enterprise Certificate Pinning feature, see the Microso doc‑
umentation.
Note:
You must be aware of the expiry of the certificate and update the group policies and certificate
trust lists correctly. Otherwise, you might fail to start the session, even if there is no attack.
© 1999–2023 Cloud Soware Group, Inc. All rights reserved. 197

Citrix Workspace app for Windows
Authentication
November 30, 2023
You can configure various types of authentication for your Citrix Workspace app, including domain
pass‑through (single sign‑on or SSON), smart card, and Kerberos pass‑through.
Domain pass‑through (single sign‑on) authentication
Domain pass‑through (single sign‑on or SSON) lets you authenticate to a domain and use Citrix Virtual
Apps and Desktops and Citrix DaaS (formerly Citrix Virtual Apps and Desktops service) without having
to reauthenticate again.
Note:
If you disable the Enable MPR notifications for the System policy in the Group Policy Object
template, the domain pass‑through (single sign‑on) authentication feature isn’t supported on
Windows 11.
This feature is available from Citrix Workspace app for Windows version 2012 and later.
When enabled, domain pass‑through (single sign‑on) caches your credentials, so that you can con‑
nect to other Citrix applications without having to sign in each time. Ensure that only soware that
is in accordance with your corporate policies runs on your device to mitigate the risk of credential
compromise.
When you log on to Citrix Workspace app, your credentials are passed through to StoreFront, along
with the apps and desktops and Start menu settings. Aer configuring single sign‑on, you can log on
to Citrix Workspace app and launch virtual apps and desktops sessions without having to retype your
credentials.
All web browsers require you to configure single sign‑on using the Group Policy Object (GPO) adminis‑
trative template. For more information about configuringsingle sign‑on using the Group Policy Object
(GPO) administrative template, see Configure single sign‑on with Citrix Gateway.
You can configure single sign‑on on both fresh installation or upgrade setup, using any of the following
options:
• Command‑line interface
• GUI
Note:
The terms domain pass‑through, single sign‑on, and SSON might be used interchangeably in this
document.
© 1999–2023 Cloud Soware Group, Inc. All rights reserved. 198

Citrix Workspace app for Windows
Configure single sign‑on during fresh installation
To configure single sign‑on during fresh installation, do the following steps:
1. Configuration on StoreFront.
2. Configure XML trust services on the Delivery Controller.
3. Modify Internet Explorer settings.
4. Install Citrix Workspace app with single sign‑on.
Configure single sign‑on on StoreFront
Single sign‑on lets you authenticate to a domain and use Citrix Virtual Apps and Desktops and Citrix
DaaS from the same domain without having to reauthenticate to each app or desktop.
When you add a store using the Storebrowse utility, your credentials pass through the Citrix Gateway
server, along with the apps and desktops enumerated for you, including your Start menu settings.
Aer configuring single sign‑on, you can add the store, enumerateyour apps and desktops, and launch
the required resources without having to type your credentials multiple times.
Depending on the Citrix Virtual Apps and Desktops deployment, single sign‑on authentication can be
configured on StoreFront using the Management Console.
Use the following table for dierent use cases and its respective configuration:
Use case Configuration details Additional information
Configured SSON on
StoreFront
Launch Citrix Studio, go to
Stores > Manage
Authentication Methods ‑
Store > enable Domain
pass‑through.
When Citrix Workspace app
isn’t configured with single
sign‑on, it automatically
switches the authentication
method from Domain
pass‑through to User name
and password, if available.
When workspace for web is
required
Launch Stores > Workspace
for Web Sites > Manage
Authentication Methods ‑
Store > enable Domain
pass‑through.
When Citrix Workspace app
isn’t configured with single
sign‑on, it automatically
switches the authentication
method from Domain
pass‑through to User name
and password, if available.
© 1999–2023 Cloud Soware Group, Inc. All rights reserved. 199

Citrix Workspace app for Windows
Configure single sign‑on with Citrix Gateway
You enable single sign‑on with Citrix Gateway using the Group Policy Object administrative template.
However, you must ensure that you have enabled basic authentication and single factor (nFactor with
1 Factor) authentication on the Citrix Gateway.
1. Open the Citrix Workspace app GPO administrative template by running gpedit.msc.
2. Under the Computer Configuration node, go to Administrative Template > Citrix Compo‑
nents > Citrix Workspace > User Authentication, and select Single Sign‑on for Citrix Gate‑
way policy.
3. Select Enabled.
4. Click Apply and OK.
5. Restart Citrix Workspace app for the changes to take eect.
Configure XML trust services on the Delivery Controller
On Citrix Virtual Apps and Desktops and Citrix DaaS, run the following PowerShell command as an
administrator on the Delivery Controller:
asnp Citrix* ; Set-BrokerSite -TrustRequestsSentToTheXmlServicePort $True
Modify the Internet Explorer settings
1. Add the StoreFront server to the list of trusted sites using Internet Explorer. To add:
a) Launch Internet Options from the Control panel.
b) Click Security > Local Intranet and click Sites.
The Local Intranet window appears.
c) Select Advanced.
d) Add the URL of the StoreFront FQDN with the appropriate HTTP or HTTPS protocols.
e) Click Apply and OK.
2. Modify the User Authentication settings in Internet Explorer. To modify:
a) Launch Internet Options from the Control panel.
b) Click Security tab > Local Intranet.
c) Click Custom level. The Security Settings – Local Intranet Zone window appears.
d) In the User Authentication pane, select Automatic logon with current user name and
password.
© 1999–2023 Cloud Soware Group, Inc. All rights reserved. 200

Citrix Workspace app for Windows
e) Click Apply and OK.
Configure single sign‑on using the command‑line interface
Install Citrix Workspace app with the /includeSSON switch and restart Citrix Workspace app for the
changes to take eect.
Note:
When you install Citrix Workspace app for Windows without the single sign‑on component, up‑
grade to the Citrix Workspace app latest version with the /includeSSON switch isn’t supported.
Configure single sign‑on using the GUI
1. Locate the Citrix Workspace app installation file (CitrixWorkspaceApp.exe).
2. Double‑click CitrixWorkspaceApp.exe to launch the installer.
3. In the Enable Single Sign‑on installation wizard, select the Enable Single Sign‑on option.
4. Click Next and follow the prompts to complete the installation.
You can now log on to an existing store (or configure a new store) using Citrix Workspace app without
entering user credentials.
Configure single sign‑on on workspace for web
You can configure single sign‑on on workspace for web using the Group Policy Object administrative
template.
1. Open the workspace for web GPO administrative template by running gpedit.msc.
2. Under the Computer Configuration node, go to Administrative Template > Citrix Compo‑
nent > Citrix Workspace > User Authentication.
3. Select the Local user name and password policy and set it to Enabled.
4. Click Enable pass‑through authentication. This option allows the workspace for web to use
your login credentials for authentication on the remote server.
5. Click Allow pass‑through authentication for all ICA connections. This option bypasses any
authentication restriction and allows credentials to pass‑through on all the connections.
6. Click Apply and OK.
7. Restart the workspace for web for the changes to take eect.
Verify that the single sign‑on is enabled by launching the Task Manager and check if the ssonsvr.
exe process is running.
© 1999–2023 Cloud Soware Group, Inc. All rights reserved. 201

Citrix Workspace app for Windows
Configure single sign‑on using Active Directory
Complete the following steps to configure Citrix Workspace app for pass‑through authentication us‑
ing Active Directory group policy. In this scenario, you can achieve the single sign‑on authentication
without using the enterprise soware deployment tools, such as the Microso System Center Config‑
uration Manager.
1. Download and place the Citrix Workspace app installation file (CitrixWorkspaceApp.exe) on
a suitable network share. It must be accessible by the target machines you install Citrix
Workspace app on.
2. Get the CheckAndDeployWorkspacePerMachineStartupScript.battemplate from the
Citrix Workspace app for Windows Download page.
3. Edit the content to reflect the location and the version of CitrixWorkspaceApp.exe.
4. In the Active DirectoryGroup Policy Managementconsole,type CheckAndDeployWorkspacePerMachineStartupScript
.bat as a startup script. For more information on deploying the startup scripts, see the Active
Directory section.
5. In the Computer Configuration node, go to Administrative Templates > Add/Remove Tem‑
plates to add the receiver.adml file.
6. Aer adding the receiver.adml template, go to Computer Configuration > Administrative
Templates > Citrix Components > Citrix Workspace > User authentication. For more infor‑
mation about adding the template files, see Group Policy Object administrative template.
7. Select the Local user name and password policy and set it to Enabled.
8. Select Enable pass‑through authentication and click Apply.
9. Restart the machine for the changes to take eect.
Configure single sign‑on on StoreFront
StoreFront configuration
1. Launch Citrix Studio on the StoreFront server and select Stores > Manage Authentication
Methods ‑ Store.
2. Select Domain pass‑through.
© 1999–2023 Cloud Soware Group, Inc. All rights reserved. 202

Citrix Workspace app for Windows
Authentication tokens
Authentication tokens are encrypted and stored on the local disk so that you don’t need to reenter
your credentials when your system or session restarts. Citrix Workspace app provides an option to
disable the storing of authentication tokens on the local disk.
For enhanced security, we now provide a Group Policy Object (GPO) policy to configure the authenti‑
cation token storage.
Note:
This configuration is applicable only in cloud deployments.
To disable storing of authentication tokens using the Group Policy Object (GPO) policy:
1. Open the Citrix Workspace app Group Policy Object administrative template by running gpedit
.msc.
2. Under the Computer Configuration node, go to Administrative Templates > Citrix Compo‑
nents > SelfService.
3. In the Store authentication tokens policy, select one of the following:
• Enabled: Indicates that the authentication tokens are stored on the disk. By default, set
to Enabled.
• Disabled: Indicates that the authentication tokens aren’t stored on the disk. Reenter your
credentials when your system or session restarts.
4. Click Apply and OK.
Starting with Version 2106, Citrix Workspace app provides another option to disable the storing of au‑
thentication tokens on the local disk. Along with the existing GPO configuration, you can also disable
the storing of authentication tokens on the local disk using the Global App Configuration Service.
© 1999–2023 Cloud Soware Group, Inc. All rights reserved. 203

Citrix Workspace app for Windows
In the Global App Configuration Service, set the Store Authentication Tokens attribute to
False.
You can configure this setting using the Global App Configuration service in one of the following meth‑
ods:
• Global App Configuration service User Interface (UI): To configure using UI, see Configure Citrix
Workspace app
• API: To configure settings using APIs, see the Citrix Developer documentation.
Configuration Checker
Configuration Checker lets you run a test to check if the single sign‑on is configured properly. The
test runs on dierent checkpoints of the single sign‑on configuration and displays the configuration
results.
1. Right‑click Citrix Workspace app icon in the notification area and click Advanced Preferences.
The Advanced Preferences dialog appears.
2. Click Configuration Checker.
The
Citrix Configuration Checker
window appears.
© 1999–2023 Cloud Soware Group, Inc. All rights reserved. 204
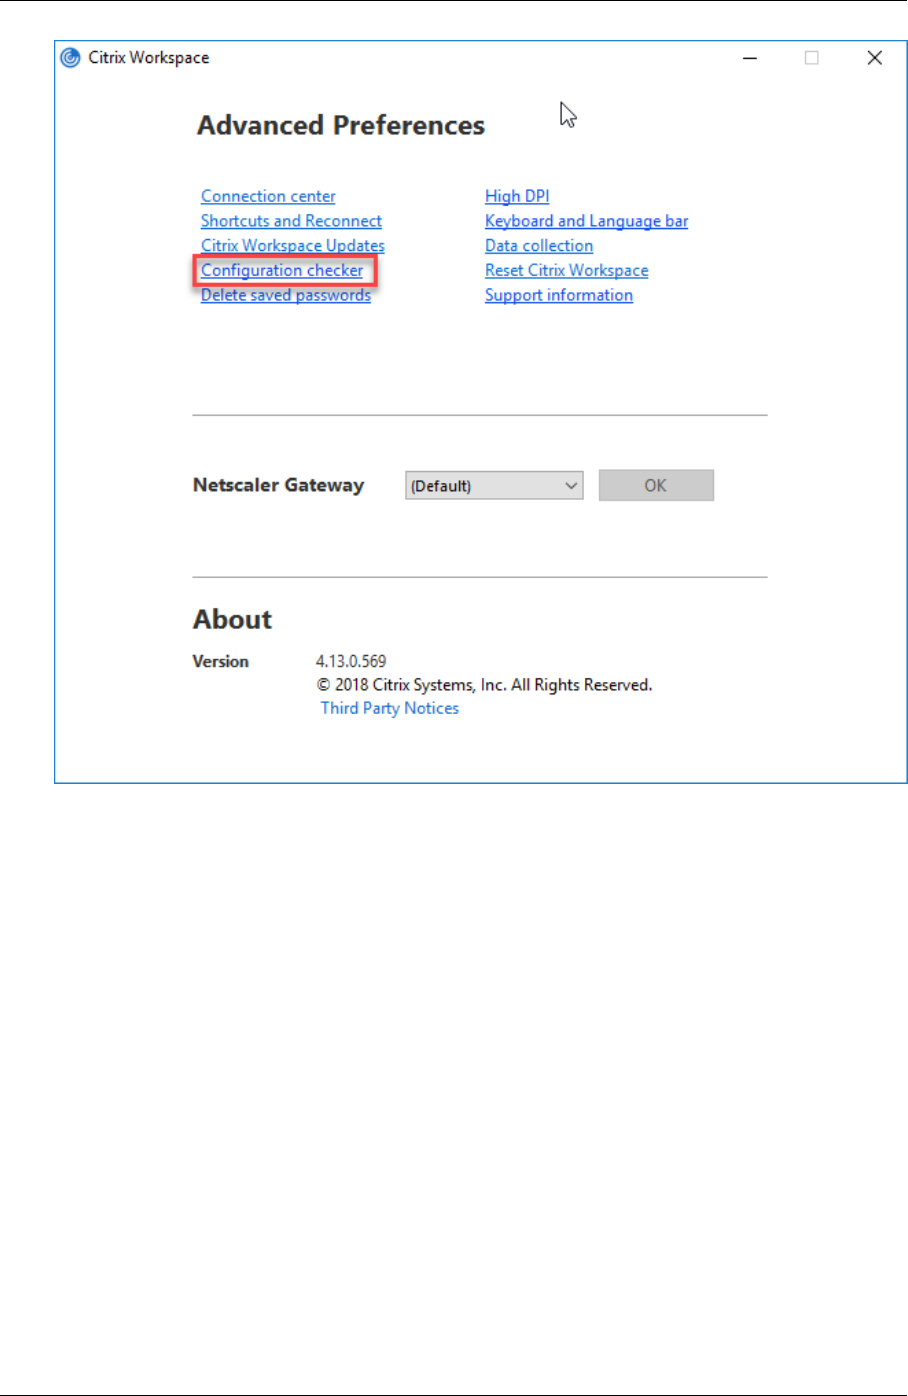
Citrix Workspace app for Windows
3. Select SSONChecker from the Select pane.
4. Click Run. A progress bar appears, displaying the status of the test.
The Configuration Checker window has the following columns:
1. Status: Displays the result of a test on a specific check point.
• A green check mark indicates that the specific checkpoint is configured properly.
• A blue I indicates information about the checkpoint.
• A Red X indicates that the specific checkpoint isn’t configured properly.
2. Provider: Displays the name of the module on which the test is run. In this case, single sign‑on.
3. Suite: Indicates the category of the test. For example, Installation.
4. Test: Indicates the name of the specific test that is run.
5. Details: Provides additional information about the test, for both pass and fail.
The user gets more information about each checkpoint and the corresponding results.
The following tests are done:
© 1999–2023 Cloud Soware Group, Inc. All rights reserved. 205

Citrix Workspace app for Windows
1. Installed with single sign‑on.
2. Logon credential capture.
3. Network Provider registration: The test result against Network Provider registration displays
a green check mark only when “Citrix Single Sign‑on” is set to be first in the list of Network
Providers. If Citrix Single Sign‑on appears anywhere else in the list, the test result against Net‑
work Provider registration appears with a blue I and additional information.
4. Single sign‑on process is running.
5. Group Policy: By default, this policy is configured on the client.
6. Internet Settings for Security Zones: Make sure that you add the Store/XenApp Service URL to
the list of Security Zones in the Internet Options.
If the Security Zones are configured via Group policy, any change in the policy requires the Ad‑
vanced Preferences window to be reopened for the changes to take eect and to display the
correct status of the test.
7. Authentication method for StoreFront.
Note:
• If you’re accessing workspace for web, the test results aren’t applicable.
• If Citrix Workspace app is configured with multiple stores, the authentication method test
runs on all the configured stores.
• You can save the test results as reports. The default report format is .txt.
Hide the Configuration Checker option from the Advanced Preferences window
1. Open the Citrix Workspace app GPO administrative template by running gpedit.msc.
2. Go to Citrix Components > Citrix Workspace > Self Service > DisableConfigChecker.
3. Click Enabled to hide the Configuration Checker option from the Advanced Preferences win‑
dow.
4. Click Apply and OK.
5. Run the gpupdate /force command.
Limitation:
Configuration Checker does not include the checkpoint for the configuration of trust requests sent to
the XML service on Citrix Virtual Apps and Desktops servers.
Beacon test
Citrix Workspace app allows you to do a beacon test using the Beacon checker that is available as part
of the Configuration Checker utility. The Beacon test helps to confirm if the beacon (ping.citrix.com)
is reachable. This diagnostic test helps to eliminate one of the many possible causes for slow resource
enumeration, that is the beacon not being available. To run the test, right‑click the Citrix Workspace
© 1999–2023 Cloud Soware Group, Inc. All rights reserved. 206

Citrix Workspace app for Windows
app in the notification area and select Advanced Preferences > Configuration Checker. Select the
Beacon checker option from the list of Tests and click Run.
The test results can be any of the following:
• Reachable – Citrix Workspace app is successfully able to contact the beacon.
• Not reachable ‑ Citrix Workspace app is unable to contact the beacon.
• Partially reachable ‑ Citrix Workspace app can contact the beacon intermittently.
Note:
• The test results aren’t applicable on workspace for web.
• The test results can be saved as reports. The default format for the report is .txt.
Domain pass‑through (Single Sign‑on) authentication with Kerberos
This topic applies only to connections between Citrix Workspace app for Windows and StoreFront,
Citrix Virtual Apps and Desktops, and Citrix DaaS.
Citrix Workspace app supports Kerberos for domain pass‑through (single sign‑on or SSON) authenti‑
cation for deployments that use smart cards. Kerberos is one of the authentication methods included
in Integrated Windows Authentication (IWA).
When enabled, Kerberos authenticates without passwords for Citrix Workspace app. As a result, pre‑
vents Trojan horse‑style attacks on the user device that try to gain access to passwords. Users can
log on using any authentication method and access published resources, for example, a biometric
authenticator such as a fingerprint reader.
When you log on using a smart card to Citrix Workspace app, StoreFront, Citrix Virtual Apps and Desk‑
tops, and Citrix DaaS configured for smart card authentication‑ the Citrix Workspace app:
1. Captures the smart card PIN during single sign‑on.
2. Uses IWA (Kerberos) to authenticate the user to StoreFront. StoreFront then provides your Citrix
Workspace app with information about the available Citrix Virtual Apps and Desktops and Citrix
DaaS.
Note:
Enable Kerberos to avoid an extran PIN prompt. If Kerberosauthenticationisn’t used, Citrix
Workspace app authenticates to StoreFront using the smart card credentials.
3. The HDX engine (previously referred to as the ICA client) passes the smart card PIN to the VDA
to log the user on to Citrix Workspace app session. Citrix Virtual Apps and Desktops and Citrix
DaaS then delivers the requested resources.
To use Kerberos authentication with Citrix Workspace app, check if the Kerberos configuration con‑
forms to the following.
© 1999–2023 Cloud Soware Group, Inc. All rights reserved. 207

Citrix Workspace app for Windows
• Kerberos works only between Citrix Workspace app and servers that belong to the same or to
trusted Windows Server domains. Servers are trusted for delegation, an option you configure
through the Active Directory Users and Computers management tool.
• Kerberos must be enabled both on the domain and Citrix Virtual Apps and Desktops and Citrix
DaaS. For enhanced security and to make sure that Kerberos is used, disable any non‑Kerberos
IWA options on the domain.
• Kerberos logon isn’t available for Remote Desktop Services connections that’re configured to
use either Basic authentication, always use specified logon information, or always prompt for
a password.
Warning:
Using the Registry editor incorrectly might cause serious problems that can require you to rein‑
stall the operating system. Citrix can’t guarantee that problems resulting from incorrect use of
the Registry editor can be solved. Use the Registry Editor at your own risk. Make sure you back
up the registry before you edit it.
Domain pass‑through (Single Sign‑on) authentication with Kerberos for use with smart cards
Before continuing, see Secure your deployment section in the Citrix Virtual Apps and Desktops docu‑
ment.
When you install Citrix Workspace app for Windows, include the following command‑line option:
• /includeSSON
This option installs the single sign‑on component on the domain‑joined computer, enabling
your workspace to authenticate to StoreFront using IWA (Kerberos). The single sign‑on compo‑
nent stores the smart card PIN, used by the HDX engine when it remotes the smart card hard‑
ware and credentials to Citrix Virtual Apps and Desktops and Citrix DaaS. Citrix Virtual Apps and
Desktops and Citrix DaaS automatically selects a certificate from the smart card and gets the
PIN from the HDX engine.
A related option, ENABLE_SSON, is enabled by default.
If a security policy prevents you from enabling single sign‑on on a device, configure Citrix Workspace
app using Group Policy Object administrative template.
1. Open the Citrix Workspace app Group Policy Object administrative template by running
gpedit.msc.
2. Choose Administrative Templates > Citrix Components > Citrix Workspace > User authen‑
tication > Local user name and password
3. Select Enable pass‑through authentication.
© 1999–2023 Cloud Soware Group, Inc. All rights reserved. 208

Citrix Workspace app for Windows
4. Restart Citrix Workspace app for the changes to take eect.
To configure StoreFront:
When you configure the authentication service on the StoreFront server, select the Domain pass‑
through option. That setting enables Integrated Windows Authentication. You do not need to select
the Smart card option unless you also have non domain‑joined clients connecting to StoreFront using
smart cards.
For more information about using smart cards with StoreFront, see Configure the authentication ser‑
vice in the StoreFront documentation.
Support for Conditional Access with Azure Active Directory
Conditional Access is a tool used by Azure Active Directory to enforce organizational policies.
Workspace administrators can configure and enforce Azure Active Directory conditional access
© 1999–2023 Cloud Soware Group, Inc. All rights reserved. 209

Citrix Workspace app for Windows
policies for users authenticating to the Citrix Workspace app. The Windows machine running the
Citrix Workspace app must have Microso Edge WebView2 Runtime version 99 or later installed.
For complete details and instructions about configuring conditional access policies with Azure
Active Directory, see Azure AD Conditional Access documentation at Docs.microso.com/en‑
us/azure/active‑directory/conditional‑access/.
Note:
This feature is supported only on Workspace (Cloud) deployments.
Support for modern authentication methods for StoreFront stores
Starting with Citrix Workspace app 2303 for Windows, you can enable support for modern authentica‑
tion methods for StoreFront stores using Group Policy Object (GPO) template. With Citrix Workspace
app version 2305.1, you can enable this feature using Global App Configuration service.
You can authenticate to Citrix StoreFront stores using any of the following ways:
• Using Windows Hello and FIDO2 security keys. For more information, see Other ways to authen‑
ticate.
• Single sign‑on to Citrix StoreFront stores from AzureActiveDirectory (AAD) joined machines with
AAD as the identity provider. For more information, see Other ways to authenticate.
• Workspace administrators can configure and enforce Azure Active Directory conditional access
policies for users authenticating to Citrix StoreFront stores. For more information, see Support
for Conditional access with Azure AD.
To enable this feature, you must use Microso Edge WebView2 as the underlying browser for direct
StoreFront and gateway authentication.
Note:
Ensure that the Microso Edge WebView2 Runtime version is 102 or later.
You can enable modern authentication methods for StoreFront storess using Global App Config ser‑
vice and Group Policy Object (GPO) template.
Using Global App Config service
To enable this feature:
1. From the Citrix Cloud menu, select Workspace Configuration and then select App Configu‑
ration.
2. Click Security & Authentication.
3. Ensure the Windows check box is selected.
© 1999–2023 Cloud Soware Group, Inc. All rights reserved. 210

Citrix Workspace app for Windows
4. Select Enabled next to Windows from the Microso Edge WebView for Storefront Authenti‑
cation drop‑down list.
Note:
If you select Disabled next to Windows from the Microso Edge WebView for Storefront Au‑
thentication drop‑down list, Internet Explorer WebView is used within the Citrix Workspace app.
As a result, the modern authentication methods for Citrix Storefront stores are not supported.
Using GPO
To enable this feature:
1. Open the Citrix Workspace app Group Policy Object administrative template by running
gpedit.msc.
2. Under the Computer Configuration node, go to Administrative Templates > Citrix
Workspace > User Authentication.
3. Click the Microso Edge WebView for StoreFront authentication policy and set it to Enabled.
© 1999–2023 Cloud Soware Group, Inc. All rights reserved. 211

Citrix Workspace app for Windows
4. Click Apply and then OK.
When this policy is disabled, Citrix Workspace app uses Internet Explorer WebView. As a result, the
modern authentication methods for Citrix StoreFront stores are not supported.
Other ways to authenticate
You can configure the following authentication mechanisms with the Citrix Workspace app. For the
following authentication mechanisms to work as expected, the Windows machine running the Citrix
Workspace app must have Microso Edge WebView2 Runtime version 99 or later installed.
1. Windows Hello based authentication – For instructions about configuring Windows Hello based
authentication, see Configure Windows Hello for Business Policy settings ‑ Certificate Trust
at _Docs.microso.com/en‑us/windows/security/identity‑protection/hello‑for‑business/hello‑
cert‑trust‑policy‑settings.
Note:
Windows Hello based authentication with domain pass‑through (single‑sign‑on or SSON)
is not supported.
2. FIDO2 Security Keys based authentication – FIDO2 security keys provide a seamless way for
enterprise employees to authenticate without entering a user name or password. You can con‑
figure FIDO2 Security Keys based authentication to Citrix Workspace. If you would like your
users to authenticate to Citrix Workspace with their Azure AD account using a FIDO2 security
key, see Enable passwordless security key sign‑in at Docs.microso.com/en‑us/azure/active‑
directory/authentication/howto‑authentication‑passwordless‑security‑key.
3. You can also configure Single Sign‑On (SSO) to Citrix Workspace app from Microso Azure Active
Directory (AAD) joined machines with AAD as an identity provider. For more details about config‑
uring Azure Active Directory Domain services, see Configuring Azure Active Directory Domain
© 1999–2023 Cloud Soware Group, Inc. All rights reserved. 212

Citrix Workspace app for Windows
services at Docs.microso.com/en‑us/azure/active‑directory‑domain‑services/overview. For in‑
formation about how to connect Azure Active Directory to Citrix Cloud, see Connect Azure Active
Directory to Citrix Cloud.
Smart card
Citrix Workspace app for Windows supports the following smart card authentication:
• Pass‑through authentication (single sign‑on) ‑ Pass‑through authentication captures the
smart card credentials when users log on to Citrix Workspace app. Citrix Workspace app uses
the captured credentials as follows:
– Users of domain‑joined devices who log on to Citrix Workspace app using the smart card
can start virtual desktops and applications without needing to reauthenticate.
– Citrix Workspace app running on non‑domain joined devices with the smart card creden‑
tials must type their credentials again to start a virtual desktop or application.
Pass‑through authentication requires configuration both on StoreFront and Citrix Workspace
app.
• Bimodal authentication ‑ Bimodal authentication oers users a choice between using a smart
card and typing the user name and password. This feature is eective when you can’t use the
smart card. For example, the logon certificate has expired. Dedicated stores must be set up per
site to allow Bimodal authentication, using the DisableCtrlAltDel method set to False to allow
smart cards. Bimodal authentication requires StoreFront configuration.
Using the Bimodal authentication, the StoreFront administrator can allow both user name and
password and smart card authentication to the same store by selecting them in the StoreFront
console. See StoreFront documentation.
• Multiple certificates ‑ Multiple certificates can be availed for a single smart card and if multi‑
ple smart cards are in use. When you insert a smart card in a card reader, the certificates are
applicable to all applications running on the user device, including Citrix Workspace app.
• Client certificate authentication ‑ Client certificate authentication requiresCitrix Gateway and
StoreFront configuration.
– For access to StoreFront through Citrix Gateway, you must reauthenticate aer removing
the smart card.
– When the Citrix Gateway SSL configuration is set to Mandatory client certificate authen‑
tication, operation is more secure. However, mandatory client certificate authentication
isn’t compatible with bimodal authentication.
• Double hop sessions ‑ If a double‑hop is required, a connection is established between Citrix
Workspace app and the user’s virtual desktop.
© 1999–2023 Cloud Soware Group, Inc. All rights reserved. 213

Citrix Workspace app for Windows
• Smart card‑enabled applications ‑ Smart card‑enabled applications, such as Microso Out‑
look and Microso Oice, allow users to digitally sign or encrypt documents available in virtual
apps and desktops sessions.
Limitations:
• Certificates must be stored on the smart card and not on the user device.
• Citrix Workspace app does not save the choice of the user certificate, but stores the PIN when
configured. The PIN is cached in non‑paged memory only during the user session and isn’t
stored on the disk.
• Citrix Workspace app does not reconnect to a session when a smart card is inserted.
• When configured for smart card authentication, Citrix Workspace app does not support virtual
private network (VPN) single‑sign on or session pre‑launch. To use VPN with smart card authen‑
tication, install the Citrix Gateway Plug‑in. Log on through a webpage using their smart cards
and PINs to authenticate at each step. Pass‑through authentication to StoreFront with the Citrix
Gateway Plug‑in isn’t available for smart card users.
• Citrix Workspace app updater communications with citrix.com and the Merchandising Server
aren’t compatible with smart card authentication on Citrix Gateway.
Warning
Some configuration requires registry edits. Using the Registry editor incorrectly might cause
problems that can require you to reinstall the operating system. Citrix can’t guarantee that prob‑
lems resulting from incorrect use of the Registry Editor can be solved. Make sure you back up the
registry before you edit it.
To enable single sign‑on for smart card authentication:
To configure Citrix Workspace app for Windows, include the following command‑line option during
installation:
• ENABLE_SSON=Yes
Single sign‑on is another term for pass‑through authentication. Enabling this setting prevents
Citrix Workspace app from displaying a second prompt for a PIN.
• In the Registry editor, navigate to the following path and set the SSONCheckEnabled string to
False if you have not installed the single sign‑on component.
HKEY_CURRENT_USER\Software{ Wow6432 } \Citrix\AuthManager\protocols\
integratedwindows\
HKEY_LOCAL_MACHINE\Software{ Wow6432 } \Citrix\AuthManager\protocols\
integratedwindows\
The key prevents the Citrix Workspace app authentication manager from checking for the single
sign‑on component and allows Citrix Workspace app to authenticate to StoreFront.
© 1999–2023 Cloud Soware Group, Inc. All rights reserved. 214

Citrix Workspace app for Windows
To enable smart card authentication to StoreFront instead of Kerberos, install Citrix Workspace app
for Windows with the following command‑line options:
• /includeSSON installs single sign‑on (pass‑through) authentication. Enables credential
caching and the use of pass‑through domain‑based authentication.
• If the user logs on to the endpoint with a dierent authentication method, for example, user
name and password, the command line is:
/includeSSON LOGON_CREDENTIAL_CAPTURE_ENABLE=No
This type of authentication prevents capturing of the credentials at logon time and allows Citrix
Workspace app to store the PIN during Citrix Workspace app login.
1. Open the Citrix Workspace app Group Policy Object administrative template by running
gpedit.msc.
2. Go to Administrative Templates > Citrix Components > Citrix Workspace > User Authenti‑
cation > Local user name and password.
3. Select Enable pass‑through authentication. Depending on the configuration and security set‑
tings, select Allow pass‑through authentication for all ICA option for pass‑through authenti‑
cation to work.
To configure StoreFront:
• When you configure the authentication service, select the Smart card check box.
For more information about using smart cards with StoreFront, see Configure the authentication ser‑
vice in the StoreFront documentation.
To enable user devices for smart card use:
1. Import the certificate authority root certificate into the device’s keystore.
2. Install your vendor’s cryptographic middleware.
3. Install and configure Citrix Workspace app.
To change how certificates are selected:
By default, if multiple certificates are valid, Citrix Workspace app prompts the user to choose a cer‑
tificate from the list. Instead, you can configure Citrix Workspace app to use the default certificate
(per the smart card provider) or the certificate with the latest expiry date. If there are no valid logon
certificates, the user is notified, and given the option to use an alternate logon method if available.
A valid certificate must have all of these characteristics:
• The current time of the clock on the local computer is within the certificate validity period.
• The Subject public key must use the RSA algorithm and have a key length of 1024 bits, 2048
bits, or 4096 bits.
• Key usage must include digital signature.
• Subject Alternative Name must include the User Principal Name (UPN).
© 1999–2023 Cloud Soware Group, Inc. All rights reserved. 215

Citrix Workspace app for Windows
• Enhanced key usage must include smart card logon and client authentication, or all key usages.
• One of the Certificate Authorities on the certificate’s issuer chain must match one of the allowed
Distinguished Names (DN) sent by the server in the TLS handshake.
Change how certificates are selected by using either of the following methods:
• On the Citrix Workspaceapp command line, specify the option AM_CERTIFICATESELECTIONMODE
={ Prompt | SmartCardDefault | LatestExpiry }.
Prompt is the default. For SmartCardDefault or LatestExpiry, if multiple certificates meet
the criteria, Citrix Workspace app prompts the user to choose a certificate.
Add the following key value to
the registry key
HKEY_CURRENT_USER OR
HKEY_LOCAL_MACHINE\
Software\[Wow6432Node\
Citrix\AuthManager:
CertificateSelectionMode={
Prompt
SmartCardDefault LatestExpiry }.
•
Values defined in HKEY_CURRENT_USER take precedence over values in HKEY_LOCAL_MACHINE to
best assist the user in selecting a certificate.
To use CSP PIN prompts:
By default, the PIN prompts presented to users are provided by Citrix Workspace app for Windows
rather than the smart card Cryptographic Service Provider (CSP). Citrix Workspace app prompts users
to enter a PIN when required and then passes the PIN to the smart card CSP. If your site or smart
card has more stringent security requirements, such as to disallow caching the PIN per‑process or
per‑session, you can configure Citrix Workspace app to use the CSP components to manage the PIN
entry, including the prompt for a PIN.
Change how PIN entry is handled by using either of the following methods:
• On the Citrix Workspace app command line, specify the option AM_SMARTCARDPINENTRY=CSP.
• Add the following key value to the registry key HKEY_LOCAL_MACHINE\Software\[
Wow6432Node\Citrix\AuthManager: SmartCardPINEntry=CSP.
Smart card support and removal changes
A Citrix Virtual Apps session logs o when you remove the smart card. If Citrix Workspace app is con‑
figured with smart card as the authentication method, configure the corresponding policy on Citrix
© 1999–2023 Cloud Soware Group, Inc. All rights reserved. 216

Citrix Workspace app for Windows
Workspace app for Windows to enforce the Citrix Virtual Apps session for logo. The user is still logged
into the Citrix Workspace app session.
Limitation:
When you log on to the Citrix Workspace app site using smart card authentication, the user name is
displayed as Logged On.
Fast smart card
Fast smart card is an improvement over the existing HDX PC/SC‑based smart card redirection. It im‑
proves performance when smart cards are used in high‑latency WAN environments.
Fast smart cards are supported on Windows VDA only.
To enable fast smart card logon on Citrix Workspace app:
Fast smart card logon is enabled by default on the VDA and disabled by default on Citrix Workspace
app. To enable fast smart card logon, include the following parameter in the default.ica file of the
associated StoreFront site:
1 copy[WFClient]
2 SmartCardCryptographicRedirection=On
3 <!--NeedCopy-->
To disable fast smart card logon on Citrix Workspace app:
Todisable fastsmart cardlogon on Citrix Workspace app, remove the SmartCardCryptographicRedirection
parameter from the default.ica file of the associated StoreFront site.
For more information, see smart‑cards.
Silent authentication for Citrix Workspace
Citrix Workspace app introducesa Group Policy Object (GPO) policy to enable silent authentication for
Citrix Workspace. This policy enables Citrix Workspace app to log in to Citrix Workspace automatically
at system startup. Use this policy only when domain pass‑through (single sign‑on or SSON) is config‑
ured for Citrix Workspace on domain‑joined devices. This feature is available from Citrix Workspace
app for Windows version 2012 and later.
For this policy to function, the following criteria must be met:
• Single sign‑on must be enabled.
• The SelfServiceMode key must be set to Off in the Registry editor.
Enabling silent authentication:
© 1999–2023 Cloud Soware Group, Inc. All rights reserved. 217

Citrix Workspace app for Windows
1. Open the Citrix Workspace app Group Policy Object administrative template by running gpedit
.msc.
2. Under the Computer Configuration node, go to Administrative Templates > Citrix
Workspace > Self Service.
3. Click the Silent authentication for Citrix Workspace policy and set it to Enabled.
4. Click Apply and OK.
Prevent Citrix Workspace app for Windows from caching passwords and usernames
By default, Citrix Workspace app for Windows automatically populates the last user name entered. To
clear autofill of the user name field, edit the registry on the user device:
1. Create a REG_SZ value HKLM\SOFTWARE\Citrix\AuthManager\RememberUsername.
2. Set its value false.
To disable the Remember my password check boxand preventan automatic sign‑in, create following
registry key on client machine where Citrix Workspace app for Windows is installed:
• Path: HKLM\Soware\wow6432node\Citrix\AuthManager
• Type: REG_SZ
• Name: SavePasswordMode
• Value: Never
Note:
Using Registry Editor incorrectly can cause serious problems that can require you to reinstall the
operating system. Citrix cannot guarantee that problems resulting from incorrect use of Registry
Editor can be solved. Use Registry Editor at your own risk. Make sure you back up the registry
before you edit it.
To prevent caching credentials for the StoreFront stores, see Prevent Citrix Workspace app for Win‑
dows from caching passwords and usernames in the StoreFront documentation.
Support for more than 200 groups in Azure AD
With this release, an Azure AD user who is part of more than 200 groups can view apps and desktops
assigned to the user. Previously, the same user wasn’t able to view these apps and desktops.
Note:
Users must sign out from Citrix Workspace app and sign in back to enable this feature.
© 1999–2023 Cloud Soware Group, Inc. All rights reserved. 218

Citrix Workspace app for Windows
Enabling authentication using conditional access
To enable authentication using conditional access with Azure AD, admins must perform the following
steps:
1. Launch the registry editor.
2. Navigate to the following registry path:
• For 64‑bit operating systems: Computer\HKEY_LOCAL_MACHINE\SOFTWARE\
WOW6432Node\Citrix\Dazzle
• For 32‑bit operating systems: Computer\HKEY_LOCAL_MACHINE\SOFTWARE\Citrix\
Dazzle
3. Create a registry value with the following attributes:
Registry key name: EdgeChromiumEnabled
Type: String Value
Value: True
4. Restart the Citrix Workspace app for the changes to take eect.
Proxy authentication support
Previously, on client machines configured with proxy authentication, if the proxy credentials don’t
exist in the Windows Credential Manager, you aren’t allowed to authenticate to Citrix Workspace
app.
From Citrix Workspace app for Windows version 2102 and later, on client machines configured for
proxy authentication, if the proxy credentials aren’t stored in the Windows Credential Manager, an
authentication prompt appears, asking you to enter the proxy credentials. Citrix Workspace app then
saves the proxy server credentials in Windows Credential Manager. This results in a seamless login
experience because you don’t need to manually save your credentials in Windows Credential Manager
before accessing Citrix Workspace app.
User‑Agent
Citrix Workspace app sends a user agent in network requests that can be used to configure authenti‑
cation policies including redirection of authentication to other Identity Providers (IdPs).
Note:
The version numbers mentioned as part of the User‑Agent in the following table are examples
and it is automatically updated based on the versions that you are using.
© 1999–2023 Cloud Soware Group, Inc. All rights reserved. 219

Citrix Workspace app for Windows
The following table describes the scenario, description, and the corresponding User‑Agent for each
scenario:
Scenario Description User‑Agent
Regular HTTP requests In general, a network request
made by Citrix Workspace
app contains a User‑Agent.
For example, network
requests like: GET /Citrix/
Roaming/Accounts and
GET / AGServices/
discover
CitrixReceiver
/23.5.0.63 Windows
/10.0 (22H2 Build
19045.2965)SelfService
/23.5.0.63 (Release)
X1Class CWACapable
Cloud store When a user authenticates to
a cloud store in Citrix
Workspace app, network
requests are made with a
specific User‑Agent. For
example, network requests
with path /core/connect/
authorize.
Mozilla/5.0 (Windows
NT 10.0; Win64; x64)
AppleWebKit/537.36 (
KHTML, like Gecko)
Chrome/113.0.0.0
Safari/537.36 Edg
/113.0.1774.50 CWA
/23.5.0.63 Windows
/10.0 (22H2 Build
19045.2965)
On‑premises store with
Gateway Advanced Auth
using Edge WebView
When a user authenticates to
the Gateway configured with
Advanced Auth on Citrix
Workspace app using Edge
WebView, network requests
are made with a specific
User‑Agent. For example,
network requests that
include: GET /nf/auth/
doWebview.do and
GET /logon/LogonPoint/
tmindex.html.
Mozilla/5.0 (Windows
NT 10.0; Win64; x64)
AppleWebKit/537.36 (
KHTML, like Gecko)
Chrome/108.0.0.0
Safari/537.36 Edg
/108.0.1462.54
CWAWEBVIEW/23.2.0.2111
Windows/10.0 (22H2
Build 19045.2364)
© 1999–2023 Cloud Soware Group, Inc. All rights reserved. 220

Citrix Workspace app for Windows
Scenario Description User‑Agent
On‑premises store with
Gateway Advanced Auth
using IE WebView
When a user authenticates to
the Gateway configured with
Advanced Auth on Citrix
Workspace app using Internet
Explorer WebView, network
requests are made with a
specific User‑Agent. For
example, network requests
that include: GET /nf/auth
/doWebview.do and
GET /logon/LogonPoint/
tmindex.html.
Mozilla/5.0 (Windows
NT 10.0; WOW64;
Trident/7.0; rv:11.0)
like Gecko, CWAWEBVIEW
/23.5.0.43
Custom web store When a user adds a custom
web store to Citrix Workspace
app, the app sends a
User‑Agent.
Mozilla/5.0 (Windows
NT 10.0; Win64; x64)
AppleWebKit/537.36 (
KHTML, like Gecko)
Chrome/113.0.0.0
Safari/537.36 Edg
/113.0.1774.50 CWA
/23.5.0.63 Windows
/10.0 (22H2 Build
19045.2965)
Domain pass‑through access matrix
October 7, 2023
If you are using Citrix Workspace and want to achieve domain pass‑through, the tables in the sub‑
sections describe the dierent scenarios and whether you can achieve domain pass‑through for each
scenario or not.
The dierentheader elements in the tablesand the additional information about the header elements
are as follows:
• End Point joined to: Indicates the directory to which the endpoint is joined. The directory pro‑
vides access control to on‑premises resources. This can be on‑premises Active Directory (AD),
Azure Active Directory (AAD) or hybrid.
© 1999–2023 Cloud Soware Group, Inc. All rights reserved. 221

Citrix Workspace app for Windows
• Identity Provider (IdP): Entity used to provide authentication services to Citrix Workspace. It
allows you to connect to the resources.
• Federated Authentication Service (FAS): For more information, see Enable single sign‑on for
workspaces with Citrix Federated Authentication Service.
• Virtual Delivery Agent (VDA): For more information, see Install VDAs.
• VDA Joined to: Indicates the directory to which the VDA device is joined. For more information,
see Identity and access management.
• Single sign‑on (SSO) to Citrix Workspace/VDA: Yes or No value indicates if domain pass‑through
to Citrix Workspace or VDA is supported.
• Citrix Workspace app: To achieve single sign‑on, see Configure single sign‑on during fresh in‑
stallation in Domain pass‑through authentication.
Note:
You might require latest version of Citrix Workspace app to get domain pass‑through support for
some of the following scenarios.
Domain pass‑through support for Citrix Workspace
End Point
Joined to IdP VDA Joined to
SSO to Citrix
Workspace SSO to VDA Documentation
AD On‑premises
Citrix
Gateway
AD Yes Citrix
Workspace
app/FAS
Domain
pass‑through
to Citrix
Workspace
using
on‑premises
Citrix
Gateway as
the identity
provider.
© 1999–2023 Cloud Soware Group, Inc. All rights reserved. 222

Citrix Workspace app for Windows
End Point
Joined to IdP VDA Joined to
SSO to Citrix
Workspace SSO to VDA Documentation
AD Adaptive Au‑
thentication
AD Yes Citrix
Workspace
app/FAS
To configure
adaptive au‑
thentication,
see Adaptive
Authentica‑
tion service
and follow
the
instruction in
Domain
pass‑through
to Citrix
Workspace
using
on‑premises
Citrix
Gateway as
the identity
provider.
AD Citrix
Gateway
federated to
another IdP
(AAD/Okta)
AD Yes Citrix
Workspace
app/FAS
Configure IdP
using
Configure
SAML single
sign‑on and
refer to the
documenta‑
tion for the
IdP used to
configure
domain
pass‑through.
© 1999–2023 Cloud Soware Group, Inc. All rights reserved. 223

Citrix Workspace app for Windows
End Point
Joined to IdP VDA Joined to
SSO to Citrix
Workspace SSO to VDA Documentation
AD Okta AD Yes Citrix
Workspace
app/FAS
Domain
pass‑through
to Citrix
Workspace
using Okta as
identity
provider.
AD/Hybrid
Joined
AAD (AD with
AAD Connect)
AD Yes Citrix
Workspace
app/FAS **
Domain
pass‑through
to Citrix
Workspace
using Azure
Active
Directory as
the identity
provider.
AD Any SAML
based IdP (ex
ADFS)
AD Yes Citrix
Workspace
app/FAS
See Connect
SAML as an
identity
provider to
Citrix Cloud
and refer to
the documen‑
tation for the
IdP used to
configure the
domain
pass‑through.
AD AD AD No Not
supported
NA
AD AD+OTP AD No Not
supported
NA
AD AAD AAD No Not
supported
NA
© 1999–2023 Cloud Soware Group, Inc. All rights reserved. 224

Citrix Workspace app for Windows
End Point
Joined to IdP VDA Joined to
SSO to Citrix
Workspace SSO to VDA Documentation
AAD AAD without
on‑premises
AD
AD Yes FAS Citrix
Workspace
uses
Microso
Edge
WebView
which allows
SSO to
workspace.
SSO to VDA is
supported via
FAS. For more
information,
see Enable
single sign‑on
for
workspaces
with Citrix
Federated Au‑
thentication
Service.
AAD AAD AAD Yes User must
enter
credentials.
Citrix
Workspace
uses
Microso
Edge
WebView
which allows
SSO to
Workspace.
SSO to VDA
isn’t
supported.
© 1999–2023 Cloud Soware Group, Inc. All rights reserved. 225

Citrix Workspace app for Windows
End Point
Joined to IdP VDA Joined to
SSO to Citrix
Workspace SSO to VDA Documentation
Non‑Domain
Joined
IdP that
supports
password less
authentica‑
tion ‑ link
AD No FAS Citrix
Workspace
uses
Microso
Edge
WebView
which allows
SSO to
Workspace.
SSO to VDA is
supported via
FAS. For more
information,
see Other
ways to
authenticate
to Citrix
Workspace.
Notes:
• Client must be reachable to AD for Kerberos to work.
• **Citrix Single Sign‑on (SSONSVR.exe) works only with the user name or password on the
client. If the user is using Windows Hello to sign in, then FAS is required.
• Authentication might not be fully silent in cloud if LLT is enabled or if the end user accep‑
tance policy is configured.
• It is recommended to configure FAS as it applies to non‑windows platforms.
Domain pass‑through support for StoreFront
End Point
Joined to IdP VDA Joined to
SSO to Citrix
Workspace SSO to VDA Documentation
AD StoreFront AD Yes Citrix
Workspace
app
Domain
pass‑through
authentica‑
tion
© 1999–2023 Cloud Soware Group, Inc. All rights reserved. 226

Citrix Workspace app for Windows
End Point
Joined to IdP VDA Joined to
SSO to Citrix
Workspace SSO to VDA Documentation
AD/Hybrid
joined/Win‑
dows Hello
for Business
StoreFront AD Yes(1) Citrix
Workspace
app /FAS(2)
Domain
pass‑through
authentica‑
tion and
Enable single
sign‑on for
workspaces
with Citrix
Federated Au‑
thentication
Service.
AD Citrix
Gateway ‑
Advanced Au‑
thentication
AD Yes Citrix
Workspace
app(3))
AD Citrix
Gateway ‑
Basic authen‑
tication
AD Yes Citrix
Workspace
app(4)
Domain
pass‑through
authentica‑
tion.
Notes:
1. In the Registry editor, navigate to the following path and set the SSONCheckEnabled string
to False if you have not installed the single sign‑on component.
HKEY_LOCAL_MACHINE\Software{ Wow6432 } \Citrix\AuthManager\protocols
\integratedwindows\
The key prevents the Citrix Workspace app authentication manager from checking for the
single sign‑on component and allows Citrix Workspace app to authenticate to StoreFront.
2. If you are using Windows Hello to sign in, FAS is required and registry configuration to en‑
able SSO.
3. Needs client to be reachable to AD as it uses Kerberos.
4. Works even if client is not reachable to AD. Not using Kerberos.
© 1999–2023 Cloud Soware Group, Inc. All rights reserved. 227

Citrix Workspace app for Windows
Domain pass‑through to Citrix Workspace using on‑premises Citrix
Gateway as the identity provider
October 7, 2023
Important:
This article helps in configuring domain pass‑through authentication. If you have already setup
on‑premises Gateway as IdP, skip to Configure domain pass‑through as the authentication
method in the Citrix Gateway section.
Citrix Cloud supports using an on‑premises Citrix Gateway as an identity provider to authenticate sub‑
scribers signing into their workspaces.
By using Citrix Gateway authentication, you can:
• Continue authenticating users through your existing Citrix Gateway so they can access the re‑
sources in your on‑premises Virtual Apps and Desktops deployment through Citrix Workspace.
• Use the Citrix Gateway authentication, authorization, and auditing functions with Citrix
Workspace.
• Provide your users access to the resources that they need through Citrix Workspace using fea‑
tures such as pass‑through authentication, smart cards, secure tokens, conditional access poli‑
cies, federation.
Citrix Gateway authentication is supported for use with the following product versions:
• Citrix Gateway 13.1.4.43 Advanced edition or later
Prerequisites:
• Cloud Connectors ‑ You need at least two servers on which to install the Citrix Cloud Connector
soware.
• An Active Directory and make sure that the domain is registered.
• Citrix Gateway requirements
– Use advanced policies on the on‑premises gateway because of the deprecation of classic
policies.
– When configuring the Gateway for authenticating subscribers to Citrix Workspace, the
gateway acts as an OpenID Connect provider. Messages between Citrix Cloud and Gate‑
way conform to the OIDC protocol, which involves digitally signing tokens. Therefore, you
must configure a certificate for signing these tokens.
– Clock synchronization – Citrix Gateway must be synchronized to NTP time.
For details, see Prerequisites in the Citrix Cloud documentation.
Before creating the OAuth IdP policy, you need to first set up Citrix Workspace or Cloud to use Gateway
as the authentication option in the IdP. For details on how to set up, see Connect an on‑premises
© 1999–2023 Cloud Soware Group, Inc. All rights reserved. 228

Citrix Workspace app for Windows
Citrix Gateway to Citrix Cloud. When you complete the setup, the Client ID, Secret, and Redirect URL
required for creating the OAuth IdP policy are generated.
Domain pass‑through for Workspace for web is enabled if you are using Internet Explorer, Microso
Edge, Mozilla Firefox, and Google Chrome. Domain pass‑through is enabled only when the client is
detected successfully.
Note:
If HTML5 client is preferred by a user or is enforced by the administrator, domain pass‑through
authentication method is not enabled.
When launching StoreFront URL in a browser, the Detect Receiver prompt is shown.
If the devices are managed, configure the group policy to disable this prompt instead of disabling
client detection. For more information, see:
• URLAllowlist in the Microso documentation.
• URLAllowlist in the Google Chrome documentation.
Note:
Protocol handler used by Citrix Workspace app is receiver:. Configure this as one of the URLs
allowed.
Users can also select the check box as shown in the following example prompt for a StoreFront URL in
the client detection prompt. Selectingthis check box also avoids the prompt forsubsequent launches.
The following steps explain how Citrix Gateway can be set up as IdP.
Create an OAuth IdP policy on the on‑premises Citrix Gateway
Creating an OAuth IdP authentication policy involves the following tasks:
1. Create an OAuth IdP profile.
2. Add an OAuth IdP policy.
3. Bind the OAuth IdP policy to a virtual server.
4. Bind the certificate globally.
© 1999–2023 Cloud Soware Group, Inc. All rights reserved. 229

Citrix Workspace app for Windows
Create an OAuth IdP profile
1. To create an OAuth IdP profile by using the CLI, type the following in the command prompt:
1 add authentication OAuthIdPProfile <name> [-clientID <string>][-
clientSecret ][-redirectURL <URL>][-issuer <string>][-audience
<string>][-skewTime <mins>] [-defaultAuthenticationGroup <
string>]
2
3 add authentication OAuthIdPPolicy <name> -rule <expression> [-
action <string> [-undefAction <string>] [-comment <string>][-
logAction <string>]
4
5 add authentication ldapAction <name> -serverIP <IP> -ldapBase "dc=
aaa,dc=local"
6
7 ldapBindDn <administrator@aaa.local> -ldapBindDnPassword <password
> -ldapLoginName sAMAccountName
8
9 add authentication policy <name> -rule <expression> -action <
string>
10
11 bind authentication vserver auth_vs -policy <ldap_policy_name> -
priority <integer> -gotoPriorityExpression NEXT
12
13 bind authentication vserver auth_vs -policy <OAuthIdPPolicyName> -
priority <integer> -gotoPriorityExpression END
14
15 bind vpn global – certkey <>
16
17 <!--NeedCopy-->
2. To create an OAuth IdP profile by using the GUI:
a) Log into your on‑premises Citrix Gateway management portal and navigate to Security >
AAA – Application Traic > Policies > Authentication > Advanced Policies > OAuth IDP.
© 1999–2023 Cloud Soware Group, Inc. All rights reserved. 230

Citrix Workspace app for Windows
b) In the OAuth IdP page, click the Profiles tab and click Add.
c) Configure the OAuth IdP profile.
Note:
• Copy and paste the Client ID, Secret, and Redirect URL values from the Citrix
Cloud > Identity and Access Management > Authentication tab to establish
the connection to Citrix Cloud.
• Enter the Gateway URL correctly in the Issuer Name field. For example, https:
//GatewayFQDN.com.
• Also copy and paste the client ID in the Audience field.
• Send Password: Enable this option for single sign‑on support. This option is
disabled by default.
d) On the Create Authentication OAuth IdP Profile screen, set values for the following pa‑
rameters and click Create.
• Name – Name of the authentication profile. Must begin with a letter, number, or the
underscore character (_). Name must have only letters, numbers, and the hyphen (‑),
period (.) pound (#), space ( ), at (@), equals (=), colon (:), and underscore characters.
© 1999–2023 Cloud Soware Group, Inc. All rights reserved. 231

Citrix Workspace app for Windows
You cannot change the name aer the profile is created.
• Client ID – Unique string that identifies SP. Authorization server infers client configu‑
ration using this ID. Maximum Length: 127.
• Client Secret – Secret string established by user and authorization server. Maximum
Length: 239.
• Redirect URL – Endpoint on SP to which code/token must be posted.
• Issuer Name – Identity of the server whose tokens are to be accepted. Maximum
Length: 127. Example: https://GatewayFQDN.com.
• Audience – Target recipient for the token sent by IdP. The recipient verifies this token.
• Skew Time – This option specifies the allowed clock skew (in minutes) that Citrix ADC
allows on an incoming token. For example, if skewTime is 10 then the token is valid
from (current time ‑ 10) mins to (current time + 10) mins, that is 20 mins in all. Default
value: 5.
• Default Authentication Group – A group added to the session internal group list
when this profile is chosen by IdP which can be used in the nFactor flow. It can be
used in the expression (AAA.USER.IS_MEMBER_OF(“xxx”)) for authentication policies
to identify relying party related nFactor flow. Maximum Length: 63
A group is added to the session for this profile to simplify policy evaluation and help in customiz‑
ing policies. This group is the default group that is chosen when the authentication succeeds in
addition to the extracted groups. Maximum Length: 63.
© 1999–2023 Cloud Soware Group, Inc. All rights reserved. 232
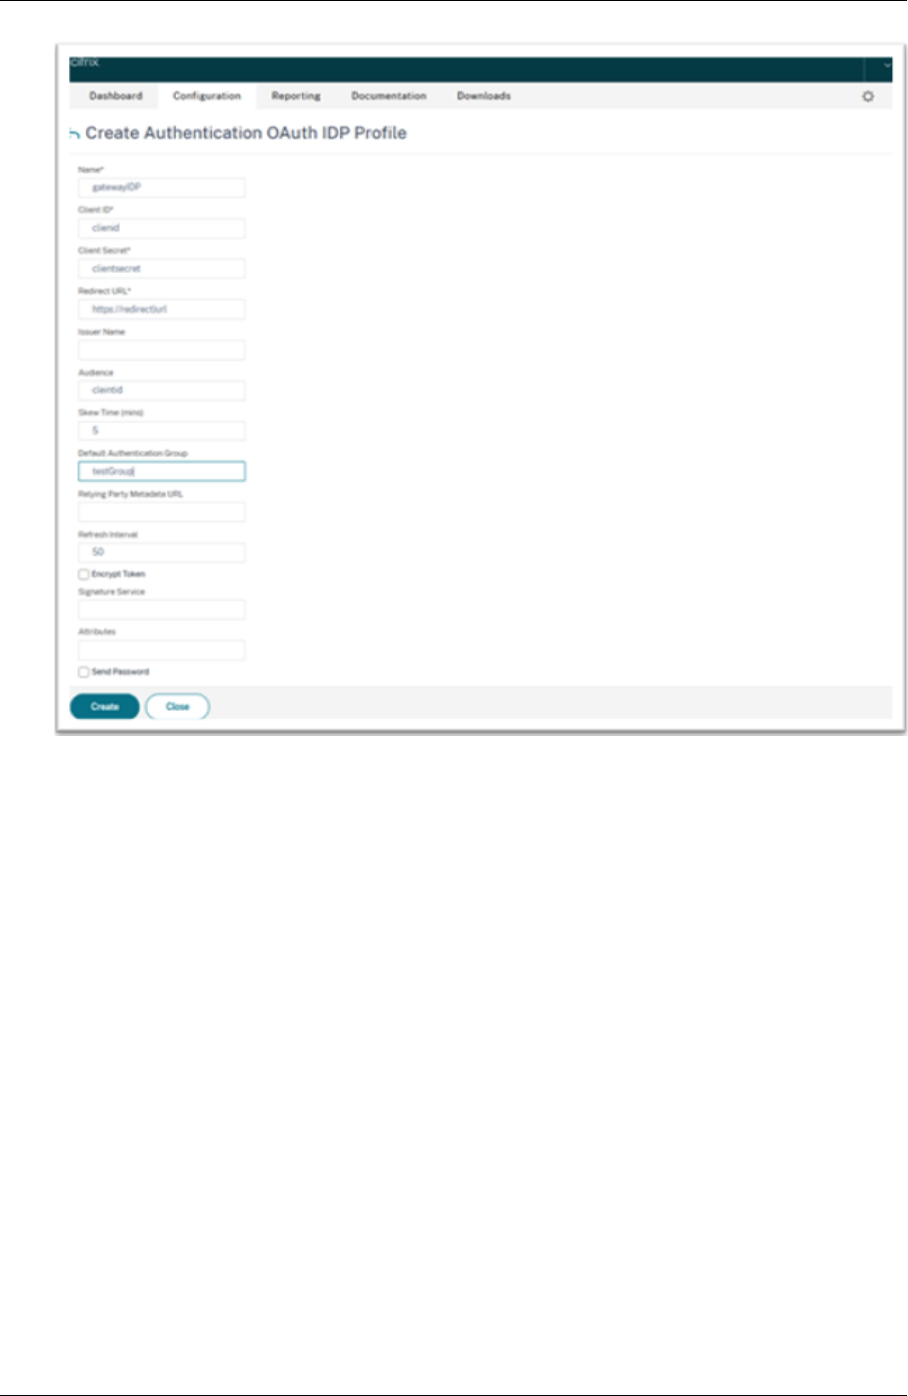
Citrix Workspace app for Windows
Add an OAuth IdP policy
1. In the OAuth IdP page, click Policies and click Add.
2. On the Create Authentication OAuth IdP Policy screen, set values for the following parameters
and click Create.
• Name – The name of the authentication policy.
• Action – Name of profile created earlier.
• Log Action – Name of the message log action to use when a request matches this policy.
Not a mandatory filed.
• Undefined‑Result Action – Action toperform if the resultof policy evaluation is undefined
(UNDEF). Not a mandatory field.
• Expression – Default syntax expression that the policy uses to respond to specific request.
For example, true.
• Comments – Any comments about the policy.
© 1999–2023 Cloud Soware Group, Inc. All rights reserved. 233

Citrix Workspace app for Windows
Note:
When sendPassword is set to ON (OFF by default), user credentials are encrypted and
passed through a secure channel to Citrix Cloud. Passing user credentials through a
secure channel allows you to enable SSO to Citrix Virtual Apps and Desktops upon launch.
Bind the OAuthIDP policy and LDAP policy to the virtual authentication server
Now you need to bind the OAuth IdP Policy to the virtual authentication server on the on‑premises
Citrix Gateway.
1. Log into your on‑premises Citrix Gateway management portal and navigate to Configuration >
Security > AAA‑Application Traic > Policies > Authentication > Advanced Policies > Actions
> LDAP.
2. On the LDAP Actions screen, click Add.
3. On the Create Authentication LDAP Server screen, set the values for the following parameters,
and click Create.
• Name – The name of the LDAP action.
• ServerName/ServerIP – Provide FQDN or IP of the LDAP server.
• Choose appropriate values for Security Type, Port, Server Type, Time‑Out.
• Make sure that Authentication is checked.
• Base DN – Base from which to start LDAP search. For example, dc=aaa, dc=local.
© 1999–2023 Cloud Soware Group, Inc. All rights reserved. 234

Citrix Workspace app for Windows
• Administrator Bind DN: User name of the bind to LDAP server. For example, admin@aaa
.local.
• Administrator Password/Confirm Password: Password to bind LDAP.
• Click Test Connection to test your settings.
• Server Logon Name Attribute: Choose “sAMAccountName”.
• Other fields are not mandatory and hence can be configured as required.
4. Navigate to Configuration > Security > AAA‑Application Traic > Policies > Authentication >
Advanced Policies > Policy.
5. On the Authentication Policies screen, click Add.
6. On the Create Authentication Policy page, set the values for the following parameters, and
click Create.
• Name – Name of the LDAP Authentication Policy.
• Action Type – Choose LDAP.
• Action – Choose the LDAP action.
• Expression – Default syntax expression that the policy uses to respond to specific request.
For example, true**.
Bind the certificate globally to the VPN
Binding the certificate globally to the VPN requires CLI access to the on‑premises Citrix Gateway. Using
Putty (or similar) login to the on‑premises Citrix Gateway using SSH.
1. Launch a command‑line utility, such as, Putty.
2. Sign in to the on‑premises Citrix Gateway using SSH.
3. Type the following command:
show vpn global
Note:
No certificate must be bound.
4. To list the certificates on the on‑premises Citrix Gateway, type the following command:
show ssl certkey
© 1999–2023 Cloud Soware Group, Inc. All rights reserved. 235

Citrix Workspace app for Windows
5. Select the appropriate certificate and type the following command to bind the certificate glob‑
ally to VPN:
bind vpn global -certkey cert_key_name
where cert_key_name is the name of the certificate.
6. Type the following command to check if the certificate is bound globally to the VPN:
show vpn global
Configure domain pass‑through as the authentication method in the Citrix Gateway
When you complete setting up the Citrix Gateway as IdP, perform the following steps to configure the
domain pass‑through as the authentication method in the Citrix Gateway.
When the domain pass‑through is set as the authentication method, the client uses Kerberos tickets
to authenticate instead of credentials.
Citrix Gateway supports both Impersonation and Kerberos Constrained Delegation (KCD). However,
this article describes KCD authentication. For more information, see Knowledge Center article
CTX236593.
Configuring the domain pass‑through includes the following steps:
1. Kerberos Constrained Delegation configuration
2. Client configuration
Kerberos Constrained Delegation configuration
1. Create a KCD user in the Active Directory
Kerberos works on a ticket granting system to authenticate users to resources, and involves a
client, server, and Key Distribution Center (KDC).
For Kerberos to work, the client needs to request a ticket from the KDC. The client must first au‑
thenticate to the KDC using their user name, password, and domain before requesting a ticket,
called as AS request.
© 1999–2023 Cloud Soware Group, Inc. All rights reserved. 236

Citrix Workspace app for Windows
2. Associate the new user with the Service Principal Name (SPN).
SPN of Gateway is used by the client to authenticate.
• Service Principal Name (SPN): A Service Principal Name (SPN) is a unique identifier of a
service instance. Kerberos authentication uses SPN to associate a service instance with a
service sign‑in account. This function allows a client application to request for the service
authentication of an account even if the client doesn’t have the account name.
SetSPN is the application for managing SPNs on a Windows device. With SetSPN, you can view,
edit, and delete SPN registrations.
a) In the Active Directory server, open a command prompt.
b) In the command prompt, enter the following command:
© 1999–2023 Cloud Soware Group, Inc. All rights reserved. 237

Citrix Workspace app for Windows
setspn –A http/<LB fqdn> <domain\Kerberos user>
c) To confirm the SPNs for the Kerberos user, run the following command:
setspn –l <Kerberos user>
The Delegation tab appears aer running the setspn command.
d) Select Trust this user for delegation to specified services only option and Use any au‑
thentication protocol option. Add the web server and select the HTTP service.
3. Create a DNS record for the client to find the Gateway’s SPN:
Add a TXT DNS record in the Active Directory.
Note:
Name must start with _Kerberos, Data must be the domain name. The FQDN must show
Kerberos..
© 1999–2023 Cloud Soware Group, Inc. All rights reserved. 238
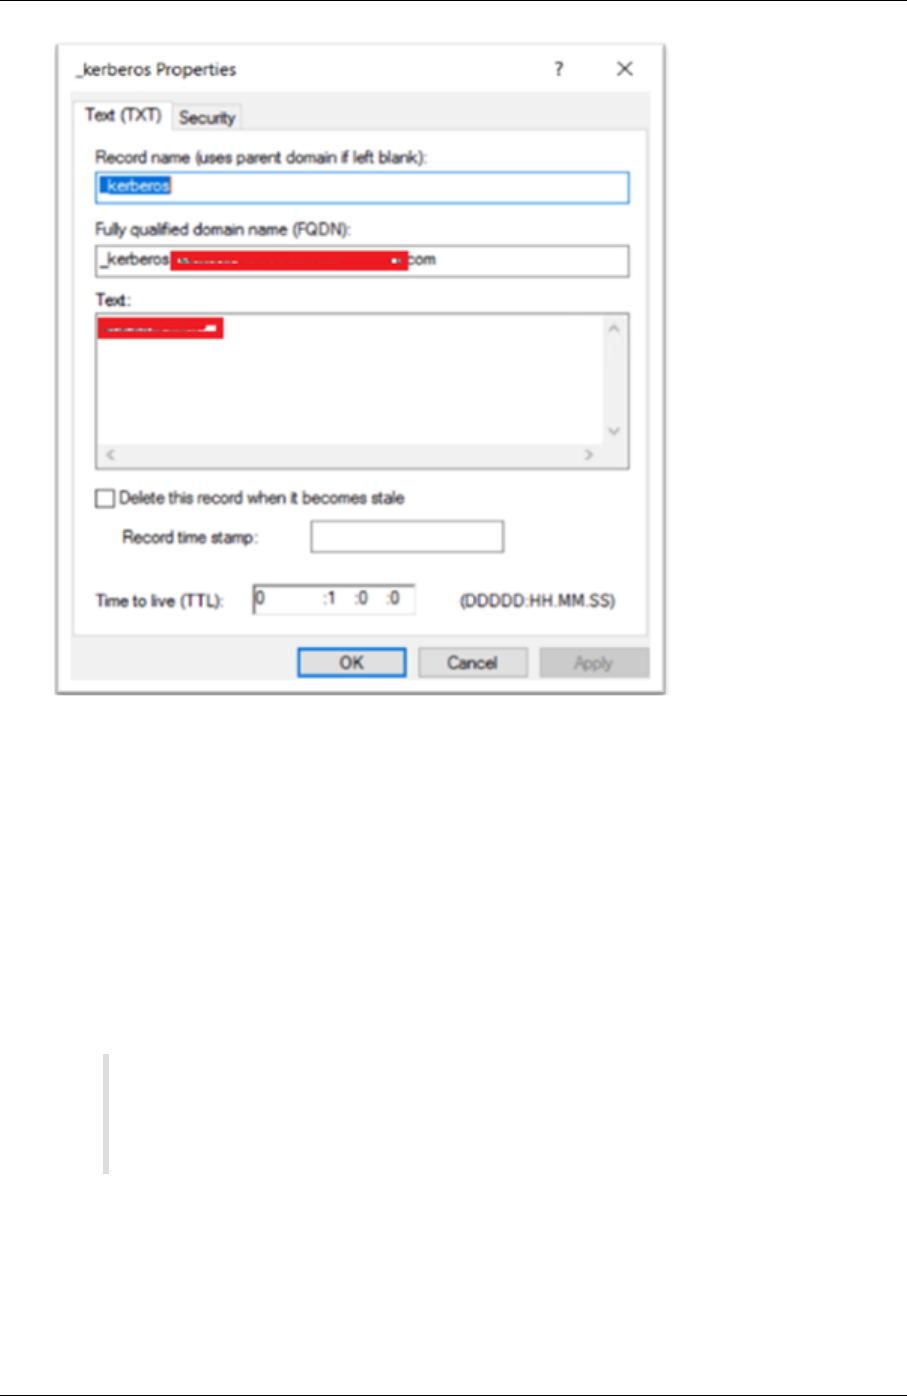
Citrix Workspace app for Windows
A window’s domain joined client uses _kerberos.fqdn to request tickets. For example, if the
client is joined to citrite.net, the operating system can get tickets for any websites with *.cit‑
rite.net. However, if the Gateway domain is external like gateway.citrix.com, then the client
operating system can’t get the Kerberos ticket.
Hence, you must create a DNS TXT record that helps the client to look up for the _ker‑
beros.gateway.citrix.com and get the Kerberos ticket for authentication.
4. Configure Kerberos as the authentication factor.
a) Create a KCD Account for the NetScaler user. Here we opted to do this manually, but you
can create a keytab file.
Note:
If you are using alternate domains (Internal domain and external domain) then you
must set the Service SPN to HTTP/PublicFQDN.com@InternalDomain.ext.
• Realm ‑ Kerberos Realm. Usually your Internal Domain suix.
• User Realm ‑ This is your user’s Internal Domain suix.
• Enterprise Realm ‑ This needs to be given only in certain KDC deployments where
KDC expects Enterprise user name instead of Principal Name.
© 1999–2023 Cloud Soware Group, Inc. All rights reserved. 239

Citrix Workspace app for Windows
• Delegated User ‑ This is the NetScaler user account for KCD that you created in AD in
the prior steps. Make sure that the password is correct.
b) Ensure that the Session Profile is using the right KCD account. Bind the session policy to
the authentication, authorization, and auditing virtual server.
© 1999–2023 Cloud Soware Group, Inc. All rights reserved. 240

Citrix Workspace app for Windows
c) Bind the Authentication policy to the authentication, authorization, and auditing virtual
server. These policies use authentication, authorization, and auditing methods that do
not obtain a password from the client, hence the need to use KCD. However, they must
still obtain the user name and domain information, in UPN format.
Note:
You can use IP address or EPA scan to dierentiate domain joined and non‑domain
© 1999–2023 Cloud Soware Group, Inc. All rights reserved. 241
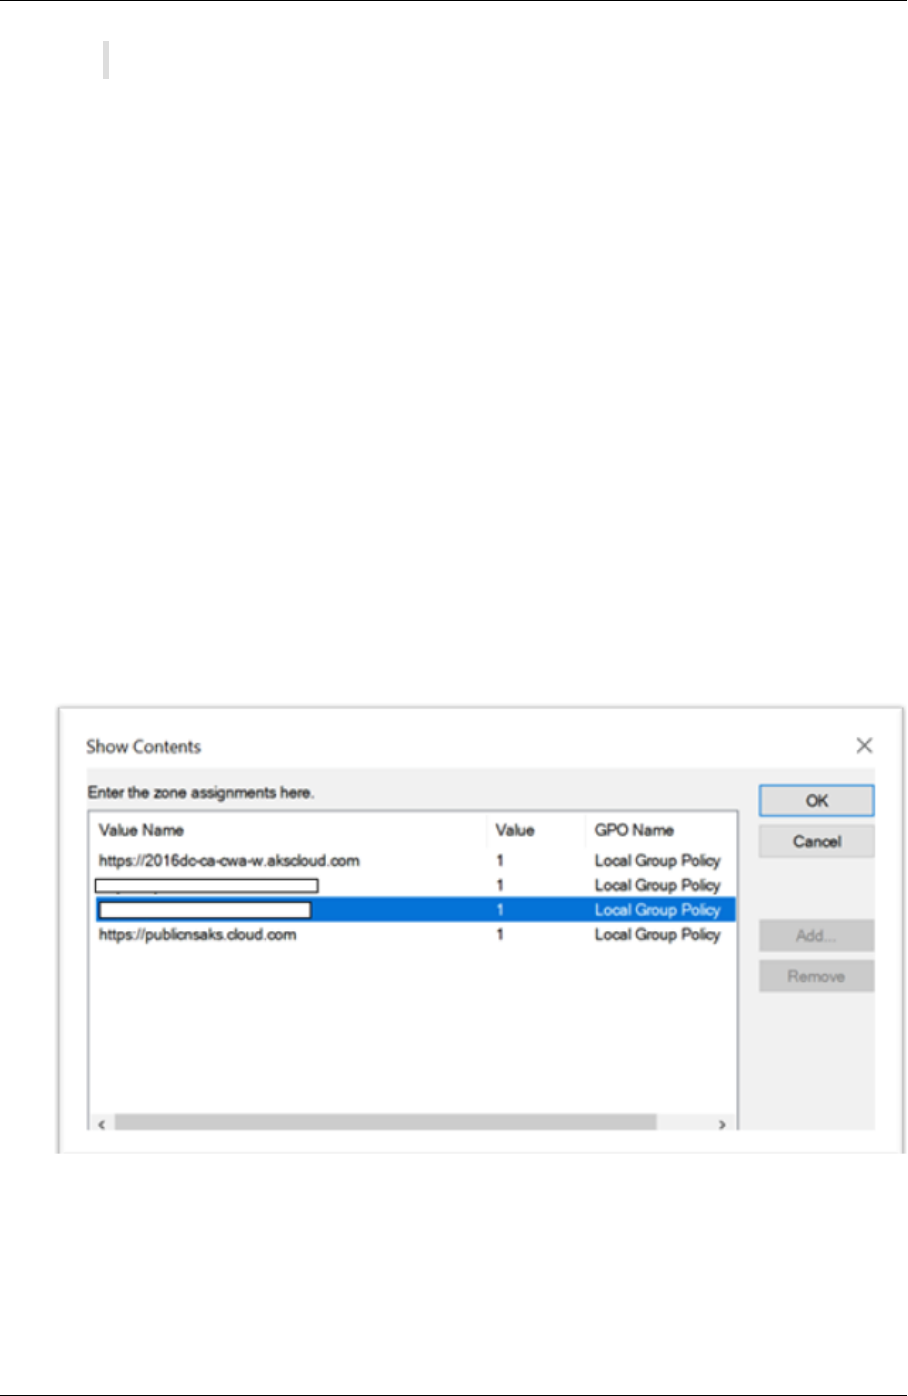
Citrix Workspace app for Windows
joined devices and use Kerberos or regular LDAP as a factor for authentication.
Configure the client
To allow successful single sign‑on to VDA, perform the following.
Prerequisites:
• Domain joined machine
• Citrix Workspace 2112.1or later with SSO setting enabled
• Trust necessary URLs that checks if the connections are secured
• Validate Kerberos from Client and AD. Client OS must have connectivity to AD to get Kerberos
tickets.
Following are some of the URLs to be trusted in the browser:
• Gateway URL or FQDN
• AD FQDN
• Workspace URL for SSO from browser‑based launches.
1. If you are using Internet Explorer, Microso Edge, or Google Chrome, do the following:
a) Launch the browser.
b) Open the Local Group Policy Editor on the Client.
a) Go to Computer Configuration > Windows Component > Internet Explorer > Internet
Control Panel > Security page.
b) Open Site to zone Assignment list and add all the listed URLs with the Value one (1).
c) (Optional) Run Gpupdate to apply policies.
© 1999–2023 Cloud Soware Group, Inc. All rights reserved. 242

Citrix Workspace app for Windows
2. If you are using Mozilla Firefox browser, do the following:
a) Open the browser.
b) Type about:config in the search bar.
c) Accept the risk and continue.
d) In the search field, type negotiate.
e) From the list of populated data, verify if the network.negotiate‑auth.trusted‑uris is set
to the domain value.
This completes the configuration on the client‑side.
3. Login using Citrix Workspace app or browser to Workspace.
This must not prompt for user name or password on a domain joined device.
Troubleshooting Kerberos
Note:
You must be domain admin to run this verification step.
In the command prompt or Windows PowerShell, run the following command to verify Kerberos ticket
validation for the SPN user:
KLIST get host/FQDN of AD
Domain pass‑through to Citrix Workspace using Azure Active Directory
as the identity provider
October 7, 2023
You can implement single sign‑on (SSO) to Citrix Workspace using Azure Active Directory (AAD) as an
identity provider with Domain joined, Hybrid, and Azure AD enrolled endpoints/VMs.
With this configuration, you can also use Windows Hello to SSO to Citrix Workspace using AAD enrolled
endpoints.
© 1999–2023 Cloud Soware Group, Inc. All rights reserved. 243

Citrix Workspace app for Windows
• You can authenticate to Citrix Workspace app using Windows Hello.
• FIDO2 based Authentication with the Citrix Workspace app.
• Single sign‑on to Citrix Workspace app from Microso AAD joined machines (AAD as IdP) and
conditional access with AAD.
To achieve SSO to virtual apps and desktops, you can either deploy FAS or configure Citrix Workspace
app as follows.
Note:
You can achieve SSO to the Citrix Workspace resources only when using Windows Hello. How‑
ever, you’re prompted for user name and password when accessing your published virtual apps
and desktops. To solve this prompt, you can deploy FAS and SSO to virtual apps and desktops.
Prerequisites:
1. Connect Azure Active Directory to Citrix Cloud. For more information, see Connect Azure Active
Directory to Citrix Cloud in the Citrix Cloud documentation.
2. Enable Azure AD authentication to access workspace. For more information, see Enable Azure
AD authentication for workspaces in the Citrix Cloud documentation.
To achieve single sign‑on to Citrix Workspace:
1. Configure Citrix Workspace app with includeSSON.
2. Disable prompt=login attribute in Citrix Cloud.
3. Configure Azure Active Directory pass‑through with Azure Active Directory Connect.
Configure Citrix Workspace app to support SSO
Prerequisites:
• Citrix Workspace version 2109 or higher.
Note:
If you’re using FAS for SSO, Citrix Workspace configuration isn’t needed.
1. Install Citrix Workspace app from administrative command line with option includeSSON:
CitrixWorkspaceApp.exe /includeSSON
2. Sign out from the Windows client and sign in to start the SSON server.
3. Click Computer configuration > Administrative templates > Citrix Components > Citrix
Workspace > User Authentication to change Citrix Workspace GPO to allow Local username
and password.
© 1999–2023 Cloud Soware Group, Inc. All rights reserved. 244

Citrix Workspace app for Windows
Note:
These policies can be pushed to the client device via Active Directory. This step is required
only when accessing Citrix Workspace from the web browser.
4. Enable the setting as per the screenshot.
5. Add the following trusted sites via GPO:
• https://aadg.windows.net.nsatc.net
• https://autologon.microsoftazuread-sso.com
• https://xxxtenantxxx.cloud.com: Workspace URL
© 1999–2023 Cloud Soware Group, Inc. All rights reserved. 245

Citrix Workspace app for Windows
Note:
Single sign‑on for AAD is disabled when the AllowSSOForEdgeWebview registry in Computer\
HKEY_LOCAL_MACHINE\SOFTWARE\WOW6432Node\Citrix\Dazzle is set to false.
Disable prompt=login parameter in Citrix Cloud
By default prompt=login is enabled for Citrix Workspace that forces the authentication even if the
user opted to stay signed in or if the device is Azure AD joined.
You candisable prompt=login in your citrix cloud account. Navigate toWorkspace Configuration
\Customize\Preferences-Federated Identity Provider Sessions and disable the tog‑
gle.
For more information, see Knowledge Center article CTX253779.
Note:
On AAD joined or hybrid AAD joined devices, if AAD is used as IdP for Workspace, then Citrix
Workspace app doesn’t prompt for credentials. Users can automatically sign in using work or
school account.
To allow users to sign in using dierent account, set the following registry to false.
Create and add a registry string REG_SZ with the AllowSSOForEdgeWebview name un‑
der Computer\HKEY_LOCAL_MACHINE\SOFTWARE\WOW6432Node\Citrix\Dazzle or
Computer\HKEY_CURRENT_USER\SOFTWARE\Citrix\Dazzle and set its value as False.
Alternatively, if users sign out from Citrix Workspace app, users can sign in with a dierent
© 1999–2023 Cloud Soware Group, Inc. All rights reserved. 246

Citrix Workspace app for Windows
account on the next sign‑in.
Configure Azure Active Directory pass‑through with Azure Active Directory Connect
• If you’re installing Azure Active Directory Connect for the first time, on the User sign‑in page,
select Pass‑through Authentication as the sign On method. For more information, see Azure
Active Directory Pass‑through Authentication: Quickstart in the Microso documentation.
• If Microso Azure Active Directory Connect exists:
1. Select the Change user sign‑in task and click Next.
2. Select Pass‑through Authentication as the sign‑in method.
Note:
You can skip this step if the client device is Azure AD joined, or hybrid joined. If the device is AD
joined, domain pass‑through authentication works using kerberos authentication.
Domain pass‑through to Citrix Workspace using Okta as identity
provider
October 7, 2023
You can achieve single sign‑on to Citrix Workspace using Okta as the identity provider (IdP).
Prerequisites:
• Citrix Cloud
– Cloud Connectors
Note:
If you’re new to Citrix Cloud, define a Resource Location, and have the connectors config‑
ured. It’s recommended to have at least two cloud connectors deployed in production envi‑
ronments. For information on how to install Citrix Cloud Connectors, see Cloud Connector
Installation.
– Citrix Workspace
– Federated Authentication Service (optional). For more information, see Enable single
sign‑on for workspaces with Citrix Federated Authentication Service.
• Citrix DaaS (formerly Citrix Virtual Apps and Desktops Service)
• AD domain joined VDA or physical AD joined devices
© 1999–2023 Cloud Soware Group, Inc. All rights reserved. 247

Citrix Workspace app for Windows
• Okta Tenant
– Okta IWA Agent (Integrated Windows Authentication)
– Okta Verify (Okta Verify can be downloaded from the app store) (optional)
• Active Directory
1. Deploy the Okta AD Agent:
a) In the Okta Admin portal, click Directory > Directory Integrations.
b) Click Add Directory > Add Active Directory.
c) Review the installation requirements by following the workflow, which covers the Agent
Architecture and Installation Requirements.
d) Click the Set Up Active Directory button and then click Download Agent.
e) Install Okta AD Agent onto a Windows server by following the instruction provided in Install
the Okta Active Directory agent.
Note:
Make sure that the prerequisites mentioned in Active Directory integration prerequi‑
sites are met before installing the agent.
2. Set up Integrated Windows Authentication (IWA):
a) On the Okta Admin portal, click Security and then Delegated Authentication.
b) Scroll down to the On‑prem Desktop SSO part on the page that loads and click Download
Agent.
c) Set up the Routing Rules for IWA. For more information, see Configure Identity Provider
routing rules.
3. Launch the Okta customer portal.
Note:
• When you install Okta IWA Agent and the status is enabled, you can sign in from a Win‑
dows Domain joined device. This configuration also jumps past the login and directs
you to the IWA login page and passes the user credentials.
© 1999–2023 Cloud Soware Group, Inc. All rights reserved. 248

Citrix Workspace app for Windows
• For more information on how to troubleshoot any issues, see Install and configure the
Okta IWA Web agent for Desktop single sign‑on.
4. Sign in to Citrix Cloud at https://citrix.cloud.com and enable Okta as the IdP. For infor‑
mation, see Tech Insight: Authentication ‑ Okta in the Citrix Tech Zone documentation.
Note:
You can sign in from either the Citrix Workspace app or browser, both provides the pass‑
through experience as per the Tech Zone documentation.
5. To achieve SSO to virtual apps and desktops, you can either deploy FAS or configure the Citrix
Workspace app.
Note:
Without FAS, you’re prompted for the AD user name and password. For more information,
see Enable single sign‑on for workspaces with Citrix Federated Authentication Service.
If you aren’t using FAS, Configure Citrix Workspace app to support SSO.
HDX
September 26, 2023
This section describes the following:
• Graphics and display
• Optimized Microso Teams
• HDX transport
• Browser content redirection
• Bidirectional content redirection
• ICA settings reference
© 1999–2023 Cloud Soware Group, Inc. All rights reserved. 249

Citrix Workspace app for Windows
Graphics and display
October 7, 2023
Multi‑monitor support
You can use up to eight monitors with Citrix Workspace app for Windows.
Each monitor in a multiple monitor configuration has its own resolution designed by its manufacturer.
Monitors can have dierent resolutions and orientations during sessions.
Sessions can span multiple monitors in two ways:
• Full screen mode, with multiple monitors shown inside the session; applications snap to moni‑
tors as they would locally.
Citrix Virtual Apps and Desktops and Citrix DaaS: To display the Desktop Viewer window
across any rectangular subset of monitors, resize the window across any part of those moni‑
tors and click Maximize.
• Windowed mode, with one single monitor image for the session, applications do not snap to
individual monitors.
Citrix Virtual Apps and Desktops and Citrix DaaS: When any desktop in the same assignment (for‑
merly “desktop group”) is launched then, the window setting is preserved and the desktop is dis‑
played across the same monitors. Multiple virtual desktops can be displayed on one device provided
the monitor arrangement is rectangular. If the primary monitor on the device is used by the virtual
apps and desktops session, it becomes the primary monitor in the session. Otherwise, the numeri‑
cally lowest monitor in the session becomes the primary monitor.
To enable multi‑monitor support, check the following:
• The user device is configured to support multiple monitors.
• The operating system can detect each of the monitors. On Windows platforms, to verify that
this detection occurs, go to Settings > System and click Display and confirm that each monitor
appears separately.
• Aer your monitors are detected:
– Citrix Virtual Desktops: Configure the graphics memory limit using the Citrix Machine
Policy setting Display memory limit.
– Citrix Virtual Apps: Depending on the version of the Citrix Virtual Apps server, you’ve
installed:
*
Configure the graphics memory limit using the Citrix Computer Policy setting Dis‑
play memory limit.
© 1999–2023 Cloud Soware Group, Inc. All rights reserved. 250

Citrix Workspace app for Windows
*
From the Citrix management console for the Citrix Virtual Apps server, select the farm
and in the task pane, select:
· Modify Server Properties > Modify all properties > Server Default > HDX
Broadcast > Display or
· Modify Server Properties > Modify all properties > Server Default > ICA > Dis‑
play) and
*
Set the Maximum memory to use for each session’s graphics.
Check if the setting is large enough (in kilobytes) to provide suicient graphic memory. If this setting
isn’t high enough, the published resource is restricted to the subset of the monitors that fits within
the size specified.
Using Citrix Virtual desktops on dual monitor:
1. Select the Desktop Viewer and click the down arrow.
2. Select Window.
3. Drag the Citrix Virtual Desktops screen between the two monitors. Ensure that about half the
screen is present in each monitor.
4. From the Citrix Virtual Desktop toolbar, select Full‑screen.
The screen is now extended to both the monitors.
For calculating the session’s graphic memory requirements for Citrix Virtual Apps and Desktops and
Citrix DaaS, see Knowledge Center article CTX115637.
Hardware decoding
When using Citrix Workspace app (with HDX engine 14.4), the GPU can be used for H.264 decoding
wherever it’s available at the client. The API layer used for GPU decoding is DirectX Video Acceleration.
To enable hardware decoding using Citrix Workspace app Group Policy Object administrative
template:
1. Open the Citrix Workspace app Group Policy Object administrative template by running
gpedit.msc.
2. Under the Computer Configuration node, go to Administrative Templates > Citrix
Workspace >User Experience.
3. Select Hardware Acceleration for graphics.
4. Select Enabled and click Apply and OK.
© 1999–2023 Cloud Soware Group, Inc. All rights reserved. 251
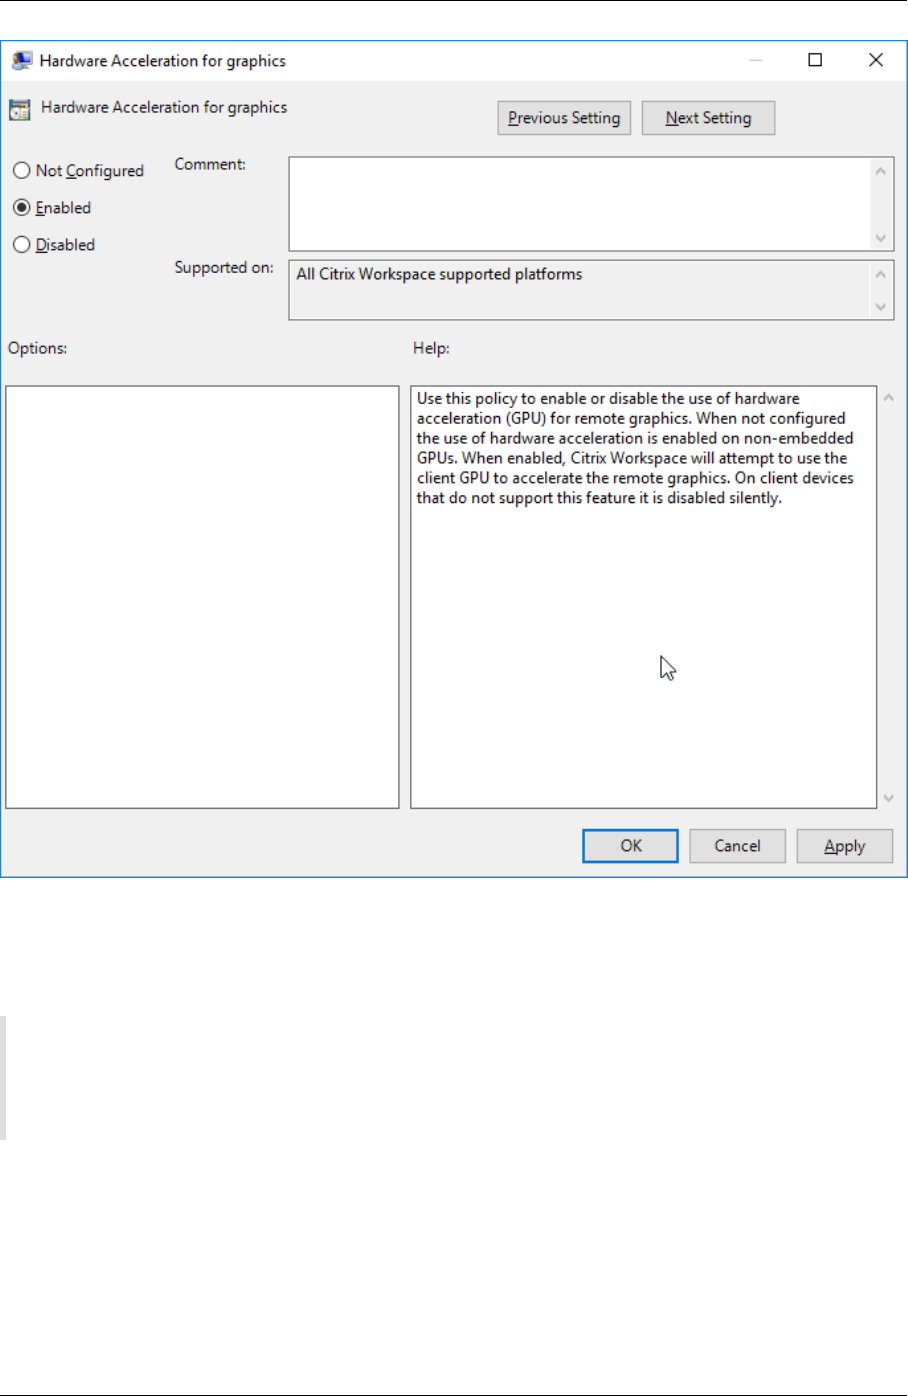
Citrix Workspace app for Windows
To validate if the policy is set and hardware acceleration is used for an active ICA session, check the
following registry entries:
Registry Path: HKEY_CURRENT_USER\SOFTWARE\Citrix\ICA Client\CEIP\Data\GfxRender.
Tip
The value for Graphics_GfxRender_Decoder and Graphics_GfxRender_Renderer must be 2.
If the value is 1, that means CPU‑based decoding is being used.
When using the hardware decoding feature, consider the following limitations:
• If the client has two GPUs and if one of the monitors is active on the second GPU, CPU decoding
is used.
• When connecting to a Citrix Virtual Apps server running on Windows Server 2008 R2, don’t use
hardware decoding on the user’s Windows device. If enabled, issues like slow performance
© 1999–2023 Cloud Soware Group, Inc. All rights reserved. 252

Citrix Workspace app for Windows
while highlighting text and flickering issues are seen.
Virtual display layout
This feature lets you define a virtual monitor layout that applies to the remote desktop. You can also
split a single client monitor virtually into up to eight monitors on the remote desktop. You can con‑
figure the virtual monitors on the Monitor Layout tab in the Desktop Viewer. There, you can draw
horizontal or vertical lines to separate the screen into virtual monitors. The screen is split according
to specified percentages of the client monitor resolution.
You can set a DPI for the virtual monitors that is used for DPI scaling or DPI matching. Aer applying a
virtual monitor layout, resize or reconnect the session.
This configuration applies only to full‑screen, single‑monitor desktop sessions, and does not aect
any published applications. This configuration applies to all subsequent connections from this client.
Starting from Citrix Workspace app for Windows 2106, virtual display layout is also supported for full‑
screen and multi‑monitor desktop sessions. Virtual display layout is enabled by default. In a multi‑
monitor scenario, the same virtual display layout is applied to all the session monitors if the total
number of virtual displays doesn’t exceed eight virtual displays. In case this limit is exceeded, the
virtual display layout is ignored and not applied to any session monitor.
Multi‑monitor enhancement can be disabled by setting the following registry key:
• HKEY_CURRENT_USER\Software\Citrix\XenDesktop\DesktopViewer
Name: SplitAllMonitors
Type: DWORD
Values:
1 ‑ Enabled
0 ‑ Disabled
DPI scaling
Citrix Workspace app is DPI aware and supports matching display resolution and DPI scale settings
on the Windows client to the virtual apps and desktops session.
DPI scaling is mostly used with large size and high‑resolution monitors to display applications, text,
images, and other graphical elements in a size that can be viewed comfortably.
This feature is enabled by default, and it is the recommended setting for all use cases. However, ad‑
ministrators can still configure the DPI scaling using Group Policy Object (GPO) administrative tem‑
plate (per‑machine configuration) if necessary.
To configure DPI scaling using GPO administrative template:
© 1999–2023 Cloud Soware Group, Inc. All rights reserved. 253

Citrix Workspace app for Windows
To configure DPI scaling using GPO administrative template:
1. Open the Citrix Workspace app Group Policy Object administrative template by running
gpedit.msc.
2. Under the Computer Configuration node, go to Administrative Templates> Citrix Compo‑
nents > Citrix Workspace > DPI
3. Select High DPI policy.
4. Select from one of the following options:
a) Yes ‑ Indicates that high DPI is applied in a session.
b) No, use the native resolution ‑ Indicates that the resolution is set by the operating system.
5. Click Apply and OK.
6. From the command line, run the gpupdate /force command to apply the changes.
Configure DPI scaling using the graphical user interface:
© 1999–2023 Cloud Soware Group, Inc. All rights reserved. 254

Citrix Workspace app for Windows
1. Right‑click Citrix Workspace app icon from the notification area.
2. Select Advanced Preferences and click High DPI setting.
3. Select one of the following options:
a) Yes ‑ Indicates that high DPI is applied in a session.
b) No, use the native resolution ‑ Indicates that the Citrix Workspace app detects the DPI
on the VDA and applies it.
c) Let the operating system scale the resolution ‑ By default, this option is selected. It
allows the Windows to handle the DPI scaling. This option also means that the High DPI
policy is set to disabled.
4. Click Save.
5. Restart the Citrix Workspace app session for the changes to take eect.
NOTE:
Additional considerations:
• DPI matching requires Citrix Virtual Apps and Desktops versions 1912 LTSR or later.
• The No, use the native resolution (DPI matching) setting is recommended in most cases.
• The default setting Let the operating system scale the resolution disables DPI awareness
on the Citrix Workspace App. This mode might result in blurry graphics when the Windows
client DPI scale is set to anything other than 100%. This mode doesn’t support multiple
monitors with dierent DPI scales.
• The Yes option results in the Citrix Workspace app upscaling the session window to match
the DPI scale configured on the Windows client. This is a legacy function recommended
only for connections to legacy XenApp and XenDesktop environments when DPI scales
above 100% are required on the client. This mode might result in blurry graphics.
For information about troubleshooting issues with DPI scaling, see Knowledge Center article
CTX230017.
H.265 video encoding
Citrix Workspace app supports the use of the H.265 video codec for hardware acceleration of remote
graphics and videos. H.265 video codec must be supported and enabled on both the VDA and Citrix
Workspace app. If the GPU on the endpoint doesn’t support H.265 decoding using the DXVA interface,
the H265 Decoding for graphics policy setting is ignored and the session falls back H.264 video codec.
Prerequisites:
1. VDA 7.16 and later.
2. Enable the Optimize for 3D graphics workload policy on the VDA.
3. Enable the Use hardware encoding for video codec policy on the VDA.
© 1999–2023 Cloud Soware Group, Inc. All rights reserved. 255

Citrix Workspace app for Windows
Note:
H.265 encoding is supported only on the NVIDIA GPU.
In Citrix Workspace app for Windows, this feature is set to Disabled by default.
Configuring Citrix Workspace app to use H.265 video encoding using Citrix Group Policy Object
(GPO) administrative template:
1. Open the Citrix Workspace app Group Policy Object administrative template by running
gpedit.msc.
2. Under the Computer Configuration node, go to Administrative Templates > Citrix
Workspace > User Experience.
3. Select the H265 Decoding for graphics policy.
4. Select Enabled.
5. Click Apply and OK.
Configuring H.265 video encoding using Registry editor:
Enabling H.265 video encoding on a non‑domain joined network on a 32‑bit operating system:
1. Launch the Registry Editor using regedit on the Run command.
2. Navigate to HKEY_LOCAL_MACHINE\SOFTWARE\Policies\Citrix\ICA Client\
Graphics Engine.
3. Create a DWORD key by name EnableH265 and set the value of the key to 1.
Enabling H.265 video encoding on a non‑domain joined network on a 64‑bit operating system:
1. Launch the Registry Editor using regedit on the Run command.
2. Navigate to HKEY_LOCAL_MACHINE\SOFTWARE\Wow6432Node\Policies\Citrix\ICA
Client\Graphics Engine.
3. Create a DWORD key by name EnableH265 and set the value of the key to 1.
Restart the session for the changes to take eect.
Note:
• If the Hardware acceleration for Graphics policy is disabled in the Citrix Workspace app
for Windows GroupPolicyObject administrativetemplate, the H265 Decoding for graphics
policy settings are ignored and the feature does not work.
• Run the HDX Monitor 3.x tool to identify if the H.265 video encoder is enabled within the ses‑
sions. For more information about HDX Monitor 3.x tool, see the Knowledge Center article
CTX135817.
© 1999–2023 Cloud Soware Group, Inc. All rights reserved. 256

Citrix Workspace app for Windows
Optimized Microso Teams
November 16, 2023
• Screen sharing
• Encoder performance estimator
• Acoustic Echo Cancellation
Upgraded version of WebRTC for the optimized Microso Teams
Starting from Version 2209. the version of WebRTC that is used for the optimized Microso Teams is
upgraded to version M98.
Background blurring and eects for Microso Teams optimization with HDX
Citrix Workspace app for Windows now supports background blurring and eects in Microso Teams
optimization with HDX.
You can either blur or replace the background with a custom image and avoid unexpected distractions
by helping the conversation stay focused on the silhouette (body and face). The feature can be used
with either P2P or conference calls.
Note:
This feature is now integrated with the Microso Teams UI/buttons. MultiWindow support is
a prerequisite that requires a VDA update to 2112 or higher. For more information, see Multi‑
window meetings and chat.
Limitations:
• Admin and user‑defined background replacement is not supported.
• The background eect doesn’t persist between sessions. When you close and relaunch
Microso Teams or VDA is reconnected, the background eect is reset to o.
• Aer the ICA session is reconnected, the eect is o. However, the Microso Teams UI shows
that the previous eect is still On by a tick mark. Citrix and Microso are working together to
resolve this issue.
• The device must be connected to the internet while replacing the background image.
Note:
This feature is available only aer future update roll‑out from Microso Teams. When the update
is rolled‑out by Microso, you can check CTX253754 and the Microso 365 Public roadmap for
the documentation update and the announcement.
© 1999–2023 Cloud Soware Group, Inc. All rights reserved. 257

Citrix Workspace app for Windows
Screen sharing
Starting with Version 2006.1, new functionalities in the outgoing screen sharing feature for the Mi‑
croso Teams application that uses HDX optimization are introduced.
The contentsshared using Microso Teams are limitedto the contents of the Desktop Viewer window.
Areas outside the Desktop Viewer window (client local desktop, apps) are blacked out.
On a Windows 10 operating system, the following aren’t blacked out when they overlap the Desktop
Viewer window:
• Start menu, Search menu, and Task View.
• Notification bar and Notifications that appear at the right‑side of the task bar.
• On a multi‑monitor set up with dierent DPI settings, if a local app is overlapping 2 dierent
monitors and its DPI doesn’t match the main monitor DPI which has the Desktop Viewer win‑
dow.
• App and preview shown when you mouse‑hover over the app’s icon in the task bar.
Encoder performance estimator
The HdxRtcEngine.exe is the WebRTC media engine embedded in Citrix Workspace app that han‑
dles Microso Teams redirection. Starting from Citrix Workspace app 1912 or higher, HdxRtcEngine
.exe can estimate the best encoding resolution that the endpoint’s CPU can sustain without over‑
loading. Possible values are 240p, 360p, 480p, 720p, and 1080p.
The performance estimation process (also called webrtcapi.EndpointPerformance) runs when
HdxTeams.exe initializes. The macroblock code determines the best resolution that can be achieved
with the particular endpoint. The Codec negotiation includes the highest possible resolution. The
Codec negotiation can be between the peers, or between the peer and the conference server.
There are four performance categoriesforendpoints that have its own maximum available resolution:
Endpoint performance Maximum resolution Registry key value
fast 1080p (1920x1080 16:9 @ 30
fps)
3
medium 720p (1280x720 16:9 @ 30 fps) 2
slow 360p (either 640x360 16:9 @
30 fps, or 640x480 4:3 @ 30
fps)
1
very slow
240p (either 320x180 16:9 @
30 fps, or 320x240 4:3 @ 30
fps)
0
© 1999–2023 Cloud Soware Group, Inc. All rights reserved. 258

Citrix Workspace app for Windows
Registry Path in Citrix Workspace app:
Navigate to the registry path HKEY_CURRENT_USER\SOFTWARE\Citrix\HDXMediaStream and create
the following key:
Name Type Values Description
OverridePerformance DWORD 0;1;2;3 Force desired
performance. Value
must be in the range
between 0 and 3,
where 0 indicates
slow and 3 fast.
For information about configuring the endpoint encoder, see Encoder performance estimator.
For more information about Microso Teams optimization, see Optimization for Microso Teams.
Acoustic Echo Cancellation
Echo cancellation in HdxRtcEngine.exe can be disabled to troubleshoot audio performance issues
or compatibility with peripherals that have built‑in AEC capabilities.
Navigate to the registry path HKEY_CURRENT_USER\SOFTWARE\Citrix\HDXMediaStream and create
the following key:
Name: EnableAEC
Type: REG_DWORD
Data: 0
(0 disables AEC. 1 enables AEC. If Regkey isn’t present, the default behavior in HdxRtcEngine is to
enable AEC, irrespective of the peripheral’s hardware capabilities.)
Enhancements to Microso Teams optimization
• Starting from Citrix Workspace app 2204.1 for Windows, Microso Teams supports incoming
video and screen sharing when Citrix Workspace app for Windows with App Protection enabled
is on Desktop Viewer mode only. Published apps in seamless mode don’t render incoming video
and screen sharing.
• Starting from Citrix Workspace app 2112.1 for Windows, the following features (MultiWindow
and Give/Take Control) are available only aer future update roll‑out from Microso Teams.
When the update is rolled‑out by Microso, you can check CTX253754 for the documentation
update and the announcement.
© 1999–2023 Cloud Soware Group, Inc. All rights reserved. 259

Citrix Workspace app for Windows
– Multi‑window chat and meetings for Microso Teams: You can use multiple windows
for chat and meetings in Microso Teams when optimized by HDX in Citrix Virtual Apps and
Desktops (2112 or higher). You can pop out the conversations or meetings in various ways.
For details about the pop‑out window feature, see Teams Pop‑Out Windows for Chats and
Meetings on the Microso Oice 365 site.
If you’re running an older version of Citrix Workspace app or Virtual Delivery Agent (VDA),
Microso might deprecate the single‑window code in the future. However, you can up‑
grade to the VDA or Citrix Workspace app version that supports multiple windows (2112 or
higher), before nine months aer the feature is GA.
– Give control: You can use the Give control button to give control access of your shared
screen to other users participating in the meeting. The other participant can make selec‑
tions and modify the shared screen through keyboard, mouse, and clipboard input. You’ll
both have control of the shared screen and you can take back the control anytime.
– Take control: During screen sharing sessions, any participants can request control access
through the Request control button. The person sharing the screen can then approve or
deny the request. When you’ve the control, you can control the keyboard and mouse input
on the screen shared and release the control to stop sharing control.
Limitation:
The Request control option is not available during the peer‑to‑peer call between an optimized
user and a user on the native Microso Teams desktop client that is running on the endpoint.
As a workaround, users can join a meeting to get the Request control option.
– Dynamic e911: Citrix Workspace app supports dynamic emergency calling. When used in
Microso Calling Plans, Operator Connect, and Direct Routing, it provides the option to:
*
configure and route emergency calls
*
notify security personnel
The notification is sent based on the current location of the Citrix Workspace app that runs
on the endpoint, instead of the Microso Teams client on the VDA.
Ray Baum’s law requires the 911 caller’s dispatchable location to be transmitted to the ap‑
propriate Public Safety Answering Point (PSAP). Starting from Citrix Workspace app 2112.1
for Windows, Microso Teams Optimization with HDX is compliant with Ray Baum’s law.
– App sharing: Previously, you weren’t able to share an app using the Screen sharing fea‑
ture in Microso Teams when you enable the HDX 3D Pro policy in Citrix Studio.
Starting with Citrix Workspace app 2112.1 for Windows and Citrix Virtual Apps and Desktops
2112, Screen sharing feature allows you to share app in Microso Teams. You can share an app
when HDX 3D Pro policy is enabled.
• Starting from Citrix Workspace app 2109 for Windows, the following features are available:
© 1999–2023 Cloud Soware Group, Inc. All rights reserved. 260

Citrix Workspace app for Windows
– Support for WebRTC 1.0: Citrix Workspace app 2109.1 for Windows supports WebRTC 1.0
for a better video conferencing experience along with Gallery View.
– Screen sharing enhancement: You can share individual applications, windows, or full
screen using the screen sharing feature in Microso Teams. Citrix Virtual Delivery Agent
2109 is a prerequisite for this feature.
– App Protection compatibility: When App Protection is enabled, you can now share con‑
tent through Microso Teams with HDX optimization. With this feature, you can share an
application window running in the virtual desktop. Citrix Virtual Delivery Agent 2109 is a
prerequisite for this feature.
Note:
Full monitor or desktop sharing is disabled when App Protection is enabled for the delivery
group.
• Citrix Workspace app 2109.1 for Windows supports the following in an optimized Microso
Teams on VM hosted apps:
– peer‑to‑peer audio and video call
– conference call
– screen sharing
• Starting from Citrix Workspace app 2106 for Windows:
– whenthe Desktop Viewer is in full screen mode, the user can select one from all the screens
covered by the Desktop Viewer to share. In window mode, the user can share the Desktop
Viewer window. In seamless mode, the user can select one from all the screens to share.
When the Desktop Viewer changes the window mode (maximized, restore, or minimize),
the screen share stops.
• Starting from Citrix Workspace app 2105 for Windows:
– You can configure a preferred network interface for media traic.
Navigate to \HKEY_CURRENT_USER\SOFTWARE\Citrix\HDXMediaStream and create a
key called NetworkPreference(REG_DWORD).
Select one of the following values as required:
*
1: Ethernet
*
2: Wi‑Fi
*
3: Cellular
*
5: Loopback
*
6: Any
By default and if no value is set, the WebRTC media engine chooses the best available
route.
© 1999–2023 Cloud Soware Group, Inc. All rights reserved. 261

Citrix Workspace app for Windows
– You can disable the audio device module 2 (ADM2) so that the legacy audio device module
(ADM) is used for quad‑channel microphones. Disabling ADM2 helps in resolving issues
related to microphones in a call.
Todisable ADM2, navigate to \HKEY_CURRENT_USER\SOFTWARE\Citrix\HDXMediaStream
and create a key named DisableADM2 (REG_DWORD) and set the value to 1.
• Starting from Citrix Workspace app 2103.1 for Windows:
– The VP9 video codec is now disabled by default.
– Enhancement to echo cancellation, auto gain control, noise suppression configurations:
If Microso Teams configures these options, Citrix‑redirected Microso Teams honors the
values as configured. Otherwise, these options are set to True by default.
– DirectShow is now the default renderer.
To change the default renderer, do the following:
1. Launch the Registry editor.
2. Navigate to the following key location: HKEY_CURRENT_USER\SOFTWARE\Citrix\
HDXMediaStream.
3. Update the following value: "UseDirectShowRendererAsPrimary"=dword
:00000000
Other possible values:
*
0: Media Foundation
*
1: DirectShow (Default)
4. Relaunch the Citrix Workspace app.
• Starting from Citrix Workspace app 2102 for Windows:
– Improved video rendering
– Performance and reliability improvements.
• Starting from Citrix Workspace app 2012 for Windows:
– Peers can now see the presenter’s mouse pointer in a screen sharing session.
– The WebRTC media engine now honors the proxy server configured on the client device.
• Starting from Citrix Workspace app 2009.6 for Windows:
– Microso Teams displays previously used peripheral devices in the Preferred devices list.
– The WebRTC media engine accurately determines the maximum encoding resolution pos‑
sible on an endpoint. The WebRTC media engine estimates multiple times a day and not
only on first launch.
– The Citrix Workspace app installer is packaged with the Microso Teams ringtones.
© 1999–2023 Cloud Soware Group, Inc. All rights reserved. 262

Citrix Workspace app for Windows
– Echo cancellation improvements ‑ Reduced echo level when a peer has a speaker or mi‑
crophone that generates an echo.
– Screen sharing improvements ‑ when you share your screen, only the Desktop Viewer
screen is captured in native bitmap format. Previously, client local windows that overlaid
on top of the Desktop Viewer window were blacked out.
• Starting from Citrix Workspace app 2002 for Windows:
– when you share your workspace using Microso Teams, Citrix Workspace app displays a
red border around the area of the monitor that is currently being shared. You can share
only the Desktop Viewer window, or any local window overlaid on top of it. When you
minimize the Desktop Viewer window, screen sharing is paused.
• Starting from Citrix Workspace app 2302 for Windows:
– Updated audio device selection behavior for optimized Microso Teams ‑ When you
change the default audio devices in the sound settings on the endpoint, the optimized
Microso Teams in the Citrix VDI changes the current audio devices selection to match the
endpoint defaults.
However, if you make an explicit device selection in Microso Teams, your selection takes
precedence and does not follow the endpoint defaults. Your selection is persistent until
you clear the Microso Teams cache.
• Starting from Citrix Workspace app 2303 for Windows:
– Improved experience for optimized Microso Teams video conference calls: The simulcast
support is enabled by default for optimized Microso Teams video conference calls. With
this support, the quality and experience of video conference calls across dierent end‑
points are improved by adapting to the proper resolution for the best call experience for
all callers.
With this improved experience, each user might deliver multiple video streams in dierent res‑
olutions (for example, 720p, 360p, and so on) depending on several factors including endpoint
capability, network conditions, and so on The receiving endpoint then requests the maximum
quality resolution that it can handle thereby giving all users the optimum video experience.
Note:
This feature is available only aer the roll‑out of an update from Microso Teams. For infor‑
mation on ETA, go to https://www.microsoft.com/ and search for Microso 365 roadmap.
When the update is rolled‑out by Microso, you can check CTX253754 for the documenta‑
tion update and the announcement.
• Starting from Citrix Workspace app 2307 for Windows:
– Added support for playing short tones in optimized Microso Teams: Earlier, with the sec‑
ondary ringtone feature enabled, short tones such as beeps or notifications were playing
© 1999–2023 Cloud Soware Group, Inc. All rights reserved. 263

Citrix Workspace app for Windows
repeatedly. For example, the tone that was played when a guest joins the Microso Teams
meeting was repeated. The only workaround was to quit and restart Microso Teams. This
issue resulted in a poor end‑user experience.
With this release, Citrix Workspace app supportsplaying the short tones as desired. Thissupport
also enables the secondary ringtone feature.
Prerequisites:
1 Update to the latest version of Microsoft Teams.
Note:
The preceding feature is available only aer the roll‑out of a corresponding update from
Microso Teams. Check the documentation update and the announcement in CTX253754.
HDX transport
October 7, 2023
HDX adaptive throughput
HDX adaptive throughput intelligently fine‑tunes the peak throughput of the ICA session by adjusting
output buers. The number of output buers is initially set at a high value. This high value allows
data to be transmitted to the client more quickly and eiciently, especially in high latency networks.
Provides better interactivity, faster file transfers, smoother video playback, higher framerate, and res‑
olution results in an enhanced user experience.
Session interactivity is constantly measured to determine whether any data streams within the ICA
session are adversely aecting interactivity. If that occurs, the throughput is decreased to reduce the
impact of the large data stream on the session and allow interactivity to recover.
This feature is supported only on Citrix Workspace app 1811 for Windows and later.
Important:
HDX adaptive throughput changes the output buers by moving the mechanism from the client
to the VDA. So, adjusting the number of output buers on the client as described in the Knowl‑
edge Center article CTX125027 has no eect.
© 1999–2023 Cloud Soware Group, Inc. All rights reserved. 264

Citrix Workspace app for Windows
Adaptive transport
Adaptive Transport is a mechanism in Citrix Virtual Apps and Desktops and Citrix DaaS that allows to
use Enlightened Data Transport (EDT) as the transport protocol for ICA connections. For more infor‑
mation, see Adaptive transport section in the Citrix Virtual Apps and Desktops documentation.
Browser content redirection
October 7, 2023
Browser content redirection prevents the rendering of webpages in the allow list on the VDA side. This
feature uses Citrix Workspace app to instantiate a corresponding rendering engine on the client side,
which fetches the HTTP and HTTPS content from the URL.
Note:
You can specify that webpages be redirected to the VDA side (and not redirected on the client
side) by using a block list.
Browser content redirection supports the Google Chrome browser in addition to the Internet Explorer
browser. Browser content redirection redirects the contents of a web browser to a client device, and
creates a corresponding browser embedded within the Citrix Workspace app. This feature oloads
network usage, page processing, and graphics appearing at the endpoint. Doing so improves the user
experience when browsing demanding webpages, especially webpages that incorporate HTML5 or
WebRTC video.
• Cookies are persistent across the sessions: When you exit and relaunch a browser, you are not
prompted to reenter your credentials.
• Browsers now honor the local system language.
For more information, see Browser content redirection.
Configure path for Browser Content Redirection overlay Browser temp data storage
Starting with Citrix Workspace app 2303 version, you are requested to configure temp data storage
path for Chromium Embedded Framework (CEF) based browser. To configure the path, do the follow‑
ing:
1. Open the registry editor.
2. Navigate to the HKCU\Software\Citrix\HdxMediaStream registry path.
3. Create a registry value with the following attributes:
• Registry key name: BCRProfilePath
© 1999–2023 Cloud Soware Group, Inc. All rights reserved. 265

Citrix Workspace app for Windows
• Registry value: string <folder for CEF based BCRtmp files>
4. Restart the Citrix Workspace app for the changes to take eect.
Bidirectional content redirection
October 7, 2023
The bidirectional content redirection policy allows you to enable or disable client to host and host
to client URL redirection. Server policies are set in Studio, and client policies are set from the Citrix
Workspace app Group Policy Object administration template.
Citrix oers host to client redirection and Local App Access for client to URL redirection. However, we
recommend that you use bidirectional content redirection for domain‑joined Windows clients.
You can enable bidirectional content redirection using one of the following methods:
1. Group Policy Object (GPO) administrative template
2. Registry editor
Note:
• Bidirectional content redirection does not work on the session where Local App Access is
enabled.
• Bidirectional content redirection must be enabled both on the server and the client. When
it is disabled either on the server or the client, the functionality is disabled.
• When you include URLs, you can specify one URL or a semi‑colon delimited list of URLs. You
can use an asterisk (*) as a wildcard.
To enable bidirectional content redirection using the GPO administrative template:
Use Group Policy Object administrative template configuration only for a first‑time installation of Cit‑
rix Workspace app for Windows.
1. Open the Citrix Workspace app Group Policy Object administrative template by running
gpedit.msc.
2. Under the User Configuration node, go to Administrative Templates > Classic Administra‑
tive Templates (ADM) > Citrix Components > Citrix Workspace > User experience.
3. Select the Bidirectional Content Redirection policy.
© 1999–2023 Cloud Soware Group, Inc. All rights reserved. 266

Citrix Workspace app for Windows
1. In the Published Application or Desktop name field, provide the name of the resource used to
launch the redirected URL.
Note:
When you include URLs, specify a single URL or a semi‑colon delimited list of URLs. You
can use an asterisk (*) as a wildcard.
2. From the Above Name is for Published Type, select Application or Desktop of the resource as
appropriate.
3. In the Allowed URLs to be redirected to VDA field, enter the URL that must be redirected. Sep‑
© 1999–2023 Cloud Soware Group, Inc. All rights reserved. 267

Citrix Workspace app for Windows
arate the list with a semicolon.
4. Select the Enable URL‑specific published application for desktop overrides? option to over‑
ride a URL.
5. Click Show to display a list where the value name must match any of the URLs listed in the
Allowed URLs to be redirected to the VDA field. The value must match a published application
name.
6. In the Allowed URLs to be redirected to Client: field, enter the URL that must be redirected
from the server to the client. Separate the list with a semicolon.
Note:
When you include URLs, specify a single URL or a semi‑colon delimited list of URLs. You
can use an asterisk (*) as a wildcard.
7. Click
Apply
and
OK
.
8. From the command line, run the gpupdate /force command.
To enable bidirectional content redirection using the registry:
To enable bidirectional content redirection, run the redirector.exe /RegIE command on the Cit‑
rix Workspace app client and from the Citrix Workspace app installation folder C:\Program Files
(x86)\Citrix\ICA Client).
© 1999–2023 Cloud Soware Group, Inc. All rights reserved. 268

Citrix Workspace app for Windows
Important:
• Ensure that the redirection rule does not result in a looping configuration. A looping
configuration results if VDA rules are set so that, for example, a URL, https://www.my\\
_company.com is configured to be redirected to the client, and the VDA.
• URL redirection supports only explicit URLs: URLs appearing in the address bar of the
browser or found using the in‑browser navigation, depending on the browser).
• If two applications with same display name use multiple StoreFront accounts, the display
name in the primary StoreFront account is used for launching the application or a desktop
session.
• New browser window opens only when a URL is redirected to the client. When a URL is
redirected to VDA, if the browser is already open, then the redirected URL opens in the new
tab.
• Embedded links in files like documents, emails, PDF is supported.
• Ensure that only one of the server file type associations exist and the host content redirec‑
tion policies are set to Enabled on the same machine. Citrix recommends that you disable
either the server file type association or the Host Content (URL) Redirection feature to con‑
firm that URL redirection works properly.
• In Internet Explorer, click Settings > Internet options > Advanced, and select Enable
third‑party browser extensions check box under Browsing section.
Limitation:
No fallback mechanism is present if the redirection fails due to session launch issues.
Bi‑directional URL support with Chromium‑based browsers
Bidirectional content redirection allows you to configure URLs to redirect from client to server and
from server to client using policies on the server and the client.
Server policies are set on the Delivery Controller and client policies on Citrix Workspace app. The
policies are set using the Group Policy Object (GPO) administrative template.
Starting with Version 2106, bidirectional URL redirection support has been added for Google Chrome
and Microso Edge.
Prerequisites:
• Citrix Virtual Apps and Desktops Version 2106 or later.
• Browser redirection extension version 5.0.
To register Google Chrome browser to bidirectional URL redirection, run the following command from
the Citrix Workspace app installation folder:
%ProgramFiles(x86)%\Citrix\ICA Client\redirector.exe /regChrome /verbose
© 1999–2023 Cloud Soware Group, Inc. All rights reserved. 269

Citrix Workspace app for Windows
Note:
When using these commands on Chrome browsers, the bidirectional content redirection exten‑
sion installs automatically from the Chrome Web Store.
To unregister Google Chrome browser from bidirectional URL redirection, run the following command
from the Citrix Workspace app installation folder:
%ProgramFiles(x86)%\Citrix\ICA Client\redirector.exe /unregChrome /verbose
Note:
If you get the following error when accessing the Browser Extensions page, ignore the message:
Websocket connection to wss://... failed.
For information on configuring URL redirection on Citrix Workspace app, see Bidirectional content
redirection.
For more information about browser content redirection, see Browser content redirection in the Citrix
Virtual Apps and Desktops documentation.
To prevent the desktop viewer window from dimming:
If you have multiple Desktop Viewer windows, by default the desktops that are not active are dimmed.
If users want to view multiple desktops simultaneously, information on them might be unreadable.
You can disable the default behavior and prevent the Desktop Viewer window from dimming by edit‑
ing the Registry editor.
Caution
Editing the registry incorrectly can cause serious problems that might require you to reinstall
your Operating system. Citrix cannot guarantee that problems resulting from the incorrect use
of the Registry Editor can be solved. Use the Registry Editor at your own risk. Be sure to back up
the registry before you edit it
• On the user device, create a REG_DWORD entry called DisableDimming in one of the following
keys, depending on whether you want to prevent dimming for the current user of the device or
the device itself. An entry exists if the Desktop Viewer has been used on the device:
– HKEY_CURRENT_USER\Software\Citrix\XenDesktop\DesktopViewer
– HKEY_LOCAL_MACHINE\Software\Citrix\XenDesktop\DesktopViewer
Optionally, instead of controlling dimming, you can define a local policy by creating the same
REG_WORD entry in one of the following keys:
• HKEY_CURRENT_USER\Software\Policies\Citrix\XenDesktop\DesktopViewer
• HKEY_LOCAL_MACHINE\Software\Policies\Citrix\XenDesktop\DesktopViewer
© 1999–2023 Cloud Soware Group, Inc. All rights reserved. 270

Citrix Workspace app for Windows
Before using these keys, check whether the Citrix Virtual Apps and Desktops and Citrix DaaS adminis‑
trator has set a policy for this feature.
Set the entry to any non‑zero value such as 1 or true.
If no entries are specified or the entry is set to 0, the Desktop Viewer window is dimmed. If multiple
entries are specified, the following precedence is used. The first entry in this list and its value deter‑
mine whether the window is dimmed:
1. HKEY_CURRENT_USER\Soware\Policies\Citrix\…
2. HKEY_LOCAL_MACHINE\Soware\Policies\Citrix\…
3. HKEY_CURRENT_USER\Soware\Citrix\…
4. HKEY_LOCAL_MACHINE\Soware\Citrix\…
ICA Settings Reference
October 7, 2023
The ICA Settings Reference file provides registry settings and ICA file settings lists, allowing admin‑
istrators to customize the behavior of the Citrix Workspace app. You can also use the ICA Settings
Reference to troubleshoot an unexpected Citrix Workspace app behavior.
ICA Settings Reference (PDF download)
Devices
September 27, 2023
This section describes the following:
• Mouse
• Keyboard
• Printing
• USB
• Client drive‑mapping
• Microphone
Mouse
October 7, 2023
© 1999–2023 Cloud Soware Group, Inc. All rights reserved. 271

Citrix Workspace app for Windows
Relative mouse
The relative mouse feature determines how far the mouse has moved since the last frame within a
window or screen.
The relative mouse uses the pixel delta between the mouse movements. When you change, for exam‑
ple, the direction of the camera using mouse controls, the feature is eicient. Apps also oen hide
the mouse cursor because the position of the cursor relative to the screen coordinates isn’t relevant,
when manipulating a 3‑D object or scene.
Relative mouse support provides an option to interpret the mouse position in a relative rather than an
absolute manner. The interpretation is required for applications that demand relative mouse input
rather than absolute.
You can configure the feature both on a per‑user and a per‑session basis, which gives more granular
control on the feature availability.
Note
This feature can be applied in a published desktop session only.
Configuring the feature using the Registry Editor or the default.ica file allows the setting to be persis‑
tent even aer the session is terminated.
Configuring relative mouse using the Registry editor
To configure the feature, set the following registry keys as applicable and then restart the session for
the changes to take eect:
To make the feature available on a per‑session basis:
HKEY_LOCAL_MACHINE\SOFTWARE\Policies\Citrix\ICA Client\Engine\Lockdown
Profiles\All Regions\Lockdown\Virtual Channels\RelativeMouse
To make the feature available on a per‑user basis:
HKEY_CURRENT_USER\Software\Policies\Citrix\ICA Client\Engine\Lockdown
Profiles\All Regions\Lockdown\Virtual Channels\RelativeMouse
• Name: RelativeMouse
• Type: REG_SZ
• Value: True
Note:
• The values set in the Registry editor take precedence over the ICA file settings.
• The values set in HKEY_LOCAL_MACHINE and HKEY_CURRENT_USER must be the same.
Dierent values might cause conflicts.
© 1999–2023 Cloud Soware Group, Inc. All rights reserved. 272

Citrix Workspace app for Windows
Configuring the relative mouse using the default.ica file
1. Open the default.ica file typically at C:\inetpub\wwwroot\Citrix\<site name>\conf\
default.ica, where sitename is the name specified for the site while creating. For StoreFront
customers, the default.ica file is typically at C:\inetpub\wwwroot\Citrix\<Storename>\
App_Data\default.ica, where storename is the name set for the store when created.
2. Add a key by name RelativeMouse in the WFClient section. Set its value to the same configura‑
tion as the JSON object.
3. Set the value as required:
• true – To enable relative mouse
• false – To disable relative mouse
4. Restart the session for the changes to take eect.
Note:
The values set in the Registry editor take precedence over the ICA file settings.
Enabling relative mouse from the Desktop Viewer
1. Log on to Citrix Workspace app.
2. Launch a published desktop session.
3. From the Desktop Viewer toolbar, select Preferences.
The Citrix Workspace ‑ Preferences window appears.
4. Select Connections.
5. Under
Relative Mouse
settings, enable
Use relative mouse
.
6. Click Apply and OK.
Note:
Configuring the relative mouse from the Desktop Viewer applies the feature to per‑session only.
Keyboard
October 7, 2023
Keyboard shortcuts
You can configure combinations of keys that Citrix Workspace app interprets as having special func‑
tionality. When the keyboard shortcuts policy is enabled, you can specify Citrix Hotkey mappings,
© 1999–2023 Cloud Soware Group, Inc. All rights reserved. 273

Citrix Workspace app for Windows
behavior of Windows hotkeys, and keyboard layout for sessions.
1. Open the Citrix Workspace app Group Policy Object administrative template by running
gpedit.msc.
2. Under the Computer Configuration node, go to Administrative Templates> Citrix Compo‑
nents > Citrix Workspace > User Experience.
3. Select the Keyboard shortcuts policy.
4. Select Enabled, and the required options.
5. Restart the Citrix Workspace app session for the changes to take eect.
Citrix Workspace app support for 32‑bit color icons:
Citrix Workspace app supports 32‑bit high color icons. To provide for seamless applications, it auto‑
matically selects the color depth for:
• applications visible in the Connection Center dialog,
• the Start menu, and
• task bar
Caution
Editing the registry incorrectly can cause serious problems that might require you to reinstall
your operating system. Citrix can’t guarantee that problems resulting from the incorrect use of
the Registry Editor can be solved. Use the Registry Editor at your own risk. Be sure to back up
the registry before you edit it.
To set a preferred depth, you can add a string registry key named TWIDesiredIconColor to HKEY
\\_LOCAL\\_MACHINE\SOFTWARE\Wow6432Node\Citrix\ICA Client\Engine\Lockdown
Profiles\All Regions\Preferences and set it to the required value. The possible color depths
for icons are 4, 8, 16, 24, and 32 bits‑per‑pixel. The user can select a lower color depth for icons if the
network connection is slow.
Customizing location for application shortcut using command line
The start menu integration and desktop shortcut only feature lets you bring published application
shortcuts into the Windows Start menu and onto the desktop. Users do not have to subscribe to
applications from the Citrix Workspace user interface. Start menu integration and desktop shortcut
management provide a seamless desktop experience for groups of users. Also for users who need
access to a core set of applications in a consistent way.
The flag is called SelfServiceMode and is set to True by default. When the administrator sets the Self‑
ServiceMode flag to False, you can’t access the self‑service user interface. Instead, you can access
subscribed apps from the Start menu and desktop shortcuts that is referred as shortcut‑only mode.
Users and administrators can use several registry settings to customize the way shortcuts are set up.
© 1999–2023 Cloud Soware Group, Inc. All rights reserved. 274

Citrix Workspace app for Windows
Working with shortcuts
• Users can’t remove apps. All apps are mandatory when working with the SelfServiceMode
flag set to false (shortcut‑only mode). If you remove a shortcut icon from the desktop, the icon
comesback when the user selects Refresh from the Citrix Workspace app icon in the notification
area.
• Users can configure only one store. The Account and Preferences options aren’t available to
prevent the user from configuring more stores. The administrator can give a user special privi‑
leges to add more than one account using the Group Policy Object template. Administrators can
also provide special privileges by manually adding a registry key (HideEditStoresDialog) on the
client machine. When the administrator gives a user this privilege, the user has a Preferences
option in the notification area, where they can add and remove accounts.
• Users can’t remove apps using the Windows Control Panel.
• You can add desktop shortcuts via a customizable registry setting. Desktop shortcuts aren’t
added by default. Aer editing the registry settings, restart the Citrix Workspace app.
• Shortcuts are created in the Start menu with a category path as the default, UseCategoryAsStart‑
MenuPath.
Note:
Windows 10 does not allow the creation of nested folders within the Start menu. Applications
are displayed individually or under the root folder. But, not within the Category sub folders that
are defined with Citrix Virtual Apps.
• You can add a flag [/DESKTOPDIR=”Dir_name”] during installation to bring all shortcuts into a
single folder. CategoryPath is supported for desktop shortcuts.
• AutoReinstallModified Apps featurecanbe enabled using the registry key AutoReInstallModifiedApps
. When AutoReInstallModifiedApps is enabled, any changes to the published
apps and desktops attributes on the server are displayed on the client machine. When
AutoReInstallModifiedApps is disabled, apps and desktop attributes aren’t up‑
dated and shortcuts aren’t restored on refresh if deleted on the client. By default, the
AutoReInstallModifiedApps is enabled.
Customizing location for application shortcut using the Registry editor
Note:
• By default, registry keys use the String format.
• Change registry keys before you configure a store. If at any time you or a user wants to
customize the registry keys, you or the user must:
1. reset Citrix Workspace app
2. configure the registry keys, and then
© 1999–2023 Cloud Soware Group, Inc. All rights reserved. 275

Citrix Workspace app for Windows
3. reconfigure the store.
Manage workspace control reconnect
Workspace control lets applications follow users as they move between devices. For example,
workspace control enables clinicians in hospitals to move from workstation to workstation with‑
out having to restart their applications on each device. For Citrix Workspace app, you manage
workspace control on client devices by modifying the registry. Workspace control can also be done
for domain‑joined client devices using Group Policy.
Caution:
Editing the registry incorrectly can cause serious problems that might require you to reinstall
your operating system. Citrix can’t guarantee that problems resulting from the incorrect use of
the Registry Editor can be solved. Use the Registry Editor at your own risk. Be sure to back up
the registry before you edit it.
Create WSCReconnectModeUser and modify the existing registry key WSCReconnectMode in the
Master Desktop Image or in the Citrix Virtual Apps server. The published desktop can change the be‑
havior of the Citrix Workspace app.
WSCReconnectMode key settings for Citrix Workspace app:
• 0 = do not reconnect to any existing sessions
• 1 = reconnect on application launch
• 2 = reconnect on application refresh
• 3 = reconnect on application launch or refresh
• 4 = reconnect when Citrix Workspace interface opens
• 8 = reconnect on Windows sign‑on
• 11 = combination of both 3 and 8
Disable workspace control
To disable workspace control, create the following key:
HKEY_LOCAL_MACHINE\SOFTWARE\Wow6432Node\Citrix\Dazzle (64‑bit)
HKEY_LOCAL_MACHINE\SOFTWARE\Citrix\\Dazzle (32‑bit)
Name: WSCReconnectModeUser
Type: REG_SZ
Value data: 0
Modify the following key from the default value of 3 to zero
HKEY_LOCAL_MACHINE\SOFTWARE\Wow6432Node\Citrix\Dazzle (64‑bit)
© 1999–2023 Cloud Soware Group, Inc. All rights reserved. 276

Citrix Workspace app for Windows
HKEY_LOCAL_MACHINE\SOFTWARE\Citrix\Dazzle (32‑bit)
Name: WSCReconnectMode
Type: REG_SZ
Value data: 0
Note:
You can also set the WSCReconnectAll key to false if you don’t want to create a key.
Registry keys for 32‑bit machines
Registry key: WSCSupported
Value: True
Key path:
1 - HKEY_CURRENT_USER\Software\Citrix\Dazzle
2 - HKEY_CURRENT_USER\Software\Citrix\Receiver\SR\Store" +
primaryStoreID +\Properties
3 - HKEY_LOCAL_MACHINE\Software\Policies\Citrix\Dazzle
4 - HKEY_LOCAL_MACHINE\Software\Citrix\Dazzle
Registry key: WSCReconnectAll
Value: True
Key path:
1 - `HKEY_CURRENT_USER\Software\Citrix\Dazzle`
2 - `HKEY_CURRENT_USER\Software\Citrix\Receiver\SR\Store" +
primaryStoreID + \Properties`
3 - `HKEY_LOCAL_MACHINE\Software\Policies\Citrix\Dazzle`
4 - `HKEY_LOCAL_MACHINe\Software\Citrix\Dazzle`
Registry key: WSCReconnectMode
Value: 3
Key path:
1 - HKEY_CURRENT_USER\Software\Citrix\Dazzle
2 - HKEY_CURRENT_USER\Software\Citrix\Receiver\SR\Store" +
primaryStoreID +\Properties
3 - HKEY_LOCAL_MACHINE\Software\Policies\Citrix\Dazzle
© 1999–2023 Cloud Soware Group, Inc. All rights reserved. 277

Citrix Workspace app for Windows
4 - HKEY_LOCAL_MACHINE\Software\Citrix\Dazzle
Registry key: WSCReconnectModeUser
Value: Registry isn’t created during installation.
Key path:
1 - HKEY_CURRENT_USER\Software\Citrix\Dazzle
2 - HKEY_CURRENT_USER\Software\Citrix\Receiver\SR\Store" + primaryStoreID
+\Properties
3 - HKEY_LOCAL_MACHINE\Software\Policies\Citrix\Dazzle
4 - HKEY_LOCAL_MACHINE\Software\Citrix\Dazzle
Registry keys for 64‑bit machines:
Registry key: WSCSupported
Value: True
Key path:
1 - HKEY_CURRENT_USER\Software\Citrix\Dazzle
2 - HKEY_CURRENT_USER\Software\Citrix\Receiver\SR\Store" + primaryStoreID
+\Properties
3 - HKEY_LOCAL_MACHINE\Software\Wow6432Node\Policies\Citrix\Dazzle
4 - HKEY_LOCAL_MACHINE\Software\Wow6432Node\Citrix\Dazzle
Registry key: WSCReconnectAll
Value: True
Key path:
1 - HKEY_CURRENT_USER\Software\Citrix\Dazzle
2 - HKEY_CURRENT_USER\Software\Citrix\Receiver\SR\Store" +
primaryStoreID + \Properties
3 - HKEY_LOCAL_MACHINE\Software\Wow6432Node\Policies\Citrix\Dazzle
4 - HKEY_LOCAL_MACHINE\Software\Wow6432Node\Citrix\Dazzle
Registry key: WSCReconnectMode
Value: 3
Key path:
© 1999–2023 Cloud Soware Group, Inc. All rights reserved. 278

Citrix Workspace app for Windows
1 - HKEY_CURRENT_USER\Software\Citrix\Dazzle
2 - HKEY_CURRENT_USER\Software\Citrix\Receiver\SR\Store" +
primaryStoreID +\Properties
3 - HKEY_LOCAL_MACHINE\Software\Wow6432Node\Policies\Citrix\Dazzle
4 - HKEY_LOCAL_MACHINE\Software\Wow6432Node\Citrix\Dazzle
Registry key: WSCReconnectModeUser
Value: Registry isn’t created during installation.
Key path:
1 - HKEY_CURRENT_USER\Software\Citrix\Dazzle
2 - HKEY_CURRENT_USER\Software\Citrix\Receiver\SR\Store" + primaryStoreID
+\Properties
3 - HKEY_LOCAL_MACHINE\Software\Wow6432Node\Policies\Citrix\Dazzle
4 - HKEY_LOCAL_MACHINE\Software\Wow6432Node\Citrix\Dazzle
Keyboard layout and language bar
Keyboard layout
Note:
You can hide all or part of the Advanced Preferences sheet available from the Citrix Workspace
app icon in the notification area. For more information, see Advanced Preferences sheet.
Keyboard layout synchronization enables you to switch among preferred keyboard layouts on the
client device. This feature is disabled by default. The keyboard layout synchronization allows the
client keyboard layout to automatically synchronize to the virtual apps and desktops session.
To configure keyboard layout synchronization using the GPO administrative template:
Note:
The GPO configuration takes precedence over the StoreFront and the GUI configurations.
1. Open the Citrix Workspace app Group Policy Object administrative template by running
gpedit.msc.
2. Under the Computer Configuration or User Configuration node, go to Administrative Tem‑
plates > Administrative Templates (ADM) > Citrix Components > Citrix Workspace > User
experience.
© 1999–2023 Cloud Soware Group, Inc. All rights reserved. 279

Citrix Workspace app for Windows
3. Select the Keyboard settings policy.
4. Select Enabled and select one the following options:
• Allow dynamic sync ‑ From the drop‑down menu, select Yes or No. This option synchro‑
nizes the client keyboard layout to the server when you change the client keyboard layout.
When selected, this option also enables the client IME for East Asian languages.
Selecting Yes for this option overrides the following two options.
• Sync mode on session launch ‑ From the drop‑down menu, select one of the following
options:
– Synconly once ‑ when session launches
‑ Synchronizes the client keyboard layout to
the server when the session launches. Any changes you make to the client keyboard
layout during the session do not take eect immediately. To apply the changes, log
o and log back on.
– Don’t sync ‑ Indicates that the client uses the keyboard layout present on the server.
5. Select Apply and OK.
To configure keyboard layout synchronization using the graphical user interface:
1. From the Citrix Workspace app icon in the notification area icon, select Advanced Preferences
> Keyboard and Language bar.
The Keyboard and Language bar dialog appears.
© 1999–2023 Cloud Soware Group, Inc. All rights reserved. 280

Citrix Workspace app for Windows
2. Select from one of the following options:
• Sync only once ‑ when the session launches ‑ Indicates that the keyboard layout is
synced from the VDA only once at the session launch.
• Allow dynamic sync ‑ Indicates that the keyboard layout is synced dynamically to the VDA
when the client keyboard is changed in a session.
• Don’t sync ‑ Indicates that the client uses the keyboard layout present on the server.
3. Click Save.
To configure keyboard layout synchronization using CLI:
Run the following command from the Citrix Workspace app for Windows installation folder.
Typically, Citrix Workspace app installation folder is at C:\Program files (x86)\Citrix\ICA
Client.
• To enable: wfica32:exe /localime:on
• To disable: wfica32:exe /localime:off
© 1999–2023 Cloud Soware Group, Inc. All rights reserved. 281

Citrix Workspace app for Windows
Using the client keyboard layout option activates the Client IME (Input Method Editor). If users work‑
ing in Japanese, Chinese, or Korean prefer to use the Server IME, they must disable the client keyboard
layout option by selecting No, or running wfica32:exe /localime:off. The session reverts to the
keyboard layout provided by the remote server when they connect to the next session.
Sometimes, switching the client keyboard layout does not take eect in an active session. To resolve
this issue, log o from Citrix Workspace app and login again.
Configure keyboard layout synchronization using command‑line interface
Previously, you could configure keyboard layout synchronization using the graphical user interface
or by updating the configuration file only. With the Citrix Workspace app 2309 version, the following
commands are introduced to configure keyboard layout synchronization using the command‑line‑
interface:
Commands Description
wfica32.exe /kbdsyncmode:once Sets keyboard sync mode to “Sync only once”.
wfica32.exe /kbdsyncmode:dynamic Sets keyboard sync mode to “Dynamic sync”.
wfica32.exe /kbdsyncmode:no Sets keyboard sync mode to “Don’t sync”.
Run the preceding commands from the Citrix Workspace app for Windows installation folder.
Typically, Citrix Workspace app installation folder is at C:\Program files (x86)\Citrix\ICA Client.
Configuring keyboard sync on Windows VDA
Note:
The following procedure applies only on Windows server 2016 and later. On Windows Server
2012 R2 and earlier, the keyboard sync feature is enabled by default.
1. Launch the Registry editor and navigate to HKEY_LOCAL_MACHINE\Software\Citrix\
IcaIme.
2. Create the DWORD entry DisableKeyboardSync and set its value to 0.
1 disables the keyboard layout sync feature.
3. Restart the session for the changes to take eect.
Aer you enable the keyboard layout on both the VDA and Citrix Workspace app, the following window
appears when you switch keyboard layouts.
© 1999–2023 Cloud Soware Group, Inc. All rights reserved. 282

Citrix Workspace app for Windows
This window indicates that the session keyboard layout is being switched to the client keyboard lay‑
out.
Configuring keyboard sync on Linux VDA
Launch the command prompt and run the following command:
/opt/Citrix/VDA/bin/ctxreg update -k "HKEY_LOCAL_MACHINE\System\CurrentControlSet
\Control\Citrix\LanguageBar"-v "SyncKeyboardLayout"-d "0x00000001"
Restart the VDA for the changes to take eect.
For more information about the keyboard layout synchronization feature on Linux VDA, see Dynamic
keyboard layout synchronization.
Hide the keyboard layout switch notification dialog:
The keyboard layout change notification dialog lets you know that the VDA session is switching the
keyboard layout. The keyboard layout switch needs approximately two seconds to switch. When you
hide the notification dialog, wait for some time before you start typing to avoid incorrect character
input.
Warning
Editing the registry incorrectly can cause serious problems that might require you to reinstall
your operating system. Citrix cannot guarantee that problems resulting from the incorrect use
of the Registry Editor can be solved. Use the Registry Editor at your own risk. Be sure to back up
the registry before you edit it.
Hide the keyboard layout switch notification dialog using the Registry editor:
1. Launch the Registry editor and navigate to HKEY_LOCAL_MACHINE\Software\Citrix\
IcaIme.
2. Create a String Value key by name HideNotificationWindow.
3. Set the DWORD value to 1.
4. Click OK.
5. Restart the session for the changes to take eect.
Limitations:
• Remote applications which run with elevated privilege (for example, right‑click an application
icon > Run as administrator) cannot be synchronized with the client keyboard layout. As a
workaround, manually change the keyboard layout on the server side (VDA) or disable UAC.
• If the user changes the keyboard layout on the client to a layout that isn’t supported on the
server, the synchronization feature of the keyboard layout is disabled for security reasons. An
unrecognized keyboard layout is treated as a potential security threat. To restore the keyboard
layout synchronization feature, log o and relog in to the session.
© 1999–2023 Cloud Soware Group, Inc. All rights reserved. 283

Citrix Workspace app for Windows
• In an RDP session, you cannot change the keyboard layout using Alt + Shi shortcuts. As a
workaround, use the language bar in the RDP session to switch the keyboard layout.
Language bar
The language bar displays the preferred input language in a session. The language bar appears in a
session by default.
Note:
This feature is available in sessions running on VDA 7.17 and later.
Configure the language bar using the GPO administrative template:
The language bar displays the preferred input language in an application session.
1. Open the Citrix Workspace app Group Policy Object administrative template by running
gpedit.msc.
2. Under the Computer Configuration or User Configuration node, go to Administrative Tem‑
plates > Administrative Templates (ADM) > Citrix Components > Citrix Workspace > User
experience.
3. Select the Language bar policy.
4. Select Enabled and select one of the following options:
• Yes – Indicates that the language bar is displayed in an application session.
• No, hide the language bar – Indicates that the language bar is hidden in an application
session.
5. Click Apply and OK.
Configure language bar using the graphical user interface:
1. Right‑click the Citrix Workspace app icon from the notification area and select Advanced Pref‑
erences.
2. Select Keyboard and Language bar.
3. Select the Language bar tab.
4. Select from one of the following options:
a) Yes ‑ Indicates that the language bar is displayed in a session.
b) No, hide the language bar ‑ Indicates that the language bar is hidden in a session.
5. Click Save.
The setting changes take eect immediately.
© 1999–2023 Cloud Soware Group, Inc. All rights reserved. 284

Citrix Workspace app for Windows
Note:
• You can change the settings in an active session.
• The remote language bar does not appear in a session if there is only one input language.
Hide the language bar tab from the Advanced Preferences sheet:
You can hide the language bar tab from the Advanced Preferences sheet by using the registry.
1. Launch the registry editor.
2. Navigateto HKEY_LOCAL_MACHINE\SOFTWARE\Citrix\ICA Client\Engine\Configuration
\Advanced\Modules\LocalIME.
3. Create a DWORD value key, ToggleOLanguageBarFeature, and setit to1 to hide the Language
bar option from the Advanced Preferences sheet.
Generic client Input Method Editors (IME)
Note:
If you’re using a Windows 10 Version 2004 operating system, you might face certain technical
issues when using the IME feature in a session. Those issues are the result of a third‑party limita‑
© 1999–2023 Cloud Soware Group, Inc. All rights reserved. 285

Citrix Workspace app for Windows
tion. For more information, see the Microso Support article.
Configuring generic client IME using the command‑line interface:
• To enable generic client IME, run the wfica32.exe /localime:on command from the Citrix
Workspace app installation folder C:\Program Files (x86)\Citrix\ICA Client.
• To disable generic client IME, run the wfica32.exe /localime:off command from the Citrix
Workspace app installation folder C:\Program Files (x86)\Citrix\ICA Client.
Note:
You can use the command‑line switch wfica32.exe /localime:on to enable both generic
client IME and keyboard layout synchronization.
• To disable generic client IME, run the wfica32.exe /localgenericime:off command
from the Citrix Workspace app installation folder C:\Program Files (x86)\Citrix\ICA
Client. This command does not aect keyboard layout synchronization settings.
If you have disabled generic client IME using the command‑line interface, you can enable the feature
again by running the wfica32.exe /localgenericime:on command.
© 1999–2023 Cloud Soware Group, Inc. All rights reserved. 286

Citrix Workspace app for Windows
Toggle:
Citrix Workspace app supports toggle functionality for this feature. You can run the
wfica32.exe
/localgenericime:on command to enable or disable the feature. However, the keyboard layout
synchronization settings take precedence over the toggle switch. If keyboard layout synchronization
is set to O, toggling does not enable generic client IME.
Configure generic client IME using the graphical user interface:
Generic client IME requires VDA Version 7.13 or later.
Generic client IME feature can be enabled by enabling keyboard layout synchronization. For more
information, see Keyboard layout synchronization.
Citrix Workspace app allows you to configure dierent options to use generic client IME. You can select
from one these options based on your requirements and usage.
1. Right‑click the Citrix Workspace app icon in the notification area and select Connection Center.
2. Select Preferences and Local IME.
© 1999–2023 Cloud Soware Group, Inc. All rights reserved. 287

Citrix Workspace app for Windows
The following options are available to support dierent IME modes:
1. Enable Server IME – Disables local IME and only the languages set on the server can be used.
2. Set Local IME to High Performance mode – Uses local IME with limited bandwidth. This option
restricts the candidate window functionality.
3. Set Local IME to Best Experience mode – Uses local IME with best user experience. This op‑
tion consumes high bandwidth. By default, this option is selected when generic client IME is
enabled.
The changes are applied only for the current session.
Enabling hotkey configuration using a registry editor:
When generic client IME is enabled, you can use the Shi+F4 hotkeys to select dierent IME modes.
The dierent options for IME modes appear in the top‑right corner of the session.
By default, the hotkey for generic client IME is disabled.
In the registry editor, navigate to HKEY_CURRENT_USER\SOFTWARE\Citrix\ICA Client\Engine
\Lockdown Profiles\All Regions\Lockdown\Client Engine\Hot Key.
Select AllowHotKey and change the default value to 1.
You can use the Shi+F4 hotkeys to select dierent IME modes in a session.
© 1999–2023 Cloud Soware Group, Inc. All rights reserved. 288

Citrix Workspace app for Windows
The dierent options for IME modes appear in the top‑right corner of the session while switching using
these hotkey combinations.
Limitations:
• Generic client IME does not support UWP (Universal Windows Platform) apps such as Search UI,
and the Edge browser of the Windows 10 operating system. As a workaround, use the server
IME instead.
• Generic client IME is not supported on Internet Explorer Version 11 in Protected Mode. As a
workaround, you can disable Protected Mode by using Internet Options. To disable, click Se‑
curity and clear Enable Protected Mode.
Printing
October 7, 2023
Printer
To override the printer settings on the user device
1. From the
Print
menu available from an application on the user device, choose
Properties
.
2. On the Client Settings tab, click Advanced Optimizations and modify the Image Compression
and Image and Font Caching options.
On‑screen keyboard control
To enable touch‑enabled access to virtual applications and desktops from Windows tablets, Citrix
Workspace app automatically displays the on‑screen keyboard when:
• you activate a text entry field and
• when the device is in tent or tablet mode.
© 1999–2023 Cloud Soware Group, Inc. All rights reserved. 289

Citrix Workspace app for Windows
On some devices and in some circumstances, Citrix Workspace app can’t accurately detect the mode
of the device. The on‑screen keyboard might also appear when you don’t want it to.
To suppress the on‑screen keyboard from appearing when using a convertible device:
• create a REG_DWORD value DisableKeyboardPopup in HKEY\\_CURRENT\\_USER\\
SOFTWARE\\Citrix\\ICA Client\\Engine\\Configuration\\Advanced\\Modules
\\MobileReceiver and
• set the value to 1.
Note:
On a x64 machine, create the value in HKEY_LOCAL_MACHINE\SOFTWARE\Wow6432Node\Citrix\ICA
Client\Engine\Configuration\Advanced\Modules\MobileReceiver.
The keys can be set to the following 3 dierent modes:
• Automatic: AlwaysKeyboardPopup = 0; DisableKeyboardPopup = 0
• Always popup (on‑screen keyboard): AlwaysKeyboardPopup = 1; DisableKeyboardPopup = 0
• Never popup (on‑screen keyboard): AlwaysKeyboardPopup = 0; DisableKeyboardPopup = 1
PDF printing
Citrix Workspace app for Windows supports PDF printing in a session. The Citrix PDF Universal Printer
driver allows you to print documents that are launched using hosted applications and desktops run‑
ning on Citrix Virtual Apps and Desktops and Citrix DaaS.
When you select the Citrix PDF Printer option from the Print dialog, the printer driver converts the
file to a PDF and transfers the PDF to the local device. The PDF is then launched using the default PDF
viewer for viewing and prints from a locally attached printer.
Citrix recommends the Google Chrome browser or Adobe Acrobat Reader for PDF viewing.
You can enable Citrix PDF printing using Citrix Studio on the Delivery Controller.
Prerequisites:
• Citrix Virtual Apps and Desktops Version 7 1808 or later.
• At least one PDF viewer must be installed on your computer.
To enable PDF printing:
1. On the Delivery Controller, use the Citrix Studio, to select the Policy node in the le pane. You
can either create a policy or edit an existing policy.
2. Set the Auto‑create PDF Universal Printer policy to Enabled.
Restart the Citrix Workspace app session for the changes to take eect.
Limitation:
© 1999–2023 Cloud Soware Group, Inc. All rights reserved. 290

Citrix Workspace app for Windows
• PDF viewing and printing aren’t supported on the Microso Edge browser.
Expanded tablet mode in Windows 10 using Windows Continuum
Windows Continuum is a Windows 10 feature that adapts to the way the client device is used. Citrix
Workspace app for Windows supports Windows Continuum, including dynamic change of modes.
For touch‑enabled devices, the Windows 10 VDA starts in tablet mode when there’s no keyboard or
mouse attached. It starts in desktop mode when either a keyboard or a mouse or both are attached.
Detaching or attaching the keyboard on any client device or the screen on a 2‑in‑1 device like a Surface
Pro toggles between tablet and desktop modes. For more information, see Tablet mode for touch‑
screen devices in Citrix Virtual Apps and Desktops documentation.
On a touch‑enabled client device, the Windows 10 VDA detects the presence of a keyboard or mouse
when you connect or reconnect to a session. It also detects when you attach or detach a keyboard
or mouse during the session. This feature is enabled by default on the VDA. To disable the feature,
modify the Tablet mode toggle policy using Citrix Studio.
Tablet mode oers a user interface that is better suited to touchscreens:
• Slightly larger buttons.
• The
Start
screen and all the apps you start open in a full screen.
• The taskbar includes a Back button.
• Icons are removed from the taskbar.
Desktop mode oers the traditional user interface where you interact in the same manner as a PC with
a keyboard and mouse.
Note:
Workspace for web doesn’t support the Windows Continuum feature.
USB
October 7, 2023
USB support
USB support enables you to interact with a wide range of USB devices when connected to a Citrix
Virtual Apps and Desktops and Citrix DaaS. You can plug USB devices into their computers and the
devices are remote to their virtual desktop. USB devices available for remoting include flash drives,
smartphones, PDAs, printers, scanners, MP3 players, security devices, and tablets. Desktop Viewer
© 1999–2023 Cloud Soware Group, Inc. All rights reserved. 291

Citrix Workspace app for Windows
users can control whether USB devices are available on the Citrix Virtual Apps and Desktops and Citrix
DaaS using a preference in the toolbar.
Isochronous features in USB devices, such as webcams, microphones, speakers, and headsets are
supported in typical low latency or high‑speed LAN environments. Such environment allows these
devices to interact with packages, like Microso Oice Communicator and Skype.
The following types of device are supported directly in a virtual apps and desktops session, and so
does not use USB support:
• Keyboards
• Mice
• Smart cards
Specialist USB devices (for example, Bloomberg keyboards and 3‑D mice) can be configured to use
USB support. For information on configuring Bloomberg keyboards, see Configure Bloomberg key‑
boards.
For information on configuring policy rules for other specialist USB devices, see Knowledge Center
article CTX122615.
By default, certain types of USB devices are not supported for remoting through Citrix Virtual Apps
and Desktops and Citrix DaaS. For example, a user might have a NIC attached to the system board by
internal USB. Remoting this device would not be appropriate. The following types of USB device are
not supported by default in a virtual apps and desktops session:
• Bluetooth dongles
• Integrated NIC
• USB hubs
• USB graphics adapters
USB devices connected to a hub can be remote, but the hub itself cannot be remote.
The following types of USB device are not supported by default for use in a virtual apps session:
• Bluetooth dongles
• Integrated NIC
• USB hubs
• USB graphics adapters
• Audio devices
• Mass storage devices
How USB support works:
When a user plugs in a USB device, it is checked against the USB policy, and, if allowed, remoted to
the virtual desktop. If the default policy denies a device, it is available only to the local desktop.
© 1999–2023 Cloud Soware Group, Inc. All rights reserved. 292

Citrix Workspace app for Windows
When a user plugs in a USB device, a notification appears to inform the user about a new device. The
user can select which USB devices must be remoted to the virtual desktop each time they connect.
Alternatively, the user canconfigure USB support so that all USBdevicesplugged in bothbeforeand/or
during a session is automatically remoted to the virtual desktop that is in focus.
USB device classes allowed by default
Default USB policy rules allow dierent classes of USB device.
Although they are on this list, some classes are only availablefor remoting in virtual apps and desktops
sessions aer additional configuration. Such USB device classes are as follows.
• Audio (Class 01)‑ Includes audio input devices (microphones), audio output devices, and MIDI
controllers. Modern audio devices generally use isochronous transfers that XenDesktop 4 or
later supports. Audio (Class01) is not applicable to virtual apps because these devices are not
available for remoting in virtual apps using USB support.
Note:
Some specialty devices (for example, VOIP phones) require additional configuration. For more
information, see Knowledge Center article CTX123015.
• Physical Interface Devices (Class 05)‑ These devices are similar to Human Interface Devices
(HIDs), but generally provide “real‑time” input or feedback and include force feedback joysticks,
motion platforms, and force feedback endoskeletons.
• Still Imaging (Class 06)‑ Includes digital cameras and scanners. Digital cameras oen support
the still imaging class which uses the Picture Transfer Protocol (PTP) or Media Transfer Protocol
(MTP) to transfer images to a computer or other peripheral. Cameras might also appear as mass
storage devices. It might be also possible to configure a camera to use either class, through the
setup menus provided by the camera itself.
Note:
If a camera appears as a mass storage device, client drive mapping is used and USB support is
not required.
• Printers (Class 07)‑ In general most printers are included in this class, although some use
vendor‑specific protocols (class ). Multi‑function printers might have an internal hub or be
composite devices. In both cases the printing element generally uses the Printers class and the
scanning or fax element uses another class; for example, Still Imaging.
Printers normally work appropriately without USB support.
© 1999–2023 Cloud Soware Group, Inc. All rights reserved. 293

Citrix Workspace app for Windows
Note
This class of device (in particular printers with scanning functions) requires additional con‑
figuration. For instructions, see Knowledge Center article CTX123015.
• Mass Storage (Class 08)‑ The most common mass storage devices are USB flash drives; others
include USB‑attached hard drives, CD/DVD drives, and SD/MMC card readers. There are a wide
variety of devices with internal storage that also present a mass storage interface; these include
media players, digital cameras, and mobile phones. Mass Storage (Class 08) is not applicable
to virtual apps because these devices are not available for remoting in virtual apps using USB
support. Known subclasses include:
– 01 Limited flash devices
– 02 Typically CD/DVD devices (ATAPI/MMC‑2)
– 03 Typically tape devices (QIC‑157)
– 04 Typically floppy disk drives (UFI)
– 05 Typically floppy disk drives (SFF‑8070i)
– 06 Most mass storage devices use this variant of SCSI
Mass storage devices can oen be accessed through client drive mapping, and so USB support
is not required.
• Content Security (Class 0d)‑ Content security devices enforce content protection, typically for
licensing or digital rights management. This class includes dongles.
• Video (Class 0e)‑ The video class cover devices that are used to manipulate video or video‑
related material. Devices, such as webcams, digital camcorders, analog video converters, some
television tuners, and some digital cameras that support video streaming.
Important
Most video streaming devices use isochronous transfers that XenDesktop 4 or later supports.
Some video devices (for example webcams with motion detection) require additional configu‑
ration. For instruction, see Knowledge Center article CTX123015.
• Personal Healthcare (Class 0f)‑ These devices include personal healthcare devices such as
blood pressure sensors, heart rate monitors, pedometers, pill monitors, and spirometry.
• Application and Vendor Specific (Classes fe and )‑ Many devices use vendor‑specific proto‑
cols or protocols not standardized by the USB consortium, and such devices usually appear as
vendor‑specific (class ).
USB devices classes denied by default
Default USB policy rules don’t allow the following dierent classes of USB device:
© 1999–2023 Cloud Soware Group, Inc. All rights reserved. 294

Citrix Workspace app for Windows
• Communications and CDC Control (Classes 02 and 0a). The default USB policy doesn’t allow
these devices, because one of the devices might be providing the connection to the virtual desk‑
top itself.
• Human Interface Devices (Class 03). Includes a wide variety of both input and output devices.
Typical Human Interface Devices (HIDs) are keyboards, mice, pointing devices, graphic tablets,
sensors, game controllers, buttons, and control functions.
Subclass 01 is known as the “boot interface” class and is used for keyboards and mice.
The default USB policy doesn’t allow USB keyboards (class 03, subclass 01, protocol 1), or USB
mice (class 03, subclass 01, protocol 2). The reason is most keyboards and mice are handled
appropriately without USB support. Also, it is normally necessary to use these devices locally
as well remotely when you connect to a virtual desktop.
• USB Hubs (Class 09). USB hubs allow extra devices to be connected to the local computer. It is
not necessary to access these devices remotely.
• Smart Card (Class 0b). Smart card readers include contactless and contact smart card readers,
and also USB tokens with an embedded smart card‑equivalent chip.
Smart card readers are accessed using smart card remoting and do not require USB support.
• Wireless Controller (Class e0). Some of these devices might be providing critical network access,
or connecting critical peripherals, such as Bluetooth keyboards or mice.
The default USBpolicy does notallow these devices. However, there might be particular devices
to which it is appropriate to provide access using USB support.
• Miscellaneous network devices (Class ef, subclass 04)‑ Some of these devices might be pro‑
viding critical network access. The default USB policy does not allow these devices. However,
there might be particular devices to which it is appropriate to provide access using USB support.
Update the list of USB devices available for remoting
Edit the Citrix Workspace for Windows template file to update the range of USB devices available for
remoting to desktops. The update allows you to make changes to the Citrix Workspace for Windows
using Group Policy. The file is in the following installed folder:
\C:\Program Files\Citrix\ICA Client\Configuration\en
Alternatively, you can edit the registry on each user device, adding the following registry key:
HKEY_LOCAL_MACHINE\SOFTWARE\Policies\Citrix\ICA Client\GenericUSB Type=String Name=”DeviceRules”
Value=
© 1999–2023 Cloud Soware Group, Inc. All rights reserved. 295

Citrix Workspace app for Windows
Important
Editing the Registry incorrectly can cause serious problems that might require you to reinstall
your operating system. Citrix cannot guarantee that problems resulting from the incorrect use
of the Registry Editor can be solved. Use the Registry Editor at your own risk. Be sure to back up
the registry before you edit it.
The product default rules are stored in:
HKEY_LOCAL_MACHINE\SOFTWARE\Citrix\ICA Client\GenericUSB Type=MultiSzName=”DeviceRules”
Value=
Do not edit the product default rules.
For more information about USB devices policy settings, see USB devices policy settings in Citrix Vir‑
tual Apps and Desktops documentation.
Composite USB device redirection
USB 2.1 and later supports the notion of USB composite devices where multiple child devices share
a single connection with the same USB bus. Such devices employ a single configuration space and
shared bus connection where a unique interface number 00‑ is used to identify each child device.
Such devices are also not the same as a USB hub which provides a new USB bus origin for other inde‑
pendently addressed USB devices for connection.
Composite devices found on the client endpoint can be forwarded to the virtual host as either:
• a single composite USB device, or
• a set of independent child devices (split devices)
When a composite USB device is forwarded, the entire device becomes unavailable to the endpoint.
Forwarding also blocks the local usage of the device for all applications on the endpoint, including
the Citrix Workspace client needed for an optimized HDX remote experience.
Consider a USB headset device with both audio device and HID button for mute and volume control.
If the entire device is forwarded using a generic USB channel, the device becomes unavailable for
redirection over the optimized HDX audio channel. However, you can achieve best experience when
the audio is sent through the optimized HDX audio channel unlike the audio sent using host‑sideaudio
drivers through generic USB remoting. The behavior is because of the noisy nature of the USB audio
protocols.
You also notice issues when the system keyboard or pointing device are part of a composite device
with other integrated features required for the remote session support. When a complete compos‑
ite device is forwarded, the system keyboard or mouse becomes inoperable at the endpoint, except
within the remote desktop session or application.
© 1999–2023 Cloud Soware Group, Inc. All rights reserved. 296

Citrix Workspace app for Windows
To resolve these issues, Citrix recommends that you split the composite device and forward only the
child interfaces that use a generic USB channel. Such mechanism ensures that the other child devices
are available for use by applications on the client endpoint, including, the Citrix Workspace app that
provides optimized HDX experiences, while allowing only the required devices to be forwarded and
available to the remote session.
Device Rules:
As with regular USB devices, device rules set in the policy or client Citrix Workspace app configuration
on the end point select the composite devices for forwarding. Citrix Workspace app uses these rules
to decide which USB devices to allow or prevent from forwarding to the remote session.
Each rule consists of an action keyword (Allow, Connect, or Deny), a colon (:), and zero or more fil‑
ter parameters that match actual devices at the endpoints USB subsystem. These filter parameters
correspond to the USB device descriptor metadata used by every USB device to identify itself.
Device rules are clear text with each rule on a single line and an optional comment aer a # character.
Rules are matched top down (descending priority order). The first rule that matches the device or
child interface is applied. Subsequent rules that select the same device or interface are ignored.
Sample device rules:
• ALLOW: vid=046D pid=0102 # Allow a specific device by vid/pid
• ALLOW: vid=0505 class=03 subclass=01 # Allow any pid for vendor 0505 when subclass=01
• DENY: vid=0850 pid=040C # Deny a specific device (incl all child devices)
• DENY: class=03 subclass=01 prot=01 # Deny any device that matches all filters
• CONNECT: vid=0911 pid=0C1C # Allow and auto‑connect a specific device
• ALLOW: vid=0286 pid=0101 split=01 # Split this device and allow all interfaces
• ALLOW: vid=1050 pid=0407 split=01 intf=00,01 # Split and allow only 2 interfaces
• CONNECT: vid=1050 pid=0407 split=01 intf=02 # Split and auto‑connect interface 2
• DENY: vid=1050 pid=0407 split=1 intf=03 # Prevent interface 03 from being remoted
You can use any of the following filter parameters to apply rules to the encountered devices:
Filter parameter Description
vid=xxxx USB device vendor ID (four‑digit hexadecimal
code)
pid=xxxx USB device product ID (four‑digit hexadecimal
code)
rel=xxxx USB device release ID (four‑digit hexadecimal
code)
class=xx USB device class code (two‑digit hexadecimal
code)
© 1999–2023 Cloud Soware Group, Inc. All rights reserved. 297

Citrix Workspace app for Windows
Filter parameter Description
subclass=xx USB device subclass code (two‑digit
hexadecimal code)
prot=xx USB device protocol code (two‑digit
hexadecimal code)
split=1 (or split=0) Select a composite device to be split (or
non‑split)
intf=xx[,xx,xx,…] Selects a specific set of child interfaces of a
composite device (comma separated list of
two‑digit hexadecimal codes)
The first six parameters select the USB devices for which the rule must be applied. If any parameter is
not specified, the rule matches a device with ANY value for that parameter.
The USB Implementors Forum maintains a list of defined class, subclass, and protocol values in De‑
fined Class Codes. USB‑IF also maintains a list of registered vendor IDs. You can check the vendor,
product, release, and interface IDs of a specific device directly in the Windows device manager or us‑
ing a free tool like UsbTreeView.
When present, the last two parameters apply only to USB composite devices. The split parameter
determines if a composite device must be forwarded as split devices or as a single composite device.
• Split=1 indicates that the selected child interfaces of a composite device must be forwarded as
split devices.
• Split=0 indicates that the composite device must not be split.
Note:
If the split parameter is omitted, Split=0 is assumed.
The intf parameter selects the specific child interfaces of the composite device to which the action
must be applied. If omitted, the action applies to all interfaces of the composite device.
Consider a composite USB headset device with three interfaces:
• Interface 0 ‑ Audio class device endpoints
• Interface 3 ‑ HID class device endpoints (volume and mute buttons)
• Interface 5 ‑ Management/update interface
The suggested rules for this type of device are:
• CONNECT: vid=047F pid=C039 split=1 intf=03 # Allow and auto‑connect HID device
• DENY: vid=047F pid=C039 split=1 intf=00 # Deny audio end points
• ALLOW: vid=047F pid=C039 split=1 intf=05 # Allow mgmt intf but don’t auto‑connect
© 1999–2023 Cloud Soware Group, Inc. All rights reserved. 298

Citrix Workspace app for Windows
Enable Device Rules policy:
Citrix Workspace app for Windows includes a set of default device rules that filters certain undesirable
classes of devices and allow one that customers oen encounter.
You can check these default device rules in the system registry at either:
• HKEY_LOCAL_MACHINE\Software\Citrix\ICA Client\GenericUSB (32 bit Windows) or
• HKEY_LOCAL_MACHINE\Software\WOW6432Node\Citrix\ICA Client\GenericUSB (64
bit Windows), in the multistring value named DeviceRules.
However, in the Citrix Workspace app for Window, you can apply USB Device Rules policy to overwrite
these default rules.
To enable device rules policy for Citrix Workspace app for Windows:
1. Open the Citrix Workspace app Group Policy Object administrative template by running
gpedit.msc.
2. Under the User Configuration node, go to Administrative Templates > Citrix Components >
Citrix Workspace > Remoting client devices > Generic USB Remoting.
3. Select the USB Device Rules policy.
4. Select Enabled.
5. In the USB Device Rules text box, paste (or edit directly) the USB device rules to be deployed.
6. Click Apply and OK.
Citrix recommends preserving the default rules shipped with the client when creating this policy by
copying the original rules and inserting new rules to alter the behavior as desired.
Connecting USB devices:
In a desktop session, split USB devices are displayed in the Desktop Viewer under Devices. Also, you
can view split USB devices from Preferences > Devices.
Note:
CONNECT keyword enables automatic connection of a USB device. However, if the CONNECT
keyword is not used when you split a composite USB device for generic USB redirection, you
must manually select the device from the Desktop Viewer or Connection Center to connect an
allowed device.
© 1999–2023 Cloud Soware Group, Inc. All rights reserved. 299
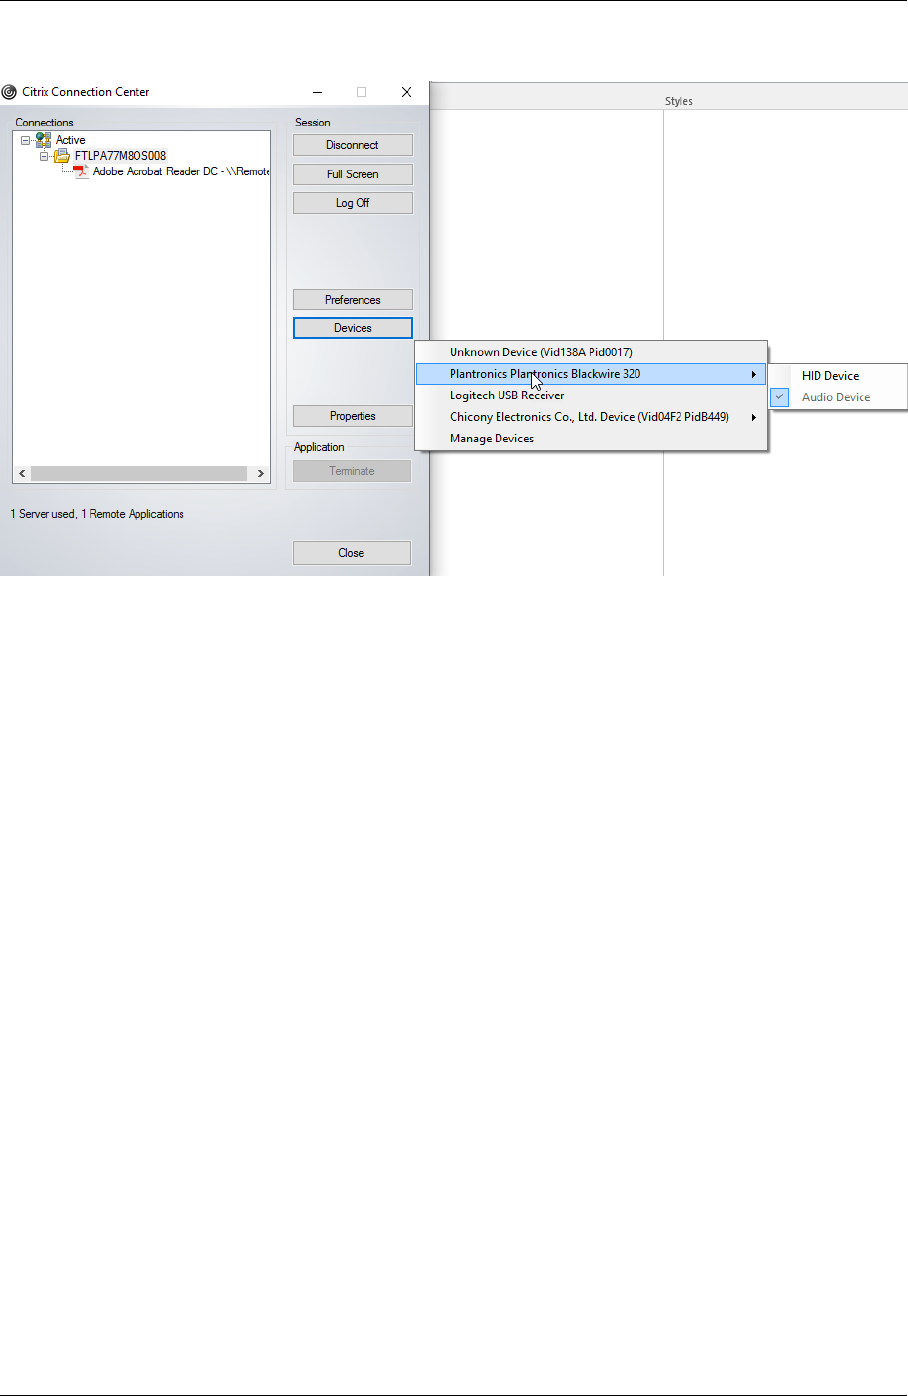
Citrix Workspace app for Windows
In an application session, split USB devices are displayed in the Connection Center.
To automatically connect an interface:
The CONNECT keyword introduced in Citrix Workspace app for Windows 2109 allows for automatic
redirection of USB devices. The CONNECT rule can replace the ALLOW rule if the administrator allows
the device or selected interfaces to automatically connect in the session.
1. Open the Citrix Workspace app Group Policy Object administrative template by running
gpedit.msc.
2. Under the
User Configuration
node, go to
Administrative Templates
>
Citrix Components
>
Citrix Workspace > Remoting client devices > Generic USB Remoting.
3. Select the USB Device Rules policy.
4. Select Enabled.
5. In the USB Device Rules text box, add the USB device that you want to auto connect.
For example, CONNECT: vid=047F pid=C039 split=01 intf=00,03 – allows for splitting a composite
device and auto connection of interfaces 00 and 03 interface and restriction other interfaces of
that device.
6. Click Apply and OK to save the policy.
Changing USB device auto‑connection preferences:
Citrix Workspace app automatically connects USB devices tagged with CONNECT action based on the
preferences set for the current desktop resource. You can change the preferences in the Desktop
viewer toolbar as shown in the following image.
© 1999–2023 Cloud Soware Group, Inc. All rights reserved. 300

Citrix Workspace app for Windows
The two check boxes at the bottom of the pane controls if the devices must connect automatically or
wait for manual connection in the session. These settings are not enabled by default. You can change
the preferences if generic USB devices must be connected automatically.
Alternatively, an administrator can override the user preferences by deploying the corresponding poli‑
cies from Citrix Workspace app Group Policy Object administrative template. Both machine and user
policies can be found under Administrative Templates > Citrix Components > Citrix Workspace >
Remoting client devices > Generic USB Remoting. The corresponding policies are labeled as Exist‑
ing USB Devices and New USB Devices respectively.
Change split device default setting:
By default, the Citrix Workspace app for Windows only splits composite devices that are explicitly
tagged as Split=1 in the device rules. However, it is possible to change the default disposition to split
all composite devices that are not otherwise tagged with Split=0 in a matching device rule.
1. Open the Citrix Workspace app Group Policy Object administrative template by running
© 1999–2023 Cloud Soware Group, Inc. All rights reserved. 301

Citrix Workspace app for Windows
gpedit.msc.
2. Under the User Configuration node, go to Administrative Templates > Citrix Components >
Citrix Workspace > Remoting client devices > Generic USB Remoting.
3. Select the SplitDevices policy.
4. Select Enabled.
5. Click Apply and OK to save the policy.
Note:
Citrix recommends using explicit device rules to identify specific devices or interfaces that need
to be split instead of changing the default. This setting will be deprecated in a future release.
Limitation:
Citrix recommends that you do not split interfaces for a webcam. As a workaround, redirect the device
to a single device using Generic USB redirection. For a better performance, use the optimized virtual
channel.
Bloomberg keyboards
Citrix Workspace app supports the use of Bloomberg keyboard in a virtual apps and desktops session.
The required components are installed with the plug‑in. You can enable the Bloomberg keyboard
feature when installing Citrix Workspace app for Windows or by using the Registry editor.
Bloomberg keyboards provide other functionality when compared to standard keyboards, that allows
the user to access financial market data and perform trades.
The Bloomberg keyboard consists of multiple USB devices built into one physical shell:
• the keyboard
• a fingerprint reader
• an audio device
• a USB hub to connect all of these devices to the system
• HID buttons, for example, Mute, Vol Up, and Vol Down for the audio device
In addition to the normal functionality of these devices, the audio device includes support for some
keys, control of the keyboard, and keyboard LEDs.
To use the specialized functionality inside a session, you must redirect the audio device as a USB de‑
vice. This redirect makes the audio device available to the session, but prevents the audio device from
being used locally. In addition, the specialized functionality can only be used with one session and
cannot be shared between multiple sessions.
Multiple sessions with Bloomberg keyboards are not recommended. The keyboard operates in a
single‑session environment only.
Configuring Bloomberg keyboard 5:
© 1999–2023 Cloud Soware Group, Inc. All rights reserved. 302

Citrix Workspace app for Windows
Starting from Citrix Workspace app for Windows 2109 version, a new CONNECT keyword is introduced
to allow automatic connection of USB devices at session startup and device insertion. The CONNECT
keyword can be used to replace the ALLOW keyword when the user wants a USB device or interface to
connect automatically.
Note:
With the introduction of Device redirection rules version 2 in Studio in Citrix Virtual Apps and
Desktops 2212 version, it isn’t required to configure the Bloomberg 5 keyboard through client‑
side group policies in Citrix Workspace app for Windows. For more details, see Client USB device
redirection rules (Version 2) in Citrix Virtual Apps and Desktops documentation.
For versions prior to Citrix Workspace app for Windows version 2212, the following example shows
how to use the CONNECT keyword:
1. Open the Citrix Workspace app Group Policy Object administrative template by running
gpedit.msc.
2. Under the Computer Configuration node, go to Administrative Templates > Citrix Compo‑
nents > Citrix Workspace > Remoting client devices > Generic USB Remoting.
3. Select the SplitDevices policy.
4. Select Enabled.
5. In the USB Device Rules text box, add the following rules if it doesn’t exist.
• CONNECT: vid=1188 pid=A101 # Bloomberg 5 Biometric module
• DENY: vid=1188 pid=A001 split=01 intf=00 # Bloomberg 5 Primary keyboard
• CONNECT: vid=1188 pid=A001 split=01 intf=01 # Bloomberg 5 Keyboard HID
• DENY: vid=1188 pid=A301 split=01 intf=02 # Bloomberg 5 Keyboard Audio Channel
• CONNECT: vid=1188 pid=A301 split=01 intf=00,01 # Bloomberg 5 Keyboard Audio HID
Note:
New lines or semicolon can be used to separate rules which allows to read either single
line or multi‑line registry values.
6. Click Apply and OK to save the policy.
7. In the Preferences window, select the Connections tab, and select one or both check boxes
to the connect devices automatically. The Preferences window is accessible from the Desktop
Toolbar or Connection Manager.
This procedure makes the Bloomberg keyboard 5 ready for use. The DENY rules that are mentioned
in the steps enforce the redirection of the primary keyboard and audio channel over an optimized
channel but not over Generic USB. The CONNECT rules enable automatic redirection of the fingerprint
module, special keys on the keyboard, and keys related to audio control.
© 1999–2023 Cloud Soware Group, Inc. All rights reserved. 303

Citrix Workspace app for Windows
Configure Bloomberg keyboard 4 or 3:
Caution
Editing the registry incorrectly can cause serious problems that might require you to reinstall
your operating system. Citrix cannot guarantee that problems resulting from the incorrect use
of the Registry editor can be solved. Use the Registry editor at your own risk. Be sure to back up
the registry before you edit it.
1. Locate the following key in the registry:
HKEY_LOCAL_MACHINE\SOFTWARE\Citrix\ICA Client\GenericUSB
2. Do one of the following:
• To enable this feature, for the entry with type DWORD and Name EnableBloombergHID,
set the value to 1.
• To disable this feature, set the value to 0.
Bloomberg keyboard 3 support is available in the online plug‑in 11.2 for Windows and subsequent
versions.
Bloomberg keyboard 4 support is available for Windows Receiver 4.8 and later versions.
Determining if Bloomberg keyboards support is enabled:
• To check if Bloomberg keyboard support is enabled in the online plug‑in, check how the Desktop
Viewer reports the Bloomberg keyboard devices. If the Desktop Viewer isn’t used, you can check
the registry on the machine where the online plug‑in is running.
• If support for Bloomberg keyboards is not enabled, the Desktop Viewer shows:
– two devices for the Bloomberg keyboard 3, that appears as Bloomberg Fingerprint Scan‑
ner and Bloomberg Keyboard Audio.
– one policy redirected device for Bloomberg keyboard 4. This device appears as
Bloomberg LP Keyboard 2013.
• If support for Bloomberg keyboards is enabled, there are two devices shown in the Desk‑
top Viewer. One appears as Bloomberg Fingerprint Scanner as before, and the other as
Bloomberg Keyboard Features.
• If the driver for the Bloomberg Fingerprint Scanner device is not installed, the Bloomberg Fin‑
gerprint Scanner entry might not appear in the Desktop Viewer. If the entry is missing, the
Bloomberg Fingerprint Scanner might not be available for redirection. You can still check the
name of the other Bloomberg device where Bloomberg keyboards support is enabled.
• You can also check the value in the registry to know if the support is enabled:
HKEY_LOCAL_MACHINE\SOFTWARE\Citrix\ICAClient\GenericUSB\EnableBloombergHID
© 1999–2023 Cloud Soware Group, Inc. All rights reserved. 304

Citrix Workspace app for Windows
If the value doesn’t exist or is 0 (zero), support for Bloomberg keyboards is not enabled. If the
value is 1, support is enabled.
Enabling Bloomberg keyboard support:
Note:
Citrix Receiver for Windows 4.8 introduced the support for composite devices through the Split‑
Devices policy. However, you must use the Bloomberg keyboard feature instead of this policy
for the Bloomberg keyboard 4.
The support for the Bloomberg keyboard changes the way certain USB devices are redirected to a
session. This support is not enabled by default.
• To enable the support during the installation time, specify the value of the ENABLE_HID_REDIRECTION
property as TRUE at the installation command‑line. For example:
CitrixOnlinePluginFull.exe /silent
ADDLOCAL="ICA_CLIENT,PN_AGENT,SSON,USB"
ENABLE_SSON="no"INSTALLDIR="c:\test"
ENABLE_DYNAMIC_CLIENT_NAME="Yes"
DEFAULT_NDSCONTEXT="Context1,Context2"
SERVER_LOCATION="http://testserver.net"ENABLE_HID_REDIRECTION="TRUE"
• To enable support aer installing the online plug‑in, edit the Windows Registry on the system
where the online plug‑in is running:
1. Open Registry Editor.
2. Navigate to the following key:
HKEY_LOCAL_MACHINE\SOFTWARE\Citrix\ICA Client\GenericUSB
3. If the value EnableBloombergHID exists, modify it so that the value data is 1.
4. If the value EnableBloombergHID does not exist, create a DWORD value with the name
EnableBloombergHID and provide the value data as 1.
Disabling support for the Bloomberg keyboard:
You can disable support for the Bloomberg keyboard in the online plug‑in as follows:
1. Open Registry Editor on the system running the online plug‑in soware.
2. Navigate to the following key:
HKEY_LOCAL_MACHINE\SOFTWARE\Citrix\ICA Client\GenericUSB
3. If the value EnableBloombergHID exists, modify it so that the value data is 0 (zero).
If the value EnableBloombergHID doesn’t exist, it indicates that the support for the Bloomberg
keyboard is not enabled. In such case, you don’t have to modify any registry values.
Using Bloomberg keyboards without enabling support:
© 1999–2023 Cloud Soware Group, Inc. All rights reserved. 305

Citrix Workspace app for Windows
• You can use the keyboard without enabling the Bloomberg keyboard support in the online plug‑
in. However, you cannot have the benefit of sharing the specialized functionality among multi‑
ple sessions and you might experience increased network bandwidth from audio.
• Bloomberg keyboard ordinary keys are available in the same way as any other keyboard. You
don’t have to take any special action.
• To use the specialized Bloomberg keys, you must redirect the Bloomberg keyboard audio de‑
vice into the session. If you are using the Desktop Viewer, the manufacturer name and device
name of the USB devices appears and Bloomberg Keyboard Audio appears for the Bloomberg
Keyboard audio device.
• To use the fingerprint reader, you must redirect the device to Bloomberg Fingerprint Scanner.
If the drivers for the fingerprint reader are not installed locally, the device only shows:
– if the online plug‑in is set to connect devices automatically or
– to let the user choose whether to connect devices.
Also, if the Bloomberg keyboard is connected before establishing the session and drivers for
the fingerprint reader doesn’t exist locally, then the fingerprint reader doesn’t appear and isn’t
usable within the session.
Note:
For Bloomberg 3, a single session or the local system can use the fingerprint reader, and cannot
be shared. Bloomberg 4 is prohibited for redirection.
Using Bloomberg keyboards aer enabling support:
• If you enable support for Bloomberg keyboards in the online plug‑in, you have the benefit of
sharing the specialized keyboard functionality with multiple sessions. You also experience less
network bandwidth from the audio.
• Enabling support for the Bloomberg keyboard prevents the redirection of the Bloomberg Key‑
board audio device. Instead, a new device is made available. If you are using the Desktop
Viewer, this device is called Bloomberg Keyboard Features. Redirecting this device provides
the specialized Bloomberg keys to the session.
Enabling the Bloomberg keyboard support only aects the specialized Bloomberg keys and the au‑
dio device. Because the ordinary keys and fingerprint reader are used in the same way as when the
support is not enabled.
HDX Plug and Play USB device redirection
HDX Plug and Play USB device redirection enables dynamic redirection of media devices to the server.
The media device includes cameras, scanners, media players, and point of sale (POS) devices. You or
the user can restrict the redirection of all or some of the devices. Edit policies on the server or apply
© 1999–2023 Cloud Soware Group, Inc. All rights reserved. 306

Citrix Workspace app for Windows
group policies on the user device to configure the redirection settings. For more information, see USB
and client drive considerations in the Citrix Virtual Apps and Desktops documentation.
Important:
If you prohibit Plug and Play USB device redirection in a server policy, the user can’t override
that policy setting.
A user can set permissions in Citrix Workspace app to allow or reject deviceredirection always or notify
each time a device is connected. The setting aects only devices plugged in aer the user changes the
setting.
To map a client COM port to a server COM port
Client COM port mapping allows devices attached to the COM ports of the user device to be used dur‑
ing sessions. These mappings can be used like any other network mappings.
You can map client COM ports at the command prompt. You can also control client COM port mapping
from the Remote Desktop (Terminal Services) Configuration tool or using policies. For information
about policies, see the Citrix Virtual Apps and Desktops documentation.
Important:
COM port mapping isn’t TAPI‑compatible.
1. For Citrix Virtual Apps and Desktops deployments, enable the Client COM port redirection policy
setting.
2. Log on to Citrix Workspace app.
3. At a command prompt, type:
net use comx: \\\\\client\\comz:
where:
• x is the number of the COM port on the server (ports 1 through 9 are available for mapping)
and
• z is the number of the client COM port you want to map
4. To confirm the operation, type:
net use
The prompt displays mapped drives, LPT ports, and mapped COM ports.
To use this COM port in a virtual desktop or application, install your user device to the mapped name.
For example, if you map COM1 on the client to COM5 on the server, install your COM port device on
COM5 during the session. Use this mapped COM port as you would a COM port on the user device.
© 1999–2023 Cloud Soware Group, Inc. All rights reserved. 307

Citrix Workspace app for Windows
Configuring USB audio
Note:
• When you upgrade or install Citrix Workspace app for Windows for the first time, add the
latest template files to the local GPO. For more information on adding template files to the
local GPO, see Group Policy Object administrative template. For upgrade, the existing set‑
tings are retained while importing the latest files.
• This feature is available only on Citrix Virtual Apps server.
To configure USB audio devices:
1. Open the Citrix Workspace app Group Policy Object administrative template by running
gpedit.msc.
2. Under the Computer Configuration node, go to Administrative Templates > Classic Admin‑
istrative Templates (ADM) > Citrix Components > Citrix Workspace > User experience, and
select Audio through Generic USB Redirection.
3. Edit the settings.
4. Click Apply and OK.
5. Open the cmd prompt in administrator mode.
6. Run the following command
gpupdate /force.
Mass storage devices
For mass storage devices only, in addition to USB support, remote access is available through client
drive mapping. You can configurethis throughthe Citrix Workspaceapp for Windows policy Remoting
client devices > Client drive mapping. When you apply this policy, the drives on the user device
automatically map to drive letters on the virtual desktop when users log on. The drives are displayed
as shared folders with mapped drive letters.
The main dierences between the two types of remoting policy are:
Feature Client drive mapping USB support
Enabled by default Yes No
Read‑only access
configurable
Yes No
Safe to remove device during
a session
No Yes, if the user clicks Safely
Remove Hardware in the
notification area
© 1999–2023 Cloud Soware Group, Inc. All rights reserved. 308

Citrix Workspace app for Windows
If you enable both Generic USB and the client drive‑mapping policies and insert a mass storage device
before a session starts, it is redirected using client drive mapping first, before being considered for
redirection through USB support. If it is inserted aer a session has started, it will be considered for
redirection using USB support before client drive mapping.
Client drive‑mapping
October 7, 2023
Client drive‑mapping supports the transfer of data between the host and the client as a stream. The
file transfer adapts to the changing network throughput conditions. It also uses any available extra
bandwidth to scale up the data transfer rate.
By default, this feature is enabled.
To disable this feature, set the following registry key and then restart the server:
Path: HKEY_LOCAL_MACHINE\System\Currentcontrolset\services\picadm\Parameters
Name: DisableFullStreamWrite
Type: REG_DWORD
Value:
0x01 ‑ disables
0 or delete ‑ enables
Citrix Workspace app for Windows supports device mapping on user devices so they’re available from
within a session. Users can:
• Transparently access local drives, printers, and COM ports
• Cut and paste between the session and the local Windows clipboard
• Hear audio (system sounds and .wav files) played from the session
Citrix Workspace app informs the server of the available client drives, COM ports, and LPT ports during
sign‑in. By default, client drives are mapped to server drive letters and server print queues are created
for client printers, which make them appear to be directly connected to the session. These mappings
are available only for the current user during the current session. They’re deleted when the user logs
o and recreated the next time the user logs on.
You can use the redirection policy settings to map user devices not automatically mapped at logon.
For more information, see the Citrix Virtual Apps and Desktops documentation.
Disable user device mappings
You can configure user device‑mapping including options for drives, printers, and ports, using the
Windows Server Manager tool. For more information about the available options, see your Remote
© 1999–2023 Cloud Soware Group, Inc. All rights reserved. 309

Citrix Workspace app for Windows
Desktop Services documentation.
Redirect client folders
Client folder redirection changes the way client‑side files are accessible on the host‑side session. En‑
abling only Client drive‑mapping on the server, client‑side full volumes automatically maps to the
sessions as Universal Naming Convention (UNC) links. When you enable client folder redirection on
the server and the user configures it on the user device, part of the user specified local volume gets
redirected.
Only the user‑specifiedfolders appear as UNC links inside the sessions, instead of the complete file sys‑
tem on the user device. If you disable UNC links through the registry, client folders appear as mapped
drives inside the session. For more information, including how to configure client folder redirection
for user devices, see the Citrix Virtual Apps and Desktops documentation.
Map client drives to host‑side drive letters
Client drive‑mapping redirects drive letters on the host‑side to drives that exist on the user device.
For example, drive H in a Citrix user session can be mapped to drive C of the user device running Citrix
Workspace app for Windows.
Client drive‑mapping is built into the standard Citrix device redirection facilities transparently. To File
Manager, Windows Explorer, and your applications, these mappings appear like any other network
mappings.
The server hosting virtual desktops and applications can be configured during installation to map
client drives automatically to a given set of drive letters. The default installation maps drive letters
assigned to client drives starting with V and works backward, assigning a drive letter to each fixed
drive and CD‑ROM drive. (Floppy drives are assigned their existing drive letters.) This method yields
the following drive mappings in a session:
Client drive letter Accessible by the server as:
A A
B B
C V
D U
The server can be configured so that the server drive letters don’t conflict with the client drive letters.
So, the server drive letters are changed to higher drive letters.
© 1999–2023 Cloud Soware Group, Inc. All rights reserved. 310

Citrix Workspace app for Windows
In the following example, changing server drives C to M and D to N allows client devices to access their
C and D drives directly. This method yields the following drive mappings in a session:
Client drive letter Accessible by the server as:
A A
B B
C C
D D
The drive letter used to replace the server drive C is defined during Setup. All other fixed drive and CD‑
ROM drive letters are replaced with sequential drive letters (for example; C > M, D > N, E > O). These
drive letters must not conflict with any existing network drive mappings. If you map the network drive
to the same drive letter as a server drive letter, the network drive mapping isn’t valid.
Connecting a user device to a server, reestablishes client mappings unless automatic client device
mapping is disabled. Client drive‑mapping is enabled by default. To change the settings, use the
Remote Desktop Services (Terminal Services) Configuration tool. You can also use policies to give you
more control over how client device mapping is applied. For more information about policies, see the
Citrix Virtual Apps and Desktops documentation.
Microphone
October 7, 2023
Citrix Workspace app supports multiple client‑side microphone inputs. You can use locally installed
microphones for:
• Real‑time activities, such as sophone calls and Web conferences.
• Hosted recording applications, such as dictation programs.
• Video and audio recordings.
Citrix Workspace app users can select whether to use microphones attached to their device using Con‑
nection Center. Citrix Virtual Apps and Desktops and Citrix DaaS users can also use the Citrix Virtual
Apps and Desktops and Citrix DaaS viewer Preferences to disable their microphones and webcams.
© 1999–2023 Cloud Soware Group, Inc. All rights reserved. 311

Citrix Workspace app for Windows
Group Policy
October 7, 2023
Group Policy Object administrative template
We recommend that you use the Group Policy Object administrative template to configure rules for:
• Network routing
• Proxy servers
• Trusted server configuration
• User routing
• Remote user devices
• User experience
You can use the receiver.admx / receiver.adml template files with domain policies and local
computer policies. For domain policies, import the template file using the Group Policy Management
console. Importing is useful when applying Citrix Workspace app settings to several dierent user
devices throughout the enterprise. To modify on a single user device, import the template file using
the local Group Policy Editor on the device.
Citrix recommends using the Windows Group Policy Object (GPO) administrative template to config‑
ure Citrix Workspace app.
The installation directory includes CitrixBase.admx and CitrixBase.adml, and, administrative
template files (receiver.adml or receiver.admx‘receiver.adml‘).
Note:
The .admx and .adml files are for use with Windows version mentioned in the Compatibility ma‑
trix.
If Citrix Workspace app is installed with VDA, the ADMX/ADML files are typically found in the
\<installation directory>\Online Plugin\Configuration directory.
If Citrix Workspace app is installed without the VDA, the ADMX/ADML files are typically found in the
C:\Program Files\Citrix\ICA Client\Configuration directory.
See the following table for information about Citrix Workspace app template files and their respective
locations.
Note:
Citrix recommends that you use the GPO template files provided with latest version of Citrix
Workspace app.
© 1999–2023 Cloud Soware Group, Inc. All rights reserved. 312

Citrix Workspace app for Windows
File type File location
receiver.adm <Installation Directory>\ICA
Client\Configuration
receiver.admx <Installation Directory>\ICA
Client\Configuration
receiver.adml <Installation Directory>\ICA
Client\Configuration\[MUIculture]
CitrixBase.admx <Installation Directory>\ICA
Client\Configuration
CitrixBase.adml <Installation Directory>\ICA
Client\Configuration\[MUIculture]
Note:
• If the CitrixBase.admx\adml isn’t added to the local GPO, the Enable ICA File Signing policy
might be lost.
• When upgrading Citrix Workspace app, add the latest template files to local GPO. Earlier
settings are retained aer import. For more information, see the following procedure:
To add the receiver.admx/adml template files to the local GPO:
You can use .adm template files to configure both the Local and the domain‑based GPO. Refer to the
Microso MSDN article about managing ADMX files here.
Aer installing Citrix Workspace app, copy the following template files:
File type Copy from Copy to
receiver.admx Installation Directory
\ICA Client\
Configuration\receiver
.admx
%systemroot%\
policyDefinitions
CitrixBase.admx Installation Directory
\ICA Client\
Configuration\
CitrixBase.admx
%systemroot%\
policyDefinitions
© 1999–2023 Cloud Soware Group, Inc. All rights reserved. 313

Citrix Workspace app for Windows
File type Copy from Copy to
receiver.adml Installation Directory
\ICA Client\
Configuration\[
MUIculture]receiver.
adml
%systemroot%\
policyDefinitions\[
MUIculture]
CitrixBase.adml Installation Directory
\ICA Client\
Configuration\[
MUIculture]\CitrixBase
.adml
%systemroot%\
policyDefinitions\[
MUIculture]
Note:
Add the CitrixBase.admx/CitrixBase.adml to the \PolicyDefinitions folder to view the tem‑
plate files in Administrative Templates > Citrix Components > Citrix Workspace.
Session experience
November 23, 2023
Application launch time
Use the session prelaunch feature to reduce application launch time during normal or high traic peri‑
ods, thus providing users with a better experience. The prelaunch feature allows to create a prelaunch
session. Prelaunch session is created when a user logs on to Citrix Workspace app, or at a scheduled
time if the user has signed in.
The prelaunch session reduces the launch time of the first application. When a user adds new account
connection to Citrix Workspace app for Windows, session prelaunch doesn’t take eect until the next
session. The default application ctxprelaunch.exe is running in the session, but it is not visible to you.
For more information, see session prelaunch and session linger guidance in the Citrix Virtual Apps and
Desktops article titled Manage delivery groups.
Session prelaunch is disabled by default. To enable session prelaunch, specify the ENABLEPRELAUNCH
=true parameter on the Workspace command line or set the EnablePreLaunch registry key to true.
The default setting, null, means that prelaunch is disabled.
© 1999–2023 Cloud Soware Group, Inc. All rights reserved. 314

Citrix Workspace app for Windows
Note:
If the client machine has been configured to support Domain Passthrough (SSON) authentica‑
tion, prelaunch is automatically enabled. If you want to use Domain Pass‑through (SSON) with‑
out prelaunch, set the EnablePreLaunch registry key value to
false.
The registry locations are:
• HKEY_LOCAL_MACHINE\Software\[Wow6432Node\]Citrix\\Dazzle
• HKEY_CURRENT_USER\Software\Citrix\Dazzle
There are two types of prelaunch:
• Just‑in‑time prelaunch‑ prelaunch starts immediately aer the user’s credentials are authen‑
ticated whether it is a high‑traic period. Typically used for normal traic periods. A user can
trigger just‑in‑time prelaunch by restarting the Citrix Workspace app.
• Scheduled prelaunch‑ prelaunch starts at a scheduled time. Scheduled prelaunch starts only
when the user device is already running and authenticated. If those two conditions are not met
when the scheduled prelaunch time arrives, a session does not launch. To share network and
server load, the session launches within a window when it is scheduled. For example, if the
scheduled prelaunch is scheduled for 13:45, the session actually launches between 13:15 and
13:45. Typically used for high‑traic periods.
Configuring prelaunch on a Citrix Virtual Apps server consists of:
• creating, modifying, or deleting prelaunch applications, and
• updating user policy settings that control the prelaunch application.
You cannot customize the prelaunch feature using the receiver.admx file. However, you can change
the prelaunch configuration by modifying registry values. Registry values can be modified during or
aer Citrix Workspace app for Windows installation.
• The HKEY_LOCAL_MACHINE values are written during client installation.
• The HKEY_CURRENT_USER values enable you to provide dierent users on the same machine
with dierent settings. Users can change the HKEY_CURRENT_USER values without administra‑
tive permission. You can provide your users with scripts to change the values.
HKEY_LOCAL_MACHINE registry values:
For 64‑bit Windows operating systems: HKEY_LOCAL_MACHINE\SOFTWARE\Wow6432Node\Citrix
\ICA Client\Prelaunch
For 32‑bit Windows operating systems: HKEY_LOCAL_MACHINE\SOFTWARE\Citrix\ICA Client\
Prelaunch
Name: UserOverride
Type: REG_DWORD
© 1999–2023 Cloud Soware Group, Inc. All rights reserved. 315

Citrix Workspace app for Windows
Values:
0 ‑ Use the HKEY_LOCAL_MACHINE values even if HKEY_CURRENT_USER values are also present.
1 ‑ Use the HKEY_CURRENT_USER values if they exist; otherwise, use the HKEY_LOCAL_MACHINE val‑
ues.
Name: State
Type: REG_DWORD
Values:
0 ‑ Disable prelaunch.
1 ‑ Enable just‑in‑time prelaunch. (prelaunch starts aer the user’s credentials are authenticated.)
2 ‑ Enable scheduled prelaunch. (prelaunch starts at the time configured for Schedule.)
Name: Schedule
Type: REG_DWORD
Value:
The time (24‑hour format) and days of a week for the scheduled prelaunch entered in the following
format:
HH:MM M:T:W:TH:F:S:SU where HH
and MM are hours and
minutes. M:T:W:TH:F:S:SU is
the days of the week. For
example, to enable scheduled
prelaunch on Monday,
Wednesday, and Friday at
13:45, set Schedule as
Schedule=13:45
1:0:1:0:1:0:0. The session
actually launches between
13:15 and 13:45.
HKEY_CURRENT_USER registry values:
HKEY_CURRENT_USER\SOFTWARE\Citrix\ICA Client\Prelaunch
The State and Schedule keys have the same values as for HKEY_LOCAL_MACHINE.
Desktop Viewer
Dierent enterprises might have dierent corporate needs. Your requirements for the way users ac‑
cessvirtual desktops might vary from user to user and as your corporate needs evolve. The user experi‑
ence of connecting to virtual desktops and the extent at which the user can configure the connections
© 1999–2023 Cloud Soware Group, Inc. All rights reserved. 316

Citrix Workspace app for Windows
depend Citrix Workspace app for Windows setup.
Use the desktop viewer when users need to interact with their virtual desktop. The user’s virtual
desktop can be a published virtual desktop, or a shared or dedicated desktop. In this access scenario,
the Desktop Viewer toolbar functionality allows the user to open a virtual desktop in a window and
pan and scale that desktop inside their local desktop. Users can set preferences and work on more
than one desktop using multiple Citrix Virtual Apps and Desktops and Citrix DaaS connections on the
same user device.
Note:
Use Citrix Workspace app to change the screen resolution on their virtual desktops. You can’t
change Screen Resolution using the Windows Control Panel.
Keyboard input in Desktop Viewer
In Desktop Viewer sessions, the Windows logo key+L is directed to the local computer.
Ctrl+Alt+Delete is directed to the local computer.
Key presses that activate certain Microso accessibility features, for example, Sticky Keys, Filter Keys,
and Toggle Keys are normally directed to the local computer.
As an accessibility featureof the Desktop Viewer, pressing Ctrl+Alt+Breakdisplays the Desktop Viewer
toolbar buttons in a pop‑up window.
Ctrl+Esc is sent to the remote, virtual desktop.
Note:
By default, if the Desktop Viewer is maximized, Alt+Tab switches focus between windows inside
the session. If the Desktop Viewer is displayed in a window, Alt+Tab switches focus between
windows outside the session.
Hotkey sequences are key combinations designed by Citrix. Hotkey sequences are, for example, the
Ctrl+F1 sequence reproduces Ctrl+Alt+Delete, and Shi+F2 switches applications between full‑screen
and windowed mode.
Note:
You can’t use hotkey sequences with virtual desktops displayed in the Desktop Viewer, that is,
with virtual apps and desktops sessions. However, you can use them with published applica‑
tions, that is, with virtual apps sessions.
Status indicator time‑out
You can change the amount of time the status indicator displays when a user is launching a session.
To alter the time‑out period, do the following steps:
© 1999–2023 Cloud Soware Group, Inc. All rights reserved. 317

Citrix Workspace app for Windows
1. Launch the Registry Editor.
2. Navigate to the following path:
• On a 64‑bit: HKEY_LOCAL_MACHINE\SOFTWARE\Wow6432Node\Citrix\ICA CLIENT\
Engine
• On a 32‑bit: HKEY_LOCAL_MACHINE\SOFTWARE\Citrix\ICA CLIENT\Engine\
3. Create a registry key as follows:
• Type: REG_DWORD
• Name: SI INACTIVE MS
• Value: 4, if you want the status indicator to disappear sooner.
When you configure this key, the status indicator might appear and disappear frequently. This behav‑
ior is as designed. To suppress the status indicator, do the following:
1. Launch the Registry Editor.
2. Navigate to the following path:
• On a 64‑bit: HKEY_LOCAL_MACHINE\SOFTWARE\Wow6432Node\Citrix\ICA CLIENT\
• On a 32‑bit: HKEY_LOCAL_MACHINE\SOFTWARE\Citrix\ICA CLIENT\
3. Create a registry key as follows:
• Type: REG_DWORD
• Name: NotificationDelay
• Value: Any value in millisecond (for example, 120000)
Improved virtual apps and desktops reconnection experience
Citrix Workspace 2302 release provides an enhanced user experience while reconnecting to virtual
apps and desktops from which you got disconnected.
When Citrix Workspace app attempts to refresh the disconnected Citrix Workspace app or start new
virtual apps or desktops as a part of the Workspace Control feature, the following prompt appears:
© 1999–2023 Cloud Soware Group, Inc. All rights reserved. 318

Citrix Workspace app for Windows
This prompt appears only when the show reconnection prompt to reconnect sessions is set to true
in the Global App Configuration service.
Click Restore to reconnect to open new and disconnected virtual apps and desktops. If you want to
start only newly selected apps and desktops, click Cancel.
You can also select Remember my preference to apply the selected preference for the next login.
The preceding new Restore session? prompt appears only if:
• the user tries to start an app belonging to a workspace store,
• admin policies or app config settings are not configured for the Workspace Control feature,
• Workspace Control Reconnect options are set to default on the client.
Note:
Reconnect settings in the Reconnect Options takes precedence over the preferences set in the
dialog box. For more information, see Configure reconnect options using Advanced Preferences
dialog.
Sustainability initiative from Citrix Workspace app
From Citrix Workspace app 2309 version onwards, when this feature is enabled, a prompt is displayed
to sign out from the desktop session when a user closes a virtual desktop. This feature might help
conserve energy if there are Windows OS policies that are used to shutdown VMs when no users are
logged in.
To enable this feature, do the following:
© 1999–2023 Cloud Soware Group, Inc. All rights reserved. 319

Citrix Workspace app for Windows
1. Navigate to Citrix Studio.
2. Click Delivery Groups from the le navigation pane.
3. Select the required VDA from the Delivery Group section.
4. Click the Edit icon. The Edit Delivery Group page appears.
5. Click Desktops from the le navigation pane.
6. Select the required VDA where you must add the keywords.
7. Click Edit. The Edit Desktop page appears.
8. Set the LogoffOnClose keyword to true in the Description field.
9. Click OK. The following dialog box appears when you close the virtual desktop:
Customizing the text in the Save energy screen
You can also customize the text in the Save energy screen.
1. Follow steps 1–8 in the preceding section.
2. Set the PromptMessage keyword to the required text in the Description field.
Example:
1 KEYWORDS:LogoffOnClose=true PromptMessage="Do you want to Log off?
"
2 <!--NeedCopy-->
© 1999–2023 Cloud Soware Group, Inc. All rights reserved. 320

Citrix Workspace app for Windows
The keywords are assigned by default for new desktop machines assigned to the group. For
existing desktop machines, you must run the following powershell commands for changes to
apply:
1 $dg = Get-BrokerDesktopGroup -Name '<group name>' -Property 'Name'
,'Uid'
2
3 $apr = @( Get-BrokerAssignmentPolicyRule -DesktopGroupUid $dg.Uid
-Property 'Description' )
4
5 Get-BrokerMachine -DesktopGroupUid $dg.Uid -IsAssigned $true | Set
-BrokerMachine -Description $apr[0].Description
6 <!--NeedCopy-->
© 1999–2023 Cloud Soware Group, Inc. All rights reserved. 321

Citrix Workspace app for Windows
With this PowerShell script, it is possible to have multiple assignment policy rules for a single
Delivery Group. Using Citrix Studio also, you can configure multiple Assignment policy rules,
each with unique description value and possible set of dierent keywords.
3. Click OK. The following dialog box appears when you close the virtual desktop.
Citrix Workspace app Desktop Lock
October 7, 2023
You can use the Citrix Workspace app Desktop Lock when you do not need to interact with the local
desktop. You can use the Desktop Viewer (if enabled), however it has only the following set of options
on the toolbar:
• Ctrl+Alt+Del
• Preferences
• Devices
• Disconnect.
Citrix Workspace app for Windows with Desktop Lock works on domain‑joined machines that are sin‑
gle sign‑on enabled and store configured. It doesn’t support PNA sites. Previous versions of Desktop
Lock aren’t supported when you upgrade to Citrix Receiver for Windows 4.2 or later.
Note:
When using Citrix Workspace app for Windows with Desktop Lock, a user is signed in to the first
desktop that is alphabetically sorted with the name of all the desktops that are available to the
user. Currently, there is no option to selectively choose which desktop the user must sign in.
Also, this feature supports only desktops and doesn’t support apps.
Install Citrix Workspace app for Windows with the /includeSSON flag. Configure the store and single
sign‑on, either using the adm/admx file or command line option. For more information, see Install.
Then, install the Citrix Workspace app DesktopLockas an administrator using the CitrixWorkspaceDesktopLock
.msi available in the Citrix Downloads page.
© 1999–2023 Cloud Soware Group, Inc. All rights reserved. 322

Citrix Workspace app for Windows
System requirements
• Microso Visual C++ 2005 Service Pack 1 Redistributable Package. For more information, see
the Microso Download page.
• Supported on Windows 10 (Anniversary update included), and Windows 11.
• Connects to StoreFront through native protocols only.
• Domain‑joined end points.
• User devices must be connected to a LAN or WAN.
Local App Access
Important
Enabling Local App Access might allow local desktop access unless a full lockdown has been
applied with the Group Policy Object template or a similar policy. For more information, see the
Configure Local App Access and URL redirection section in the Citrix Virtual Apps and Desktops
documentation.
Working with Citrix Workspace app Desktop Lock
• You can use Citrix Workspace app Desktop Lock with the following Citrix Workspace app fea‑
tures:
– 3Dpro, Flash, USB, HDX Insight, Microso Lync 2013 plug‑in, and Local App Access
– Domain, two‑factor authentication, or smart card authentication only
• Disconnecting the Citrix Workspace app Desktop Lock session logs out the end device.
• Flash redirection is disabled on Windows 8 and later versions. Flash redirection is enabled on
Windows 7.
• The Desktop Viewer is optimized for Citrix Workspace app Desktop Lock with no Home, Restore,
Maximize, and Display properties.
• Ctrl+Alt+Del is available on the Desktop Viewer toolbar.
• Most windows shortcut keys are passed to the remote session, except for Windows+L.
• Ctrl+F1 triggers Ctrl+Alt+Del when you disable the connection or Desktop Viewer for desktop
connections.
• A local user profile is created at the end device when the user logs in to the system. The profile
is retained at the end device even when the user logs out and based on the profile management
configurations.
Note:
With the Desktop Lock installed, and LiveInDesktopDisconnectOnLock set to False in the
registry path HKEY_LOCAL_MACHINE\SOFTWARE\Citrix\Dazzle Or HKEY_LOCAL_MACHINE
\SOFTWARE\Wow6432Node\Citrix\Dazzle, the active session gets disconnected when the
© 1999–2023 Cloud Soware Group, Inc. All rights reserved. 323

Citrix Workspace app for Windows
end‑point wakes up from hibernation or standby mode.
Install Citrix Workspace app Desktop Lock
This procedure installs Citrix Workspace app for Windows so that virtual desktops appear using Citrix
Workspace app Desktop Lock. For deployments that use smart cards, see
Smart card.
1. Log on using a local administrator account.
2. At a command prompt, run the following command:
For example:
1 CitrixWorkspaceApp.exe
2 /includeSSON
3 STORE0="DesktopStore;https://my.storefront.server/Citrix/MyStore/
discovery;on;Desktop Store"
4 <!--NeedCopy-->
The command is available in the Citrix Workspace app and Plug‑ins > Windows > Citrix
Workspace app folder on the installation media. For command details, see the Citrix
Workspace app install documentation at Install.
3. In the same folder on the installation media, double‑click CitrixWorkspaceDesktopLock.
msi. The Desktop Lock wizard appears. Follow the prompts.
4. When the installation completes, restart the user device. If you have permission to accessa desk‑
top and you log on as a domain user, the device appears using Citrix Workspace app Desktop
Lock.
You can allow administration of the user device aer installation, the account used to install
CitrixWorkspaceDesktopLock.msi is excluded from the replacement shell. If that account is
later deleted, you can’t log on and administer the device.
To run a silent install of Citrix Workspace Desktop Lock, use the following command line:
msiexec /i CitrixWorkspaceDesktopLock.msi /qn
Configure Citrix Workspace app Desktop Lock
When you’ve logged in as a non‑administrator, Desktop Lock automatically launches an assigned desk‑
top session.
Using Active Directory policies prevent users from hibernating virtual desktops.
Use the same administrator account to configure Citrix Workspace app Desktop Lock as you did to
install it.
© 1999–2023 Cloud Soware Group, Inc. All rights reserved. 324

Citrix Workspace app for Windows
• Check if the receiver.admx (or receiver.adml) and receiver_usb.admx (.adml) files are loaded
into Group Policy (where the policies appear in Computer Configuration or User Configura‑
tion > Administrative Templates > Classic Administrative Templates (ADMX) > Citrix Com‑
ponents). The .admx files are in %Program Files%\Citrix\ICA Client\Configuration\.
• USB preferences ‑ When a user plugs in a USB device, that device is automatically remoted to
the virtual desktop and no user interaction is required. The virtual desktop controls the USB
device and displaying it in the user interface.
– Enable the USB policy rule.
– In Citrix Workspace app > Remoting client devices > Generic USB Remoting, enable
and configure the Existing USB Devices and New USB Devices policies.
• Drive mapping ‑ In Citrix Workspace app > Remoting client devices, enable, and configure the
Client drive mapping policy.
• Microphone ‑ In Citrix Workspace app > Remoting client devices, enable, and configure the
Client microphone policy.
Configure smart cards for use with Windows Desktop Lock
1. Configure StoreFront.
a) Configure the XML Service to use DNS Address Resolution for Kerberos support.
b) Configure StoreFront sites for HTTPS access, create a server certificate signed by your do‑
main certificate authority, and add HTTPS binding to the default website.
c) Make sure that pass‑through authentication with the smart card is enabled (enabled by
default).
d) Enable Kerberos.
e) Enable Kerberos and pass‑through authentication with smart card.
f) Enable Anonymous access on the IIS Default website and use Integrated Windows Authen‑
tication.
g) Ensure that the IIS Default website doesn’t require SSL and ignores client certificates.
2. Use the Group Policy Management Console to configure Local Computer Policies on the user
device.
a) Import the Receiver.admx template from %Program Files%\Citrix\ICA Client\Configuration\.
b) Expand Administrative Templates > Classic Administrative Templates (ADMX) > Citrix
Components > Citrix Workspace > User authentication.
c) Enable Smart card authentication.
d) Enable Local user name and password.
3. Configure the user device before installing Citrix Workspace app Desktop Lock.
a) Add the URL for the Delivery Controller to the Windows Internet Explorer Trusted Sites list.
b) Add the URL for the first Delivery Group to the Internet Explorer Trusted Sites list. Add the
URL in the form desktop://delivery‑group‑name.
c) Enable Internet Explorer to use automatic logon for Trusted Sites.
© 1999–2023 Cloud Soware Group, Inc. All rights reserved. 325

Citrix Workspace app for Windows
When Citrix Workspace app Desktop Lock is installed on the user device, it enforces a consistent smart
card removal policy. For example, if the Windows smart card removal policy is set to Force logo for
the desktop, the user must log o from the user device, regardless of the Windows smart card removal
policy set on it. Desktop Lock ensures that the user device isn’t le in an inconsistent state. This
applies only to user devices with the Citrix Workspace app Desktop Lock.
Remove Desktop Lock
Be sure to remove both of the components listed as follows:
1. Log on with the same local administrator account that was used to install and configure Citrix
Workspace app Desktop Lock.
2. From the Windows feature for removing or changing programs:
• Remove Citrix Workspace app Desktop Lock.
• Remove Citrix Workspace app for Windows.
Passing Windows shortcut keys to the remote session
Most windows shortcut keys are passed to the remote session. This section highlights some of the
common ones.
Windows
• Win+D ‑ Minimize all windows on the desktop.
• Alt+Tab ‑ Change active window.
• Ctrl+Alt+Delete ‑ via Ctrl+F1 and the Desktop Viewer toolbar.
• Alt+Shi+Tab
• Windows+Tab
• Windows+Shi+Tab
• Windows+All Character keys
Windows 8
• Win+C ‑ Open charms.
• Win+Q ‑ Search charm.
• Win+H ‑ Share charm.
• Win+K ‑ Devices charm.
• Win+I ‑ Settings charm.
• Win+Q ‑ Search apps.
• Win+W ‑ Search settings.
• Win+F ‑ Search files.
© 1999–2023 Cloud Soware Group, Inc. All rights reserved. 326

Citrix Workspace app for Windows
Windows 8 apps
• Win+Z ‑ Get to app options.
• Win+. ‑ Snap app to the le.
• Win+Shi+. ‑ Snap app to the right.
• Ctrl+Tab ‑ Cycle through app history.
• Alt+F4 ‑ Close an app.
Desktop
• Win+D ‑ Open desktop.
• Win+, ‑ Peek at desktop.
• Win+B ‑ Back to desktop.
Other
• Win+U ‑ Open Ease of Access Center.
• Ctrl+Esc ‑ Start screen.
• Win+Enter ‑ Open Windows Narrator.
• Win+X ‑ Open the system utility settings menu.
• Win+PrintScrn ‑ Take a screenshot and save to pictures.
• Win+Tab ‑ Open switch list.
• Win+T ‑ Preview open windows in taskbar.
Soware Development Kit (SDK) and API
October 7, 2023
Certificate Identity Declaration SDK
The Certificate Identity Declaration (CID) SDK lets developers create a plug‑in. The plug‑in lets Citrix
Workspace app authenticate to the StoreFront server by using the certificate that is installed on the
client machine. CID declares the user’s smart card identity to a StoreFront server without performing
a smart card‑based authentication.
The latest version for Certificate Identity Declaration for Citrix Workspace for Windows is 2212.
For more information, see the Certificate Identity Declaration SDK for Citrix Workspace app for Win‑
dows documentation.
© 1999–2023 Cloud Soware Group, Inc. All rights reserved. 327

Citrix Workspace app for Windows
Citrix Common Connection Manager SDK
Common Connection Manager (CCM) SDK provides a set of native APIs that enables you to interact and
perform basic operations programmatically. This SDK does not require a separate download because
it is a part of the Citrix Workspace app for Windows installation package.
Note:
Some of the APIs that are related to launch require the ICA file to initiate the launch process to
virtual apps and desktops sessions.
The CCM SDK capabilities include:
• Session launch
– Allows launching applications and desktops using the generated ICA file.
• Session disconnect
– Similar to the disconnect operation using the Connection Center. The disconnect can be
for all the sessions or to a specific user.
• Session logo
– Similar to the logo operation using the Connection Center. The logo can be for all the
sessions or to a specific user.
• Session information
– Provides dierent methods to get connection‑related information of the sessions
launched. The session includes desktop session, application session, and reverse
seamless application session
For more information about the SDK documentation, see Programmers guide to Citrix CCM SDK.
Citrix Virtual Channel SDK
The Citrix Virtual Channel soware development kit (SDK) supports writing server‑side applications
and client‑side drivers for more virtual channels using the ICA protocol. The server‑side virtual chan‑
nel applications are on Citrix Virtual Apps and Desktops servers. If you want to write virtual drivers for
other client platforms, contact Citrix Technical support.
The Virtual Channel SDK provides:
• The Citrix Virtual Driver Application Programming Interface (VDAPI) is used with the virtual chan‑
nel functions in the Citrix Server API SDK (WFAPI SDK) to create new virtual channels. The virtual
channel support provided by VDAPI makes it easy to write your own virtual channels.
• The Windows Monitoring API, which enhances the visual experience and support for third‑party
applications integrated with ICA.
• Working source code for virtual channel sample programs to demonstrate programming tech‑
niques.
• The Virtual Channel SDK requires the WFAPI SDK to write the server side of the virtual channel.
© 1999–2023 Cloud Soware Group, Inc. All rights reserved. 328

Citrix Workspace app for Windows
The latest version for Virtual Channel SDK for Windows is 2302.
For more information, see Citrix Virtual Channel SDK for Citrix Workspace app for Windows documen‑
tation.
Fast Connect 3 Credential Insertion API
The Fast Connect 3 Credential Insertion API provides an interface that supplies user credentials to the
single sign‑on (SSON) feature. This feature is available in Citrix Workspace app for Windows Version
4.2 and later. With this API, Citrix partners can provide authentication and SSO products that use
StoreFront to log users on to virtual applications or desktops and then disconnect users from those
sessions.
The latest version for Fast Connect API for Citrix Workspace for Windows is 2212.
For more information, see Fast Connect 3 Credential Insertion API for Citrix Workspace app for Win‑
dows documentation.
Scripts for deploying Citrix Workspace for Windows
These are sample scripts to deploy and configure Citrix Workspace app.
The latest version for Scripts for deploying Citrix Workspace for Windows is 2212.
Storebrowse
October 7, 2023
Note:
This article is applicable to on‑premises deployments of Citrix Workspace only. For cloud de‑
ployements, see Storebrowse for Workspace documentation.
Storebrowse is a command‑line utility that interacts between the client and the server. It’s used to
authenticate all the operations within StoreFront and with Citrix Gateway.
Using the Storebrowse utility, administrators can automate the following operations:
• Add a store.
• List the published apps and desktops from a configured store.
• Generate an ICA file by selecting any published virtual apps and desktops manually.
• Generate an ICA file using the Storebrowse command line.
• Launch the published application.
© 1999–2023 Cloud Soware Group, Inc. All rights reserved. 329

Citrix Workspace app for Windows
The Storebrowse utility is a part of the Authmanager component. When Citrix Workspace app instal‑
lation is complete, the Storebrowse utility is in the AuthManager installation folder.
To confirm that the Storebrowse utility is installed along with the Authmanager component, check
the following registry path:
When Citrix Workspace app is installed by administrators:
On a 32‑bit machine [HKEY_LOCAL_MACHINE\SOFTWARE\Citrix\AuthManager\Install]
On a 64‑bit machine [HKEY_LOCAL_MACHINE\SOFTWARE\WOW6432Node\Citrix\AuthManager\Install]
When Citrix Workspace app is installed by users (non‑administrators):
On a 32‑bit machine [HKEY_CURRENT_USER\SOFTWARE\Citrix\AuthManager\Install]
On a 64‑bit machine [HKEY_CURRENT_USER\SOFTWARE\WOW6432Node\Citrix\AuthManager\Install]
Requirements
• Citrix Workspace app Version 1808 for Windows or later.
• Minimum of 530 MB of free disk space.
• 2 GB RAM.
Compatibility Matrix
Storebrowse utility is compatible with the following Operating systems:
Operating system
Windows 10 32‑bit and 64‑bit editions
Windows Server 2022
Windows Server 2016
Windows Server 2008 R2, 64‑bit edition
Windows Server 2008 R2, 64‑bit edition
© 1999–2023 Cloud Soware Group, Inc. All rights reserved. 330

Citrix Workspace app for Windows
Connections
Storebrowse utility supports the following types of connections:
• HTTP store
• HTTPS store
• Citrix Gateway 11.0 and later
Note:
On an HTTP store, the Storebrowse utility does not accept credentials using the command‑line.
Authentication methods
StoreFront servers
StoreFront supports dierent authentication methods to access stores, however, not all are recom‑
mended. For security purposes, some of the authentication methods are disabled by default while
creating a store.
• Username and Password: Enter the credentials to be authenticated to access stores. By de‑
fault, Explicit authentication is enabled when you create your first store.
• Domain Pass‑through: Aer authenticating to the domain‑joined windows computers, you’re
automatically logged on to stores. To use this option, enable pass‑through authenticationwhen
installing the Citrix Workspace app. For more information on domain pass‑through, see Config‑
uring Pass‑through authentication.
• HTTP Basic: This method is used by third‑party client integrations and web portals, where an
external user interface has been used to capture a domain‑qualified user name and password.
StoreFront uses the Basic Authentication feature in IIS to transport the credentials to the Store‑
Front server. StoreFront then uses either the Domain Services, or the Broker XML Service au‑
thentication to validate the credentials and to obtain the group information. For information on
how to enable HTTP Basic authentication, see HTTP Basic in the Manage authentication meth‑
ods documentation.
Storebrowse utility supports authentication methods in any of the following methods:
• Using the AuthManager that is in‑built along with the Storebrowse utility. Note: Enable the
HTTP Basic authentication method on the StoreFront while working with the Storebrowse util‑
ity. This method applies when the user provides the credentials using the Storebrowse com‑
mands.
• Use the Authmanager that is included with Citrix Workspace app for Windows. You can use
this method, when you use domain pass‑through authentication. For more information, see
Domain pass‑through authentication documentation.
© 1999–2023 Cloud Soware Group, Inc. All rights reserved. 331

Citrix Workspace app for Windows
Launch published desktop or application
You can now launch a resource directly from the store without having to use an ICA file.
Note:
You can’t open SaaS apps or published content using Storebrowse commands.
Command usage
The following section provides detailed information about the commands that you can use from the
Storebrowse utility.
Add a store
-a, --addstore
Description:
Adds new store. Returns the full URL of the store. If the return fails, an error is reported.
Note:
Multi‑store configuration is supported on the Storebrowse utility.
Command example on StoreFront:
Command:
storebrowse.exe –U *username* -P *password* -D *domain* -a *URL of Storefront
*
Example:
.\storebrowse.exe –U { Username } –P { Password } –D { Domain } –a [https://
my.firstexamplestore.net](https://my.firstexamplestore.net)
Command example on Citrix Gateway:
Command:
storebrowse.exe –U *username* -P *password* -D *domain* -a *URL of CitrixGateway
*
Example:
.\storebrowse.exe –U { Username } –P { Password } –D { Domain } –a <https://
mysecondexample.com>
© 1999–2023 Cloud Soware Group, Inc. All rights reserved. 332

Citrix Workspace app for Windows
Help
/?
Description:
Provides details on Storebrowse utility usage.
List store
(-l), --liststore
Description:
Lists the stores that are added by the user.
Command Example on StoreFront:
.\storebrowse.exe –l
Command Example on Citrix Gateway:
.\storebrowse.exe –l
Enumerate
(-M 0x2000 -E)
Description:
Enumerates resources.
Command example on StoreFront:
.\storebrowse.exe –U { Username } –P { Password } –D { Domain } –M 0x2000 –E
<https://my.firstexamplestore.net/Citrix/Store/discovery>
Command example on Citrix Gateway:
.\storebrowse.exe –U { Username } –P { Password } –D { Domain } –M 0x2000 –E
<https://my.secondexample.net>
Quick launch
-q, --quicklaunch
Description:
Generates the ICA file for published apps and desktops using the Storebrowse utility. The
quicklaunch option requires a launch URL as an input along with the Store URL. The launch URL
© 1999–2023 Cloud Soware Group, Inc. All rights reserved. 333

Citrix Workspace app for Windows
which can either be the StoreFront server or the Citrix Gateway URL. The ICA file is generated in the
%LocalAppData%\Citrix\Storebrowse\cache directory.
You can get the launch URL for any published apps and desktops by running the following command:
.\storebrowse –M 0X2000 –E https://myfirstexamplestore.net/Citrix/Second/
discovery
A typical launch URL is as follows:
'Controller.Calculator''Calculator''\' ''http://abc-sf.xyz.com/Citrix/
Stress/resources/v2/Q29udHJvbGxlci5DYWxjdWxhdG9y/launch/ica
Command example on StoreFront:
.\storebrowse.exe –U { Username } –P { Password } –D { Domain } –q { Launch_URL_of_published_
apps and desktops } <https://my.firstexamplestore.net/Citrix/Store/resources
/v2/Q2hJkOlmNoPQrSTV9y/launch/ica> <https://my.firstexamplestore.net/Citrix
/Store/discovery>
Command example on Citrix Gateway:
.\storebrowse.exe –U { Username } –P { Password } –D { Domain } –q { Launch_URL_of_published_
apps and desktops } <https://my.secondexmaplestore.com>
Launch
-L, --launch
Description:
Generates the required ICA file for published apps and desktops using the Storebrowse utility. The
launch option requires the name of the resource along with the Store URL. The name which can either
be the StoreFront server or the Citrix Gateway URL. The ICA file is generated in the %LocalAppData
%\Citrix\Storebrowse\cache directory.
Run the following command to get the display name of the published apps and desktops:
.\storebrowse –M 0X2000 –E https://myfirstexamplestore.net/Citrix/Second/
discovery
This command results in the following output:
'Controller.Calculator''Calculator''\' ''http://abc-sf.xyz.com/Citrix/
Stress/resources/v2/Q29udHJvbGxlci5DYWxjdWxhdG9y/launch/ica
The name that is in bold in the previous output is used as an input parameter to the launch option.
Command example on StoreFront:
© 1999–2023 Cloud Soware Group, Inc. All rights reserved. 334

Citrix Workspace app for Windows
.\storebrowse.exe -U { Username } –P { Password } –D { Domain } –L “{
Resource_Name } <https://my.firstexamplestore.net/Citrix/Store/discovery>
Command example on Citrix Gateway:
<.\storebrowse.exe –U { Username } –P { Password } –D { Domain } –L { Resource_Name
} https://my.secondexamplestore.com>
Session launch
-S, --sessionlaunch
Description:
With this command, you can add a store, verify, and launch the published resources. This option takes
the following as parameters:
• User name
• Password
• Domain
• Name of the resource to be launched
• Store URL
However, if the user does not provide the credentials, the AuthManager prompts to enter the creden‑
tials and then the resource is launched.
You can get the name of the resource of published apps and desktops by running the following com‑
mand:
.\storebrowse –M 0X2000 –E https://myfirstexamplestore.net/Citrix/Second/
discovery
This command results in the following output:
'Controller.Calculator''Calculator''\' ''http://abc-sf.xyz.com/Citrix/
Stress/resources/v2/Q29udHJvbGxlci5DYWxjdWxhdG9y/launch/ica
The name that is in bold in the previous output is used as the input parameter to the -S option.
Command example on StoreFront:
.\storebrowse.exe -U { Username } –P { Password } –D { Domain } –S “{
Friendly_Resource_Name } <https://my.firstexamplestore.net/Citrix/Store/
discovery >
Command example on Citrix Gateway:
.\storebrowse.exe –U { Username } –P { Password } –D { Domain } –S { Friendly_Resource_Name
} <https://my.secondexamplestore.com>
© 1999–2023 Cloud Soware Group, Inc. All rights reserved. 335

Citrix Workspace app for Windows
File folder
-f, --filefolder
Description:
Generates the ICA file in the custom path for the published apps and desktops.
The launch option requires a folder name and the name of the resource as the input with the Store
URL. The Store URL can either be the StoreFront server or the Citrix Gateway URL.
Command example on StoreFront:
.\storebrowse.exe –f “C:\Temp\Launch.ica” –L “Resource_Name” { Store }
Command example on the Citrix Gateway:
.\storebrowse.exe –f “C:\Temp\Launch.ica” –L “Resource_Name” { NSG_URL }
Trace authentication
-t, --traceauthentication
Description:
Generateslogs for the AuthManager component. Logs are generatedonly if the Storebrowse utility is
using an in‑built AuthManager. Logs are generated in the localappdata%\Citrix\Storebrowse
\logs directory.
Note:
This option must not be the last parameter listed in the user’s command line.
Command example on StoreFront:
.\storebrowse.exe –t –U { UserName } –P { Password } –D { Domain } –a {
StoreURL }
Command example on Citrix Gateway:
.\storebrowse.exe –t –U { UserName } –P { Password } –D { Domain } –a {
NSG_URL }
Delete a store
-d, --deletestore
Description:
Deletes existing StoreFront or Citrix Gateway store.
Command example on StoreFront:
© 1999–2023 Cloud Soware Group, Inc. All rights reserved. 336

Citrix Workspace app for Windows
.\storebrowse.exe –d https://my.firstexamplestore.net/Citrix/Store/discovery
Command example on Citrix Gateway:
.\storebrowse.exe –d https://my.secondexmaplestore.com
Tracking Storebrowse command status
Starting with 2305.1 release, you can track the execution status of a Storebrowse command in a file. To
track the success status, provide a unique file name with the -f launch command. This command
generates a file with the name that you have provided. The failure status is present in the ica.error
file, which is created automatically.
Note:
Ensure that you add an .ica extension to the file name with -f launch command. Otherwise,
the file isn’t generated.
The files to track both success and failure are present at %LOCALAPPDATA%\citrix\selfservice
\cache and you can monitor these files as needed.
This enhancement is enabled by default.
Following is an example to use the launch command with -f option:
1 -launch -f <uniqueFileName.ica> "launchcommandline"
2 For example:
3 SelfService.exe storebrowse -launch -f uniqueFileName.ica -s store0-5
c3ec017 -CitrixID store0-5c3ec017@@a9a8e3ac-099d-4577-b84e-
e33d0695df39.Notepad -ica "https://cwawiniwstest.cloudburrito.com/
Citrix/Store/resources/v2/
YTlhOGUzYWMtMDk5ZC00NTc3LWI4NGUtZTMzZDA2OTVkZjM5Lk5vdGVwYWQ-/launch/
ica" -cmdline
4
5 <!--NeedCopy-->
Single sign‑on support with Citrix Gateway
Single sign‑on lets you authenticate to a domain and use the Citrix Virtual Apps and Desktops and
Citrix DaaS (formerly Citrix Virtual Apps and Desktops service)that the domain provides. You can sign
in without having to reauthenticate to each app or desktop. When you add a store, your credentials
pass through the Citrix Gateway server, along with the Citrix Virtual Apps and Desktops and Citrix
DaaS, and Start menu settings.
This feature is supported on Citrix Gateway Version 11 and later.
© 1999–2023 Cloud Soware Group, Inc. All rights reserved. 337

Citrix Workspace app for Windows
Prerequisites:
For the prerequisites on how to configure Single Sign‑On for the Citrix Gateway, see Configure domain
pass‑through authentication.
The single sign‑on feature with Citrix Gateway can be enabled using the Group Policy Object (GPO)
administrative template.
1. Open the Citrix Workspace app GPO administrative template by running gpedit.msc
2. Under the Computer Configuration node, go to Administrative Template > Citrix Compo‑
nent > Citrix Workspace > User Authentication > Single Sign‑on for Citrix Gateway.
3. Use the toggle options to Enable or Disable the Single Sign‑On option.
4. Click Apply and OK.
5. Restart the Citrix Workspace app session for the changes to take eect.
Limitations:
• Enable the HTTP Basic Authentication method on the StoreFront server for credential injec‑
tion operations with the Storebrowse utility.
• If you have an HTTP store and try to connect to the store using the utility to check or launch the
published virtual apps and desktops, the credential injection using the command‑line option is
unsupported. As a workaround, use the external AuthManager module if you do not provide
credential using the command line.
• Storebrowse utility currently supports only single store configured the Citrix Gateway on the
StoreFront server.
• Credential Injection in the Storebrowse utility works only if the Citrix Gateway is configured
with Single‑Factor Authentication.
• The command‑line options Username (-U), Password (-P) and Domain (-D) of the Store‑
browse utility are case‑sensitive and must be in upper case only.
To enable SSON for third‑party applications that uses ICOSDK, create the following registry:
• Registry Key: Computer\HKEY_LOCAL_MACHINE\SOFTWARE\WOW6432Node\Citrix\ICA
Client\NonIEAppsWithSson
• Registry Value: full path of the third‑party applications
• Registry Type: reg_multi_sz
Example:
• Registry Key: Computer\HKEY_LOCAL_MACHINE\SOFTWARE\WOW6432Node\Citrix\ICA
Client\NonIEAppsWithSson
• Registry Value: C:\temp1\abc.exe;C:\temp2\xyz.exe
• Registry Type: reg_multi_sz
© 1999–2023 Cloud Soware Group, Inc. All rights reserved. 338

Citrix Workspace app for Windows
Note:
• You can provide multiple third‑party applications separated by semicolon.
• This feature is supported on Version 2107 onwards.
Storebrowse for Workspace
November 28, 2023
Citrix Workspace app for Windows provides Storebrowse support on self‑service and on‑premises de‑
ployment of Citrix Workspace app. It also enables Storebrowse users to access Cloud and Workspace
features.
Note:
• This article is applicable to cloud deployments of Citrix Workspace only. For on‑premises
deployements, see Storebrowse documentation.
• This feature provides Storebrowse support with single sign‑on only.
• The prerequisites mentioned in System requirements and compatibility must be available
to use this feature.
• You can’t open SaaS apps or published content using Storebrowse commands.
Command usage
The following section provides detailed information about the commands that you can use from the
Storebrowse utility.
Note:
• This feature also supports other self‑service plug‑in commands as mentioned in the
CTX200337.
• You can execute the following commands in the command prompt.
• -a "discoveryurl": Adds a store via command line. This command doesn’t show the Au‑
thentication prompt where SSO is enabled. For example, AAD domains join devices where au‑
thentication happens through webview. On other devices, the Authentication prompt appears.
– Example: SelfService.exe storebrowse -a "https://cwawiniwstest.
cloudburrito.com/citrix/store/discovery"
• -d "discoveryurl": Deletes the store.
– Example: SelfService.exe storebrowse -d "https://cwawiniwstest.
cloudburrito.com/citrix/store/discovery"
© 1999–2023 Cloud Soware Group, Inc. All rights reserved. 339

Citrix Workspace app for Windows
• -e "discoveryurl": Exports the resource details in the JSON format. This command stores
the resource.json file in the %LOCALAPPDATA%\citrix\selfservice default location. Citrix
Workspace app must be active to run this command and user must be signed in.
– Example: SelfService.exe storebrowse -e "https://cwawiniwstest.
cloudburrito.com/citrix/store/discovery"
You can also specify your own path if you don’t want to store the resource.json in the default
location.
– Example: .\SelfService.exe storebrowse -e "https://cwawiniwstest
.cloudburrito.com/citrix/store/discovery""C:\Users\<username>\
Documents\Fiddler2". This stores the resource.json file in the C:\Users\<username
>\Documents\Fiddler2.
• -q "FriendlyName""discoveryurl": Use this command to perform quick launch of the
specified resource.
– Example: SelfService.exe storebrowse -q "Excel 2016""https://cwawiniwstest
.cloudburrito.com/citrix/store/discovery"
• -launch "launchcommandline": Launch of resources using “launchcommandline” from re‑
source.json.
Note:
– Copy the “launchcommandline” from the resource.json.
– Remove / from the “launchcommandline” specified in the resource.json file before
executing the command.
– Example: SelfService.exe storebrowse -launch -s store0-5c3ec017 -
CitrixID store0-5c3ec017@@a9a8e3ac-099d-4577-b84e-e33d0695df39.
Notepad -ica "https://cwawiniwstest.cloudburrito.com/Citrix/Store/
resources/v2/YTlhOGUzYWMtMDk5ZC00NTc3LWI4NGUtZTMzZDA2OTVkZjM5Lk5vdGVwYWQ
-/launch/ica"-cmdline
Aer executing the -launch "launchcommandline", the ica file will be stored in the %
LOCALAPPDATA%\citrix\selfservice\cache directory. Double‑click the ica file to launch
the resource.
• -liststore: Lists the stores that are added inside SSP. Store list to include storeID, discovery
url for each store.
– Example: SelfService.exe storebrowse -liststore
Note:
Citrix Workspace app must be active to execute the -liststore command.
© 1999–2023 Cloud Soware Group, Inc. All rights reserved. 340

Citrix Workspace app for Windows
Selfservice.exe storebrowse -liststore command stores the storedetails.json file in
the AppData\Local\Citrix\SelfService.
Troubleshoot
November 16, 2023
Log collection
Log collection simplifies the process of collecting logs for Citrix Workspace app. The logs help Citrix
to troubleshoot, and, in cases of complicated issues, provides support. This feature is available from
Citrix Workspace app for Windows 2012 version and later.
You can collect logs using the GUI.
Collecting logs:
1. Right‑click the Citrix Workspace app icon in the notification area and select Advanced Prefer‑
ences.
2. Select Log collection.
The Log collection dialog appears.
3. Select one of the following log levels:
• Low
• Medium
• Verbose
4. Click Start collecting logs to reproduce the issue and collect the latest logs.
The log collection process starts.
© 1999–2023 Cloud Soware Group, Inc. All rights reserved. 341

Citrix Workspace app for Windows
5. Click Stop collecting logs aer the issue is reproduced.
6. Click
Save log
to save the logs to a desired location.
Data collected through logs
Hardware
• Attached monitors information
• Memory information
• Network adapters
• Processor
• Direct X diagnostics information
Soware
• Citrix Workspace app version
• OS information (version, service pack, and architecture)
• Internet Explorer version
• Default browser
• ActiveX Flash version
• NPAPI Flash version
Registry
• HKLM\Soware\Citrix\AuthManager
• HKLM\Soware\Citrix\CitrixCAB
© 1999–2023 Cloud Soware Group, Inc. All rights reserved. 342

Citrix Workspace app for Windows
• HKLM\Soware\Citrix\Dazzle
• HKLM\Soware\Citrix\ICA Client
• HKLM\Soware\Citrix\Install
• HKLM\Soware\Citrix\InstallDetect
• HKLM\Soware\Citrix\PluginPackages
• HKLM\Soware\Citrix\Receiver
• HKLM\Soware\Citrix\ReceiverInside
• HKLM\Soware\Citrix\XenDesktop
• HKLM\Soware\Policies\Citrix
• HKLM\Soware\Microso\Windows\CurrentVersion\Internet Settings\Zones
• HKLM\Soware\Microso\Windows\CurrentVersion\Internet Settings\ZoneMap\Domains
• HKLM\System\CurrentControlSet\Control\NetworkProvider\Order
• HKCU\Soware\Citrix\AuthManager
• HKCU\Soware\Citrix\CitrixCAB
• HKCU\Soware\Citrix\Dazzle
• HKCU\Soware\Citrix\ICA Client
• HKCU\Soware\Citrix\Install
• HKCU\Soware\Citrix\InstallDetect
• HKCU\Soware\Citrix\PluginPackages
• HKCU\Soware\Citrix\Receiver
• HKCU\Soware\Citrix\ReceiverInside
• HKCU\Soware\Citrix\XenDesktop
• HKCU\Soware\Policies\Citrix
• HKCU\Soware\Microso\Windows\CurrentVersion\Explorer\VisualEects
• HKCU\Soware\Microso\Windows\CurrentVersion\Internet Settings\Zones
• HKCU\Soware\Microso\Windows\CurrentVersion\Internet Settings\ZoneMap\Domains
Event Logs
• Application Event log
• System Event log
Tracing
• HDX
• Receiver shell, Auth Manager, and Self‑Service plug‑in
• Install logs
• Always‑On logs
© 1999–2023 Cloud Soware Group, Inc. All rights reserved. 343
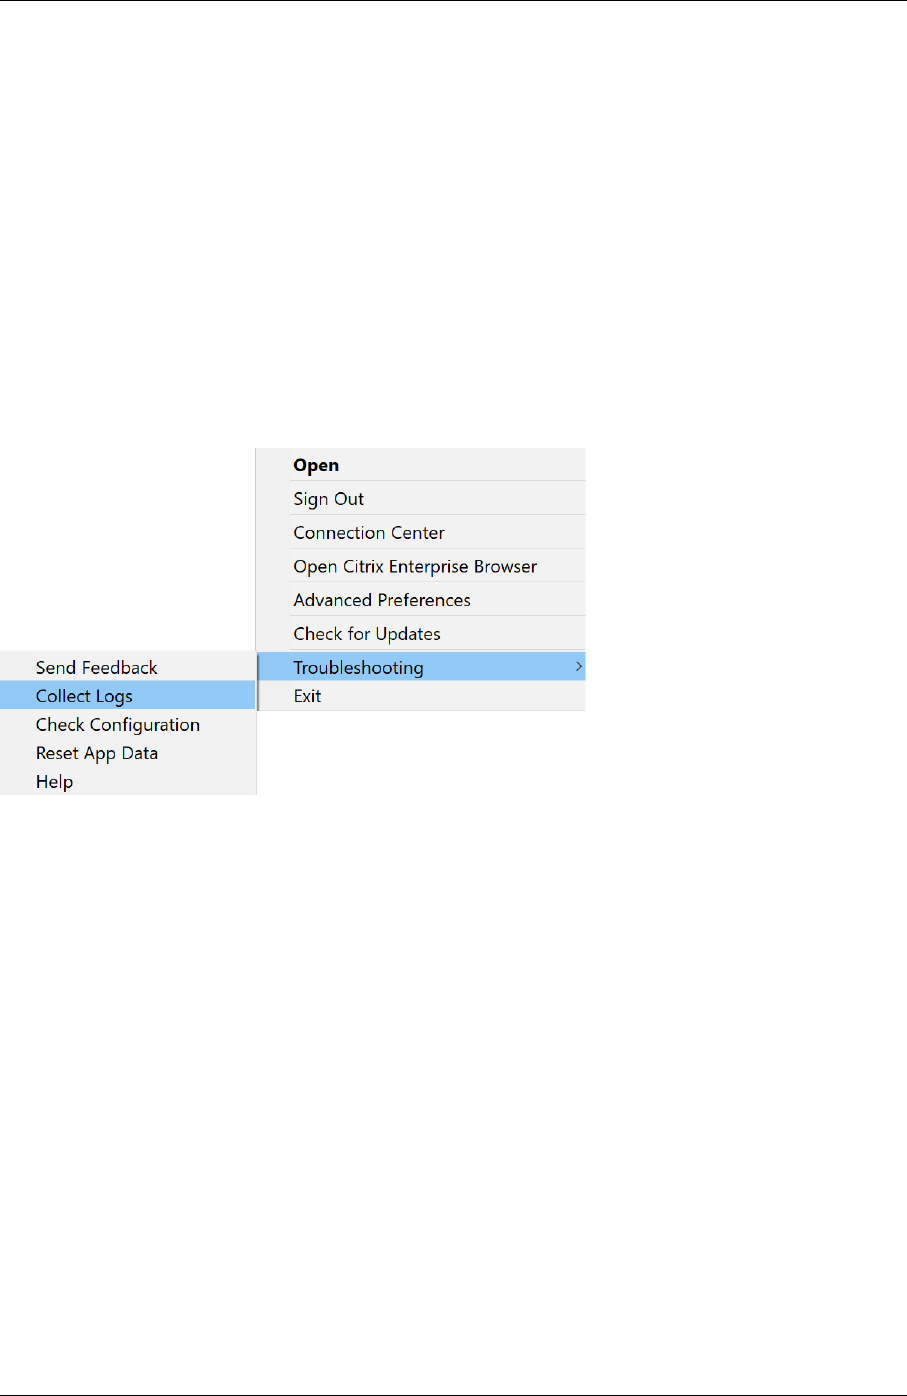
Citrix Workspace app for Windows
Addition of the Troubleshooting option in the system tray of Citrix Workspace app
From Citrix Workspace app 2309 version and later, the Troubleshooting option is introduced to im‑
prove the user experience and to easily proceed with the troubleshooting. You can right‑click on the
Citrix Workspace app icon in the system tray that is placed in the bottom‑right corner of your screen
and then select Troubleshooting to access it.
The options available under Troubleshooting are:
• Send Feedback
• Collect Logs
• Check Configuration
• Reset App Data
• Help
Send feedback on Citrix Workspace app
The Send feedback option allows you to inform Citrix about any issues that you might run into while
using Citrix Workspace app. You can also send suggestions to help us improve your Citrix Workspace
app experience.
You can submit feedback using the following steps:
1. Right‑click the Citrix Workspace app icon in the notification area and select Troubleshooting >
Submit feedback. The Submit Feedback screen appears.
© 1999–2023 Cloud Soware Group, Inc. All rights reserved. 344

Citrix Workspace app for Windows
2. Provide the issue Title.
3. Add issue details in the Tell us more field.
4. Click Capture my issue. The Log collection screen appears.
© 1999–2023 Cloud Soware Group, Inc. All rights reserved. 345

Citrix Workspace app for Windows
a) Click Start collecting logs and then reproduce the issue to collect the latest logs.
b) Click Stop collecting logs aer the issue is reproduced.
Or,
Click Collect existing logs if you are not able to reproduce the issue.
c) Click Stop collecting logs aer the issue is reproduced.
5. Ensure that the log files are displayed next to Capture my issue.
6. Click Choose file and then add attachments that describe your issues such as screenshots or
screen recordings. The maximum file size allowed for all the attachments including the log file
is 20 MB.
7. Click Send. The Feedback report screen appears.
The .zip file contains the log files, the issue description as test files, and the attachments.
8. You can send the feedback report to Citrix using the following options:
• Click Ok to use the default mail app in your system.
Or,
• Send the report manually to the provided email ID.
Note:
Ensure that the .zip file is attached in the email.
© 1999–2023 Cloud Soware Group, Inc. All rights reserved. 346

Citrix Workspace app for Windows
© 1999–2023 Cloud Soware Group, Inc. All rights reserved. 347

© 2023 Cloud Soware Group, Inc. All rights reserved. Cloud Soware Group, the Cloud Soware Group logo, and other
marks appearing herein are property of Cloud Soware Group, Inc. and/or one or more of its subsidiaries, and may be
registered with the U.S. Patent and Trademark Oice and in other countries. All other marks are the property of their
respective owner(s).
Citrix Product Documentation | https://docs.citrix.com December 4, 2023
