
Configure Certificate Renewals on ISE
Contents
Introduction
Prerequisites
Requirements
Components Used
Background Information
Configure
View ISE Self-Signed Certificates
Determine When to Change the Certificate
Generate Certificate Signing Request
Install Certificate
Configure Alerting System
Verify
Verify Alerting System
Verify Certificate Change
Verify Certificate
Troubleshoot
Conclusion
Introduction
This document describes the best practices and proactive procedures to renew certificates on the Cisco
Identity Services Engine (ISE).
Prerequisites
Requirements
Cisco recommends that you have knowledge of these topics:
X509 certificates•
Configuration of a Cisco ISE with certificates•
Components Used
"The information in this document was created from the devices in a specific lab environment. All of the
devices used in this document started with a cleared (default) configuration. If your network is live, ensure
that you understand the potential impact of any command."
Cisco ISE Release 3.0.0.458•
Appliance or VMware•
Background Information
Note: This document is not intended to be a diagnostic guide for certificates.

This document describes the best practices and proactive procedures to renew certificates on the Cisco
Identity Services Engine (ISE). It also reviews how to set up alarms and notifications so administrators are
warned of imminent events such as certificate expiration.
As an ISE administrator, you eventually encounter the fact that ISE certificates expire. If your ISE server
has an expired certificate, serious problems can arise unless you replace the expired certificate with a new,
valid certificate.
Note: If the certificate that is used for the Extensible Authentication Protocol (EAP) expires, all
authentications can fail because clients do not trust the ISE certificate anymore. If the ISE Admin
Certificate expires, the risk is even greater: an administrator is not able to log in to the ISE anymore,
and the distributed deployment can cease to function and replicate.
The ISE administrator must install a new, valid certificate on the ISE before the old certificate expires. This
proactive approach prevents or minimizes downtime and avoids an impact on your end-users. Once the time
period of the newly installed certificate begins, you can enable the EAP/Admin or any other role on the new
certificate.
You can configure the ISE so that it generates alarms and notifies the administrator to install new certificates
before the old certificates expire.
Note: This document uses ISE Admin certificate as a self-signed certificate in order to demonstrate
the impact of certificate renewal, but this approach is not recommended for a production system. It is
better to use a CA certificate for both the EAP and Admin roles.
Configure
View ISE Self-Signed Certificates
When the ISE is installed, it generates a self-signed certificate. The self-signed certificate is used for
administrative access and for communication within the distributed deployment (HTTPS) as well as for user
authentication (EAP). In a live system, use a CA certificate instead of a self-signed certificate.
Tip: Refer to the Certificate Management in Cisco ISE section of the Cisco Identity Services Engine
Hardware Installation Guide, Release 3.0 for additional information.
The format for an ISE certificate must be Privacy Enhanced Mail (PEM) or Distinguished Encoding Rules
(DER).
In order to view the initial self-signed certificate, navigate to Administration > System> Certificates>
System Certificates in the ISE GUI, as shown in this image.

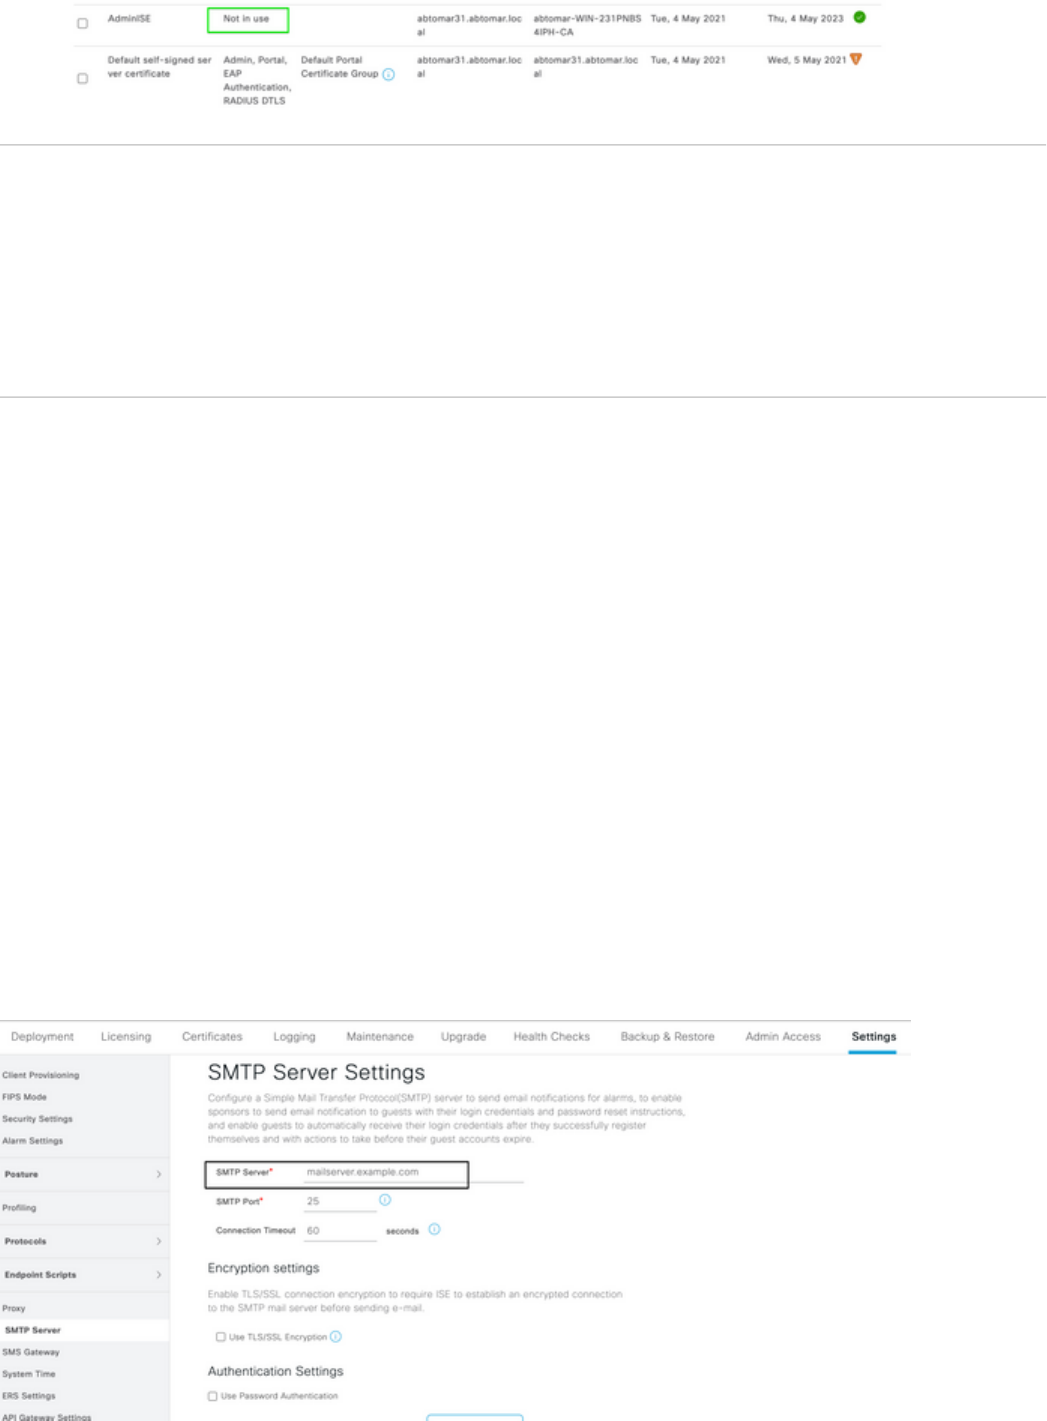
If you install a server certificate on the ISE via a Certificate Signing Request (CSR) and change the
certificate for the Admin or EAP protocol, the self-signed server certificate is still present but is in a Not in-
use status.
Caution: For Admin protocol changes, a restart of the ISE services is required, which creates a few
minutes of downtime. EAP protocol changes do not trigger a restart of the ISE services and do not
cause downtime.
Determine When to Change the Certificate
Assume that the installed certificate expires soon. Is it better to let the certificate expire before you renew it
or to change the certificate before expiration? You must change the certificate before expiration so that you
have time to plan the certificate swap and to manage any downtime caused by the swap.
When must you change the certificate? Obtain a new certificate with a start date that precedes the expiration
date of the old certificate. The time period between those two dates is the change window.
Caution: If you enable Admin, it causes a service restart on the ISE server, and you experience a
few minutes of downtime.
This image depicts the information for a certificate that expires soon:
Generate Certificate Signing Request
This procedure describes how to renew the certificate through a CSR:
In the ISE console, navigate to Administration> System >Certificates>Certificate Signing
Requests and click on Generate Certificate Signing Request:
1.
The minimum information that you must enter in the Certificate Subject text field is CN=ISEfqdn, 2.

where ISEfqdn is the Fully Qualified Domain Name (FQDN) of the ISE. Add additional fields such as
O (Organization), OU (Organizational Unit), or C (Country) in the Certificate Subject with the use of
commas:
One of the Subject Alternative Name (SAN) text field lines must repeat the ISE FQDN. You can add
a second SAN field if you want to use alternative names or a wildcard certificate.
3.
Click on Generate, a popup window indicates whether the CSR fields are completed correctly or not:
4.
In order to export the CSR, click Certificate Signing Requests in the left panel, select your CSR, and
click Export:
5.

The CSR is stored on your computer. Submit it to your CA for signature.6.
Install Certificate
Once you receive the final certificate from your CA, you must add the certificate to the ISE:
In the ISE console, navigate Administration > System >Certificates>Certificate Signing
Requests, then tick the checkbox on CRSand click Bind Certificate:
1.
Enter a simple, clear description of the certificate in the Friendly Name text field and hit submit.
Note: Do not enable the EAP or Admin protocol at this time.
2.
Under System Certificate, you have a new certificate that is Not in use as shown here:
3.
Because the new certificate is installed before the old one expires, you see an error that reports a date
range in the future:
4.
Click Yes in order to continue. The certificate is now installed but not in use, as highlighted in green. 5.
Note: If you use self-signed certificates in a distributed deployment, the primary self-signed
certificate must be installed into the trusted certificate store of the secondary ISE server. Likewise,
the secondary self-signed certificate must be installed into the trusted certificate store of the primary
ISE server. This allows the ISE servers to mutually authenticate each other. Without this, the
deployment can break. If you renew certificates from a third-party CA, verify whether the root
certificate chain has changed and update the trusted certificate store in the ISE accordingly. In both
scenarios, ensure that the ISE nodes, endpoint control systems, and supplicants are able to validate the
root certificate chain.
Configure Alerting System
The Cisco ISE notifies you when the expiration date of a local certificate is within 90 days. Such advance
notification helps you avoid expired certificates, plan the certificate change, and prevent or minimize
downtime.
The notification appears in several ways:
Color expiration status icons appear on the Local Certificates page.
•
Expiration messages appear in the Cisco ISE System Diagnostic report.
•
Expiration alarms are generated at 90 days and 60 days, then daily in the final 30 days before
expiration.
•
Configure the ISE for email notification of expiration alarms. In the ISE console, navigate to
Administration > System > Settings > SMTP Server, identify the Simple Mail Transfer Protocol (SMTP)
server, and define the other server settings so that email notifications are sent for the alarms:

There are two ways that you can set up notifications:
Use Admin Access in order to notify administrators:
Navigate to Administration > System > Admin Access > Administrators > Admin Users.
1.
Check the Include system alarms in emails checkbox for the Admin Users that need to receive
alarm notifications. The email address for the sender of the alarm notifications is hardcoded as
ise@hostname.
2.
•
Configure the ISE alarm settings in order to notify users:
Navigate to Administration > System > Settings > Alarm Settings > Alarm Configuration,
as shown in this image.
Note: Disable the Status for a category if you wish to prevent alarms from that category.
1.
•

Select Certificate Expiration and then click Alarm Notification, enter the email addresses of
the users to be notified, and save the configuration change. Changes can take up to 15 minutes
before they are active.
2.
Verify
Use this section in order to confirm that your configuration works properly.
Verify Alerting System
Verify that the alerting system works correctly. In this example, a configuration change generates an alert
with a severity level of Information. (An Information alarm is the lowest severity, while certificate
expirations generate a higher severity level of Warning.)
This is an example of the email alarm that is sent by the ISE:

Verify Certificate Change
This procedure describes how to verify that the certificate is installed correctly and how to change EAP
and/or Admin roles:
On the ISE console, navigate to Administration > Certificates > System Certificates and select the
new certificate in order to view the details.
Caution: If you enable the Admin Usage, the ISE service restarts, which causes server
downtime.
1.
In order to verify the certificate status on the ISE server, enter this command into the CLI: 2.
<#root>
CLI:>
show application status ise
Once all of the services are active, attempt to log in as an administrator.
3.
For a distributed deployment scenario, navigate to Administration > System > Deployment. Verify
the node has a Green Icon. Place the cursor over the icon to verify teh legend shows "Connected".
4.
Check that the end-user authentication is successful. To do this, navigate toOperations > RADIUS >
Livelogs. You can find a specific Authentication attempt and verify that those attempts were
successfully authenticated.
5.
Verify Certificate
If you want to check the certificate externally, you can use the embedded Microsoft Windows tools or the
OpenSSL toolkit.
OpenSSL is an open-source implementation of the Secure Sockets Layer (SSL) protocol. If the certificates
use your own private CA, you must place your root CA certificate on a local machine and use the OpenSSL
option -CApath. If you have an intermediate CA, you must place it into the same directory as well.
In order to obtain general information about the certificate and verify it, use:
<#root>
openssl x509 -in certificate.pem -noout -text
openssl verify certificate.pem
It can also be useful to convert the certificates with the OpenSSL toolkit:
<#root>
openssl x509 -in certificate.der -inform DER -outform PEM -out certificate.pem
Troubleshoot
There is currently no specific diagnostic information available for this configuration.
Conclusion
As you can install a new certificate on the ISE before it is active, Cisco recommends that you install the new
certificate before the old certificate expires. This overlap period between the old certificate expiration date
and the new certificate start date gives you time to renew certificates and plan their installation with little or
no downtime. Once the new certificate enters its valid date range, enable the EAP and/or Admin.
Remember, if you enable Admin usage, there is a service restart.
