
Copyright 1010music LLC 2023
bluebox Eurorack
edition
v. 1.0.2
User Manual

Welcome 5
Setup 6
Power Requirements .......................................................................................................................................................6
Connect Power and Mount in Rack .......................................................................................................................6
Connect and Congure Inputs and Outputs ..................................................................................................6
Input Connections .......................................................................................................................................................7
Output Connections ..................................................................................................................................................7
Meter Bridge Layout .........................................................................................................................................................8
Set the Meter Bridge Layout ........................................................................................................................8
Mapping Inputs to Tracks ............................................................................................................................................8
Map Inputs To Tracks ........................................................................................................................................8
Track Labels ............................................................................................................................................................................9
Rename a Track .....................................................................................................................................................9
Gain .............................................................................................................................................................................................10
Adjust the Gain to Balance your Inputs ..............................................................................................10
Controls Overview 11
Control Modes 12
MIXER Mode vs TRACK Mode ................................................................................................................................... 13
When to Use MIXER Mode .................................................................................................................................. 13
When to Use TRACK Mode .................................................................................................................................. 13
Display Overview 14
PROJ Mode 15
Work with Project Files ................................................................................................................................................. 15
Save Changes to the Current Project ....................................................................................................16
Load a Different Project ..................................................................................................................................16
Create a New Project ........................................................................................................................................ 17
Rename a Project ............................................................................................................................................... 17
Save Project Settings without WAV Files to a new Project ...................................................18
Create a New Project from a Template Project .............................................................................18
Congure Project Settings .........................................................................................................................................19
Select a Tempo and Set up the Metronome ....................................................................................19
Control bluebox Settings with a MIDI Controller .........................................................................20
See a List of Mapped MIDI Controls and Clear Mappings .....................................................20
Table of Contents
Page 2 of 60 Copyright 1010music LLC 2023
The bluebox Eurorack edition User Manual v 1.0.2 Oct 11, 2023

Copyright 1010music LLC 2023
Page 3 of 60
The bluebox Eurorack edition User Manual v 1.0.2Oct 11, 2023
Map CV Inputs to bluebox Settings ........................................................................................................ 21
See a List of Mapped CV Inputs and Clear CV Mappings ........................................................21
MIXER Mode 23
Control One Setting for Multiple Tracks ............................................................................................. 25
Arm the Main Output for Recording or Mute the Main Output ........................................26
TRACK Mode 27
Change Settings for a Single Track .......................................................................................................28
MAIN Mode 29
Adjust Output Levels .......................................................................................................................................29
Mute an Output ..................................................................................................................................................29
Congure Signal Routing and Compression Settings .............................................................30
EQ Mode 33
Adjust the EQ for a Track or the Main Mix ........................................................................................34
FX Mode 36
FX View Modes ................................................................................................................................................................... 36
Adjust Reverb and Delay Effects Settings ........................................................................................ 37
EDIT Mode 40
Edit Mode and the Edit Conguration Screen .............................................................................................41
See Where WAV Files Fall in the Timeline for Each Track ......................................................41
Change Start Position for Recording or Playback .......................................................................42
Punch In Recording .........................................................................................................................................42
Play a WAV le for a Track ...........................................................................................................................43
Make a WAV File Stop Playing ..................................................................................................................43
Add a File to a Project .................................................................................................................................... 44
Remove a WAV le from a Project .........................................................................................................45
Rename a WAV File ..........................................................................................................................................45
Delete a WAV File from a Project ............................................................................................................46
Playback a Recording of the Main Output .......................................................................................46
TOOLS Mode 47
Adjust the Screen Brightness ....................................................................................................................47
See How Much Space is Available on the microSD Card ........................................................47
See Which Firmware Version You Are Using ..................................................................................47

Record and Play WAV Files 48
Record One or More Tracks ........................................................................................................................ 48
Record the Main Mix ........................................................................................................................................49
Play a WAV le for a Track ...........................................................................................................................50
Congure bluebox to Record Tracks as Pre-Fader or Post-Fader ....................................50
Stream Audio over USB 51
Receive USB Audio ........................................................................................................................................................... 51
Send USB Audio ................................................................................................................................................................ 52
MicroSD File Management 53
Copy a Project or Make a Backup on Your Computer ............................................................. 53
MIDI Clock Synchronization 54
Setup bluebox to Follow a MIDI Clock .................................................................................................54
Setup bluebox to Send a MIDI Clock ....................................................................................................54
Record while using MIDI Sync to Follow An External Device ..............................................54
Update Firmware 55
Update the bluebox Firmware .................................................................................................................. 55
Common Tasks 56
Balance Levels for the Main Mix ..............................................................................................................56
Mute a Track ..........................................................................................................................................................56
Mute an Output ..................................................................................................................................................56
Congure the OUT 3 and 4 jacks as one Stereo Send or Two Mono Sends ..............56
Adjust a Track’s Sends to OUT3, OUT4 and the CUE Bus ....................................................... 57
Adjust a Track’s Sends to FX1 and FX2 ................................................................................................. 57
Use Headphones to Monitor the Main Output ............................................................................. 57
Send a Dry Track Signal to an External Device for Processing ...........................................58
Use Two Mono Outputs for External Effects Processing .......................................................58
Troubleshooting 59
Clicks and Pops over USB C ...................................................................................................................................... 59
On Windows 10 ...........................................................................................................................................................59
On Mac OS .....................................................................................................................................................................59
Learn More 60
Stay in touch 60
Page 4 of 60 Copyright 1010music LLC 2023
The bluebox Eurorack edition User Manual v 1.0.2 Oct 11, 2023

Oct 11, 2023 The bluebox Eurorack edition User Manual v 1.0.2
Page 5 of 60
Copyright 1010music LLC 2023
WELCOME
Welcome to the bluebox Eurorack edition User Manual. If you want to get up and
running quickly with the bluebox Eurorack edition, the Quick Start Guide will walk you
through basic setup and the primary features. The Quick Start Guide was included in the
package with your bluebox, and you can nd it on our bluebox Eurorack edition Support
page at:
1010music.com/blueeurodocs
If you are ready for more detail, you are in the right place. We will go into detail about set
up options, explain the features available in each of the different modes, and help you
nd all the available options. We will cover how to tweak your mix, how to route your
signals to the different outputs and the effects, how to rene your sound using EQ and
FX, and how to record tracks and the main output. We will also review how to play back
the WAV les you have recorded or stored on your microSD card, and how to select the
Active WAV le for each track. Along the way we will see how to save your settings into
different project les, congure the metronome, adjust the tempo and use MIDI and CV
to control the bluebox Eurorack edition.
If you still have questions after reading this manual, join our forum at forum.1010music.
com. You can specically get bluebox Eurorack edition support at:
https://forum.1010music.com/forum/products/bluebox-eurorack-edition
You may also nd the bluebox desktop edition forum helpful as well since the two share a
lot of features:
https://forum.1010music.com/forum/products/bluebox-compact-digital-mixer-recorder
Our support team and other users are out there to help you and to exchange ideas about
how to get the most out of bluebox. Registered forum users can also get the latest
rmware with new features and bug xes in the downloads section of the forum.
Registration is free, but you will need to provide an email address.
Before you get started, you may want to check for rmware updates for your bluebox
Eurorack edition. You can learn how to do that in the Update Firmware section near the
end of this document. This document covers version 1.0 of the rmware.

Oct 11, 2023The bluebox Eurorack edition User Manual v 1.0.2
Copyright 1010music LLC 2023Page 6 of 60
SETUP
Power Requirements
The bluebox Eurorack edition needs a lot of power to work properly. It requires two power
connections. Please ensure your rack can supply the following:
● +5V: 500mA
● +12V: 320mA
● -12V: 82mA
Connect Power and Mount in Rack
1. Insert the micro SD card into the MICRO SD slot,
notched edge away from the screen.
2. Attach the two ribbon cables to the module as shown on
the right. Note the red edge of each ribbon cable should
be on the edge indicated by the arrows.
3. Turn off your Eurorack and attach the two cables to the Eurorack power supply,
with the red edge of the cable aligned with pin 1 or the -12V pins on the power
supply bus. This module requires the +5V rail which may not be present on some
older racks.
4. Mount the module into the rack and then power up the rack. You will see the
Mixer screen with a demo project provided on the microSD card.
Connect and Congure Inputs and Outputs
1. Connect your audio inputs and outputs along the left
side of the front panel.
2. Connect a CV signal or MIDI controller to the CV In, DEV
or MIDI input if desired.
3. Choose how many tracks you will work with: Push
MIXER, then push B. Touch to select the number of
tracks, and Single Row or Double Row display mode.
4. Map inputs to tracks: Push TRACK and then push B. Touch a track at the top of
the screen, and then in the bottom grid touch 1 input for mono or 2 inputs for
stereo.
5. Name your tracks: Push TRACK and then push B. Touch a track to select it.
Touch the number in the middle of the screen to open the track naming screen.
Type in a name and then touch Enter to save your change.
6. Adjust the gain for your inputs: Push MIXER and then touch Gain. Turn a knob
to adjust the gain for one of the pink highlighted tracks. Touch a different group
of tracks or push A to highlight the next group. You can also touch and drag a
slider to adjust it.

Oct 11, 2023 The bluebox Eurorack edition User Manual v 1.0.2
Page 7 of 60
Copyright 1010music LLC 2023
NOTE:
► The bluebox has 12 mono inputs which can be used as stereo pairs.
When connecting a stereo input, use a pair of side by side jacks.
► The bluebox has AC coupled inputs. You cannot use them to record
Control Voltage. Check out the 1010music blackbox or bitbox micro if
you want to do this.
► The bluebox outputs are DC Coupled and can be used to send out
Control Voltage signals.
► See the 1010music Cable Recommendations page in our online
knowledge base for help nding cables.
Input Connections
To use bluebox to mix signals from other devices, you will need to connect them to
bluebox’s input jacks. The bluebox can receive both standard audio line level and
Eurorack level inputs in each of the 12 mono 3.5 mm TS jacks. You can use a dual mono to
stereo adapter to connect a stereo signal to two separate mono inputs if desired. Later we
will see how to map these to tracks.
Output Connections
Use 3.5 mm TS patch cords to connect bluebox’s 4 mono outputs to your speakers, mixer
or audio interface. You can also plug headphones or stereo cables directly into the
PHONES output. Here are a few things to note about the bluebox outputs:
NOTE:
► Effects signals are only routed to the Main output pair of Out 1 & 2.
► Outputs 3 & 4 are useful for sending out the dry signal for selected
tracks, for example for external effects processing. They can be used
independently in mono or as a stereo output pair.
► The PHONES port can be congured to play either the dry CUE signal
for a selected subset of tracks, or to duplicate the Main output signal.
► You can adjust the volume and track routing for each of the outputs
independently. We will cover that later when we take about MAIN
control mode.

a c
b
Oct 11, 2023The bluebox Eurorack edition User Manual v 1.0.2
Copyright 1010music LLC 2023Page 8 of 60
TRACK
Conguration
Mapping Inputs to Tracks
You might have an instrument connected to input 1, but want it
to be track 5. You might also want to split the stereo signal from
input 3 to be controlled as two mono tracks on tracks 7 and 8 so
you can adjust their settings independently.
Map Inputs To Tracks
1. Push the white TRACK button, c in the gure, to enter
TRACK Control Mode.
2. Push the B button, b in the gure, to bring up the Track
Conguration screen.
3. Touch a track in the meter bridge, d in the gure, to
select it.
4. In the bottom grid, the active inputs for this track are
highlighted blue. Touch the inputs to toggle them on
and off.
Meter Bridge Layout
You can congure bluebox to display meters for 4, 6, 8, 10 or 12
tracks. If you keep the track count low the meters will be bigger,
making them easier to see and easier to control with the touch
screen. You can choose to display the meters in one row or two.
In Double Row mode, the knob mapping is more intuitive, but
some people prefer Single Row mode to see all the meters side
by side.
Set the Meter Bridge Layout
1. Push the white MIXER button, a in the gure, to enter
MIXER Control Mode.
2. Push the B button, b in the gure, to bring up the Mixer
Conguration screen.
3. Touch the option in the list to select the number of
tracks you want bluebox to display in the meter bridge.
4. Touch the option at the bottom of the screen to select
Single Row or Double Row display mode for the meter
bridge.
MIXER
Conguration
d

Oct 11, 2023 The bluebox Eurorack edition User Manual v 1.0.2
Page 9 of 60
Copyright 1010music LLC 2023
Track Labels
To help you keep track of what you have plugged into each of the inputs, you can name
your tracks. If you are using twelve tracks in Single Row mode, only one character will be
displayed in the track meter header. If you are using fewer tracks and Double Row mode,
more characters are displayed.
Rename a Track
1. Push TRACK and then push B. You will see the Track
Conguration screen.
2. Touch a track meter to select the track. The selected
track meter is highlighted pink.
3. Touch the track label in the middle of the screen to bring
up the text keyboard where you can enter a new name.
4. Touch the ABC or 123 button at the bottom of the screen
to toggle between the numeric and alphabetic
keyboard. Touch the back arrow ← to backspace. Touch
the caret ^ to toggle the letter case. Turn a knob to
change the position of the cursor.
5. Touch Enter to save your change.
NOTE:
► Each input can only be mapped to one track. If you try to map an input
to a second track, the mapping to the rst track will be removed.
► When conguring a stereo track, choose a pair of side by side jacks, 1
and 2 for example.
Text Keyboard

Oct 11, 2023The bluebox Eurorack edition User Manual v 1.0.2
Copyright 1010music LLC 2023Page 10 of 60
Gain
Gain adjusts the level of an incoming signal before it is sent to any outputs or other signal
paths. Use the gain to normalize the audio levels coming from Eurorack, pro audio, or
consumer level gear. When connecting a new input, it is a good idea to adjust the gain
rst to get a good initial level, starting with a volume setting of +0dB. This can also help
avoid clipping if your source signal is too high, as seen by a red bar at the top of the meter.
Later you can use Volume to control the relative level of each input throughout your mix.
Adjust the Gain to Balance your Inputs
1. Make some sound by sending a signal from your
sources.
2. Push MIXER and you will see the meters move with the
incoming signal.
3. Touch Gain at the bottom of the screen. If you don’t see
the Gain option at the bottom of the screen, touch
MIXER again to toggle the control panel.
4. Four of the tracks are highlighted in the meter bridge at the top of the screen.
The knobs are controlling the highlighted tracks. Touch a different group or push
A to select another group. Turn a knob to adjust the gain for a track. You can also
touch a slider and move your nger up and down or left and right to control the
level for that meter.
At this point, when you send a signal to the input you should be able to hear it through
the equipment connected to the bluebox output. You should see the meters on the
meter bridge moving in response to the incoming signal. If you see the track meters
moving but don’t hear anything from the outputs, skip ahead and read how to control
the output levels in the MAIN Mode section below.
MIXER Gain Control
Next we will get acquainted with the general control scheme for bluebox.

Oct 11, 2023 The bluebox Eurorack edition User Manual v 1.0.2
Page 11 of 60
Copyright 1010music LLC 2023
CONTROLS OVERVIEW
By now you probably want to get started using your bluebox. Buttons labeled A and B
don’t really tell what you they do and they seem to be different on different screens. The
following general ideas can help you nd your way around the controls:
We will address the specics about how the knobs and buttons work for each control
mode as we review them. REC, STOP and PLAY work the same in all control modes. To
record, you must push REC and PLAY.
If you are using MIDI to control playback, you can press Rec to arm recording, then use
the external play command to start recording on the bluebox.
General Controls Behavior
White Buttons
Select a control mode. Push again to access additional
screens for a control mode. The button for the current
control mode is brighter than the others.
Touch
Select tracks or control panels, adjust levels and toggle
settings. Touch a meter or on screen knob and slide your
nger up and down or left and right to make an
adjustment.
Knobs
Turn a hardware knob to adjust a parameter or make a
selection in a list. In conguration lists, the top knobs select
a parameter and the bottom knobs change the value.
A Button
Change the knob focus when there are multiple banks of
controls. On the EDIT conguration screen, pushing A
toggles the active playback state for a WAV le.
B Button
Access conguration options for the current control mode,
when available.
REC, STOP and
PLAY
Controls playback and recording of tracks and the Main Mix.
You can play a WAV le that has been mapped to a track
when the track is not armed for recording. Push Rec + Play
to Start Recording the Armed Tracks. This will also record
the Main Mix when armed.

Oct 11, 2023The bluebox Eurorack edition User Manual v 1.0.2
Copyright 1010music LLC 2023Page 12 of 60
Control
Mode
When to Use It
MIXER
Use MIXER when you want to focus on one control option from
the bottom of the screen across many tracks at the top of the
screen. Here, the knobs control the top part of the screen. You can
adjust the mix, congure track sends, and arm tracks for
recording here. You can access the Meter Conguration screen
from here by pressing B.
TRACK
Use TRACK when you want to focus on one track at a time and
adjust multiple settings for that track. Here, the knobs control the
bottom part of the screen. You can adjust the mix, congure track
sends, and arm tracks for recording. You can access the Track
Conguration screen by pressing B.
MAIN
You can adjust the level and mute each of the three outputs here.
You can access the Output Conguration screen by pressing B.
EQ
Here you can adjust the four band equalizer for each track.
FX
Adjust the settings for the delay and reverb effects here. These are
global settings that apply to all signals sent to the effects by the
tracks.
EDIT
See the WAV les for each track on a timeline. Punch In recording.
See the list of WAV les associated with each track. These could
be les recorded for this track or les chosen from the microSD
card. You can set a WAV le to be Active to playback when you
push PLAY. The Active WAV will not play if the track is armed for
recording. Each track can have multiple layered Active WAV les.
This is also where you can toggle MIDI Learn mode on and off.
PROJ
Use this mode to save your settings to a project le. A project
saves the state of the track conguration, meter conguration,
and all controls. It also retains the mapping of the WAV les.
Create new projects to store different sets of settings and WAV
les. You can also rename projects and SaveAs templates.
TOOLS
Keep track of your available space on your microSD card here. You
can also adjust the screen brightness and see which version of
the bluebox rmware you are running.
CONTROL MODES
As you have seen during setup, the white square buttons are used to select a Control
Mode. How do you know which Control Mode to use? Here’s a brief outline to help guide
you to the correct control mode.
Oct 11, 2023 The bluebox Eurorack edition User Manual v 1.0.2
Page 13 of 60
Copyright 1010music LLC 2023
MIXER Mode vs TRACK Mode
MIXER and TRACK mode both allow you to control the same settings, but they let you
approach them from different perspectives. When should you use each one?
When to Use MIXER Mode
Use MIXER mode when you want to focus on one setting and control it for multiple tracks.
In this mode, each knob controls the selected setting for a different track. Select a setting
to control from the bottom of the screen, and use the knobs to adjust the different tracks
at the top of the screen.
When to Use TRACK Mode
Use TRACK mode when you want to narrow your focus to one track and control various
settings for that track all at once. In this mode, each knob controls a different setting for
the selected track.
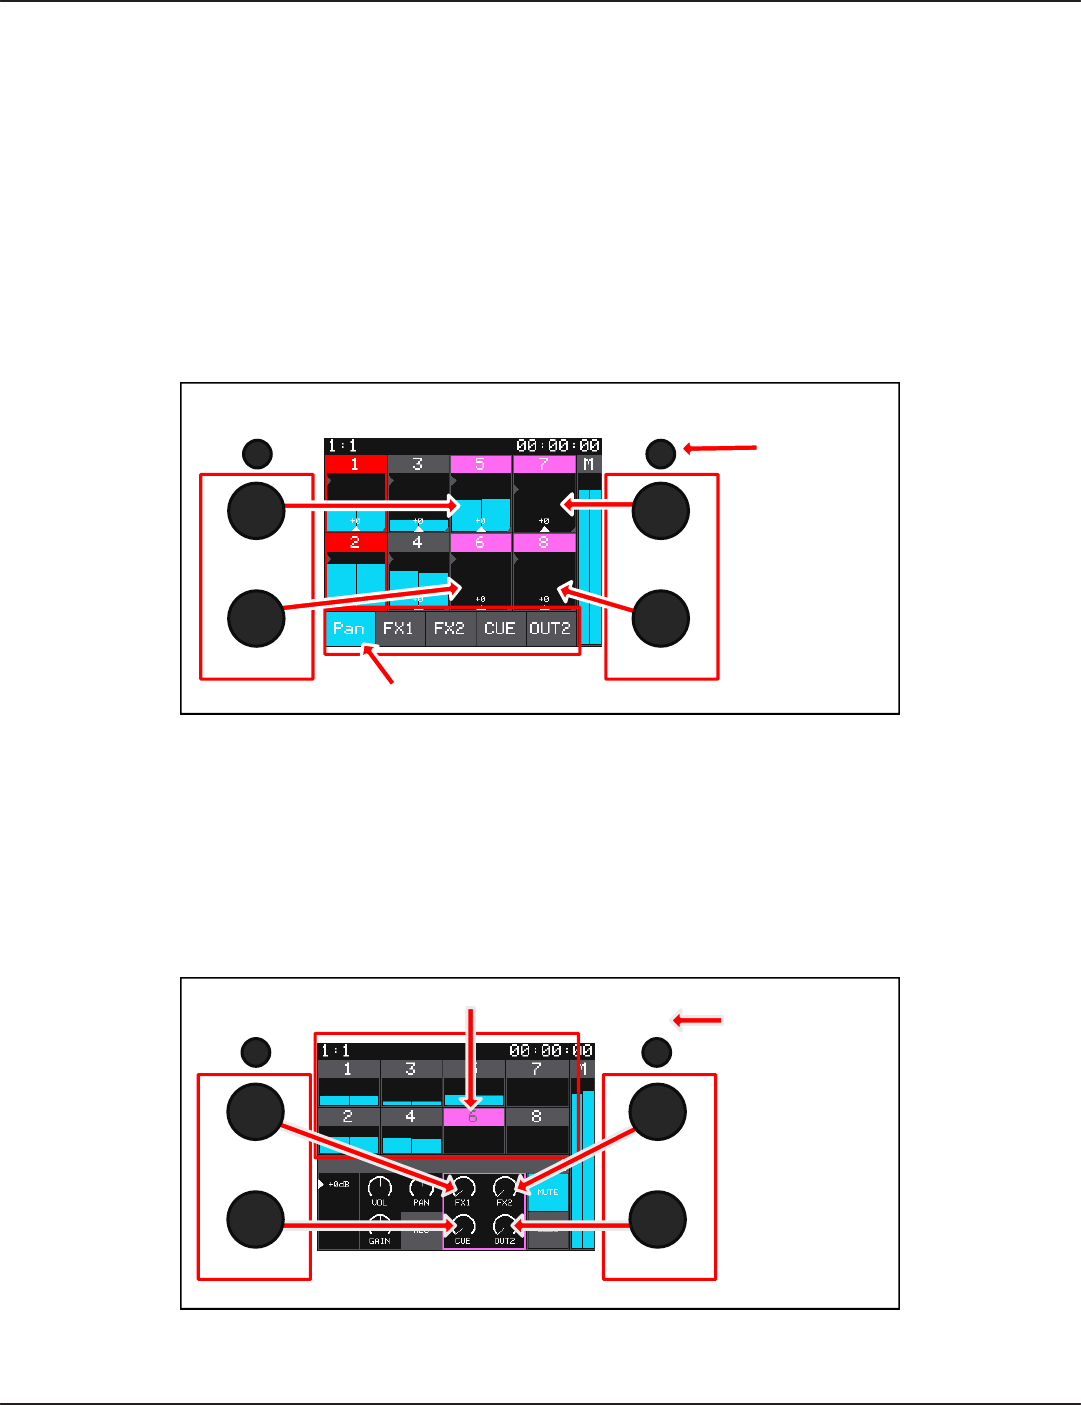
Track 5
Track 6
Track 7
Track 8
Choose a Track Setting
Knobs control tracks
at the top of the screen
Select a
group of
tracks for
the knobs
AB
MIXER Mode Controls
TRACK Mode Controls
FX1
CUE
FX2
OUT2
Choose a Track
Select a
control bank
for the knobs
AB
Knobs control the
bottom of the screen

Oct 11, 2023The bluebox Eurorack edition User Manual v 1.0.2
Copyright 1010music LLC 2023Page 14 of 60
DISPLAY OVERVIEW
Let’s give some names to the elements on the screen so we can talk about them. Now is
also a good time to talk about the color conventions that bluebox uses to show the state
of different tracks.
The top bar of the screen displays timing information and
warnings. The numbers in the top left display the play clock time
in the format measures : beats. The numbers in the top right
display the time in the format hours : minutes : seconds. The
space in between these two is usually blank. When the microSD
card is almost full, red text will appear here displaying the
amount of space remaining on the card. Consider cleaning up
some les or getting an additional microSD card if you need to
continue to record. Select an A2 rated microSD card or better.
The MIXER, TRACK, MAIN, EQ AND FX Control modes display the Meter Bridge and the
Main Output Level meter. The Meter Bridge shows the current level of the corresponding
input for each track. Generally, this is the level that is being sent to the Main output at
Out 1, after gain and volume settings are applied. In MIXER mode, the meters show the
signal being controlled at the time.
The text across the top of each meter is the track name. The pink track or tracks are
currently selected. Tap a track to change the selection. As you change settings, track
highlight colors and track name text colors indicate different states:
In MIXER control mode, there are a few triangular indicators along the edges of the
meters. The currently active indicator is white, and the others are gray. The indicator
moves as you change the level, and the current numeric setting is displayed on the meter.
The number disappears a few seconds after you stop changing the setting.
The bar along the right of the screen with the label M is the Main Output Level meter. This
meter represents the level of the output to Out 1. In MIXER control mode you can touch
the Main Output Level meter to mute it or arm it for recording.
Each of these rst ve control modes has a different set of controls along the bottom of
the display. MIXER, EQ and FX control modes have multiple control options that can be
accessed by pushing the control mode button repeatedly to cycle through the options.
MIXER Mode with
Storage Warning
Green Highlight: Solo mode
Red Highlight: Armed for recording
Gray Text & Meter: Muted
Pink Highlight: Selected to work with the knobs
Light Blue Frame: MIDI Map or CV Map is enabled. Controls with blue frames can
be mapped by tapping them. To toggle Learn and/or Assign,
push Proj then B and then select Learn for MIDI or Assign for CV.

Oct 11, 2023 The bluebox Eurorack edition User Manual v 1.0.2
Page 15 of 60
Copyright 1010music LLC 2023
PROJ MODE
After you have spent some time setting up bluebox, you can save your work to the
project. You can have as many projects as can t on the microSD card, and then you can
get another microSD card, or archive les to your computer to make more room. I
suggest you create a new project to use as you explore bluebox.
In PROJ mode, you can manage project les. On the Project Conguration screen, you
can adjust tempo and metronome settings, map MIDI Map controllers and assign Control
Voltage inputs to bluebox Eurorack edition controls.
Work with Project Files
When you push PROJ, you see a list of projects on the current microSD card. There are a
few demonstration projects on the included microSD card. These projects show the
different meter bridge layouts. Here’s how to use the controls in PROJ mode:
NOTE:
► The bluebox does not automatically save your changes. When you
change projects or unplug bluebox, any unsaved changes will be lost.
Control Control Behavior in PROJ Mode
Knobs
Scroll through the list of les and select a le. On the Project
Conguration page use the top knobs to select a parameter and a
bottom knob to select a value.
Touch
Touch menu options.
PROJ button
No additional functions in PROJ mode.
A button
Not used in PROJ mode.
B button
Opens the Project Conguration screen, where you can set the tempo,
and congure metronome options. You can also assign CV Mappings
and learn MIDI mappings for external control.

Oct 11, 2023The bluebox Eurorack edition User Manual v 1.0.2
Copyright 1010music LLC 2023Page 16 of 60
Save Changes to the Current Project
Be sure you to save changes so you don’ t lose your work.
1. Push PROJ. The bluebox will show you a list of projects
on the microSD card.
2. Touch Save in the top menu to save your changes. The
XML les on the microSD card for this project will be
updated to have the current settings. This includes all
settings and the list of WAV les for the project.
Load a Different Project
Loading a project replaces all of the settings on bluebox with those saved in the project,
including the list of WAV les for the project.
1. Push PROJ and you will see the list of projects on the microSD card.
2. Turn a knob to select a project to load.
3. Touch Load in the menu bar at the top of the screen. The bluebox will update the
settings and WAV le list with the information saved in the selected project.
NOTE:
► The Load menu option is disabled if the current project is selected. If
you want to revert to the saved version of the project, load a different
project and then reload the desired project.
► The Save menu option is disabled if there are no new changes to save.
PROJ Mode

Oct 11, 2023 The bluebox Eurorack edition User Manual v 1.0.2
Page 17 of 60
Copyright 1010music LLC 2023
Create a New Project
1. Push PROJ.
2. Touch File and then New in the menu bar.
3. Use the on-screen text keyboard to enter a name for
your new project if desired. Touch Clear at the top of the
screen if you want to start with a blank name. Turn a
knob to change the cursor position. Touch <– to
backspace. Touch 123 or ABC to change between text
and number entry. Touch the ^ to toggle between upper
and lower case letters.
4. Touch Enter when you are done typing the new name.
The bluebox will create the new project with default
settings and load it.
Rename a Project
1. Push PROJ.
2. Touch File and then Rename in the menu bar.
3. Use the on-screen text keyboard to enter a new name for your new project.
Touch Clear at the top of the screen if you want to start with a blank name. Turn
a knob to change the cursor position. Touch <– to backspace. Touch 123 or ABC to
change between text and number entry. Touch the ^ to toggle between upper
and lower case letters.
4. Touch Enter when you are done typing the new name. The bluebox will rename
the project. The project folder on the microSD card will be updated to match.
PROJ File Menu
NOTE:
► Renaming a project does not save the changes to the project.

Oct 11, 2023The bluebox Eurorack edition User Manual v 1.0.2
Copyright 1010music LLC 2023Page 18 of 60
NOTE:
► Make sure you save your conguration to the current project before
using SaveAs Template if you want all recent changes to be in the
original project le. Skip this step if you don’t want recent changes
included in the original Project le.
► The new Project that results from SaveAs Template is a normal Project
le. You can open it and work with it as normal.
Save Project Settings without WAV Files to a new Project
Once you get bluebox congured the way that works for you, can save the conguration
without the WAV les so you can reuse it for another project.
1. Push PROJ.
2. If you want to save the current settings to the current project to avoid losing
changes, touch Save.
3. Touch File and then SaveAs Template.
4. Use the on-screen text keyboard to enter a name for the new template project.
Touch Clear at the top of the screen if you want to start with a blank name. Turn
a knob to change the cursor position. Touch <– to backspace. Touch 123 or ABC to
change between text and number entry. Touch the ^ to toggle between upper
and lower case letters.
5. Touch Enter when you are done typing the new name. The bluebox will load the
new template project, which will have all of the active conguration settings but
will not have any WAV les.
Create a New Project from a Template Project
A template project is a normal project that was saved without the WAV les. You can use
it as a new project, or keep it as a template and create a new Project from it.
1. Touch PROJ.
2. Turn a knob to choose the template project you want to use and then touch
Load.
3. You can use the project as it is, or you can create a new project by touching File
and then SaveAs Template. Give the project a new name and touch Enter.

Oct 11, 2023 The bluebox Eurorack edition User Manual v 1.0.2
Page 19 of 60
Copyright 1010music LLC 2023
Congure Project Settings
On the Project Conguration Screen, you can congure tempo settings, MIDI Mapping
and CV Assignments. Push PROJ then push B to access the Project Conguration screen.
Select a Tempo and Set up the Metronome
The bluebox uses the tempo for some synchronized effects, the
clock display, the metronome and synchronizing with external
MIDI devices.
1. Push PROJ.
2. Push the B button to bring up the Project Conguration
Screen.
3. Turn a top knob or touch a setting to select it.
4. Turn a bottom knob to change the value for the selected
setting.
Here are the available tempo and metronome settings:
Project
Conguration
Setting Description
BPM
The tempo used for the project. See the MIDI section below
for information about how this works with external MIDI
devices.
Metronome
You can turn the metronome off, or you can turn it on only
when recording, or whenever you push PLAY. Note that the
metronome will not be recorded.
Met Output
Choose which output the metronome will play through.
Options are 1 & 2, Phones, 3 & 4, 3 and 4. The options related
to outputs 3 and 4 vary based on the 3 & 4 Mode set on the
Main Conguration screen.
Met Gain
Adjust the level of the metronome. Value can be -96.0 dB
through + 20.0 dB.

Oct 11, 2023The bluebox Eurorack edition User Manual v 1.0.2
Copyright 1010music LLC 2023Page 20 of 60
Control bluebox Settings with a MIDI Controller
You can use an external MIDI controller to customize the way you
control your mix. Connect the controller to bluebox, and then use
MIDI Learn mode to map the controls to the bluebox tracks and
settings.
1. Connect your MIDI Controller to the MIDI Device input
or the TRS MIDI IN jack.
2. Push PROJ, and then B.
3. Touch the MIDIMap tab and then touch Learn to enable
MIDI Learn mode.
4. Push MIXER and touch the control option from the
bottom of the screen. Then touch the track you want to
control. Now move the MIDI control you want to map to
this setting. The bluebox Eurorack edition will map this
MIDI Control to this setting for this track and display the
MIDI mapping in blue on the screen. The mapping is in
the format <Channel> : <CC Number>.
5. Repeat the process as needed for settings on the MIXER,
TRACK, MAIN, EQ or FX screens.
6. To clear a mapping, touch and hold the target control
until the mapping disappears.
7. When done, push PROJ and then B. Touch Learn to
disable MIDI Learn mode. The mapped controls are
listed on the MIDIMap tab.
8. Push PROJ then touch Save to save the changes in your
preset if desired.
See a List of Mapped MIDI Controls and Clear Mappings
1. Push PROJ, and then B.
2. Touch the MIDIMap tab. You will now see a list of MIDI
CC mapped controls.
3. Touch or use the knobs to select the mapping you want
to clear.
4. Touch Clear at the top of the screen. The mapping has
been removed.
PROJ Conguration
- MIDI Learn On
MIXER Mode - MIDI
Learn On
FX Mode - MIDI
Learn On
TRACK Mode - MIDI
Learn On

Oct 11, 2023 The bluebox Eurorack edition User Manual v 1.0.2
Page 21 of 60
Copyright 1010music LLC 2023
NOTE:
► Use the USB C DEV. Port to connect a MIDI controller. You cannot use
this with a computer.
► The bluebox can power some external MIDI devices through the USB C
DEV port, but some will need to be powered separately.
► The TRS MIDI input supports MIDI TRS Type A and Type B connections.
Use the included MIDI Adapter to connect through a MIDI 5 pin DIN.
Map CV Inputs to bluebox Settings
You can send a Control Voltage (CV) signal from another module to bluebox Eurorack
edition to control some of the bluebox Eurorack edition settings.
1. Send a +/- 5 Volt CV signal to one of the 6 CV In ports.
2. Push PROJ, and then B.
3. Touch the CV Map tab and then touch Assign to enable
CV Assignment mode. A pink lled circle with a C next to
it appears in the heading to indicate you are in CV assign
mode.
4. Select the CV input you want to map from the list by
touching it or turning a knob.
5. Push MIXER and touch the control option from the bottom of the screen. Then
touch the track you want to control. The mapped CV port number is displayed
on the track while you are in Learn mode. You will also see any MIDI CC
mappings that have been created. The selected parameter will now follow the
CV input, even if nothing is connected to that CV port.
6. Push PROJ and B. Select a different CV input and then select a setting to control
on the MIXER, TRACK, MAIN, EQ or FX screen.
7. To clear a mapping, touch and hold the target control until the mapping
disappears.
8. When done, push PROJ and then B. Touch Assign to disable CV Assignment
mode. The CV assignments are listed on the CV Map tab.
See a List of Mapped CV Inputs and Clear CV Mappings
1. Push PROJ, and then B.
2. Touch the MIDIMap tab. You will now see a list of CV inputs and their control
assignments.
3. Touch or use the knobs to select the mapping you want to clear.
4. Touch Clear at the top of the screen. The mapping has been removed.
CV Map

Oct 11, 2023The bluebox Eurorack edition User Manual v 1.0.2
Copyright 1010music LLC 2023Page 22 of 60
NOTE:
► You can only use one MIDI CC or CV Input to control each bluebox
Eurorack edition setting.
► Each MIDI CC and each CV Input can only map to a single bluebox
Eurorack edition setting.
► In CV Assign Mode and MIDI Learn Mode, there is a small teal outline
around controls that can accept a CV assignments and CC mappings.
► MIDI Thru is not supported.

Oct 11, 2023 The bluebox Eurorack edition User Manual v 1.0.2
Page 23 of 60
Copyright 1010music LLC 2023
MIXER MODE
Do you want to control one setting for multiple tracks at once? MIXER mode is the place
to do that. MIXER mode and TRACK mode allow you to control the following settings for
each track:
Control
Option
Description
Vol
The track level going to the Main output connected to OUT1.
Gain
Trim or boost the input to balance the incoming signals.
Solo
Disables the output to Main for all other tracks. Tracks in Solo
mode have a green outline.
Mute
Disables the output to Main for the muted tracks or the main
output. The track label and meter bars are gray for muted tracks.
Rec
Arms the selected track or the Main output for recording. Armed
tracks have a red outline.
Pan
Adjust how much of the signal is sent to the left and right
channels of the sends for this track.
FX1
Control the level of the track audio sent to FX1 (Delay).
FX2
Control the level of the track audio sent to FX2 (Reverb).
CUE
The track level going to the CUE bus, which is the default signal
sent to the PHONES jack.
3&4
The track level going to the outputs connected to OUT3 and
OUT4 when the 3&4 Mode on the Main Conguration screen is
set to Stereo.
OUT3
When the 3&4 Mode on the Main Conguration screen is set to
MONO, the OUT3 option controls the track level going to the
OUT 3 jack.
OUT4
When the 3&4 Mode on the Main Conguration screen is set to
MONO, the OUT4 option controls the track level going to the
OUT 4 jack.
NOTE:
► You can also arm the Main Output for recording and mute the Main
Output in MIXER mode by touching the M meter on the right.

Oct 11, 2023The bluebox Eurorack edition User Manual v 1.0.2
Copyright 1010music LLC 2023Page 24 of 60
When you push the MIXER button, the meter bridge lls most of the screen, the Main
output meter is along the right, and the Control Options buttons are along the bottom of
the screen. As mentioned earlier, the knobs and buttons do different things in different
modes. Here’s how they work in MIXER mode:
Control Control Behavior in MIXER Mode
Knobs
Adjust selected setting for different tracks
Touch
Touch and drag to adjust a level. Tap to change knob focus
or toggle state of a meter.
MIXER button
Toggle between two control option panels at bottom of
screen.
A button
Change knob focus to the next bank of meters.
B button
Open the Mixer Conguration Screen. See the SETUP
section above to learn more about this.

Oct 11, 2023 The bluebox Eurorack edition User Manual v 1.0.2
Page 25 of 60
Copyright 1010music LLC 2023
MIXER Vol Control
Control One Setting for Multiple Tracks
To control one setting for multiple tracks, you will need to select a control option in MIXER
mode, and select a bank of tracks to map to the knobs. Then use knobs or touch to adjust
the levels or toggle the settings.
5. Push the A button or tap a meter that is not pink to select a different group of
meters to control with the knobs.
6. Touch and hold a meter and then drag your nger left and right or up and down
to adjust the level of that meter. You can drag outside of the frame of the meter
after the initial touch.
7. If you are controlling the Solo, Mute, or Rec setting, tap a meter to toggle it’s
state for that setting. The color of the frame or of the header text will change to
show the current state of the meter.
You can use this process to:
● Adjust the volume
● Adjust the gain
● Solo one or more tracks
● Mute tracks
● Arm tracks for recording
● Pan tracks between left and
right channels
● Control the sends to FX1 and FX2
for various tracks
● Control the sends to the
headphones (CUE), OUT2 and
OUT3 for tracks
MIXER Solo Control
1. Push the MIXER button to enter MIXER mode. The
MIXER screen shows the meter bridge and a set of
control options along the bottom of the screen. When
you rst push MIXER, the main set of control options
appear.
2. Push MIXER again to toggle between the main and
secondary control options panel across the bottom of
the screen.
3. Touch a control option to select it. The selected option
button has a blue background.
4. Turn a knob to adjust one of the meters with a pink
header. The triangle shaped indicator for that setting
will move along the edge of the meter to show the
relative value of the setting. The numeric value of the
setting will appear briey and disappear a few seconds
after you stop changing the value.

Oct 11, 2023The bluebox Eurorack edition User Manual v 1.0.2
Copyright 1010music LLC 2023Page 26 of 60
NOTE:
► You can use touch and drag to change the value of a meter that is not
pink without changing the knob mapping.
► As you move between control modes, the track selection will remain
the same.
► When you leave MIXER mode and then come back, bluebox will
remember which control options panel was open and go back to that.
► You can touch and control more than one track at a time.
Arm the Main Output for Recording or Mute the Main Output
1. Push the MIXER button to bring up MIXER mode. If you don’t see Rec in the
control panel, push MIXER again.
2. Touch the on screen Rec control option button.
3. Touch the M meter along the right side of the screen to arm the Main output for
recording. Touch the M meter again to disarm it.
4. Touch the Mute button on the bottom of the screen.
5. Touch the M meter along the right side of the screen to toggle the mute state of
Out 1.

Oct 11, 2023 The bluebox Eurorack edition User Manual v 1.0.2
Page 27 of 60
Copyright 1010music LLC 2023
TRACK MODE
TRACK control mode is the place to go to focus on one track at a time. When you push
the TRACK button, the meter bridge gets a little shorter to make room for the two banks
of control knobs at the bottom of the display. These control knobs show the current levels
of the control options for the track selected in the meter bridge at the top of the screen.
Here’s how the controls work in TRACK mode:
Control Control Behavior in TRACK Mode
Knobs
Adjust different settings for the selected track.
Touch
Touch and drag an on-screen knob to adjust a level. Tap to
change knob focus or toggle state of a meter.
TRACK button
Not used in TRACK mode.
A button
Change knob focus to the next bank of control knobs on the
screen.
B button
Open the Track Conguration Screen. See the SETUP
section above to learn more about this.
Oct 11, 2023The bluebox Eurorack edition User Manual v 1.0.2
Copyright 1010music LLC 2023Page 28 of 60
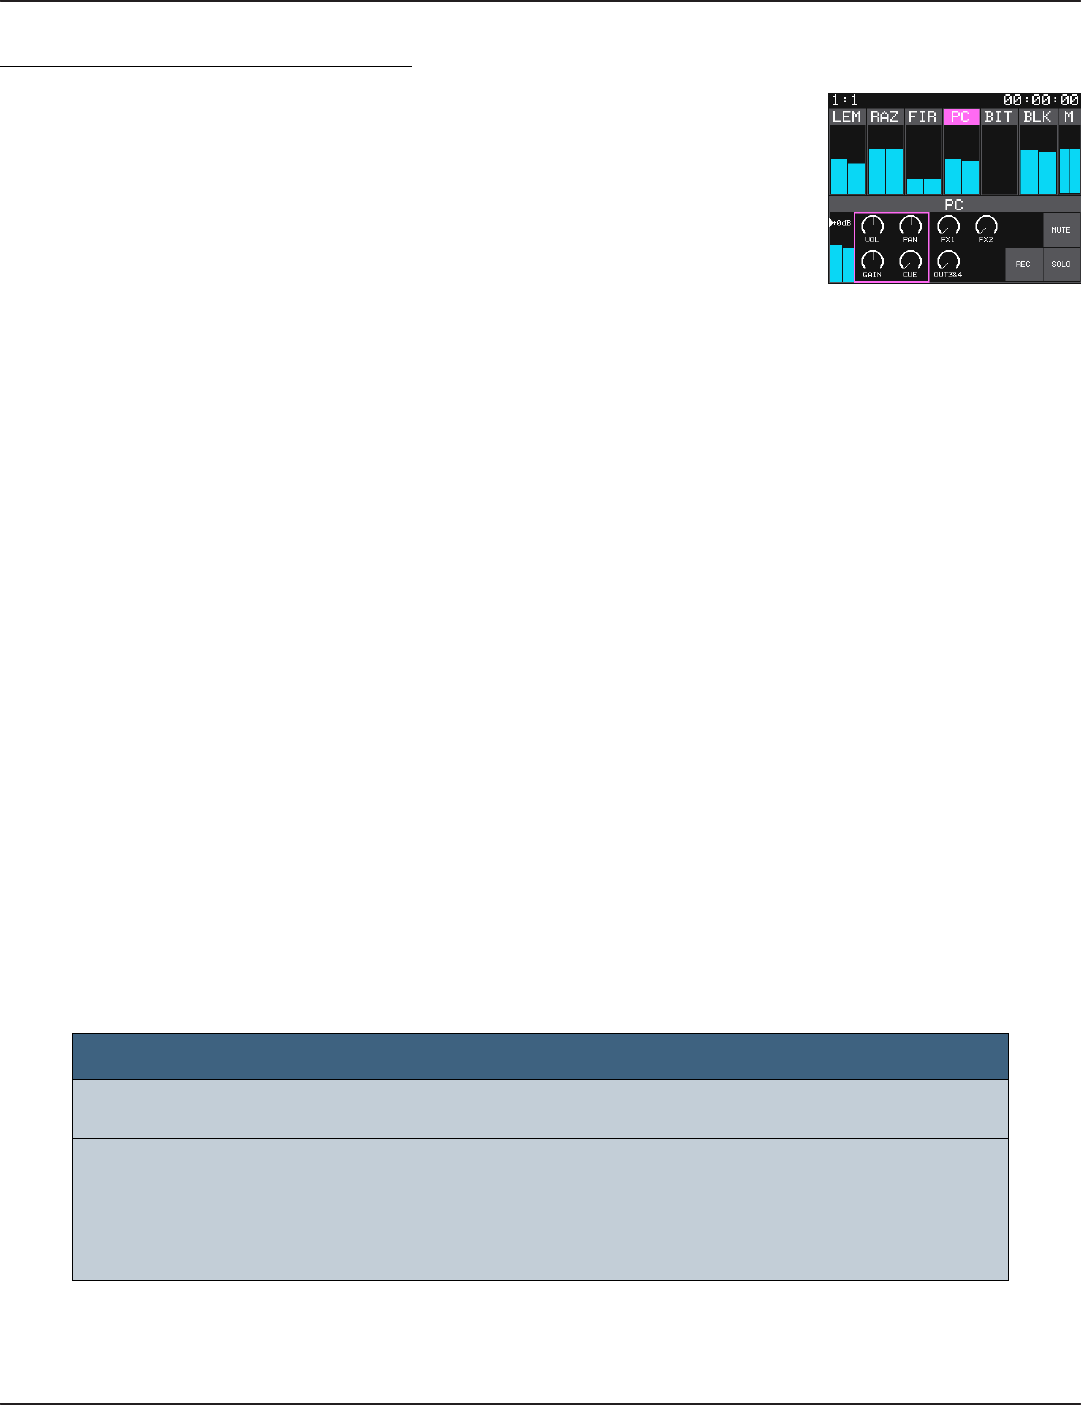
Change Settings for a Single Track
To change settings for a track you will rst select a track in TRACK
mode. Then you use the knobs and touch gestures to change the
levels and toggle the states of the settings. You can switch which
bank of controls have the knob focus.
1. Push TRACK and then touch a track in the meter bridge
to select it. The controls on the bottom half of the screen
are now controlling only the selected track.
2. Turn the knobs to adjust the four controls within the
pink frame and change the settings for the selected
track. The meter in the lower left displays the main
output level of the current track.
3. Push A to toggle the knob focus to the other set of
controls, or tap a control panel to give it focus.
4. Touch and hold a knob on the screen and then drag
your nger to change the value of that knob. Slide your
nger up and down or left and right to adjust the value.
5. Tap the REC, MUTE or SOLO button to toggle the state
for the current track.
TRACK Mode
You can use this process to:
● Adjust the volume
● Adjust the gain
● Solo a track
● Mute a track
● Arm a track for recording
● Pan a track between left and
right channels
● Control the sends to FX1 and FX2
for a track
● Control the sends to the CUE
bus and to Outputs 3&4
NOTE:
► You can touch and drag multiple knobs at once.
► On the Main conguration screen, use the 3&4 Mode parameter to
choose to control the two outputs as one stereo pair or as two mono
outputs. The controls for Out 3 & 4 here and on other screens will
change based on this choice.

Oct 11, 2023 The bluebox Eurorack edition User Manual v 1.0.2
Page 29 of 60
Copyright 1010music LLC 2023
MAIN MODE
Use MAIN mode to control the output levels. From here you can also access the Main
Conguration screen where you can choose options like pre- or post-fader sends, and
tweak the Compressor.
Here’s how the controls work in MAIN mode.
Adjust Output Levels
1. Push MAIN to select Main mode.
2. Turn a knob to adjust the level of the corresponding
output. See the table above for the mapping.
3. Touch a meter and then drag your nger left and right
or up and down to adjust the level for that meter.
Mute an Output
1. Push MAIN to select Main mode.
2. Touch the MUTE button under the heading for the
output you want to mute. Touch the button again to
unmute it.
Control Control Behavior in MAIN Mode
Knobs
Top left - Adjust the Phones Output Level
Bottom left - Adjust the level for Out 3&4 or just 3
Top right - Adjust the level for the Main output (Outs 1&2)
Bottom right - Adjust the level for the Main output (Outs
1&2) or Out 4
Touch
Touch and drag a meter to adjust a level. Tap to toggle the
mute state of an output.
MAIN button
Not used in MAIN mode.
A button
Not used in MAIN mode.
B button
Open the Main Conguration Screen.
MAIN Mode

Oct 11, 2023The bluebox Eurorack edition User Manual v 1.0.2
Copyright 1010music LLC 2023Page 30 of 60
Congure Signal Routing and Compression Settings
Use the controls on the Main conguration screen to adjust the
signal routing and the compressor settings.
1. Push MAIN to enter Main mode.
2. Push B to bring up the Main Conguration screen.
3. Turn one of the top knobs to select which setting you
want to change.
4. Turn one of the bottom knobs to select a value for that
setting.
MAIN Conguration
MAIN Conguration
- Scroll for More
Settings
NOTE:
► A compressor allows the overall output level to sound higher by
pushing down the level of the highest highs and boosting the lower
levels. As a result, the average level of the audio signal is higher than it
would otherwise be. You can adjust the Compressor parameters to
control the compression.
► The Threshold, Ratio, Exp Ratio and Mode are the most important
compressor parameters. Take a look at these rst if you are not getting
the results you want.
► The pair of audio inputs selected for USB Rcv will be replaced with the
USB input stream when available.

Oct 11, 2023 The bluebox Eurorack edition User Manual v 1.0.2
Page 31 of 60
Copyright 1010music LLC 2023
Option Description Range of Values
Phones Src
Choose which signal to send to the PHONES output.
CUE: the CUE mix
Main: the Main mix
USB Rcv
Choose which pair of tracks will receive the USB Audio
Stream.
None, 1&2 thru 11&12
CUE Style
When set to Fader, you can set the level of each track that is
sent to the CUE bus. When set to Toggle, you can mute and
unmute tracks on the CUE bus.
Fader, Toggle
CUE Send
3&4 Send
FX1 Send
FX2 Send
Controls whether the tracks send their signals to the
corresponding outputs before or after the track Vol level is
applied. The Gain is always applied.
Pre Fader
Post Fader
3&4 Mode
This option allows you to congure OUT3 and OUT4 to
either work as two mono outputs or as a stereo output pair.
When set to Stereo, the MIXER and TRACK screens will allow
you to control the sends to OUT3 and OUT4 together as a
stereo output.
When set to MONO, the MIXER and TRACK screens allow
you to independently control sends to OUT3 and OUT4 on
the second page of the mixer screen.
Stereo, Mono
3 Send
4 Send
These settings are only enabled if 3&4 Mode is set to Mono.
Controls whether the tracks send their signals to OUT3 and
OUT4 before or after the track Vol level is applied. The Gain
is always applied.
Pre Fader
Post Fader
Rec Source
Controls whether the track recordings use the pre or post
fader signal.
Pre Fader
Post Fader
Rec FX WAV
When On, Delay and Reverb will be recorded to their own
stereo WAV les. You can nd these les in the project
folder.
On or Off
Compressor
Turn this On to apply the compressor to the main output
(OUT1 AND OUT2). The compressor is not applied to OUT3
and OUT4. It is applied to the PHONES output if Phones
Source is Main.
On or Off
Attack
This controls how long it takes for the compressor to reach
its full extent after the threshold is crossed.
0 to 1000 ms
Release
This controls how long it takes for the compressor to dial
down once the input falls back under the threshold.
0 to 1000 ms
Thresh
This is the most important parameter of the compressor.
The compressor will start to attenuate a signal when it
exceeds this Threshold level. The amount of attenuation is
governed by the Ratio Parameter.
-48.0 dB to +0.0 dB
The table below and continued on the next page describes the signal routing and
compressor settings available on the Main Conguration Screen:

Oct 11, 2023The bluebox Eurorack edition User Manual v 1.0.2
Copyright 1010music LLC 2023Page 32 of 60
Option Description Range of Values
Ratio
When mode is Peak or RMS, this is the ratio between
the input and output signal when the compression is
active. A ratio of 1 means no compression. A ratio of 100
means only 1/100th of the input signal is sent to the
output.
1 to 100
Exp Ratio
When mode is Expander, this is the ratio between the
input and output signal when the expander is active. A
ratio of 1 means no expansion. A ratio of 100 means the
signal sent to the output is 100 times the input signal.
1 to 100
AutoMkup
Turn this on if you want the compressor to automatically
compensate the output level when the threshold and
ratio settings change.
On or Off
Knee
This adjusts whether the compressor kicks in all at once
or more gradually. At 0.0 dB the compressor will be off
below the threshold and fully applied as soon as the
threshold is reached. The knee value is the range above
and below the threshold where the compressor ramps
up. The compressor starts to be gradually at applied at
Threshold - Knee and is fully applied at Threshold +
Knee, with a gradual transition between the two.
+0.0 dB to +18.0 dB
Lookahead
Increase this number to give the compressor more time
to identify the peaks and respond to them. When this is
zero, the compressor can only respond after the peak
has occurred.
0 to 10 ms
AutoRel
When this is on, the Release time will be automatically
determined based on the incoming signal. The Release
setting is not used when AutoRel is On.
On or Off
Mode
Use Peak mode when you want the compressor to be
able to respond quickly to even short peaks to ensure
the output signal does not exceed the threshold.
Use RMS mode when you can allow the signal to exceed
the threshold for short amounts of time, in order to get
a more musical sounding output.
Use Expander mode when you want the opposite of a
compressor. The Exp Ratio value will be used to increase
the output level when the input exceeds the threshold.
Peak, RMS or Expander
Wet/Dry
The ratio of wet (compressed) vs dry signal that is sent
to the output. 100% means the full compressed signal is
sent. 0% means only the dry signal is sent.
0.0% to 100.0%
Gain
Adjust this makeup gain to makeup for differences in
volume caused by the compressor.
-36.0 dB to +36.0 dB

Oct 11, 2023 The bluebox Eurorack edition User Manual v 1.0.2
Page 33 of 60
Copyright 1010music LLC 2023
EQ MODE
If it’s time to adjust the frequency response for each track, it’s time to use EQ Mode. With
bluebox, you can adjust the frequency response for each of 4 nodes per track. You can
also adjust the EQ for the overall output by selecting the Main output meter on the right.
Here’s how the Controls are used in EQ mode:
Control Control Behavior in EQ Mode
Knobs
Adjust a value for the selected node and track:
Top left - Gain
Bottom left - Q - sometimes shape or bandwidth based on EQ Type
Top right - Frequency
Bottom right - Equalization type
Touch
Touch and drag in the grid to move the selected node for the selected
track
EQ button
Hide or bring back the meter bridge and change the size of the EQ
graph.
A button
Select the next node in the EQ graph
B button
Not used in EQ mode
Each track and the main mix has a 4 band equalizer. In EQ mode, you will see a graph
that represents the frequency response for the current selection. In this graph, the x axis
represents frequency and the y axis represents the gain that will be applied at that
frequency. The resulting graph is called the frequency response. As you change
parameters for each of the four lter bands, the shape of the graph will change to show
the impact of all of the bands applied together. The gain in this context is the amount of
boosting or attenuation will be applied to the signal level at various frequencies.
You can touch the grid to move the lter point for each band. The lter point will also
move in the grid as you turn the knobs to adjust each of the parameters for that lter
band. Push the A button to select a different lter to control. The lter point for the
selected lter is pink. Set the lter type to None for the lter bands that are not used.
Each of the four knobs controls the EQ parameter displayed in the corresponding corner
of the EQ grid for the selected lter band.
In EQ mode, you can push the EQ button to toggle the EQ grid in and out of full screen
mode to select a different track or have more precision when using touch to control the
grid.

Oct 11, 2023The bluebox Eurorack edition User Manual v 1.0.2
Copyright 1010music LLC 2023Page 34 of 60
Adjust the EQ for a Track or the Main Mix
You will need to choose a track or the main mix, and then choose
a lter band to adjust. Then select an EQ type for that lter band
and adjust the corresponding settings.
1. Push EQ to bring up the EQ screen.
2. If the meter bridge is hidden, push EQ again to bring it
back and reduce the size of the EQ Control Grid.
3. Touch the meter you want to control. You can select a
track meter or the Main output meter.
4. Push A to change which lter band you are controlling
for the selected track. The lter point on the grid for the
selected lter band is pink.
5. Turn the bottom right knob to choose the Type of
equalization to be used for this lter band. The selected
value is displayed in the lower right corner of the grid.
The options are:
None
L Cut = Low cut lter
L Shelf = Low Shelf
Param = Parametric
H Shelf = High Shelf
H Cut = High cut lter
6. Turn the other three knobs to adjust their values. The numbers in the respective
corners display the current value and the shape of the frequency response graph
will change accordingly.
7. Tap a spot in the grid to quickly move a lter point on the grid to that spot and
reshape the lter based on the corresponding frequency and gain there.
8. Touch the selected lter point and drag it to make more gradual changes.
9. Push EQ to hide the meter bridge and use the EQ grid in full screen mode. Push
EQ again to bring the meter bridge back.
NOTE:
► You cannot select a different lter band in the EQ Grid Control by
touching the grid. You have to push the A button to select a different
lter band.

Oct 11, 2023 The bluebox Eurorack edition User Manual v 1.0.2
Page 35 of 60
Copyright 1010music LLC 2023
EQ Mode Description
L Cut =
Low Cut
(high pass)
Filter
Pass frequencies above the cutoff frequency, and progressively attenuate
frequencies below the cutoff frequency.
Gain parameter is not used here.
Frequency is the lowest frequency that will pass through the lter for this
band. Anything below this is cut out.
Q controls the level of boosting or attenuation at and around the cut off
frequency. Values above 1 boost the level of the audio signal at the cutoff
frequency. Values below 1 attenuate the level of the audio signal at the
cutoff frequency.
L Shelf =
Low Shelf
Filter
Cut or boost frequencies below the cutoff frequency. Above the cutoff,
signal will not be altered and will pass normally.
Gain controls the amount of boosting or attenuation that happens near and
below the selected frequency.
This lter impacts the audio signal near and below the selected frequency.
Q controls the shape of the gain adjustments made at the selected
frequency. Set to 1 or lower to have a shelf shape to the frequency
response. Values above 1 cause gradually sharper rises and drops on either
side of the selected frequency.
Param =
Parametric
Filter
Boost or attenuate the gain for a series of bands around the selected center
frequency.
Gain is the amount of attenuation or boosting that is applied at the
selected frequency.
Frequency is the center frequency of the affected band.
Q controls the width and shape of the band affected.
H Shelf =
High Shelf
Filter
Cut or boost frequencies above the cutoff frequency. Below the cutoff,
signal will not be altered and will pass normally.
Gain controls the amount of boosting or attenuation that happens near and
above the selected frequency.
This lter impacts the audio signal near and above the selected frequency.
Q controls the shape of the gain adjustments made at the selected
frequency. Set to 1 or lower to have a shelf shape to the frequency
response. Values above 1 cause gradually sharper rises and drops on either
side of the selected frequency.
H Cut =
High Cut
(lows pass)
Filter
Pass frequencies below the cutoff frequency, and progressively attenuate
frequencies above the cutoff frequency.
Gain parameter is not used here.
Frequency is the highest frequency that will pass through the lter.
Anything above this is cut out.
Q controls the level of boosting or attenuation at and around the cut off
frequency. Values above 1 boost the level of the audio signal at the cutoff
frequency. Values below 1 attenuate the level of the audio signal at the
cutoff frequency.
Here are some more details about the different EQ Modes and parameters:

Oct 11, 2023The bluebox Eurorack edition User Manual v 1.0.2
Copyright 1010music LLC 2023Page 36 of 60
FX MODE
In FX mode you can adjust the settings for the Delay and Reverb effects. There is one
global set of effects settings that are applied to the overall signal that has been routed to
the effects channels. You can adjust the FX sends for each track in MIXER or TRACK mode.
The Reverb effect has two layers of settings. First you choose one of the 15 available
Reverb models you want to use, then you rene the effect using the Reverb view mode
settings.
There is a lot happening on the FX screen. Here’s how to use the controls in FX mode:
FX View Modes
Push the FX button multiple times to cycle through the three different view modes:
Control Control Behavior in FX Mode
Knobs
Adjust the value for an effect setting in the pink frame.
Touch
Touch and drag an on-screen knob to adjust a parameter value. Tap to
change knob focus or toggle state of a button. Touch and drag on the x-
y grid to adjust the effects parameters.
FX button
Cycles through the FX View modes:
FX1/Delay, FX2/Reverb, X/Y Grid
A button
When there is more than one bank of knobs on the screen, this will
select the next group of 4 knobs. This is used on the FX2/Reverb screen.
B button
Open the Reverb Model selection window.
FX Mode with
FX1/Delay
View
FX Mode with
FX2/Reverb
FX Mode with
X/Y Grid
View

Oct 11, 2023 The bluebox Eurorack edition User Manual v 1.0.2
Page 37 of 60
Copyright 1010music LLC 2023
Adjust Reverb and Delay Effects Settings
1. Adjust the effects sends for each track using the Track or Mixer control mode.
2. Choose whether the FX Mix is pre- or post-fader in the Main Conguration
screen.
3. Choose the Reverb model to be used by pushing FX and then pushing the B
button. Select the desired model by touching the screen or turning a knob.
4. Push FX. The bluebox will display the last FX view mode used. Push FX again to
change the view mode if needed.
5. Turn a knob to adjust the value of one of the on screen controls in the pink box.
6. Touch an on-screen knob and drag left and right or up and down to change the
value of the setting.
7. Touch an onscreen button to toggle its state.
8. In the Reverb view mode you can push A to toggle the knob focus to the other
control group. The pink frame will move to show the current focus. You can also
tap a control to change the focus to the corresponding group.
9. In X/Y Grid view mode, touch and drag in the grids to change the effects
settings. For the Delay, X= cut-off frequency and Y=lter bandwidth. For Reverb,
X=size and Y=level.
NOTE:
► If you leave FX mode and come back, bluebox will remember which FX
View mode you were using and return to it.
► The Delay and Reverb fx sends are only sent to the Main Out 1. If you
set the CUE Source to Main, you will hear the effects through the
Phones output as well.

Oct 11, 2023The bluebox Eurorack edition User Manual v 1.0.2
Copyright 1010music LLC 2023Page 38 of 60
Here are the available settings for the Delay effect:
Delay
Parameter
Description
Delay Time The amount of time between when the dry signal is received and when the
rst echo is heard. If Beat mode is on, the delay time will be expressed in
musical increments. Otherwise, it is a percentage of the time range
between 0 and 2 sec.
Feedback The amount of wet signal that is sent back into the delay buffer, from 0 to
100%. When set to 0, a single echo will play.
Cutoff When Filter is On, this is the center frequency of the frequency band that
the delay will be applied to.
Width When Filter is On, this is the range of frequencies on either side of the
Cutoff that will be included in the delay.
Beat When Beat is on, the delay amount is expressed in musical increments,
and thus synchronized with the MIDI clock. When off, the Delay time is a
percentage of time between 0 and 2 sec.
Filt When the lter is on, the feedback path goes through a band pass lter to
shape the sound of the echoes, using the cutoff and width parameters
above.
Ping Controls whether the delay uses ping pong mode.
NOTE:
► You do not have to push Play to use the Beat mode for the delay. The
delay will use the tempo set in the Project Conguration screen or
received from a MIDI input.

Oct 11, 2023 The bluebox Eurorack edition User Manual v 1.0.2
Page 39 of 60
Copyright 1010music LLC 2023
Reverb
Parameter
Description
Time How long it takes for the reections to fade out. The behavior of this control
varies based on the reverb model selected.
Level Controls the audio level of the reverb. Keep this high to hear more of the
reverb.
HI C The high frequency cutoff. When all the way up, all frequencies are allowed
into the reverb processing. Dial this down to remove higher frequencies
from the reverb processing.
Low C The low frequency cutoff. When all the way down, all frequencies are
allowed into the reverb processing. Dial this up to remove lower
frequencies from the reverb processing.
Pre D Pre-delay is the amount of time the dry signal will be heard before the
reections begin. The range is 0 to 1000ms.
Freeze Turn on the freeze for brief periods to reverberate the current input signal
at max levels and hold it until freeze is turned off. The freeze will turn the
high cut off all the way up, the low cut off all the way down, and the reverb
level all the way up.
Here are the available settings for the Reverb effect:

Oct 11, 2023The bluebox Eurorack edition User Manual v 1.0.2
Copyright 1010music LLC 2023Page 40 of 60
EDIT MODE
You can manage your recorded les and setup for punching in when you are in Edit
mode. Here you can see which tracks have recordings, where the recordings start and
stop in the timeline, control where playback and recording will start, and set up Punch In
and Punch Out points for recording. In the Edit Conguration page you can see all of the
recordings for each track, select which WAV les are active for each track, rename and
manage les.
When you record, the les are stored on the microSD card. The bluebox names each le
based on the track number, track name, and recording number. In Edit mode, you can
see the les that have been recorded for each track or the overall mix of this project,
rename them, add new les from the microSD card to the project, and assign which WAV
les will playback for a track.
Edit mode is where you can choose which tracks you want to hear playback a WAV le
while listening to the live input or recording from another track. You may want to hear
multiple WAVs playing at once and mix them together. You also might need to stop
playing back a WAV le. You can set these things up in the EDIT Conguration screen.
Here’s an overview of the controls in EDIT mode:
Control Control Behavior in EDIT Mode
Knobs
Scroll through the list of les and select a le.
Touch
Touch a le to select it. Touch and drag the le list to scroll through the
list.
EDIT button
Not used in EDIT mode.
A button
Toggle the ACTIVE state of the currently selected WAV le.
B button
Not used in EDIT mode.
NOTE:
► Recording can be done from any control mode, once tracks have been
armed in MIXER or TRACK control mode. Since it doesn’t t in any one
control mode, we cover this in the RECORD AND PLAY WAV FILES
section, after the discussion of all of the control modes.

Oct 11, 2023 The bluebox Eurorack edition User Manual v 1.0.2
Page 41 of 60
Copyright 1010music LLC 2023
Edit Mode and the Edit Conguration Screen
In Edit mode, the meter bridge is replaced by a timeline view
of the recordings for each track. Here, the tracks run from top
to bottom and time moves from left to right. The pink bars
represent the recording and playback position of the active
WAV les for each track. Small pink handle indicates where
the layered WAV les are. You can touch the track timeline to
move the vertical playback cursor. Playback will continue
from the last touch point.
The Main output meter is visible along the right side of the
screen. The time in measures:beats is at the top left and in
hours:minutes:seconds in the top right.
The bottom half of the screen in Edit Mode controls when
playback starts and punch in timing. Touch the numbers
below a column heading to select a different time, which is
displayed in measures:beats. You can alter the starting
measure number, but not the beat number. Touch the Enable
button in each column to enable that feature.
While in Edit mode, press B to access the Edit conguration
screen. The tracks labels are listed down the left side of the
screen. Next to each track label is a list of the WAV les
recorded for that track. The right column indicates which WAV
les are active. Press A to toggle the ACTIVE state of a WAV le.
Touch File to add or remove WAV les for a track, to rename a
WAV le or to completely delete the WAV le from the
microSD card.
Now we are ready to discuss how to perform specic tasks in
Edit mode.
Edit Mode
Time Selection
Edit Conguration
See Where WAV Files Fall in the Timeline for Each Track
1. Push EDIT. The track display across the top of the screen shows where in time
the WAV les for that track will play. Track 1 is at the top.
2. The vertical pink bar shows the current playback position. Touch the screen to
move this playback cursor. The time displays at the top of the screen will update
to show the time at that position.

Oct 11, 2023The bluebox Eurorack edition User Manual v 1.0.2
Copyright 1010music LLC 2023Page 42 of 60
Change Start Position for Recording or Playback
There are three different ways to change the position of the recording and playback
cursor.
1. Push EDIT.
2. If you want to always start playback from the same position, touch Enable in the
PLAY FROM column and then touch the PLAY FROM start number. Enter a new
number for the starting measure and then touch Enter. (You cannot specify a
starting beat.) Now pressing PLAY will always start playback from this position
even if you move the playback cursor using one of the following methods.
3. To start or continue playback or recording from any point, disable Play From and
touch the timeline to move the playback and recording cursor to the place
touched. You can do this during playback or while stopped but not while
recording.
4. If Play From is disabled, start playback from the beginning by pushing Stop
twice.
Punch In Recording
Sometimes you need to re-record a small section in the middle of a track. This can be
done to correct small mistakes in an otherwise good recording or to add a bit of
something different in the middle of a track. You may want to use the PLAY FROM
feature described above together with Punch In to start playback slightly before the place
where you want to punch in the new recording.
1. Use the MIXER or TRACK screen to arm the desired tracks for recording. See
Record and Play WAV Files below to learn how to do this.
2. Push EDIT.
3. Touch Enable in the PUNCH IN column.
4. Touch the time in the PUNCH IN column and then specify the measure where
you want the new recording to start. Touch Enter when done.
5. If you want to also automatically stop recording at a specic point in time, touch
Enable in the PUNCH OUT column. Touch the time in the PUNCH OUT column
and enter the measure where recording should stop. The recording will stop
after the last beat of the measure before the specied measure.
6. Push REC and PLAY. Playback will start immediately, but recording will not start
until the target PUNCH IN time is reached. If you enabled PUNCH OUT,
recording will stop when the PUNCH OUT time is reached. The current track will
now have two active playback les: the original le and the newly punched in
le.

Oct 11, 2023 The bluebox Eurorack edition User Manual v 1.0.2
Page 43 of 60
Copyright 1010music LLC 2023
EDIT Conguration
Screen
Play a WAV le for a Track
When you record a track, bluebox stores a WAV le for that track in the folder for the
project on the microSD card. You can see the list of les on the EDIT Conguration screen.
By default, the most recent recording for a track is marked Active. If a recording is
marked Active here, and it is not armed for recording, bluebox will play back that track
when you press the Play or Rec + Play transport buttons. To play a WAV le, you will need
to set its state to Active and disarm it for recording.
1. Push EDIT and then push the B button. You will see a list
of les that have been recorded for each track along
with les that have been mapped to tracks.
2. Turn a knob or touch to select the le you want to play.
3. Push A to change the state of the le to Active.
4. Push MIXER.
5. Make sure the track is not armed for recording. If the
track has a red frame, touch the Rec button at the
bottom of the screen, and then touch the track to
disarm it.
6. Push the black square ▶ PLAY transport button to start
playback.
NOTE:
► You can have more than one ACTIVE le. However, if a WAV le would
be totally eclipsed by a newer le in the list, you will not be able to
activate it.
► If you have two or more ACTIVE les that overlap, the newest recording
will play during the time it overlaps with the older le, and the older le
will be muted.
Make a WAV File Stop Playing
You recorded a track, disarmed it, and now the WAV le plays back when you push
▶ PLAY. You can make it stop by changing the ACTIVE status of the WAV le.
1. Push EDIT and then push the B button. You will see a list of WAV les that have
been recorded or loaded for each track.
2. Turn a knob or touch to select the le that is marked ACTIVE for the track where
it is playing back.
3. Push the A button to toggle the ACTIVE state off. As long as there is no active le
for the track, nothing will play for that track.

Oct 11, 2023The bluebox Eurorack edition User Manual v 1.0.2
Copyright 1010music LLC 2023Page 44 of 60
EDIT Conguration
File Menu
NOTE:
► When you add a le to a project, the le does not move or get copied. It
stays in its original folder. The bluebox simply adds a pointer to that le
to the list of assets for the project. If that le gets deleted or moved, the
link will be broken and the le will not be able to play.
► WAV les must be 48kHz for bluebox to play them.
Add a File to a Project
If you have another WAV le that you want to play in the MIXER, you can put it on the
microSD card and then add it to the project. You can also add a WAV le from a different
project.
1. Take the microSD card out of blackbox and put it in your
computer. (The card is spring loaded. Push it in to get it
to pop out.) Copy the le you want onto the microSD
card. Under the Projects folder on the card, there is a
folder named for each project. Put the le here to keep it
with the project.
2. Push EDIT and then push the B button. You will see a list
of les per track for this project.
3. Select the track where you want to add the le.
4. Touch File at the top of the screen to open the File
menu.
5. Touch Add. Navigate to the folder with the le by
selecting a folder and touching Load or touching the ^
symbol to navigate back in the folder hierarchy. Turn the
knobs to change the folder or le selection.
6. Touch LOAD with the le selected to add the le to the
project. The le will now appear in the list and will be set
as the ACTIVE le for that track.
7. If you want to change the le to inactive, select it and
push the A button.
EDIT Conguration
File Selection

Oct 11, 2023 The bluebox Eurorack edition User Manual v 1.0.2
Page 45 of 60
Copyright 1010music LLC 2023
Text Keyboard
Remove a WAV le from a Project
If you no longer want to include a le in a project, you can remove it from the list of assets
for the project without deleting the WAV le.
1. Push EDIT and then push the B button.
2. Turn a knob or touch to select the le you want to remove from the project.
3. Touch File, then Remove.
NOTE:
► When you remove a le from a project, you are taking it out of the list
of assets for that project. The le is still on the microSD card. Use
DELETE if you also want to erase the le from the microSD card to free
up space.
Rename a WAV File
When bluebox records a WAV le, the le name is <track number> + <track name> +
<number>. For example, if you have renamed track 2 to DRUMS, the third recording for
that track is named 02-DRUMS-003. You can rename it to help you keep track of the les.
1. Push EDIT and then push the B button.
2. Touch File and then Rename. You will see a text
keyboard on screen.
3. Touch Clear at the top of the screen if you want to start
with a blank name. Turn a knob to change the cursor
position. Touch <– to backspace. Touch 123 or ABC to
change between text and number entry. Touch the ^ to
toggle between upper and lower case letters.
4. Touch Enter when you are done typing the new name.
The bluebox will change the display name of the le in
the list and change the name of the le on the microSD
card.

Oct 11, 2023The bluebox Eurorack edition User Manual v 1.0.2
Copyright 1010music LLC 2023Page 46 of 60
Delete
Conrmation
NOTE:
► WARNING! There is no “UNDO” for delete.
Delete a WAV File from a Project
You can delete a le from the project and the microSD card to
free up space.
1. Push EDIT and then push the B button.
2. Turn a knob or touch to select the le you want to
remove from the project.
3. Touch File, then Delete.
4. Touch OK to conrm. The le is now removed from the
microSD card. Touch anywhere else on the screen to
cancel.
Playback a Recording of the Main Output
The list of les in EDIT mode does not include the WAV les that were recorded from the
Main output. The les are on the microSD card in the folder for the project. The le
names start with 13-Main. To play one of these WAV les, add it to a track.
1. Push EDIT and then push the B button.
2. Select the track to be used for playback.
3. Touch File, then Add.
4. Navigate to the project folder, and then scroll down to the les that start with 13-
Main. Select the le you want and touch Load.
5. Make sure the track you used is not armed for recording.
6. Push ▶ PLAY.

Oct 11, 2023 The bluebox Eurorack edition User Manual v 1.0.2
Page 47 of 60
Copyright 1010music LLC 2023
Control Control Behavior in TOOLS Mode
Knobs
Turn the top left knob to adjust the brightness.
Touch
Not used in TOOLS mode.
TOOLS button
No additional functions in TOOLS mode.
A button
Not used in TOOLS mode.
B button
Not used in TOOLS mode.
TOOLS MODE
The tools screen has some valuable information that is easy to overlook: the available
space on the microSD card, and the current rmware version. This is also where you can
adjust the brightness of the screen.
Here is what the controls do in TOOLS mode:
Adjust the Screen Brightness
1. Push TOOLS.
2. Change the Brightness to adjust the overall level. Adjust
Bright Fine if you are experiencing ickering.
See How Much Space is Available on the microSD Card
1. Push TOOLS.
2. The available space is displayed in the top left header
area.
See Which Firmware Version You Are Using
1. Push TOOLS.
2. The current rmware version is displayed in the top right
menu area. (0.9.0S in the image on the right.)
TOOLS Mode

Oct 11, 2023The bluebox Eurorack edition User Manual v 1.0.2
Copyright 1010music LLC 2023Page 48 of 60
RECORD AND PLAY WAV FILES
With bluebox, you can record individual tracks and the Main mix to WAV les on the
microSD card. You can record some tracks while playing back other tracks to create a
layered recording. Recording can start at the beginning of the timeline or in the middle
of the timeline. You can punch in a recording to overdub sections of tracks as needed. You
can even record all 12 tracks plus the Main mix at once. You can then take the WAV les to
your computer to further rene your mix. You can record a jam session up to 4 hours long
and then take the le to your computer to pull out the best parts. You can choose
whether to record tracks pre- or post- fader.
Record One or More Tracks
To record a track, you rst have to arm it on either the MIX or
TRACK screen. Then you can use the transport buttons to stop
and end recording.
1. Push MIXER. If you don’t see the Rec button in the
control options at the bottom of the screen, push MIXER
again.
2. Touch Rec in the control options at the bottom of the
screen.
3. Arm the tracks you want to record by touching them.
The armed tracks have a red frame.
4. To Arm a track in TRACK mode, push TRACK, touch the
track you want to arm and then touch the REC button in
the control panel at the bottom of the screen.
5. Use your external gear to send a signal to the input for
the armed track or tracks.
6. Push the REC and PLAY transport buttons together to
start recording at the current play cursor position. See
EDIT Mode above to control the play cursor position.
7. Push the STOP transport button when you want to end
recording.
The bluebox will save the WAV le or les to the microSD card in
the folder for this project. To see the WAV les for tracks, push
EDIT then push B. The WAV le you just recorded for each track is
ACTIVE for that track. This means if you disarm recording for that
track and push the PLAY transport button the WAV le will play.
You can change the ACTIVE le on the EDIT Conguration screen.
See EDIT Mode above for more about this.
MIXER Mode - Arm
for Recording
EDIT Conguration
Screen

Oct 11, 2023 The bluebox Eurorack edition User Manual v 1.0.2
Page 49 of 60
Copyright 1010music LLC 2023
NOTE:
► See EDIT Mode above to Punch In a recording and to see where
recordings t in timeline.
► You can record all inputs and the Main output at the same time.
► WAV les must be 48kHz for bluebox to play them.
Record the Main Mix
To record the Main mix, you rst have to arm it on the MIX screen. Then you can use the
transport buttons to stop and end recording.
1. Push MIXER. If you don’t see the Rec button in the
control options at the bottom of the screen, push MIXER
again.
2. Touch Rec in the control options at the bottom of the
screen.
3. Touch the Main meter on the right to arm the Main mix
for recording. You can record the Main mix and
individual tracks at the same time.
4. Use your external gear to send a signal to the inputs. You can also congure a
WAV le to playback for one or more tracks. These WAV les will not be recorded
in the Main Mix.
5. Push the REC and PLAY transport buttons together to start recording.
6. Push the STOP transport button when you want to end recording.
The Main mix recording is saved in a WAV le with the prex 13-Main in the folder for the
project, but it is not listed in EDIT mode with the track WAV les. You can add the Main
mix recording to a track to play it.
MIXER Mode - Main
Armed to Record

Oct 11, 2023The bluebox Eurorack edition User Manual v 1.0.2
Copyright 1010music LLC 2023Page 50 of 60
Play a WAV le for a Track
You can play WAV les that you recorded on bluebox and les you have copied onto the
microSD card. To do this, you need to assign the le to the track, set the status of the WAV
le to ACTIVE, and make sure the track is not armed for recording. When you record a le
on bluebox, it is mapped to the track used to record it. You can change this in EDIT mode.
1. Push EDIT and then push the B button to see the list of les mapped to each
track and the ACTIVE status of the WAV les.
2. If the le you want to play is listed but does not have the word ACTIVE in the
right column, you will need to make it ACTIVE. Turn a knob or touch the screen
to select the WAV le you want to play. Push A to set the selected le as ACTIVE
for playback for that track.
3. If you want to add a le to a track, select the track and then touch File and Add.
Select the le you want to add and then touch Load. You can navigate to other
folders to nd the le if needed. Touch the ^ to go back to a previous folder in
the hierarchy, or touch Load to drill into a folder in the list.
4. Push MIXER and check the status of the tracks you want to play. If a track has a
red frame, you have to disarm the recording status. Touch Rec at the bottom of
the screen, and then touch the tracks you want to disarm.
5. Push the PLAY transport button to start playback of the ACTIVE WAV les for the
tracks that are not armed for recording.
Congure bluebox to Record Tracks as Pre-Fader or Post-Fader
If your track recordings are not at the volume level you expect, try changing the Rec
Source option on the Main Conguration page.
1. Push MAIN and then push B to access the Main Conguration Page.
2. Turn a top knob to select the Rec Source parameter.
3. Turn a bottom knob to choose between Pre and Post Fader recording. If you
choose Pre Fader, the recording will use the level of the input after the Gain has
been applied but before the Fader or Volume setting has been applied. If you
choose Post Fader, the Volume selected on the Mixer or Track screen will be
applied to the recording.

Oct 11, 2023 The bluebox Eurorack edition User Manual v 1.0.2
Page 51 of 60
Copyright 1010music LLC 2023
STREAM AUDIO OVER USB
The bluebox Eurorack edition can stream audio in and out over USB via the USB C EXT
port. Send the master audio bus output to your device to include it in your DAW based
projects, or send the audio output from the device to record or include in the mix. The
bluebox supports two channels of audio in each direction. The bluebox Eurorack edition
is audio class compliant and has been tested with the following:
● PC running Windows 10 or Windows 11
● Apple computers with Intel & Apple Silicon running mac-OS Catalina and Ventura.
● iOS and iPadOS 16 or newer devices connected via a Certied Apple Lightning to
USB Camera Adapter
The bluebox operates at 48 kHz. If it receives audio at 44.1 kHz it will convert it to 48 kHz
automatically.
Receive USB Audio
To receive the USB audio signal on the bluebox Eurorack edition,
you must congure the bluebox to route the USB signal to a pair
of tracks:
1. Connect the USB C EXT port to one of the supported
devices, listed above.
2. Push Main and then push B to open the Main
Conguration screen.
3. Set the USB Rcv parameter to the pair of tracks that will
be used to control the USB audio, for example 7 & 8. This
will override any track mappings to hardware inputs
when a signal is streaming into the USB C Ext port.
4. Push MIXER and then B. Select a number of tracks that
includes the track pair selected above. For example, if
you selected 7 & 8, choose 8 or more tracks.
5. Congure your computer or iOS device to send audio to
the 1010music bluebox device, preferably at 48 kHz.
6. You can now use the controls for the selected pair of
tracks to control the USB audio signal.
MAIN
CONFIGURATION
MIXER
Conguration

Oct 11, 2023The bluebox Eurorack edition User Manual v 1.0.2
Copyright 1010music LLC 2023Page 52 of 60
Send USB Audio
The bluebox always sends the Main output bus out over the USB C EXT port.
1. Congure the VOL of the tracks to control what bluebox will send out over USB
streaming audio. The effects and the compressor will be applied to the output.
2. Connect the USB C EXT port of your bluebox to a supported device. The bluebox
will appear as 1010music bluebox in the list of input devices on your receiving
computer or iOS device.
3. Send signals to the inputs of bluebox or playback WAV les recorded on bluebox.
The Main output bus of bluebox will be routed to your computer or iOS device.
NOTE:
► When you have a pair of inputs assigned to USB Rcv and the bluebox is
receiving a signal over the USB C EXT port, the USB signal will override
any signal coming in on the selected inputs.
► For the best audio quality, congure your computer to use 48 kHz
audio when sending out to bluebox.
► The iPhone does not have native support for the 48 kHz audio sent by
bluebox Eurorack edition. You will need to use an app on the iPhone,
such as “Audiobus: Mixer for music apps” or “AUM - Audio Mixer”, to
convert the incoming audio to the 44.1 kHz in real time.

Oct 11, 2023 The bluebox Eurorack edition User Manual v 1.0.2
Page 53 of 60
Copyright 1010music LLC 2023
MICROSD FILE MANAGEMENT
The bluebox stores all project les and WAV recordings on the microSD card. When you
playback WAV les, they are streamed from the microSD card. Recording up to 13 WAV
les at one time is very demanding and not all microSD cards can work fast enough. We
recommend name brand cards with the A2 rating or better with at least 128GB storage.
For example, SanDisk A2 cards work very well. Use SD Card Formatter from sdcard.org to
format and x any errors or when refreshing or using a new card.
The microSD card makes it easy to move les on and off of the bluebox. Take the microSD
card out of bluebox by pressing it in until it springs back. Use a USB or SD card adapter to
put the card in your computer and then browse the les in standard le management
tools. There is a Projects folder at the root of the card, and under that a folder for each
project, with the same name as the project. Each project’s folder holds the WAV les
recorded for this project. The bluebox assigns names to the WAV les in the format of
<Track Number>-<Track Name>-<Number>. You can rename the les in EDIT mode on
bluebox. This will ensure that they maintain their mapping to the tracks and their ACTIVE
state. If you rename the les from your PC, bluebox won’t nd them when you open the
project. You can add the les to tracks if needed.
In addition to the WAV les, each project folder also has two XML les: assets.xml and
project.xml. These les are updated when you save the project and store your project
settings and WAV le mappings.
Copy a Project or Make a Backup on Your Computer
You can copy a project to another project on the microSD card, or to your PC for backup
purposes. To copy a project, you need to copy the project folder and all of its contents.
Project folders must be under the Projects folder on the microSD card for bluebox to nd
them.
1. Remove the microSD card from bluebox by pushing it gently until it springs
back out.
2. Use a USB or SD Card adapter to put the microSD card in your computer.
3. Use File Explorer on a PC or Finder on a Mac to open the removable drive.
4. Open the Projects folder and you will see a folder for each of your projects.
5. To make a new project on the microSD card, copy the folder for a project and all
of its contents to a folder under the Projects folder.
6. To back up your les, copy the folders in the Projects folder onto your computer.
7. When the les nish copying, be sure to eject the removable drive in File
Explorer or Finder before removing the USB or SD Card adapter from your
computer. This will ensure that the computer has properly closed the connection
to those les and will avoid le corruption.
8. You can put the microSD card back in bluebox to continue using the old projects
and start working with any new projects.

Oct 11, 2023The bluebox Eurorack edition User Manual v 1.0.2
Copyright 1010music LLC 2023Page 54 of 60
MIDI CLOCK SYNCHRONIZATION
The bluebox is designed to work together with other synthesizer gear. This includes
sharing a clock signal in order to synchronize timing. The bluebox will display the clock at
the top of the screen. You can congure the effects to synchronize with the clock, and you
can turn on the metronome to hear the clock while you play.
The bluebox will automatically synchronize to an external MIDI clock on a connected MIDI
device. The bluebox is also always sending the current clock signal (either the native
bluebox clock or the synchronized clock) out on the MIDI OUT TRS jack and the MIDI
Device port.
Setup bluebox to Follow a MIDI Clock
1. Connect a MIDI Device with a clock signal to either the USB C DEV input below
the MICRO SD slot, or the MIDI IN TRS jack below that.
2. Congure the external MIDI device to send a clock signal. The bluebox will
automatically follow the incoming clock.
Setup bluebox to Send a MIDI Clock
1. Connect a MIDI Device that is ready to follow a clock signal to either the USB C
DEV input below the MICRO SD slot, or the MIDI IN TRS jack below that.
2. Congure the external MIDI device to follow a clock signal.
3. Push the PLAY transport button bluebox. The bluebox will send out a MIDI clock
whenever the PLAY transport button is active. You will see the clock reading at
the top of the screen update in real time.
4. To change the tempo, push PROJ and then push the B Button. Turn a top knob
to select the BPM setting, and then turn a bottom knob to adjust the value.
NOTE:
► Set the bluebox BPM and congure the metronome on the Project
Conguration screen. Push PROJ, and then push the B button to
access these features.
Record while using MIDI Sync to Follow An External Device
1. Arm tracks for recording as usual.
2. Push the REC button to enable recording mode, then press Play on the MIDI
device sourcing the clock. The recording will start when bluebox receives the
Play signal from the MIDI device.

Oct 11, 2023 The bluebox Eurorack edition User Manual v 1.0.2
Page 55 of 60
Copyright 1010music LLC 2023
UPDATE FIRMWARE
1010music occasionally provides rmware updates with bug xes and new features. You
can use the microSD card with your computer to get the new rmware. You will need to
login to the 1010music forum to download the new rmware. Then, put the new le on
the microSD card and reboot bluebox while telling it to load new rmware.
Update the bluebox Firmware
1. Check which rmware version you are currently running. Push Tools. The current
rmware version is displayed in the top right corner.
2. Check the forum to see if there is a newer version. On your computer, go to the
website forum.1010music.com. Click Login or Sign Up in the top right corner.
Follow the instructions on screen to login or sign up if needed. Email
support@1010music.com if you have any trouble with logging in.
3. Once you are logged in to the forum, click bluebox Eurorack edition under Pick
a Product. Click Firmware & Content Downloads to see the list of available
rmware downloads. Download the desired le to your computer. Unzip the
contents of the le. Some computers will unzip it automatically when you
download it.
4. Put the bluebox microSD card in your computer and place the new copy of
BLUEBOX.BIN in the root folder. Make sure you allow it to overwrite the old le
with the new le, and make sure it is named BLUEBOX.BIN. You can use a
microSD to SD adapter, or a microSD to USB adapter to put the microSD card in
your computer.
5. Backup the les from your microSD card to make sure you don’t lose any of your
work.
6. Eject the microSD card from your computer. This option is available by right
clicking the drive name in Windows File Explorer or control clicking the name of
the microSD drive in Finder on an Apple computer, and then clicking Eject. If you
don’t do this, the card can become corrupted.
7. Unplug your Eurorack and put the microSD card back in. Hold down the A
button on the right while plugging it back in. Release the A button when you see
“bluebox Installer” on the screen. The bluebox will display status updates as it
completes the reprogramming. It will nally display a success message and then
restart with the rmware update.
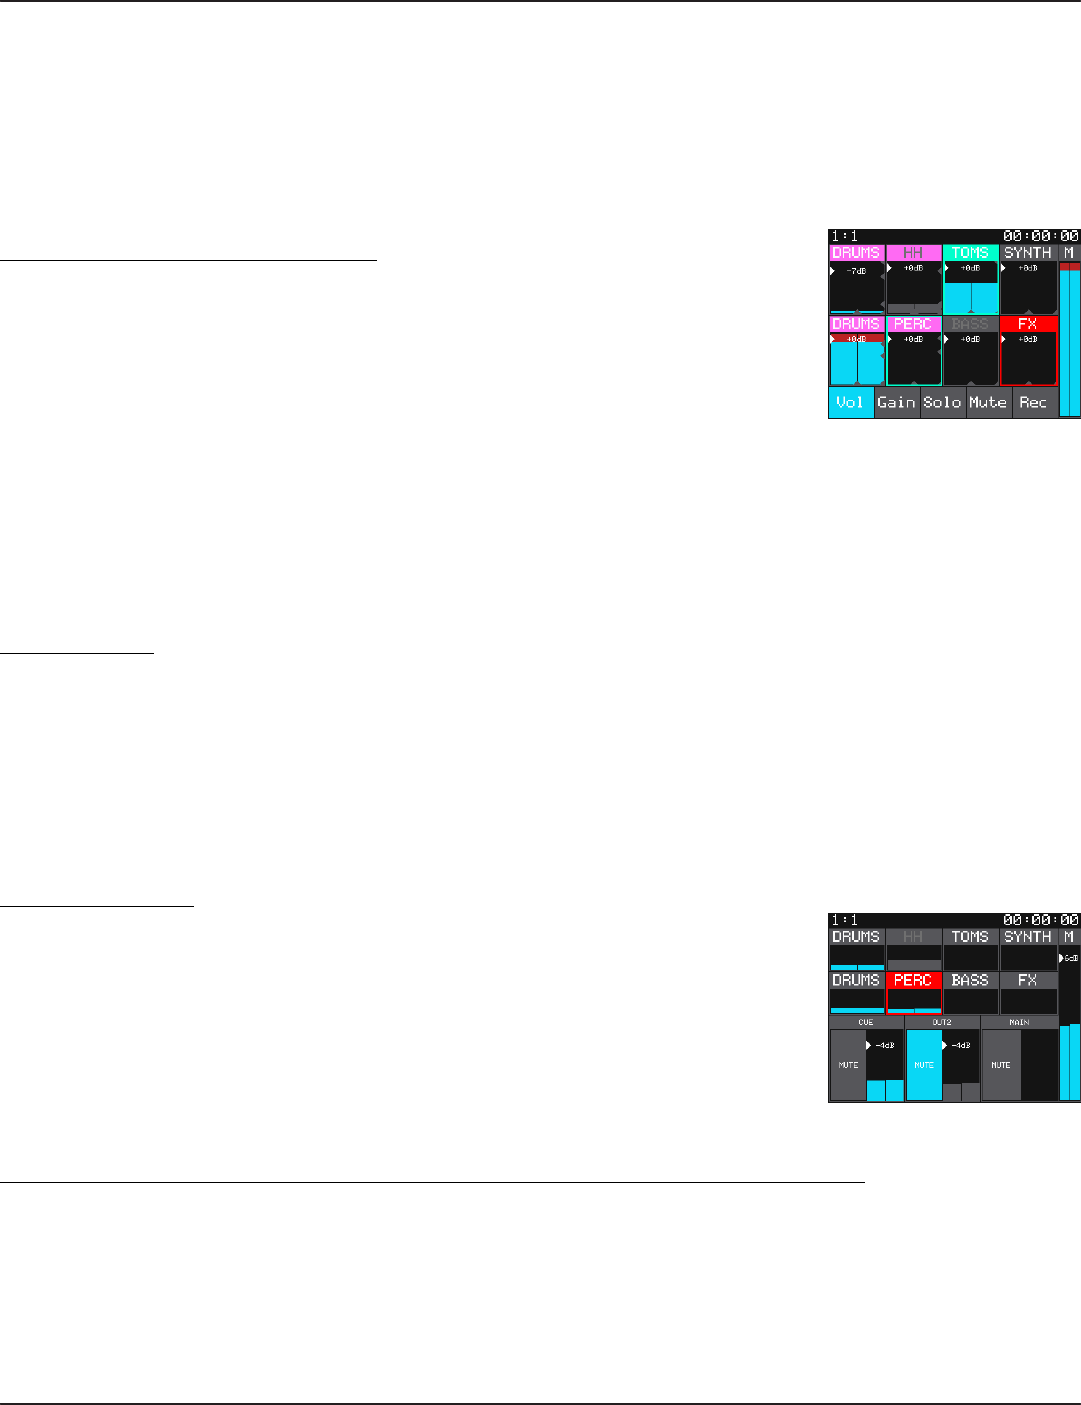
Oct 11, 2023The bluebox Eurorack edition User Manual v 1.0.2
Copyright 1010music LLC 2023Page 56 of 60
COMMON TASKS
The earlier parts of this document focused on how to use the different bluebox Control
Modes. Here we will cover some of the same information from the perspective of how to
do some common tasks. We will describe one quick way to do each task, but there may
be other ways to do it as well.
Balance Levels for the Main Mix
1. Push MIXER. If you don’t see Vol in the control options at
the bottom of the screen, push MIXER again.
2. Start your external gear to send signals to your inputs.
3. Touch Gain.
4. Touch and drag a meter for a track to adjust the gain for
that track. Do this for all the tracks until they are all even.
5. Touch Vol.
6. Touch and drag a meter for a track to adjust the volume for that track. Do this for
all the tracks until you get the mix you want.
Mute a Track
1. Push MIXER. If you don’t see Mute in the control options at the bottom of the
screen, push MIXER again.
2. Touch Mute in the control options at the bottom of the screen.
3. Touch the track in the meter bridge that you want to mute. The header text for
the track will turn gray. Touch the track again to stop muting it.
Mute an Output
1. Push MAIN.
2. Touch the MUTE button on the screen under the
heading for the output you want to mute. The MUTE
button is blue when the mute is engaged. Touch the
button again to stop muting.
Congure the OUT 3 and 4 jacks as one Stereo Send or Two Mono Sends
1. Push Main and then push the B button.
2. Turn a top knob to select the 3&4 Mode setting.
3. Turn a bottom knob to select a value. Choose Stereo for one stereo send. Choose
Mono to route two independent signals to ports OUT3 and OUT4.
MIXER Mode -
Volume Control
MAIN Mode
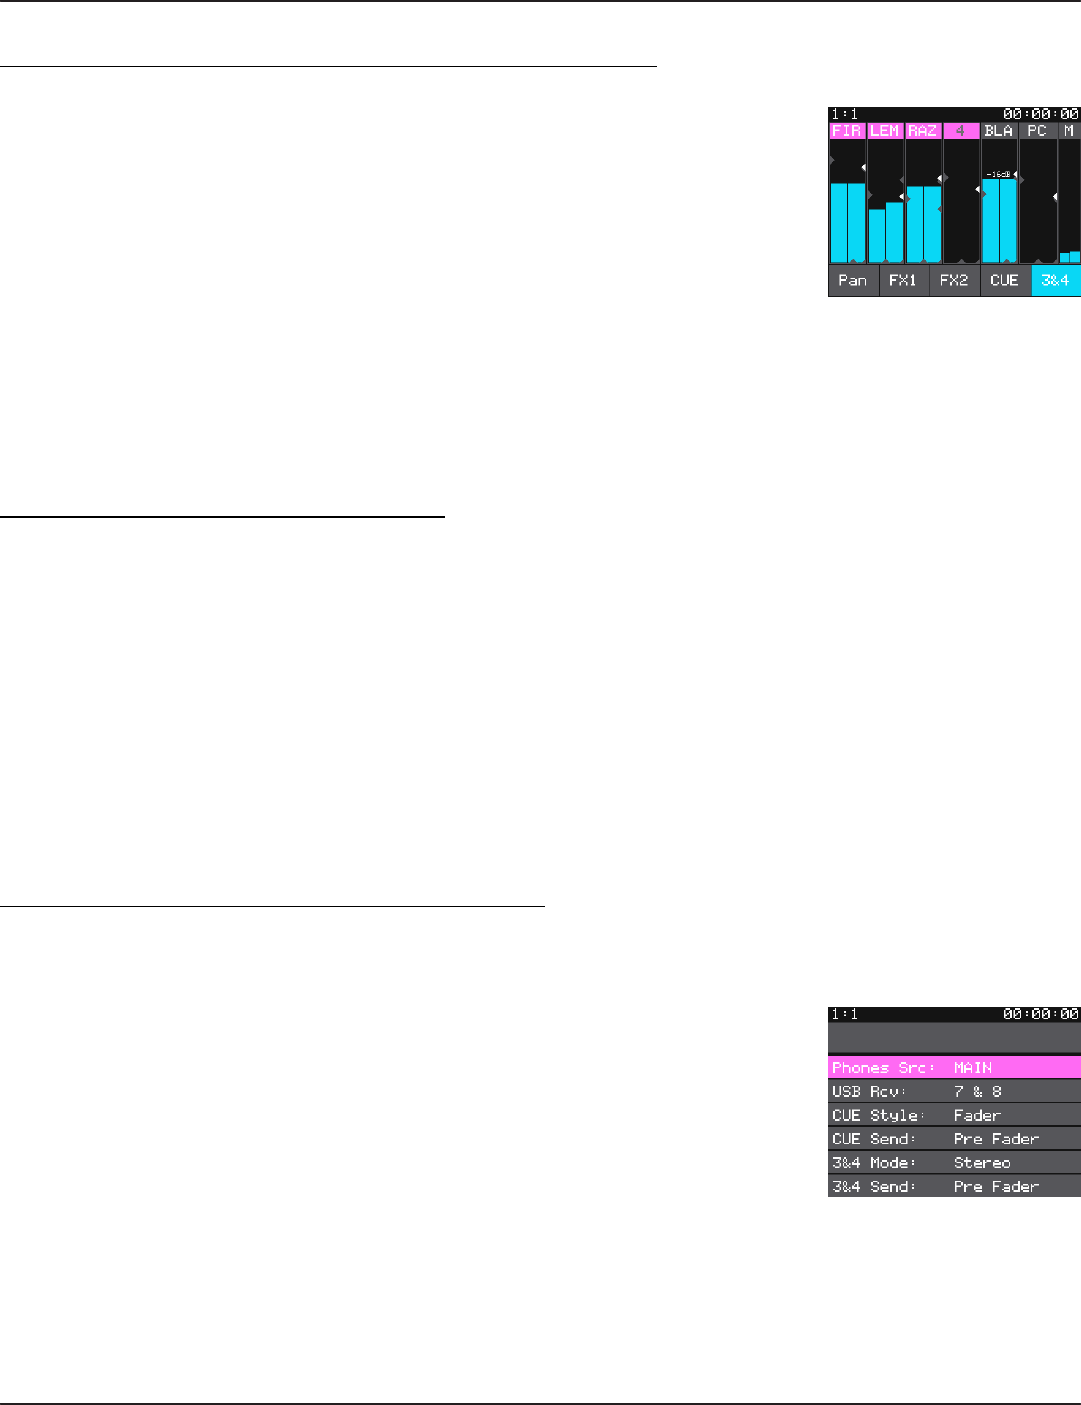
Oct 11, 2023 The bluebox Eurorack edition User Manual v 1.0.2
Page 57 of 60
Copyright 1010music LLC 2023
Adjust a Track’s Sends to OUT3, OUT4 and the CUE Bus
1. Push MIXER twice.
2. Touch the send you want to adjust, CUE, 3&4, OUT3 or
OUT4 from the controls across the bottom of the screen.
3. Touch the meter for the track you want to control.
4. Push the A button until the pink knob focus ring
includes the tracks you want to control.
5. Turn the knob for the track you want to control to adjust
the selected send.
6. You can also touch and drag the tracks to adjust their
sends. Move your nger up and down or left and right to
change the setting.
Adjust a Track’s Sends to FX1 and FX2
1. Push TRACK.
2. Touch the meter for the track you want to control.
3. Push the A button until the pink knob focus ring is around the right control
panel.
4. Turn the top left knob to adjust the send to FX1, which is the delay.
5. Turn the top right knob to adjust the send to FX2, which is the reverb.
6. You can also touch and drag one of the on screen knobs to adjust its value. Move
your nger up and down or left and right to change the setting.
Use Headphones to Monitor the Main Output
1. Plug your headphones into the Phones jack.
2. Push Main.
3. Push the B button.
4. Select the Phones Src parameter by touching it. Turn a
bottom knob to change the value to Main. The signal
coming out of the Phones jack will now use the same
mix as the Main output. You can still adjust the PHONES
volume independently in Main mode.
5. If you want to send a custom mix to the headphones, set
the Phones Src to CUE, and then adjust the CUE sends
for each track.
MIXER Mode
MAIN Conguration
Screen
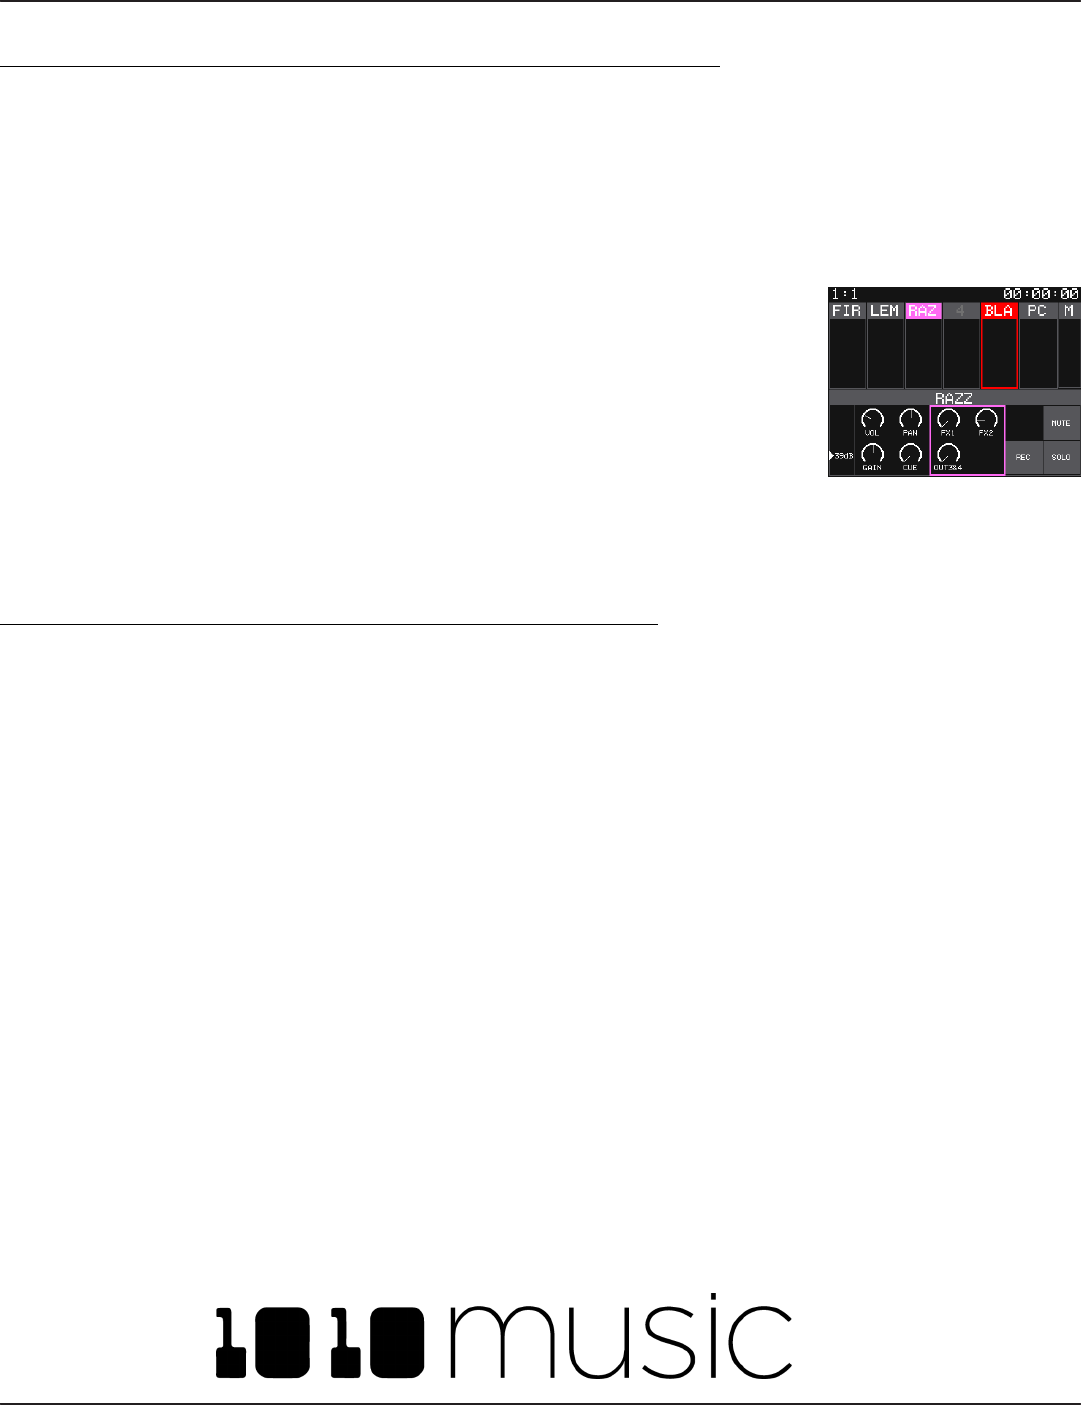
Oct 11, 2023The bluebox Eurorack edition User Manual v 1.0.2
Copyright 1010music LLC 2023Page 58 of 60
Send a Dry Track Signal to an External Device for Processing
1. Connect Out 3 and 4 of bluebox to the device that will
receive the dry signal.
a. Optionally, you can connect the output of the
external processing device into one of the bluebox
inputs to use it as an additional track.
1. Push Track.
2. Touch the meter for the track you want to send out as a
dry signal.
3. Tap the OUT3&4 knob on the screen to set the knob
focus to include this control.
4. Turn the appropriate knob to adjust the send for this
track to Out 3&4.
5. Repeat steps 4, 5, and 6 for additional tracks as needed.
TRACK Mode
Use Two Mono Outputs for External Effects Processing
1. Push Main and then push the B button to access the Main Conguration screen.
2. Set the 3&4 Mode parameter to Mono.
3. Set the 3 Send and 4 Send parameters to Pre or Post Fader as needed.
4. Connect the Out 3 and Out 4 jacks of bluebox to the devices that will receive the
dry signal.
5. Optionally, you can connect the outputs of the external processing devices into
bluebox to use as additional tracks.
6. Push MIXER until you see the OUT3 and OUT4 controls in the bar across the
bottom.
7. Touch OUT3 and then touch and drag a track to control the send level to OUT3.
8. Touch OUT4 and then touch and drag a track to control the send level to OUT4.
9. Repeat steps 7 and 8 for additional tracks as needed.

Oct 11, 2023 The bluebox Eurorack edition User Manual v 1.0.2
Page 59 of 60
Copyright 1010music LLC 2023
TROUBLESHOOTING
Clicks and Pops over USB C
Check your sample rate coming out of your computer and make sure it is 48kHz.
On Windows 10
1. Make sure the bluebox Eurorack edition is connected to your computer via USB.
2. Right-click on the speaker icon in the system tray and click Sounds to open the
Sound window.
3. In the Sound window, switch to the Playback tab and select the 1010music
bluebox device, which is displayed as Headphones.
4. Click the Properties button in the bottom-right of the Sound window to open
the Headphones Properties window.
5. In the Headphones Properties window, click on the Advanced tab.
6. In the drop down within the Default Format frame, select “2 channel, 24 bit,
48000 Hz (Studio Quality)”.
7. You may also need to congure the output of your audio applications to use
48,000 Hz. See the documentation for the specic application.
On Mac OS
1. Make sure the bluebox Eurorack edition is connected to your computer via USB.
2. Open the Audio MIDI Setup App
3. Select 1010music bluebox from the list of devices on the left.
4. Select Output at the top of the screen.
5. Set the Format to 48,000 Hz.
6. You may also need to congure the output of your audio applications to use
48,000 Hz. See the documentation for the specic application.

Page 60 of 60 Copyright 1010music LLC 2023
The bluebox Eurorack edition User Manual v 1.0.2 Oct 11, 2023
LEARN MORE
Check the support page on our website for updated user manuals and links to videos:
bluebox Eurorack edition Support page: 1010music.com/blueboxeurodocs
Check out our list of recommended cables for use with your bluebox:
https://1010music.com/cablerecommendations
Look for how-to videos that show the bluebox in action on the 1010music YouTube page:
youtube.com/c/1010music/playlists
The bluebox for desktop videos and community are also helpful since the two products
share much of the same functionality.
STAY IN TOUCH
Share information with other users and our support team on our forum, website and
social media pages:
Forum: forum.1010music.com facebook.com/1010musicllc
Website: 1010music.com instagram.com/1010_music/
