
Live Streaming System
Setup Guide
for Small Music Venues and
Houses of Worship
2
Table of Contents
1.0 Introduction ............................................................................................................. 3
2.0 Main Equipment ...................................................................................................... 4
2.1 Video switcher .................................................................................................... 4
2.2 Mixing Console/Audio Interface ......................................................................... 5
2.3 Other equipment ................................................................................................ 8
3.0 System Examples ................................................................................................. 10
3.1 Basic System ................................................................................................... 10
3.2 Improved System ............................................................................................. 11
3.3 Advanced System with Dante network ............................................................. 12
4.0 System Setup ....................................................................................................... 15
4.1 Basic System ................................................................................................... 15
4.2 Improved system .............................................................................................. 17
4.3 Advanced system with Dante network ............................................................. 19
5.0 Optimize ATEM Mini Pro for Live-streaming ........................................................ 22
5.1 Prepare the video program for live streaming .................................................. 23
6.0 Optimize your mixing console for live-streaming .................................................. 25
7.0 Set up and configure the streaming platform ........................................................ 26
7.1 Use the devices as webcam/audio sources directly ......................................... 26
7.2 Use the devices together with a software encoder (e.g. OBS Studio) ............. 27
3
1.0 Introduction
The global outbreak of COVID-19 has forced music venues to restrain themselves from
keeping their businesses open to host concerts and large events with tightly packed crowds.
While social distancing and stay-at-home restrictions have made more people seek
entertainment online, streaming music events online may open up new opportunities for their
businesses.
Also, House of worship is one of the fastest-growing groups online, with many establishments
reaching their worshipers by live streaming. While congregations meet in all sorts of unique
places, it requires the setup of multiple audio configurations.
In this guide, we’ll provide a simple step-by-step introduction to how you can move your
music events or congregations online and feature high-quality professional content with a
multi-camera setup, a video switcher, and Yamaha mixing consoles.

4
2.0 Main Equipment
2.1 Video switcher
Streaming a music event online can be done easily with a camera, but using a video switcher
can help to improve the quality of your productions. With a video switcher, you can create
multi-angle shots to make your video look and feel more professional. There are many video
switchers available in the market, but a compact switcher like the ATEM Mini Pro can get the
job done even on a tight budget.
2.1.1 ATEM Mini Pro
ATEM Mini Pro is a video mixer/AV switcher that accepts up to four camera inputs (HDMI) in
full resolution 1080HD quality and operates up to 60 frames per second. It is a compact all-
in-one switcher for professional use. It features a USB webcam output which allows to send
all video input sources into your PC. It also offers Picture-in-Picture, MultiView monitoring,
video recording to a hard drive, etc.
ATEM Mini Pro
Note:
Please note that the “standard” ATEM Mini does not support MultiView function, which
may not be suitable for a serious production.

5
2.2 Mixing Console/Audio Interface
A mixing console can be a great help when it comes to building an outstanding live
performance. Yamaha has a wide range of mixing consoles, both analog and digital.
Generally, analog mixers are more straightforward and less expensive, while digital mixers
provide more flexibility with onboard features like effects, scene recall, etc. Both Yamaha
analog and digital mixing consoles can work as audio interfaces, allowing you to easily
transfer your audio signal to a production PC. So you’ll always be able to find a console that
fits your budgetary, venue, and production needs. Here, we will use a Yamaha MG-XU mixer
(Analog) and a TF Series mixer (Digital) for our system examples.
For some older mixing consoles that do not include a PC audio interface, it is possible to
connect the output of the console to an audio interface which converts the audio signal to
digital and transmits to the PC for live streaming. For example, a Steinberg UR Series audio
interface would be a good choice.
2.2.1 Yamaha MG XU Series Analog Mixing Consoles
The Yamaha MG XU Series has earned a reputation as an intuitive, easy-to-use interface
that’s suitable for a diverse range of users and applications. The MG XU models feature a
USB port that allows you to transfer audio signals between your console and PC for live
streaming. The MG XU Series contains mixing consoles with models ranging from 10 to 20
channels, giving music venue owners a lot of options.
Available Models – MG20XU, MG16XU, MG12XU, MG12XUF, MG10XU, MG10XUK

6
2.2.2 Yamaha TF Series Digital Mixing Consoles
The TF Series combines Yamaha know-how with new insight from the field and the latest
touch-screen technology to deliver an evolved experience in console operation. It also
features powerful processors and effects, advanced channel presets, efficient panel layouts
and high-performance system expansion. All TF Series models can support Dante™ audio
networking with the NY64-D I/O expansion card which allows transmission and reception of
64 channels of uncompressed 48kHz 24-bit digital audio data via a Dante™ audio network.
The audio signal can be transmitted to the PC over the Dante network for live streaming, as
well as multi-track recording. There are 3 models in the TF Series providing up to 48 input
channels that can be mixed simultaneously – suitable for a wide variety of music venues.
Available Models – TF5, TF3, TF1
NY64-D I/O expansion card
Note:
All Yamaha Digital Mixing consoles that support Dante networks can transmit digital
audio signals from the mixing console to a live streaming PC, e.g. Yamaha CL/QL
Series. Also, some consoles do not have the Dante port by default, can use Dante
network with the Dante-MY16-AUD2 I/O card. So take time to find the most suitable
mixing console for your music venue.

7
CL Series/QL Series
Dante-MY16-AUD2 expansion card
2.2.3 Steinberg UR Series
Yamaha and Steinberg have together produced the UR, UR-C and UR-RT series audio
interfaces which all have exceptionally high audio quality, flexibility and reliability at heart.
Whatever and wherever your recording or production needs, we have an audio interface
that will surpass your expectations.
8
2.3 Other equipment
To make your live streaming production look as professional as possible, other equipment
such as cameras, tripods, lights, PCs, power supplies, and the Internet connections are also
very important. Here are some tips:
2.3.1 Cameras
As you probably already know, higher quality cameras produce higher quality video. To
produce a high quality picture, a video camera that can support at least 1080p Full HD is
required. Of course, using a 4K camera will give you a much better picture for your production,
but please note that the ATEM Mini Pro only supports video output up to 1080p with HDMI.
Also, some of the streaming platforms do not support 4K output anyway. So, a camera that
supports Full HD video will be enough for livestreaming in most case.
2.3.2 Lights
Ensuring that the subjects of your video can be seen is also crucial. Lighting helps in
obtaining good picture quality as well as establishing the desired mood you want for your live
stream.
2.3.3 Tripod
Using a tripod can improve the quality of your picture. Select a tripod based on the weight of
your camera.
2.3.4 Microphones
Using the proper microphone will improve the quality of the audio. Basically, there are two
types of microphone: dynamic microphones and condenser microphones. They differ in
structure, price and sound quality. Make sure to select a suitable microphone for the
environment and usage.
2.3.5 PC (or Mac)
A PC is a must for your system. At least one PC is necessary for streaming. ATEM Mini Pro
has a USB-C output to your PC, which will allow you to use the ATEM Mini Pro as a
webcam. ATEM Mini Pro is only supported on Windows 10 (64-bit) or Mac OS X or higher.
9
2.3.6 Power supply
In advance, make sure that you have enough power outlets and that the circuit they are on
can supply enough power. To avoid trouble, do not use low-price mass-market outlet strips.
Always use power conditioners or power distributors with noise filtering that are intended
specifically for use in both video and audio applications.
2.3.7 Internet connection
For live streaming, we need to have a stable connection to the Internet. Use a wired
connection to create the best possible connection from your Mac/PC to the Internet. To
obtain a stable live stream in 1080p Full HD Quality, it is recommended to have at 4-6Mbps
Internet speed.
2.3.8 Display Monitor
This display monitor is for the operator to control the switcher and to monitor the
output of the streaming program. Basically, ATEM Mini Pro supports any display monitors
with HDMI connection, but we recommend using at least a 1920x1080 Full HD display.

10
3.0 System Examples
3.1 Basic System
3.1.1 Overview
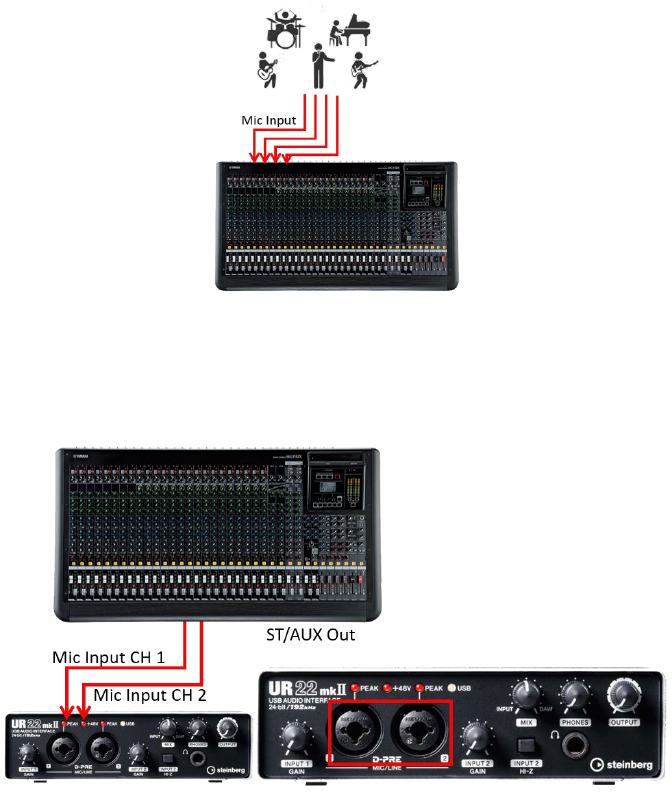
This system is a basic system for streaming live music events with minimal and existing
equipment. It is built with an ATEM Mini Pro, an existing mixing console without any audio
interface feature (Yamaha MGP32X as an example) and a Steinberg UR Series (UR22mkII
as an example) audio interface.
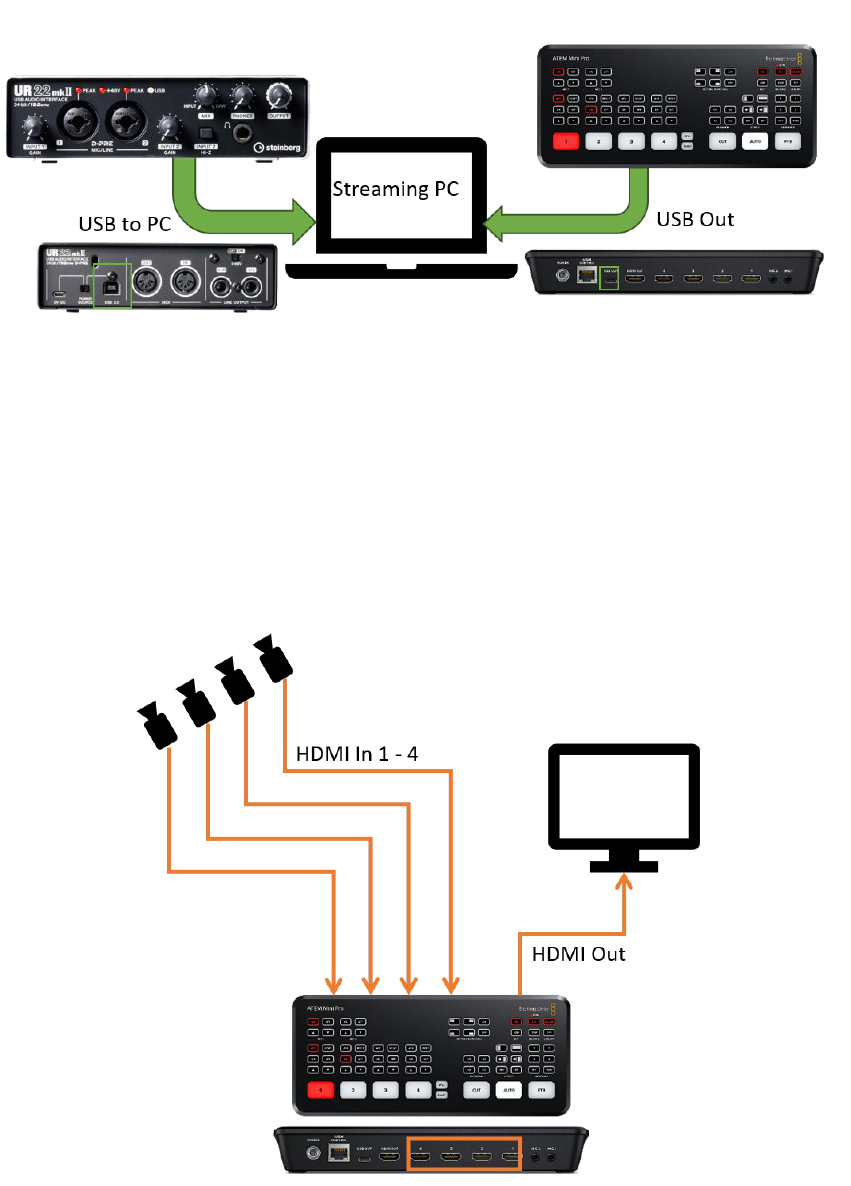
For video, two cameras are used as video inputs. Connect the cameras to ATEM Mini Pro
with HDMI cables. Also, connect the ATEM Mini Pro to the display monitor with HDMI for
Multi-View monitoring, then to the PC with a USB cable for delivering the image to the PC
for streaming.
For audio, the master audio mix from the MGP32X will be transmitted to the UR22mkII.
Connect the output for your master audio to the Mic Input 1 and 2 on UR22mkII with XLR or
jack cables respectively. Also, connect the UR22mkII to a PC with a USB cable for
streaming.
Note:
ATEM Mini Pro has an USB-C port to connect to the PC as a video interface. It allows
the ATEM Mini Pro to be recognized as the webcam video source. The “Program” video
source will be sent to your PC, which allows you to stream your source live with Teams,
Zoom, FB Live, etc.
Note:
It is possible to input the audio signal to ATEM Mini Pro by connecting the output from
the mixing console to audio input on the ATEM MIini Pro. However, ATEM Mini pro only
supports 3.5mm mini jack for audio input, so it may not be suitable for live sound that
requires more secured connections.

11
3.1.2 System Benefits
In this system, the displayed camera image can be easily switched using the ATEM Mini Pro.
Likewise, the audio managed on MGP32X can be sent to the UR22mkII and transmitted to
the PC for live stream. Both video and audio can be delivered from a high-quality environment
and make your production more attractive and entertaining.
3.2 Improved System
3.2.1 Overview
This is an Improved system for streaming live music events from a small venue. It was
designed using an ATEM Mini Pro and Yamaha MG20XU
For video, four cameras are used as video inputs. Connect the cameras to ATEM Mini Pro
with HDMI cables. Also, connect the ATEM Mini Pro to a display monitor via HDMI for
MultiView monitoring. Then, connect the PC and ATEM Mini Pro via USB to deliver images
to the PC for streaming.
For audio, 20 inputs (microphones or instruments) can be physically connected to the
MG20XU. Use XLR or jack cables to connect each input accordingly. Then, connect the

12
MG20XU to a PC with a USB cable for streaming.
3.2.2 System Benefits
In this system, multiple cameras are used for the production. All camera images can be
displayed with the ATEM Mini Pro Switcher which will help bring your production to the next
level. For audio, the MG20XU can help you to set up and manage all your input and output
sources. Easily set up your sound for live stream to further increase the quality of your
production.
3.3 Advanced System with Dante network
3.3.1 Overview
An advanced system with a completely digital network is well suited for mid-size or larger
venues. Using a TF5 with a Tio I/O rack system, all of your audio signals will be transmitted
over a Dante network, providing up to 48 channels of digital audio being transmitted through

13
your venue. These audio signals can then be transmitted to your PC via Dante for both
streaming and multi-track recording.
3.3.2 System Benefits
In this system, the TF can help you to set up and manage all your input and output sources.
Easily set up presets and fine tune your sound to further increase the quality of your
production. Even if you have multiple bands performing in one night, the TF can help you
store channel assignments, name performance scenes, and instantly recall them, saving
you from lost time and frustration for your team. Also, multi-track recording can be done
simultaneously with the bundled Nuendo Live software application. Recording your show in
the best quality sound for your on-demand production.
Note:
It is recommended to use a separated PC from for recording from your streaming PC if
possible. Simply add an additional PC to the Dante network and use the Dante
controller to make patches for live streaming and recording.

14
Note:
A license for Steinberg Nuendo Live software is bundled with Yamaha mixing console
(CL, QL and TF Series). This is compatible with Mac and Windows computers, and can
be used for multi-track live recording. It is designed to be simple and quick to setup and
operate, while providing a stable and reliable recording environment.
For more details on how to set up and record your production with Nuendo Live, please
refer to the “Live Recording Guide with Nuendo Live” available on our website:
yamaha.com

15
4.0 System Setup
4.1 Basic System
4.1.1 Video Inputs and Output
• Use HDMI cables to connect camera 1 and 2 to ATEM Mini Pro’s HDMI In 1 and 2
• Use an HDMI cable to connect HDMI Out on ATEM Mini Pro to a display monitor
4.1.2 Audio
• Connect microphone and musical instrument to the mic inputs on the mixing console
• Connect other equipment (loudspeakers, processors, amplifiers, etc.) to the mixing
console’s outputs as necessary
16
• Connect the ST or AUX Out on the main console to the mic input CH 1 & 2 on UR22mkII
with XLR or phone cables
4.1.3 USB out
• Connect USB Out from ATEM Mini Pro to PC with a USB-C cable
• Connect USB Out from UR22mkII to PC with USB 2.0 cable or better
17
4.2 Improved system
4.2.1 Video Inputs and Output
• Use HDMI cables to connect cameras 1 - 4 to ATEM Mini Pro’s HDMI In 1 - 4
• Use an HDMI cable to connect HDMI Out on ATEM Mini Pro to a display monitor
4.2.2 Audio
• Connect microphone and musical instrument to the mic inputs on the mixing console

18
• Connect other equipment (loudspeakers, processors, amplifiers, etc.) to the mixing
console’s outputs as necessary
4.2.3 USB out
• Connect USB Out from ATEM Mini Pro to PC with a USB-C cable
• Connect USB Out from MG20XU to PC with a USB 2.0 cable or better

19
4.3 Advanced system with Dante network
4.3.1 Video Inputs and Output
• Same as advanced system above
4.3.2 Audio
• Connect microphones and musical instruments to the mic inputs on the Tio1608-D I/O
racks
• Connect other equipment (loudspeakers, processors, amplifiers, etc.) to the outputs on the
Tio1608-D I/O racks as necessary
• Connect the Dante Primary port on the Tio1608-D I/O rack to the Dante port on NY64-D
inserted to the mixing console with Ethernet cable*
* There are several methods to connect TF and Tio, for details, please refer to the Tio1608-
D owner’s manual available on our website (https://www.yamaha.com/
)


21
4.3.3 USB out
• Connect USB Out from ATEM Mini Pro to PC with a USB-C cable

22
5.0 Optimize ATEM Mini Pro for Live-streaming
To configure ATEM Mini Pro, use the ATEM Mini Pro setup app available on
(https://www.blackmagicdesign.com/). This application contains the driver and the UI
software for ATEM Mini Pro.
Panel Settings allow to make settings for the switching mode, Picture in picture keyer, etc.
The control surface has a similar function to the hardware, but it is possible to make some
more detailed settings.
On the Panel settings page, make sure the switching mode of ATEM Mini pro is set to
Program/Preview. It allows you to operate the switcher with Preview mode so you can
prepare the preview source to avoid any mistake during operation.

23
5.1 Prepare the video program for live streaming
On “ATEM Software Control”, prepare the program with various sources. All sources can be
monitored with the Multiview function.
ATEM Software Control Panel
MultiView monitoring

24
Switching Input sources can be done on both the hardware and the software.
Cam1 to Cam4: Video input source 1 to 4
Still: Still graphic stored in the media player
Black: To black screen
Red indicator is “Program”
Green indicator is “Preview”
For more details about the functions and operations of “ATEM Software Control”, please refer
to the “ATEM Mini Manual” which comes together with the software.

25
6.0 Optimize your mixing console for live-streaming
For MG-XU series, the audio output from the stereo output bus will be sent to the PC via USB
cable (Please note that the USB cable is not included in the product). If you are using the
MG on Microsoft Windows OS, it is necessary to install the “Yamaha Steinberg USB Driver”.
For TF series with NY64-D card, the stereo output bus will be sent from Slot out 57 – 58.
Please use Dante Controller (https://www.audinate.com
) to set the patch on your PC.
Note:
To learn how to optimize your audio mix for live-streaming, please find more details on
our Yamaha website (https://www.yamaha.com
) or our Youtube channel:
yamaha_global.

26
7.0 Set up and configure the streaming platform
After preparing all your video and audio sources for your live-stream, you can configure your
streaming platform. There are two methods to stream using the system introduced in this
document.
• Use the devices as webcam/audio sources directly
• Use the devices together with a software encoder (e.g. OBS studio)
In this document, we will use the steaming platform “YouTube” as an example. Make sure
to evaluate and decide which platform makes the most sense for you or your business
7.1 Use the devices as webcam/audio sources directly
The ATEM Mini Pro can be used as a webcam to transmit camera images to the PC
directly. After connecting the ATEM Mini pro and the mixing console to the PC, select the
devices as video and audio sources on the streaming platform respectively.
Example: Choosing the devices on YouTube

27
7.2 Use the devices together with a software encoder (e.g. OBS
Studio)
Open Broadcaster Software (OBS) is a free open source software suite that is used for live
streaming and recording. Some live-stream platforms require the use of an encoder like OBS
to convert the content into a compatible digital format. To live-stream using a software
encoder like OBS Studio together with the system, it is necessary to select the devices as
video and audio sources first.
Set the device in “Properties”
Choosing the device for video

28
Choosing the device for audio
After making the configuration on OBS Studio, you can create a stream and generate the
stream key on your platform and link it to OBS Studio.
Create a live-stream on your platform

29
You can find the Stream key in the Setup page
On OBS studio, select “Settings” in the “Controls” menu to set the stream key
“Settings” on OBS Studio

30
Select Stream in Settings and copy the stream key > OK
Now, your event is ready to go live!
Click “Start Streaming” to start your live-stream

