

Home Recording Studio: How To Get Started
!2
Table Of Contents
!
TABLE OF CONTENTS 2 ..............................................................................................
WELCOME 3 ..................................................................................................................
YOUR COMPUTER 7 .....................................................................................................
AUDIO INTERFACES (OR SOUND CARDS) 8 .............................................................
MICROPHONES 11 ........................................................................................................
USB MICROPHONES 14 ...............................................................................................
MIDI CONTROLLER KEYBOARDS 16 .........................................................................
MIDI INTERFACES 20 ...................................................................................................
RECORDING GUITAR 21 ..............................................................................................
SPEAKERS AND HEADPHONES 22 ............................................................................
CABLES 26 ....................................................................................................................
AUDIO PRODUCTION SOFTWARE 27 .........................................................................
TURNING EQUIPMENT ON & OFF 30 ..........................................................................
AND FINALLY ... 31 ......................................................................................................
LET’S KEEP IN TOUCH 32...........................................................................................
www.musicrepo.com

Home Recording Studio: How To Get Started
!3
!
Welcome
Thank you for downloading this guide to setting up a
home recording studio from the ground up. I'm Jane
from Music Repo and I'm the resident music
technology and educational expert. I hope that by the
end of reading this eBook you will be a few steps
nearer to creating and operating your own home
recording studio. If you want to read more about me
or get in touch then visit my Google Plus page and
say hello!
At Music Repo we have already helped hundreds of
people to set up their own home studios and get up
and running with this rewarding (and for many
people lucrative) hobby. Many have gone on to
successfully kick-start their careers in the music and
entertainment industry. Not just bedroom DJ's and
record producers but people making professional
voiceovers and video backing tracks, stock music,
podcasters and classical and jazz performers too.
There has never been a better time than now to
record your own music and make professional audio
tracks at home. Technology keeps advancing in
leaps and bounds, which leads to quality equipment
at affordable prices. Years ago most people didn't
have the budget available to build a multi-track
recording studio. Those days are gone. Today, you
can have a quality recording rig for a couple of
hundred dollars.
The problem we all face is that with the onset of
affordable recording technology comes an endless
www.musicrepo.com

Home Recording Studio: How To Get Started
!4
array of choices. There’s not a single best way to
build a studio.
Every component of a typical home set-up - from the
computer to the audio interface, microphone,
preamp, etc. – has dozens, maybe even hundreds,
of choices. With all these options comes a lot of
confusion. Hopefully this guide can help you decide
where to start and pick out what is most important to
your situation.
Here are just some of our most frequently asked
questions
•
I don't know much about computers, and I'm not
technical, so how on earth do I get started?
•
What is an audio interface? What does a soundcard
actually do? Have I already got one? Do I need a new
one to make recordings??
•
What is the perfect home studio equipment for me?
•
Which microphone is best? And how do I connect it to
my computer?
•
How do I record my guitar/keyboard/trumpet/double
bass/other instrument and make it sound professional?
•
What exactly IS a MIDI controller? Should I have one?
•
What production software will suit my type of music?
•
What is the best way to make professional voiceovers?
•
How do I connect all my equipment up correctly?
•
Why does it have to be so complicated?
Sound familiar? With the right advice from the
beginning you can set up a great home studio and
www.musicrepo.com

Home Recording Studio: How To Get Started
!5
make high quality recordings that you will be proud
to share with your friends, family, even the rest of the
world.
!
I'm only going to be able to cover the absolute basics
of setting up a home studio for recording in this short
guide. If I miss anything out or you want to know
more, then there are plenty of ways you can get in
touch and get a direct answer to YOUR particular
question - all our contact details are at the end so
please do get in touch or post a comment. I would
love to hear from back from you!
Also if you enjoy what you read, please feel free to
share your feedback. You'd be helping me a lot and
I'd love to find out what you liked and what you want
to know more about.
So let's kick off with 2 very simple golden rules
Rule #1: take just one step at a time
!
What do I mean by that? I mean don't lose focus and
become overwhelmed by trying to get too many
things working at once. That will almost certainly be
doomed to failure. I know, you are eager to get
started but I have seen so many people try to set up
their complicated recording hardware and music
production software all at once, it hasn't worked, and
then it becomes really hard to fix because they don't
www.musicrepo.com

Home Recording Studio: How To Get Started
!6
know which bit isn't working. So they give up before
they've got started. What a shame.
Take a deep breath, get one piece of the jigsaw
working at a time, become an expert in each piece of
equipment or software as you install it, then
introduce another component. Trust me, you will get
much further and the whole process will be more
rewarding. I can guarantee you are not limiting your
options by taking this one-thing-at-once approach.
Rule #2: start with the hardware
!
It's very common to be asked about which is the best
music production software. But no matter how much
you spend on software if you haven't got the right
hardware for the job then you will find it very difficult
to make good recordings.
What do I mean by hardware? I mean the computer
itself, the recording interface, controllers,
microphones, headphones and speakers. Don't
worry if you don't understand all these terms right
now, by the end of this guide you will hopefully be
much clearer.
Even if you don't actually want to make any of your
own recordings, you still want to have a high quality
way of listening to your work, and your music
software will work better and more efficiently with the
right equipment installed. Once you get the correct
hardware set up and optimised then you should be
able to get great results with any music making
software, even free or budget apps.
So let's break it down and look at each piece of the
traditional home studio recording jigsaw. You may
www.musicrepo.com

Home Recording Studio: How To Get Started
!7
not need everything listed here, but these are the
basic building blocks of a typical home studio set-up
and if you are looking to make purchases, there are
some tips on what to look out for, and to help you
decide whether you need to buy now or you can
postpone the decision for a while.
Your Computer
!
It is very likely you already own a computer that is
more than capable of being the hub of your recording
studio or will at least get you started. In fact if you
can get away with it I would postpone buying a new
computer unless your existing one just won't run with
modern software or interfaces.
If you do need a new computer anyway, or you want
to set one up especially for recording, then it is easy
to get blinded by the options. Whether you decide on
Mac or PC is personal preference.
Most music production software is dual platform so
you really can pick either. The main exception is if
you really want to use Logic then you need to buy a
Mac, whereas Sonar/Cakewalk and FL Studio
products are PC only. But do not get too hung up at
this stage. Choose what you feel most at home with,
and what fits comfortably in your budget.
Make sure it has plenty of RAM. If you think that you
are on the limit, then investigate whether you could
easily add a bit more (you'll have to check the model
of your computer on one of the big memory upgrade
sites).
www.musicrepo.com

Home Recording Studio: How To Get Started
!8
If you want to make backing tracks for videos and
can see yourself getting into some serious video
editing, then do consider a computer with separate
graphics capability and dedicated graphics memory
rather than relying on the standard built-in video
card.
However if you buy any modern laptop or desktop off
the shelf it is more than likely going to be just fine for
home studio recording.
Given that there is lots of music making hardware
now that works on both standard computers and
iPads and even iPhones, I would not let the
consideration of the computer worry you too much.
Don't try and future proof.
Buy what you need today. Who knows what will be
available in three-five years' time?
Audio Interfaces (or Sound
Cards)
!
Quick Link: How To Choose An Audio Interface
If you want to record anything on your computer you
have to have some way of getting the sounds in to
your recording software, and then if you want to
listen back you need some means of hearing it. That
www.musicrepo.com

Home Recording Studio: How To Get Started
!9
is the basic point of a sound card. So even the most
lowly laptops and tablet computers have a simple
built in card and most of these can record and play
back. But that is as far as it goes. And the quality is
usually at best average.
You can drastically improve the quality of your
recordings and what they sound like by investing in a
decent USB audio interface. And this is where the
fun and confusion begins!
In my experience this is what you need to know if
you haven't owned one before: once you have an
audio interface successfully installed it should work
with any audio production software. So don't worry
too much about making the wrong decision, because
whatever you buy it should work with any software
you pick in the future.
It's a bit like installing a new printer. You know that
once you have the printer set up correctly you can
print from any program just by selecting that printer
in the options box? You don't worry about what
software you might install in the future, you just
assume it will work smoothly with the printer. Well,
the same is true of the audio interface and recording.
Think about it like that hopefully it makes choosing
one a bit simpler.
!
So now you have decided to buy an audio interface
to kick start your studio, it is easy to get
overwhelmed by the choice. If you are just starting
out, then I recommend you begin with a really good
quality 2-channel interface like the one above.
www.musicrepo.com

Home Recording Studio: How To Get Started
!10
It should have at least one microphone preamp with
phantom power if you want to record vocals and/or
acoustic instruments, a Hi-Z guitar input if you want
to connect your electric guitar, and the ability to
switch to line level so you can record a keyboard or
other line level instrument.
!
Phantom power is essential if you want to work with
condenser microphones - and I would recommend
that you do. Make it a 'must have' if your budget will
stretch to it.
Unless you absolutely know right now that you will
want to record several things all at once then you
don't need any more than two input channels for the
time being.
!
If you definitely want to connect a MIDI controller or
device that has standard MIDI ports (and many
controllers you buy now are USB only) then you may
also want MIDI i/o on the interface too.
Buy the best you can - but focus on quality rather
than quantity! If in the future you find you want more
inputs and outputs then if you have invested in a
good branded interface it will always hold a
www.musicrepo.com

Home Recording Studio: How To Get Started
!11
reasonable second-hand value when you want to
upgrade. Conversely, consider looking for a used
bargain on eBay or similar.
Then as long as the interface has stereo outputs and
a headphone output your choice is made. (By the
way if you know right now that you only want to
record from a microphone you might choose just to
invest in a USB Microphone rather than the
expense of an interface + mic and all the cables.
More later if you are not sure).
Stick, if you can, with a good well-known brand
because the back-up and after sales service will be
much better. Spend more on quality and less on
multiple inputs you don't need! Finally look at the
software that comes with the interface to help you
make the final decision. For example some
interfaces come with Pro Tools Express, which is a
great way to get started with this industry standard
software, others might come with a cut-down version
of Cubase or Ableton Live. For complete beginners
Ignite by Air is a really good starting point as it is
simple and yet has some very nice features that will
ensure you can get up and running quickly.
Microphones
!
www.musicrepo.com
Home Recording Studio: How To Get Started
!12
Quick Links: In Depth Guide To Mic Types"
The Best Studio Condenser Microphones
My advice here is buy one good quality condenser
microphone. Perfect for getting a really accurate
recording of vocals and most acoustic instruments. If
you buy one great mic and work on your mic
placement and recording techniques you will learn
plenty.
Bear in mind that studio condenser microphones are
sensitive so while they will give a nice accurate
recording they will have a tendency to pick up
unwanted background sounds. Make sure you have
a nice quiet space where you can set up your studio
and maybe experiment with constructing a knock-up
recording booth using absorbent materials. It is
amazing what you can achieve with a couple of
blankets and some kind of frame or old clothes airer.
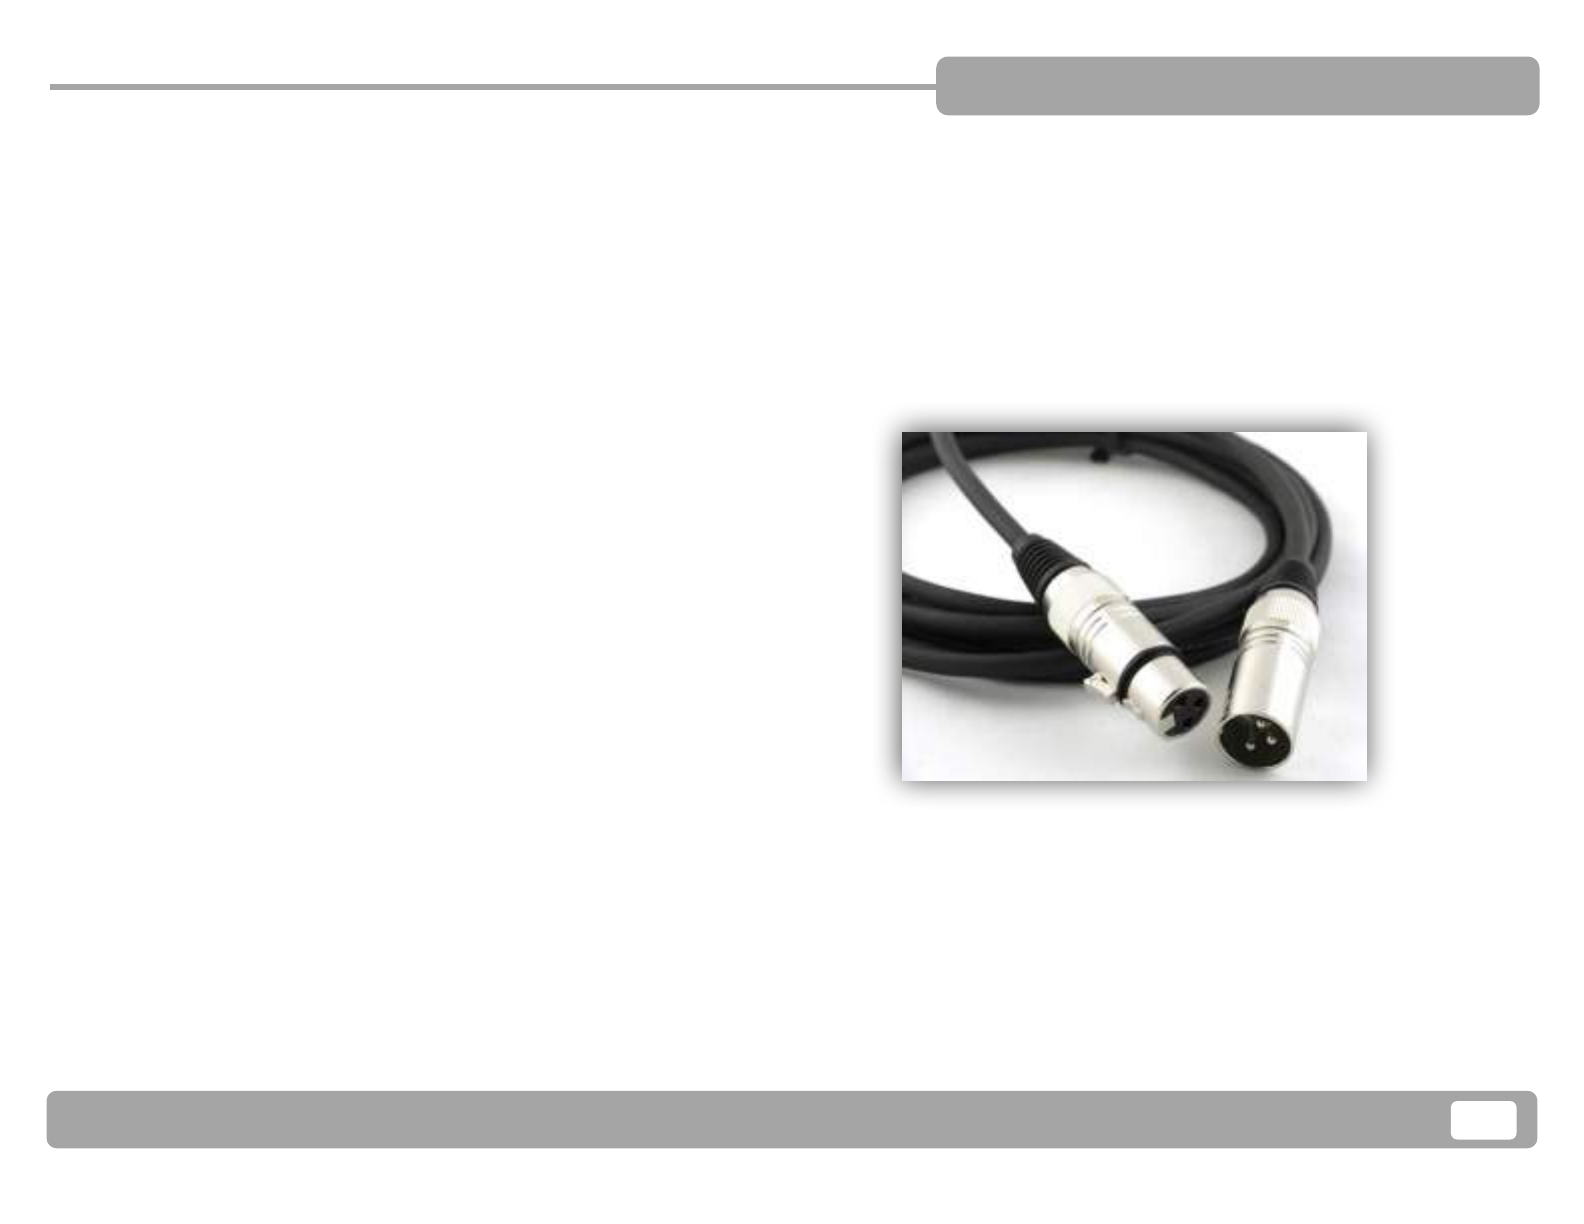
Once you have your mic picked out, the most
essential accessory that you will almost certainly
have to buy as well is the mic stand - studio mics
should not be hand held because of their sensitivity
so budget for a stand when buying the mic. You will
also need a good quality XLR microphone lead
(assuming both your interface and your mic have
XLR connections).
!
Other accessories to consider, but not immediately
essential, are a shockmount (which will protect your
mic from picking up knocks and vibrations), a pop
filter if you are going to record vocals and lastly a
portable vocal booth that clips onto the mic stand.
(These portable booths used to be so expensive but
www.musicrepo.com
Home Recording Studio: How To Get Started
!13
are now mass produced and easily available: check
out the range at Editor's Keys or sE Electronics).
!
If you only have a dynamic mic, don't panic - this will
be fine for recording vocals. It may not have the
same frequency response at the top end, but you
can still get good results and this is a much better
'live' mic if you want to perform on stage as well and
can only afford one microphone right now. Also you
may have to go with a dynamic mic if your audio
interface does not have phantom power - or you
mainly want to record the output of your guitar amp.
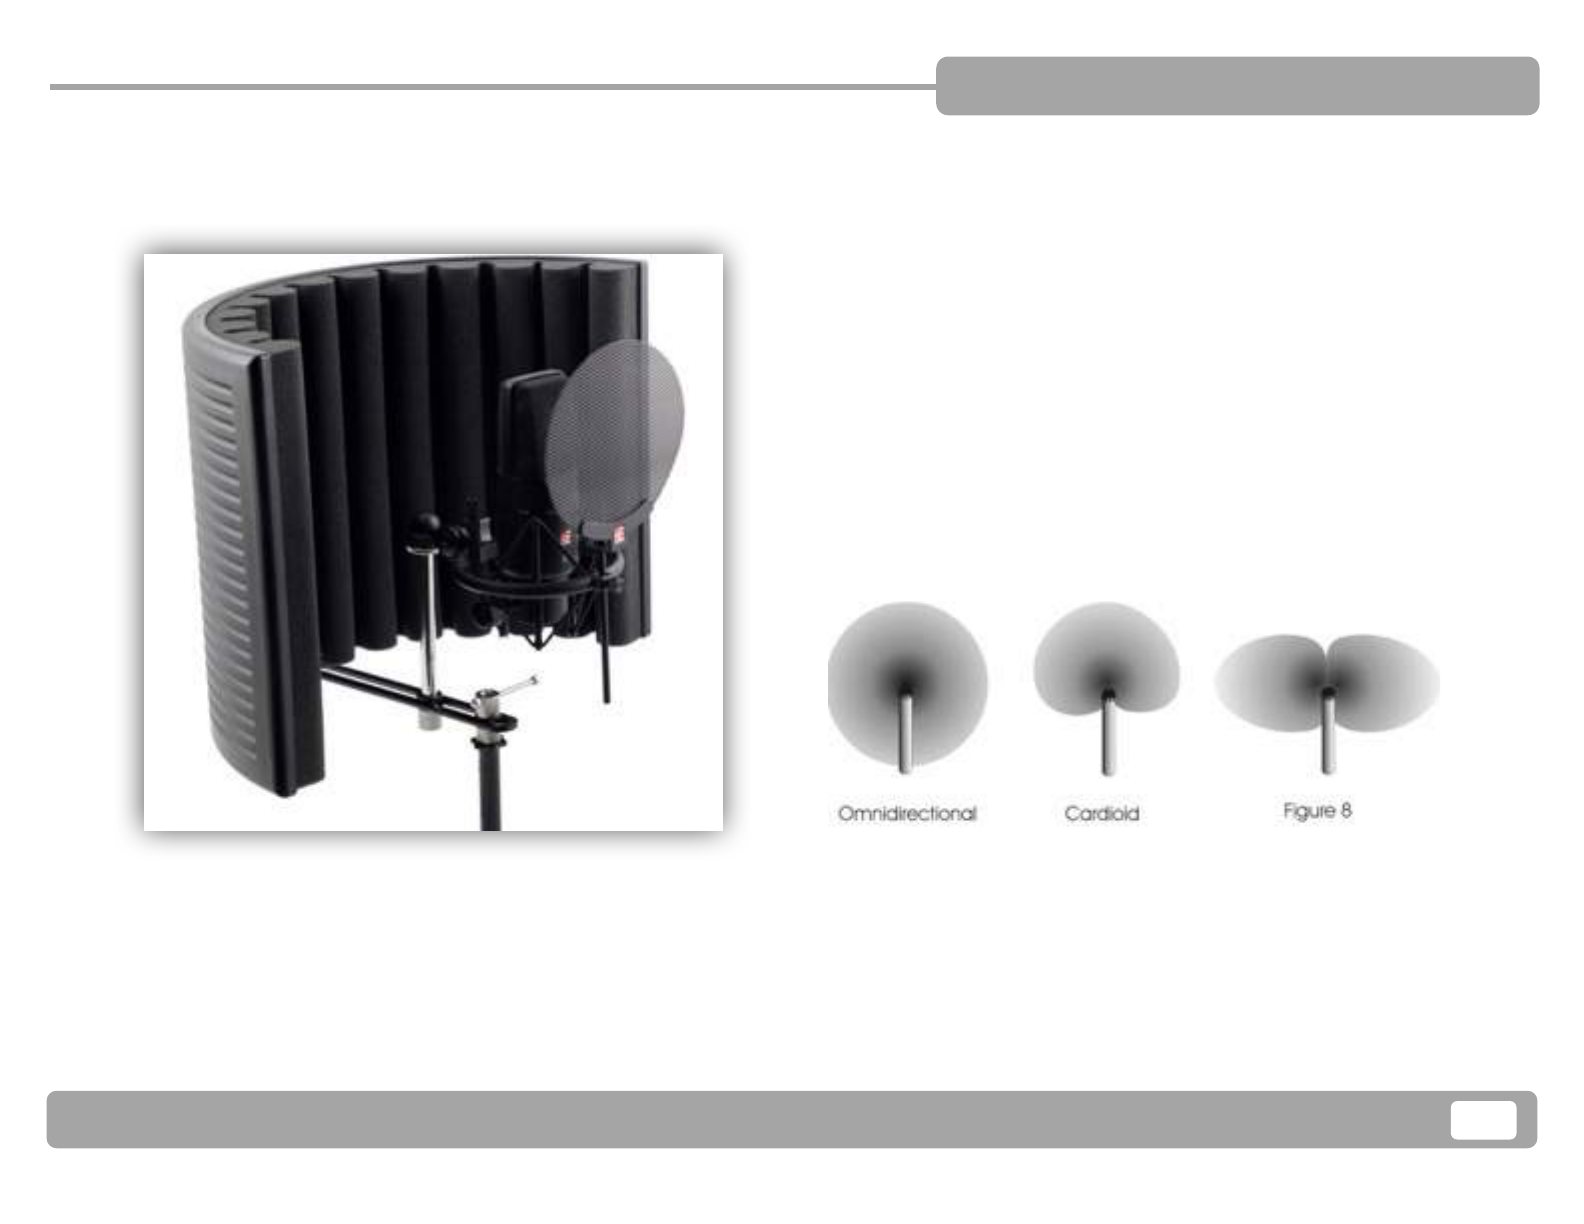
How do you choose which microphone? Things to
look out for and compare when delving into the
specs to compare mics are: the pick-up pattern
(cardioid, figure of 8, omni) and the frequency
response.
!
What is a pick-up pattern? This is the specific area
around the microphone where it 'hears' the best. A
mic works best when the sound source is placed
inside its pick-up pattern area. The three most
www.musicrepo.com

Home Recording Studio: How To Get Started
!14
common are: omni-directional (the mic records all
the way round, great for meetings and 'ensembles');
cardioid (the mic records much better on one side
than the other - ie quite directional - so great for
vocals and general use); and Figure-Of-Eight or Bi-
directional (good for recording conversations
between two people facing each other with the mic
between them).
USB Microphones
Quick Link:
The Ultimate Guide To USB Microphones - a
comprehensive guide to the best selling USB
microphones including videos, and audio recordings.
Absolutely essential to help you pick the right USB
mic whatever you budget.
!
I've put this in a separate section - although it is
related to the audio interface and the standard
microphone - to help you make an important
decision.
Basically a USB microphone is a mic with a built-in
audio interface. It is designed to plug straight into the
USB port of your computer without the need to buy
anything else. These used to be quite specialist with
Samson being the 'inventor' of the concept, but now
every major microphone manufacturer makes a USB
www.musicrepo.com

Home Recording Studio: How To Get Started
!15
microphone and they can be a fantastic one step
solution.
If you buy a USB microphone you simply connect it
to your computer then any recording software you
have should be able to 'find' the microphone as an
input. You are effectively bypassing your internal
soundcard (or any other interface you might have)
and recording directly from the mic.
Now the USB microphone is the most fantastic
invention and if you are not interested in recording
an electric guitar or hooking up the line output of a
synth or other keyboard then it offers a very cost
effective solution. BUT beware of one thing! Many
USB microphones are just RECORDING
microphones. They make a nice quality recording
and are perfect for video voiceovers and podcasting,
but you 'monitor' or 'listen' to the recording you made
through your existing soundcard.
This means if you want to record yourself on top of
backing tracks or sequences you have created on
your computer you will not be able to listen to the
tracks running in the software at the same time as
making a recording without experiencing what is
known as 'latency' or delay. For this reason, I would
strongly recommend that you look for a microphone
that has a headphone socket so that you can 'direct
monitor' (listen to yourself while recording).
!
www.musicrepo.com

Home Recording Studio: How To Get Started
!16
The other big misunderstanding is some people buy
a really good audio interface and then buy a USB
microphone to record through it. That is losing the
point of buying the interface in the first place! Think
about it as a direct choice between [Audio Interface +
conventional microphone] OR [USB Microphone].
NOT [USB audio interface + USB mic]!
If you do opt for the USB mic, then re-read the
section about accessories in the section on
microphones. Some USB mics come in a pack with a
stand etc, others don't. You WILL need a stand at
least if you buy a condenser microphone.
MIDI Controller Keyboards
Quick Link: How to choose the best MIDI controller
!
So far we have talked about recording - either vocals
or instruments. We have been concerned with
getting sounds into your computer one way or
another. MIDI is related but very different.
Most music production software allows you to enter
notes and other instructions via a MIDI controller.
Usually this is a silent keyboard that just has a set of
keys, and maybe pads, sliders or knobs and buttons.
Other MIDI controllers are a matrix of pads. Most
now connect directly via USB and are usually plug
and play - though you may need to install drivers for
the more complex controllers.
www.musicrepo.com

Home Recording Studio: How To Get Started
!17
In my experience the notion of MIDI controllers, in
fact the whole concept of MIDI, causes some
confusion. One common issue is when you are
putting your home recording studio together and you
buy an audio interface and a MIDI controller. How do
they work together? This will depend on whether or
not your audio interface has got MIDI i/o as well.
The most likely scenario is that you connect up the
audio interface, and then you connect your MIDI
controller to a separate USB port. Now assuming
both items have been correctly connected, when you
start up your audio production software they should
both be available to use. I have been asked many
times if you can use a USB controller alongside a
USB audio interface. Yes you can. You simply go into
the settings panel of your software and make sure
you have selected the audio interface for recording
and playback, and then you select the MIDI
controller for MIDI input. "
!
The "problem" you might have is that if your audio
interface has got MIDI then the software will
automatically select the MIDI input on the audio
interface instead of your controller. You try and
create a MIDI track and nothing happens! This is
easily fixed - just open up the software settings and
make sure you have selected the controller as the
input. (Hint: Think of it again a bit like having two
printers attached to your computer - if the default
www.musicrepo.com

Home Recording Studio: How To Get Started
!18
printer is switched off and you try and print nothing
happens until you select the other printer.)
Another option would be to power the controller
keyboard via USB (or external power socket) and
then connect the standard MIDI port from the
controller to the MIDI in of your audio interface with a
MIDI lead. In this case you WOULD select the
default MIDI input device as the audio interface.
(This may not be an option if your keyboard is USB
only). You might want to experiment with this to see if
you can drive down any latency issues you may
experience.
The other really common confusion is how on earth
you can have a keyboard that doesn't make any
sound itself. Well the keyboard is transmitting your
"performance". Which notes have you pressed, how
long have you held them down, whether you have
moved faders and sliders. Then the sounds come
from "virtual instruments" in your software. If you
have an audio interface connected then you will hear
the sounds via the output of your interface. (See the
section later on headphones and speakers).
If you are still a bit confused, think about how you
use a standard keyboard to type letters. The word
processing software can then show you words on the
screen (or garbage if you can't type too well...) based
on which keys you pressed in which order. It also
understands other controls like [Ctrl-C] for copy and
so on.
!
The MIDI keyboard is really very similar, it is
www.musicrepo.com

Home Recording Studio: How To Get Started
!19
outputting a stream of information about your
performance and the music making software can
then "record" this performance information for you to
edit after if you hit the wrong notes or want to make
changes, copy and paste phrases, transpose etc.
Just as on a word processor you can change the
colour of the font and the size, in MIDI software you
can directly edit the data and change the instruments
that play back the notes. You'll get the hang of it!
So now you know what a MIDI controller is, do you
need one? What if you can't play a note on a
keyboard to save your life? I would say even if you
only have a very basic knowledge of keyboards then
a small controller will save you lots of time in
entering notes and phrases. There are then plenty of
ways to edit what you have played on screen. Even if
it is not your main instrument, it is a useful way of
programming drum tracks and bass lines. If you are
planning to use notation or score-writing software in
any way then a MIDI keyboard is the fastest way to
work and I would almost say essential.
!
That said, most software has different ways of
entering notes, from drag and drop to pencil tools
and using your standard computer keyboard, so if
you are not 100% sure right now, postpone the
decision. If I could only buy one thing and I wanted to
record vocals etc then I would spend my money on
the audio interface instead. On the other hand if I
wasn't going to actually record any instruments but
wanted to generate tracks using MIDI programming
www.musicrepo.com

Home Recording Studio: How To Get Started
!20
then I would go for the MIDI controller as my first
purchase.
MIDI Interfaces
Quick Link: How To Connect Your MIDI Keyboard
If you already possess a multi-timbral keyboard or a
digital piano then it should be possible to connect
that up to your computer and use it as a MIDI
controller. Or it may be that rather than buy a 'silent'
keyboard you'd prefer to own one that you could use
standalone without your computer.
Hopefully if either of these is the case, you already
made the decision to make sure the audio interface
you chose had MIDI input and output. If so, then you
can now easily connect your piano or keyboard up
using standard MIDI leads. Connect the "MIDI out" of
the keyboard to the "MIDI in" of the interface and
vice versa. (The signal is going OUT of the keyboard
and IN to the computer).
!
What if you don't have MIDI on your audio interface?
Then you will need to purchase a special MIDI-USB
interface. Look for a good quality branded one for the
most reliable performance. Most MIDI interfaces just
plug and play very simply. Many also work
seamlessly on iPad too, so look for one that says it is
iPad ready for the ultimate versatility.
Once the interface is installed and hooked up to your
keyboard (and again remember connect Out->In and
In->Out) when you start up your software you should
find the interface is listed in the MIDI device control
panel ready for you to select.
www.musicrepo.com

Home Recording Studio: How To Get Started
!21
!
Recording Guitar
Quick Link: How To Record Your Guitar On Your
Computer
We get so many guitarists contacting us who want to
get started with recording that it seemed appropriate
to give the guitar a section of its own. Just to repeat
golden rule #2 - get the hardware right first! There
are thousands of great guitar apps out there but
none of them will be any good if you can't get a
decent recording from your guitar.
!
If you have an electric or semi-acoustic guitar with
1/4-inch TS output then you really need to start by
investing in an audio interface. Look for one that has
a specially designed input for guitar (most of them
do). That way you'll be able to get a nice quality
recording without needing other equipment like a DI
box. Many software programs give you virtual amps
and other processing effects on the computer itself,
so you don't need to connect your amp - just your
guitar. Then you listen to what you are doing through
headphones or speakers.
www.musicrepo.com

Home Recording Studio: How To Get Started
!22
If you are an acoustic guitar player, then you will
want a condenser microphone, well positioned, to
record yourself. Read the section again about
choosing an audio interface with phantom power,
and the section on microphones. The other option is
to consider a good quality USB microphone as an
alternative to buying interface + mic.
!
Finally, many guitarists do want to record the output
of their amp. In that case, the classic microphone to
place in front of the cab is a dynamic microphone (a
Shure SM58 or equivalent). So you will need either
an audio interface + dynamic mic, or a dynamic USB
Microphone.
Some acoustic guitarists like the effect of hooking up
their semi-acoustic via one channel with the 1/4"
output and then placing a condenser microphone in
front of the guitar on the second channel to pick up
the ambient sounds of the fret board and the natural
reverb. This is where your two-channel audio
interface plus condenser microphone set up will
really score.
Speakers and Headphones
www.musicrepo.com

Home Recording Studio: How To Get Started
!23
Quick Link: The Ultimate Guide To Choosing
Studio Headphones. You will need to hear what you
are recording and playing back, so a reasonable set
of headphones and/or studio monitors (speakers) are
a must. Let's look first at headphones.
You will often hear about either closed-back or open-
back headphones (Also referred to sometimes as
simply “closed” and “open"). This distinction
addresses the design of the part of the headphone
that covers the area behind the driver in a straight
line away from the side of your head.
Closed headphones prevent sound from escaping.
The downside of this design is that it traps pressure
inside the headphone, which creates false low
frequencies. These bass frequencies are fine for
most professional uses (and even desirable in
consumer products), but less desirable for critical
listening.
However, when you are trying to record vocals or
acoustic guitar (for example) over a backing track,
you do not want any "bleed" - ie you don't want to be
making a recording of the sound coming out of the
headphones. So a pair of closed headphones may
be essential to get a recording without bleed if you
cannot afford the really high-end open headphones
which do have good sound insulation.
For critical listening, headphones with an open back
often provide a more accurate frequency balance,
with the trade off of providing slightly less isolation -
in other words great for working on your mix but less
good for recording acoustic instruments and voice.
There is a bit of a trade-off here between critical
listening and recording.
Extremely well engineered open-back headphones
provide almost the same isolation as high quality
closed back headphones, and if you can afford them
www.musicrepo.com

Home Recording Studio: How To Get Started
!24
that would be the solution, but it is a luxury you’ll
have to pay for.
As a reasonable compromise for those on more of a
budget, there are some excellent “semi-open-back”
headphones that are affordable, well balanced, and
provide enough isolation for professional tracking
applications.
In the long run you may well need more than one set
of headphones for recording and monitoring. In the
short run check out the semi-open designs.
!
The other way to monitor your sound is with a set of
studio monitor speakers. Here you are looking for the
most accurate representation of your recordings and
mixes as possible. Whether you’re recording, editing,
mixing, or mastering audio, your studio monitors will
ultimately determine how well your project translates
to headphones, car audio systems, TVs, and
wherever else your work may be listened to.
www.musicrepo.com

Home Recording Studio: How To Get Started
!25
If this is your first set up then it is most likely you will
be looking for a pair of "active" studio monitors.
Active monitors have their amplifiers built in so you
do not need to buy any external amplifier. Also, the
internal amplifier is specifically matched to that
speaker for the best sonic performance so you don't
have additional headaches on deciding what to
purchase.
Unless you already have a specific reason to prefer
a passive system, you’ll probably appreciate both the
convenience and performance you get from an
active studio monitoring system.
You have to position a stereo pair of studio monitors
so they form an equilateral triangle with your head
when you’re seated in your mix position. In other
words, you place them so that they’re as far away
from you as they are to each other. This will result in
the most accurate frequency response and clearest
stereo image. The size of your speakers should be
appropriate for the size of your room. If you’re mixing
in a small space, then you’ll get much more accurate
results with smaller monitors.
!
Remember that technically speaking, studio monitors
aren’t trying to sound "good". They’re trying to sound
as accurate and precise as possible. The ideal set of
studio monitors should reveal every detail in your
mix, both good and bad, while portraying an accurate
balance across the entire frequency range.
Keep in mind that it’s almost impossible to tell how a
set of studio monitors will sound in your room. Even
if you invest time in auditioning a set at a store or a
www.musicrepo.com
Home Recording Studio: How To Get Started
!26
friend’s studio, the acoustics of your room play a
huge role in what you’ll hear when you’re mixing. You
can make note of certain characteristics, but don’t
expect them to sound exactly the same. You may
have to spend a bit of your budget (or use your
ingenuity with what you have lying around) to
acoustically treat your studio with some absorbent
materials to reduce reflections.
You will find that for most recording you will need to
use headphones rather than monitors, as you can
end up with terrible feedback loops if you have your
mic positioned anywhere near your monitors! You
have been warned...
Cables
Many people ask me what cables you need to
connect your equipment together, so I thought I'd
include a bit here about this. In general, though,
there is no once answer fits all situations. You have
to look at what outputs and inputs you have to
determine the connections you need to make. So do
have a look at your manuals and at the actual
sockets themselves to make an educated guess at
least!
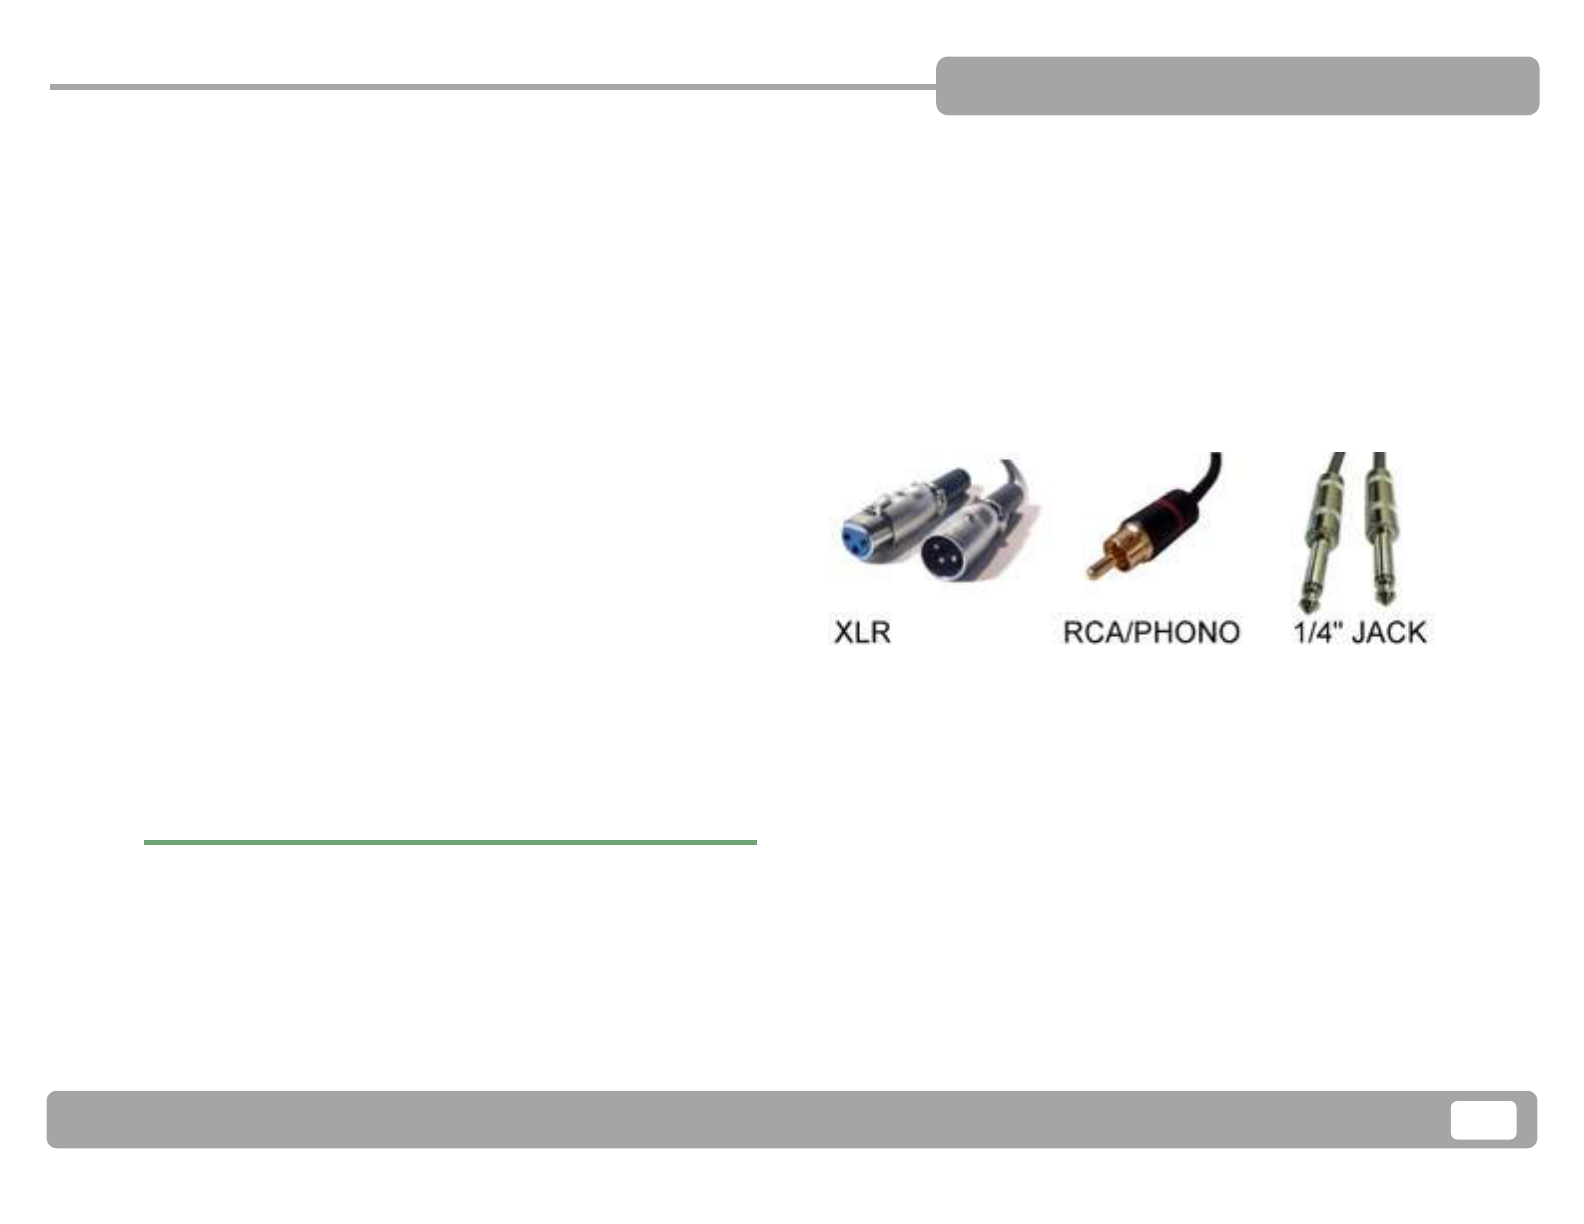
The most common types of sockets are 1/4 inch
jack, RCA and XLR.
!
The other thing that causes confusion is the
difference between 'balanced' and 'unbalanced'
signals. Balanced signals - most commonly used to
connect microphones and high-end monitors - are
important in sound recording and production. The
balanced signal reduces susceptibility to external
noise. Balanced connections use three-conductor
www.musicrepo.com

Home Recording Studio: How To Get Started
!27
connectors, usually the XLR or TRS phone (1/4-inch
jack connector with additional ring).
!
XLR connectors are usually used with microphones
because of their durable construction, while TRS jack
plugs are often used for mixer inputs and outputs or
some monitors because of their smaller profile.
(Though higher end monitors have balanced XLR
inputs). TRS stands for Tip-Ring-Sleeve. These
cables look like a standard guitar cable with 1/4 inch
jack except they have extra rings on the actual jack
to carry the extra signal and should be clearly
labelled as balanced.
If all this sounds a bit confusing, don't worry. Check
the manuals carefully for your audio interface and
monitors, and if the interface has balanced outs and
the monitor has balance inputs then make sure you
purchase the appropriate balanced cables. Use a
professional XLR mic cable to connect your
microphone to your interface and all should be good.
Audio Production Software
www.musicrepo.com

Home Recording Studio: How To Get Started
!28
Now we have got our hardware set up, it's time to
think about the software. However even at this point I
would be cautious about spending hundreds of
pounds straight off. Most audio interfaces and
controllers come with some kind of audio production
software that should get you going. Use this
opportunity to make sure your system is really well
set up. Next up, try downloading a few demos to get
a feel for the kind of thing you want to do. Even now,
don't go mad! Remember rule #1? Get one software
package, follow the basic tutorials, and really get it to
work.
!
If you are a classical musician or you know for
certain that you want to write using notation, then
you should try Finale and Sibelius. Both are very
expensive applications but are extremely powerful.
But both also have cut down versions as well and for
simpler arrangements they are usually all you need.
Both have demos you can download and try. The
other notation option is Notion - very reasonably
priced with great sounds and the benefit of an app so
you can seamlessly integrate your work on your
laptop and your iPad.
www.musicrepo.com

Home Recording Studio: How To Get Started
!29
For more general audio production, you need to look
to a DAW (Desktop Audio Workstation) also
commonly referred to as sequencing software or
audio production software. The big players are as
follows: Logic and Digital Performer are Mac only,
Sonar (Cakewalk) is PC only, while Pro Tools,
Cubase, Ableton Live, and Studio One are all dual
platform. They are all fabulous programs and will get
the job done for you. Which one should you go with
though? That's a question only you can answer by
trialling each one, or maybe just go for one and
sticking with it. Most producers have their favourites
but all these DAW's are excellent for writing,
recording, editing, mixing, and mastering.
!
Will your final choice be the deciding factor in how
your songs turn out? No! The software is a tool but it
won't write the song for you!
Other software you could take a look at is
Propellerhead Reason which is dual platform (a
whole virtual studio in a box complete with
sequencer) or FL Studio (PC only). Or if you want
something a bit different, Band In A Box from PG
Music is the longest running music software and is
actually a brilliant creative tool.
www.musicrepo.com

Home Recording Studio: How To Get Started
!30
But for those on a tight budget, sticking with the
software that came with your hardware and trying out
free applications like Audacity can force you to really
learn the basics and get creative.
Turning Equipment On & Off
I haven't got room in this intro guide to get much into
production techniques and how to actually use the
equipment I've looked at. However I thought I would
include this vital final section about turning your
equipment on and off. It is so exciting to get new
stuff, but it would be easy to blow your new speakers
without a little thought first!
If you are using monitor speakers or lots of
interconnected equipment it is really important to
switch them on and off in the correct order. Turning
equipment on and off when the powered speakers
are still switched on can result in a nasty audible
'thump' or 'bang' which can damage your equipment.
Follow these simple rules:
Turning on your equipment:
•
Lower the levels (volumes) of all equipment (including
monitor, amps, audio interface output) to silent
•
Turn on all the equipment except the monitors one by
one
•
Turn on the monitors and gradually raise their volume
Turning off your equipment:
•
Lower the levels of all the equipments including the
monitors to silent
•
Turn off the monitors (speakers)
•
Turn off the rest of the equipment one by one
Golden rule: The monitors (amp/speakers) should be
the last thing to be turned on and the first thing to be
turned off and ALWAYS with the levels completely
down.
www.musicrepo.com

Home Recording Studio: How To Get Started
!31
!
And Finally ...
Congratulations on getting this far. I really hope you
have learned something and are ready to get started
with your set up.
If you have the time to share the love, then please
leave a comment on our Facebook Page, tweet me
@MusicRepo, or connect with us on Google Plus.
I'd love to know what you think and what you want to
do next.
While you're there if you follow us then you'll be the
first to hear as we add new information to help you
with your home studio recording.
I wish you every success in your recording
adventures. All the best! Jane x
www.musicrepo.com

Home Recording Studio: How To Get Started
!32
Let’s Keep In Touch
Let’s Keep In Touch
Visit our site
Tweet @musicrepo
Follow us on Google
Follow us on Facebook
!
!
!
!
www.musicrepo.com
iiiiiiiiiiiiiiiii
iiiiiiiiiiiiiiiii
iiiiiiiiiiiiiiiii
iiiiiiiiiiiiiiiii
iiiiiiiiiiiiiiiii
iiiiiiiiiiiiiiiii
iiiiiiiiiiiiiiiii
iiiiiiiiiiiiiiiii
iiiiiiiiiiiiiiiii
iiiiiiiiiiiiiiiii
iiiiiiiiiiiiiiiii
iiiiiiiiiiiiiiiii
iiiiiiiiiiiiiiiii
iiiiiiiiiiiiiiiii
iiiiiiiiiiiiiiiii
iiiiiiiiiiiiiiiii
