
Version 9.61.x – October 12, 2018
SAP Concur's mobile app – Android™
Page 1 of 56
You can use SAP Concur on your Android smartphone to
assist with
your Expense, Travel, Invoice, and Request
needs. Because you are using your smartphone, you can
access your information in a cab, in a meeting, at the
restaurant – where your laptop is not available or is too
cumbersome.
You can check your itinerary; book a flight, rental car,
Amtrak, or
hotel; get directions from your current location.
You can enter out- of-pocket expenses real-time and take a
picture of the associated receipt; create, submit, and check
the status of your expense
reports…and much more.
If you are an approver, you can approve expense
reports,
requests, payment requests (Invoice), etc.
THIS GUIDE - This guide provides brief "how to" steps. It
assumes that the user already knows how to use the web
version
of SAP Concur and already understands the
concepts of Expense
(expenses, itemizations, attendees,
etc.), Travel (booking, rules,
etc.), Invoice (payment
requests, purchase requests, etc.), the
approval process,
and so on.
It also assumes that the user is generally familiar with their
mobile
device. This guide is available in DOC and PDF
format. You can use
the DOC as a starting point for your
Version 9.61.x – October 12, 2018
SAP Concur's mobile app – Android™
Page 2 of 56
Contents
Contents.................................................. 2
Download ............................................. 2,3
Sign In .................................................... 3
Trips ........................................................ 4
View an Itinerary ................................... 4
Book a Flight .......................................... 4
Book a Rental Car ................................... 5
Book a Hotel ......................................... 7
Book Amtrak Direct Connect ................... 7
Cancel a Rental Car Reservation .............. 9
Cancel a Hotel Reservation ...................... 9
View Agency Information ....................... 10
Use TripIt and Other Apps .................... 10
Expenses and Expense Reports............... 12
Expense List (Expenses Screen) ............ 12
Expense Report List (Active and History
Sections) ............................................ 12
Create a Mobile Expense ....................... 13
Delete an Expense from the Expenses
Screen ............................................... 14
Create a New Expense Report ................ 14
Move Expenses from the Expenses Screen
to an Expense Report ........................... 15
Manage Multiple Items on the Expenses
Screen ............................................... 15
Create an Expense with an Open Expense
Report ................................................ 16
Edit an Expense on an Expense Report... 17
Add a Car Mileage (or Kilometer) Expense
......................................................... 17
Add a Car Mileage (or Km) Expense–
Mileage Calculator ................................. 18
Add/Edit/Delete Itemizations ................. 22
Add/Edit/Delete Attendees .................... 22
View/Add/Edit/Delete Allocations ............23
Work with Receipts ...............................29
Remove an Expense from an Expense
Report ................................................31
Edit Report Header Information .............. 31
Submit an Expense Report ....................32
Copy an Unsubmitted Expense Report ... 32
Work with Fixed Travel Allowances .........33
Requests ............................................... 36
Create a New Request ..........................37
Add Segments to a Request ..................37
Submit a Request ................................38
Approvals .............................................. 39
Trips .................................................... 39
Expense Reports ................................... 40
Requests ............................................42
Payment Requests (Invoice) .................. 43
Purchase Requests (Invoice) .................. 44
Budget ................................................... 47
Concur Locate ........................................ 48
Check-in With Location Check In or
Request Safety Assistance .....................48
Location Access ..................................... 50
Concur Drive .......................................... 51
Track Mileage Automatically...................51
Track Mileage Manually .........................52
ExpenseIt .............................................. 53
Convert Receipts into Expenses..............53
Save Login ID and Auto Login ................ 55
Get Help ................................................ 56
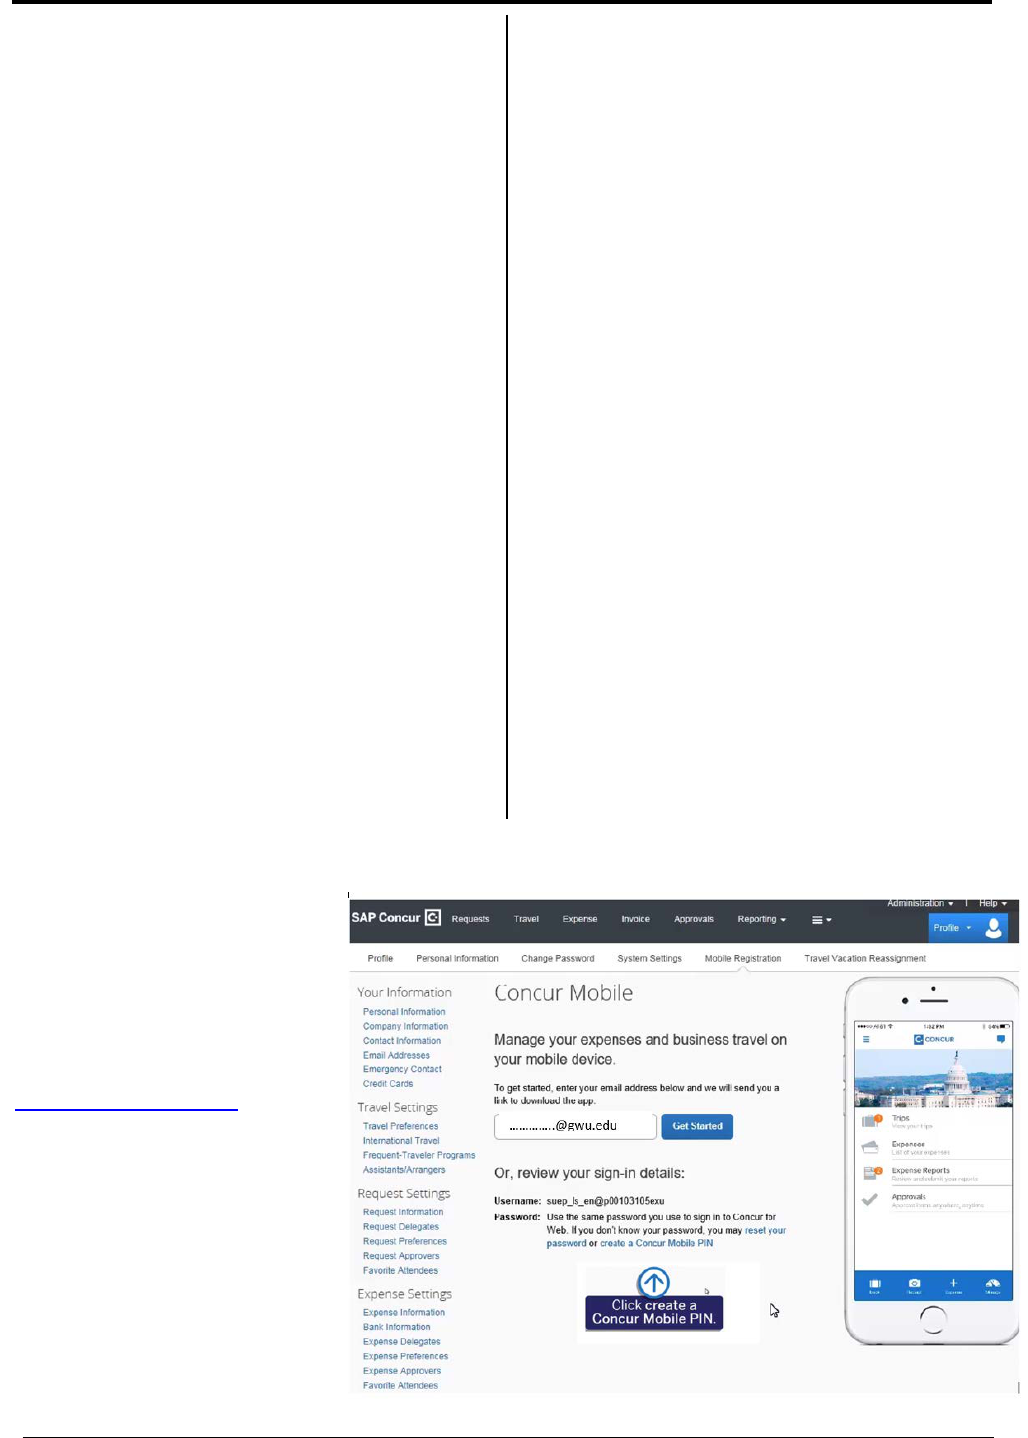
Initial login must be from a
PC. Users should have their
mobile device at hand to
confirm that the download
and access are successful.
Log into iBuy Expense
Reporting at
https://ibuy.gwu.edu/
and
click the GW iBuy + Expense
icon. Select Profile > Profile
Settings. Select the Concur
Mobile Registration option
and click create a Concur
Mobile PIN (your mobile-
only password). It’s
recommended to create a
short memorable PIN, such
as a 4-digit number.
Version 9.61.x – October 12, 2018
SAP Concur's mobile app – Android™
Page 3 of 56
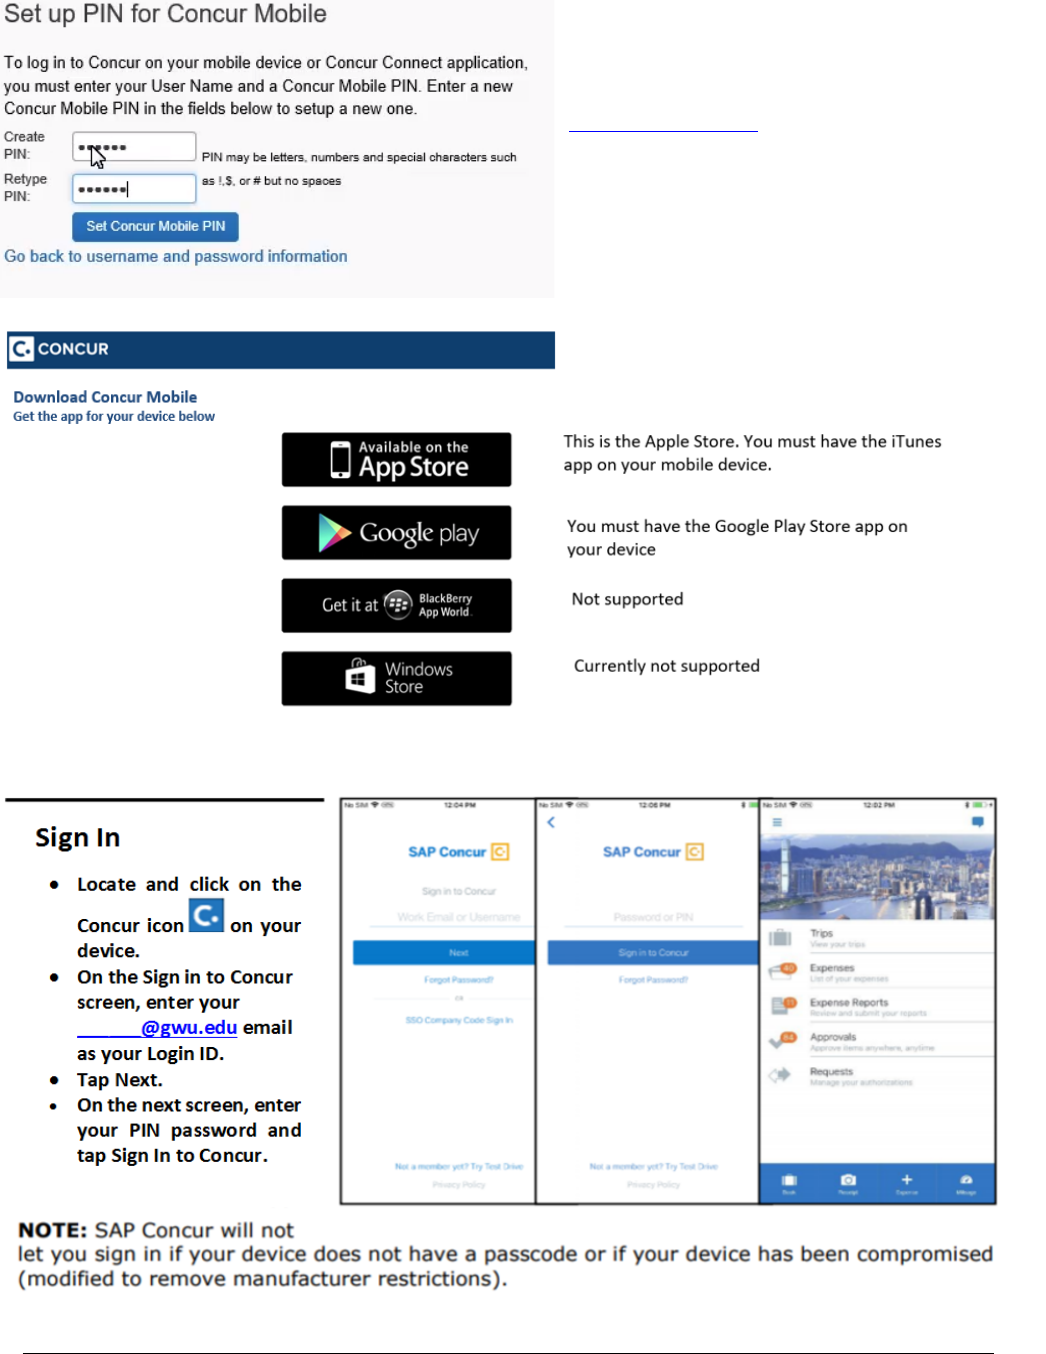
Once the Concur app is downloaded, make sure you can log in and access the various
features.
Once you have set your PIN, click Go back
to username and password information,
enter your GW email address
, and click Get Started.
An email will be sent you with instructions on
how to install and log in to Concur Mobile.
Click Tap here to install Concur Mobile to
bring up these mobile app options:

Version 9.61.x – October 12, 2018
SAP Concur's mobile app – Android™
Page 4 of 56
PERMISSIONS
The options that are available on the home screen vary depending on the user's permissions.
For example, users who can access Expense on the web version of SAP Concur can access
Expense in the mobile app. The same applies to Travel, Invoice, and Request.
Trips
View an Itinerary
If
you have any trips, a counter is displayed in the Trips section
of the home screen.
1)
On the home screen, tap Trips.
2)
On the Trips screen, you can:
♦ On the Upcoming and Past tabs, view trip status,
date, etc.
♦ View travel agency information.
3)
To open a trip, tap the desired trip.
4)
On the Itinerary screen, tap each segment to see the
details.

Version 9.61.x – October 12, 2018
SAP Concur's mobile app – Android™
Page 5 of 56
Book a Flight
Depending on your configuration, you may be able to search for and
book a flight.
To search for and book a flight:
• On the home screen, tap (lower-left corner) and then
tap Book a Flight on the Select an Action menu.
– or –
• On the Trips screen, tap (upper-right corner) and then tap
Book a Flight on the Select an Action menu.
1)
On the Book Flight screen:
♦ Tap One Way or Round Trip.
• Enter the search criteria.
• Tap Search.
2)
On the Results Summary screen,
tap the desired carrier.
3)
On the Select Flight screen, tap the
desired flight.
4)
On the Flight Detail screen:
♦ Review for accuracy.
♦ Fill in the fields and make the
desired selections.
♦ Tap Reserve.
Version 9.61.x – October 12, 2018
SAP Concur's mobile app – Android™
Page 6 of 56
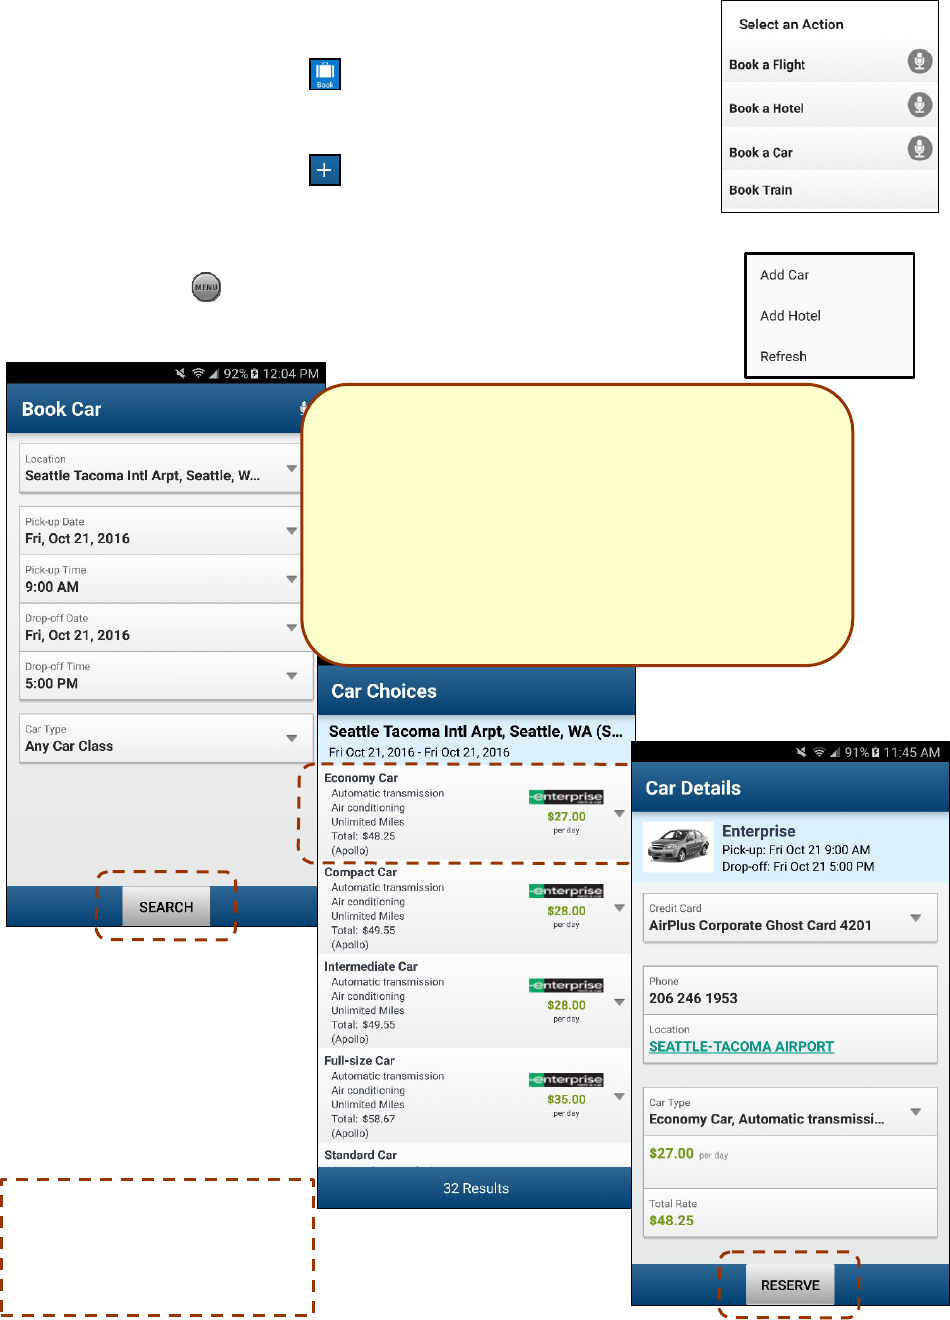
Book a Rental Car
To search for and book a rental car:
• On the home screen, tap (lower-left corner) and then
tap Book a Car on the Select an Action menu.
– or –
• On the Trips screen, tap (upper-right corner) and then tap
Book a Car on the Select an Action menu.
– or –
Depending on your company's
configuration, you may not be
able to book a car unless you
are adding it to an existing
itinerary.
• To add a car to an existing itinerary, with the itinerary open,
tap the menu button and then tap Add Car.
1)
On the Book Car screen:
♦ Enter the search criteria.
♦ Tap Search.
2)
On the Car Choices screen, tap the desired car.
3)
On the Car Details screen:
♦ Review for accuracy.
♦ Fill in the fields and make the desired
selections.
♦ Tap Reserve.

Version 9.61.x – October 12, 2018
SAP Concur's mobile app – Android™
Page 7 of 56
Book a Hotel
To search for and book a hotel:
• On the home screen, tap (lower -left corner) and then
tap Book a Hotel on the Select an Action menu.
– or –
• On the Trips screen, tap (upper-right corner) and then
tap Book a Hotel on the Select an Action menu.
– or –
• To add a hotel to an existing itinerary, with the itinerary open,
♦
T
ap
Reserve Room.
tap the menu
button and then tap Add Hotel.
– or –
On the search result screen, tap to get the office location
results.
1)
On the Search screen:
♦ Enter the search criteria.
♦ Tap Search.
2)
On the Hotels screen, tap the desired hotel.
3)
On the Overview screen, tap the desired room.
4)
On the next screen:
♦ Review for accuracy.
♦ Fill in the fields and make the desired
selections.
Depending on your
company's
configuration,
you
may not be able to
book
a hotel unless you
are
adding it to an
existing
itinerary.
Tap here for amenities, cancellation info, etc.
Tap here for
images

Version 9.61.x – October 12, 2018
SAP Concur's mobile app – Android™
Page 8 of 56
Book Amtrak Direct Connect
You can book rail if your company is configured to use Amtrak Direct
Connect.
1
• On the home screen, tap (lower left corner) and then
tap Book Train on the Select an Action menu.
– or –
• On the Trips screen, tap (upper right corner) and then
tap Book Train on the Select an Action menu.
1)
On the Book Train screen:
♦ Tap One Way or Round Trip.
♦ Enter the search criteria.
♦ Tap Search.
2)
On the Select Train screen, tap the desired
trip.
3)
On the Select Seat Class screen, tap the
desired seat.
4)
On the Book Train Details screen:
♦ Review for accuracy.
♦ Fill in the fields and make the desired
selections.
♦ Tap Reserve.

Cancel a Rental Car Reservation
There are two ways to cancel a car reservation on an itinerary.
1)
On the itinerary, long
2)
Tap Cancel Hotel.
Cancel a Hotel Reservation
There are two ways to cancel a hotel reservation on an itinerary.
Method #1:
press the reservation.
Method #2:
1)
On the itinerary, open
the hotel reservation.
2)
Tap Cancel Car.
Version 9.61.x – October 12, 2018
SAP Concur's mobile app – Android™
Page 9 of 56
Method #1:
1) On the itinerary, lon
g press
the reservation.
2) Tap Cancel Car.
Method #2:
1)
On the itinerary, open the
car reservation.
2)
Tap Cancel Car.
Version 9.61.x – October 12, 2018
SAP Concur's mobile app – Android™
Page 10 of 56
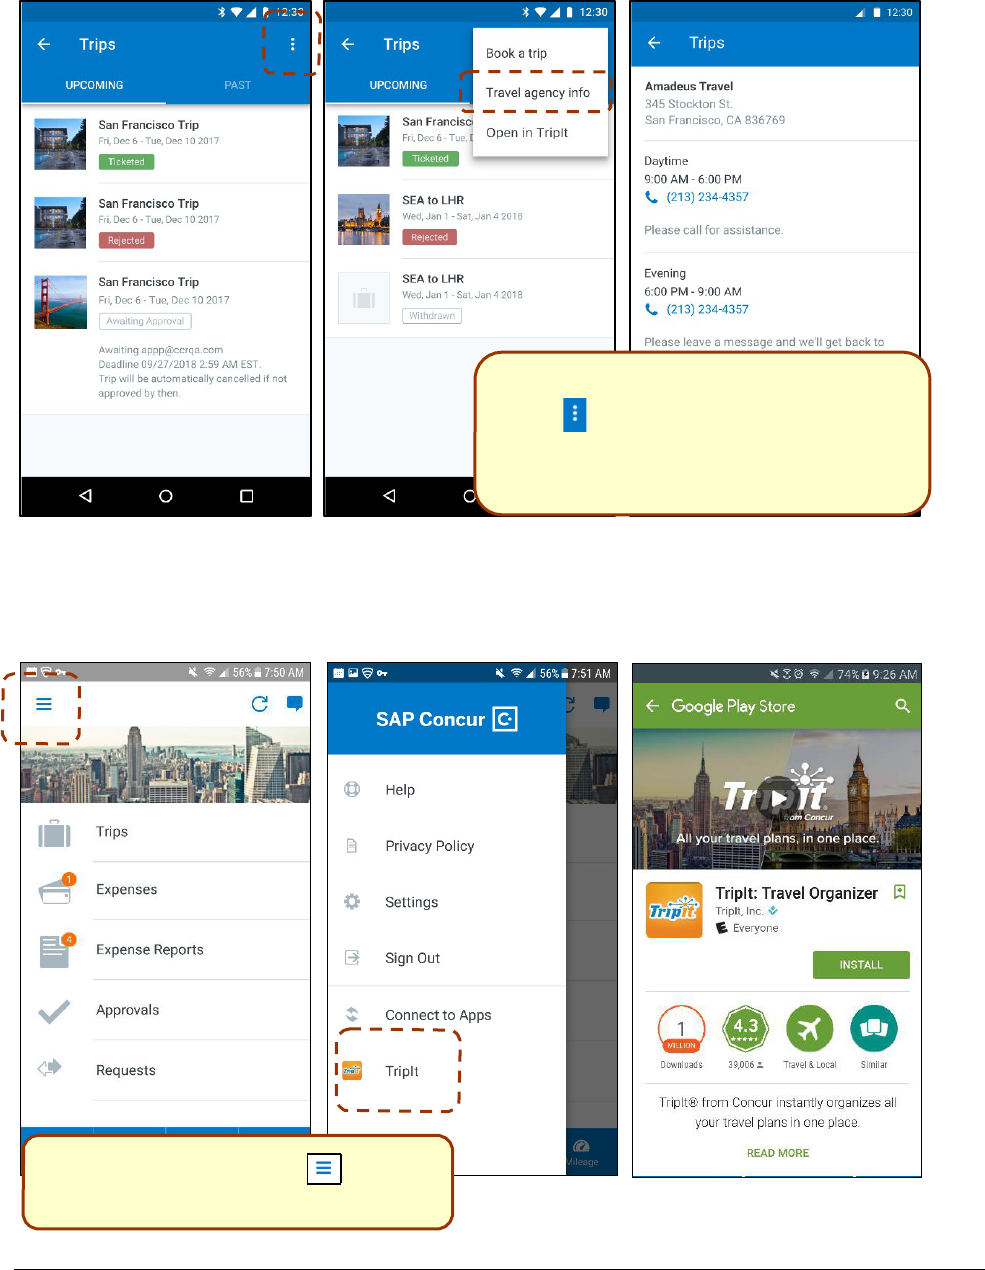
View Agency Information
You can access your agency information, such as hours, phone numbers, and web site
information.
Use TripIt and Other Apps
Depending on your company's configuration, TripIt (and other apps) may be available for
download via the home screen.
1) On the home screen, tap.
.
2) Tap the desired option and download.
m
lis
A
1)
On the ho e screen, tap Trips.
2)
Tap
.
3)
From the t, select Travel Agency Info.
The Travel gency Info screen appears.

Version 9.61.x – October 12, 2018
SAP Concur's mobile app – Android™
Page 11 of 56
VIEW TRIPIT ITINERARY
1)
On the home screen, tap Trips.
2)
On the Trips screen, tap View in TripIt.

Version 9.61.x – October 12, 2018
SAP Concur's mobile app – Android™
Page 12 of 56
Expenses and Expense Reports
Expense List (Expenses Screen)
On the home screen, tap Expenses to access your list of
expenses. Use the Expenses screen to:
• Add, view, edit, and delete mobile expenses. Mobile
expenses are designed to be quick and easy.
♦ To make more extensive features like itemizations and
attendees, either:
• Add the mobile expense to an expense report
then edit.
• Create the expense on an open expense report
and then edit.
♦ For car mileage/kilometers expenses, use the on
the home screen.
• View and make minimal edits to card transactions, which
appear with the icon.
♦ To make more extensive edits, add the card
transaction to an expense report then edit.
♦ To delete a card transaction, use the web version of
Expense, if your company allows you to delete card transactions.
• View e-receipts, which can be edited once attached to a report.
• Attach expenses – mobile expenses, e-receipts, and card transactions – to a new or
existing expense report.
Expense Report List (Active and History Sections)
On the home screen, tap Expense Reports to access the list of expense reports. On the
Reports screen, you can view up to 100
expense reports in each of the Active or
History sections. In the Active section,
you can:
• View unsubmitted, submitted, and
returned reports
• Create a new report
• Copy reports
• Delete unsubmitted reports
• View red and yellow earmarked
reports flagged for exceptions
• View the name, status, date, and
amount of each report
All active reports are separated into
Unsubmitted, Submitted, and Other
sections. Within each category, the
reports are sorted by report date.

Version 9.61.x – October 12, 2018
SAP Concur's mobile app – Android™
Page 13 of 56
You can open an existing expense report and:
• View and edit the report summary (report header)
• View and attach receipt images
• View, add, import, match, edit (add attendees and
itemizations), and remove expenses
• Submit your report
In the History section, you can:
• View reports that have been approved and sent for
payment
• View red and yellow earmarked reports flagged for
exceptions
• Copy reports
Create a Mobile Expense
To create a mobile expense:
• On the home screen, tap .
– or –
• On the home screen, tap .
– or –
• On the Expenses screen, tap .
1)
On the Expense screen, fill in the
fields and make the desired
selections.
2)
Tap Attach Receipt to take a
picture of the receipt, if required.
3)
Tap
to save.

Version 9.61.x – October 12, 2018
SAP Concur's mobile app – Android™
Page 14 of 56
Delete an Expense from the Expenses Screen
You can delete a mobile expense from the Expenses screen.
NOTE: To delete a card transaction, use the web version of
Expense - if your company allows you to delete card
transactions.
Create a New Expense Report
You can create a new report:
• From the Reports screen (shown here)
• While adding expenses from the Expense screen (described
on the following pages)
• While creating a car mileage expense (described on the
following pages)
1)
On the Expenses screen,
long press the desired
expense (or multiple
expenses). The icon
appears.
2)
Tap
to delete the
expense.
1)
On the home screen, tap Expense Reports.
2)
On the Reports screen, tap .
3)
On the New Report screen:
♦ SAP Concur provides a report name. Change it if desired.
♦ Fill in the fields and make the desired selections.
♦
Tap
to save.
4)
On the Report screen, enter your expenses, attach receipts,
etc. (described on the following pages).

Version 9.61.x – October 12, 2018
SAP Concur's mobile app – Android™
Page 15 of 56
Move Expenses from the Expenses Screen to an Expense Report
Manage Multiple Items on the Expenses Screen
You can delete multiple expenses or move them to an expense report on the Expenses
screen.
1)
On the Expenses screen, long
press a desired item to
activate multi-selection mode.
2)
To add additional items to the
selection, single-tap them.
3)
To remove items from the
selection, single-tap them.
4)
After selecting the desired
items, you can:
♦ Tap
to delete the
selected itemes.
♦ Tap
to add the
selected items to a report.
You can move expenses to a new
expense report or an existing
expense report.
1)
On the Expenses screen, long press the
desired expense (or multiple expenses).
The
icon appears.
2)
Tap
to add an expense to an expense
report.
3)
On the Select Report screen, tap the
desired expense report.
- or -
Tap
to manually create a new expense
report.

Version 9.61.x – October 12, 2018
SAP Concur's mobile app – Android™
Page 16 of 56
Create an Expense with an Open Expense Report
1)
On the home screen, tap Expense Reports.
2)
On the Reports screen, tap to open the desired report.
3)
On the Report screen, tap to create a new expense.
4)
On the Expense screen:
♦
♦
♦
Choose the desired expense type.
Fill in the fields and make the desired selections.
Tap
to save.

Version 9.61.x – October 12, 2018
SAP Concur's mobile app – Android™
Page 17 of 56
Edit an Expense on an Expense Report
If an expense is attached to an unsubmitted expense report, you can edit almost every field.
Add a Car Mileage (or Kilometer) Expense
1)
On the home screen, tap .
NOTE: The Mileage icon only appears if your company has the Personal Car Mileage feature
activated and when you have registered a personal car on the Profile > Profile Settings >
Personal Car page. This icon does not appear for company cars.
2)
On the Select Report screen, either tap the desired expense report or tap Add to new report.
3)
On the Mileage Expense screen:
♦ Fill in the fields and make the desired selections.
NOTE: SAP Concur calculates the amount based on the distance and the company's mileage
rate.
♦
Tap
to save.
1)
On the Reports
screen, tap to open
the desired report.
2)
On the Report
screen, tap to open
the desired
expense.
3)
On the Expense
screen:
♦ Make the
desired
changes.
♦
Tap to save.

Version 9.61.x – October 12, 2018
SAP Concur's mobile app – Android™
Page 18 of 56
Add a Car Mileage (or Km) Expense–Mileage Calculator
The Mileage Calculator can be used for both personal and company car mileage. The example
below shows personal mileage, using the Mileage icon on the home screen. For company car
mileage, the user creates an expense as usual and selects the Company Car Mileage (or
something similar) expense type. After that, both types work the same way – as shown below.
1)
On the home screen, tap the Mileage icon (lower-right corner).
NOTE: This icon appears only if the company's configuration includes personal car mileage and if
the user has defined a personal car in Profile.
2)
On the Select Report screen, either:
♦ Tap Add to new report. Then, complete the steps to create the new report.
– or –
♦ Add to an existing report by tapping the report.
3)
On the Mileage Expense screen, tap Add Route.

Version 9.61.x – October 12, 2018
SAP Concur's mobile app – Android™
Page 19 of 56

Version 9.61.x – October 12, 2018
SAP Concur's mobile app – Android™
Page 20 of 56
lculator
e
ending
l
f
location
th
the m
il
lculator
ation
to
pper
-
right
oute
is av
screen,
in the Add Destina
ocation.
s.
The selected location
app
eage
(lower-right corner).
screen,
you have several
add
another destination.
corner)
to choose to avoid
ailable
(shown as a gray li
ne
hat route.
Route.
unt appea
6)
On the Distance Ca
field, start typing th
7)
Select from the list o
on the map along wi
8)
On the Distance Ca
additional options:
♦ Tap Add Destin
♦ Tap Options (u
or highways.
♦ If an alternate r
you can select t
9)
When done, tap Use
The mileage and the
tion
ears
tolls
),
reimbursement amo
screen.
r on the Mileage Expense
ulator
sc
yping
the
4) On the Distance Calc
Location field, start t
reen, in the Start
initial location.
5) Select from the list of locations. The selected location
appears on the map.

Version 9.61.x – October 12, 2018
SAP Concur's mobile app – Android™
Page 21 of 56
MAKE ADJUSTMENTS
1)
To make additional adjustments, on the Mileage
Expense screen, tap Route Details.
2)
On the Route Details screen, tap (upper-right corner)
to access the menu. Using the menu, you can:
♦ Edit any portion of the trip
– or –
♦ Designate part of the trip as personal
To edit a route:
1)
On the menu of the Route Details screen, tap Edit
Route.
2)
Make the desired changes, using the same steps as when
you created the route.
To designate part of the trip as personal:
1)
On the menu of the Route Details screen, tap
Set Segment as Personal.
2)
On the Set Personal screen, select the segment
that is personal.
3)
Tap
. On the Route Details screen, the
personal and business distance amounts appear
at the bottom of the screen.

Version 9.61.x – October 12, 2018
SAP Concur's mobile app – Android™
Page 22 of 56
5)
On the Ro
screen, w
6)
Tap
. Th
ute
Details screen, tap (upper-
le
here
the adjusted distance and amou
e
expense is saved to the expense r
ft
co
nt
a
eport
rner) to return to the Mileage Expe
ppear.
.
nse
To
deduct
co
1)
On the
Ro
2)
On the Di
3)
Select wh
4)
When don
mmute mileage:
ute Details screen, tap Deduct
Co
stance
Calculator screen, define
th
ether
the commute is one way or
rou
e,
tap Use Route. The Route Detai
mm
e
sta
nd
t
ls
sc
ute
Distance.
rting and ending points using the m
rip.
reen appears.
ap.

Version 9.61.x – October 12, 2018
SAP Concur's mobile app – Android™
Page 23 of 56
Add/Edit/Delete Itemizations
After an expense has been added to a report, you can itemize the expense.
To edit an itemization, tap the
desired itemization and then
make the desired changes.
To remove an itemization,
long-press the desired
itemization and then tap
Remove From Itemization.
1)
On the report, tap to open the desired expense.
2)
On the Expense screen, tap Itemization.
3)
On the Itemization screen:
♦ Enter the daily room rate and daily tax rate.
♦
Tap
to save. The individual itemizations
appear.
If there is a remaining balance, tap and repeat these
steps (including ) until the remaining amount balance
is zero.

Version 9.61.x – October 12, 2018
SAP Concur's mobile app – Android™
Page 24 of 56
Search > Favorites
Search > Advanced
New from
N
Add/Edit/Delete Attendees
After an expense has been added to a report, you can add attendees to the expense.
Contact
ew
To edit an attendee, tap the
desired attendee name and
then make the desired
changes.
To delete an attendee, long-
press the desired attendee
name and then tap Remove.
1)
On the report, tap to open the desired expense.
2)
On the Expense screen, tap Attendees.
3)
On the Attendees screen, tap to add.
4)
On the Add Attendee Options menu, tap one
of the following:
♦ Search > Favorites to search your Favorite
Attendees
♦ Search > Advanced to search your
company's list of attendees or from an
external source (like Salesforce)
♦ New from Contact to select from your
smartphone contact list
♦ New to manually add the attendee

Version 9.61.x – October 12, 2018
SAP Concur's mobile app – Android™
Page 25 of 56
View/Add/Edit/Delete Allocations
You can view report-level allocations, expense-level allocations, and itemization-level
allocations.
VIEW REPORT-LEVEL ALLOCATIONS
The Allocation Summary screen shows that the expense is allocated to the Mid Market cost
center with a total of $2,376.85.
1)
On the Report screen, tap Allocation Summary.
2)
On the Allocation Summary screen:
♦ Review the information.
♦
Tap
(upper-left corner) to return to the
report.

Version 9.61.x – October 12, 2018
SAP Concur's mobile app – Android™
Page 26 of 56
1)
On the Report screen, tap the desired expense.
2)
On the Expense screen, tap Allocations.
3)
On the Allocate Expense screen:
♦ Review the information.
♦
Tap
(upper-left corner) to return to the
report.
VIEW EXPENSE-LEVEL ALLOCATIONS

Version 9.61.x – October 12, 2018
SAP Concur's mobile app – Android™
Page 27 of 56
VIEW ITEMIZATION-LEVEL ALLOCATIONS
1)
On the Report screen, tap the desired expense.
2)
On the Expense screen, tap Itemization.
3)
On the Itemization screen, tap the desired itemization.

Version 9.61.x – October 12, 2018
SAP Concur's mobile app – Android™
Page 28 of 56
ADD/EDIT/DELETE ALLOCATIONS
1)
To add allocations, on the Expense screen:
♦ Tap Allocations.
♦ On the Allocate Expense screen, tap (upper-right
corner).
♦ Tap Allocate Expense.
♦ On the Allocations screen, fill in the desired percentage.
♦ Tap DONE.
♦ Fill in the fields (if any) and make the desired selections.
♦ Tap SAVE.
♦ On the Allocate Expense screen, tap (upper-right
corner) to add additional allocations.
2)
To edit an allocation, on the Allocate Expense screen, tap the
desired allocation to open it and then make the desired
changes.

Version 9.61.x – October 12, 2018
SAP Concur's mobile app – Android™
Page 29 of 56
3)
To delete an allocation, on the Allocate Expense screen:
♦
Tap
(upper-right corner).
♦ Tap Clear Allocations.
♦ Tap the desired selection circles.
♦
Tap
to delete the selected allocations from an expense.

Version 9.61.x – October 12, 2018
SAP Concur's mobile app – Android™
Page 30 of 56
CREATE ITEMIZATION-LEVEL ALLOCATIONS
tion
screen:
en,
tap
n
the desire
ke
the
desire
1)
To add allocatio
♦ Tap Allocat
♦ On the Allo
(upper-righ
t
♦ Tap Allocat
♦ On the Allo
percentage.
♦ Tap DONE.
♦ Fill in the fie
selections
ns, on the Itemiza
ions.
cate
Expense scre
corner).
e Expense.
cations screen, fill i
d
lds (if any) and ma
d
♦ Tap SAVE.
♦ On the Allocate Expense screen, tap
(upper-right corner) to add additional
allocations.
2) To edit an allocation, on the Allocate Expense
screen, tap the desired allocation to open it and
then make the desired changes.
I
CON
Once items are allocated, an Allocation icon appears next to the
expense and at the report level.

Version 9.61.x – October 12, 2018
SAP Concur's mobile app – Android™
Page 31 of 56
Work with Receipts
Attach a receipt to a report or to an individual expense, whichever the situation requires.
ATTACH A MISSING RECEIPT DECLARATION TO AN EXPENSE
Attach a missing receipt declaration to an expense.
1)
On the report screen, tap to create a new
expense.
2)
Fill in the fields and make the desired selections.
3)
Tap Save.
4)
Tap the desired expense.
5)
On the expense screen, tap Attach Receipt.
6)
From the list, select Missing Receipt Declaration.
7)
On the Terms & Conditions screen, tap Accept.
The Missing Receipt Declaration appears on the
Receipt Viewer screen.
1)
On the Report screen, tap Receipts.
- or –
On the Expense screen, tap Attach
Receipt.
2)
On the Select A Receipt Action
menu, tap:
♦ Select from Receipt Store to
select an image in your Concur
Receipt Store (Available Receipts
Library in the web version of SAP
Concur)
♦ Select from Gallery to select an
image in your device gallery
♦ Capture Picture to use your
device camera

Version 9.61.x – October 12, 2018
SAP Concur's mobile app – Android™
Page 32 of 56
Remove an Expense from an Expense Report
You can remove an expense from an unsubmitted expense report.
1)
Long press on the desired expense.
2)
On the Expense Entry Action menu,
tap Remove From Report.
NOTE: If you delete a mobile expense or an
expense created from a card transaction, it is not
really deleted; it is moved back to the "pool" of
expenses on the Expenses screen.
If you delete any other type of expense from an
expense report, it is truly deleted. (This is
consistent with the web version of Expense.)
Edit Report Header
Information
You can edit the report name, date,
and other company-defined fields
on an unsubmitted report.
1)
On the Report screen, tap
Report Summary.
2)
On the Summary screen,
make the desired changes.
3)
Tap
to save.

Version 9.61.x – October 12, 2018
SAP Concur's mobile app – Android™
Page 33 of 56
Submit an Expense Report
NOTE: Expenses on the report that are related to card transactions are not really deleted –
they are returned to the "pool" of card transactions. Cash transactions are truly deleted.
Copy an Unsubmitted Expense Report
1) On the Reports s
section, swipe the
reen
desir
c
, in the Active
ed report.
2)
Tap Copy.
3)
Enter the desired report name.
4)
Click Create.
The copied expense report appears.
On the Report screen, tap Submit.

Version 9.61.x – October 12, 2018
SAP Concur's mobile app – Android™
Page 34 of 56
Work with Fixed Travel Allowances
Users can now claim their fixed meals and fixed lodging travel allowances in the SAP Concur
mobile app.
FIXED VS REIMBURSABLE TRAVEL ALLOWANCES
• Fixed travel allowances – often referred to as per diems – provide a defined daily amount
regardless of the actual amount spent by the user.
• Reimbursable travel allowances generally provide reimbursement for the actual amount
of the expense. The ability to create and manage reimbursable travel allowances is not
yet available in the mobile app.
RESTRICTIONS
For the most part, fixed travel allowances work the same way in the mobile app as on the web
version of SAP Concur – with some exceptions. These configuration options are not available in
the mobile app:
• Users cannot define/select:
♦ Trip length
♦ "Short distance"
♦ "Extended trips"
♦ "Use Percent Rule"
♦ Location "within municipality"
• Users cannot enter:
♦ Actual meal amounts
♦ Rate location
• The mobile version of SAP Concur does
not combine meals and lodging rates nor
does it display base rates, company
rates, government rates, etc.
If the user's configuration uses any of the options listed above, the user should manage their
travel allowances using the web version of SAP Concur.
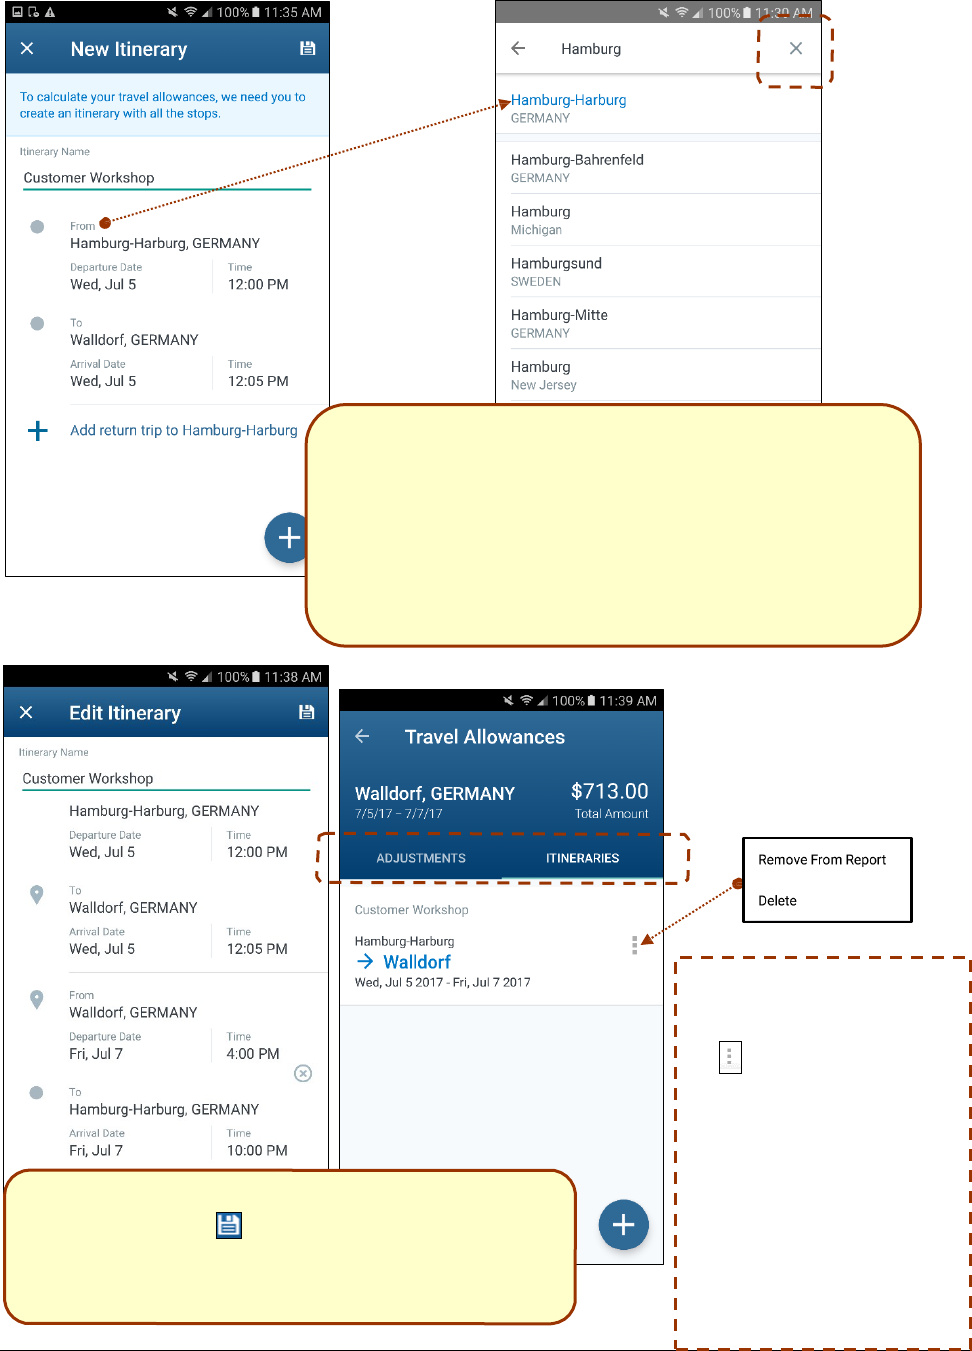
CREATE FIXED ALLOWANCES
1)
With a report open, tap Claim
Allowances (or Travel Allo
2)
On the Add Itinerary screen,
select an existing itinerary.
- or -
You can create a new itinerar
create a new itinerary.)
Select existing
itinerary
Create new
itinerary
wances).
you can
y. (We will
Version 9.61.x – October 12, 2018
SAP Concur's mobile app – Android™
Page 35 of 56
Remove/Delete:
1)
On the Travel
Allowances screen, tap
to open the menu.
2)
On the menu, tap one of
the following:
♦ Remove From
Report to remove
the itinerary from the
report and move it
into the "pool" of
itineraries.
♦ Delete to
permanently delete
the itinerary.
4) On the Edit Itinerary screen
accuracy and tap to save.
, review the itinerary for
The new itinerary appears on the Itineraries tab of
the Travel Allowances screen.
inerary
screen:
tinerary
name.
departure
and arrival location, date,
eturn
trip to to obtain the return tr
3) On the New It
♦
♦
♦
Enter the i
Enter
the
time.
Tap
Add r
fields.
Enter the return trip information.
and
ip
♦
Repeat for each leg of the trip, entering the exact "arrival"
Version 9.61.x – October 12, 2018
SAP Concur's mobile app – Android™
Page 36 of 56
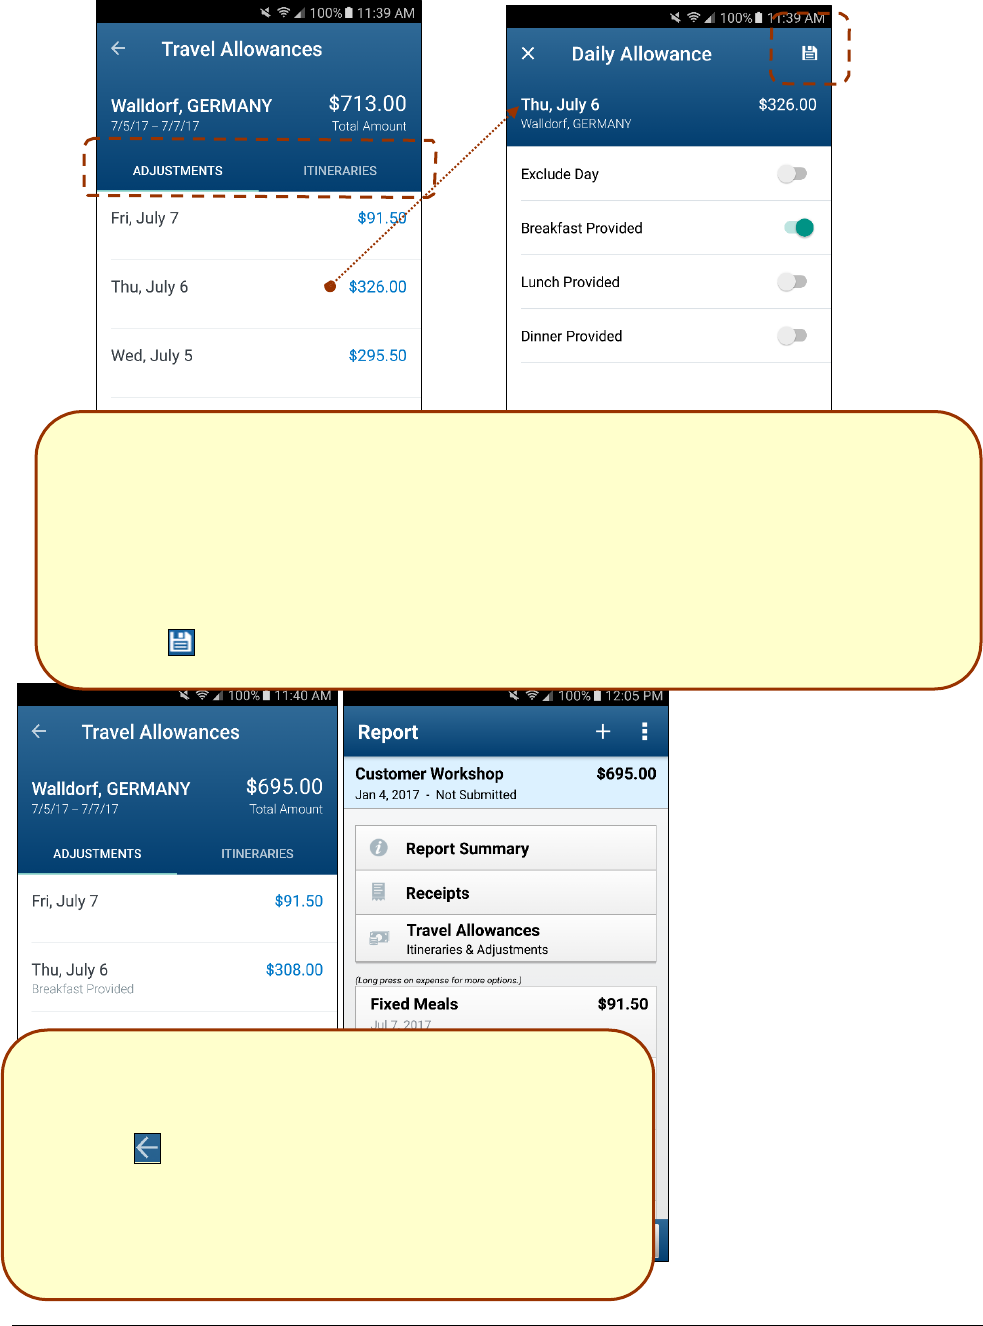
5)
If adjustments are necessary (for example, to deduct for provided meals), tap the
Adjustments tab on the Travel Allowances screen.
6)
Tap to open the daily allowance that requires adjustment.
7)
On the Daily Allowance screen:
♦ Make the desired adjustments, in this case, to indicate that breakfast was provided on
Thursday.
NOTE: If the web version of SAP Concur provides a list of options instead of Yes/No, then
the list appears here as well.
♦
Tap
to save.
8)
On the Travel Allowances screen:
♦ Notice that the Thursday amount has been adjusted.
♦ Make any other required adjustments.
♦
Tap
to return to the expense report.
9)
On the Report screen:
♦ Review for accuracy.
♦ Tap Travel Allowances if changes are necessary.
♦ Finish adding expenses, receipts, etc. Submit when ready.

Version 9.61.x – October 12, 2018
SAP Concur's mobile app – Android™
Page 37 of 56
Requests
The ability to create requests will be available in the SAP Concur mobile app. Like other feature
introductions – the initial feature set is limited and will expand over time.
INITIAL FEATURE SET AND OPTIONS
Multiple policies per user: For clients who allow users to select from multiple policies on the
web version of Request, be aware that users cannot select a policy in the mobile app. Instead,
all requests are created with the first policy that supports segments, preferably the default
policy.
Header form: On this form, only these fields are currently supported:
To Location
Start Date
Comment
Business Purpose
End Date
Segment form: On this form, only these fields are currently supported:
From Location
To Location
Start Date / Time
Comment
Amount
Currency (read-only)
End Date / Time
Segment types: Only these system segment types are currently supported; custom
segment types are not yet supported:
Air Ticket
Rail Ticket
Hotel
Miscellaneous
Car Rental
Workflow: Only "Submit" and "Recall" actions are currently supported. In addition for
"Submit," in those cases where the client allows the user in the web version of SAP Concur to
select their own approver on submit, be aware that this option is not yet available in the
mobile app. The request user's default approver must appear in the user's profile.
Not yet available: These options are not currently available in the mobile app:
Allocations
Expected Expenses
Cash Advances
Request & Travel integration
Custom Fields

Version 9.61.x – October 12, 2018
SAP Concur's mobile app – Android™
Page 38 of 56
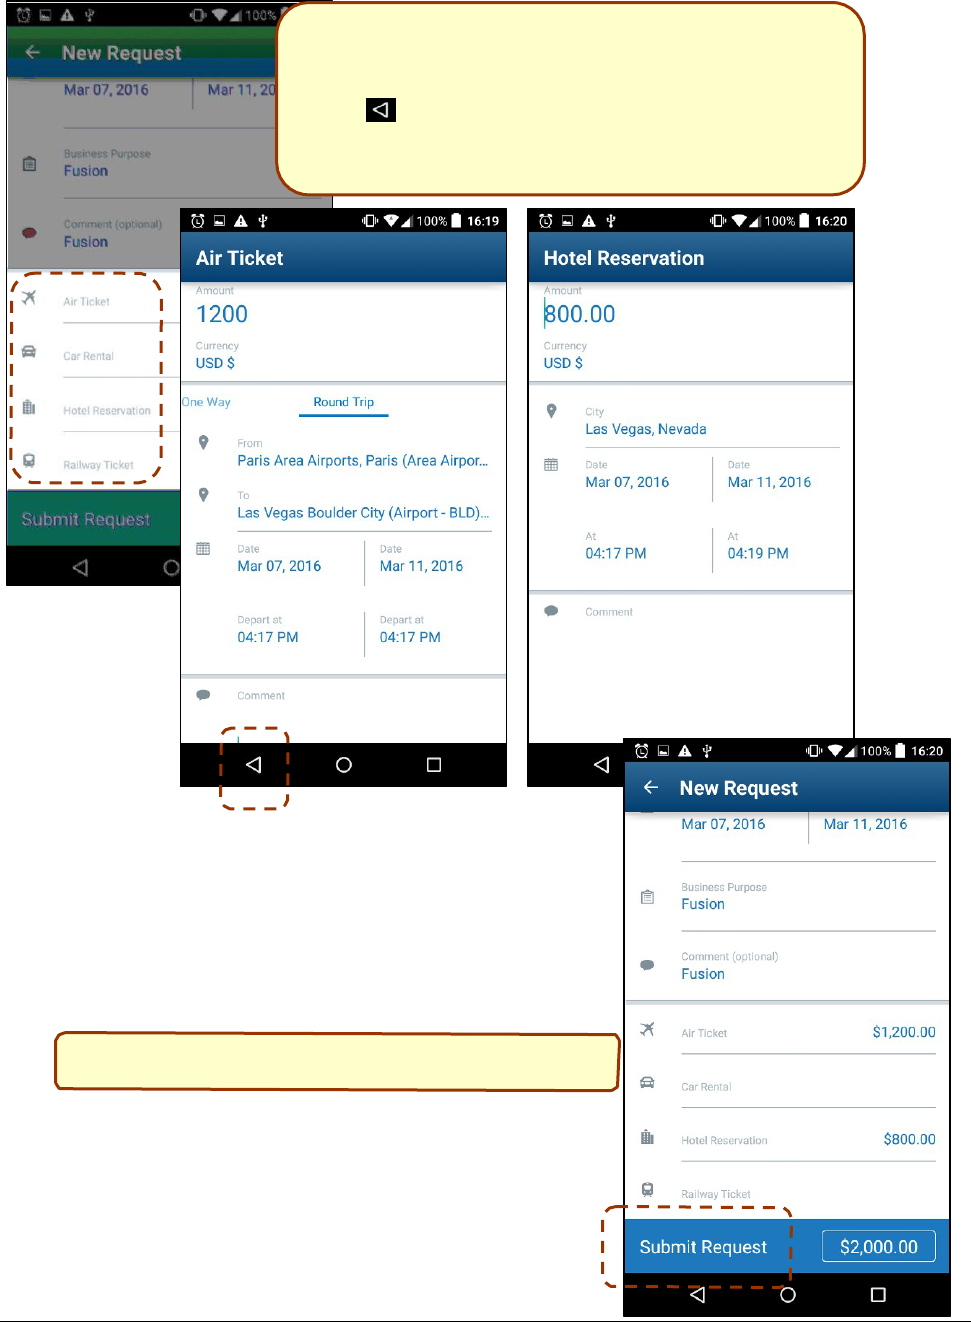
Create a New Request
You can create a new request from the Requests screen
1) On the home screen, tap Requests.
2) On the Requests screen, tap
corner).
(lower-right
3)
On the New Request screen, fill in the location
and date fields. (SAP Concur provides a request
name based on location and destination.)
4)
Add your segments (described on the following
page).
Version 9.61.x – October 12, 2018
SAP Concur's mobile app – Android™
Page 39 of 56
Add Segments to a Request
1)
On the New Request screen, tap a segment type.
2)
On the various segments screens, fill in the fields and
make the desired selections.
3)
Tap
(lower-left corner) to return to the New
Request screen.
4)
Add other segments as desired.
Submit a Request
On the New Request screen, tap Submit Request.

Version 9.61.x – October 12, 2018
SAP Concur's mobile app – Android™
Page 40 of 56
Approvals
Trips
Use Approvals on the home screen to view and approve trips (if you are a trip approver).
In the Report Approvals and Trip
Approvals sections indicates that there
are exceptions.
If the approval type does not have any
approvals, then that type does not appear
on the Approvals screen. For example, if
there are no trips to approve, then Trip
Approvals does not appear.
1)
On the home screen, tap Approvals.
2)
On the Approvals screen, tap to open the desired trip.
3)
On the Trip Approval screen:
♦ View the report details (segments, violations, etc.).
♦ Tap Approve or Reject.

Version 9.61.x – October 12, 2018
SAP Concur's mobile app – Android™
Page 41 of 56
ND BACK AN EXPENSE REPOR
PROVE AN EXPENSE REPORT
Expense Reports
Use Approvals on the home screen to view and approve expense reports (if you are a report
approver or a cost objects approver).
AP
1)
On the home screen, tap
Approvals.
2)
On the Approvals screen, tap
the desired expense report.
3)
On the Report Approval
screen, tap Send Back.
4)
On the Report Approval
screen, enter the desired
comment.
5)
Tap Send Back.
SE
T
1)
On the home screen, tap
Approvals.
2)
On the Approvals screen, tap
the desired expense report.
3)
On the Report Approval
screen, tap Approve.
4)
On the Report Approval
screen, enter the desired
comment.
5)
Tap Approve.
Version 9.61.x – October 12, 2018
SAP Concur's mobile app – Android™
Page 42 of 56
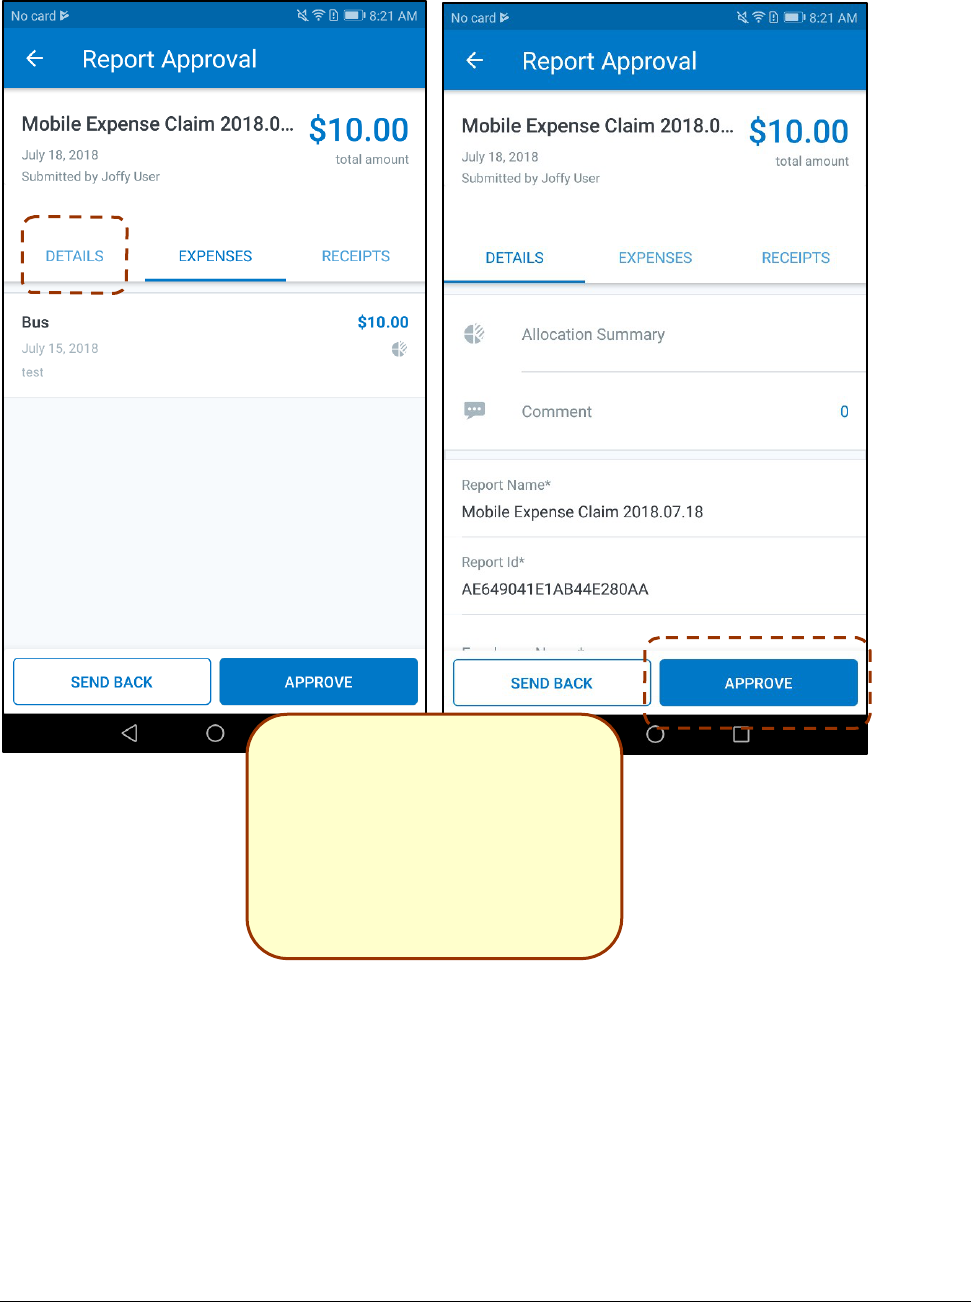
VIEW AND PPROVE AN XPENSE AS A O
RE
A
E
C ST OBJECT APPROVER
1)
On the home screen, tap
Approvals.
2)
On the Approvals screen, tap
the desired expense report.
3)
On the Report Approval
screen, tap Details.
4)
When ready to approve an
expense, tap Approve.
Version 9.61.x – October 12, 2018
SAP Concur's mobile app – Android™
Page 43 of 56
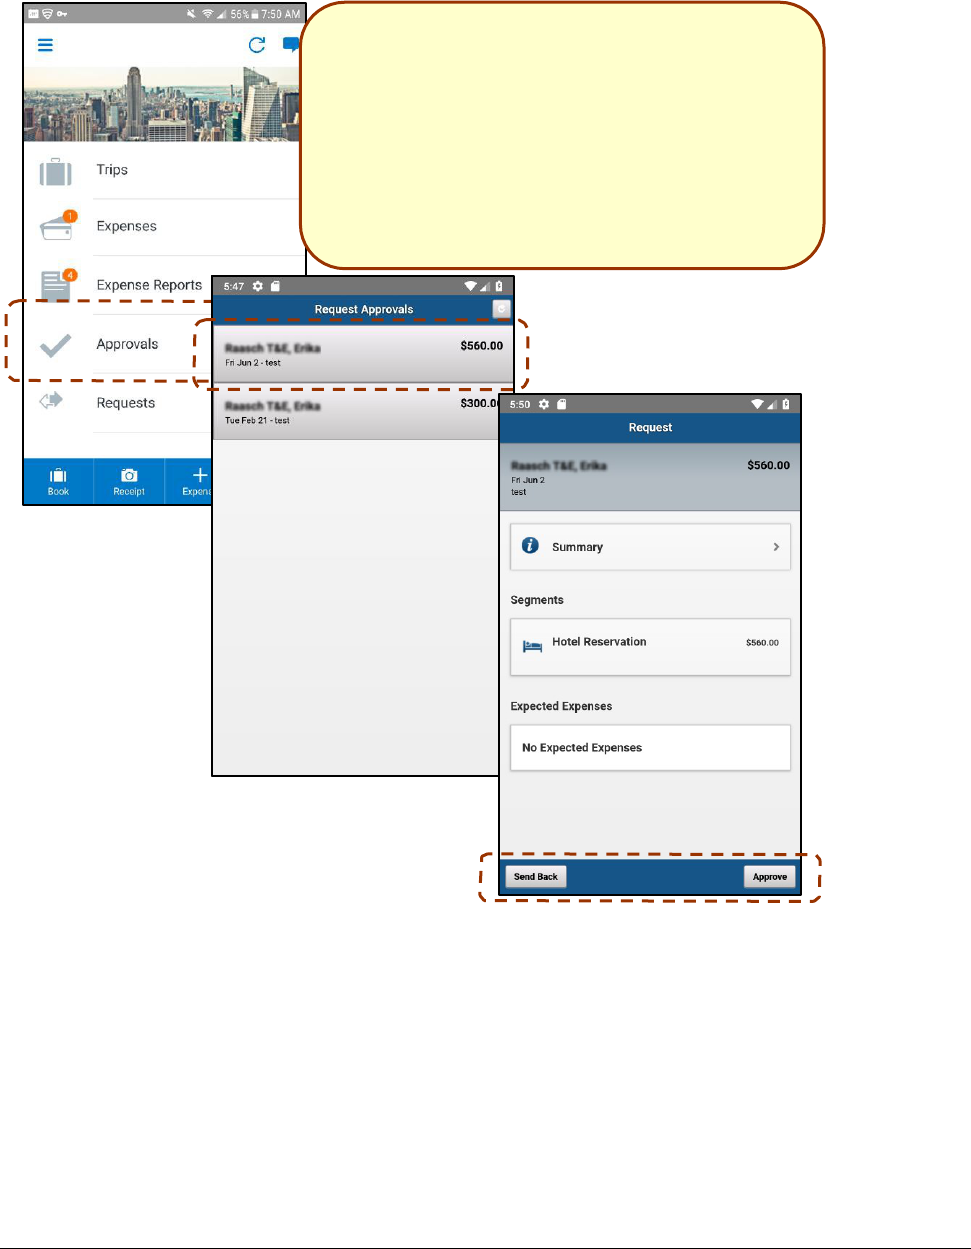
Requests
Use Approvals on the home screen to view and approve requests (if you are a request
approver).
1)
On the home screen, tap Approvals.
2)
On the Approvals screen, tap Request
Approvals.
3)
Tap to open the desired request.
4)
On the Request Approvals screen:
♦ View the request details (segments,
expected expenses, etc.).
♦ Tap Approve or Send Back.
NOTE: If you send back, you must provide

Version 9.61.x – October 12, 2018
SAP Concur's mobile app – Android™
Page 44 of 56
Payment Requests (Invoice)
Use Approvals on the home screen to view and approve payment requests (if you are an
approver).
NOTE: This also includes Cost Object Approvals and Authorized Approvals.
ACCESS
To access payment request approvals:
a
p Approvals.
en,
tap Invoice Approvals.
1)
On the home screen, t
2)
On the Approvals scre
The Invoice Approvals screen appears.

Version 9.61.x – October 12, 2018
SAP Concur's mobile app – Android™
Page 45 of 56
REVIEW AND APPROVE PAYMENT REQUESTS
A
PPROVE/RETURN ONE OR MORE PAYMENT REQUESTS
1)
On the Invoice
A
(upper-right corn
appears to the lef
2)
Tap the desired s
3)
Tap Send Back o
pprovals screen, tap
er). A selection circle
t of each payment request.
elected circles.
r Approve.
1)
On the Invoice Appr
the desired payment
r
2)
Tap the Summary, L
tabs to access and re
3)
When done, tap Sen
ovals
scree
equest.
ine
Items,
view
all infor
d Back or A
n, tap to open
and Images
mation.
pprove.

Version 9.61.x – October 12, 2018
SAP Concur's mobile app – Android™
Page 46 of 56
Purchase Requests (Invoice)
Use Approvals on the home screen to view and approve purchase requests (if you are an
approver).
NOTE: This also includes Cost Object Approvals and Authorized Approvals.
1)
On the home screen, tap Approvals.
2)
On the Approvals screen, tap Purchase Request
Approvals.
3)
On the Purchase Request screen, tap to open the
desired request.
(cont'd)

Version 9.61.x – October 12, 2018
SAP Concur's mobile app – Android™
Page 47 of 56
With the purchase request open:
4)
View the request details (summary, images, vendor info,
etc.).
5)
Tap Approve or Send Back.
NOTE: If you send back a request, you must provide a
comment.

Version 9.61.x – October 12, 2018
SAP Concur's mobile app – Android™
Page 48 of 56
Budget
Use Budgets on the home screen to see your budget in a yearly, quarterly, and monthly view.
You can toggle between budgets and approvals to see – in real time – if there is enough
budget remaining to allow approval of an expense.
NOTE: You will be sent push notifications if your budget is approaching its limit or is over limit.
1)
On the home screen, tap
NOTE: The "striped" sect
spend.
2)
On the Budgets screen,
t
NOTE: The date represe
budget start and end dat
udgets
.
n
of the colored bar indicates p
p
the desired budget.
s
where "today" is in relation to
cre
re
b
u
en,
tap the Education section.
flects
the overall totals for all
dget.
B
io
ending
a
nt
e.
the
3) On the Budget Details s
NOTE:
The Education chart
products associated with the

Version 9.61.x – October 12, 2018
SAP Concur's mobile app – Android™
Page 49 of 56
Concur Locate
Check-in With Location Check In or Request Safety Assistance
If your company uses SAP Concur's messaging service, you can send your check-in location
details to your company or request assistance using your mobile device.
NOTE: While your mobile device is offline, the SAP Concur mobile app keeps and displays your
previous check-in location details.

Version 9.61.x – October 12, 2018
SAP Concur's mobile app – Android™
Page 50 of 56
On the Check In Location screen, you can check-in to your current location only while your
mobile device is online.
1)
On the home screen, tap
(upper-left corner).
2)
On the menu screen, tap
Check In Location.
3)
On the Check In
Location screen, tap
Check In Here.
On the Request Safety Assistance screen, you can request assistance only while your mobile
device is online.
1)
On the home screen, tap
.
2)
On the menu screen, tap
Request Safety
Assistance.
3)
On the Request Safety
Assistance screen, tap
Request Assistance.
4)
In the text field, enter the
appropriate help request
message and then tap Send.
A message appears, confirming
that your request was
successfully sent.

Version 9.61.x – October 12, 2018
SAP Concur's mobile app – Android™
Page 51 of 56
Location Access
Use the Location Access feature to allow/disallow SAP Concur access to your location.
Access the Location Access feature to select location options.
2) O
1) On the Settings screen, tap Location Access.
n the Location Access screen, tap the desired
location option.
1)
On the Allow SAP Concur
to use your location?
screen, tap either:
♦ I Agree
– or –
♦ No, Thanks
NOTE: If you tap I Agree,
the Allow "SAP Concur"
to access your location
while you are using the
app? screen appears.
2)
On the Allow "SAP
Concur" to access your
location while you are
using the app? screen,
tap either:
♦ Allow
– or –
♦ Deny

Version 9.61.x – October 12, 2018
SAP Concur's mobile app – Android™
Page 52 of 56
Concur Drive
If your company uses Concur Drive, you can automatically use GPS to track your travel –
either manually or automatically – on your mobile device.
The SAP Concur mobile app captures your route data - which is available in Concur Expense
and on the mobile app - where you can select the segments to add to an expense report.
Track Mileage Automatically
Use Mileage on the home screen to set up the day and time (for example, Monday through
Friday, 8 AM to 5 PM) for which the app will automatically track your trips by detecting car
movement.
To set Drive to track distance
automatically:
1)
Tap Mileage (lower-right corner) of
the main screen.
2)
On the menu that appears, tap
Enable Concur Drive.
3)
On the Drive Settings screen, tap
Scheduled.
4)
Make the desired selections.
Drive will track distance automatically
during the times the user have selected.
Version 9.61.x – October 12, 2018
SAP Concur's mobile app – Android™
Page 53 of 56
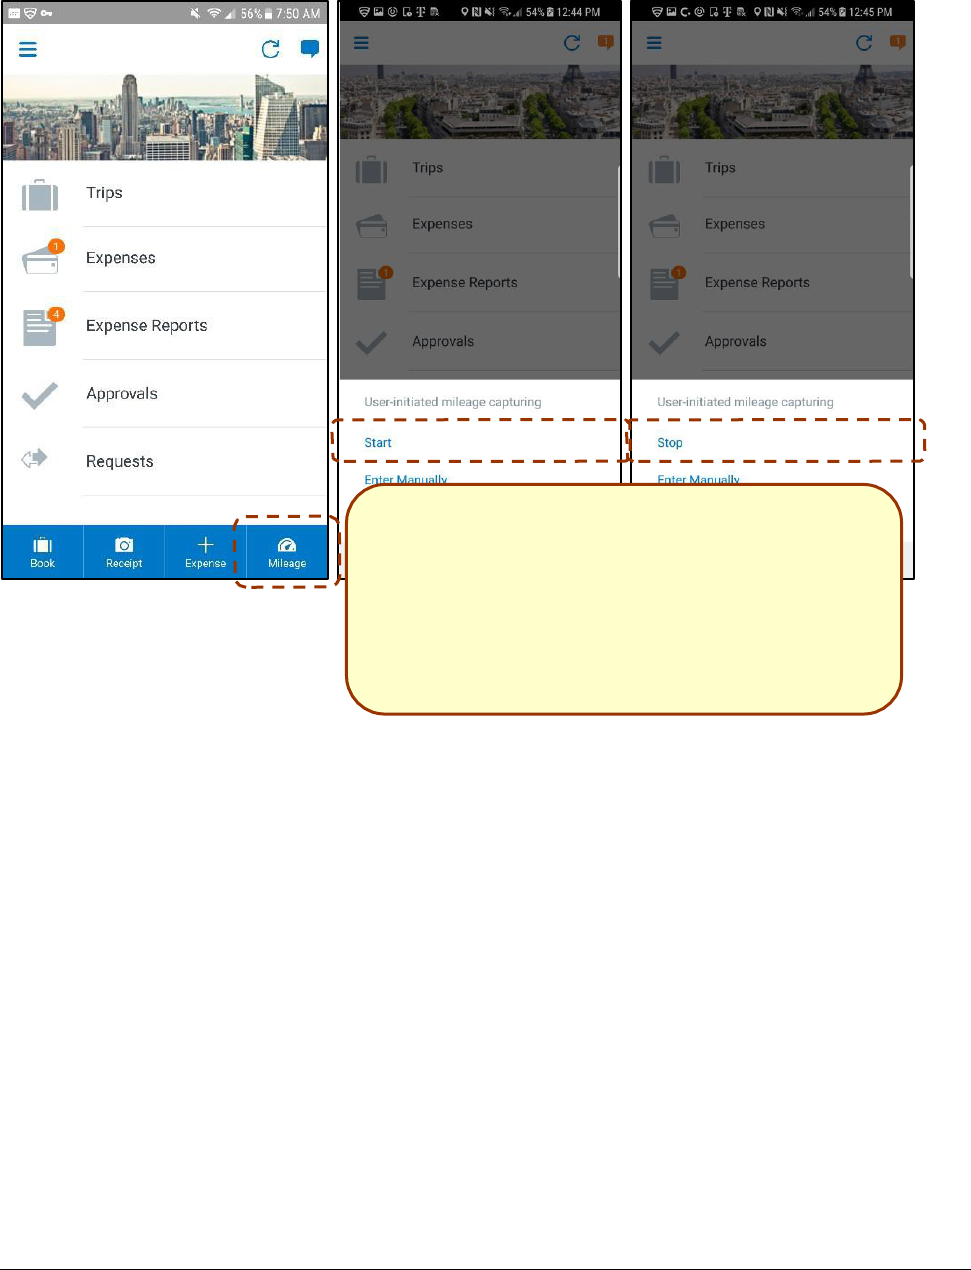
Track Mileage Manually
Use Mileage on the home screen to initiate GPS tracking manually with a click of a button and
then stop when you want your trip to end.
To use Drive to track distance manually:
1)
Tap Mileage (lower-right corner) of the main
screen.
2)
On the menu that appears, tap Start. (This option
appears if User-Initiated is selected in Settings.)
3)
When done, tap Mileage (lower-right corner) again.
4)
On the menu, tap Stop.

Version 9.61.x – October 12, 2018
SAP Concur's mobile app – Android™
Page 54 of 56
ExpenseIt
If your company uses ExpenseIt, you can manage your expenses start to finish. The SAP
Concur mobile app will turn your receipts into expense entries and then send them directly into
Concur Expense.
Convert Receipts into Expenses
Use ExpenseIt on the home screen to turn your receipts into expenses.
1)
Tap ExpenseIt.
2)
Take a picture of the receipt. Concur analyzes
the receipt information.

Version 9.61.x – October 12, 2018
SAP Concur's mobile app – Android™
Page 55 of 56
3)
When the analysis is complete, open the
receipt, attach to a report, edit as
necessary, etc.
4)
When done, tap Move To Claim.
Version 9.61.x – October 12, 2018
SAP Concur's mobile app – Android™
Page 56 of 56
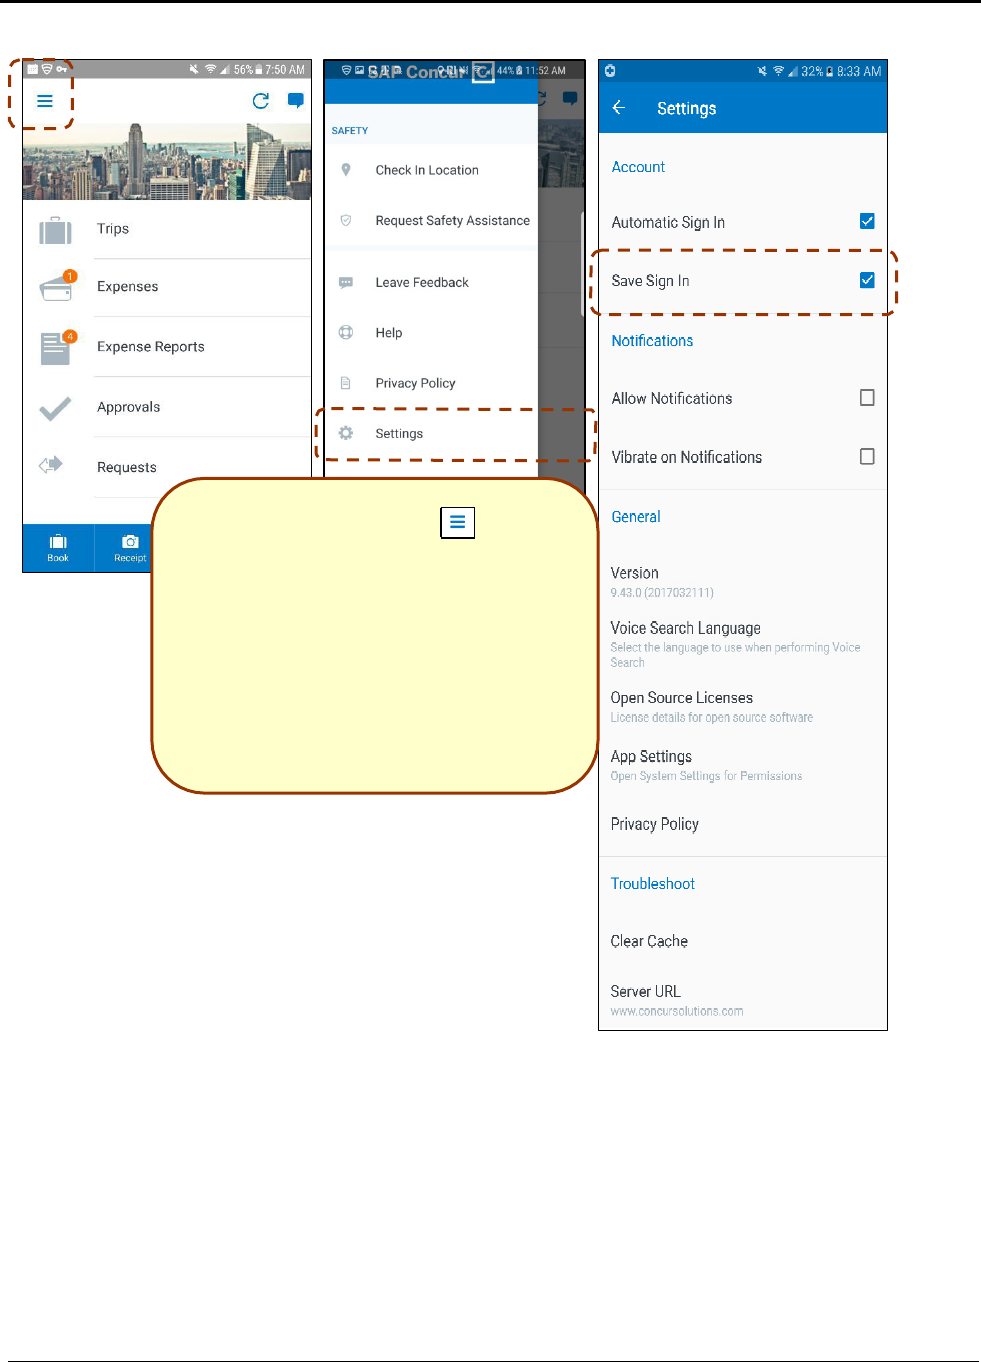
Save Login ID and Auto Login
1)
On the home screen, tap (upper-
left corner).
2)
On the menu, tap Settings.
3)
Tap Automatically Sign In to have
SAP Concur log in automatically when
you open the app.
4)
Tap Save Sign In to have SAP Concur
remember and then provide your ID at
login.
NOTE: You must select Save Sign In
in order to use auto login.
Version 9.61.x – October 12, 2018
SAP Concur's mobile app – Android™
Page 57 of 56
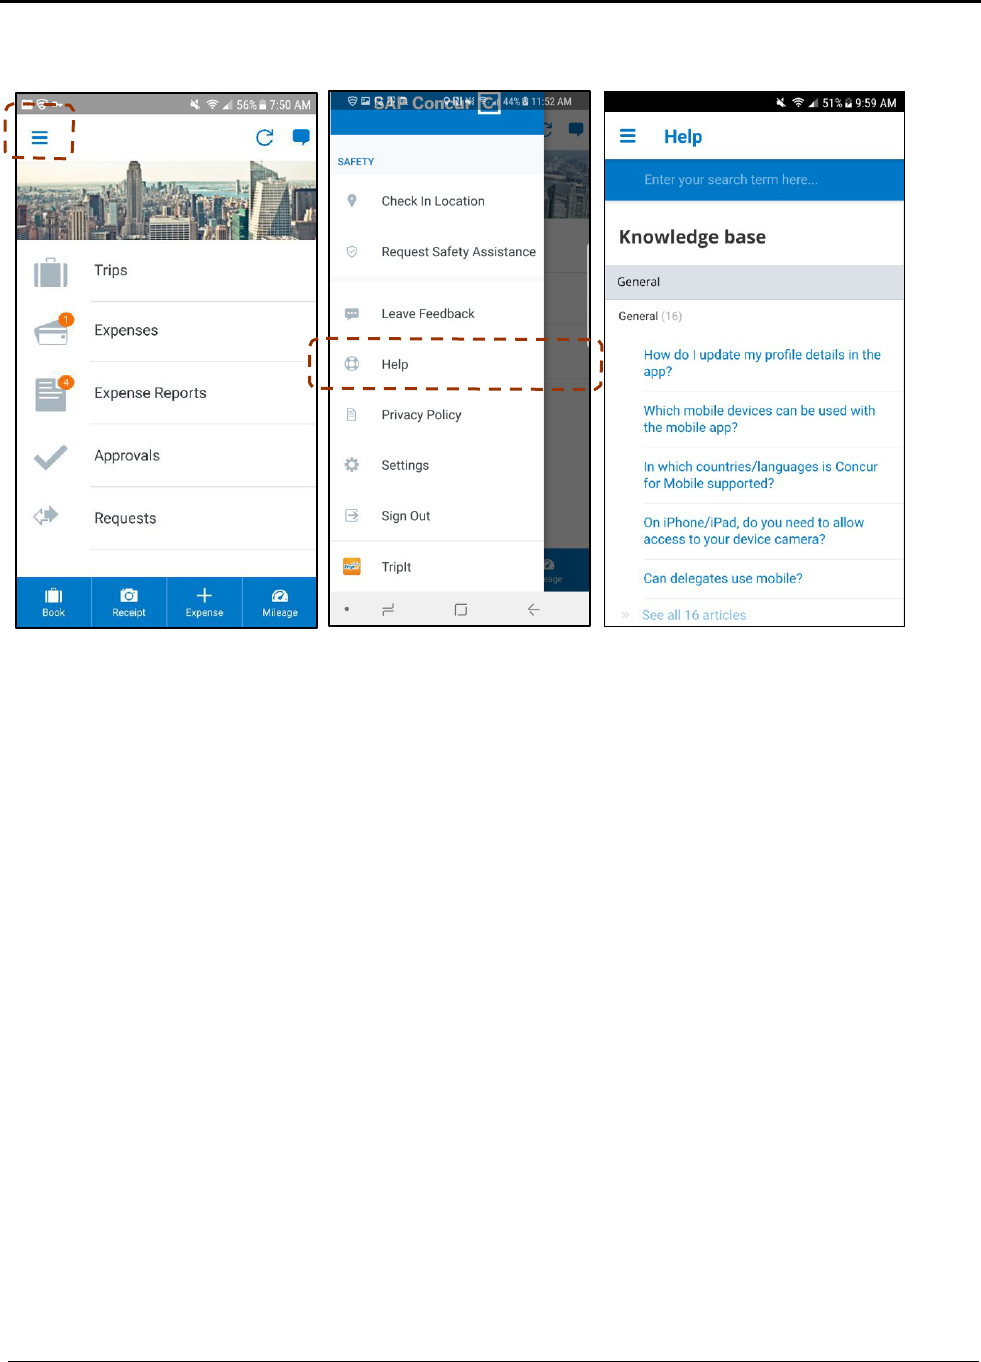
Get Help
Use Help & Feedback to search for help topics or find helpful articles.
